Системе не удается найти указанный файл -это сообщение об ошибке, которое может появиться в Windows 10 при попытке открыть или удалить файл, запустить приложение, обновить ОС, выполнить резервное копирование данных или выполнить другие файловые операции.
В более серьезных случаях ошибка появляется при попытке загрузить операционную систему, показывая оранжевый экран . Однако есть несколько способов решить эту проблему, в зависимости от того, где вы на нее наткнулись.
Как исправить Системе не удается найти указанный файл ошибку в Windows 10
Обратите внимание на следующие исправления. Если возможно, убедитесь, что создайте точку восстановления системы , чтобы вы могли восстановить Windows 10, если вам нужно начать работу с нуля.
1. Перезагрузите компьютер
Возможно, Windows показывает ошибку Система не может найти указанный файл из-за зависшего процесса или неотвечающей службы. Поэтому рекомендуется начать с чего-нибудь столь же простого, как перезагрузка компьютера. Еще лучшая идея-жестко перезагрузить компьютер. После выключения отключите источник питания и удерживайте кнопку питания нажатой в течение 20-30 секунд, чтобы очистить кэш ПК. Затем загрузите операционную систему и проверьте, решена ли ваша проблема.
2. Обновите Windows 10
Установка последних обновлений операционной системы имеет решающее значение для обслуживания вашего компьютера, что стало возможным благодаря Центру обновления Windows. Эта служба должна автоматически работать в фоновом режиме, постоянно проверять наличие обновлений и запрашивать вас, когда требуются дальнейшие действия.
Проверьте, нет ли в центре уведомлений или меню параметров питания красных точек, указывающих на отложенный перезапуск, особенно если вы не выключали компьютер в течение длительного времени. В противном случае вы можете вручную проверить наличие обновлений:
- Нажмите кнопку Пуск , введите проверить наличие обновлений и нажмите Enter
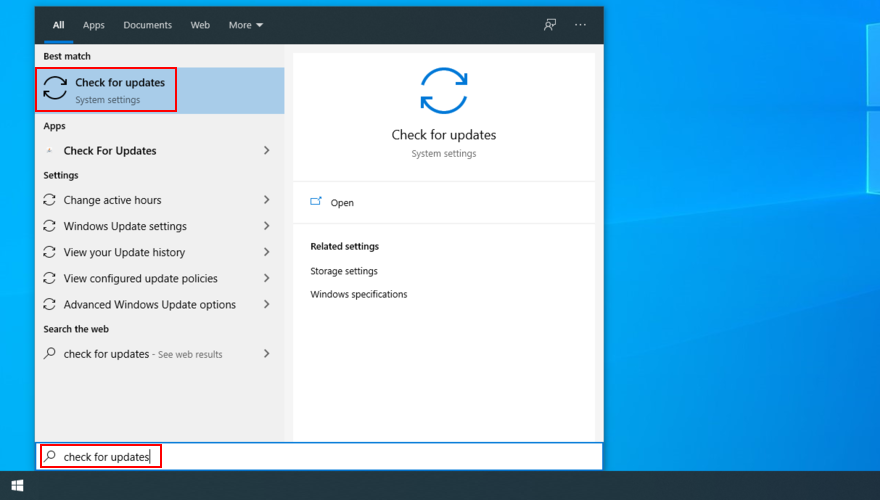
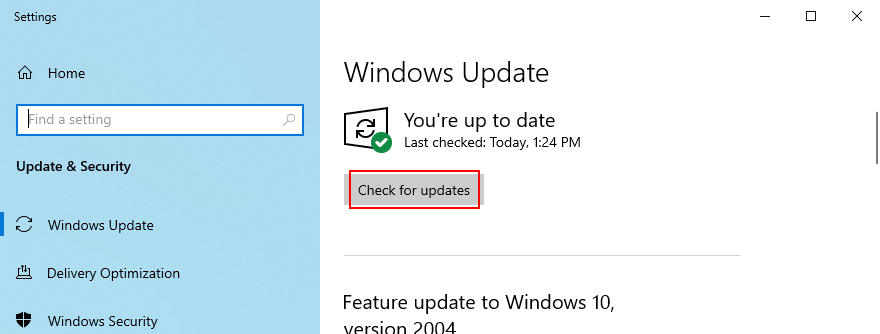
- Нажмите Проверить обновления и подождите
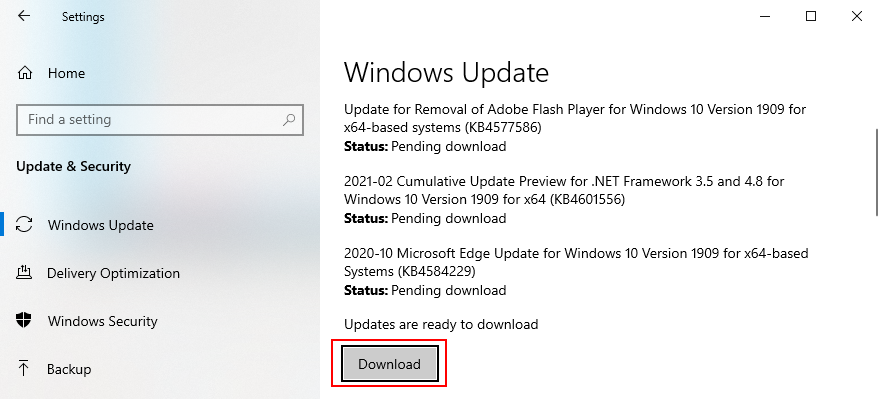
- Если есть что-то ожидающее, нажмите Загрузить
- Не выключайте и не перезагружайте компьютер в это время. После загрузки и установки обновлений перезагрузите компьютер, чтобы завершить задачу.

3. Запустите средство устранения неполадок Центра обновления Windows
Многие пользователи не могут запустить Центр обновления Windows из-за ошибки Системе не удается найти указанный файл . В этом случае вам следует использовать средство устранения неполадок Центра обновления Windows , чтобы найти и исправить типичные проблемы, мешающие запуску этого приложения:
- Нажмите кнопку Пуск , введите Настройки устранения неполадок и нажмите Enter
- Нажмите Дополнительные средства устранения неполадок .
- Выберите Центр обновления Windows и нажмите Запустить средство устранения неполадок

- Примените все исправления, обнаруженные средством устранения неполадок.
- Перезагрузите компьютер и попробуйте запустить Центр обновления Windows прямо сейчас.
4. Проверьте службы Центра обновления Windows
Некоторые пользователи отключить службу Windows Update , потому что она прерывает их действия и требует навсегда выключить, запустить или перезагрузить их компьютер во время срочных задач. Однако, если он останется отключенным, служба не сможет получать критические обновления, что приведет к различным проблемам с компьютером.
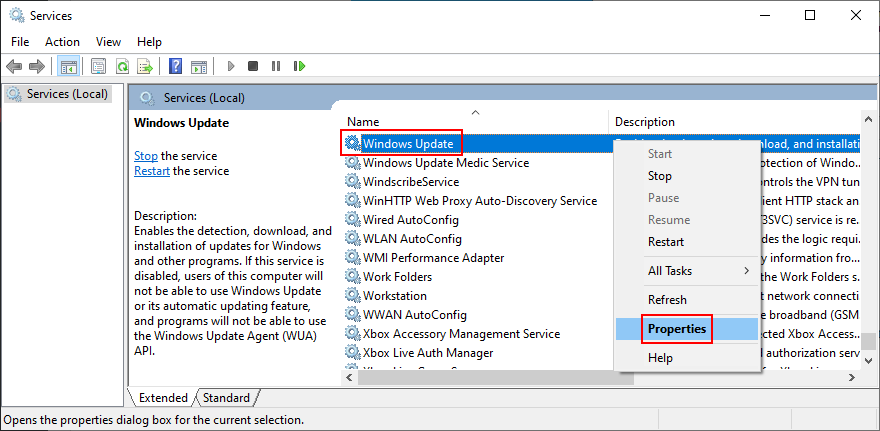
Как перезапустить службы Центра обновления Windows:
- Нажмите клавиши Win + R , введите services.msc и нажмите Enter , чтобы открыть Сервисы
- Найдите и дважды щелкните Центр обновления Windows , чтобы просмотреть его свойства
- Установите для Тип запуска значение Автоматический (отложенный запуск)
- Нажмите кнопку Пуск , чтобы сразу запустить службу.
- Нажмите Применить и вернитесь в главное окно
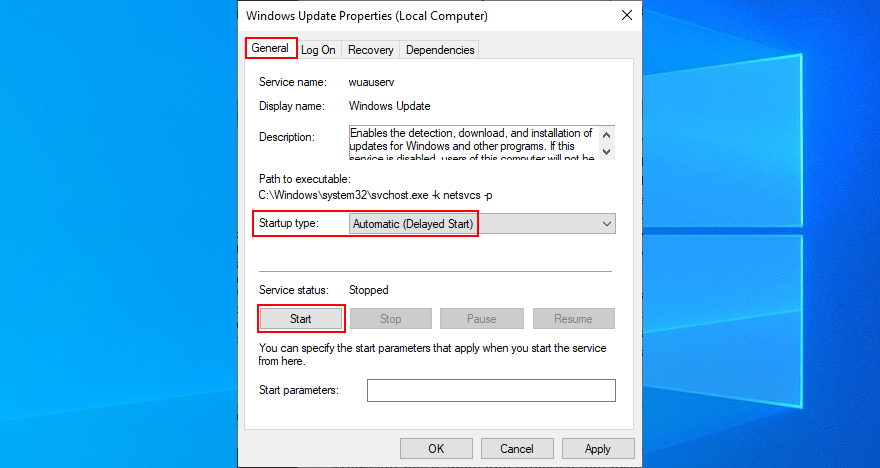
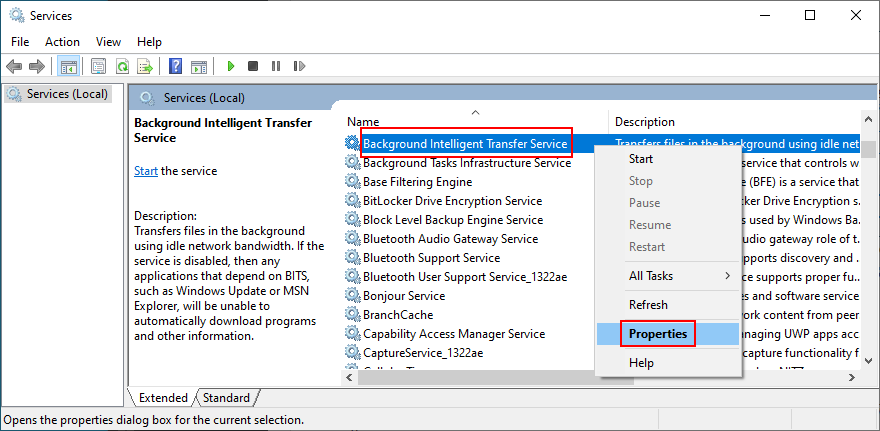
- Найдите службы Фоновая интеллектуальная передача и Готовность приложения , чтобы изменить те же настройки, указанные выше


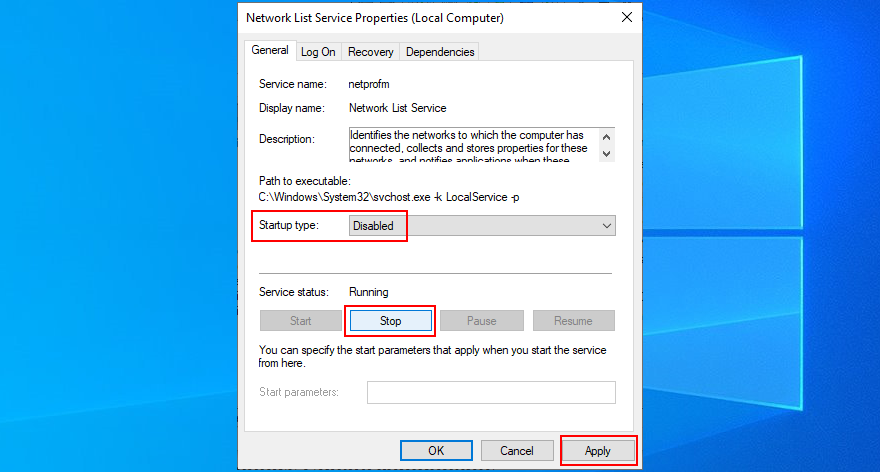
Также неплохо отключить службу списка сетей, которая иногда конфликтует со службой Центра обновления Windows:
- Найдите и дважды щелкните Служба списка сетей , чтобы получить доступ к ее свойствам

- Установите для Тип запуска значение Выключено
- Нажмите Остановить , чтобы прекратить обслуживание.
- Нажмите Применить и выйдите на рабочий стол
- Попробуйте запустить Центр обновления Windows прямо сейчас.

5. Запустите Windows 10 в безопасном режиме
Если ошибка Система не может найти указанный файл вызвана неисправным сторонним драйвером или службой, вы можете запустить Windows 10 в безопасном режиме , чтобы автоматически отключить все драйверы и службы, не принадлежащие вашему Операционная система. Вот что вам нужно сделать:
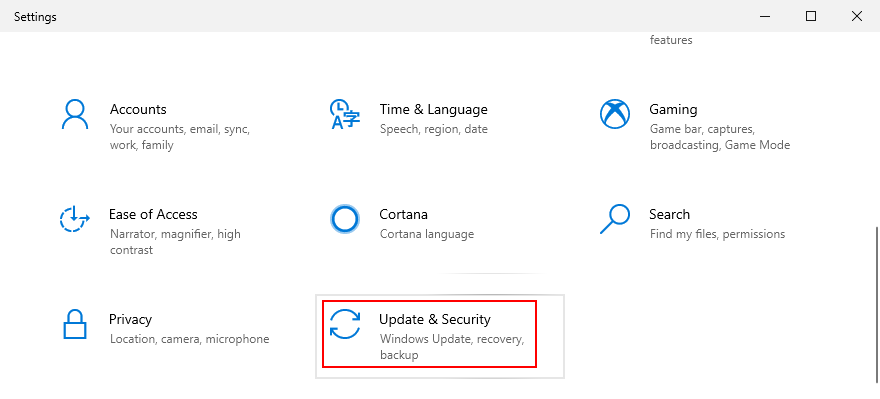
- Щелкните правой кнопкой мыши кнопку Пуск и выберите Настройки
- Выберите Обновление и безопасность .
- Перейдите на страницу Восстановление
- В разделе Расширенный запуск нажмите Перезагрузить сейчас

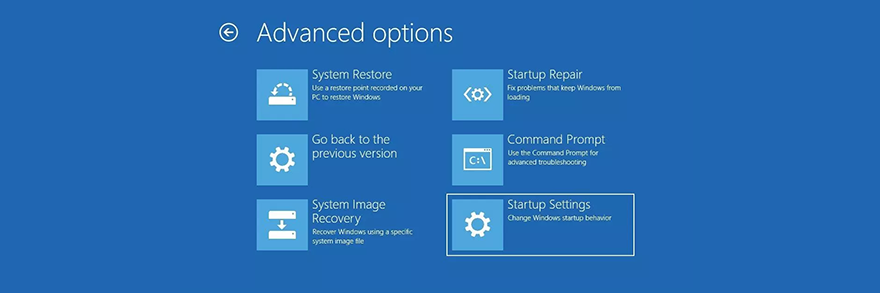
- Перейдите в Устранение неполадок > Дополнительные параметры > Настройки запуска
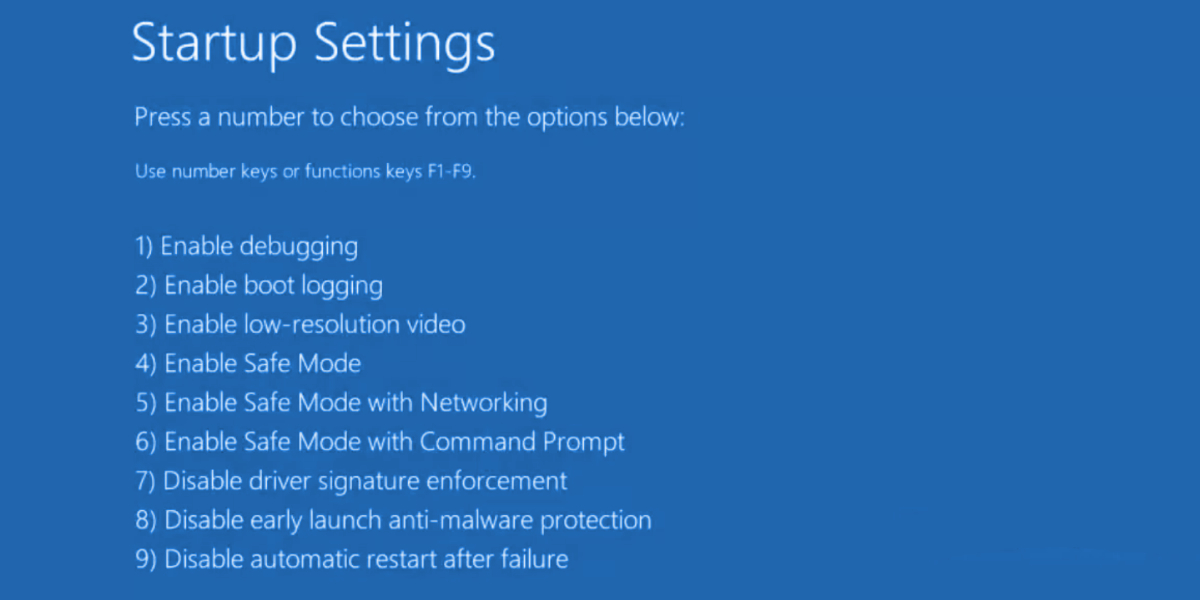
- Нажмите Перезагрузить
- Если вам не нужен доступ в Интернет, нажмите F4 . В противном случае нажмите F5 , чтобы включить безопасный режим с сетью
- Выберите Обновление и безопасность .


6. Отключить запускаемые приложения
Если безопасный режим не помог устранить ошибку Система не может найти указанный файл , попробуйте отключение запускаемых программ . Например, у вас может быть приложение безопасности, которое автоматически запускается каждый раз при включении компьютера, что конфликтует с критически важными системными процессами. Выявить виновных бывает сложно, поэтому лучше все выключить.
Как отключить автозагрузку программ:
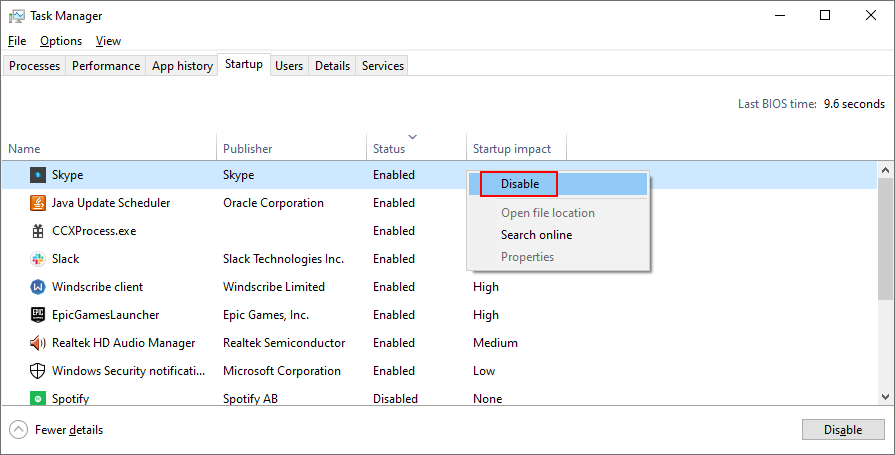
- Щелкните правой кнопкой мыши панель задач Windows 10 и выберите Диспетчер задач
- Перейдите в раздел Запуск .
- Для каждого приложения со статусом Включено выберите его запись и нажмите Отключить
- Перезагрузите компьютер.
.

7. Чистая загрузка ОС
Выполнение чистой загрузки в Windows 10 чем-то похож на безопасный режим. Разница в том, что при чистой загрузке отключаются не только второстепенные устройства и службы, но и элементы автозагрузки. Вот как это настроить:
- Нажмите клавиши Win + R , введите msconfig и нажмите Enter , чтобы открыть Системный Приложение”Конфигурация “
- Оставайтесь на вкладке Общие .
- Выберите Выборочный запуск
- Снимите флажки Загружать системные службы и Загружать элементы автозагрузки
- Нажмите Применить

- Перейдите на вкладку Автозагрузка
- Нажмите Открыть диспетчер задач .
- Отключите все запускаемые приложения со статусом Включено
- Перезагрузите компьютер.


Если позже вам потребуется восстановить настройки загрузки по умолчанию, откройте приложение «Конфигурация системы» и выберите Обычный запуск .
8. Удалите сторонние приложения
Получение Системе не удается найти указанный файл . Ошибка после запуска приложения может сигнализировать о конфликте программного обеспечения. Возможно, ваша программа конфликтует с другой, например, с двумя антивирусными программами с отдельными ядрами реального времени. Вам ничего не остается, кроме как удалить другое приложение с вашего компьютера.
- Щелкните правой кнопкой мыши кнопку Пуск и выберите Приложения и функции .
- Найдите и выберите программу из списка.
- Нажмите Удалить , а затем еще раз для подтверждения.
- Продолжить работу с мастером
- Перезагрузите компьютер.
Однако, если программа изменила настройки реестра, программа удаления Windows по умолчанию не поможет их восстановить. Вместо этого вам следует использовать программу удаления программного обеспечения , которая удаляет не только программу, но и все оставшиеся файлы и записи реестра.
9. Отключите внешние устройства
Конфликты также могут быть вызваны неподдерживаемыми периферийными устройствами, недавно подключенными к вашему компьютеру. Если вы недавно приобрели или получили в подарок новое оборудование, например адаптер Wi-Fi, новые наушники, веб-камеру или USB-накопитель, немедленно извлеките его из компьютера, а затем перезапустите, чтобы проверить, решило ли это проблему Система не может найти указанный файл ошибка.
Возможно, дело не в устройстве, а в вашем порту. Попробуйте изменить порты USB, если у вас есть несколько вариантов. В противном случае подключите многопортовый концентратор USB к компьютеру, а затем ваше устройство к концентратору, а не непосредственно к компьютеру. Иногда это срабатывает.
10. Запустите CHKDSK
CHKDSK (Проверить диск)-это внутренний инструмент Windows, которым можно управлять из среды командной строки. Это помогает устранить проблемы с повреждением жесткого диска и наличие битых секторов, которые могут помешать правильной работе вашего компьютера и в результате вызвать ошибку Система не может найти указанный файл .
Как использовать CHKDSK:
- Нажмите кнопку Пуск , введите Командная строка , выберите это приложение и нажмите Запуск от имени администратора
- Если Windows установлена на диске C: по умолчанию, введите
chkdsk c:/f/r. В противном случае не забудьте заменитьc:буквой раздела ОС
- Когда вас попросят запланировать CHKDSK при следующей перезагрузке системы, введите y и нажмите Enter
- Перезагрузите компьютер и дождитесь, пока CHKDSK выполнит свою работу.
11. Запустите SFC
Если вы по-прежнему получаете сообщение об ошибке Система не может найти указанный файл после запуска инструмента CHKDSK, возможно, вам следует переключить свое внимание на систему, поскольку в ней могут быть поврежденные или отсутствующие файлы. SFC (проверка системных файлов) может помочь вам в этом внимание.
Как использовать SFC:
- Запустите Windows 10 в безопасном режиме.
- Нажмите клавиши Win + R и нажмите Enter, чтобы запустить командную строку.
- Напишите
sfc/scannowи нажмите Enter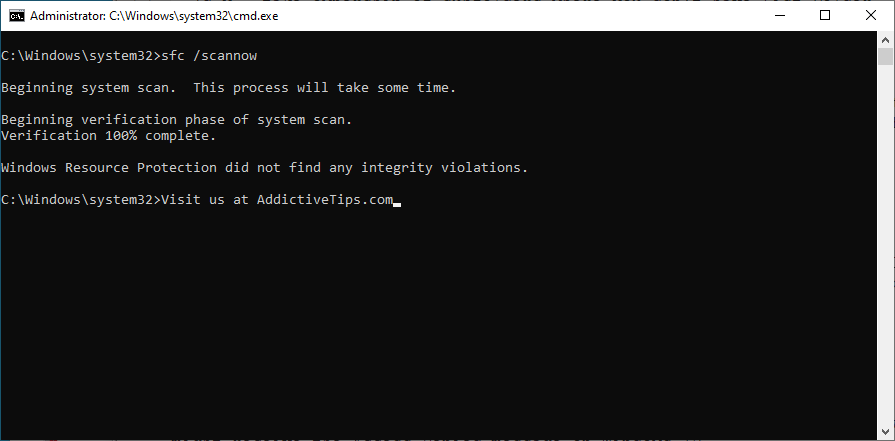
- После завершения работы SFC перезагрузите компьютер.

12. Запустите DISM
DISM (Обслуживание образов развертывания и управление ими)-более продвинутый инструмент, чем SFC, поскольку он может проверять целостность хранилища компонентов в файле образа Windows.
Как использовать DISM:
- Запустите Windows 10 в безопасном режиме.
- Откройте Командную строку
- Введите
DISM/online/cleanup-image/scanhealthи нажмите Enter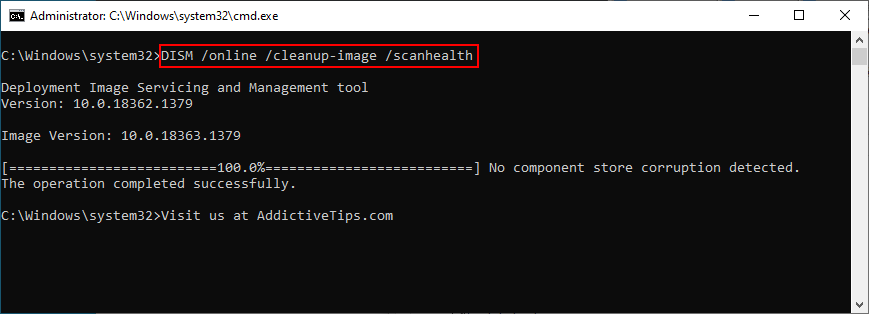
- Если он обнаруживает какие-либо ошибки, запустите
DISM/online/cleanup-image/restorehealth, чтобы избавиться от них. - После его завершения перезапустите Windows 10 в безопасном режиме.
- Откройте Командную строку и запустите SFC (
sfc/scannow) - Перезагрузите компьютер в обычном режиме.

13. См. Системный журнал
Вы можете узнать, какой именно драйвер устройства вызывает ошибку Система не может найти указанный файл , просмотрев файл системного журнала. Вот что вам нужно сделать:
- Нажмите клавишу Win + E , чтобы открыть Проводник Windows .
- Перейдите по следующему адресу:
% SystemRoot% \ INF
- Найдите и откройте файл setupapi.dev или setupapi.dev.log в Блокноте
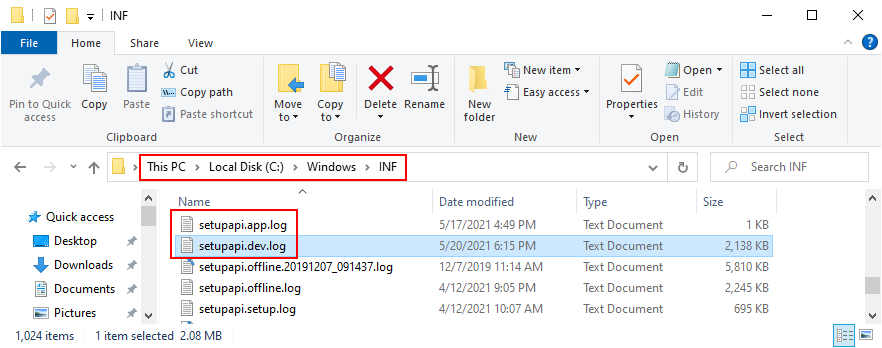
- Нажмите Ctrl + F , введите система не может найти файл и нажмите Enter
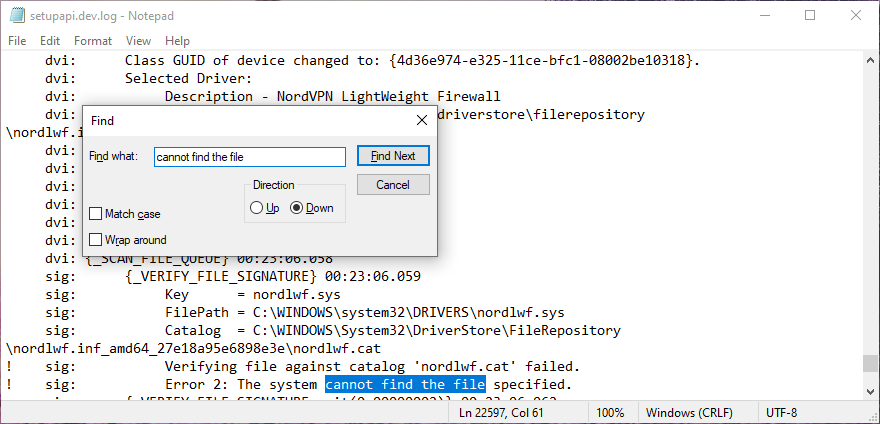
- В FilePath скопируйте имя драйвера.
- Откройте веб-браузер и введите имя файла драйвера, чтобы узнать, какому устройству он принадлежит.
После определения виновного устройства вы можете предпринять дальнейшие действия в Диспетчере устройств (выполните следующие решения).
14. Быстро переустановите устройства
Принимая во внимание драйвер и устройство, обнаруженные в системном журнале, вам следует перейти в Диспетчер устройств , чтобы переустановить устройство. Если он не был правильно установлен на вашем ПК с Windows 10, этот метод должен исправить это. Вот что вам нужно сделать:
- Щелкните правой кнопкой мыши кнопку Пуск и выберите Диспетчер устройств
- Find the device and double-click it
- Switch to the Driver tab and click Driver Details
- Here you can double-check that the driver file matches the information you found in the system log
- Return to the main window of Device Manager
- Right-click the device and select Uninstall device
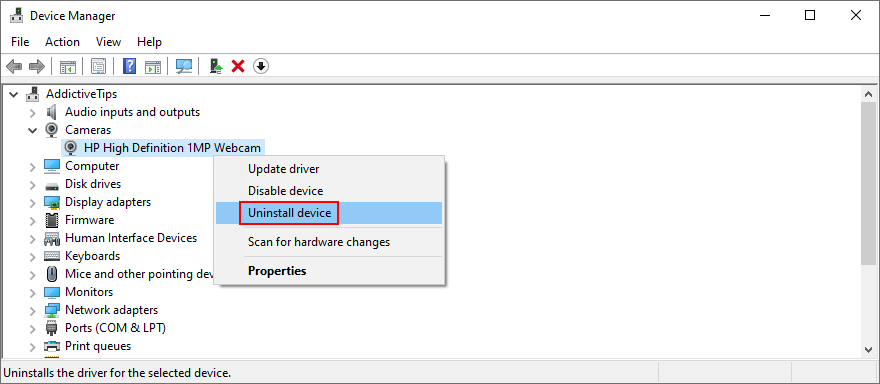
- Check Delete the driver software for this device and click Uninstall to confirm
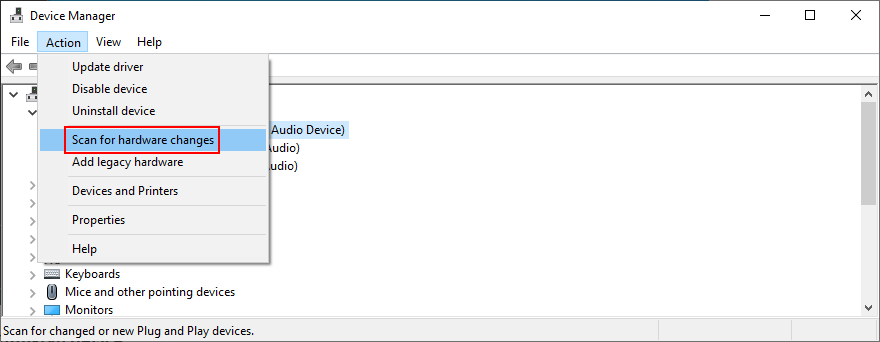
- Open the Action menu and select Scan for hardware changes
- If the device doesn’t reappear in Device Manager, reboot your PC since Windows will auto-reinstall the missing adapter
.
15. Update device drivers
It’s possible that the device is properly installed on your computer but its driver is outdated. The solution here is to update the obsolete drivers:
- Press Win key + R, type devmgmt.msc, and press Enter
- Right-click the device and select Update driver
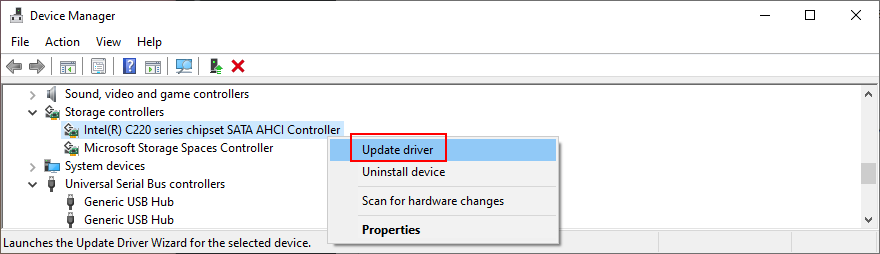
- Click Search automatically for drivers and follow the on-screen instructions
If the online search doesn’t return any results, click Search for updated drivers on Windows Update. However, if you have already checked for system updates or the dedicated service doesn’t work, then you have to manually download and install drivers.
However, if you don’t want to risk installing an unsupported driver, it’s better to use a driver update tool. Besides, you can use it to update all your obsolete drivers at the same time, without risking compatibility issues.
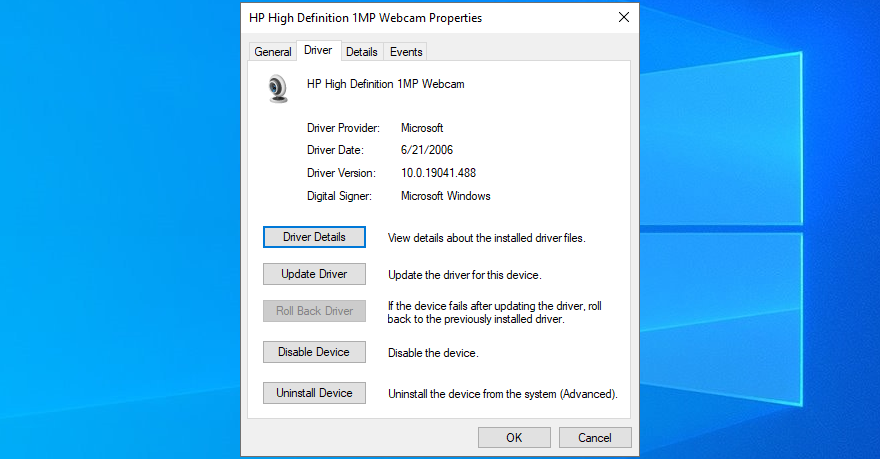
16. Roll back drivers
If you have already downloaded an unsupported driver, you must roll it back to the previous version before performing the update. Here’s what you need to do:
- Click the Start button, search for Device Manager, and press Enter
- Right-click a device and go to Properties
- Select the Driver section
- Click Roll Back Driver and follow the instructions. If the button is greyed out, you can skip this step since you can’t perform the rollback
17. Reinstall programs
Some software applications should be reset, repaired, or reinstalled, depending on the available operations. It certainly applies in the scenario where the The system cannot find the file specified error started appearing on your screen after a recent software change.
You have multiple options when it comes to Microsoft Store apps. Click the Start button, search for a program, and go to App settings. From that section, you can repair or reset the app with one click. And, if those two options fail, you should uninstall the app and reinstall it from Microsoft Store.
It’s simpler with regular software programs since the repair option rarely works. Instead, you can uninstall the application from Apps & Features, then download it again from its official website and proceed with the setup operation.
18. Check registry settings
If you can’t open files or launch applications due to the The system cannot find the file specified error, you should inspect registry settings to make sure that everything is in order. It’s pretty easy. Here’s what you need to do:
- Click the Start button, search for Registry Editor, and hit Enter to open this app
- Open the File menu and click Export
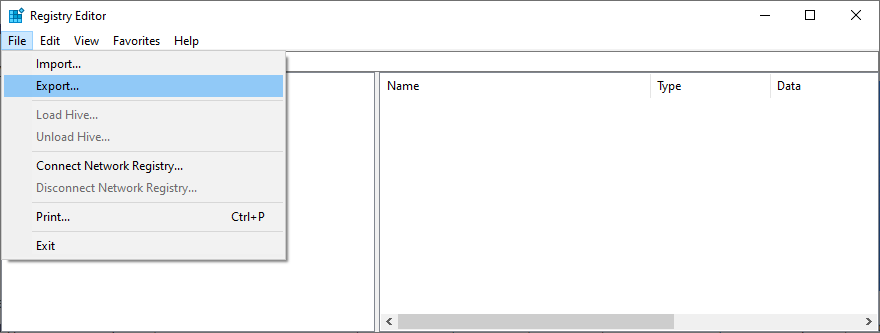
- Create a registry backup by setting a file name, picking a destination, and clicking Save. If you need to restore the initial registry configuration later, just double-click the.reg file
- Visit the following address:
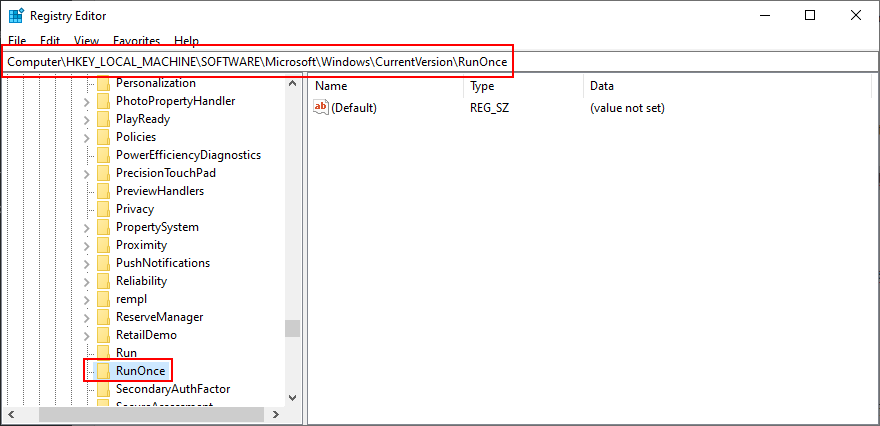
Computer\HKEY_LOCAL_MACHINE\SOFTWARE\Microsoft\Windows\CurrentVersion\
- Look for the RunOnce key (looks like a folder in the tree on the left)
- If the key doesn’t exist, right-click the CurrentVersion key and select New > Key
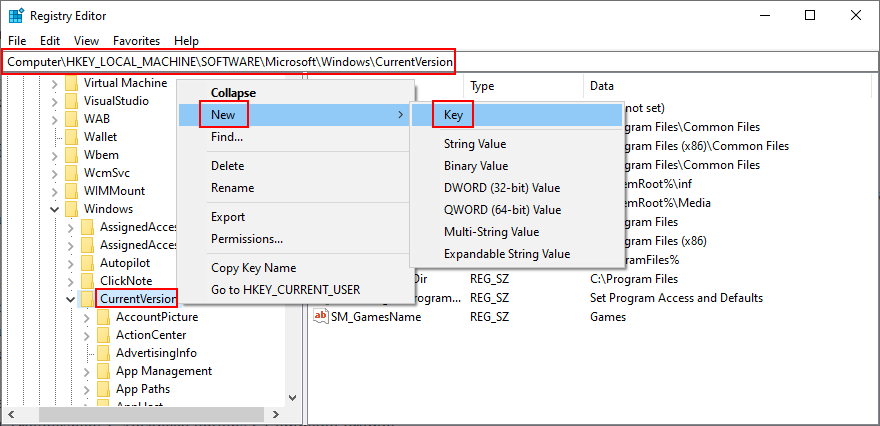
- Set the key name to RunOnce
- Now, go to this location:
Computer\HKEY_CURRENT_USER\SOFTWARE\Microsoft\Windows\CurrentVersion\
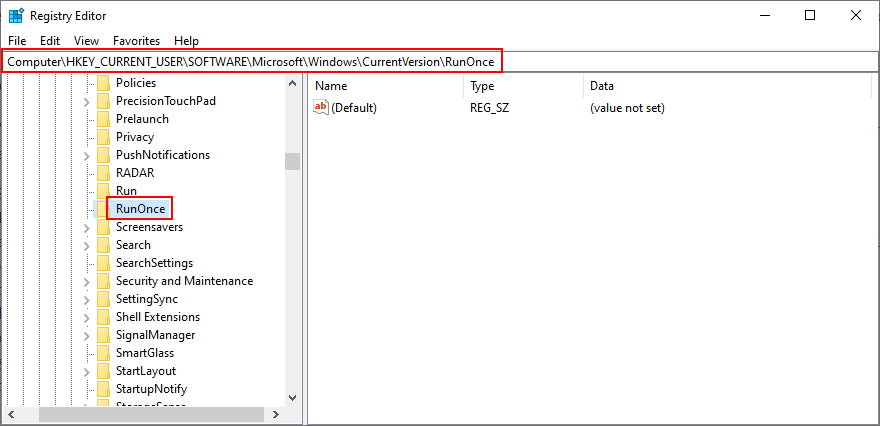
- Take the same steps: if the RunOnce key doesn’t exist, create it
- Exit Registry Editor
19. Restore the original registry settings
If the system registry suffered more modifications that you can’t identify, it’s easier to restore its configuration to factory values, which is more effective than using a registry cleaner. Here’s how to make it happen.
- Click the Start button, search for Registry Editor, and launch this tool
- Create a registry backup:
- Open the File menu and click Export
- Set a file name and destination
- Click Save to create a backup of the current registry settings
- Press the Windows key and click the power button to view power options
- While holding down the Shift key, click Restart to reboot Windows in troubleshooting mode
- Select Troubleshoot > Advanced options > Command Prompt
- Choose your PC account and enter your password to continue
- Write the following commands and hit Enter after each one:
-
cd %SystemRoot%\System32\config
-
ren %SystemRoot%\System32\config\DEFAULT DEFAULT.old
-
ren %SystemRoot%\System32\config\SAM SAM.old
-
ren %SystemRoot%\System32\config\SECURITY SECURITY.old
-
ren %SystemRoot%\System32\config\SOFTWARE SOFTWARE.old
-
ren %SystemRoot%\System32\config\SYSTEM SYSTEM.old
-
copy %SystemRoot%\System32\config\RegBack\DEFAULT %SystemRoot%\System32\config\
-
copy %SystemRoot%\System32\config\RegBack\DEFAULT %SystemRoot%\System32\config\
-
copy %SystemRoot%\System32\config\RegBack\SAM %SystemRoot%\System32\config\
-
copy %SystemRoot%\System32\config\RegBack\SECURITY %SystemRoot%\System32\config\
-
copy %SystemRoot%\System32\config\RegBack\SYSTEM %SystemRoot%\System32\config\
-
copy %SystemRoot%\System32\config\RegBack\SOFTWARE %SystemRoot%\System32\config\
-
- Restart your computer
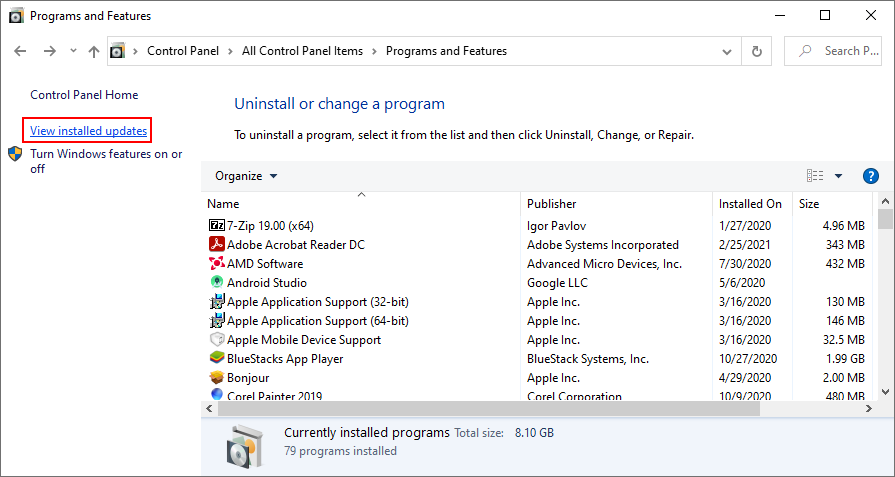
20. Uninstall system updates
Some Windows updates end up harming your computer and causing various problems, including the The system cannot find the file specified error. In this case, the best course of action is to remove the most recent system update. Here’s how:
- Press Win key + R, type appwiz.cpl, and hit Enter

- Click View installed updates
- To sort the updates by time of installed, click the Installed On column
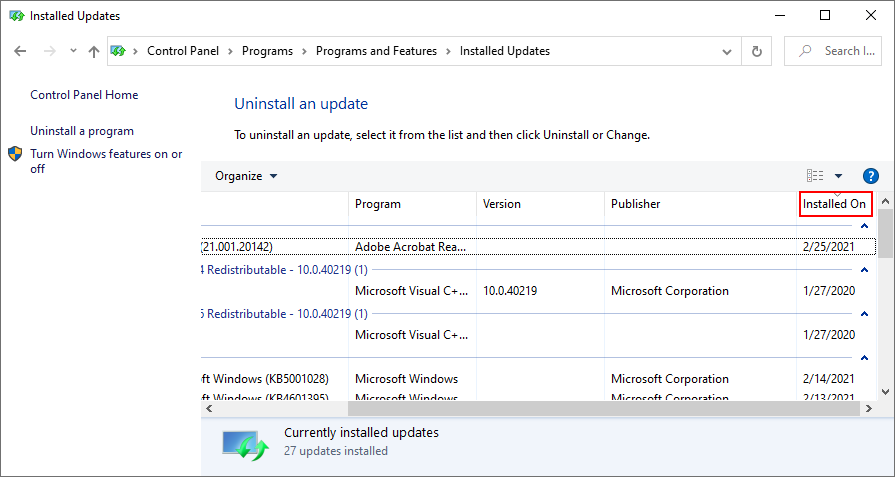
- Search for the Microsoft Windows category
- Double-click the first update in that group
- When asked to confirm its uninstall, click Yes
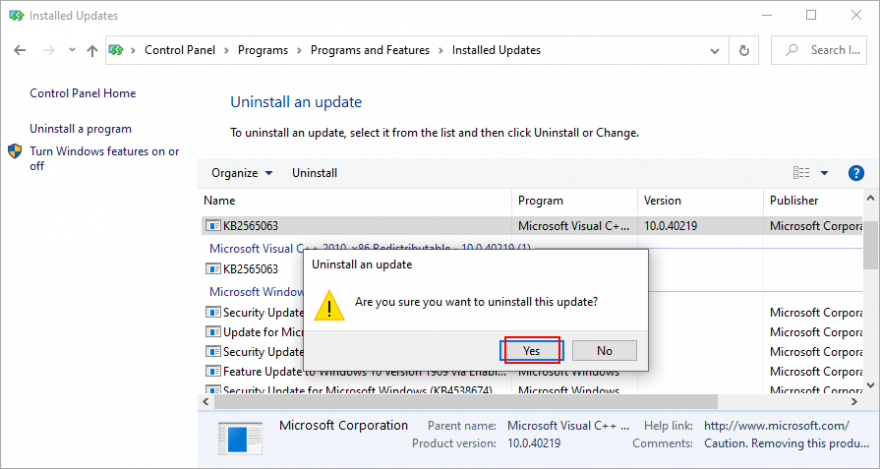
- Restart your computer
If you can’t boot Windows due to the The system cannot find the file specified error, you can interrupt the startup sequence three times in a row to start Windows troubleshooting mode. Then go to Troubleshoot > Advanced Options > Uninstall Updates.
21. Check your computer for malware
A malware agent could have infected system files, thus preventing you from opening any files or launching applications. To fix this issue, you can resort to Windows Defender:
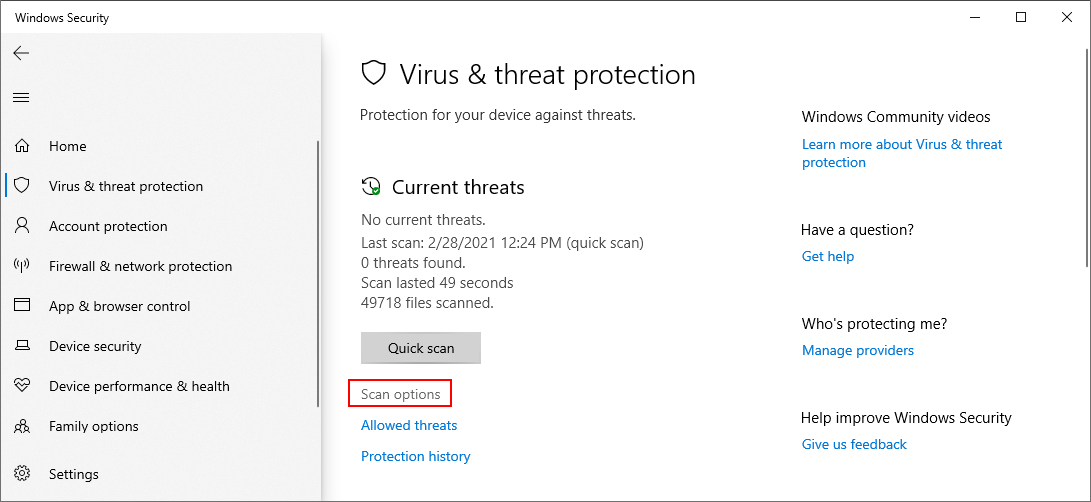
- Press the Win key, search for Windows Security, and open this app
- Select Virus & threat protection

- Click Scan options
- Pick Quick scan and click Scan now
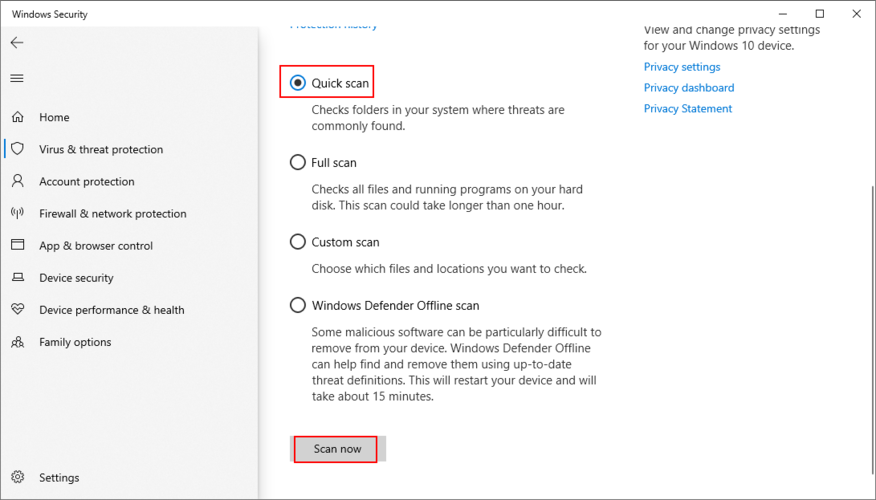
- If it doesn’t find any threats, choose Windows Defender Offline scan and click Scan now
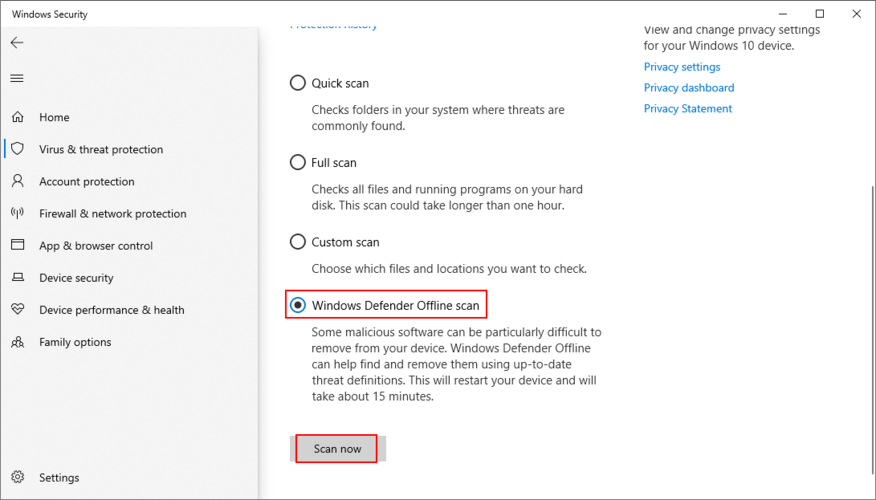
- Allow Windows to quarantine or remove any suspicious files. If you think some of those files are safe, make sure to add them to the whitelist, in order to exclude them from any upcoming scans
If you have a third-party security solution that you rely on, make sure to adjust the steps above.
22. Use a Linux live distro
You might think that your data will be lost forever due to this serious error. And it might be impossible to even perform a disk backup because Windows doesn’t recognize the selected files. If there’s a major problem with your OS that requires system reset, you can save your files with the help of a Linux live distro.
Simply put, you will be creating a USB flash drive that boots a Linux-based operating system (e.g. Ubuntu), in order to gain access to your files and copy them somewhere safe. Since it’s not Windows, you shouldn’t be getting the The system cannot find the file specified error anymore. Then, you can safely proceed with more dangerous scenarios that involve data loss, like disk formatting.
How to create a Linux live distro with Rufus:
- Download a Linux distro. If you can’t decide which, we suggest Ubuntu since it’s intuitive
- Connect a USB flash drive to your PC. Make sure it doesn’t contain any files you might need later since the disk will be formatted
- Download Rufus from the official website
- Install and run Rufus
- Choose the pen drive and set Boot section to Disk or ISO image
- Click SELECT and add the Ubuntu ISO
- Set Partition scheme to MBR
- At File system, select FAT32
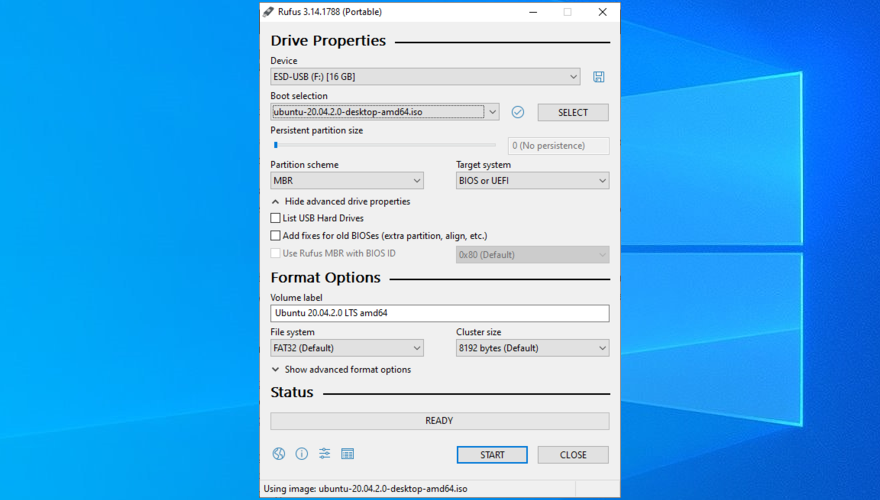
- Click OK and wait for Rufus to create your Linux live distro drive
How to boot Linux from the USB flash drive:
- Keep the flash drive plugged into your PC
- Restart Windows
- Right after your display turns on and before Windows boots, press the key shown on the screen to enter the boot startup menu (e.g. F12)
- Select the USB storage drive and hit Enter
- Once Ubuntu loads, create a backup of your files
23. Change drive letters
You might be experiencing file access errors due to your HDD or SSD. For instance, if it doesn’t have a partition letter assigned, or if it shares the letter with another drive, you should immediately fix this problem. The simplest way to do this is by using Disk Management.
How to assign drive letters with Disk Management:
- Press Win key + R, type diskmgmt.msc, and press Enter
- In Disk Management, select the drive that’s giving you trouble
- Right-click the drive and select Change Drive Letters and Paths
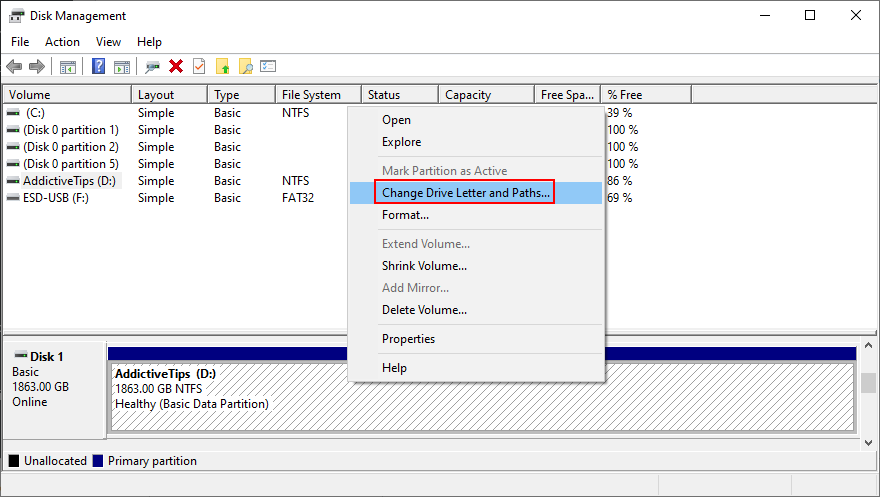
- If the drive already has a letter
- Click Change
- Set a new drive letter
- Click OK
- If the drive doesn’t have a letter
- Click Add
- At Mount in the following empty NTFS folder, click Browse
- Set the new drive path by selecting an empty NTFS folder and click OK
- Then, click OK to confirm
- Quit to the desktop
However, if you can’t access Disk Management or if it doesn’t identify your drive, you can turn to the console environment.
How to assign drive letters with Command Prompt:
- Press Windows key + R, type cmd, then press Ctrl + Shift + Enter to launch Command Prompt with elevated rights
- Type
diskpartand hit Enter to use the partition manager built into Windows - Run
list volumeto view all current drives - Check out the number assigned to your disk or partition. Run
select volume #and use that number (e.g.select volume 4) - Write
assign letter=and add the new drive letter (e.g.assign letter=e). Hit Enter - Quit to the desktop
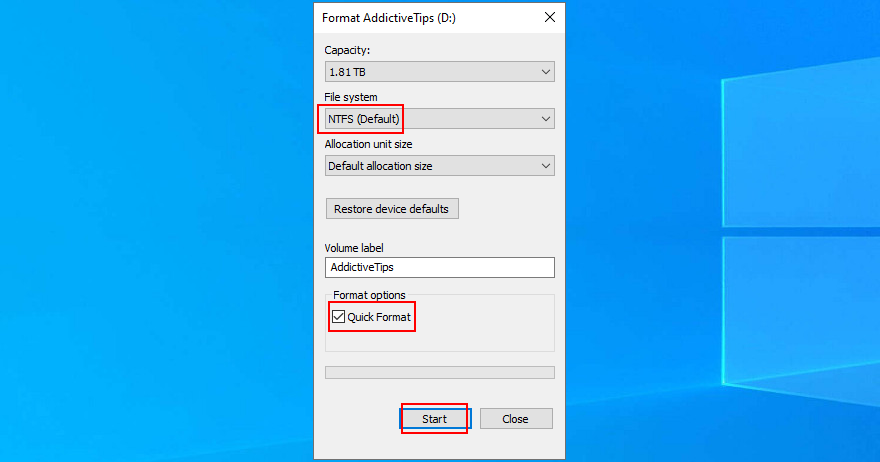
24. Format the partition
If changing the drive letter didn’t help get rid of the The system cannot find the file specified error, it’s time to format the partition. Keep in mind that it means losing everything saved there.
So, you should perform a backup before proceeding with this solution. If you can’t perform the backup in Windows, check out the previous solution on how to create a backup from a Linux distro.
How to format a partition using Windows Explorer:
- Press Win key + E to open File Explorer on Windows 10
- Select the drive, right-click it, and choose Format

- At File system, select NTFS
- Leave Quick Format enabled
- Click Start
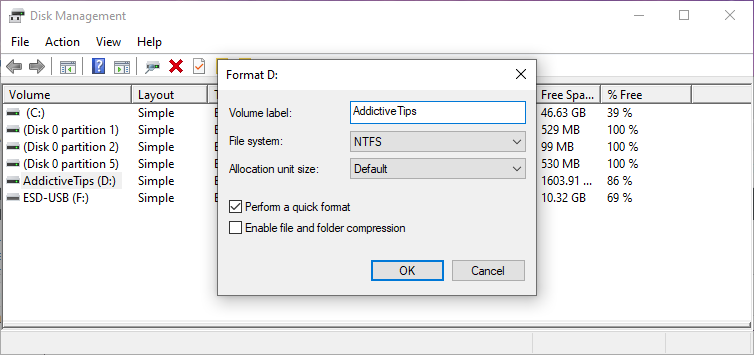
How to format a partition using Disk Management:
- Right-click the Start button and launch Disk Management
- Pick the partition, right-click it, and select Format
- Set File system to NTFS
- Leave Perform a quick format enabled
- Click OK
How to format a partition using Command Prompt:
- Press the Win key, search for Command Prompt, and click Run as administrator. If prompted by User Account Control, click Yes
- Type
diskpartand press Enter - Run
list volumeto view all volumes - Identify the number of your partition and use it when entering
select volume #(e.g.select volume 5) - Run
format fs=ntfsto format the partition as NTFS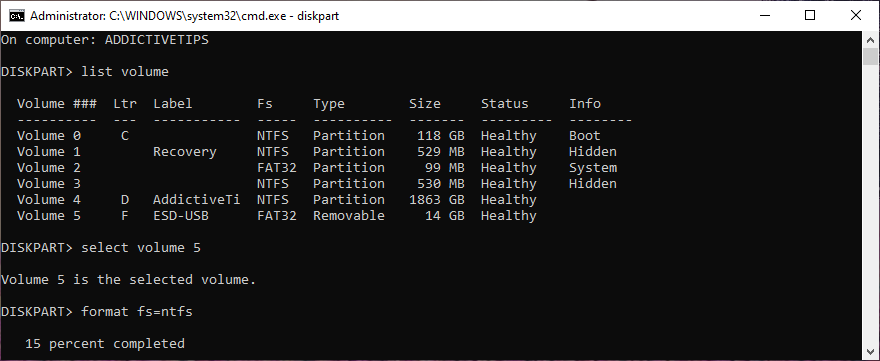
25. Roll back the operating system
You can roll back Windows 10 to a restore point that was recorded before you started experiencing the The system cannot find the file specified error, thanks to System Restore. It means undoing all software modifications made to your computer that you can’t detect and which somehow led to file access and application launch issues. However, it automatically means that all programs you installed after the restore point was recorded will no longer exist, so you will have to install them again.
How to use System Restore:
- Sign in to Windows 10 with an administrator account
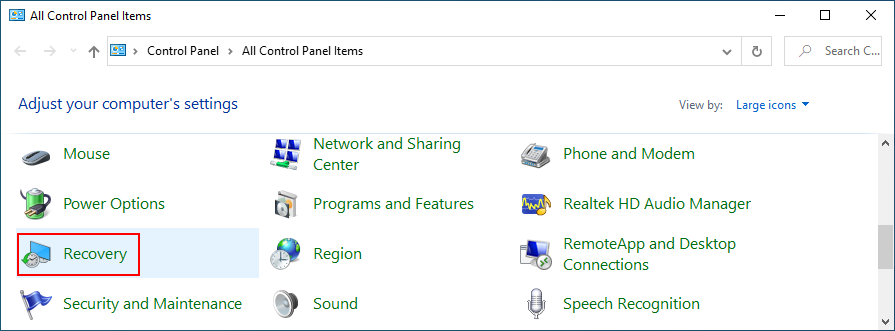
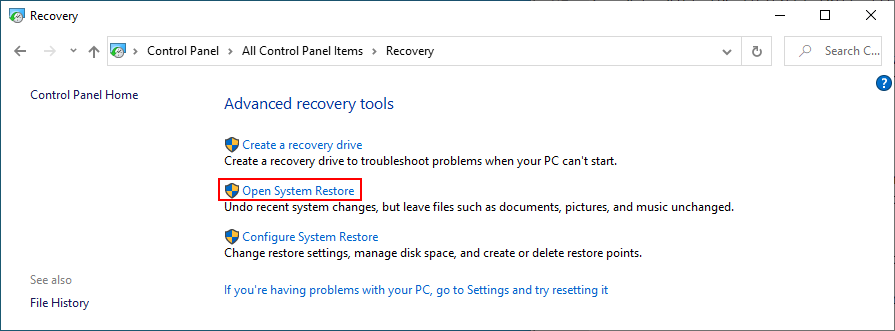
- Click the Start button, find Control Panel, and open this app
- Select Recovery
- Click Open System Restore
- Choose a restore point or click Show more restore points to get more options. Click Scan for affected programs to discover the exact applications you will have to reinstall
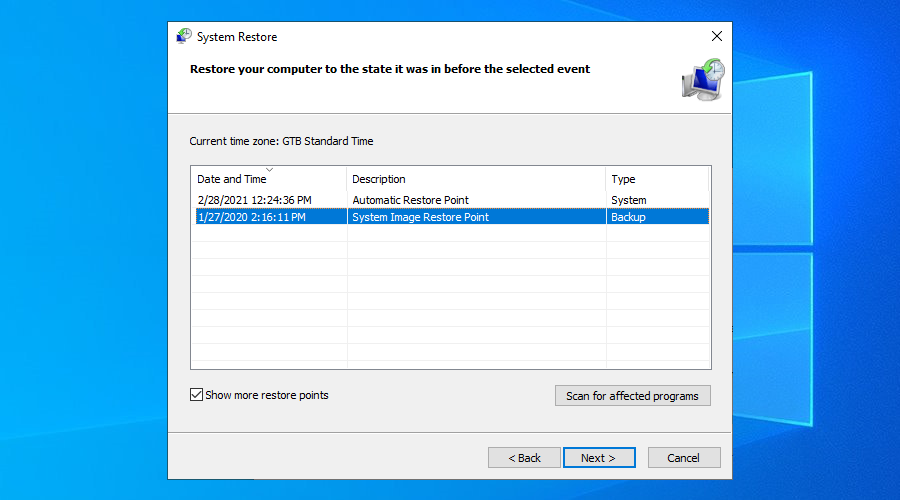
- After making a selection, click Next and follow the remaining steps
If you can’t boot Windows 10, interrupt the startup three times in a row to access system troubleshooting mode. Then, go to Troubleshoot > Advanced Options > System Restore.
26. Reset Windows 10
If you still can’t shake off the The system cannot find the file specified error or if System Restore didn’t work, there’s nothing left to do except restore Windows 10 to factory settings. It means uninstalling all your applications and reverting the system configuration to default. But you can keep your personal files, so it’s not necessary to perform a backup.
How to reset Windows 10:
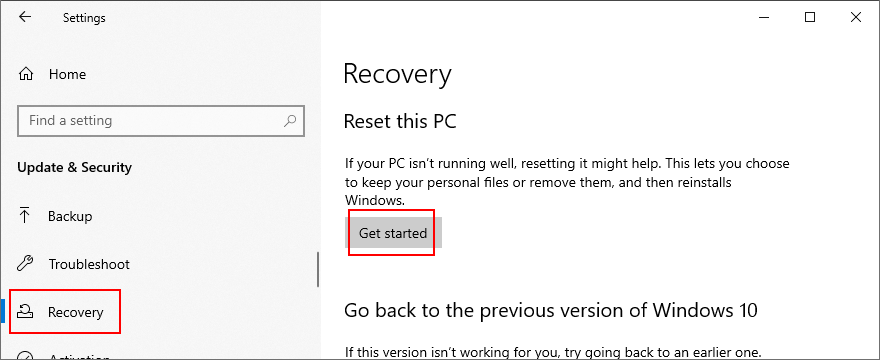
- Right-click the Start button and select Settings
- Click Update & Security and select Recovery
- At Reset this PC, click Get started
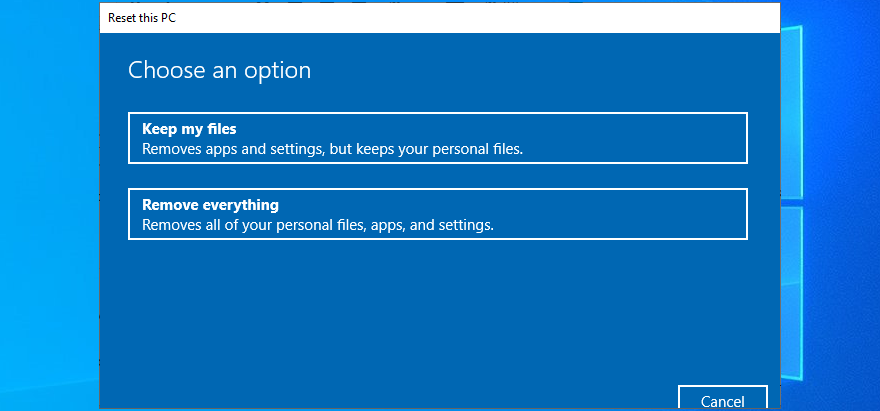
- Pick Keep my files and follow the remaining instructions
You can also turn your PC on and off three times to launch Advanced Startup mode before Windows boot. There, you can go to Troubleshoot > Reset your PC.
If you managed to get hold of your files by using the Linux live distro, we suggest performing a clean reset by selecting the Remove everything option instead of Keep my files.
Error The system cannot find the file specified can be fixed
To review, you can try to fix the The system cannot find the file specified error by restarting your PC, updating Windows 10, running the Windows Update troubleshooter, checking the Windows Update services, starting the OS in Safe Mode, disabling startup apps, running a clean boot, and uninstalling third-party applications.
It’s also a good idea to disconnect external devices, run CHKDSK, SFC and DISM, investigate the system log, reinstall devices, update or roll back drivers, reinstall programs, check registry settings or restore the registry to default, uninstall system updates, run a malware scan, use a Linux live distro, change drive letters, format partitions, use System Restore, and reset Windows 10.
How did you repair this error? Let us know in the comments below.