Die meisten von uns kennen den Nervenkitzel, einen neuen Computer zu bekommen, und wissen, wie Sie in den ersten Sekunden nach dem blitzschnellen Booten Ihres Betriebssystems staunen, wie schnell alles ist scheint zu sein. Sobald Sie mit dem Booten fertig sind, können Sie Ihren PC zu Ihrem echten PC machen, indem Sie seine Einstellungen anpassen, neue Programme installieren, Treiber einrichten und für die technisch versiertesten von Ihnen sogar mit Hardwareeinstellungen wie dem Einstellen der Taktfrequenz herumspielen und Einstellen der Lüftergeschwindigkeit.
Leider gibt es eine Zeit im Leben eines jeden (in Bezug auf seine PCs), in der sich die Dinge verlangsamen. Ein kleiner Frame-Drop, den Sie zunächst bereitwillig abrutschen lassen, gefolgt von ein wenig Stottern einige Wochen später, und all dies führt letztendlich dazu, dass Sie endlich feststellen, dass Ihr PC vom Booten bis zum Anmeldebildschirm keine 2-3 Sekunden benötigt , geschweige denn, Ihren Favoriten fast sofort zu starten.

Computer läuft langsam?
Es ist wirklich herzzerreißend zu sehen, dass das Gerät, auf dem Sie wahrscheinlich viele Stunden verbringen, langsamer wird, egal wie sorgfältig Sie versuchen, es zu warten, indem Sie es aufräumen, auseinander nehmen und mit einer Dose Blasen aufblasen Luftstaubtuch, wo es benötigt wird, defragmentiert oder Tuning-Dienstprogramme darauf ausgeführt. Um ehrlich zu sein, die meisten Elektronikgeräte haben eine Lebensdauer , und wenn Sie wirklich Glück haben, können Sie auf bestimmte Teile stoßen, die länger als der Durchschnitt halten, bevor Sie anfangen, an Leistung zu verlieren.
Wenn man bedenkt, dass Computer mehrere solcher Teile umfassen, ist es leicht zu verstehen, wie manchmal nur ein Teil des gesamten Systems das gesamte System beeinflussen und es verlangsamen oder zum Stottern bringen kann. Normalerweise tritt dieses Phänomen häufiger auf alten , veralteten Systemen auf, es kann jedoch auch bei neueren auftreten, je nachdem, wie gut Sie sich darum kümmern und ob oder nicht, Sie tun alles, um alles in Topform zu halten.
Es klingt vielleicht etwas (mehr) kontraintuitiv, aber häufige Systemaktualisierungen können die Gesamtleistung Ihres Computers massiv beeinträchtigen . Wir sind alle bestrebt, uns selbst zu verbessern, und Entwickler sind auch bestrebt, Decken zu sprengen und neue Leistungshöhen zu erreichen. Daher ist leicht zu erkennen, warum ein Betriebssystem, das häufig aktualisiert wird, um seine Leistung zu steigern, die Hardware im Internet belassen kann Staub im Laufe der Zeit.
Warum ist mein Computer so langsam?

Wenn Ihnen all dies schrecklich bekannt vorkommt, haben Sie möglicherweise Probleme mit einer Systemverlangsamung, egal ob geringfügig oder unglaublich schwer zu ignorieren. In diesem Fall ist die naheliegendste Antwort ein Upgrade auf ein besseres System , wie die meisten zuzustimmen scheinen. Nur weil Ihr System etwas verrostet ist, bedeutet dies nicht, dass Sie es so schnell wie möglich verschrotten und durch ein besseres ersetzen müssen, da Ihr alter Computer unabhängig vom installierten Betriebssystem möglicherweise noch eine gewisse Lebensdauer hat darauf, ob es Windows 10, Windows 8, Windows 7 oder eines ist, das noch älter ist.
Tatsächlich würden die meisten Benutzer es vorziehen, einen Weg zu finden, um ihren PCs neues Leben einzuhauchen , ohne nach ihrer Brieftasche greifen und aktualisierte Komponenten oder einen brandneuen Computer kaufen zu müssen. Wenn Sie sich jemals gefragt haben, warum mein Computer so langsam ist, lesen Sie einfach weiter. In diesem Handbuch zeigen wir Ihnen eine Reihe möglicher Möglichkeiten, Ihr System zu reparieren, ohne Ihren lokalen PC-Shop anzurufen und ein neues Gerät zu bestellen.
So beschleunigen Sie den Computer (Das ultimative Handbuch für Windows)
In erster Linie müssen Sie die Ursache für die Verlangsamung Ihres PCs ermitteln . Sobald Sie den Grund gefunden haben, warum Ihr Computer oder Laptop nach und nach aufgegeben hat, können Sie daran arbeiten, um die aktuelle Situation zu verbessern und sicherzustellen, dass Ihr PC in einer stabilen Umgebung läuft, bevor Sie ihn beenden und aufgeben (von denen wir abraten, insbesondere wenn Sie noch nicht alle Vorschläge in unserem ausführlichen Leitfaden ausprobiert haben).
Lassen Sie uns vor diesem Hintergrund sehen, welche Dinge Sie versuchen könnten, wenn Sie Ihren PC schneller machen möchten (wenn Sie ihn kürzlich gekauft haben) oder Ihren alten Computer oder Laptop beschleunigen und ihn noch einige Jahre lang verwenden möchten, bevor Sie ihn drehen in Schrott. Neben den Korrekturen, die Sie versuchen könnten, werden wir auch einige mögliche Ursachen angeben, die möglicherweise zur (hoffentlich vorübergehenden) Verschlechterung Ihres Computers beigetragen haben, sodass Sie die Verlangsamung besser verstehen und gegebenenfalls entsprechend handeln können passiert wieder.
17 Arbeitsmethoden, um Ihren Computer schneller zu machen
1. Deinstallieren Sie nicht verwendete oder selten verwendete Apps

Wenn Sie neugierig wurden, Ihren PC zu erkunden und Ihren Task-Manager nicht nur zum Schließen hartnäckiger Apps zu verwenden, wissen Sie möglicherweise bereits, dass es drei wichtige Ressourcen gibt, von denen Ihr Computer abhängt, um sie bereitzustellen Eine reibungslose und schnelle Erfahrung: RAM, CPU, und Speicher.
Während Speicherprobleme leicht behoben werden können, indem unnötige Dateien einfach auf andere Speichermedien (wie CDs, DVDs, USB-Sticks oder externe Festplatten/SSDs) übertragen werden, werden RAM-und CPU-Probleme häufig von Prozessen beeinflusst, die dies sind läuft gerade.
Möglicherweise wissen Sie bereits, dass Dinge, die zu einem bestimmten Zeitpunkt auf Ihrem PC ausgeführt werden, verschiedene Formen haben können, z. B. Apps, Hintergrundprozesse und Dienste. Ein häufiges Missverständnis ist, dass der RAM-Verbrauch auf einem minimalen Wert gehalten werden kann, indem einfach keine Vordergrund-Apps auf Ihrem Computer ausgeführt werden. Wenn Sie jedoch nicht vorsichtig genug sind, können Sie Hintergrundprozesse und-dienste in größere Werte umwandeln RAM-Hogger als aktive (Vordergrund-) Apps.
Jeder Prozess, der derzeit auf Ihrem PC ausgeführt wird, unabhängig davon, ob er im Vordergrund aktiv ist und Sie mit ihm interagieren, im Hintergrund ausgeführt oder als Dienst ausgeführt werden können, wirkt sich auf Ihre CPU aus , Speicher-(RAM), Festplatten-(Speicher) und Netzwerkressourcen (Bandbreite). Hintergrundprozesse verbrauchen im Allgemeinen weniger als Apps auf Ihrem PC. Wenn jedoch viele davon vorhanden sind, können sie Ihre Ressourcen auch stark belasten, wenn Sie nicht vorsichtig genug sind.
Überprüfen Sie den Ressourcenverbrauch selbst
Nehmen Sie jedoch nicht unser Wort dafür. Verwenden Sie die Tastenkombination Strg + Umschalt + Esc , um den Windows-Task-Manager aufzurufen und sich selbst davon zu überzeugen. Wenn Sie beispielsweise Chrome auf Ihrem Computer eingerichtet haben, werden Sie feststellen, dass es wahrscheinlich einer der größten RAM-Konsumenten ist, die Sie haben.
Stellen Sie sich nun vor, dass nicht nur Chrome, sondern jeder andere Prozess, der auf Ihrem PC ausgeführt wird, Ihren RAM-, CPU-, Festplatten-und Netzwerkressourcen belastet, was unweigerlich zu einem System führt, das nicht nur langsamer, sondern auch nicht so stabil ist wie das eine, die Sie gerade ausgepackt haben und auf der fast nichts installiert ist.
Aus diesem Grund empfehlen wir Ihnen, die Systemsteuerung zu starten, Programme und Funktionen aufzurufen und sich die Liste der Apps anzusehen, die Sie auf Ihrem Computer installiert haben Computer. Wenn Sie etwas sehen, das Sie selten oder nie verwenden, können Sie es entfernen.
Die Sache ist, dass viele Apps Dienste und Hintergrundprozesse zusammen mit ihrem Gegenstück im Vordergrund installieren. Selbst wenn Sie die App selten starten, kann sie durch Hintergrundprozesse oder Dienste, die die App behält, einen winzigen Teil Ihres RAM oder Ihrer CPU verbrauchen Öffnen Sie, falls Sie es starten.
Wenn Sie ein bisschen technisch versiert sind, können Sie mit dem Windows-Task-Manager feststellen, auf welchen Apps Hintergrundprozesse auf Ihrem PC ausgeführt werden, und diese bei Bedarf anhand dieser Informationen entfernen.
Verwenden Sie Apps von Drittanbietern, um Programme zu entfernen
Haben Sie viele installierte Programme auf Ihrem Computer, die Sie nicht mehr verwenden, oder sind Sie kein großer Fan davon, Dinge manuell von Ihrem Computer zu deinstallieren? Dann werden Sie froh sein zu wissen, dass es Apps von Drittanbietern gibt, die diese Belastung von Ihren Schultern nehmen können.
Die Verwendung des in Windows integrierten Programmmanagers zum Deinstallieren von Apps von Ihrem PC kann häufig mehrere Spuren des Programms hinterlassen, z. B. ausführbare Dateien, DLLs und Konfigurationsdateien, die dazu beitragen, den Speicherplatz auf Ihrem Computer unnötig zu belasten.
Meistens passiert dies, wenn Sie versuchen, Programme zu deinstallieren , während sie gerade ausgeführt werden. Wenn Sie dies tun, bleiben ausführbare Dateien, DLLs und Konfigurationsdateien, die für die Ausführung der ausführbaren Datei erforderlich sind, auf Ihrem PC gestrandet. Manchmal stellen Sie möglicherweise fest, dass im Programm noch ein Prozess im Hintergrund ausgeführt wird, obwohl Sie dachten, Sie hätten ihn vollständig entfernt von Ihrem Computer.
Dieser Vorgang beansprucht möglicherweise nicht viel CPU und Arbeitsspeicher. Wenn Sie jedoch mehr als nur einige solcher Programmreste haben, fällt dies auf.
Spezielle Deinstallationssoftwarelösungen von Drittanbietern können Ihnen dabei helfen, eine Vielzahl von Vorgängen in Bezug auf das Entfernen von Apps auszuführen, einschließlich, aber nicht beschränkt auf das gleichzeitige Entfernen mehrerer Apps (zu denen Windows derzeit nicht in der Lage ist), das Entfernen verwaister Registrierungseinträge und das Bereinigen jede Spur des Programms, das Sie entfernen möchten, um zu verhindern, dass Situationen wie die oben abgebildete jemals auftreten.
Auf der nicht ganz so guten Seite sind die meisten dieser Programme nicht gerade effektiv, insbesondere wenn Sie auf kostenlose Programme zusteuern, die sogar ein Sicherheits-oder Datenschutzrisiko für Ihren PC darstellen können. Wir haben jedoch eine Liste der besten kostenlosen Software erstellt Deinstallationsprogramme für Windows , die Sie verwenden können, sind tatsächlich effektiv und sicher zu verwenden.
2. Startvorgänge entfernen
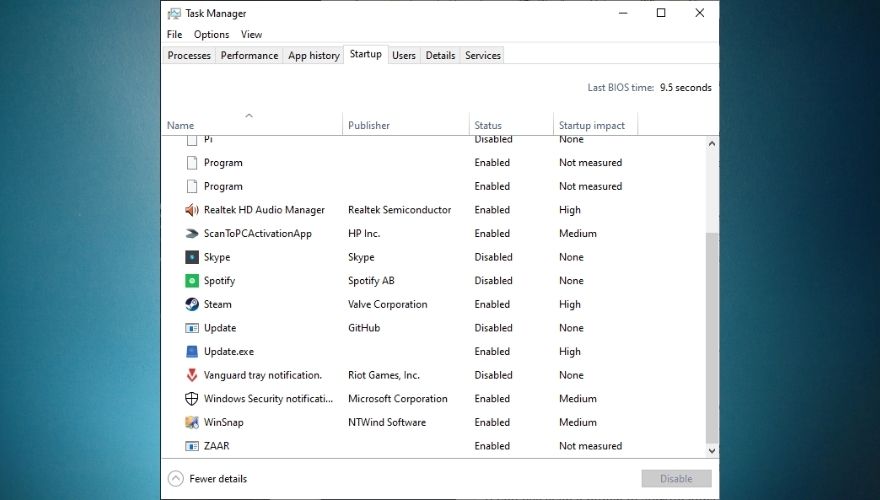
Wenn Sie feststellen, dass Ihr PC langsamer startet als früher, besteht eine gute Chance, dass Sie eine Reihe von Apps installiert und diese während des Systemstarts ausgeführt haben. Startprozesse sind große Ressourcenhändler und können die Zeit, die Ihr Computer zum Booten benötigt, erheblich verlängern.
Während des Startvorgangs muss Ihr Computer viele Prozesse laden, die das Betriebssystem benötigt, um wie beabsichtigt ausgeführt zu werden. Daher benötigt er alle Ressourcen, die erforderlich sind, um die Aufgabe so schnell wie möglich und vorzugsweise ohne dass Sie es bemerken, zu erledigen Verlangsamungen. Hier ist die Sache: Wenn Sie zulassen, dass andere Apps während des Startvorgangs ausgeführt werden, können diese Apps Ressourcen beanspruchen, die Ihr Betriebssystem benötigt, um einen reibungslosen Ablauf zu gewährleisten und die Startsequenz rechtzeitig abzuschließen.
Wenn Sie auch nur eine Reihe von Start-Apps verwenden, verteilt Ihr Computer Ressourcen zwischen den Apps von Drittanbietern und Ihren Systemprozessen neu und versucht sicherzustellen, dass alles, ob es sich um eine App oder eine App handelt Systemprozess, hat die Chance, ordnungsgemäß ausgeführt zu werden.
Infolgedessen werden Apps langsamer geladen und der Start von Systemprozessen dauert länger, da beide CPU und RAM miteinander teilen müssen Holen Sie sich eine träge, langsame, stotternde Erfahrung von Ihrem Computer.
Verwenden Sie stattdessen den Taskplaner
Wenn Sie möchten, dass Ihr Computer wieder schnell ist, sollten Sie versuchen, alle Start-Apps und-Prozesse zu entfernen, die Sie auf Ihrem PC installiert haben. Sie müssen sie nicht vollständig deinstallieren: Starten Sie sie einfach, suchen Sie nach Starteinstellungen und versuchen Sie, alles zu deaktivieren, das Beim Start ausführen oder Beim Start starten ähnelt. Wenn Sie nicht alle entfernen können oder möchten, entfernen Sie einfach so viele wie möglich, da dies immer noch einen großen Unterschied macht.
Eine letzte Sache: Sie haben das wahrscheinlich bereits gewusst, aber wenn Sie Windows 10, Windows 8.1, Windows 8 oder sogar Windows 7 ausführen, haben Sie einen Taskplaner auf Ihrem Computer. Scheuen Sie sich nicht davor und versuchen Sie, damit mehrere Apps gleichzeitig zu starten, anstatt zufällig alle Apps auf Ihrem PC beim Start laufen zu lassen. Stellen Sie einfach sicher, dass Sie während des Startvorgangs keine Apps planen (Sie kehren zum ersten Punkt zurück), und wählen Sie stattdessen einen späteren Zeitpunkt (z. B. 5 Minuten später).
3. Schließen Sie die Fachprozesse
Eine andere Art von hinterhältiger Software, die Sie auf Ihrem PC haben können, ohne es zu wissen, besteht aus Anwendungen, die unbeaufsichtigt in Ihrer Taskleiste ausgeführt werden. Sie wissen, dass dieser winzige Bereich neben Ihrer Uhrzeit, Ihrem Datum, Ihren Benachrichtigungen und Ihrer Eingabesprachenanzeige Sie erweitern können. Wenn in diesem Bereich (dem Fach) mehr als nur einige Dinge angezeigt werden, ist dies ein guter Grund, warum Ihr Computer möglicherweise verlangsamt wird.
Wie wir oben sorgfältig erklärt haben, bedeuten viele Apps, die auf Ihrem PC ausgeführt werden, dass mehr Ressourcen verwendet werden. Da Sie nur Verlangsamungen bemerken, wenn Sie tatsächlich versuchen, Ressourcen selbst zu verwenden ( und nicht viele von ihnen sind verfügbar), na ja, Sie können wahrscheinlich rechnen. Es liegt also auf der Hand, so viele wie möglich zu schließen und zu prüfen, ob sich Verbesserungen ergeben.
Wir haben dies zuvor noch nicht erwähnt, aber Sie sollten nach jedem Schritt in unserem Handbuch nach Anzeichen für Verbesserungen suchen. Auf diese Weise wissen Sie es sofort, wenn Sie etwas richtig machen. Wenn Sie besonders sicher sein möchten, dass Sie tatsächlich auf dem richtigen Weg sind, starten Sie Ihren Task-Manager und sehen Sie sich die CPU , Speicher , Festplatte und Netzwerk Spaltenüberschriften im rechten Bereich des Hauptbildschirms. Wenn Sie sie nicht sehen können, klicken Sie unten links im Task-Manager auf die Schaltfläche”Weitere Details”.
Einige Tray-Prozesse können nicht geschlossen werden
Nun zurück zu unseren Schafen: Wenn Sie feststellen, dass Ihre Speicher-oder CPU-Prozentwerte nach dem Schließen bestimmter Apps erheblich sinken, ist dies ein ziemlich solider Indikator dafür, dass diese genaue App der Grund für das Verhalten Ihres Computers war Alle langsam und dringend brauchten Sie, um einzugreifen. Beachten Sie, dass Sie durch Klicken auf die Spalten Speicher, CPU, Festplatte oder Netzwerk die Prozesse auf Ihrem PC nach dem Verbrauch dieser spezifischen Ressource sortieren können. Wenn Sie einmal darauf klicken, wird zuerst der Top-Consumer angezeigt, während Sie erneut darauf klicken, sollte die Liste umgekehrt werden, um zuerst Low-Consumer anzuzeigen.
Beachten Sie, dass in Windows standardmäßig auch einige Taskleistensymbole platziert sind, was Sie nicht sonderlich stören sollte. Dies sind die Hardware sicher entfernen und Medien auswerfen , die Sie nicht schließen können (da es sich nicht genau um eine App handelt), Windows-Sicherheit (die Sie standardmäßig nicht beenden können) und treiberspezifische Symbole (z. B. Bedienfelder für Ihre Audio-und Videotreiber). Sie sollten diese in Ruhe lassen und sich auf Apps von Drittanbietern konzentrieren, die Sie installiert haben, z. B. Browser-Agenten (ich persönlich kümmere mich nicht allzu sehr um sie und stelle immer sicher, dass sie geschlossen sind), Office-Agenten und andere solche Apps.
4. Entfernen Sie alle Unordnung
Wie bereits erwähnt, spielen Speichermedien (HDD, SSD) auf Ihrem Computer eine große Rolle. Stellen Sie sich Ihre Festplatte und/oder SSD als die Schränke oder Schubladen vor, in die Sie jedes Mal greifen, wenn Sie etwas Wichtiges benötigen (z. B. Ihren Personalausweis, einen Stift und ein Stück Papier, a Kreditkarte, MP3-Player usw.). In diesem Szenario spielen Sie die Rolle Ihres Betriebssystems, das jedes Mal, wenn es etwas abrufen muss, in diese Speichermedien (HDD, SSD) gelangt.
Hoffentlich macht es jetzt Sinn, warum Sie Ihre Festplatte und SSD schön, ordentlich und ohne viel Unordnung halten müssen, wenn Sie möchten, dass Ihr Betriebssystem und Ihr PC Daten schnell von ihnen abrufen. Sie können uns wahrscheinlich zustimmen, dass es unglaublich schwierig sein kann, in einer überfüllten Schublade nach einem winzigen Stück Papier oder einem anderen kleinen Gegenstand zu suchen. Warum sollten Sie also Ihre Festplatte und/oder SSD dieser schrecklichen Erfahrung unterziehen, indem Sie Junk-Dateien stapeln lassen? ?
Unter technisch versierten Benutzern ist es eine Faustregel, dass eine Festplatte, die zu etwa 90 Prozent voll ist, langsamer wird. Sie sollten daher versuchen, sie durch Entfernen von Dateien unter diesem Niveau zu halten und Programme, die Sie nicht brauchen. Dies gilt insbesondere dann, wenn Sie Ihr Betriebssystem auf derselben Festplatte belassen, da Ihr Windows zusammen mit Ihrer Festplatte zwangsläufig langsamer wird.
Wenn Sie eine SSD haben, sind die Dinge noch komplizierter, da SSDs allmählich langsamer werden, wenn Sie sie mit Daten füllen. Wenn es jedoch keine andere Möglichkeit gibt, als viele Dinge auf Ihrer SSD zu speichern, ist es ein guter Rat, sie unter 75% ihrer vollen Kapazität zu halten. Schließlich werden SSDs im Allgemeinen verwendet, um Apps und Prozesse blitzschnell zu laden und keine lächerlichen Datenmengen zu speichern.
Denken Sie immer daran, dass Unordnung auch in anderen Teilen Ihres Computers auftreten kann, die nicht sofort erkennbar sind. Wenn Sie Dateien und Ordner nicht mit Umschalt + Entf löschen (diese Verknüpfung löscht sie, ohne sie an den Papierkorb zu senden), möchten Sie möglicherweise Ihren Papierkorb alle überprüfen ab und zu und leeren Sie es, besonders wenn Sie es nicht regelmäßig tun. In Ihrem Papierkorb können sich viele Junk-Dateien ansammeln, die sich auf Ihre Leistung auswirken können, bevor Sie es wissen.
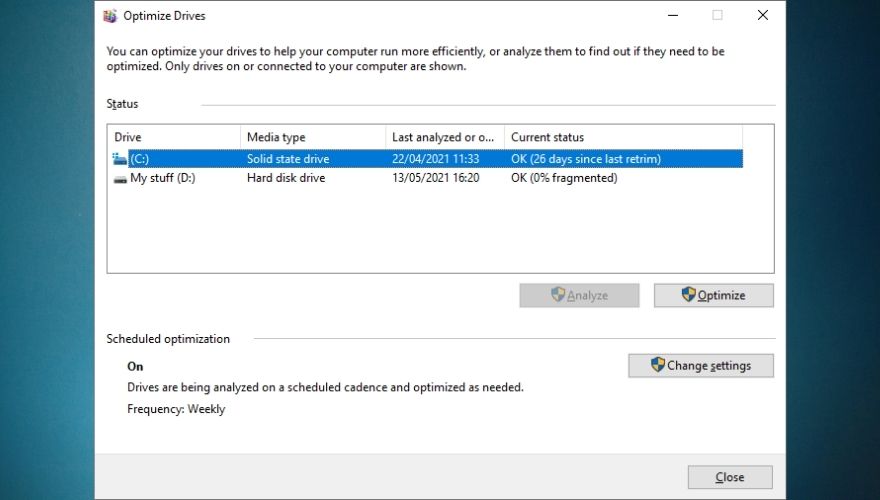
5. Defragmentieren Sie Ihre Festplatte
Es mag sich nach einer extremen Maßnahme anhören, aber die Defragmentierung Ihrer Festplatte ist unerlässlich, wenn Sie sie lange in Topform halten und nicht nur verschiedene Dokumente darauf speichern, sondern auch Apps und Spiele ohne Probleme ausführen möchten. Ups, Einfrieren oder zufällige Abstürze. Die Notwendigkeit für diesen Defragmentierungsprozess ergibt sich aus der Tatsache, dass Ihre Festplatte im Laufe der Zeit fragmentiert wird und Ihr Betriebssystem dadurch langsamer wird, da es an mehreren Stellen nach Inhalten auf Ihrer Festplatte suchen muss, bevor es darauf zugreifen kann.
Bei der Defragmentierung werden die jetzt fragmentierten Teile tatsächlich wieder zusammengesetzt, sodass Ihr Betriebssystem schneller und einfacher darauf zugreifen kann. Infolgedessen wird Ihr Computer schneller geladen, da die auf Ihrer Festplatte gespeicherten Dateien aus einem Stück bestehen, anstatt in mehrere Teile aufgeteilt und über den gesamten Ort verteilt zu sein.
Windows 10, 8 und 7 können sich um Ihre Festplatte kümmern, indem sie etwa jede Woche automatisch Scans und Defragmentierungsvorgänge ausführen. Es schadet jedoch nicht, sicherzustellen, dass alles in Topform ist, indem Sie den Zustand Ihrer Festplatte und den Prozentsatz der erreichten Fragmentierung überprüfen (falls zutreffend). Wenn Sie feststellen, dass etwas nicht in Ordnung ist, können Sie problemlos selbst einen Defragmentierungsvorgang ausführen. Folgendes müssen Sie tun:
- Drücken Sie die Taste Win auf Ihrer Tastatur
- Geben Sie Defrag
- Wählen Sie Defragmentieren und Laufwerke optimieren aus der Ergebnisliste aus.
- Überprüfen Sie, ob eine der Festplatten mehr als 0% fragmentiert ist
- Wählen Sie die Festplatte aus, die defragmentiert werden soll
- Klicken Sie auf die Schaltfläche Analysieren
- Klicken Sie nach Abschluss der Analyse auf die Schaltfläche Optimieren
- Warten Sie, bis der Vorgang abgeschlossen ist (lassen Sie den PC vorzugsweise in Ruhe, während die Defragmentierung ausgeführt wird).
- Wiederholen Sie die obigen Schritte, um alle Festplatten abzudecken, die defragmentiert werden müssen.
ein
Beachten Sie, dass wir in unserem kleinen Leitfaden oben nur HDDs erwähnt haben, da SSDs keine Defragmentierung erfordern, da sie anders funktionieren als ihre HDD-Gegenstücke. Sie werden feststellen, dass die Schaltfläche”Analysieren”ausgegraut ist, wenn Sie im obigen Dialogfeld Defragmentieren und Laufwerke optimieren eine SSD auswählen. Dies ist kein Fehler. SSDs müssen nicht defragmentiert werden, da sie überhaupt nicht fragmentiert werden können.
Beachten Sie, dass Sie auch dann auf die Schaltfläche Optimieren klicken können, wenn die Schaltfläche Analysieren für SSDs ausgegraut ist. Obwohl Ihre SSD nicht defragmentiert wird, wird der Befehl TRIM ausgeführt, mit dem Daten gelöscht werden, die Ihr PC nicht mehr als nützlich erachtet.
Wie bereits erwähnt, führen Windows 10-, 8-und 7-Betriebssysteme eine wöchentliche Analyse Ihrer Festplatten durch und führen bei Bedarf Defragmentierungsvorgänge durch, wenn einige Ihrer Festplatten dies erfordern. Beachten Sie, dass Sie die Häufigkeit, mit der Optimierungsvorgänge ausgeführt werden, von ‘wöchentlich’ auf ‘täglich’ oder ‘monatlich’ändern können, obwohl das Betriebssystem empfiehlt, dass Sie es auf ‘wöchentlich’halten.
Sie können auch eine Option umschalten, die die Priorität der Aufgabe erhöht, wenn drei aufeinanderfolgende geplante Festplattenoptimierungsläufe verpasst wurden. Darüber hinaus können Sie mit dem Programm Defragmentieren und Laufwerke optimieren die Laufwerke auswählen, die Sie regelmäßig optimieren möchten, und eine Option umschalten, mit der das Programm neue auf Ihrem System erkannte Laufwerke automatisch optimiert.
Erwähnenswert ist, dass die obigen Anweisungen für Windows 10-und Windows 8-Betriebssysteme gelten. Wenn Sie einen Windows 7-Desktop-Computer oder-Laptop verwenden, können Sie mithilfe der Suchfunktion das Defragmentierungsprogramm suchen und im Abschnitt”Aktueller Status”eine Festplatte auf Ihrem System auswählen.
6. Führen Sie eine Datenträgerbereinigung durch
Datenträgerbereinigungen sind von größter Bedeutung, um alles auf Ihren Speichergeräten sauber und ordentlich zu halten. Viele Apps verwenden zwischengespeicherte Daten, und diese Daten müssen an einem Ort gespeichert werden, wenn auch nur vorübergehend, und dieser Speicher befindet sich auf Ihren Festplatten oder SSDs. Leider finden temporäre Dateien wie zwischengespeicherte Daten, heruntergeladene Installationsdateien, Fehlerprotokolle und Optimierungsdateien nicht auf magische Weise ihren Weg in den Papierkorb, sodass Sie diese Bereinigung selbst durchführen müssen.
So können Sie eine Festplattenbereinigung ohne großen Aufwand auf einem Windows 10-PC durchführen:
- Drücken Sie die Taste Win auf Ihrer Tastatur
- Geben Sie PC ein und klicken Sie in der Ergebnisliste
- Klicken Sie mit der rechten Maustaste auf eine Partition
- Wählen Sie im Kombinationsmenü Eigenschaften
- Klicken Sie auf die Schaltfläche Datenträgerbereinigung
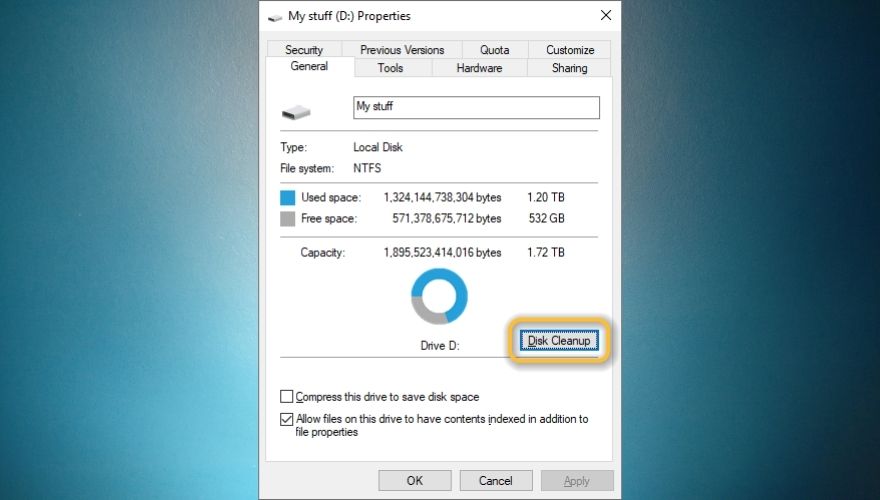
- Klicken Sie auf die Schaltfläche Systemdateien bereinigen
- Überprüfen Sie die Dateien, die Sie löschen möchten, im entsprechenden Abschnitt
- Klicken Sie auf die Schaltfläche OK
- Bestätigen Sie, dass Sie die ausgewählten Dateien dauerhaft löschen möchten
- Klicken Sie erneut auf die Schaltfläche OK
- Wiederholen Sie die obigen Schritte für alle internen Partitionen auf Ihrem System (stellen Sie sicher, dass Sie keine externen Speichermedien auswählen).
auf das Symbol Dieser PC
Beachten Sie, dass Sie für Windows 8.1, 8 und 7 möglicherweise eine andere Route suchen müssen, um auf Ihre Partitionen zuzugreifen (z. B. ein Symbol”Arbeitsplatz” auf Ihrem Desktop oder im Start) Menü ). Darüber hinaus stellen Sie möglicherweise fest, dass einige Funktionen unterschiedlich sind oder vollständig fehlen, aber der Teil Datenträgerbereinigung selbst ist recht intuitiv, sodass Sie wahrscheinlich ohne weitere Unterstützung damit interagieren werden.
Wenn Sie nicht gerade ein Fan davon sind, sich die Hände in die integrierte Windows-Funktion zu vertiefen, sind Sie möglicherweise froh zu erfahren, dass es Softwarelösungen von Drittanbietern gibt, die sich um Sie kümmern können Sie müssen keine Zeit damit verschwenden, sich nach Werkzeugen umzusehen, die möglicherweise nicht einmal vorhanden sind.
Verwenden Sie Datenträgerbereinigungstools von Drittanbietern
Es gibt viele Datenträgerbereinigung Im Internet verfügbare Tools , von denen die meisten mehr als nur Funktionen zur Datenträgerbereinigung bieten. Einige Apps bieten Ihnen beispielsweise Funktionen zur Bereinigung von Dateien in Echtzeit, Tools zur Bereinigung des Browserverlaufs, Dienstprogramme zur Systemoptimierung, erweiterte App-Deinstallationsprogramme, Tools zur Bereinigung der Registrierung, Start-App-Manager und sogar Defragmentierung.
Erwähnenswert ist jedoch, dass es sich bei den meisten dieser Apps um Premium Softwarelösungen handelt. Sie müssen daher ein Abonnement oder eine Lizenz erwerben, um sie in vollem Umfang nutzen zu können. Fast alle von ihnen verfügen über funktionale Demos , mit denen Sie die Funktionen der App nutzen und auf einer Probefahrt nutzen können, bevor Sie endgültig entscheiden, ob das Programm für Sie geeignet ist oder nicht dieser Demos sind unglaublich begrenzt.
Einer der häufigsten Demo-Typen ist der, der Ihr System einfach scannt und viele Fehler erkennt, aber absolut nichts unternimmt, um das Problem zu beheben, bevor Sie eine Lizenz oder ein Abonnement kaufen.
7. Schließen Sie Ressourcenfresser manuell
Wir haben bereits festgestellt (und Sie sollten dies bereits wissen, wenn Sie zumindest ein wenig Erfahrung mit der Bedienung Ihres PCs haben), dass einige Programme, Prozesse und Spiele einen Großteil Ihrer verfügbaren Ressourcen beanspruchen können, unabhängig davon, ob es sich um eine CPU handelt , RAM, Speicherplatz oder Bandbreite, über die wir sprechen. Sie sollten sich jedoch nur so lange auf die Leistung Ihres PCs auswirken, wie sie ausgeführt werden. Sie sollten also keine Einfrierungen, Abstürze oder Ruckeln außerhalb des Laufzeitfensters bemerken.
Drücken Sie Strg + Umschalt + Esc , um Ihren Task-Manager anzuzeigen und die Detailansicht zu aktivieren, indem Sie unten auf die Schaltfläche”Weitere Details”klicken. links von seinem Hauptfenster. Beachten Sie, dass es 6 Spalten gibt, die jeweils Informationen zu den auf Ihrem Computer ausgeführten Programmen, Prozessen und Diensten in dieser Reihenfolge enthalten: Name, Status, CPU, Speicher, Festplatte und Netzwerk.
Wenn Sie die Programme, Prozesse und Dienste nach der Anzahl der Ressourcen sortieren möchten, die sie belasten, können Sie einfach auf eine der vier Ressourcenregisterkarten klicken, je nachdem, woran Sie interessiert sind: CPU, RAM, Festplattennutzung oder Bandbreite. Wie oben erläutert, sollte ein einmaliges Klicken den höchsten Verbraucher an den Anfang der Liste bringen, und ein erneutes Klicken sollte die Liste umkehren und die Programme, Prozesse und Dienste anzeigen, die die geringste Menge dieser spezifischen Ressource verbrauchen.
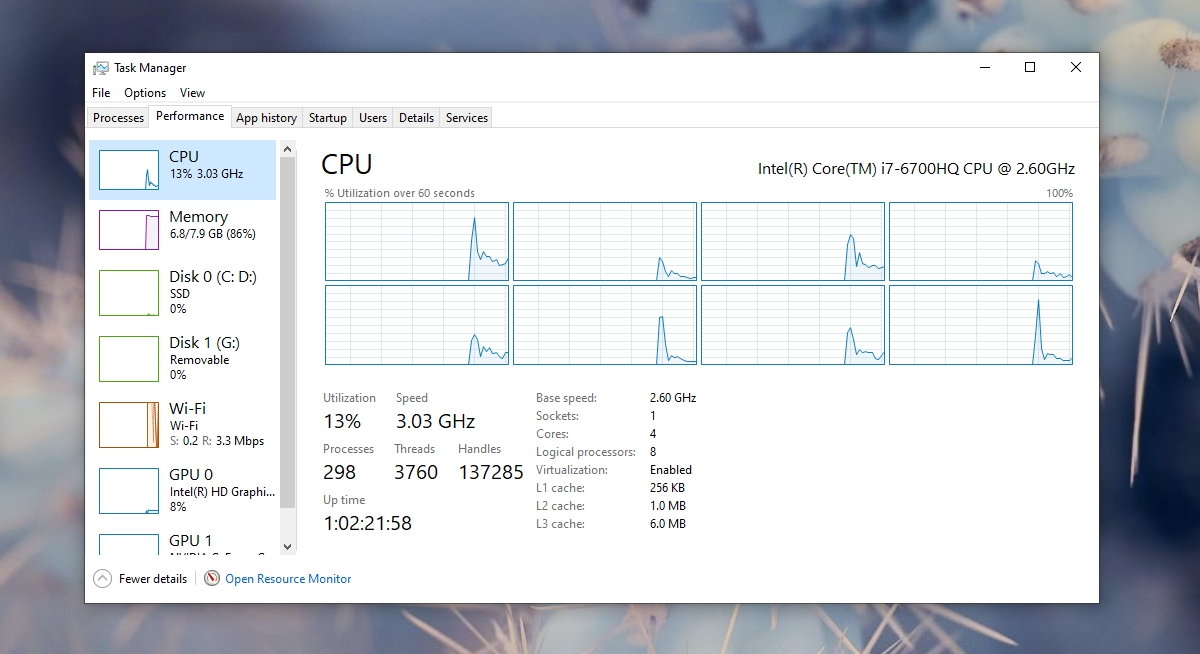
If your computer is incredibly slow, for instance, you can launch the Task Manager and click the RAM column to display the app that’s currently eating up most of your memory. Now if you notice that it’s hogging a lot more than it should, you can try to close it and check if there’s any improvement. The same principle applies to CPU usage: if you notice that the percentage is just too high, try closing the app, process, or service and see if your PC is any faster.
There’s another scenario where an app doesn’t show as being a huge RAM or CPU consumer but renders your PC unusable by making it extremely slow, stuttery, or even prone to crashes. Most of the time, these apps will show as non-responsive (Not Responding) in the Task Manager, so you can try and terminate them, even though they technically don’t consume a lot of resources.
If closing the processes that were taking up a lot of your system’s resources seems to have done the trick, then you could consider removing the app from your computer altogether, updating it to the latest version, or checking if it’s been misconfigured. It’s worth noting that some apps have certain configuration options that, once enabled, turn them into massive resource leeches.
8. Check your power & sleep settings
The fact that your power and sleep settings can have a negative impact on the performance of your computer is a less-known fact, but it does make sense, come to think of it. High processing power requires more resources, and one of the most overlooked resources in your computer is electricity. Therefore, it should make perfect sense that a more powerful computer should consume more electricity, which it does.
Fortunately, Windows comes with a bunch of power plans that you can apply depending on your current setup and preferences. For instance, you can set your computer to preserve more power at the expense of performance, or you can go full-throttle on performance, while also increasing the amount of electricity required. The most used alternative is a balanced power scheme that doesn’t give you full performance, but it doesn’t take a lot of energy, either.
Now if you’re on a desktop computer, the only reason why you’d want to adjust these power schemes is if you want more performance from your PC or keep your power bill at a minimum. However, for laptop users, things are a bit more delicate, as they also have to consider battery life when using their computers. Most laptop users are fans of the Balanced power scheme, which ensures normal PC performance and balanced battery life.
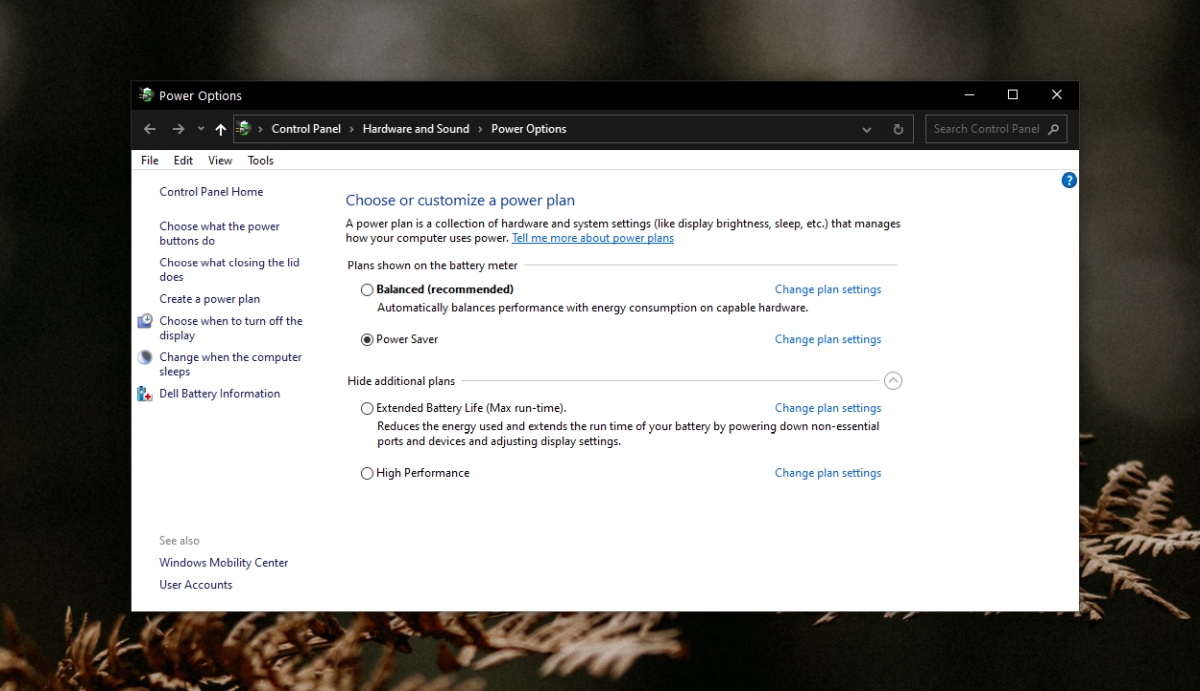
However, there are exceptional cases where you just need that extra oomph, so you switch to the performance-oriented power plan that drains your battery in a matter of hours (if you’re lucky and have a good battery), or you need more juice and you enable the battery-saving feature. Now if you remember what we mentioned just above, switching to a battery-saving plan will have a huge impact on your PC’s performance.
Therefore, if you notice that your computer acts incredibly slow for no apparent reason, you should check and see what power plan you’re currently using. This goes especially for laptop users since they’re more prone to interacting with power-saving options, but you should check it even if you’re a desktop PC user. It’s not uncommon to accidentally change power settings regardless of device type.
On laptops, a solid indicator that you’re using a power-saving plan is the reduced luminosity (brightness) of your screen. By default, the power saving plan will reduce luminosity to the absolute minimum, so it should be a bit harder to see stuff on your screen during daylight if that happens. Additionally, you’ll notice your laptop and its screen going to sleep way faster than it used to since it needs to conserve energy.
Long story short, if you decide to save some battery on your laptop you shouldn’t act all surprised when your entire system seems to be slowing down to a point where it’s barely usable.
9. Adjust visual effects
Newer versions of the Windows operating system have been not only more performance-oriented than their older counterparts but also made to look nicer. Windows developers have been implementing various animations, new polished graphics, menus, buttons, and icons to improve the user experience by providing users with not only a fast operating system but a sleek-looking one too.
However, all of this extra bling had to take its toll on your system somehow, as you probably know from computer games; increasing your graphic quality settings and setting a high resolution could affect your system’s performance and make the game feel more sluggish, albeit breathtaking in terms of eye candy. The same principle applies to Windows, but on a much smaller scale.
If you’re a lover of fancy animations, polished fonts, smooth buttons, window margins, and generally anything that looks out of the ordinary on your operating system, you probably have all these appearance-related enhancements enabled. For cutting-edge systems, this shouldn’t be a problem, since they’re specifically built to handle pressure from a wide variety of sources.
However, if your laptop or computer has been through more than two generations of operating systems without any significant hardware upgrade to help them match the requirements of new, modern Windows versions, there might be a problem there. For that reason, we recommend that you turn off as many visual enhancements as you can and check if there’s any notable improvement on how fast your computer is after doing so. Don’t know where to look for these settings? Check out the following mini-guide:
- Press the Win key on your keyboard
- Type Control
- Select Control Panel from the list of results
- Go to System and Security
- Open the System window
- Scroll down until you reach Advanced system settings and click it
- Click the Settings button in the Performance section
- Click the Adjust for best performance radio button
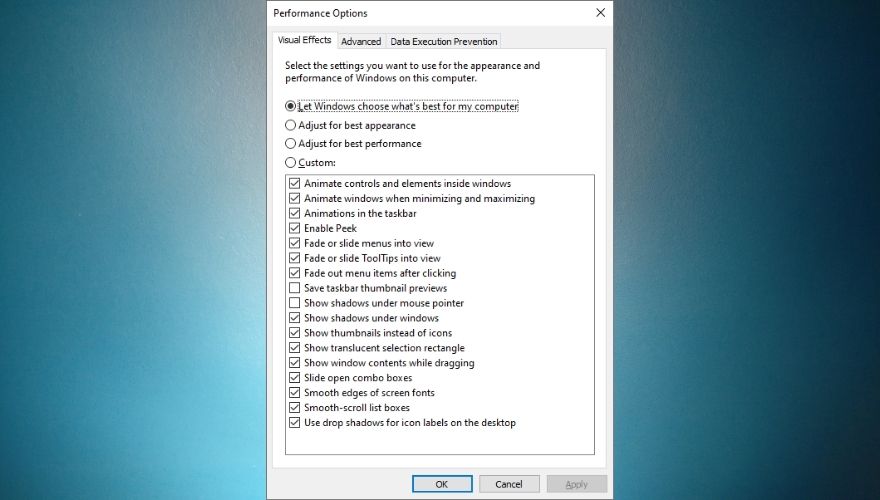
- Confirm your action by clicking the OK button
- Restart your PC and check if there’s any major improvement
It’s worth mentioning that clicking the ‘Adjust for best performance‘ button will disable absolutely every visual effect in that list. If you don’t want your Windows experience to be devoid of every type of eye candy, you could give it a whirl and create your own scheme of visual effects by clicking the Custom radio button and start toggling features on or off from the list. Once you’re satisfied with your selection, click the OK button and restart your PC.
While you’re here, you should know that the Advanced tab of the Performance Options window enables you to change the paging file size for your drives manually (if you don’t trust that Windows’ automatic paging management is good enough), and switch between program-and background-service-oriented performance by clicking the corresponding radio button depending on your preference.
By default, Windows is automatically adjusted for the best performance of programs, but you can also set it to ‘Background Services’ if you feel it may benefit you more.
If you’re a Windows 7 user, you can find the same settings by searching for the Performance Information and Tools section, selecting the Adjust visual effects option, and navigate to the Visual effects tab to start customizing your settings or choosing a different scheme.
10. Disable unnecessary Windows Features
Windows features might seem like something that has to do more with your operating system’s infrastructure than with any active components that you got running, such as apps or services, and you’d be half right. However, most of these features rely on services and background processes to run flawlessly on your system, and as we’ve already established before, the more you load your PC, the slower it will get as time goes by.
For that reason, a wise thing to do would be to take a look at your system’s features and perform a swift cleanup if needed. Microsoft wishes to cater to the needs of a varied clientele through their most important product (i.e. the Windows operating system), so the product gets delivered with a bunch of tools and features readily available (already enabled) by default.
Don’t get us wrong, that’s not inherently bad, as you may need most of these tools at one point or another, but loading services that you “might someday need” and end up not using them ever can be harmful to your PC in the long run, much like leaving the light on or the water slightly running can be to your monthly budget. On the bright side, just because Microsoft decided to enable certain features it doesn’t mean that you WILL need them or that turning them off could cause irreparable damage to your computer, so you may want to turn some of them off.
This goes specifically if you notice that your system is not as fresh and fast as it used to, and trust us when you’ve reached this point, every little thing counts. You disable this, you uninstall that, you do a little bit of defragmenting, and before you know it your PC starts picking up its pace, doesn’t freeze as often as it used to, and crashes start to feel like a thing of the past.
However, if you landed here, chances are you’re not exactly a pro when it comes to computers, and you might not know exactly how to reach the list of Windows features, let alone disable or enable them to your heart’s content. Not to worry, though, we’ll walk you through the steps so that you can give your old PC the performance boost it so much needs. Here’s what you have to do to disable Windows Features:
- Press the Win key on your keyboard
- Type control
- Select the Control Panel icon in the Start menu
- Click the Programs and Features section in the Control Panel
- Locate and click the Turn Windows features on or off at the left side of the main window
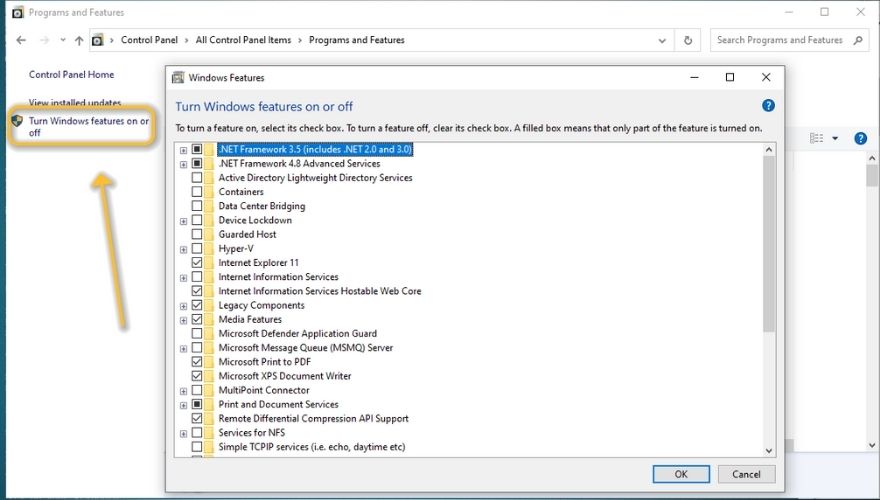
- From the newly-opened window toggle any unnecessary features off and click the OK button once you’re done
- Restart your computer
Note that you may want to refrain from haphazardly disabling everything in your wake, especially if you’re a PC novice and have no idea what each of the features depicted in that list helps you achieve on your PC. If you’re not sure about any specific feature and what role it plays on your computer, you may want to steer away from it and keep yourself from disabling it, as doing so may render some parts of your PC partially unusable.
Although the safest way to go with this would be looking up each feature, see what it does and what disabling it could mean for your system, we’ve also included some of the features that you could disable safely, along with what that feature does, and what disabling it could mean for your computer and/or operating system. Note that these features apply specifically to Windows 10, so if you’re using an older version of Windows some of these items may not apply to you.
- Internet Explorer 11
- You can safely disable Internet Explorer 11 from your Windows 10 PC considering the fact that Microsoft replaced it recently with Microsoft Edge. Internet Explorer still continues to remain available on Windows 10 PCs and there’s no immediate plan to remove it. Furthermore, Microsoft stopped sending Internet Explorer 11 updates through Windows Update, and you’d have to download and install them manually from Microsoft’s website, which is all the more reason to remove it without thinking about it twice.
- Internet Information Services (IIS)
- Recently, IIS started being enabled by default on new Windows 10 installations or during upgrades from older versions of these operating systems. Although it sounds like a big deal, you probably won’t need IIS up and running, so you might as well disable it. This doesn’t apply if you’re running a web server on your PC, in which case you shouldn’t disable IIS. If you do decide to disable it, you could also expand the IIS folder and disable FTP Server, Web Management Tools, and World Wide Web Services, if they’re enabled.
- Internet Information Services Hostable Web Core
- This goes in the same category as the IIS we mentioned and explained just above. If you’re not running any web server of any kind on your computer and don’t intend to do so anytime soon, you can safely disable the Internet Information Services Hostable Web Core if it’s enabled.
- Legacy Components and DirectPlay
- Legacy Components is a feature that enables you to add support for a wide variety of old components on Windows. One example of such a component is DirectPlay, which is a feature that was a part of DirectX a long time ago and is no longer used. If your system can still be considered somewhat new, go ahead and disable both Legacy Components and DirectPlay from the Windows Features screen.
- Media Features – Media Player
- A while ago, Media Features used to have more than just one feature under it, but now it’s just Media Player, Windows’ built-in solution for playing media files on your PC. If you have any experience with Windows PCs, you probably know that Media Player isn’t exactly versatile, as it depends on numerous codecs in order to let you enjoy your favorite video and audio files. If you’re already using a third-party multimedia player, such as VLC or Gom Player, go ahead and disable this feature.
- Microsoft Print to PDF
- This is Microsoft’s virtual printer that lets you export any printable document to a PDF on your computer instead of actually printing it. Personally, I find this feature useful on various occasions, so I keep it enabled all the time. However, if you’re using Microsoft Office or any other third-party tool that can convert documents to PDFs there’s no point in keeping this feature enabled as well, so it’s really your call.
- Microsoft XPS Document Writer
- XPS is a file format that was created by Microsoft as a response to Adobe’s PDF, in order to replace it and provide users with more flexibility over documents created locally without requiring third-party software solutions. If you never heard of XPS and don’t plan to use it anytime soon, our suggestion is to disable this feature.
- Print and Document Services – Internet Printing Client
- If you use a local printer to print documents from your computer instead of using one that’s available and shared on your network (LAN), you can safely disable this feature, as it has little to no use to you. However, if you’re used to sending documents over to a network printer, make sure you keep it enabled.
- Print and Document Services – Windows Fax and Scan
- If you have a fax machine or a scanner connected to your computer, make sure you don’t disable this feature. It’s enabled by default, so just leave it be if you need it. However, if you don’t use fax machines or scanners that are connected to your computer, then you can safely disable it without looking back. Note that certain versions of Windows may lack this feature altogether, so don’t bother looking for it if you can’t find it on your first try.
- Remote Differential Compression API Support
- If you’re not using remote access apps (even those that are built-in and readily available on your PC) or Windows Server, you can disable this feature, as it was introduced in Windows Server 2003 R2 to help users enhance their server management experience.
- Windows PowerShell 2.0
- If you’re a PowerShell user, you probably know that PowerShell 2.0 has been outdated for quite a while now, so there’s absolutely no reason to keep this feature enabled. At the time being, the latest version of PowerShell is 5.1.19041.906, so you can safely disable PowerShell 2.0 support from your PC.
- Windows Process Activation
- On newer versions of Windows, this should be already disabled by default, along with everything within it (.NET Environment, Configuration APIs, and Process Model), so you can guess for yourself exactly how useful this feature is for regular Windows users. If you’re running any home server or plan to do so in the near future you shouldn’t disable this feature, but if you’re just a regular home Windows user, you can get rid of it without even blinking.
- Work Folders Client
- Through this feature, you can connect to any linked device on your network, including other computers, and work on them (in work folders). If you’re simply using your Windows PC alone on your network and don’t need to connect to other devices on your network that you can work on, just disable it.
Note that all the features that you’ve disabled can be easily re-activated by simply following the same steps before our list of features and checking the boxes that you want to re-enable. We’ve personally tested disabling these features before putting them in our guide, so everything should be alright with your PC as long as you follow our guidelines.
However, if you notice any stability or functionality issues that occur after disabling some or all of those features, feel free to re-enable them. Here’s a trick: you can only enable half of them each time so that you know which half contains the troublesome feature, and work your way through them using this technique. It’s faster and can save you a lot of time, especially if you have to restart your PC after enabling or disabling some of the features.
11. Run a malware checkup
Maybe you won’t believe us, but malware can beat your computer down to a pulp and make it virtually unusable to you (at least compared to what it used to work like when you first purchased it). Therefore, it goes without saying that you should pay great attention to stuff that you let reach onto your PC and seep within its virtual entrails.
However, you can never be too careful, seeing as cyber threats and their perpetrators get more dangerous and creative by the day, so if prevention is not a viable option, the next best thing is the treatment.
In case you didn’t know, Windows includes a quite powerful anti-malware solution that you can use to scan for malicious files and code on your computer and remove it. Just like any other anti-malware software solution, Windows Security can’t possibly detect newly-created code, so there is a possibility that at some point your PC could get infected even if you’ve scheduled 12 quick scans per day and 7 full system scans per week.
In this case, you should be prepared by backing up everything important externally as frequently as you can, considering that ransomware seems to be the current trend.

However, if you’re not a fan of Windows Security, you can feel free to install any other anti-malware utility you find fit. As a rule of thumb, you should keep in mind that free antivirus and anti-malware solutions are generally not more powerful than Windows’ built-in solution and could make your system go slower, so if you’re really serious about cybersecurity, you’ll need to pay top dollar for the best tools available.
Note that malware can be found in many forms, so you shouldn’t target EXE files on your PC exclusively when performing your scans. In fact, some of the most dangerous forms of malware inject themselves into system processes and DLL files, so you should perform full system scans as often as possible.
However, keep in mind that a full system scan will slow down most computers by a significant deal, so avoid using them during those times or set scans at hours when you’re not using them and schedule your PC to turn off afterward.
One last thing regarding malware checkups: sometimes Windows might detect false positives, so you should try doing some additional research on your files before sending them to quarantine or removing them from your PC altogether.
One quick way of doing that is submitting the potentially dangerous file to an online virus scanning service such as VirusTotal and analyzing the results. Always remember to clean up quarantined files by either removing them from your PC altogether or restoring them to their initial location if appliable. Make sure not to allow/restore files that are really infected.
12. Use Windows’ security utility
If you’ve installed several security tools on your computer, especially if they’re free, limited ones, you should know that Windows’ built-in antivirus and anti-ransomware protection works absolutely great, it’s built-in (which gives it an extraordinary edge over third-party products), and doesn’t use up a lot of your system resources.
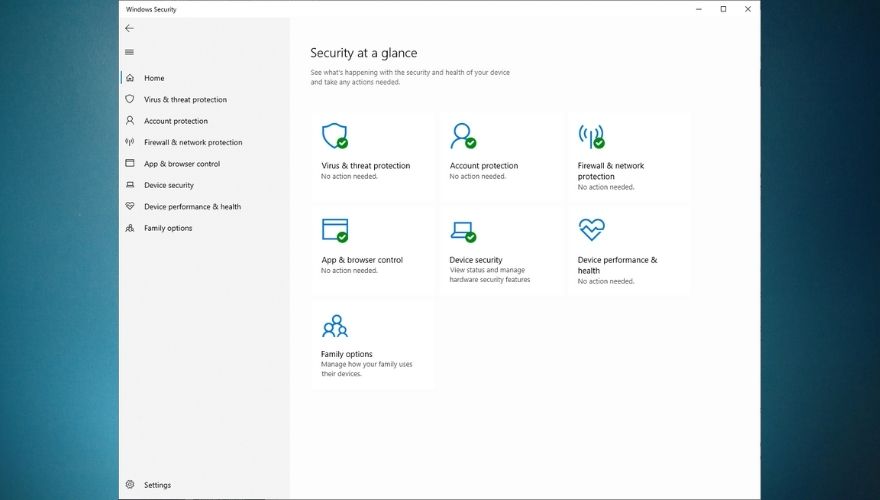
Antivirus tools are more often than not huge resource mongers, and it’s no surprise, considering that they constantly perform background checks, have real-time scanners that are ready to capture anything going wrong on your system, most of them are scheduled to run on startup, and almost all of them can’t be closed (for obvious security concerns), not even using Windows Task Manager.
For that reason, we suggest you stick to as few malware detection tools as you can, especially if you’re trigger-happy, and install every free tool that promises to keep your system clean of threats without first uninstalling some of those that you were previously using.
As a rule of thumb, you should have no more than one antivirus, one anti-malware/adware, and one firewall running at the same time on your system if you want to avoid slowdowns and keep your PC running smoothly and fast for a long time.
13. Update your drivers
Compared to older versions of this operating system, Windows 10 does an incredibly good job at fetching drivers from the Internet and installing them on your PC merely moments after you finish deploying this OS. In fact, most of this magic happens in the background so you don’t even realize what’s happening until after everything has already been installed and configured.
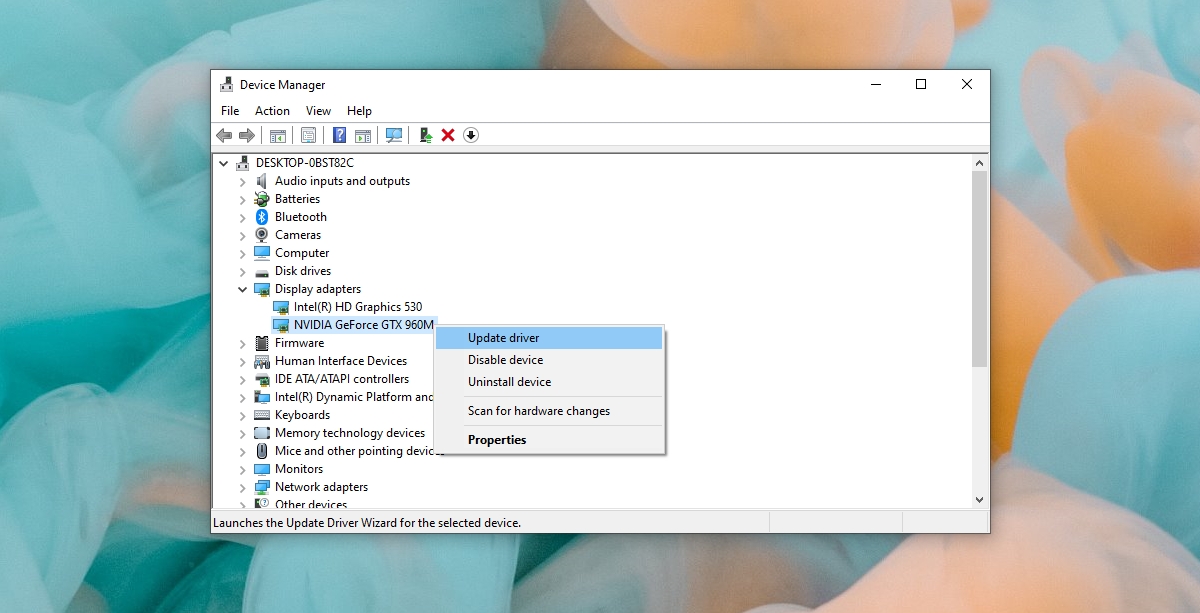
However, sometimes even Windows 10 can make mistakes, and you might end up with an outdated set of drivers on your system, which may cause certain performance issues, such as slowdowns, freezes, stutters, and even crashes if you’re really unfortunate. I can’t even remember how many times I’ve faced a BSOD because of a driver mismatch, so you might want to check the manufacturer’s official website for the latest drivers.
Fortunately, most manufacturers released checkup tools that you can install on your system and use them to detect if you’re running the latest drivers for your hardware components, whether it’s the GPU, network adapter, or CPU we’re talking about. After deploying the latest versions of the drivers you need, make sure to restart your PC and check if there’s any improvement.
If you don’t like getting your hands dirty and spending a lot of time online searching for the correct versions of the drivers you need to install, you’ll probably be glad to learn that there are various third-party software solutions that could take care of these things for you. Unfortunately, most of these tools are premium, so you’ll need to pay a fee in order to use them.
You could find some working demos of these utilities, but almost all of them merely detect what drivers you’re missing and don’t allow you to download or install them directly through their interface.
14. Turn Cortana off
Cortana could save you from a lot of headaches if you’re into virtual assistants and controlling stuff with your voice on your computer. However, if you rarely or never used it before, there’s absolutely no need to keep it active on your PC, as it will only slow it down by a great deal, not to mention that several hackers have figured various ways to exploits its vulnerabilities and gain access to your system through it.
For those two ultra-important reasons alone you may want to consider disabling Cortana on your Windows 10 PC. For obvious reasons (Cortana is only available on Windows 10 systems), if you’re using Windows 8 or Windows 7 (or even older systems), you can skip this step.
There’s some bad news, though: in the beginning, Cortana was relatively easy to remove, but now you have to get your hands a bit dirty by going through your system registry, which can be a bit scary for novices. Don’t worry, though, we’ve got your back and will teach you exactly what to do in order to remove Cortana from your Windows 10 PC:
- Press the Win key on your keyboard
- Type Edit group
- Select Edit Group Policy
- Go to Computer Configuration
- Open the Administrative Templates folder
- Head to Windows Components
- Open the Search folder
- Double-click Allow Cortana
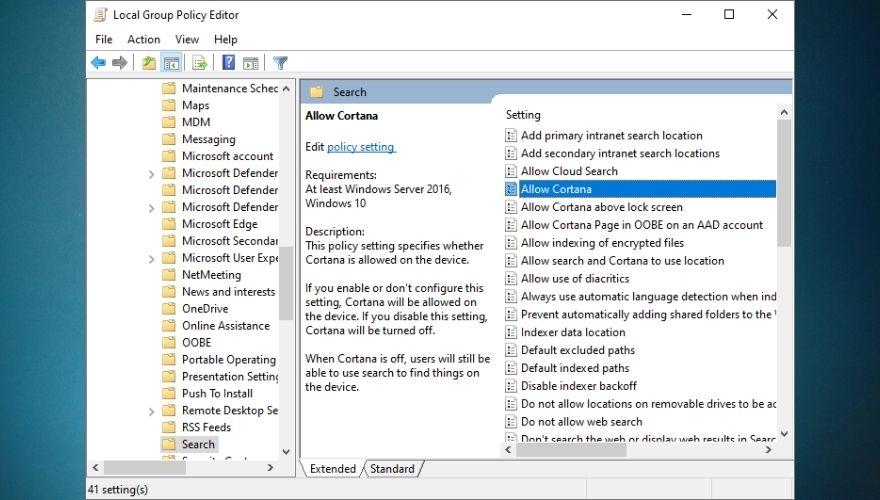
- Click the Disabled radio button on the left side of the window
- Click the OK button to confirm your action
- Close the Local Group Policy Editor window
- Restart your computer
After you restart your PC you should notice that Cortana is not available any longer and instead of the Ask me anything textbox that is specific to Cortana you should see a Search Windows one. It’s worth mentioning that the instructions above will only work on Windows 10 Pro. If you’re using Windows 10 Home, you need to do a modification to your Windows registry.
15. Use tune-up utilities
Maybe the name of tune-up utilities doesn’t speak volumes to you, but if you’re planning to breathe new life into your old computer, they’re an absolute must, as they can perform a huge array of functions without having any previous experience using similar tools or having a degree in operating computers. Usually, you just install these utilities on your computer, allow them to perform a quick scan, and let them take care of everything.
Not too long ago these tools were very popular and as a consequence of their popularity (of the legit ones), a lot of knockoff copies started flooding the market. Now that’s not to say that clones and forks of popular programs are inherently bad, but as far as tune-up utilities go, most of their knockoff copies are entirely useless, and could even make your computer go slower, not to mention the fact that almost all of them come packed with additional software, which is an excellent entry point for malware on your PC.
Therefore, if you’ve decided to go this path and let a third-party tune-up utility do all the heavy lifting and breathe new life into your computer, you need to make sure that the tool you’re using is actually legit and not some clone that will only steal data, grab your money by making you pay for a subscription plan or a license, plant malware, or open backdoors on your PC.
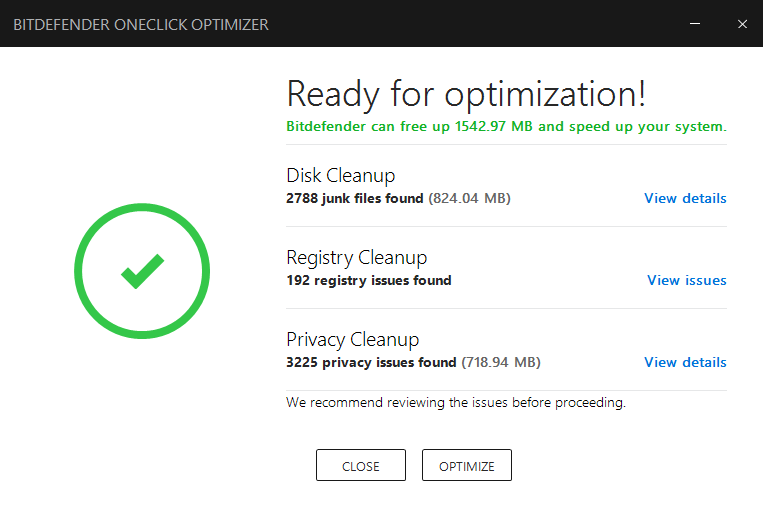
More often than not, PC optimization tools will have a working demo that you can download and install on your computer and take the features of the program on a test drive and see exactly how effective it is. However, there’s a catch: most of these tools will only perform a quick scan on your PC, one that goes so fast it’s actually hard to believe it took so little time to complete.
This scan will most likely find a LOT of things that are not alright with your PC and claim that they can fix it in a couple of clicks, but here’s the catch: you must pay for a subscription plan or buy a license in order to do that. So even if you believe you pulled a winning ticket with these programs, most of them are actually trying to trick you into buying a license and will do almost nothing to restore your PC to its former glory.
We get the appeal of free software; nobody wants to pay for stuff that they could get for free, and that’s one of the biggest reasons why so many get scammed or end up with a malware-ridden computer. Given that nowadays it’s hard to distinguish between tools that actually work and ones that are only there to make a quick buck out of your naivete, we took the liberty of creating a list of free PC optimization tools that are actually safe.
Note that despite the fact that you can use these tools without paying a dime, they are somewhat limited in functionality, so you’ll only be able to perform a series of operations while using their free versions. However, if you feel like one of the apps on our list is exactly what you’ve been looking for, you can unblock their full versions by either buying a subscription plan or purchasing a license.
16. Perform a clean Windows install
It’s not a terrible idea to perform a clean Windows install on your computer every now and then, especially if you’re using your PC on a daily basis, and bombard it with various apps, updates, browser extensions, and the such. In time, these things can lead to a total system slowdown, stutters, hang-ups, freezes, and even failures (crashes, BSODs, you name it).
If you’re the type who performs regular system maintenance, uses uninstallers to get rid of leftover data, doesn’t run a huge amount of apps simultaneously, updates drivers frequently, and generally runs a tidy ship, then a clean OS install may be redundant. However, if you’re somewhat negligent when it comes to keeping things nice and tidy on your PC, you should definitely go for it, especially if you’ve noticed that your system started slowing down for no apparent reason.
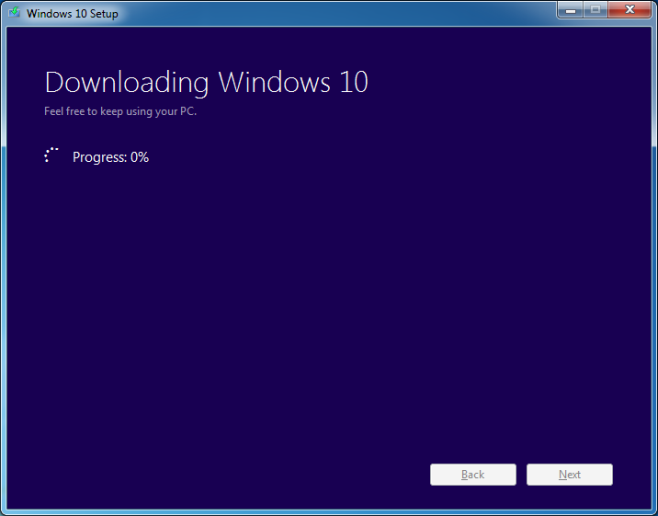
Novice computer users might not grasp exactly everything regarding how an operating system works and may not know exactly where to start if a clean Windows installation is in order. Although performing a clean operating system installation could feel somewhat intimidating for a novice, there are numerous detailed guides online on how to do that with minimum risks. Check out our extensive guide on how you can install Windows 10 using a UEFI bootable USB.
Windows 10 also offers you what would be the equivalent of performing a factory reset and restoring your PC. However, a lot of users complained that attempting to do so only leads to an error that informs them that there was a problem during the PC reset operation and that no changes were made, so Microsoft still has to go to some lengths to iron these imperfections.
However, if you’re among the lucky ones and resetting your PC works on your end, you could try and do that instead of performing a clean install. We also have a guide on how you can perform a factory reset on your Windows 10 PC without significant efforts, so feel free to use it at your leisure if you’re worried that you’ll get stuck.
Note that resetting your PC, the drive on which you installed the operating system (usually the C drive) will be cleaned up, and as a result, all of your user settings and applications will be removed. Therefore, it goes without saying that if you have anything worth saving on the drive where you have Windows installed, you should back it up before you start the reset process. If you forget to do so, you could still use data recovery tools in an attempt to restore lost data, but there’s no guarantee doing so will work.
17. Upgrade your hardware
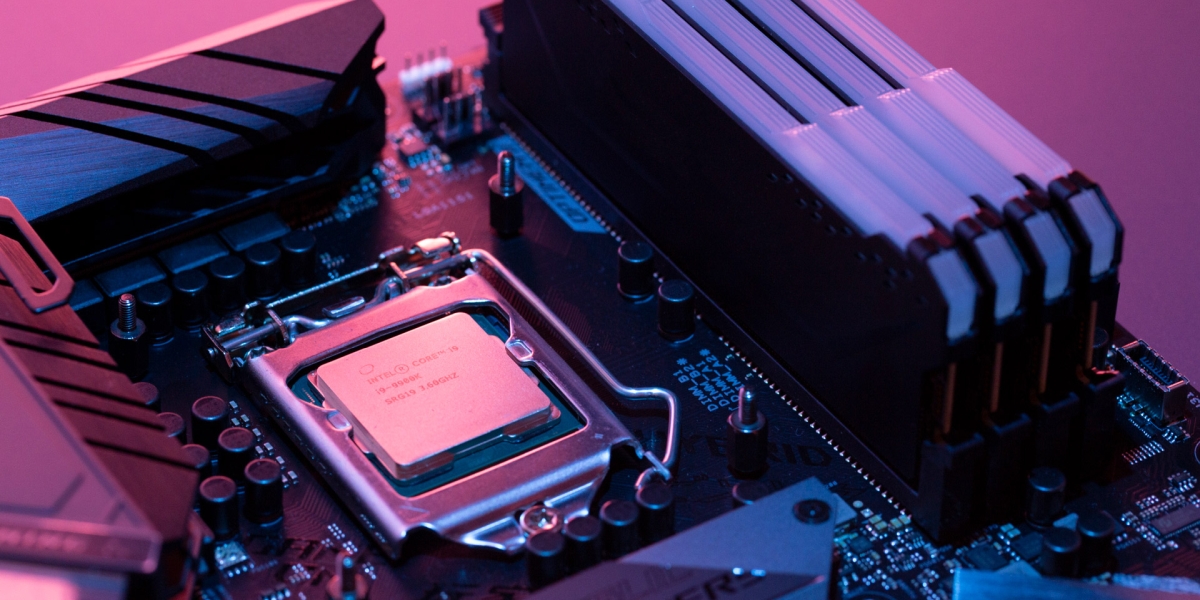
If you’ve tried everything or at least almost everything in our guide and your computer is still acting stubborn and refuses to speed up even just a bit, there’s a good chance that you need to perform a hardware upgrade. In time, operating systems can get ahead of the hardware they’re installed on, and that’s perfectly natural considering that we’re always striving to reach new heights regarding performance.
As a result, your hardware may not be able to keep up with your operating system, the programs you installed, drivers, and updates, so it starts to feel sluggish, freeze, or even crash occasionally. If that happens, you should start looking up components for your system or considering upgrading to a new system altogether if you lack the patience of searching for individual parts for your PC.
Although quite popular, SSDs are still quite overlooked when it comes to performing system upgrades. Most users focus on RAM, coolers, PS (power sources), and CPUs, but upgrading your SSD is equally important for speed, especially if you have a low-storage unit or lack one altogether.
If you only have an HDD on your system, consider replacing it with an SSD, or better yet, install an SSD alongside it and deploy your operating system on the SSD. As a rule of thumb, you should know that SSDs are way better at loading stuff (apps, operating systems), while HDDs are better for storing documents (cheaper units for the same storage space).
If you make the switch from an HDD to an SSD, you’ll notice a significant improvement in OS booting time, performing updates, copying or moving files, deleting files, as well as launching various apps that you may have installed on the same drive (the SSD). Thus, if your system is acting all slow and you’re not using an SSD, now is the best time to get one and migrate everything OS-related on it.
However, RAM and CPUs aren’t to ignore, either. If you notice that your operating system or various programs you’ve installed on your computer quickly eat up your RAM or CPU no matter how great you are at resource management and try to keep a tidy workspace, it’s definitely time for an upgrade. More RAM means you have more spare memory to use, which subsequently means that you’ll be able to run more apps simultaneously without your PC getting slow or unresponsive.
A better, faster CPU translates into more computing power, so if you notice that your PC takes an awfully long time to perform even basic, menial tasks, upgrading your CPU may be exactly what you need to make things better.
Some of the most important details you’ll have to look after when you’re buying a CPU are the number of cores it sports, the number of threads it has, its clock frequency, whether or not it supports turbo (boosting) technology that increases the frequency when needed, and whether or not it supports overclocking (sometimes you’ll need it).
If you’re using a laptop and low battery life makes you constantly switch to a power-saving plan, you should use your laptop plugged into a power source (an outlet) and make the switch to a performance-oriented power plan. Another alternative would be purchasing a brand new battery, desirably an extended one, that could eliminate the need to constantly saving power by throttling your laptop’s performance.
How to make my PC faster
All things considered, if your computer is not exactly what it used to be in terms of speed and seems to be slacking off lately even when it comes to basic, day-to-day tasks, you should consider stepping in and trying some of the suggested fixes we’ve included in our comprehensive guide. We recommend you to try as many fixes as you can, seeing as your PC is a piece of complex, well-oiled machinery that depends on a huge array of components in order to function properly, so the reason for your system’s slowdown could be basically anything.
CONCLUSION
The suggested fixes we’ve included in our guide were designed to cover as much ground as possible, so try to avoid skipping any one of our suggestions. As we’ve explained in the last part of our guide, if everything else fails, you should start considering upgrading your hardware, either by buying better components separately and use them to replace the existing ones on your old/slow system, or purchase a new, pre-configured system altogether. Just to be safe, if you buy a new system, make sure its specs are better than the ones on your existing computer.