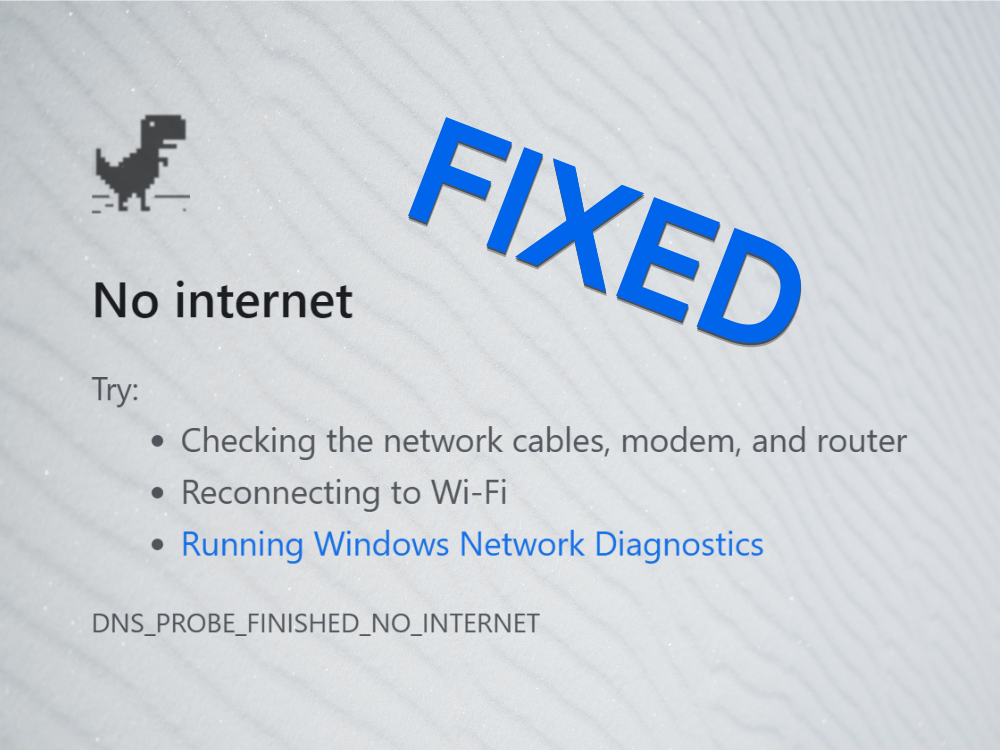
DNS_PROBE_FINISHED_NO_INTERNET è un messaggio di errore visualizzato da Google Chrome quando si tenta di accedere a qualsiasi sito web. Indica un problema con i tuoi server DNS, che ti impedisce di navigare in Internet e visualizzare i tuoi contenuti preferiti.
Esistono diversi modi per gestire questo errore senza ricorrere a un aiuto professionale. Tuttavia, è necessario determinare se c’è qualcosa che non va nel browser web, nelle impostazioni del computer o nella connessione Internet.
Come correggere l’errore DNS_PROBE_FINISHED_NO_INTERNET su qualsiasi piattaforma
Dai un’occhiata alle seguenti soluzioni e assicurati di eseguirle un passaggio alla volta. Abbiamo preso in considerazione le piattaforme Windows 10 e macOS.
1. Prova un altro browser
Il modo più semplice per scoprire se DNS PROBE FINISHED NO INTERNET indica un problema con il tuo browser web è provare a utilizzare un’altra applicazione per accedere a Internet.
Se riesci a navigare correttamente sul Web con un altro browser come Firefox, Edge o Safari, le cose saranno più semplici poiché devi solo risolvere i problemi di Chrome. Altrimenti, indica un problema più grande che riguarda non solo Chrome ma l’intero computer e possibilmente la tua connessione Internet.
2. Riavvia Chrome
Può sembrare troppo semplice per funzionare, ma il riavvio di Google Chrome di solito risolve l’errore DNS_PROBE_FINISHED_NO_INTERNET. Tuttavia, devi assicurarti di chiudere correttamente tutti i suoi processi prima di riavviare.
Come riavviare correttamente Chrome su Windows 10:
- Fai clic con il pulsante destro del mouse sulla barra delle applicazioni e vai a Task Manager

- Nella scheda Processi , trova e seleziona Google Chrome e l’intera struttura dei processi
- Fai clic su Termina attività
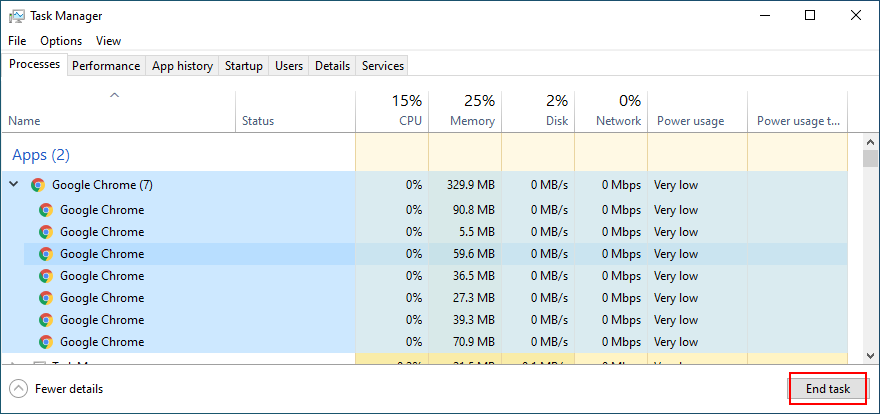
- Avvia Chrome e verifica la presenza di errori DNS
Come riavviare correttamente Chrome su Mac:
- Seleziona la finestra Chrome
- Fai clic sul pulsante Apple e seleziona Uscita forzata dal menu
- Riavvia Chrome e controlla i risultati
3. Cancella la cache del browser
I problemi di connessione DNS possono essere causati dalla cache del browser, come i cookie salvati. Quindi è una buona idea svuotare la cache di Chrome prima di provare ad accedere a qualsiasi pagina web. Ecco cosa devi fare.
Come svuotare la cache di Chrome (Windows e Mac):
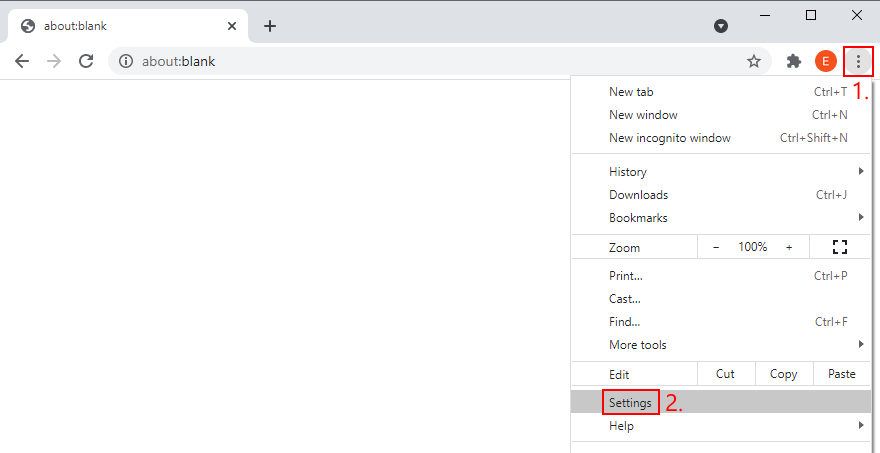
- Avvia Chrome e fai clic sul pulsante Altro nell’angolo in alto a destra
- Seleziona Impostazioni dal menu
- Passa alla sezione Privacy e sicurezza (oppure visita l’indirizzo
chrome://settings/privacycome scorciatoia) - Fai clic su Cancella dati di navigazione

- Rimani nell’area Base
- Imposta Intervallo di tempo su Dall’inizio
- Assicurati di abilitare le seguenti opzioni:
- Cronologia di navigazione
- Cookie e altri dati dei siti
- Immagini e file memorizzati nella cache
- Fai clic su Cancella dati quando sei pronto

- Riavvia Chrome e verifica la presenza di errori DNS
4. Aggiorna Chrome
Nell’ultima edizione di Windows e macOS, è essenziale mantenere Chrome aggiornato alla versione più recente. In questo modo, avrai accesso immediato non solo a nuove funzionalità, ma anche a qualsiasi miglioramento e correzione di errori DNS noti.
Come aggiornare Chrome su Windows e Mac:
- Apri Chrome e fai clic sul pulsante Altro
- Vai alla sezione Guida
- Fai clic su Informazioni su Google Chrome . Altrimenti, puoi visitare
chrome://settings/help address
- Attendi finché Chrome non trova ed esegue gli aggiornamenti
- Riavvia il browser al termine e verifica la presenza di problemi DNS
5. Ripristina le impostazioni predefinite di Chrome
Se tu o un’estensione del browser avete configurato troppe impostazioni in Chrome, forse anche la configurazione DNS è stata incasinata. È difficile trovare e correggere le opzioni non funzionanti. Una soluzione più semplice ed elegante è ripristinare le impostazioni predefinite di Chrome.
Come ripristinare Chrome alle impostazioni di fabbrica su Windows e Mac:
- Apri il menu Altro e seleziona Impostazioni (o visita l’indirizzo
chrome://settings/)
- Vai in fondo alla pagina e fai clic su Avanzate
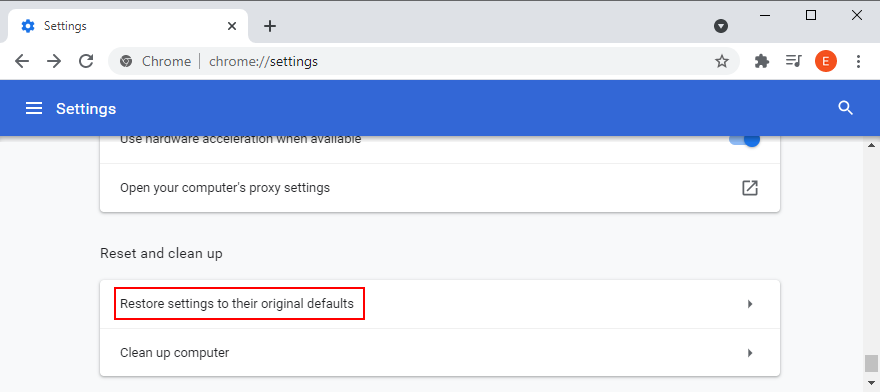
- Nella sezione Reimposta e pulisci , fai clic su Ripristina le impostazioni ai valori predefiniti originali
- Quando viene chiesto di confermare, fai clic su Reimposta impostazioni
- Riavvia Chrome e verifica la presenza di problemi DNS
- Nella sezione Reimposta e pulisci , fai clic su Ripristina le impostazioni ai valori predefiniti originali
6. Disattiva le estensioni di Chrome
Alcune estensioni del browser sono autorizzate a modificare la configurazione IP e DNS di Chrome, come VPN servizi e strumenti proxy. Se non viene eseguito correttamente, ciò potrebbe interrompere l’accesso a Internet a tutto il browser.
Per risolvere questo problema, devi disinstallare eventuali estensioni di Chrome sospette o sconosciute. Ecco cosa devi fare (Windows e Mac):
- Dal menu Altro , vai a Altri strumenti
- Seleziona Estensioni . In caso contrario, visita l’indirizzo
chrome://extensions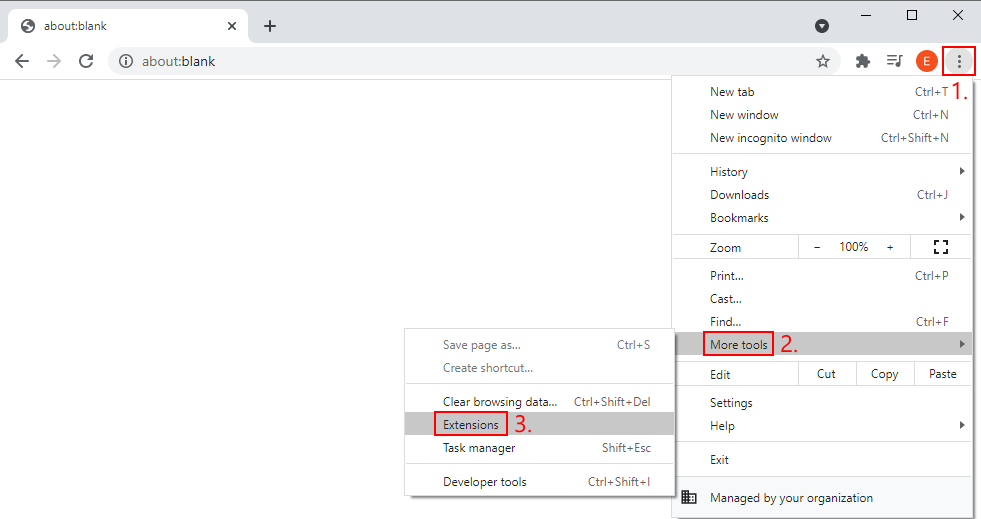
- Rimuovi tutte le estensioni con accesso alla tua configurazione IP e DNS, inclusi VPN e strumenti proxy
- Riavvia Chrome e controlla i risultati
7. Reinstalla Chrome
Se Chrome ti lancia ancora l’errore DNS_PROBE_FINISHED_NO_INTERNET dopo aver provato le soluzioni precedenti, è una buona idea rimuoverlo dal computer e reinstallarlo.
Come reinstallare correttamente Chrome su Windows 10:
- Fai clic con il pulsante destro del mouse sulla barra delle applicazioni e seleziona Task Manager

- Seleziona Google Chrome e fai clic su Termina attività

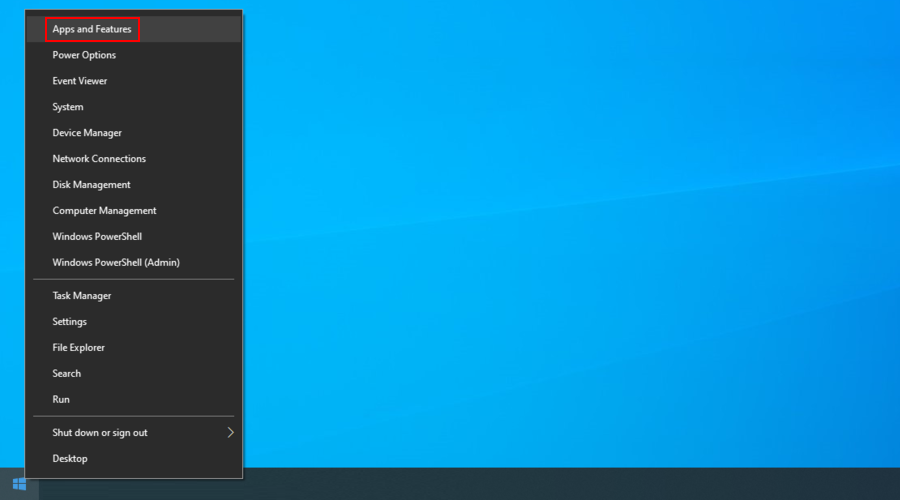
- Fai clic con il pulsante destro del mouse sul pulsante Start e vai su App e funzionalità
- Individua e seleziona Google Chrome
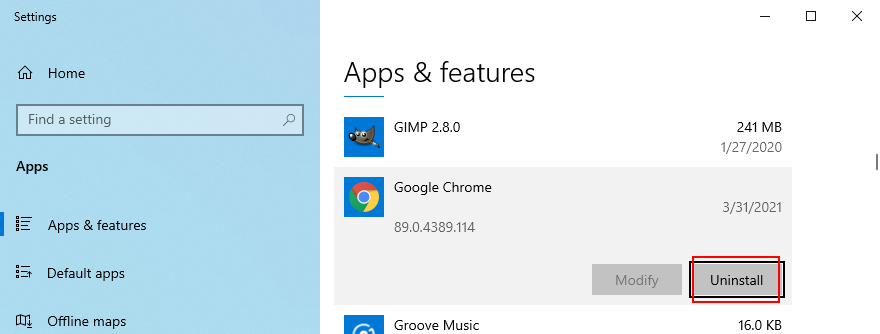
- Fai clic su Disinstalla e poi di nuovo per confermare
- Procedi con l’operazione di rimozione
- Scarica Chrome dal sito web ufficiale
- Avvia Chrome e verifica la presenza di errori DNS
Come reinstallare correttamente Chrome su Mac:
- Avvia Chrome e apri il menu Apple
- Fai clic su Uscita forzata
- Utilizza l’app Finder per rintracciare Chrome
- Trascina Chrome nel Cestino
- Se richiesto, inserisci il nome utente e la password dell’amministratore per confermare la rimozione dell’app
- Seleziona Svuota cestino in Finder
- Scarica Chrome dal sito web ufficiale
- Apri Chrome e prova a visitare un sito web
8. Utilizza il canale stabile di Chrome
Chrome ha più canali di rilascio disponibile per il download: Stable, Beta, Developer e Canary. Le ultime tre versioni ti danno accesso a nuove funzionalità e miglioramenti che devono essere testati prima di raggiungere il canale Stabile. Alcuni di loro non lo fanno mai.
Sebbene sia entusiasmante mettersi in prima fila e scoprire nuove fantastiche funzioni di Chrome, è incredibilmente instabile e dovrebbe essere evitato se non si desidera riscontrare problemi di connettività Internet come l’errore DNS_PROBE_FINISHED_NO_INTERNET.
Attenersi alla versione stabile di Chrome e sarai trovato. È quello disponibile per il download dal sito web ufficiale .
Puoi scaricare separatamente le versioni Beta, Developer o Canary poiché non sovrascriveranno la versione Stable. Ma non usarli quando hai bisogno di una connessione Internet affidabile.
9. Esegui il downgrade di Chrome (Windows)
Se disponi di una versione precedente di Windows, potrebbe non supportare completamente l’ultima edizione di Google Chrome. Questo può portare a tutti i tipi di problemi man mano che Chrome si evolve e il tuo sistema operativo viene lasciato indietro.
La soluzione più sicura qui è eseguire la migrazione a Windows 10 poiché puoi sfruttare le patch di sicurezza rilasciate da Microsoft e proteggere il tuo computer dal malware.
Tuttavia, se non è possibile, dovresti eseguire il downgrade di Chrome a una versione precedente, ancora compatibile con il tuo sistema operativo obsoleto. Tieni presente che tutti i tuoi profili utente e i dati della cache verranno rimossi.
Come disabilitare gli aggiornamenti automatici di Chrome:
- Fai clic sul pulsante Start , cerca Servizi e apri questa applicazione
- Individua Google Update Service (gpupdate) , fai clic con il pulsante destro del mouse e vai a Proprietà
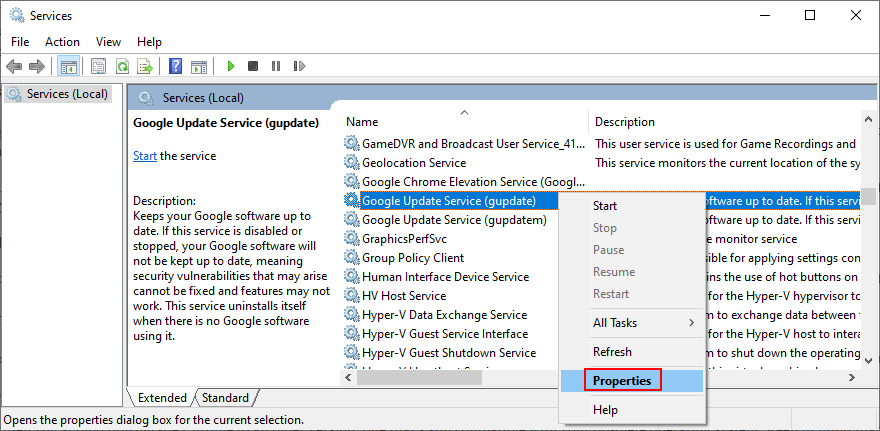
- Imposta Tipo di avvio su Disabilitato
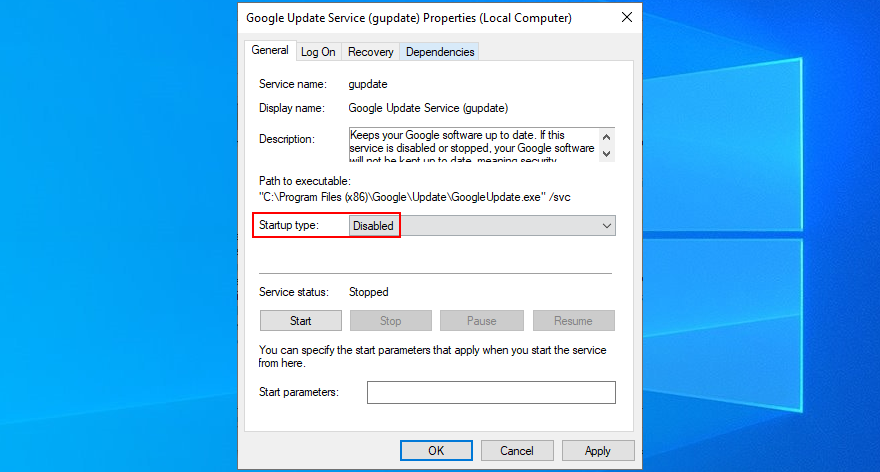
- Fai clic su Applica ed esci
- Fai doppio clic su Google Update Service (gpupdatem) per visualizzarne le proprietà
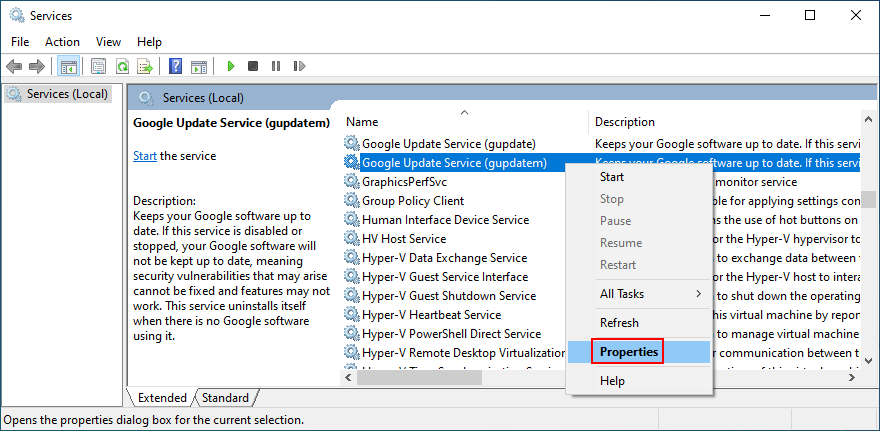
- Imposta Tipo di avvio su Disabilitato
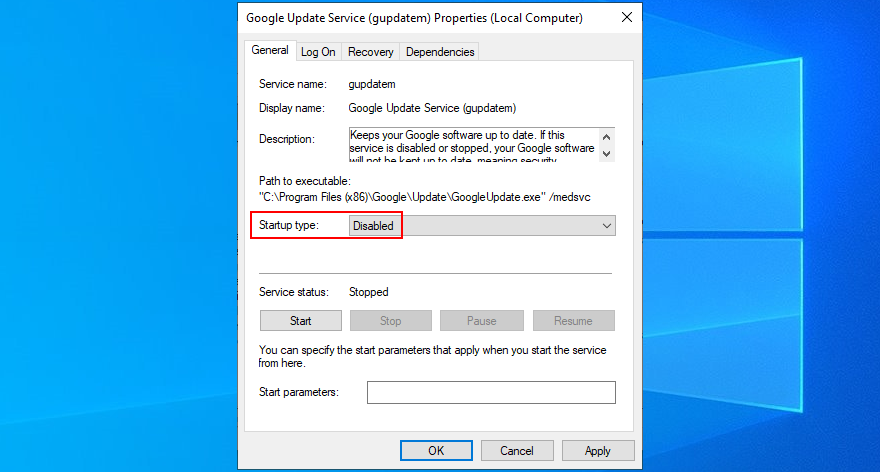
- Fai clic su Applica ed esci dai servizi
Come disinstallare Chrome:
- Fai clic con il pulsante destro del mouse sul pulsante Start e seleziona App e funzionalità

- Seleziona Google Chrome e fai clic su Disinstalla

- Procedi con la procedura di rimozione
Come installare il vecchio Chrome:
Purtroppo Google non consente agli utenti di scaricare versioni precedenti di Chrome per motivi di sicurezza. Tuttavia, puoi ancora trovare versioni precedenti di Chrome su siti web di terze parti come SlimJet .
Tieni presente che scaricherai e installerai quei file a tuo rischio e pericolo. Si consiglia cautela.
10. Riavvia il servizio client DNS (Windows)
I server DNS di Windows sono gestiti dal servizio client DNS, che deve essere eseguito automaticamente a ogni avvio del sistema e rimanere in esecuzione mentre si lavora sul computer.
Tuttavia, se c’è qualcosa che non va nel servizio, non c’è da meravigliarsi se viene visualizzato l’errore DNS PROBE FINISHED NO INTERNET in Chrome. Significa anche che la tua connessione Internet è disabilitata su qualsiasi applicazione che provi a utilizzare, non solo su Chrome.
Come riavviare il servizio client DNS:
- Premi il tasto Win + R , digita services.msc e premi Invio

- Trova e fai clic con il pulsante destro del mouse su Client DNS
- Vai a Proprietà
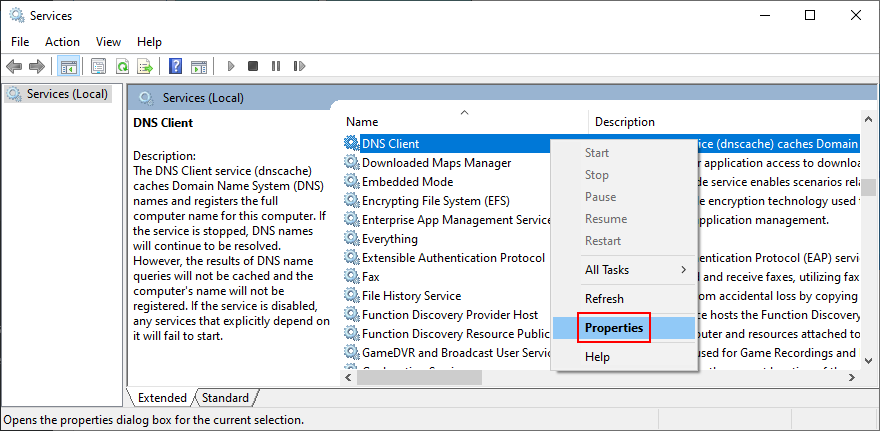
- Imposta Tipo di avvio su Automatico
- Se lo Stato del servizio indica Interrotto , fai clic sul pulsante Avvia
- Fai clic su Applica ed esci
Se i pulsanti del servizio client DNS sono disattivati, ecco cosa fare:
- Premi il tasto Win + R , digita regedit e premi Invio

- Fare clic su Sì se richiesto da UAC (User Account Control)
- Copia e incolla il seguente indirizzo:
Computer \ HKEY_LOCAL_MACHINE \ SYSTEM \ CurrentControlSet \ Services \ Dnscache
- Individua e fai doppio clic sulla voce Start

- Imposta Dati valore su 2
- Set Base to Hexadecimal

- Click OK and exit Services
- Restart your PC
- Launch Chrome and check for DNS errors
- Set Base to Hexadecimal
11. Use Google DNS servers
By default, your computer uses the DNS servers assigned by your ISP. If they are too slow for Chrome, then your web browser might show the DNS_PROBE_FINISHED_NO_INTERNET error as a warning. You can fix this issue by changing your DNS servers to something else.
We suggest using Google Public DNS because it provides free, public, and secure DNS servers optimized for Chrome. However, you can also try others like OpenDNS or Cloudflare.
How to set Google Public DNS servers on Windows 10:
- Make sure to log in to Windows 10 with an admin account
- Click the connections icon in the systray and then Network & Internet settings
- Press Change adapter options
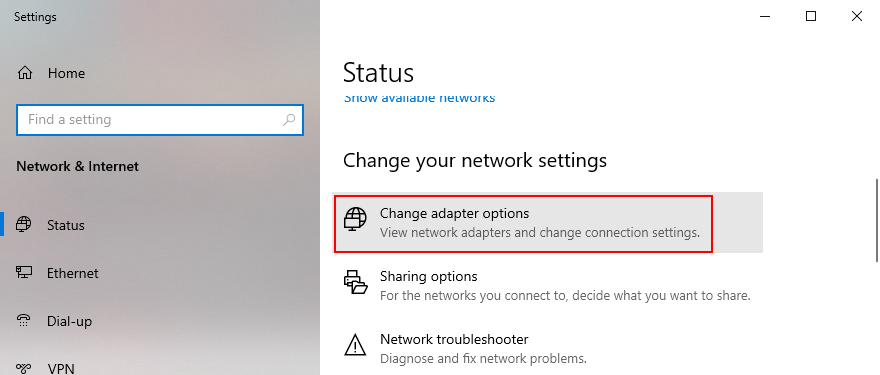
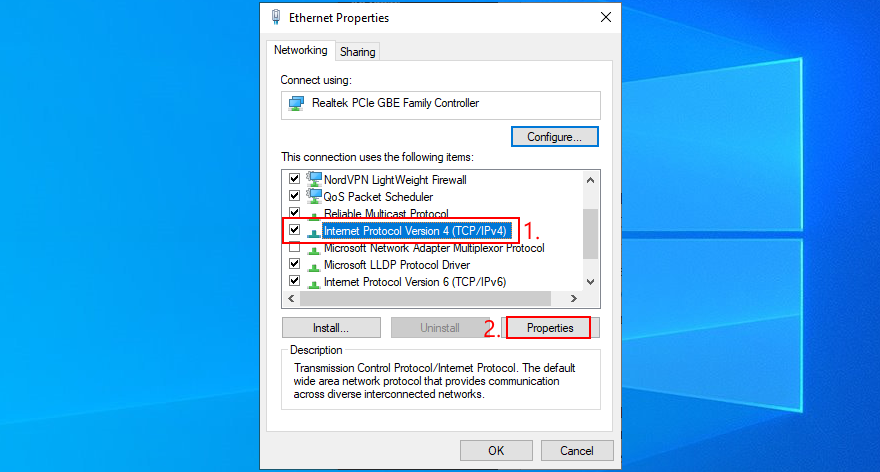
- Choose your Internet connection from the list, right-click it, and go to Properties
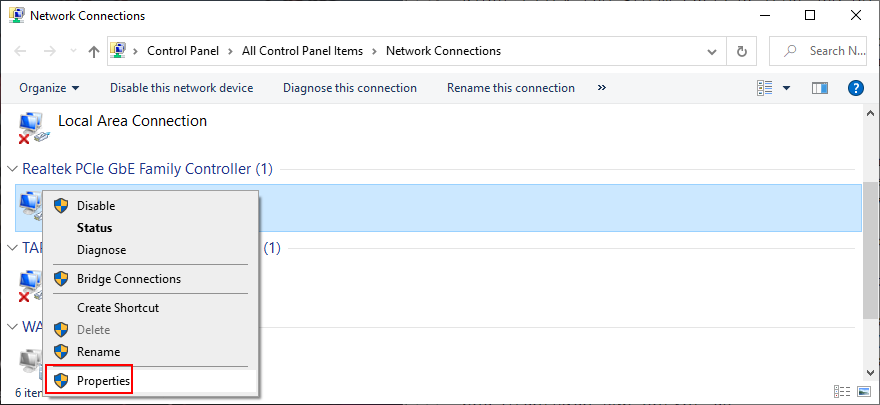
- Select the Internet Protocol Version 4 (TCP/IPv4) entry and click Properties
- Remain in the General section
- Select Use the following DNS server addresses
- Set Preferred DNS server to 8.8.8.8
- Set Alternate DNS server to 8.8.4.4
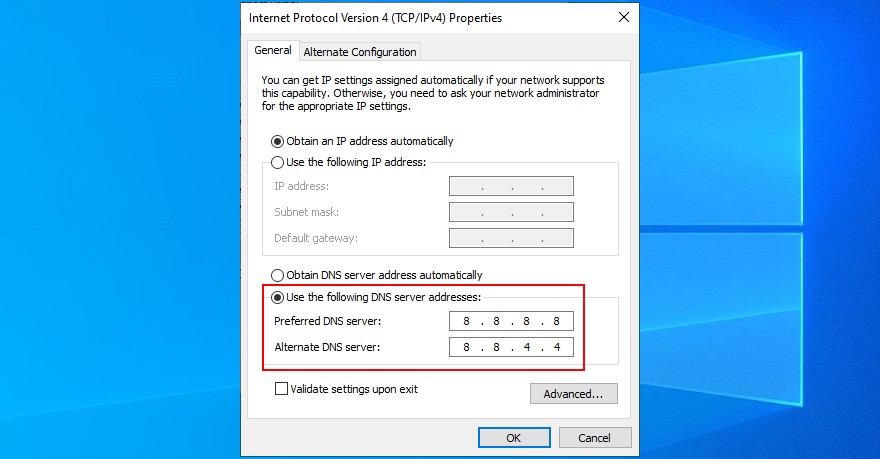
- Check the Validate settings upon exit option
- Click OK and exit
- Try to use Chrome now
How to set Google Public DNS servers on Mac:
- Open the Apple menu on the upper-right part of the screen
- Select System Preferences
- Go to Network > Advanced
- Choose the DNS section
- Click the + symbol and write 8.8.8.8
- Press it again to also add 8.8.4.4
- Click OK and exit
- Launch Chrome and check for DNS errors
12. Clear the DNS cache
Just like your web browser, the system’s DNS cache might get full and cause connectivity errors instead of loading the pages you’re attempting to access. But you can fix this problem by entering a couple of lines of code in Command Prompt on Windows and Terminal on Mac, in order to clear the DNS cache.
How to clear the DNS cache on Windows 10:
- Press the Win key, search for Command Prompt, and open this app
- Paste the following lines of code (press Enter after each one):
-
ipconfig/flushdns
-
ipconfig/registerdns
-
ipconfig/release
-
ipconfig/renew
-
netsh winsock reset
-
- Exit Command Prompt and restart your PC
- Fire up Chrome and check for DNS errors
How to clear the DNS cache on macOS:
- Open the Terminal app
- Type
sudo killall-HUP mDNSResponderand press Return - When asked, write your admin username and password to confirm
- Restart macOS
- Launch Chrome and inspect results
13. Run a ping test
A ping test helps you measure the connectivity signal between your device and Chrome. You can use it as a guide to figure out if the Internet connection is too slow or doesn’t work at all. It’s possible to use ping in Command Prompt on Windows or Terminal on Mac. Alternatively, you can turn to third-party ping applications.
How to run a ping test on Windows 10:
- Click the Start button, search for Command Prompt, and open this application
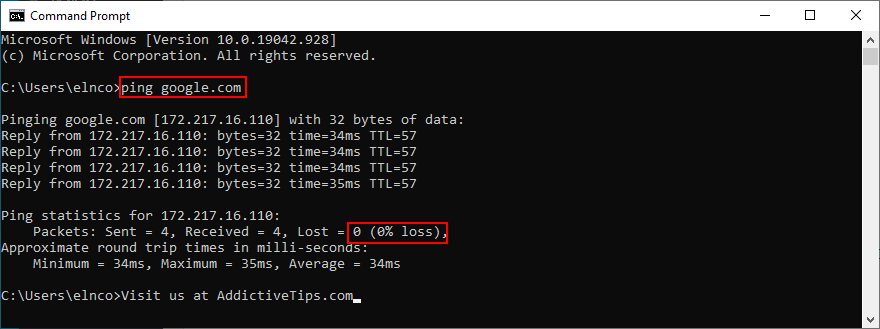
- Ping Google by typing
ping google.comand pressing Enter - Wait until the ping test is complete
- Check out the % loss noted at Ping statistics
How to run a ping test on Mac:
- Go to Applications > Utilities
- Launch the Terminal app
- Type
ping.google.comand press Return - Patiently wait while the ping test is working
- Note the 0% packet loss written at Server ping statistics
If you have 100% packet loss, it means that your device can’t reach Google at all, indicating an issue with your Internet connection. Any value lower than 100% says that the connection is active but unstable. It’s good news because you can take action to improve it.
14. Visit a website by IP address
You normally visit a website by entering its domain in the Chrome address bar. However, if the DNS resolver isn’t doing its job properly and shows the DNS_PROBE_FINISHED_NO_INTERNET instead, try entering the domain’s IP address.
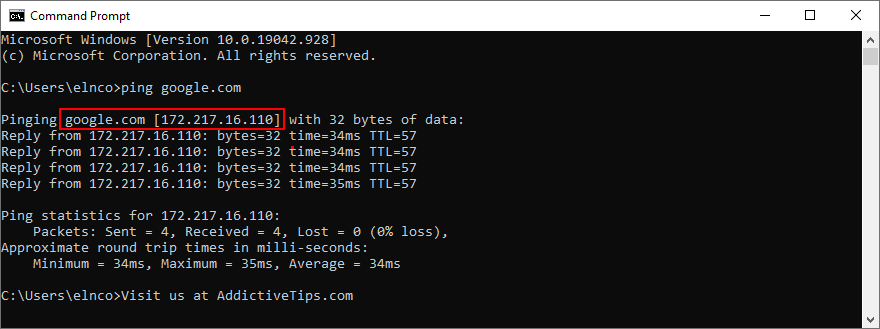
To discover a domain’s name, you can use the ping command with the help of Command Prompt on Windows or Terminal on macOS. No administrative rights are required. Just send the ping website_name command. For example, if you want to find out the IP address used by Google, type ping google.com.
Right before the logging details, you can spot the IP address next to the domain name. In the example below, the domain name is google.com and its IP is 172.217.20.14.
In the next step, launch Chrome, enter the IP address in the address bar, and see what happens. If Google loads after visiting 172.217.20.14, it means that your DNS resolver is at fault and there’s nothing wrong with your device or Internet connection.
15. Disable the VPN or proxy
A lot of privacy-concerned users turn to VPN or proxy tools to hide their IP address and encrypt their data traffic. It has numerous benefits, like accessing websites that aren’t normally available to your country.
However, the IP address change could affect Chrome entirely, especially if you’re using a free VPN or proxy server (they are notoriously unreliable). To stay on the safe side and restore the connectivity of your web browser, you should disable any VPN or proxy services.
For example, if you have a proxy or VPN browser extension installed on Chrome, make sure to turn it off. When it comes to desktop applications designed for Windows or Mac, uninstall them from Apps and Features. Or, if you have system-wide manual connections set up, here’s how to deactivate them.
How to disable VPN and proxy on Windows 10:
- Click the network icon in the notifications area and select Network & Internet settings
- Go to VPN on the left panel
- Select any active VPN connections and click Disconnect
- Shift your attention to the Proxy area on the left side
- Disable Automatically detect settings and Use setup script
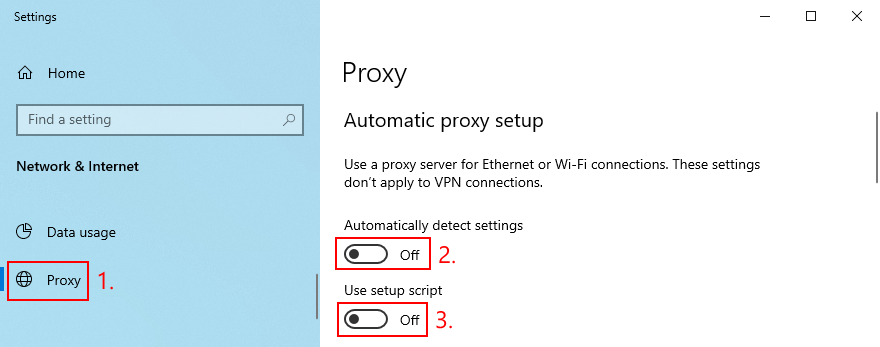
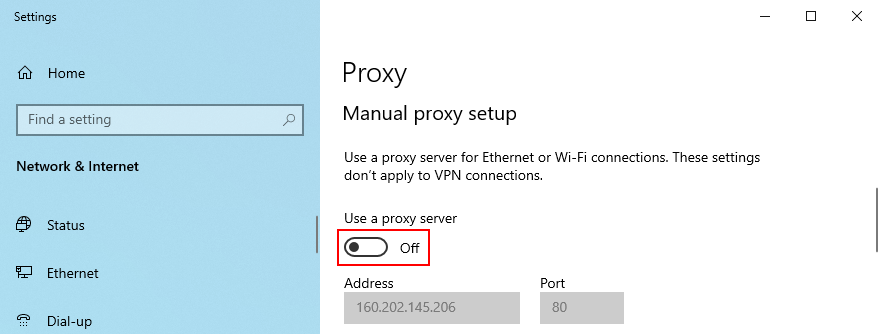
- Scroll down and also turn off Use a proxy server
- Reboot your PC
- Fire up Chrome and check for DNS issues
How to disable VPN and proxy on macOS:
- Click the Apple button on the top-left corner
- Select System Preferences
- Head over to Network
- Choose VPN on the left side
- If there’s an ongoing VPN connection, click Disconnect
- Choose your Internet connection from the list and go to Advanced
- Select the Proxies tab and turn off all settings
- Click OK and restart macOS
- Launch Chrome and check for DNS errors
16. Check firewall settings for Chrome
Under normal circumstances, Chrome gets added as an exception to the system firewall at installation. However, your firewall settings might have been changed in the meantime. It’s not unusual but can be fixed without any issues.
How to add Chrome as an exception to the firewall on Windows 10:
- Sign in to Windows 10 with elevation rights
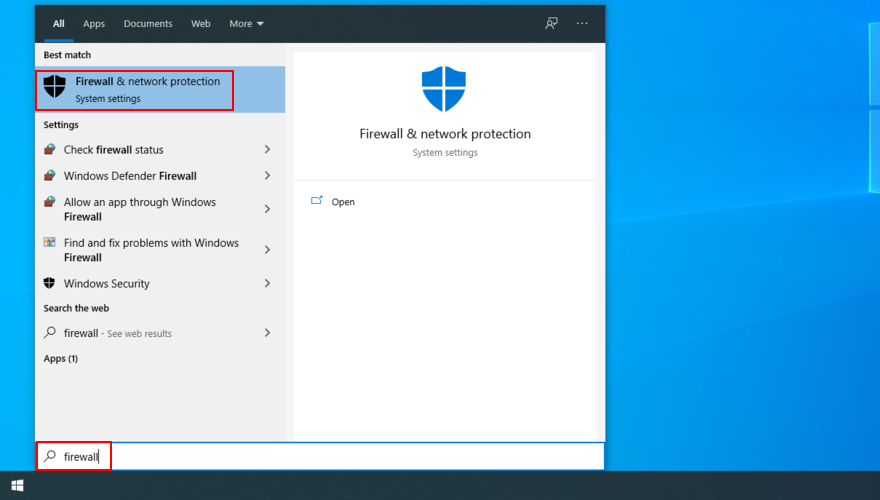
- Press the Win key button, search for firewall, and open Firewall & network protection
- Click Allow an app through firewall

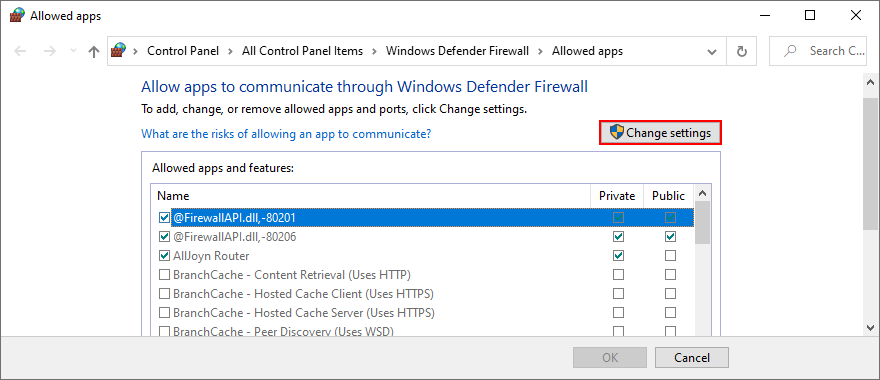
- Then, click Change settings
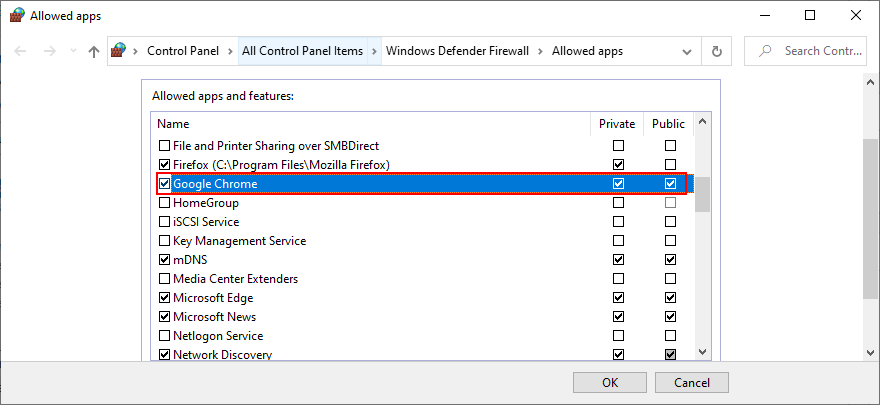
- Try to find Google Chrome on this list. If it’s not there, click Allow another app and then Browse to track down and add the Chrome executable file (on Windows 64-bit, it’s in
C:\Program Files (x86)\Google\Chrome\Application\chrome.exeby default) - Tick the Private and Public boxes next to Google Chrome
- Click OK
- Fire up the web browser and try to access something
If you have a third-party firewall installed that overrides Windows Firewall, adjust the steps above for that application.
How to add Chrome as an exception to the firewall on macOS:
- Open the Apple menu
- Go to System Preferences > Security
- Choose the Firewall section
- Press the lock symbol and specify your admin username and password if required
- Go to Firewall > Firewall Options > Add Application
- Choose Google Chrome and click Add
- Click OK
- Open the Chrome app and check for DNS errors
17. Uninstall antivirus tools
If you have third-party Internet security solutions installed on your computer, you should check their settings since they might be configured to block browser traffic as a security measure. However, when it comes to free antivirus tools, it’s safer to just remove them from your PC.
Just head over to the Apps and Features section of Windows, locate your security solution, and proceed with the uninstallation process. On Mac, you just have to drag the app to the Trash using Finder.
18. Verify parental control settings
Many parents turn to specialized solutions to protect the online privacy of their children and prevent them from accessing websites with inappropriate content: parental control tools. Some of them also give you the possibility to schedule allowed times for Internet navigation.
If you have such a program installed on your computer, check its settings and make sure to temporarily turn it off while you’re using Google Chrome. Otherwise, you might wake up with the DNS_PROBE_FINISHED_NO_INTERNET error due to permission issues.
19. Inspects the Hosts file (Windows)
The Windows Hosts file contains information about your TCP/IPv4 configuration. It can also be used to block access to specific websites. If you’re receiving the DNS error when trying to reach a particular page although Chrome seems to load others without any problems, it’s worth inspecting and modifying the Hosts file. Here’s how:
- Press Win key + R to open File Explorer
- Visit the following location:
C:\Windows\System32\drivers\etc
- Locate the Hosts file and copy it to create a backup

- Open the Hosts file in a text editor like Notepad (you must run the text editor with admin rights)
- Look for any lines that mention the website you’re trying to visit. For example, if you can’t access Google, try to locate
127.0.0.1 https://www.google.comor something similar - Delete those lines and save the new Hosts file
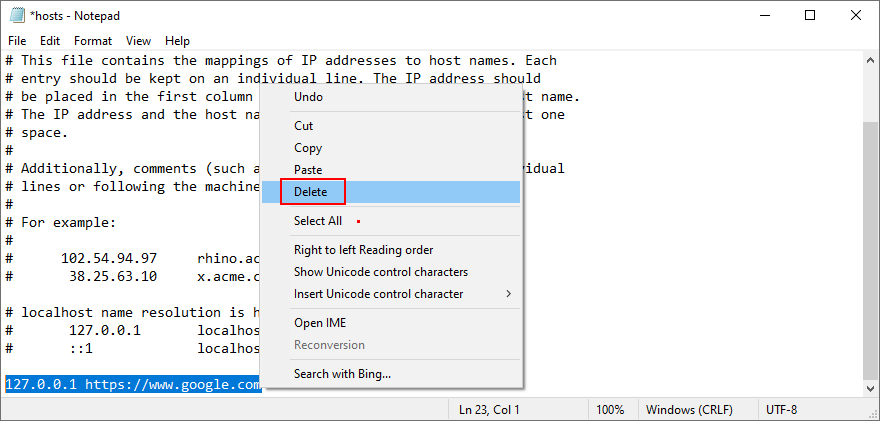
- Launch Chrome and try to access your website now
- If you need to restore the previous Hosts version, you just have to replace the newest file with the backup
20. Update your OS
Your operating system should have automatic access to updates, but that’s not always possible. In case you haven’t updated your OS for a long time, you should take care of that issue right away. It’s an opportunity to resolve a wide range of PC problems, including the DNS PROBE FINISHED NO INTERNET error on Google Chrome.
How to update Windows 10:
- Click the Start button, search for Check for updates, and hit Enter
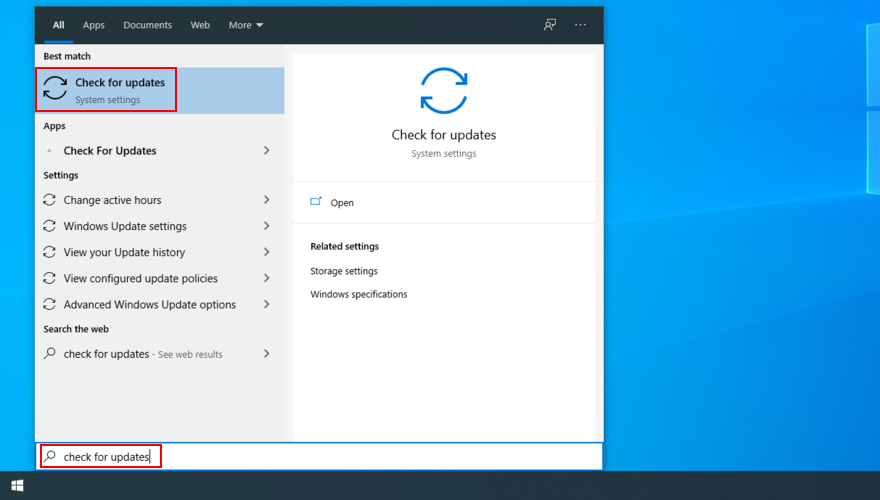
- If the auto-search doesn’t begin automatically, press the Check for updates button
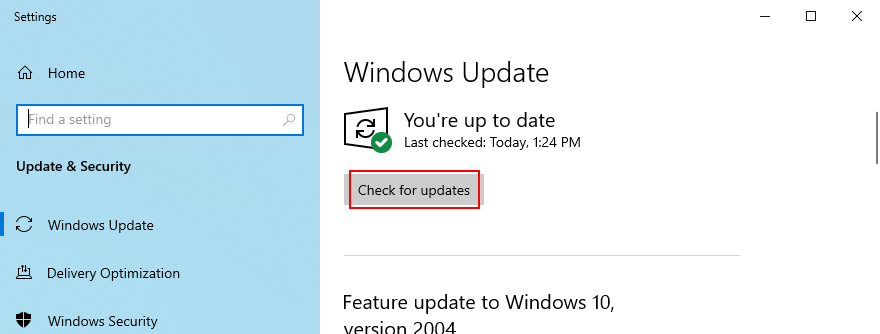
- Wait until Windows locates any available updates. If it finds anything, click Download
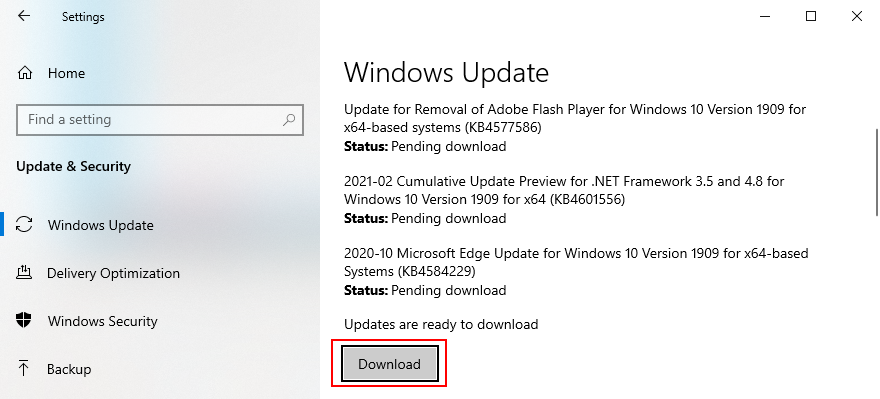
- Your PC might restart one or more times to complete the update
- When it finishes, launch Chrome and check for DNS issues
How to update macOS:
- Click the Apple button on the top-left corner
- Press Software Update
- macOS will start looking for and downloading new updates
- When it finishes, restart the computer
- Launch Chrome and check for DNS errors
21. Check the network driver
There might be something wrong with your network device, which is causing DNS errors in your web browser. Try reinstalling the network adapter, updating its driver, or downgrading an incompatible driver to a stable version. Here’s everything you need to know.
How to reinstall the network device on Windows 10:
- Press Windows key + R, type devmgmt.msc, and press Enter
- In Device Manager, open the Network adapters category
- Identify your network adapter, right-click it, and select Uninstall device
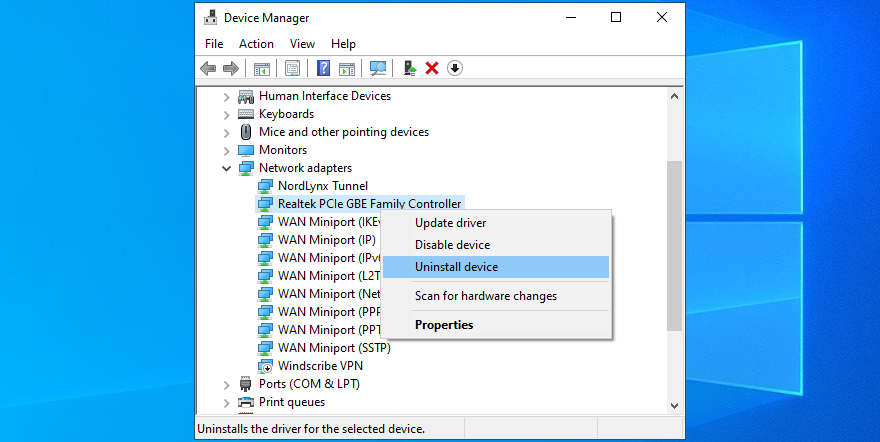
- Proceed with the removal steps
- Open the Action menu and click Scan for hardware changes
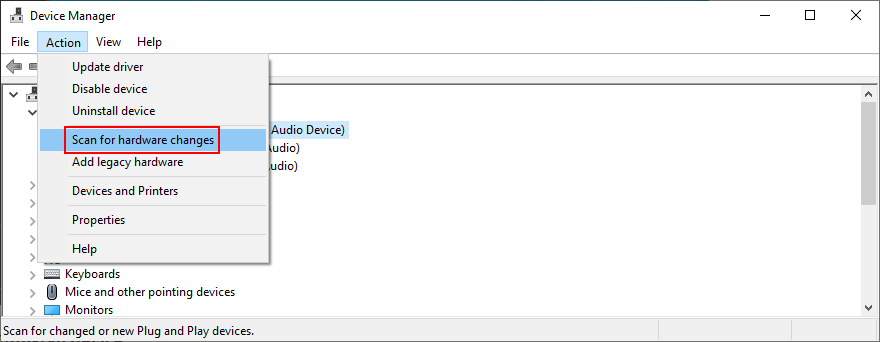
- Restart your PC. Windows will auto-reinstall the missing network adapter
- Check Chrome for DNS errors
How to update the network driver on Windows 10:
- Go to Device Manager
- Expand the Network adapters group
- Right-click your network adapter and choose Update driver
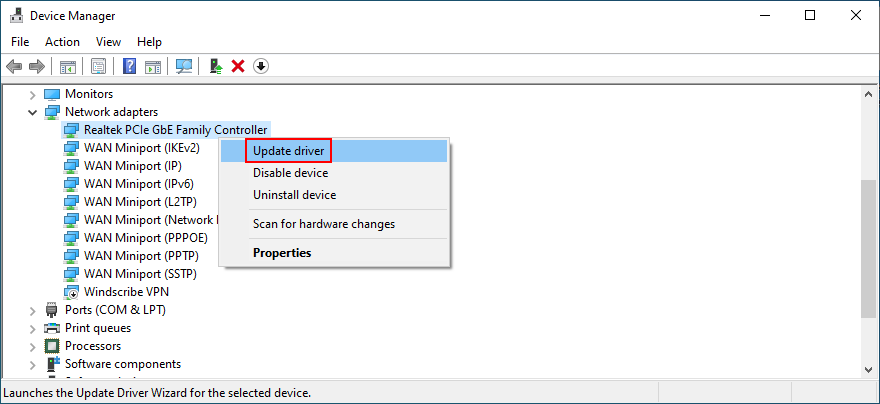
- Click Search automatically for updated driver software
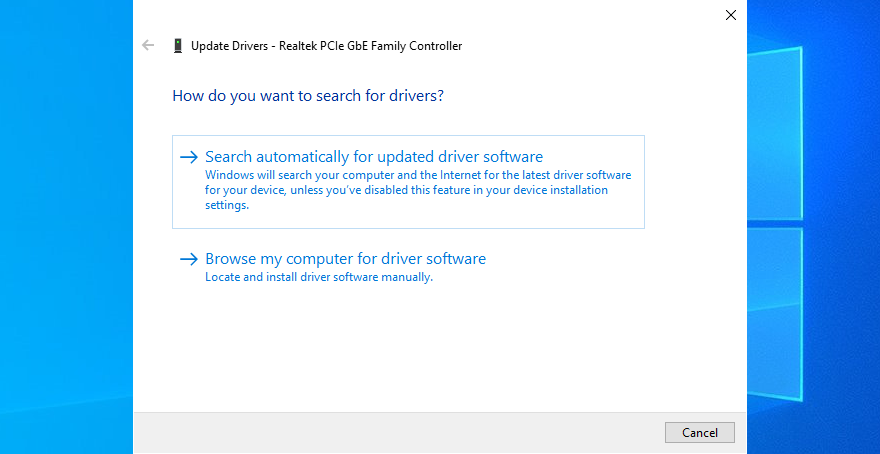
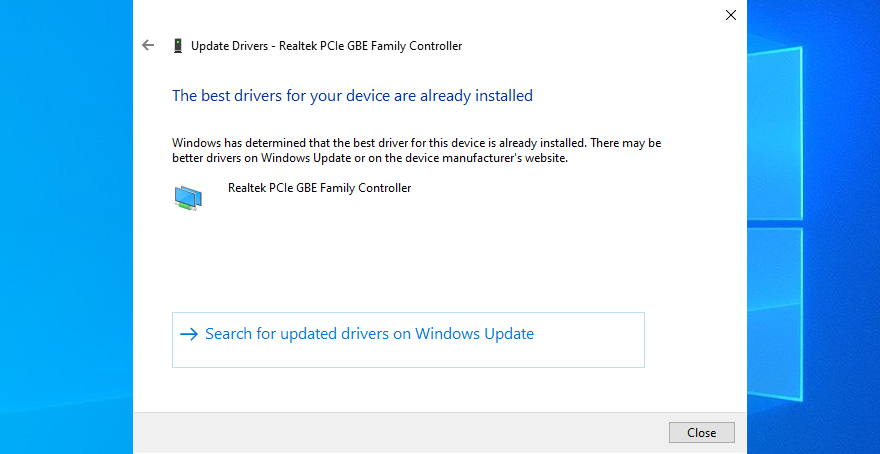
- If the online search doesn’t return any results, click Search for updated drivers on Windows Update. However, if you have already used Windows Update in a previous solution, you can skip this step
- Reboot your PC
- Start Chrome and check for DNS errors
If Windows can’t find a network driver available for download, you should visit the manufacturer’s website and look for a newer version yourself. Alternatively, you can turn to a driver update app to update all your device drivers and avoid getting incompatible versions that could cause system stability issues.
On the other hand, if you have already installed a network driver that doesn’t support Windows 10, you should roll it back to the previous, stable version.
How to roll back the network driver on Windows 10:
- Open Device Manager
- Right-click your network device and go to Properties
- Switch to the Driver tab
- Click Roll Back Driver and follow the step-by-step instructions
- If the button is greyed out, it means that you can’t perform the rollback because a previous version doesn’t exist on your computer
- Restart your computer
- Launch Chrome and check for DNS issues
22. Check IPv4 and IPv6 connectivity
If you don’t have Internet access at all but get the DNS PROBE FINISHED NO INTERNET error when trying to visit a webpage in Chrome, you should check the IPv4 and IPv6 settings of your Internet connection.
For example, if your network doesn’t support IPv6 connections but has it enabled in the properties panel, make sure that your device is still getting assigned with an IPv4 address, regardless of whether IPv6 is enabled or not.
How to verify IPv4 and IPv6 on Windows 10:
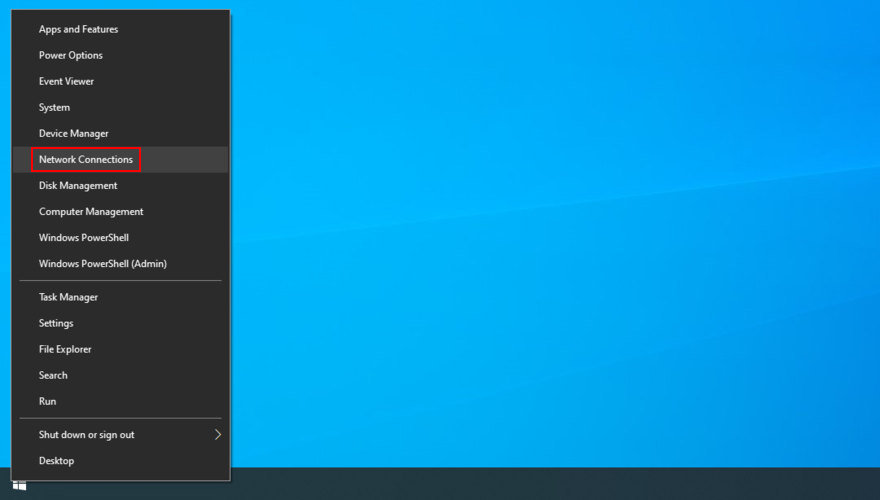
- Right-click the Start button and select Network Connections
- Click Change adapter options

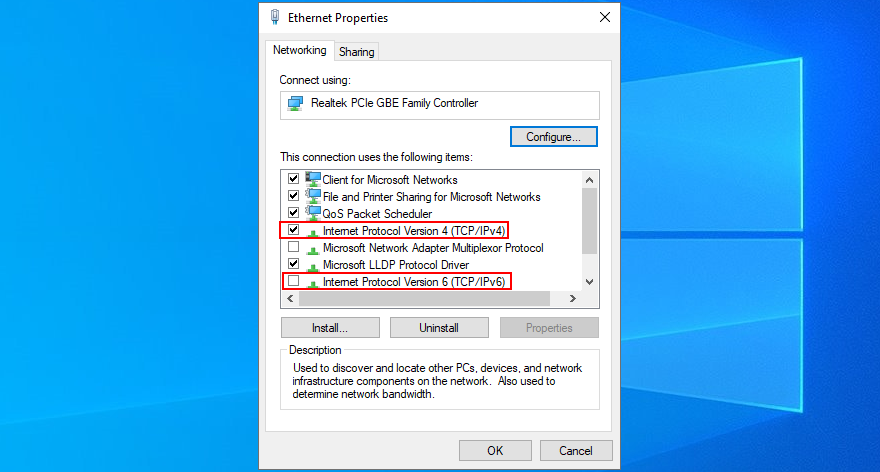
- Right-click your Internet connection and go to Properties

- Check the box next to Internet Protocol Version 4 (TCP/IPv4)
- Uncheck the box next to Internet Protocol Version 6 (TCP/IPv6)
- Click OK
- Launch Chrome and try to use it
23. Run the Internet Connections troubleshooter (Windows)
You can run the Internet Connections troubleshooter built into Windows 10 to resolve common issues that could have a negative impact on your browsing experience and trigger the DNS_PROBE_FINISHED_NO_INTERNET error in Chrome. Here’s how:
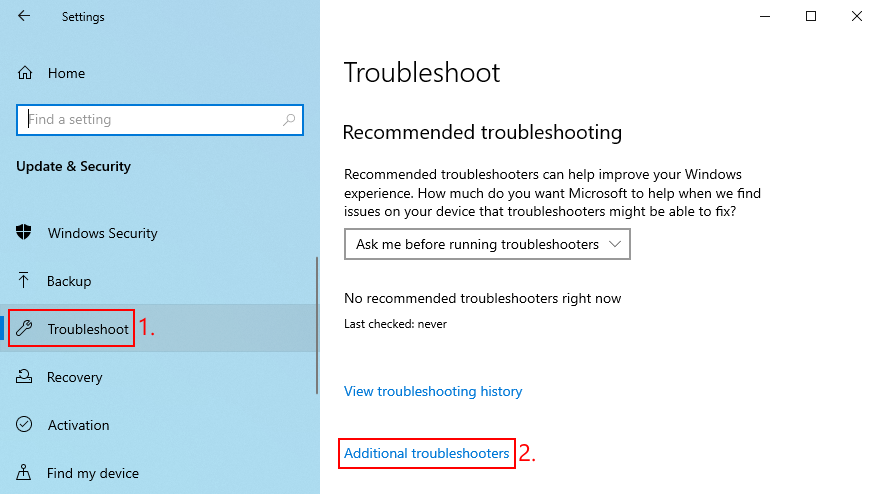
- Press the Windows key, search for Settings, and press Enter

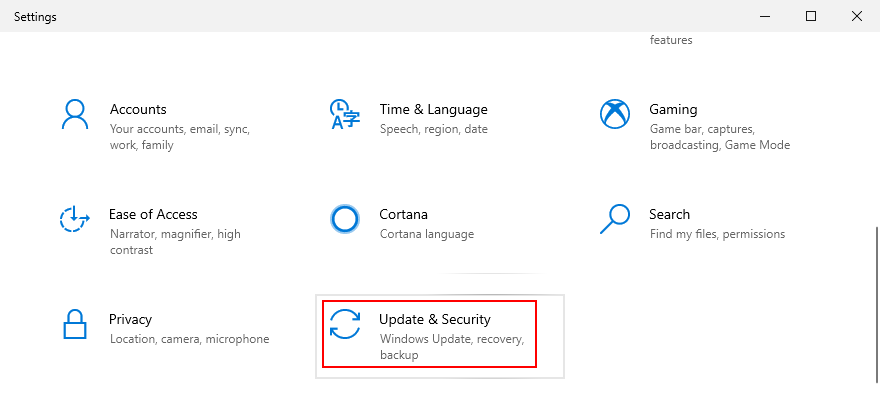
- Go to the Update & Security area
- Select Troubleshoot
- Click Additional troubleshooters
- Select Internet Connections and click Run the troubleshooter
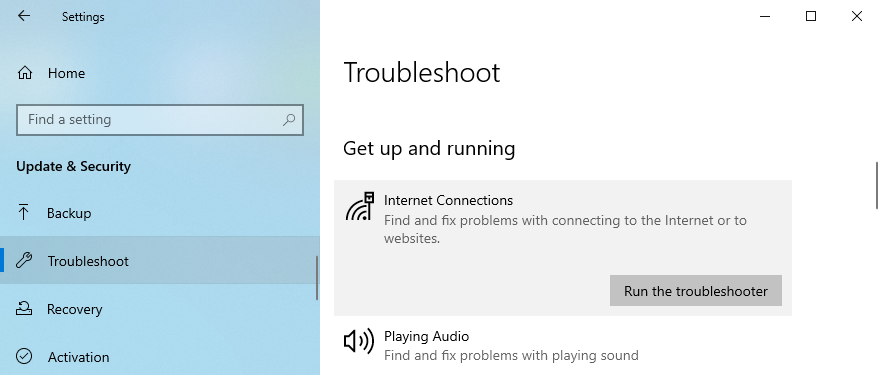
- Proceed with the wizard steps
- Restart your computer and try to use Chrome now
24. Reboot your router and modem
To refresh your Internet connectivity settings, it’s a good idea to shut down your router and modem, wait for a few minutes, and then start them up again. Then, you can shift your attention to your computer, fire up Chrome, and see if you can access any pages.
The DNS_PROBE_FINISHED_NO_INTERNET issue can be solved
To recap, DNS_PROBE_FINISHED_NO_INTERNET is an error message that appears in Chrome and prevents you from going online. It describes a problem with the DNS servers, which can be used by incorrect DNS, computer, or Internet settings. There are multiple ways to repair it.
You should try using a different browser, restart Chrome, clear the browsing cache, update Chrome, reset it to default settings, disable any third-party browser extensions, reinstall the application, and always use the Chrome stable channel.
Furthermore, you should downgrade Chrome if you’re using an older Windows version, restart the DNS client service, use Google DNS servers, clear the DNS cache, run a ping test, visit a website by IP address instead of domain name, and turn off any VPN or proxy apps.
It’s also a good idea to check firewall settings, uninstall antivirus tools, check parental control settings, examine the Hosts file, update your operating system, check the network driver, check IPv4 and IPv6 connectivity, run the Internet Connections troubleshooter, as well as reboot your router and modem.
How did you manage to fix the DNS_PROBE_FINISHED_NO_INTERNET error on your device? Let us know in the comment section below.
