Il sistema non riesce a trovare il file specificato è un messaggio di errore che può verificarsi su Windows 10 quando si tenta di aprire o eliminare un file, avvio un’applicazione, aggiornare il sistema operativo, eseguire il backup dei dati o eseguire altre operazioni sui file.
In scenari più gravi, l’errore viene visualizzato quando si tenta di avviare il sistema operativo, mostrando un schermata arancione . Tuttavia, ci sono diversi modi in cui puoi riparare questo problema, a seconda di dove lo incontri.

Come correggere l’errore Il sistema non riesce a trovare il file specificato su Windows 10
Controlla le seguenti correzioni. Se possibile, assicurati di crea un punto di ripristino del sistema in modo da poter ripristinare Windows 10 se devi avviare le soluzioni da zero.
1. Riavvia il computer
Forse Windows mostra l’errore Il sistema non riesce a trovare il file specificato a causa di un processo in sospeso o di un servizio che non risponde. Quindi è una buona idea iniziare con qualcosa di semplice come riavviare il computer. Un’idea ancora migliore è riavviare il PC. Dopo l’arresto, scollegare la fonte di alimentazione e tenere premuto il pulsante di accensione per 20-30 secondi per cancellare la cache del PC. Quindi, avvia il sistema operativo e controlla se il problema è stato risolto.
2. Aggiorna Windows 10
L’aggiunta degli ultimi aggiornamenti al sistema operativo è fondamentale per la manutenzione del computer, resa possibile da Windows Update. Questo servizio dovrebbe essere eseguito automaticamente in background, verificare continuamente la disponibilità di aggiornamenti e richiedere all’utente quando sono necessarie ulteriori azioni.
Dai un’occhiata al centro notifiche o al menu delle opzioni di alimentazione per eventuali punti rossi che indicano un riavvio in sospeso, soprattutto se non hai spento il computer per molto tempo. Altrimenti, puoi controllare manualmente la presenza di aggiornamenti:
- Fai clic sul pulsante Start , digita verifica aggiornamenti e premi Invio
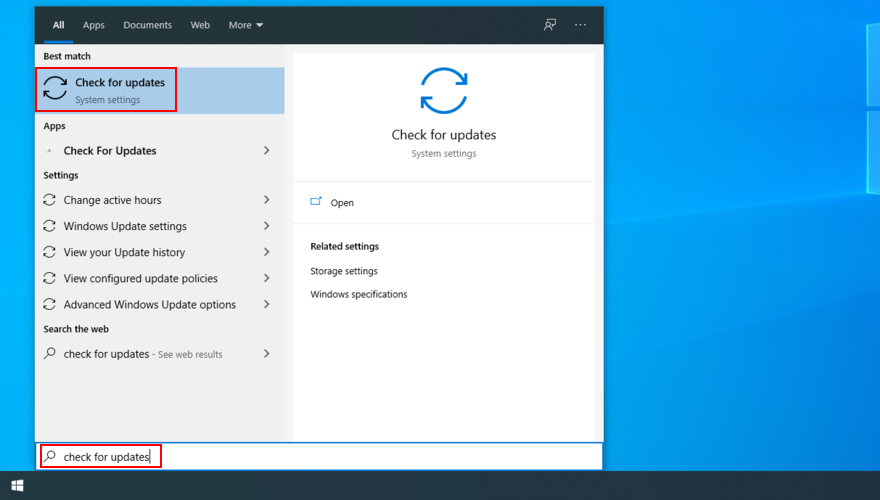
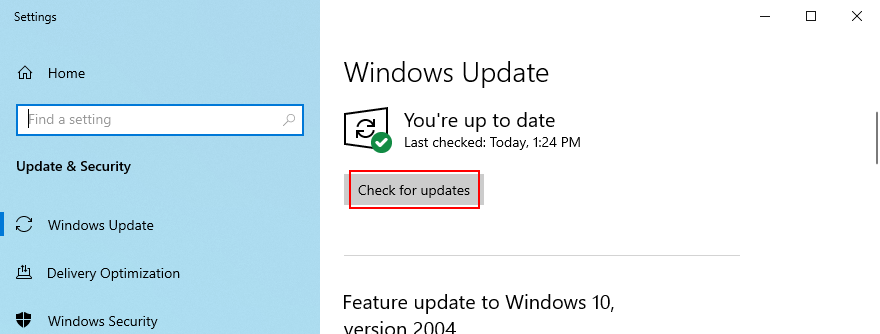
- Fai clic su Verifica aggiornamenti e attendi
- Se c’è qualcosa in sospeso, fai clic su Scarica
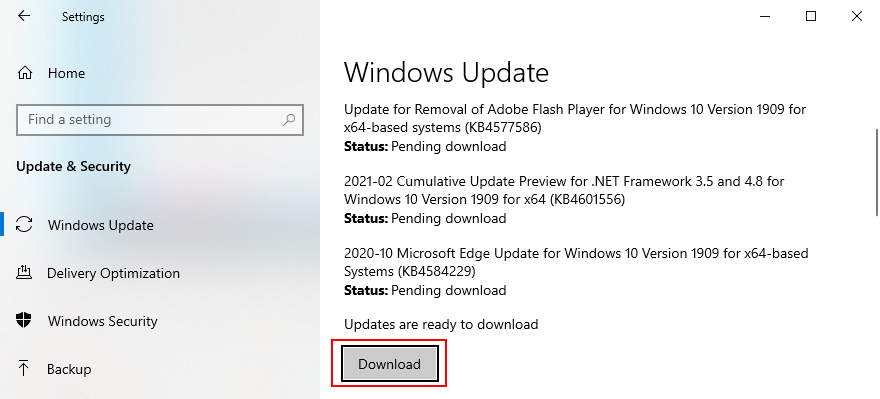
- Non spegnere o riavviare il PC durante questo periodo. Una volta scaricati e installati gli aggiornamenti, riavvia il PC per finalizzare l’attività
3. Esegui lo strumento di risoluzione dei problemi di Windows Update
Molti utenti non possono eseguire Windows Update a causa dell’errore Il sistema non riesce a trovare il file specificato . In tal caso, dovresti utilizzare la risoluzione dei problemi di Windows Update per trovare e risolvere problemi comuni che impediscono l’esecuzione di questa app:
- Fai clic sul pulsante Start , digita Impostazioni di risoluzione dei problemi e premi Invio
- Fai clic su Ulteriori strumenti per la risoluzione dei problemi
- Seleziona Windows Update e fai clic su Esegui lo strumento di risoluzione dei problemi
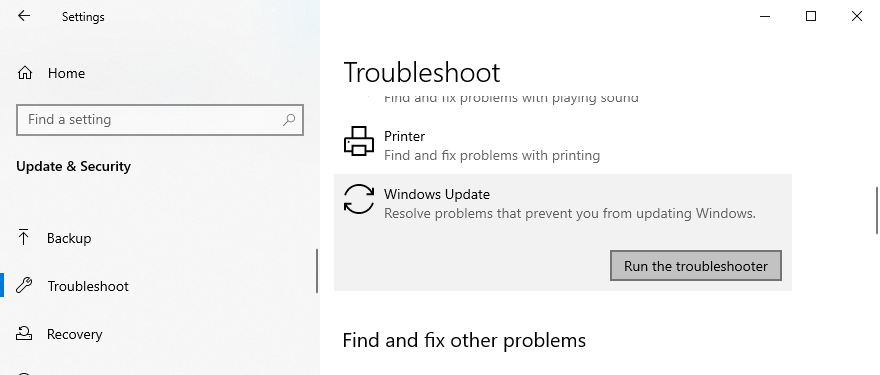
- Applica eventuali correzioni identificate dallo strumento di risoluzione dei problemi
- Riavvia il PC e prova a eseguire Windows Update ora
4. Controlla i servizi di Windows Update
Alcuni utenti disabilita il servizio Windows Update perché interrompe le loro attività e impiega un’eternità per spegnere, avviare o riavviare il computer durante le attività urgenti. Tuttavia, se rimane disattivato, il servizio non sarà in grado di recuperare gli aggiornamenti critici, causando vari problemi al computer.
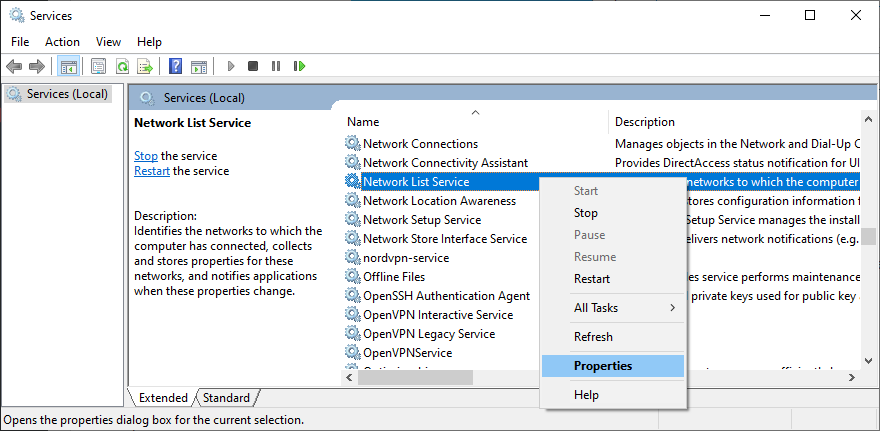
Come riavviare i servizi di Windows Update:
- Premi il tasto Win + R , digita services.msc e premi Invio per aprire il App Servizi
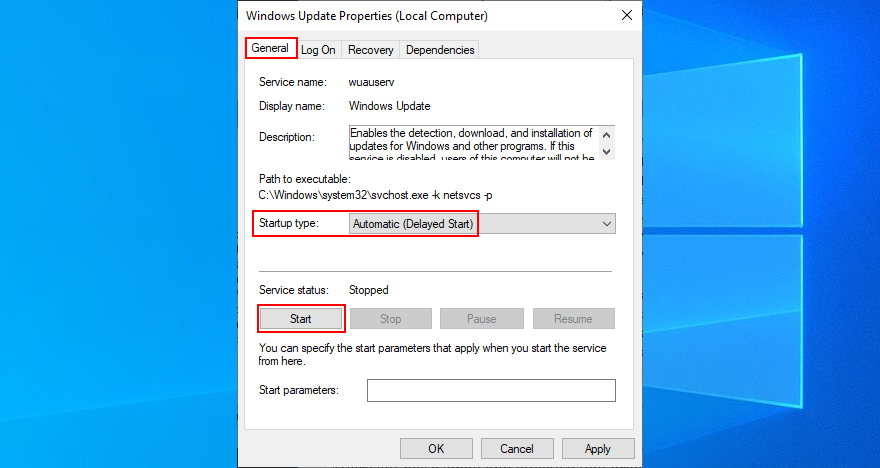
- Trova e fai doppio clic su Windows Update per visualizzarne le proprietà
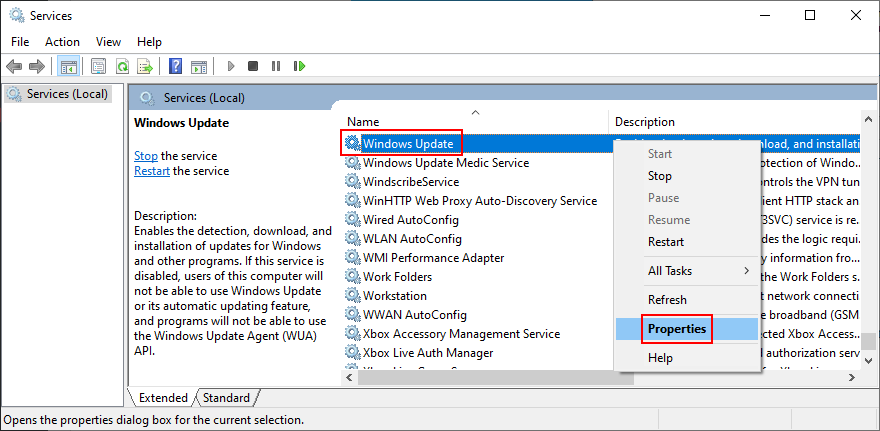
- Imposta Tipo di avvio su Automatico (avvio ritardato)
- Fare clic sul pulsante Start per avviare subito il servizio
- Fai clic su Applica e torna alla finestra principale
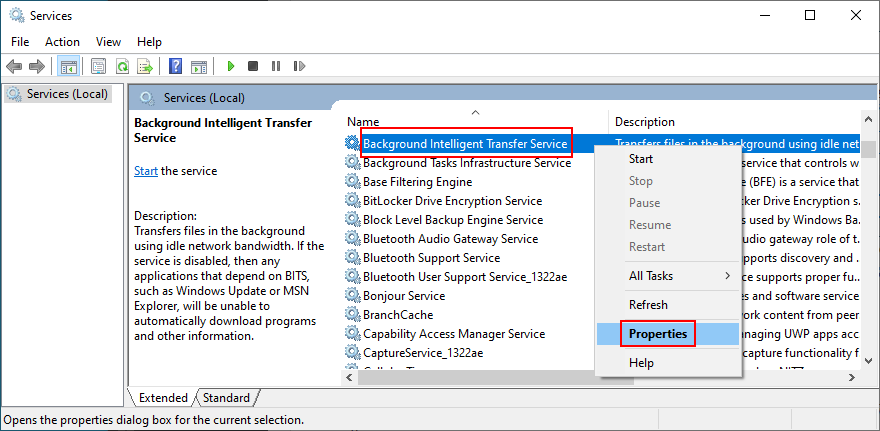
- Trova i servizi Servizio trasferimento intelligente in background e Pronto app per modificare le stesse impostazioni sopra
È anche una buona idea disattivare il servizio elenco reti, che a volte è in conflitto con il servizio Windows Update:
- Individua e fai doppio clic su Network List Service per accedere alle sue proprietà

- Imposta Tipo di avvio su Disattivato
- Fare clic su Interrompi per terminare il servizio
- Fai clic su Applica ed esci sul desktop
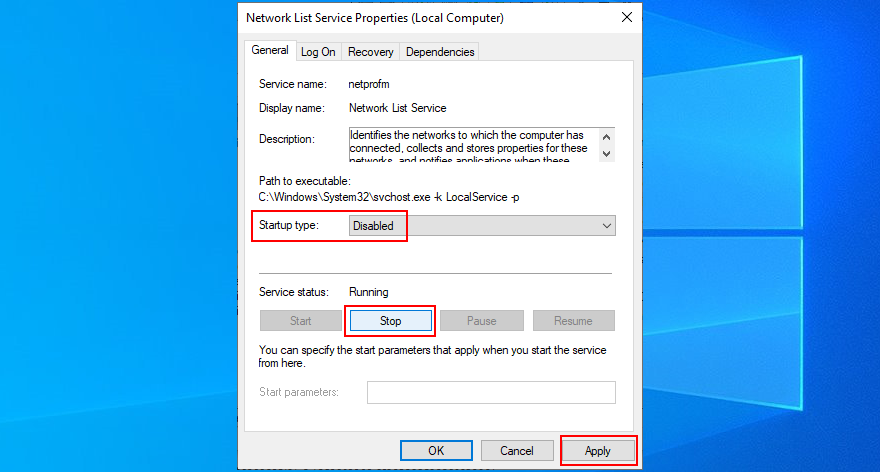
- Prova a eseguire Windows Update adesso
5. Avvia Windows 10 in modalità provvisoria
Se l’errore Il sistema non riesce a trovare il file specificato viene attivato da un driver o servizio di terze parti difettoso, puoi esegui Windows 10 in modalità provvisoria per disattivare automaticamente tutti i driver e i servizi che non appartengono al tuo sistema operativo. Ecco cosa devi fare:
- Fai clic con il pulsante destro del mouse sul pulsante Start e vai a Impostazioni
- Seleziona Aggiornamento e sicurezza
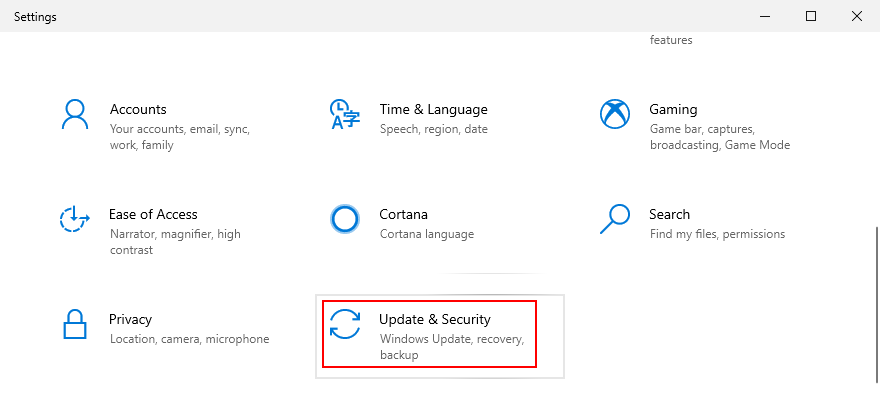
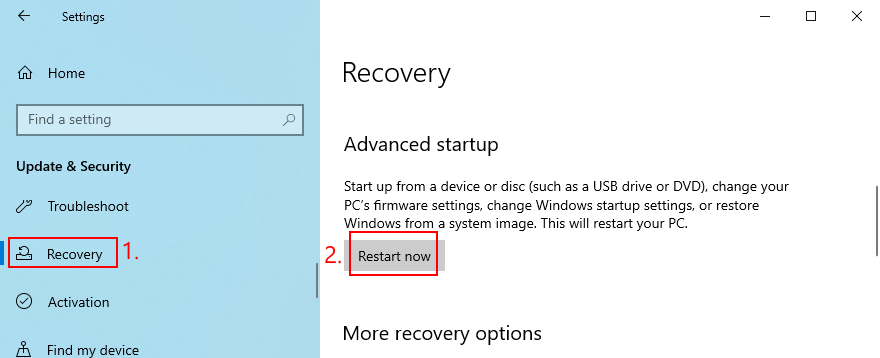
- Vai a Recupero
- In Avvio avanzato , fai clic su Riavvia ora

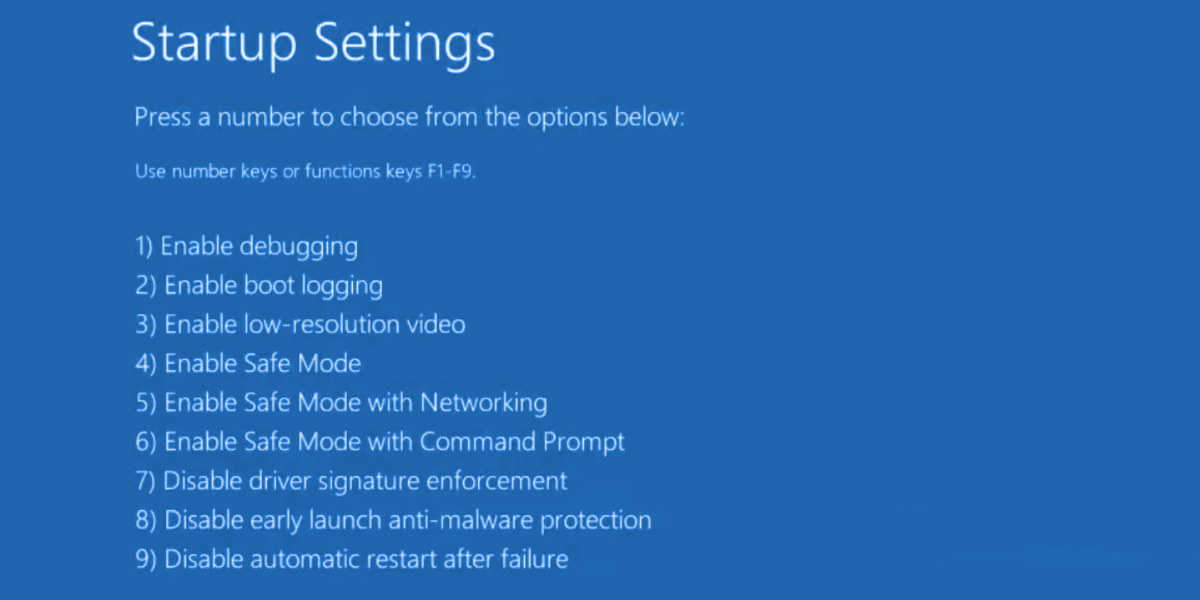
- Vai a Risoluzione dei problemi > Opzioni avanzate > Impostazioni di avvio
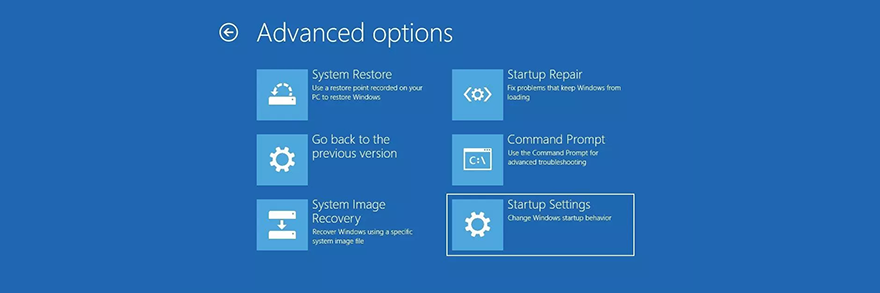
- Fai clic su Riavvia
- Se non hai bisogno dell’accesso a Internet, premi F4 . Altrimenti, premi F5 per abilitare la modalità provvisoria con rete
- Seleziona Aggiornamento e sicurezza

6. Disabilita le app di avvio
Se la modalità provvisoria non ha risolto l’errore Il sistema non riesce a trovare il file specificato , prova disabilitazione dei programmi di avvio . Ad esempio, potresti avere un’applicazione di sicurezza pianificata per essere eseguita automaticamente ogni volta che accendi il computer, il che è in conflitto con i processi di sistema critici. Può essere difficile identificare il colpevole, quindi è meglio disattivare tutto.
Come disabilitare i programmi di avvio:
- Fai clic con il pulsante destro del mouse sulla barra delle applicazioni di Windows 10 e seleziona Task Manager
- Vai alla sezione Avvio
- Per ogni applicazione con lo stato Abilitato , seleziona la relativa voce e fai clic su Disabilita
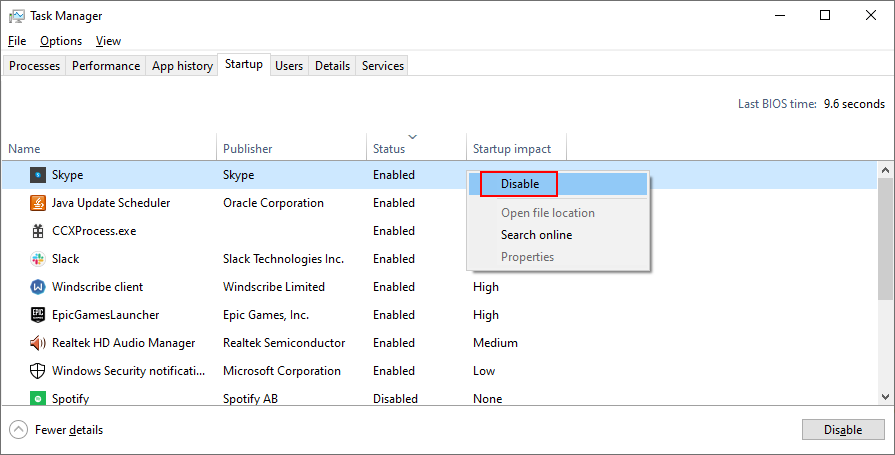
- Riavvia il computer
7. Avvio pulito del sistema operativo
Esecuzione di un avvio pulito su Windows 10 è in qualche modo simile alla modalità provvisoria. La differenza è che l’avvio pulito disabilita non solo i dispositivi ei servizi non essenziali, ma anche gli elementi di avvio. Ecco come configurarlo:
- Premi il tasto Win + R , digita msconfig e premi Invio per aprire il Sistema Configurazione app
- Rimani nella scheda Generale
- Scegli Avvio selettivo
- Deseleziona Carica servizi di sistema e Carica elementi di avvio
- Fai clic su Applica

- Passa alla scheda Avvio
- Fai clic su Apri Task Manager
- Disabilita tutte le app di avvio con lo stato Abilitato
- Riavvia il computer

Se in un secondo momento sarà necessario ripristinare le impostazioni di avvio predefinite, apri l’app Configurazione di sistema e seleziona Avvio normale .
8. Disinstalla applicazioni di terze parti
Ottenere l’errore Il sistema non riesce a trovare il file specificato dopo l’avvio dell’applicazione potrebbe segnalare un conflitto software. Forse il tuo programma sta entrando in conflitto con un altro, come due programmi antivirus con motori in tempo reale separati. Non c’è niente da fare se non rimuovere l’altra applicazione dal computer.
- Fai clic con il pulsante destro del mouse sul pulsante Start e seleziona App e funzionalità
- Individua e seleziona un programma dall’elenco
- Fai clic su Disinstalla e poi di nuovo per confermare
- Procedi con la procedura guidata
- Riavvia il computer
Tuttavia, se il programma ha modificato le impostazioni del registro, il programma di disinstallazione predefinito di Windows non aiuterà a ripristinarle. Invece, dovresti utilizzare un programma di disinstallazione del software che elimina non solo un programma ma anche tutti i file e le voci di registro rimanenti.
9. Disconnetti i dispositivi esterni
I conflitti possono anche essere causati da periferiche non supportate recentemente collegate al computer. Se di recente hai acquistato o ricevuto in regalo un nuovo componente hardware, come un adattatore Wi-Fi, nuove cuffie, una webcam o un’unità flash USB, rimuovilo immediatamente dal PC e quindi riavvia per verificare se questo ha risolto il problema Il sistema non riesce a trovare il file specificato errore.
Potrebbe non essere colpa del dispositivo ma della tua porta. Prova a cambiare le porte USB se hai più opzioni disponibili. Altrimenti, collega un hub USB multiporta al computer, quindi il dispositivo all’hub anziché direttamente al PC. A volte funziona.
10. Esegui CHKDSK
CHKDSK (Check Disk) è uno strumento interno di Windows che puoi utilizzare dall’ambiente della riga di comando. Aiuta a riparare i problemi di danneggiamento del disco rigido e i settori danneggiati che potrebbero impedire il corretto funzionamento del computer e causare l’errore Il sistema non riesce a trovare il file specificato di conseguenza.
Come utilizzare CHKDSK:
- Fai clic sul pulsante Start , digita Prompt dei comandi , seleziona questa applicazione e fai clic su Esegui come amministratore
- Se Windows è installato sull’unità C: predefinita, digita
chkdsk c:/f/r. In caso contrario, assicurati di sostituirec:con la lettera della partizione del sistema operativo
- Quando ti viene chiesto di programmare CHKDSK al successivo riavvio del sistema, digita y e premi Invio
- Riavvia il PC e attendi che CHKDSK faccia il suo lavoro
11. Esegui SFC
Se ricevi ancora l’errore Il sistema non riesce a trovare il file specificato dopo aver eseguito lo strumento CHKDSK, forse dovresti spostare la tua attenzione sul sistema poiché potrebbe avere file corrotti o mancanti. SFC (System File Checker) può aiutarti in questo riguardo.
Come utilizzare SFC:
- Avvia Windows 10 in modalità provvisoria
- Premi il tasto Win + R e premi Invio per eseguire il prompt dei comandi
- Scrivi
sfc/scannowe premi Invio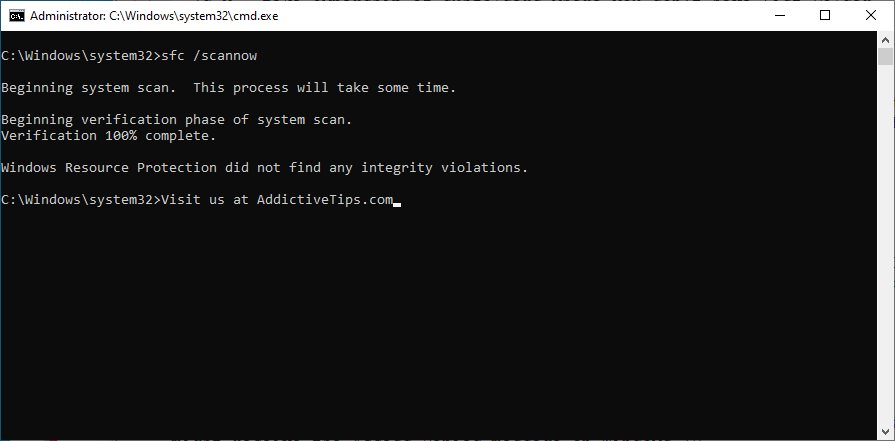
- Al termine di SFC, riavvia il PC
12. Esegui DISM
DISM (Deployment Image Servicing and Management) è uno strumento più avanzato di SFC perché può controllare l’integrità dell’archivio componenti nel file immagine di Windows.
Come utilizzare Gestione e manutenzione immagini distribuzione:
- Avvia Windows 10 in modalità provvisoria
- Apri Prompt dei comandi
- Digita
DISM/online/cleanup-image/scanhealthe premi Invio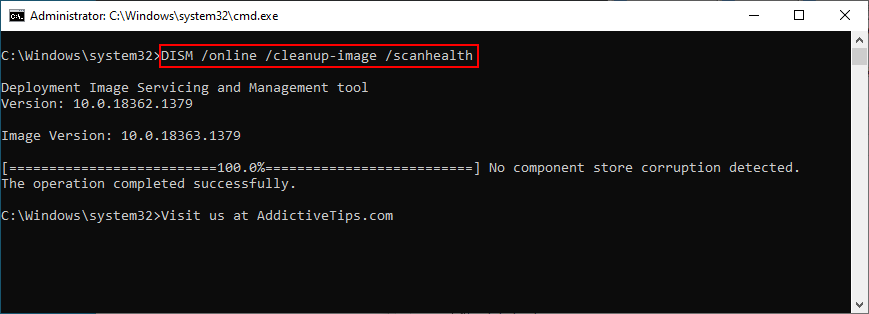
- Se identifica errori, esegui
DISM/online/cleanup-image/restorehealthper eliminarli - Al termine, riavvia Windows 10 in modalità provvisoria
- Apri il Prompt dei comandi ed esegui SFC (
sfc/scannow) - Riavvia normalmente il PC
13. Consulta il registro di sistema
Puoi scoprire il driver di dispositivo esatto che causa l’errore Il sistema non riesce a trovare il file specificato consultando il file di registro di sistema. Ecco cosa devi fare:
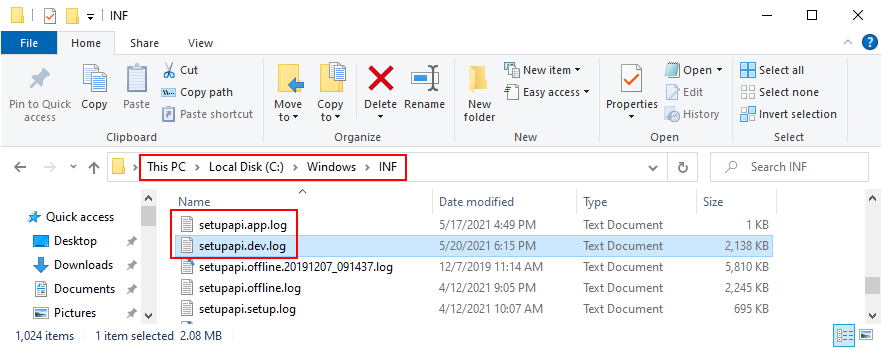
- Premi il tasto Win + E per aprire Esplora risorse
- Vai al seguente indirizzo:
% SystemRoot% \ INF
- Trova e apri il file setupapi.dev o setupapi.dev.log in Blocco note
- Premi Ctrl + F , digita il sistema non riesce a trovare il file e premi Invio

- In FilePath , copia il nome del driver
- Apri un browser web e inserisci il nome del file del driver per scoprire il dispositivo a cui appartiene
Una volta identificato il dispositivo colpevole, puoi eseguire ulteriori azioni in Gestione dispositivi (procedi con le seguenti soluzioni).
14. Reinstalla rapidamente i dispositivi
Prendendo in considerazione il driver e il dispositivo trovati nel registro di sistema, dovresti andare su Gestione dispositivi per reinstallare il dispositivo. Se non è stato installato correttamente sul tuo PC Windows 10, questo metodo dovrebbe risolverlo. Ecco cosa devi fare:
- Fai clic con il pulsante destro del mouse sul pulsante Start e seleziona Gestione dispositivi
- Trova il dispositivo e fai doppio clic su di esso
- Passa alla scheda Driver e fai clic su Dettagli driver
- Qui puoi ricontrollare che il file del driver corrisponda alle informazioni trovate nel registro di sistema
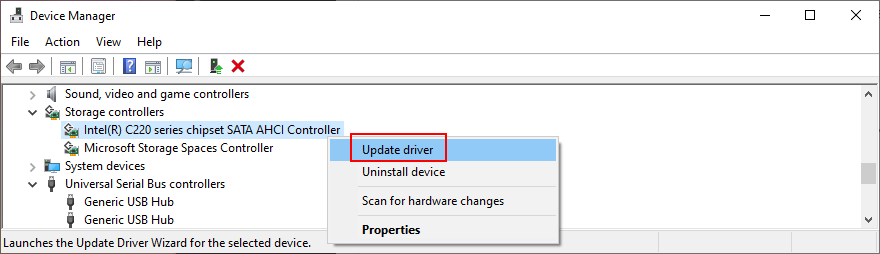
- Torna alla finestra principale di Gestione dispositivi
- Fai clic con il pulsante destro del mouse sul dispositivo e seleziona Disinstalla dispositivo
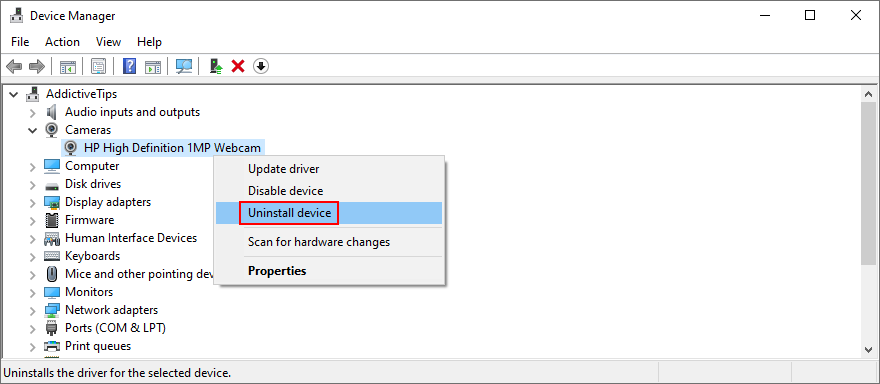
- Seleziona Elimina il software del driver per questo dispositivo e fai clic su Disinstalla per confermare
- Apri il menu Azione e seleziona Rileva modifiche hardware
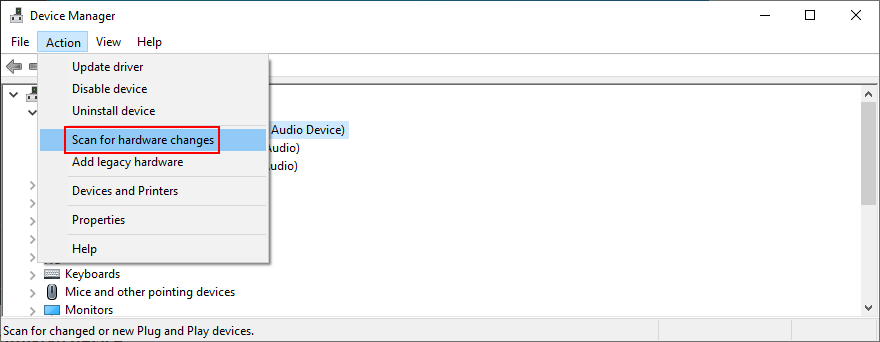
- Se il dispositivo non viene nuovamente visualizzato in Gestione dispositivi, riavvia il PC poiché Windows reinstallerà automaticamente l’adattatore mancante
15. Aggiorna i driver di dispositivo
È possibile che il dispositivo sia installato correttamente sul computer ma il suo driver non è aggiornato. The solution here is to update the obsolete drivers:
- Press Win key + R, type devmgmt.msc, and press Enter
- Right-click the device and select Update driver
- Click Search automatically for drivers and follow the on-screen instructions
If the online search doesn’t return any results, click Search for updated drivers on Windows Update. However, if you have already checked for system updates or the dedicated service doesn’t work, then you have to manually download and install drivers.
However, if you don’t want to risk installing an unsupported driver, it’s better to use a driver update tool. Besides, you can use it to update all your obsolete drivers at the same time, without risking compatibility issues.
16. Roll back drivers
If you have already downloaded an unsupported driver, you must roll it back to the previous version before performing the update. Ecco cosa devi fare:
- Fai clic sul pulsante Start , cerca Gestione dispositivi e premi Invio
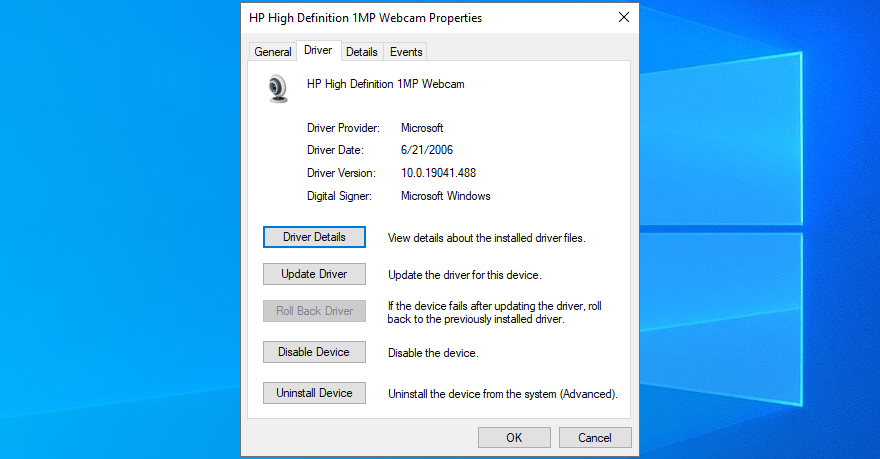
- Right-click a device and go to Properties
- Select the Driver section
- Click Roll Back Driver and follow the instructions. If the button is greyed out, you can skip this step since you can’t perform the rollback
17. Reinstall programs
Some software applications should be reset, repaired, or reinstalled, depending on the available operations. It certainly applies in the scenario where the The system cannot find the file specified error started appearing on your screen after a recent software change.
You have multiple options when it comes to Microsoft Store apps. Click the Start button, search for a program, and go to App settings. From that section, you can repair or reset the app with one click. And, if those two options fail, you should uninstall the app and reinstall it from Microsoft Store.
It’s simpler with regular software programs since the repair option rarely works. Instead, you can uninstall the application from Apps & Features, then download it again from its official website and proceed with the setup operation.
18. Controlla le impostazioni del registro
If you can’t open files or launch applications due to the The system cannot find the file specified error, you should inspect registry settings to make sure that everything is in order. It’s pretty easy. Ecco cosa devi fare:
- Click the Start button, search for Registry Editor, and hit Enter to open this app
- Open the File menu and click Export
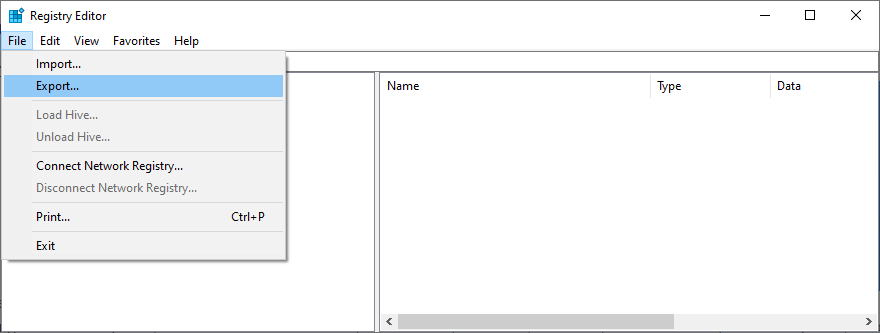
- Create a registry backup by setting a file name, picking a destination, and clicking Save. If you need to restore the initial registry configuration later, just double-click the.reg file
- Visit the following address:
Computer\HKEY_LOCAL_MACHINE\SOFTWARE\Microsoft\Windows\CurrentVersion\
- Look for the RunOnce key (looks like a folder in the tree on the left)
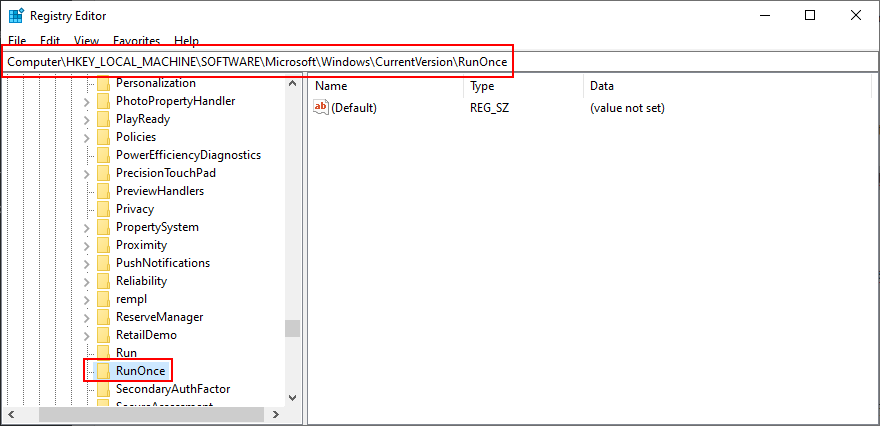
- If the key doesn’t exist, right-click the CurrentVersion key and select New > Key
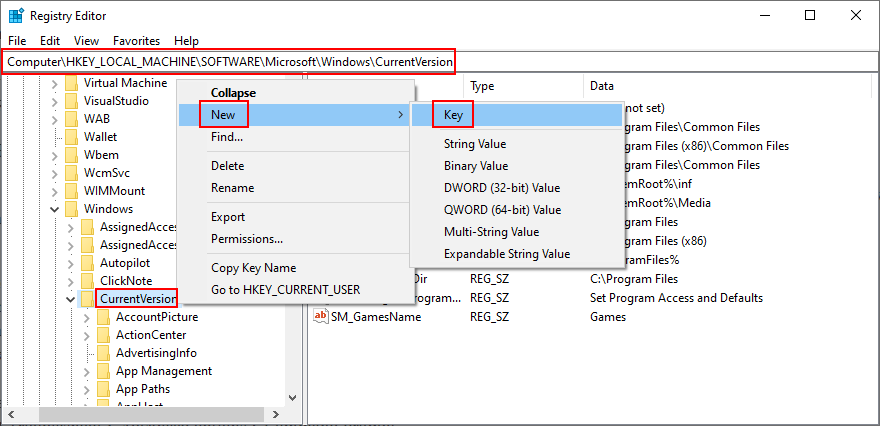
- Set the key name to RunOnce
- Now, go to this location:
Computer\HKEY_CURRENT_USER\SOFTWARE\Microsoft\Windows\CurrentVersion\
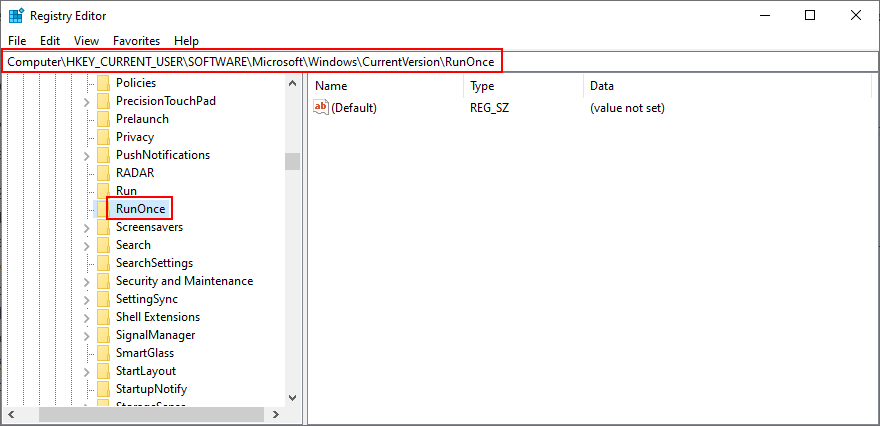
- Take the same steps: if the RunOnce key doesn’t exist, create it
- Exit Registry Editor
19. Restore the original registry settings
If the system registry suffered more modifications that you can’t identify, it’s easier to restore its configuration to factory values, which is more effective than using a registry cleaner. Here’s how to make it happen.
- Click the Start button, search for Registry Editor, and launch this tool
- Create a registry backup:
- Open the File menu and click Export
- Set a file name and destination
- Click Save to create a backup of the current registry settings
- Press the Windows key and click the power button to view power options
- While holding down the Shift key, click Restart to reboot Windows in troubleshooting mode
- Select Troubleshoot > Advanced options > Command Prompt
- Choose your PC account and enter your password to continue
- Write the following commands and hit Enter after each one:
-
cd %SystemRoot%\System32\config
-
ren %SystemRoot%\System32\config\DEFAULT DEFAULT.old
-
ren %SystemRoot%\System32\config\SAM SAM.old
-
ren %SystemRoot%\System32\config\SECURITY SECURITY.old
-
ren %SystemRoot%\System32\config\SOFTWARE SOFTWARE.old
-
ren %SystemRoot%\System32\config\SYSTEM SYSTEM.old
-
copy %SystemRoot%\System32\config\RegBack\DEFAULT %SystemRoot%\System32\config\
-
copy %SystemRoot%\System32\config\RegBack\DEFAULT %SystemRoot%\System32\config\
-
copy %SystemRoot%\System32\config\RegBack\SAM %SystemRoot%\System32\config\
-
copy %SystemRoot%\System32\config\RegBack\SECURITY %SystemRoot%\System32\config\
-
copy %SystemRoot%\System32\config\RegBack\SYSTEM %SystemRoot%\System32\config\
-
copy %SystemRoot%\System32\config\RegBack\SOFTWARE %SystemRoot%\System32\config\
-
- Riavvia il computer
20. Uninstall system updates
Some Windows updates end up harming your computer and causing various problems, including the The system cannot find the file specified error. In this case, the best course of action is to remove the most recent system update. Ecco come:
- Press Win key + R, type appwiz.cpl, and hit Enter

- Click View installed updates
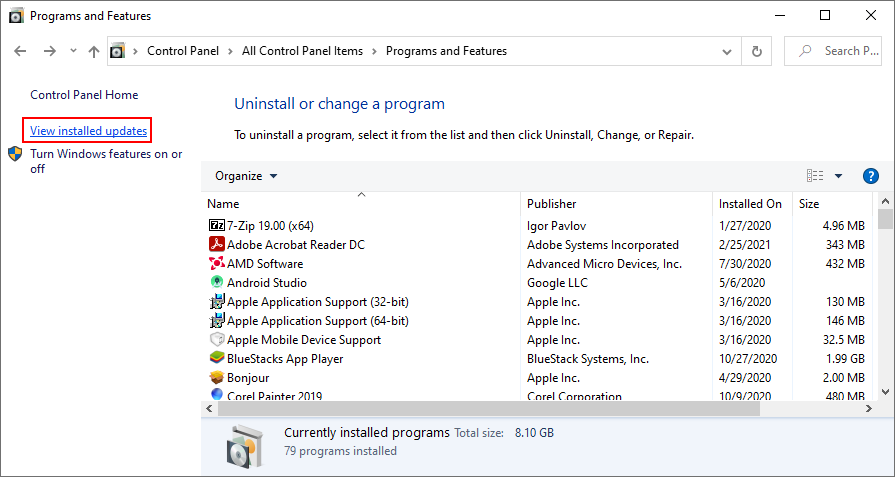
- To sort the updates by time of installed, click the Installed On column
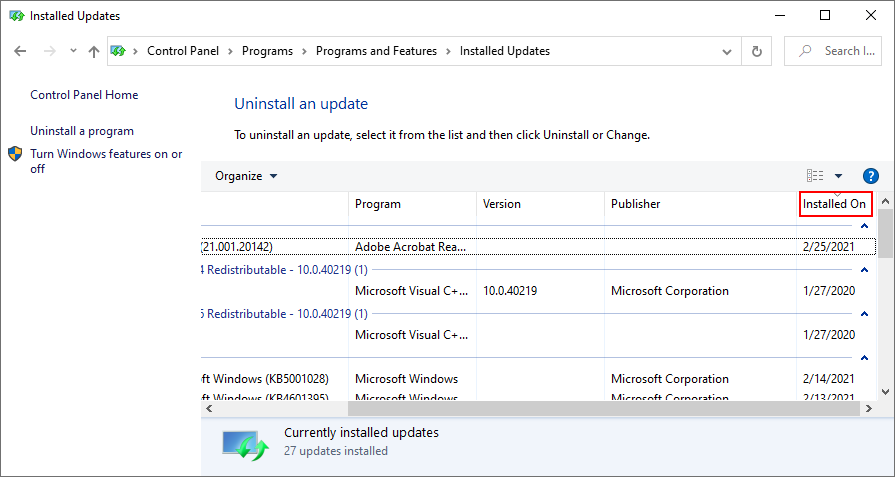
- Search for the Microsoft Windows category
- Double-click the first update in that group
- When asked to confirm its uninstall, click Yes
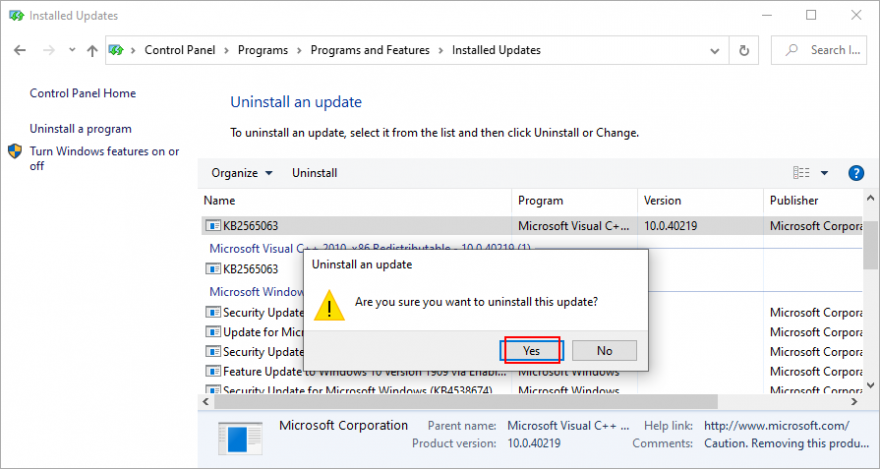
- Riavvia il computer
If you can’t boot Windows due to the The system cannot find the file specified error, you can interrupt the startup sequence three times in a row to start Windows troubleshooting mode. Then go to Troubleshoot > Advanced Options > Uninstall Updates.
21. Check your computer for malware
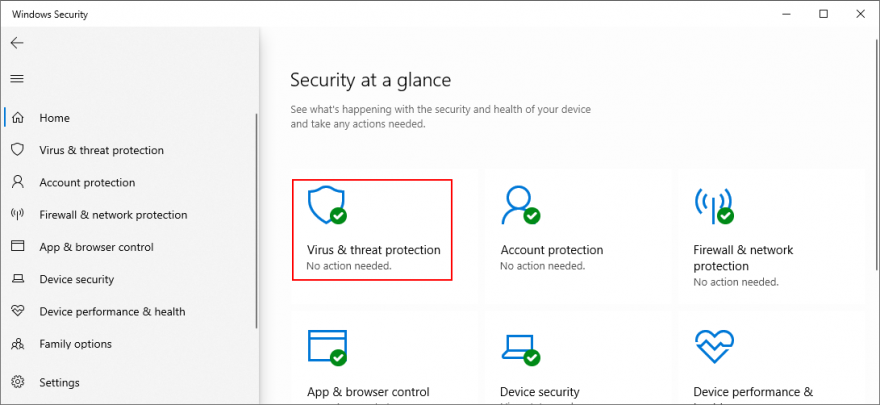
A malware agent could have infected system files, thus preventing you from opening any files or launching applications. To fix this issue, you can resort to Windows Defender:
- Press the Win key, search for Windows Security, and open this app
- Select Virus & threat protection
- Fai clic su Opzioni di scansione
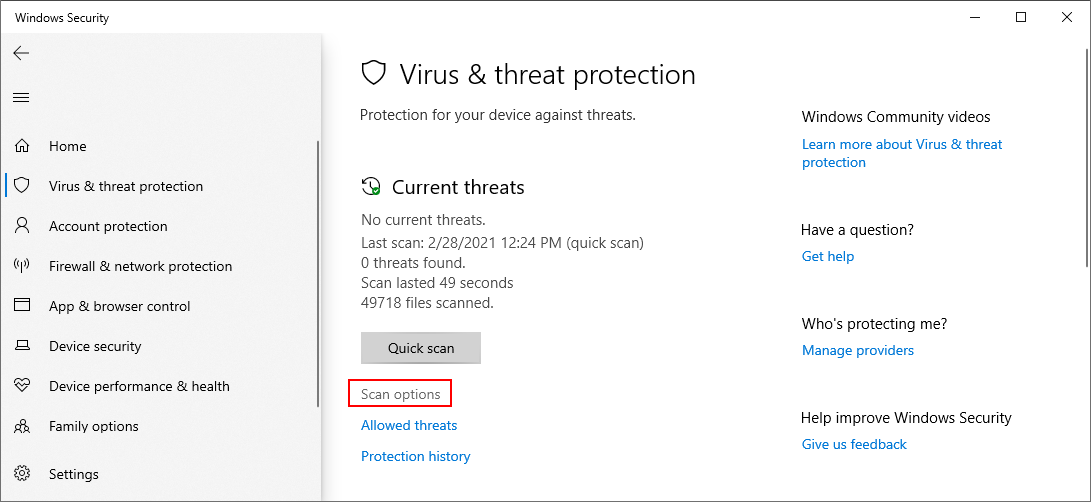
- Pick Quick scan and click Scan now
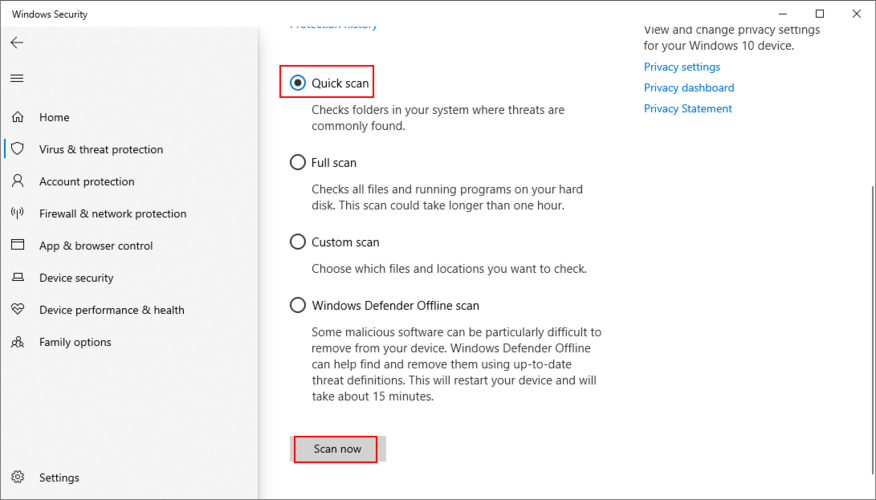
- If it doesn’t find any threats, choose Windows Defender Offline scan and click Scan now

- Allow Windows to quarantine or remove any suspicious files. If you think some of those files are safe, make sure to add them to the whitelist, in order to exclude them from any upcoming scans
If you have a third-party security solution that you rely on, make sure to adjust the steps above.
22. Use a Linux live distro
You might think that your data will be lost forever due to this serious error. And it might be impossible to even perform a disk backup because Windows doesn’t recognize the selected files. If there’s a major problem with your OS that requires system reset, you can save your files with the help of a Linux live distro.
Simply put, you will be creating a USB flash drive that boots a Linux-based operating system (e.g. Ubuntu), in order to gain access to your files and copy them somewhere safe. Since it’s not Windows, you shouldn’t be getting the The system cannot find the file specified error anymore. Then, you can safely proceed with more dangerous scenarios that involve data loss, like disk formatting.
How to create a Linux live distro with Rufus:
- Download a Linux distro. If you can’t decide which, we suggest Ubuntu since it’s intuitive
- Connect a USB flash drive to your PC. Make sure it doesn’t contain any files you might need later since the disk will be formatted
- Download Rufus from the official website
- Install and run Rufus
- Choose the pen drive and set Boot section to Disk or ISO image
- Click SELECT and add the Ubuntu ISO
- Set Partition scheme to MBR
- At File system, select FAT32
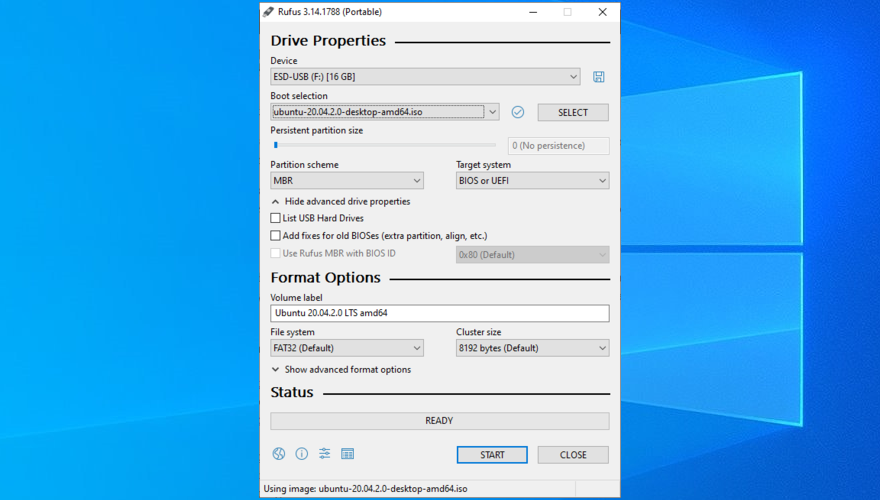
- Click OK and wait for Rufus to create your Linux live distro drive
How to boot Linux from the USB flash drive:
- Keep the flash drive plugged into your PC
- Restart Windows
- Right after your display turns on and before Windows boots, press the key shown on the screen to enter the boot startup menu (e.g. F12)
- Select the USB storage drive and hit Enter
- Once Ubuntu loads, create a backup of your files
23. Change drive letters
You might be experiencing file access errors due to your HDD or SSD. For instance, if it doesn’t have a partition letter assigned, or if it shares the letter with another drive, you should immediately fix this problem. The simplest way to do this is by using Disk Management.
How to assign drive letters with Disk Management:
- Press Win key + R, type diskmgmt.msc, and press Enter
- In Disk Management, select the drive that’s giving you trouble
- Right-click the drive and select Change Drive Letters and Paths

- If the drive already has a letter
- Click Change
- Set a new drive letter
- Fai clic su OK
- If the drive doesn’t have a letter
- Click Add
- At Mount in the following empty NTFS folder, click Browse
- Set the new drive path by selecting an empty NTFS folder and click OK
- Then, click OK to confirm
- Esci dal desktop
However, if you can’t access Disk Management or if it doesn’t identify your drive, you can turn to the console environment.
How to assign drive letters with Command Prompt:
- Press Windows key + R, type cmd, then press Ctrl + Shift + Enter to launch Command Prompt with elevated rights
- Type
diskpartand hit Enter to use the partition manager built into Windows - Run
list volumeto view all current drives - Check out the number assigned to your disk or partition. Run
select volume #and use that number (e.g.select volume 4) - Write
assign letter=and add the new drive letter (e.g.assign letter=e). Hit Enter - Esci dal desktop
24. Format the partition
If changing the drive letter didn’t help get rid of the The system cannot find the file specified error, it’s time to format the partition. Keep in mind that it means losing everything saved there.
So, you should perform a backup before proceeding with this solution. If you can’t perform the backup in Windows, check out the previous solution on how to create a backup from a Linux distro.
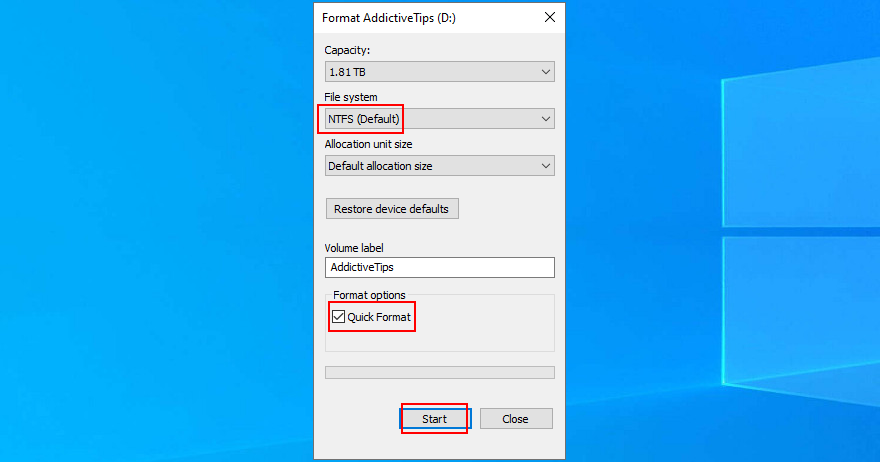
How to format a partition using Windows Explorer:
- Press Win key + E to open File Explorer on Windows 10
- Select the drive, right-click it, and choose Format
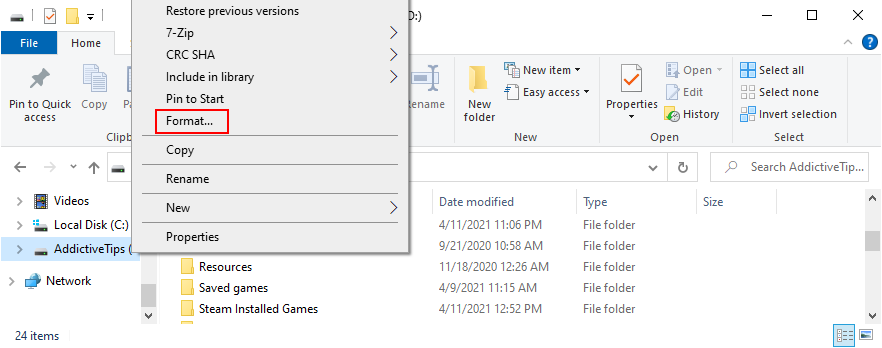
- At File system, select NTFS
- Leave Quick Format enabled
- Click Start
How to format a partition using Disk Management:
- Right-click the Start button and launch Disk Management
- Pick the partition, right-click it, and select Format
- Set File system to NTFS
- Leave Perform a quick format enabled
- Click OK

How to format a partition using Command Prompt:
- Press the Win key, search for Command Prompt, and click Run as administrator. If prompted by User Account Control, click Yes
- Type
diskpartand press Enter - Run
list volumeto view all volumes - Identify the number of your partition and use it when entering
select volume #(e.g.select volume 5) - Run
format fs=ntfsto format the partition as NTFS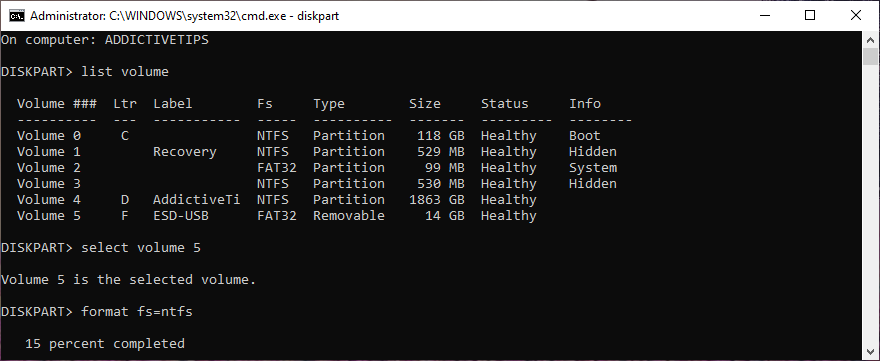
25. Roll back the operating system
You can roll back Windows 10 to a restore point that was recorded before you started experiencing the The system cannot find the file specified error, thanks to System Restore. It means undoing all software modifications made to your computer that you can’t detect and which somehow led to file access and application launch issues. However, it automatically means that all programs you installed after the restore point was recorded will no longer exist, so you will have to install them again.
How to use System Restore:
- Sign in to Windows 10 with an administrator account
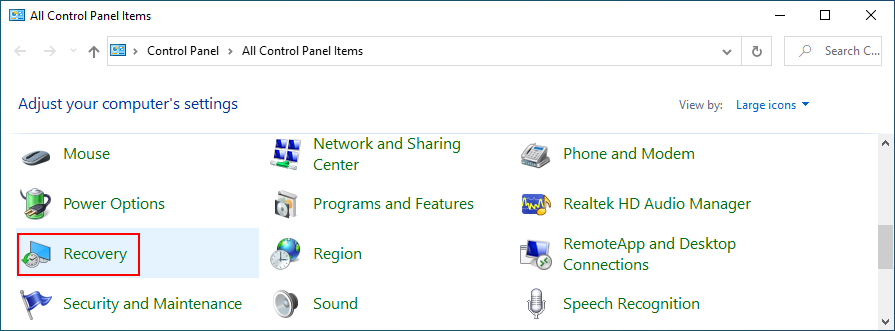
- Click the Start button, find Control Panel, and open this app
- Select Recovery
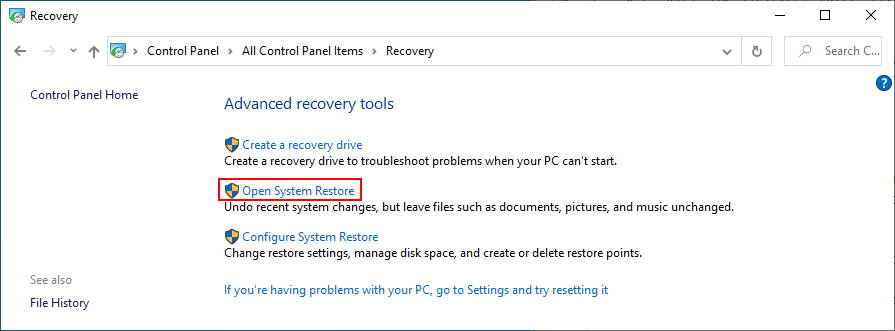
- Click Open System Restore
- Choose a restore point or click Show more restore points to get more options. Click Scan for affected programs to discover the exact applications you will have to reinstall
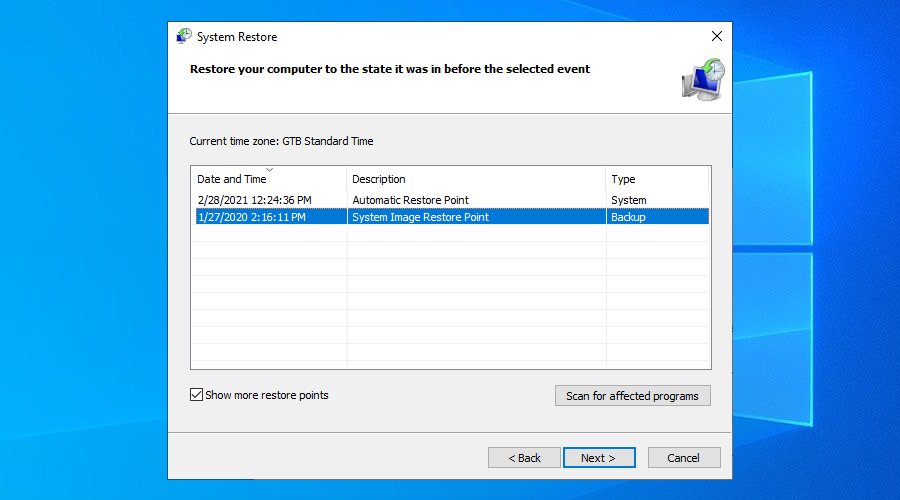
- After making a selection, click Next and follow the remaining steps
If you can’t boot Windows 10, interrupt the startup three times in a row to access system troubleshooting mode. Then, go to Troubleshoot > Advanced Options > System Restore.
26. Reset Windows 10
If you still can’t shake off the The system cannot find the file specified error or if System Restore didn’t work, there’s nothing left to do except restore Windows 10 to factory settings. It means uninstalling all your applications and reverting the system configuration to default. But you can keep your personal files, so it’s not necessary to perform a backup.
How to reset Windows 10:
- Fai clic con il pulsante destro del mouse sul pulsante Start e seleziona Impostazioni
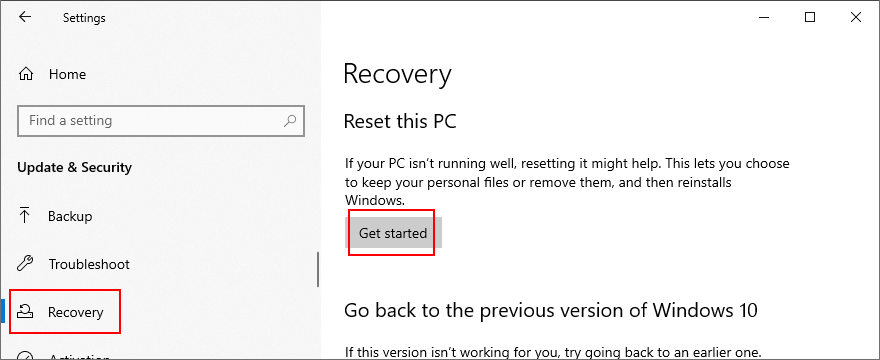
- Click Update & Security and select Recovery
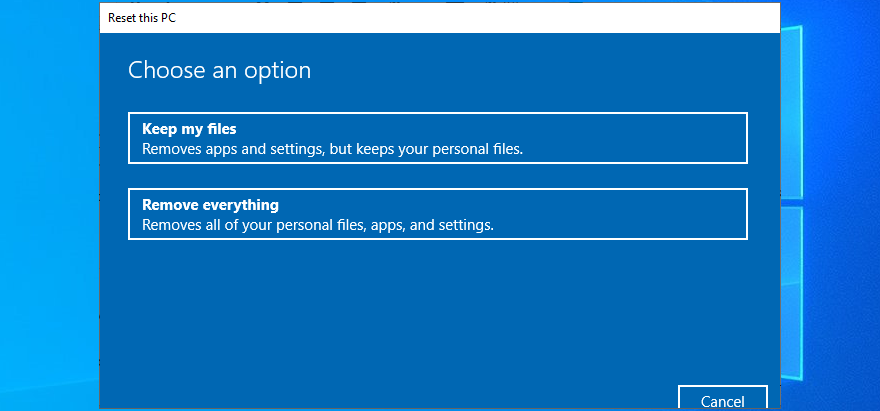
- At Reset this PC, click Get started
- Pick Keep my files and follow the remaining instructions
You can also turn your PC on and off three times to launch Advanced Startup mode before Windows boot. There, you can go to Troubleshoot > Reset your PC.
If you managed to get hold of your files by using the Linux live distro, we suggest performing a clean reset by selecting the Remove everything option instead of Keep my files.
Error The system cannot find the file specified can be fixed
To review, you can try to fix the The system cannot find the file specified error by restarting your PC, updating Windows 10, running the Windows Update troubleshooter, checking the Windows Update services, starting the OS in Safe Mode, disabling startup apps, running a clean boot, and uninstalling third-party applications.
It’s also a good idea to disconnect external devices, run CHKDSK, SFC and DISM, investigate the system log, reinstall devices, update or roll back drivers, reinstall programs, check registry settings or restore the registry to default, uninstall system updates, run a malware scan, use a Linux live distro, change drive letters, format partitions, use System Restore, and reset Windows 10.
How did you repair this error? Let us know in the comments below.