Un mouse è indispensabile per i computer desktop e la maggior parte delle persone lo utilizza anche sui propri laptop poiché il touchpad o lo stick di puntamento sono piuttosto scomodi. I giocatori sono probabilmente l’esempio migliore di un pubblico che apprezza veramente la qualità di un buon mouse con una sensazione confortevole, molti pulsanti e un tempo di risposta eccellente.
Raramente troverai un mouse wireless nella scorta di attrezzature di un giocatore. Rispetto a un mouse cablato, ha un tempo di risposta inferiore poiché si collega al computer tramite un dongle USB wireless.
Tuttavia, altri tipi di utenti preferiscono i mouse cordless per attività informali sul PC, navigazione in Internet, streaming e lavoro. Tuttavia, quando il tuo mouse wireless non funziona, potresti essere tentato di abbandonarlo a favore di un mouse cablato che non ti deluderà.

Mouse wireless non funzionante
Prima di farlo, dovresti risolvere questo problema per vedere se può essere risolto facilmente. I problemi di funzionalità del mouse possono verificarsi indipendentemente dal marchio, inclusi Microsoft, Logitech e HP.
Alcuni scenari indesiderati che potresti riscontrare:
Come risolvere i problemi del mouse senza un mouse
Il primo problema è delicato: come risolvere i problemi del mouse sul tuo computer se non puoi usare il mouse per navigare in Windows 10. La soluzione più ovvia in questo caso è usare un altro dispositivo di puntamento. Ad esempio, se hai un laptop, puoi passare al touchpad o allo stick di puntamento.
Se non hai un secondo mouse sul desktop, prova a utilizzare un dispositivo di puntamento diverso, come una tavoletta grafica. Oppure puoi dipendere completamente dalla tastiera per la navigazione del computer, anche se questo richiede un po’di pratica per imparare a cambiare scheda e finestra e come eseguire azioni simili a fare clic sui pulsanti.
Puoi anche provare a utilizzare Cortana o un’altra soluzione software di riconoscimento vocale sul tuo PC Windows 10. Tuttavia, riteniamo che il modo migliore per risolvere i problemi del mouse sia configurare un telecomando connessione desktop da un altro computer utilizzando l’app Connessione desktop remoto incorporata o un’applicazione di terze parti come TeamViewer .
Come riparare un mouse wireless se non funziona su Windows 10
Segui queste soluzioni una alla volta per risolvere i problemi di funzionalità con il tuo mouse senza fili su un computer Windows 10.
1. Controlla se l’intero sistema è bloccato
Inizia verificando se l’intero sistema operativo è bloccato poiché il tuo mouse potrebbe funzionare correttamente. Se la tua sessione di gioco è stata interrotta, puoi facilmente capirlo poiché la finestra di gioco e l’audio si bloccano.
Tuttavia, se non accade nulla sullo schermo quando il mouse wireless ha smesso di funzionare, controlla che la tastiera funzioni. Se ha luci a LED, premi i tasti Num Lock o Caps Lock per vedere se si attivano. Altrimenti, premi Ctrl + Alt + Canc per vedere se lo schermo diventa blu e mostra le opzioni di alimentazione e Task Manager.
Dopo aver determinato che tutto funziona perfettamente tranne che per il mouse, procedi con le seguenti soluzioni.
2. Riavvia il computer
Sappiamo che sembra sciocco, ma riavviare il computer potrebbe essere sufficiente per riavviare il mouse wireless e farlo funzionare di nuovo correttamente. È possibile che i suoi servizi e driver fossero sospesi a causa di altri processi in esecuzione, quindi riavviare Windows 10 dovrebbe risolvere il problema.
3. Verifica la compatibilità del mouse
Se di recente hai acquistato un nuovo mouse o lo hai ricevuto in regalo, forse non supporta il tuo sistema operativo. È raro al giorno d’oggi poiché la maggior parte dei mouse moderni supporta Windows 10.
Ma potrebbe comunque accadere, soprattutto se il marchio è nuovo o relativamente sconosciuto. Visita il sito web del produttore del tuo mouse o contatta l’assistenza clienti per confermare che il tuo mouse USB è compatibile con il tuo sistema.
4. Controlla la batteria del mouse
Capovolgi il mouse per verificare se la sua luce è accesa. Mentre lo fai, dai un’occhiata più da vicino per assicurarti che la luce non sia coperta da una pellicola sottile e trasparente. Forse i tuoi colleghi dell’ufficio volevano farti un piccolo scherzo.
Tuttavia, se la luce è intermittente o spenta, significa che la batteria è scarica o scarica, quindi dovresti sostituirla. Una volta fatto, controlla se il tuo mouse wireless funziona ora.
5. Avvicinati al ricevitore USB
Alcuni utenti collegano i loro laptop tramite le loro smart TV tramite un cavo HDMI e provano a navigare nei loro computer con un mouse da una grande distanza. Tuttavia, i mouse senza fili non sono progettati per un lungo raggio, quindi dovresti avvicinarti al ricevitore USB per ottenere un segnale migliore. È come spostarsi con lo smartphone più vicino al router per accedere a Internet.
Inoltre, dovresti assicurarti che il ricevitore USB del mouse non sia ostruito da alcun oggetto o vicino ad altri dispositivi come un forno a microonde o uno smartphone poiché l’interferenza può causare il blocco del mouse wireless sul tuo computer Windows 10.
6. Utilizza una porta USB diversa
Potrebbe esserci un problema con la porta USB, non con il mouse. Scollegare il ricevitore USB dal desktop o laptop e provare una porta diversa e identica. Sui desktop, puoi anche provare la parte anteriore o posteriore dell’unità computer.
Tuttavia, se il tuo notebook non ha troppe porte, collega un hub USB multiporta e poi collega il tuo ricevitore USB all’hub per vedere se il tuo mouse wireless ora funziona.
7. Prova a utilizzare il mouse su un altro computer
Forse il tuo mouse non funziona male, ma c’è qualcosa che non va nelle impostazioni del tuo computer. Il modo più semplice per dimostrarlo è collegare il ricevitore USB del mouse a un altro computer per vedere se funziona lì.
8. Reinstalla il mouse e i dispositivi USB
È possibile che il mouse e i dispositivi USB non siano stati installati correttamente sul computer Windows 10. Ma puoi risolvere rapidamente questo problema da Gestione dispositivi.
Utilizzo di un mouse
- Fai clic con il pulsante destro del mouse sul pulsante Start e vai a Gestione dispositivi
- Espandi il menu Mouse e altri dispositivi di puntamento , fai clic con il pulsante destro del mouse e seleziona Disinstalla dispositivo
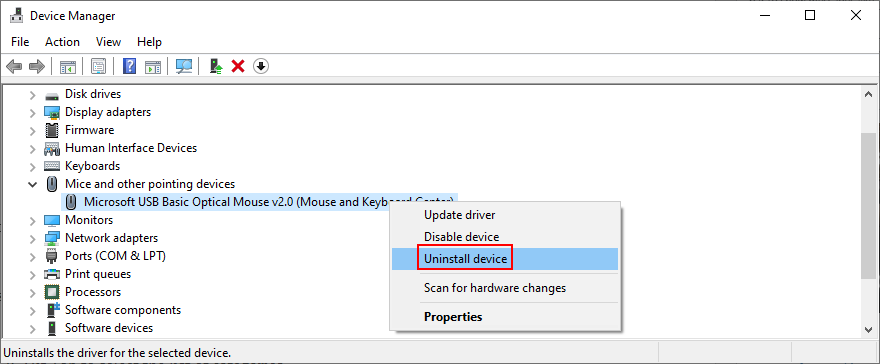
- Seleziona la casella Elimina il software del driver per questo dispositivo
- Fai clic su Disinstalla
- Torna alla finestra principale di Gestione dispositivi
- Apri il gruppo Controller Universal Serial Bus
- Segui la stessa procedura per disinstallare i dispositivi per le tue porte USB

- Apri il menu Azione
- Seleziona Rileva modifiche hardware
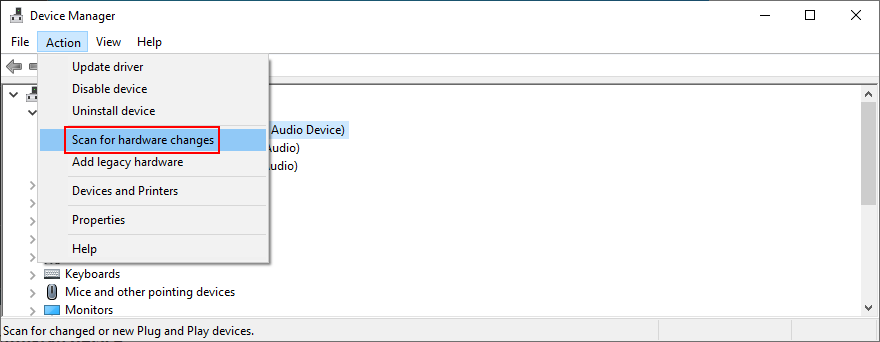
- Riavvia il computer. Windows reinstallerà automaticamente i dispositivi mancanti
- Controlla subito il mouse
Utilizzo della tastiera
- Premi Win + R , digita devmgmt.msc e premi Invio per avviare Dispositivo Manager
- Premi Tab per selezionare l’elenco di categorie
- Utilizza i tasti freccia per spostarti verso il basso nella categoria Mouse e altri dispositivi di puntamento
- Premi Barra spaziatrice per espandere questo gruppo
- Premi il tasto menu (un rettangolo con tre linee) o utilizza Maiusc + F10 per aprire il menu contestuale
- Premi tre volte il tasto freccia giù per selezionare Disinstalla dispositivo e premi Invio
- Premi Tab fino a selezionare Elimina il software del driver per questo dispositivo e premi Barra spaziatrice per selezionare la relativa casella
- Premi Tab per selezionare il pulsante Disinstalla e fai clic su Invio
- Premi Alt + F4 per chiudere tutte le finestre finché non viene visualizzata la finestra di dialogo di spegnimento
- Utilizza il tasto freccia su o giù per selezionare l’opzione Spegni e premi Invio
- Dopo il riavvio del PC, Windows reinstallerà i dispositivi mancanti
- Controlla se il tuo mouse wireless ora funziona
9. Aggiorna il mouse e i driver USB
Se la reinstallazione dei dispositivi non ha risolto il problema del mouse USB, è possibile che i suoi driver non siano aggiornati. Ma puoi risolvere questo problema anche utilizzando Gestione dispositivi.
- Accedi a Gestione dispositivi e naviga seguendo le istruzioni nella Soluzione 8 da questo elenco
- Fai clic con il pulsante destro del mouse sull’adattatore del mouse (o premi il tasto menu o Maiusc + F12 ) e seleziona Aggiorna driver (o premi il tasto in basso freccia una volta e premi Invio )

- Fai clic su Cerca automaticamente i conducenti (o premi Tab per selezionare questa opzione, quindi premi Invio )
- Se ricevi il messaggio I migliori driver per il tuo dispositivo sono già installati , fai clic su Cerca driver aggiornati su Windows Update (o premi Tab per selezionare questa opzione e premi Invio )
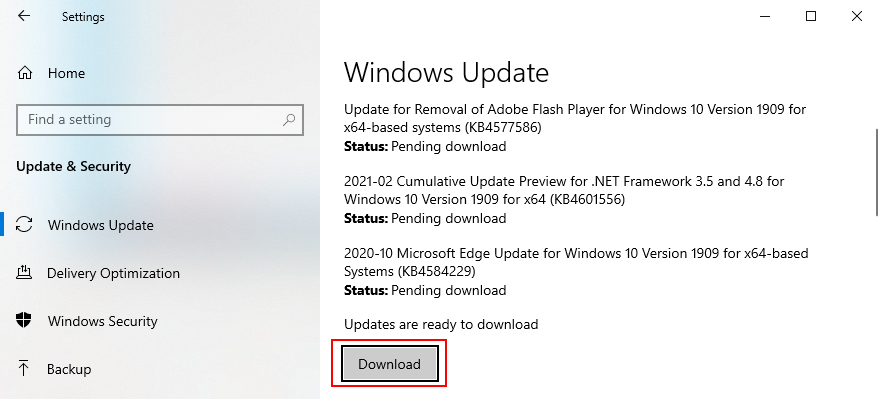
- Una volta aperte le impostazioni di Windows Update, il tuo sistema operativo dovrebbe iniziare subito a cercare gli aggiornamenti. In caso contrario, fai clic su Verifica aggiornamenti (o premi Tab finché non selezioni questa impostazione e premi Invio )
- Attendi pazientemente che Windows cerchi gli aggiornamenti. Se c’è qualcosa in sospeso, fai clic su Scarica o Installa ora (a seconda di cosa mostra lo schermo)
- Riavvia il computer per finalizzare l’aggiornamento di sistema
- Torna a Gestione dispositivi ed esegui gli stessi passaggi per aggiornare le porte USB dal menu Controller USB (Universal Serial Bus) . Tuttavia, non è necessario verificare la presenza di aggiornamenti di sistema se l’hai già fatto per il driver del mouse

Sfortunatamente, Windows 10 non è così efficiente quando si tratta di rintracciare i driver utilizzando Windows Update. Ci sono due soluzioni alternative qui: puoi scaricare e installare il driver da solo o utilizzare applicazione aggiornamento driver .
Per gli aggiornamenti manuali, è necessario visitare il sito Web del produttore del mouse per individuare e scaricare un driver più recente compatibile con il sistema operativo. Tuttavia, se non vuoi rischiare di ottenere un driver non supportato e fare più danni, puoi rivolgerti a un’applicazione specializzata che rileva e aggiorna automaticamente tutti i tuoi driver.
10. Ripristina il mouse o i driver USB
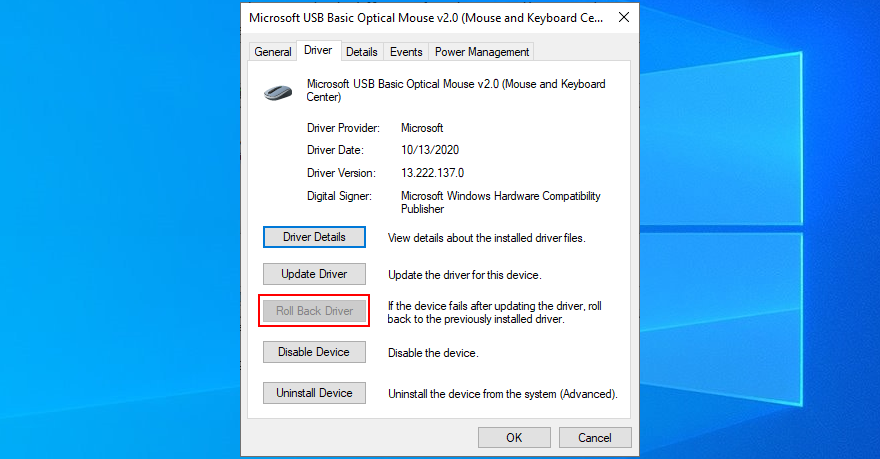
Se hai già installato un driver del mouse incompatibile, dovresti rimuoverlo immediatamente dal tuo computer e tornare alla versione precedente. Anche se non sei sicuro di questo, è comunque una buona idea eseguire il rollback, se possibile. Ecco cosa devi fare:
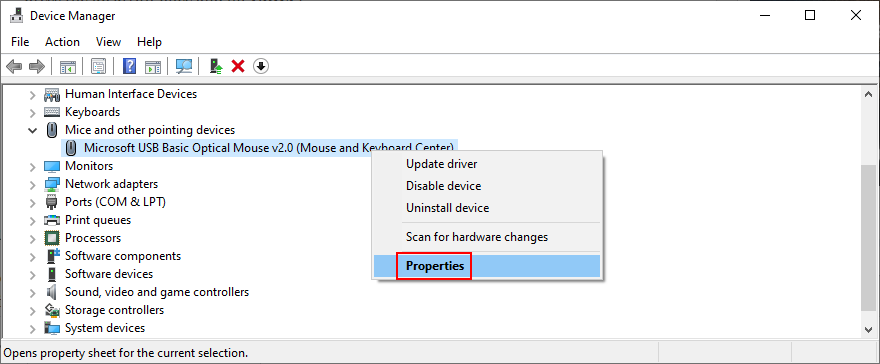
- Accedi e sfoglia Gestione dispositivi eseguendo la procedura descritta in dettaglio nella Soluzione 8 da questo elenco
- Fai clic con il pulsante destro del mouse sul dispositivo e seleziona Proprietà (o premi il tasto menu o Maiusc + F12 , premi la freccia su una volta e premi Invio )
- Fai clic sulla scheda Driver (o premi Tab finché non selezioni la scheda Generale e premi il tasto freccia destra per andare a Driver )
- Fai clic su Ripristina driver e segui le istruzioni sullo schermo (o premi Tab tre volte per selezionare Ripristina driver e premi
Invio ) - Se il pulsante Ripristina driver è disattivato, significa che non è possibile eseguire il ripristino perché non esiste una versione precedente del driver sul PC
- Fai lo stesso per le tue porte USB nella categoria Controller USB (Universal Serial Bus ) per eseguire il rollback, se consentito
11. Controlla le impostazioni di gestione dell’alimentazione USB
Impostazioni errate della porta USB potrebbero essere un altro motivo per cui il tuo mouse wireless non funziona sul tuo computer Windows 10. Per impostazione predefinita, il tuo sistema operativo è autorizzato a mantenere le porte USB disabilitate quando non sono in uso, al fine di risparmiare energia. Ma diventa problematico quando le porte non si attivano quando si collega il ricevitore USB. Ecco come affrontare questo problema:
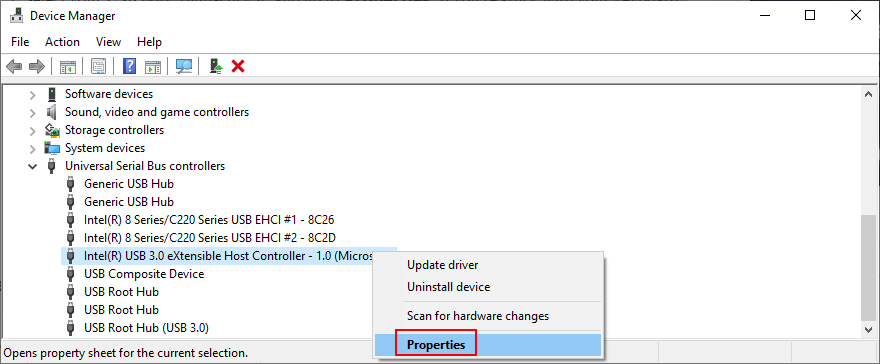
- Vai a Gestione dispositivi e spostati utilizzando le istruzioni fornite nella Soluzione 8 da questo elenco
- Estendi il gruppo Controller Universal Serial Bus
- Seleziona il tuo dispositivo USB, fai clic con il pulsante destro del mouse e vai a Proprietà . Se sei bloccato con la tastiera, premi il tasto menu o Maiusc + F12 , premi la freccia su una volta e premi Invio per accedere alle Proprietà
- Passa alla sezione Risparmio energia (premi Tab fino a selezionare l’area delle schede e utilizza i tasti freccia per andare a Risparmio energia )
- Deseleziona Consenti al computer di spegnere il dispositivo per risparmiare energia (premi Tab per selezionare questa opzione, quindi premi Barra spaziatrice )
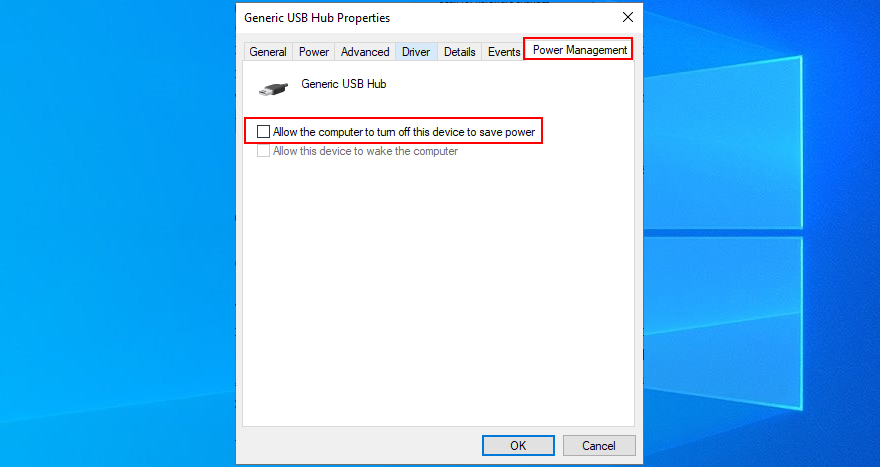
- Fai clic su OK (premi Tab finché non selezioni OK , quindi Invio )
- Riavvia il PC (premi Alt + F4 fino a raggiungere il menu di spegnimento, quindi seleziona Riavvia e premi Invio )
- Controlla se il tuo mouse senza fili ora funziona
12. Esegui lo strumento di risoluzione dei problemi relativi a hardware e dispositivi
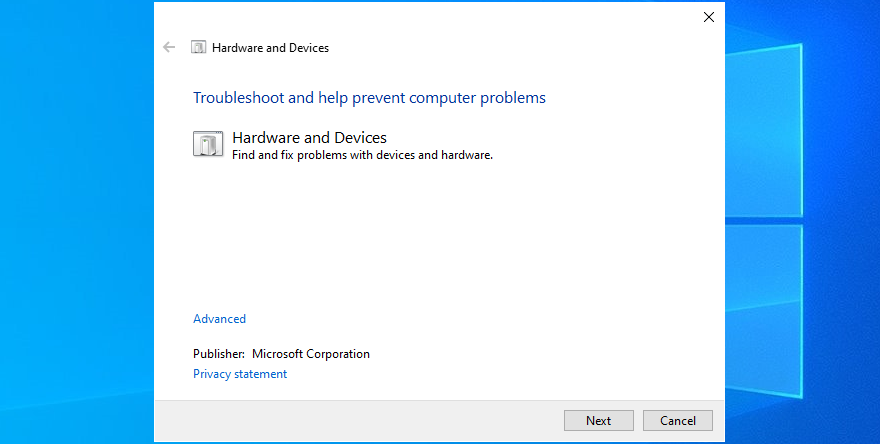
Windows 10 dispone di strumenti per la risoluzione dei problemi interni per tutte le parti critiche del sistema, inclusi hardware e dispositivi. Può aiutarti a risolvere problemi comuni che potrebbero impedire il corretto funzionamento del mouse o delle porte USB, quindi vale la pena provare. Normalmente, puoi trovarlo in Impostazioni > Risoluzione dei problemi . Ma se Manca lo strumento per la risoluzione dei problemi relativi a hardware e dispositivi dall’elenco, puoi avviarlo utilizzando lo strumento Esegui. Ecco come:
- Premi il tasto Win + R , digita
msdt.exe-id DeviceDiagnostice premi Invio - Fai clic su Avanti (premi Tab finché non selezioni Avanti e premi Invio )
- Segui i passaggi della procedura guidata e applica le correzioni disponibili
- Riavvia il sistema operativo
- Prova a utilizzare il tuo mouse USB adesso
13. Disabilita la modalità di avvio rapido
L’avvio rapido è una funzionalità di Windows 10 che assicura che non tutti i processi e i servizi vengano arrestati, al fine di avviare il sistema operativo più velocemente dopo un arresto. Tuttavia, è noto che Fast Startup ha causato più problemi agli utenti Windows, incluso Errori di schermata blu della morte .
In alcuni casi, può anche impedire il corretto funzionamento del mouse wireless. Tuttavia, puoi risolvere facilmente questo problema disattivando l’avvio rapido su Windows 10 . Ecco cosa devi fare:
- Assicurati di accedere a Windows 10 utilizzando un account amministratore
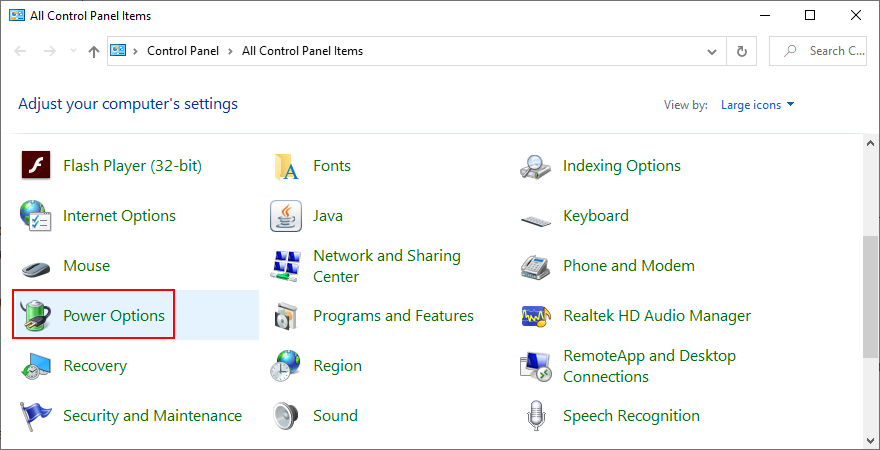
- Premi il tasto Win + R , digita control panel e premi Invio per aprire questa app
- Fai clic su Opzioni risparmio energia (o utilizza i tasti freccia per spostarti, seleziona Opzioni risparmio energia e premi Invio )
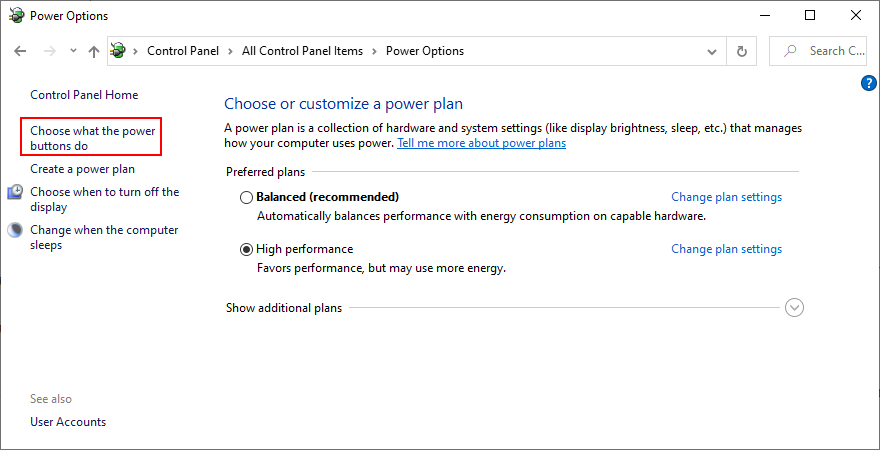
- Seleziona Scegli cosa fanno i pulsanti di accensione sul lato sinistro (o premi Tab per selezionare questa opzione e Invio per fare clic su di essa)
- Fai clic su Modifica impostazioni attualmente non disponibili (o premi Tab fino a selezionare l’opzione, quindi premi Invio )
- Disattiva Attiva avvio rapido (utilizza Tab o i tasti freccia per selezionare l’opzione, quindi premi Barra spaziatrice per deselezionare la casella)
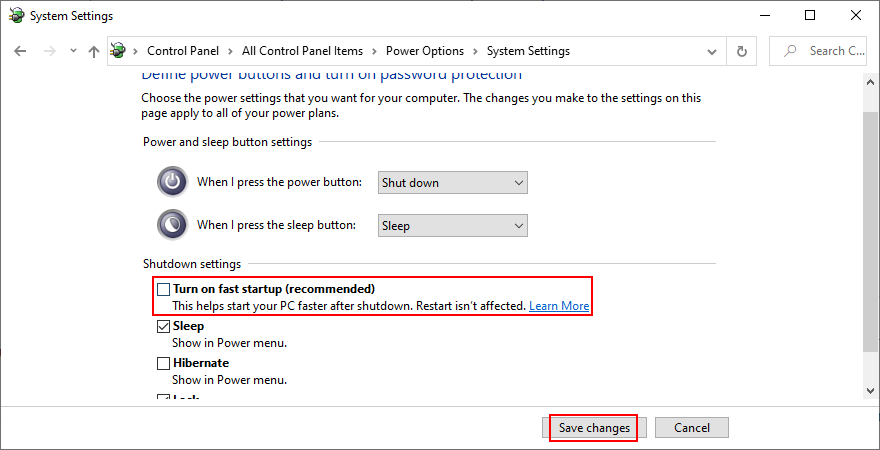
- Fai clic su Salva modifiche (utilizza Tab o i tasti freccia per selezionare il pulsante, quindi premi Invio )
- Riavvia il computer e prova a utilizzare il mouse senza fili adesso
14. Chiudi tutte le applicazioni in esecuzione
Se hai avviato applicazioni o giochi che richiedono molte risorse, non c’è da meravigliarsi che il tuo mouse USB si blocchi di tanto in tanto. Ma puoi risolvere questo problema chiudendo tutti i programmi che non stai attualmente utilizzando. Il modo migliore per farlo è terminare la loro attività da Task Manager.
Come terminare i processi in esecuzione:
- Fai clic sul pulsante Start , cerca Task Manager e premi Invio per aprire questa applicazione
- Rimani nella scheda Processi . Se ti trovi in un’altra area, utilizza Tab per selezionare le schede e i tasti freccia per passare alla sezione Processi
- Seleziona un’applicazione inutilizzata e fai clic su Termina attività . In alternativa, utilizza il tasto Tab per selezionare l’elenco dei processi e premi i tasti freccia per navigare. Dopo aver selezionato un’app, premi Tab finché non selezioni il pulsante Termina attività e premi Invio (o premi il tasto menu o Maiusc + F12 per aprire il menu di scelta rapida, quindi utilizza le frecce su e giù per selezionare Termina attività e premi Invio )

- Esegui questa operazione per tutte le applicazioni che non riconosci o non utilizzi
- Prova a utilizzare il mouse wireless adesso
It might be necessary to restart the computer after exiting all applications. However, if all or part of these programs are scheduled to automatically run at Windows boot, then your work will have been in vain. In that case, you should return to Task Manager to disable all startup apps.
How to disable startup apps:
- Click the Start button, type Task Manager, and press Enter to open this app
- Go to the Startup tab. If you’re using a keyboard, press the Tab key until you select the tabs area, and use the arrow keys to navigate to Startup
- Select an app and click Disable. Or, press Tab until you select the list of apps, use the arrow keys to navigate and select an app. Then press Tab until you select the Disable button and hit Enter (or press the menu button or Shift + F12 to open the context menu, use the arrow keys to select Disable, and press Enter)
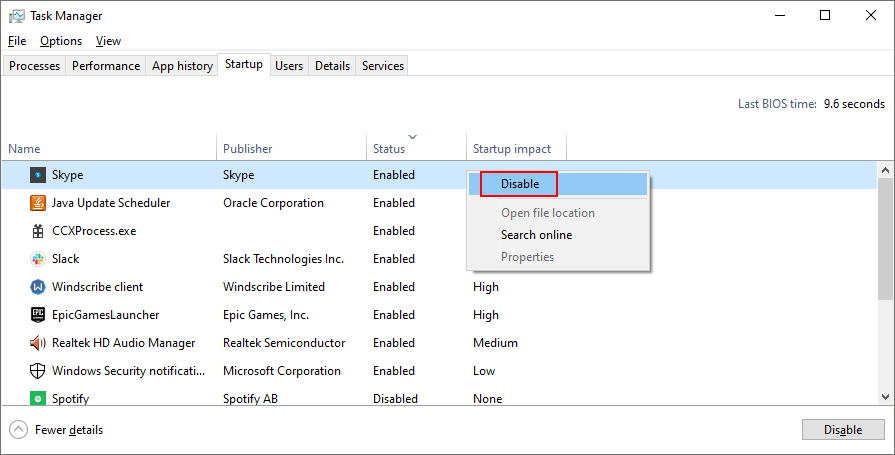
- Do this for all startup apps with the Enabled status
- Restart your computer and see if you can use your USB mouse now
15. Esegui un avvio pulito
A better idea than disabling startup apps is running a clean boot on Windows 10. In addition to stopping all programs that automatically run at Windows startup, you will be also disabling scheduled services. It’s a step forward toward fixing your wireless mouse if it’s not working on your Windows 10 PC.
- Press Win key + R, type msconfig, and hit Enter to open the System Configuration app
- Stay in the General tab. If you’re somewhere else, press Tab until you select the tabs area and use the arrow keys to go to General
- At Startup selection, select Selective startup and disable Load system services and Load startup items. Or, press Tab until you reach Selective startup, use the arrow keys to select Load system services and Load startup items, then press Spacebar at each setting to disable it
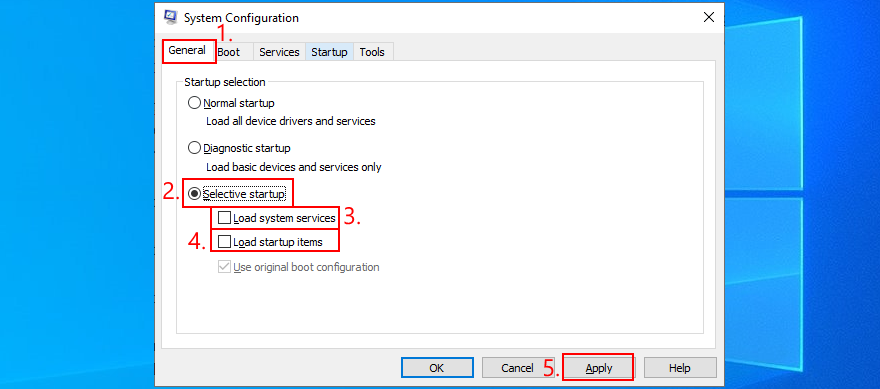
- Click Apply and exit. Or press Tab until you reach the Apply button, hit Enter, and press Esc
- Follow the instructions at Solution 14 from this list to disable startup apps
- Restart your computer and check your cordless mouse for issues
16. Avvia Windows 10 in modalità provvisoria
Running Windows 10 in Safe Mode means starting your operating system in a basic state, with all non-important drivers and files disabled. It’s a bit more strict than clean boot, but it helps you narrow down the root of the problem.
If your wireless mouse works in Safe Mode, it means that there’s no problem with the default Windows settings and standard drivers. Here’s what you need to do:
- Shut down your computer, turn it on, and then shut it down by force. Do this three times to boot to Troubleshoot mode
- Go to Troubleshoot > Advanced options > Startup Settings. If you can’t use a mouse, then use the Tab key to navigate and Enter to access options

- Select Restart and press F4 to start Windows in Safe Mode (without networking features)
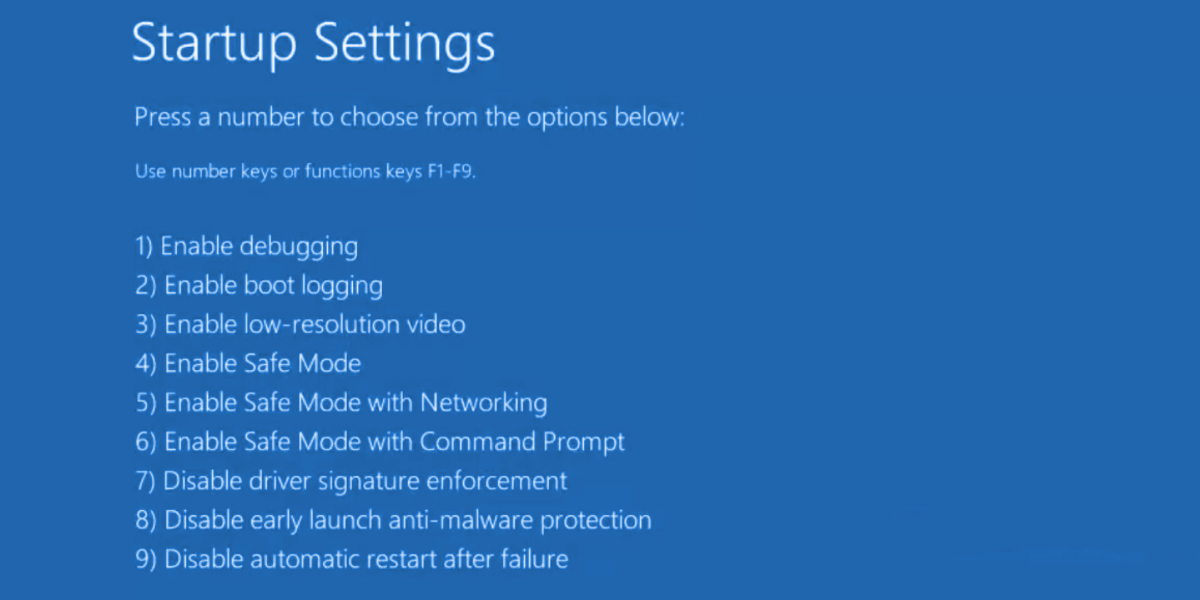
- After Windows boots, check if you can use your USB mouse
17. Unplug other peripheral devices
Your USB mouse might interfere with other external devices currently attached to your computer. If you have recently purchased or received a new device as a gift, like a webcam or Wi-Fi adapter, try unplugging it from your PC to see if this fixed your mouse issue.
If you’re unsure, unplug everything except for your mouse and keyboard. Then, shut down your computer, start Windows again, and inspect results. If your wireless mouse is working now, start plugging in your devices one at a time until your mouse starts malfunctioning again.
Once you spot the bad apple, you can reinstall the device, repair it, send it back to your manufacturer if you have a warranty, or just drop and replace it with something else.
18. Esegui SFC
Any corrupt files in your operating system could be causing device functionality issues, even with your mouse. However, you should be able to fix damaged files by turning to an internal Windows utility called SFC (System File Checker). Here’s how to use it:
- Press Windows key + R, type cmd, and press Ctrl + Shift + Enter to open Command Prompt as administrator
- Type
sfc/scannowand press Enter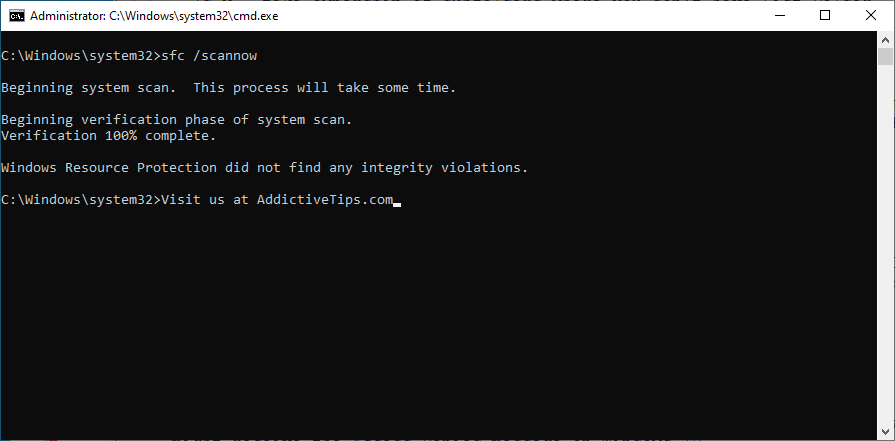
- Patiently wait while SFC does its job. Once it finishes, restart your computer
- Check if you can use your USB mouse now
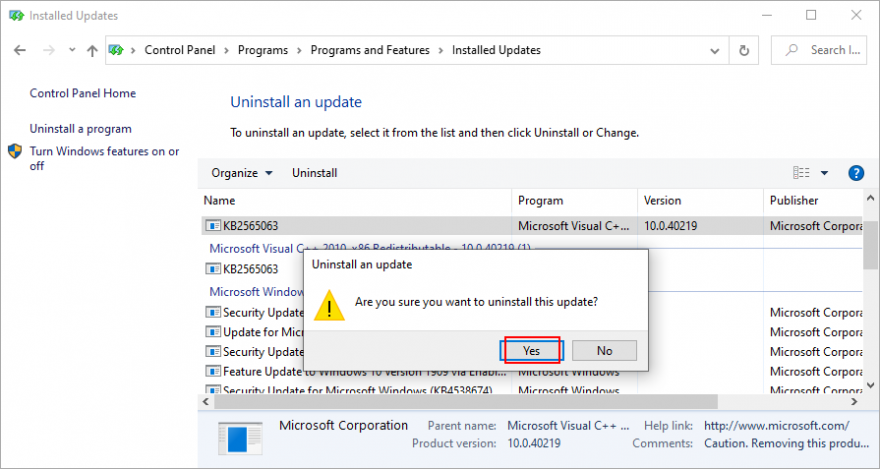
19. Uninstall system updates
Long-time Windows users are familiar with the fact that certain system updates shouldn’t be released because they end up harming computers. A bad update could be the reason why your wireless mouse isn’t working properly anymore, especially if you have recently gone through an update. To solve this matter, you should uninstall the most recent Windows update. Ecco come:
- Press Win key + R, type appwiz.cpl, and press Enter
- Click View installed updates. Or, press Tab until you select View installed updates, then press Enter
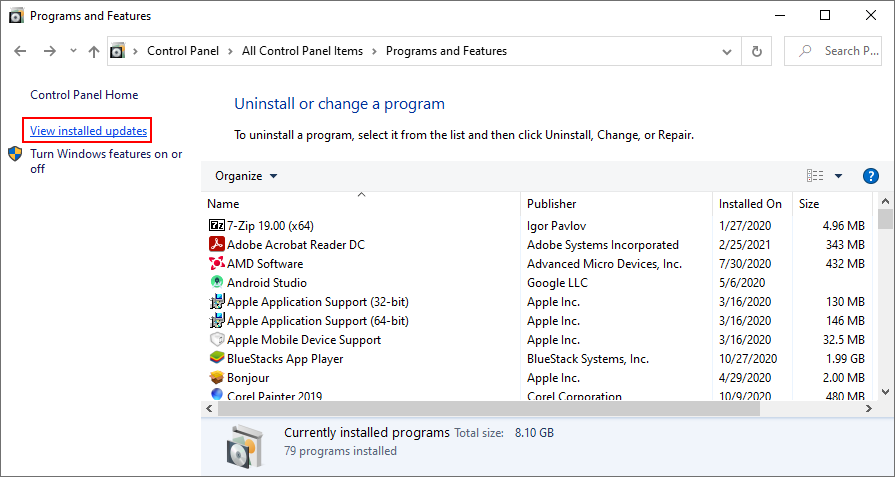
- Click the Installed on column to sort updates by date of installation (newest first). Or, press Tab until you select the Name column, then use the arrow keys to go to Installed On, and press Enter once or twice

- Double-click the first update in the Microsoft Windows category and click Yes to confirm uninstall. Or, press Tab until you select the updates area, use the arrow keys to navigate to the update, then press Enter to perform the uninstall and Enter again to confirm (on the Yes option)
- Restart your computer and check your mouse
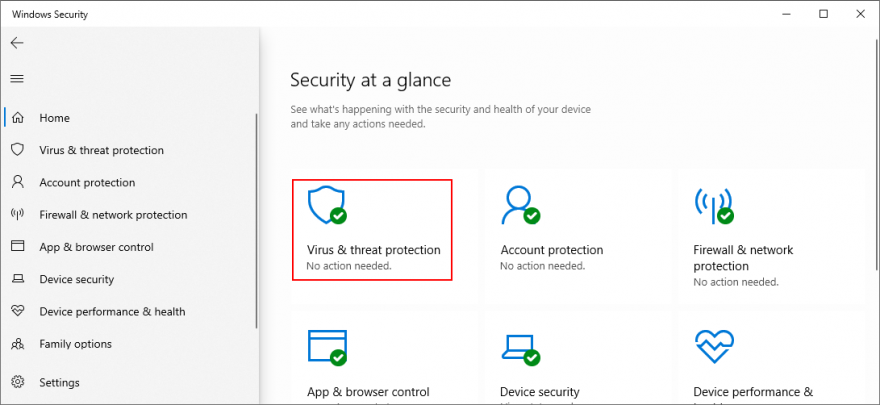
20. Check your PC for malware
If your computer has viruses and if critical files in charge of your mouse device were infected, it’s no wonder that your wireless mouse is not working anymore on Windows 10. But you can run a malware scan to fix this problem. If you don’t have a third-party security solution installed, turn to Windows Defender.
Come utilizzare Windows Defender:
- Press the Win key, type Windows Security, and press Enter to open this program
- Click Virus & threat protection (or, press Tab until you select this option and hit Enter)
- Click Scan options or use the arrow keys to navigate there and hit Enter

- Select Quick scan and click Scan now. Or, press Tab until you select the scan options, hit Spacebar at Quick scan, then press Tab to select Scan now and hit Enter
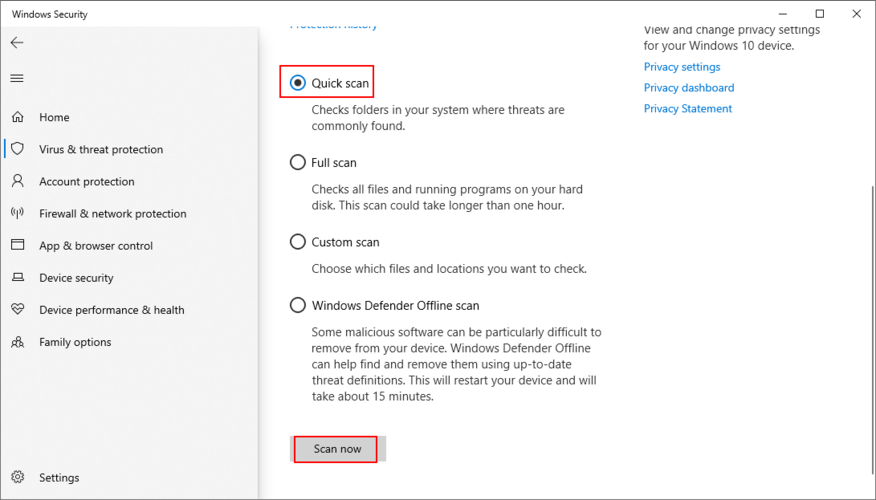
- If the search is unsuccessful, run another scan after selecting Windows Defender Offline scan mode
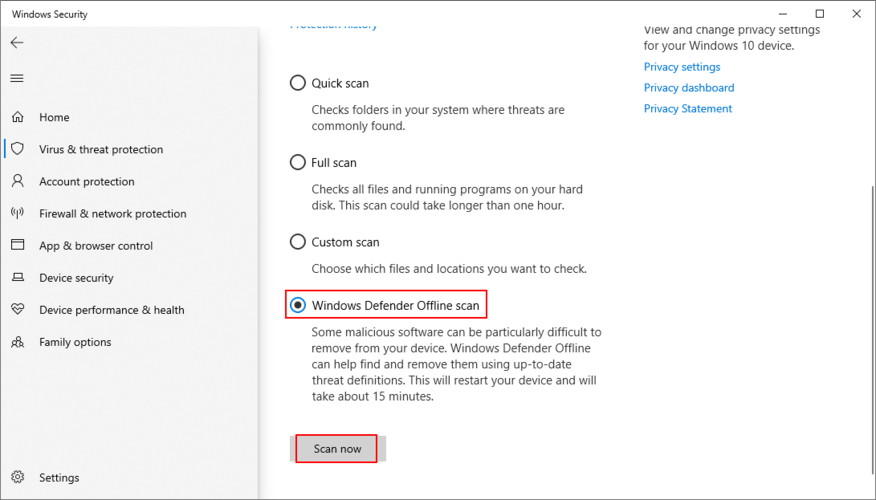
- Patiently wait until the scan is carried out and allow Windows to remove any infected files
- Restart your computer and check if your mouse works now
21. Uninstall game controller software
You can use a PS4 controller on Windows 10 to play awesome games like Dark Souls, for example. However, certain game controller software applications can interfere with your mouse’s USB receiver, preventing you from using it on your computer.
If you recently installed tools like MotioninJoy, Keysticks or JoyToKey, you should remove them from your computer to restore the functionality of your wireless mouse.
How to uninstall game controller apps:
- Press Win key + R, type appwiz.cpl, and press Enter
- Find the app in the list, double-click it, and click Yes to confirm its removal
- Click Yes again if prompted by UAC (User Account Control) to uninstall
- If you’re glued to your keyboard, press Tab until you reach the list of apps, use the arrow keys to navigate to the game controller tool, then press Enter and follow the removal instructions
22. Change BIOS or UEFI settings
USB settings can be enabled and disabled from BIOS or UEFI mode. If you or someone else with access to your computer has changed the BIOS configuration, perhaps the USB support was deactivated there and must be turned on again. It’s really easy to make it happen:
- Restart your computer (press Alt + F4, press Tab to select Restart from the menu, then hit Enter)
- Before Windows boots, quickly press the key shown on the screen to access BIOS setup
- Using your arrow keys, navigate to the Devices section
- Depending on your BIOS type, find and access any area about USB
- Make sure to enable USB support
- Save the current BIOS configuration and quit to Windows
- Check if you can use your wireless mouse now
23. Check if you have the mouhid.sys file
mouhid.sys (Mouse HID Driver) is the kernel device driver responsible for your mouse interface. Without this file, you can’t use any mouse, no matter what you do. Get started by verifying that you have this item.
Where to find mouhid.sys:
- Press Win + R to open File Explorer
- Navigate to the address bar by pressing Tab
- Hit the Enter key and paste the following location:
%SystemRoot%\System32\drivers\
- Press Enter
- Search for the mouhid.sys file in this list
- If you find it, press Win key + R, type cmd, press Ctrl + Shift + Enter to launch Command Prompt as admin
- Type
sc config mouhid start=demandand press Enter to restore the mouhid.sys configuration to default - If the file’s not there or if it’s changed or damaged, you must create a Windows installation media disc and restore it from there
How to create Windows installation media:
- Connect an empty USB flash drive to your PC
- Download Media Creation Tool from the official website
- Launch the program and follow the instructions to create a Windows installation media USB disk
How to restore mouhid.sys from the Windows installation media:
- Sign in to Windows 10 using an administrative account
- Make sure the pen drive with the Windows installation media is plugged into the PC
- Download 7-Zip and install it on your PC
- Press Win + E to open File Explorer
- Navigate to the USB flash drive
- Open the Sources folder
- Locate the install.esd file
- Right-click install.esd (or press the menu key or Shift + F12) and open it with 7-Zip (Open archive)
- Browse the install.esd file contents in 7-Zip, then locate and copy the mouhid.sys file
- Switch back to File Explorer and go to the following location:
%SystemRoot%\System32\drivers\
- Paste the mouhid.sys file here. If it already exists, overwrite the existing item
- Restart your computer
If the mouhid.sys file is currently being used by Windows, it won’t allow you to overwrite it. However, there are a couple of workarounds: taking ownership and using Unlocker to delete the corrupt file.
How to take ownership of mouhid.sys:
- Sign in to Windows 10 using an administrator account
- Press Win key + E to open File Explorer
- Navigate to:
%SystemRoot%\System32\drivers\
- Right-click mouhid.sys and go to Properties. Or, press the menu key or Shift + F12, hit the up arrow, and press Enter
- Switch to the Security section. Or, press Tab until you select the area of tabs, then press the right arrow to go to Security
- Click Advanced. Or, press Tab until you select that button and press Enter
- Next to Owner, click Change. Or, press Tab until you select Change, then press Spacebar
- Type Administrators and click Check names. Or, press Tab to select Check names, then hit Enter
- Press OK, then Apply and OK twice
- Once returned to the Properties panel, click Edit (press Tab to select the option, then Enter)
- At Full control, click Allow. Or, press Tab until you reach the Allow box and press Spacebar to enable it
- Click Apply (press Tab until you reach Apply and hit the Enter key)
- After confirming the action, exit all windows
How to delete mouhid.sys with Unlocker:
- Download Unlocker. The app is not available for download from the official website anymore, but you can find it on third-party mirror websites
- Unzip and install the application. Be careful during setup since Unlocker offers to download and install unrelated, third-party programs. You can refuse those offers by unchecking their options before clicking Next
- If you get an error when trying to unzip or install Unlocker, it means that Windows Defender or your third-party antivirus tool is blocking it (the threat is called
PUA:Win32/Presenoker). You must allow it on your device to be able to use Unlocker. Don’t worry since you can delete it afterward - Launch the Unlocker app
- Using the built-in file browser, navigate to the
%SystemRoot%\System32\drivers\location (if Windows is installed on the default C: drive, then go to Windows > System32 > drivers) - Select the mouhid.sys file and press OK
- Open the No action menu and select Delete, then press OK
- Since it’s a system file currently being used by your computer, Unlocker will offer to delete it during the next Windows boot. Accept this offer
- Reboot your computer
- Open File Explorer using Win key + E
- Navigate to the location where you copied the mouhid.sys file from the Windows installation media. Copy it again
- Now, go to
%SystemRoot%\System32\drivers\and paste the file. You shouldn’t get permission errors anymore - Restart your computer again. Your wireless mouse should work now on Windows 10
24. Use System Restore
Rolling back Windows 10 to a previous checkpoint when your mouse still worked in a simple way to fix the problem if it occurred due to an unknown software event. However, this means that System Restore must have been enabled on your PC a long time ago, and that you have at least one restore point created before your cordless mouse stopped working. Here’s what you need to do:
- Log in to Windows 10 with an admin account
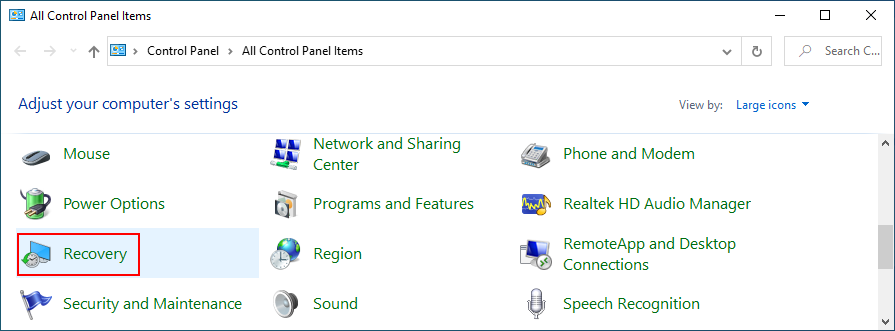
- Press Win key + R, type control panel, and hit Enter
- Select Recovery. Or, use the arrow keys to navigate to this option and press Enter
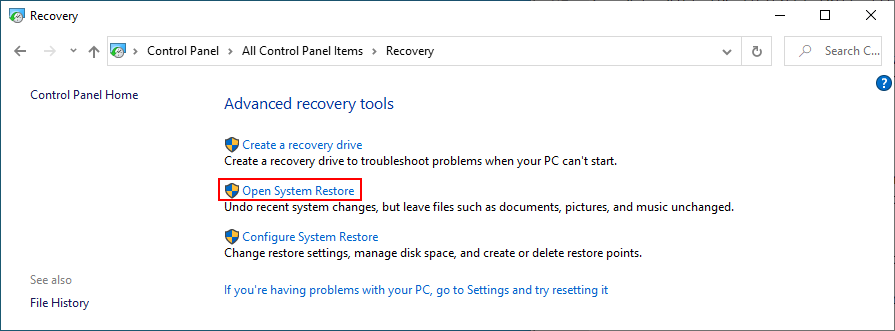
- Click Open System Restore. Or, press Tab until you reach the Advanced recovery tools menu, move to Open System Restore using the arrow keys, and hit Enter
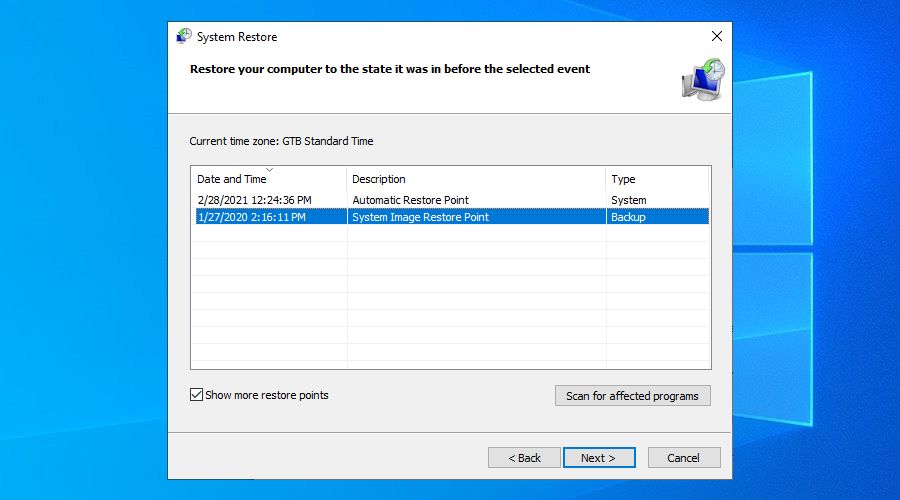
- Select a restore point from the list and click Next. Or, use Tab to switch to the list of restore points, move with the arrow keys to select a checkpoint, press Tab until you reach the Next button, and hit Enter
- Follow the on-screen instructions
- After Windows restarts, check if you still have problems with your wireless mouse
25. Use Event Viewer
If you still can’t figure out what’s wrong in order to fix the problem, we recommend getting in touch with the tech support of your mouse manufacturer. They should be able to shed some light on the matter.
Before doing so, it’s a good idea to collect as much information as possible about your mouse, and the best way to do that is by using Event Viewer.
How to use Event Viewer:
- Press the Windows key, type Device Manager, and hit Enter to open this app
- Extend the Mice and other pointing devices group. Or, press Tab, use the arrow keys to navigate to the category, and press the right arrow key to extend the group
- Right-click your mouse adapter and go to Properties. Or, press the menu key or Shift + F12, press the up arrow, and hit Enter
- Switch to the Events tab. Or, press Tab until you reach the tabs area and use the arrow keys to go to Events
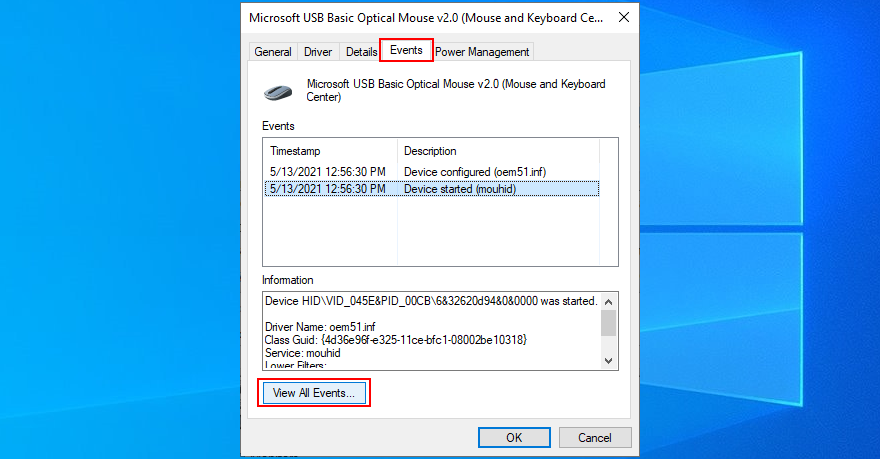
- Click View All Events. Or, press Tab until you select that button and press Enter
- Copy the information found in the events list (at General and Details)
If you don’t want to contact tech support, you can look up more information on Google based on the mouse events registered by your system. You could also plug the USB receiver into another PC to compare the event logs.
26. Reset Windows 10
Performing a factory reset on Windows 10 is the last resort to restore the original system files. However, you should only proceed with this solution if you’re absolutely sure that your mouse is supported by your operating system and not damaged in any way.
Your personal files will be left untouched, so you don’t need to perform backups. But you will have to reinstall all your applications and games installed on the same drive as Windows.
How to reset Windows 10:
- Press the Win key, type Reset this PC, and hit Enter
- At Reset this PC, click Get started. Or, press Tab until you select this button, then hit Enter

- Choose Keep my files
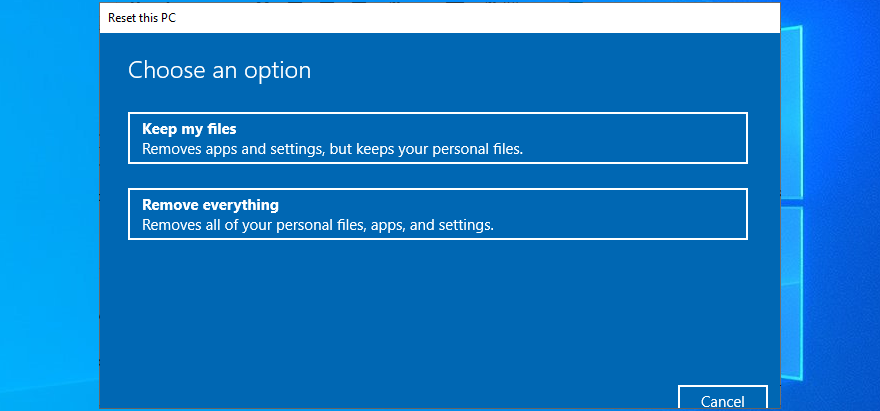
- Proceed with the on-screen steps
You can fix a non-working wireless mouse
To review, if your cordless mouse is not working on Windows 10, there could be a problem with the device or your computer settings. The most delicate part is troubleshooting the problem without a mouse, unless you can control your PC remotely from another computer. Still, your keyboard is your friend.
Get started by checking if your entire system is frozen. You can try simple solutions like restarting your PC, checking the mouse compatibility and battery, moving closer to the USB receiver and ensuring that it’s not obstructed, connecting to a different USB port, and trying to use the malfunctioning mouse on another machine.
Next, you should reinstall the mouse and USB devices, update or roll back their drivers, check the USB power management settings, run the internal Hardware and Devices troubleshooter, turn off Fast Startup, terminate all running programs, run a clean boot, start Windows 10 in Safe Mode, and unplug other external devices except for the mouse USB receiver.
Furthermore, you can run SFC to find and fix corrupt system files, uninstall bad system updates, check your PC for malware, uninstall any game controller tools, change BIOS or UEFI settings, check if you have the mouhid.sys file, use System Restore to roll back to a previous checkpoint, and consult Event Viewer to get more details before contacting tech support.
If everything fails but you’re certain that the USB mouse works on any other computer, you can reset Windows 10 to factory settings and, subsequently, reinstall all system files that might be corrupt, missing, or damaged.
How did you manage to get your wireless mouse working again? Tell us all about it in the comments below.