Ultimátní průvodce instalací a používáním prostředí Linux (včetně bash, linuxových aplikací, linuxového desktopu a dalších) v systému Windows 11 s WSL.
Podsystém Windows pro Linux (WSL) je vrstva kompatibility, která vám umožňuje provozovat vaši oblíbenou variantu linuxových distribucí v rámci operačního systému Windows (Windows 10 a 11). Linux můžete provozovat nad Windows 11 (nebo bez nutnosti duálního spouštění pomocí VMWare/VirtualBox nebo instalace jako hlavního operačního systému).
Na rozdíl od Windows 10 je Windows 11 dodáván s WSL 2.0, upgradovaná verze WSL, navržená tak, aby spouštěla úplné linuxové jádro v prostředí Hyper-V pro lepší kompatibilitu. Kromě toho WSL 2 na Windows 11 nyní nativně podporuje grafická uživatelská rozhraní a zvuk, což znamená, že můžete spouštět aplikace GUI Linux vedle aplikací pro Windows. A aktualizace systému Windows udržuje jádro aktualizované.
WSL také umožňuje přístup k souborům systému Windows z jádra Linuxu. Spojuje to nejlepší z obou světů tím, že umožňuje správcům a vývojářům vyvíjet a testovat aplikace pro různé platformy, aniž by museli opustit Windows nebo vyžadovat další zařízení.
V tomto tutoriálu vás provedeme vším, co potřebujete vědět o instalaci a používání Linuxu na Windows 11 prostřednictvím Windows Subsystem for Linux (WSL).
Předpoklady pro instalaci Linuxu na Windows 11
Jeden z klíčových předpokladů pro spuštění WSL Linux na Windows 11 je podpora virtualizace. Než nainstalujete Linux na Windows 11, musíte zkontrolovat, zda je ve firmwaru povolena podpora virtualizace CPU. Bez virtualizace nemůžete na svém PC emulovat žádný jiný operační systém.
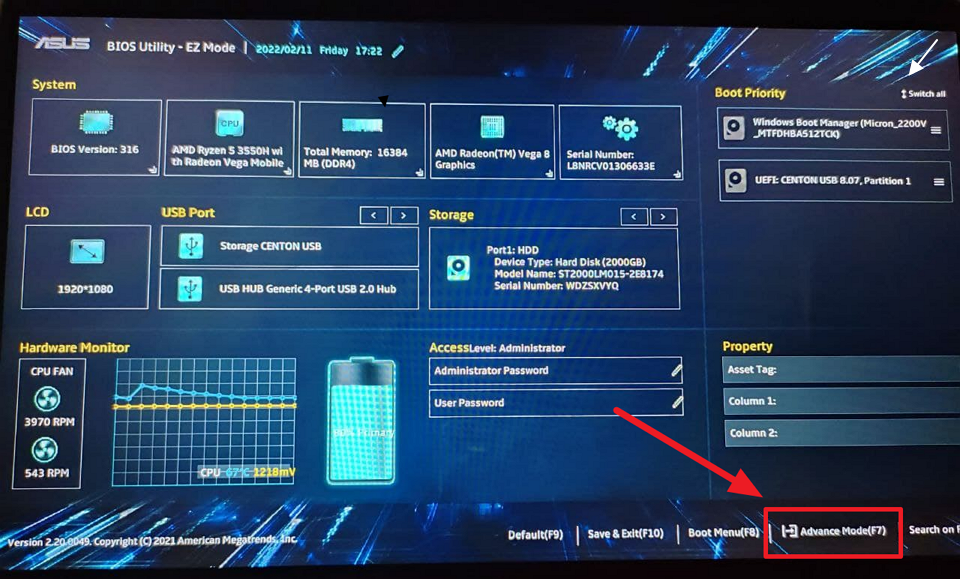
Chcete-li to provést, otevřete Správce úloh systému Windows 11 (Ctrl + Shift + Esc) a přejděte na stránku „Výkon“ na levém panelu. Poté se ujistěte, že je „Virtualizace“ v dolní části stránky na pravé straně „Povoleno“.
Chcete-li to provést, otevřete nastavení systému BIOS nebo UEFI na vašem zařízení a vyberte možnost’Advanced Mode’. Pokud nevíte, jak vstoupit do systému BIOS na počítači se systémem Windows 11, postupujte podle pokynů v naší specializované příručce.
Under the Advanced mode, locate the option called’Intel(VMX) Virtualization Technology’and set na „Povoleno“. For AMD processors, select the’SVM’Mode option and change it to’Enabled’.
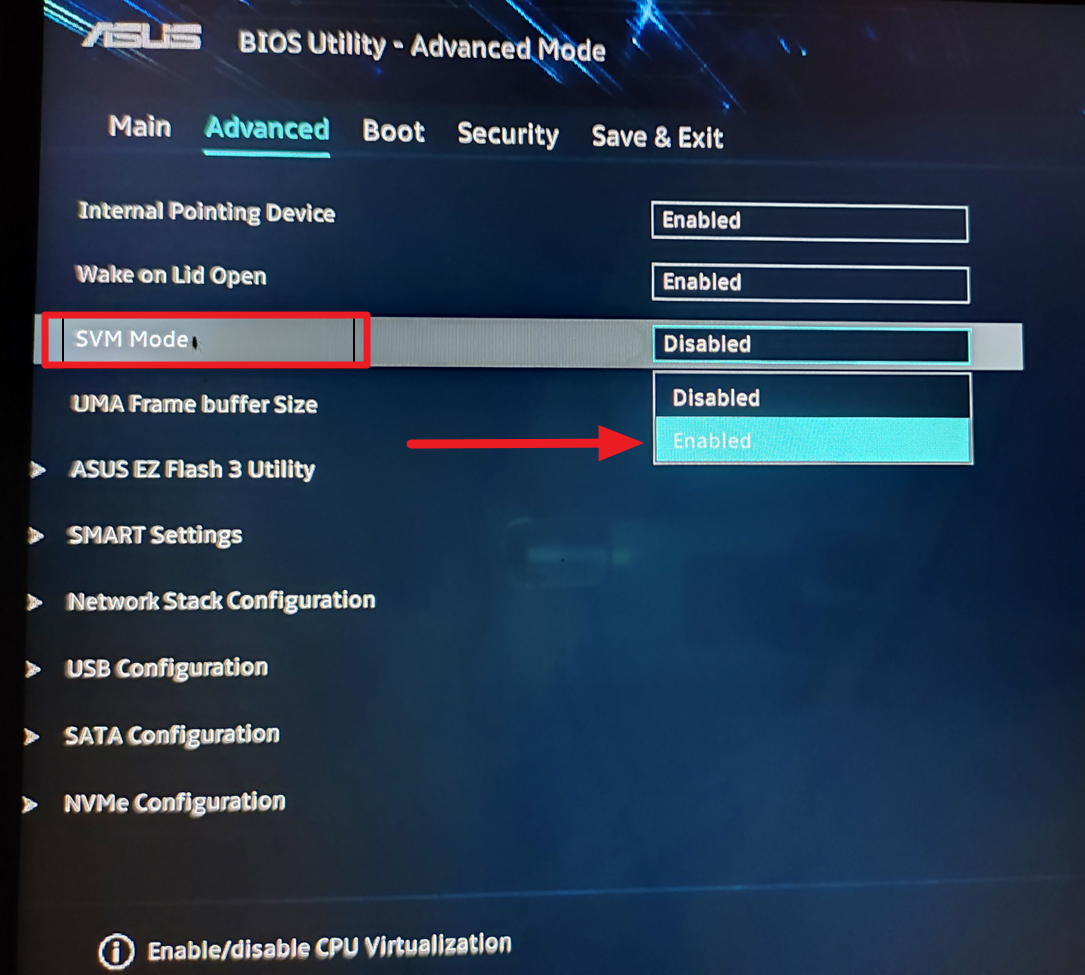
Poté uložte a ukončete BIOS/UEFI a restartujte systém. Jakmile se systém restartuje, budete moci nainstalovat distribuce WSL a Linux.
Instalace distribuce Linuxu na Windows 11
Před instalací požadované distribuce Linuxu prostřednictvím obchodu Microsoft Store je třeba povolit funkci Windows Subsystem for Linux ve funkcích Windows. Zde je návod, jak povolit WSL ve Windows 11.
Instalace Windows Subsystému pro Linux pomocí funkcí Windows
S nainstalovaným Windows Subsystémem pro Linux budete moci spouštět linuxové aplikace a příkazy Bash nativně ve Windows. Existují dva různé typy verzí WSL: WSL 1 a WSL 2. I když obě poskytují hladkou a nepřetržitou integraci Linuxu v rámci Windows, WSL 2 je nejnovější a nejrychlejší verze s plnou podporou linuxového jádra a kompatibilitou systémových volání.
WSL provozuje vrstvu kompatibility, která překlenuje propast mezi linuxovým jádrem a Windows pro spouštění linuxových binárních spustitelných souborů nativně na Windows. Chcete-li spustit WSL 1, budete potřebovat alespoň Windows 10 verze 1607 (nebo vyšší) a 64bitový počítač. Pro WSL 2 budete potřebovat Windows 10 verze 2004 (nebo vyšší) a 64bitový počítač. Protože instalujeme WSL na Windows 11, nemusíme si dělat starosti s požadavky.
Pokud byl váš počítač dodán s předinstalovaným systémem Windows 11, možná jste již WSL aktivovali.
Nejprve otevřete nabídku Start a vyhledejte „Funkce systému Windows“. Poté z výsledku vyhledávání vyberte možnost ovládacího panelu „Zapnout a vypnout funkce systému Windows“.
V V dialogovém okně Funkce systému Windows zaškrtněte možnost „Podsystém Windows pro Linux“ a klikněte na „OK“
Po změnách jsou použity, kliknutím na’Restartovat nyní’restartujte počítač.
Pokud chcete nainstalovat pouze WSL 1, nyní můžete restartovat počítač a nainstalovat distribuci Linuxu.
Upgradujte na WSL 2 ve Windows
Doporučujeme upgradovat WSL na verzi 2 pro rychlejší výkon zvýšit rychlost a spustit skutečné linuxové jádro přímo na Windows 11. Chcete-li to provést, musíte povolit funkci ‚Virtual Machine Platform‘ kromě funkce ‚Windows Subsystem for Linux‘ na ovládacím panelu funkcí Windows. Poté klikněte na „OK“ a restartujte počítač. Pokud jste upgradovali svůj počítač z Windows 10 na Windows 11, možná již máte povoleno WSL, ale pro upgrade na WSL 2 budete muset povolit Virtual Machine Platform.
Nastavte WSL 2 jako výchozí verzi pro všechny budoucí distribuce
Před nastavením WSL 2 jako výchozí verze pro všechny distribuce Linuxu si stáhněte Aktualizace balíčku jádra WSL Linux pro systémy x64 z tohoto odkazu.
Potom spusťte instalační program „.msi“, který jste si stáhli, a nainstalujte jej. Pokračujte kliknutím na’Další’v průvodci.
Bude to trvat jen několik sekund. Poté kliknutím na’Dokončit’ukončete průvodce.
Nastavení WSL 2 jako výchozí verze při instalaci nové distribuce Linuxu otevřete PowerShell a spusťte následující příkaz:
wsl –set-default-version 2
Poté restartujte systém a přepněte funkci z WSL 1 na WSL 2.
Povolte WSL 1 přes PowerShell
WSL můžete povolit také pomocí příkazu’PowerShell’-linkový nástroj. To dělá stejnou práci jako ovládací panel Funkce Windows. Za tímto účelem otevřete’PowerShell’jako správce a spusťte níže uvedený příkaz.
dism.exe/online/enable-feature/featurename:Microsoft-Windows-Subsystem-Linux/all/norestart
Povolení WSL 2 přes PowerShell
Prvním krokem k povolení WSL 2 je povolení komponenty Virtual Machine Platform ve Windows. WSL 2 můžete také povolit pomocí nástroje příkazového řádku „PowerShell“. Chcete-li to provést, otevřete’PowerShell’jako správce a spusťte následující dodatečný příkaz pomocí příkazu WSL 1.
dism.exe/online/enable-feature/featurename:Microsoft-Windows-Subsystem-Linux/all/norestart dism.exe/online/enable-feature/featurename:VirtualMachinePlatform/all/norestart
Instalovat WSL z Microsoft Store
WSL si také můžete stáhnout a nainstalovat z obchodu Microsoft Store. Spusťte aplikaci Microsoft Store a vyhledejte „Windows Subsystem for Linux“. Poté klikněte na tlačítko’Získat’v náhledu Windows Subsystem for Linux’
Microsoft Store se automaticky stáhne a nainstaluje požadované soubory.
Nainstalujte si požadovanou distribuci Linuxu pomocí obchodu Microsoft Store
Jakmile je povoleno WSL, můžete nainstalovat distribuci Linuxu podle svého výběru. Microsoft Store má tucet linuxových distribucí, které si můžete stáhnout a nainstalovat. Podívejme se, jak stáhnout a nainstalovat distribuci Ubuntu z obchodu Microsoft. Nejprve vyhledejte „Microsoft Store“ ve vyhledávacím poli nabídky Start. Poté jej otevřete z výsledku vyhledávání.
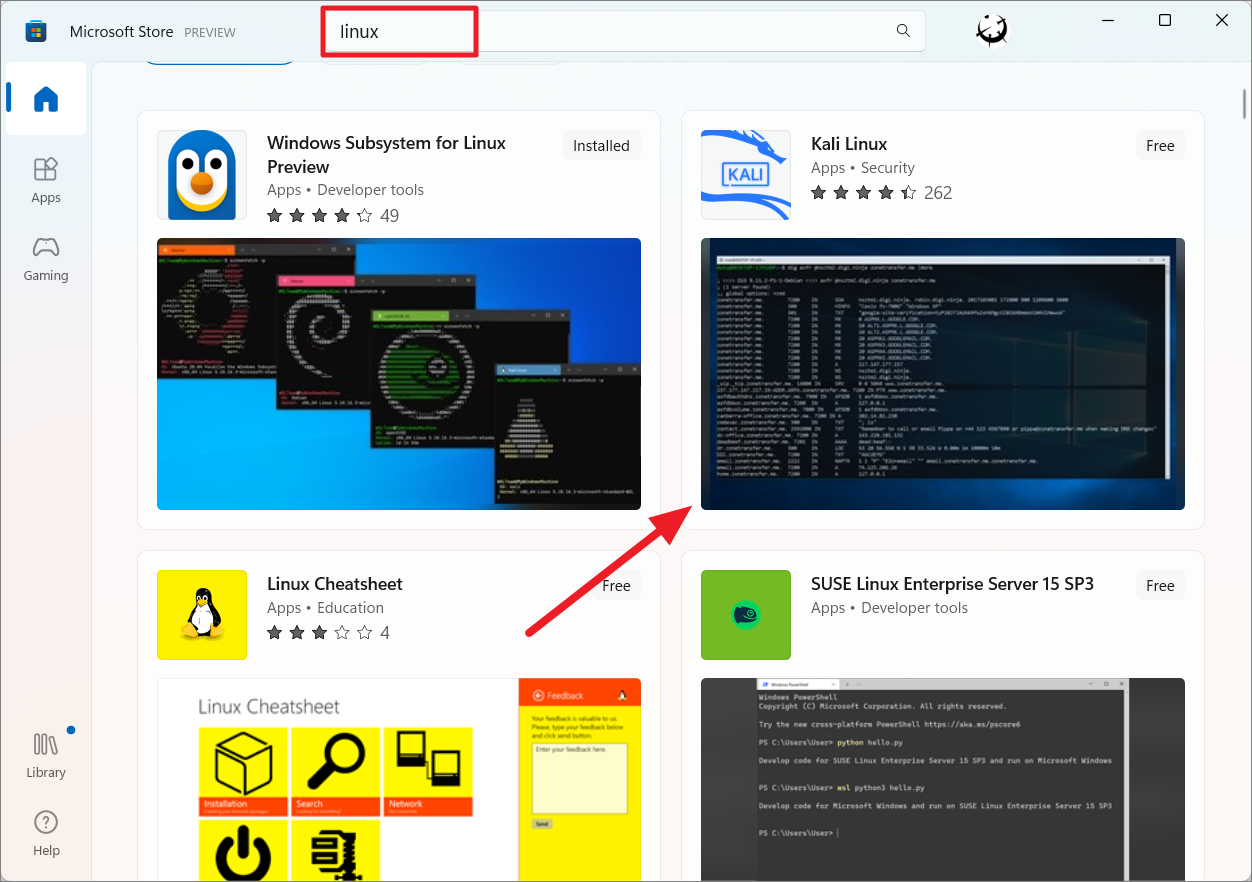
V obchodě Microsoft Store můžete vyhledat výraz „Linux“ a získat seznam dostupných distribucí Linuxu a vyberte požadovanou distribuci.
Zde je seznam linuxových distribucí, které jsou aktuálně dostupné ve Windows Store podporované WSL.
Ubuntu 16.04 LTS Ubuntu 18.04 LTS Ubuntu 20.04 LTS openSUSE Leap 15.1 SUSE Linux Enterprise Server 12 SP5 SUSE Linux Enterprise Server 15 SP4 SUSE Linux Enterprise Server 15 SP3 Kali Linux Debian GNU/Linux Remix Linux Fedora 8 pro Linux 8.8. Oracle Linux 7.9 Oracle Linux 9 Pengwin Pengwin Enterprise 7 Pengwin Enterprise 8 Alpine WSL Raft WSL
Všechny tyto distribuce jsou k dispozici v Microsoft Store zdarma.
Nebo vyhledejte konkrétní distribuci Linuxu. Například zde hledáme „Ubuntu“. Poté z výsledků vyberte verzi Ubuntu, kterou chcete nainstalovat.
Podle výsledků je Ubuntu bez čísla verze nejnovější stabilní verzí. A Ubuntu s čísly verzí odkazuje na konkrétní verze distribuce. Pokud chcete, můžete si vybrat konkrétní verzi. V níže uvedeném příkladu vybíráme’Ubuntu’, abychom získali nejnovější verzi distribuce.
Ubuntu ( Preview) odkazuje na denní sestavení nejnovější vývojové verze distribuce.
Na stránce distribuce Ubuntu klikněte na tlačítko’Získat’.
Dokončení stahování kompletního prostředí terminálu Ubuntu bude chvíli trvat. Po stažení se automaticky nainstaluje do vašeho zařízení.
Instalace Ubuntu 22.04.1 LTS na Windows 11
Kanonical Ubuntu právě vydala mateřskou společnost nová a vylepšená verze Linuxu s názvem Ubuntu 22.04.1 LTS (kódové označení Jammy Jellyfish) v srpnu 2022. Tato nová verze Ubuntu Linux je dodávána s nejnovějšími nástroji, včetně Python, Rust, Ruby, Go, PHP a Perl. Nyní můžete nainstalovat Ubuntu 22.04.1 LTS prostřednictvím Windows Store na Windows 11.
Před instalací této distribuce se ujistěte, že je na vašem zařízení povolena funkce Windows Subsystem for Linux a virtualizační technologie.
Chcete-li nainstalovat nejnovější verzi Ubuntu, vyhledejte „Ubuntu“ v Microsoft Store a ve výsledku vyhledávání vyberte „Ubuntu 22.04.01 LTS“. Poté kliknutím na „Získat“ stáhněte a nainstalujte kontejner Linux.
Po dokončení instalace klikněte na tlačítko’Otevřít’pro spuštění terminálu Linux. Aplikaci můžete také spustit z nabídky Start systému Windows.
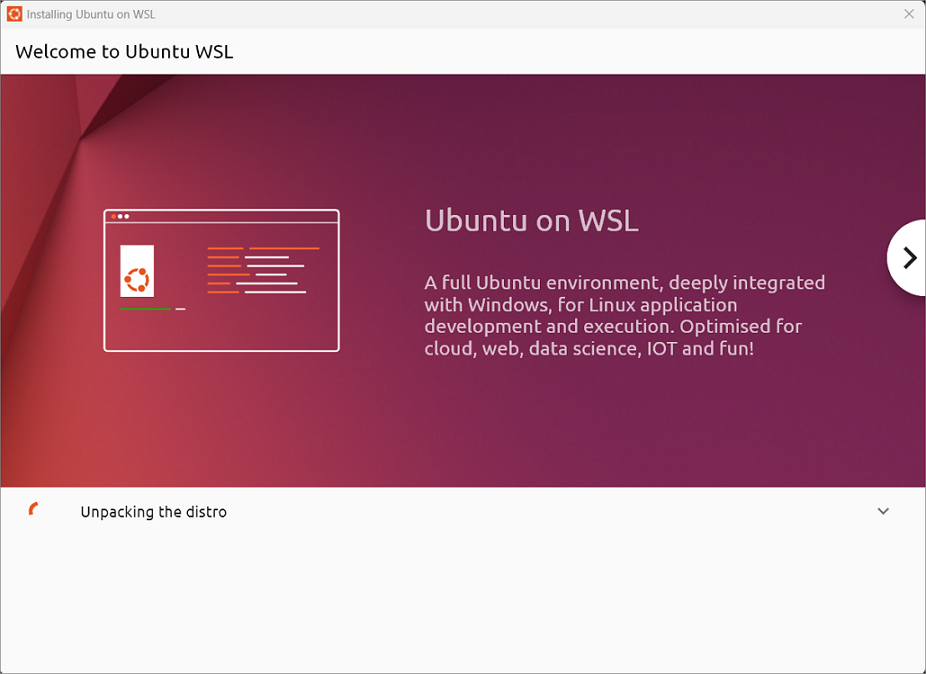
Po stažení se zobrazí okno Ubuntu WSL objeví se. The installer will continue to unpack the distro and install it on your device.
After it’s done, click’OK’on the’We are almost done’prompt box.
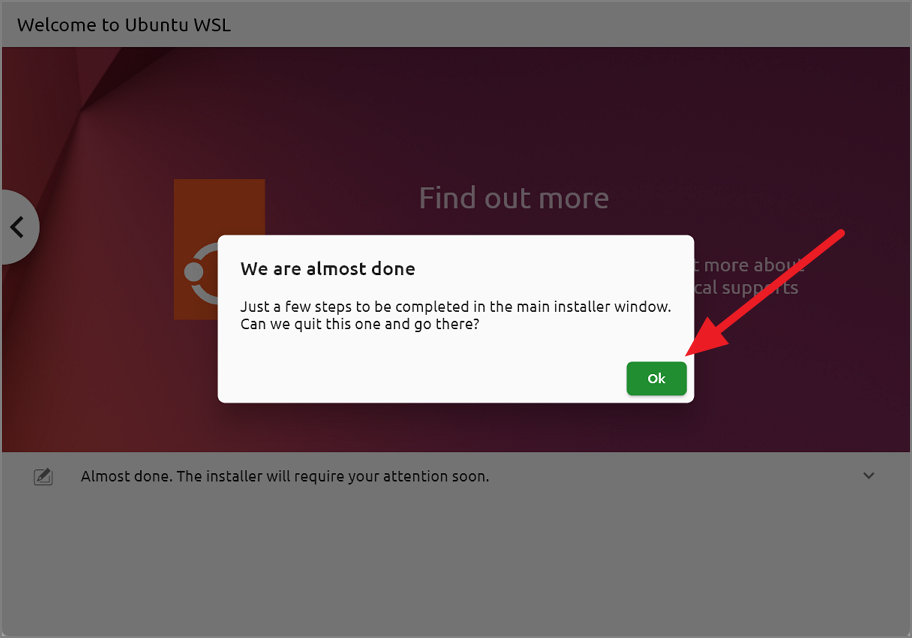
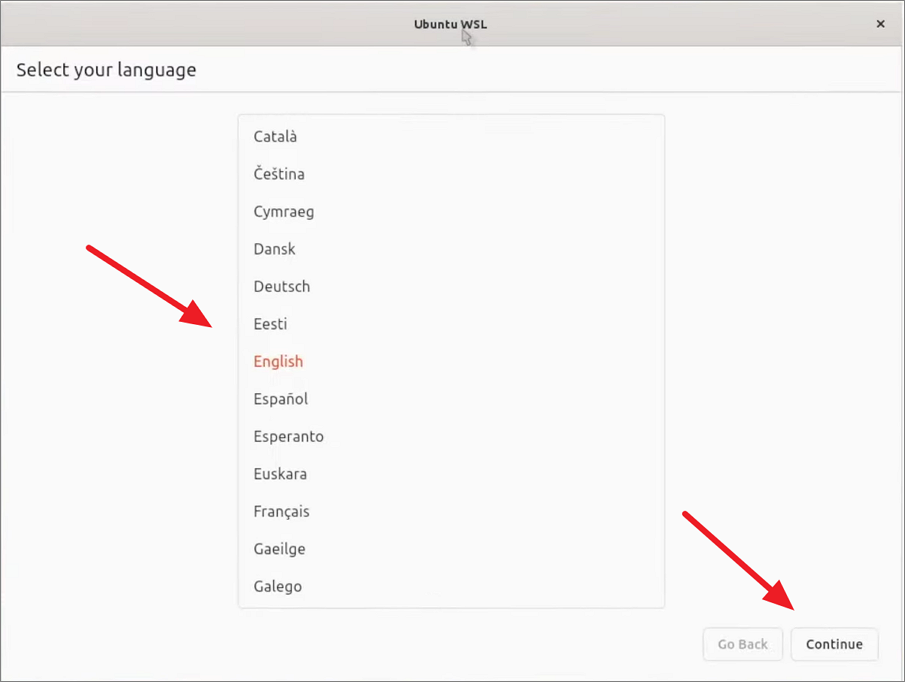
Once you click’OK’, the main installer objeví se okna, kde je třeba nakonfigurovat několik dalších nastavení. Hlavní okno instalačního programu bude buď okno uživatelského rozhraní, nebo okno shellu. V obou případech mají obě okna instalačního programu stejné možnosti.
Nejprve v okně uživatelského rozhraní vyberte jazyk distribuce, kterou instalujete.
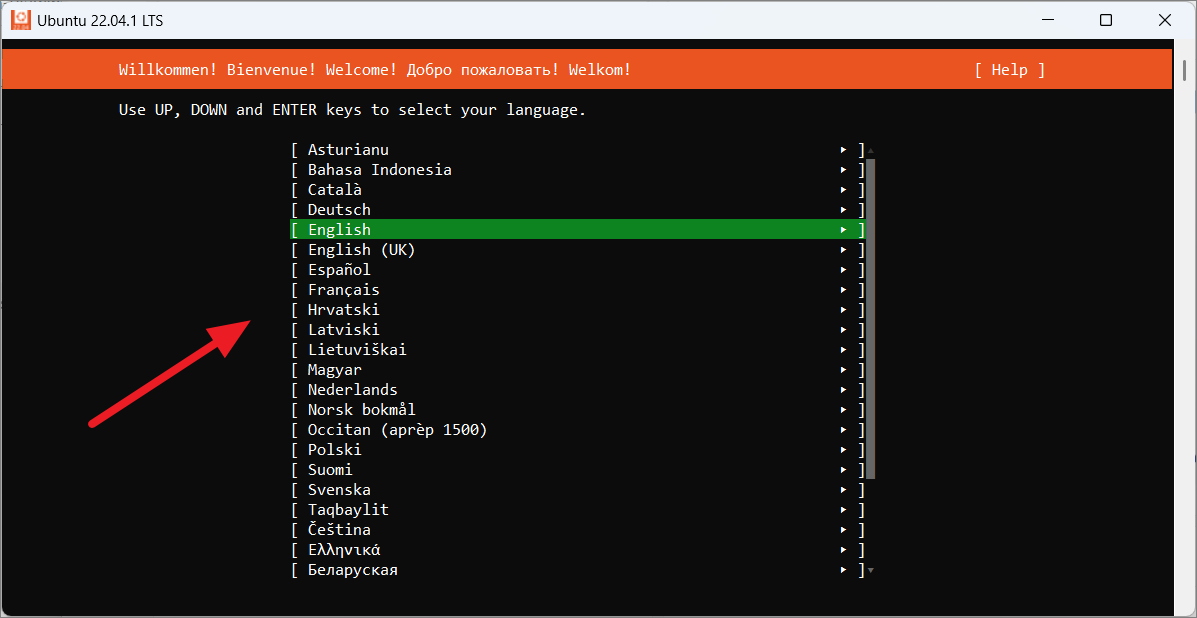
Or, select the language from the terminal window.
Na stránce Nastavení profilu můžete vytvořit výchozí uživatelský účet UNIX. Do příslušných polí zadejte své jméno, uživatelské jméno a heslo. V tomto instalačním programu však nelze použít myš; k procházení možností můžete použít pouze tlačítka se šipkami na klávesnici. After entering details, move to the’Done’button and press Enter.

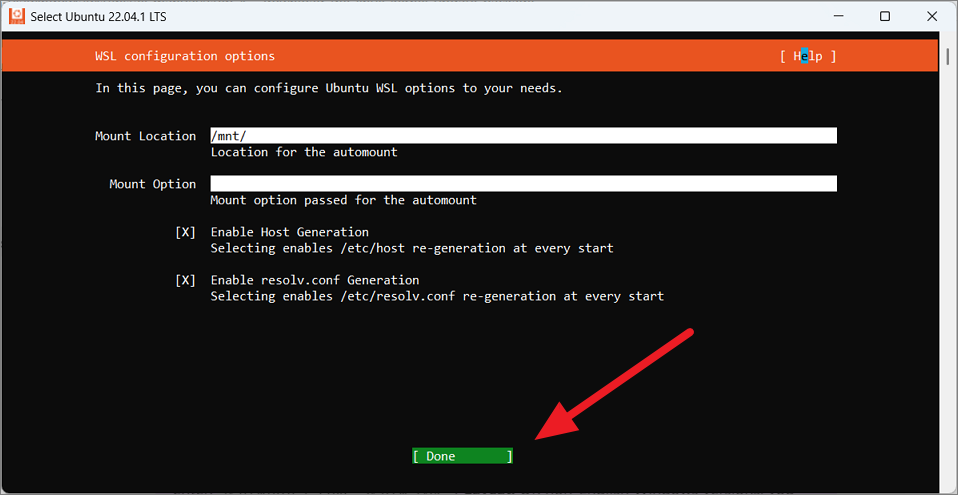
In the V dalším okně můžete zadat bod připojení a možnosti připojení pro automatické připojení. Můžete si také vybrat, zda povolit regeneraci „host“ a „resolv.conf“ při každém spuštění terminálu.
V níže uvedeném příkladu zachováváme výchozí možnosti konfigurace WSL. Then, move to’Done’and press Enter to save the changes.
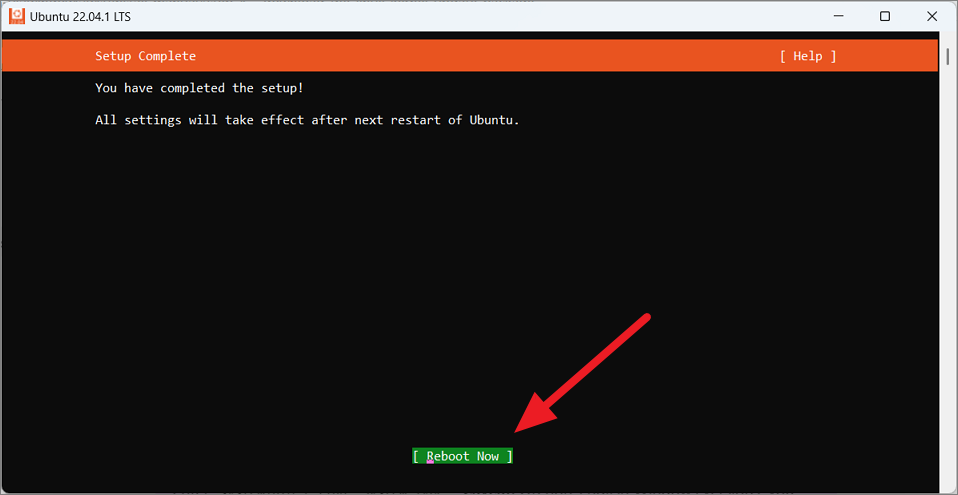
After the setup is complete, move to the’Reboot now’option to restart your device.
Install WSL and Linux using Windows Terminal (Cmd or PowerShell ) ve Windows 11
Toto je nejjednodušší způsob, jak nainstalovat Linux do Windows 11. Nejnovější verzi WSL a instalaci Ubuntu můžete povolit jediným příkazem. Tyto příkazy můžete použít v příkazovém řádku nebo PowerShellu k instalaci Linuxu. Můžete to udělat takto:
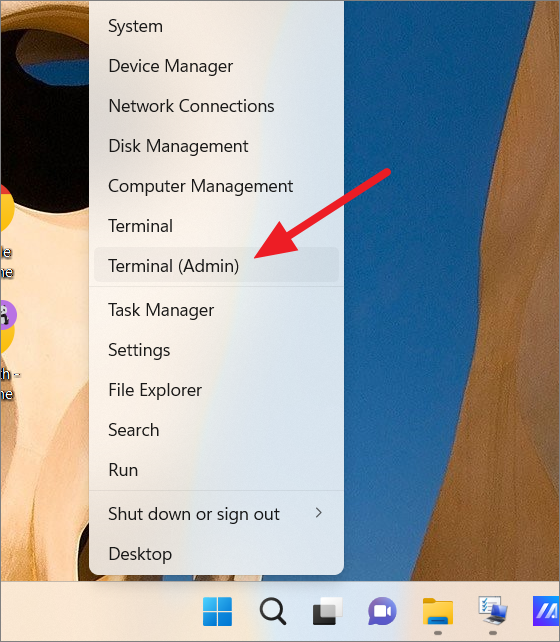
Nejprve otevřete Windows Terminal kliknutím pravým tlačítkem na nabídku Start a výběrem’Terminál (Admin).
Click’Yes’in the User Account Control to continue.
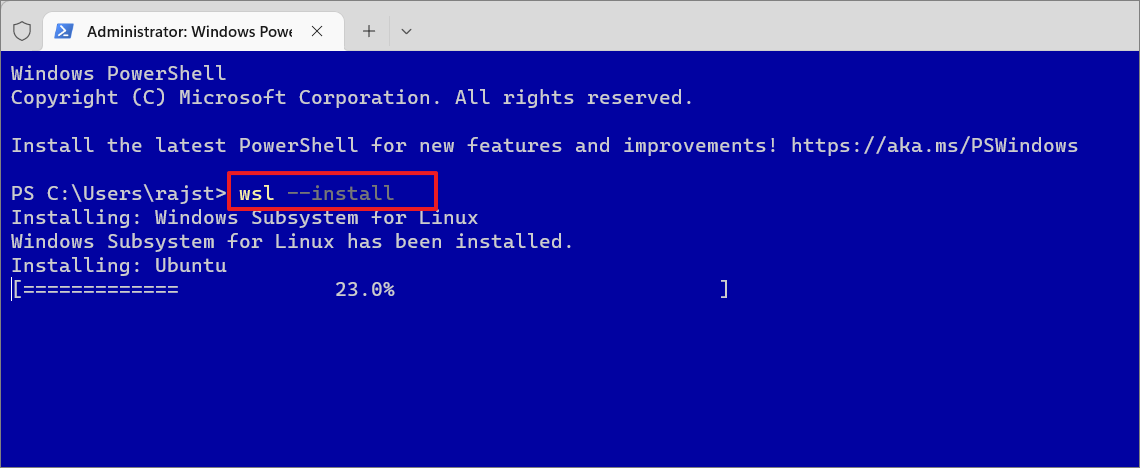
Když se otevře Windows Terminal, zadejte následující příkaz a stisknutím klávesy Enter nainstalujte WSL:
wsl–install
Dokončení procesu může nějakou dobu trvat. Výše uvedený příkaz stáhne a nainstaluje soubory, takže se ujistěte, že máte aktivní připojení k internetu. Jak můžete vidět ze snímku obrazovky, výše uvedený příkaz nejen povolí WSL 2, ale také automaticky nainstaluje nejnovější verzi distribuce Ubuntu Linux. This command installs Ubuntu as the default Linux distribution, but you can change that at any time.
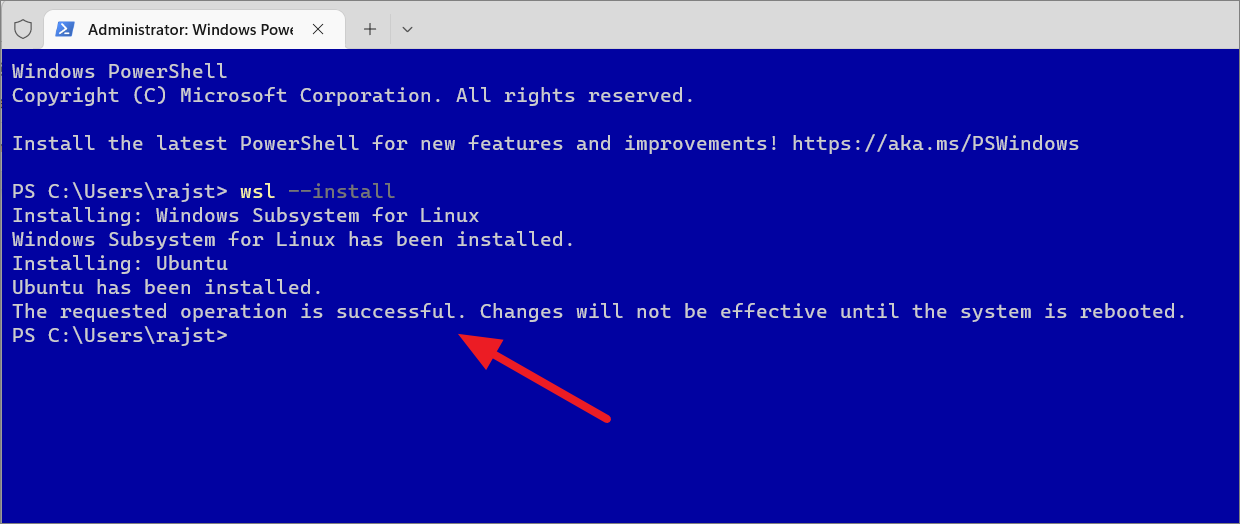
Po dokončení instalace byste měli vidět tuto zprávu – „Požadovaná operace byla úspěšná. After you see this message, restart your device to apply the changes.
Pokud se během tohoto kroku zobrazí zpráva „WslRegisterDistribution se nezdařila s chybou 0x80370102“ nebo „Instalace se nezdařila s chybou 0x80070003“, znamená to, že musíte v BIOSu nebo Unified Extensible Firmware Interface (UEFI) povolit „CPU Virtualization“. Povolte virtualizaci v systému BIOS, jak je vysvětleno dříve v této příručce, a spusťte příkaz znovu.

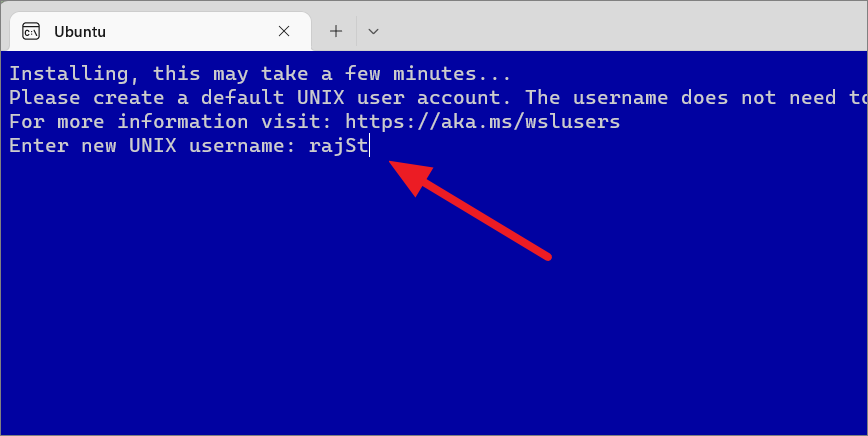
Then, enter the new username and password to complete the setup. This username doesn’t necessarily need to be the same as the Windows account.
Po nastavení uživatelského jména a hesla se terminál Ubuntu spustí v samostatném okně terminálu, jak je znázorněno níže.
Instalujte různé distribuce Linuxu na Windows 11
Pokud dáváte přednost jiné verzi Linuxu než Ubuntu s WSL, můžete si do zařízení nainstalovat jiné verze Linuxu. Různé distribuce můžete nainstalovat prostřednictvím obchodu Microsoft Store nebo pomocí příkazového řádku. Ačkoli si můžete přes Microsoft Store nainstalovat tucet různých variant Linuxu, některé linuxové distribuce nejsou dostupné přes Powershell.
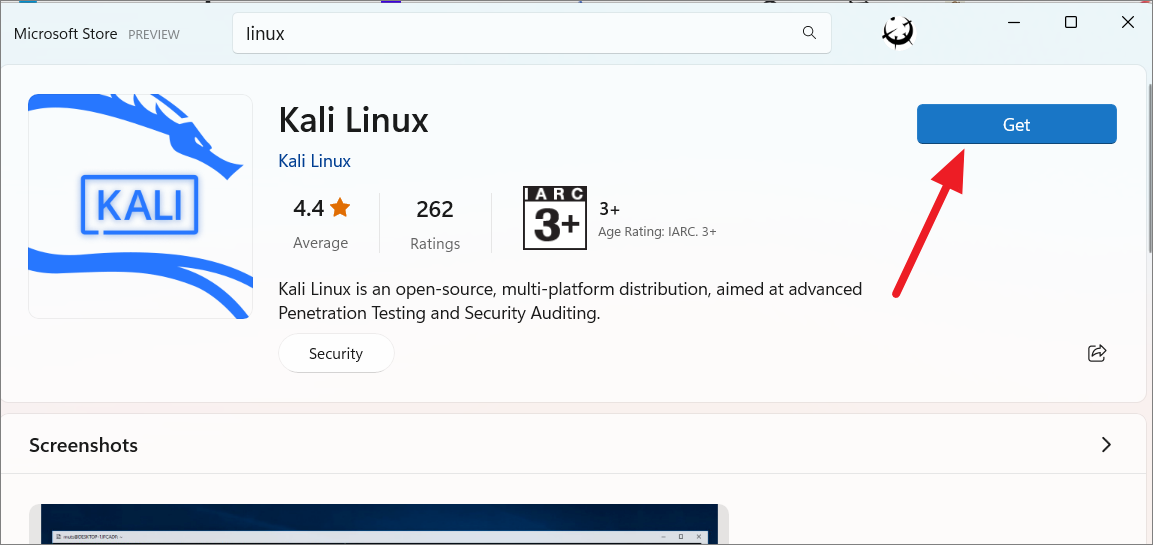
Chcete-li nainstalovat alternativní distribuce Linuxu přes Microsoft Store, otevřete aplikaci Store a vyhledejte „Linux“ získat seznam dostupných distribucí Linuxu. Then, select your desired distro from the result.
After that, click the’Get’button to download and install the distro.
Chcete-li získat seznam dalších dostupných distribucí Linuxu prostřednictvím příkazového řádku, zadejte některý z následujících příkazů:
wsl–list–online
nebo
wsl-l-o
Tím se zobrazí seznam podporovaných distribucí Linuxu.
Pro instalaci nového distro použijte níže uvedený příkaz:
wsl–install-d
Kde nahradit
wsl–install-d Debian
Po dokončení instalace , nastavení bude pokračovat v dalším okně terminálu, kde budete muset zadat nové uživatelské jméno a heslo pro výchozí uživatelský účet UNIX. Tento uživatelský účet bude přiřazen pouze k prostředí Debian Linux.
Po dokončení restartujte počítač pro provedení změn aby nabyly účinnosti. Jakmile se váš počítač restartuje, můžete spustit nově nainstalovanou distribuci Linuxu z nabídky Start nebo otevřít Windows Terminal, kliknout na tlačítko se šipkou dolů a z rozevírací nabídky vybrat distribuci Linuxu.
Tímto se spustí nově nainstalovaná distribuce na kartě Windows Terminal.
Spusťte své linuxové distro a použijte Bash Shell
Jakmile je nainstalována Ubuntu nebo jiná distribuce Linuxu, budete mít přístup k linuxovému terminálu tak, že jej vyhledáte v Start Jídelní lístek. Otevřete nabídku Start, vyhledejte’Ubuntu’a z výsledku vyberte terminál.
Případně vy můžete otevřít Windows Terminal a kliknout na tlačítko se šipkou dolů na liště karet. Poté z rozbalovací nabídky vyberte distribuci Linuxu, kterou jste nainstalovali (Ubuntu), čímž spustíte prostředí Linux.
To spustí prostředí Linux shell v terminálu Windows. Nyní můžete použít Linux Bash Shell ve Windows, stejně jako byste používali počítač se systémem Linux.
Případně můžete jednoduše zadat název distribuce a stisknout klávesu Enter a rychle spustit distribuci.
Chcete-li zobrazit seznam všech dostupných příkazů Linuxu, které můžete použít v Bash, zadejte help-da stiskněte Enter.
Chcete-li získat další podrobnosti (jako jsou možnosti, argumenty, použití atd.) o konkrétní příkaz zadejte help a za ním název příkazu, jak je uvedeno níže (např. typ nápovědy).
Další skvělá věc na Linuxu je, že Bash je výchozí shell zahrnutý v Ubuntu a další distribuce Linuxu, což znamená, že stejné příkazy lze použít v různých distribucích k provádění stejných funkcí. Následující příkazy se většinou spouštějí v Ubuntu Linuxu, ale lze je použít i v jiných distribucích, jako je Kali Linux, OpenSUSE, Debian atd.
Aktualizovat Ubuntu ve WSL
Jednou je sada po dokončení vás přenese na příkazový řádek bash. Je lepší aktualizovat software ihned. V Ubuntu můžete vyhledávat, stahovat a instalovat aktualizace softwaru, to vše z příkazu apt.
Chcete-li spustit příkaz s oprávněními správce, přidejte před příkaz sudo.
Pro aktualizaci softwaru zadejte níže uvedený příkaz:
sudo apt update
Po spuštění výše uvedeného příkazu budete vyzváni k zadání hesla. Chcete-li příkaz spustit jako správce, zadejte heslo systému UNIX, které jste vytvořili dříve. Když zadáte heslo, nebude viditelné, takže jakmile dokončíte zadávání hesla, stiskněte Enter.
Jakmile bude heslo ověřeno, výše uvedený příkaz „update“ zkontroluje aktualizace.
Ubuntu získá řadu seznamů balíčků, které lze upgradovat v prostředí Linuxu. Jak můžete vidět níže, příkaz ukazuje, že lze upgradovat 26 balíčků.
Zatím ale nejsou upgradovány. Chcete-li zobrazit seznam dostupných upgradů, použijte níže uvedený příkaz:
sudo apt list–upgradable
Potom zadejte své heslo a stiskněte Enter.
Toto zobrazí seznam všech dostupných aktualizací spolu s jejich aktuální verzí a verzí, kterou lze upgradovat.
Pokud si přejete aktualizovat pouze konkrétní balíček, můžete tak učinit pomocí níže uvedeného příkazu:
sudo apt–only-upgrade install package
Zde nahraďte balíček názvem balíčku, který chcete upgradovat.
Například chceme aktualizovat pouze balíček s názvem’curl’. Chcete-li to provést, zadejte níže uvedený příkaz:
sudo apt–only-upgrade install curl
Pokud budete vyzváni k zadání hesla, zadejte jej a stiskněte klávesu Enter. V opačném případě zadejte „Y“ a pokračujte stisknutím klávesy Enter.
Instalace aktualizací bude trvat několik sekund zadaný balíček.
Chcete-li upgradovat všechny dostupné balíčky, zadejte níže uvedený příkaz:
sudo apt upgrade
Poté na výzvu zadejte Y a pokračujte v instalaci.
Výše uvedený příkaz upgraduje balíčky na jejich nejnovější verze.
Add a User to Linux Distro in Windows 11
When configuring the new Linux distribution, you will be asked to create a new account and that account will být také použit jako váš výchozí uživatelský účet. V případě, že chcete vytvořit nový uživatelský účet pro konkrétní distribuci, postupujte takto:
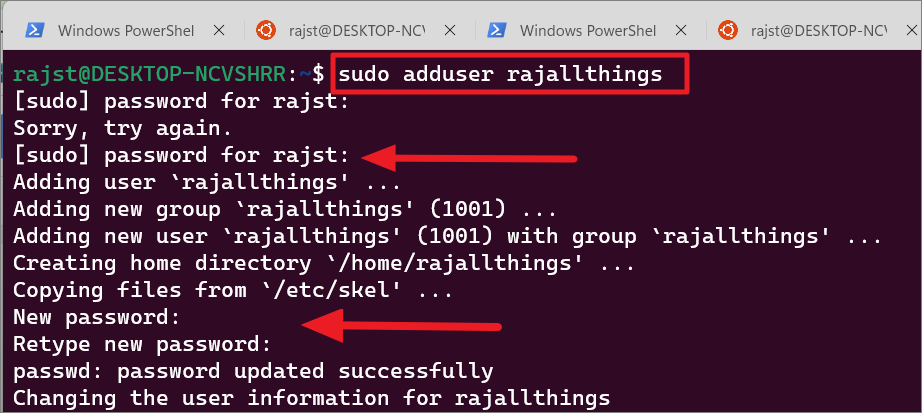
Pro vytvoření nového uživatelského účtu použijte následující příkaz:
sudo adduser
Nahraďte
Příklad:
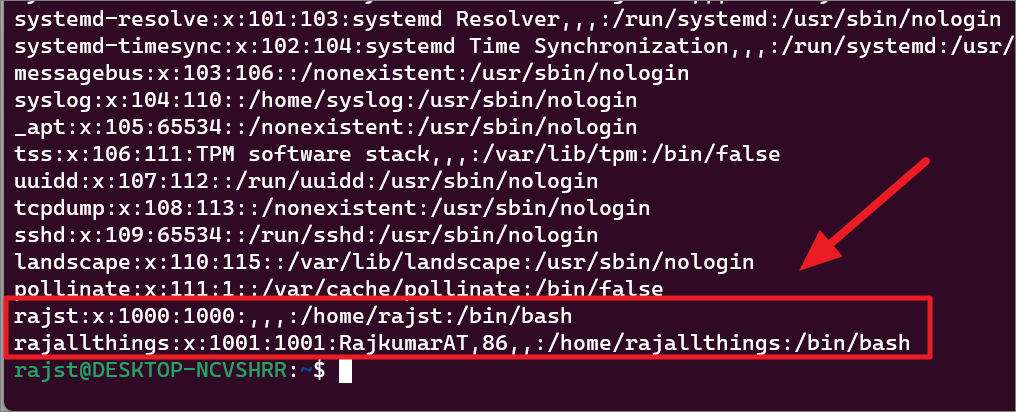
sudo adduser rajallthings
Zadejte aktuální heslo, když budete vyzváni. Poté zadejte a znovu zadejte hesla pro tento nový účet a stiskněte klávesu Enter.
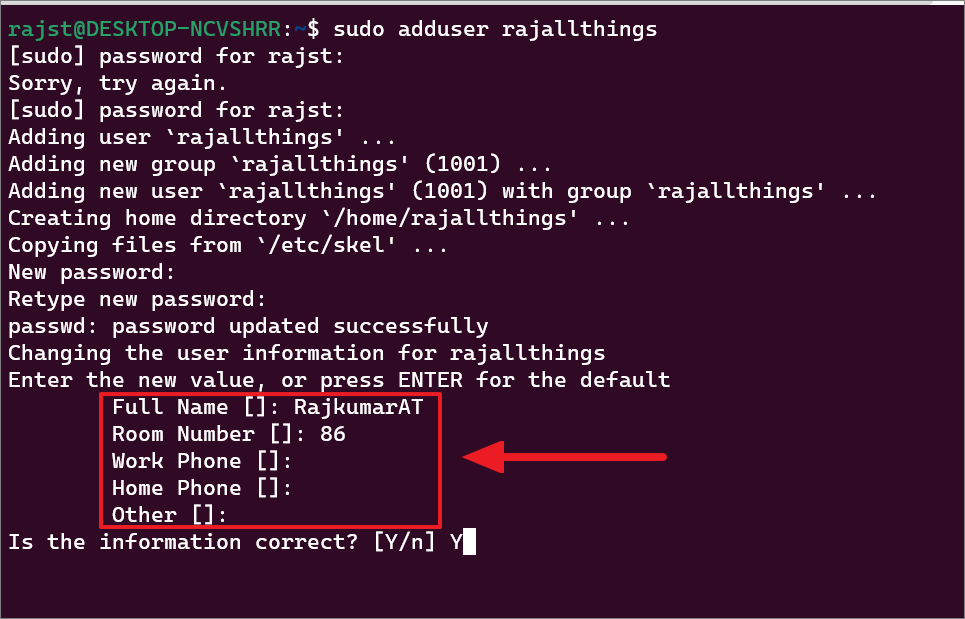
After that, enter a new value or leave it blank and press Zadejte pro každou hodnotu informace o uživateli pro nový uživatelský účet. Uživatelské informace zahrnují celé jméno, číslo pokoje, pracovní telefon, domácí telefon a další. Finally, click’Y’and hit Enter to confirm the details.
To get the list of user účtů na konzoli Linuxzadejte následující příkaz a stiskněte klávesu Enter.
cat/etc/passwd|more
Toto vám ukáže seznam speciálních účtů používaných pro démony, aplikace a systémové uživatelské účty, jak je uvedeno níže.
Ve spodní části obrazovky stiskněte klávesu Enter na’–Více–‘, abyste viděli vše související to user accounts.
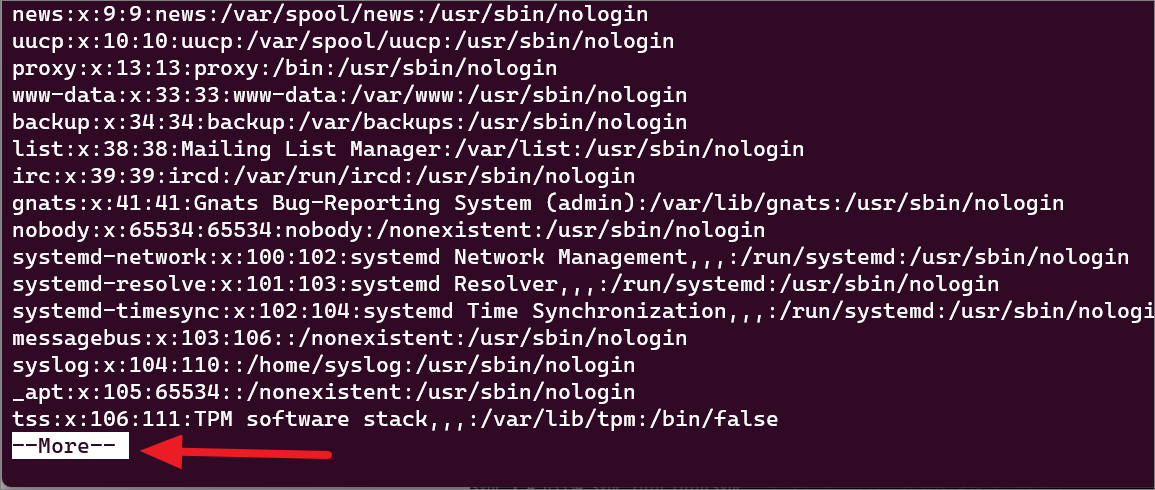
You will see your user accounts at the end of the results.
Set Default User for WSL Linux Distro
The default account is the one that automatically signs in when you launch a distro. The one that you created during the initial setup of the distro will likely be the default account.
If you want to set another user account as the default UNIX user for WSL, run the following command:
Substitute
Example:
ubuntu config–default-user rajallthings 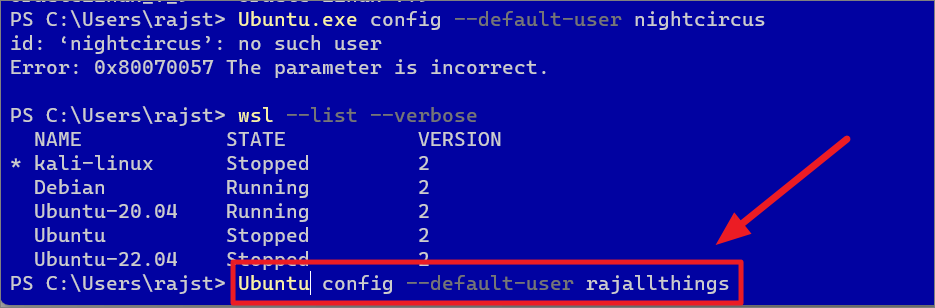
If you are using OpenSUSE, run the following command:
opensuse-42 config–default-user
If you are using SUSE Linux Enterprise Server, run the following command:
sles-12 config–default-user
If you are using Debian Linux, run the following command:
debian config–default-user
If you are using Kali Linux, run the following command:
kali config–default-user
Switch User in WSL Linux Distro in Windows 11
In Linux, ‘sudoers’ is a group of users who are allowed to run commands as root (i.e., elevated). In case you are using a user who is not a sudoer, you can quickly switch users to run elevated commands.
To switch users in the WSL Linux distro, run the following command:
su-
Or
su-
In the command, substitute the
Su-rajstd 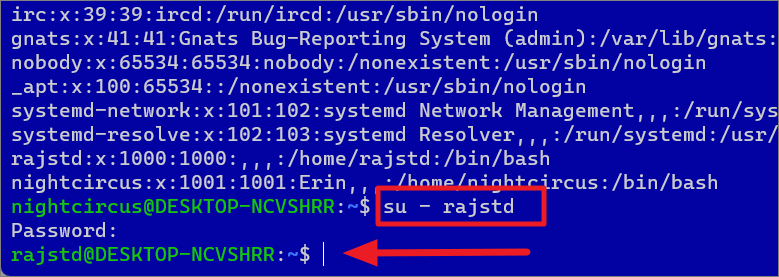
Remove User from WSL Linux Distro in Windows 11
To remove a specific user account from the WSL Linux distro, enter the below command in the Linux terminal:
sudo deluser
Replace the
Example:
sudo deluser nightcircus 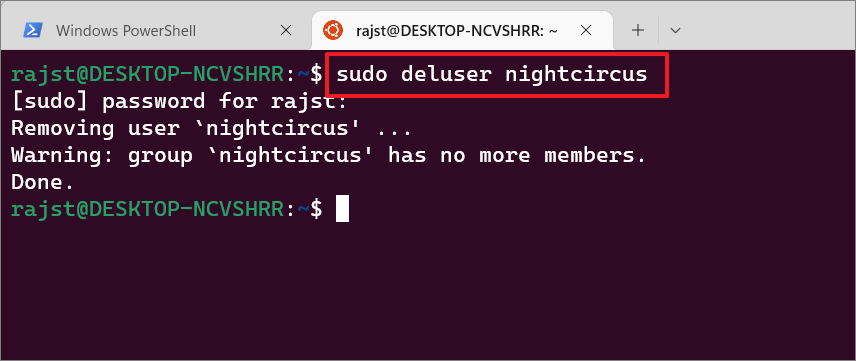
Change Password in Linux Distro in Windows 11
Linux operates with root privileges, so it is vulnerable to misuse. In case your password is compromised or for some other reason you want to change your password, you can use the following command:
sudo passwd root
After entering the above command, you will be prompted for the current password. Type your current password and press Enter. Then, type your new password and then retype your new password.

And the password will be updated successfully for the current account.
Manage Windows Subsystem for Linux in Windows 11
Here’s how you can manage Windows Subsystem for Linux (WSL) and Linux distributions installed on Windows 11 through PowerShell.
List all Installed Linux distros on Windows 11
To list all the installed Linux distributions on your device, run the below command in PowerShell or Command Prompt:
wsl–list–verbose
or
wsl-l-v
This will show a list of all the Linux distros installed on your system along with their status and their WSL version.
To list only the Linux distros that are currently running on the device, you can run the below command:
wsl–list–running
Change Default Linux Distribution on Windows 11
By default, the WSL command installs and sets Ubuntu as the default Linux distribution or the Linux distribution you first installed. The default Linux distribution will be marked with a small asterisk (*) symbol when you list all distros using the above command. As you can see in the above screenshot, there’s an asterisk (*) character next to the distro name Ubuntu-20.04.
To change the default distribution to something else (e.g. Debian), run the following command:
wsl–set-default debian 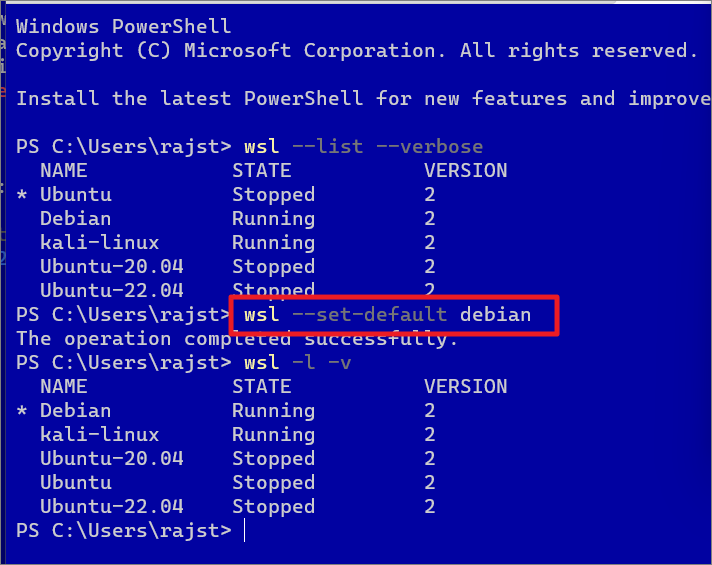
You can launch the default distro by simply running wsl in a command line without specifying the distribution.
Run a Specific Linux Distribution through PowerShell
In case you have only one Linux distribution installed on your device, you can run the following command from within PowerShell or Windows Command Prompt to launch it:
wsl
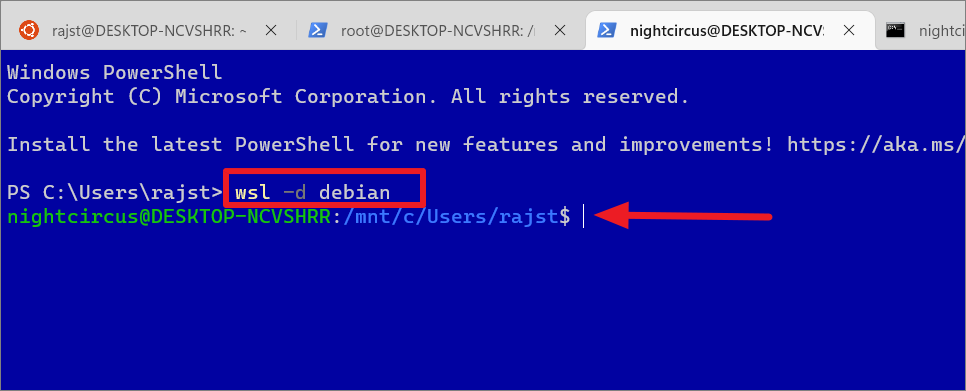
However, if you have multiple Linux distributions on your computer, you can use the following command from within PowerShell or Windows Command Prompt to start a specific Linux distro:
wsl-d
Replace
wsl-d debian
Type the above command and press Enter. This will start the specified distro’s bash shell directly in the current PowerShell or CMD terminal.
If you wish to log in to a WSL distro with a specific user, type the below command:
wsl–distribution debian–user rajstd 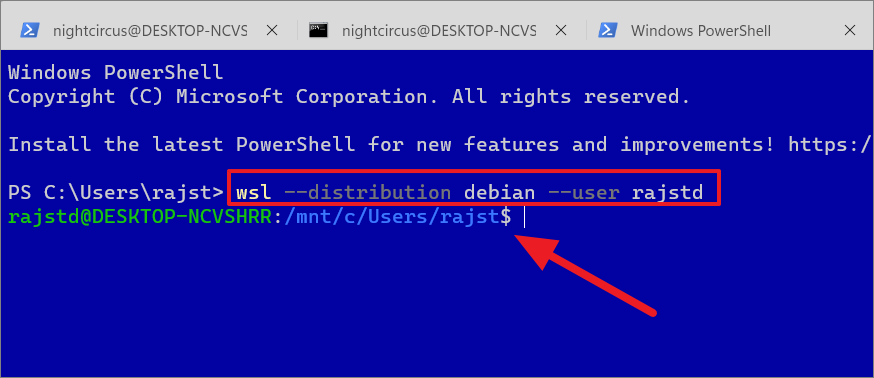
To get back to the PowerShell shell, simply type exit and press Enter to exit bash.
Stop a W SL Linux Distro on Windows 11
Once a WSL distro is started, it will continue to run in the background even after closing the Linux terminal window or the distro bash shell until you manually terminate the WSL instance. Here’s how you can stop a specific Linux distro or all of them.
wsl–terminate kali-linux
However, if you are still on the Linux bash shell or terminal, you can just type exit and press Enter instead of closing the Linux terminal window to stop the WSL instance.
If your computer has multiple Linux Distro running in the background and you want to stop them all, use the below command:
wsl–shutdown
Change the WSL version for a Specific Distribution
WSL 2 is the newer version of Windows Subsystem for Linux that runs on a virtual machine to run a Linux kernel with full system call compatibility while WSL 1 works better when work ing across filesystems. When you enable Windows Subsystem for Linux feature through Windows Features, WSL 1 will be set as default. However, if you use wsl–install command to install new Linux distros, WSL 2 will be set as default.
You can use wsl–set-version command to change the version of WSL (upgrade or downgrade) for the previously installed Linux distributions. You can also change the WSL version globally for all future Linux installations.
If you wish to upgrade the existing WSL 1 version to WSL 2 for a specific distribution. Then, run the below command in PowerShell or command prompt:
wsl –set-default-version
Replace the
Example:
wsl –set-default-version Kali Linux 1
To change the WSL version globally ( for all future WSL instances), use the below command:
wsl–set-default-version 2 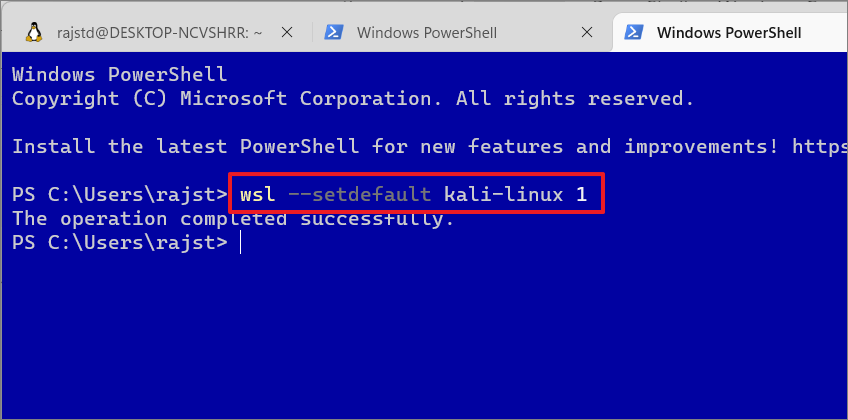
Update the Window Subsystem for Linux (WSL) kernel
WSL feature is usually updated with Windows Updates however if you want to manually check and update the WSL feature, you can do that with the following c ommands:
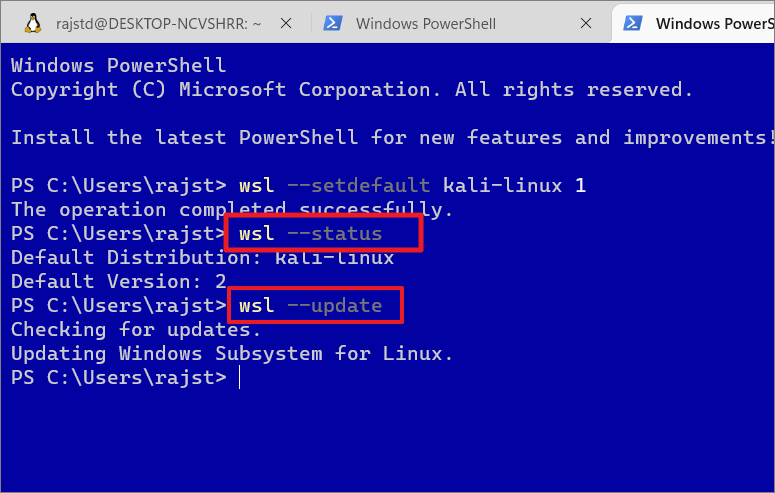
wsl–status
First, use the above command to check the status of WSL, including the default distribution name and kernel version.
wsl–update
This command will check and update the WSL kernel version if an update is available.
Remove or Unregister a Linux Distribution
If you no longer need a particular distro or you want to install a different distribution in its place or want to troubleshoot a distro, you can uninstall the Linux distribution easily. Unregistering will erase all data, settings, and programs associated with that distribution. Here’s how you can unregister a Linux distro in Windows 11.
To remove or uninstall a Linux distro from WSL, execute the following command:
wsl–unregister
Replace

Once you run the above command, it will remove all the data, settings, and applications within that distro.
Mount a Disk to WSL Linux on Windows 11
Windows Subsystem for Linux now allows you to mount a physical disk formatted with a Linux file system (e.g. ext3, ext4) that is not supported by Windows and access its content. However, you can only use this feature in the Linux distro that is running on WSL 2 on Windows 11 (build 22000 or higher).
Windows Operating System recognizes drives and disks that are formatted with FAT16, FAT32, exFAT, NTFS, and a few other file systems, but it does not support the most commonly used Linux file systems such as EXT3, EXT4, XFS, etc.
For instance, if you are trying to access files copied from a Linux computer to a USB drive, Windows won’t recognize it and nothing will show up in File Explorer as the disk is formatted with a Linux file system (EXT3).
To access Linux disk format in the WSL distribution, you can mount hard drives, flash drives, and other removable disks using the wsl–mount command. Here’s how you can do that:
Before you mount a disk, you need to get a list of available drives and their deviceID. To do that, open PowerShell or Windows Terminal with administrative privileges and enter either of the following commands:
Get-CimInstance-query’SELECT * from Win32_DiskDrive’
or
wmic diskdrive list brief
The above command will list all the available physical disks connected to your computer Now note down the device ID of the disk you wish to mount in the WSL distro.
If you have a single partition or unpartitioned disk, use the below syntax command to mount that disk
wsl–mount
Example:
wslwsl–mount \\.\PHYSICALDRIVE2
The above command mounts the given disk globally so that it is available to all the Linux distros in WSL.
When you attempt to mount a disk to WSL, it will automatically assume it is an EXT4 file system. However, if your disk has a different file system, you will need to specify it using the–type or-t argument.
wsl–mount \\.\PHYSICALDRIVE2–bare–type ext3
or
wsl–mount \\.\PHYSICALDRIVE2–bare-t ext3
The-bare argument can be used with a command to make the specified disk available in WSL without mounting it to all distros. In the above command make sure to replace ‘ext3’ with the file format of the drive you are mounting.
If you wish to mount a particular partition with multiple partitions, you can use the following command syntax:
wsl–mount
Example:
This command mounts the specified disk and makes it available to all the Linux distros in WSL. You can use the –bare parameter to make the disk available in WSL without mounting it to all distros. The –type parameter can be used to specify the file system for the disk. If you don’t know the file system, you can skip this parameter.
wsl–mount \.\PHYSICALDRIVE3–partition 1-t ext3
To access the mounted Linux disk in File Explorer, open File Explorer and enter this in the address bar: \wsl$. Then, navigate to the desired distro.
After that, go to the ‘mnt’ folder in the list where you can find all your mounted drives and their contents.
To unmount a disk after finishing accessing its content, execute the following command:
wsl–unmount
Example:
wsl–unmount \\.\PHYSICALDRIVE2
Access Windows Drives from Windows Subsystem for Linux (WSL)
The above commands let you mount the Linux files system to WSL but the Windows Subsystem for Linux still automatically mounts fixed NTFS drives on your computer. However, secondary drives, removable drives, and external networks need to be mounted to access their content in WSL. Here’s how you can mount Windows drives in Windows Subsystem for Linux to access their files.
You can use the new mounting option – ‘DrvFs’ to mount external drives like hard drives, USB sticks, CDs, DVDs, and other removable disks. However, this mounting option can only work on NTFS, ReFS, or FAT file systems.
Let’s assume you have an external drive ‘W:’. To mount this drive, you can use the below commands:
sudo mkdir/mnt/w sudo mount-t drvfs W:/mnt/w
Replace w in the commands with your desired drive letter or path. When navigating a drive from a Linux terminal, make sure to add/mnt/before the path. After entering the first command, type your Unix password. Then, enter the second command.
Once a drive is mounted, it will remain accessible in the Linux environment and you can access the drive anytime you want as long as it is connected to the device.
To access files in the mounted or the internal drive, use the below command:
ls/mnt/w
Here, replace w with your desired drive path.
To unmount an external drive, run the following command:
sudo umount/mnt/w/
Please remember there is no “n” between “u” and “mount” in the “umount” command.
When mounting a drive, a temporary folder will be created in the mnt directory where the mounted driv es and locations will be located. You can also delete these temporary folders after unmounting the drive. You can remove the temporary folder using the ‘rmdir’ argument:
sudo rmdir/mnt/foldername
Substitute foldername with the drive letter or path of the location.
Example:
sudo rmdir/mnt/w
The rmdir parameter can only remove the empty directories. So make sure the location is properly unmounted before executing the above command.
Mount Windows Network Location
You can also mount network locations directly from WSL whether or not the network location has been mapped to a specific drive letter in Windows. If your network is already mapped to a drive letter inside Windows, you can use that drive letter to mount it.
In case you have an unmapped network location, you can mount it directly using the below commands.
First, let’s create a folder for the location inside the/mnt/folder using the below command:
sudo mkdir/mnt/folder
Then, use the mount switch to connect the folder with the network location:
sudo mount-t’\\server\folder’/mnt/folder
Where replace \\server\folder with the path to your network location.
Clear the Terminal Screen
If you have been running commands for a while, the terminal window may get clustered. You can quickly clear your terminal screen to make it look like a new tab with this command:
clear
Result:
Access Windows Files through WSL and Vice Versa
You can also access your Windows files in the Linux environment as well as create, copy/move files, and delete files in the Windows file system. Microsoft WSL allows you to access your Windows files through the Linux kernel by navigating to the exact path. Here’s how you can do this:
Navigate and Access Windows File System in WSL
You can use the cd command to navigate the Windows File System.
cd/mnt/windows_path
Replace windows_path with the Windows path, you want to navigate to.
Example:
cd/mnt/f/Projects
When navigating drives in Linux, always add/mnt/before the path.
You can also access your User accounts with this:
cd/mnt/c/Users
To view the contents inside a directory or folder, use the ls command. Folders will be highlighted with a green background and blue text.
Copying/Moving files Between Linux and Windows File Systems through WSL
You can move or copy files between the two operating systems using the cp or mv commands.
To copy files from Windows to the Linux file system, run the following commands:
cp/mnt/f/Projects/Patch.zip/home/rajst/Documents
Here, f/Projects/Patch.zip is the location and file you want to copy from Windows to Linux./home/rajst/Documents is the destination for the copied file.
To Move files from Windows to the Linux file system, run the following commands:
mv/mnt/f/Projects/Patch.zip/home/rajst/Documents
To move the file, you have to use ‘mv’ instead of ‘cp’. In case there’s already a file with the same name that exists in the destination, type y and hit to replace it.
To move a file from Linux to the Windows file system, run the following commands:
mv/home/rajst/Documents/Patch.zip/mnt/f/Projects
Edit Windows files through WSL
You can also edit your Windows files (e.g., text files) through the Linux terminal using WSL. To do that, you have to use a text editor that can run in a terminal like ‘nano’. Below is the command for the same:
sudo nano/mnt/f/Projects/TestREF.txt
The built-in nano text editor will open the files in the terminal. Now, you can make changes to the file.
To exit the editor, press Ctrl+X. If you have made any changes to the file, you’ll be prompted to save the changes before quitting the editor. To save and exit the file, type Y and then press Enter.
Create files in Windows through WSL.
You can also create any kind of file in a specific windows directory using the touch command.
First, navigate to the directory where you want to create the file with the command like this:
cd/mnt/f/Projects/Documents
Then, use the touch command followed by the filename and type to create the file:
touch final_report.docx
Substitute final_report.docx with the file name and file type your want to create. The file type can be anything you want (.txt,.xlsx,.mp4, etc.)
Delete Files from Windows File System through WSL
Deleting files is similar to creating files via WSL, you have to navigate the folder or directory first and then use the rm command to delete the files.
First, navigate the directory or location:
cd/mnt/f/Projects/Vids
Then, use the rm command to remove the unwanted files:
rm final_report.docx
Access Linux Files through File Explorer
You can also access the Linux file system through File Explorer. To do that, open Windows File Explorer, scroll down to the left navigation panel and select the ‘Linux’ option.
Here, you will see the list of all distro you have installed on your device. Select the desired distro folder to view its files.
Under the ‘Home’ folder, you can find user profiles and their files.
Running GUI Linux Apps using WSL
Windows 11 comes with ‘WSLg’, short for Windows Subsystem for Linux GUI, which is a new feature that allows you to run Linux Graphical apps on Windows in a fully integrated desktop experience. It is a great feature that helps users to run apps and tools that work well or are only available in Linux. Follow these instructions to install GUI apps in WSL.
Prerequisites:
You will need at least Windows 11 (build 22000 or later) or Windows 11 Insider Preview (builds 21362 or later). To run Linux GUI apps, you will need a system with virtual GPU (vGPU) enabled for WSL. You can download and install the below driver matching your system to enable virtual GPU (vGPU) to achieve hardware-accelerated rendering.
Update WSL and package list:
Next, you need to update the Windows Subsystem for Linux. To do that, open PowerShell or Command Prompt in elevated mode and enter the below command:
wsl–update
Then restart the WSL for the changes to take effect with this command:
wsl–shutdown
Update the packages in your distribution:
Then update your packages in the Linux distribution using the following commands:
sudo apt update sudo apt upgrade
Install Linux GUI apps
Now you can download and install the Linux applications you want to use via the bash shell. In Linux distros, you can use various package managers to install your desired applications. Here’s a list of commands to install some of the most popular software in Linux.
To install apps in WSL, use the below command syntax:
sudo apt-get install APP-NAME-y
Here, replace App-Name with the actual app name.
Install GIMP
GIMP is a free and open-source image editor available for GNU-Linux, macOS, and Windows. It is used for image editing, photo retouching, image manipulation, and image authoring. To install GIMP software, open the Linux terminal and type this command:
sudo apt install gimp-y
or
sudo apt install gimp
In the install command, you can add-y at the end to skip confirmation and get right to the installation.
Install Gedit app
To install GNOME’s default text editor, use the below command:
sudo apt install gedit-y
Install VLC Media Player
sudo apt install vlc-y
Install X1 1 apps
X11 is a Linux Windowing system that provides a miscellaneous assortment of X applications such as the xclock, xcalc calculator, clipboard, etc.
sudo apt install x11-apps-y
Install Firefox
apt install firefox-y
Search for Apps in the Software Repository
If you don’t know the specific name of the app you want to install, you can search for it using the apt-cache command. Run the following command to find the name of a specific application:
sudo apt-cache search [application name or type]
Example:
sudo apt-cache search kden
The apt-cache command will show the results related to the search word ‘kden’ in the repository.
Now, you can use the name of the app from the search to install it.
Once you finish installing your desired application on the WSL distro, restart your PC and launch the app via the bash command line.
List All Installed Packages and Programs in Linux Distro
To list all the packages that you have installed using on your distro, run the below command:
apt list–installed
This will list all the packages installed on your Linux distro.
Launch Linux GUI Apps
To launch the install apps in WSL, simply type the name of the app and hit Enter to run it.
For example:
gimp
or
gimp &
As you can see below in the screenshot, the above command launches the GIMP (GNU Image Manipulation Program) application. Now, you can use your mouse and keyboard to use the app just like any of your Windows apps.
Access Linux Apps from Windows 11 Start Menu
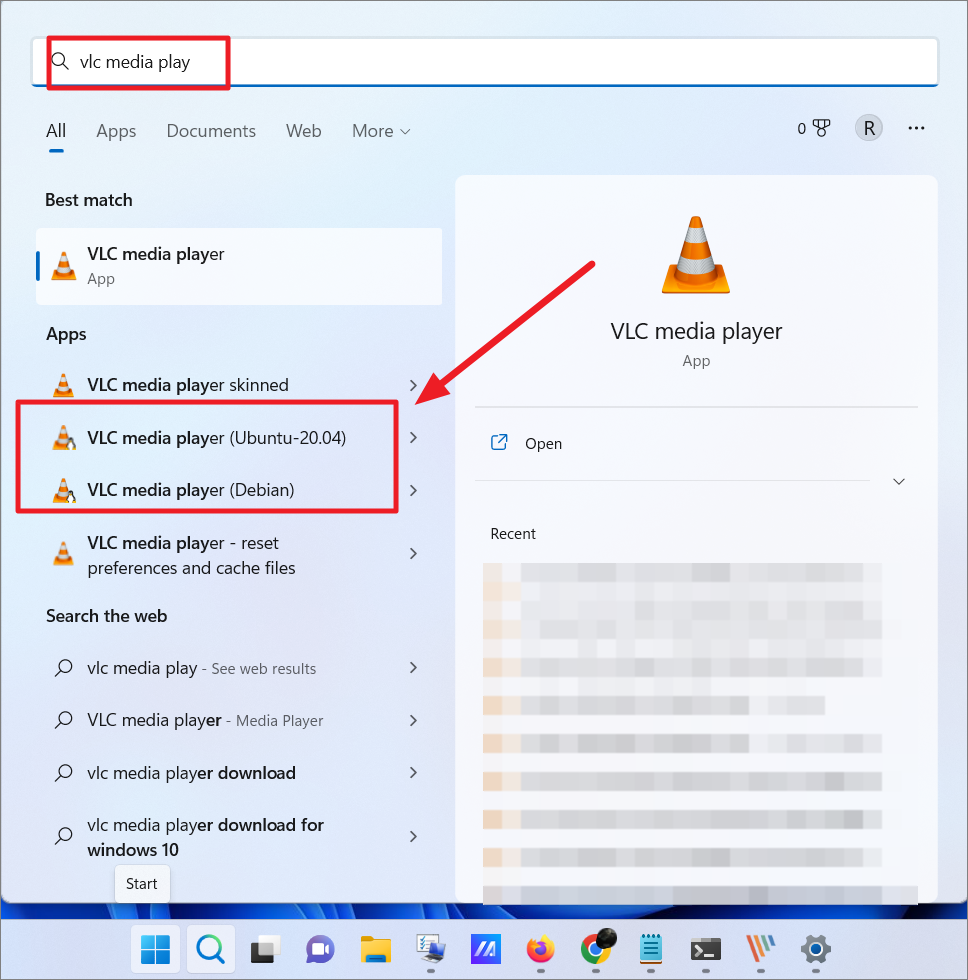
Once you install an app in Linux, you can also access that Linux app directly from your Windows Start menu, just like you do a Windows app. You can tell the difference between Windows and Linux apps with the app name. You can just open the Start menu and access the app from the Recent list.
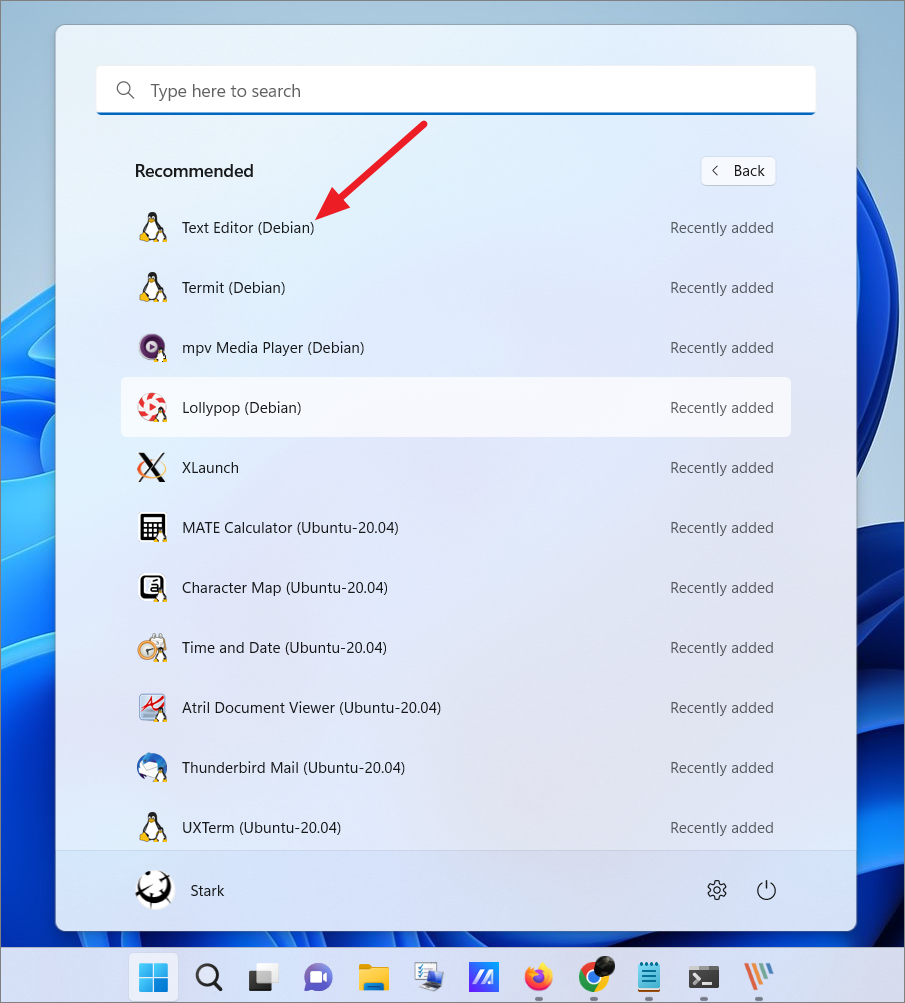
Or, you can search for the app in Windows Search. As you can see below, the Linux app will have the Linux Distribution name as part of the label. Also, the Linux penguin logo will be visible at the corner of the app icon.
Installing a Desktop Environment
Unlike Windows, Linux offers several customizable desktop environments that you can install on the same Linux distro. A desktop environment is a bundle of programs that runs on top of the operating system to provide default graphical user interface elements such as menus, windows, icons, toolbars, wallpapers, etc.
Some Linux distros come with their own desktop environments while in others you can manually install and customize them as you see fit. In Windows 11, you can not only install Linux terminals and apps but also install Linux desktop environments and use Linux graphically as you do any other operating systems like Windows and macOS. Let us see how to install Linux desktop environments in Windows 11.
Xfce is a lightweight and easy-to-use desktop environment that provides a feature-rich user experience. And it is one of the most commonly used desktop environments on WSL.
Start by updating and upgrading Ubuntu:
sudo apt update
sudo apt upgrade
To download and install Xfce on the WSL distro, run the following command in the Linux terminal:
sudo apt-get-y install xfce4 && sudo apt-get-y install xubuntu-desktop
Then, enter your password to execute the command. It will take a while to complete the installation process.
In the middle of the installation, you will be asked to choose a Desktop Manager – ‘GDM3’ or ‘LightDM’.
Install X server for Windows
Once it’s finished installation, we need to install an X server for Windows, such as VcXsrv. To run a Linux desktop environment inside Windows, we will need an X server. To install and set up an X server, follow these steps:
First, go to the download page of VcXscr X Windows Server and click the ‘Download’ button to download the software.
Alternatively, you can also go to the GitHub page of VcXsrv server and download the latest version of the app.
After the software is downloaded, run the setup. Then choose ‘Full’ from the ‘Select the type of install’ drop-down menu and click ‘Next’.
Then, click ‘Install’ on the next window to install the program and its components.
Once the installation is finished, you will have a shortcut named ‘Xlaunch’ on the desktop. Don’t open it yet.
Now go back to the Linux terminal and enter the below command to see if the ‘resolv.conf file auto-generated:
cat/etc/resolv.conf
If the server is running, you will get an IP address. Now, note down the IP address you got from this command. (e.g., 172.29.128.1)
Next, type the below command to edit the.bashrc script file which contains a series of configurations for the terminal session:
nano ~/.bashrc
In case you see this prompt message on the screen, simply press Y.
This will show a series of scripts on the screen. Now, go to the bottom of the script and add this new entry:
export DISPLAY=172.29.128.1:0
Now, type that IP address (172.29.128.1) you got earlier in the code, and make sure to add a colon (:) and zero (0) at the end.
If you have a problem restarting your Xfce server running on Ubuntu or launching the desktop environment, type this entry instead:
export DISPLAY=$(cat/etc/resolv.conf | grep nameserver | awk'{print $2}’):0
Then, press Ctrl+X and then Y to save the script. After that, hit Enter to exit the script.
After that, reload the service with this command.
source ~/.bashrc
Launch Desktop Environment:
Next, go back to the desktop and launch the ‘XLaunch’ app (VcXsrv) that you installed earlier.
Then, choose a display option in the Display settings window and click ‘Next’. Here, we are selecting the ‘One window without titlebar’ option.
Under Client startup, select the ‘Start no client’ option and click ‘Next’ to start only the server.
On the next screen, add all the additional parameters needed by you for the X server in the field below and click ‘Next’. In the example, we are adding-ac.
Finally, click on ‘Finish’. You can also save these configurations for later use or backup by clicking the ‘Save configuration’ option.
If you see the Windows Security Alert prompt, make sure to select both options and click ‘Allow access’.
Once you do that, you may just see a black screen. It is normal, ignore it and go back to the terminal.
Then, launch the new desktop environment by entering the following:
startxfce4
If you have a problem running the above command, run the following command instead:
sudo-u rajst startxfce4
Here, replace rajst with your username.
This will launch the Xfce desktop environment. Now, go back to the VcXsrv server program in the taskbar and you will have a Linux desktop as shown below.
You can use the new desktop as if it were a normal Windows desktop. You can access the file manager by clicking the ‘Home’ button.
To open applications, click the search button (Application Finder) at the bottom of the Xfce desktop. Then, find and click on the application from the Application Finder menu to launch the app.
Install Desktop Environment for Kali Linux:
If you are using the Kali Linux distro, you can install Win-KeX desktop which is a Kali Desktop Experience for Windows Subsystem for Linux (WSL 2).
To do this, first launch the Kali Linux and update the packages using the below commands:
sudo apt update sudo apt upgrade
Then, execute the following command to install the Win-Kex desktop environment and press Enter:
sudo apt install-y kali-win-kex 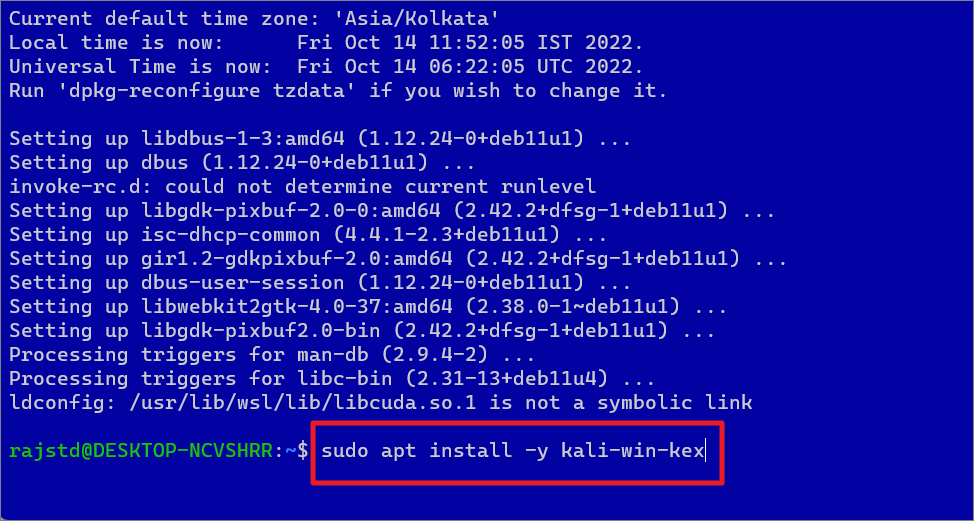
Run Bas h Scripts on Windows 11
So far we have seen how to run commands one by one in an interactive way but there’s another way you can execute commands in Linux – batch mode. You can run commands in batches. You can create a bash script that contains all of the commands you would like Linux to execute in order. Then, run that bash script (batch file) to execute the task one by one automatically without having to manually run individual commands. Here’s how you can do this:
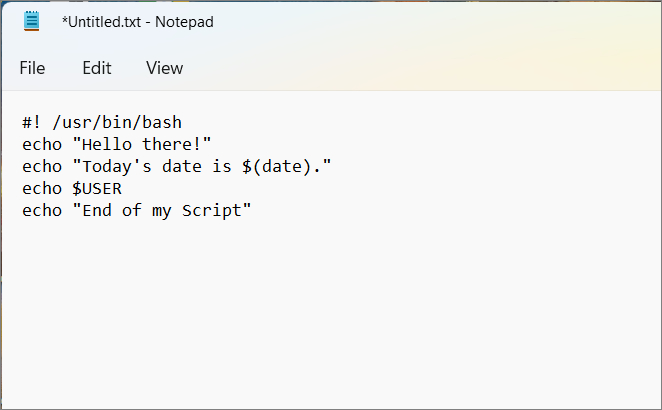
Open your favorite text editor like Notepad and create a new text file. The first line of the script must be “#!” followed by the path of your Linux bash. To find the path of your Linux bash, open the Ubuntu terminal and run which bash. This will show you the Bash path. Note down or copy it.
Now, open your new text file and include that first line at the top. For example:
“#!”/usr/bin/bash
Next, type the commands you want Linux to run in sequential order. Each line should have a single command.
For example:
Line 2: Use theecho command to show a welcome text to the user.
Line 3: Use echo with the date command to show today’s date, time, time zone, and more.
Line 3: A combination of USER and echo commands is used to return the current user name.
Line 4: Once again, the echo command is used to display the message ‘End of My Script’.
As you can see there are three sequential commands set to execute in this script file.
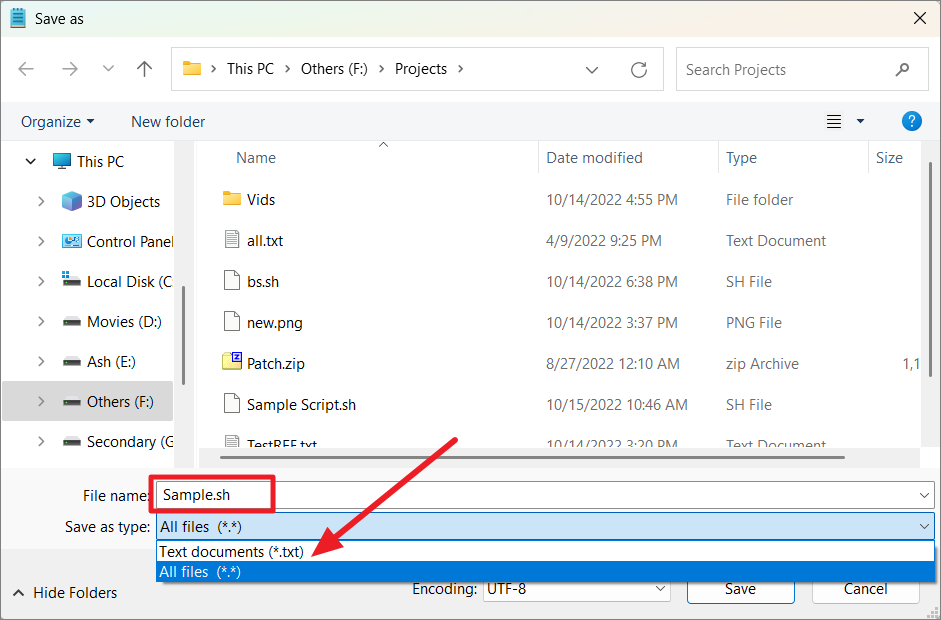
After typing all the commands you want, save the text file with a.sh extension. When saving the file, select ‘All files (*.*)’ as the Save as type. Be sure to remember where you saved it because you need the file path to run the script.
Next, open PowerShell or Bash shell (Linux terminal) and use the cd command to navigate to the path where you have saved the Bash script file.
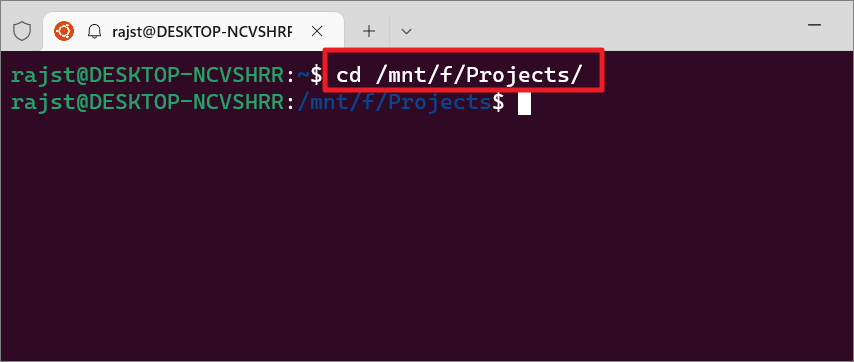
Then, run the script with the following command:
bash
Replace
bash Sample.sh
This simple example shows you how you can create bash scripts to execute more complex script programs.
Create Aliases in Windows Subsystem for Linux
Alias in Linux is a custom shortcut used to execute more complex and lengthy commands. Aliases make Linux commands easy to remember and use. For example, if you need to execute this long command – mysqldump-u root-p–all-databases >/home/server/Desktop/backupfile.sql which is hard to type and prone to mistakes, you can instead create an alias like mysqlback and use it to execute that command.
There are two ways you can create to create aliases in Linux – per session or permanently.
Create Per Session Aliases
To create a temporary alias for your current session of bash (which will expire once you close the terminal), use the below command:
alias
Example: Creating an alias for cp/home/rajst/Test.bas/mnt/f/Projects command:
alias copytest=’cp/home/rajst/Test.bas/mnt/f/Projects’
Now, you can use the alias copytest to execute that command quickly. However, this alias will only be available for your current terminal session.
Create Permanent Aliases
To create permanent aliases between sessions, you will need to edit and save your aliases inside a configuration file called.bash_aliases or.bashrc
First, check if the.bash_aliases file exists in your system using the below commands:
cd ~ ls-a
If you can’t find it, then run the following command:
touch.bash_aliases
To edit the.bash_aliases file, use the below command:
nano ~/.bash_aliases
Then, add your permanent aliases to the file. For example:
alias c=’clear’alias ll=”ls-alF”echo alias wmi=\’echo I am in $PWD\’alias Guten=’cd/mnt/f/Projects/Project Gutenberg’
You can also leave a comment before your aliases (like #My Custom Aliases) for organization purposes.
You can also add your aliases in the.bashrc file.
Press Ctrl+X and then type Y to save the file. Then press Enter to exit the editor.
The new aliases in the file will be automatically loaded in your next session. But if you want to use them in your current session, you can ‘source’ your.bash_aliases file using this command:
source ~/.bashrc
Now, you can use your alias shortcuts to execute your frequent commands quickly.
Essential WSL Commands for PowerShell
Here’s a list of essential Windows Subsystem for Linux commands that you can use in Windows PowerShell.
That’s it. Using this guide, you’ll become a pro in using Linux on your Windows 11 PC in no time.
