Najbolji vodič za instalaciju i korištenje Linux okruženja (uključujući bash, Linux aplikacije, Linux radnu površinu i više) na Windows 11 s WSL-om.
Windows podsustav za Linux (WSL) je sloj kompatibilnosti koji vam omogućuje pokretanje vaše omiljene verzije distribucija Linuxa unutar operativnog sustava Windows (Windows 10 i 11). Možete pokrenuti Linux povrh Windowsa 11 (ili bez potrebe za dvostrukim pokretanjem, koristeći VMWare/VirtualBox ili instalirajući ga kao svoj glavni operativni sustav).
Za razliku od Windowsa 10, Windows 11 dolazi s WSL-om 2.0, nadograđena verzija WSL-a, dizajnirana za pokretanje punog Linux kernela u Hyper-V okruženju radi poboljšane kompatibilnosti. Uz to, WSL 2 na Windows 11 sada izvorno podržava grafička korisnička sučelja i zvuk, što znači da možete pokrenuti GUI Linux aplikacije uz Windows aplikacije. A Windows ažuriranje održava kernel ažuriranim.
WSL vam također omogućuje pristup vašim Windows datotekama unutar Linux kernela. Kombinira najbolje od oba svijeta dopuštajući administratorima i programerima da razvijaju i testiraju aplikacije za više platformi bez napuštanja sustava Windows ili potrebe za dodatnim uređajima.
U ovom vodiču ćemo vas provesti kroz sve što trebate znati o instaliranju i korištenje Linuxa na Windows 11 putem Windows podsustava za Linux (WSL).
Preduvjeti za instalaciju Linuxa na Windows 11
Jedan od ključnih preduvjeta za pokretanje WSL Linux na Windows 11 je podrška za virtualizaciju. Prije nego što instalirate Linux na Windows 11, trebate provjeriti je li podrška za virtualizaciju procesora omogućena na firmveru. Bez virtualizacije, ne možete emulirati bilo koji drugi operativni sustav na vašem računalu.
Da biste to učinili, otvorite Windows 11 Upravitelj zadataka (Ctrl + Shift + Esc) i idite na stranicu”Performanse”na lijevoj ploči. Zatim provjerite je li’Virtualizacija”Omogućena’na dnu desne bočne stranice.
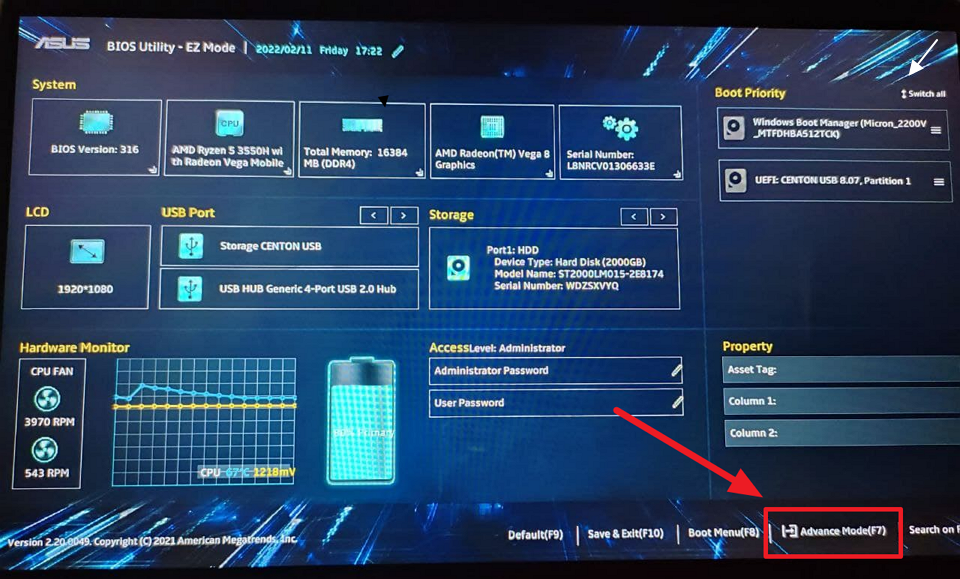
Da biste to učinili, otvorite BIOS postavke ili UEFI na svom uređaju i odaberite opciju’Advanced Mode’. Ako ne znate kako ući u BIOS na računalu sa sustavom Windows 11, slijedite upute u našem namjenskom vodiču za isto.
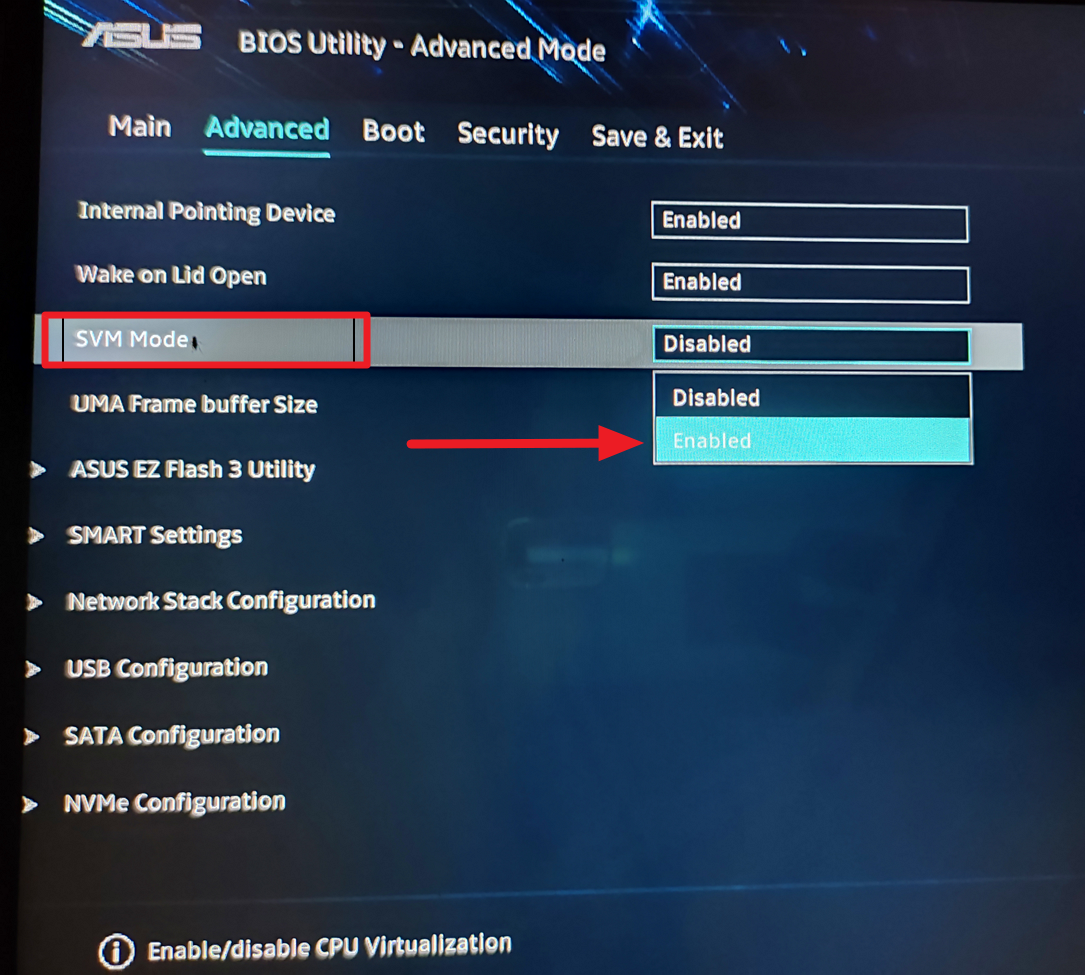
Under the Advanced mode, locate the option called’Intel(VMX) Virtualization Technology’and set na’Omogućeno’. For AMD processors, select the’SVM’Mode option and change it to’Enabled’.
Zatim spremite i izađite iz BIOS-a/UEFI-ja da ponovno pokrenete sustav. Nakon što se sustav ponovno pokrene, moći ćete instalirati WSL i Linux distribucije.
Instalirajte Linux distribuciju na Windows 11
Prije nego što instalirate željenu Linux distribuciju putem Microsoft Storea, trebate omogućite značajku podsustava Windows za Linux u značajkama sustava Windows. Evo kako možete omogućiti WSL u sustavu Windows 11.
Instalirajte Windows podsustav za Linux pomoću značajki sustava Windows
S instaliranim Windows podsustavom za Linux, moći ćete pokretati Linux aplikacije i Bash naredbe izvorno na Windowsima. Postoje dvije različite vrste WSL verzija: WSL 1 i WSL 2. Iako obje pružaju glatku i kontinuiranu integraciju Linuxa unutar Windowsa, WSL 2 je najnovija i najbrža verzija s potpunom podrškom za Linux kernel i kompatibilnošću sa sistemskim pozivima.
WSL pokreće sloj kompatibilnosti koji premošćuje jaz između Linux kernela i Windowsa za pokretanje Linux binarnih izvršnih datoteka izvorno na Windowsima. Da biste pokrenuli WSL 1, trebat će vam najmanje Windows 10 verzija 1607 (ili novija) i 64-bitno računalo. Za WSL 2 trebat će vam Windows 10 verzija 2004 (ili novija) i 64-bitno računalo. Budući da instaliramo WSL na Windows 11, zapravo se ne moramo brinuti o zahtjevima.
Ako je na vašem računalu predinstaliran Windows 11, možda imate već omogućen WSL.
Prvo otvorite izbornik Start i potražite”Značajke sustava Windows”. Zatim odaberite opciju upravljačke ploče’Uključivanje i isključivanje Windows značajki’iz rezultata pretraživanja.
U Dijaloški okvir Windows Features, označite opciju’Windows Subsystem for Linux’i kliknite’OK’
Nakon promjena primjenjuju se, kliknite’Ponovo pokreni sada’za ponovno pokretanje računala.
Ako želite instalirati samo WSL 1, sada možete ponovno pokrenuti računalo i instalirati svoju distribuciju Linuxa.
Nadogradite na WSL 2 na Windowsima
Preporučamo da nadogradite svoj WSL na verziju 2 za brži rad manju brzinu i pokrenuti pravi Linux kernel izravno na Windows 11. Da biste to učinili, trebate omogućiti značajku’Virtual Machine Platform’uz značajku’Windows Subsystem for Linux’na upravljačkoj ploči Windows značajki. Zatim kliknite”OK”i ponovno pokrenite računalo. Ako ste svoje računalo nadogradili s Windows 10 na Windows 11, možda već imate omogućen WSL, ali morat ćete omogućiti Platformu virtualnog stroja za nadogradnju na WSL 2.
Postavite WSL 2 kao zadanu verziju za sve buduće distribucije
Prije postavljanja WSL 2 kao zadane verzije za sve distribucije Linuxa, preuzmite Ažuriranje paketa WSL Linux kernela za x64 sustave s ove veze.
Zatim pokrenite instalacijski program ‘.msi’ koji ste preuzeli i instalirajte ga. Pritisnite’Dalje’u čarobnjaku za nastavak.
Trajat će samo nekoliko sekundi. Zatim kliknite’Završi’za izlaz iz čarobnjaka.
Za postavljanje WSL 2 kao zadane verzije kada instalirate novu distribuciju Linuxa, otvorite PowerShell i pokrenite sljedeću naredbu:
wsl –set-default-version 2
Zatim ponovno pokrenite sustav kako biste značajku prebacili s WSL 1 na WSL 2.
Omogućite WSL 1 putem PowerShell
WSL također možete omogućiti putem naredbe’PowerShell’-linijski alat. Ovo radi isti posao kao i upravljačka ploča značajki sustava Windows. Za to otvorite’PowerShell’kao administrator i pokrenite donju naredbu.
dism.exe/online/enable-feature/featurename:Microsoft-Windows-Subsystem-Linux/all/norestart
Omogućite WSL 2 putem PowerShell-a
Prvi korak za omogućavanje WSL-a 2 je omogućavanje komponente značajke Virtual Machine Platform u sustavu Windows. Također možete omogućiti WSL 2 putem alata naredbenog retka’PowerShell’. Da biste to učinili, otvorite’PowerShell’kao administrator i pokrenite sljedeću dodatnu naredbu s naredbom WSL 1.
dism.exe/online/enable-feature/featurename:Microsoft-Windows-Subsystem-Linux/all/norestart dism.exe/online/enable-feature/featurename:VirtualMachinePlatform/all/norestart
Instalirajte WSL iz Microsoftove trgovine
Također možete preuzeti i instalirati WSL iz Microsoftove trgovine. Pokrenite aplikaciju Microsoft Store i potražite”Windows podsustav za Linux”. Zatim kliknite gumb’Dohvati’na Windows Subsystem for Linux Preview’
Microsoft Store će automatski preuzeti i instalirati potrebne datoteke.
Instalirajte svoju željenu distribuciju Linuxa koristeći Microsoft Store
Nakon što je WSL omogućen, možete instalirati distribuciju Linuxa po svom izboru. Microsoft Store ima desetak distribucija Linuxa koje možete preuzeti i instalirati. Pogledajmo kako preuzeti i instalirati Ubuntu distro iz Microsoft trgovine. Prvo potražite”Microsoft Store”u polju za pretraživanje izbornika Start. Zatim ga otvorite iz rezultata pretraživanja.
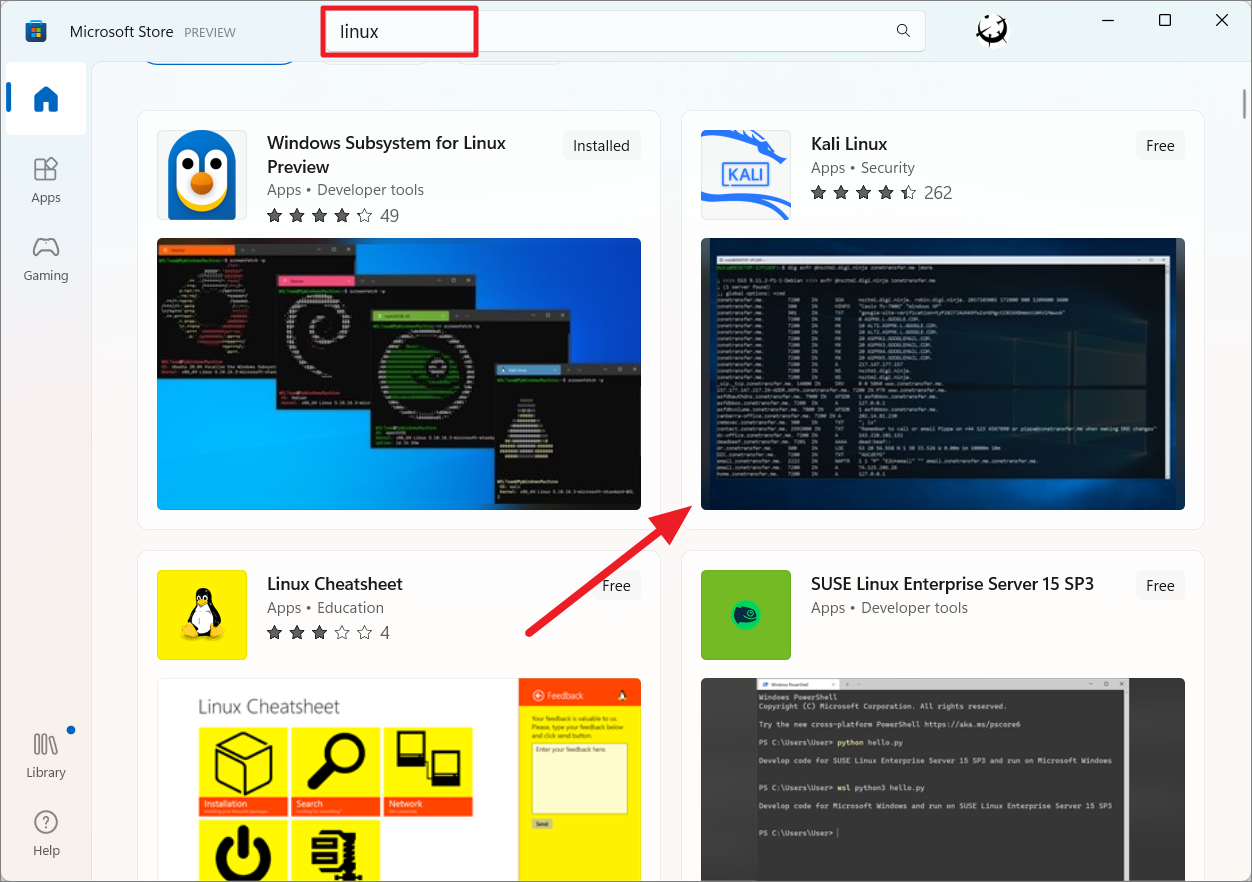
U Microsoft Storeu možete pretraživati ’Linux’da biste dobili popis dostupnih distribucija Linuxa i odaberite željenu distribuciju.
Ovdje je popis distribucija Linuxa koje su trenutno dostupne u Windows trgovini podržane od WSL-a.
Ubuntu 16.04 LTS Ubuntu 18.04 LTS Ubuntu 20.04 LTS openSUSE Leap 15.1 SUSE Linux Enterprise Server 12 SP5 SUSE Linux Enterprise Server 15 SP4 SUSE Linux Enterprise Server 15 SP3 Kali Linux Debian GNU/Linux Fedora Remix za WSL Oracle Linux 8.5 Oracle Linux 8.6 Oracle Linux 7.9 Oracle Linux 9 Pengwin Pengwin Enterprise 7 Pengwin Enterprise 8 Alpine WSL Raft WSL
Sve ove distribucije dostupne su u Microsoft Storeu besplatno.
Ili potražite određenu distribuciju Linuxa. Na primjer, ovdje tražimo’Ubuntu’. Zatim iz rezultata odaberite verziju Ubuntua koju želite instalirati.
Prema rezultatima, Ubuntu bez broja verzije najnovija je stabilna verzija. A Ubuntu s brojevima verzija odnosi se na specifične verzije distroa. Možete odabrati određenu verziju ako želite. U donjem primjeru odabiremo’Ubuntu’kako bismo dobili najnoviju verziju distribucije.
Ubuntu ( Preview) odnosi se na dnevnu izgradnju najnovije razvojne verzije distribucije.
Na stranici distribucije Ubuntu kliknite gumb’Preuzmi’.
Bit će potrebno malo vremena da se dovrši preuzimanje kompletnog Ubuntu terminalskog okruženja. Nakon što se preuzme, automatski će se instalirati na vaš uređaj.
Instalirajte Ubuntu 22.04.1 LTS na Windows 11
Matična tvrtka Canonical Ubuntu upravo je izdana nova i poboljšana verzija Linuxa pod nazivom Ubuntu 22.04.1 LTS (kodno ime Jammy Jellyfish) u kolovozu 2022. Ova nova verzija Ubuntu Linuxa isporučuje se s najnovijim lancima alata, uključujući Python, Rust, Ruby, Go, PHP i Perl. Sada možete instalirati Ubuntu 22.04.1 LTS putem Windows trgovine na Windows 11.
Prije nego što instalirate ovu distribuciju, provjerite jesu li značajka Windows podsustava za Linux i tehnologija virtualizacije omogućeni na vašem uređaju.
Da biste instalirali najnoviju verziju Ubuntua, potražite’Ubuntu’u Microsoft Storeu i odaberite’Ubuntu 22.04.01 LTS’iz rezultata pretraživanja. Zatim kliknite na’Get’za preuzimanje i instaliranje Linux spremnika.
Nakon što instalacija završi, kliknite gumb’Otvori’za pokretanje Linux terminala. Aplikaciju možete pokrenuti i iz izbornika Start sustava Windows.
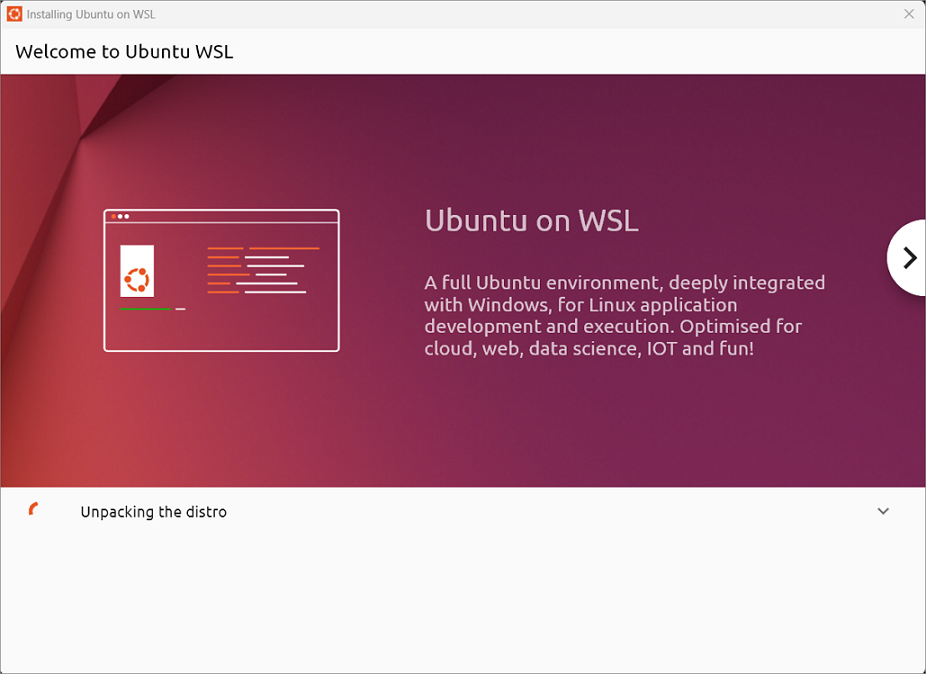
Nakon što se preuzme, prikazuje se prozor dobrodošlice u Ubuntu WSL pojavit će se. The installer will continue to unpack the distro and install it on your device.
After it’s done, click’OK’on the’We are almost done’prompt box.
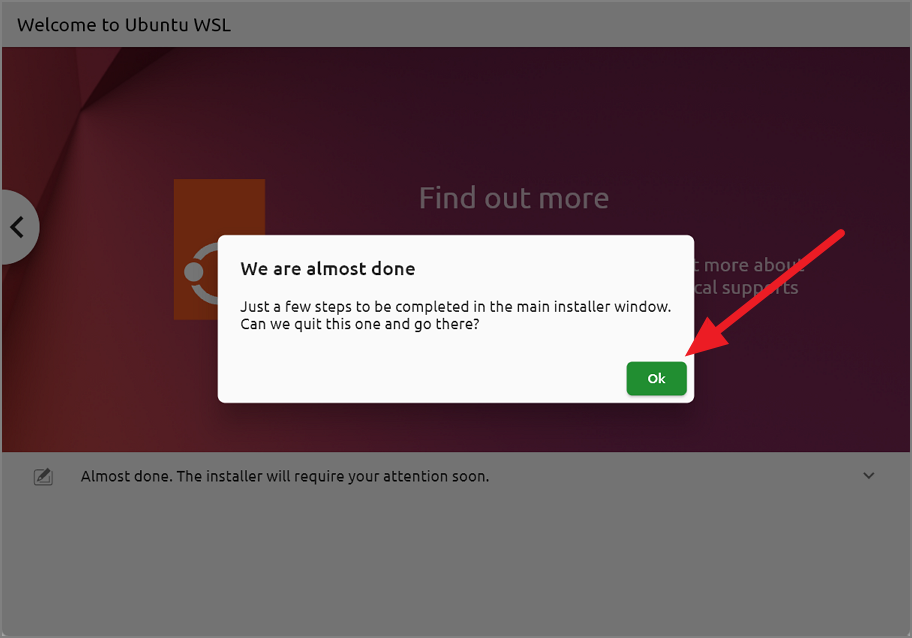
Once you click’OK’, the main installer pojavit će se prozori u kojima trebate konfigurirati još nekoliko postavki. Glavni prozor instalacijskog programa bit će ili prozor korisničkog sučelja ili prozor ljuske. U svakom slučaju, oba prozora programa za instalaciju imaju iste opcije.
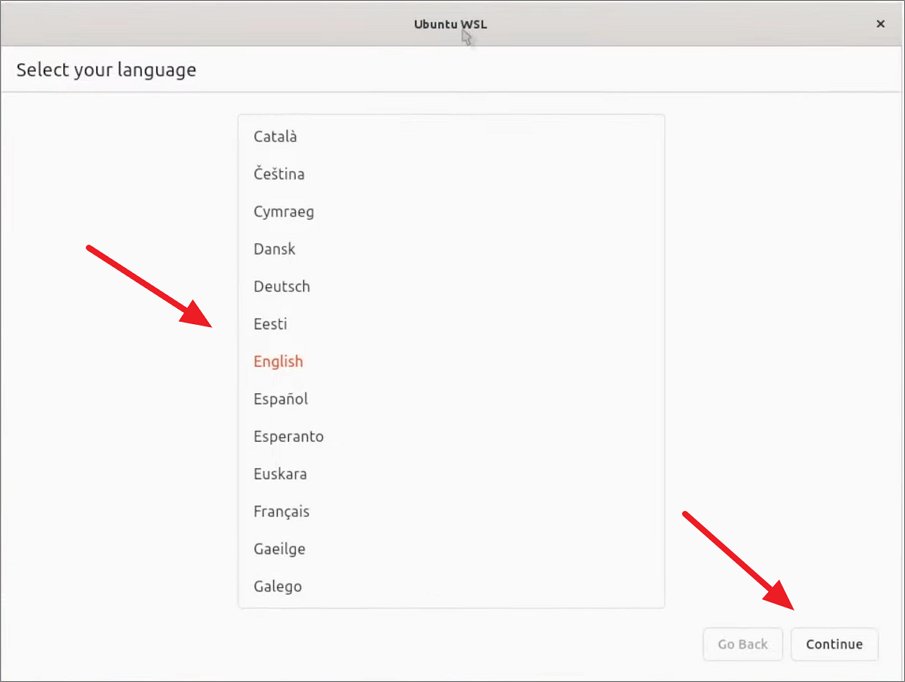
Prvo odaberite jezik za distribuciju koju instalirate u prozoru korisničkog sučelja.
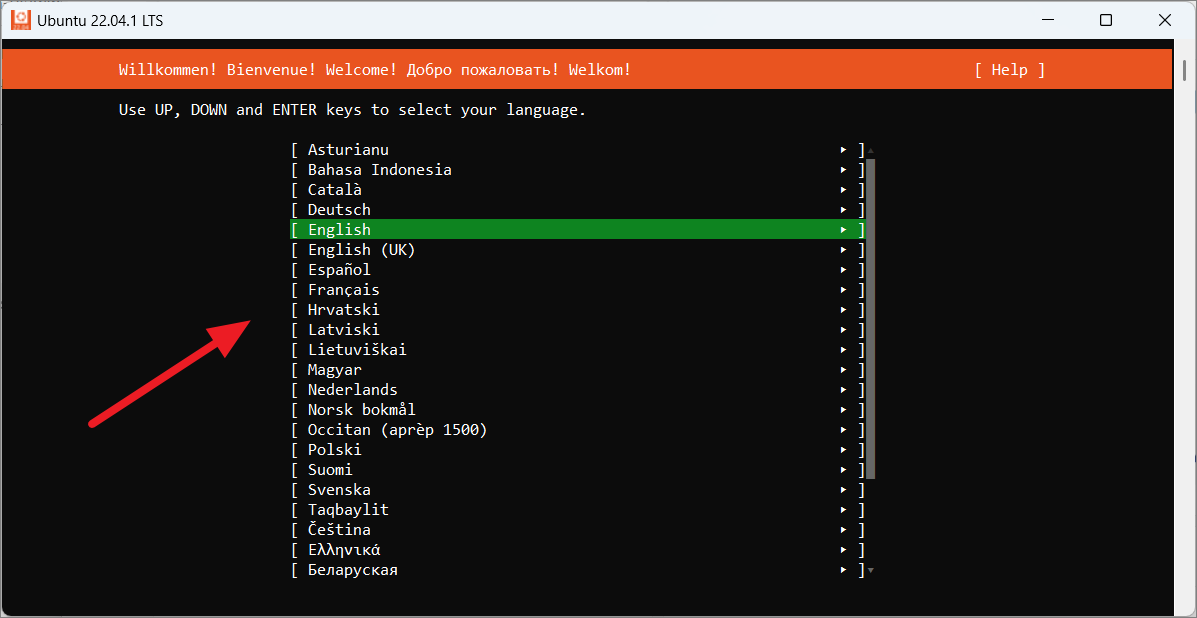
Or, select the language from the terminal window.
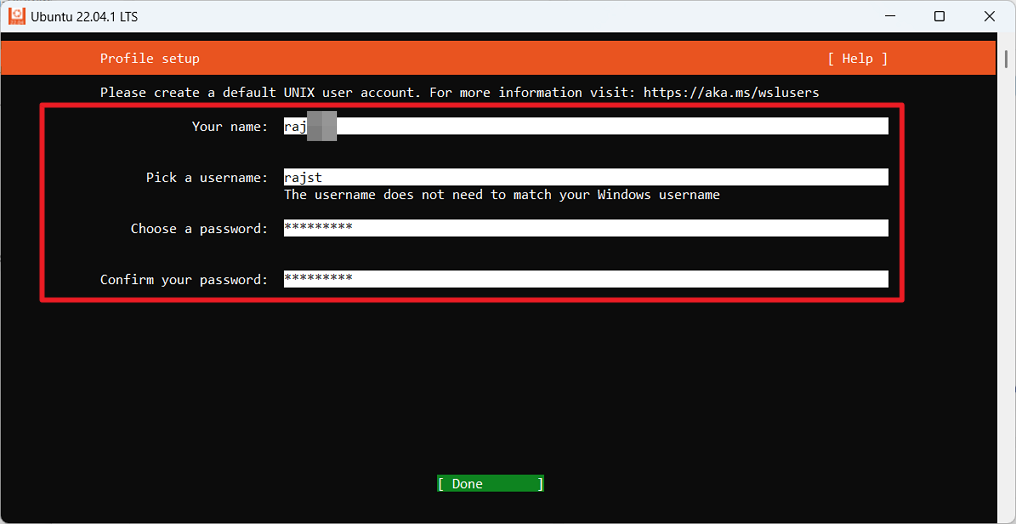
Na stranici Postavljanje profila možete stvoriti zadani UNIX korisnički račun. Unesite svoje ime, korisničko ime i lozinku u zadana polja. Međutim, ne možete koristiti miš u ovom instalacijskom programu; možete koristiti samo tipke sa strelicama na tipkovnici za navigaciju opcijama. After entering details, move to the’Done’button and press Enter.
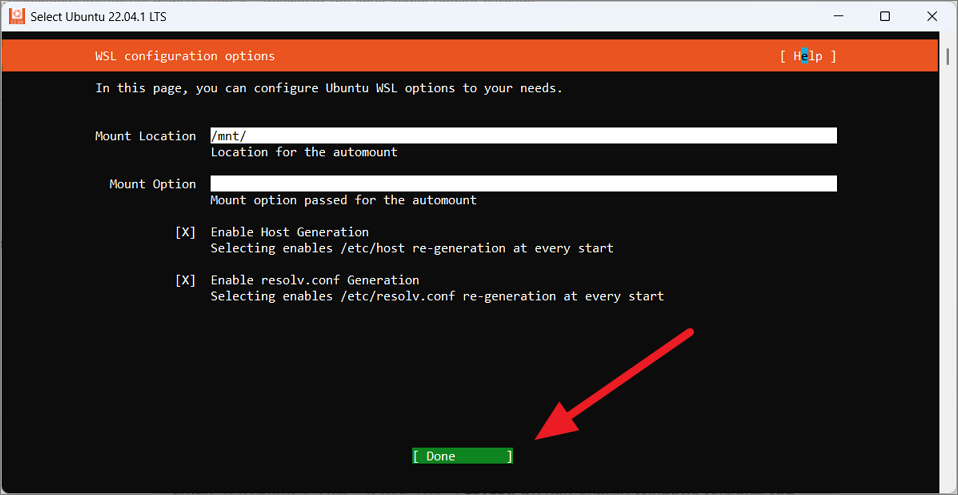
In the u sljedećem prozoru možete odrediti točku montiranja i opcije montiranja za automatsko montiranje. Također možete odabrati želite li omogućiti regeneraciju’host’i’resolv.conf’pri svakom pokretanju terminala.
U donjem primjeru, zadržavamo zadane konfiguracijske opcije WSL-a. Then, move to’Done’and press Enter to save the changes.
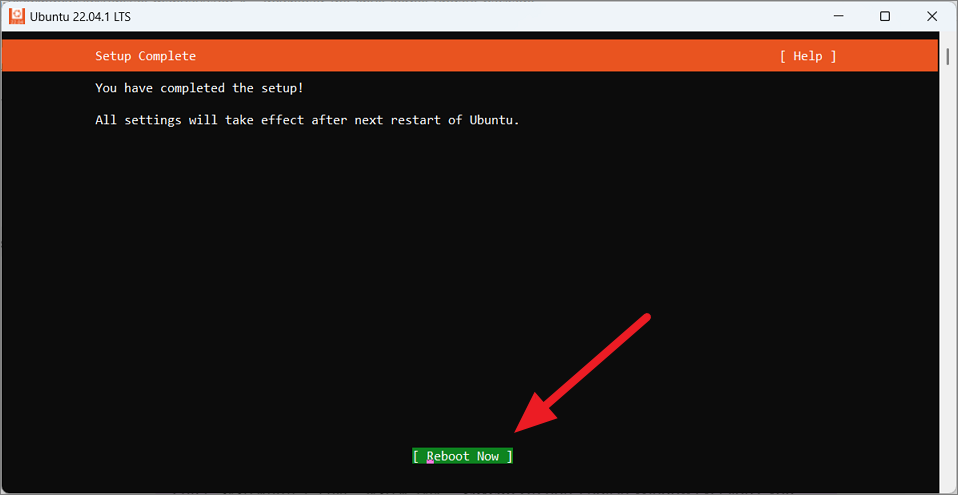
After the setup is complete, move to the’Reboot now’option to restart your device.
Install WSL and Linux using Windows Terminal (Cmd or PowerShell ) u sustavu Windows 11
Ovo je najlakši način za instaliranje Linuxa u sustavu Windows 11. Možete omogućiti najnoviju verziju WSL-a i instalirati Ubuntu jednom naredbom. Ove naredbe možete koristiti u naredbenom retku ili PowerShell za instalaciju Linuxa. Evo kako to možete učiniti:
Prvo otvorite Windows terminal desnim klikom na izbornik Start i odabirom’Terminal (Administrator).
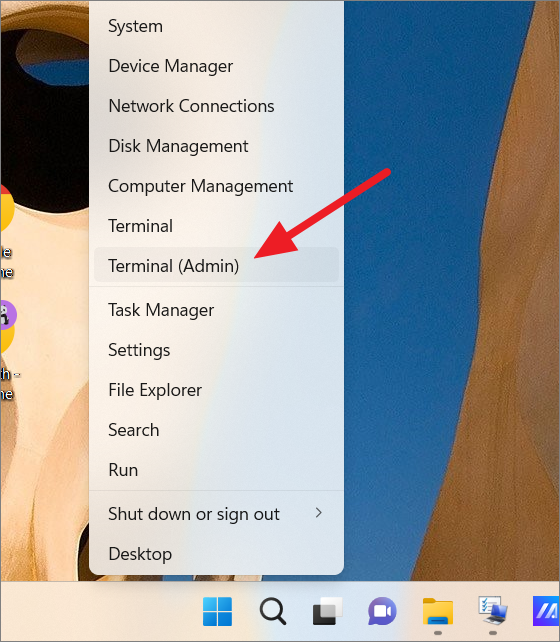
Click’Yes’in the User Account Control to continue.
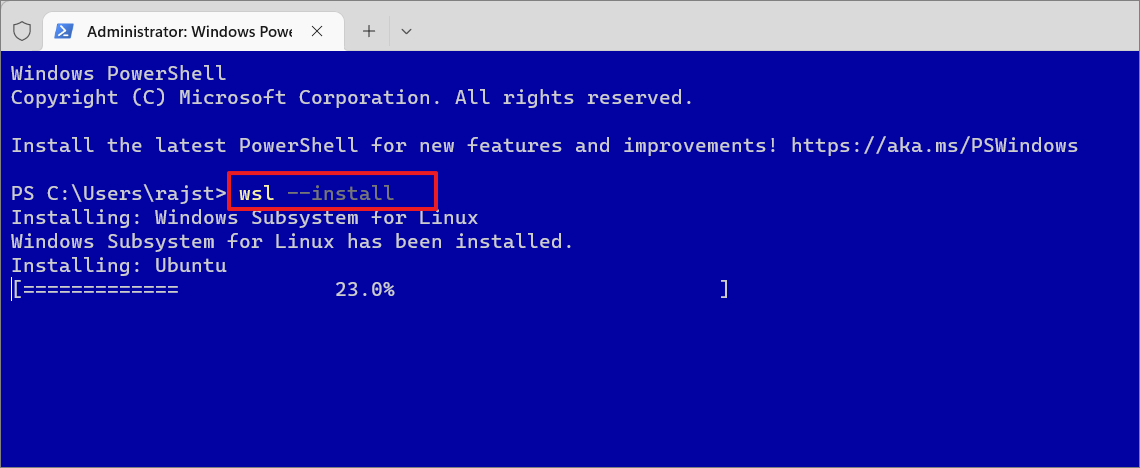
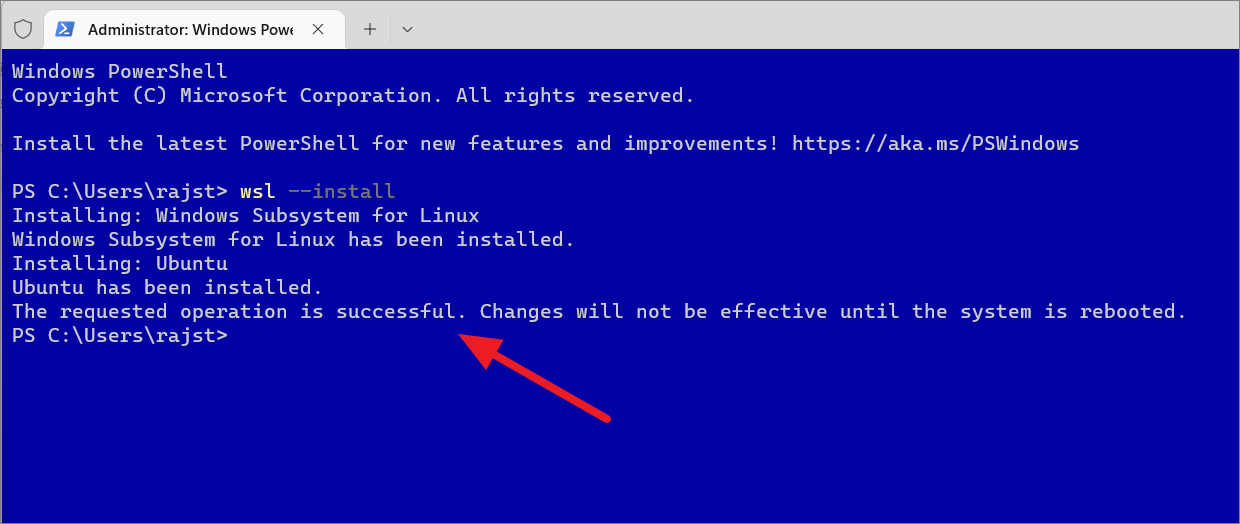
Kada se otvori Windows terminal, upišite sljedeću naredbu i pritisnite Enter za instalaciju WSL-a:
wsl–install
Proces može potrajati neko vrijeme dok se ne završi. Gornja naredba će preuzeti i instalirati datoteke, stoga provjerite imate li aktivnu internetsku vezu. Kao što možete vidjeti na snimci zaslona, gornja naredba ne samo da omogućuje WSL 2, već i automatski instalira najnoviju verziju Ubuntu Linux distribucije. This command installs Ubuntu as the default Linux distribution, but you can change that at any time.
Kad instalacija završi, trebali biste vidjeti ovu poruku – “Tražena operacija je uspješna. After you see this message, restart your device to apply the changes.
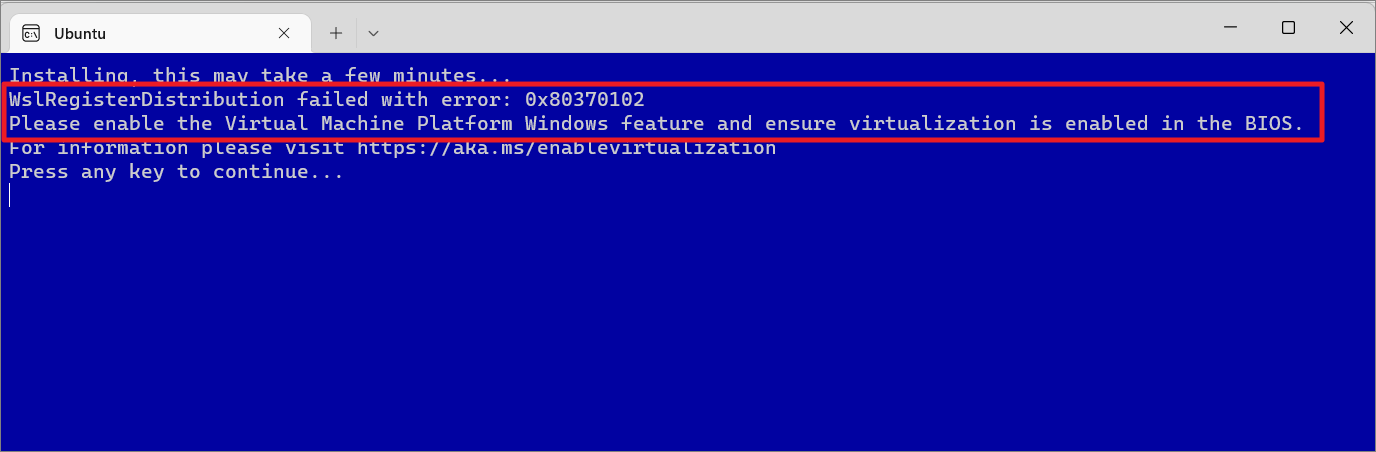
Ako dobijete”WslRegisterDistribution failed with error 0x80370102″ili”Installation failed with error 0x80070003″tijekom ovog koraka, to znači da morate omogućiti’CPU Virtualization’u vašem BIOS-u ili Unified Extensible Firmware Interface (UEFI). Omogućite virtualizaciju u BIOS-u kao što je objašnjeno u ovom vodiču prije i ponovno izvedite naredbu.
Then, enter the new username and password to complete the setup. This username doesn’t necessarily need to be the same as the Windows account.
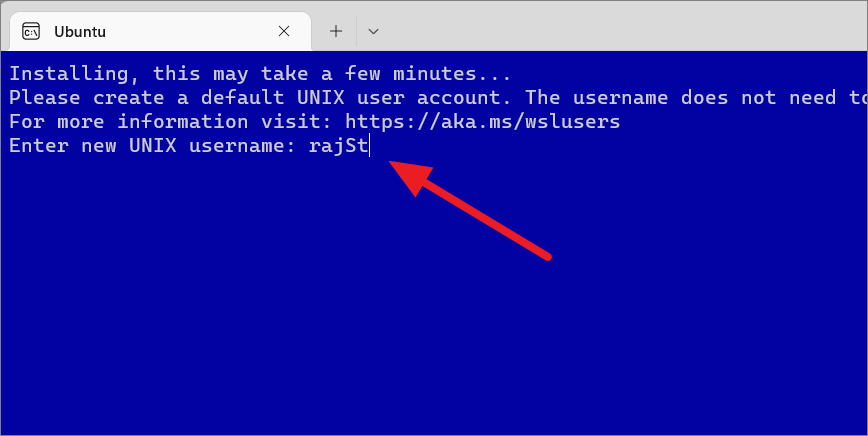
Nakon postavljanja korisničkog imena i lozinke, Ubuntu terminal će se pokrenuti u zasebnom prozoru terminala kao što je prikazano u nastavku.
Instalirajte različite distribucije Linuxa na Windows 11
Ako više volite drugu verziju Linuxa osim Ubuntua s WSL-om, možete instalirati druge verzije Linuxa na svoj uređaj. Možete instalirati različite distribucije putem Microsoft Storea ili putem naredbenog retka. Iako možete instalirati desetke različitih verzija Linuxa putem Microsoft Storea, neke distribucije Linuxa nisu dostupne putem Powershell-a.
Da biste instalirali alternativne distribucije Linuxa putem Microsoft Storea, otvorite aplikaciju Store i potražite’Linux’dobiti popis dostupnih distribucija Linuxa. Then, select your desired distro from the result.
After that, click the’Get’button to download and install the distro.

Da biste dobili popis drugih dostupnih distribucija Linuxa putem naredbenog retka, upišite jednu od sljedećih naredbi:
wsl–list–online
ili
wsl-l-o
Ovim ćete dobiti popis podržanih Linux distribucija.
Da biste instalirali novu distribuciju, koristite donju naredbu:
wsl–install-d
Gdje zamijenite
wsl–install-d Debian
Nakon završetka instalacije , postavljanje će se nastaviti u drugom prozoru terminala gdje ćete morati unijeti novo korisničko ime i lozinku za zadani UNIX korisnički račun. Ovaj korisnički račun bit će dodijeljen samo Debian Linux okruženju.
Nakon što završi, ponovno pokrenite računalo za promjene stupiti na snagu. Nakon što se vaše računalo ponovno pokrene, možete pokrenuti novoinstaliranu distribuciju Linuxa iz izbornika Start ili otvoriti Windows terminal, kliknuti gumb sa strelicom prema dolje i odabrati distribuciju Linuxa s padajućeg izbornika.
Ovo će pokrenuti novoinstaliranu distribuciju na kartici Windows terminala.
Pokrenite svoj Linux Distro i koristite Bash Shell
Kad se instalira Ubuntu ili neka druga distribucija Linuxa, moći ćete pristupiti Linux terminalu tako da ga potražite u Startu izbornik. Otvorite izbornik Start, potražite’Ubuntu’i odaberite terminal iz rezultata.
Alternativno, vi možete otvoriti Windows terminal i kliknuti gumb strelice prema dolje na traci kartica. Zatim odaberite Linux distribuciju koju ste instalirali (Ubuntu) s padajućeg izbornika za pokretanje Linux ljuske.
Ovo će pokrenuti okruženje Linux ljuske na Windows terminalu. Sada možete koristiti Linux Bash Shell u sustavu Windows, baš kao da koristite Linux PC.
Alternativno, možete jednostavno upisati naziv distribucije i pritisnuti Enter za brzo pokretanje distribucije.
Da biste vidjeli popis svih dostupnih Linux naredbi koje možete koristiti u Bashu, upišite help-d i pritisnite Enter.
Da biste dobili više detalja (kao što su opcije, argumenti, upotreba itd.) o određenu naredbu, upišite pomoć nakon čega slijedi naziv naredbe kao što je prikazano u nastavku (npr. vrsta pomoći).
Još jedna sjajna stvar kod Linuxa je da je Bash zadana ljuska uključena u Ubuntu i druge Linux distribucije, što znači da se iste naredbe mogu koristiti na različitim distribucijama za izvođenje istih funkcija. Sljedeće se naredbe uglavnom izvode u Ubuntu Linuxu, ali se mogu koristiti u drugim distribucijama kao što su Kali Linux, OpenSUSE, Debian itd.
Ažurirajte Ubuntu u WSL-u
Jednom, skup završi, odvest će vas do bash naredbenog retka. Bolje je odmah ažurirati softver. U Ubuntuu možete pretraživati, preuzimati i instalirati ažuriranja softvera, sve pomoću naredbe apt.
Da pokrenete naredbu s administrativnim povlasticama, dodajte sudo ispred naredbe.
Unesite donju naredbu za ažuriranje softvera:
sudo apt update
Dok pokrenete gornju naredbu od vas će se tražiti lozinka. Upišite UNIX lozinku koju ste ranije izradili da pokrenete naredbu kao administrator. Kada upišete lozinku, ona neće biti vidljiva, pa kada završite s upisivanjem lozinke, pritisnite Enter.
Nakon što je lozinka potvrđena, gornja naredba’ažuriraj’provjerit će postoje li ažuriranja.
Ubuntu će dobiti niz popisa paketa koji se mogu nadograditi u Linux okruženju. Kao što možete vidjeti ispod, naredba pokazuje da se 26 paketa može nadograditi.
Ali još nisu nadograđeni. Da biste vidjeli popis dostupnih nadogradnji, upotrijebite naredbu u nastavku:
sudo apt list–upgradable
Zatim unesite lozinku i pritisnite Enter.
Ovo će izlistati sva dostupna ažuriranja zajedno s njihovom trenutnom verzijom i verzijom koja se može nadograditi.
Ako želite ažurirati samo određeni paket, to možete učiniti s donjom naredbom:
sudo apt–only-upgrade instalirajte paket
Ovdje zamijenite paket nazivom paketa koji želite nadograditi.
Na primjer, želimo ažurirati samo paket pod nazivom’curl’. Da biste to učinili, unesite naredbu u nastavku:
sudo apt–only-upgrade install curl
Ako se od vas zatraži lozinka, upišite je i pritisnite Enter. U protivnom unesite’Y’i pritisnite Enter za nastavak.
Potrajat će nekoliko sekundi za instalaciju ažuriranja za navedeni paket.
Za nadogradnju svih dostupnih paketa unesite naredbu ispod:
sudo apt upgrade
Zatim upišite Y na upit za nastavak instalacije.
Gornja naredba nadograđuje pakete na njihove najnovije verzije.
Add a User to Linux Distro in Windows 11
When configuring the new Linux distribution, you will be asked to create a new account and that account will također koristiti kao vaš zadani korisnički račun. U slučaju da želite stvoriti novi korisnički račun za određenu distribuciju, evo kako ćete to učiniti:
Da biste stvorili novi korisnički račun, upotrijebite naredbu u nastavku:
sudo adduser
Zamijenite
Primjer:
sudo adduser rajallthings
Unesite svoje trenutno lozinku kada se to od vas zatraži. Zatim upišite i ponovno upišite lozinke za ovaj novi račun i pritisnite Enter.
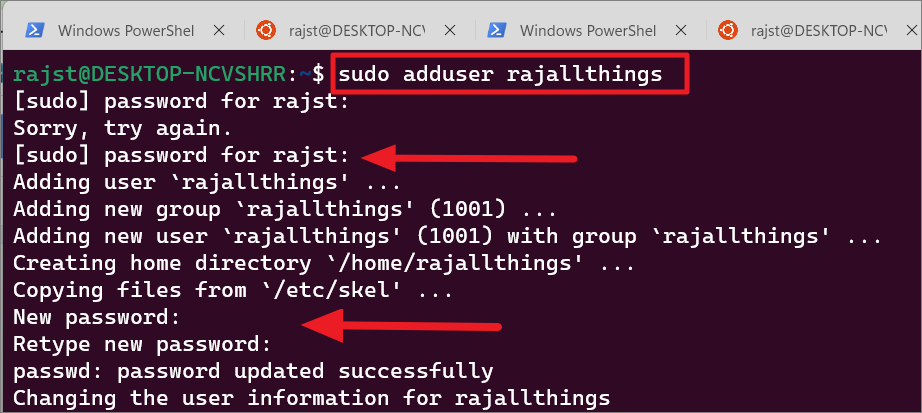
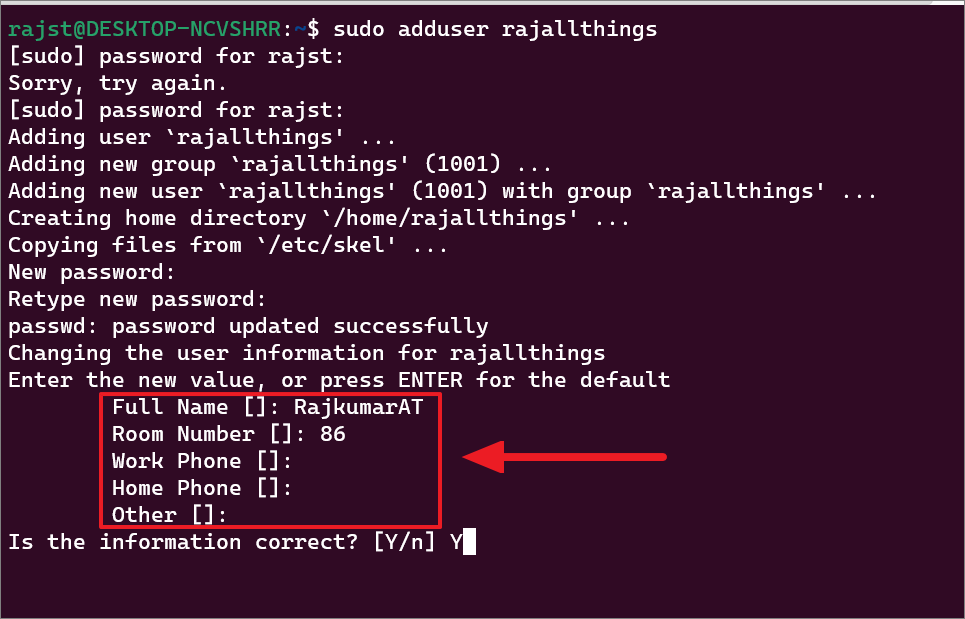
After that, enter a new value or leave it blank and press Unesite za svaku vrijednost korisničke podatke za novi korisnički račun. Podaci o korisniku uključuju puno ime, broj sobe, poslovni telefon, kućni telefon i ostalo. Finally, click’Y’and hit Enter to confirm the details.
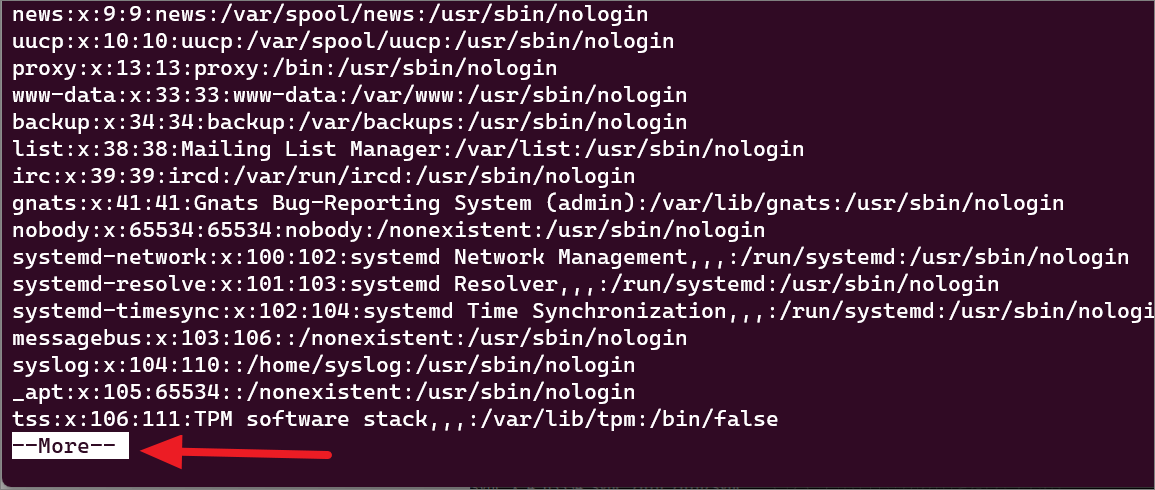
To get the list of user računa na vašoj Linux konzoliupišite sljedeću naredbu i pritisnite Enter.
cat/etc/passwd|više
Ovo će vam pokazati popis posebnih računa koji se koriste za demone, aplikacije i korisničke račune sustava kao što je prikazano u nastavku.
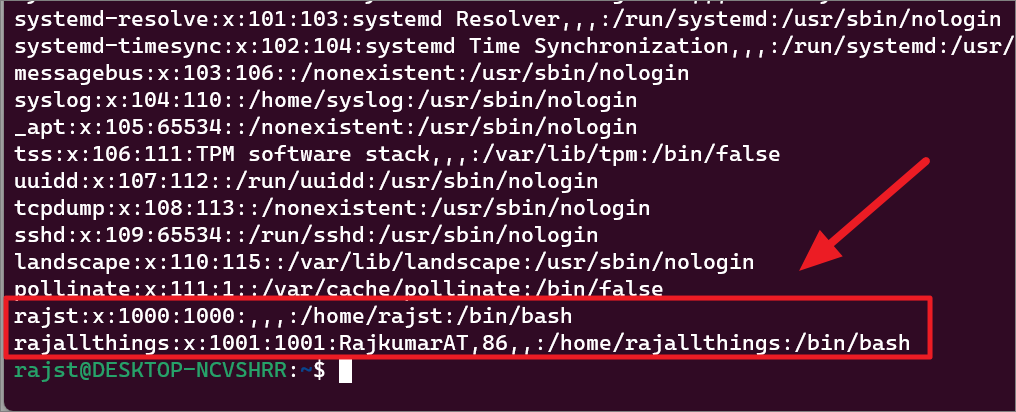
Na dnu ekrana nastavite pritiskati Enter na’–More–‘da vidite sve povezano to user accounts.
You will see your user accounts at the end of the results.
Set Default User for WSL Linux Distro
The default account is the one that automatically signs in when you launch a distro. The one that you created during the initial setup of the distro will likely be the default account.
If you want to set another user account as the default UNIX user for WSL, run the following command:
Substitute
Example:
ubuntu config–default-user rajallthings 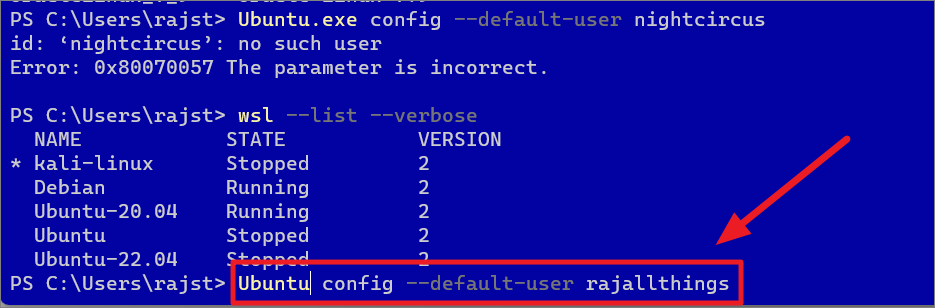
If you are using OpenSUSE, run the following command:
opensuse-42 config–default-user
If you are using SUSE Linux Enterprise Server, run the following command:
sles-12 config–default-user
If you are using Debian Linux, run the following command:
debian config–default-user
If you are using Kali Linux, run the following command:
kali config–default-user
Switch User in WSL Linux Distro in Windows 11
In Linux, ‘sudoers’ is a group of users who are allowed to run commands as root (i.e., elevated). In case you are using a user who is not a sudoer, you can quickly switch users to run elevated commands.
To switch users in the WSL Linux distro, run the following command:
su-
Or
su-
In the command, substitute the
Su-rajstd 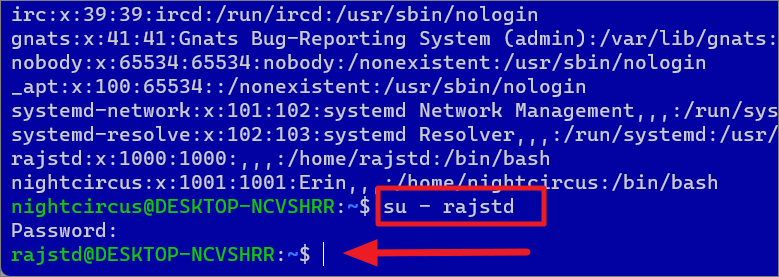
Remove User from WSL Linux Distro in Windows 11
To remove a specific user account from the WSL Linux distro, enter the below command in the Linux terminal:
sudo deluser
Replace the
Example:
sudo deluser nightcircus 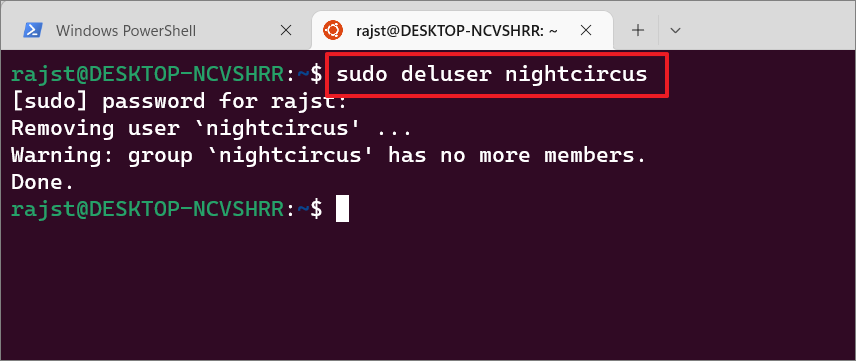
Change Password in Linux Distro in Windows 11
Linux operates with root privileges, so it is vulnerable to misuse. In case your password is compromised or for some other reason you want to change your password, you can use the following command:
sudo passwd root
After entering the above command, you will be prompted for the current password. Type your current password and press Enter. Then, type your new password and then retype your new password.
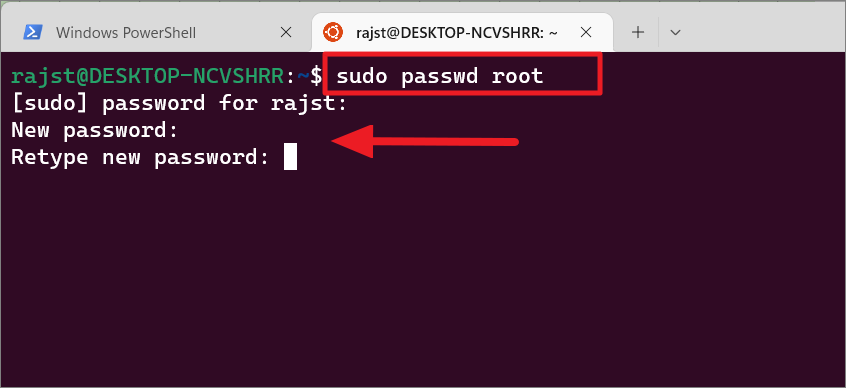
And the password will be updated successfully for the current account.
Manage Windows Subsystem for Linux in Windows 11
Here’s how you can manage Windows Subsystem for Linux (WSL) and Linux distributions installed on Windows 11 through PowerShell.
List all Installed Linux distros on Windows 11
To list all the installed Linux distributions on your device, run the below command in PowerShell or Command Prompt:
wsl–list–verbose
or
wsl-l-v
This will show a list of all the Linux distros installed on your system along with their status and their WSL version.
To list only the Linux distros that are currently running on the device, you can run the below command:
wsl–list–running
Change Default Linux Distribution on Windows 11
By default, the WSL command installs and sets Ubuntu as the default Linux distribution or the Linux distribution you first installed. The default Linux distribution will be marked with a small asterisk (*) symbol when you list all distros using the above command. As you can see in the above screenshot, there’s an asterisk (*) character next to the distro name Ubuntu-20.04.
To change the default distribution to something else (e.g. Debian), run the following command:
wsl–set-default debian 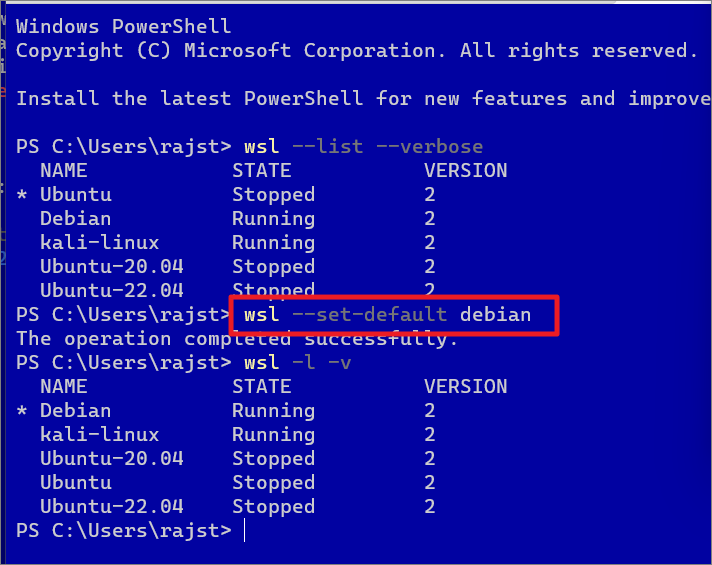
You can launch the default distro by simply running wsl in a command line without specifying the distribution.
Run a Specific Linux Distribution through PowerShell
In case you have only one Linux distribution installed on your device, you can run the following command from within PowerShell or Windows Command Prompt to launch it:
wsl
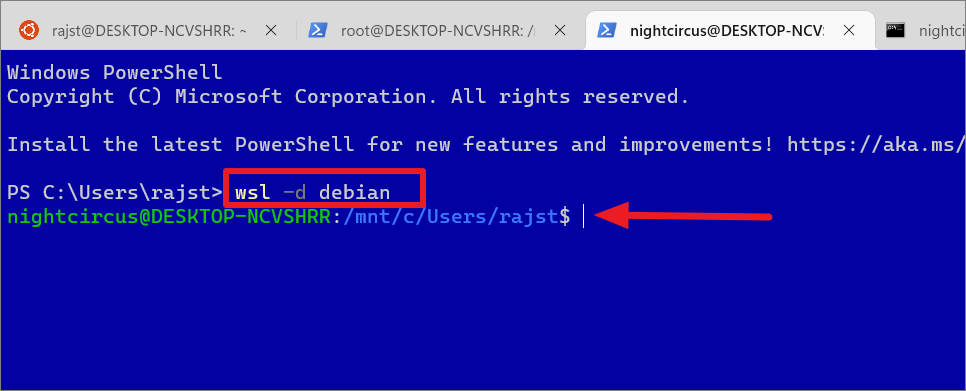
However, if you have multiple Linux distributions on your computer, you can use the following command from within PowerShell or Windows Command Prompt to start a specific Linux distro:
wsl-d
Replace
wsl-d debian
Type the above command and press Enter. This will start the specified distro’s bash shell directly in the current PowerShell or CMD terminal.
If you wish to log in to a WSL distro with a specific user, type the below command:
wsl–distribution debian–user rajstd 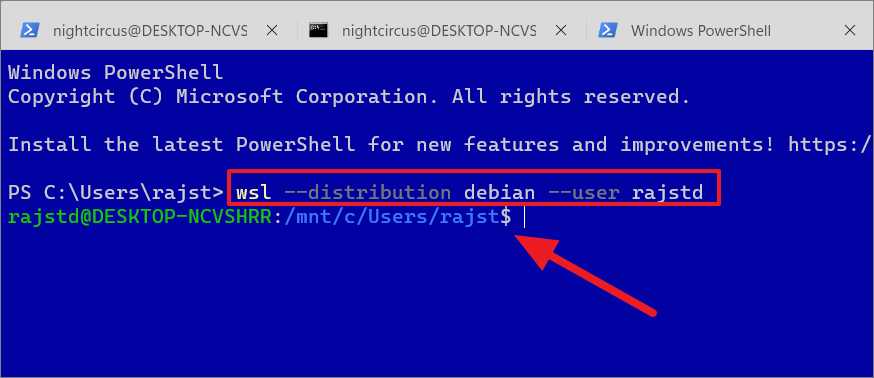
To get back to the PowerShell shell, simply type exit and press Enter to exit bash.
Stop a W SL Linux Distro on Windows 11
Once a WSL distro is started, it will continue to run in the background even after closing the Linux terminal window or the distro bash shell until you manually terminate the WSL instance. Here’s how you can stop a specific Linux distro or all of them.
wsl–terminate kali-linux
However, if you are still on the Linux bash shell or terminal, you can just type exit and press Enter instead of closing the Linux terminal window to stop the WSL instance.
If your computer has multiple Linux Distro running in the background and you want to stop them all, use the below command:
wsl–shutdown
Change the WSL version for a Specific Distribution
WSL 2 is the newer version of Windows Subsystem for Linux that runs on a virtual machine to run a Linux kernel with full system call compatibility while WSL 1 works better when work ing across filesystems. When you enable Windows Subsystem for Linux feature through Windows Features, WSL 1 will be set as default. However, if you use wsl–install command to install new Linux distros, WSL 2 will be set as default.
You can use wsl–set-version command to change the version of WSL (upgrade or downgrade) for the previously installed Linux distributions. You can also change the WSL version globally for all future Linux installations.
If you wish to upgrade the existing WSL 1 version to WSL 2 for a specific distribution. Then, run the below command in PowerShell or command prompt:
wsl –set-default-version
Replace the
Example:
wsl –set-default-version Kali Linux 1
To change the WSL version globally ( for all future WSL instances), use the below command:
wsl–set-default-version 2 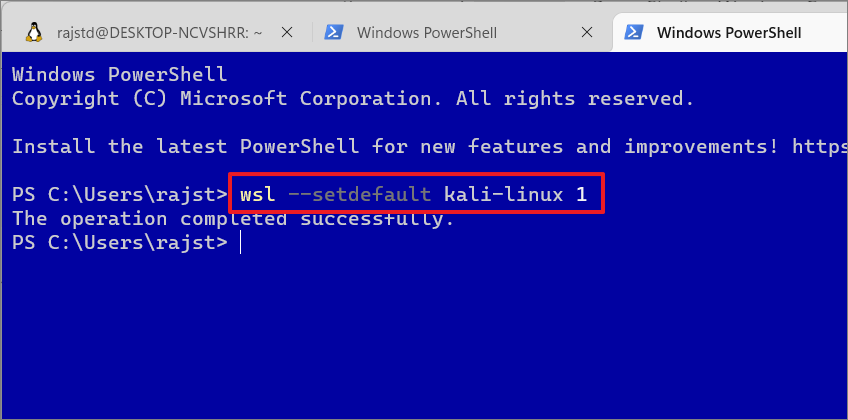
Update the Window Subsystem for Linux (WSL) kernel
WSL feature is usually updated with Windows Updates however if you want to manually check and update the WSL feature, you can do that with the following c ommands:
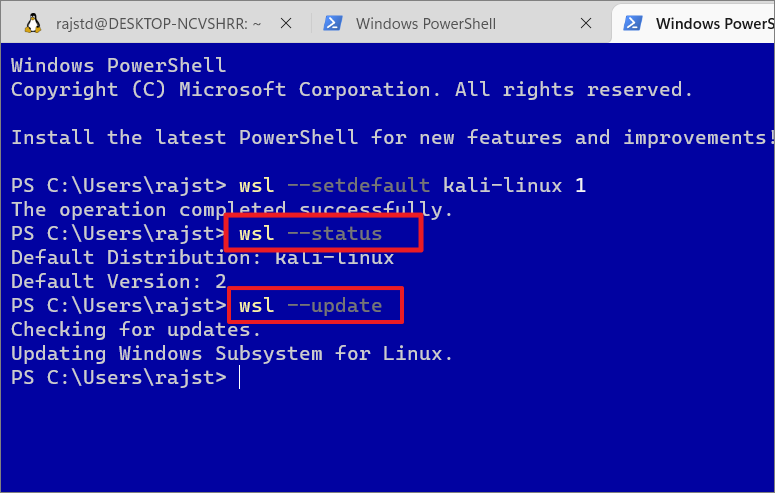
wsl–status
First, use the above command to check the status of WSL, including the default distribution name and kernel version.
wsl–update
This command will check and update the WSL kernel version if an update is available.
Remove or Unregister a Linux Distribution
If you no longer need a particular distro or you want to install a different distribution in its place or want to troubleshoot a distro, you can uninstall the Linux distribution easily. Unregistering will erase all data, settings, and programs associated with that distribution. Here’s how you can unregister a Linux distro in Windows 11.
To remove or uninstall a Linux distro from WSL, execute the following command:
wsl–unregister
Replace
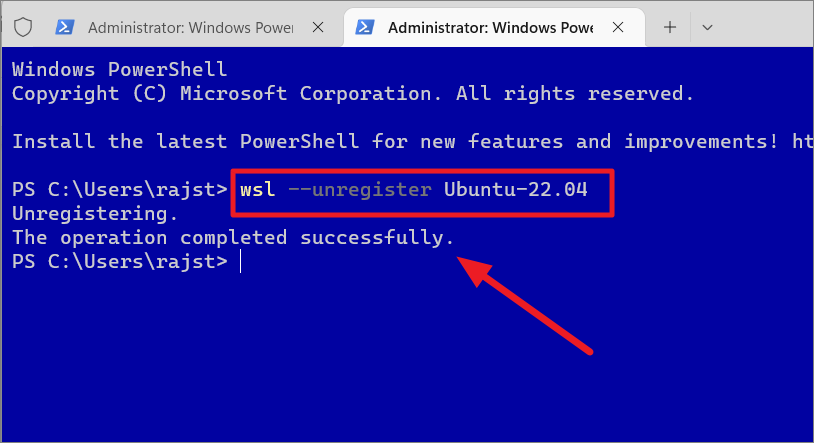
Once you run the above command, it will remove all the data, settings, and applications within that distro.
Mount a Disk to WSL Linux on Windows 11
Windows Subsystem for Linux now allows you to mount a physical disk formatted with a Linux file system (e.g. ext3, ext4) that is not supported by Windows and access its content. However, you can only use this feature in the Linux distro that is running on WSL 2 on Windows 11 (build 22000 or higher).
Windows Operating System recognizes drives and disks that are formatted with FAT16, FAT32, exFAT, NTFS, and a few other file systems, but it does not support the most commonly used Linux file systems such as EXT3, EXT4, XFS, etc.
For instance, if you are trying to access files copied from a Linux computer to a USB drive, Windows won’t recognize it and nothing will show up in File Explorer as the disk is formatted with a Linux file system (EXT3).
To access Linux disk format in the WSL distribution, you can mount hard drives, flash drives, and other removable disks using the wsl–mount command. Here’s how you can do that:
Before you mount a disk, you need to get a list of available drives and their deviceID. To do that, open PowerShell or Windows Terminal with administrative privileges and enter either of the following commands:
Get-CimInstance-query’SELECT * from Win32_DiskDrive’
or
wmic diskdrive list brief
The above command will list all the available physical disks connected to your computer Now note down the device ID of the disk you wish to mount in the WSL distro.
If you have a single partition or unpartitioned disk, use the below syntax command to mount that disk
wsl–mount
Example:
wslwsl–mount \\.\PHYSICALDRIVE2
The above command mounts the given disk globally so that it is available to all the Linux distros in WSL.
When you attempt to mount a disk to WSL, it will automatically assume it is an EXT4 file system. However, if your disk has a different file system, you will need to specify it using the–type or-t argument.
wsl–mount \\.\PHYSICALDRIVE2–bare–type ext3
or
wsl–mount \\.\PHYSICALDRIVE2–bare-t ext3
The-bare argument can be used with a command to make the specified disk available in WSL without mounting it to all distros. In the above command make sure to replace ‘ext3’ with the file format of the drive you are mounting.
If you wish to mount a particular partition with multiple partitions, you can use the following command syntax:
wsl–mount
Example:
This command mounts the specified disk and makes it available to all the Linux distros in WSL. You can use the –bare parameter to make the disk available in WSL without mounting it to all distros. The –type parameter can be used to specify the file system for the disk. If you don’t know the file system, you can skip this parameter.
wsl–mount \.\PHYSICALDRIVE3–partition 1-t ext3
To access the mounted Linux disk in File Explorer, open File Explorer and enter this in the address bar: \wsl$. Then, navigate to the desired distro.
After that, go to the ‘mnt’ folder in the list where you can find all your mounted drives and their contents.
To unmount a disk after finishing accessing its content, execute the following command:
wsl–unmount
Example:
wsl–unmount \\.\PHYSICALDRIVE2
Access Windows Drives from Windows Subsystem for Linux (WSL)
The above commands let you mount the Linux files system to WSL but the Windows Subsystem for Linux still automatically mounts fixed NTFS drives on your computer. However, secondary drives, removable drives, and external networks need to be mounted to access their content in WSL. Here’s how you can mount Windows drives in Windows Subsystem for Linux to access their files.
You can use the new mounting option – ‘DrvFs’ to mount external drives like hard drives, USB sticks, CDs, DVDs, and other removable disks. However, this mounting option can only work on NTFS, ReFS, or FAT file systems.
Let’s assume you have an external drive ‘W:’. To mount this drive, you can use the below commands:
sudo mkdir/mnt/w sudo mount-t drvfs W:/mnt/w
Replace w in the commands with your desired drive letter or path. When navigating a drive from a Linux terminal, make sure to add/mnt/before the path. After entering the first command, type your Unix password. Then, enter the second command.
Once a drive is mounted, it will remain accessible in the Linux environment and you can access the drive anytime you want as long as it is connected to the device.
To access files in the mounted or the internal drive, use the below command:
ls/mnt/w
Here, replace w with your desired drive path.
To unmount an external drive, run the following command:
sudo umount/mnt/w/
Please remember there is no “n” between “u” and “mount” in the “umount” command.
When mounting a drive, a temporary folder will be created in the mnt directory where the mounted driv es and locations will be located. You can also delete these temporary folders after unmounting the drive. You can remove the temporary folder using the ‘rmdir’ argument:
sudo rmdir/mnt/foldername
Substitute foldername with the drive letter or path of the location.
Example:
sudo rmdir/mnt/w
The rmdir parameter can only remove the empty directories. So make sure the location is properly unmounted before executing the above command.
Mount Windows Network Location
You can also mount network locations directly from WSL whether or not the network location has been mapped to a specific drive letter in Windows. If your network is already mapped to a drive letter inside Windows, you can use that drive letter to mount it.
In case you have an unmapped network location, you can mount it directly using the below commands.
First, let’s create a folder for the location inside the/mnt/folder using the below command:
sudo mkdir/mnt/folder
Then, use the mount switch to connect the folder with the network location:
sudo mount-t’\\server\folder’/mnt/folder
Where replace \\server\folder with the path to your network location.
Clear the Terminal Screen
If you have been running commands for a while, the terminal window may get clustered. You can quickly clear your terminal screen to make it look like a new tab with this command:
clear
Result:
Access Windows Files through WSL and Vice Versa
You can also access your Windows files in the Linux environment as well as create, copy/move files, and delete files in the Windows file system. Microsoft WSL allows you to access your Windows files through the Linux kernel by navigating to the exact path. Here’s how you can do this:
Navigate and Access Windows File System in WSL
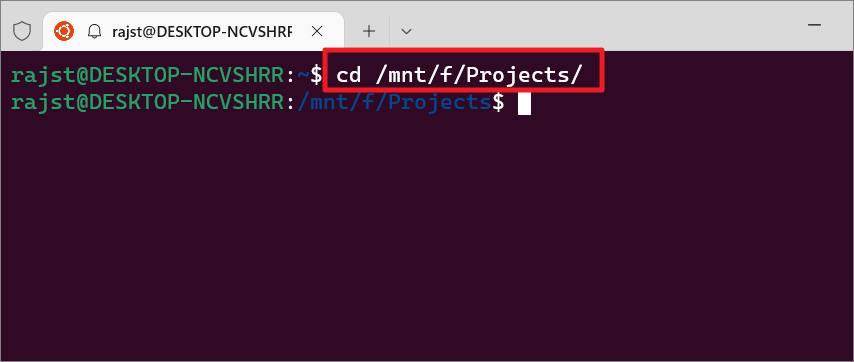
You can use the cd command to navigate the Windows File System.
cd/mnt/windows_path
Replace windows_path with the Windows path, you want to navigate to.
Example:
cd/mnt/f/Projects
When navigating drives in Linux, always add/mnt/before the path.
You can also access your User accounts with this:
cd/mnt/c/Users
To view the contents inside a directory or folder, use the ls command. Folders will be highlighted with a green background and blue text.
Copying/Moving files Between Linux and Windows File Systems through WSL
You can move or copy files between the two operating systems using the cp or mv commands.
To copy files from Windows to the Linux file system, run the following commands:
cp/mnt/f/Projects/Patch.zip/home/rajst/Documents
Here, f/Projects/Patch.zip is the location and file you want to copy from Windows to Linux./home/rajst/Documents is the destination for the copied file.
To Move files from Windows to the Linux file system, run the following commands:
mv/mnt/f/Projects/Patch.zip/home/rajst/Documents
To move the file, you have to use ‘mv’ instead of ‘cp’. In case there’s already a file with the same name that exists in the destination, type y and hit to replace it.
To move a file from Linux to the Windows file system, run the following commands:
mv/home/rajst/Documents/Patch.zip/mnt/f/Projects
Edit Windows files through WSL
You can also edit your Windows files (e.g., text files) through the Linux terminal using WSL. To do that, you have to use a text editor that can run in a terminal like ‘nano’. Below is the command for the same:
sudo nano/mnt/f/Projects/TestREF.txt
The built-in nano text editor will open the files in the terminal. Now, you can make changes to the file.
To exit the editor, press Ctrl+X. If you have made any changes to the file, you’ll be prompted to save the changes before quitting the editor. To save and exit the file, type Y and then press Enter.
Create files in Windows through WSL.
You can also create any kind of file in a specific windows directory using the touch command.
First, navigate to the directory where you want to create the file with the command like this:
cd/mnt/f/Projects/Documents
Then, use the touch command followed by the filename and type to create the file:
touch final_report.docx
Substitute final_report.docx with the file name and file type your want to create. The file type can be anything you want (.txt,.xlsx,.mp4, etc.)
Delete Files from Windows File System through WSL
Deleting files is similar to creating files via WSL, you have to navigate the folder or directory first and then use the rm command to delete the files.
First, navigate the directory or location:
cd/mnt/f/Projects/Vids
Then, use the rm command to remove the unwanted files:
rm final_report.docx
Access Linux Files through File Explorer
You can also access the Linux file system through File Explorer. To do that, open Windows File Explorer, scroll down to the left navigation panel and select the ‘Linux’ option.
Here, you will see the list of all distro you have installed on your device. Select the desired distro folder to view its files.
Under the ‘Home’ folder, you can find user profiles and their files.
Running GUI Linux Apps using WSL
Windows 11 comes with ‘WSLg’, short for Windows Subsystem for Linux GUI, which is a new feature that allows you to run Linux Graphical apps on Windows in a fully integrated desktop experience. It is a great feature that helps users to run apps and tools that work well or are only available in Linux. Follow these instructions to install GUI apps in WSL.
Prerequisites:
You will need at least Windows 11 (build 22000 or later) or Windows 11 Insider Preview (builds 21362 or later). To run Linux GUI apps, you will need a system with virtual GPU (vGPU) enabled for WSL. You can download and install the below driver matching your system to enable virtual GPU (vGPU) to achieve hardware-accelerated rendering.
Update WSL and package list:
Next, you need to update the Windows Subsystem for Linux. To do that, open PowerShell or Command Prompt in elevated mode and enter the below command:
wsl–update
Then restart the WSL for the changes to take effect with this command:
wsl–shutdown
Update the packages in your distribution:
Then update your packages in the Linux distribution using the following commands:
sudo apt update sudo apt upgrade
Install Linux GUI apps
Now you can download and install the Linux applications you want to use via the bash shell. In Linux distros, you can use various package managers to install your desired applications. Here’s a list of commands to install some of the most popular software in Linux.
To install apps in WSL, use the below command syntax:
sudo apt-get install APP-NAME-y
Here, replace App-Name with the actual app name.
Install GIMP
GIMP is a free and open-source image editor available for GNU-Linux, macOS, and Windows. It is used for image editing, photo retouching, image manipulation, and image authoring. To install GIMP software, open the Linux terminal and type this command:
sudo apt install gimp-y
or
sudo apt install gimp
In the install command, you can add-y at the end to skip confirmation and get right to the installation.
Install Gedit app
To install GNOME’s default text editor, use the below command:
sudo apt install gedit-y
Install VLC Media Player
sudo apt install vlc-y
Install X1 1 apps
X11 is a Linux Windowing system that provides a miscellaneous assortment of X applications such as the xclock, xcalc calculator, clipboard, etc.
sudo apt install x11-apps-y
Install Firefox
apt install firefox-y
Search for Apps in the Software Repository
If you don’t know the specific name of the app you want to install, you can search for it using the apt-cache command. Run the following command to find the name of a specific application:
sudo apt-cache search [application name or type]
Example:
sudo apt-cache search kden
The apt-cache command will show the results related to the search word ‘kden’ in the repository.
Now, you can use the name of the app from the search to install it.
Once you finish installing your desired application on the WSL distro, restart your PC and launch the app via the bash command line.
List All Installed Packages and Programs in Linux Distro
To list all the packages that you have installed using on your distro, run the below command:
apt list–installed
This will list all the packages installed on your Linux distro.
Launch Linux GUI Apps
To launch the install apps in WSL, simply type the name of the app and hit Enter to run it.
For example:
gimp
or
gimp &
As you can see below in the screenshot, the above command launches the GIMP (GNU Image Manipulation Program) application. Now, you can use your mouse and keyboard to use the app just like any of your Windows apps.
Access Linux Apps from Windows 11 Start Menu
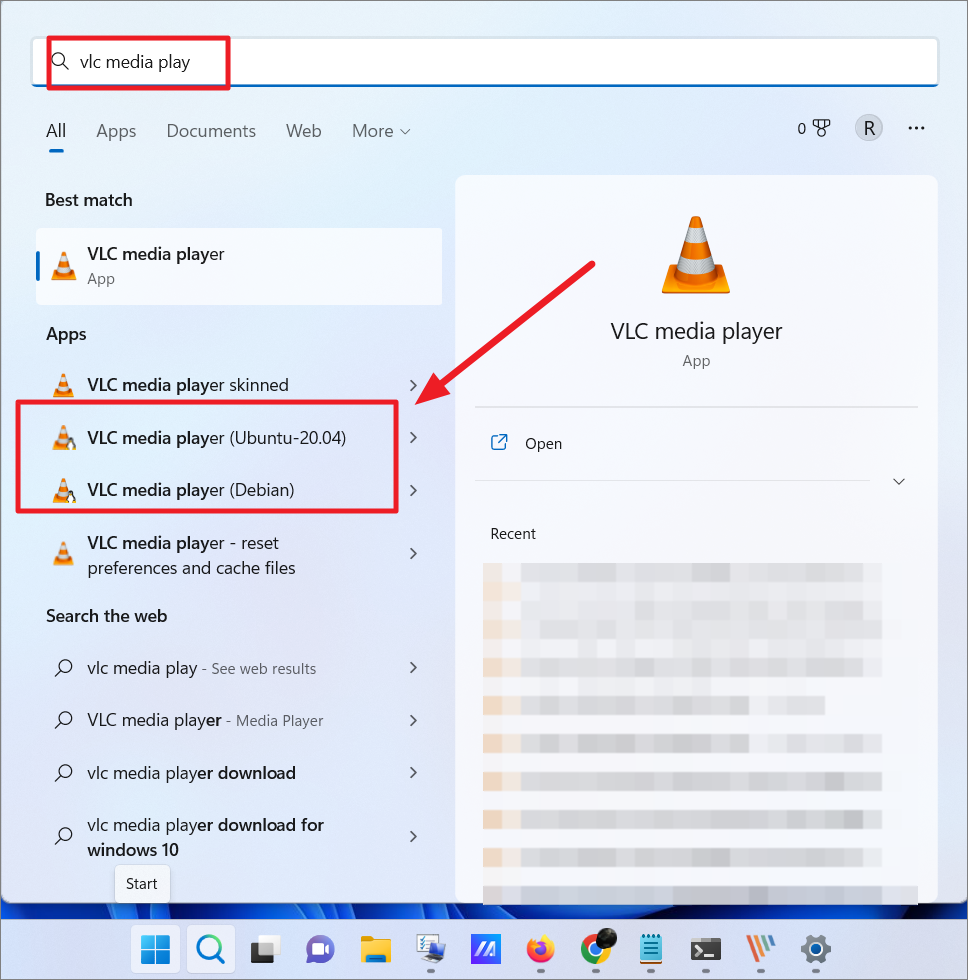
Once you install an app in Linux, you can also access that Linux app directly from your Windows Start menu, just like you do a Windows app. You can tell the difference between Windows and Linux apps with the app name. You can just open the Start menu and access the app from the Recent list.
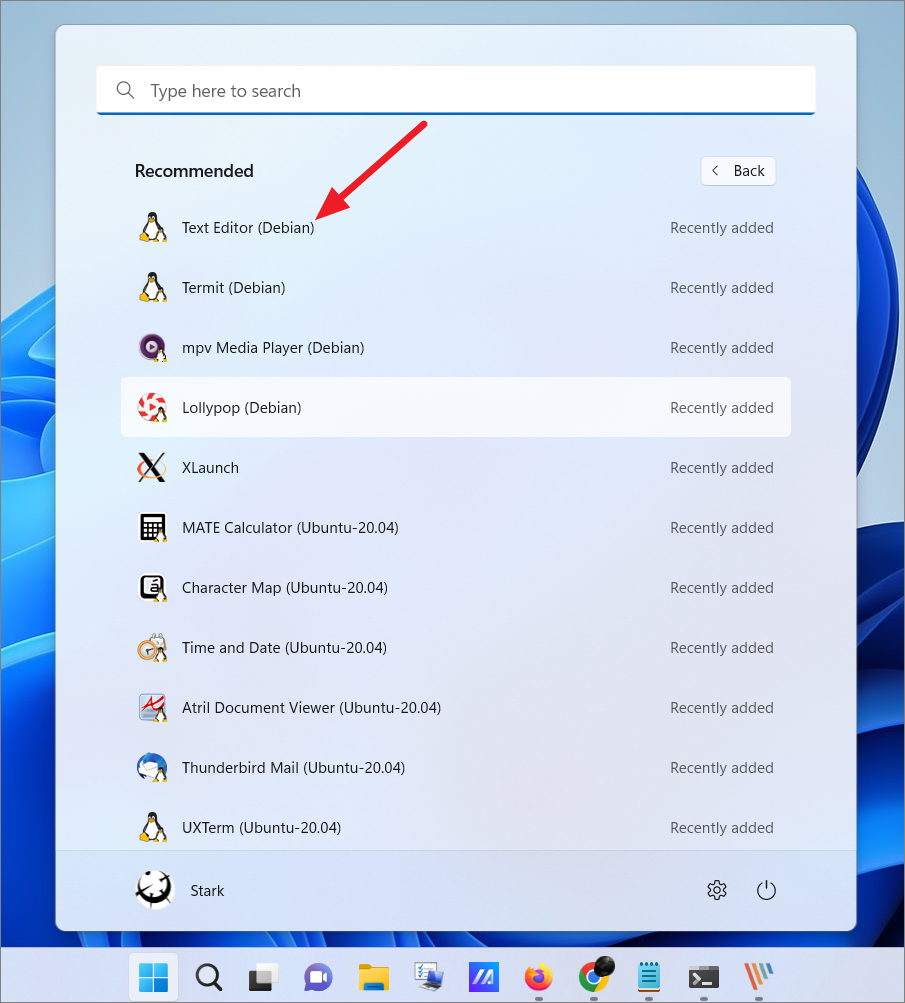
Or, you can search for the app in Windows Search. As you can see below, the Linux app will have the Linux Distribution name as part of the label. Also, the Linux penguin logo will be visible at the corner of the app icon.
Installing a Desktop Environment
Unlike Windows, Linux offers several customizable desktop environments that you can install on the same Linux distro. A desktop environment is a bundle of programs that runs on top of the operating system to provide default graphical user interface elements such as menus, windows, icons, toolbars, wallpapers, etc.
Some Linux distros come with their own desktop environments while in others you can manually install and customize them as you see fit. In Windows 11, you can not only install Linux terminals and apps but also install Linux desktop environments and use Linux graphically as you do any other operating systems like Windows and macOS. Let us see how to install Linux desktop environments in Windows 11.
Xfce is a lightweight and easy-to-use desktop environment that provides a feature-rich user experience. And it is one of the most commonly used desktop environments on WSL.
Start by updating and upgrading Ubuntu:
sudo apt update
sudo apt upgrade
To download and install Xfce on the WSL distro, run the following command in the Linux terminal:
sudo apt-get-y install xfce4 && sudo apt-get-y install xubuntu-desktop
Then, enter your password to execute the command. It will take a while to complete the installation process.
In the middle of the installation, you will be asked to choose a Desktop Manager – ‘GDM3’ or ‘LightDM’.
Install X server for Windows
Once it’s finished installation, we need to install an X server for Windows, such as VcXsrv. To run a Linux desktop environment inside Windows, we will need an X server. To install and set up an X server, follow these steps:
First, go to the download page of VcXscr X Windows Server and click the ‘Download’ button to download the software.
Alternatively, you can also go to the GitHub page of VcXsrv server and download the latest version of the app.
After the software is downloaded, run the setup. Then choose ‘Full’ from the ‘Select the type of install’ drop-down menu and click ‘Next’.
Then, click ‘Install’ on the next window to install the program and its components.
Once the installation is finished, you will have a shortcut named ‘Xlaunch’ on the desktop. Don’t open it yet.
Now go back to the Linux terminal and enter the below command to see if the ‘resolv.conf file auto-generated:
cat/etc/resolv.conf
If the server is running, you will get an IP address. Now, note down the IP address you got from this command. (e.g., 172.29.128.1)
Next, type the below command to edit the.bashrc script file which contains a series of configurations for the terminal session:
nano ~/.bashrc
In case you see this prompt message on the screen, simply press Y.
This will show a series of scripts on the screen. Now, go to the bottom of the script and add this new entry:
export DISPLAY=172.29.128.1:0
Now, type that IP address (172.29.128.1) you got earlier in the code, and make sure to add a colon (:) and zero (0) at the end.
If you have a problem restarting your Xfce server running on Ubuntu or launching the desktop environment, type this entry instead:
export DISPLAY=$(cat/etc/resolv.conf | grep nameserver | awk'{print $2}’):0
Then, press Ctrl+X and then Y to save the script. After that, hit Enter to exit the script.
After that, reload the service with this command.
source ~/.bashrc
Launch Desktop Environment:
Next, go back to the desktop and launch the ‘XLaunch’ app (VcXsrv) that you installed earlier.
Then, choose a display option in the Display settings window and click ‘Next’. Here, we are selecting the ‘One window without titlebar’ option.
Under Client startup, select the ‘Start no client’ option and click ‘Next’ to start only the server.
On the next screen, add all the additional parameters needed by you for the X server in the field below and click ‘Next’. In the example, we are adding-ac.
Finally, click on ‘Finish’. You can also save these configurations for later use or backup by clicking the ‘Save configuration’ option.
If you see the Windows Security Alert prompt, make sure to select both options and click ‘Allow access’.
Once you do that, you may just see a black screen. It is normal, ignore it and go back to the terminal.
Then, launch the new desktop environment by entering the following:
startxfce4
If you have a problem running the above command, run the following command instead:
sudo-u rajst startxfce4
Here, replace rajst with your username.
This will launch the Xfce desktop environment. Now, go back to the VcXsrv server program in the taskbar and you will have a Linux desktop as shown below.
You can use the new desktop as if it were a normal Windows desktop. You can access the file manager by clicking the ‘Home’ button.
To open applications, click the search button (Application Finder) at the bottom of the Xfce desktop. Then, find and click on the application from the Application Finder menu to launch the app.
Install Desktop Environment for Kali Linux:
If you are using the Kali Linux distro, you can install Win-KeX desktop which is a Kali Desktop Experience for Windows Subsystem for Linux (WSL 2).
To do this, first launch the Kali Linux and update the packages using the below commands:
sudo apt update sudo apt upgrade
Then, execute the following command to install the Win-Kex desktop environment and press Enter:
sudo apt install-y kali-win-kex 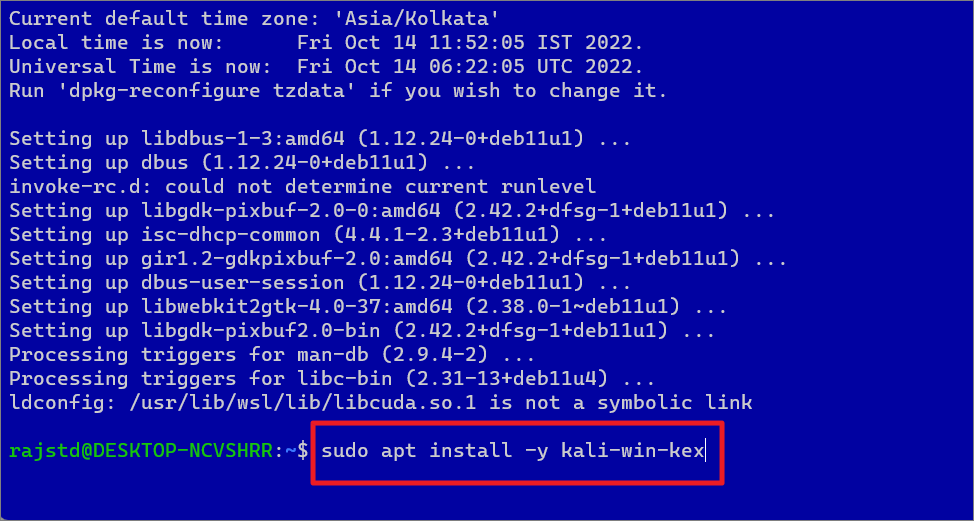
Run Bas h Scripts on Windows 11
So far we have seen how to run commands one by one in an interactive way but there’s another way you can execute commands in Linux – batch mode. You can run commands in batches. You can create a bash script that contains all of the commands you would like Linux to execute in order. Then, run that bash script (batch file) to execute the task one by one automatically without having to manually run individual commands. Here’s how you can do this:
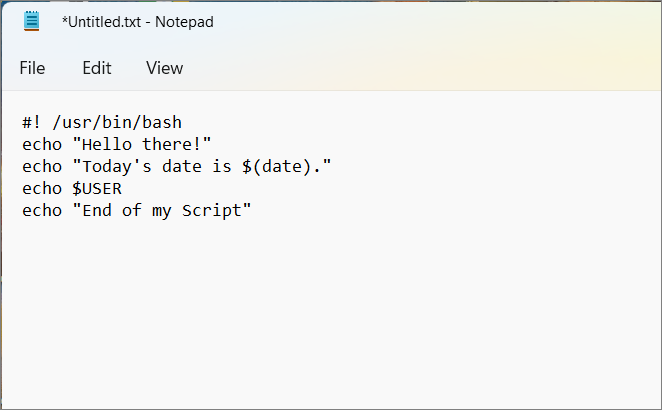
Open your favorite text editor like Notepad and create a new text file. The first line of the script must be “#!” followed by the path of your Linux bash. To find the path of your Linux bash, open the Ubuntu terminal and run which bash. This will show you the Bash path. Note down or copy it.
Now, open your new text file and include that first line at the top. For example:
“#!”/usr/bin/bash
Next, type the commands you want Linux to run in sequential order. Each line should have a single command.
For example:
Line 2: Use theecho command to show a welcome text to the user.
Line 3: Use echo with the date command to show today’s date, time, time zone, and more.
Line 3: A combination of USER and echo commands is used to return the current user name.
Line 4: Once again, the echo command is used to display the message ‘End of My Script’.
As you can see there are three sequential commands set to execute in this script file.
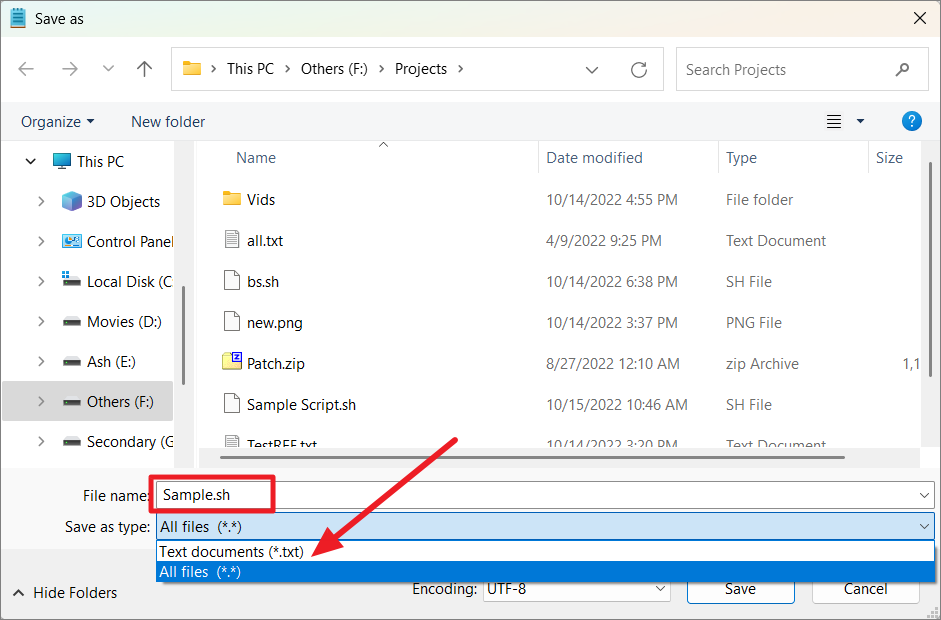
After typing all the commands you want, save the text file with a.sh extension. When saving the file, select ‘All files (*.*)’ as the Save as type. Be sure to remember where you saved it because you need the file path to run the script.
Next, open PowerShell or Bash shell (Linux terminal) and use the cd command to navigate to the path where you have saved the Bash script file.
Then, run the script with the following command:
bash
Replace
bash Sample.sh
This simple example shows you how you can create bash scripts to execute more complex script programs.
Create Aliases in Windows Subsystem for Linux
Alias in Linux is a custom shortcut used to execute more complex and lengthy commands. Aliases make Linux commands easy to remember and use. For example, if you need to execute this long command – mysqldump-u root-p–all-databases >/home/server/Desktop/backupfile.sql which is hard to type and prone to mistakes, you can instead create an alias like mysqlback and use it to execute that command.
There are two ways you can create to create aliases in Linux – per session or permanently.
Create Per Session Aliases
To create a temporary alias for your current session of bash (which will expire once you close the terminal), use the below command:
alias
Example: Creating an alias for cp/home/rajst/Test.bas/mnt/f/Projects command:
alias copytest=’cp/home/rajst/Test.bas/mnt/f/Projects’
Now, you can use the alias copytest to execute that command quickly. However, this alias will only be available for your current terminal session.
Create Permanent Aliases
To create permanent aliases between sessions, you will need to edit and save your aliases inside a configuration file called.bash_aliases or.bashrc
First, check if the.bash_aliases file exists in your system using the below commands:
cd ~ ls-a
If you can’t find it, then run the following command:
touch.bash_aliases
To edit the.bash_aliases file, use the below command:
nano ~/.bash_aliases
Then, add your permanent aliases to the file. For example:
alias c=’clear’alias ll=”ls-alF”echo alias wmi=\’echo I am in $PWD\’alias Guten=’cd/mnt/f/Projects/Project Gutenberg’
You can also leave a comment before your aliases (like #My Custom Aliases) for organization purposes.
You can also add your aliases in the.bashrc file.
Press Ctrl+X and then type Y to save the file. Then press Enter to exit the editor.
The new aliases in the file will be automatically loaded in your next session. But if you want to use them in your current session, you can ‘source’ your.bash_aliases file using this command:
source ~/.bashrc
Now, you can use your alias shortcuts to execute your frequent commands quickly.
Essential WSL Commands for PowerShell
Here’s a list of essential Windows Subsystem for Linux commands that you can use in Windows PowerShell.
That’s it. Using this guide, you’ll become a pro in using Linux on your Windows 11 PC in no time.