میں لینکس ٹرمینل کا استعمال کیسے کریں
WSL کے ساتھ ونڈوز 11 پر لینکس ماحول (بشمول bash، Linux ایپس، Linux ڈیسک ٹاپ، اور مزید) انسٹال کرنے اور استعمال کرنے کے لیے حتمی گائیڈ۔ لینکس (WSL) ایک مطابقت کی پرت ہے جو آپ کو ونڈوز آپریٹنگ سسٹم (ونڈوز 10 اور 11) کے اندر لینکس کی تقسیم کے اپنے پسندیدہ ذائقے کو چلانے کی اجازت دیتی ہے۔ آپ لینکس کو ونڈوز 11 کے اوپر چلا سکتے ہیں (یا ڈوئل بوٹ کی ضرورت کے بغیر، VMWare/VirtualBox کا استعمال کرتے ہوئے، یا اسے اپنے مرکزی آپریٹنگ سسٹم کے طور پر انسٹال کر کے)۔
Windows 10 کے برعکس، Windows 11 WSL کے ساتھ آتا ہے۔ 2.0، WSL کا ایک اپ گریڈ شدہ ورژن، جسے بہتر مطابقت کے لیے Hyper-V ماحول میں مکمل لینکس کرنل چلانے کے لیے ڈیزائن کیا گیا ہے۔ اس کے علاوہ، ونڈوز 11 پر WSL 2 اب گرافیکل یوزر انٹرفیس اور آڈیو کو مقامی طور پر سپورٹ کرتا ہے جس کا مطلب ہے کہ آپ ونڈوز ایپس کے ساتھ GUI لینکس ایپلی کیشنز چلا سکتے ہیں۔ اور ونڈوز اپ ڈیٹ کرنل کو اپ ڈیٹ کرتا رہتا ہے۔ یہ منتظمین اور ڈویلپرز کو ونڈوز چھوڑے بغیر یا اضافی آلات کی ضرورت کے بغیر کراس پلیٹ فارم ایپلی کیشنز تیار کرنے اور جانچنے کی اجازت دے کر دونوں جہانوں کی بہترین چیزوں کو یکجا کرتا ہے۔ اور لینکس (WSL) کے لیے Windows سب سسٹم کے ذریعے Windows 11 پر لینکس کا استعمال۔
Windows 11 پر لینکس انسٹال کرنے کی شرائط Windows 11 پر WSL Linux ورچوئلائزیشن سپورٹ ہے۔ ونڈوز 11 پر لینکس انسٹال کرنے سے پہلے، آپ کو یہ چیک کرنا ہوگا کہ آیا فرم ویئر پر CPU ورچوئلائزیشن سپورٹ فعال ہے یا نہیں۔ ورچوئلائزیشن کے بغیر، آپ اپنے کمپیوٹر پر کسی بھی مختلف آپریٹنگ سسٹم کی تقلید نہیں کر سکتے۔
ایسا کرنے کے لیے، ونڈوز 11 ٹاسک مینیجر (Ctrl + Shift + Esc) کھولیں اور بائیں پینل پر’پرفارمنس’صفحہ پر جائیں۔ پھر یقینی بنائیں کہ’ورچوئلائزیشن’دائیں طرف کے صفحہ کے نیچے’فعال’ہے۔
ایسا کرنے کے لیے، اپنے آلے پر BIOS سیٹنگز یا UEFI کھولیں، اور’ایڈوانسڈ موڈ’آپشن کو منتخب کریں۔ اگر آپ اپنے Windows 11 PC پر BIOS میں داخل ہونے کا طریقہ نہیں جانتے ہیں، تو اس کے لیے ہماری وقف گائیڈ میں دی گئی ہدایات پر عمل کریں۔
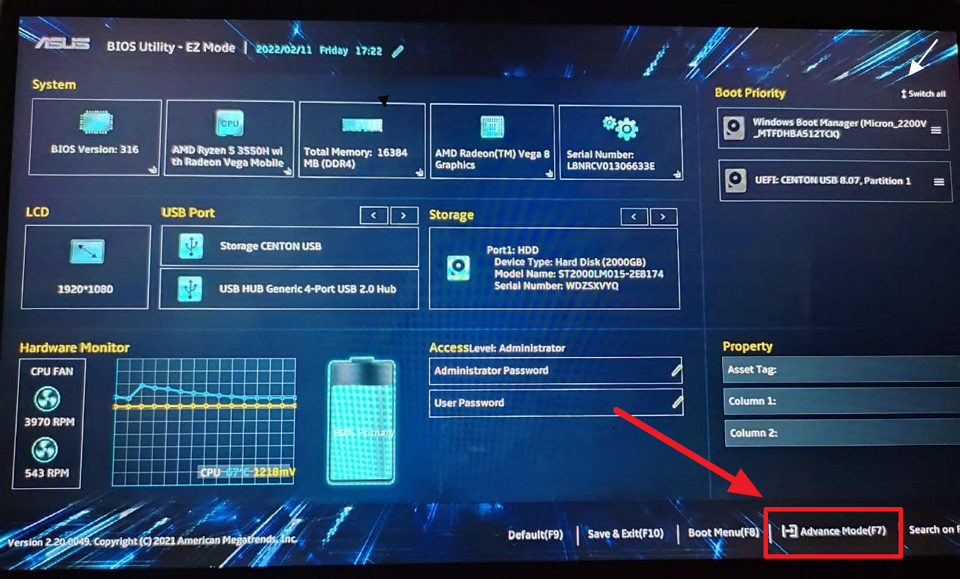
Under the Advanced mode, locate the option called’Intel(VMX) Virtualization Technology’and set اسے’فعال’کرنے کے لیے۔ For AMD processors, select the’SVM’Mode option and change it to’Enabled’.
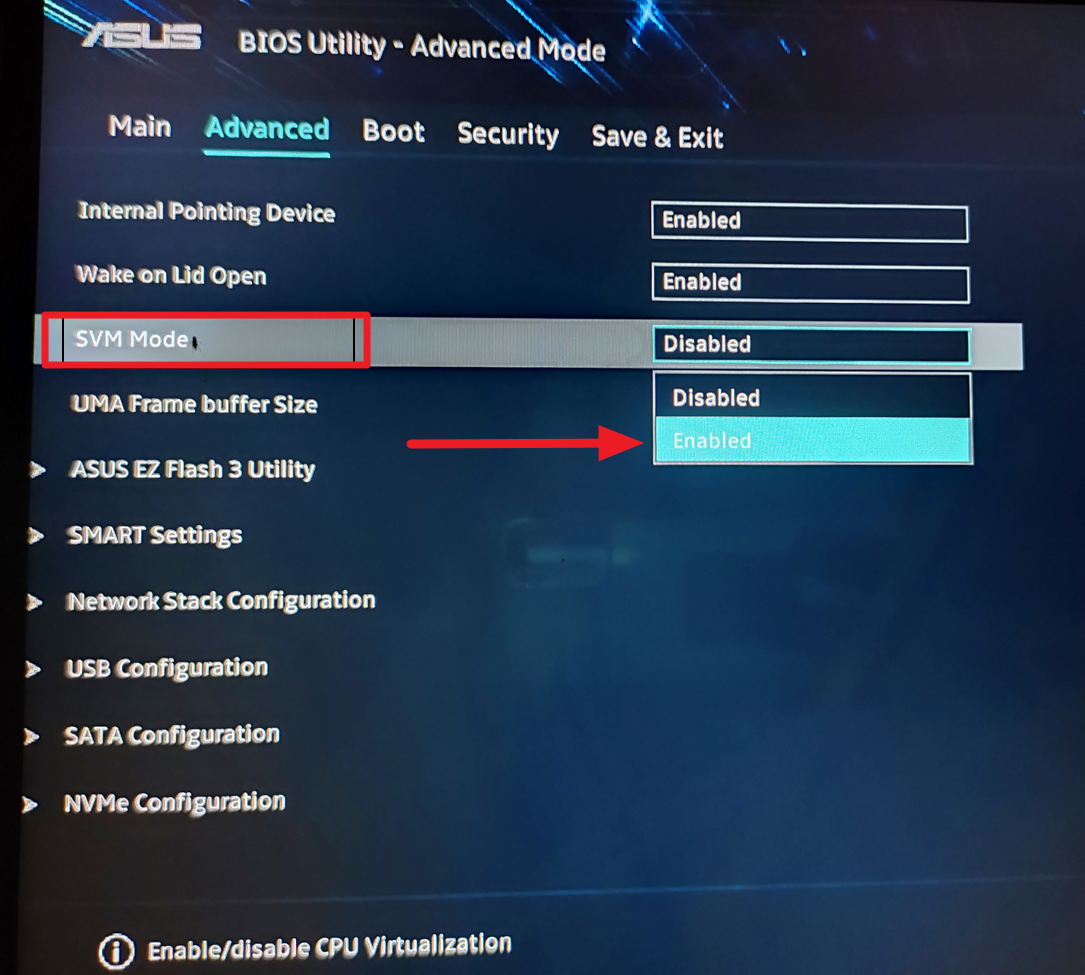
پھر، اپنے سسٹم کو ریبوٹ کرنے کے لیے BIOS/UEFI کو محفوظ کریں اور باہر نکلیں۔ سسٹم کے دوبارہ شروع ہونے کے بعد، آپ WSL اور Linux ڈسٹری بیوشنز انسٹال کر سکیں گے۔
Windows 11 پر لینکس ڈسٹری بیوشن انسٹال کریں
اس سے پہلے کہ آپ Microsoft اسٹور کے ذریعے اپنی مطلوبہ لینکس ڈسٹری بیوشن انسٹال کریں، آپ کو ونڈوز فیچرز میں لینکس فیچر کے لیے ونڈوز سب سسٹم کو فعال کریں۔ یہاں یہ ہے کہ آپ ونڈوز 11 میں WSL کو کیسے فعال کر سکتے ہیں۔
ونڈوز فیچرز کا استعمال کرتے ہوئے لینکس کے لیے ونڈوز سب سسٹم انسٹال کریں
لینکس کے لیے ونڈوز سب سسٹم انسٹال ہونے کے ساتھ، آپ لینکس ایپلی کیشنز اور باش کمانڈز کو چلانے کے قابل ہو جائیں گے۔ مقامی طور پر ونڈوز پر۔ ڈبلیو ایس ایل ورژن کی دو مختلف قسمیں ہیں: ڈبلیو ایس ایل 1 اور ڈبلیو ایس ایل 2۔ جب کہ یہ دونوں ونڈوز کے اندر لینکس کا ہموار اور مسلسل انضمام فراہم کرتے ہیں، ڈبلیو ایس ایل 2 مکمل لینکس کرنل سپورٹ اور سسٹم کال کی مطابقت کے ساتھ جدید ترین اور تیز ترین ورژن ہے۔
WSL ایک مطابقت پرت چلاتا ہے جو لینکس کرنل اور ونڈوز کے درمیان فاصلہ کو پورا کرتا ہے تاکہ لینکس بائنری ایگزیکیوٹیبل کو ونڈوز پر مقامی طور پر چلایا جا سکے۔ WSL 1 کو چلانے کے لیے، آپ کو کم از کم Windows 10 ورژن 1607 (یا اس سے زیادہ) اور 64-bit PC کی ضرورت ہوگی۔ WSL 2 کے لیے، آپ کو Windows 10 ورژن 2004 (یا اس سے زیادہ) اور 64-bit PC کی ضرورت ہوگی۔ چونکہ ہم Windows 11 پر WSL انسٹال کر رہے ہیں، ہمیں درحقیقت ضروریات کے بارے میں فکر کرنے کی ضرورت نہیں۔
سب سے پہلے اسٹارٹ مینو کھولیں اور’ونڈوز فیچرز’تلاش کریں۔ پھر، تلاش کے نتائج سے’Windows کی خصوصیات کو آن اور آف کریں’کنٹرول پینل کا اختیار منتخب کریں۔
میں ونڈوز فیچرز کے ڈائیلاگ باکس میں،’ونڈوز سب سسٹم فار لینکس’آپشن پر نشان لگائیں اور’OK’پر کلک کریں
ایک بار تبدیلیاں لاگو ہوتے ہیں، اپنے کمپیوٹر کو دوبارہ شروع کرنے کے لیے’ابھی دوبارہ شروع کریں’پر کلک کریں۔
اگر آپ صرف WSL 1 انسٹال کرنا چاہتے ہیں، اب آپ اپنے کمپیوٹر کو ری سٹارٹ کر کے اپنا لینکس ڈسٹرو انسٹال کر سکتے ہیں۔
ونڈوز پر WSL 2 میں اپ گریڈ کریں رفتار کو درست کریں، اور ایک حقیقی لینکس کرنل کو براہ راست ونڈوز 11 پر چلانے کے لیے۔ ایسا کرنے کے لیے، آپ کو ونڈوز فیچرز کنٹرول پینل پر ’ونڈوز سب سسٹم فار لینکس‘ فیچر کے علاوہ ’ورچوئل مشین پلیٹ فارم‘ فیچر کو فعال کرنا ہوگا۔ پھر،’OK’پر کلک کریں اور اپنے کمپیوٹر کو دوبارہ شروع کریں۔ اگر آپ نے اپنے پی سی کو Windows 10 سے Windows 11 میں اپ گریڈ کیا ہے، تو ہو سکتا ہے آپ کے پاس WSL پہلے سے فعال ہو لیکن WSL 2 میں اپ گریڈ کرنے کے لیے آپ کو ورچوئل مشین پلیٹ فارم کو فعال کرنے کی ضرورت ہوگی۔
WSL 2 کو تمام فیوچر ڈسٹروز کے لیے ڈیفالٹ ورژن کے طور پر سیٹ کریں
WSL 2 کو تمام لینکس ڈسٹری بیوشنز کے لیے اپنے ڈیفالٹ ورژن کے طور پر ترتیب دینے سے پہلے، WSL Linux کرنل پیکیج اپ ڈیٹ برائے x64 سسٹمز۔
پھر، اپنے ڈاؤن لوڈ کردہ’.msi’انسٹالر کو چلائیں اور اسے انسٹال کریں۔ جاری رکھنے کے لیے وزرڈ میں’اگلا’پر کلک کریں۔
اس میں صرف سیکنڈ لگیں گے۔ پھر، وزرڈ سے باہر نکلنے کے لیے’ختم کریں’پر کلک کریں۔
WSL 2 کو اپنے ڈیفالٹ ورژن کے طور پر سیٹ کرنا نئی لینکس ڈسٹری بیوشن انسٹال کرتے وقت، پاور شیل کھولیں اور درج ذیل کمانڈ چلائیں:
wsl –set-default-version 2
پھر WSL 1 سے WSL 2 میں خصوصیت کو تبدیل کرنے کے لیے اپنے سسٹم کو دوبارہ شروع کریں۔
WSL 1 کو PowerShell کے ذریعے فعال کریں
آپ’PowerShell’کمانڈ کے ذریعے WSL کو بھی فعال کر سکتے ہیں۔ لائن ٹول۔ یہ وہی کام کرتا ہے جیسا کہ ونڈوز فیچرز کنٹرول پینل کرتا ہے۔ اس کے لیے،’PowerShell’کو بطور ایڈمنسٹریٹر کھولیں اور نیچے دی گئی کمانڈ کو چلائیں۔
dism.exe/online/enable-feature/featurename:Microsoft-Windows-Subsystem-Linux/all/norestart
WSL 2 کو PowerShell کے ذریعے فعال کریں
WSL 2 کو فعال کرنے کا پہلا مرحلہ ونڈوز پر ورچوئل مشین پلیٹ فارم فیچر کو فعال کرنا ہے۔ آپ WSL 2 کو’PowerShell’کمانڈ لائن ٹول کے ذریعے بھی فعال کر سکتے ہیں۔ ایسا کرنے کے لیے،’PowerShell’کو بطور ایڈمنسٹریٹر کھولیں اور WSL 1 کمانڈ کے ساتھ درج ذیل اضافی کمانڈ چلائیں۔
dism.exe/online/enable-feature/featurename:Microsoft-Windows-Subsystem-Linux/all/norestart dism.exe/online/enable-feature/featurename:VirtualMachinePlatform/all/norestart
Microsoft اسٹور سے WSL انسٹال کریں
آپ Microsoft اسٹور سے WSL ڈاؤن لوڈ اور انسٹال بھی کر سکتے ہیں۔ مائیکروسافٹ اسٹور ایپ لانچ کریں اور’ونڈوز سب سسٹم فار لینکس’تلاش کریں۔ پھر، لینکس پیش نظارہ کے لیے ونڈوز سب سسٹم پر’گیٹ’بٹن پر کلک کریں’
مائیکروسافٹ اسٹور خود بخود ڈاؤن لوڈ اور انسٹال ہو جائے گا مطلوبہ فائلیں.
مائیکروسافٹ اسٹور کا استعمال کرتے ہوئے اپنی مطلوبہ لینکس ڈسٹری بیوشن انسٹال کریں
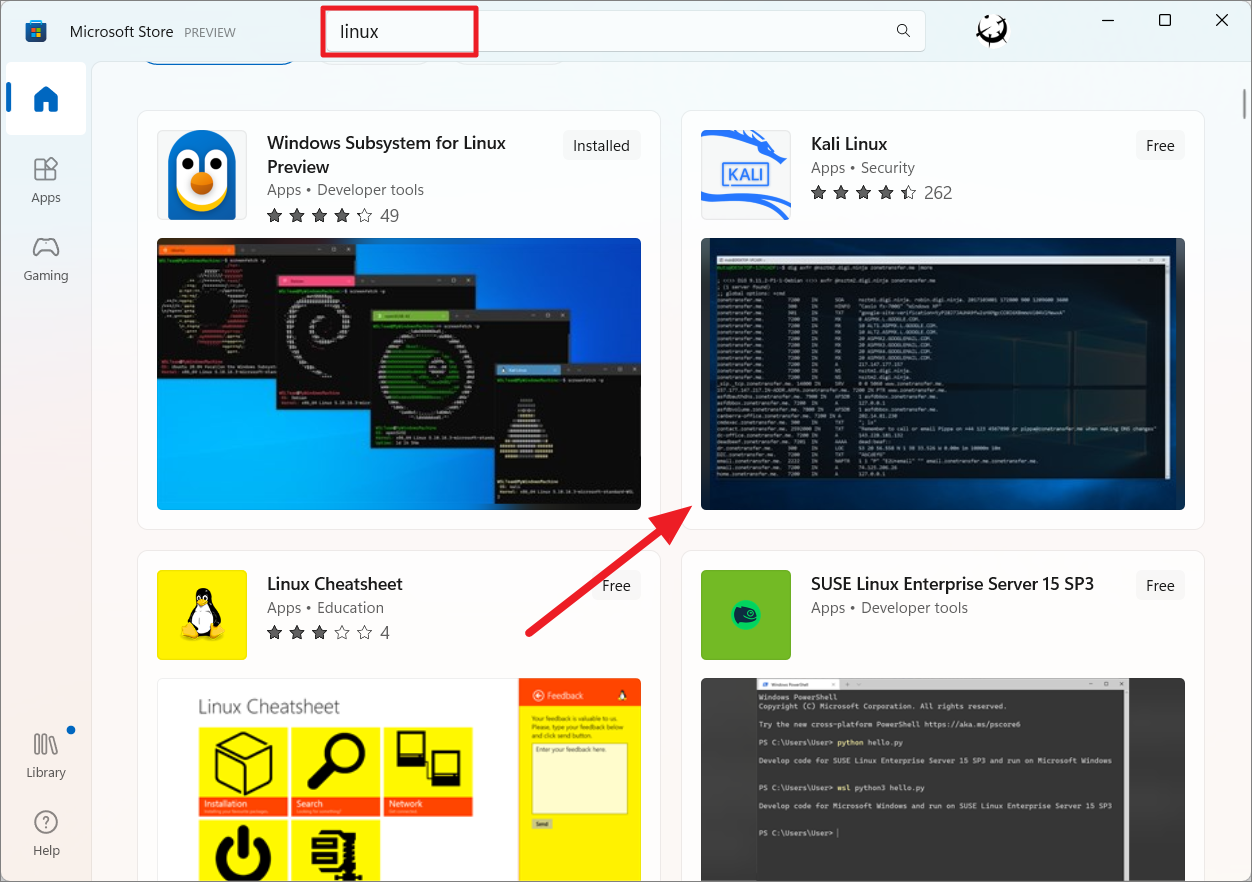
WSL کے فعال ہونے کے بعد، آپ اپنی پسند کی لینکس ڈسٹری بیوشن انسٹال کر سکتے ہیں۔ مائیکروسافٹ اسٹور میں لینکس کی ایک درجن تقسیمیں ہیں جنہیں آپ ڈاؤن لوڈ اور انسٹال کر سکتے ہیں۔ آئیے دیکھتے ہیں کہ مائیکروسافٹ اسٹور سے اوبنٹو ڈسٹرو کو ڈاؤن لوڈ اور انسٹال کرنے کا طریقہ۔ سب سے پہلے، اسٹارٹ مینو سرچ فیلڈ میں’مائیکروسافٹ اسٹور’تلاش کریں۔ پھر، اسے تلاش کے نتائج سے کھولیں۔
مائیکروسافٹ اسٹور میں، آپ حاصل کرنے کے لیے’Linux’تلاش کر سکتے ہیں لینکس ڈسٹرو کی فہرست دستیاب ہے اور اپنے مطلوبہ ڈسٹرو کو منتخب کریں۔
یہاں لینکس ڈسٹری بیوشنز کی ایک فہرست ہے جو اس وقت WSL کے تعاون سے ونڈوز اسٹور میں دستیاب ہیں۔
Ubuntu 16.04 LTS Ubuntu 18.04 LTS Ubuntu 20.04 LTS openSUSE Leap 15.1 SUSE Linux Enterprise Server 12 SP5 SUSE Linux Enterprise Server 15 SP4 SUSE لینکس انٹرپرائز سرور 15 SP3 Kali Linux Debian/Linux Debianx4 Obuntu 20.04 Oracle Linux 7.9 Oracle Linux 9 Pengwin Pengwin Enterprise 7 Pengwin Enterprise 8 Alpine WSL Raft WSL
یہ تمام تقسیم مائیکروسافٹ اسٹور پر مفت دستیاب ہیں۔
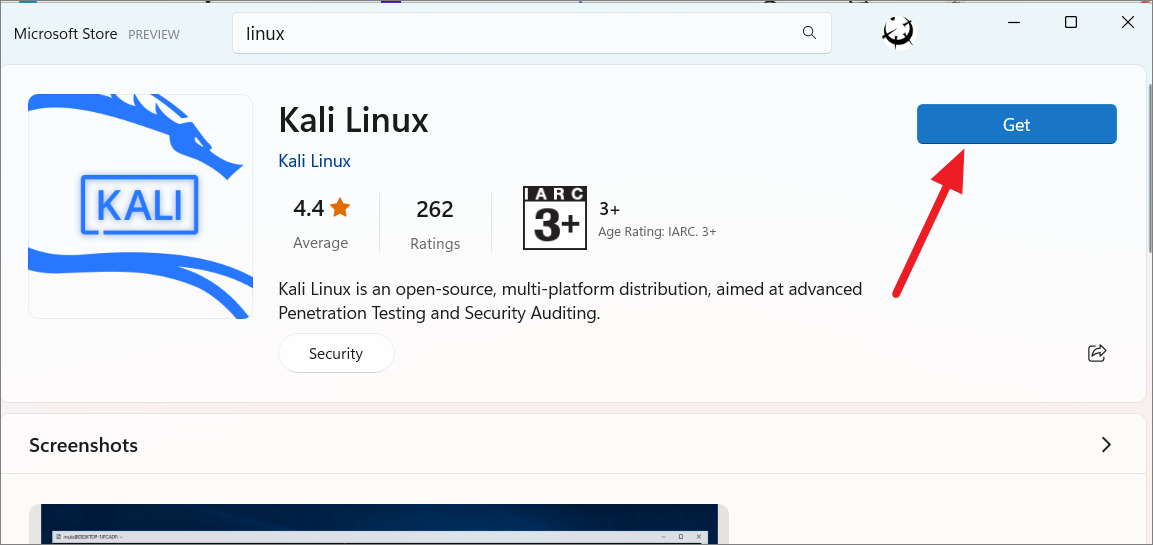
یا، ایک مخصوص لینکس ڈسٹری بیوشن تلاش کریں۔ مثال کے طور پر، یہاں ہم’اوبنٹو’تلاش کر رہے ہیں۔ پھر، Ubuntu ورژن کا انتخاب کریں جسے آپ نتائج سے انسٹال کرنا چاہتے ہیں۔
نتائج سے، ورژن نمبر کے بغیر Ubuntu جدید ترین مستحکم ورژن ہے۔ اور ورژن نمبر کے ساتھ اوبنٹو سے مراد ڈسٹرو کے مخصوص ورژن ہیں۔ اگر آپ چاہیں تو آپ ایک مخصوص ورژن منتخب کر سکتے ہیں۔ ذیل کی مثال میں، ہم ڈسٹرو کا تازہ ترین ورژن حاصل کرنے کے لیے’Ubuntu’کو منتخب کر رہے ہیں۔
اوبنٹو ( پیش نظارہ) سے مراد ڈسٹرو کے تازہ ترین ترقیاتی ورژن کی روزانہ کی تعمیر سے ہے۔
اوبنٹو ڈسٹری بیوشن کے صفحہ پر،’گیٹ’بٹن پر کلک کریں۔
اوبنٹو ٹرمینل کے مکمل ماحول کو ڈاؤن لوڈ کرنے میں کچھ وقت لگے گا۔ ڈاؤن لوڈ ہونے کے بعد، یہ خود بخود آپ کے آلے پر انسٹال ہو جائے گا۔
Windows 11 پر Ubuntu 22.04.1 LTS انسٹال کریں
کیننیکل اوبنٹو کی پیرنٹ کمپنی نے ابھی جاری کیا لینکس کا ایک نیا اور بہتر ورژن اگست 2022 میں Ubuntu 22.04.1 LTS (کوڈ نام جیمی جیلی فش) کہلاتا ہے۔ Ubuntu Linux کا یہ نیا ورژن جدید ترین ٹول چینز کے ساتھ بھیجتا ہے، بشمول Python، Rust، Ruby، Go، PHP، اور Perl۔ اب آپ Windows 11 پر Windows Store کے ذریعے Ubuntu 22.04.1 LTS انسٹال کر سکتے ہیں۔
اس ڈسٹرو کو انسٹال کرنے سے پہلے، یقینی بنائیں کہ Windows Subsystem for Linux کی خصوصیت اور ورچوئلائزیشن ٹیکنالوجی آپ کے آلے پر فعال ہیں۔
اوبنٹو کا تازہ ترین ورژن انسٹال کرنے کے لیے، مائیکروسافٹ اسٹور میں’اوبنٹو’تلاش کریں اور تلاش کے نتیجے سے’اوبنٹو 22.04.01 LTS’کو منتخب کریں۔ پھر، لینکس کنٹینر کو ڈاؤن لوڈ اور انسٹال کرنے کے لیے’گیٹ’پر کلک کریں۔
انسٹالیشن مکمل ہونے کے بعد، کلک کریں لینکس ٹرمینل شروع کرنے کے لیے’اوپن’بٹن۔ آپ ونڈوز اسٹارٹ مینو سے بھی ایپ لانچ کر سکتے ہیں۔
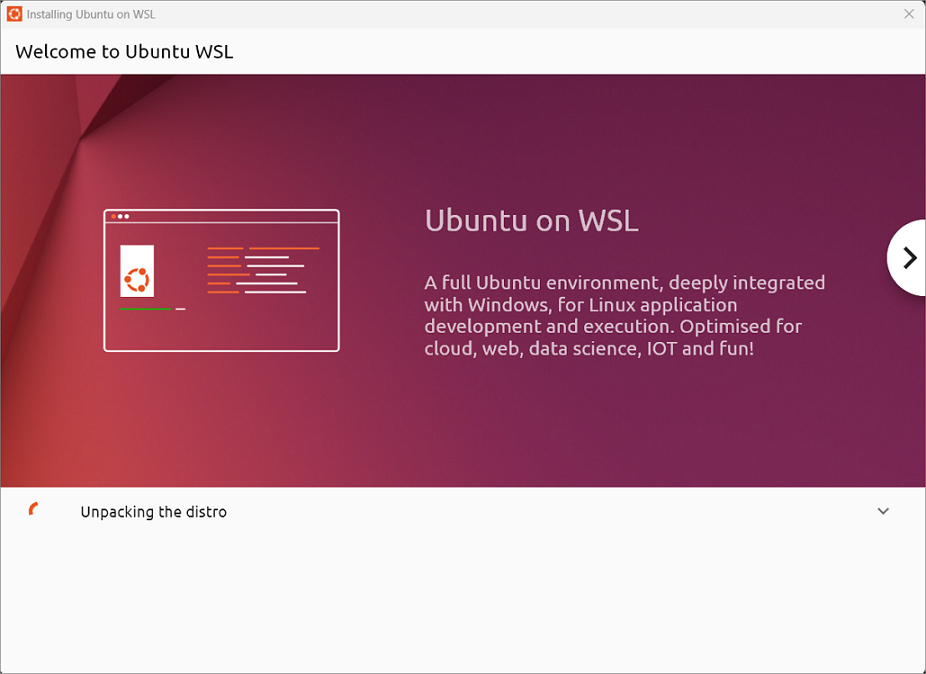
ڈاؤن لوڈ ہونے کے بعد، Ubuntu WSL ونڈو میں خوش آمدید ظاہر ہو جائے گا. The installer will continue to unpack the distro and install it on your device.
After it’s done, click’OK’on the’We are almost done’prompt box.
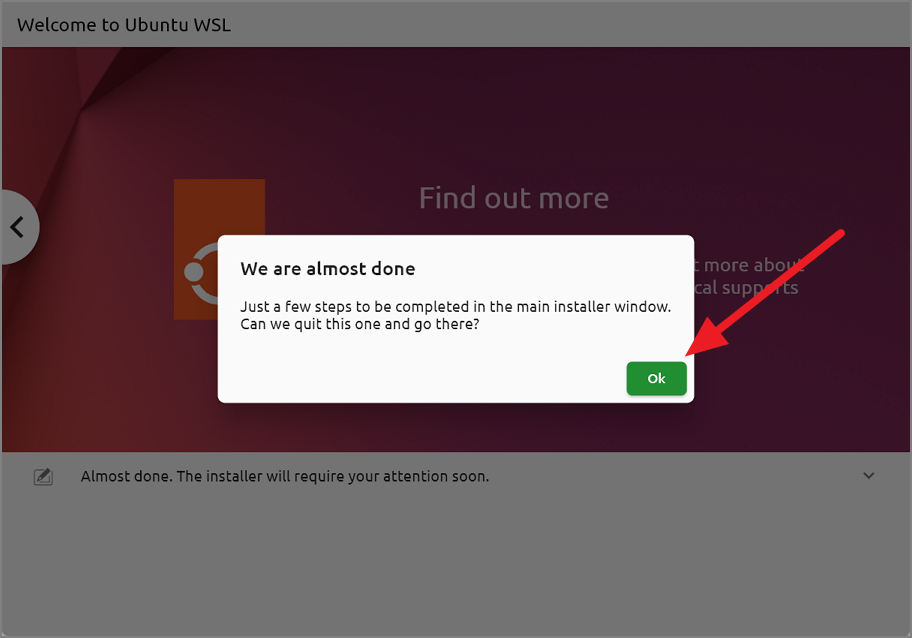
Once you click’OK’, the main installer ونڈوز ظاہر ہوں گی جہاں آپ کو کچھ اور سیٹنگز کنفیگر کرنے کی ضرورت ہے۔ مین انسٹالر ونڈو یا تو یوزر انٹرفیس ونڈو یا شیل ونڈو ہوگی۔ کسی بھی طرح سے، دونوں انسٹالر ونڈوز میں ایک جیسے اختیارات ہوتے ہیں۔
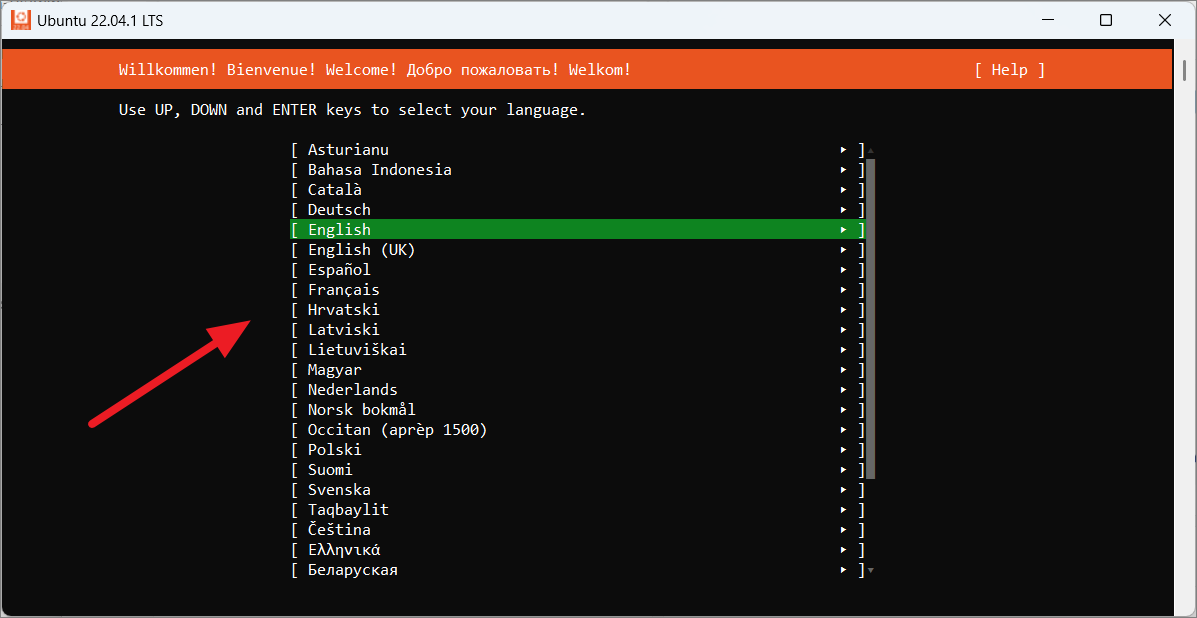
سب سے پہلے، UI ونڈو میں آپ جس تقسیم کو انسٹال کر رہے ہیں اس کے لیے زبان منتخب کریں۔
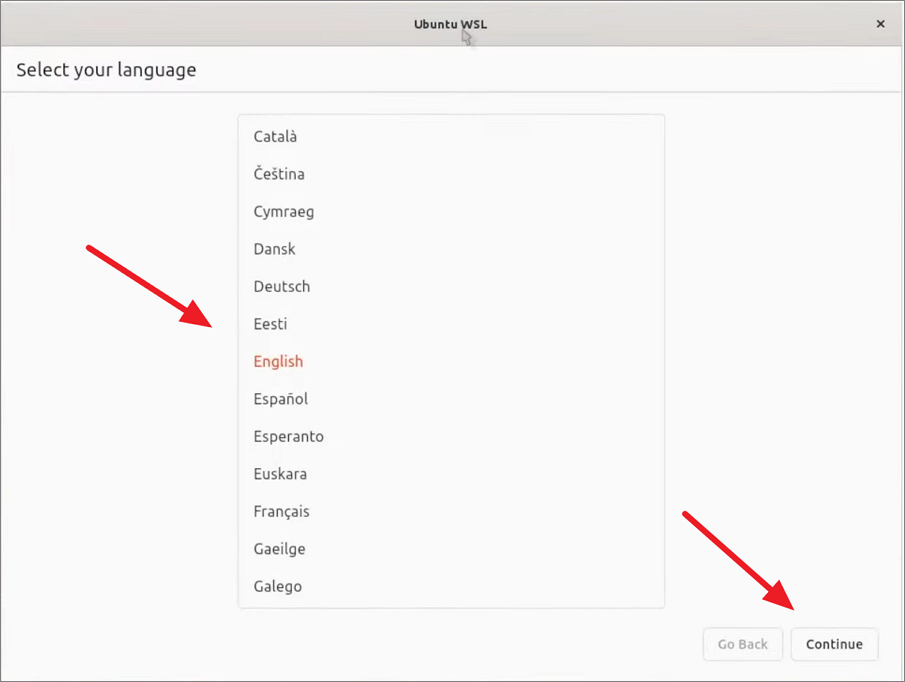
Or, select the language from the terminal window.
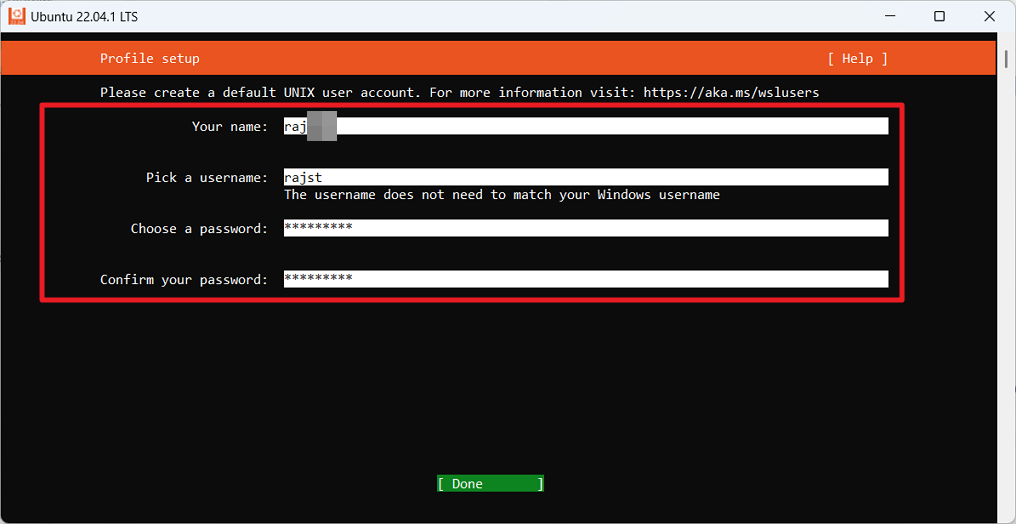
پروفائل سیٹ اپ صفحہ پر، آپ ایک ڈیفالٹ UNIX صارف اکاؤنٹ بنا سکتے ہیں۔ دیئے گئے فیلڈز میں اپنا نام، صارف نام اور پاس ورڈ درج کریں۔ تاہم، آپ اس انسٹالر میں ماؤس استعمال نہیں کر سکتے۔ آپ اختیارات کو نیویگیٹ کرنے کے لیے صرف کی بورڈ کے تیر والے بٹنوں کا استعمال کر سکتے ہیں۔ After entering details, move to the’Done’button and press Enter.
In the اگلی ونڈو میں، آپ آٹو ماؤنٹ کے لیے ماؤنٹ پوائنٹ اور ماؤنٹ کے اختیارات بتا سکتے ہیں۔ آپ یہ بھی منتخب کر سکتے ہیں کہ آیا ٹرمینل کے ہر آغاز پر’host’اور’resolv.conf’کی تخلیق نو کو فعال کرنا ہے۔
مندرجہ ذیل مثال میں، ہم پہلے سے طے شدہ WSL کنفیگریشن آپشنز رکھ رہے ہیں۔ Then, move to’Done’and press Enter to save the changes.
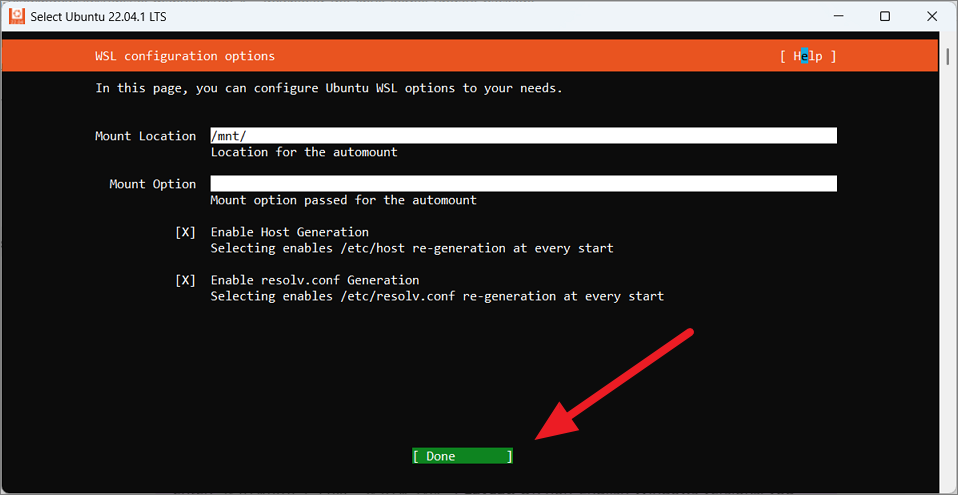
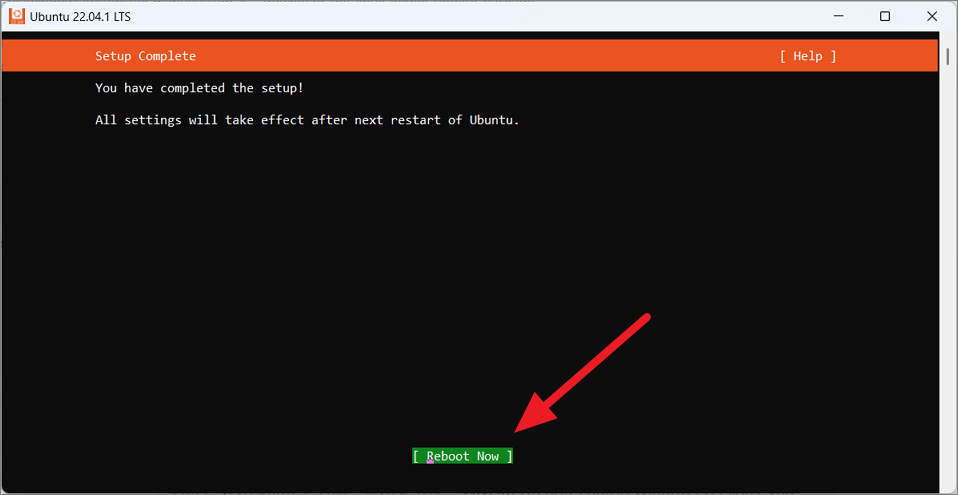
After the setup is complete, move to the’Reboot now’option to restart your device.
Install WSL and Linux using Windows Terminal (Cmd or PowerShell ) Windows 11 میں
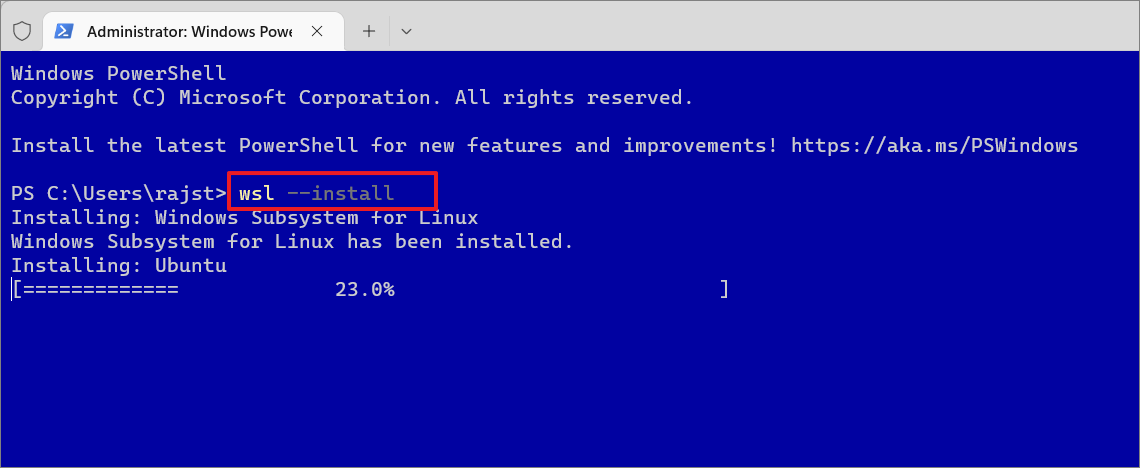
یہ ونڈوز 11 میں لینکس کو انسٹال کرنے کا سب سے آسان طریقہ ہے۔ آپ WSL کے تازہ ترین ورژن کو فعال کر سکتے ہیں اور ایک کمانڈ کے ساتھ Ubuntu انسٹال کر سکتے ہیں۔ لینکس کو انسٹال کرنے کے لیے آپ کمانڈ پرامپٹ یا پاور شیل میں ان کمانڈز کا استعمال کر سکتے ہیں۔ یہاں یہ ہے کہ آپ یہ کیسے کر سکتے ہیں:
اسٹارٹ مینو پر دائیں کلک کرکے اور’ٹرمینل (ایڈمن) کو منتخب کرکے پہلے ونڈوز ٹرمینل کھولیں۔
Click’Yes’in the User Account Control to continue.
جب ونڈوز ٹرمینل کھلتا ہے، درج ذیل کمانڈ کو ٹائپ کریں اور WSL کو انسٹال کرنے کے لیے Enter دبائیں:
wsl–install
اس عمل کو ختم ہونے میں کچھ وقت لگ سکتا ہے۔ مندرجہ بالا کمانڈ فائلوں کو ڈاؤن لوڈ اور انسٹال کرے گا، لہذا یقینی بنائیں کہ آپ کے پاس ایک فعال انٹرنیٹ کنیکشن ہے۔ جیسا کہ آپ اسکرین شاٹ سے دیکھ سکتے ہیں، مذکورہ کمانڈ نہ صرف WSL 2 کو فعال کرتی ہے بلکہ Ubuntu Linux ڈسٹری بیوشن کے تازہ ترین ورژن کو خود بخود انسٹال کرتی ہے۔ This command installs Ubuntu as the default Linux distribution, but you can change that at any time.
جب انسٹالیشن مکمل ہو جائے تو آپ کو یہ پیغام نظر آنا چاہیے – “درخواست کردہ آپریشن کامیاب ہے۔ After you see this message, restart your device to apply the changes.

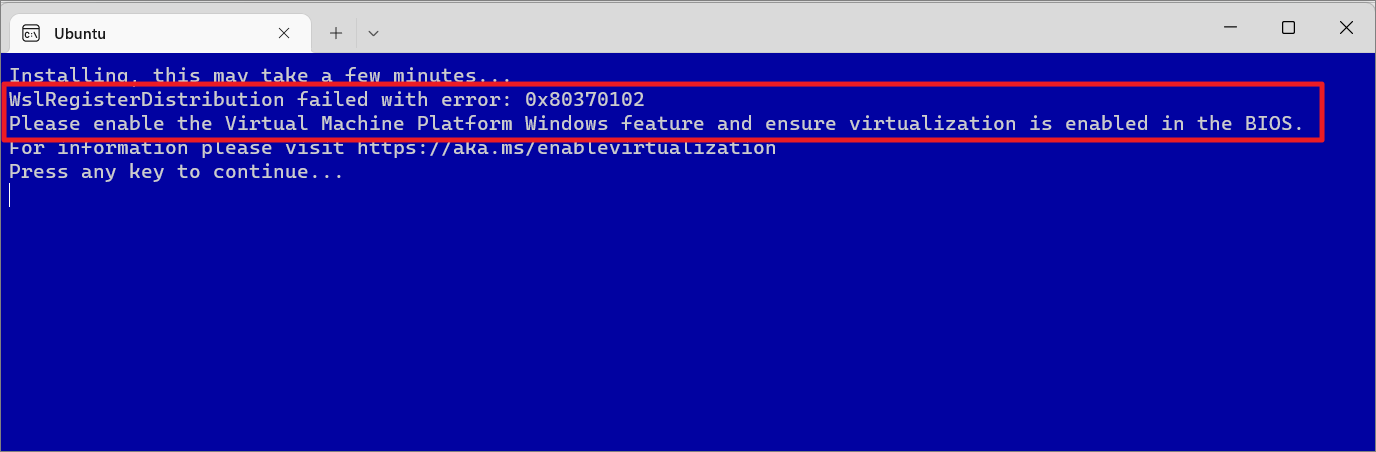
اگر اس مرحلے کے دوران آپ کو”WslRegisterDistribution فیل ہو گیا نقص 0x80370102″یا”Installation فیل ہو گئی نقص 0x80070003″تو اس کا مطلب ہے کہ آپ کو اپنے BIOS یا یونیفائیڈ ایکسٹینسیبل فرم ویئر انٹرفیس (UEFI) میں’CPU ورچوئلائزیشن’کو فعال کرنے کی ضرورت ہے۔ BIOS میں ورچوئلائزیشن کو فعال کریں جیسا کہ اس سے پہلے اس گائیڈ میں بیان کیا گیا ہے اور کمانڈ پر دوبارہ عمل کریں۔
Then, enter the new username and password to complete the setup. This username doesn’t necessarily need to be the same as the Windows account.
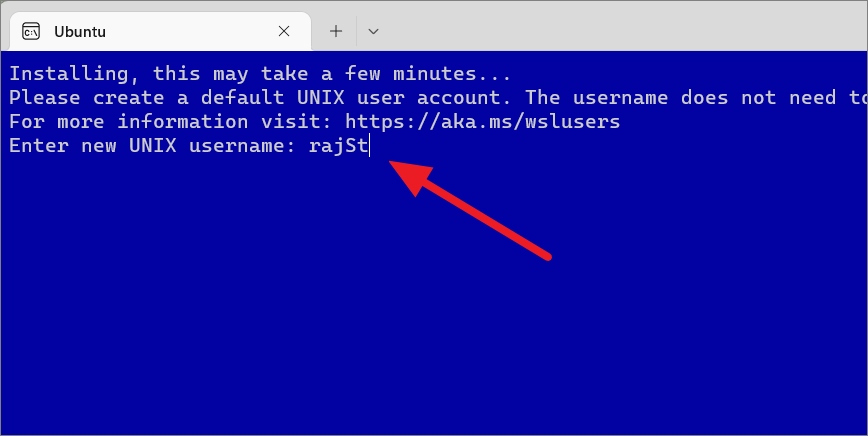
صارف کا نام اور پاس ورڈ ترتیب دینے کے بعد، Ubuntu ٹرمینل ایک علیحدہ ٹرمینل ونڈو میں شروع ہوگا جیسا کہ ذیل میں دکھایا گیا ہے۔
ونڈوز 11 پر مختلف لینکس ڈسٹری بیوشنز انسٹال کریں آپ مائیکروسافٹ اسٹور کے ذریعے یا کمانڈ لائن کے ذریعے مختلف تقسیمیں انسٹال کر سکتے ہیں۔ اگرچہ آپ مائیکروسافٹ اسٹور کے ذریعے لینکس کے درجن بھر مختلف ذائقوں کو انسٹال کر سکتے ہیں، لیکن کچھ لینکس ڈسٹرو پاورشیل کے ذریعے دستیاب نہیں ہیں۔
مائیکروسافٹ اسٹور کے ذریعے لینکس کی متبادل تقسیم کو انسٹال کرنے کے لیے، اسٹور ایپ کھولیں اور’Linux’تلاش کریں۔ دستیاب لینکس ڈسٹروز کی فہرست حاصل کریں۔ Then, select your desired distro from the result.
After that, click the’Get’button to download and install the distro.
کمانڈ لائن کے ذریعے لینکس کی دیگر دستیاب تقسیموں کی فہرست حاصل کرنے کے لیے، درج ذیل میں سے کوئی ایک کمانڈ ٹائپ کریں:
wsl–list–online
یا
wsl-l-o
اس سے تعاون یافتہ لینکس ڈسٹری بیوشنز کی فہرست ملے گی۔
نیا ڈسٹرو انسٹال کرنے کے لیے، نیچے دی گئی کمانڈ استعمال کریں:
wsl–install-d
جہاں کو اس تقسیم کے نام سے تبدیل کریں جسے آپ انسٹال کرنا چاہتے ہیں۔ مثال کے طور پر، نیچے دی گئی کمانڈ ڈیبین کو انسٹال کرے گی۔
wsl–install-d Debian
انسٹالیشن مکمل ہونے کے بعد ، سیٹ اپ ایک اور ٹرمینل ونڈو میں جاری رہے گا جہاں آپ کو پہلے سے طے شدہ UNIX صارف اکاؤنٹ کے لیے ایک نیا صارف نام اور پاس ورڈ درج کرنے کی ضرورت ہوگی۔ یہ صارف اکاؤنٹ اکیلے Debian Linux ماحول کو تفویض کیا جائے گا۔
اس کے ختم ہونے کے بعد، تبدیلیوں کے لیے اپنے پی سی کو دوبارہ شروع کریں۔ اثر کرنے کے لئے. آپ کا کمپیوٹر دوبارہ شروع ہونے کے بعد، آپ اپنے اسٹارٹ مینو سے نئی انسٹال شدہ لینکس ڈسٹرو لانچ کرسکتے ہیں یا ونڈوز ٹرمینل کھول سکتے ہیں، نیچے تیر والے بٹن پر کلک کریں اور ڈراپ ڈاؤن مینو سے لینکس ڈسٹرو کو منتخب کریں۔
یہ ونڈوز ٹرمینل ٹیب میں نئے انسٹال شدہ ڈسٹرو کو لانچ کرے گا۔
اپنا لینکس ڈسٹرو لانچ کریں اور Bash Shell استعمال کریں مینو. اسٹارٹ مینو کھولیں،’Ubuntu’تلاش کریں، اور نتیجہ سے ٹرمینل منتخب کریں۔
متبادل طور پر، آپ ونڈوز ٹرمینل کھول سکتے ہیں اور ٹیب بار پر نیچے تیر والے بٹن پر کلک کر سکتے ہیں۔ پھر، لینکس شیل کو لانچ کرنے کے لیے ڈراپ ڈاؤن مینو سے وہ لینکس ڈسٹری بیوشن منتخب کریں جسے آپ نے انسٹال کیا (Ubuntu)۔
یہ ونڈوز ٹرمینل میں لینکس شیل ماحول کو شروع کرے گا۔ اب، آپ ونڈوز میں لینکس باش شیل استعمال کر سکتے ہیں، بالکل اسی طرح جیسے آپ لینکس پی سی استعمال کر رہے ہوں۔
متبادل طور پر، آپ صرف ڈسٹرو کا نام ٹائپ کر سکتے ہیں اور اپنی ڈسٹرو کو تیزی سے لانچ کرنے کے لیے Enter دبائیں۔
ان تمام دستیاب لینکس کمانڈز کی فہرست دیکھنے کے لیے جنہیں آپ Bash میں استعمال کر سکتے ہیں، ٹائپ کریں help-d اور انٹر دبائیں۔
ایک کے بارے میں مزید تفصیلات (جیسے اختیارات، دلائل، استعمال وغیرہ) حاصل کرنے کے لیے مخصوص کمانڈ، کمانڈ کے نام کے بعد مدد ٹائپ کریں جیسا کہ ذیل میں دکھایا گیا ہے (مثال کے طور پر مدد کی قسم)۔
Linux کے بارے میں ایک اور اچھی بات یہ ہے کہ Bash ڈیفالٹ شیل ہے جس میں شامل ہے Ubuntu اور دیگر Linux distros جس کا مطلب ہے کہ ایک ہی کام کو انجام دینے کے لیے ایک ہی کمانڈ کو مختلف distros پر استعمال کیا جا سکتا ہے۔ مندرجہ ذیل کمانڈز زیادہ تر اوبنٹو لینکس میں چلائی جاتی ہیں لیکن وہ دیگر تقسیموں جیسے کالی لینکس، اوپن سوس، ڈیبیئن وغیرہ میں استعمال کی جا سکتی ہیں۔
اوبنٹو کو WSL میں اپ ڈیٹ کریں
ایک بار، سیٹ ختم ہو گیا، یہ آپ کو bash کمانڈ لائن پر لے جائے گا۔ بہتر ہے کہ سافٹ ویئر کو فوراً اپ ڈیٹ کر لیں۔ Ubuntu میں، آپ سافٹ ویئر اپ ڈیٹس کو تلاش، ڈاؤن لوڈ، اور انسٹال کر سکتے ہیں، یہ سب کچھ آپٹ کمانڈ سے ہے۔
انتظامی مراعات کے ساتھ کمانڈ چلانے کے لیے، کمانڈ کے سامنے sudo شامل کریں۔.
سافٹ ویئر کو اپ ڈیٹ کرنے کے لیے نیچے دی گئی کمانڈ درج کریں:
sudo apt update
جب آپ مندرجہ بالا کمانڈ کو چلاتے ہیں تو آپ کو پاس ورڈ کے لیے کہا جائے گا۔ ایڈمنسٹریٹر کے طور پر کمانڈ چلانے کے لیے آپ نے پہلے بنایا ہوا UNIX پاس ورڈ ٹائپ کریں۔ جب آپ پاس ورڈ ٹائپ کرتے ہیں، تو یہ نظر نہیں آئے گا، اس لیے ایک بار جب آپ پاس ورڈ ٹائپ کرنا ختم کر لیں گے، تو Enter کو دبائیں۔
اوبنٹو کو پیکیج کی فہرستوں کی ایک سیریز ملے گی جنہیں لینکس ماحول میں اپ گریڈ کیا جا سکتا ہے۔ جیسا کہ آپ نیچے دیکھ سکتے ہیں، کمانڈ سے پتہ چلتا ہے کہ 26 پیکجوں کو اپ گریڈ کیا جا سکتا ہے۔
لیکن وہ ابھی تک اپ گریڈ نہیں ہوئے ہیں۔. دستیاب اپ گریڈز کی فہرست دیکھنے کے لیے، نیچے دی گئی کمانڈ کا استعمال کریں:
sudo apt list–upgradable
پھر، اپنا پاس ورڈ اور Enter کو دبائیں۔
یہ تمام دستیاب اپ ڈیٹس کو ان کے موجودہ ورژن اور قابل اپ گریڈ ورژن کے ساتھ درج کرے گا۔
اگر آپ صرف ایک مخصوص پیکج کو اپ ڈیٹ کرنا چاہتے ہیں، تو آپ ذیل کی کمانڈ کے ساتھ ایسا کر سکتے ہیں:
sudo apt–only-upgrade پیکیج انسٹال کریں
یہاں، پیکج کو اس پیکیج کے نام سے تبدیل کریں جس کو آپ اپ گریڈ کرنا چاہتے ہیں۔
مثال کے طور پر، ہم صرف’کرل’نامی پیکیج کو اپ ڈیٹ کرنا چاہتے ہیں۔ ایسا کرنے کے لیے نیچے دی گئی کمانڈ درج کریں:
sudo apt–only-upgrade install curl
اگر آپ کو پاس ورڈ کے لیے کہا جائے تو اسے ٹائپ کریں اور انٹر دبائیں۔ دوسری صورت میں،’Y’درج کریں اور جاری رکھنے کے لیے Enter دبائیں 3D’http%3A%2F%2Fwww.w3.org%2F2000%2Fsvg’%20viewBox%3D’0%200%201111%20601’%2F%3E”>
اس میں اپ ڈیٹس انسٹال ہونے میں چند سیکنڈ لگیں گے مخصوص پیکیج۔
تمام دستیاب پیکیجز کو اپ گریڈ کرنے کے لیے، درج ذیل کمانڈ درج کریں:
sudo apt upgrade
پھر انسٹالیشن جاری رکھنے کے لیے پرامپٹ پر Y ٹائپ کریں۔
مذکورہ کمانڈ پیکجوں کو ان کے تازہ ترین ورژنز میں اپ گریڈ کرتی ہے۔
Add a User to Linux Distro in Windows 11
When configuring the new Linux distribution, you will be asked to create a new account and that account will آپ کے ڈیفالٹ صارف اکاؤنٹ کے طور پر بھی استعمال کیا جائے۔ اگر آپ کسی مخصوص ڈسٹرو کے لیے نیا صارف اکاؤنٹ بنانا چاہتے ہیں، تو یہ ہے کہ آپ یہ کیسے کرتے ہیں:
نیا صارف اکاؤنٹ بنانے کے لیے، درج ذیل کمانڈ کا استعمال کریں:
sudo adduser
نئے اکاؤنٹ کے لیے صارف نام کے ساتھ کو تبدیل کریں۔
مثال:
sudo adduser rajallthings
اپنا موجودہ درج کریں جب اشارہ کیا جائے تو پاس ورڈ۔ پھر، اس نئے اکاؤنٹ کے پاس ورڈز ٹائپ کریں اور دوبارہ ٹائپ کریں اور Enter دبائیں۔
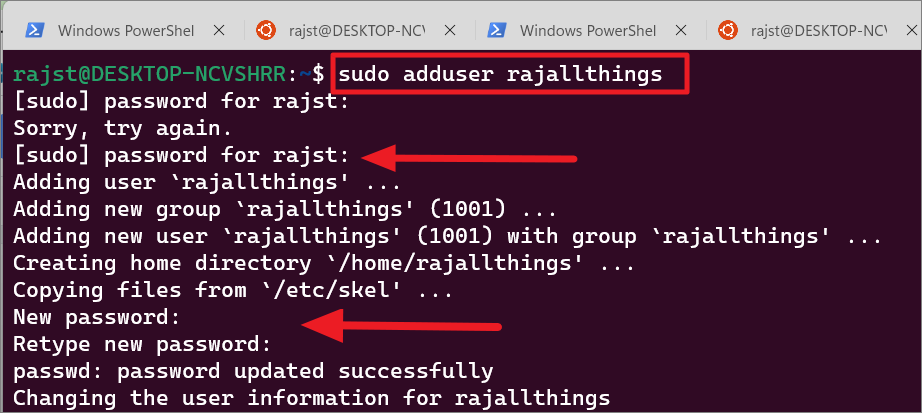
After that, enter a new value or leave it blank and press نئے صارف اکاؤنٹ کے لیے صارف کی معلومات کی ہر قیمت درج کریں۔ صارف کی معلومات میں پورا نام، کمرہ نمبر، کام کا فون، ہوم فون اور دیگر شامل ہیں۔ Finally, click’Y’and hit Enter to confirm the details.
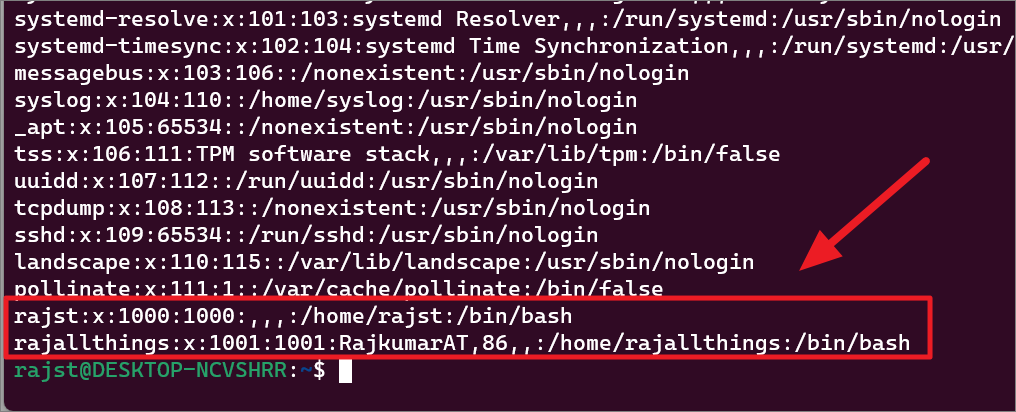
To get the list of user آپ کے لینکس کنسول پر اکاؤنٹس، درج ذیل کمانڈ ٹائپ کریں اور انٹر دبائیں۔
cat/etc/passwd|more
یہ آپ کو خصوصی اکاؤنٹس کی فہرست دکھائے گا جو ڈیمونز، ایپس، اور سسٹم صارف اکاؤنٹس کے لیے استعمال ہوتے ہیں جیسا کہ ذیل میں دکھایا گیا ہے۔
اسکرین کے نیچے، متعلقہ سب کچھ دیکھنے کے لیے’–More–‘پر Enter کو دباتے رہیں to user accounts.

You will see your user accounts at the end of the results.
Set Default User for WSL Linux Distro
The default account is the one that automatically signs in when you launch a distro. The one that you created during the initial setup of the distro will likely be the default account.
If you want to set another user account as the default UNIX user for WSL, run the following command:
config–default-user
Substitute with the name of the Linux distribution and with the user name you want to set as the default for the distro.
Example:
ubuntu config–default-user rajallthings 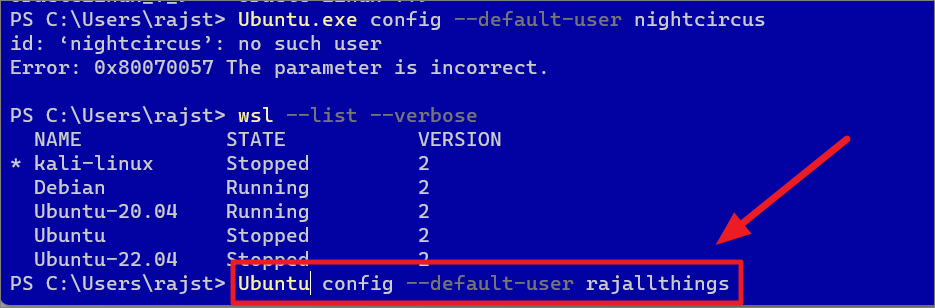
If you are using OpenSUSE, run the following command:
opensuse-42 config–default-user
If you are using SUSE Linux Enterprise Server, run the following command:
sles-12 config–default-user
If you are using Debian Linux, run the following command:
debian config–default-user
If you are using Kali Linux, run the following command:
kali config–default-user
Switch User in WSL Linux Distro in Windows 11
In Linux, ‘sudoers’ is a group of users who are allowed to run commands as root (i.e., elevated). In case you are using a user who is not a sudoer, you can quickly switch users to run elevated commands.
To switch users in the WSL Linux distro, run the following command:
su-
Or
su-
In the command, substitute the with the actual user name. Example:
Su-rajstd 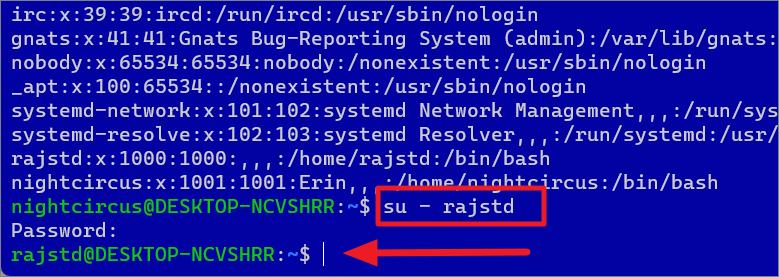
Remove User from WSL Linux Distro in Windows 11
To remove a specific user account from the WSL Linux distro, enter the below command in the Linux terminal:
sudo deluser
Replace the argument with the actual user you want to remove.
Example:
sudo deluser nightcircus 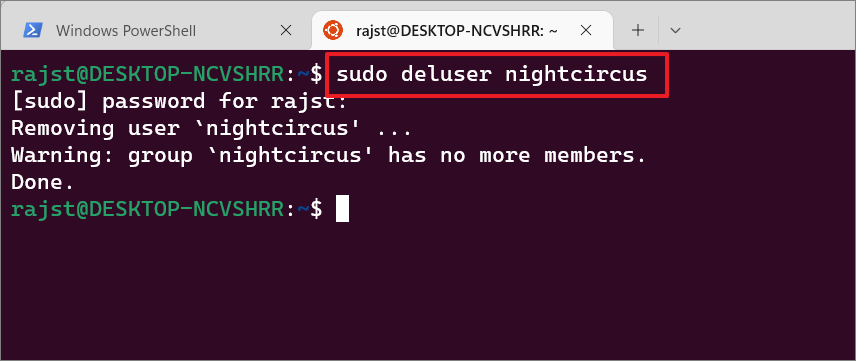
Change Password in Linux Distro in Windows 11
Linux operates with root privileges, so it is vulnerable to misuse. In case your password is compromised or for some other reason you want to change your password, you can use the following command:
sudo passwd root
After entering the above command, you will be prompted for the current password. Type your current password and press Enter. Then, type your new password and then retype your new password.
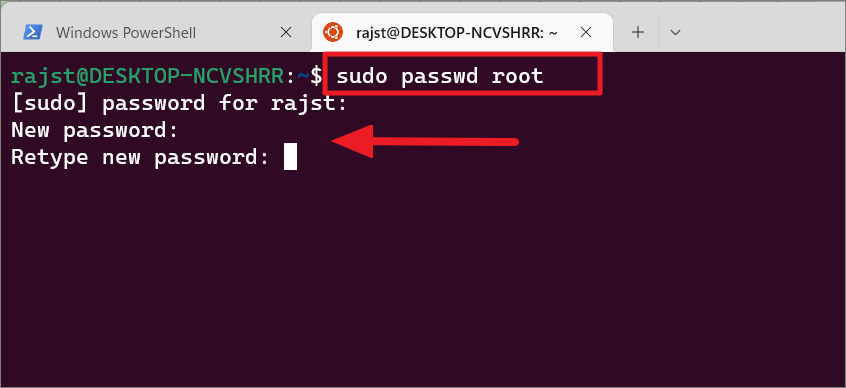
And the password will be updated successfully for the current account.
Manage Windows Subsystem for Linux in Windows 11
Here’s how you can manage Windows Subsystem for Linux (WSL) and Linux distributions installed on Windows 11 through PowerShell.
List all Installed Linux distros on Windows 11
To list all the installed Linux distributions on your device, run the below command in PowerShell or Command Prompt:
wsl–list–verbose
or
wsl-l-v
This will show a list of all the Linux distros installed on your system along with their status and their WSL version.
To list only the Linux distros that are currently running on the device, you can run the below command:
wsl–list–running
Change Default Linux Distribution on Windows 11
By default, the WSL command installs and sets Ubuntu as the default Linux distribution or the Linux distribution you first installed. The default Linux distribution will be marked with a small asterisk (*) symbol when you list all distros using the above command. As you can see in the above screenshot, there’s an asterisk (*) character next to the distro name Ubuntu-20.04.
To change the default distribution to something else (e.g. Debian), run the following command:
wsl–set-default debian 
You can launch the default distro by simply running wsl in a command line without specifying the distribution.
Run a Specific Linux Distribution through PowerShell
In case you have only one Linux distribution installed on your device, you can run the following command from within PowerShell or Windows Command Prompt to launch it:
wsl
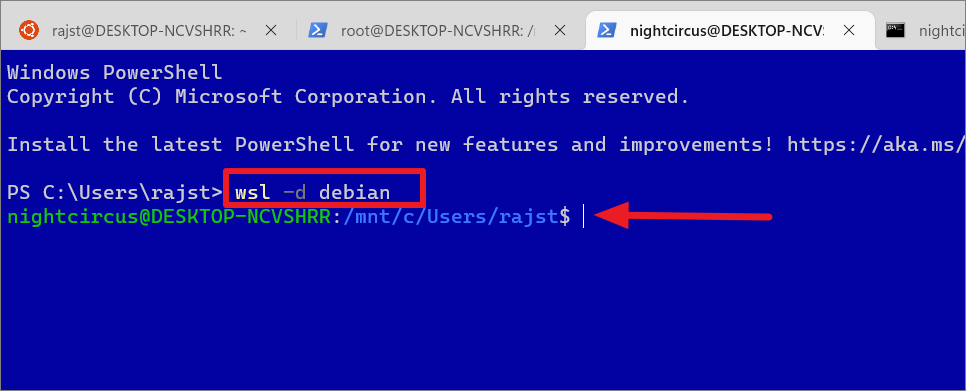
However, if you have multiple Linux distributions on your computer, you can use the following command from within PowerShell or Windows Command Prompt to start a specific Linux distro:
wsl-d
Replace with the name of the distribution you want to use. Example:
wsl-d debian
Type the above command and press Enter. This will start the specified distro’s bash shell directly in the current PowerShell or CMD terminal.
If you wish to log in to a WSL distro with a specific user, type the below command:
wsl–distribution debian–user rajstd 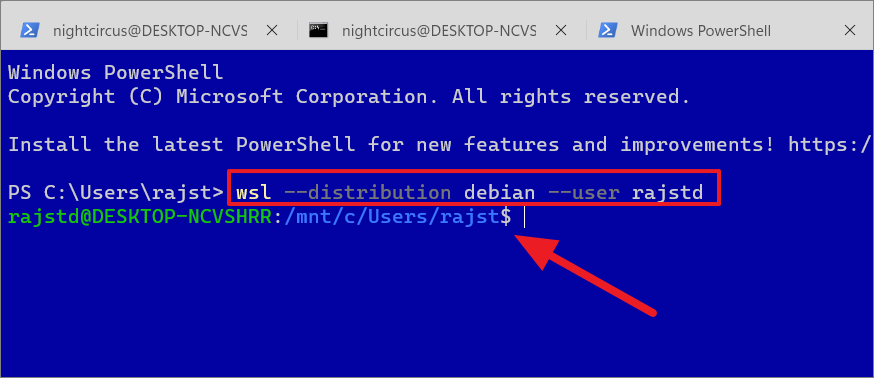
To get back to the PowerShell shell, simply type exit and press Enter to exit bash.
Stop a W SL Linux Distro on Windows 11
Once a WSL distro is started, it will continue to run in the background even after closing the Linux terminal window or the distro bash shell until you manually terminate the WSL instance. Here’s how you can stop a specific Linux distro or all of them.
wsl–terminate kali-linux
However, if you are still on the Linux bash shell or terminal, you can just type exit and press Enter instead of closing the Linux terminal window to stop the WSL instance.
If your computer has multiple Linux Distro running in the background and you want to stop them all, use the below command:
wsl–shutdown
Change the WSL version for a Specific Distribution
WSL 2 is the newer version of Windows Subsystem for Linux that runs on a virtual machine to run a Linux kernel with full system call compatibility while WSL 1 works better when work ing across filesystems. When you enable Windows Subsystem for Linux feature through Windows Features, WSL 1 will be set as default. However, if you use wsl–install command to install new Linux distros, WSL 2 will be set as default.
You can use wsl–set-version command to change the version of WSL (upgrade or downgrade) for the previously installed Linux distributions. You can also change the WSL version globally for all future Linux installations.
If you wish to upgrade the existing WSL 1 version to WSL 2 for a specific distribution. Then, run the below command in PowerShell or command prompt:
wsl –set-default-version
Replace the argument with the name of whichever distribution (Kali Linux in our case) you would like to use and with either 1 or 2. Make sure to specify the distribution name correctly.
Example:
wsl –set-default-version Kali Linux 1
To change the WSL version globally ( for all future WSL instances), use the below command:
wsl–set-default-version 2 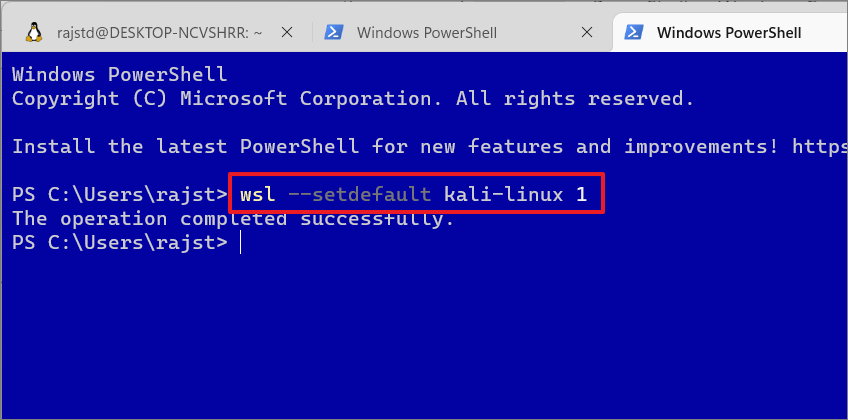
Update the Window Subsystem for Linux (WSL) kernel
WSL feature is usually updated with Windows Updates however if you want to manually check and update the WSL feature, you can do that with the following c ommands:
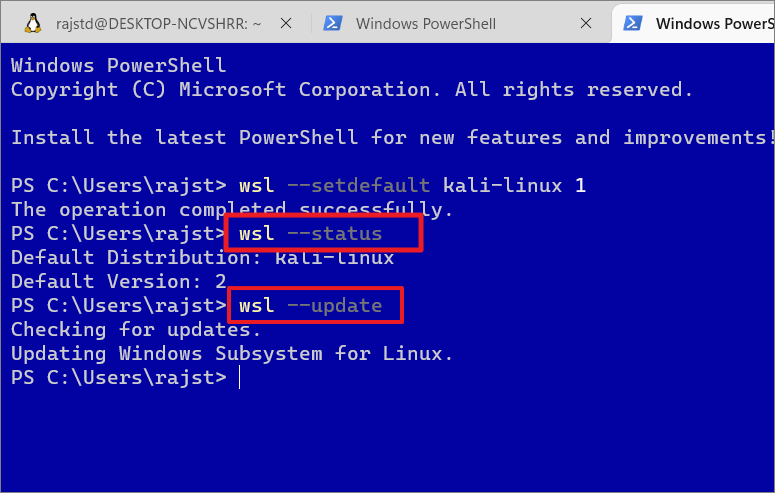
wsl–status
First, use the above command to check the status of WSL, including the default distribution name and kernel version.
wsl–update
This command will check and update the WSL kernel version if an update is available.
Remove or Unregister a Linux Distribution
If you no longer need a particular distro or you want to install a different distribution in its place or want to troubleshoot a distro, you can uninstall the Linux distribution easily. Unregistering will erase all data, settings, and programs associated with that distribution. Here’s how you can unregister a Linux distro in Windows 11.
To remove or uninstall a Linux distro from WSL, execute the following command:
wsl–unregister
Replace with the actual name of the distro, you want to remove from WSL.
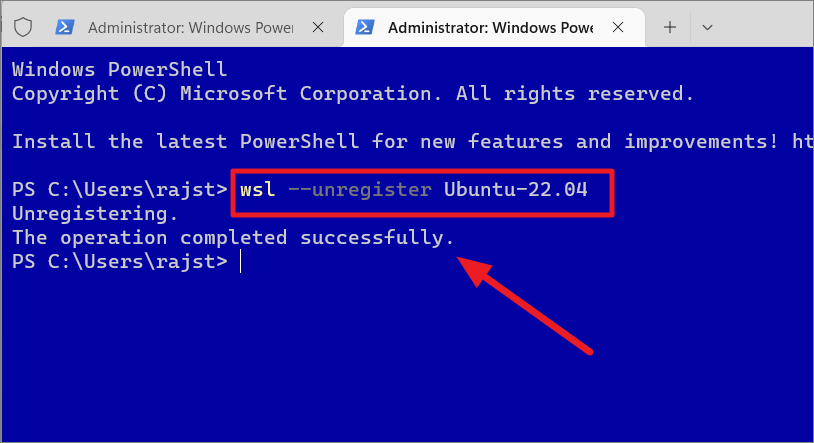
Once you run the above command, it will remove all the data, settings, and applications within that distro.
Mount a Disk to WSL Linux on Windows 11
Windows Subsystem for Linux now allows you to mount a physical disk formatted with a Linux file system (e.g. ext3, ext4) that is not supported by Windows and access its content. However, you can only use this feature in the Linux distro that is running on WSL 2 on Windows 11 (build 22000 or higher).
Windows Operating System recognizes drives and disks that are formatted with FAT16, FAT32, exFAT, NTFS, and a few other file systems, but it does not support the most commonly used Linux file systems such as EXT3, EXT4, XFS, etc.
For instance, if you are trying to access files copied from a Linux computer to a USB drive, Windows won’t recognize it and nothing will show up in File Explorer as the disk is formatted with a Linux file system (EXT3).
To access Linux disk format in the WSL distribution, you can mount hard drives, flash drives, and other removable disks using the wsl–mount command. Here’s how you can do that:
Before you mount a disk, you need to get a list of available drives and their deviceID. To do that, open PowerShell or Windows Terminal with administrative privileges and enter either of the following commands:
Get-CimInstance-query’SELECT * from Win32_DiskDrive’
or
wmic diskdrive list brief
The above command will list all the available physical disks connected to your computer Now note down the device ID of the disk you wish to mount in the WSL distro.
If you have a single partition or unpartitioned disk, use the below syntax command to mount that disk
wsl–mount
Example:
wslwsl–mount \\.\PHYSICALDRIVE2
The above command mounts the given disk globally so that it is available to all the Linux distros in WSL.
When you attempt to mount a disk to WSL, it will automatically assume it is an EXT4 file system. However, if your disk has a different file system, you will need to specify it using the–type or-t argument.
wsl–mount \\.\PHYSICALDRIVE2–bare–type ext3
or
wsl–mount \\.\PHYSICALDRIVE2–bare-t ext3
The-bare argument can be used with a command to make the specified disk available in WSL without mounting it to all distros. In the above command make sure to replace ‘ext3’ with the file format of the drive you are mounting.
If you wish to mount a particular partition with multiple partitions, you can use the following command syntax:
wsl–mount –partition –type
Example:
This command mounts the specified disk and makes it available to all the Linux distros in WSL. You can use the –bare parameter to make the disk available in WSL without mounting it to all distros. The –type parameter can be used to specify the file system for the disk. If you don’t know the file system, you can skip this parameter.
wsl–mount \.\PHYSICALDRIVE3–partition 1-t ext3
To access the mounted Linux disk in File Explorer, open File Explorer and enter this in the address bar: \wsl$. Then, navigate to the desired distro.
After that, go to the ‘mnt’ folder in the list where you can find all your mounted drives and their contents.
To unmount a disk after finishing accessing its content, execute the following command:
wsl–unmount
Example:
wsl–unmount \\.\PHYSICALDRIVE2
Access Windows Drives from Windows Subsystem for Linux (WSL)
The above commands let you mount the Linux files system to WSL but the Windows Subsystem for Linux still automatically mounts fixed NTFS drives on your computer. However, secondary drives, removable drives, and external networks need to be mounted to access their content in WSL. Here’s how you can mount Windows drives in Windows Subsystem for Linux to access their files.
You can use the new mounting option – ‘DrvFs’ to mount external drives like hard drives, USB sticks, CDs, DVDs, and other removable disks. However, this mounting option can only work on NTFS, ReFS, or FAT file systems.
Let’s assume you have an external drive ‘W:’. To mount this drive, you can use the below commands:
sudo mkdir/mnt/w sudo mount-t drvfs W:/mnt/w
Replace w in the commands with your desired drive letter or path. When navigating a drive from a Linux terminal, make sure to add/mnt/before the path. After entering the first command, type your Unix password. Then, enter the second command.
Once a drive is mounted, it will remain accessible in the Linux environment and you can access the drive anytime you want as long as it is connected to the device.
To access files in the mounted or the internal drive, use the below command:
ls/mnt/w
Here, replace w with your desired drive path.
To unmount an external drive, run the following command:
sudo umount/mnt/w/
Please remember there is no “n” between “u” and “mount” in the “umount” command.
When mounting a drive, a temporary folder will be created in the mnt directory where the mounted driv es and locations will be located. You can also delete these temporary folders after unmounting the drive. You can remove the temporary folder using the ‘rmdir’ argument:
sudo rmdir/mnt/foldername
Substitute foldername with the drive letter or path of the location.
Example:
sudo rmdir/mnt/w
The rmdir parameter can only remove the empty directories. So make sure the location is properly unmounted before executing the above command.
Mount Windows Network Location
You can also mount network locations directly from WSL whether or not the network location has been mapped to a specific drive letter in Windows. If your network is already mapped to a drive letter inside Windows, you can use that drive letter to mount it.
In case you have an unmapped network location, you can mount it directly using the below commands.
First, let’s create a folder for the location inside the/mnt/folder using the below command:
sudo mkdir/mnt/folder
Then, use the mount switch to connect the folder with the network location:
sudo mount-t’\\server\folder’/mnt/folder
Where replace \\server\folder with the path to your network location.
Clear the Terminal Screen
If you have been running commands for a while, the terminal window may get clustered. You can quickly clear your terminal screen to make it look like a new tab with this command:
clear
Result:
Access Windows Files through WSL and Vice Versa
You can also access your Windows files in the Linux environment as well as create, copy/move files, and delete files in the Windows file system. Microsoft WSL allows you to access your Windows files through the Linux kernel by navigating to the exact path. Here’s how you can do this:
Navigate and Access Windows File System in WSL
You can use the cd command to navigate the Windows File System.
cd/mnt/windows_path
Replace windows_path with the Windows path, you want to navigate to.
Example:
cd/mnt/f/Projects
When navigating drives in Linux, always add/mnt/before the path.
You can also access your User accounts with this:
cd/mnt/c/Users
To view the contents inside a directory or folder, use the ls command. Folders will be highlighted with a green background and blue text.
Copying/Moving files Between Linux and Windows File Systems through WSL
You can move or copy files between the two operating systems using the cp or mv commands.
To copy files from Windows to the Linux file system, run the following commands:
cp/mnt/f/Projects/Patch.zip/home/rajst/Documents
Here, f/Projects/Patch.zip is the location and file you want to copy from Windows to Linux./home/rajst/Documents is the destination for the copied file.
To Move files from Windows to the Linux file system, run the following commands:
mv/mnt/f/Projects/Patch.zip/home/rajst/Documents
To move the file, you have to use ‘mv’ instead of ‘cp’. In case there’s already a file with the same name that exists in the destination, type y and hit to replace it.
To move a file from Linux to the Windows file system, run the following commands:
mv/home/rajst/Documents/Patch.zip/mnt/f/Projects
Edit Windows files through WSL
You can also edit your Windows files (e.g., text files) through the Linux terminal using WSL. To do that, you have to use a text editor that can run in a terminal like ‘nano’. Below is the command for the same:
sudo nano/mnt/f/Projects/TestREF.txt
The built-in nano text editor will open the files in the terminal. Now, you can make changes to the file.
To exit the editor, press Ctrl+X. If you have made any changes to the file, you’ll be prompted to save the changes before quitting the editor. To save and exit the file, type Y and then press Enter.
Create files in Windows through WSL.
You can also create any kind of file in a specific windows directory using the touch command.
First, navigate to the directory where you want to create the file with the command like this:
cd/mnt/f/Projects/Documents
Then, use the touch command followed by the filename and type to create the file:
touch final_report.docx
Substitute final_report.docx with the file name and file type your want to create. The file type can be anything you want (.txt,.xlsx,.mp4, etc.)
Delete Files from Windows File System through WSL
Deleting files is similar to creating files via WSL, you have to navigate the folder or directory first and then use the rm command to delete the files.
First, navigate the directory or location:
cd/mnt/f/Projects/Vids
Then, use the rm command to remove the unwanted files:
rm final_report.docx
Access Linux Files through File Explorer
You can also access the Linux file system through File Explorer. To do that, open Windows File Explorer, scroll down to the left navigation panel and select the ‘Linux’ option.
Here, you will see the list of all distro you have installed on your device. Select the desired distro folder to view its files.
Under the ‘Home’ folder, you can find user profiles and their files.
Running GUI Linux Apps using WSL
Windows 11 comes with ‘WSLg’, short for Windows Subsystem for Linux GUI, which is a new feature that allows you to run Linux Graphical apps on Windows in a fully integrated desktop experience. It is a great feature that helps users to run apps and tools that work well or are only available in Linux. Follow these instructions to install GUI apps in WSL.
Prerequisites:
You will need at least Windows 11 (build 22000 or later) or Windows 11 Insider Preview (builds 21362 or later). To run Linux GUI apps, you will need a system with virtual GPU (vGPU) enabled for WSL. You can download and install the below driver matching your system to enable virtual GPU (vGPU) to achieve hardware-accelerated rendering.
Update WSL and package list:
Next, you need to update the Windows Subsystem for Linux. To do that, open PowerShell or Command Prompt in elevated mode and enter the below command:
wsl–update
Then restart the WSL for the changes to take effect with this command:
wsl–shutdown
Update the packages in your distribution:
Then update your packages in the Linux distribution using the following commands:
sudo apt update sudo apt upgrade
Install Linux GUI apps
Now you can download and install the Linux applications you want to use via the bash shell. In Linux distros, you can use various package managers to install your desired applications. Here’s a list of commands to install some of the most popular software in Linux.
To install apps in WSL, use the below command syntax:
sudo apt-get install APP-NAME-y
Here, replace App-Name with the actual app name.
Install GIMP
GIMP is a free and open-source image editor available for GNU-Linux, macOS, and Windows. It is used for image editing, photo retouching, image manipulation, and image authoring. To install GIMP software, open the Linux terminal and type this command:
sudo apt install gimp-y
or
sudo apt install gimp
In the install command, you can add-y at the end to skip confirmation and get right to the installation.
Install Gedit app
To install GNOME’s default text editor, use the below command:
sudo apt install gedit-y
Install VLC Media Player
sudo apt install vlc-y
Install X1 1 apps
X11 is a Linux Windowing system that provides a miscellaneous assortment of X applications such as the xclock, xcalc calculator, clipboard, etc.
sudo apt install x11-apps-y
Install Firefox
apt install firefox-y
Search for Apps in the Software Repository
If you don’t know the specific name of the app you want to install, you can search for it using the apt-cache command. Run the following command to find the name of a specific application:
sudo apt-cache search [application name or type]
Example:
sudo apt-cache search kden
The apt-cache command will show the results related to the search word ‘kden’ in the repository.
Now, you can use the name of the app from the search to install it.
Once you finish installing your desired application on the WSL distro, restart your PC and launch the app via the bash command line.
List All Installed Packages and Programs in Linux Distro
To list all the packages that you have installed using on your distro, run the below command:
apt list–installed
This will list all the packages installed on your Linux distro.
Launch Linux GUI Apps
To launch the install apps in WSL, simply type the name of the app and hit Enter to run it.
For example:
gimp
or
gimp &
As you can see below in the screenshot, the above command launches the GIMP (GNU Image Manipulation Program) application. Now, you can use your mouse and keyboard to use the app just like any of your Windows apps.
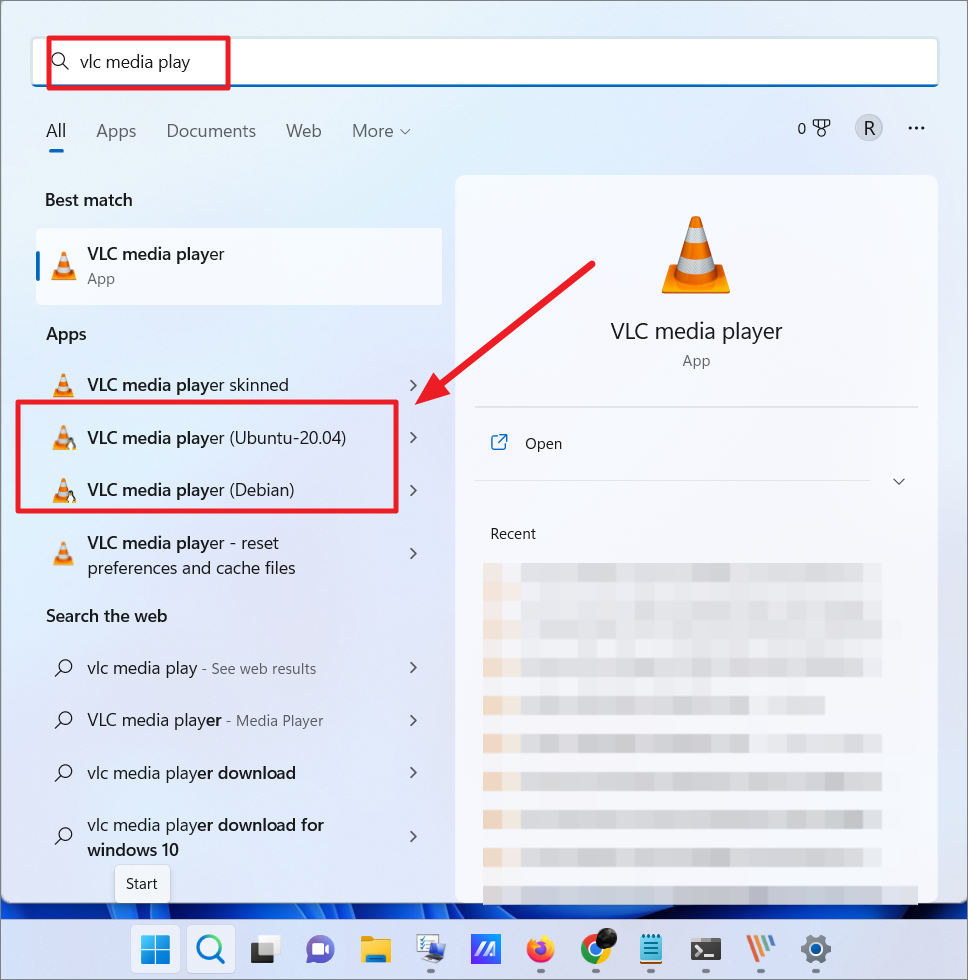
Access Linux Apps from Windows 11 Start Menu
Once you install an app in Linux, you can also access that Linux app directly from your Windows Start menu, just like you do a Windows app. You can tell the difference between Windows and Linux apps with the app name. You can just open the Start menu and access the app from the Recent list.
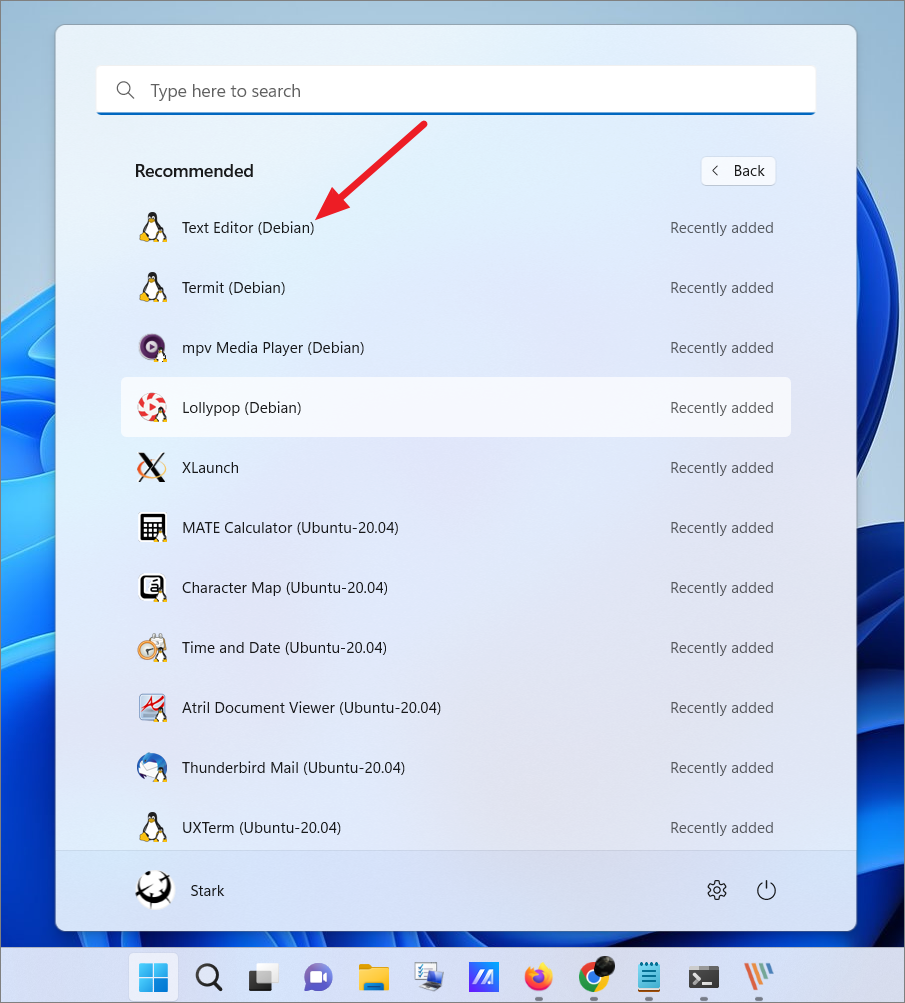
Or, you can search for the app in Windows Search. As you can see below, the Linux app will have the Linux Distribution name as part of the label. Also, the Linux penguin logo will be visible at the corner of the app icon.
Installing a Desktop Environment
Unlike Windows, Linux offers several customizable desktop environments that you can install on the same Linux distro. A desktop environment is a bundle of programs that runs on top of the operating system to provide default graphical user interface elements such as menus, windows, icons, toolbars, wallpapers, etc.
Some Linux distros come with their own desktop environments while in others you can manually install and customize them as you see fit. In Windows 11, you can not only install Linux terminals and apps but also install Linux desktop environments and use Linux graphically as you do any other operating systems like Windows and macOS. Let us see how to install Linux desktop environments in Windows 11.
Xfce is a lightweight and easy-to-use desktop environment that provides a feature-rich user experience. And it is one of the most commonly used desktop environments on WSL.
Start by updating and upgrading Ubuntu:
sudo apt update
sudo apt upgrade
To download and install Xfce on the WSL distro, run the following command in the Linux terminal:
sudo apt-get-y install xfce4 && sudo apt-get-y install xubuntu-desktop
Then, enter your password to execute the command. It will take a while to complete the installation process.
In the middle of the installation, you will be asked to choose a Desktop Manager – ‘GDM3’ or ‘LightDM’.
Install X server for Windows
Once it’s finished installation, we need to install an X server for Windows, such as VcXsrv. To run a Linux desktop environment inside Windows, we will need an X server. To install and set up an X server, follow these steps:
First, go to the download page of VcXscr X Windows Server and click the ‘Download’ button to download the software.
Alternatively, you can also go to the GitHub page of VcXsrv server and download the latest version of the app.
After the software is downloaded, run the setup. Then choose ‘Full’ from the ‘Select the type of install’ drop-down menu and click ‘Next’.
Then, click ‘Install’ on the next window to install the program and its components.
Once the installation is finished, you will have a shortcut named ‘Xlaunch’ on the desktop. Don’t open it yet.
Now go back to the Linux terminal and enter the below command to see if the ‘resolv.conf file auto-generated:
cat/etc/resolv.conf
If the server is running, you will get an IP address. Now, note down the IP address you got from this command. (e.g., 172.29.128.1)
Next, type the below command to edit the.bashrc script file which contains a series of configurations for the terminal session:
nano ~/.bashrc
In case you see this prompt message on the screen, simply press Y.
This will show a series of scripts on the screen. Now, go to the bottom of the script and add this new entry:
export DISPLAY=172.29.128.1:0
Now, type that IP address (172.29.128.1) you got earlier in the code, and make sure to add a colon (:) and zero (0) at the end.
If you have a problem restarting your Xfce server running on Ubuntu or launching the desktop environment, type this entry instead:
export DISPLAY=$(cat/etc/resolv.conf | grep nameserver | awk'{print $2}’):0
Then, press Ctrl+X and then Y to save the script. After that, hit Enter to exit the script.
After that, reload the service with this command.
source ~/.bashrc
Launch Desktop Environment:
Next, go back to the desktop and launch the ‘XLaunch’ app (VcXsrv) that you installed earlier.
Then, choose a display option in the Display settings window and click ‘Next’. Here, we are selecting the ‘One window without titlebar’ option.
Under Client startup, select the ‘Start no client’ option and click ‘Next’ to start only the server.
On the next screen, add all the additional parameters needed by you for the X server in the field below and click ‘Next’. In the example, we are adding-ac.
Finally, click on ‘Finish’. You can also save these configurations for later use or backup by clicking the ‘Save configuration’ option.
If you see the Windows Security Alert prompt, make sure to select both options and click ‘Allow access’.
Once you do that, you may just see a black screen. It is normal, ignore it and go back to the terminal.
Then, launch the new desktop environment by entering the following:
startxfce4
If you have a problem running the above command, run the following command instead:
sudo-u rajst startxfce4
Here, replace rajst with your username.
This will launch the Xfce desktop environment. Now, go back to the VcXsrv server program in the taskbar and you will have a Linux desktop as shown below.
You can use the new desktop as if it were a normal Windows desktop. You can access the file manager by clicking the ‘Home’ button.
To open applications, click the search button (Application Finder) at the bottom of the Xfce desktop. Then, find and click on the application from the Application Finder menu to launch the app.
Install Desktop Environment for Kali Linux:
If you are using the Kali Linux distro, you can install Win-KeX desktop which is a Kali Desktop Experience for Windows Subsystem for Linux (WSL 2).
To do this, first launch the Kali Linux and update the packages using the below commands:
sudo apt update sudo apt upgrade
Then, execute the following command to install the Win-Kex desktop environment and press Enter:
sudo apt install-y kali-win-kex 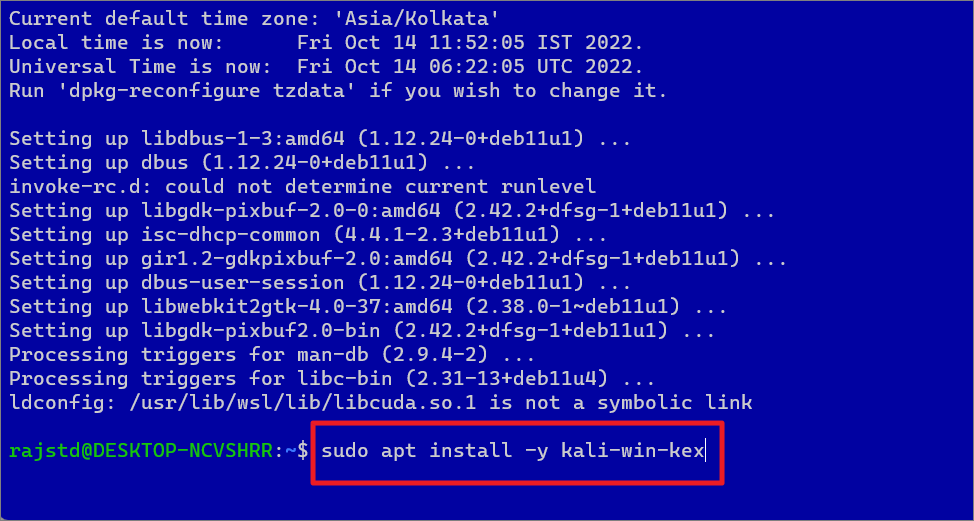
Run Bas h Scripts on Windows 11
So far we have seen how to run commands one by one in an interactive way but there’s another way you can execute commands in Linux – batch mode. You can run commands in batches. You can create a bash script that contains all of the commands you would like Linux to execute in order. Then, run that bash script (batch file) to execute the task one by one automatically without having to manually run individual commands. Here’s how you can do this:
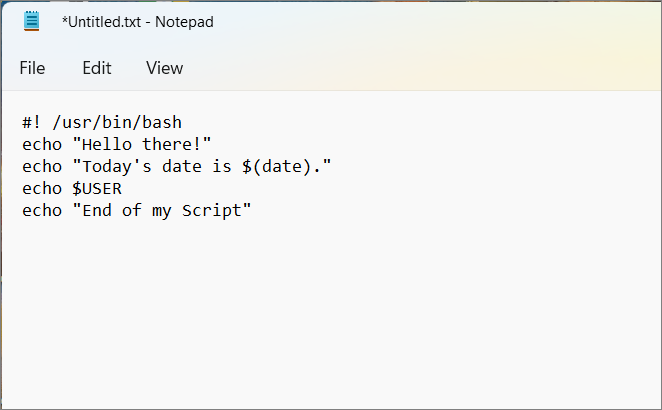
Open your favorite text editor like Notepad and create a new text file. The first line of the script must be “#!” followed by the path of your Linux bash. To find the path of your Linux bash, open the Ubuntu terminal and run which bash. This will show you the Bash path. Note down or copy it.
Now, open your new text file and include that first line at the top. For example:
“#!”/usr/bin/bash
Next, type the commands you want Linux to run in sequential order. Each line should have a single command.
For example:
Line 2: Use theecho command to show a welcome text to the user.
Line 3: Use echo with the date command to show today’s date, time, time zone, and more.
Line 3: A combination of USER and echo commands is used to return the current user name.
Line 4: Once again, the echo command is used to display the message ‘End of My Script’.
As you can see there are three sequential commands set to execute in this script file.
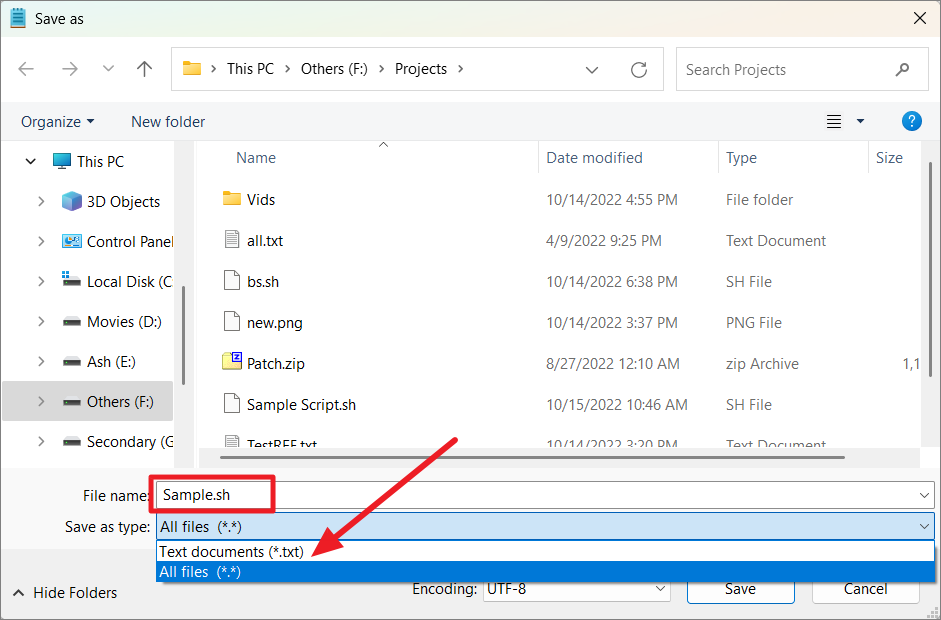
After typing all the commands you want, save the text file with a.sh extension. When saving the file, select ‘All files (*.*)’ as the Save as type. Be sure to remember where you saved it because you need the file path to run the script.
Next, open PowerShell or Bash shell (Linux terminal) and use the cd command to navigate to the path where you have saved the Bash script file.
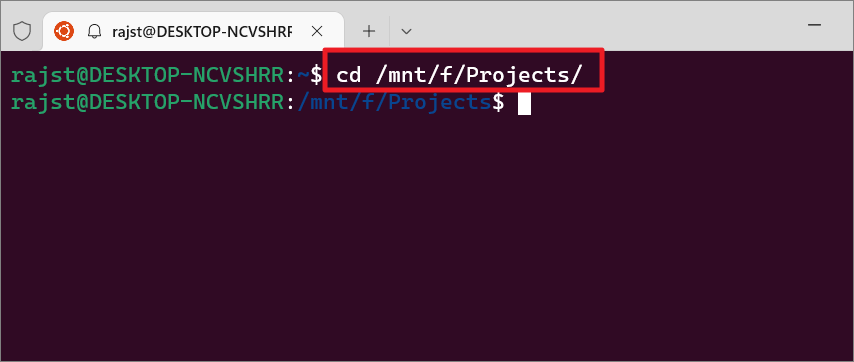
Then, run the script with the following command:
bash
Replace with the name of the bash file you created.
bash Sample.sh
This simple example shows you how you can create bash scripts to execute more complex script programs.
Create Aliases in Windows Subsystem for Linux
Alias in Linux is a custom shortcut used to execute more complex and lengthy commands. Aliases make Linux commands easy to remember and use. For example, if you need to execute this long command – mysqldump-u root-p–all-databases >/home/server/Desktop/backupfile.sql which is hard to type and prone to mistakes, you can instead create an alias like mysqlback and use it to execute that command.
There are two ways you can create to create aliases in Linux – per session or permanently.
Create Per Session Aliases
To create a temporary alias for your current session of bash (which will expire once you close the terminal), use the below command:
alias =’‘
Example: Creating an alias for cp/home/rajst/Test.bas/mnt/f/Projects command:
alias copytest=’cp/home/rajst/Test.bas/mnt/f/Projects’
Now, you can use the alias copytest to execute that command quickly. However, this alias will only be available for your current terminal session.
Create Permanent Aliases
To create permanent aliases between sessions, you will need to edit and save your aliases inside a configuration file called.bash_aliases or.bashrc
First, check if the.bash_aliases file exists in your system using the below commands:
cd ~ ls-a
If you can’t find it, then run the following command:
touch.bash_aliases
To edit the.bash_aliases file, use the below command:
nano ~/.bash_aliases
Then, add your permanent aliases to the file. For example:
alias c=’clear’alias ll=”ls-alF”echo alias wmi=\’echo I am in $PWD\’alias Guten=’cd/mnt/f/Projects/Project Gutenberg’
You can also leave a comment before your aliases (like #My Custom Aliases) for organization purposes.
You can also add your aliases in the.bashrc file.
Press Ctrl+X and then type Y to save the file. Then press Enter to exit the editor.
The new aliases in the file will be automatically loaded in your next session. But if you want to use them in your current session, you can ‘source’ your.bash_aliases file using this command:
source ~/.bashrc
Now, you can use your alias shortcuts to execute your frequent commands quickly.
Essential WSL Commands for PowerShell
Here’s a list of essential Windows Subsystem for Linux commands that you can use in Windows PowerShell.
Use Command Update WSL wsl –update Install WSL wsl –install Install a specific Linux Distribution wsl –install –distribution or wsl –install-d List all available Distribution wsl –list –online List all installed Distributions wsl –list –verbose Set the WSL version from 1 to 2 wsl –set-version Set default WSL version wsl –set-default-version Set default Linux distribution wsl –set-default Change directory to home wsl ~ Run a specific Linux distribution from PowerShell or CMD wsl –distribution –user Check WSL status wsl –status List of options and commands available with WSL wsl –help Run as a specific user wsl-u `, `wsl –user Change the default user for a distribution config –default-user To shutdown WSL wsl –shutdown To terminate or stop a specific distribution from running wsl –terminate Export a distribution to a TAR file wsl –export Import a new distribution wsl –import Unregister or uninstall a Linux distribution wsl –unregister Mount a disk or device wsl –mount
That’s it. Using this guide, you’ll become a pro in using Linux on your Windows 11 PC in no time.
WSL 2 کو تمام فیوچر ڈسٹروز کے لیے ڈیفالٹ ورژن کے طور پر سیٹ کریں
sudo apt upgrade