Mysz jest niezbędna w komputerach stacjonarnych i większość ludzi używa jej nawet na laptopach, ponieważ touchpad lub wodzik są dość niewygodne. Gracze są prawdopodobnie lepszym przykładem odbiorców, którzy naprawdę doceniają jakość dobrej myszy, wygodną w dotyku, dużą liczbę przycisków i doskonały czas reakcji.
Rzadko znajdziesz mysz bezprzewodową w schowku ze sprzętem gracza. W porównaniu do myszy przewodowej ma gorszy czas reakcji, ponieważ łączy się z komputerem za pomocą bezprzewodowego klucza USB.
Niemniej jednak inni użytkownicy preferują myszy bezprzewodowe do zwykłych czynności na komputerze, przeglądania Internetu, przesyłania strumieniowego i pracy. Jeśli jednak mysz bezprzewodowa nie działa, możesz pokusić się o porzucenie jej na rzecz myszy przewodowej, która Cię nie zawiedzie.
Mysz bezprzewodowa nie działa
Wcześniej należy rozwiązać ten problem, aby sprawdzić, czy można go łatwo naprawić. Problemy z działaniem myszy mogą wystąpić niezależnie od marki, w tym Microsoft, Logitech i HP.
Niepożądane scenariusze, które możesz napotkać:
Jak rozwiązywać problemy z myszą bez myszy
Pierwsza kwestia jest delikatna: jak rozwiązać problemy z myszą na komputerze, jeśli nie możesz używać myszy do nawigacji w systemie Windows 10. Najbardziej oczywistym rozwiązaniem w tym przypadku jest użycie innego urządzenia wskazującego. Na przykład, jeśli masz laptopa, możesz przełączyć się na touchpad lub drążek wskazujący.
Jeśli nie masz drugiej myszy na pulpicie, spróbuj użyć innego urządzenia wskazującego, np. tabletu do rysowania. Możesz też w pełni polegać na klawiaturze do nawigacji po komputerze, chociaż nauczenie się, jak przełączać karty i okna, a także jak wykonywać czynności podobne do klikania przycisków, wymaga trochę praktyki.
Możesz także spróbować użyć Cortany lub innego oprogramowania do rozpoznawania mowy na komputerze z systemem Windows 10. Uważamy jednak, że najlepszym sposobem rozwiązywania problemów z myszą jest skonfigurowanie pilota połączenie pulpitu z innego komputera za pomocą wbudowanej aplikacji Podłączanie pulpitu zdalnego lub aplikacji innej firmy, takiej jak TeamViewer .
Jak naprawić mysz bezprzewodową, jeśli nie działa w systemie Windows 10
Wykonaj kolejno poniższe rozwiązania, aby rozwiązać problemy z funkcjonalnością myszy bezprzewodowej na komputerze z systemem Windows 10.
1. Sprawdź, czy cały system nie jest zawieszony
Zacznij od sprawdzenia, czy cały system operacyjny nie zawiesił się, ponieważ mysz może faktycznie działać dobrze. Jeśli twoja sesja gry została przerwana, możesz łatwo stwierdzić, że okno gry i dźwięk zawieszają się.
Jeśli jednak nic się nie działo na ekranie, gdy mysz bezprzewodowa przestała działać, sprawdź, czy klawiatura działa. Jeśli ma diody LED, naciśnij klawisz Num Lock lub Caps Lock , by sprawdzić, czy się włączają. W przeciwnym razie naciśnij Ctrl + Alt + Del , aby sprawdzić, czy ekran zmieni kolor na niebieski i pokaże opcje zasilania oraz Menedżera zadań.
Gdy stwierdzisz, że wszystko działa bez zarzutu oprócz myszy, przejdź do następujących rozwiązań.
2. Uruchom ponownie komputer
Wiemy, że to brzmi głupio, ale ponowne uruchomienie komputera może wystarczyć do ponownego uruchomienia myszy bezprzewodowej i przywrócenia jej prawidłowego działania. Możliwe, że jego usługi i sterowniki zawieszały się z powodu innych uruchomionych procesów, więc ponowne uruchomienie systemu Windows 10 powinno załatwić sprawę.
3. Sprawdź kompatybilność myszy
Jeśli niedawno kupiłeś nową mysz lub otrzymałeś ją w prezencie, być może ona nie obsługuje Twojego systemu operacyjnego. Obecnie jest to rzadkie, ponieważ większość nowoczesnych myszy obsługuje system Windows 10.
Jednak może się to zdarzyć, zwłaszcza jeśli marka jest nowa lub stosunkowo nieznana. Wystarczy odwiedzić witrynę producenta myszy lub skontaktować się z obsługą klienta, aby potwierdzić, że mysz USB jest zgodna z systemem.
4. Sprawdź baterię myszy
Odwróć kursor myszy, aby sprawdzić, czy lampka się świeci. Robiąc to, przyjrzyj się bliżej, aby upewnić się, że światło nie jest pokryte cienką, przezroczystą folią. Być może twoi koledzy z biura chcieli zrobić z ciebie mały żart.
Jeśli jednak lampka jest przerywana lub wyłączona, oznacza to, że bateria jest rozładowana lub wyczerpana, dlatego należy ją wymienić. Gdy to zrobisz, sprawdź, czy mysz bezprzewodowa działa teraz.
5. Zbliż się do odbiornika USB
Niektórzy użytkownicy łączą swoje laptopy przez telewizory Smart TV kablem HDMI i próbują nawigować po komputerach za pomocą myszy z dużej odległości. Jednak myszy bezprzewodowe nie są zbudowane z myślą o dużym zasięgu, dlatego należy zbliżyć się do odbiornika USB, aby uzyskać lepszy sygnał. To tak, jakbyś zbliżał smartfon do routera, aby uzyskać dostęp do Internetu.
Ponadto należy upewnić się, że odbiornik USB myszy nie jest zasłonięty żadnymi przedmiotami ani w pobliżu innych urządzeń, takich jak kuchenka mikrofalowa lub smartfon, ponieważ zakłócenia mogą spowodować, że mysz bezprzewodowa przestanie działać na komputerze z systemem Windows 10.
6. Użyj innego portu USB
Mógł wystąpić problem z portem USB, a nie myszą. Odłącz odbiornik USB od komputera stacjonarnego lub laptopa i wypróbuj inny, identyczny port. Na komputerach stacjonarnych możesz również wypróbować przód lub tył komputera.
Jeśli jednak Twój notebook nie ma zbyt wielu portów, podłącz wieloportowy koncentrator USB, a następnie podłącz odbiornik USB do koncentratora, aby sprawdzić, czy mysz bezprzewodowa działa teraz.
7. Spróbuj użyć myszy na innym komputerze
Być może mysz nie działa nieprawidłowo, ale coś jest nie tak z ustawieniami komputera. Najłatwiej to udowodnić, podłączając odbiornik USB myszy do innego komputera i sprawdzając, czy tam działa.
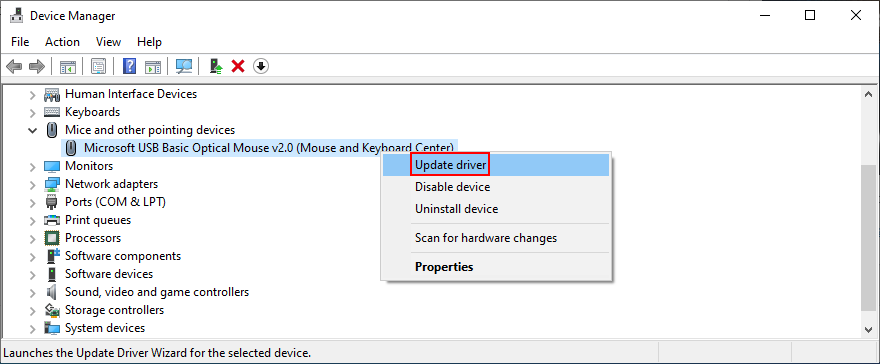
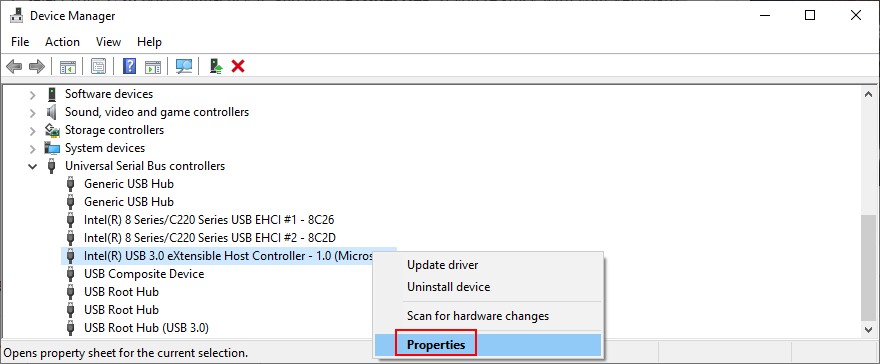
8. Zainstaluj ponownie mysz i urządzenia USB
Możliwe, że mysz i urządzenia USB nie zostały poprawnie zainstalowane na komputerze z systemem Windows 10. Ale możesz szybko to naprawić w Menedżerze urządzeń.
Za pomocą myszy
- Kliknij prawym przyciskiem myszy przycisk Start i przejdź do Menedżera urządzeń
- Rozwiń menu Myszy i inne urządzenia wskazujące , kliknij prawym przyciskiem myszy i wybierz opcję Odinstaluj urządzenie
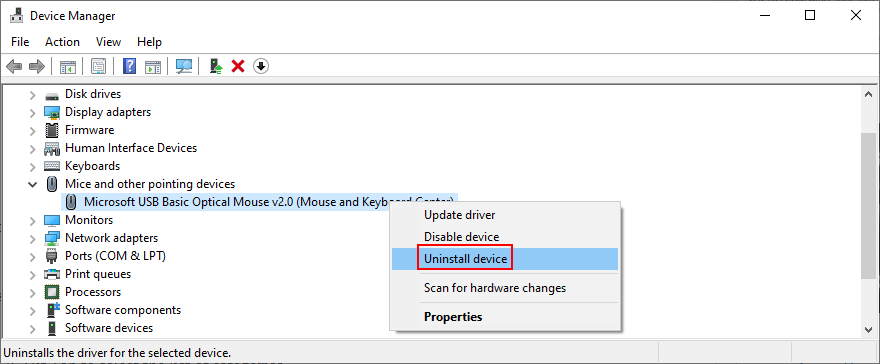
- Zaznacz pole Usuń oprogramowanie sterownika dla tego urządzenia
- Kliknij Odinstaluj
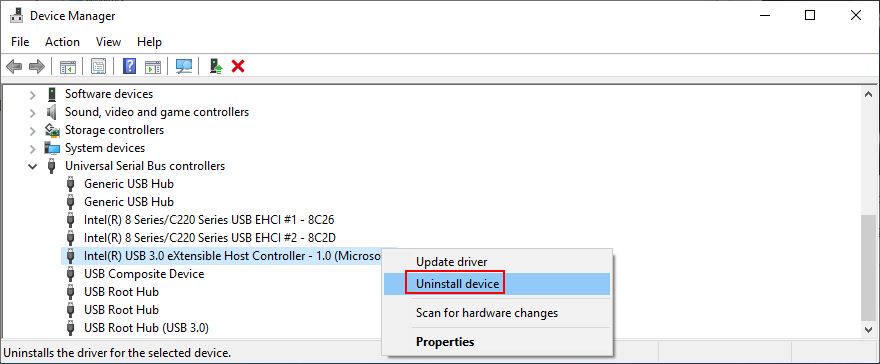
- Wróć do głównego okna Menedżera urządzeń
- Otwórz grupę Kontrolery uniwersalnej magistrali szeregowej
- Wykonaj te same kroki, aby odinstalować urządzenia dla portów USB
- Otwórz menu Akcja
- Wybierz opcję Skanuj w poszukiwaniu zmian sprzętu
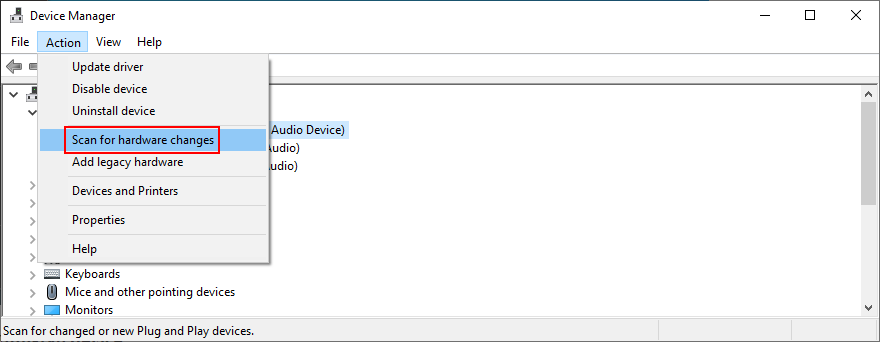
- Uruchom ponownie komputer. Windows automatycznie ponownie zainstaluje brakujące urządzenia
- Sprawdź teraz swoją mysz
Korzystanie z klawiatury
- Naciśnij Win + R , wpisz devmgmt.msc i naciśnij Enter , aby uruchomić Urządzenie Menedżer
- Naciśnij Tab , aby wybrać listę kategorii
- Za pomocą klawiszy strzałek przejdź w dół do kategorii Myszy i inne urządzenia wskazujące
- Naciśnij klawisz Spacja , aby rozwinąć tę grupę
- Naciśnij klawisz menu (prostokąt z trzema liniami) lub użyj Shift + F10 , aby otworzyć menu kontekstowe.
- Trzykrotnie naciśnij klawisz strzałki w dół, aby wybrać opcję Odinstaluj urządzenie , i naciśnij Enter
- Naciskaj klawisz Tab , aż wybierzesz opcję Usuń oprogramowanie sterownika dla tego urządzenia , a następnie naciśnij klawisz Spacja , aby zaznaczyć jego pole
- Naciśnij Tab , aby wybrać przycisk Odinstaluj , i naciśnij Wprowadź
- Naciśnij Alt + F4 , aby zamknąć wszystkie okna, aż pojawi się okno dialogowe zamykania
- Za pomocą klawisza strzałki w górę lub w dół wybierz opcję Zamknij , a następnie naciśnij Enter
- Po ponownym uruchomieniu komputera system Windows ponownie zainstaluje brakujące urządzenia
- Sprawdź, czy Twoja mysz bezprzewodowa działa teraz
9. Zaktualizuj sterowniki myszy i USB
Jeśli ponowna instalacja urządzeń nie rozwiązała problemu myszy USB, możliwe, że jej sterowniki są nieaktualne. Ale możesz rozwiązać ten problem również za pomocą Menedżera urządzeń.
- Przejdź do Menedżera urządzeń i przejdź do niego, postępując zgodnie z instrukcjami w Rozwiązaniu 8 z tej listy.
- Kliknij prawym przyciskiem myszy adapter myszy (lub naciśnij klawisz menu lub Shift + F12 ) i wybierz Aktualizuj sterownik (lub naciśnij dolny strzałka raz i naciśnij Enter )
- Kliknij Wyszukaj automatycznie sterowniki (lub naciśnij Tab , aby wybrać tę opcję, a następnie naciśnij Enter )
- Jeśli pojawi się komunikat Najlepsze sterowniki dla Twojego urządzenia są już zainstalowane , kliknij opcję Wyszukaj zaktualizowane sterowniki w witrynie Windows Update (lub naciśnij klawisz Tab aby wybrać tę opcję i naciśnij Enter )
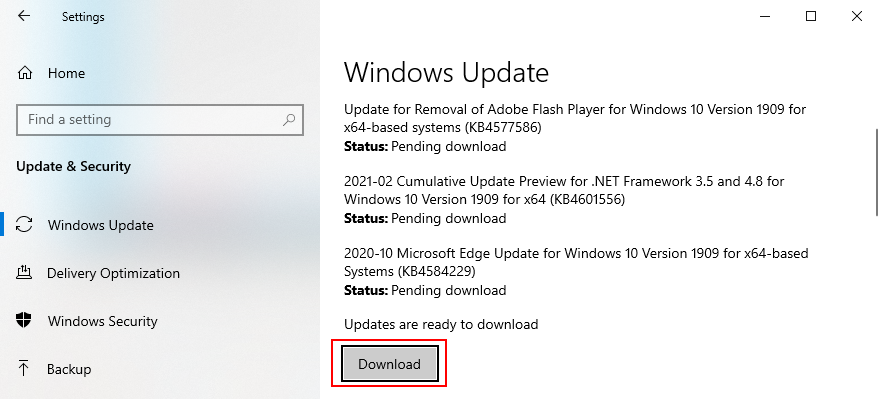
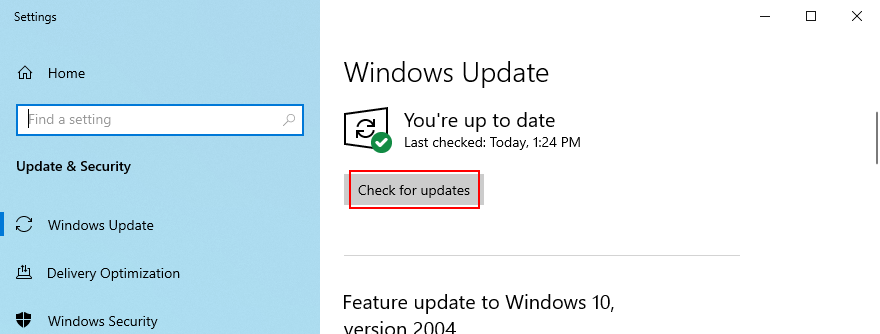
- Po otwarciu ustawień usługi Windows Update Twój system operacyjny powinien od razu zacząć szukać aktualizacji. Jeśli tak się nie stanie, kliknij Sprawdź aktualizacje (lub naciskaj Tab , aż wybierzesz to ustawienie i naciśnij Enter )
- Cierpliwie czekaj, aż system Windows będzie szukał aktualizacji. Jeśli coś jest oczekujące, kliknij Pobierz lub Zainstaluj teraz (w zależności od tego, co wyświetli się na ekranie)
- Uruchom ponownie komputer, aby sfinalizować aktualizację systemu
- Wróć do Menedżera urządzeń i wykonaj te same czynności, aby zaktualizować porty USB z menu Kontrolery uniwersalnej magistrali szeregowej . Nie jest jednak konieczne sprawdzanie dostępności aktualizacji systemu, jeśli już to zrobiłeś dla sterownika myszy
Niestety system Windows 10 nie jest tak wydajny, jeśli chodzi o śledzenie sterowników za pomocą usługi Windows Update. Istnieją dwa sposoby obejścia tego problemu: możesz samodzielnie pobrać i zainstalować sterownik lub skorzystać z aplikacja do aktualizacji sterowników .
W celu ręcznego zaktualizowania należy odwiedzić witrynę producenta myszy, aby znaleźć i pobrać nowszy sterownik zgodny z systemem operacyjnym. Jeśli jednak nie chcesz ryzykować zdobycia nieobsługiwanego sterownika i spowodowania większych szkód, możesz skorzystać ze specjalistycznej aplikacji, która automatycznie wykrywa i aktualizuje wszystkie sterowniki.
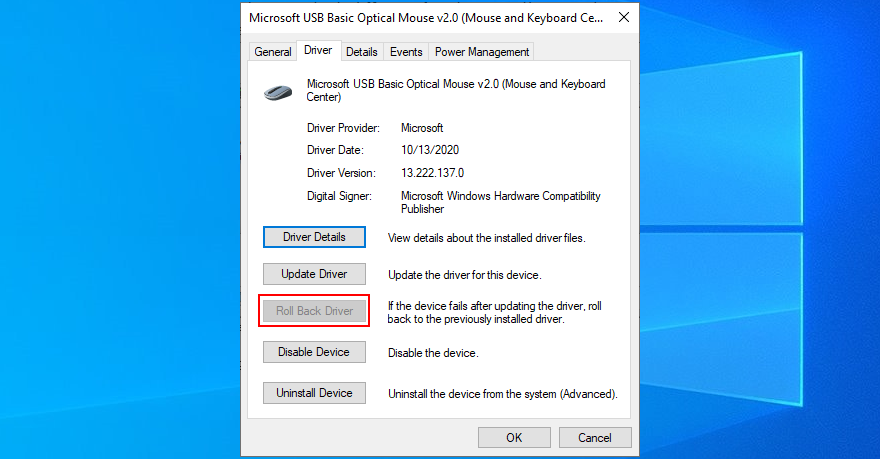
10. Wycofaj sterowniki myszy lub USB
Jeśli zainstalowałeś już niezgodny sterownik myszy, natychmiast usuń go z komputera i przywróć poprzednią wersję. Nawet jeśli nie masz co do tego pewności, nadal dobrze jest przeprowadzić wycofywanie, jeśli to możliwe. Oto, co musisz zrobić:
- Uzyskaj dostęp do Menedżera urządzeń i przeglądaj go, wykonując czynności opisane w Rozwiązaniu 8 z tej listy
- Kliknij prawym przyciskiem myszy urządzenie myszy i wybierz Właściwości (lub naciśnij klawisz menu lub Shift + F12 , naciśnij raz strzałkę w górę i naciśnij Enter )

- Kliknij kartę Sterownik (lub naciskaj klawisz Tab , aż wybierzesz kartę Ogólne , a następnie naciśnij klawisz strzałki w prawo, aby przejść do opcji Sterownik )
- Kliknij opcję Przywróć sterownik i postępuj zgodnie z instrukcjami wyświetlanymi na ekranie (lub naciśnij trzykrotnie klawisz Tab , aby wybrać opcję Przywróć sterownik i naciśnij klawisz Enter )
- Jeśli przycisk Przywróć sterownik jest wyszarzony, oznacza to, że nie można przywrócić wersji, ponieważ na komputerze nie ma poprzedniej wersji sterownika
- Zrób to samo dla portów USB w kategorii Kontrolery uniwersalnej magistrali szeregowej , aby wykonać wycofanie, jeśli jest to dozwolone
11. Sprawdź ustawienia zarządzania energią USB
Nieprawidłowe ustawienia portu USB mogą być kolejnym powodem, dla którego mysz bezprzewodowa nie działa na komputerze z systemem Windows 10. Domyślnie system operacyjny może wyłączać porty USB, gdy nie są używane, w celu oszczędzania energii. Ale staje się to problematyczne, gdy porty nie włączają się po podłączeniu odbiornika USB. Oto jak poradzić sobie z tym problemem:
- Przejdź do Menedżera urządzeń i poruszaj się po nim, postępując zgodnie z instrukcjami podanymi w Rozwiązaniu 8 z tej listy
- Rozszerz grupę Kontrolery uniwersalnej magistrali szeregowej
- Wybierz swoje urządzenie USB, kliknij je prawym przyciskiem myszy i przejdź do Właściwości . Jeśli utkniesz z klawiaturą, naciśnij klawisz menu lub Shift + F12 , naciśnij raz strzałkę w górę i naciśnij Enter , aby dostęp do Właściwości
- Przejdź do sekcji Zarządzanie energią (naciskaj klawisz Tab , aż wybierzesz obszar kart, a następnie użyj klawiszy strzałek, aby przejść do opcji Zarządzanie energią ).
- Odznacz opcję Zezwalaj komputerowi na wyłączanie tego urządzenia w celu oszczędzania energii (naciśnij klawisz Tab , aby zaznaczyć tę opcję, a następnie naciśnij klawisz Spacja )
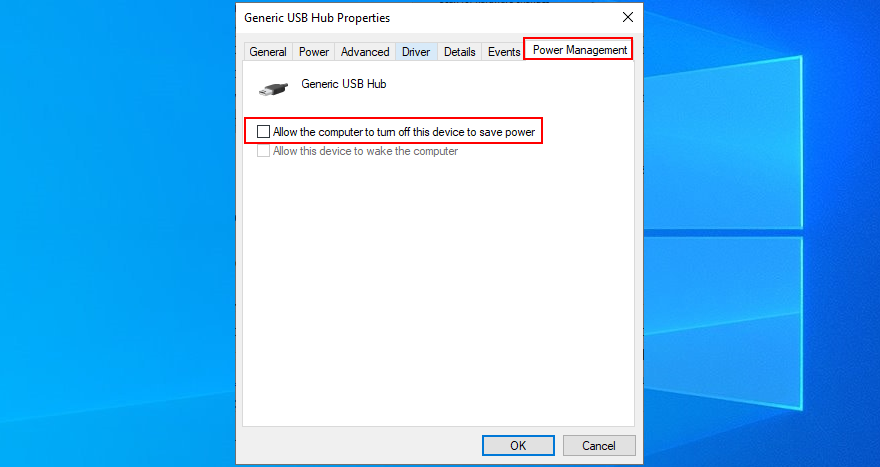
- Kliknij OK (naciskaj Tab , aż wybierzesz OK , a następnie Enter )
- Uruchom ponownie komputer (naciskaj Alt + F4 , aż dojdziesz do menu wyłączania, a następnie wybierz opcję Uruchom ponownie i naciśnij klawisz Enter )
- Sprawdź, czy teraz mysz bezprzewodowa działa
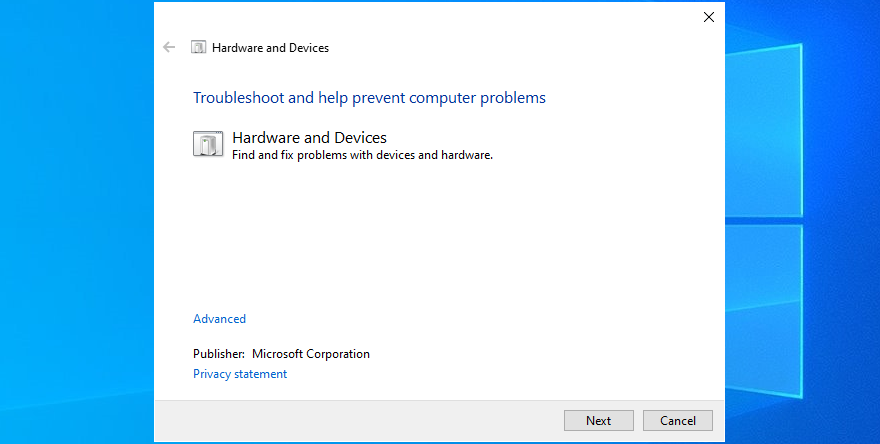
12. Uruchom narzędzie do rozwiązywania problemów ze sprzętem i urządzeniami
Windows 10 ma wewnętrzne narzędzia do rozwiązywania problemów dla wszystkich krytycznych części systemu, w tym sprzętu i urządzeń. Może pomóc w rozwiązaniu typowych problemów, które mogą uniemożliwiać prawidłowe działanie myszy lub portów USB, więc warto spróbować. Zwykle możesz go znaleźć, wybierając Ustawienia > Narzędzia do rozwiązywania problemów . Ale jeśli Na tej liście brakuje narzędzia do rozwiązywania problemów ze sprzętem i urządzeniami , możesz je uruchomić za pomocą narzędzia Uruchom. Oto jak:
- Naciśnij klawisz Win + R , wpisz
msdt.exe-id DeviceDiagnostici naciśnij Enter - Kliknij przycisk Dalej (naciskaj klawisz Tab , aż wybierzesz opcję Dalej , a następnie naciśnij klawisz Enter )
- Postępuj zgodnie z instrukcjami kreatora i zastosuj wszelkie dostępne poprawki
- Uruchom ponownie system operacyjny
- Spróbuj teraz użyć myszy USB
13. Wyłącz tryb szybkiego uruchamiania
Szybkie uruchamianie to funkcja systemu Windows 10, która zapewnia, że nie wszystkie procesy i usługi zostaną zamknięte, aby szybciej uruchomić system operacyjny po zamknięciu. Wiadomo jednak, że szybkie uruchamianie spowodowało wiele problemów dla użytkowników systemu Windows, w tym niebieski ekran błędów śmierci .
W niektórych przypadkach może to również uniemożliwić prawidłowe działanie myszy bezprzewodowej. Możesz jednak łatwo rozwiązać ten problem, wyłączanie szybkiego uruchamiania w systemie Windows 10 . Oto, co musisz zrobić:
- Pamiętaj, aby zalogować się do systemu Windows 10 przy użyciu konta administratora
- Naciśnij klawisz Win + R , wpisz control panel i naciśnij Enter aby otworzyć tę aplikację
- Kliknij Opcje zasilania (lub poruszaj się za pomocą klawiszy strzałek, wybierz Opcje zasilania i naciśnij Enter )
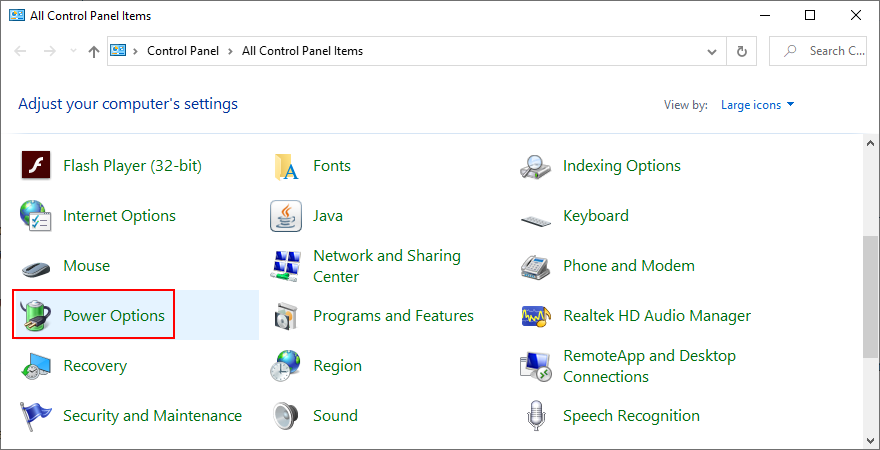
- Wybierz opcję Wybierz działanie przycisków zasilania po lewej stronie (lub naciśnij klawisz Tab , aby wybrać tę opcję, i naciśnij klawisz Enter , aby ją kliknąć)
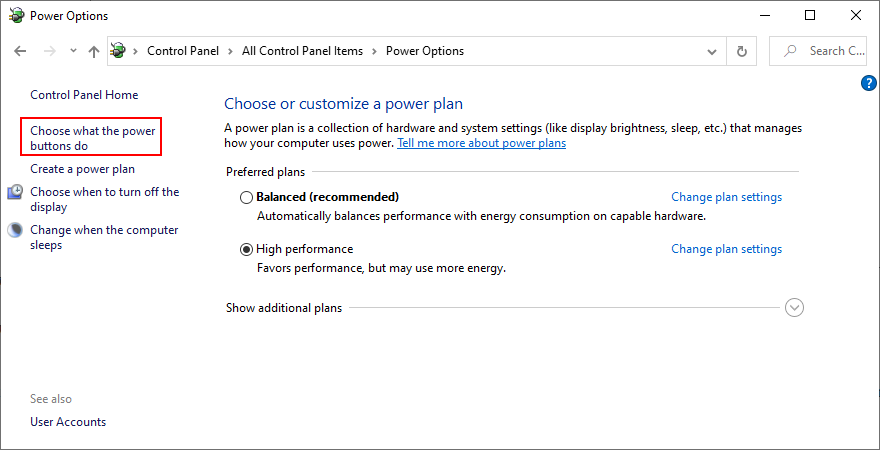
- Kliknij Zmień ustawienia, które są obecnie niedostępne (lub naciskaj Tab , aż opcja zostanie wybrana, a następnie naciśnij Enter )
- Wyłącz Włącz szybkie uruchamianie (użyj klawisza Tab lub klawiszy strzałek, aby wybrać opcję, a następnie naciśnij Spację , aby odznaczyć to pole)
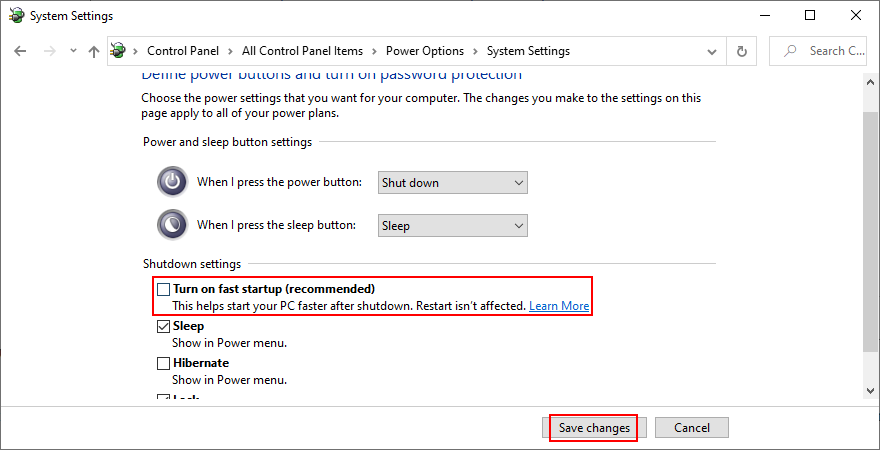
- Kliknij Zapisz zmiany (użyj Tab lub klawiszy strzałek, aby wybrać przycisk, a następnie naciśnij Enter )
- Uruchom ponownie komputer i spróbuj teraz użyć myszy bezprzewodowej
14. Zamknij wszystkie uruchomione aplikacje
Jeśli masz uruchomione aplikacje lub gry wymagające dużej ilości zasobów, nic dziwnego, że mysz USB od czasu do czasu zawiesza się. Możesz jednak rozwiązać ten problem, zamykając wszystkie programy, których obecnie nie używasz. Najlepszym sposobem na to jest zakończenie ich zadania w Menedżerze zadań.
Jak zakończyć uruchomione procesy:
- Kliknij przycisk Start , wyszukaj Menedżer zadań i naciśnij Enter , aby otworzyć tę aplikację.
- Pozostań na karcie Procesy . Jeśli jesteś w innym obszarze, użyj Tab , aby wybrać karty, i klawiszy strzałek, aby przejść do sekcji Procesy .
- Wybierz nieużywaną aplikację i kliknij Zakończ zadanie . Możesz też użyć klawisza Tab , aby wybrać listę procesów, i użyć klawiszy strzałek, aby nawigować. Po wybraniu aplikacji naciskaj Tab , aż wybierzesz przycisk Zakończ zadanie i naciśnij Enter (lub naciśnij klawisz menu lub Shift + F12 , aby otworzyć menu prawego przycisku myszy, a następnie za pomocą strzałek w górę i w dół wybierz Zakończ zadanie i naciśnij Enter )
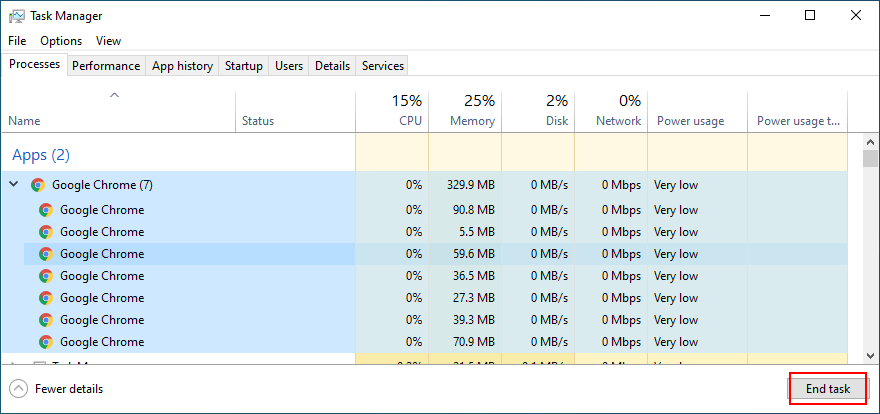
- Zrób to dla wszystkich aplikacji, których nie rozpoznajesz lub których nie używasz
- Try to use your wireless mouse now
It might be necessary to restart the computer after exiting all applications. However, if all or part of these programs are scheduled to automatically run at Windows boot, then your work will have been in vain. In that case, you should return to Task Manager to disable all startup apps.
How to disable startup apps:
- Click the Start button, type Task Manager, and press Enter to open this app
- Go to the Startup tab. If you’re using a keyboard, press the Tab key until you select the tabs area, and use the arrow keys to navigate to Startup
- Select an app and click Disable. Or, press Tab until you select the list of apps, use the arrow keys to navigate and select an app. Then press Tab until you select the Disable button and hit Enter (or press the menu button or Shift + F12 to open the context menu, use the arrow keys to select Disable, and press Enter)
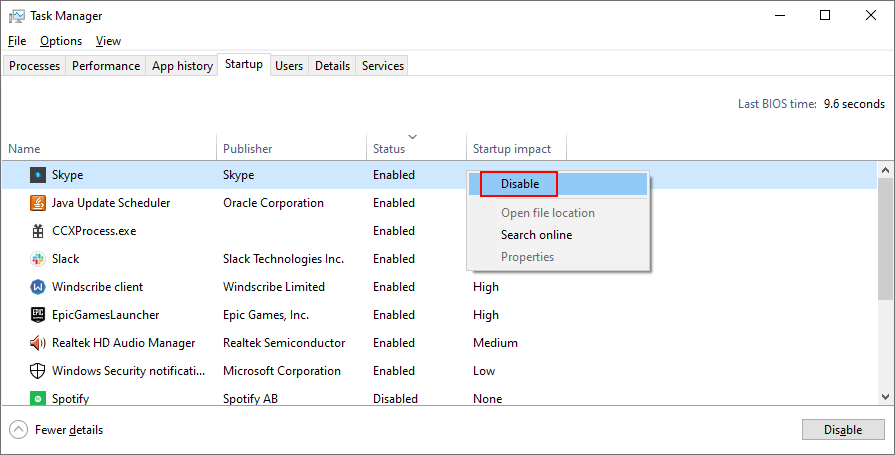
- Do this for all startup apps with the Enabled status
- Restart your computer and see if you can use your USB mouse now
15. Run a clean boot
A better idea than disabling startup apps is running a clean boot on Windows 10. In addition to stopping all programs that automatically run at Windows startup, you will be also disabling scheduled services. It’s a step forward toward fixing your wireless mouse if it’s not working on your Windows 10 PC.
- Press Win key + R, type msconfig, and hit Enter to open the System Configuration app
- Stay in the General tab. If you’re somewhere else, press Tab until you select the tabs area and use the arrow keys to go to General
- At Startup selection, select Selective startup and disable Load system services and Load startup items. Or, press Tab until you reach Selective startup, use the arrow keys to select Load system services and Load startup items, then press Spacebar at each setting to disable it
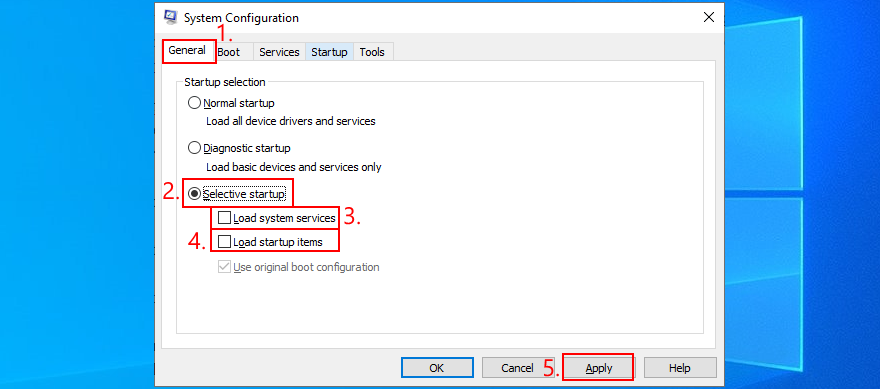
- Click Apply and exit. Or press Tab until you reach the Apply button, hit Enter, and press Esc
- Follow the instructions at Solution 14 from this list to disable startup apps
- Restart your computer and check your cordless mouse for issues
16. Start Windows 10 in Safe Mode
Running Windows 10 in Safe Mode means starting your operating system in a basic state, with all non-important drivers and files disabled. It’s a bit more strict than clean boot, but it helps you narrow down the root of the problem.
If your wireless mouse works in Safe Mode, it means that there’s no problem with the default Windows settings and standard drivers. Here’s what you need to do:
- Shut down your computer, turn it on, and then shut it down by force. Do this three times to boot to Troubleshoot mode
- Go to Troubleshoot > Advanced options > Startup Settings. If you can’t use a mouse, then use the Tab key to navigate and Enter to access options

- Select Restart and press F4 to start Windows in Safe Mode (without networking features)
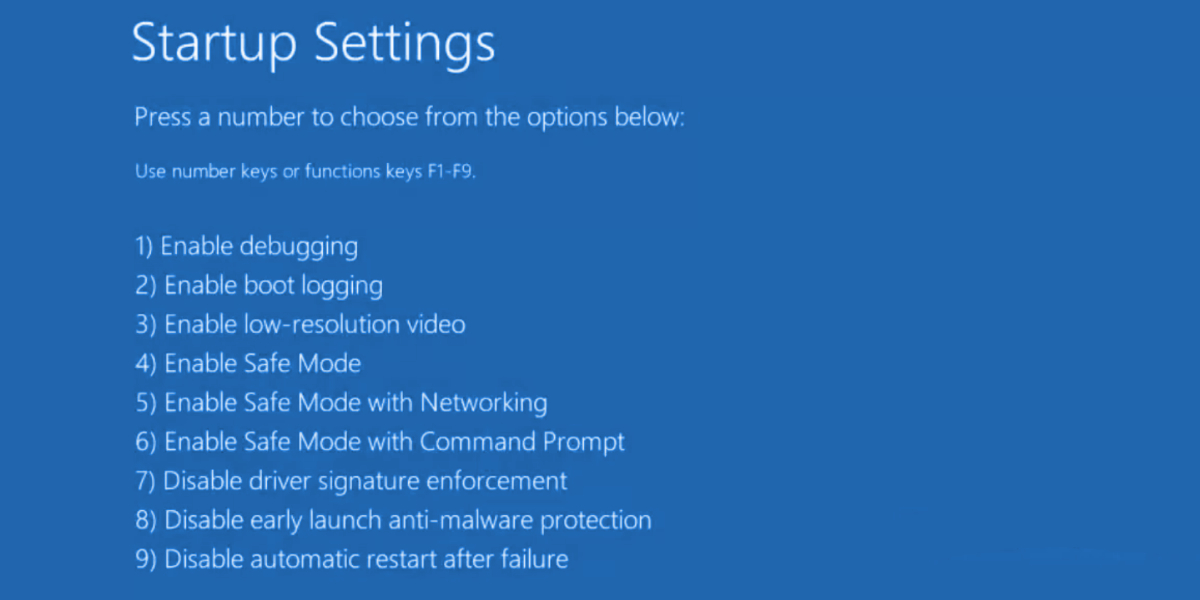
- After Windows boots, check if you can use your USB mouse
17. Unplug other peripheral devices
Your USB mouse might interfere with other external devices currently attached to your computer. If you have recently purchased or received a new device as a gift, like a webcam or Wi-Fi adapter, try unplugging it from your PC to see if this fixed your mouse issue.
If you’re unsure, unplug everything except for your mouse and keyboard. Then, shut down your computer, start Windows again, and inspect results. If your wireless mouse is working now, start plugging in your devices one at a time until your mouse starts malfunctioning again.
Once you spot the bad apple, you can reinstall the device, repair it, send it back to your manufacturer if you have a warranty, or just drop and replace it with something else.
18. Run SFC
Any corrupt files in your operating system could be causing device functionality issues, even with your mouse. However, you should be able to fix damaged files by turning to an internal Windows utility called SFC (System File Checker). Here’s how to use it:
- Press Windows key + R, type cmd, and press Ctrl + Shift + Enter to open Command Prompt as administrator
- Type
sfc/scannowand press Enter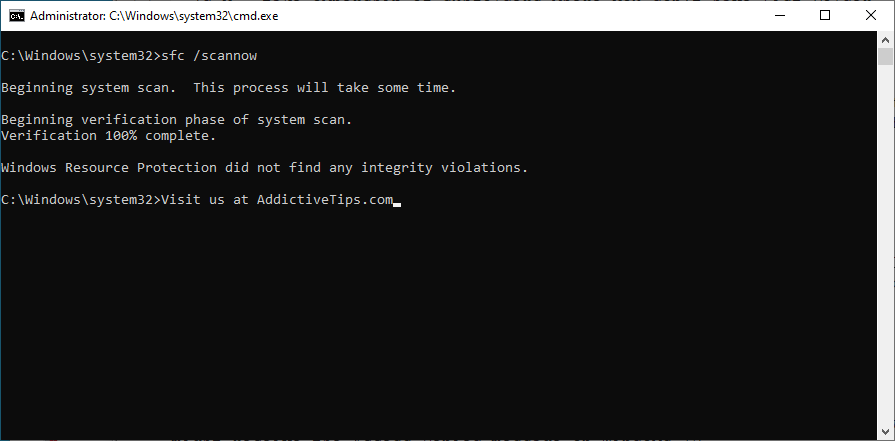
- Patiently wait while SFC does its job. Once it finishes, restart your computer
- Check if you can use your USB mouse now
19. Uninstall system updates
Long-time Windows users are familiar with the fact that certain system updates shouldn’t be released because they end up harming computers. A bad update could be the reason why your wireless mouse isn’t working properly anymore, especially if you have recently gone through an update. To solve this matter, you should uninstall the most recent Windows update. Here’s how:
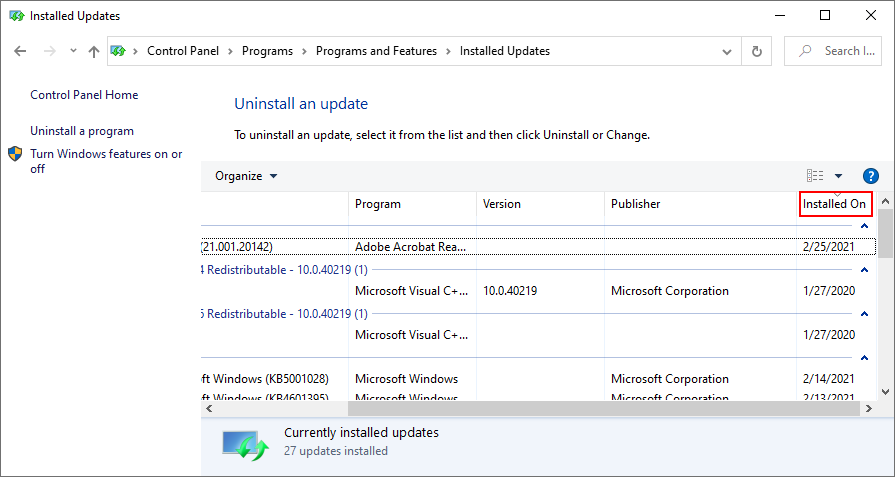
- Press Win key + R, type appwiz.cpl, and press Enter
- Click View installed updates. Or, press Tab until you select View installed updates, then press Enter
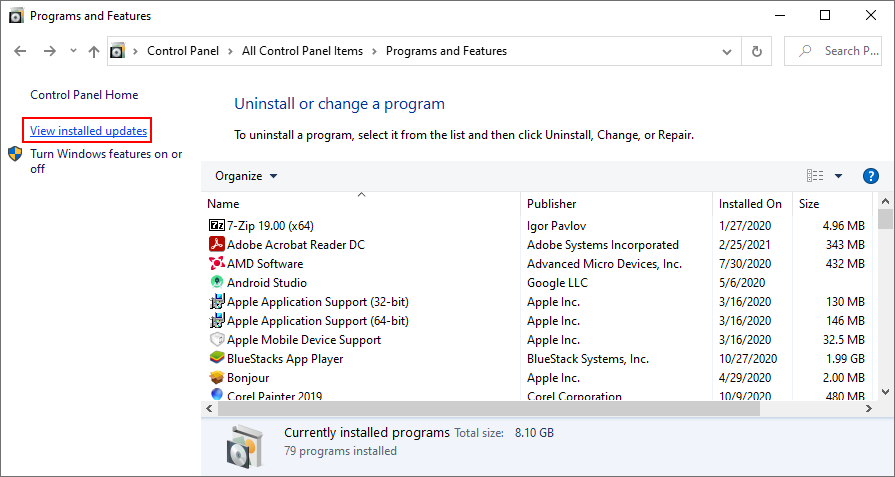
- Click the Installed on column to sort updates by date of installation (newest first). Or, press Tab until you select the Name column, then use the arrow keys to go to Installed On, and press Enter once or twice
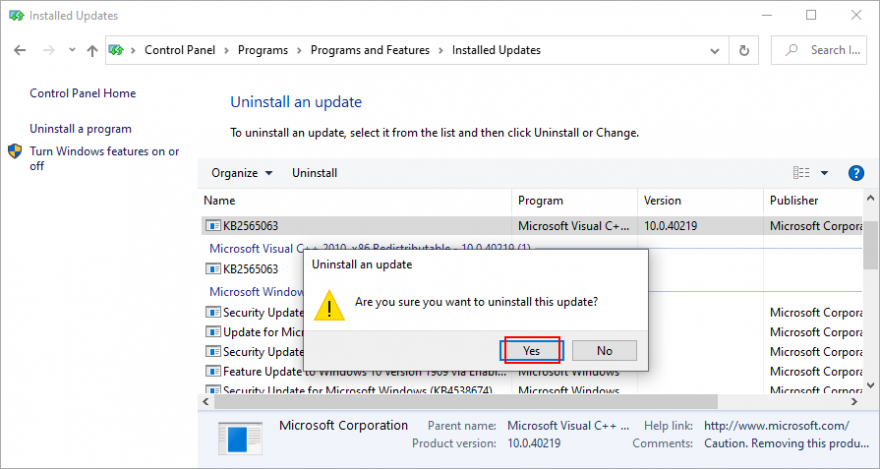
- Double-click the first update in the Microsoft Windows category and click Yes to confirm uninstall. Or, press Tab until you select the updates area, use the arrow keys to navigate to the update, then press Enter to perform the uninstall and Enter again to confirm (on the Yes option)
- Restart your computer and check your mouse
20. Check your PC for malware
If your computer has viruses and if critical files in charge of your mouse device were infected, it’s no wonder that your wireless mouse is not working anymore on Windows 10. But you can run a malware scan to fix this problem. If you don’t have a third-party security solution installed, turn to Windows Defender.
How to use Windows Defender:
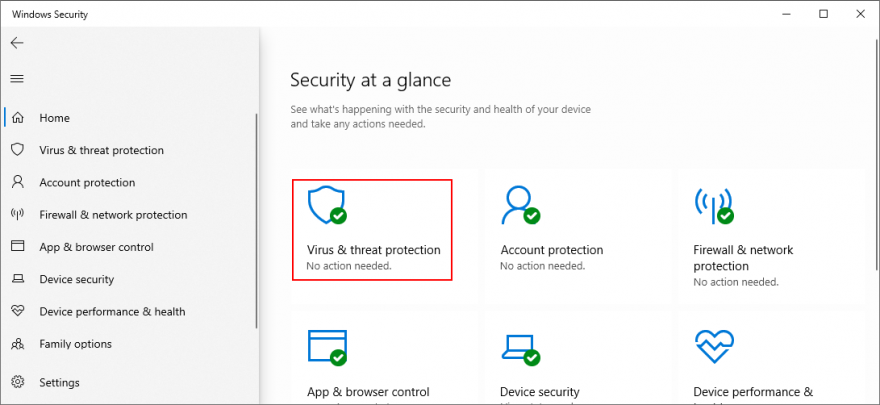
- Press the Win key, type Windows Security, and press Enter to open this program
- Click Virus & threat protection (or, press Tab until you select this option and hit Enter)
- Click Scan options or use the arrow keys to navigate there and hit Enter
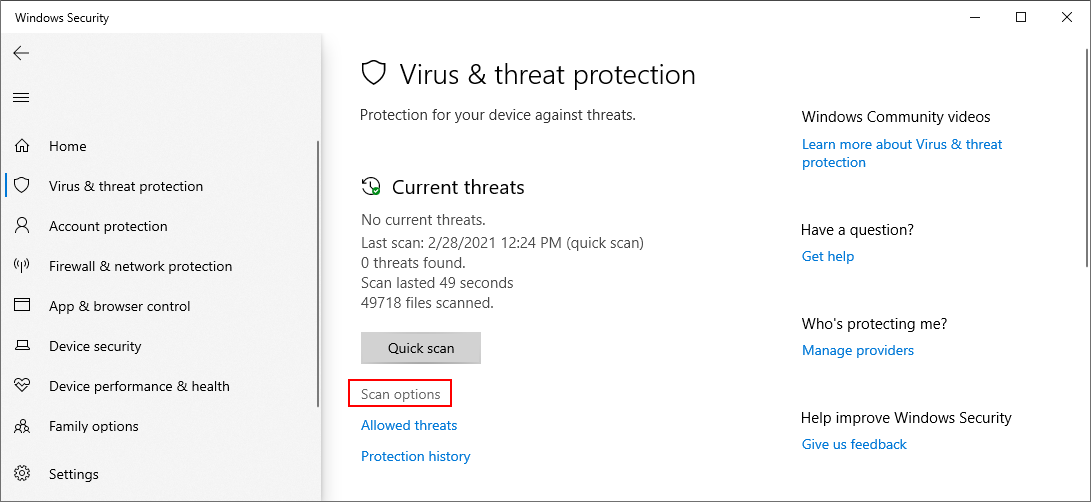
- Select Quick scan and click Scan now. Or, press Tab until you select the scan options, hit Spacebar at Quick scan, then press Tab to select Scan now and hit Enter

- If the search is unsuccessful, run another scan after selecting Windows Defender Offline scan mode
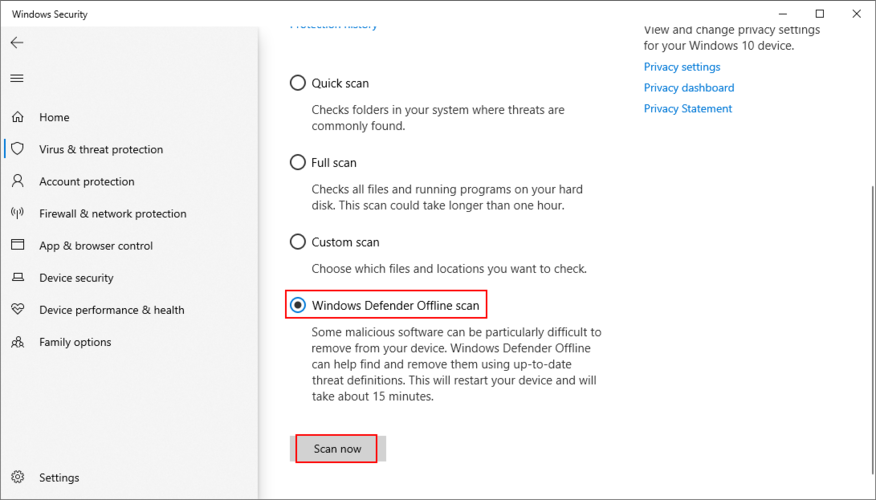
- Patiently wait until the scan is carried out and allow Windows to remove any infected files
- Restart your computer and check if your mouse works now
21. Uninstall game controller software
You can use a PS4 controller on Windows 10 to play awesome games like Dark Souls, for example. However, certain game controller software applications can interfere with your mouse’s USB receiver, preventing you from using it on your computer.
If you recently installed tools like MotioninJoy, Keysticks or JoyToKey, you should remove them from your computer to restore the functionality of your wireless mouse.
How to uninstall game controller apps:
- Press Win key + R, type appwiz.cpl, and press Enter
- Find the app in the list, double-click it, and click Yes to confirm its removal
- Click Yes again if prompted by UAC (User Account Control) to uninstall
- If you’re glued to your keyboard, press Tab until you reach the list of apps, use the arrow keys to navigate to the game controller tool, then press Enter and follow the removal instructions
22. Change BIOS or UEFI settings
USB settings can be enabled and disabled from BIOS or UEFI mode. If you or someone else with access to your computer has changed the BIOS configuration, perhaps the USB support was deactivated there and must be turned on again. It’s really easy to make it happen:
- Restart your computer (press Alt + F4, press Tab to select Restart from the menu, then hit Enter)
- Before Windows boots, quickly press the key shown on the screen to access BIOS setup
- Using your arrow keys, navigate to the Devices section
- Depending on your BIOS type, find and access any area about USB
- Make sure to enable USB support
- Save the current BIOS configuration and quit to Windows
- Check if you can use your wireless mouse now
23. Check if you have the mouhid.sys file
mouhid.sys (Mouse HID Driver) is the kernel device driver responsible for your mouse interface. Without this file, you can’t use any mouse, no matter what you do. Get started by verifying that you have this item.
Where to find mouhid.sys:
- Press Win + R to open File Explorer
- Navigate to the address bar by pressing Tab
- Hit the Enter key and paste the following location:
%SystemRoot%\System32\drivers\
- Press Enter
- Search for the mouhid.sys file in this list
- If you find it, press Win key + R, type cmd, press Ctrl + Shift + Enter to launch Command Prompt as admin
- Type
sc config mouhid start=demandand press Enter to restore the mouhid.sys configuration to default - If the file’s not there or if it’s changed or damaged, you must create a Windows installation media disc and restore it from there
How to create Windows installation media:
- Connect an empty USB flash drive to your PC
- Download Media Creation Tool from the official website
- Launch the program and follow the instructions to create a Windows installation media USB disk
How to restore mouhid.sys from the Windows installation media:
- Sign in to Windows 10 using an administrative account
- Make sure the pen drive with the Windows installation media is plugged into the PC
- Download 7-Zip and install it on your PC
- Press Win + E to open File Explorer
- Navigate to the USB flash drive
- Open the Sources folder
- Locate the install.esd file
- Right-click install.esd (or press the menu key or Shift + F12) and open it with 7-Zip (Open archive)
- Browse the install.esd file contents in 7-Zip, then locate and copy the mouhid.sys file
- Switch back to File Explorer and go to the following location:
%SystemRoot%\System32\drivers\
- Paste the mouhid.sys file here. If it already exists, overwrite the existing item
- Restart your computer
If the mouhid.sys file is currently being used by Windows, it won’t allow you to overwrite it. However, there are a couple of workarounds: taking ownership and using Unlocker to delete the corrupt file.
How to take ownership of mouhid.sys:
- Sign in to Windows 10 using an administrator account
- Press Win key + E to open File Explorer
- Navigate to:
%SystemRoot%\System32\drivers\
- Right-click mouhid.sys and go to Properties. Or, press the menu key or Shift + F12, hit the up arrow, and press Enter
- Switch to the Security section. Or, press Tab until you select the area of tabs, then press the right arrow to go to Security
- Click Advanced. Or, press Tab until you select that button and press Enter
- Next to Owner, click Change. Or, press Tab until you select Change, then press Spacebar
- Type Administrators and click Check names. Or, press Tab to select Check names, then hit Enter
- Press OK, then Apply and OK twice
- Once returned to the Properties panel, click Edit (press Tab to select the option, then Enter)
- At Full control, click Allow. Or, press Tab until you reach the Allow box and press Spacebar to enable it
- Click Apply (press Tab until you reach Apply and hit the Enter key)
- After confirming the action, exit all windows
How to delete mouhid.sys with Unlocker:
- Download Unlocker. The app is not available for download from the official website anymore, but you can find it on third-party mirror websites
- Unzip and install the application. Be careful during setup since Unlocker offers to download and install unrelated, third-party programs. You can refuse those offers by unchecking their options before clicking Next
- If you get an error when trying to unzip or install Unlocker, it means that Windows Defender or your third-party antivirus tool is blocking it (the threat is called
PUA:Win32/Presenoker). You must allow it on your device to be able to use Unlocker. Don’t worry since you can delete it afterward - Launch the Unlocker app
- Using the built-in file browser, navigate to the
%SystemRoot%\System32\drivers\location (if Windows is installed on the default C: drive, then go to Windows > System32 > drivers) - Select the mouhid.sys file and press OK
- Open the No action menu and select Delete, then press OK
- Since it’s a system file currently being used by your computer, Unlocker will offer to delete it during the next Windows boot. Accept this offer
- Reboot your computer
- Open File Explorer using Win key + E
- Navigate to the location where you copied the mouhid.sys file from the Windows installation media. Copy it again
- Now, go to
%SystemRoot%\System32\drivers\and paste the file. You shouldn’t get permission errors anymore - Restart your computer again. Your wireless mouse should work now on Windows 10
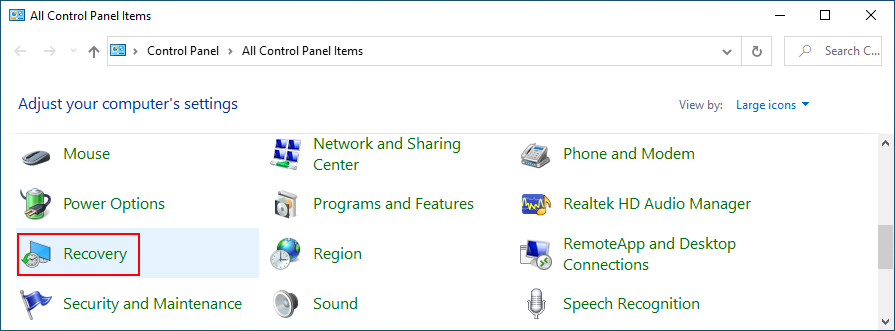
24. Use System Restore
Rolling back Windows 10 to a previous checkpoint when your mouse still worked in a simple way to fix the problem if it occurred due to an unknown software event. However, this means that System Restore must have been enabled on your PC a long time ago, and that you have at least one restore point created before your cordless mouse stopped working. Here’s what you need to do:
- Log in to Windows 10 with an admin account
- Press Win key + R, type control panel, and hit Enter
- Select Recovery. Or, use the arrow keys to navigate to this option and press Enter
- Click Open System Restore. Or, press Tab until you reach the Advanced recovery tools menu, move to Open System Restore using the arrow keys, and hit Enter
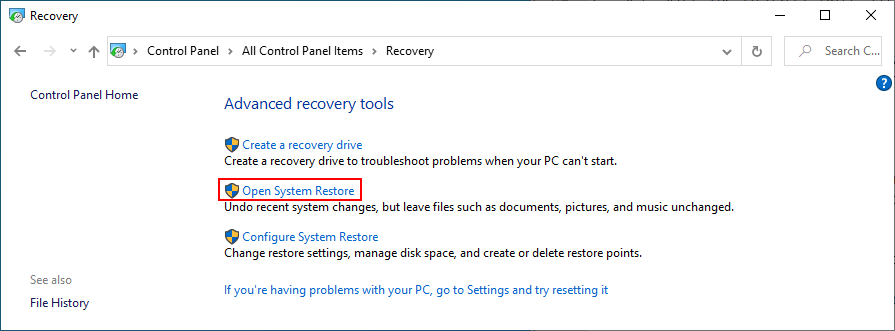
- Select a restore point from the list and click Next. Or, use Tab to switch to the list of restore points, move with the arrow keys to select a checkpoint, press Tab until you reach the Next button, and hit Enter
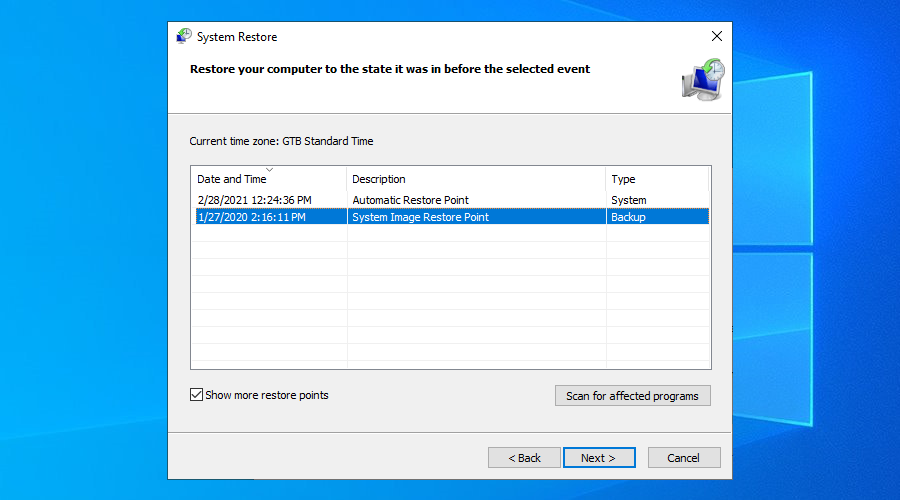
- Follow the on-screen instructions
- After Windows restarts, check if you still have problems with your wireless mouse
25. Use Event Viewer
If you still can’t figure out what’s wrong in order to fix the problem, we recommend getting in touch with the tech support of your mouse manufacturer. They should be able to shed some light on the matter.
Before doing so, it’s a good idea to collect as much information as possible about your mouse, and the best way to do that is by using Event Viewer.
How to use Event Viewer:
- Press the Windows key, type Device Manager, and hit Enter to open this app
- Extend the Mice and other pointing devices group. Or, press Tab, use the arrow keys to navigate to the category, and press the right arrow key to extend the group
- Right-click your mouse adapter and go to Properties. Or, press the menu key or Shift + F12, press the up arrow, and hit Enter
- Switch to the Events tab. Or, press Tab until you reach the tabs area and use the arrow keys to go to Events
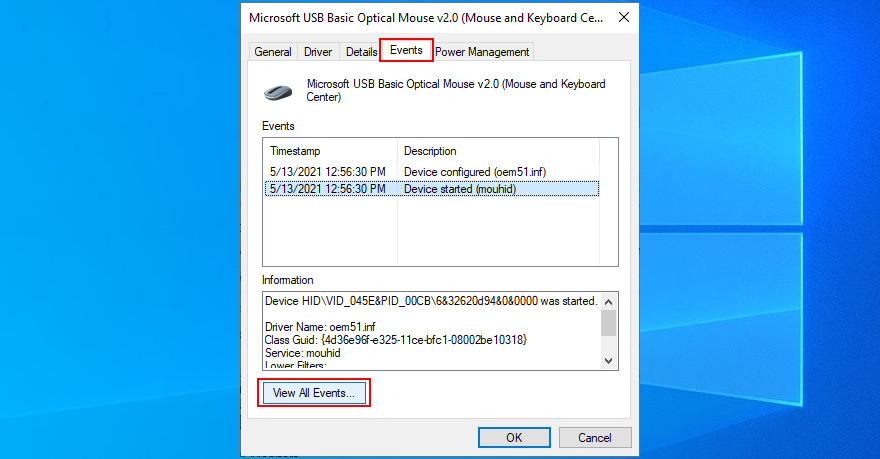
- Click View All Events. Or, press Tab until you select that button and press Enter
- Copy the information found in the events list (at General and Details)
If you don’t want to contact tech support, you can look up more information on Google based on the mouse events registered by your system. You could also plug the USB receiver into another PC to compare the event logs.
26. Reset Windows 10
Performing a factory reset on Windows 10 is the last resort to restore the original system files. However, you should only proceed with this solution if you’re absolutely sure that your mouse is supported by your operating system and not damaged in any way.
Your personal files will be left untouched, so you don’t need to perform backups. But you will have to reinstall all your applications and games installed on the same drive as Windows.
How to reset Windows 10:
- Press the Win key, type Reset this PC, and hit Enter
- At Reset this PC, click Get started. Or, press Tab until you select this button, then hit Enter
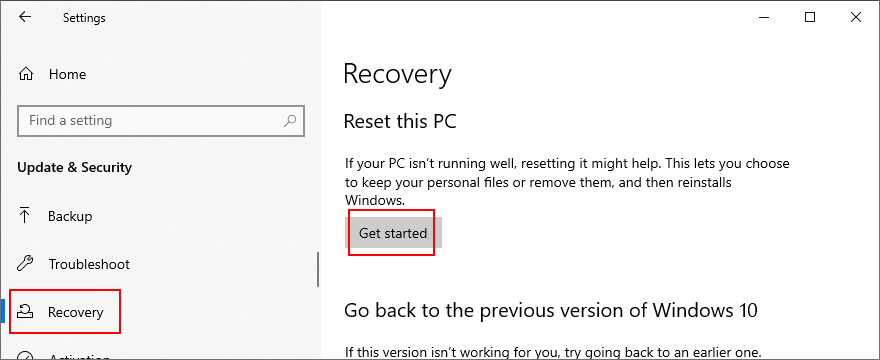
- Choose Keep my files
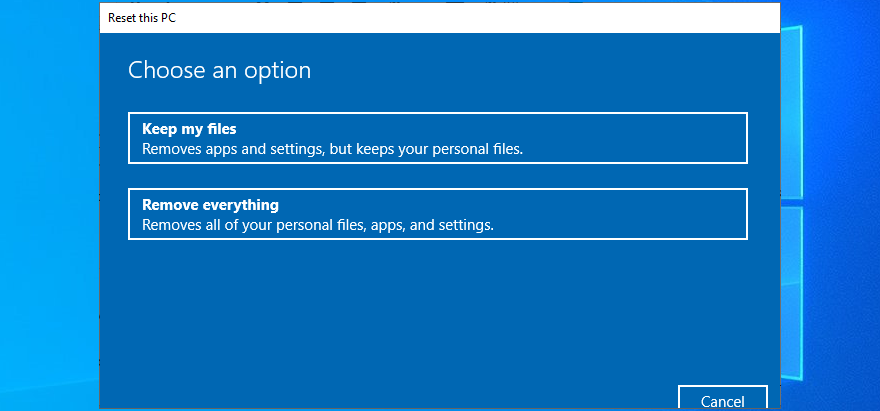
- Proceed with the on-screen steps
You can fix a non-working wireless mouse
To review, if your cordless mouse is not working on Windows 10, there could be a problem with the device or your computer settings. The most delicate part is troubleshooting the problem without a mouse, unless you can control your PC remotely from another computer. Still, your keyboard is your friend.
Get started by checking if your entire system is frozen. You can try simple solutions like restarting your PC, checking the mouse compatibility and battery, moving closer to the USB receiver and ensuring that it’s not obstructed, connecting to a different USB port, and trying to use the malfunctioning mouse on another machine.
Next, you should reinstall the mouse and USB devices, update or roll back their drivers, check the USB power management settings, run the internal Hardware and Devices troubleshooter, turn off Fast Startup, terminate all running programs, run a clean boot, start Windows 10 in Safe Mode, and unplug other external devices except for the mouse USB receiver.
Furthermore, you can run SFC to find and fix corrupt system files, uninstall bad system updates, check your PC for malware, uninstall any game controller tools, change BIOS or UEFI settings, check if you have the mouhid.sys file, use System Restore to roll back to a previous checkpoint, and consult Event Viewer to get more details before contacting tech support.
If everything fails but you’re certain that the USB mouse works on any other computer, you can reset Windows 10 to factory settings and, subsequently, reinstall all system files that might be corrupt, missing, or damaged.
How did you manage to get your wireless mouse working again? Tell us all about it in the comments below.