Если вы опытный пользователь Windows, вы, вероятно, знаете и понимаете, как выполнение различных операций на вашем ПК может иметь несколько подходов и что специализированные приложения с графическим интерфейсом часто более ограничивающий (и менее удовлетворительный, давайте будем честными), чем ввод команд в командной строке вручную. Когда вы видите эту стену текста, разворачивающуюся перед вами, возникает чувство удовлетворения, и, если результат не является ошибкой, это делает ее еще более целесообразной.

На ПК с Windows это можно сделать только двумя способами: с помощью CMD или PowerShell. Хотя CMD немного более популярен, чем PowerShell, он также менее мощный, поскольку его аналог позволяет выполнять гораздо больше операций, включая те, которые вы можете запускать через CMD. Можно сказать, что PowerShell сочетает в себе мощь старого CMD со сценариями и возможностями командлетов, предоставляя вам множество возможностей в отношении операций, которые вы можете выполнять с его помощью.
Однако огромное количество возможных операций, которые вы могли бы выполнить с помощью PowerShell, может напугать даже опытных пользователей, не говоря уже о тех, кто никогда раньше не слышал о CMD (не говоря уже о PowerShell). Но не волнуйтесь, мы постараемся научить вас нескольким простым трюкам, которые вы сможете реализовать с помощью PowerShell и, возможно, даже запомнить в долгосрочной перспективе. Хотя этот наш «ускоренный курс» не будет служить исчерпывающим руководством по PowerShell, мы надеемся, что он поможет вам сориентироваться в PowerShell, дав вам несколько указателей и объяснив ряд команд. Если готовы, приступим.
Что такое PowerShell?
Как мы вкратце упоминали выше, PowerShell-это мощный инструмент, который можно использовать для огромного количества операций. Более того, PowerShell-это решение для автоматизации задач, которое включает в себя несколько мощных инструментов, включая, помимо прочего, оболочку командной строки (например, CMD), язык сценариев, а также структуру управления конфигурацией.
В отличие от других оболочек, которые могут принимать и возвращать только текст, PowerShell также может принимать и возвращать объекты.NET благодаря огромному количеству функций, которые он включает. Вот некоторые из наиболее важных функций PowerShell, связанных с оболочкой:
- Прогнозирование команд и завершение табуляции
- Поддержка псевдонимов параметров и команд
- Полная история командной строки
- Возможность связывать команды по конвейеру.
- Консольная справочная система, аналогичная справочным страницам в Unix-системах.
Однако это только верхушка айсберга, поскольку, как мы упоминали ранее, PowerShell-это больше, чем просто оболочка; вы можете использовать его как мощный язык сценариев для автоматизации операций управления системой, а также если вы хотите создавать, анализировать, тестировать и развертывать решения в различных средах.
Учитывая, что PowerShell основан на.NET CLR (.NET Common Language Runtime), легко понять, почему все входные и выходные данные, с которыми работает PowerShell, являются объектами.NET. Кроме того, нет никакой необходимости анализировать вывод текста, чтобы PowerShell мог извлекать из него информацию. Среди функций сценариев PowerShell вы можете найти следующие:
- Комплексная система форматирования, обеспечивающая чистый и простой вывод.
- Создавайте динамические типы с помощью обширной системы типов.
- Вы можете расширить возможности PowerShell с помощью классов, функций, модулей и скриптов.
- Встроенная поддержка различных форматов данных, включая XML, JSON и CSV.
Если вас больше интересует управление и настройка корпоративной инфраструктуры с помощью кода, вы будете рады узнать, что PowerShell также предлагает вам эту возможность через свою структуру управления Desired State Configuration (DSC). Среди операций, которые можно легко выполнить с помощью DSC PowerShell, мы напоминаем вам:
- Развертывайте различные схемы конфигурации, используя модели push или pull.
- Создавайте собственные сценарии и декларативные конфигурации, которые можно использовать для повторяемых развертываний в своей среде.
- Применяйте различные схемы конфигурации.
- Отчет о дрейфе конфигурации
PowerShell имеет проприетарную командную строку, которая поставляется с проприетарным языком программирования, чем-то похожим на Perl. Обратите внимание, что вначале PowerShell был разработан, чтобы помочь пользователям управлять объектами на своих компьютерах, но, как вы можете догадаться, он прошел долгий путь и теперь используется для более обширных и сложных задач.
Например, вы можете использовать обширную рабочую среду PowerShell не только для выполнения различных операций по управлению системой, но и для их автоматизации, чтобы вам не приходилось время от времени выполнять утомительные, повторяющиеся задачи. Также очень важно отметить, что вы можете получить доступ к множеству ресурсов с помощью только одной программы (например, PowerShell), включая, но не ограничиваясь:
- Инструментарий управления Windows
- API.NET Framework
- Командная строка
- Модель компонентных объектов Windows
- Команды PowerShell
В настоящее время одна из самых популярных задач PowerShell-помочь конечным пользователям автоматизировать задачи управления системой, тем самым помогая им избежать серии скучных повторяющихся операций. Доказано, что устранение человеческого фактора из повторяющихся действий повышает эффективность и снижает количество человеческих ошибок по разным причинам, так что это действительно беспроигрышный вариант для всех.
Вы можете использовать PowerShell для выполнения простых или более сложных команд, но эта программа также может помочь вам создавать сценарии на основе этих команд, которые будут автоматически запускаться PowerShell. Кроме того, существует огромное количество команд, которые вы можете настраивать и запускать впоследствии, так называемые командлеты.
Стоит отметить, что PowerShell является кроссплатформенным и имеет открытый исходный код, а это означает, что вы также можете использовать его в других системах, таких как Mac или Linux, без использования уловок и инструментов повышения совместимости, таких как Wine или Boot Camp.
Список основных команд PowerShell
Мы понимаем, что PowerShell может показаться немного пугающим, особенно теперь, когда вы обнаружили, что это больше, чем просто еще одна командная строка на вашем компьютере, и на самом деле она включает в себя функции CMD, а также определенный язык программирования и различные сценарии, которые вы можете использовать для автоматизации операций по управлению системой.
Однако, если вы чувствуете решимость освоить PowerShell и все, что он может предложить, мы настоятельно рекомендуем вам начать с его самых основных функций. Таким образом, вам не придется откатывать месяцы прогресса, когда вы обнаружите, что случайно использовали неправильную функцию, и вся работа, которую вы выполняли за это время, начинает больше походить на далекое воспоминание.
Именно поэтому мы подготовили список основных команд, которые вы можете безопасно использовать в сеансах PowerShell, чтобы протестировать возможности этой мощной программы и посмотреть, какая из них именно что делает. В списке ниже представлены имена команд, их псевдонимы и краткое описание того, что делает каждая команда.
Обратите внимание, что вы можете использовать либо имена команд, либо их псевдонимы, и результат будет точно таким же. Причина, по которой предпочтительнее использовать псевдонимы, заключается в том, что они намного быстрее набираются, и если вы можете правильно их запомнить и связать с их соответствующим именем команды, это имеет больше смысла, если вы хотите выполнить работу быстро.
| Название команды | Псевдоним | Описание |
|---|---|---|
| Добавить контент | ac | Позволяет добавлять содержимое (например, слова или данные) в файл |
| Добавить PSSnapIn | asnp | Помогает добавить несколько оснасток Windows PowerShell в текущий сеанс |
| Clear-Content | clc | Очищает содержимое элемента без удаления самого элемента |
| Очистить историю | clhy | Удаляет все записи из истории команд |
| Очистить хост | очистить | Очищает отображение основной программы |
| Очистить хост | cls | Выполняет то же самое, что и clear |
| Очистить элемент | cli | Удаляет содержимое элемента, не удаляя сам элемент |
| Clear-ItemProperty | clp | Удаляет значение свойства без фактического удаления самого свойства |
| Clear-Variable | clv | Удаляет значение переменной |
| Сравнить объект | сравнить | Позволяет сравнить два набора объектов |
| Сравнить объект | diff | Выполняет те же действия, что и compare |
| Connect-PSSession | cnsn | Позволяет повторно подключиться к сеансам, от которых вы отключились |
| Convert-Path | cvpa | Позволяет преобразовать путь Windows PowerShell в путь поставщика Windows PowerShell |
| Копировать элемент | копия | Помогает скопировать элемент из одного места в другое |
| Копировать элемент | cp | Выполняет то же самое, что и copy |
| Копировать элемент | cpi | Выполняет те же действия, что и copy и cp |
| Copy-ItemProperty | cpp | Позволяет скопировать значение и свойство из одного места в другое место |
| Disable-PSBreakpoint | dbp | Помогает отключить точки останова в текущей консоли |
| Disconnect-PSSession | dnsn | Отключает вас от текущего сеанса |
| Enable-PSBreakpoint | ebp | Позволяет включать точки останова в текущей консоли |
| Enter-PSSession | etsn | Помогает запустить интерактивный сеанс с удаленным устройством |
| Exit-PSSession | exsn | Завершает интерактивный сеанс с удаленным устройством |
| Экспорт-псевдоним | эпал | Позволяет экспортировать информацию о псевдонимах, которые в настоящее время определены в выходной файл |
| Export-CSV | epcsv | Позволяет преобразовывать объекты в несколько строк, разделенных запятыми (CSV), и экспортировать строки в документ CSV |
| Export-PSSession | epsn | Импортирует команды из другого сеанса и экспортирует их в модуль Windows PowerShell |
| ForEach-Object | % | Выполняет определенную операцию с каждым из элементов, содержащихся в коллекции входных объектов |
| ForEach-Object | foreach | Выполняет то же самое, что и % |
| Пользовательский формат | fc | Помогает использовать настраиваемое представление для форматирования вывода |
| Список форматов | fl | Позволяет форматировать вывод как список свойств, где каждое свойство помещается в новую строку |
| Формат-таблица | футов | Позволяет форматировать вывод в виде таблицы |
| Широкий формат | fw | Помогает форматировать объекты в виде широких таблиц, в которых отображается только одно свойство каждого объекта |
| Get-Alias | гал | Выбирает псевдонимы для текущего сеанса |
| Get-ChildItem | директория | Получает список всех файлов и папок на диске с файловой системой |
| Get-ChildItem | gci | Выполняет то же самое, что и dir |
| Get-ChildItem | ls | Выполняет те же функции, что и dir и gci |
| Get-Command | gcm | Получает список всех команд, которые вы можете использовать |
| Get-Content | кот | Отображает содержимое файла |
| Get-Content | gc | Выполняет то же самое, что и cat |
| Get-History | ghy | Получает список всех команд, введенных вами во время текущего сеанса |
| Get-History | h | Выполняет то же самое, что и ghy |
| Get-History | история | Выполняет те же действия, что и ghy и h |
| Get-Item | gi | Позволяет получать файлы и папки |
| Get-ItemProperty | gp | Получает свойства указанного вами элемента |
| Get-Job | gjb | Получает список всех фоновых заданий Windows PowerShell, которые в данный момент выполняются в вашем сеансе |
| Get-Location | gl | Получает информацию о вашем текущем стеке местоположений или рабочем местоположении |
| Get-Location | pwd | Выполняет то же самое, что и gl |
| Get-Member | gm | Получает все свойства и методы указанных объектов |
| Get-Module | gmo | Получает список импортированных модулей или модулей, которые могут быть импортированы в текущий
сеанс |
| Get-Process | GPS | Получает список всех процессов, запущенных локально или на удаленном компьютере |
| Get-Process | ps | Выполняет то же самое, что и gps |
| Get-PSBreakpoint | gbp | Получает все точки останова, установленные в текущем сеансе |
| Get-PSCallStack | gcs | Отображает текущий стек вызовов |
| Get-PSDrive | гдр | Извлекает диски в текущем сеансе |
| Get-PSSession | gsn | Получает список локальных и удаленных сеансов Windows PowerShell |
| Get-PSSnapIn | gsnp | Получает список всех оснасток Windows PowerShell на компьютере |
| Get-Service | gsv | Список всех служб на локальном или удаленном компьютере |
| Get-Unique | гу | Извлекает уникальные элементы из отсортированного списка |
| Get-Variable | gv | Отображает список всех переменных в текущей консоли |
| Get-WmiObject | gwmi | Получает экземпляры классов инструментария управления Windows (WMI) или информацию о доступных классах |
| Групповой объект | группа | Позволяет группировать объекты, содержащие одно и то же значение для указанных вами свойств |
| справка | человек | Отображает дополнительные сведения о командах Windows PowerShell и концепциях |
| Импорт псевдонима | ipal | Позволяет импортировать список псевдонимов из файла |
| Import-CSV | ipcsv | Создавайте настраиваемые объекты в виде таблиц, используя все элементы, содержащиеся в файле CSV |
| Модуль импорта | ipmo | Импортировать модули в текущий сеанс |
| Import-PSSes sion | ipsn | Импортирует команды из другого сеанса в текущий сеанс |
| Команда вызова | icm | Позволяет выполнять команды на локальных и удаленных компьютерах |
| Вызов-выражение | iex | Позволяет выполнять команды или выражения на локальном компьютере |
| История вызовов | ihy | Выполняет команды из вашей истории сеанса |
| История вызовов | г | Выполняет то же самое, что и ihy |
| Invoke-Item | ii | Выполняет действие по умолчанию для указанного элемента |
| Invoke-RestMethod | irm | Отправляет запрос HTTP или HTTPS в веб-службу RESTful |
| Invoke-WebRequest | завиток | Получает контент с веб-страницы в Интернете |
| Invoke-WebRequest | iwr | Выполняет то же самое, что и curl |
| Invoke-WMIMethod | iwmi | Позволяет вызывать методы инструментария управления Windows (WMI) |
| Объект измерения | мера | Определяет числовые свойства объектов, а также слова, строки и символы в строковых объектах |
| mkdir | мкр | Создает новый элемент (каталог) |
| Переместить элемент | миль | Позволяет переместить элемент из одного места в другое |
| Переместить элемент | переместить | Выполняет то же самое, что и mi |
| Переместить элемент | мв | Выполняет те же действия, что и mi и move |
| Move-ItemProperty | mp | Позволяет переместить свойство из одного места в другое |
| Новый псевдоним | последний | Позволяет создать новый псевдоним |
| Новый элемент | нет | Позволяет создать новый элемент |
| Новый модуль | nmo | Создает новый динамический модуль, который существует только в памяти |
| New-PSDrive | монтировать | Позволяет создавать временные и постоянные подключенные сетевые диски |
| New-PSDrive | ndr | Выполняет то же самое, что и mount |
| New-PSSession | nsn | Устанавливает постоянное соединение с локальным или удаленным компьютером |
| New-PSSessionConfigurationFile | npssc | Создает файл конфигурации сеанса |
| Новая переменная | nv | Позволяет создать новую переменную |
| Out-GridView | ogv | Позволяет отправлять вывод в интерактивную таблицу в отдельном окне |
| Out-Host | о | Отправляет вывод в командную строку (CMD) |
| Out-Printer | lp | Позволяет отправлять вывод на принтер |
| Pop-Location | popd | Изменяет ваше текущее местоположение на местоположение, которое было помещено в стек в последний раз. Вы можете использовать командлет Push-Location ( pushd ), чтобы извлекать местоположение либо из его стека по умолчанию, либо из стека, который вы создали. |
| powershell_ise.exe | ise | Отображает объяснение того, как можно использовать PowerShell_ISE.exe инструмент командной строки |
| Push-Location | pushd | Добавляет текущее местоположение в начало стека местоположений |
| Получение задания | rcjb | Получает результаты текущего сеанса фоновых заданий Windows PowerShell |
| Receive-PSSession | rcsn | Получает результаты команд из отключенных сеансов |
| Remove-Item | дель | Удаляет файлы и папки |
| Remove-Item | стереть | Выполняет то же самое, что и del |
| Remove-Item | рд | Выполняет те же действия, что и del и erase |
| Remove-Item | ри | Выполняет то же самое, что и del , erase и rd |
| Remove-Item | рм | Выполняет те же действия, что и del , erase , rd и ri |
| Remove-Item | rmdir | Удаляет папки |
| Remove-ItemProperty | рп | Позволяет удалить свойство и его значение из данного элемента |
| Remove-Job | rjb | Позволяет удалить фоновое задание Windows PowerShell |
| Remove-Module | рмо | Помогает удалить модули из текущего сеанса |
| Remove-PSBreakpoint | rbp | Позволяет удалять точки останова с текущей консоли |
| Remove-PSDrive | рдр | Удаляет временные диски Windows PowerShell, а также отключает подключенные сетевые диски |
| Remove-PSSession | RSN | Позволяет закрыть один или несколько сеансов Windows PowerShell (PSSessions) |
| Remove-PSSnapin | RSNP | Позволяет удалить оснастки Windows PowerShell из текущего сеанса |
| Remove-Variable | rv | Очищает переменную и ее значение |
| Remove-WMIObject | rwmi | Позволяет удалить экземпляр существующего класса Windows Management Instrumentation (WMI) |
| Переименовать элемент | аренда | Помогает переименовать элемент в пространстве имен поставщика Windows PowerShell |
| Переименовать элемент | рни | Выполняет то же самое, что и ren |
| Rename-ItemProperty | РНП | Позволяет переименовать свойство элемента |
| Resolve-Path | rvpa | Разрешает символы подстановки в пути, а также отображает содержимое пути |
| Resume-Job | rujb | Помогает перезапустить задание, которое было приостановлено |
| Выбрать объект | выбрать | Позволяет выбирать объекты, а также их свойства |
| Установить псевдоним | сал | Позволяет создавать или изменять псевдоним командлета или элемента команды (альтернативное имя) в текущем сеансе Windows PowerShell |
| Set-Content | sc | Позволяет заменить содержимое файла указанным вами содержимым. |
| Set-Item | си | Изменяет значение элемента на значение, указанное в команде |
| Установить местоположение | компакт-диск | Позволяет установить ваше текущее рабочее место на определенное место (изменяет активное местоположение) |
| Установить местоположение | chdir | Выполняет то же самое, что и cd |
| Set-PSBreakpoint | sbp | Позволяет установить точку останова для команды, переменной или строки |
| Установить переменную | установить | Позволяет установить значение переменной или создает переменную, если она с запрошенным именем не существует |
| Show-Command | shcm | Отображает список команд Windows PowerShell в графическом командном окне |
| Начало работы | sajb | Starts a background job in Windows PowerShell |
| Start-Process | saps | Launches one or more local processes |
| Start-Service | sasv | Lets you start one or more stopped services |
| Stop-Process | kill | Helps you stop one or more running processes |
| Where-Object | ? | Enables you to select certain objects from a collection based on their property values |
| Write-Output | echo | Allows you to send an object to the next command in the pipeline. If it reaches the last command in the pipeline, the command will display the objects in the console |
Don’t let the sheer amount of basic PowerShell commands intimidate you. Although we called them basic, there’s absolutely no need for you to start memorizing them. In fact, that’s the exact reason why we created the table above so that you can go on about your work without worrying about having to remember each and every command we mentioned above.
You can use it as a quick refresher or even use your browser’s search feature to locate a specific command, its alias, and what it does if you’re confused. Although we already included this piece of information in the table above, if you’re ever confused while working in PowerShell, using the help command will display a few helpful details on how you can use this program and its commands more efficiently.
You can also pair the help command with another command or alias if you want more details about that specific command. For instance, this is what PowerShell displays when you type help Add-Computer:
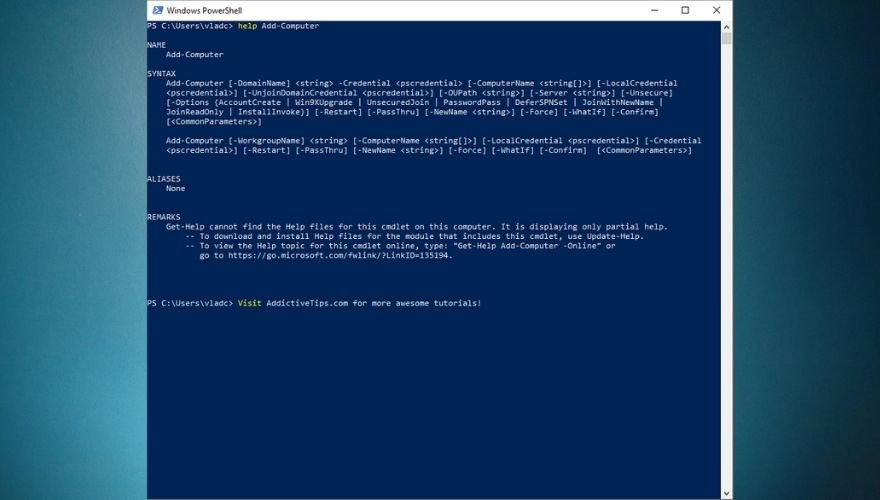
However, you can use help with any other of the commands or their aliases in our table above. Make sure you understand that the same command can have multiple aliases, which means that you can achieve the same result by using various aliases. Although this may sound confusing, it actually gives you plenty of flexibility in case you can’t remember one command alias, but you remember another one that can help you achieve the same goal.
Using PowerShell
Naturally, the first thing you’d want to do is locate PowerShell and launch it. One sure way to launch PowerShell from just about anywhere you are on your PC is to hold down the Shift button on your keyboard, right-click any empty spot on your screen (not a menu, icon, button, or similar object), and select Open PowerShell window here from the context menu.
In addition to giving you quick access to the PowerShell console anywhere on your PC, doing so will automatically switch the default working directory for PowerShell to the one you’re currently located at. If you’re on a Windows 10 PC, you can also launch PowerShell by pressing the Win key on your keyboard, typing PowerShell in the Start menu, and selecting PowerShell when it becomes visible in the list of results.
On older versions of Windows, you’ll need to manually locate the PowerShell executable, which you can either find in the Accessories or System folders in your Start menu. Furthermore, seeing how older systems (such as Windows 7) don’t provide you with PowerShell by default, you’ll also have to install it on your computer, along with all of its dependencies.
Notice how launching PowerShell from the Start menu will set your active working directory to C:\Users\[your username here]. By comparison, using the Shift + Right-click method we’ve presented above will set PowerShell’s active directory to the one you’re currently at when you spawn the console. For instance, if you use Shift + right-click and open PowerShell from your desktop, you’ll notice that the active directory will be C:\Users\[your username here]\Desktop. For obvious reasons, the [your username here] part will be different depending on your username.
Although you can keep PowerShell for home usage just fine, it’s better if you could make use of all that it has to offer. Incidentally, these features make PowerShell awesome for corporate usage, where you need to perform a large number of operations in a short time, and most likely on a huge number of devices.
Thus, instead of running each command manually on every single machine, you could simply create an automation script in PowerShell and receive the information you need automatically, without having to physically interact with the devices in case or even be near them. Just as CMD, PowerShell can be used through command lines. However, unlike its more rudimentary counterpart (i.e. the CMD), PowerShell also lets you summon scripts and cmdlets, which makes it more powerful, but also more complicated to use.
How to use cmdlets
We’ve used the term cmdlets quite a few times in our guide, so you’re probably left wondering whatever they mean. Well, to start at the beginning, it’s worth reminding you that CMD works with commands. A cmdlet, which is pronounced command-let, is also a command, but unlike traditional CMD commands, cmdlets are specific to PowerShell and let you perform single specific operations, such as copying files, moving items from one place to another, changing the active directory, or see the contents of an item.
Simply put, cmdlets are single function commands that you can type directly in PowerShell’s command line. If you have any prior experience with the CMD, you’ll find PowerShell somewhat intuitive to work with. One interesting thing about PowerShell is that it shares plenty of commands with CMD. Therefore, using CD with PowerShell will still change your active directory, DIR will still display the contents of the current folder, and CP will still let you copy an item from one place to another.
It’s quite worth mentioning that PowerShell is not case sensitive, unlike many other shells, which return errors if you miss using the correct case when typing your commands in them. Thus, copy-item will work just as well as Copy-Item, and if you remember neither one of them you can also use Copy, CP, and CPI (but also copy, COPY, cp, or cpi).
Most PowerShell cmdlets are written in C# and are specially built to perform operations that will return a.NET object as their result. At the time being, you could find more than a couple of hundred cmdlets you can use in PowerShell, which, let’s be fair, gives you more than just a little elbow room as far as performing operations goes.
Although it will be difficult to remember all the cmdlets you may have to work with (remember that you can use the table above), there are a few that you’ll use more frequently, which will make them incredibly easy to remember. Not to mention the fact that some of them are intuitive enough that their name actually gives away their purpose (e.g. copy is used to copy items, move can be used to move files, compare helps you compare sets of objects, etc).
However, if you’re not exactly in the mood to bookmark this article to use it later, you could also type in the Get-Command cmdlet in PowerShell, or gcm, if you want to keep things short. Doing so will display a full list of commands that are available to you, and you can use that list to plan ahead on whatever it is you’re trying to do.
Unlocking custom cmdlets
On the downside, Microsoft doesn’t just give you full access to the whole array of cmdlets that you can use in PowerShell by default, so you’ll have to jump through a bunch of extra hoops to unlock this feature and use it at your leisure. The good news is that the unlocking process doesn’t take long, and then there’s the fact that it can also be done through the PowerShell, which will make great practice for you. Without any further ado, let’s see how you can unlock custom cmdlets privileges in PowerShell.
- Log in to an Administrator account (it won’t work without Admin rights)
- Launch PowerShell with Administrator rights (Run as administrator)
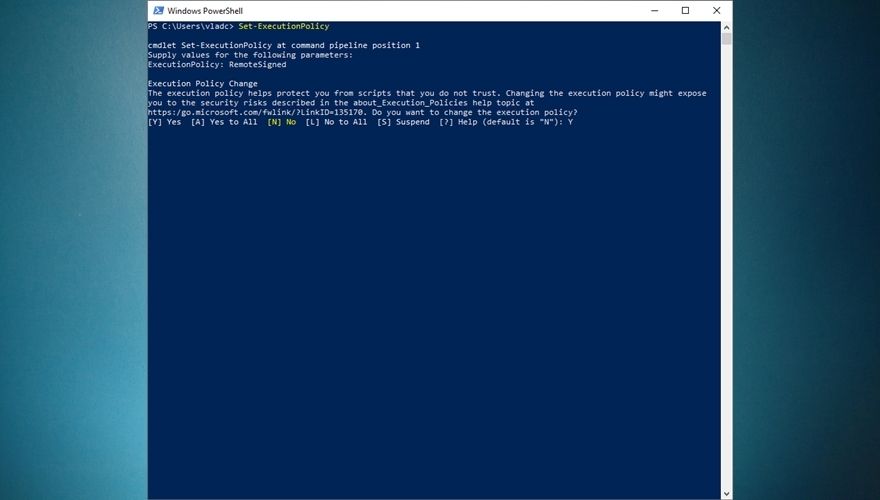
- Type the following command in PowerShell and press Enter:
Set-ExecutionPolicy
- If done right, PowerShell will prompt you with a dialog, asking you for the new ExecutionPolicy value
- Type
RemoteSignedin the PowerShell command prompt and press Enter - PowerShell will give you a heads up on the risks of modifying the value of the ExecutionPolicy
- Type Y and press the Enter key
- If you need to turn custom cmdlets off, just follow steps 1-4, and when PowerShell asks you to type the value, type
Restrictedand confirm your choice as you did at step 7
If you want to streamline the whole process and not waste time typing everything down in PowerShell’s command prompt, you’ll be glad to learn that there’s an even simpler way to achieve the same result. Launch PowerShell with Administrator rights as you did at step one, and instead of typing each command and waiting for the prompt, you’re gonna pipeline everything up until the confirmation by typing this:
Set-ExecutionPolicy-ExecutionPolicy RemoteSigned
Naturally, you will still need to confirm your choice by typing Y and hitting Enter on your keyboard, but you just skipped a step and performed a series of operations at the same time. This is exactly why advanced PowerShell users create automation scripts to perform various management operations automatically: to save time and hassle. If you want, you can use the same command above to disable custom cmdlets on your system, but you’ll have to replace RemoteSigned with Restricted and also confirm your choice at the end.
You can also use AllSigned and Unrestricted to grant yourself even more privileges when it comes to running potentially unsafe scripts on your Windows PowerShell. The AllSigned option will let you run all scripts that were created by trusted publishers, whereas the Unrestricted option will enable PowerShell to run any script, regardless of its provenience and trustworthiness. Naturally, the Unrestricted option is also the most dangerous, so try to avoid it as best as you can, if possible, especially if you are a PC novice.
See? PowerShell is already starting to look a lot more accessible than it did just a few minutes back.
How to create and use scripts in PowerShell
As we’ve mentioned before and we’re positively sure you remember, you can use PowerShell to run automation scripts. However, you can’t just yell at PowerShell “Hey you, create this script for me!” and expect it to magically work, so you’ll have to put in some elbow grease and get it done yourself. However inconvenient this may sound right now, trust us, you’ll be thankful in the long run, considering all the work you won’t need to do anymore.
Although most of us rely on specialized software such as IDEs to create scripts or programs in a specific programming language, truth be told you can use any text editor as long as it can save files to the right extension. And even if it can’t, you can just navigate to the file you created and modify its extension manually by renaming it, but let’s get back to our sheep.
If you’re interested in creating a script that can work in PowerShell, you’ll be thrilled to learn that this script you’ve probably heard a lot of, is merely a text document with an extension that makes it compatible with PowerShell, PS1. Therefore, it’s easy to see why creating these scripts can be actually handled from within virtually any text editor, as long as you save it with the right (PS1) extension.
Write-host"Please enter your name:"
$Name=read-host
"Hello $Name! Visit AddictiveTips.com for more awesome tutorials and guides!"
Now for the actual creation part:
- Launch Notepad (or any other text editor for that matter)
- Copy the code above (the script you’ll be creating and running)
- Paste it into your new Notepad document
- Use CTRL + S to save the document
- Type
script.ps1as the file name - Save the file somewhere accessible
- Open a PowerShell instance with administrator rights (very important)
- Make sure you’ve enabled custom scripts on your system (check sections above)
- Navigate to the location where you saved the script
- Type the full path of the script to run it
- For instance, if your script is in a Scripts folder on your C drive, your command will be
C:\Scripts\script.ps1 - Alternatively, you could simply navigate to the location of your script and use this command to run it:
.\script.ps1
- For instance, if your script is in a Scripts folder on your C drive, your command will be
If you can’t run the script and PowerShell returns an error, make sure you’ve enabled PowerShell to run custom scripts on your system, and that you’re running PowerShell as an administrator. Not doing any or both things that we’ve specified in our instructions will most likely result in an error and you won’t be able to run your script.
Remember that this is merely a basic script that is somewhat similar to the classic “Hello, world!” один. It puts a spin on it by interacting with you (i.e. asking what your name is) and letting you interact with it (i.e. typing your name which will be used to print a message for you). However, PowerShell is capable of running far more complex scripts, ranging from collecting data from an array of machines to intricate data management, advanced system configuration operations, and even creating backups of SQL databases in a blink of an eye.
How can I backup SQL databases with PowerShell?
We’re glad you asked. As we’ve mentioned countless times in our guide, there are almost endless possibilities when it comes to operations that PowerShell can help you perform. One of the most popular ones is backing up an SQL database without having to go great lengths or possess extraordinary database management capabilities. All you have to do is fire up an elevated instance of PowerShell (with Administrator privileges) and use the Backup-SqlDatabase command. However, things are a bit more complicated than that, but we’ll get to that in a few.
Backing up an SQL database isn’t as easy as simply copying files from your PC to a safe location and hope they stay safe for whenever you may need them to perform data restoration operations, but on the bright side, using PowerShell can make it look like a walk in the park. Although there are several ways to achieve this, using the command we’ve mentioned above is the fastest, simplest way to backup an SQL database.
Among the capabilities of the Backup-SqlDatabase command, it’s possible to find full database backups, database file backups, as well as transaction log backups, so you got the full package within a single command-line tool. By default, using this command will perform a full database backup, so you will need to specify if you want it to follow a certain set of rules by using the BackupFile parameter.
Note that some versions of PowerShell won’t feature this command by default, so you’ll either have to import it or install it. The good news is that installing the SQL module isn’t exactly rocket science and can be accomplished even by novices. Here’s what you’ll have to do if you can’t use the Backup-SqlDatabase command in your PowerShell session:
- Launch PowerShell with administrator rights
- Type the following command:
install-module sqlserver
- When asked to confirm your actions, type Y and hit Enter on your keyboard
- Confirm the untrusted repository once more by typing Y and Enter
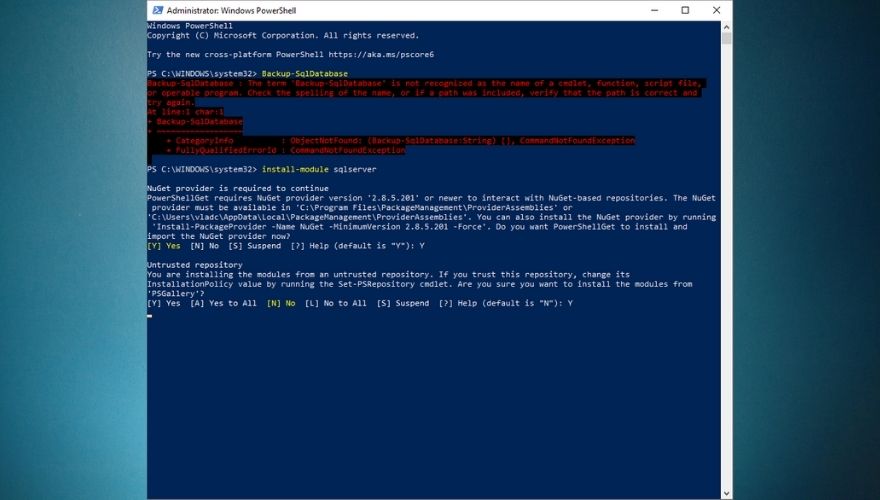
- Once the installation is complete, type the following command:
import-module sqlserver
- Try running the Backup-SqlDatabase command by typing it in the PowerShell command-line
- If it works, you should see that PowerShell is asking you to supply values for some parameters
- If it doesn’t work, make sure that you’ve set PowerShell’s permission to allow it to run custom scripts
1. Complete SQL database backup
Backup-SqlDatabase-ServerInstance"Computer\Instance"-Database"AddictiveTips"
The command we’ve exemplified above will generate a full database backup of a database called AddictiveTips and save it to the default backup location of the “Computer\Instance” server instance as ‘AddictiveTips.bak’.
2. Perform a location-based database backup
Set-Location"SQLSERVER:\SQL\Computer\Instance"PS SQLSERVER:\SQL\Computer\Instance> Backup-SqlDatabase-Database"AddictiveTips"
The first command above will change your location to the active directory within the server instance on which the backup will occur. Essentially, this technique works almost like the full database backup we’ve exemplified above, but in this example, you get to change the working directory in order to locate the server instance where the backup occurs.
This operation will also create a full backup of a database called AddictiveTips and export it as an ‘AddictiveTips.bak’ file in the default location of the server instance you’re connected to.
3. Perform a transaction log backup
Backup-SqlDatabase-ServerInstance"Computer\Instance"-Database"AddictiveTips"-BackupAction Log
If you only need to backup the transaction log of a specific database, PowerShell can also help you do that through a single command you can input straight in its command-line interface. The command above will generate a backup copy of the ‘AddictiveTips’ database’s transaction log and export it to the default location of the ‘Computer\Instance’ server instance as a file named ‘AddictiveTips.trn’.
4. Create an encrypted SQL database backup
$EncryptionOption=New-SqlBackupEncryptionOption-Algorithm Aes256-EncryptorType ServerCertificate-EncryptorName"BackupCert"Backup-SqlDatabase-ServerInstance"."-Database"AddictiveTips"-BackupFile"AddictiveTips.bak"-CompressionOption On-EncryptionOption $EncryptionOption
If you’re worried that your database backup may fall in the wrong hands, PowerShell can also help you create ready-encrypted backup files. Naturally, you’ll have to specify some parameters such as the encryption algorithm, the encryption type (i.e. certificate), server instance, database name, backup file, and whether or not you want the output to be compressed.
The example above will create a backup of a certain ‘AddictiveTips’ database, encrypt it with AES-256 encryption and a server certificate, compress it, and save the resulting ‘AddictiveTips.bak’ file on the server instance’s default backup location. This is quite important if you plan a migration and have no surefire way to transport all backup files without risking estranging any single one of them.
5. Perform a backup on all databases in a server instance
Get-ChildItem"SQLSERVER:\SQL\Computer\Instance\Databases"| Backup-SqlDatabase
Another tool that may come in handy is PowerShell’s ability to backup all the databases on a server instance at the same time. Regardless of their number, you just fire up PowerShell, type an adaptation of the command above, and wait for the backup process to come to an end. Note that since this will backup all the databases within the server instance, you may have to wait for a while, so be patient.
The command above will back up all the databases located on the ‘Computer\Instance’ server instance and export the resulting files to the default backup location on the same server instance. The names of the backup files will be generated automatically according to each one’s corresponding database followed by the BAK extension (i.e.
Although there are several more methods to perform SQL backup with PowerShell in various ways, we’ve only presented a few that we felt were more important. Note that the commands we used in our examples above are not likely to work on your environment in their current form, so you will have to adapt them to your current situation.
For instance, you will have to change the ‘Computer\Instance’ parameter to match your own server instance and modify the name of your database to reflect the name of your own database. Remember that you can always turn to the help command in PowerShell if you ever feel that the command you’re trying to run is confusing or doesn’t work as it should.
Must-know PowerShell commands
1. Get-Help
We can’t stress this enough, but the Get-Help command should be the first one you ever learn, as it can seriously get you out of numerous sticky situations where you’re not exactly sure if you’re using the correct command, or exactly what you can achieve with the command that you’re trying to deploy.
Now that you’ve installed the sqlserver module on your system, you can try the Get-Help command now and see how Backup-SqlDatabase works. Just type Get-Help Backup-SqlDatabase in the command-line of PowerShell and brush up your PowerShell SQL database backup skills.
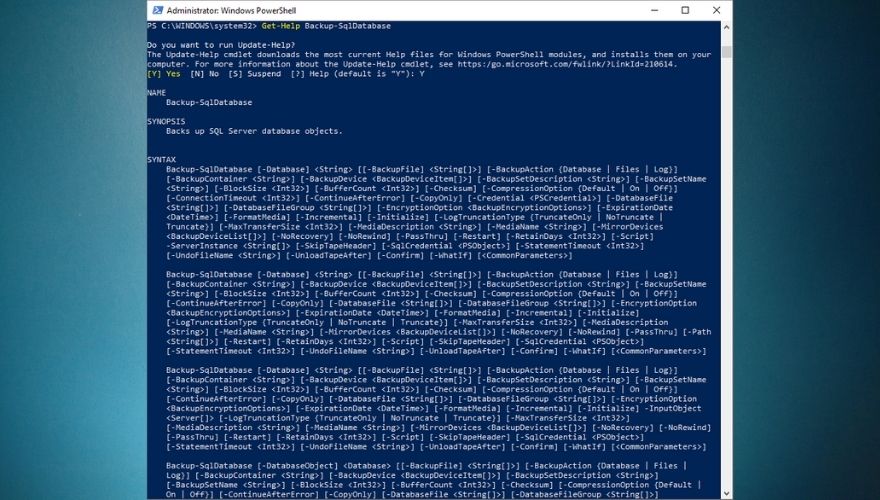
Note that if you just recently installed the sqlserver module on your system, the Help database may still be outdated, and you may need to run an update on it so that it can catch up on any new scripts. By default, PowerShell will detect that the content you’re trying to reach is available online, but you can’t access it locally, and even offer to update the database for you. In this case, all you need to do is type Y when prompted and hit the Enter key on your keyboard.
However, if PowerShell just prompts you with an error stating that there’s no help manual available for the command you’re interested in, you can update it manually by typing Update-Help and hitting the Enter key on your keyboard. After the update process comes to an end, you should be able to check available help documentation for the command you’re interested in.
2. Get-Process
Get-Process is paramount if you want to discover more about the system you’re currently working on. To be more specific, although you might’ve guessed what this command does already by merely looking at it, Get-Process will provide you with a list of all the processes that are currently running on the system you’re working on.
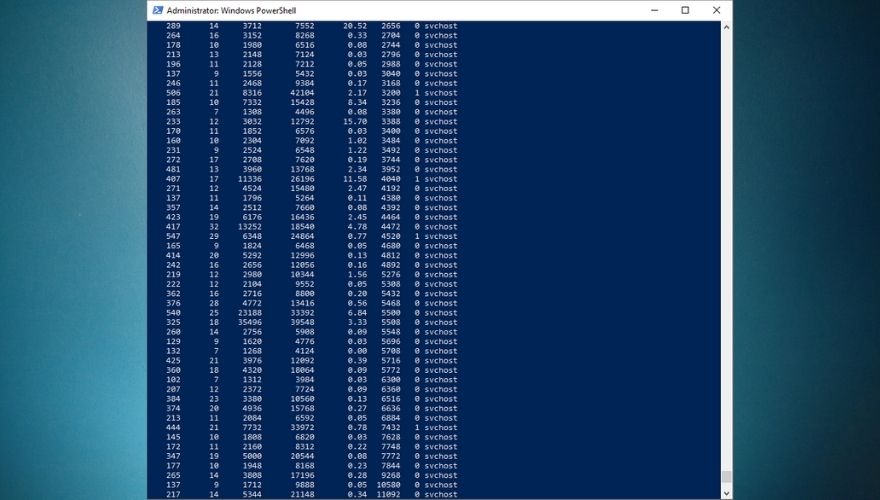
By default, Get-Process will retrieve a list of every process running on the current system you’re working on, so you may need to append some extra parameters to this command if you want more specific information and narrow the list of results. Check out in the screenshots below what you get when you run the Get-Process command by itself versus how it looks if you’re more specific and format the results.
Get-Process
Get-Process explorer | Format-List *
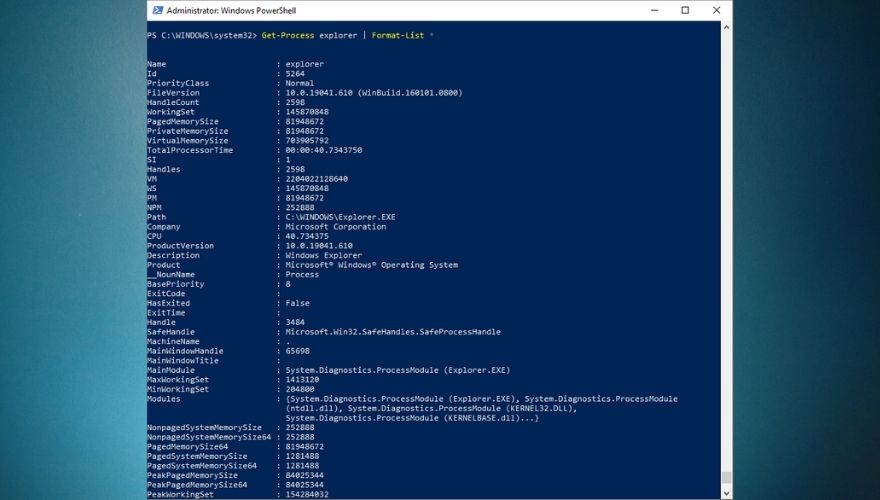
The second command can be customized to display additional details about any active process on your system. You can replace explorer with svchost or Chrome or any other active process on your system that you’re interested in. As we’ve mentioned above, using Get-Processes by itself can help you with that (i.e. finding a list of all running processes).
3. Stop-Process
This command is pretty much self-explanatory, as you may already have figured out that it can help you stop processes that are currently running on your system. The most common reason for doing that from PowerShell and not by using the Windows Task Manager is that sometimes processes can freeze and make GUI apps barely usable.
PowerShell users can easily identify a troublesome process using the Get-Process command we’ve previously explained, then using Stop-Process to terminate it, thus unclogging the system. Running Stop-Process by itself (without any additional parameter) in your PowerShell command-line interface will prompt you to input the ID of the process you’re trying to terminate.
However, you can also terminate a process by its name (if you know it) by appending the -Name parameter to the cmdlet, like in the example below:
Stop-Process-Name"explorer"
The command above will terminate the Explorer process, which can be useful especially if it freezes or crashes on you and refuses to load properly. Note that you’ll need to use quotes when specifying the name of the process you’re trying to terminate. If a process is stubborn and refuses to terminate (usually higher clearance processes do that), you can “convince” it by appending a -Force parameter to your command. Say, for instance, that you can’t terminate your Explorer process. In this case, you can simply type the command below:
Stop-Process-Force-Name"explorer"
Furthermore, it’s worth mentioning that using the -Force parameter in your Stop-Process command won’t ask for confirmation, as opposed to running the command without this option. If you want to find out more about this cmdlet, make sure to use the Get-Help command.
4. Get-Service
This command is among the essential command list for a good reason: it can provide you with a list of all the services that are currently installed on the system you’re working on, regardless of whether they’re running or not. As with many other cmdlets, you can customize Get-Service to provide you with more specific information, either regarding a certain service or even displaying a list of all running (or stopped) services on your machine.
You can go ahead and type Get-Service in your PowerShell command line. Doing so should provide you with a list of all the services available on your computer, as well as their display names and statuses. If you append an additional command to the original cmdlet, you can change the output, making it display only results that you’re interested in.
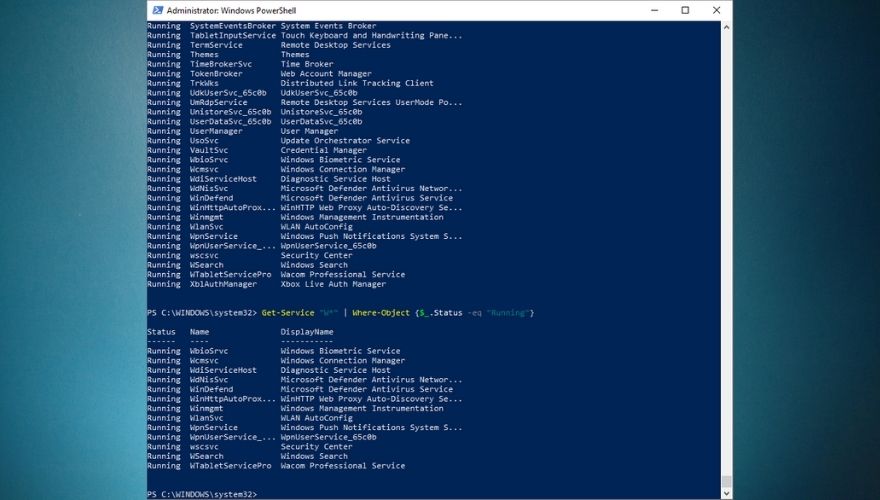
Get-Service"W*"
For instance, typing the command above should return a list of all services available on your computer that start with the letter ‘W’. However, you can go even further and customize your command in order to narrow the list of results even more.
Get-Service | Where-Object {$_.Status-eq “Running”}
The command above will let you see a list of all the available services on your computer that are also running at the time you’re running the cmdlet. Appending the “W*” as we did in the previous example will display a list of all the running services on your computer that start with the letter ‘W’, and the command should look like this:
Get-Service"W*"| Where-Object {$_.Status-eq"Running"}
5. Get-EventLog
Every responsible system administrator should know its way around working with event logs, seeing that these documents can provide you with useful knowledge about what happened on your system, at what time did it occur, and sometimes even what triggered that specific event.
Therefore, we can safely assume that PowerShell’s Get-EventLog command is not something you want to be missing from your toolbelt, especially if you plan on honing your system administration skills. If you know everything there is to know about event logs and their names, you can go ahead and type Get-EventLog directly in your PowerShell’s command line. Note that PowerShell will prompt you to input the name of the log you’re trying to view.
If you type the name of an empty event log (one with no entries), PowerShell will prompt you with an error and return you to the command-line interface. Therefore, it would be easier if you just used the command below, which will provide you with a list of Event Logs on your system, along with additional details about each one, such as the default overflow action, and the number of entries.
Get-EventLog-List
One of the most popular use cases for event logs is checking for errors, especially if they occurred silently, were shortly followed by a system crash, or lead to a BSOD, which we all know how cryptic can be. However, you will need to be more specific with the Get-EventLog cmdlet if you want to narrow down the list of results, which oftentimes can be huge.
Get-EventLog-LogName Security-EntryType Error
Typing the command above in your PowerShell’s command-line interface should provide you with a list of all the errors registered in your Security event log. Note that you can use the-List parameter to see all the log types in your system and replace Security in the command above with any other log type that you find on your list, just as long as it has more than zero entries.
If you want to learn more about using the Get-EventLog command in PowerShell, feel free to use the Get-Help command we’ve talked about in the first section of this subchapter.
6. ConvertTo-HTML
Sometimes when you’re using PowerShell, you may stumble upon certain information that you want to extract and keep for future reference, create reports, or simply import it from a different application. One of the most frequently-used ways to extract this data from PowerShell and export it to an external file on your computer is the ConvertTo-HTML command.
Using this command will help you build comprehensive reports that can help you analyze extracted information and insights in a more effective manner by providing you with HTML tables that you can customize later by adding custom styles and color-coded data. As with many other PowerShell commands, ConvertTo-HTML doesn’t work by itself, and you’ll need to pair it up with an additional command which it will use as an input (or a source of data).
For instance, if you’re trying to print a report consisting of every service that starts with the letter ‘W’ and is currently running on your computer, you can type the command below:
Get-Service"W*"| Where-Object {$_.Status-eq"Running"} | ConvertTo-HTML
This will provide you with an HTML code of the data you fed to the ConvertTo-HTML function, which you can simply copy directly from the PowerShell’s command-line interface, paste it in your favorite text editor and save it as an HTML file, which you can use to view the result in any web browser.
You can use ConvertTo-HTML with virtually any PowerShell command, as long as the command you’re using as a data source will generate output. You can try it with other cmdlets, such as Get-Process, Get-EventLog, or Get-Help. Note that aside from HTML conversions, the ConvertTo cmdlet can also be used to generate JSON, CSV, and XML files. You just have to replace HTML in the command syntax with the format you’re interested in.
7. Export-CSV
If you’re working with various objects that you feel may fit way better in a table, you can use PowerShell to convert the items you’re currently handling into a series of CSV (comma-separated value) strings and export the strings to a file in one swift motion through the Export-CSV cmdlet.
As with ConvertTo-HTML, Export-CSV needs an input that it can convert to CSV strings, as it can’t just work on its own. Thus, you will need to pair it with a command that can be used to generate data, such as the Get-Service or Get-Process ones we’ve explained earlier.
Essentially, Export-CSV does almost the same thing as the ConvertTo-HTML cmdlet we’ve discussed above, aside from one important aspect that shouldn’t be overlooked: this cmdlet actually generates a file and saves it on your computer, as opposed to the ConvertTo command, which only gives you the output and lets you create the file on your own.
Let’s assume, for instance, that you’d like to turn the list of services running on your computer into a CSV file so that you can process the file further with third-party software, or put it in a spreadsheet for further reference. All you’d have to do is type the Get-Service command followed by the Export-CSV one, and mention a location where you’d like the CSV file to be generated, like in the example below:
Get-Service | Export-CSV c:\AddictiveTips.csv
The command above will fetch a list of all the services that are available on your computer, running or not, convert them into a series of CSV strings, and save the result as a CSV file named ‘AddictiveTips’ in the root of your C drive. You can then open the file in a third-party software solution, convert it into a fully-fledged table, or just store it for future usage.
PowerShell cheatsheet – CONCLUSION
Although there’s still a lot of people advocating for CMD, truth be told PowerShell is more versatile, way more powerful, but at the same time more complicated to work with than its traditional CMD counterpart. The sheer amount of features, combined with the fact that you can create automation scripts in PowerShell and perform complicated system management operations just leaves CMD in a cone of shadow.
If you’re just starting to discover PowerShell and you’re struggling to figure out what each command does, how to pipeline several commands, or how to create and run simple PowerShell scripts on your own, our guide is a great starting point. We’ve taken our time to explain some of the most important commands you should know about in PowerShell, created a few short tutorials, and also included a list of basic PowerShell commands, their aliases, and short descriptions for each item, just to simplify your PowerShell discovery journey.