A lot of times, you may encounter the screen flickering issue on your Windows 10 PC due to an application gone corrupt or due to an outdated/unfit display driver. Whether you are using a laptop or a desktop, this is a common issue and it can be frustrating, especially when you are in the mid of an important work. Most of the times, there’s not much to worry, as a few changes to the display driver or the problematic application can help fix when your screen flickering on your Windows 10 PC.
The problem mostly occurs immediately after you have upgraded to Windows 10, however, it can also occur at any random time also. Before we show you a few methods to fix when your screen flickering on your Windows 10 PC, perform the below screen flickering test to identify what might be causing the issue.
How to Perform the Screen Flickering Test
Step 1: Right-click on the Taskbar and select Task Manager.
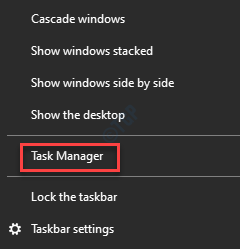
Step 2: once the Task Manager is open, check if the Task Manager is also flickering along with the screen and all the icons.
If it is, then the problem could be with the display driver.
However, if the Task Manager is stable and everything else on the screen is flickering, the problem is most likely due a recently installed application.
Now, that you have a fair idea about what could be the possible cause for the screen flickering issue, you can try a few quick tricks. A lot of times we do not realize that the problem could be due to the lose monitor cable. So, make sure you check if the monitor cable is seated properly at the back of the device. If not, then make sure you unplug the cable and re-insert it properly.
Alternatively, you can also check if the monitor cable is damaged, incompatible, or of low-quality. In any of these cases, consider replacing your monitor cable based on the monitor’s manual guide suggestions and invest in a high-quality and compatible cable. This should fix the screen flickering issue on your Windows 10 PC, however, if it does not, proceed with the below solutions.
Method 1: Modify the Monitor’s Refresh Rate
Sometimes, the screen flickering issue could arise when you have set a higher refresh rate for your monitor than it can take. Monitor’s refresh rate determines how frequently the content gest refreshed on your PC screen, but not all monitors are configured to refresh content at a higher rate and hence, the glitch may occur. In such a case, you may change the refresh rate and see if it helps fix the issue. Here’s how to change the refresh rate:
Step 1: Click on the Start menu and select Settings (gear icon).
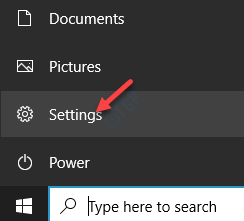
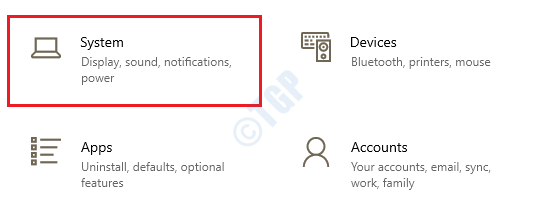
Step 2: This will launch the Settings window.
Here, go to the System option.
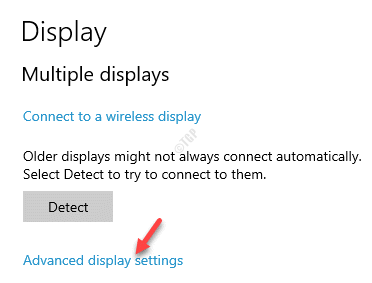
Step 3: You are directed straight to the Display page in the Settings window.
Go to the right side of the pane, scroll down and under the Multiple displays section, click on the Advanced display settings link.
Step 4: In the next window, go to the Refresh Rate section and from the Refresh rate drop-down, select a lower refresh rate than the current one.
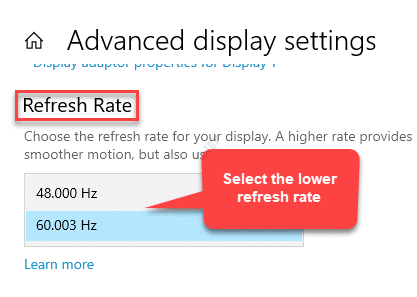
Close the Settings window and now, you should not experience the screen flickering issue again.
Method 2: Uninstall Problematic Apps
This method is useful when you have a vague idea about which app could be causing the issue, For instance, if you recently installed an app and if the screen flickering issue started immediately after that, then that specific app is your target. There is a possibility that either the app does not match the system requirements ( for example, if you downloaded a 64-bit app for a 32-bit PC) or it may be simply an outdated version, and hence, causing the issue.
In such a case, you can either download the correct version based on the system architecture (32-bit/64-bit) or you can visit the app’s website to check if there’s a latest version available for the same. If available, you would first need to uninstall the installed app and then install the latest version. Let’s see how to uninstall the app:
Step 1: Press the Win + I keys together on your keyboard to open the Settings app.
Step 2: In the Settings window, click on Apps.
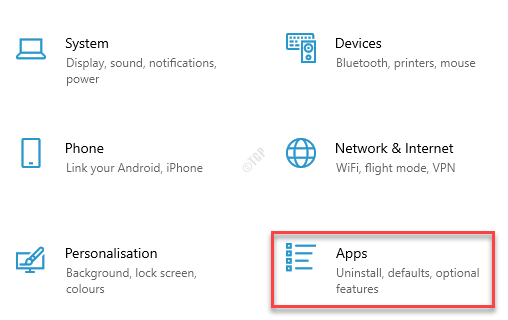
Step 3: It takes you straight to the Apps & features section in the Settings window.
Go to the right side of the pane and under the Apps & features section, look for the problematic app.
Select the problematic app and press the Uninstall button below.
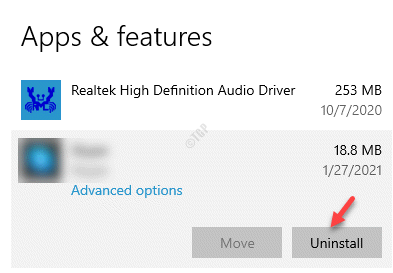
Step 4: Press the Uninstall button again in the pop-up to confirm the action.
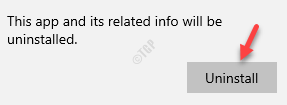
Once the app is completely uninstalled, reboot your PC and check if the Screen Flickering issue is resolved.
Method 3: Update the Display Drivers
When your Screen is Flickering on your Windows 10 PC, the issue could also be due to the Display driver. It could be possible that either the driver is outdated and you missed an update. In such a case, you can try updating the driver to any latest version available and see if it helps fix the issue:
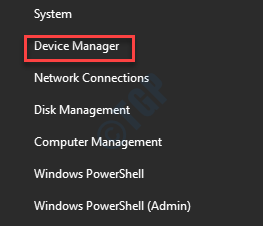
Step 1: Right-click on Start menu and select Device Manager to open the Device Manager window.
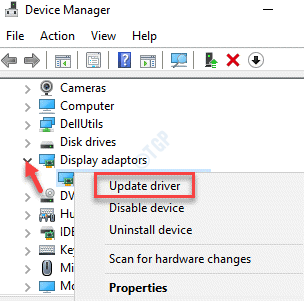
Step 2: In the Device Manager window, navigate to Display adaptors and expand the section by clicking on the arrow on the left.
Now, right-click on the graphics driver and select Update driver.
Step 3: In the Update Drivers window, click on Search automatically for drivers.
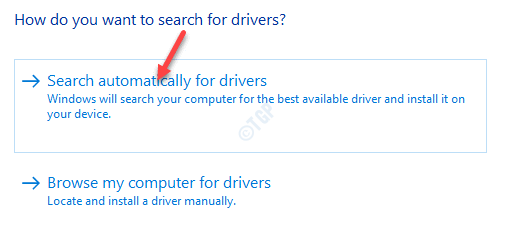
Now, wait for Windows to look for any available drivers and if available, it will update the driver automatically to the latest version.
Restart your PC and see if your Screen still flickers.
*Note – Alternatively, you can also download and install the display driver, manually, by downloading the latest version from the manufacturer website and then install it using this process – Device Manager > Display adapters > graphics driver > right click > Update driver > Browse my computer for drivers.
Method 4: Rollback the Driver to Previous Version
If updating the display driver does not help fix the issue, then you can roll back the driver to the the previous version and see if it resolves the issue. Follow the below steps to roll back the driver:
Step 1: Right-click on Start and select Device Manager.

Step 2: This will open the Device Manager window.
Here, navigate to Display adapters and click on the arrow next to it to expand the section.
Now, right-click on the graphics driver and select Properties.
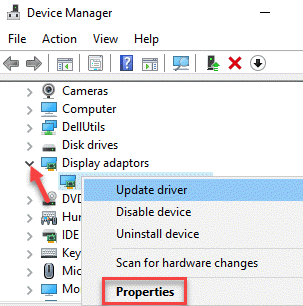
Step 3: In the Properties dialogue box, select the Driver tab and click on the Roll back Driver button.
Press OK to return to the Device Manager and the driver should be rolled back to the older version.
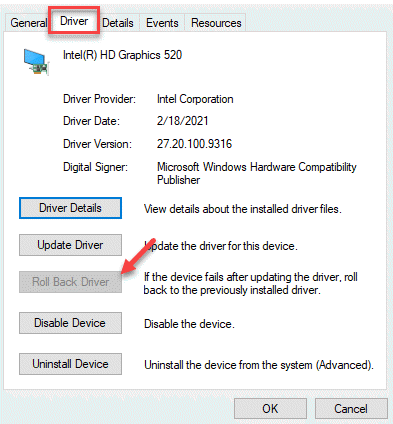
Now, exit Device Manager, reboot your PC and you should not face the screen flickering issue anymore.
Method 5: Uninstall and Reinstall Display Driver
Since the screen flickering issue could well be due to the display drivers, you can try uninstalling and then reinstalling the drivers in safe mode. Once you uninstall the drivers and restart your PC, the drivers are automatically re-installed. However, since you must do it in the safe mode, let’s see how to go about it.
Step 1: Right-click on Start and select Settings to launch the Settings app.
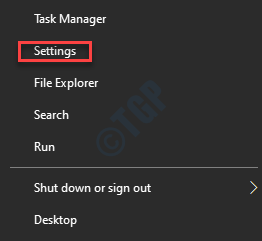
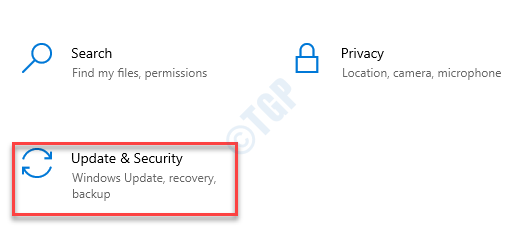
Step 2: In the Settings window, click on Update & Security.
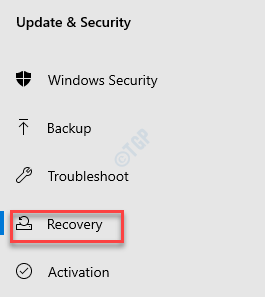
Step 3: Next, on the left side of the pane, click on Recovery.
Step 4: Now, go to the right side of the window and under the Advanced start-up section, click on Restart now.
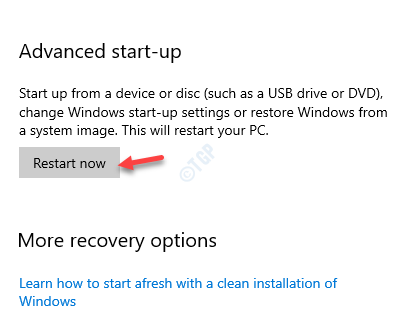
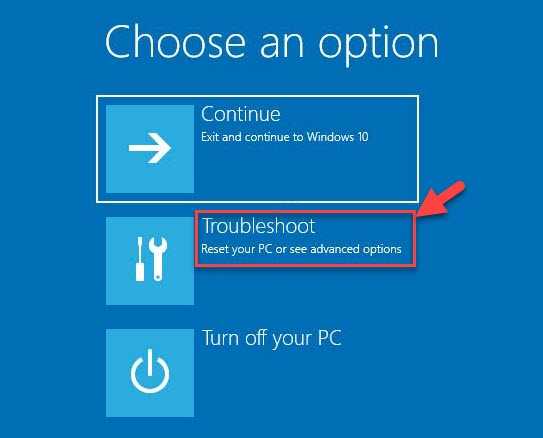
Step 5: This will restart your PC in the Advanced Recovery mode.
Now, in the Choose an option screen, select Troubleshoot.
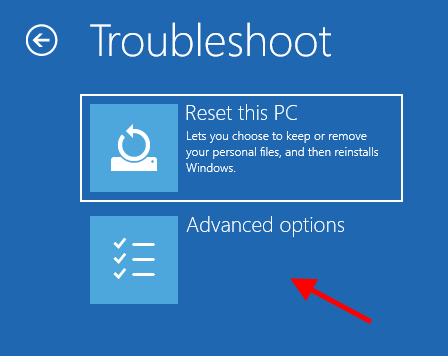
Step 6: In the Troubleshoot section, click on Advanced options.
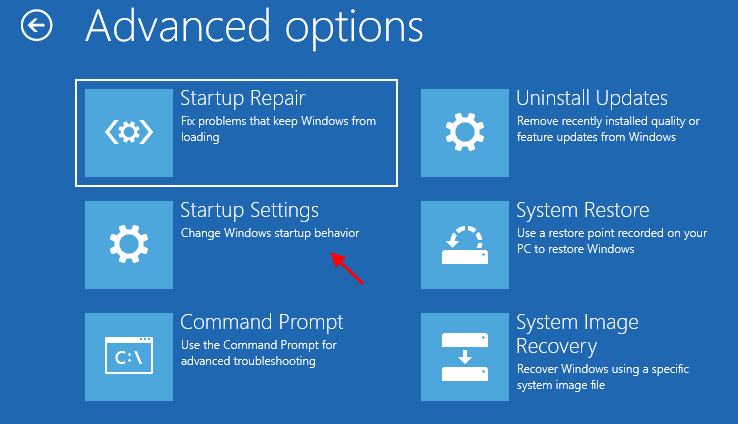
Step 7: Next, in the Advanced options screen, click on Startup Settings.
Step 8: In the next window, click on the Restart option.
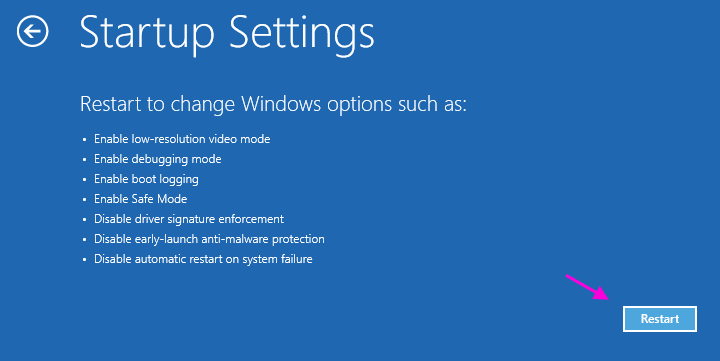
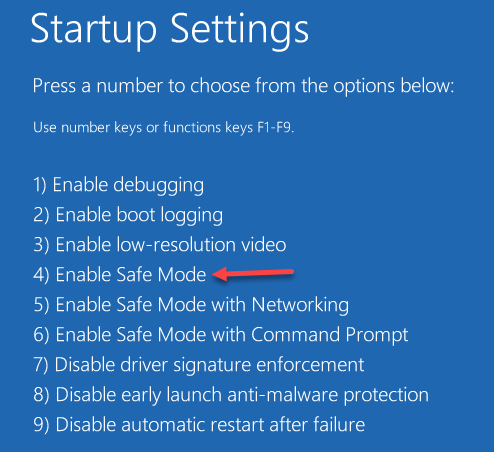
Step 9: Next, press the number 4 on your keyboard to reboot your PC into safe mode.
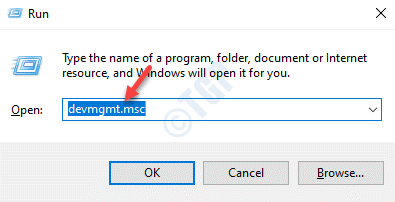
Step 10: Now, press the Win + R shortcut keys to open Run command.
Step 11: In the Run command search field, type devmgmt.msc and hit Enter to open the Device Manager window.
Step 12: In the Device Manager window, expand the Display adapters section.
Right-click on the graphics driver and select Uninstall device.
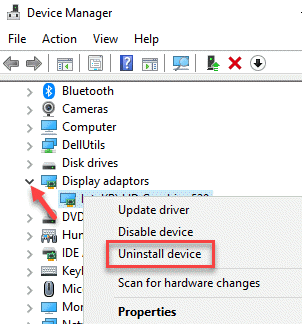
Step 13: In the Uninstall Device pop-up, check the box next to Delete the driver software for this device and press the Uninstall button again to confirm the action.
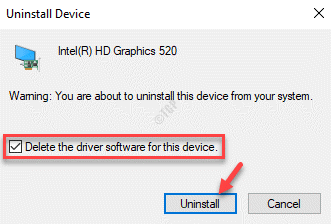
Step 14: Now, restart your PC and the display driver should be automatically re-installed by Windows.
Now, reboot your PC again to check if the Screen Flickering issue is resolved.
Method 6: Install a New Driver Version
However, you can still check if any new version of the driver is available through updates by following the next instructions:
Step 1: press the Win + I shortcut keys to open the Settings app.
Step 2: In the Settings app, select the Update & Security option.

Step 3: You are now in the Windows Update page in the Settings window.
Here, go to the right-side of the pane and click on Check for updates.
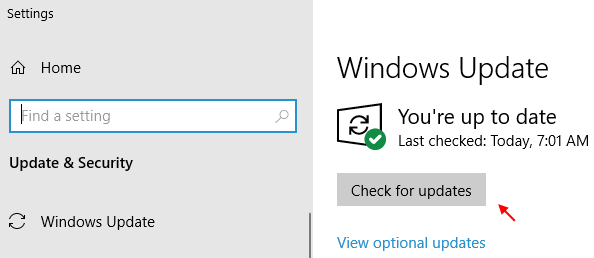
If any updates available click to download and install automatically.
You can restart your PC and the screen flickering issue should be fixed.
Method 7: Disable Automatic Windows 10 Driver Update
Windows 10 keeps releasing mandatory updates at frequent intervals with patches, security improvements, feature updates and more that are crucial for your system to function at its best at all times. The updates are automatically installed and hence, even the drivers get updated automatically. However, if you have already installed the latest version of the driver and the screen flicker issue is gone, then you can disable the automatic driver update to prevent Windows 10 from automatically updating the driver.
Method 8: Create a New User Profile
When none of the above method works, creating a new user profile can help get rid of the screen flickering issue. Follow the below steps to create a new user profile on your Windows 10 PC:
Step 1: Press the Win + I keys together on your keyboard to launch the Settings window.
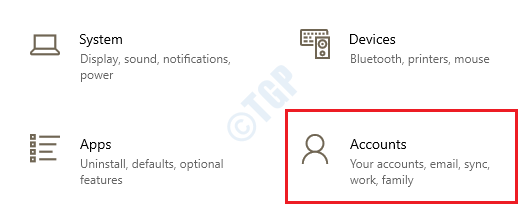
Step 2: In the Settings window, click on the Accounts option.
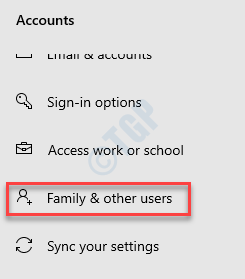
Step 3: Next, click on the Family & other users option on the left side of the pane.
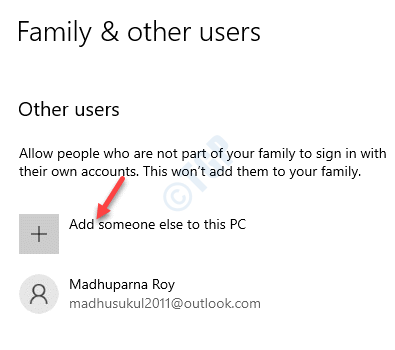
Step 4: Now, navigate to the right side of the window, go to the Other users section and click on Add someone else to this PC.
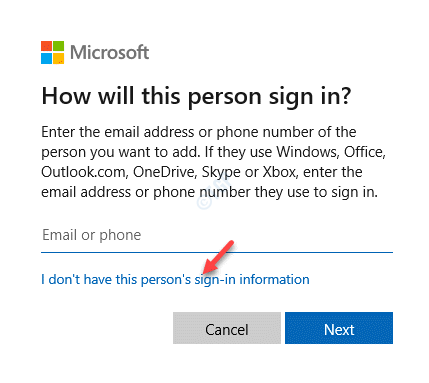
Step 5: It opens another window – How will this person sign-in?
Here, click on the I don’t have this person’s sign-in information link.
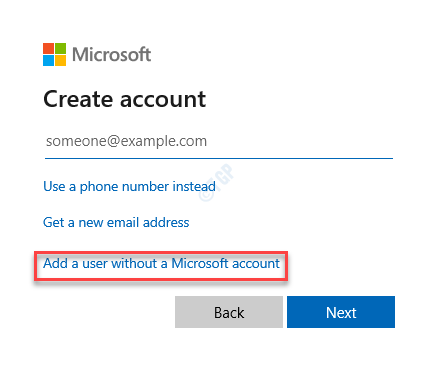
Step 6: In the next window (Create account), select the Add a user without a Microsoft account link.
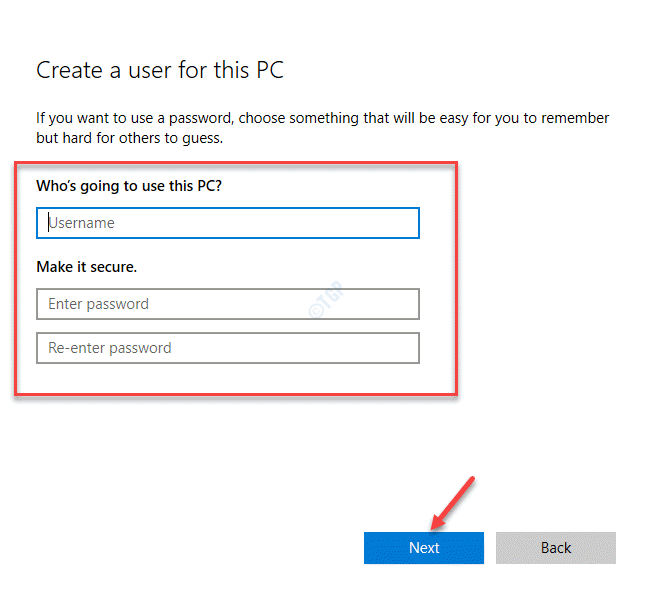
Step 7: Now, in the Create a user for this PC window, enter the Username and Password.
Click Next to complete creating the new user account.
Once you are done, sign-in with the new user account and this time you should not face the screen flickering issue in your Windows 10 PC anymore.
