Нет ничего хуже, чем приготовиться сыграть в видеоигру с друзьями только для того, чтобы вас прервал синий экран смерти (BSOD) сообщение , которое захватывает ваш компьютер, выключается все, и не дает вам ничего делать, кроме перезапуска.
Ошибки BSOD различаются, и они указывают на точную проблему, из-за которой ваш компьютер отключается, и предотвращает повреждение оборудования и значительную потерю данных. Проблема в том, что коды ошибок сложно расшифровать без технических знаний.
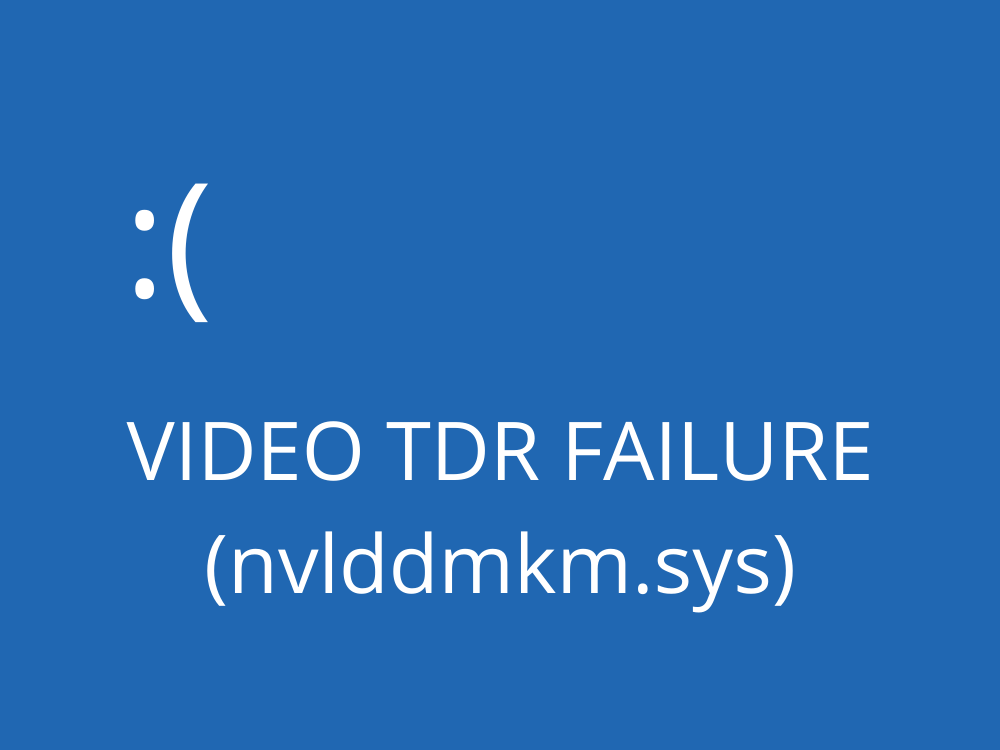
Например, VIDEO TDR FAILURE -это код остановки BSOD, который может возникать на компьютерах с видеокартами NVIDIA. Весь ваш экран станет синим, отобразится На вашем компьютере возникла проблема, и ему необходимо перезагрузить сообщение , в котором указан файл nvlddmkm.sys как проблемный файл. nvlddmkm.sys-это драйвер, полное имя которого- NVIDIA Windows Kernel Mode Driver .
ОТКАЗ ВИДЕО TDR в Windows 10-ИСПРАВЛЕНИЕ
Прежде чем найти способ обхода ошибки VIDEO TDR FAILURE, рекомендуется создать точку восстановления системы . Если что-то случится и вам нужно отменить все изменения, вы можете легко откатить Windows 10 до контрольной точки и начать устранение неполадок с нуля.
1. Ошибка nvlddmkm.sys ? Запустите Windows 10 в безопасном режиме
Если вам сложно пользоваться компьютером, потому что система сразу дает сбой, показывает синий экран и входит в цикл перезагрузки, вы можете запустить Windows 10 в безопасном режиме :
- Трижды включите и выключите компьютер, чтобы запустить режим устранения неполадок Windows 10.
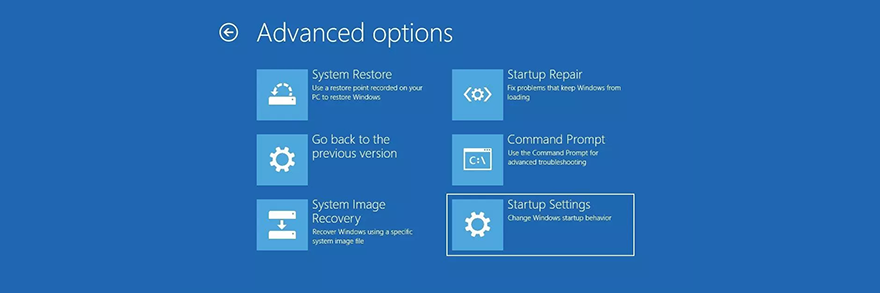
- Перейдите в Устранение неполадок > Дополнительные параметры > Настройки запуска
- Нажмите Перезагрузить и немного подождите.
- Нажмите F5 , чтобы включить Безопасный режим с загрузкой сетевых драйверов

- После загрузки Windows проверьте, не возникает ли ошибка nvlddmkm. Если вы все еще делаете это, выполните указанные выше действия, чтобы перейти к параметрам безопасного режима, и выберите F4 , чтобы включить безопасный режим без сетевых функций


2. Запустите чистую загрузку
Если безопасный режим оказался ключом к стабилизации вашей операционной системы и предотвращению отображения ошибок BSOD, вы можете чистая загрузка Windows 10 , чтобы отключить запуск и службы, которые могут работать неправильно и вызывать ошибку VIDEO TDR FAILURE.
- Следуйте инструкциям в решении 1 , чтобы запустить Windows 10 в безопасном режиме.
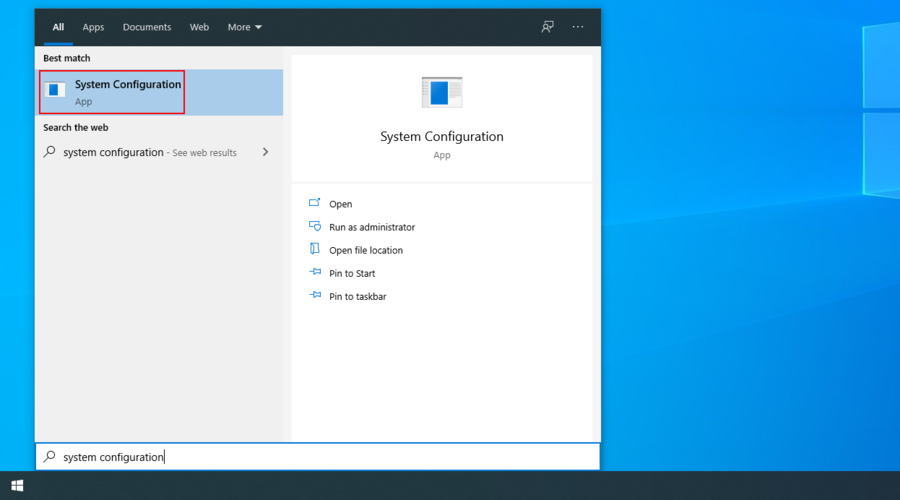
- Нажмите кнопку Пуск , найдите Конфигурация системы и запустите это приложение
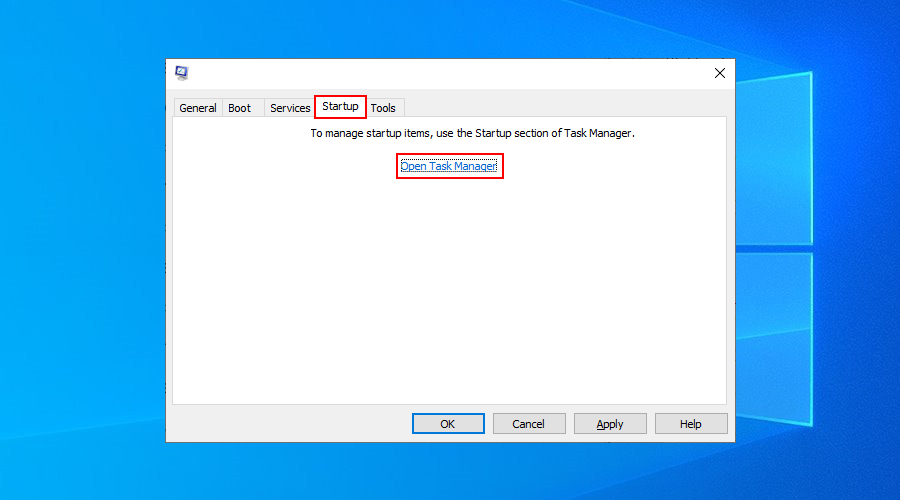
- На вкладке Общие выберите параметр Выборочный запуск .
- Отключите Загрузка системных служб и Загрузка элементов автозагрузки

- Нажмите Применить и перейдите в раздел Запуск .
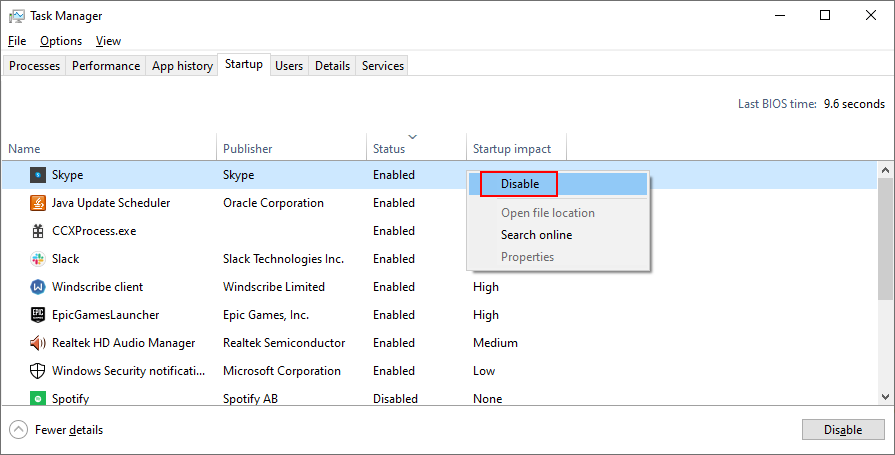
- Нажмите Открыть диспетчер задач
- Выберите приложение со статусом Включено и нажмите Отключить . Сделайте это для всех приложений со статусом Включено
- Перезагрузите компьютер и проверьте результаты.

3. Проверить наличие обновлений системы
Если вы долгое время не использовали Центр обновления Windows, возможно, вы пропустили важные обновления, предназначенные для исправления системных ошибок. Поскольку это такой важный компонент ОС, Центр обновления Windows должен работать в фоновом режиме и сообщать вам обо всех ожидающих обновлениях. Но если автоматические обновления системы были отключены на вашем устройстве, их следует запускать вручную.
- Нажмите клавишу Win , введите Проверить наличие обновлений и нажмите Enter
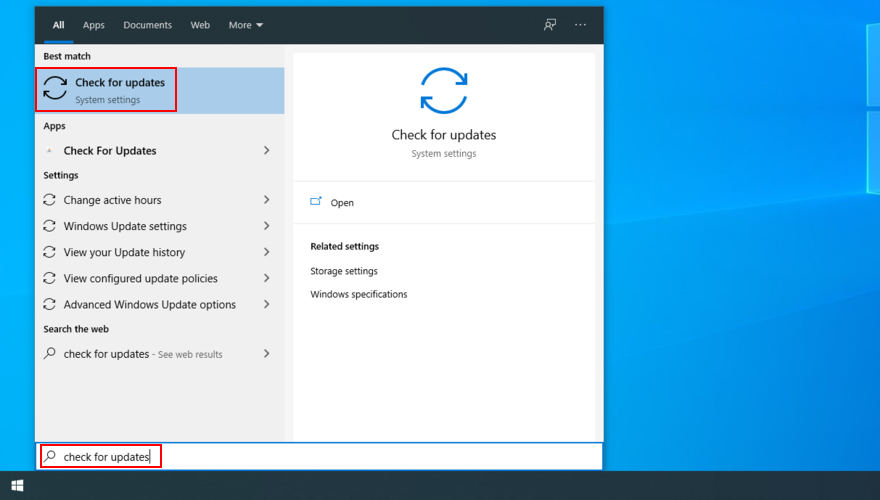
- Нажмите Проверить обновления и подождите
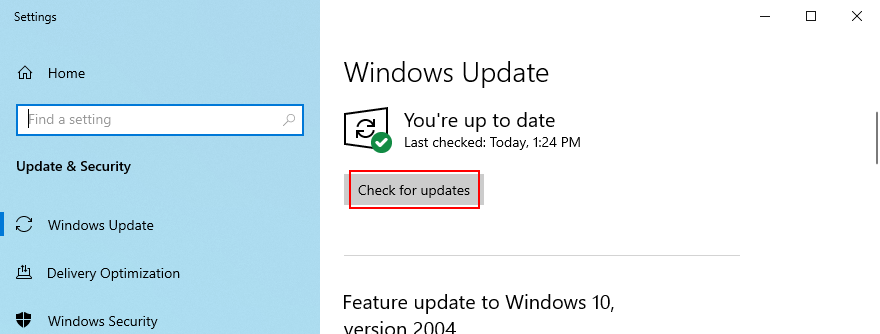
- Если Windows что-то обнаружит, нажмите Загрузить
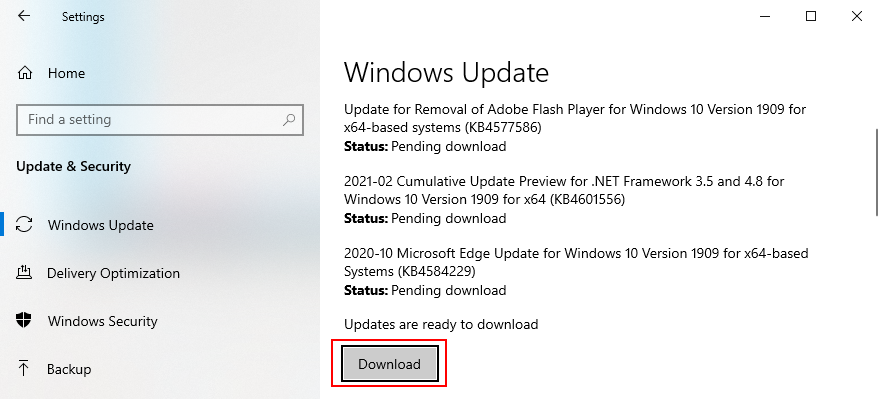
- Терпеливо дождитесь загрузки и установки новых системных обновлений.
- Перезагрузите компьютер.

4. Отключить программное обеспечение для разгона
Люди используют инструменты разгона памяти , чтобы улучшить свой игровой опыт. Однако, если компьютер не оснащен кулером, достаточно мощным, чтобы выдерживать дополнительный нагрев, Windows в конечном итоге отключится и покажет синее сообщение на экране, например VIDEO TDR FAILURE, чтобы предотвратить повреждение жесткого диска и потерю данных.
Если вы точно не знаете, что делаете, вам следует отключить все программные инструменты для разгона, такие как MSI Afterburner , CPU-Z или GPU-Z и сбросить настройки часов компьютера до значений по умолчанию. Если вы настроили разгон в BIOS, обратите внимание на следующее решение в этом списке.
5. Сбросить BIOS до значений по умолчанию
BIOS компьютера содержит широкий спектр настроек, предназначенных для повышения производительности вашей системы. К сожалению, этот план может легко иметь неприятные последствия, если вы или кто-то другой, имеющий доступ к вашему компьютеру, бесцельно изменили настройки BIOS, такие как разгон и кеширование.
Это могло даже привести к ошибкам типа”синий экран”, например nvlddmkm.sys. Самый простой способ решить эту проблему- сброс BIOS до значений по умолчанию .
- Включите компьютер.
- Перед загрузкой Windows быстро нажмите кнопку, показанную на экране, чтобы получить доступ к настройке BIOS
- Доступ к расширенному разделу BIOS.
- Найдите и включите параметр, который сбрасывает данные конфигурации BIOS по умолчанию
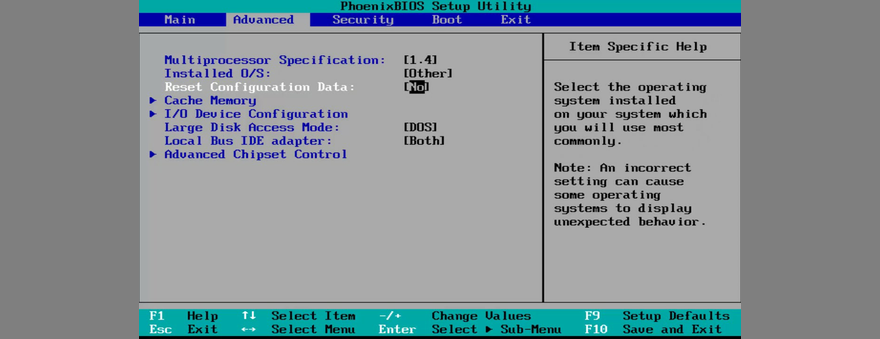
- Сохраните текущие настройки и выйдите.
6. Обновите BIOS
Если вы долгое время не обновляли BIOS или никогда этого не делали, вам следует немедленно приступить к обновлению. Вам просто понадобится USB-накопитель и подключение к Интернету.
- Подключите USB-накопитель к компьютеру.
- Загрузите систему и нажмите кнопку, показанную на экране, чтобы войти в программу настройки BIOS.
- В основном разделе BIOS вы можете узнать производителя, версию и дату установки BIOS.
- Используя эту информацию, запустите Windows на неисправном ПК или используйте другой компьютер с доступом в Интернет, откройте веб-браузер и посетите веб-сайт производителя BIOS.
- Найдите и загрузите последнюю версию BIOS, совместимую с вашей операционной системой.
- Разархивируйте загруженный файл на USB-накопитель.
- Вернитесь в меню BIOS, создайте резервную копию текущей версии BIOS для безопасного хранения и сохраните резервную копию на USB-накопитель.
- Запустите обновление микропрограммы системы и убедитесь, что в это время не выключили и не перезапустили компьютер

7. Восстановите файл nvlddmkm.sys
NVIDIA имеет резервную копию файла nvlddmkm.sys где-то на вашем компьютере, поэтому все, что вам нужно сделать, это найти ее, скопировать и перезаписать поврежденный файл nvlddmkm.sys.
- Откройте Проводник Windows , нажав клавишу Win + E
- В адресной строке введите
%SystemRoot%\System32\Drivers- Найдите файл nvlddmkm.sys и переименуйте его в nvlddmkm.sys.old
- На панели навигации Windows Explorer нажмите Этот компьютер .
- Щелкните поле Искать на этом компьютере и найдите nvlddmkm.sy_
- Скопируйте файл nvlddmkm.sy_
- Нажмите клавиши Win + R , введите cmd и нажмите Enter , чтобы открыть командную строку.
- Запустите
chdir desktop- Затем запустите
expand-r nvlddmkm.sy_ nvlddmkm.sys- Выйти из командной строки
- Перейдите на рабочий стол и скопируйте файл nvlddmkm.sys .
- Вернитесь в
% SystemRoot% \ System32 \ Driversи вставьте файл- Перезагрузите компьютер и проверьте наличие ошибок BSOD.
- В адресной строке введите
8. Очистить системные файлы cookie и временные файлы
Windows сохраняет файлы cookie и временные файлы, которые следует регулярно удалять, чтобы очистить системный кеш и освободить место для новых данных. Если этого не произойдет, это может привести к проблемам со стабильностью системы и ошибкам типа”синий экран смерти”, таким как ОТКАЗ ВИДЕО TDR.
Чтобы решить эту проблему, вам просто нужно очистить системные файлы cookie и временные файлы с помощью специальных инструментов, таких как CCleaner . Или, если вы не хотите устанавливать какие-либо сторонние приложения, вы можете воспользоваться встроенной утилитой очистки диска.
Как использовать очистку диска:
- Нажмите кнопку Пуск , найдите Очистка диска и откройте это приложение.
- Выберите диск, на котором установлена Windows (обычно это C: ), и нажмите OK
- Выберите следующие файлы для удаления:
- Загруженные программные файлы
- Временные файлы Интернета
- Временные файлы
- Нажмите ОК и Удалить файлы для подтверждения.
- Выберите следующие файлы для удаления:
9. Переустановите графический адаптер
Возможно, графический дисплей неправильно установлен на вашем компьютере. Однако это легко исправить в диспетчере устройств.
- Щелкните правой кнопкой мыши кнопку Пуск и выберите Диспетчер устройств
- Разверните категорию Видеоадаптеры .
- Щелкните правой кнопкой мыши адаптер дисплея и выберите Удалить устройство
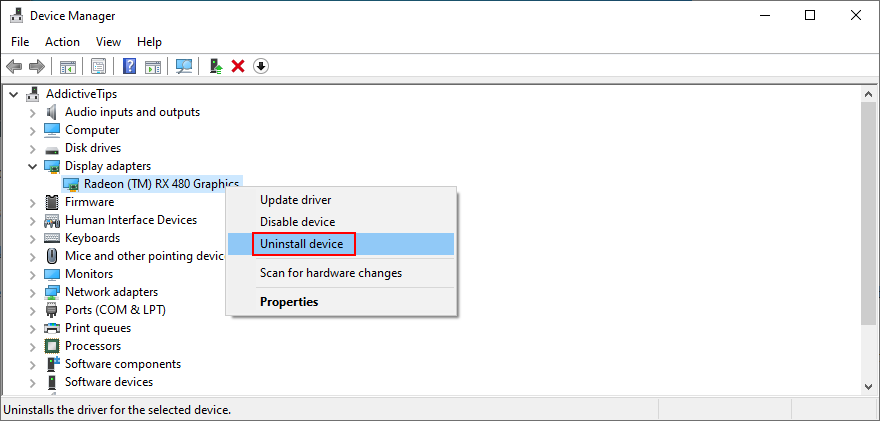
- Перезагрузите компьютер. Windows автоматически установит недостающие адаптеры.
.

10. Обновите драйверы графического процессора
Устаревшие графические драйверы могут вызвать проблемы с видеокартой, игровые проблемы и даже ошибки синего экрана, такие как nvlddmkm.sys. Но вы можете обновить устаревший драйвер графического процессора с минимальными усилиями.
- Откройте Диспетчер устройств , щелкните правой кнопкой мыши адаптер дисплея и выберите Обновить драйвер
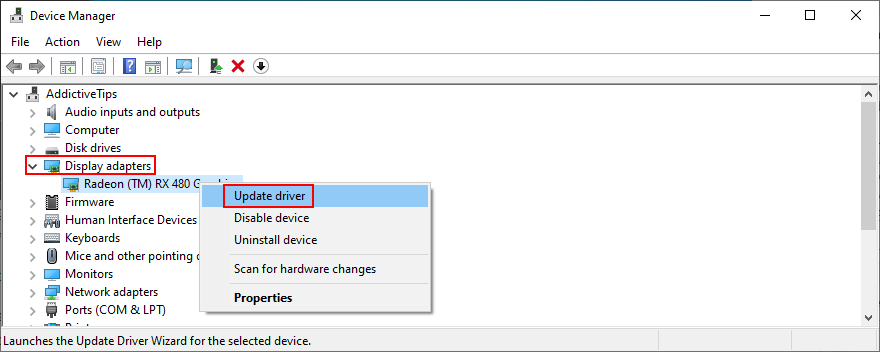
- Нажмите Автоматический поиск драйверов
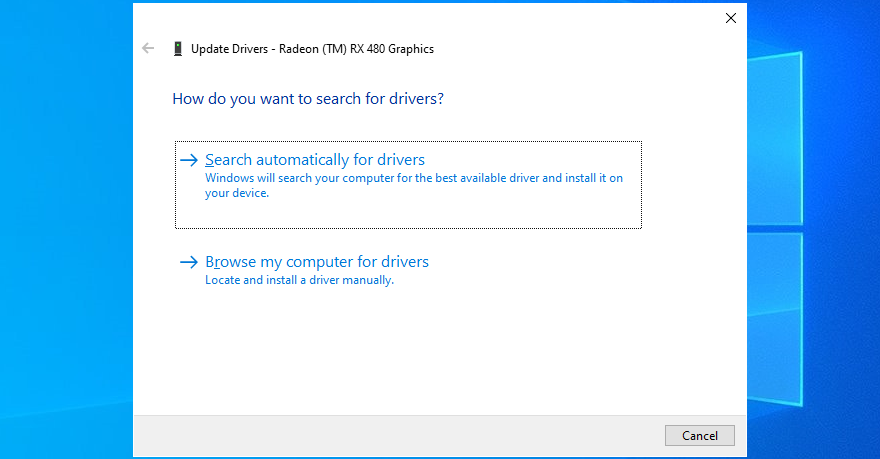
- Если вы получили сообщение Лучшие драйверы для вашего устройства уже установлены , нажмите Искать обновленные драйверы в Центре обновления Windows . Однако, если вы уже проверили свою систему на наличие обновлений, нет необходимости делать это снова

- Перезагрузите компьютер, если драйвер был успешно обновлен.

К сожалению, Windows часто не может найти более новые драйверы в своей базе данных или с помощью компонента Windows Update. В этом случае вы можете дважды щелкнуть адаптер графического процессора в диспетчере устройств, переключиться на вкладку Драйвер и узнать производителя, версию и дату установки драйвера. Используя эту информацию, посетите производителя веб-сайта, чтобы загрузить и установить последнюю версию драйвера.
Однако, если вам сложно этот процесс или вы не хотите рисковать загрузкой неподдерживаемого драйвера, вы можете обратиться к средство обновления драйверов , которое автоматически обнаруживает все устаревшие драйверы на вашем ПК и предлагает сразу установить последние версии. И вы не рискуете получить несовместимые драйверы.
11. Откатить неподдерживаемые драйверы графического процессора
Говоря о несовместимых драйверах графического процессора, многие пользователи ПК загружают их из неизвестных источников, фактически не зная, работают ли они на своих компьютерах.
Если вы один из этих пользователей, вам следует немедленно откатить неподдерживаемый драйвер дисплея, чтобы восстановить стабильность вашего компьютера, устранить повторяющиеся сбои системы и продолжить обновление драйвера.
- Перейдите в Диспетчер устройств и дважды щелкните адаптер графического процессора.
- Перейдите в раздел Драйвер .
- Нажмите Откатить драйвер и следуйте инструкциям на экране. Если кнопка неактивна, это означает, что на вашем компьютере не сохранена предыдущая версия драйвера, поэтому вы можете полностью пропустить это решение.
12. Запустите средство устранения неполадок оборудования и устройств
В Windows 10 есть внутренние средства устранения неполадок для решения общих проблем, возникающих с различными компонентами ПК, включая оборудование и устройства. Обычно его можно найти в Настройках устранения неполадок . Однако, если Средство устранения неполадок оборудования и устройств отсутствует в этом разделе. Вот как вы можете запустить его прямо сейчас:
- Нажмите клавиши Win + R и запустите
msdt.exe-id DeviceDiagnostic - Нажмите Далее и подождите, пока средство устранения неполадок просканирует ваш компьютер
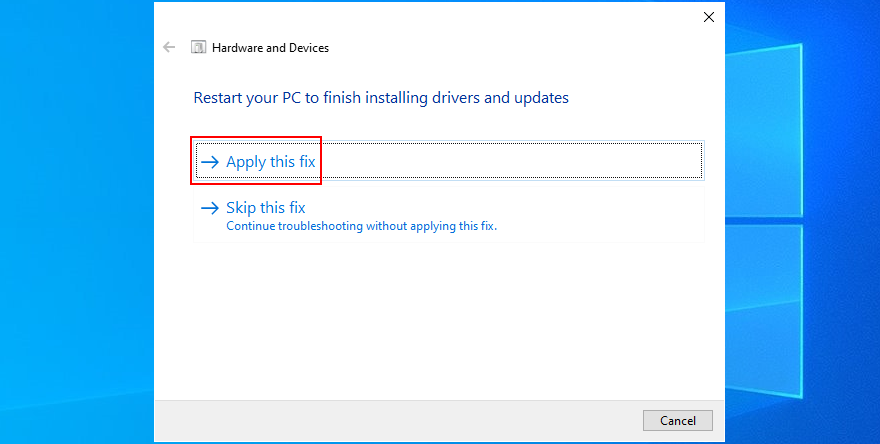
- Если будут найдены обходные пути, нажмите Применить это исправление .
- По завершении перезагрузите компьютер и проверьте наличие ошибок BSOD.

13. Отключить аппаратное ускорение
Многие программные приложения используют аппаратное ускорение для улучшения вашего опыта, будь то игры, просмотр веб-страниц, потоковая передача или что-то еще. Если вы заметили, что ваш компьютер показывает ошибку BSOD после запуска определенного приложения, проверьте настройки программы и найдите параметр аппаратного ускорения, чтобы отключить его. Вот несколько предложений.
Как отключить аппаратное ускорение в Google Chrome :
- В Chrome откройте меню Еще и выберите Настройки

- Выберите Дополнительно > Система (или перейдите в
chrome://settings/system) - Отключите Использовать аппаратное ускорение, если доступно
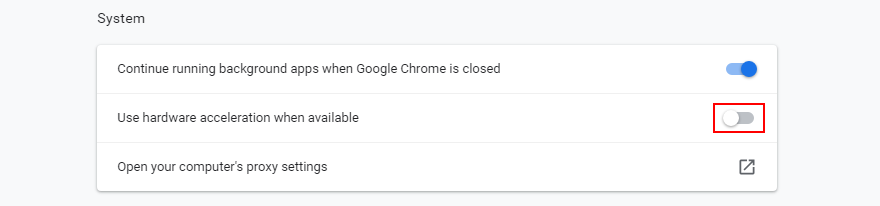
- Перезагрузите Chrome.

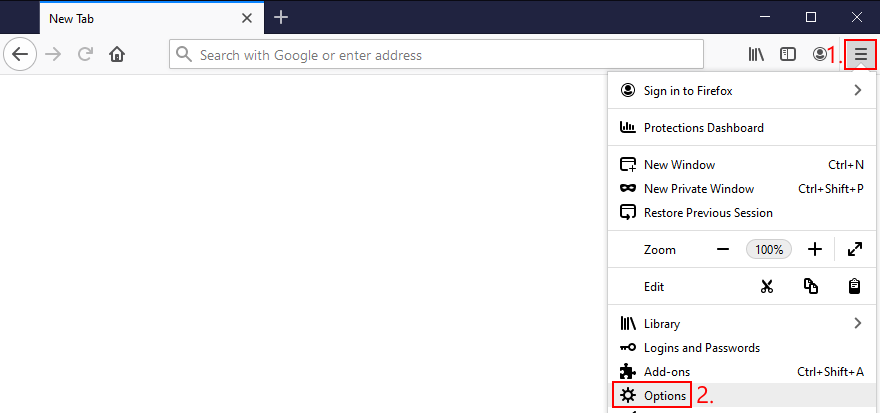
Как отключить аппаратное ускорение в Mozilla Firefox:
- В Firefox откройте меню ≡ и выберите Параметры (или посетите
about: preferences) - In General, locate the Performance section
- Disable Use recommended performance settings
- Also disable Use hardware acceleration when available
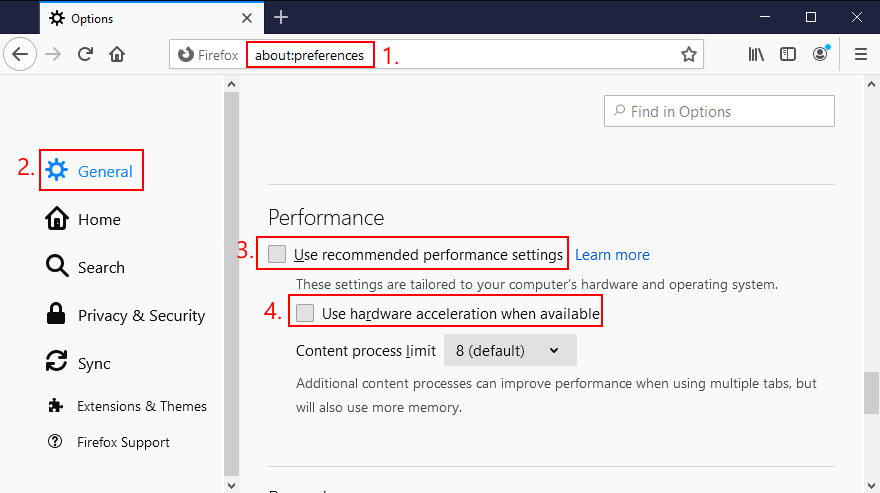
- Restart Firefox
How to disable hardware acceleration in Microsoft Edge:
- In Edge, open the More menu and select Settings
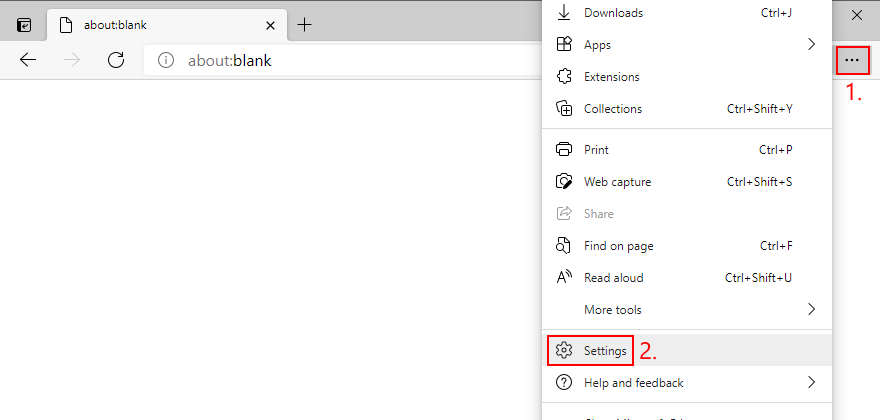
- Go to System (or visit
edge://settings/system) - Disable Use hardware acceleration when available
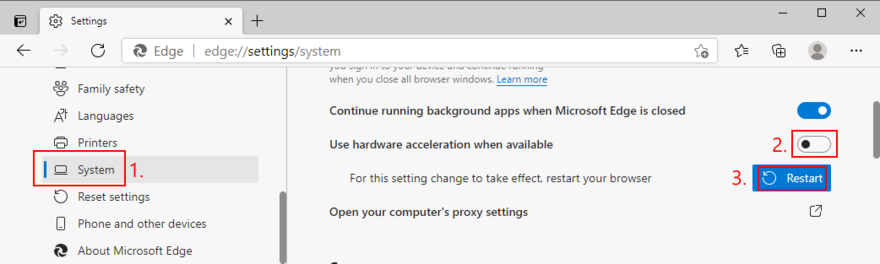
- Restart Edge
14. Analyze the crash dumps
If you’re the type of user who doesn’t shy away from the computer’s technical aspects, you can analyze the crash dumps left behind by the VIDEO TDR FAILURE error, in order to find out the exact driver that’s giving you trouble. Event Viewer is a great assistant for this role.
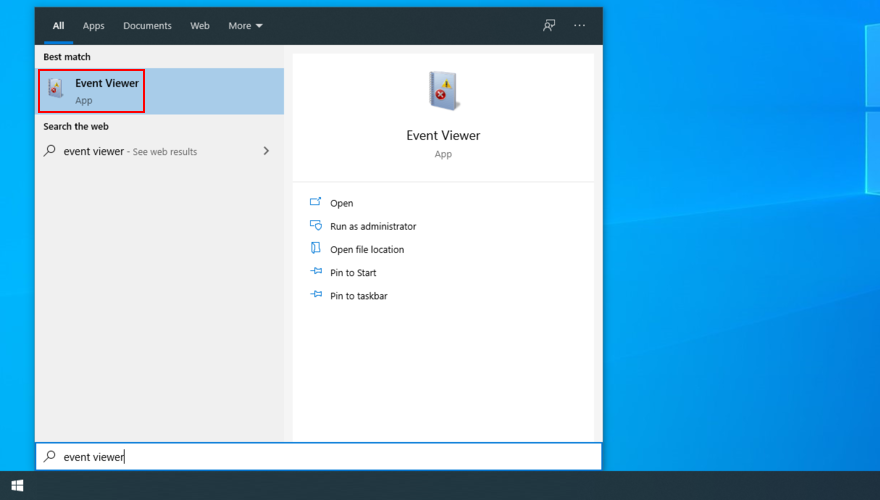
How to use Event Viewer:
- Restart your PC after a system crash
- Immediately press the Win key, search for Event Viewer, and open this app
- In the navigation pane on the left side, go to Windows Logs > System
- Select the first entry that says Error
- Inspect the information from the General and Details tab
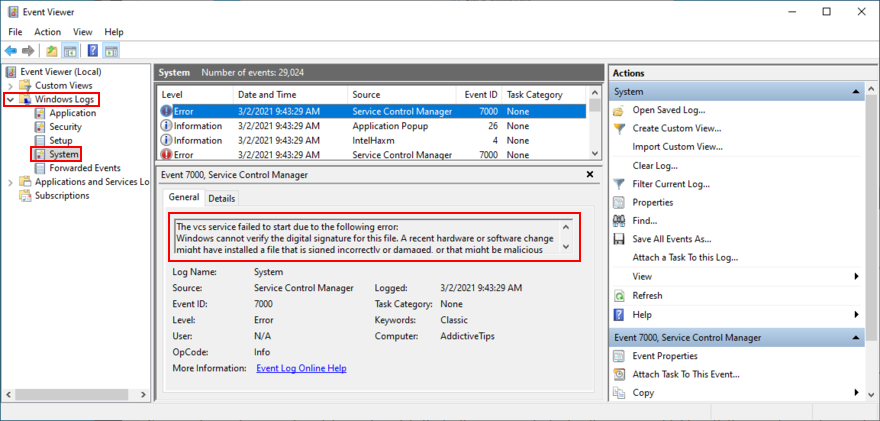
You can use this data to perform a Google search or get in touch with the Microsoft support team. However, if you find Event Viewer to be intimidating, we suggest using BlueScreenView instead. It has the same role but it’s wrapped in a simpler interface and has more intuitive options for analyzing minidump files.
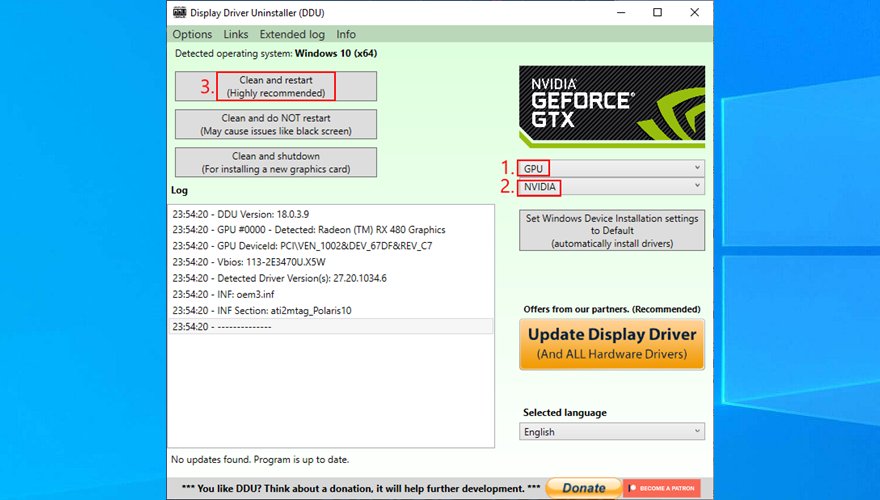
15. Use Display Driver Uninstaller
Display Driver Uninstaller (DDU) is an awesome application that can reset your GPU software and drivers. If display driver nvlddmkm stopped responding on your Windows 10 PC, you can use DDU to safely troubleshoot the BSOD error.
- Make sure to create a system restore point if you haven’t so far
- Download Display Driver Uninstaller from the official website
- Unzip the downloaded archive and open the DDU file
- Start Windows 10 in Safe Mode with Networking (see Solution 1 from this list)
- Open Display Driver Uninstaller.exe
- When prompted with the configuration window, leave everything as is and click OK to continue
- Select GPU and NVIDIA from the two menus on the right side
- Then, click Clean and restart
16. Remove and reseat the GPU card
It’s possible that your graphics card needs to be reattached to your computer unit. If it’s not properly connected, this could trigger Blue Screen of Death errors like the VIDEO TDR FAILURE stop code.
Shut down your desktop, unplug all cables, remove the computer chassis, and carefully detach the GPU card. Then, put it back in the same slot firmly but without using force. Turn on your computer and see if anything changed.
17. Try the GPU card on another computer
If your graphics card is malfunctioning and needs to be replaced, then all your efforts at attempting to resolve the blue screen problem at the software level will have been in vain.
A simple way to test this is by removing the GPU card from your computer and inserting it into another PC, preferably with a clean Windows installation. If the system starts glitching, it should be pretty clear that you need to replace your hardware. Check out the best GPU cards for gaming.
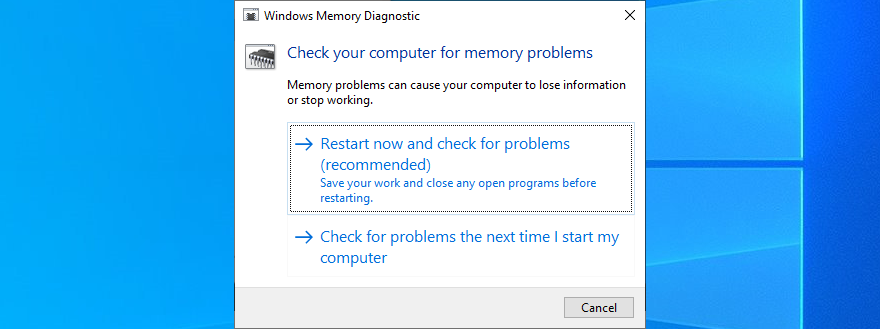
18. Check system memory
System memory issues can affect the entire computer, leading to blue screen errors like nvlddmkm.sys. You can easily run a check-up by turning to Windows Memory Diagnostic, a tool that comes bundled with Windows 10.
How to use Windows Memory Diagnostic:
- Save your current work and close all programs
- Press Win key + R, type
mdsched.exe, and hit the Enter key - Click Restart now and check for problems
Your operating system will reboot and start running memory tests. It runs a standard test by default. However, if you have a bit of time on your hands, we suggest switching to the Extended test in order to obtain more accurate information about any potential RAM issues.
Press F1 to open the options section, select Extended, and press F10 to apply this setting. The entire memory test can take a long time, so you can leave your PC unattended since your intervention will not be required. Once the test is complete, Windows 10 boots as usual and shows the test results in the notifications center.
19. Use Startup Repair
If Windows 10 is experiencing boot problems, this can lead to all sorts of computer issues, including BSOD errors with the VIDEO TDR FAILURE stop code. But you can fix startup issues by running the Startup Repair tool from the Advanced Startup menu. Before doing so, you need an empty USB flash drive and Internet access to set up a system installation disk.
How to create a Windows 10 installation media disk:
- Plug a USB flash drive into the PC and make sure to save any important files saved there since the drive will be formatted
- Download Media Creation Tool from the official website
- Open Media Creation Tool and follow the steps to create a Windows 10 installation media disk on the USB flash drive
How to run Startup Repair:
- Make sure the USB flash drive with the Windows 10 installation media is plugged into the PC
- Click the Start button and open the menu with the power options
- While holding down the Shift key, click Restart to boot Windows 10 to the troubleshoot menu
- Go to Troubleshoot > Advanced options > Startup Repair
- Select your administrator account and enter your password to continue
- Follow the given instructions to complete the startup repair sequence
20. Fix HDD issues
Your hard drive may have corrupt files or bad sectors which prevent Windows from operating normally, But you can fix HDD issues without having to use a third-party software application, thanks to CHKDSK (Check Disk).
- Press Win key + R, type CMD, and press Ctrl + Shift + Enter to open Command Prompt with administrator rights

- If your OS is installed on the C: drive, run
chkdsk c:/f/r. Else, replacec:with the correct partition letter- If you don’t know Windows’ whereabouts, choose a drive letter when entering the run command (e.g.
run d:) and view its containing folders (run dir). Keep listing folders for multiple drive letters until you see the Windows directory
- If you don’t know Windows’ whereabouts, choose a drive letter when entering the run command (e.g.
- When asked to confirm scheduling CHKDSK during the next system reboot, type y and press Enter
- Restart your computer and wait for CHKDSK to do its job
21. Repair corrupt system files
Not only hard disk problems but also damaged, modified, or missing OS files can cause blue screen errors on your computer. To restore system files on Windows 10, you can run DISM (Deployment Image Servicing and Management) and SFC (System File Checker).
- Start Windows 10 in Safe Mode with Networking (see Solution 1)
- Click the Start button, type cmd, and open Command Prompt
- Run
DISM.exe/Online/Cleanup-image/RestoreHealth. However, if the Windows Update component is broken, this command won’t work. Instead, you can create a Windows 10 installation media disk (see Solution 19) and set it as the repair source:DISM.exe/Online/Cleanup-Image/RestoreHealth/Source:C:\RepairSource\Windows(replaceC:\RepairSource\Windowswith the full path to your Windows 10 installation media disk) - After DISM does its job, run SFC (
sfc/scannow). If SFC is successful, it shows the Windows Resource Protection did not find any integrity violations message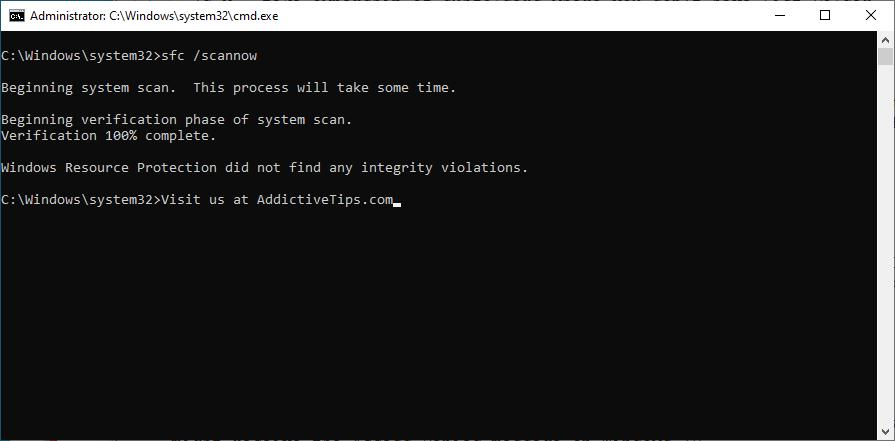
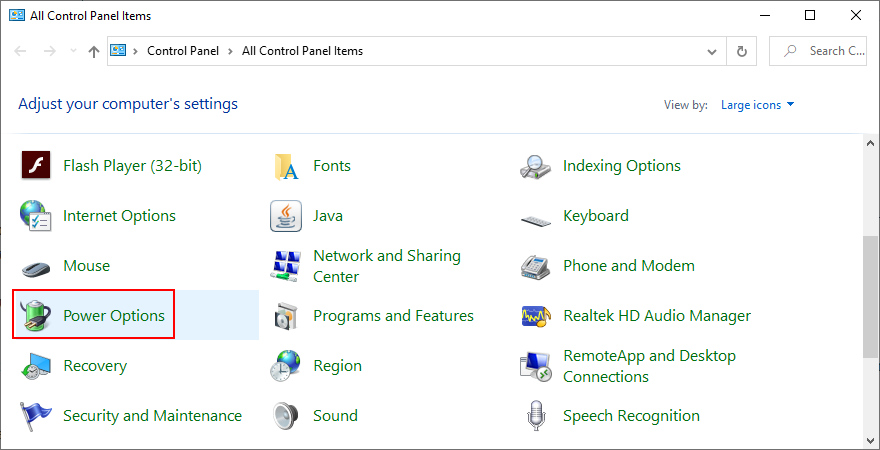
22. Disable Fast Startup
Fast Startup is a Windows component that boots your operating system faster by pre-loading drivers. Unfortunately, it’s known to cause serious PC problems. If drivers are not properly shut down and restarted, it could trigger blue screen errors like nvlddmkm.sys.
To solve this problem, you can disable Fast Startup:
- Press the Win key, search for Control Panel, and open this app
- Double-click Power Options
- Click Choose what the power buttons do
- Click Change settings that are currently unavailable (admin rights are required)
- Disable Turn on fast startup and click Save changes
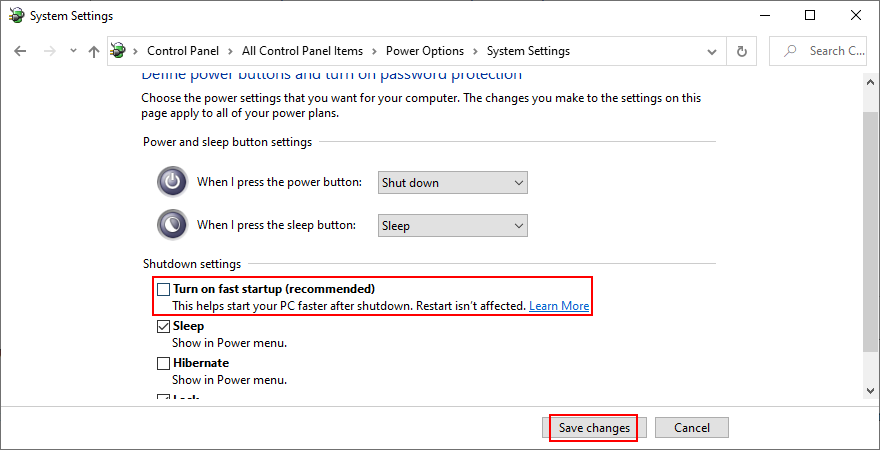
- Restart your computer
23. Disable the PCI Express power option
Many users reported that turning off the PCI Express power option helped fix the VIDEO TDR FAILURE error on their computer. Here’s what you need to do:
- Click the Start button, type edit power plan, and press Enter
- Click Change advanced power settings
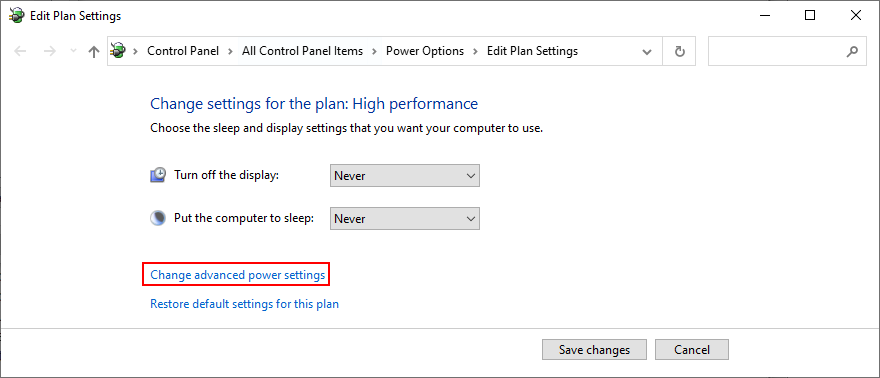
- Expand the PCI Express group
- Set Link State Power Management to Off
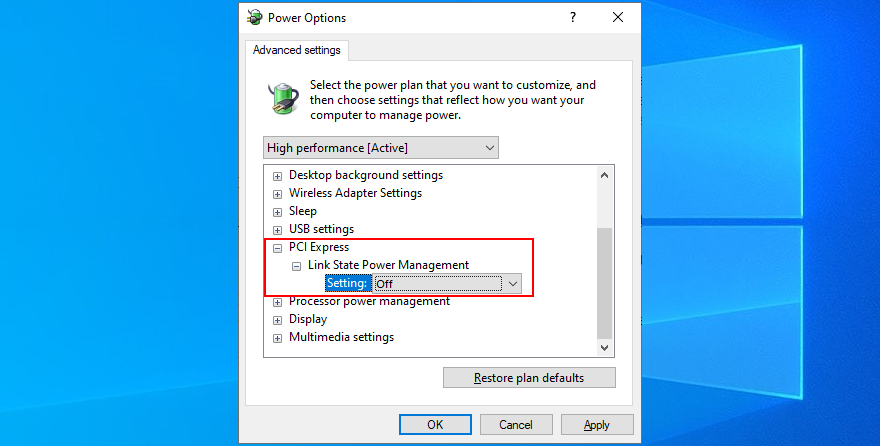
- Click Apply
- Restart your computer
24. Run a malware scan
Malware infections can be severe enough to corrupt critical system files and prevent you from running system tools like Task Manager or Command Prompt. If you suspect that your computer was recently infected with a virus, you should run a scan to eliminate any threats and regain the control of your PC.
How to run a malware scan with Windows Defender:
- Press the Windows key, type Windows Security, and launch this tool
- Select Virus & threat protection
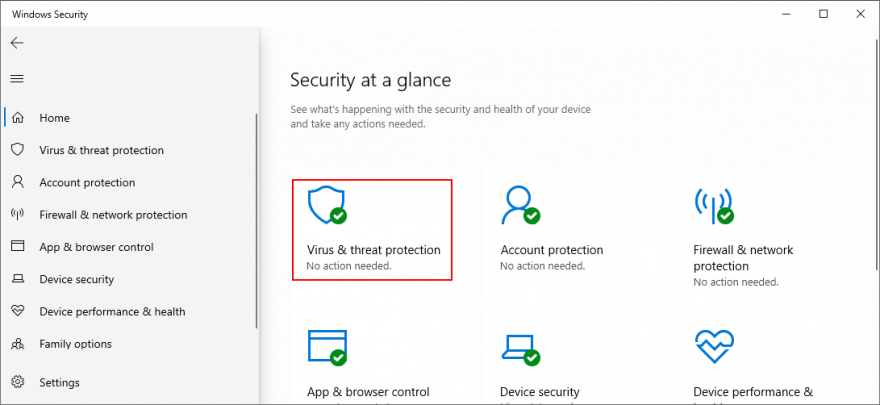
- Click Scan options
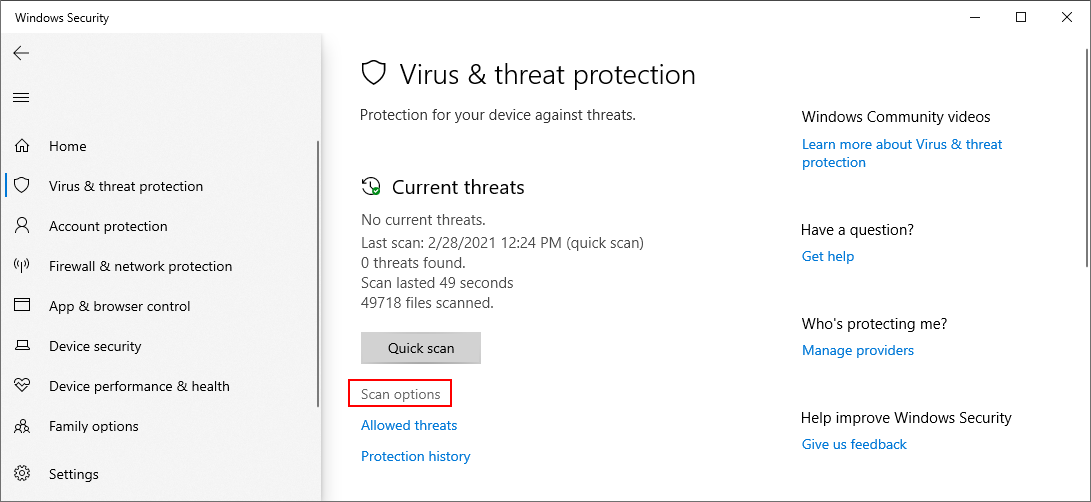
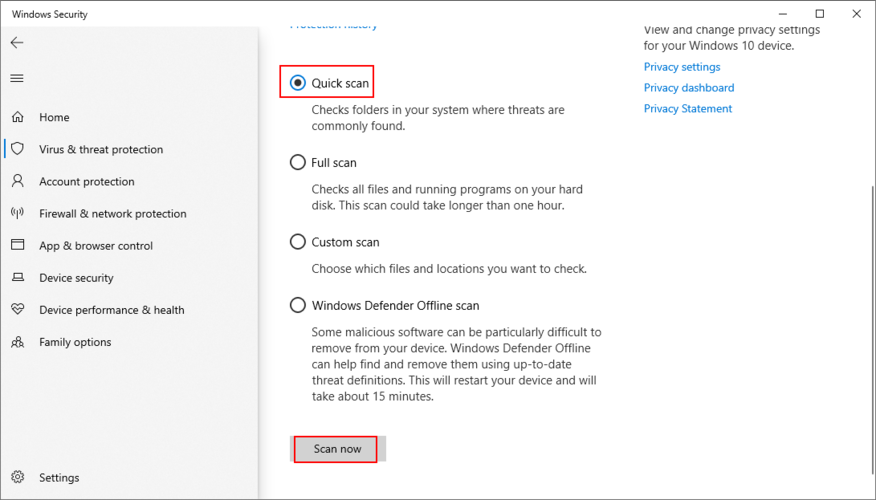
- Choose Quick scan and press Scan now
- If the computer search reveals nothing, select Windows Defender Offline scan and click Scan now
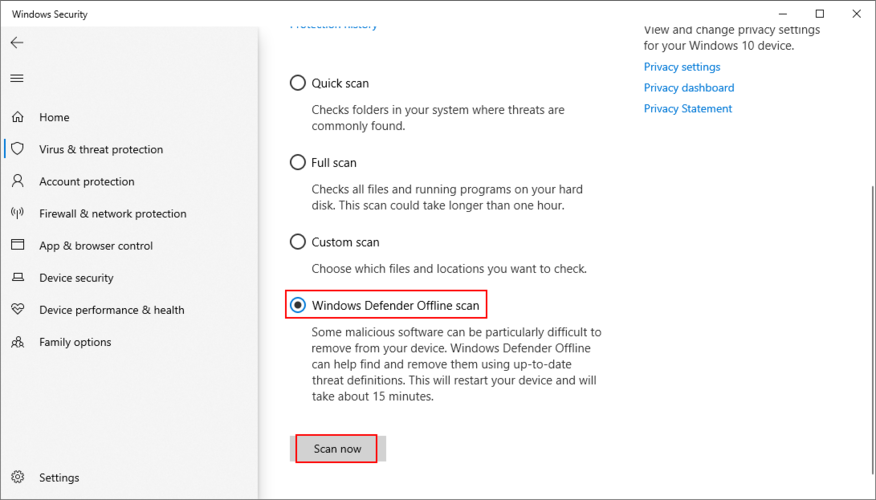
- Allow Windows Defender to remove or quarantine any threats. If you think it has wrongfully detected safe files as malware, make sure to add them to the whitelist in order to exclude the items from future scans
25. Fix the system registry
Missing, modified, corrupt, or incorrect registry settings can be devastating for your operating system and can even trigger blue screen errors like nvlddmkm.sys. But you can restore the original registry configuration from Command Prompt before system boot.
- Click the Start button and open the power menu
- Hold down the Shift key and click Restart to reboot Windows in Advanced Startup mode
- Select Troubleshoot > Advanced options > Command Prompt
- Pick your admin account and enter your password
- Run these commands (press Enter after each line):
-
cd %SystemRoot%System32\config
-
ren %SystemRoot%System32\config\DEFAULT DEFAULT.old
-
ren %SystemRoot%System32\config\SAM SAM.old
-
ren %SystemRoot%System32\config\SECURITY SECURITY.old
-
ren %SystemRoot%System32\config\SOFTWARE SOFTWARE.old
-
ren %SystemRoot%System32\config\SYSTEM SYSTEM.old
-
copy %SystemRoot%System32\config\RegBack\DEFAULT %SystemRoot%System32\config\
-
copy %SystemRoot%System32\config\RegBack\DEFAULT %SystemRoot%System32\config\
-
copy %SystemRoot%System32\config\RegBack\SAM %SystemRoot%System32\config\
-
copy %SystemRoot%System32\config\RegBack\SECURITY %SystemRoot%System32\config\
-
copy %SystemRoot%System32\config\RegBack\SYSTEM %SystemRoot%System32\config\
-
copy %SystemRoot%System32\config\RegBack\SOFTWARE %SystemRoot%System32\config\
-
- Start Windows as usual
26. Unplug external devices
If you have recently attached new hardware components into your desktop or laptop, such as a webcam, a USB flash drive, a microphone, headphones, or a wireless network adapter, it’s possible that the device is experiencing compatibility issues with your Windows 10 PC, triggering the VIDEO TDR FAILURE stop code as a result.
You can easily test this by unplugging all external devices from your PC, except for your keyboard and mouse, in order to inspect results. If the keyboard and mouse are also brand new, try replacing them if you have others.
27. Use System Restore
System Restore allows you to revert Windows 10 to a checkpoint that was recorded before you started experiencing blue screen errors. However, it means that System Restore must be enabled on your computer and at least one restore point must have been created prior to the BSOD event.
Even if you didn’t manually set up a restore point, it’s possible that some of your applications did, such as driver updaters, so it doesn’t hurt to at least check.
How to use System Restore:
- Sign in to Windows 10 using an administrator account
- Press the Win key, type Control Panel, and launch this app
- Go to Recovery
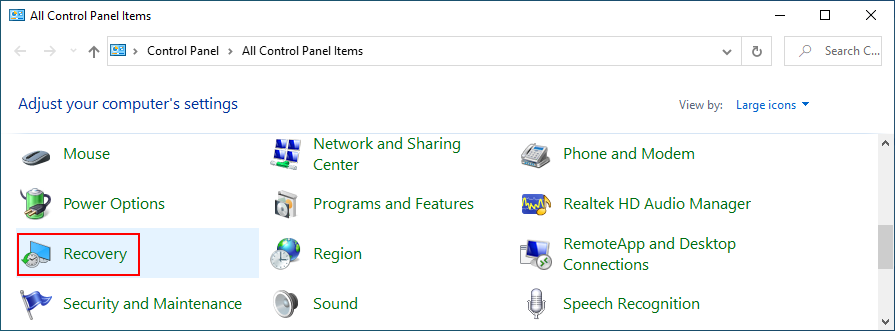
- Click Open System Restore
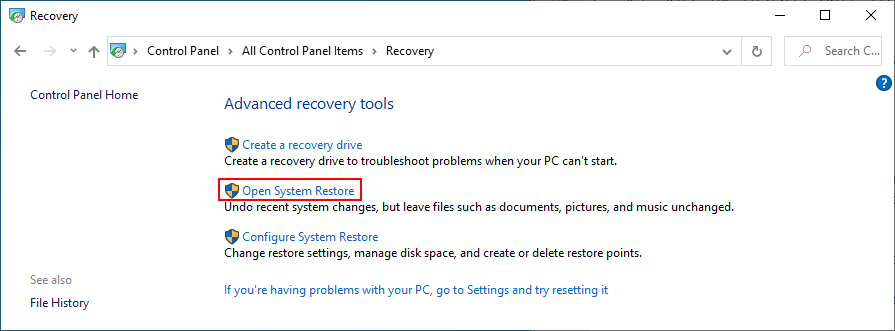
- Select a restore point or click Show more restore points to evaluate more options. You can also click Scan for affected programs to find out which applications you will have to reinstall after restore
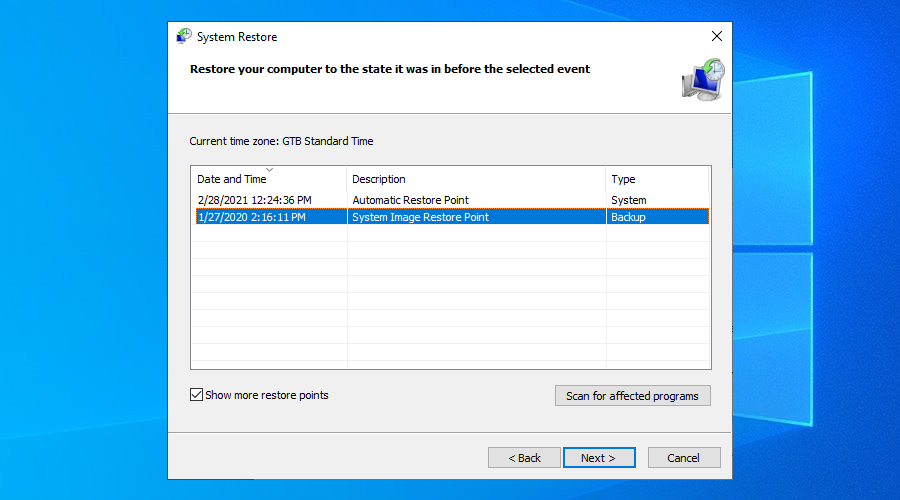
- Click Next and follow the instructions. Your PC will reboot
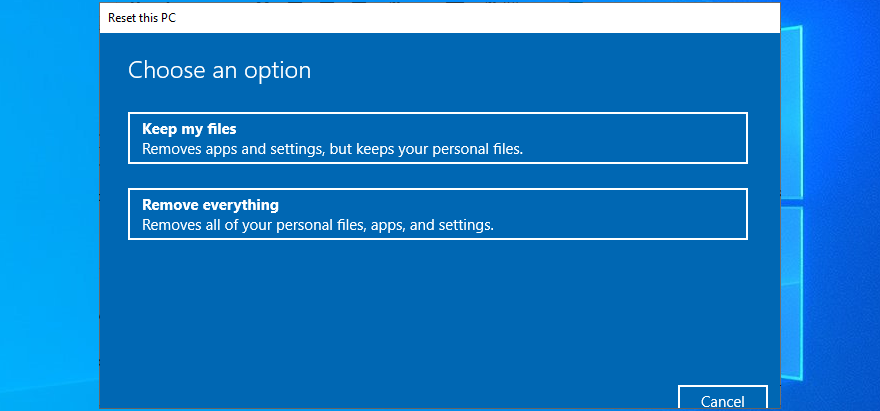
28. Reset Windows 10
If everything failed up until this point, you should prepare Windows 10 for factory reset in order to uninstall all programs and restore system settings to default. The good news is that your personal files will be left untouched.
But make sure to write down all applications you will have to install, save program preferences, and get hold of serial keys required for reactivation. Then, proceed to the following steps:
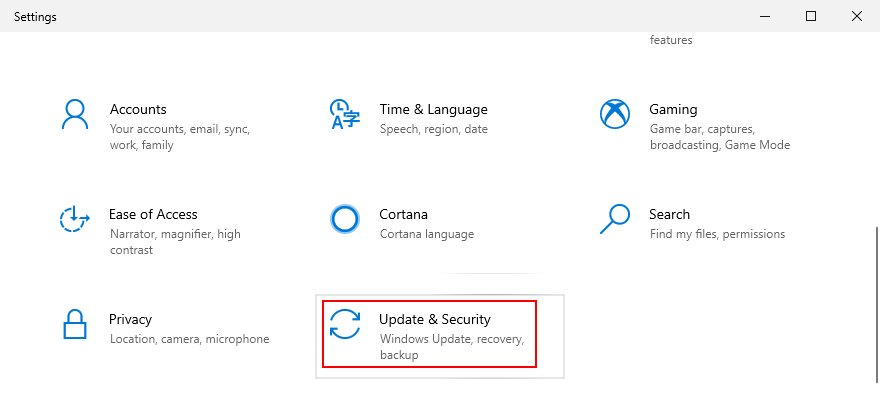
- Right-click the Start button and go to Settings
- Select Update & Security
- Choose Recovery and click Get started
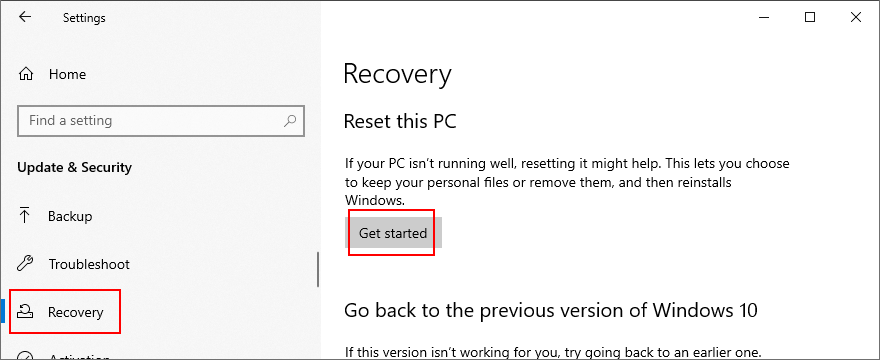
- Click Keep my files and follow the remaining instructions
Stop code VIDEO TDR FAILURE (nvlddmkm.sys) can be fixed on Windows 10
To recap, VIDEO TDR FAILURE is a BSOD error that indicates a problem with your video settings. If it’s accompanied by the nvlddmkm.sys file, it means that you can troubleshoot the file errors to get rid of system crashes.
To fix this problem, you can start Windows 10 in Safe Mode, run a clean system boot, check for system updates, disable overclocking software, reset and update BIOS, restore the nvlddmkm.sys file, clear system cookies and temp files, reinstall the graphics adapter, as well as update or roll back GPU drivers.
It’s also a good idea to run the Hardware and Devices troubleshooter, disable hardware acceleration, analyze crash dumps, use Display Driver Uninstaller, remove and reseat the GPU card, try the GPU card on another computer, check system memory, use Startup Repair, or fix HDD issues and corrupt system files.
In addition, you can disable Fast Startup and the PCI Express power option, run a computer malware scan, fix the system registry, unplug external devices, and use System Restore to roll back Windows 10 to a previous checkpoint. If all these solutions fail, you can go to the last resort, which means resetting Windows 10 to factory settings.
How did you manage to fix the nvlddmkm.sys file and VIDEO TDR FAILURE stop code? Tell us all about it in the comments section below.