ไม่มีอะไรแย่ไปกว่าการเตรียมพร้อมที่จะเล่นวิดีโอเกมกับเพื่อนของคุณเพียงเพื่อให้ ข้อความจอฟ้ามรณะ (BSOD) ที่เข้าควบคุมคอมพิวเตอร์ของคุณ ปิดตัวลง ทุกอย่างและป้องกันไม่ให้คุณทำอะไรนอกจากรีสตาร์ท
ข้อผิดพลาด BSOD แตกต่างกันไปและระบุถึงปัญหาที่ทำให้คอมพิวเตอร์ของคุณปิดตัวเองและป้องกันความเสียหายของฮาร์ดแวร์และการสูญหายของข้อมูลที่สำคัญ ปัญหาคือรหัสข้อผิดพลาดอาจถอดรหัสได้ยากหากไม่มีความรู้ด้านเทคนิค
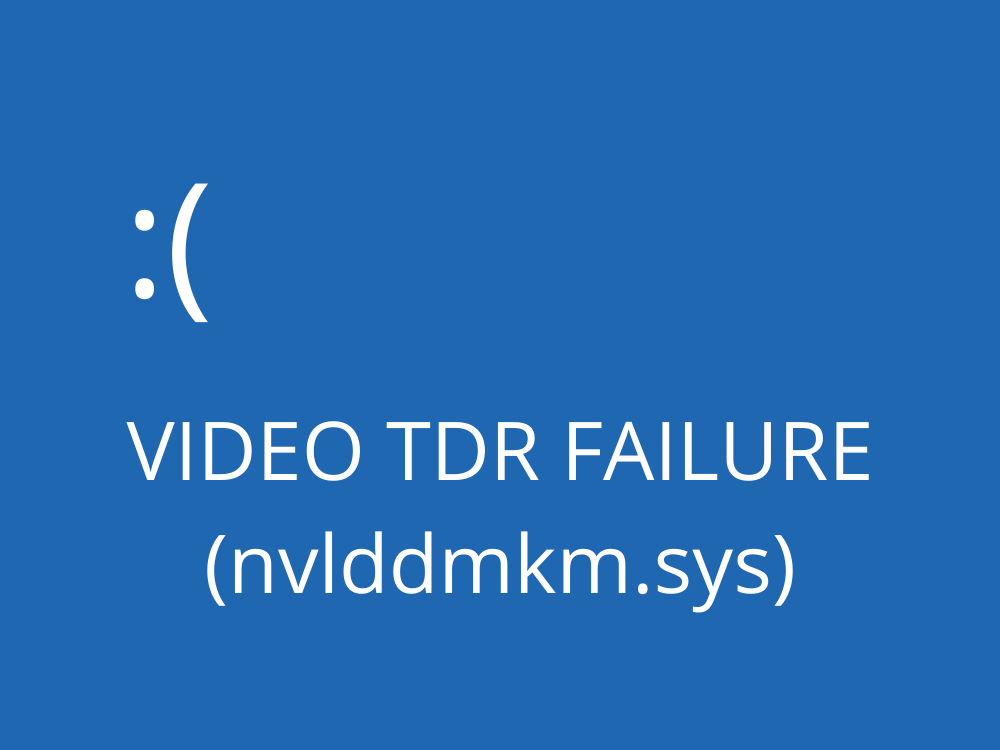
ตัวอย่างเช่น VIDEO TDR FAILURE คือรหัสหยุด BSOD ที่สามารถเกิดขึ้นได้บนคอมพิวเตอร์ที่มีการ์ดแสดงผล NVIDIA หน้าจอทั้งหมดของคุณเปลี่ยนเป็นสีน้ำเงิน แสดง พีซีของคุณประสบปัญหาและจำเป็นต้องรีสตาร์ทข้อความ และระบุว่า nvlddmkm.sys เป็นไฟล์ที่มีปัญหา nvlddmkm.sys เป็นไดร์เวอร์ และชื่อเต็มคือ NVIDIA Windows Kernel Mode Driver
วิดีโอ TDR ล้มเหลวใน Windows 10 – แก้ไข
ก่อนที่จะหาวิธีแก้ไขปัญหาข้อผิดพลาด VIDEO TDR FAILURE สร้างจุดคืนค่าระบบ หากมีอะไรเกิดขึ้นและคุณจำเป็นต้องเลิกทำการเปลี่ยนแปลงทั้งหมด คุณสามารถย้อนกลับ Windows 10 ไปยังจุดตรวจสอบและเริ่มการแก้ไขปัญหาตั้งแต่ต้นจนจบได้
1. nvlddmkm.sys ล้มเหลว? เริ่ม Windows 10 ในเซฟโหมด
หากคุณประสบปัญหาในการใช้คอมพิวเตอร์เนื่องจากระบบขัดข้องทันทีแสดงหน้าจอสีน้ำเงินและเข้าสู่ลูปการรีบูตคุณสามารถ เริ่ม Windows 10 ในเซฟโหมด:
- เปิดและปิดพีซีของคุณสามครั้งเพื่อเรียกใช้โหมดการแก้ไขปัญหา Windows 10
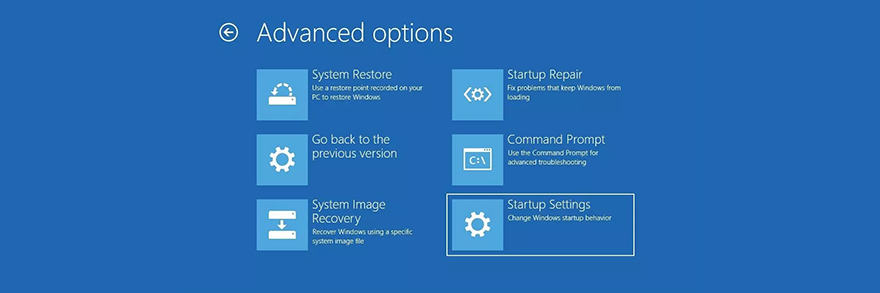
- ไปที่ แก้ปัญหา > ตัวเลือกขั้นสูง > การตั้งค่าเริ่มต้น
- คลิก รีสตาร์ท และรอสักครู่
- กด F5 เพื่อเปิดใช้งาน Safe Mode with Networking
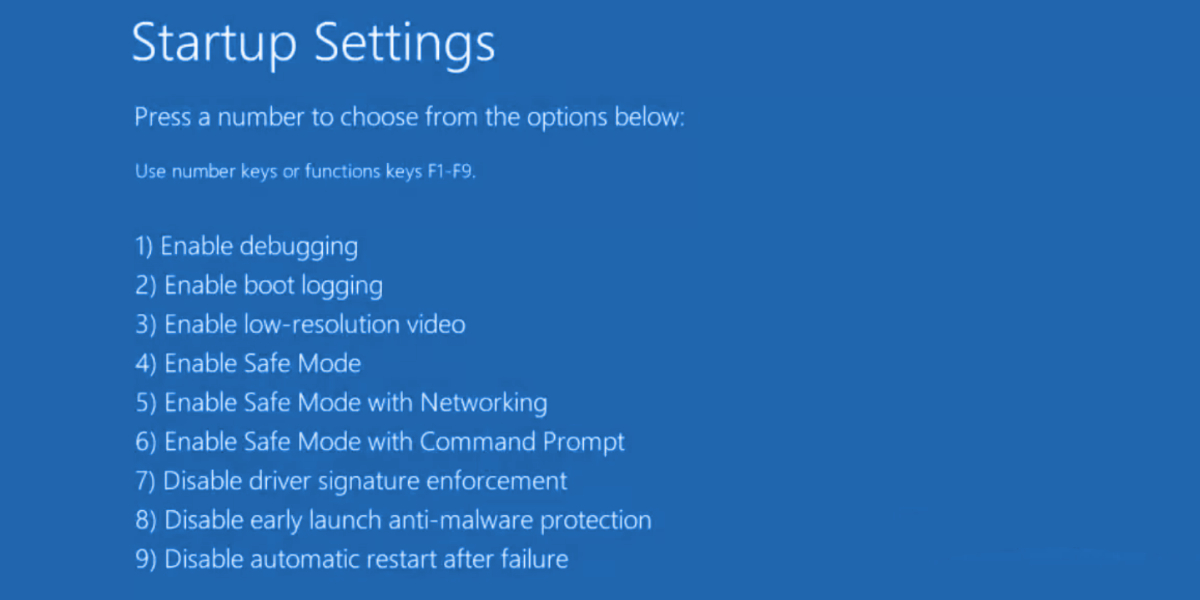
- หลังจากบู๊ต Windows ให้ตรวจสอบว่าคุณยังคงได้รับข้อผิดพลาด nvlddmkm หรือไม่ หากยังดำเนินการอยู่ ให้ทำตามขั้นตอนด้านบนเพื่อไปที่ตัวเลือก Safe Mode และเลือก F4 เพื่อเปิดใช้งาน Safe Mode โดยไม่มีคุณลักษณะเครือข่าย
2. เรียกใช้คลีนบูต
หาก Safe Mode กลายเป็นกุญแจสำคัญในการทำให้ระบบปฏิบัติการของคุณเสถียรและป้องกันไม่ให้แสดงข้อผิดพลาด BSOD คุณสามารถ คลีนบูต Windows 10 เพื่อปิดใช้งานการเริ่มต้นและบริการที่อาจทำงานผิดปกติและทำให้เกิดข้อผิดพลาด VIDEO TDR FAILURE
- ทำตามขั้นตอนในโซลูชันที่ 1 เพื่อเริ่ม Windows 10 ในเซฟโหมด
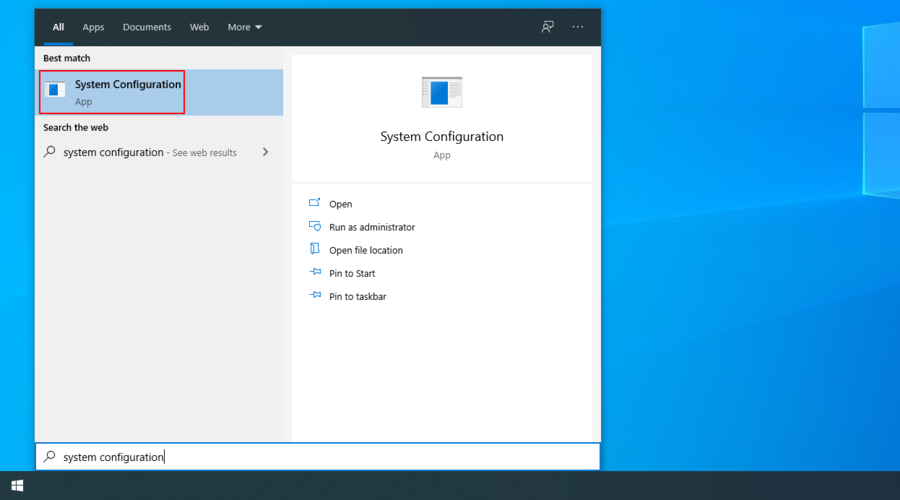
- คลิกปุ่ม เริ่ม ค้นหา การกำหนดค่าระบบ และเปิดแอปนี้
- ในแท็บ ทั่วไป ให้เลือกตัวเลือก การเริ่มต้นระบบแบบเลือก
- ปิดใช้งาน โหลดบริการของระบบ และ โหลดรายการเริ่มต้น
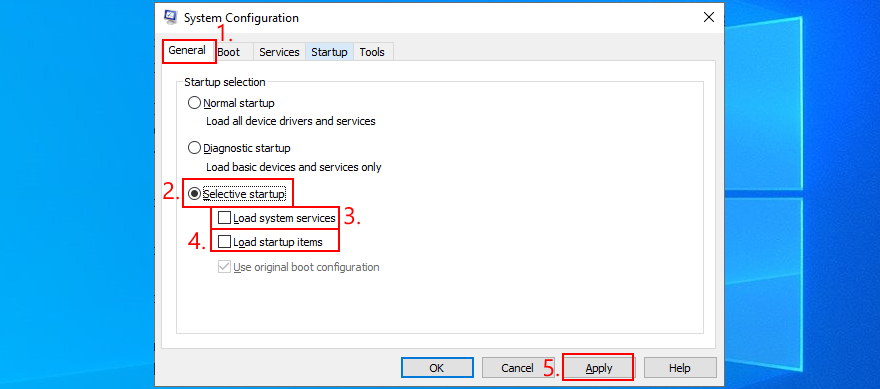
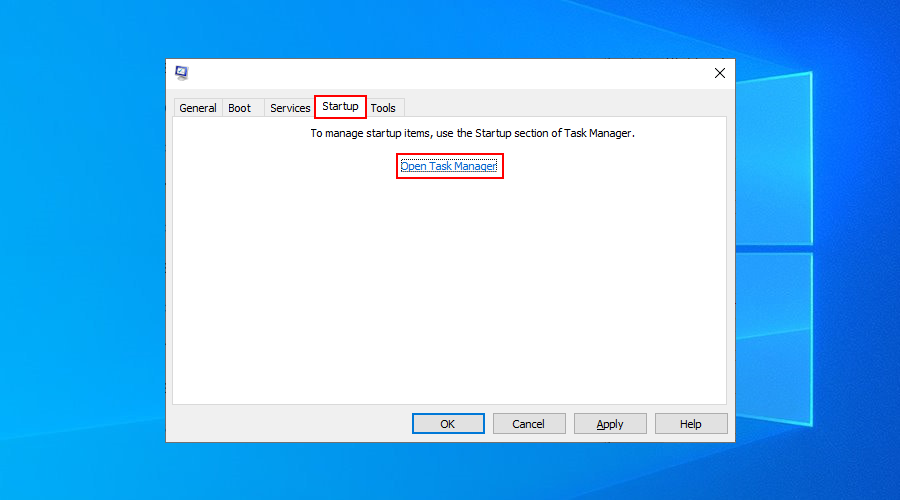
- คลิก ใช้ และไปที่ส่วน เริ่มต้น
- คลิก เปิดตัวจัดการงาน
- เลือกแอปพลิเคชันที่มีสถานะ เปิดใช้งาน แล้วคลิก ปิดใช้งาน ทำให้สิ่งนี้เกิดขึ้นกับทุกแอปที่มีสถานะเปิดใช้งาน
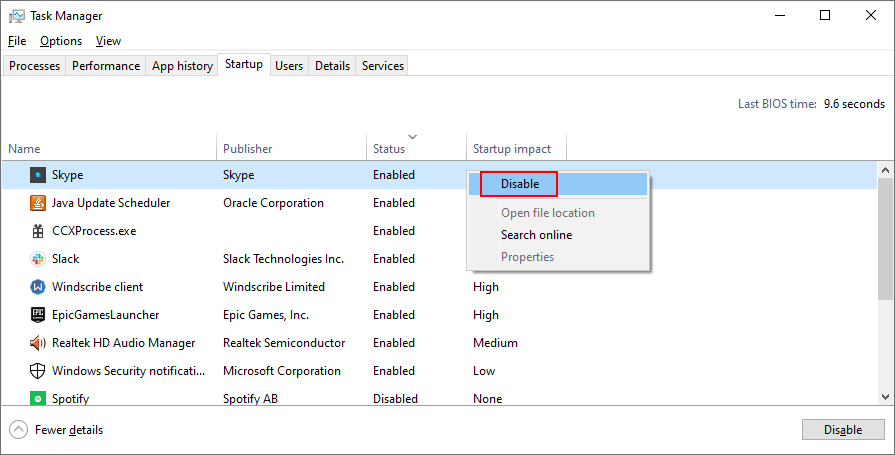
- รีบูตพีซีของคุณและตรวจสอบผลลัพธ์

3. ตรวจสอบการอัปเดตระบบ
หากคุณไม่ได้ใช้ Windows Update เป็นเวลานานคุณอาจพลาดการอัปเดตสำคัญที่ออกแบบมาเพื่อแก้ไขข้อผิดพลาดของระบบ เนื่องจากเป็นส่วนประกอบสำคัญของระบบปฏิบัติการ Windows Update จึงควรทำงานในพื้นหลังและแจ้งให้คุณทราบทุกครั้งที่มีการอัปเดตที่รอดำเนินการ แต่ถ้า การอัปเดตระบบอัตโนมัติปิดอยู่ในอุปกรณ์ของคุณ ควรเปิดด้วยตนเอง
- กดปุ่ม ชนะ พิมพ์ ตรวจสอบการอัปเดต และกด Enter
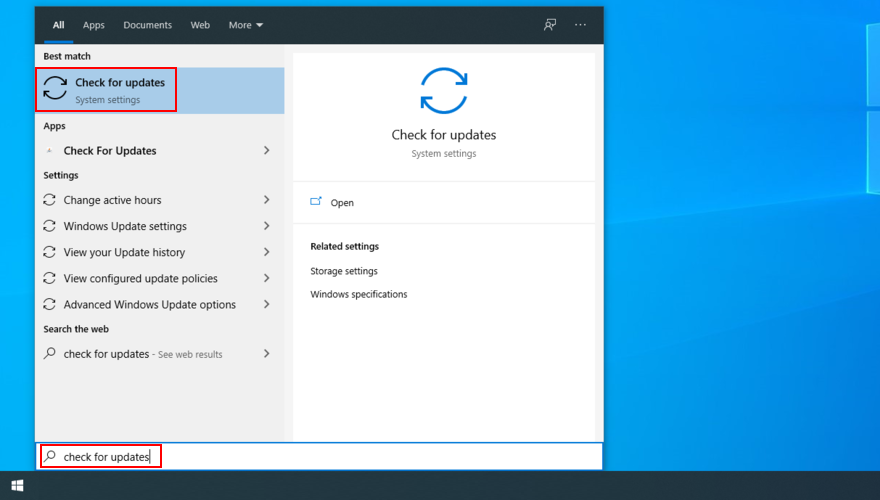
- คลิก ตรวจหาการอัปเดต และรอ

- หาก Windows พบสิ่งใด ให้คลิก ดาวน์โหลด
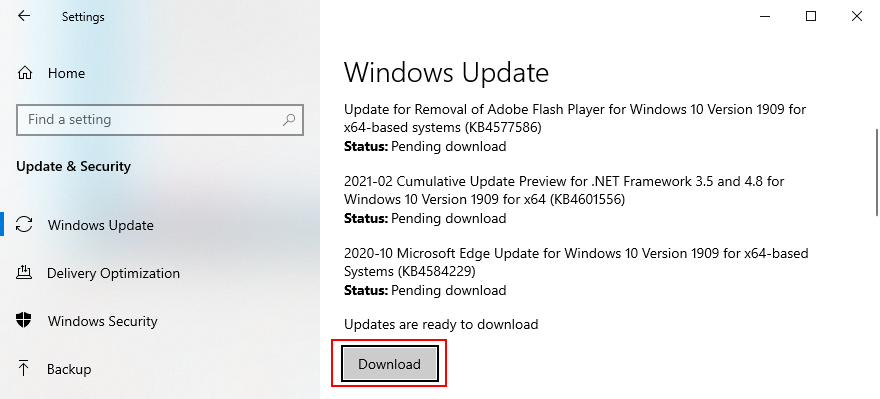
- อดทนรอจนกว่าจะดาวน์โหลดและติดตั้งการอัปเดตระบบใหม่
- รีสตาร์ทคอมพิวเตอร์ของคุณ
4. ปิดใช้งานซอฟต์แวร์โอเวอร์คล็อก
ผู้คนใช้ เครื่องมือโอเวอร์คล็อกหน่วยความจำ เพื่อ ปรับปรุงประสบการณ์การเล่นเกมของพวกเขา อย่างไรก็ตาม หากคอมพิวเตอร์ไม่มีตัวทำความเย็นที่มีพลังมากพอที่จะรักษาความร้อนที่เพิ่มขึ้น ในที่สุด Windows จะปิดตัวเองลงและแสดงข้อความหน้าจอสีน้ำเงิน เช่น VIDEO TDR FAILURE เพื่อป้องกันความเสียหายของ HDD และข้อมูลสูญหาย
หากคุณไม่ทราบว่ากำลังทำอะไรอยู่ คุณควรปิดใช้งานเครื่องมือซอฟต์แวร์โอเวอร์คล็อก เช่น MSI Afterburner, CPU-Z or GPU-Z และรีเซ็ตการตั้งค่านาฬิกาของคอมพิวเตอร์เป็นค่าเริ่มต้น หากคุณกำหนดค่าการโอเวอร์คล็อกใน BIOS ให้ตรวจสอบแนวทางแก้ไขปัญหาถัดไปในรายการนี้
5. รีเซ็ต BIOS เป็นค่าเริ่มต้น
BIOS ของคอมพิวเตอร์ประกอบด้วยการตั้งค่าการปรับแต่งที่หลากหลายซึ่งออกแบบมาเพื่อปรับปรุงประสิทธิภาพของระบบ ขออภัย แผนนี้อาจย้อนกลับมาได้อย่างง่ายดาย หากคุณหรือบุคคลอื่นที่สามารถเข้าถึงคอมพิวเตอร์ของคุณได้เปลี่ยนการตั้งค่า BIOS อย่างไม่มีจุดหมาย เช่น การโอเวอร์คล็อกและการแคช
มันอาจนำไปสู่ข้อผิดพลาดหน้าจอสีน้ำเงิน เช่น nvlddmkm.sys วิธีที่ง่ายที่สุดในการแก้ปัญหานี้คือโดย กำลังรีเซ็ต BIOS เป็นค่าเริ่มต้น
- เปิดพีซีของคุณ
- ก่อนบูต Windows ให้กดปุ่มที่แสดงบนหน้าจออย่างรวดเร็วเพื่อ เข้าถึงการตั้งค่า BIOS
- เข้าถึงส่วน BIOS ขั้นสูง
- ค้นหาและเปิดใช้งานตัวเลือกที่รีเซ็ตข้อมูลการกำหนดค่า BIOS เป็นค่าเริ่มต้น
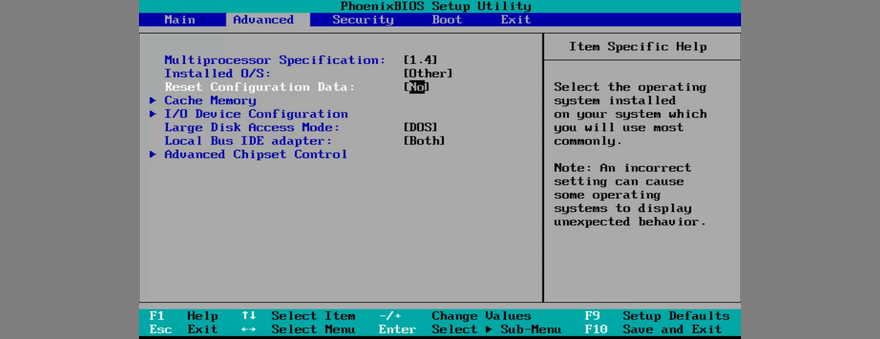
- บันทึกการตั้งค่าปัจจุบันและออก
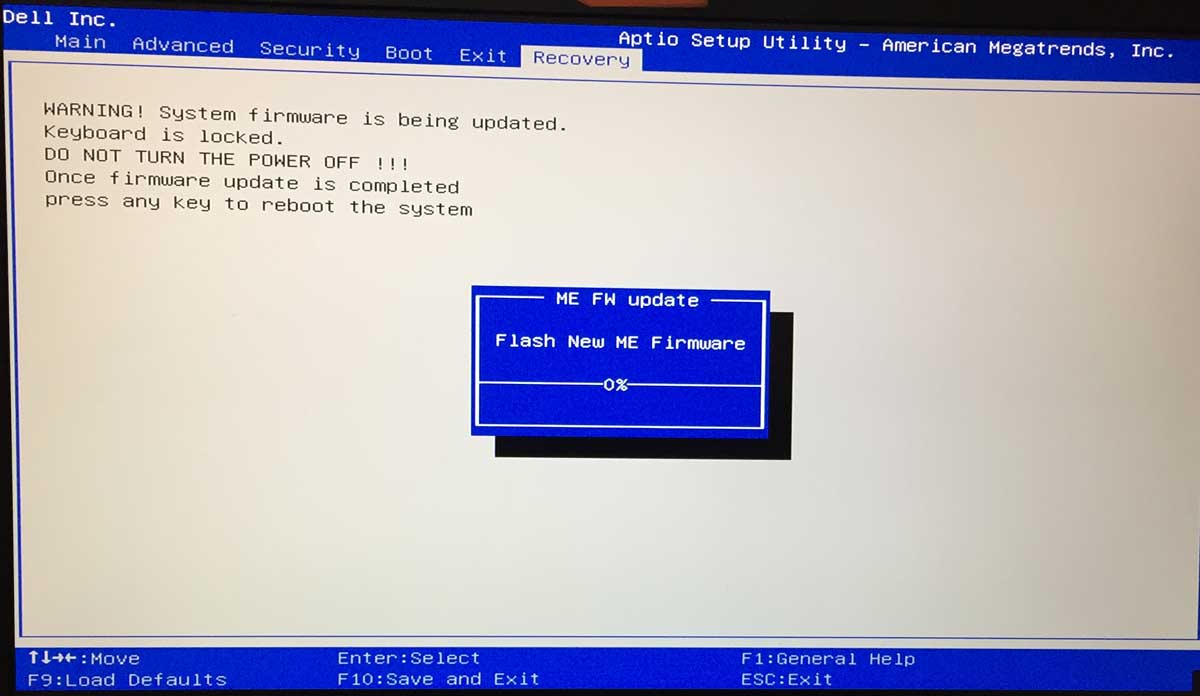
6. อัพเดตไบออส
หากคุณไม่ได้อัปเดต BIOS เป็นเวลานานหรือไม่เคยทำมาก่อน คุณควรเริ่มใช้งานทันที คุณเพียงแค่ต้องใช้แฟลชไดรฟ์ USB และการเชื่อมต่ออินเทอร์เน็ต
- เชื่อมต่อแฟลชไดรฟ์ USB เข้ากับพีซีของคุณ
- บูตระบบของคุณและกดปุ่มที่แสดงบนหน้าจอเพื่อเข้าสู่การตั้งค่า BIOS
- ในส่วน BIOS หลัก คุณสามารถค้นหาผู้ผลิต BIOS รุ่นและวันที่ติดตั้งได้
- ใช้ข้อมูลนี้ เริ่มต้น Windows บนพีซีที่มีปัญหาหรือใช้คอมพิวเตอร์เครื่องอื่นที่มีการเข้าถึงอินเทอร์เน็ต เปิดเว็บเบราว์เซอร์ และไปที่เว็บไซต์ของผู้ผลิต BIOS
- ค้นหาและดาวน์โหลด BIOS เวอร์ชันล่าสุดที่เข้ากันได้กับระบบปฏิบัติการของคุณ
- แตกไฟล์ที่ดาวน์โหลดมาไปยังแฟลชไดรฟ์ USB
- กลับไปที่เมนู BIOS สร้างข้อมูลสำรองของเวอร์ชัน BIOS ปัจจุบันเพื่อความปลอดภัย และบันทึกข้อมูลสำรองลงใน USB แฟลชไดรฟ์
- เรียกใช้การอัปเดตเฟิร์มแวร์ระบบและอย่าปิดเครื่องหรือรีสตาร์ทพีซีในช่วงเวลานี้
7. กู้คืนไฟล์ nvlddmkm.sys
NVIDIA มีการสำรองไฟล์ nvlddmkm.sys ไว้ที่ใดที่หนึ่งบนคอมพิวเตอร์ของคุณ ดังนั้นสิ่งที่คุณต้องทำคือค้นหา คัดลอก และเขียนทับไฟล์ nvlddmkm.sys ที่เสียหาย
- เปิด Windows Explorer โดยกดปุ่ม ชนะ + E
- ในแถบที่อยู่พิมพ์
%SystemRoot%\System32\Drivers - ค้นหาไฟล์ nvlddmkm.sys และเปลี่ยนชื่อเป็น nvlddmkm.sys.old
- ในบานหน้าต่างนำทางของ Windows Explorer ให้คลิก พีซีเครื่องนี้
- คลิกภายในฟิลด์ ค้นหาพีซีเครื่องนี้ และค้นหา nvlddmkm.sy_
- คัดลอกไฟล์ nvlddmkm.sy_
- กดปุ่ม ชนะ + R พิมพ์ cmd แล้วกด Enter เพื่อเปิด พรอมต์คำสั่ง
- เรียกใช้
chdir desktop - จากนั้น เรียกใช้
expand-r nvlddmkm.sy_ nvlddmkm.sys - ออกจากพรอมต์คำสั่ง
- ไปที่เดสก์ท็อปของคุณและคัดลอกไฟล์ nvlddmkm.sys
- กลับไปที่
%SystemRoot%\System32\Driversและวางไฟล์ - รีสตาร์ทคอมพิวเตอร์และตรวจสอบข้อผิดพลาด BSOD
8. ล้างคุกกี้ของระบบและไฟล์ชั่วคราว
Windows จะบันทึกคุกกี้และไฟล์ชั่วคราว ซึ่งควรถูกลบเป็นประจำเพื่อล้างแคชของระบบและทำให้มีที่ว่างสำหรับข้อมูลใหม่ หากไม่เกิดขึ้น อาจนำไปสู่ปัญหาความเสถียรของระบบและข้อผิดพลาด Blue Screen of Death เช่น VIDEO TDR FAILURE
เพื่อแก้ไขปัญหานี้ คุณเพียงแค่ล้างคุกกี้ของระบบและไฟล์ชั่วคราวโดยใช้เครื่องมือพิเศษ เช่น CCleaner หรือหากคุณไม่ต้องการติดตั้งแอปพลิเคชันของบริษัทอื่น คุณสามารถเปลี่ยนไปใช้ยูทิลิตี้ Disk Cleanup ในตัวได้
วิธีใช้การล้างข้อมูลบนดิสก์:
- คลิกปุ่ม เริ่ม ค้นหา การล้างข้อมูลบนดิสก์ และเปิดแอปนี้
- เลือกไดรฟ์ที่ติดตั้ง Windows (โดยปกติคือ C:) แล้วคลิก ตกลง
- เลือกไฟล์ต่อไปนี้ที่จะลบ:
- ดาวน์โหลดไฟล์โปรแกรม
- ไฟล์อินเทอร์เน็ตชั่วคราว
- ไฟล์ชั่วคราว
- คลิก ตกลง และ ลบไฟล์ เพื่อยืนยัน
9. ติดตั้งอะแดปเตอร์กราฟิกอีกครั้ง
จอแสดงผลกราฟิกของคุณอาจไม่ได้รับการติดตั้งอย่างถูกต้องบนคอมพิวเตอร์ของคุณ อย่างไรก็ตาม คุณสามารถแก้ไขปัญหานี้ได้อย่างง่ายดายจากตัวจัดการอุปกรณ์
- คลิกขวาที่ปุ่ม เริ่ม แล้วเลือก ตัวจัดการอุปกรณ์
- ขยายหมวดหมู่ การ์ดแสดงผล
- คลิกขวาที่การ์ดแสดงผลของคุณและเลือกถอนการติดตั้งอุปกรณ์

- รีสตาร์ทพีซีของคุณ Windows จะติดตั้งอะแดปเตอร์ที่ขาดหายไปโดยอัตโนมัติ
10. อัปเดตไดรเวอร์ GPU
ไดรเวอร์กราฟิกที่ล้าสมัยอาจทำให้เกิดปัญหาการ์ดแสดงผล ปัญหาการเล่นเกม และแม้แต่ข้อผิดพลาดหน้าจอสีน้ำเงิน เช่น nvlddmkm.sys แต่คุณสามารถอัปเดตไดรเวอร์ GPU ที่ล้าสมัยได้โดยใช้ความพยายามเพียงเล็กน้อย
- เปิดตัวจัดการอุปกรณ์ คลิกขวาที่การ์ดแสดงผลของคุณ แล้วเลือกอัปเดตไดรเวอร์
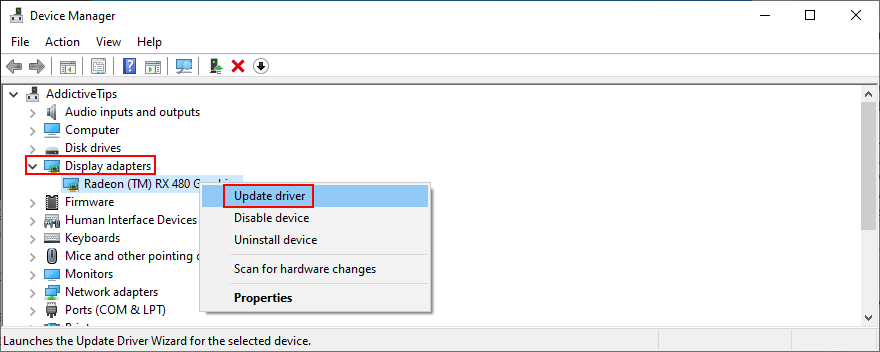
- คลิก ค้นหาไดรเวอร์โดยอัตโนมัติ
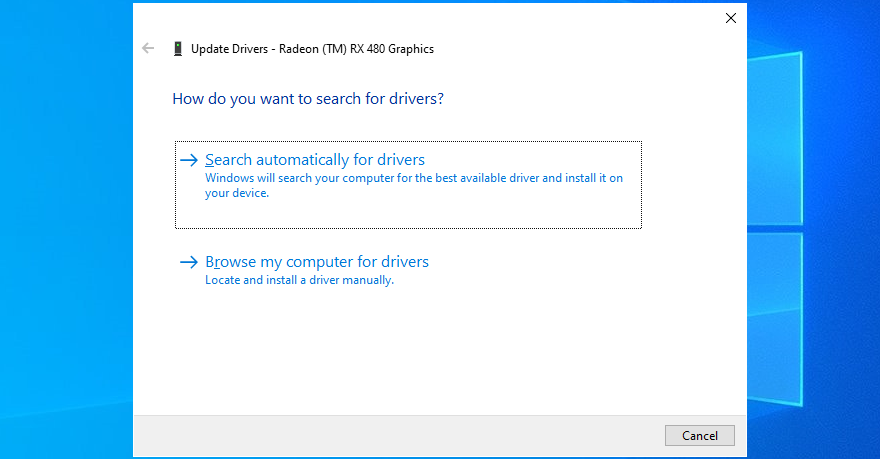
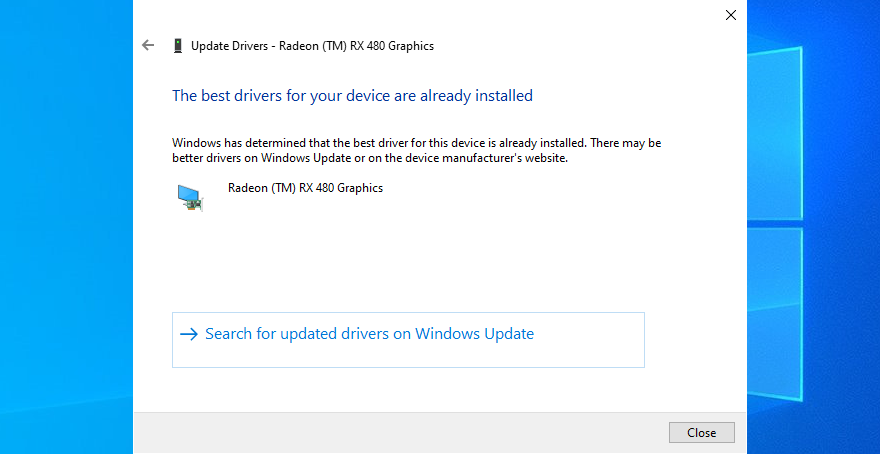
- หากคุณได้รับข้อความ ไดรเวอร์ที่ดีที่สุดสำหรับอุปกรณ์ของคุณติดตั้งแล้ว ให้คลิก ค้นหาไดรเวอร์ที่อัปเดตบน Windows Update อย่างไรก็ตาม หากคุณได้ตรวจสอบระบบของคุณสำหรับการอัปเดตแล้ว ก็ไม่จำเป็นต้องทำอีก
- รีสตาร์ทคอมพิวเตอร์หากอัปเดตไดรเวอร์สำเร็จ
น่าเสียดายที่ Windows มักล้มเหลวในการค้นหาไดรเวอร์ที่ใหม่กว่าในฐานข้อมูลหรือโดยใช้คอมโพเนนต์ Windows Update ในกรณีดังกล่าว คุณสามารถดับเบิลคลิกที่อะแดปเตอร์ GPU ในตัวจัดการอุปกรณ์ สลับไปที่แท็บ ไดรเวอร์ และค้นหาผู้ผลิตไดรเวอร์ เวอร์ชัน และวันที่ติดตั้ง ใช้ข้อมูลนี้ ไปที่ผู้ผลิตเว็บไซต์เพื่อดาวน์โหลดและติดตั้งไดรเวอร์ล่าสุด
อย่างไรก็ตาม หากคุณพบว่ากระบวนการนี้ยากหรือไม่ต้องการเสี่ยงในการดาวน์โหลดไดรเวอร์ที่ไม่รองรับ คุณสามารถเปลี่ยนเป็น ตัวอัปเดตไดรเวอร์ที่ตรวจหาไดรเวอร์ที่ล้าสมัยทั้งหมดบนพีซีของคุณโดยอัตโนมัติ และเสนอให้ติดตั้งเวอร์ชันล่าสุดทันที และคุณจะไม่เสี่ยงต่อการได้รับไดรเวอร์ที่เข้ากันไม่ได้ด้วย
11. ย้อนกลับไดรเวอร์ GPU ที่ไม่รองรับ
เมื่อพูดถึงไดรเวอร์ GPU ที่เข้ากันไม่ได้ ผู้ใช้พีซีจำนวนมากดาวน์โหลดจากแหล่งที่ไม่รู้จักโดยไม่รู้จริง ๆ ว่าพวกเขาทำงานบนคอมพิวเตอร์ของพวกเขาหรือไม่
หากคุณเป็นหนึ่งในผู้ใช้เหล่านี้ คุณควรย้อนกลับโปรแกรมควบคุมการแสดงผลที่ไม่รองรับเพื่อคืนค่าความเสถียรของคอมพิวเตอร์ของคุณ กำจัดการหยุดทำงานของระบบที่เกิดซ้ำ และดำเนินการอัปเดตไดรเวอร์ที่ถูกต้อง
- ไปที่ ตัวจัดการอุปกรณ์ และดับเบิลคลิกที่อะแดปเตอร์ GPU
- สลับไปที่ส่วนไดรเวอร์
- คลิก ย้อนกลับไดรเวอร์ และปฏิบัติตามคำแนะนำบนหน้าจอ หากปุ่มเป็นสีเทา แสดงว่าไม่มีเวอร์ชันไดรเวอร์ก่อนหน้าในพีซีของคุณ ดังนั้นคุณจึงสามารถข้ามโซลูชันทั้งหมดนี้ได้
12. เรียกใช้ตัวแก้ไขปัญหาฮาร์ดแวร์และอุปกรณ์
Windows 10 มีตัวแก้ไขปัญหาภายในสำหรับแก้ไขปัญหาทั่วไปที่เกิดขึ้นกับส่วนประกอบต่างๆ ของพีซี รวมถึงฮาร์ดแวร์และอุปกรณ์ โดยปกติ คุณควรจะสามารถค้นหาได้ในการตั้งค่าการแก้ไขปัญหา อย่างไรก็ตาม หาก ตัวแก้ไขปัญหาฮาร์ดแวร์และอุปกรณ์หายไปจากส่วนนั้น คุณสามารถเรียกใช้ได้ทันที:
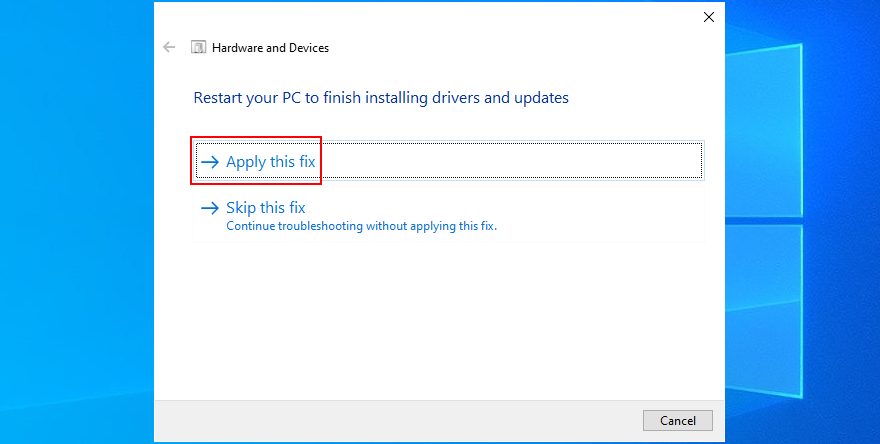
- กดปุ่ม ชนะ + R และเรียกใช้
msdt.exe-id DeviceDiagnostic - คลิก ถัดไป และรอจนกว่าเครื่องมือแก้ปัญหาจะสแกนพีซีของคุณ
- หากพบวิธีแก้ปัญหา ให้คลิกใช้การแก้ไขนี้
- รีบูตพีซีของคุณเมื่อเสร็จสิ้นและตรวจสอบข้อผิดพลาด BSOD
13. ปิดใช้งานการเร่งด้วยฮาร์ดแวร์
แอปพลิเคชันซอฟต์แวร์จำนวนมากใช้การเร่งฮาร์ดแวร์
a> เพื่อปรับปรุงประสบการณ์ของคุณ ไม่ว่าเราจะพูดถึงการเล่นเกม การท่องเว็บ การสตรีม หรืออย่างอื่น หากคุณสังเกตเห็นว่าคอมพิวเตอร์ของคุณแสดงข้อผิดพลาด BSOD หลังจากเปิดแอปพลิเคชันเฉพาะ ให้ตรวจสอบการตั้งค่าของโปรแกรมและมองหาตัวเลือกการเร่งด้วยฮาร์ดแวร์เพื่อปิด นี่คือคำแนะนำบางส่วน
วิธีปิดใช้งานการเร่งฮาร์ดแวร์ใน Google Chrome
a>:
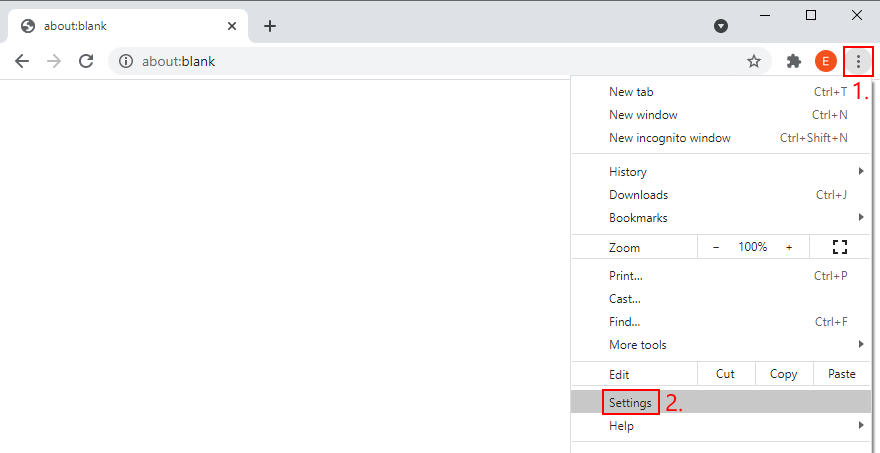
- ใน Chrome ให้เปิดเมนูเพิ่มเติม แล้วไปที่การตั้งค่า

- เลือก ขั้นสูง > ระบบ (หรือไปที่
chrome://settings/system) - ปิดใช้งาน ใช้การเร่งฮาร์ดแวร์เมื่อมี

- รีสตาร์ท Chrome
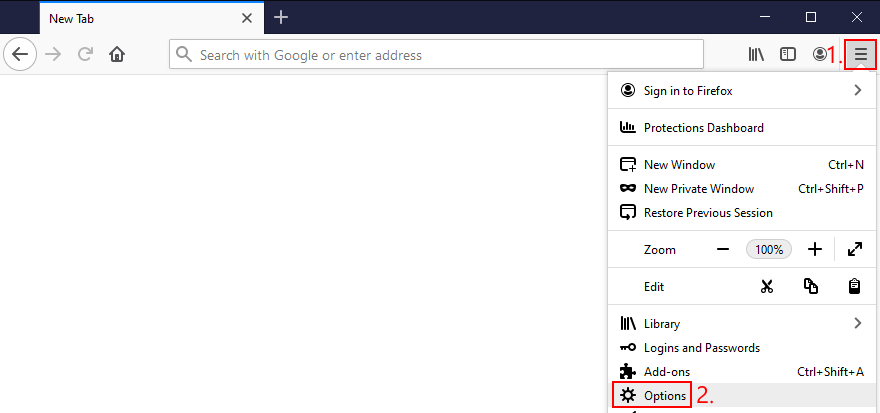
วิธีปิดใช้งานการเร่งด้วยฮาร์ดแวร์ใน Mozilla Firefox:
- ใน Firefox ให้เปิดเมนู ≡ และไปที่ ตัวเลือก (หรือไปที่
about:preferences) - In General, locate the Performance section
- Disable Use recommended performance settings
- Also disable Use hardware acceleration when available
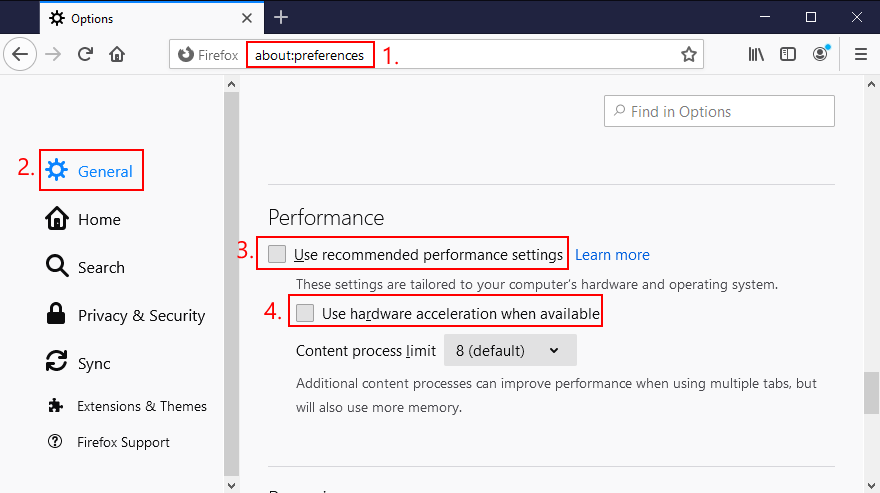
- Restart Firefox
How to disable hardware acceleration in Microsoft Edge:
- In Edge, open the More menu and select Settings
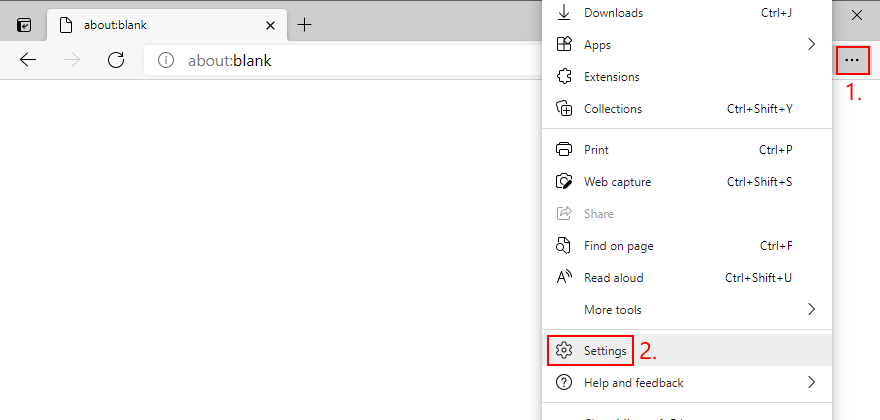
- Go to System (or visit
edge://settings/system) - Disable Use hardware acceleration when available
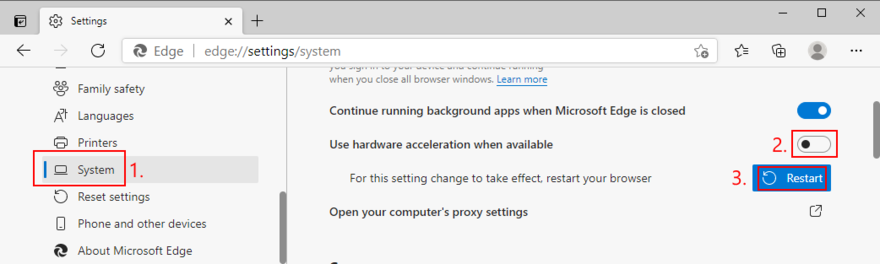
- Restart Edge
14. Analyze the crash dumps
If you’re the type of user who doesn’t shy away from the computer’s technical aspects, you can analyze the crash dumps left behind by the VIDEO TDR FAILURE error, in order to find out the exact driver that’s giving you trouble. Event Viewer is a great assistant for this role.
How to use Event Viewer:
- Restart your PC after a system crash
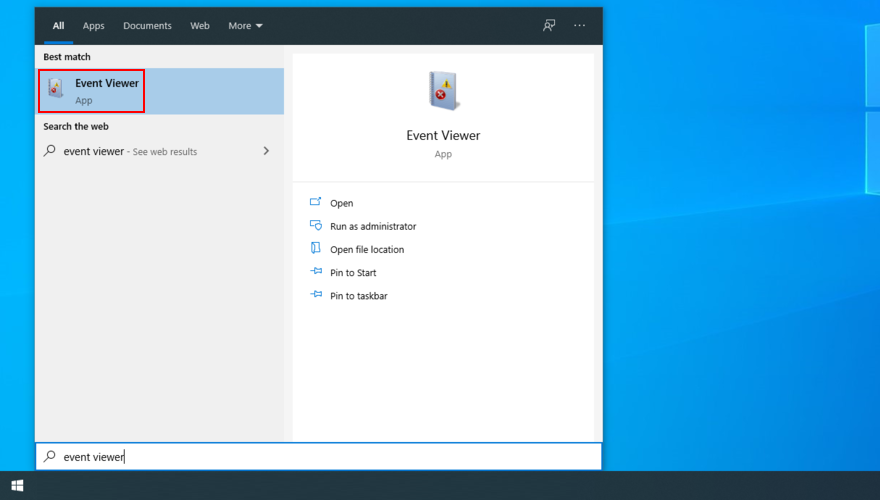
- Immediately press the Win key, search for Event Viewer, and open this app
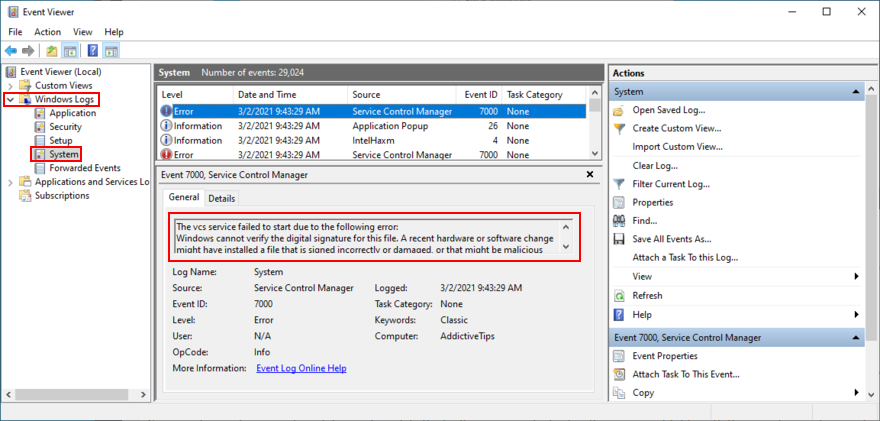
- In the navigation pane on the left side, go to Windows Logs > System
- Select the first entry that says Error
- Inspect the information from the General and Details tab
You can use this data to perform a Google search or get in touch with the Microsoft support team. However, if you find Event Viewer to be intimidating, we suggest using BlueScreenView instead. It has the same role but it’s wrapped in a simpler interface and has more intuitive options for analyzing minidump files.
15. Use Display Driver Uninstaller
Display Driver Uninstaller (DDU) is an awesome application that can reset your GPU software and drivers. If display driver nvlddmkm stopped responding on your Windows 10 PC, you can use DDU to safely troubleshoot the BSOD error.
- Make sure to create a system restore point if you haven’t so far
- Download Display Driver Uninstaller from the official website
- Unzip the downloaded archive and open the DDU file
- Start Windows 10 in Safe Mode with Networking (see Solution 1 from this list)
- Open Display Driver Uninstaller.exe
- When prompted with the configuration window, leave everything as is and click OK to continue
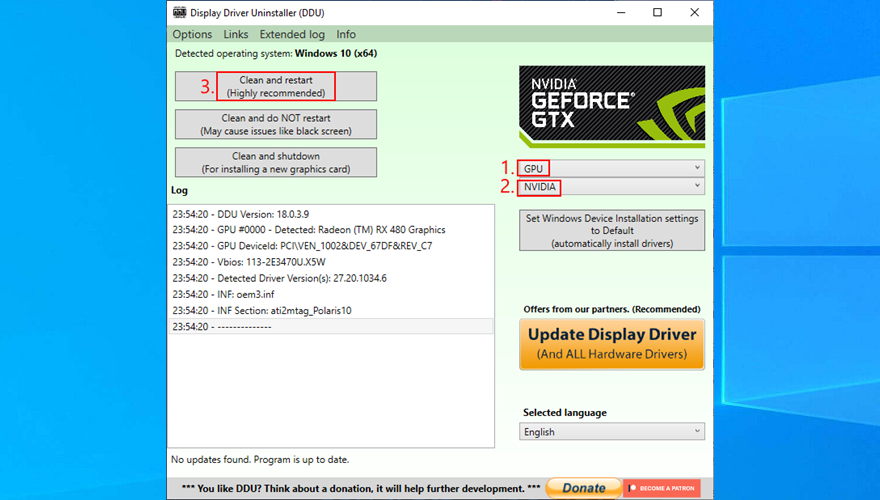
- Select GPU and NVIDIA from the two menus on the right side
- Then, click Clean and restart
16. Remove and reseat the GPU card
It’s possible that your graphics card needs to be reattached to your computer unit. If it’s not properly connected, this could trigger Blue Screen of Death errors like the VIDEO TDR FAILURE stop code.
Shut down your desktop, unplug all cables, remove the computer chassis, and carefully detach the GPU card. Then, put it back in the same slot firmly but without using force. Turn on your computer and see if anything changed.
17. Try the GPU card on another computer
If your graphics card is malfunctioning and needs to be replaced, then all your efforts at attempting to resolve the blue screen problem at the software level will have been in vain.
A simple way to test this is by removing the GPU card from your computer and inserting it into another PC, preferably with a clean Windows installation. If the system starts glitching, it should be pretty clear that you need to replace your hardware. Check out the best GPU cards for gaming.
18. Check system memory
System memory issues can affect the entire computer, leading to blue screen errors like nvlddmkm.sys. You can easily run a check-up by turning to Windows Memory Diagnostic, a tool that comes bundled with Windows 10.
How to use Windows Memory Diagnostic:
- Save your current work and close all programs
- Press Win key + R, type
mdsched.exe, and hit the Enter key - Click Restart now and check for problems

Your operating system will reboot and start running memory tests. It runs a standard test by default. However, if you have a bit of time on your hands, we suggest switching to the Extended test in order to obtain more accurate information about any potential RAM issues.
Press F1 to open the options section, select Extended, and press F10 to apply this setting. The entire memory test can take a long time, so you can leave your PC unattended since your intervention will not be required. Once the test is complete, Windows 10 boots as usual and shows the test results in the notifications center.
19. Use Startup Repair
If Windows 10 is experiencing boot problems, this can lead to all sorts of computer issues, including BSOD errors with the VIDEO TDR FAILURE stop code. But you can fix startup issues by running the Startup Repair tool from the Advanced Startup menu. Before doing so, you need an empty USB flash drive and Internet access to set up a system installation disk.
How to create a Windows 10 installation media disk:
- Plug a USB flash drive into the PC and make sure to save any important files saved there since the drive will be formatted
- Download Media Creation Tool from the official website
- Open Media Creation Tool and follow the steps to create a Windows 10 installation media disk on the USB flash drive
How to run Startup Repair:
- Make sure the USB flash drive with the Windows 10 installation media is plugged into the PC
- Click the Start button and open the menu with the power options
- While holding down the Shift key, click Restart to boot Windows 10 to the troubleshoot menu
- Go to Troubleshoot > Advanced options > Startup Repair
- Select your administrator account and enter your password to continue
- Follow the given instructions to complete the startup repair sequence
20. Fix HDD issues
Your hard drive may have corrupt files or bad sectors which prevent Windows from operating normally, But you can fix HDD issues without having to use a third-party software application, thanks to CHKDSK (Check Disk).
- Press Win key + R, type CMD, and press Ctrl + Shift + Enter to open Command Prompt with administrator rights

- If your OS is installed on the C: drive, run
chkdsk c:/f/r. Else, replacec:with the correct partition letter- If you don’t know Windows’ whereabouts, choose a drive letter when entering the run command (e.g.
run d:) and view its containing folders (run dir). Keep listing folders for multiple drive letters until you see the Windows directory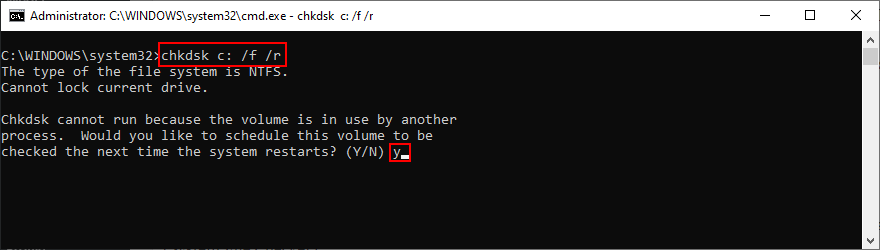
- If you don’t know Windows’ whereabouts, choose a drive letter when entering the run command (e.g.
- When asked to confirm scheduling CHKDSK during the next system reboot, type y and press Enter
- Restart your computer and wait for CHKDSK to do its job
21. Repair corrupt system files
Not only hard disk problems but also damaged, modified, or missing OS files can cause blue screen errors on your computer. To restore system files on Windows 10, you can run DISM (Deployment Image Servicing and Management) and SFC (System File Checker).
- Start Windows 10 in Safe Mode with Networking (see Solution 1)
- Click the Start button, type cmd, and open Command Prompt
- Run
DISM.exe/Online/Cleanup-image/RestoreHealth. However, if the Windows Update component is broken, this command won’t work. Instead, you can create a Windows 10 installation media disk (see Solution 19) and set it as the repair source:DISM.exe/Online/Cleanup-Image/RestoreHealth/Source:C:\RepairSource\Windows(replaceC:\RepairSource\Windowswith the full path to your Windows 10 installation media disk) - After DISM does its job, run SFC (
sfc/scannow). If SFC is successful, it shows the Windows Resource Protection did not find any integrity violations message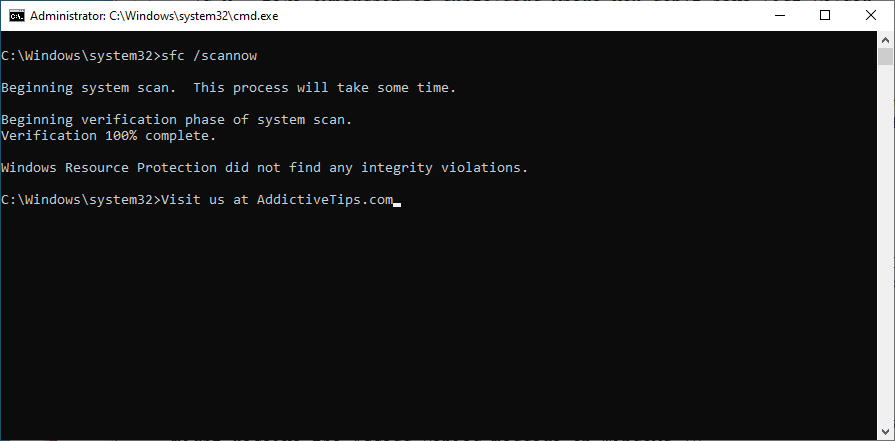
22. Disable Fast Startup
Fast Startup is a Windows component that boots your operating system faster by pre-loading drivers. Unfortunately, it’s known to cause serious PC problems. If drivers are not properly shut down and restarted, it could trigger blue screen errors like nvlddmkm.sys.
To solve this problem, you can disable Fast Startup:
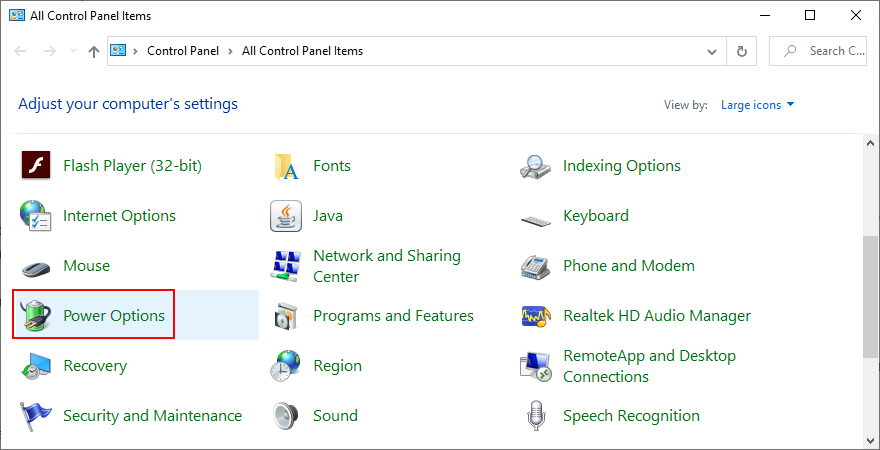
- Press the Win key, search for Control Panel, and open this app
- Double-click Power Options
- Click Choose what the power buttons do
- Click Change settings that are currently unavailable (admin rights are required)
- Disable Turn on fast startup and click Save changes

- Restart your computer
23. Disable the PCI Express power option
Many users reported that turning off the PCI Express power option helped fix the VIDEO TDR FAILURE error on their computer. Here’s what you need to do:
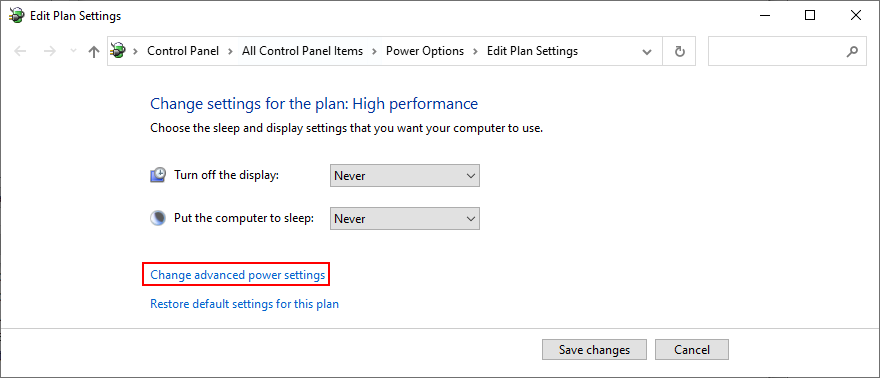
- Click the Start button, type edit power plan, and press Enter
- Click Change advanced power settings
- Expand the PCI Express group
- Set Link State Power Management to Off
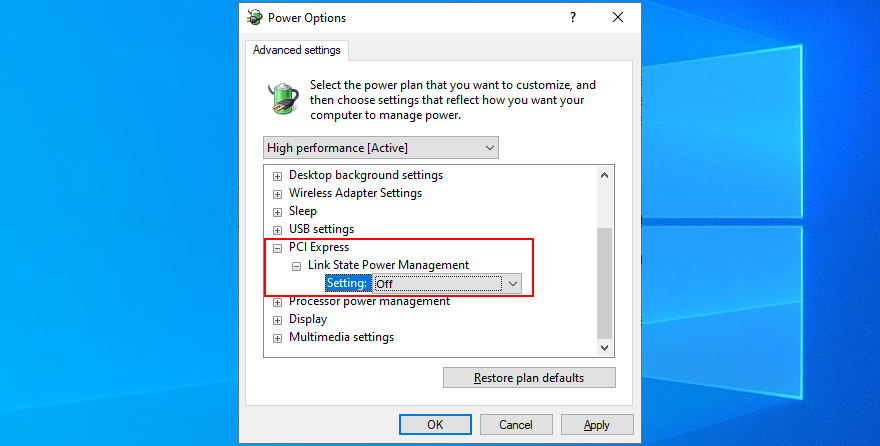
- Click Apply
- Restart your computer
24. Run a malware scan
Malware infections can be severe enough to corrupt critical system files and prevent you from running system tools like Task Manager or Command Prompt. If you suspect that your computer was recently infected with a virus, you should run a scan to eliminate any threats and regain the control of your PC.
How to run a malware scan with Windows Defender:
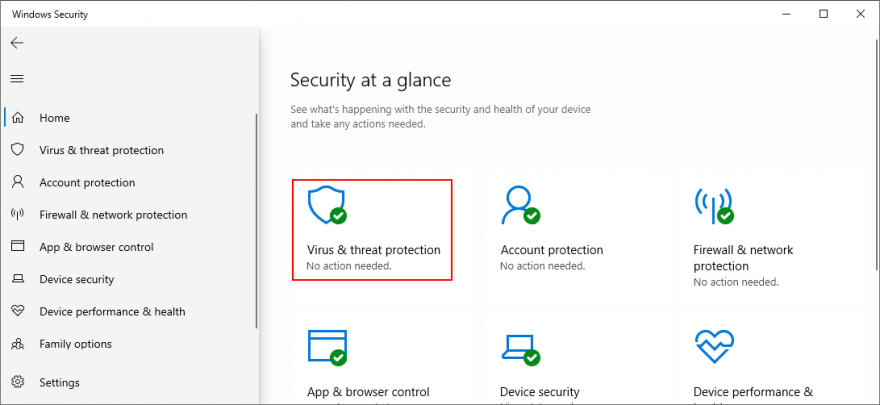
- Press the Windows key, type Windows Security, and launch this tool
- Select Virus & threat protection
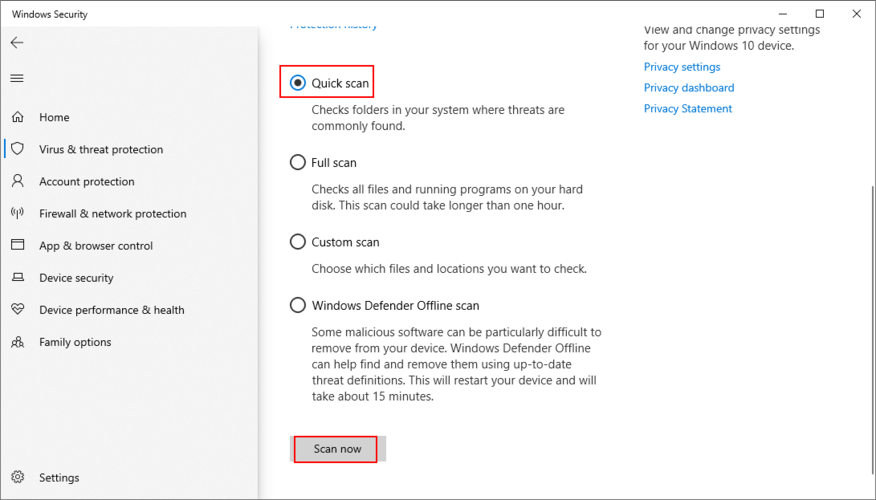
- Click Scan options

- Choose Quick scan and press Scan now
- If the computer search reveals nothing, select Windows Defender Offline scan and click Scan now
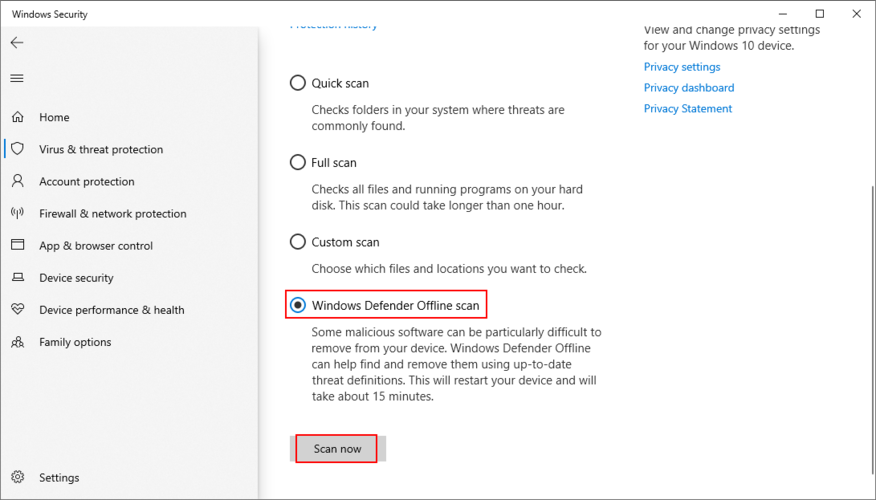
- Allow Windows Defender to remove or quarantine any threats. If you think it has wrongfully detected safe files as malware, make sure to add them to the whitelist in order to exclude the items from future scans
25. Fix the system registry
Missing, modified, corrupt, or incorrect registry settings can be devastating for your operating system and can even trigger blue screen errors like nvlddmkm.sys. But you can restore the original registry configuration from Command Prompt before system boot.
- Click the Start button and open the power menu
- Hold down the Shift key and click Restart to reboot Windows in Advanced Startup mode
- Select Troubleshoot > Advanced options > Command Prompt
- Pick your admin account and enter your password
- Run these commands (press Enter after each line):
-
cd %SystemRoot%System32\config
-
ren %SystemRoot%System32\config\DEFAULT DEFAULT.old
-
ren %SystemRoot%System32\config\SAM SAM.old
-
ren %SystemRoot%System32\config\SECURITY SECURITY.old
-
ren %SystemRoot%System32\config\SOFTWARE SOFTWARE.old
-
ren %SystemRoot%System32\config\SYSTEM SYSTEM.old
-
copy %SystemRoot%System32\config\RegBack\DEFAULT %SystemRoot%System32\config\
-
copy %SystemRoot%System32\config\RegBack\DEFAULT %SystemRoot%System32\config\
-
copy %SystemRoot%System32\config\RegBack\SAM %SystemRoot%System32\config\
-
copy %SystemRoot%System32\config\RegBack\SECURITY %SystemRoot%System32\config\
-
copy %SystemRoot%System32\config\RegBack\SYSTEM %SystemRoot%System32\config\
-
copy %SystemRoot%System32\config\RegBack\SOFTWARE %SystemRoot%System32\config\
-
- Start Windows as usual
26. Unplug external devices
If you have recently attached new hardware components into your desktop or laptop, such as a webcam, a USB flash drive, a microphone, headphones, or a wireless network adapter, it’s possible that the device is experiencing compatibility issues with your Windows 10 PC, triggering the VIDEO TDR FAILURE stop code as a result.
You can easily test this by unplugging all external devices from your PC, except for your keyboard and mouse, in order to inspect results. If the keyboard and mouse are also brand new, try replacing them if you have others.
27. Use System Restore
System Restore allows you to revert Windows 10 to a checkpoint that was recorded before you started experiencing blue screen errors. However, it means that System Restore must be enabled on your computer and at least one restore point must have been created prior to the BSOD event.
Even if you didn’t manually set up a restore point, it’s possible that some of your applications did, such as driver updaters, so it doesn’t hurt to at least check.
How to use System Restore:
- Sign in to Windows 10 using an administrator account
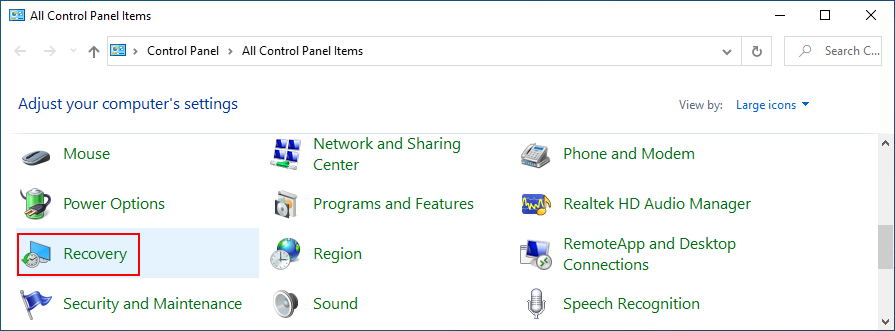
- Press the Win key, type Control Panel, and launch this app
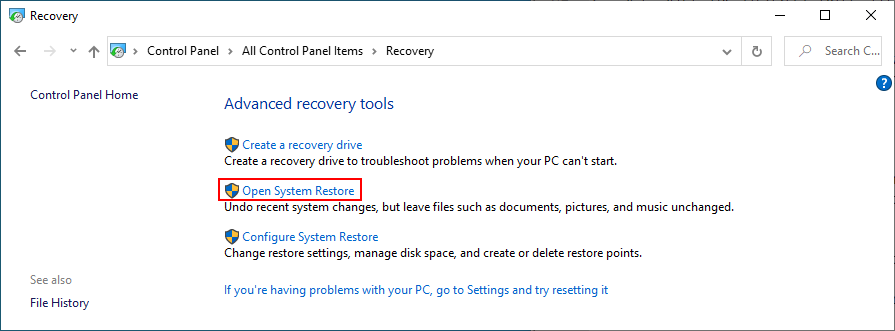
- Go to Recovery
- Click Open System Restore
- Select a restore point or click Show more restore points to evaluate more options. You can also click Scan for affected programs to find out which applications you will have to reinstall after restore
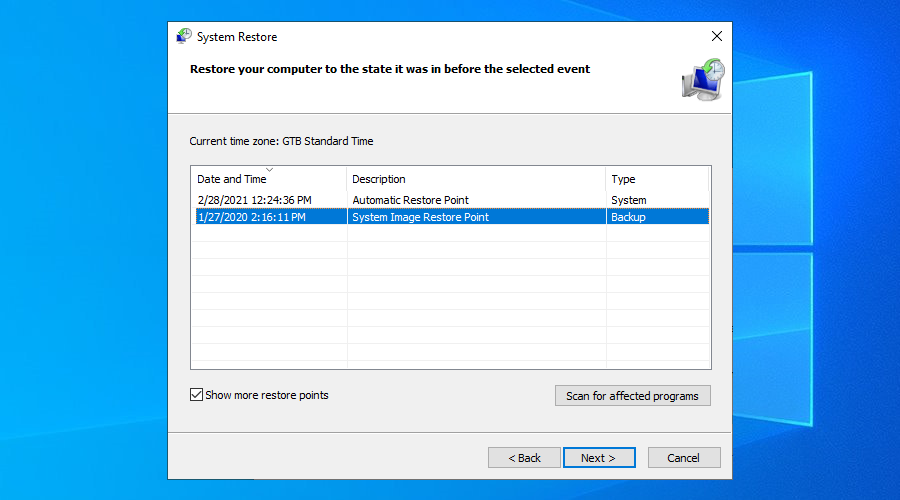
- Click Next and follow the instructions. Your PC will reboot
28. Reset Windows 10
If everything failed up until this point, you should prepare Windows 10 for factory reset in order to uninstall all programs and restore system settings to default. The good news is that your personal files will be left untouched.
But make sure to write down all applications you will have to install, save program preferences, and get hold of serial keys required for reactivation. Then, proceed to the following steps:
- Right-click the Start button and go to Settings
- Select Update & Security
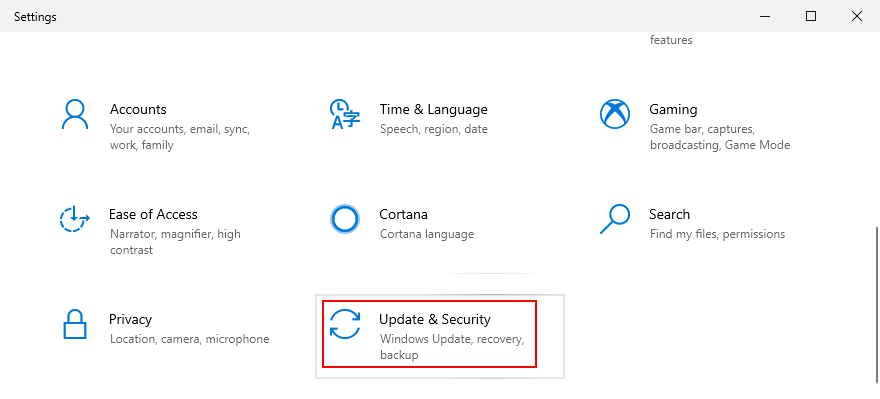
- Choose Recovery and click Get started
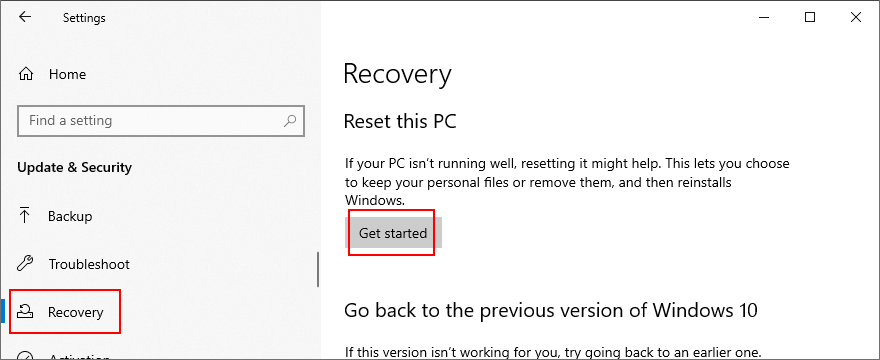
- Click Keep my files and follow the remaining instructions

Stop code VIDEO TDR FAILURE (nvlddmkm.sys) can be fixed on Windows 10
To recap, VIDEO TDR FAILURE is a BSOD error that indicates a problem with your video settings. If it’s accompanied by the nvlddmkm.sys file, it means that you can troubleshoot the file errors to get rid of system crashes.
To fix this problem, you can start Windows 10 in Safe Mode, run a clean system boot, check for system updates, disable overclocking software, reset and update BIOS, restore the nvlddmkm.sys file, clear system cookies and temp files, reinstall the graphics adapter, as well as update or roll back GPU drivers.
It’s also a good idea to run the Hardware and Devices troubleshooter, disable hardware acceleration, analyze crash dumps, use Display Driver Uninstaller, remove and reseat the GPU card, try the GPU card on another computer, check system memory, use Startup Repair, or fix HDD issues and corrupt system files.
In addition, you can disable Fast Startup and the PCI Express power option, run a computer malware scan, fix the system registry, unplug external devices, and use System Restore to roll back Windows 10 to a previous checkpoint. If all these solutions fail, you can go to the last resort, which means resetting Windows 10 to factory settings.
How did you manage to fix the nvlddmkm.sys file and VIDEO TDR FAILURE stop code? Tell us all about it in the comments section below.