คู่มือที่เน้นความเป็นส่วนตัวในการสร้างเครือข่ายในบ้านที่ปลอดภัยด้วยไฟร์วอลล์ pfSense อธิบายวิธีตั้งค่าเครือข่ายภายในบ้านโดยเฉพาะเพื่อแยกการท่องเว็บ WiFi ของครอบครัวคุณออกจากการรับส่งข้อมูลการขุด Bitcoin ; วิธีกำหนดค่า VPN ด้วย WireGuard; และวิธีส่งทราฟฟิกอินเทอร์เน็ตทั้งหมดของคุณผ่านอุโมงค์ Mullvad VPN พร้อมโหลดบาลานซ์อัตโนมัติเพื่อสลับระหว่างอุโมงค์ข้อมูลในช่วงเวลาที่มีเวลาแฝงสูง รวมถึงวิธีกำหนดค่าตัวบล็อกโฆษณาที่ระดับไฟร์วอลล์

นักขุด Bitcoin ในบ้านทุกคนจะต้องมีเครือข่ายในบ้าน การสร้างเครือข่ายที่ปลอดภัยและเป็นส่วนตัวเพื่อขุดเป็นส่วนสำคัญของการรักษาการดำเนินการที่ไม่ได้รับอนุญาต เมื่อทำตามคำแนะนำนี้ คุณจะเห็นวิธีสร้างเครือข่ายการขุดในบ้านที่แข็งแกร่งและปรับแต่งได้ ซึ่งมีข้อดีดังต่อไปนี้และอื่นๆ:
การขุดอุโมงค์เครือข่ายส่วนตัวเสมือน (VPN) เพื่อความปลอดภัยและเข้ารหัสการรับส่งข้อมูลทางอินเทอร์เน็ตของคุณ เพิ่มความเป็นส่วนตัวจากการสอดรู้สอดเห็นของ ผู้ให้บริการอินเทอร์เน็ต (ISP) ของคุณลดความเสี่ยงที่อาจเกิดขึ้นจากการบันทึกที่อยู่ IP จากพูลการขุดของคุณ การกำหนดค่าไฟร์วอลล์ pfSense การสร้างเครือข่ายในบ้านที่แยกส่วนเพื่อแยก ASIC ของคุณออกจากเครือข่าย WiFi สำหรับแขก ฯลฯ การตั้งค่าจุดเชื่อมต่อเครือข่าย mesh WiFi การกำหนดค่า ของ ad-blocker ที่ระดับไฟร์วอลล์
ในคู่มือนี้ คุณจะเห็นซอฟต์แวร์โอเพนซอร์สฟรี เช่น pfSense และ WireGuard รวมถึงซอฟต์แวร์โอเพนซอร์สที่ต้องชำระเงิน เช่น Mullvad VPN.
การเริ่มต้นงานนี้สำหรับฉัน เมื่อผมกับภรรยาตัดสินใจขายบ้านในเมืองและย้ายไปอยู่ต่างจังหวัด ฉันมีวิสัยทัศน์ในการตั้งค่าโครงสร้างพื้นฐานการขุดใหม่ตั้งแต่ต้น และฉันต้องการใช้โอกาสนี้เพื่อสร้างเครือข่ายภายในบ้านที่ดีที่สุดที่ฉันต้องการมาโดยตลอด — เครือข่ายในบ้านที่ขัดขวาง ISP ของฉันไม่ให้เห็นข้อมูลของฉันและมันกำลังจะไปที่ใด เครือข่ายในบ้านที่ แยก ASIC ของฉันออกจากอุปกรณ์ที่เชื่อมต่อเครือข่ายอื่นๆ ซึ่งเป็นเครือข่ายในบ้านที่ไม่ได้ติดตามฉันตลอดเวลาและขายข้อมูลการท่องเว็บของฉันให้กับผู้โฆษณา
นี่คือตอนที่ฉันเริ่มดูบล็อกโพสต์ในหัวข้อนี้อย่างใกล้ชิดจากk3tan ในบทความ pfSense ของพวกเขา k3tan ได้วางคุณลักษณะหลายอย่างของเครือข่ายภายในบ้านที่ฉันต้องการสร้างสำหรับตัวเอง และชี้ไปที่แหล่งข้อมูลเพิ่มเติมหลายอย่างที่ทำให้ฉันคิดว่าฉันสามารถทำได้ด้วยตัวเองหากฉันพยายามจริงๆ
ฉันไม่เคยมีประสบการณ์ด้านเครือข่ายมาก่อนเลย และแม้ว่าจะมีขั้นตอนมากมาย แต่จริงๆ แล้ว มันง่ายมากที่จะใช้เครื่องมือฟรีและโอเพนซอร์ซเพื่อเริ่มต้นการก้าวกระโดดในการปกป้องความเป็นส่วนตัวของคุณ
ฉันเอื้อมมือไปหา k3tan และพวกเขาสนับสนุนความพยายามของฉันและช่วยให้ฉันผ่านอุปสรรคบางอย่างที่ฉันเจอ — ฉันซาบซึ้งในสิ่งนี้จริงๆ และอยากจะกล่าวขอบคุณ k3tan
ในคู่มือนี้ ฉันใช้จ่าย $360 เพื่อสร้างเครือข่ายในบ้าน $160 สำหรับการ์ดเครือข่าย และ $200 สำหรับ mesh WiFi kit (ซึ่งจริงๆ แล้ว สามารถทำได้ด้วยเราเตอร์ $40 แต่ YOLO!)
ข้อจำกัดบางประการที่คุณควรระวัง: แท้จริงแล้วฉันมีเครือข่ายเป็นศูนย์ ประสบการณ์ก่อนหน้าคู่มือนี้ เป็นไปได้มากที่ฉันทำผิดพลาดโดยไม่คาดคิด ฉันขอแนะนำอย่างยิ่งให้คุณใช้สิ่งนี้เป็นแนวทาง แต่ยังรวมการวิจัยของคุณเองและความขยันในการตั้งค่าเครือข่ายในบ้านของคุณด้วย VPN เป็นเครื่องมือที่ยอดเยี่ยมในการปกป้องความเป็นส่วนตัวของคุณ แต่ไม่ใช่กระสุนเงิน มีหลายวิธีที่คุณสามารถทำให้ข้อมูลรั่วไหลและลดความเป็นส่วนตัวของคุณ ข่าวดีก็คือ มันง่ายที่จะเริ่มดำเนินการพัฒนาแนวทางปฏิบัติที่ดีที่สุดที่ดีและเน้นความเป็นส่วนตัว
ฉันขอแนะนำให้อ่านคู่มือนี้ จาก Mullvad กำลังฟังนี้พอดคาสต์จาก SethForPrivacy และดูแหล่งข้อมูลเพิ่มเติมจาก Techlore
มาเริ่มกันเลยดีกว่าและตั้งค่าเครือข่ายการขุดในบ้านของคุณในลักษณะที่ทำให้ครอบครัวของคุณมีความสุขและดูแล ASIC ของคุณให้ปลอดภัยและเป็นส่วนตัว
การสร้าง pfSense Firewall จากรุ่นเก่า คอมพิวเตอร์เดสก์ท็อป
ใน 10 ขั้นตอนด้านล่าง ฉันจะแสดงให้คุณเห็นถึงวิธีที่ฉันใช้คอมพิวเตอร์เดสก์ท็อปเครื่องเก่าเพื่อสร้างไฟร์วอลล์ pfSense และวิธีที่ฉันกำหนดค่าเครือข่ายในบ้านของฉัน
เนื้อหา
ขั้นตอนที่หนึ่ง: วิธีการติดตั้งการ์ดเครือข่ายใหม่ขั้นตอนที่สอง: วิธีดาวน์โหลดและตรวจสอบไฟล์ภาพ pfSense และแฟลชไปยังไดรฟ์ USB ขั้นตอนที่สาม: วิธีแฟลชเดสก์ท็อปและติดตั้ง pfSense ขั้นตอนที่สี่: วิธีเชื่อมต่อ pfSense ในเครือข่ายภายในบ้านขั้นตอนที่ห้า: วิธีกำหนดค่าการตั้งค่าพื้นฐาน pfSense ขั้นตอนที่หก: วิธีกำหนดค่าการตั้งค่าขั้นสูง pfSense ขั้นตอนที่เจ็ด: วิธีการตั้งค่าและกำหนดค่าจุดเชื่อมต่อ WiFi ขั้นตอนที่แปด: วิธีติดตั้งและกำหนดค่าแพ็คเกจ WireGuard ด้วย Mullvadขั้นตอนที่เก้า: วิธีกำหนดค่าความสามารถของตัวบล็อกโฆษณาขั้นตอนที่ 10: วิธีตรวจสอบเวลาแฝงที่เกิดจาก VPN
หากคุณเลือกตัวเลือกนั้น inste โฆษณาของการสร้างการ์ดของคุณเอง จากนั้นคุณสามารถข้ามไปยังขั้นตอนที่สี่ด้านล่างได้
ขั้นตอนที่หนึ่ง: วิธีการติดตั้งการ์ดเครือข่ายใหม่
ขั้นแรก คุณจะต้องมีคอมพิวเตอร์เดสก์ท็อปเครื่องเก่า ฉันใช้ Dell Optiplex 9020 Small Form Factor (SFF) นี่เป็นฮาร์ดแวร์ที่ทรงพลังสำหรับไฟร์วอลล์ โดยมีซีพียู Intel i7-4790 3.6GHz, RAM 16 GB และฮาร์ดไดรฟ์ 250 GB
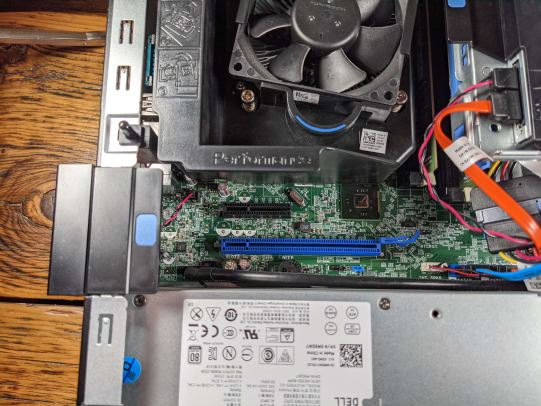
ตามค่าเริ่มต้น คอมพิวเตอร์เครื่องนี้มีพอร์ตอีเทอร์เน็ต RJ45 เพียงพอร์ตเดียวเท่านั้น อย่างไรก็ตาม หากจะใช้เป็นไฟร์วอลล์ ก็จะต้องมีพอร์ตอีเทอร์เน็ตอย่างน้อย 2 พอร์ต เพื่อให้บรรลุสิ่งนี้ ฉันซื้อการ์ดเครือข่าย Intel i350 ซึ่งมาพร้อมกับพอร์ตอีเทอร์เน็ตสี่พอร์ต การ์ดเครือข่าย i350 ออกแบบมาเพื่อใช้ในสล็อต PCIe สี่เลนบนเมนบอร์ดของเดสก์ท็อป
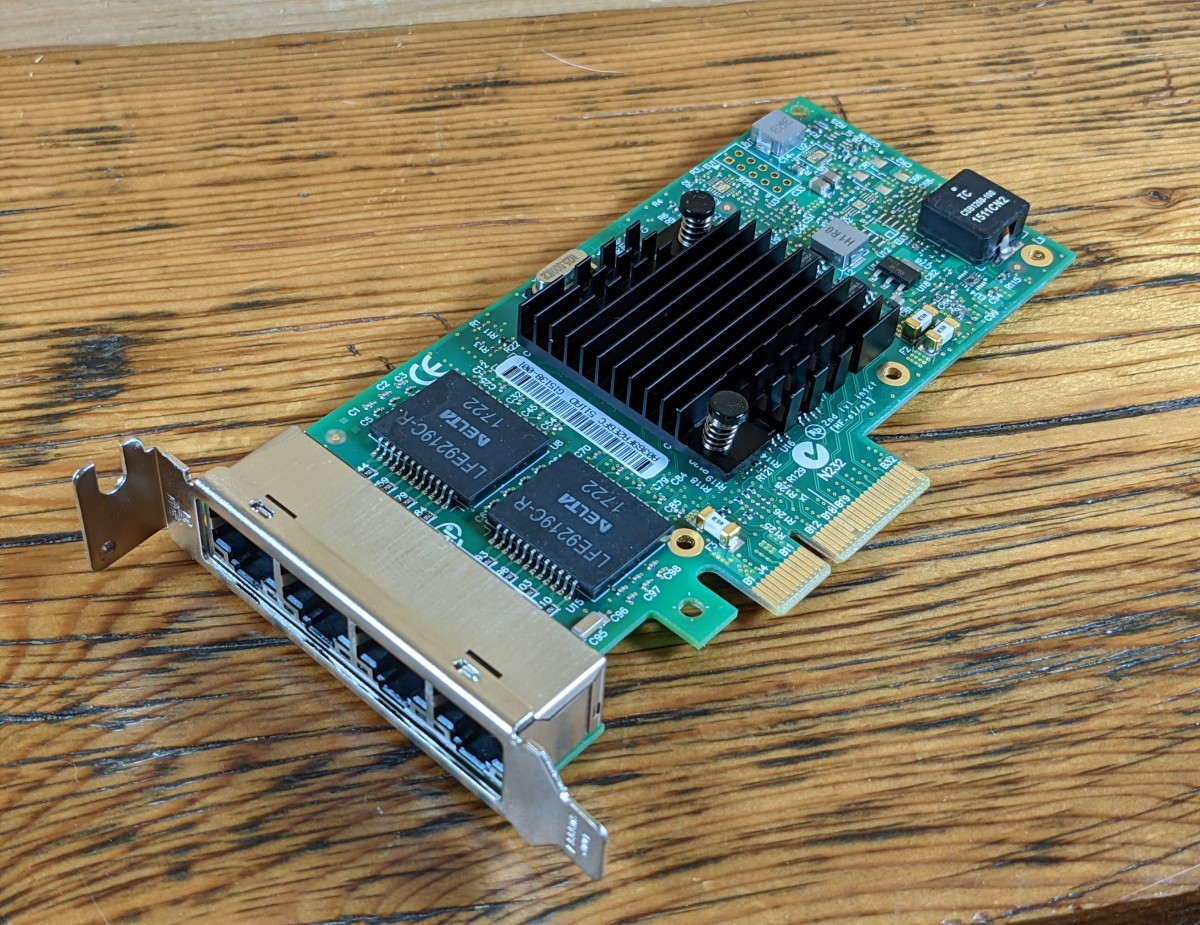
สำหรับแชสซี SFF นี้ ฉันต้องสลับโครงยึดโลหะขนาดฟูลเฟรมกับโครงยึดขนาดเล็กที่รวมอยู่ในการ์ดเครือข่าย จากนั้นเพียงเปิดแชสซีและพลิกเปิดแคลมป์ภายนอกที่ปิดสล็อต PCI ว่าง ด้วยไขควง คุณสามารถถอดตัวยึดโลหะเปล่าที่ด้านหน้าของสล็อต PCI สี่เลนและเสียบการ์ดเครือข่าย จากนั้น ปิดแคลมป์แล้วใส่ฝาครอบด้านข้างของแชสซีกลับเข้าไปใหม่
เมื่อติดตั้งแล้ว สิ่งสำคัญคือต้องสังเกตว่าพอร์ตอีเทอร์เน็ตใดสำหรับเครือข่ายบริเวณกว้าง (WAN) และพอร์ตใดสำหรับเครือข่ายท้องถิ่น (LAN) WAN คือสิ่งที่หันหน้าเข้าหาอินเทอร์เน็ตสาธารณะแบบเปิดกว้าง และ LAN คือสิ่งที่ต้องเผชิญกับเครือข่ายในบ้านของคุณ
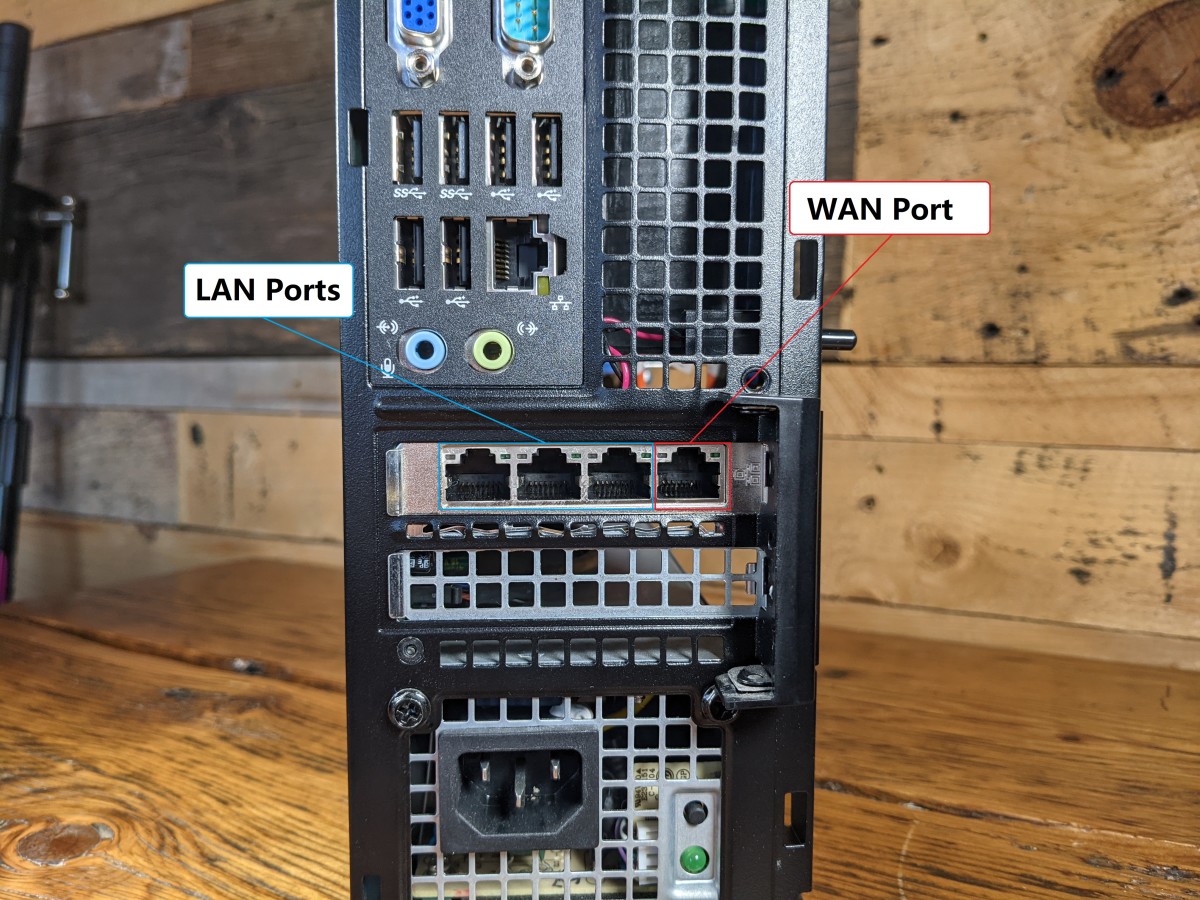
เมื่อติดตั้งแล้ว คุณสามารถตั้งค่าคอมพิวเตอร์เดสก์ท็อปของคุณไปด้านข้างได้ในตอนนี้ คุณจะต้องใช้คอมพิวเตอร์ที่เชื่อมต่อเครือข่ายของคุณเพื่อดาวน์โหลดและตรวจสอบอิมเมจ pfSense และแฟลชไปยังไดรฟ์ USB
ขั้นตอนที่สอง: วิธีดาวน์โหลดและยืนยันไฟล์ภาพ pfSense และแฟลชไปยังไดรฟ์ USB
ขั้นแรก ให้ไปที่หน้าดาวน์โหลด pfSense และเมื่อถึงแล้ว:
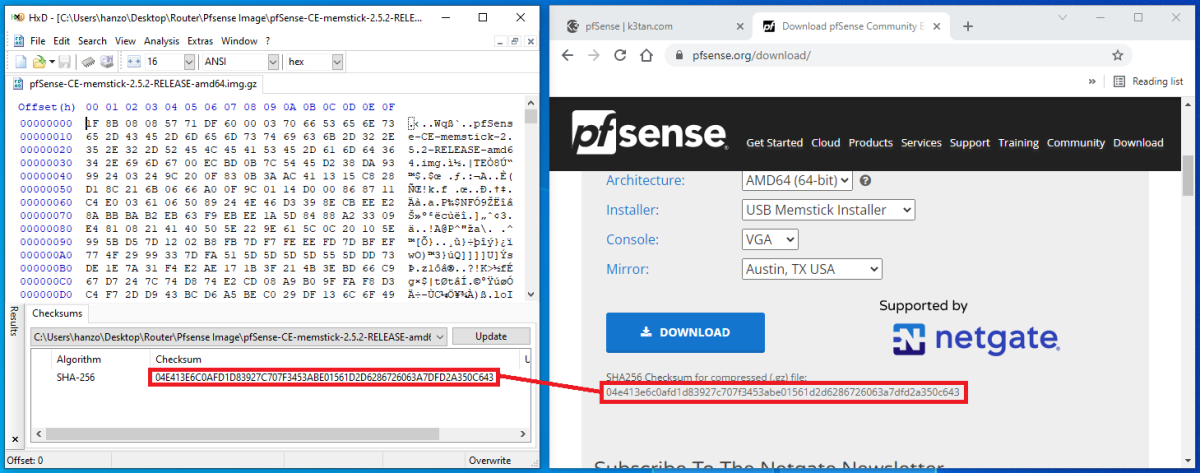
เลือกสถาปัตยกรรม”AMD64″จากนั้นเลือก”ตัวติดตั้ง USB Memstick”จากนั้นไปที่คอนโซล”VGA”จากนั้นเลือกมิเรอร์ที่ใกล้เคียงที่สุด ตำแหน่งทางภูมิศาสตร์ของคุณ เช่น ที่แสดงในภาพหน้าจอด้านล่าง และคลิก”ดาวน์โหลด”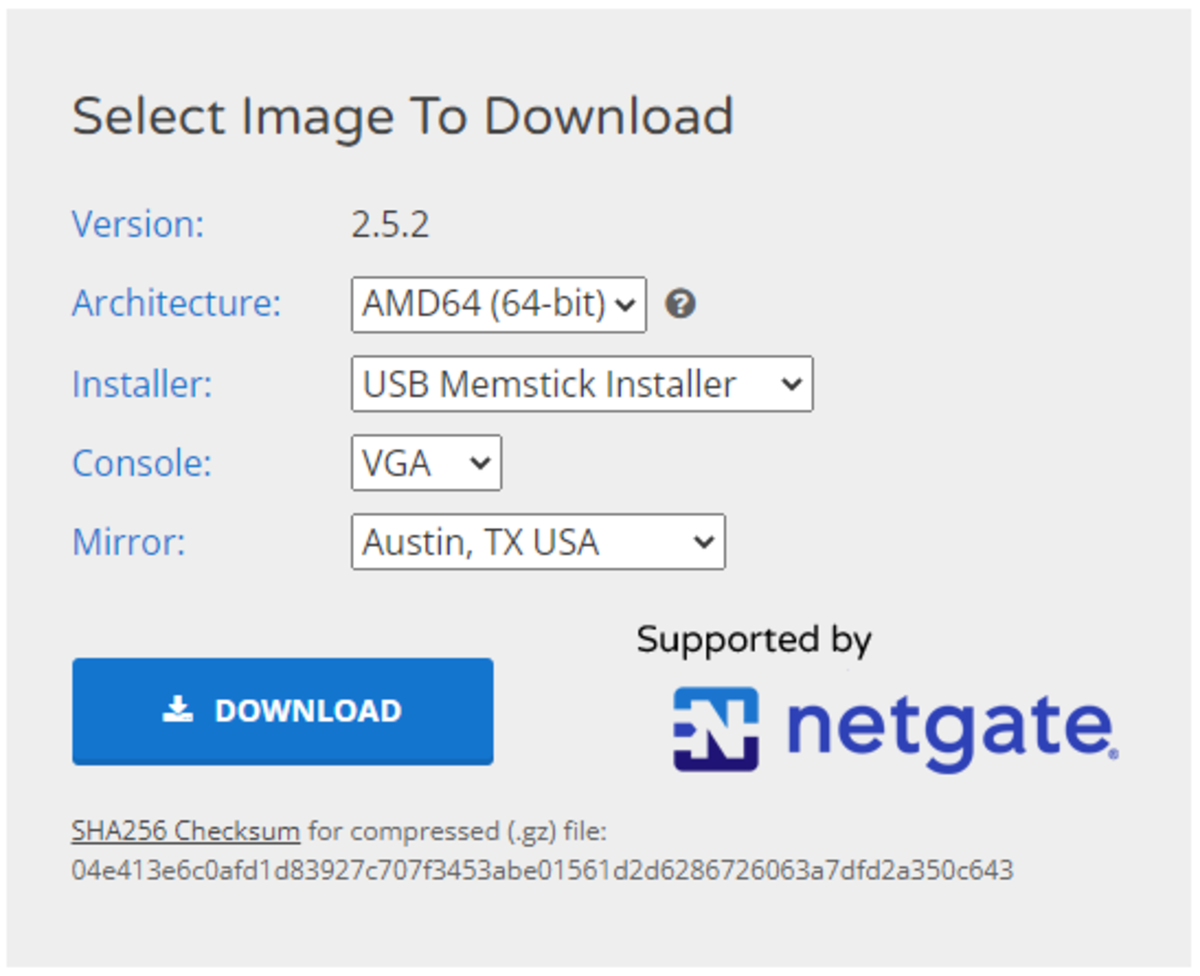
ถัดไป คุณสามารถคำนวณเช็คซัม SHA-256 บนไฟล์บีบอัดที่คุณดาวน์โหลด และตรวจสอบกับเช็คซัมที่แสดงบนหน้าดาวน์โหลด pfSense
ฉันชอบใช้ตัวแก้ไขฐานสิบหกฟรีแวร์ชื่อ HxD สำหรับการคำนวณเช็คซัม. เพียงเปิดไฟล์ที่คุณสนใจ ไปที่”เครื่องมือ”จากนั้นเลือก”Checksums”และเลือก”SHA256″จากเมนู หากค่าแฮชไม่ตรงกัน อย่าเรียกใช้ไฟล์เรียกทำงาน
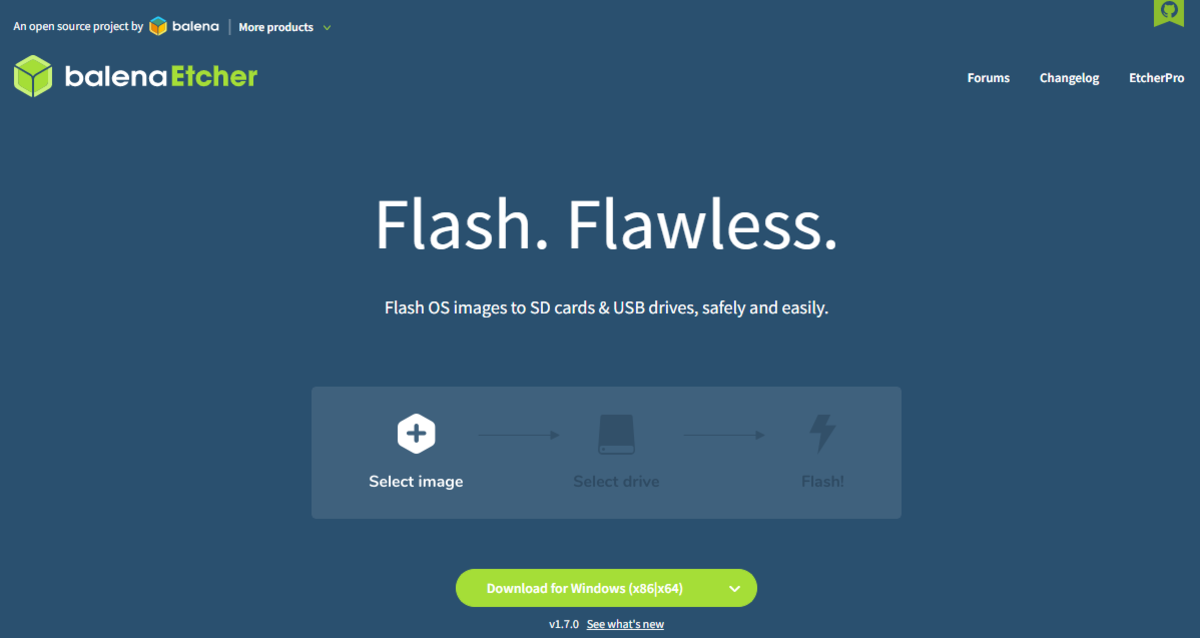
วิธีที่ง่ายที่สุดที่ฉันพบในการแฟลชไฟล์รูปภาพไปยังไดรฟ์ USB คือการใช้โปรแกรมที่ชื่อว่า balenaEtcher.
เมื่อติดตั้งแล้ว ให้เปิดแอปพลิเคชัน คลิก”แฟลชจากไฟล์”จากนั้นไปที่โฟลเดอร์ที่คุณมีไฟล์รูปภาพ pfSense ที่บีบอัดไว้
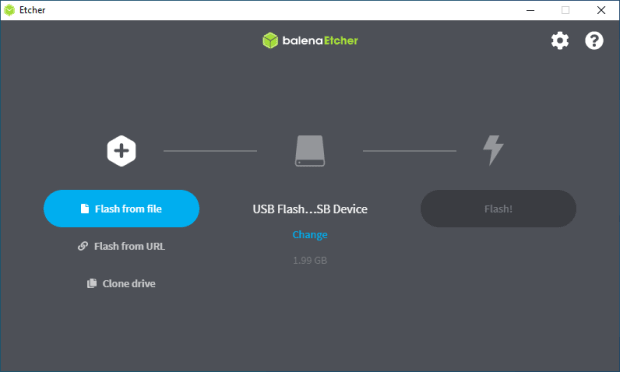
ถัดไป เลือกไดรฟ์ USB เปล่าของคุณ จากนั้นคลิกที่”Flash”BalenaEtcher จะเริ่มกระบวนการกระพริบและคลายการบีบอัดไฟล์ภาพ pfSense โดยอัตโนมัติ ขั้นตอนนี้จะใช้เวลาสักครู่
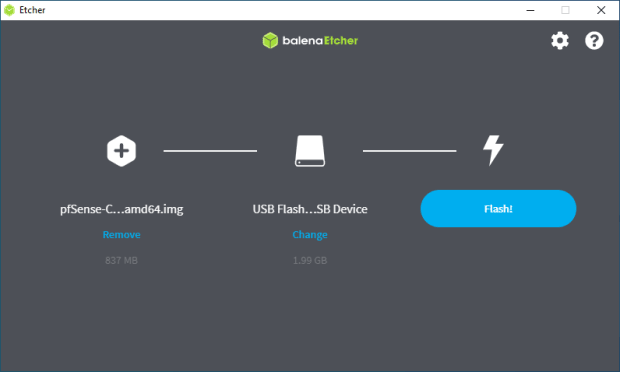
หลังจากการกะพริบเสร็จสิ้น คุณควรได้รับเครื่องหมายถูกสีเขียวที่ระบุว่าทุกอย่างเช็คเอาท์ หากคุณได้รับข้อผิดพลาดจาก balenaEtcher คุณอาจต้องลองแฟลชไปยังไดรฟ์ USB อื่น

ตอนนี้คุณสามารถดีดไดรฟ์ USB ที่แฟลชแล้วออกจากคอมพิวเตอร์ของคุณได้อย่างปลอดภัย และคุณพร้อมที่จะแฟลชคอมพิวเตอร์เดสก์ท็อปเครื่องอื่น
ขั้นตอนที่สาม: วิธีแฟลชเดสก์ท็อป และติดตั้ง pfSense
เชื่อมต่อแป้นพิมพ์ จอภาพ สายไฟ และไดรฟ์ USB แบบแฟลชกับคอมพิวเตอร์เดสก์ท็อปที่คุณติดตั้งการ์ดเครือข่ายไว้ จอภาพจะต้องเชื่อมต่อผ่านการเชื่อมต่อ VGA — การเชื่อมต่อ DisplayPort จะไม่ทำงาน ทำงานในประสบการณ์ของฉัน อย่าเพิ่งต่อสายอีเทอร์เน็ต
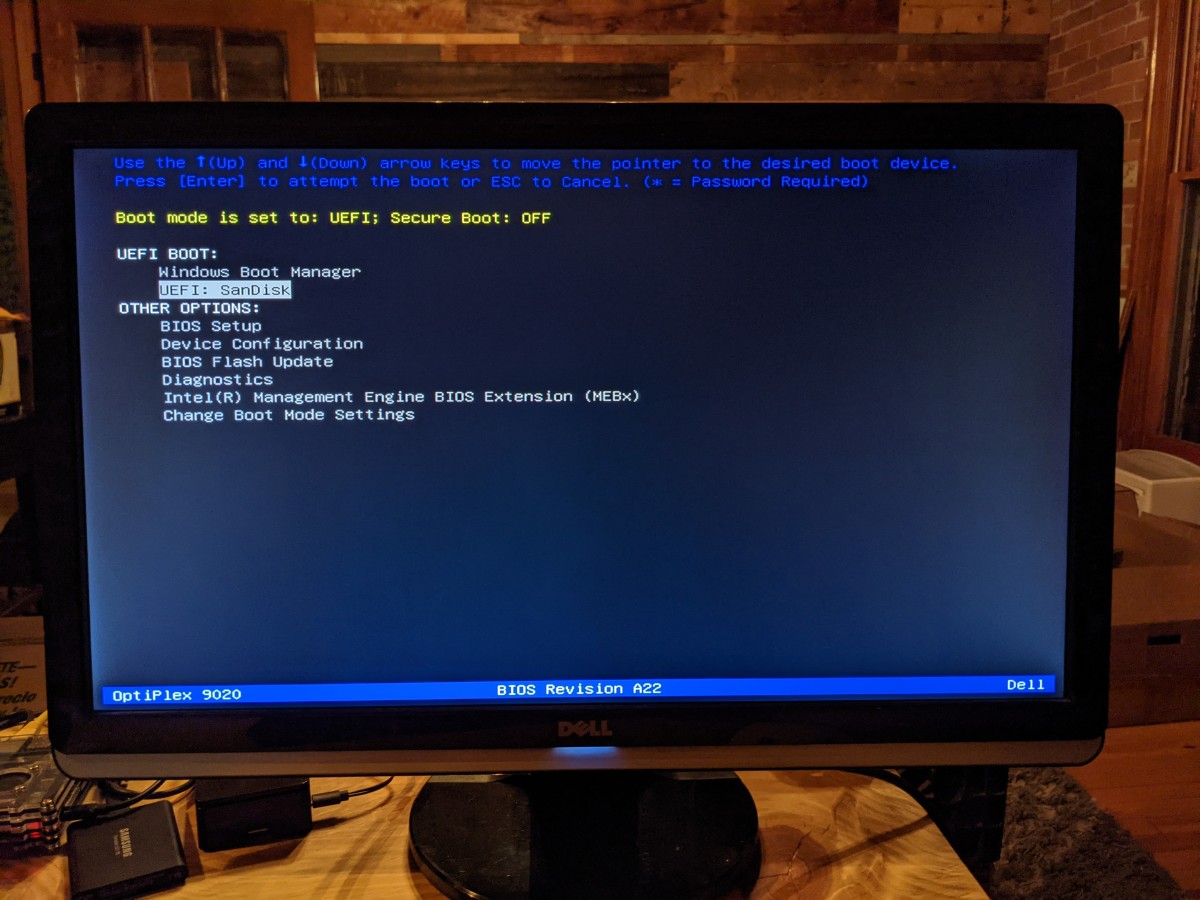
เมื่อเชื่อมต่อทุกอย่างแล้ว ให้เปิดเครื่องเดสก์ท็อปของคุณ คอมพิวเตอร์บางเครื่องจะตรวจพบโดยอัตโนมัติว่ามีไดรฟ์ USB ที่สามารถบู๊ตได้เสียบอยู่ และจะถามคุณว่าต้องการบูตจากไดรฟ์ใด ในกรณีของฉัน คอมพิวเตอร์เพิ่งเริ่มต้นการบูทจากไดรฟ์”C:\”และเปิดใช้งาน Windows โดยอัตโนมัติ หากเกิดเหตุการณ์นี้กับคุณ ให้ปิดเครื่องคอมพิวเตอร์ จากนั้นกด”F12″บนแป้นพิมพ์ค้างไว้แล้วเปิดใหม่ การดำเนินการนี้จะเปิด BIOS ซึ่งคุณสามารถบอกคอมพิวเตอร์ได้ว่าต้องการบูตจากไดรฟ์ใด
ตัวอย่างเช่น นี่คือสภาพแวดล้อม BIOS ของฉัน ซึ่งฉันสามารถเลือกไดรฟ์ USB ของ SanDisk ที่ฉันแฟลชไว้ ภาพ pfSense ไปที่. หลังจากเลือกตัวเลือกนี้ สคริปต์จะทำงานชั่วขณะ จากนั้นโปรแกรมติดตั้ง pfSense จะเปิดขึ้น:
ขั้นแรก ให้ยอมรับข้อกำหนดและเงื่อนไข จากนั้นเลือก”ติดตั้ง pfSense”จากนั้นเลือกคีย์แมปที่เหมาะสมกับคุณ หากคุณพูดภาษาอังกฤษและอาศัยอยู่ในสหรัฐอเมริกา คุณอาจต้องการใช้ค่าเริ่มต้น
ต่อไป ฉันเพิ่งเลือกตัวเลือก”ระบบไฟล์ ZettaByte อัตโนมัติ”(ZFS) เพราะฉันกำลังใช้แพลตฟอร์มฮาร์ดแวร์ที่มีข้อกำหนดสำหรับไฟร์วอลล์ที่บ้านมากกว่า ตัวเลือก ZFS มีคุณสมบัติมากกว่าและมีความน่าเชื่อถือมากกว่าตัวเลือก Unix File System (UFS) แต่ ZFS อาจมีหน่วยความจำมากกว่า ซึ่งฉันไม่ได้กังวลมากนักเนื่องจากฉันมี RAM ขนาด 16 GB ในเดสก์ท็อปนี้
จากนั้น คุณจะมีตัวเลือกการแบ่งพาร์ติชั่นและความซ้ำซ้อน ซึ่งผมเพิ่งจะรักษาความเรียบง่ายที่สุดเท่าที่จะทำได้ เช่น ไม่มีความซ้ำซ้อน และตัวเลือกการกำหนดค่าเริ่มต้น จากนั้นเลือก”ติดตั้ง”
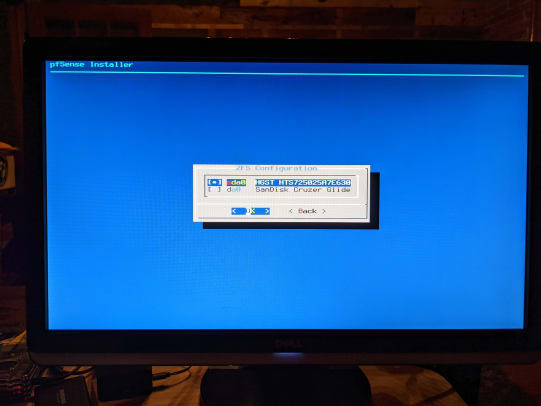 <>จากนั้น คุณจะเห็นการยืนยันว่าการติดตั้ง pfSense สำเร็จ ข้อความแจ้งจะถามคุณว่าคุณต้องการทำการแก้ไขขั้นสุดท้ายด้วยตนเองหรือไม่ ซึ่งฉันไม่ได้ทำ จากนั้นระบบจะถามคุณว่าต้องการรีบูตหรือไม่ เลือกใช่ ถอดไดรฟ์ USB ออกทันทีก่อนที่การรีบูตจะเริ่มขึ้นใหม่ เพราะไม่เช่นนั้นระบบจะพาคุณไปที่จุดเริ่มต้นของวิซาร์ดการติดตั้งอีกครั้ง คุณควรปิดท้ายเมนูเทอร์มินัลหลักเมื่อการรีบูตเสร็จสิ้น

ตอนนี้คุณพร้อมที่จะเชื่อมต่อแล้ว ไฟร์วอลล์ใหม่ของคุณไปยังเครือข่ายในบ้านของคุณ
ขั้นตอนที่สี่: วิธีเชื่อมต่อ pfSense ในเครือข่ายภายในบ้าน
ขั้นตอนต่อไปนี้จะเสร็จสมบูรณ์บนแป้นพิมพ์และจอภาพที่เชื่อมต่อกับเครื่องใหม่ของคุณ ไฟร์วอลล์:
ขั้นแรก ปิดเราเตอร์ที่ ISP ให้มา ปิดโมเด็ม และถอดสายอีเทอร์เน็ตออกจากโมเด็มและเราเตอร์ จากนั้นเปิดไฟร์วอลล์ใหม่แล้วปล่อยให้ pfSense โหลด จากนั้นเปิดโมเด็มของคุณและรอให้มันลิงก์กับอินเทอร์เน็ต ในเมนู pfSense ให้เลือกตัวเลือกที่หนึ่ง”กำหนดอินเทอร์เฟซ”ระบบจะถามคุณว่าต้องการตั้งค่า VLAN ตอนนี้หรือไม่ ให้ป้อน”n”แทน จากนั้นจะขอให้คุณป้อนชื่ออินเทอร์เฟซ WAN ป้อน”a”เพื่อตรวจหาอัตโนมัติ เชื่อมต่อสายอีเทอร์เน็ตจากเอาต์พุตโมเด็มของคุณไปยังอินเทอร์เฟซการ์ดเครือข่ายไฟร์วอลล์ใหม่ โปรดจำไว้ว่า พอร์ตทางด้านขวาสุดหากแท็บรีลีส RJ45 หงายขึ้นคือพอร์ต WAN ของคุณ หรือด้านซ้ายสุดหากแท็บรีลีส RJ45 คว่ำลง เมื่อเชื่อมต่อแล้ว ให้กด”Enter”ควรตรวจพบการเชื่อมโยงบนพอร์ตอินเทอร์เฟซ igb0 หากเป็น igb3 ให้สลับสายอีเทอร์เน็ตไปฝั่งตรงข้ามแล้วลองอีกครั้ง จากนั้นระบบจะขอให้คุณป้อนชื่ออินเทอร์เฟซ LAN ป้อน”a”เพื่อตรวจหาอัตโนมัติ เชื่อมต่อสายอีเทอร์เน็ตจากพอร์ตถัดไปที่พร้อมใช้งานบนการ์ดเครือข่ายไฟร์วอลล์ใหม่กับสวิตช์อีเทอร์เน็ตหรือจุดเชื่อมต่ออื่นๆ โปรดทราบว่าหากคุณต้องการเรียกใช้ Virtual Local Area Network (VLAN) คุณจะต้องใช้สวิตช์ที่มีการจัดการ เมื่อเชื่อมต่อแล้ว ให้กด Enter ควรตรวจพบการเชื่อมโยงบนพอร์ตอินเทอร์เฟซ igb1 จากนั้นกด Enter อีกครั้งเพื่อ”ไม่มี”เนื่องจากไม่มีการกำหนดค่าการเชื่อมต่อเครือข่ายอื่น ๆ ในขณะนี้ จากนั้นจะแจ้งให้คุณทราบว่าอินเทอร์เฟซจะถูกกำหนดดังนี้ WAN=igb0 และ LAN=igb1.ป้อน”y”สำหรับใช่ และ pfSense จะเขียนการกำหนดค่าและนำคุณกลับไปที่เมนูหลักโดยแสดงที่อยู่ WAN IP v4 และ IP v6 ที่ด้านบน
เพียงเพื่อแสดงตัวอย่างการกำหนดค่าเส้นทางสัญญาณ คุณก็ทำได้ ทำการตั้งค่าดังนี้:

ที่นี้ ชี้ คุณควรจะสามารถป้อน”192.168.1.1″ลงในเว็บเบราว์เซอร์บนเดสก์ท็อปปกติของคุณ และเปิดเว็บอินเทอร์เฟซ pfSense ได้ เป็นใบรับรองที่ลงนามเอง ดังนั้นยอมรับความเสี่ยงเมื่อได้รับแจ้งและดำเนินการต่อ ข้อมูลรับรองการเข้าสู่ระบบคือ admin/pfsense
ขณะนี้คุณสามารถยกเลิกการเชื่อมต่อแป้นพิมพ์และจอภาพจากไฟร์วอลล์ใหม่ของคุณ ขั้นตอนที่เหลือจะเสร็จสมบูรณ์ผ่านอินเทอร์เฟซเว็บบนเดสก์ท็อปปกติของคุณ
ขั้นตอนที่ห้า: วิธีกำหนดค่าการตั้งค่าพื้นฐาน pfSense
ในขั้นตอนนี้ คุณจะเห็นวิธีการ กำหนดการตั้งค่าพื้นฐาน เช่น วิซาร์ดการตั้งค่า เปลี่ยนพอร์ต TCP เปิดใช้งาน Secure Shell SSH และตั้งค่ากิ๊บติดผมตามค่าเริ่มต้น ข้อมูลส่วนใหญ่ที่นำเสนอในที่นี้และในขั้นตอนที่ 6 ด้านล่างมาจากการดูวิดีโอของ Tom Lawrence บน pfSense — ฉันขอตอบ แนะนำให้ดูวิดีโอนี้ ยาวแต่เต็มไปด้วยข้อมูลที่มีค่าและมีรายละเอียดมากกว่าที่ฉันนำเสนอในคู่มือนี้
ขั้นแรก ให้คลิกที่กล่องโต้ตอบคำเตือนสีแดงที่ด้านบนของหน้าเพื่อเปลี่ยน รหัสผ่านที่ใช้ในการเข้าสู่ระบบไฟร์วอลล์ใหม่ของคุณ โดยส่วนตัวแล้ว ฉันแนะนำรหัสผ่านแบบใช้ครั้งเดียวที่มีเอนโทรปีสูงพร้อมตัวจัดการรหัสผ่านที่มาพร้อม จากนั้นออกจากระบบและกลับเข้าสู่ระบบใหม่เพื่อทดสอบการเปลี่ยนแปลงของคุณ
เมื่อกลับเข้าสู่ระบบแล้ว ให้เปิด”วิซาร์ดการตั้งค่า”จากแท็บ”ระบบ”:

จากนั้น วิซาร์ดจะแนะนำคุณตลอดเก้าขั้นตอนพื้นฐานเพื่อกำหนดค่าไฟร์วอลล์ pfSense ใหม่ของคุณ
คลิก”ถัดไป”ในขั้นตอนแรก

จากนั้น ในขั้นตอนที่สอง คุณสามารถกำหนดค่าชื่อโฮสต์ โดเมน และเซิร์ฟเวอร์ DNS หลัก/รอง คุณสามารถปล่อยให้”ชื่อโฮสต์”และ”โดเมน”เป็นค่าเริ่มต้นหรือตั้งค่าให้เป็นอะไรก็ได้ที่คุณต้องการ ฉันเลือก”100.64.0.3″สำหรับเซิร์ฟเวอร์ DNS หลักเพื่อออกสู่อินเทอร์เน็ต และยกเลิกการเลือกช่อง”แทนที่ DNS”เพื่อหลีกเลี่ยงไม่ให้ DHCP แทนที่เซิร์ฟเวอร์ DNS ฉันจะอธิบายให้ฟังว่าทำไมฉันจึงใช้”100.64.0.3″ในขั้นตอนที่ 10 ของคู่มือนี้

จากนั้น คุณสามารถตั้งค่าเขตเวลาของคุณในขั้นตอนที่สาม:

ในขั้นตอนที่สี่ คุณสามารถเลือก”DHCP”สำหรับอินเทอร์เฟซ WAN และปล่อยให้ฟิลด์อื่นๆ ทั้งหมดเป็นค่าเริ่มต้น หากคุณต้องการปลอมแปลงที่อยู่ MAC ของคุณ คุณสามารถทำได้ในขั้นตอนนี้ สำหรับสองฟิลด์สุดท้าย ตรวจสอบให้แน่ใจว่าได้เลือกช่อง”บล็อก RFC1918 เครือข่ายส่วนตัว”และช่อง”บล็อกเครือข่ายโบกอน”ไว้ ซึ่งจะเป็นการเพิ่มกฎที่เหมาะสมให้กับไฟร์วอลล์ของคุณโดยอัตโนมัติ

ในขั้นตอนที่ห้า คุณสามารถเปลี่ยนที่อยู่ IP ของไฟร์วอลล์ได้ เครือข่ายท้องถิ่นส่วนใหญ่จะใช้ 192.168.0.1 หรือ 192.168.1.1 เพื่อเข้าถึงเราเตอร์หรือไฟร์วอลล์ เหตุผลที่คุณอาจต้องการเปลี่ยนการตั้งค่านี้เป็นที่อยู่ IP ในเครื่องที่ไม่ใช่ค่าเริ่มต้น เนื่องจากหากคุณอยู่ในเครือข่ายของผู้อื่นและกำลังพยายาม VPN กลับเข้าไปในเครือข่ายในบ้าน คุณอาจประสบปัญหาในที่อยู่เดียวกัน ที่ปลายทั้งสองข้าง และระบบจะไม่ทราบว่าคุณกำลังพยายามเชื่อมต่อกับที่อยู่ในเครื่องหรือที่อยู่ระยะไกล ตัวอย่างเช่น ฉันเปลี่ยนที่อยู่ IP ในเครื่องเป็น”192.168.69.1″

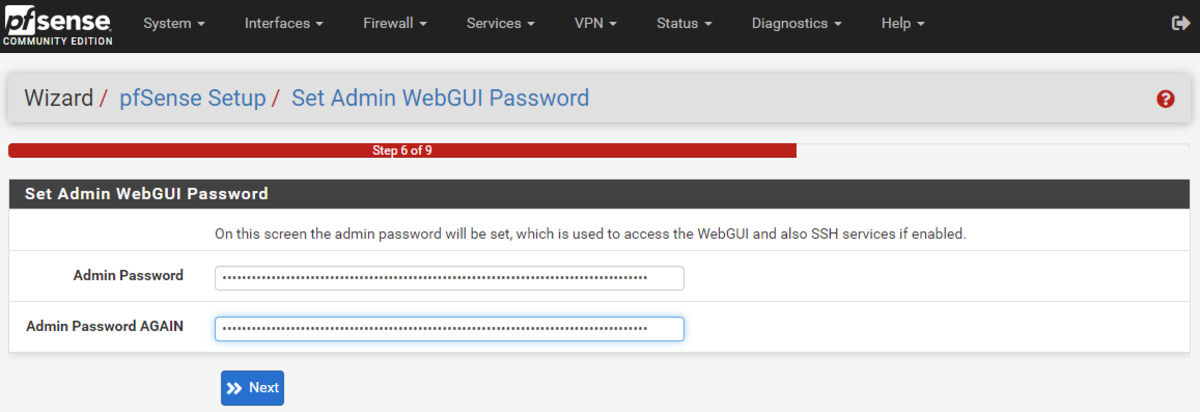
ในขั้นตอนที่หก คุณสามารถตั้งรหัสผ่านผู้ดูแลระบบของคุณ ฉันสับสนเล็กน้อยที่เห็นขั้นตอนนี้แทรกไว้ที่นี่ เนื่องจากฉันเปลี่ยนรหัสผ่านของผู้ดูแลระบบในตอนเริ่มต้น ดังนั้นฉันจึงใช้รหัสผ่านแบบ high-entropy เดิมเมื่อก่อน สมมติว่าขอรหัสผ่านเดียวกันกับที่จะใช้เข้าสู่ระบบ เราเตอร์
จากนั้น ในขั้นตอนที่เจ็ด คุณสามารถคลิกปุ่ม”โหลดซ้ำ”ขณะที่กำลังโหลดซ้ำ ให้ถอดปลั๊กสายไฟออกจากสวิตช์ของคุณ เนื่องจากที่อยู่ IP ในเครื่องของเราเตอร์เปลี่ยนเป็น”192.168.69.1″(หรืออะไรก็ตามที่คุณเลือก) ตอนนี้อุปกรณ์ทั้งหมดในเครือข่ายจะมีที่อยู่ IP ที่อัปเดตเป็นช่วง IP นั้น
ดังนั้น หากคุณมี PuTTY หรือเซสชัน SSH อื่นๆ ที่กำหนดค่าให้กับโหนด Raspberry Pi ของคุณ คุณจะต้องอัปเดตการกำหนดค่าการเชื่อมต่อเหล่านั้น การถอดปลั๊กไฟจากสวิตช์และเสียบกลับเข้าไปใหม่หลังจากรีบูตเราเตอร์แล้ว จะช่วยให้กำหนดอุปกรณ์ทั้งหมดของคุณใหม่ได้

ในการหาที่อยู่ IP สำหรับอุปกรณ์ในเครือข่ายท้องถิ่นของคุณ คุณสามารถไปที่แท็บ”สถานะ”และเลือก”DHCP Leases”เพื่อดูรายการทั้งหมด:

หลังจากโหลดซ้ำในขั้นตอนที่เจ็ด วิซาร์ดเพิ่งข้ามไปยังขั้นตอนที่แปดและเก้า ดังนั้นฉันจึงไม่แน่ใจว่าจะเกิดอะไรขึ้นในขั้นตอนเหล่านั้น แต่เราจะดำเนินการต่อไปและจัดการสิ่งต่างๆ ตามความจำเป็น
การตั้งค่าพื้นฐานอื่นๆ ที่ควรค่าแก่การสังเกตมีอยู่ภายใต้”ระบบ>ขั้นสูง>การเข้าถึงของผู้ดูแลระบบ”ที่นี่ ฉันอัปเดตพอร์ต TCP เป็น”10443″เพราะฉันเรียกใช้บริการบางอย่างที่จะเข้าถึงพอร์ตเริ่มต้นเดียวกัน เช่น 80 หรือ 443 และฉันต้องการลดความแออัด

นอกจากนี้ ฉันเปิดใช้งาน SSH จากนั้น คุณสามารถเลือกวิธีการรักษาความปลอดภัย SSH โดยใช้รหัสผ่านหรือคีย์ หรือทั้งสองอย่างหรือคีย์เท่านั้น เมื่อบันทึกแล้ว ให้เวลาอินเทอร์เฟซหนึ่งนาทีเพื่ออัปเดตพอร์ตใหม่ คุณอาจต้องโหลดหน้าซ้ำโดยใช้ที่อยู่ IP ในเครื่องและพอร์ตใหม่ เช่น”192.168.69.1:10443″อย่าลืมบันทึกการเปลี่ยนแปลงที่ด้านล่างของหน้า

การตั้งค่าพื้นฐานสุดท้ายที่ฉันจะกล่าวถึงในที่นี้คือการติดกิ๊บ ซึ่งหมายความว่า ตัวอย่างเช่น คุณสามารถตั้งค่าเครือข่ายเพื่อให้คุณสามารถเปิดพอร์ตไปยังระบบกล้องรักษาความปลอดภัยด้วยที่อยู่ IP สาธารณะได้ ที่อยู่ IP สาธารณะนี้ยังสามารถใช้ในเครือข่ายของคุณได้ด้วย ซึ่งจะสะดวกถ้าคุณอยู่ที่บ้านเพื่อเข้าถึงระบบกล้องจากโทรศัพท์มือถือบน LAN คุณไม่จำเป็นต้องเปลี่ยนตำแหน่งที่จะเชื่อมต่อด้วยตนเอง เพราะการปักหมุดจะเห็น ว่าคุณกำลังพยายามเข้าถึง IP ในพื้นที่และมันจะวนกลับมาตามค่าเริ่มต้นโดยเปิดใช้งานการตั้งค่านี้
ภายใต้แท็บ”ระบบ”ให้ไปที่”ขั้นสูง>ไฟร์วอลล์ & NAT”เลื่อนลงไปที่”เครือข่าย ส่วนตัวแปลที่อยู่”จากเมนูแบบเลื่อนลง”โหมดสะท้อน NAT”ให้เลือก”NAT บริสุทธิ์”คลิก”บันทึก”ที่ด้านล่างของหน้าและ”ใช้การเปลี่ยนแปลง”ที่ด้านบนของหน้า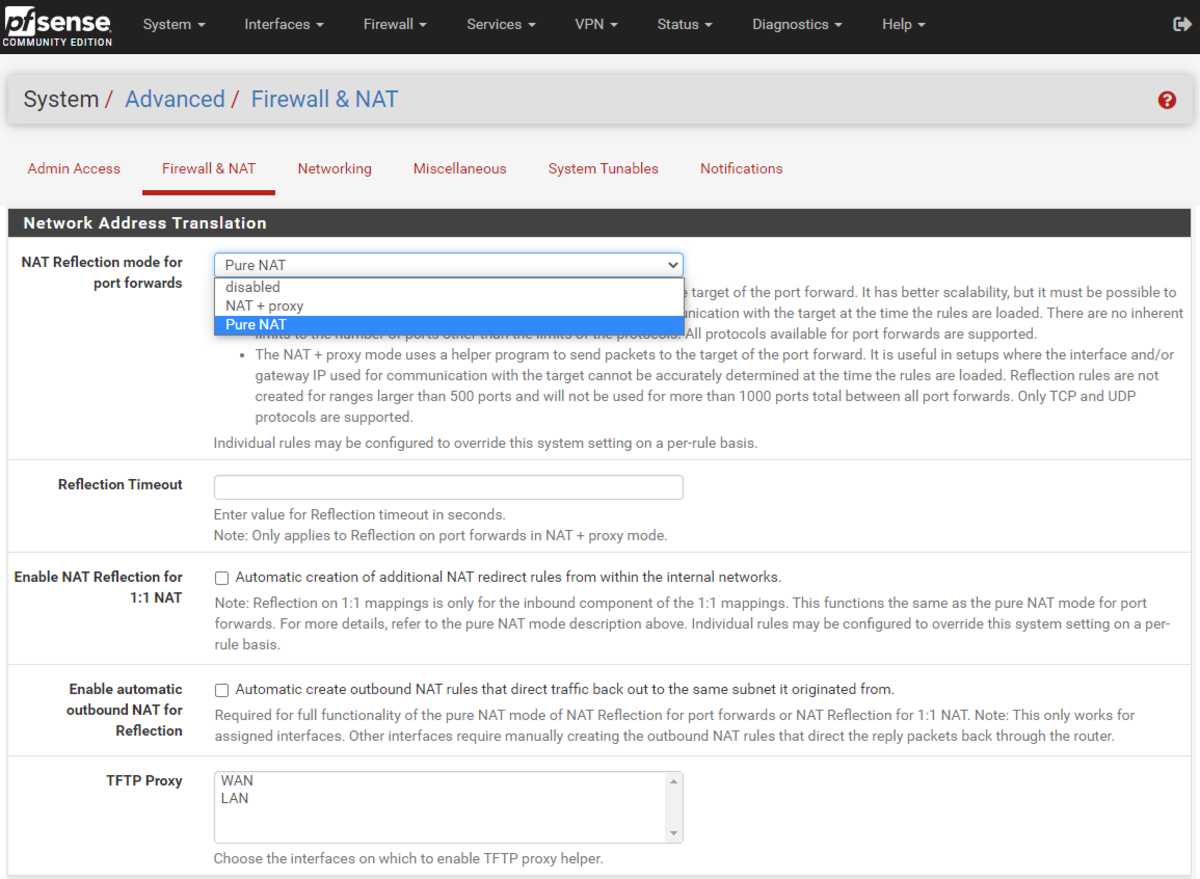
นั่นคือการตั้งค่าพื้นฐาน ข่าวดีก็คือว่า pfSense ค่อนข้างปลอดภัยในการติดตั้งเริ่มต้น ดังนั้นคุณไม่จำเป็นต้องเปลี่ยนอะไรมากมายเพื่อให้มีพื้นฐานที่ดี โดยทั่วไป จุดยืนของนักพัฒนา pfSense ก็คือ หากมีวิธีที่ปลอดภัยกว่าในการเปิดตัว pfSense พวกเขาก็จะทำให้การตั้งค่าเริ่มต้นนั้นเป็นค่าเริ่มต้น
สิ่งหนึ่งที่ควรทราบก็คือโดยค่าเริ่มต้น pfSense เปิดใช้งานการแมปการแปลที่อยู่เครือข่าย WAN IPv6 (NAT) ฉันเลือกที่จะปิดใช้งานสิ่งนี้ ดังนั้นฉันจึงไม่ได้เปิดเกตเวย์ IPv6 สู่อินเทอร์เน็ตแบบเปิดกว้าง
คุณสามารถทำได้โดยไปที่”อินเทอร์เฟซ>การมอบหมาย”จากนั้นคลิกที่ไฮเปอร์ลิงก์”WAN”ในงานแรก ซึ่งจะเปิดหน้าการกำหนดค่า จากนั้นตรวจสอบให้แน่ใจว่า”ประเภทการกำหนดค่า IPv6″ถูกตั้งค่าเป็น”ไม่มี”จากนั้นให้บันทึกและใช้การเปลี่ยนแปลงเหล่านั้น

จากนั้น คุณสามารถไปที่”ไฟร์วอลล์>NAT”และเลื่อนลงไปที่อินเทอร์เฟซ”WAN”ที่มีแหล่งที่มาของ IPv6 แล้วลบออก
ขั้นตอนที่หก: วิธีกำหนดค่าการตั้งค่าขั้นสูง pfSense
ในส่วนนี้ ฉันจะพูดถึงคุณสมบัติขั้นสูงบางอย่างที่คุณอาจสนใจสำหรับเครือข่ายในบ้านของคุณ ที่นี่ คุณจะเห็นวิธีตั้งค่าเครือข่ายแยกจากเราเตอร์ pfSense ของคุณ ตัวอย่างเช่น แขกสามารถเข้าถึงอินเทอร์เน็ตแบบเปิดกว้างจากจุดเชื่อมต่อ WiFi ในบ้านของคุณ แต่ไม่สามารถเข้าถึง ASIC ของคุณจากเครือข่ายนั้นได้
หากคุณใช้การ์ดเครือข่าย i350 เหมือนกับฉัน แสดงว่าคุณมีพอร์ตอีเทอร์เน็ตสี่พอร์ต และหากคุณใช้ Dell Optiplex เหมือนฉัน คุณก็มีพอร์ตอีเทอร์เน็ตที่ห้าบนเมนบอร์ดด้วย ซึ่งหมายความว่าฉันมีอินเทอร์เฟซห้าแบบที่ฉันสามารถกำหนดค่าได้ โดยสี่อินเทอร์เฟซสามารถเป็นเครือข่ายท้องถิ่นสำรองได้
สิ่งที่ฉันจะทำคือเก็บเดสก์ท็อปที่ทำงานของฉันและเดสก์ท็อป Bitcoin เฉพาะของฉันไว้ในเครือข่ายเดียว (LANwork) จากนั้น ฉันจะกำหนดค่า LAN สำรองที่จุดเชื่อมต่อ WiFi ที่บ้านของฉันจะเปิดอยู่ (LANhome) ด้วยวิธีนี้ ฉันสามารถแยกการเข้าชมจากการท่องเว็บของครอบครัวออกจากงานและกิจกรรมที่เกี่ยวข้องกับ Bitcoin โดยสิ้นเชิง
จากนั้น ฉันจะตั้งค่า LAN อื่นซึ่งจะใช้สำหรับ ASICs (LANminers) ของฉันโดยเฉพาะ แยกจากอีกสองเครือข่าย สุดท้าย ฉันจะสร้างเครือข่ายทดสอบ (LANtest) ซึ่งฉันจะใช้เพื่อรวม ASIC ใหม่ และตรวจสอบให้แน่ใจว่าไม่มีเฟิร์มแวร์ที่เป็นอันตรายก่อนที่จะเปิดเผย ASIC อื่นๆ ของฉันแก่พวกเขา คุณสามารถเพิ่มเครือข่ายกล้องรักษาความปลอดภัยในอินเทอร์เฟซใดก็ได้ ความเป็นไปได้ไม่มีที่สิ้นสุด
หากคุณไปที่แท็บ”อินเทอร์เฟซ”จากนั้น”การกำหนดอินเทอร์เฟซ”คุณจะเห็นเครือข่ายที่พร้อมใช้งานทั้งหมด พอร์ตการ์ด RJ45 ควรมีป้ายกำกับว่า”igb0,””igb1″”igb2″เป็นต้น ตอนนี้ เพียงเพิ่มรายการที่คุณสนใจโดยเลือกจากเมนูแบบเลื่อนลงและคลิกที่ช่อง”เพิ่ม”สีเขียว

จากนั้น คลิกที่ไฮเปอร์ลิงก์ทางด้านซ้ายมือ ด้านข้างของอินเทอร์เฟซที่คุณเพิ่งเพิ่มเข้าไปเพื่อเปิดหน้า”การกำหนดค่าทั่วไป”สำหรับอินเทอร์เฟซนั้น
คลิกช่อง”เปิดใช้งานอินเทอร์เฟซ”จากนั้น เปลี่ยน”คำอธิบาย”เป็นบางอย่างที่ช่วยระบุฟังก์ชันของอินเทอร์เฟซนั้น เช่น”LANhome”ตัวอย่างเช่นจากนั้นตั้งค่าประเภท”การกำหนดค่า IPv4″เป็น”IPv4 แบบคงที่”และกำหนดช่วง IP ใหม่ ฉันใช้”192.168.69.1/24″สำหรับ LAN แรกของฉัน ดังนั้นสำหรับอันนี้ ฉันจะใช้ช่วง IP ตามลำดับถัดไป”192.168.70.1/24″
คุณสามารถปล่อยให้การตั้งค่าอื่นๆ ทั้งหมดเป็นค่าเริ่มต้นได้ คลิก”บันทึก”ที่ด้านล่างของหน้า จากนั้น”ใช้การเปลี่ยนแปลง”ที่ด้านบนของหน้า

ตอนนี้ คุณต้องตั้งค่ากฎไฟร์วอลล์สำหรับ LAN ใหม่นี้ ไปที่แท็บ”ไฟร์วอลล์”จากนั้น”กฎ”คลิกที่เครือข่ายที่เพิ่มใหม่ของคุณ เช่น”LANhome”จากนั้น คลิกที่กล่องสีเขียวที่มีลูกศรขึ้นและคำว่า”เพิ่ม”

ในหน้าถัดไป:
ตรวจสอบให้แน่ใจว่าได้ตั้งค่า”Action”เป็น”Pass””Interface”ถูกตั้งค่าเป็น”LANhome”(หรือ LAN สำรองของคุณเรียกว่าอะไร) อย่าลืมตั้งค่า”โปรโตคอล”เป็น”ใดๆ”ไม่เช่นนั้นเครือข่ายนี้จะจำกัดประเภทของการรับส่งข้อมูลที่สามารถส่งต่อไปได้ ถัดไป คุณสามารถเพิ่มหมายเหตุสั้นๆ เพื่อช่วยระบุว่ากฎนี้มีไว้เพื่ออะไร เช่น”อนุญาตการรับส่งข้อมูลทั้งหมด”จากนั้นการตั้งค่าอื่นๆ ทั้งหมดจะยังคงเป็นค่าเริ่มต้นและคลิก”บันทึก”ที่ด้านล่างของหน้าและ”ใช้การเปลี่ยนแปลง”ที่ด้านบนของหน้า
ก่อนที่คุณจะสามารถทดสอบเครือข่ายใหม่ของคุณ คุณต้องมีการตั้งค่าที่อยู่ IP:
ไปที่”บริการ”จากนั้น”DHCP Server”จากนั้นคลิกที่แท็บสำหรับ n. ของคุณ ew LAN คลิกที่ช่อง”Enable”แล้วเพิ่มช่วงที่อยู่ IP ของคุณลงในช่อง”Range”สองช่อง ตัวอย่างเช่น ฉันใช้ช่วงตั้งแต่”192.168.70.1 ถึง 192.168.70.254″จากนั้นคลิก”บันทึก”ที่ด้านล่างของหน้าและ”ใช้การเปลี่ยนแปลง”ที่ด้านบนของหน้า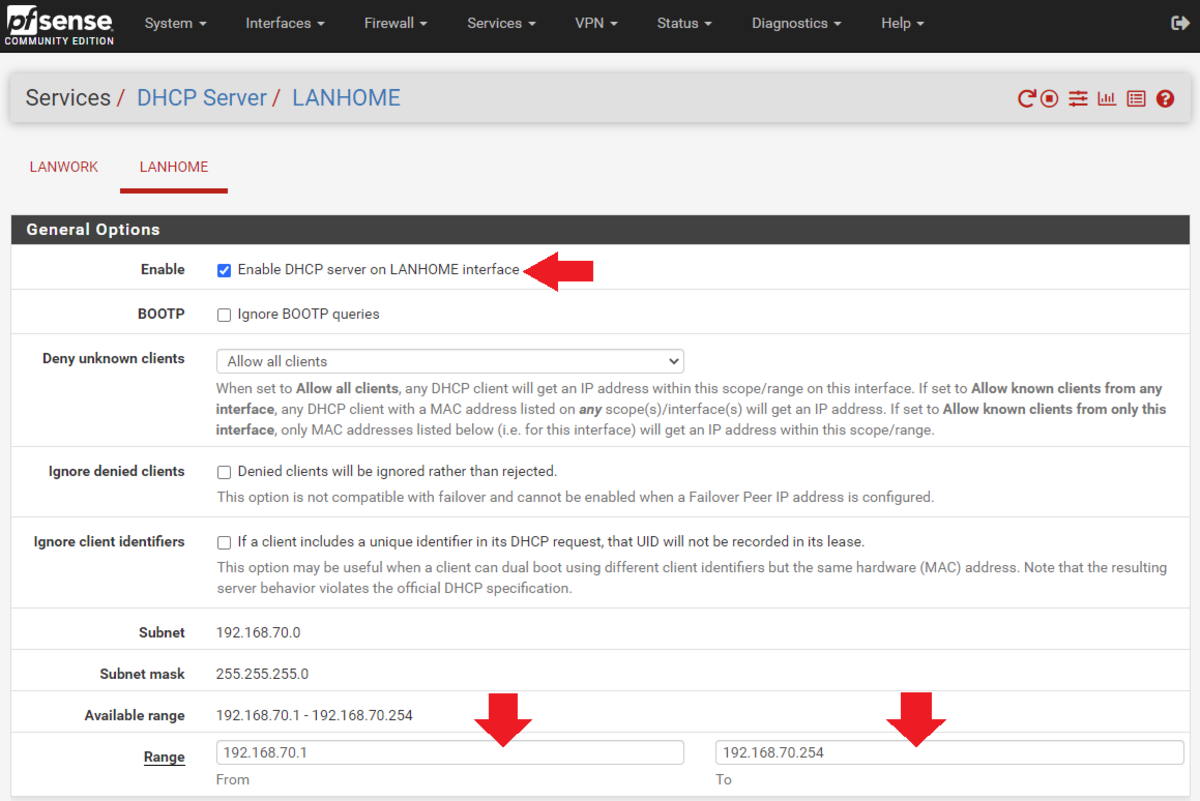
ตอนนี้ คุณสามารถทดสอบเครือข่ายใหม่ของคุณโดยเชื่อมต่อคอมพิวเตอร์เข้ากับพอร์ต RJ45 ที่เกี่ยวข้องบนการ์ดเครือข่าย จากนั้นลองเข้าถึงอินเทอร์เน็ต หากทุกอย่างทำงาน คุณควรจะสามารถเรียกดูเว็บที่เปิดกว้างได้
อย่างไรก็ตาม คุณอาจสังเกตเห็นว่าหากคุณใช้ LAN สำรองและพยายามเข้าสู่ระบบไฟร์วอลล์ คุณจะสามารถ โดยใช้ที่อยู่ IP”192.168.70.1″โดยส่วนตัวแล้ว ฉันต้องการให้ไฟร์วอลล์เข้าถึงได้จากเครือข่าย”LANwork”เท่านั้น ฉันไม่ต้องการให้ภรรยาและลูกๆ หรือแขกของฉันเข้าสู่ระบบไฟร์วอลล์จากเครือข่าย”LANhome”ที่กำหนดไว้ แม้ว่าฉันจะมีรหัสผ่านที่มีเอนโทรปีสูงเพื่อเข้าสู่ไฟร์วอลล์ แต่ฉันยังคงกำหนดค่า LAN อื่น ๆ เพื่อไม่ให้สื่อสารกับเราเตอร์ได้
สิ่งหนึ่งที่ฉันมีความกังวลเกี่ยวกับประเภทนี้ การกำหนดค่าจะช่วยบรรเทาได้ คือ ถ้าฉันเสียบ ASIC เข้ากับเครือข่ายของฉันโดยมีเฟิร์มแวร์ที่เป็นอันตรายติดตั้งอยู่ ฉันสามารถแยกอุปกรณ์นั้นออกจากกัน และป้องกันไม่ให้ความกังวลเรื่องความปลอดภัยส่งผลกระทบกับอุปกรณ์และข้อมูลอื่นๆ ที่ฉันมี ซึ่งเป็นสาเหตุหนึ่งใน LAN ที่ฉันตั้งค่าเรียกว่า”LANtest”ซึ่งจะทุ่มเทเพื่อให้ ASIC ใหม่แยกจากกันโดยสิ้นเชิง เพื่อให้ฉันสามารถทดสอบได้อย่างปลอดภัยโดยไม่อนุญาตให้มีการโจมตีเกิดขึ้นบน ASIC อื่นๆ ของฉันหรืออุปกรณ์อื่นๆ บนเครือข่ายในบ้านของฉัน
ในการตั้งค่ากฎเพื่อไม่ให้พอร์ต 10443 ไม่สามารถเข้าถึงได้จากเครือข่าย LAN อื่นของคุณ ให้ไปที่”ไฟร์วอลล์>กฎ”จากนั้นเลือกแท็บสำหรับเครือข่ายที่คุณสนใจ คลิกที่กล่องสีเขียวที่มีลูกศรขึ้นและคำว่า”เพิ่ม”อยู่ในนั้น
ตรวจสอบให้แน่ใจว่า”การดำเนินการ”ถูกตั้งค่าเป็น”บล็อก”จากนั้น ในส่วน”ปลายทาง”ให้ตั้งค่า”ปลายทาง”เป็น”ไฟร์วอลล์นี้”(ตัวเอง)”จากนั้น”ช่วงพอร์ตปลายทาง”ถึง”10443″โดยใช้ช่อง”กำหนดเอง”สำหรับฟิลด์”จาก”และ”ถึง”คุณสามารถเพิ่มคำอธิบายเพื่อช่วยให้คุณจำได้ว่ากฎนี้มีไว้เพื่ออะไร จากนั้นคลิก”บันทึก”ที่ด้านล่างของหน้า จากนั้นคลิก”ใช้การเปลี่ยนแปลง”ที่ด้านบนของหน้า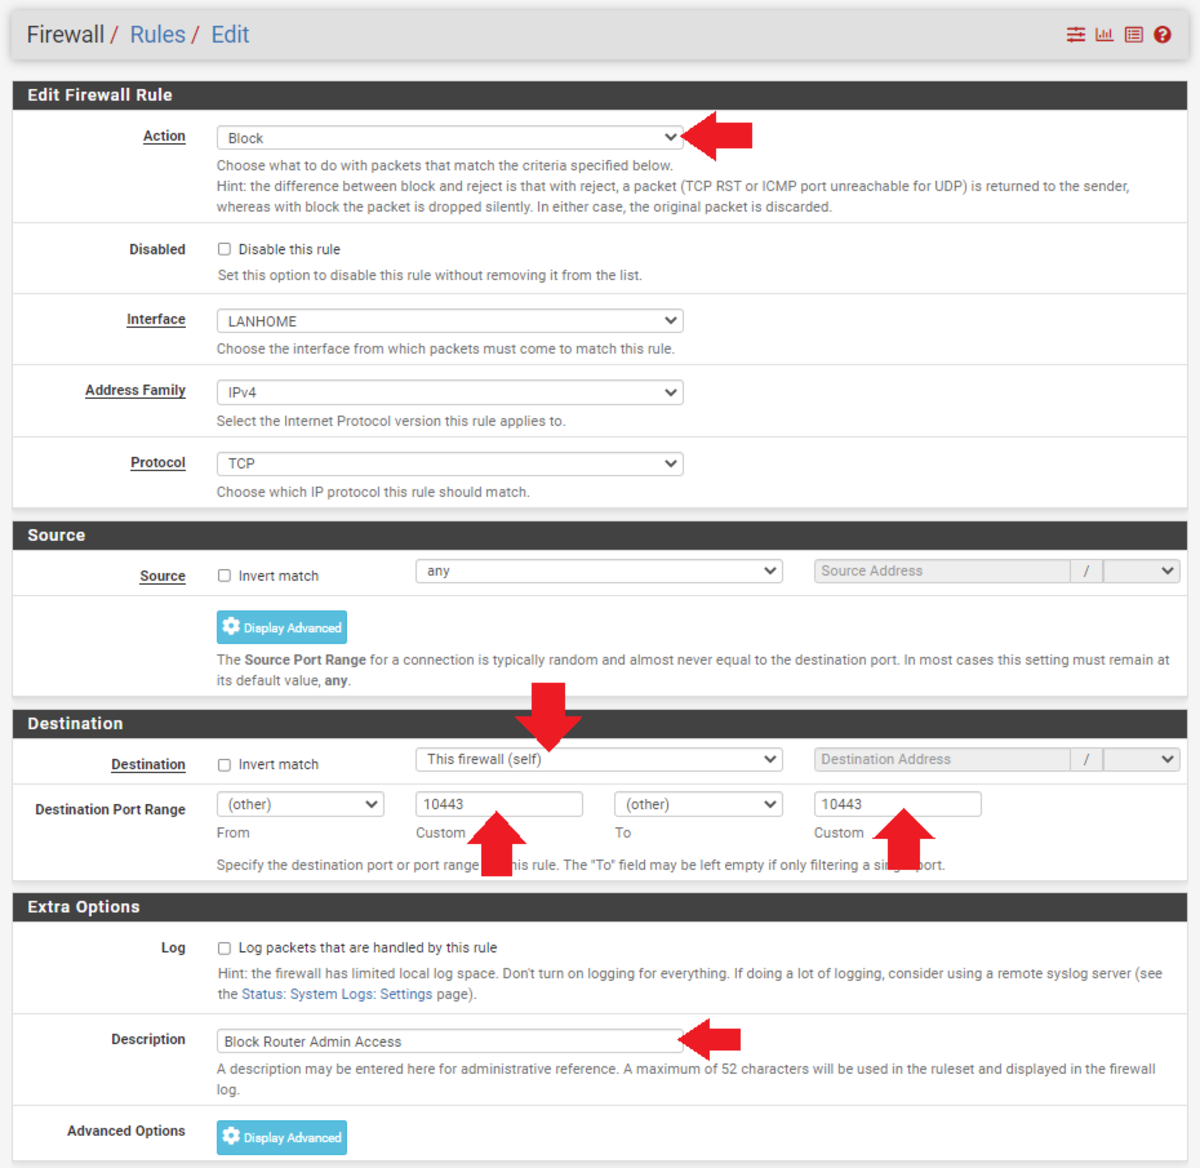
การมีรหัสผ่านเอนโทรปีสูงเพื่อเข้าสู่ระบบเราเตอร์และล็อคพอร์ตเป็นการเริ่มต้นที่ดี แต่คุณสามารถยึดเครือข่าย LAN ของคุณต่อไปได้ และทำให้อุปกรณ์ในเครือข่ายเดียวไม่สามารถทำได้ เข้าสู่เครือข่ายอื่นๆ ได้เลยโดยตั้งค่านามแฝงสำหรับ LAN หลักของคุณ
ไปที่”ไฟร์วอลล์>นามแฝง”จากนั้นภายใต้แท็บ”IP”ให้คลิกปุ่ม”เพิ่ม”
 จากนั้น ฉันตั้งชื่อนามแฝงนี้ว่า”SequesteredNetworks0″ฉันป้อน คำอธิบายเพื่อเตือนฉันถึงหน้าที่ของมัน เนื่องจากฉันจะเพิ่มกฎไฟร์วอลล์ให้กับเครือข่าย”LANhome”ที่อ้างอิงนามแฝงนี้ ฉันจึงเพิ่ม LAN อื่นในรายการ”เครือข่าย”วิธีนี้จะทำให้”LANhome”คุยกับ”LANwork”,”LANminers”หรือ”LANtest”ไม่ได้ คลิก”Save”ที่ด้านล่างของหน้า จากนั้น”Apply Changes”ที่ด้านบนของหน้า
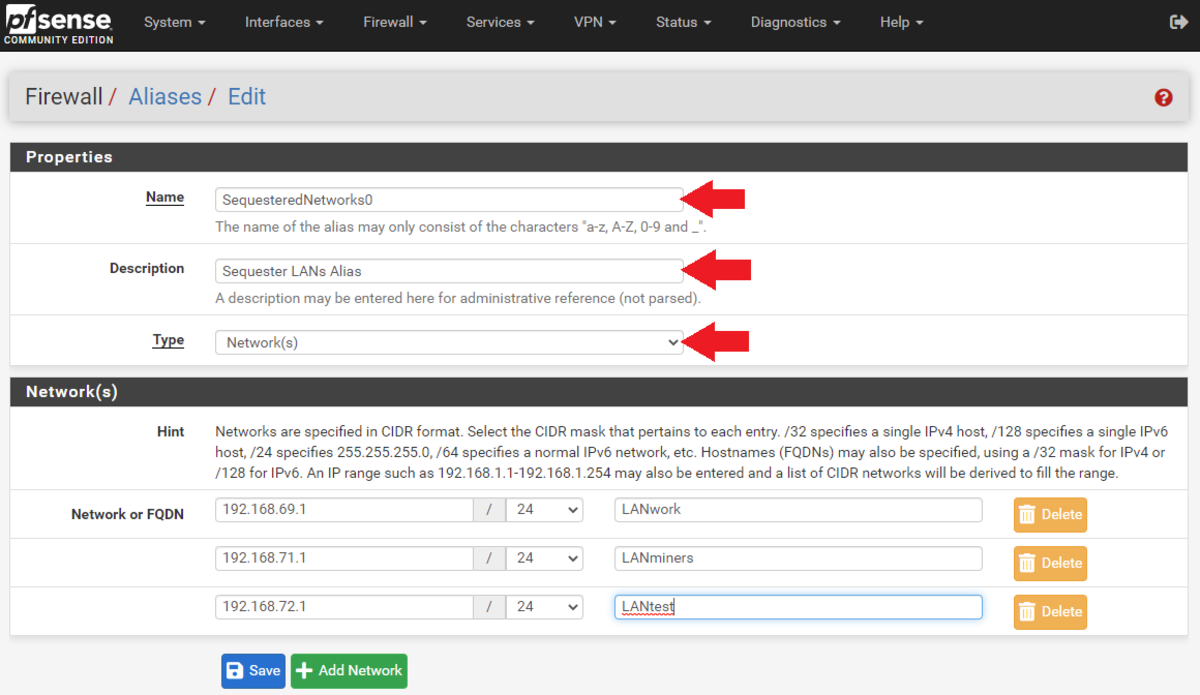
Now I can add additional aliases that will be referenced in firewall rules on the other LANs to prevent”LANminers”from talking to”LANwork,””LANhome,”and”LANtest”— so on and so forth until all my networks are sequestered in a way that only my firewall can see what is connected on the other networks.
With the alias created, a new firewall rule can be applied referencing this alias on the secondary LAN.
Navigate to”Firewall>Rules,”select the LAN you want to apply the rule to, eg,”LANhome”Then for”Action”set it to”Block. For”Protocol”set it to”Any.”For”Destination”set it to”Single host or alias”Then enter your alias nameClick on”Save”at the bottom of the page and the n”Apply Changes”at the top of the page.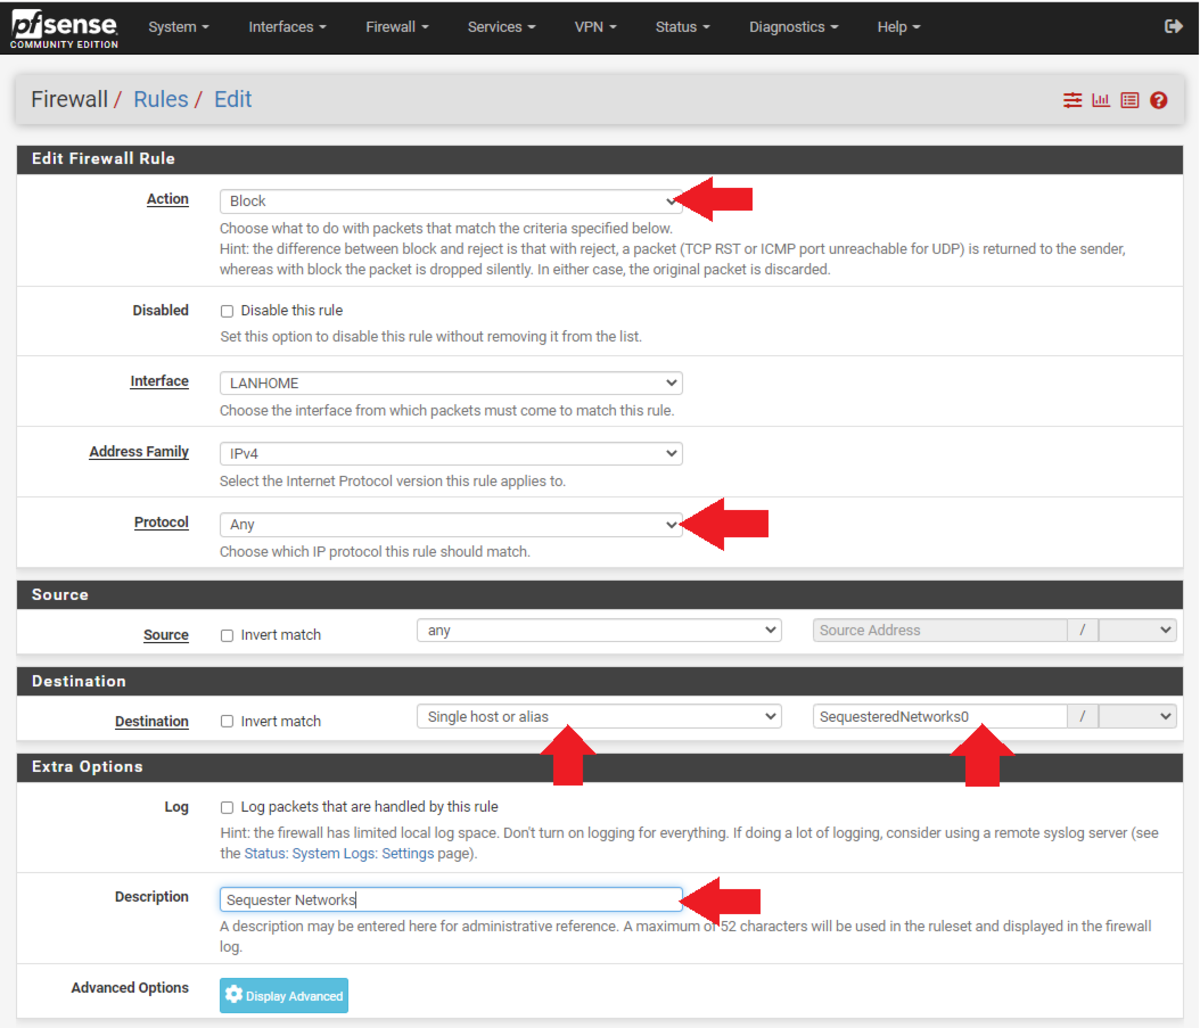
Once I created the aliases and set the firewall rules, I was then able to connect my laptop to each network card RJ45 interface port and attempt to ping each of the other networks. I could get out to the wide-open internet from each LAN but I was not able to communicate with any of the other LANs or the firewall. Now I know any devices on any of my LANs will not have access to devices on any of my other LANs. Only from my primary”LANwork”network am I able to see what is connected on all of the other LANs.

That takes care of the advanced features that I wanted to share with you. You should now have some firewall rules set up and multiple networks sequestered. Next, we’ll get into setting up a WiFi access point on one of the secondary LANs.
Step Seven: How To Set Up And Configure A WiFi Access Point
In this section I’ll show you how I configured my home’s mesh WiFi using the secondary”LANhome”network. The key points to keep in mind here is that I made this a dedicated LAN specifically for a WiFi access point for my family and guests to link to without giving them access to my pfSense firewall or any other LANs. But they still have unrestricted access to the wide-open web. I will add a VPN tunnel for this LAN later in this guide.
To ensure that I was providing adequate WiFi signal to the entire house, I decided to go with a NetGear Nighthawk AX1800 kit.
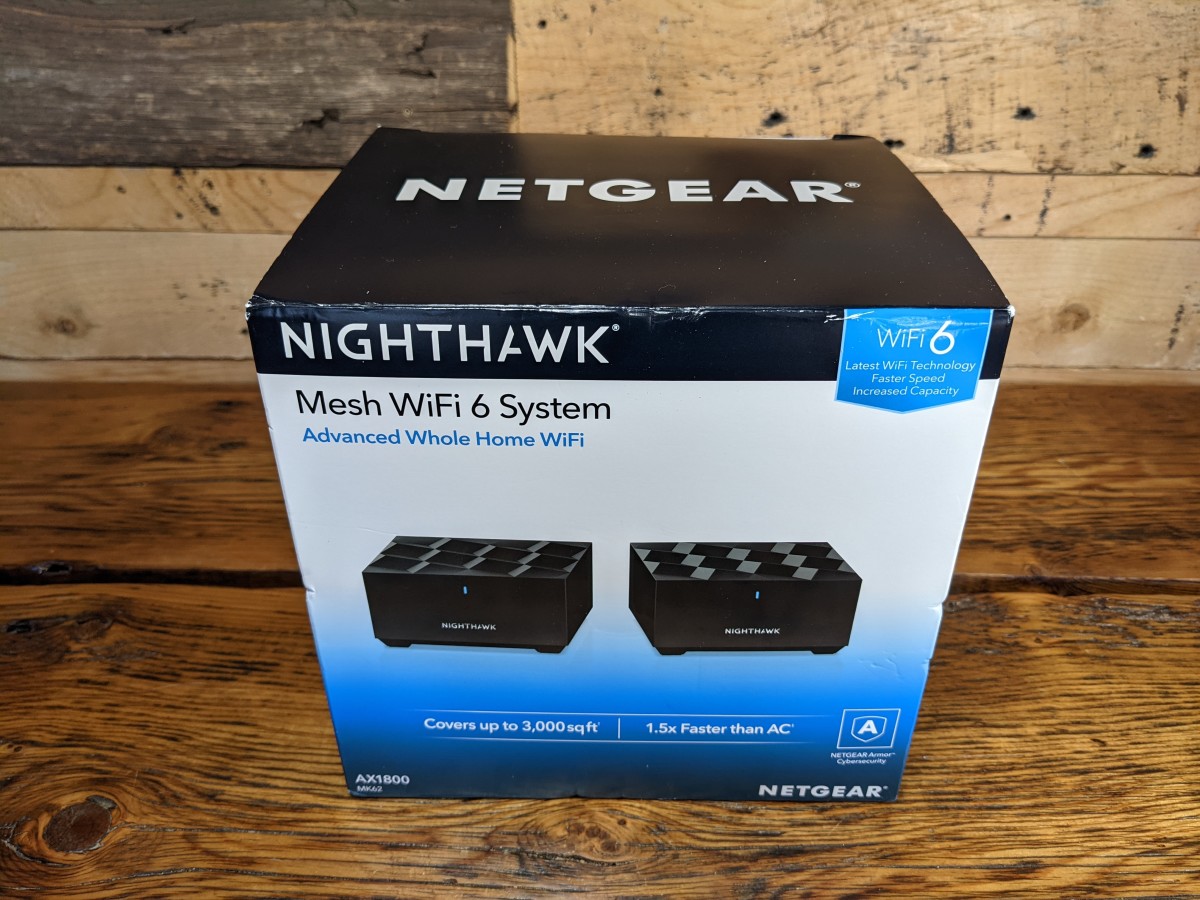
Inside this kit is a WiFi router and a repeater satellite. The basic idea is that the WiFi router gets connected to the pfSense firewall directly with an Ethernet cable on the igb2″LANhome”port. Then, the WiFi router broadcasts the signal to the repeater satellite in another area of the house. Like this, I can increase the WiFi signal coverage to a wider area.

To accomplish this I simply followed these steps:
1. Plug the WiFi router in the pfSense firewall on port igb2″LANhome”using an Ethernet cable to the port labeled”Internet”on the back of the WiFi router.2. Plug a laptop into the port labeled”Ethernet”on the back of the WiFi router with an Ethernet cable.3. Plug the WiFi router into power using the supplied power adapter.4. Wait for the light to turn solid blue on the front of the WiFi router.5. Open a web browser on the laptop and type in the IP address for the WiFi router. I found the IP address next to the”MR60″device in my pfSense dashboard under”Status>DHCP Leases.”6. Immediately, I was prompted to change the password. Again, I used a high-entropy, random password with an accompanying password manager. I don’t want my family or guests to be able to access this WiFi access point administrative settings, so placing a strong password here is recommended. You may also be prompted to update the firmware as well, which will result in a reboot.7. Then, you can log back in with your new admin password and change the default network name to whatever you want and add a WiFi password to access the WiFi network; this is the password shared with family and guests so this one I made pretty easy to remember and share. Even if a nefarious actor cracks the password and gains access to the WiFi network, it is totally sequestered from everything else and the WiFi router itself has a high-entropy password. 8. Then, navigate to”Advanced>Wireless AP”and enable”AP Mode.””AP”stands for access point. Then, apply the changes.9. The router will reboot again. At this point, the local IP address will be updated, this change can be monitored in the”DHCP Leases”status page. Now, the laptop can be unplugged from the WiFi router and the WiFi router can be logged into from the same machine as the pfSense interface is running.10. Once logged in again, click on”Add Device”and you will be prompted to set the satellite repeater in place and connect it to power. Then follow the prompts on the interface to sync the satellite.
Now my family, guests and I can browse the wide-open web from our devices via WiFi with no dropouts in the whole house and I don’t have to be concerned with anyone accessing my sensitive work network, or my ASIC network or my test network.
Next, we’ll get into adding VPN tunnels to the networks we’ve created so far.
Step Eight: How To Install And Configure The WireGuard Package With Mullvad
WireGuard is a VPN software protocol that can be installed on your pfSense firewall, then you can use that protocol to define how you construct your tunnels with your VPN provider.
VPNs create a secure and encrypted tunnel from your computer to your VPN provider’s server. This prevents your ISP from seeing your data or where it’s final destination is. There are several types of VPN protocols, such as OpenVPN, IKEv2/IPSec, L2TP/IPSec and WireGuard, but they all essentially have the same goal to outline the instructions for creating a secure tunnel for encrypting your data to be sent over public networks.
WireGuard is a recent addition to the lineup of VPN protocols, it is open-source, and comparatively”light,”with less code and faster speeds than some others. The speed part was key for me considering that added latency can decrease an ASICs efficiency.
Another benefit of VPNs is that your geographic location can be spoofed, meaning that if you are in one part of the world, you can use a VPN tunnel to a VPN provider’s server in another part of the world and it will appear as though your internet traffic is coming from that server. This is beneficial for people who live in authoritative countries where access to certain websites and services is restricted.
Keep in mind that you have to trust that your VPN provider is not logging your IP address or that it could or would turn this information over to authorities if pressed. Mullvad collects no personal information about you, not even an email address. Plus, it accepts bitcoin or cash so you can pay for the service without the risk of linking your banking details. Mullvad also has a”no-logging”policy, which you can read here.
For my specific use case here, I will be using a VPN to ensure my ISP does not see that I am mining Bitcoin and to also prevent my mining pool, Slush Pool, from seeing my real IP address — not because I am doing anything illegal or because I think Slush Pool is logging my IP address, but simply because these are tumultuous times with a quickly-changing political environment and the things I do legally today could very well be outlawed tomorrow.
Or, if some legislation was passed making it illegal for a person to operate a Bitcoin miner in the United States without a money transmitter’s license, for example, then I could spoof my location so that if Slush Pool’s hand were forced to block IP addresses coming from the United States, I could continue mining as it would appear my hash rate was originating from outside the United States.
Considering that the blockchain is forever and the future is uncertain, I think it is worth taking the time to figure out how to guard my privacy. By taking steps today to increase my privacy and security, I can ensure that my freedom and my pursuit of happiness are guarded.
The vast majority of the information presented in this section comes from watching Christian McDonald videos on YouTube. You can find all of his WireGuard & Mullvad VPN videos here.
I want to specifically point out this video of his on using the WireGuard package in pfSense to set up Mullvad in a way to have multiple tunnels that allow load balancing your traffic seamlessly:
Mullvad is a paid VPN subscription, the fee is €5 per month. However, Mullvad does accept bitcoin and does not require any identifying information. Before I show you how to set up your Mullvad subscription, we’ll get the WireGuard package installed to your pfSense firewall. Then, we’ll set up a Mullvad account and generate the configuration files. Then, we can get multiple tunnels set up and do some fancy configurations in pfSense.
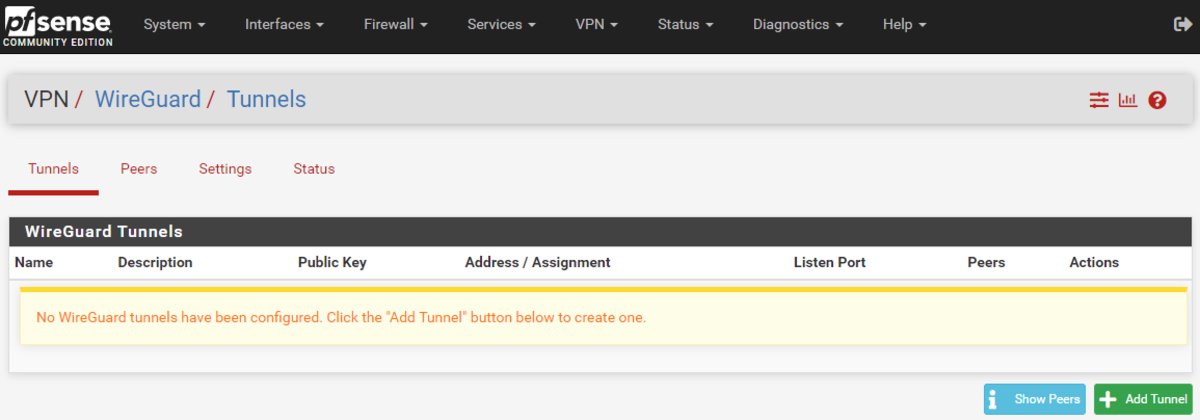
In pfSense, navigate to”System>Package Manager>Available Packages”then scroll down to the WireGuard link and click on”Install.”On the next page, click on”Confirm.”The installer will run and let you know when it has successfully completed.

Now, you can navigate to”VPN>WireGuard”and see that the package has been installed but nothing is configured yet. Now that the firewall has WireGuard ready, we will work on getting the VPN client installed.
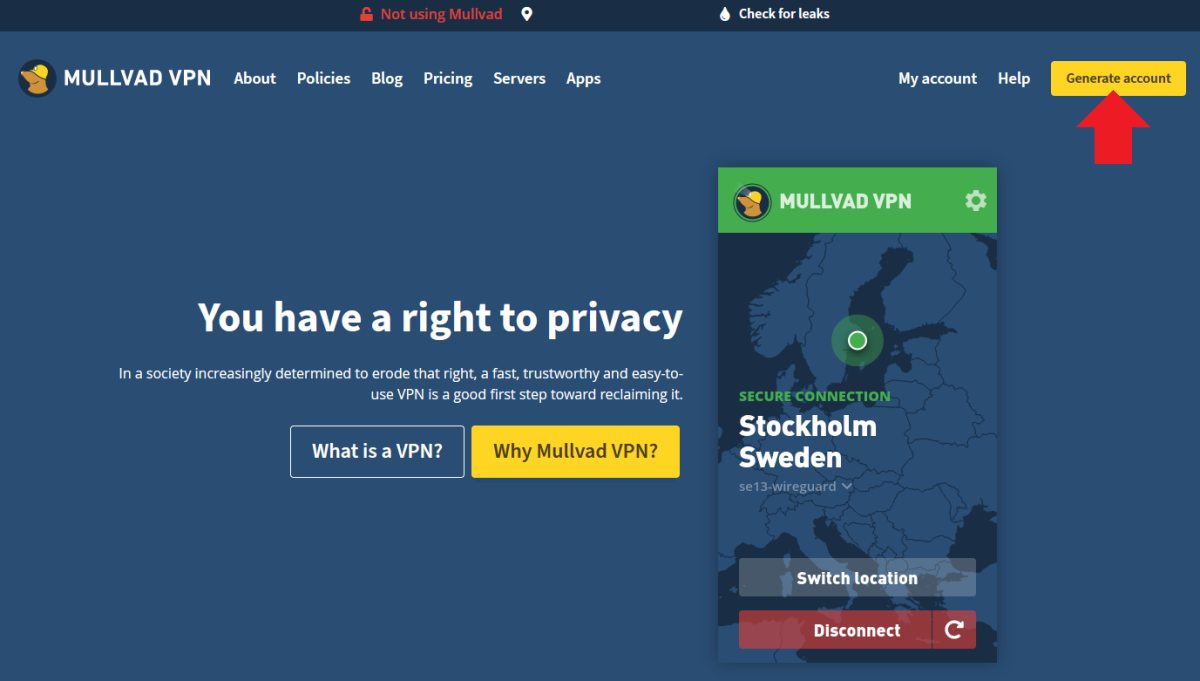
Navigate to https://mullvad.net/en/ and click on”Generate Account.”
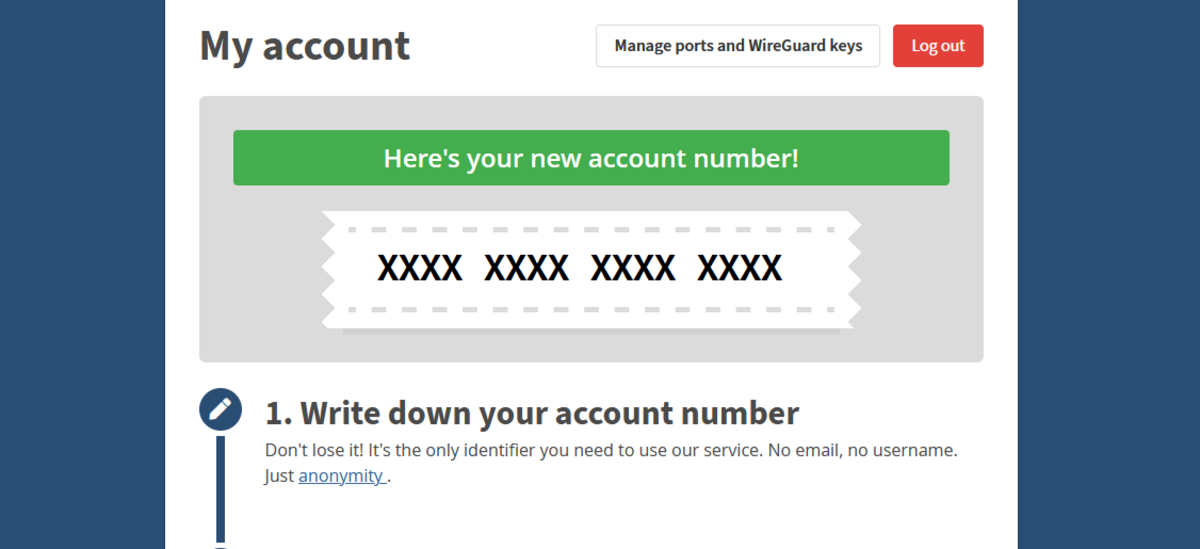
Mullvad does not collect any information from you such as name, phone number, email, etc. Mullvad generates a unique account number and this is the only identifying piece of information you get related to your account, so write it down and secure it.
Next, select your payment method. You get a 10% discount for using bitcoin. The subscription works for as long as you want to pay for (up to 12 months) at the rate of €5 per month. So, a one-year subscription for example would be €60 or about 0.001 BTC at today’s rate (as of November 2021). You will be presented with a Bitcoin address QR code to send your payment to.

Check the mempool to see when your Bitcoin transaction gets confirmed. You may need to wait a while depending on network congestion.
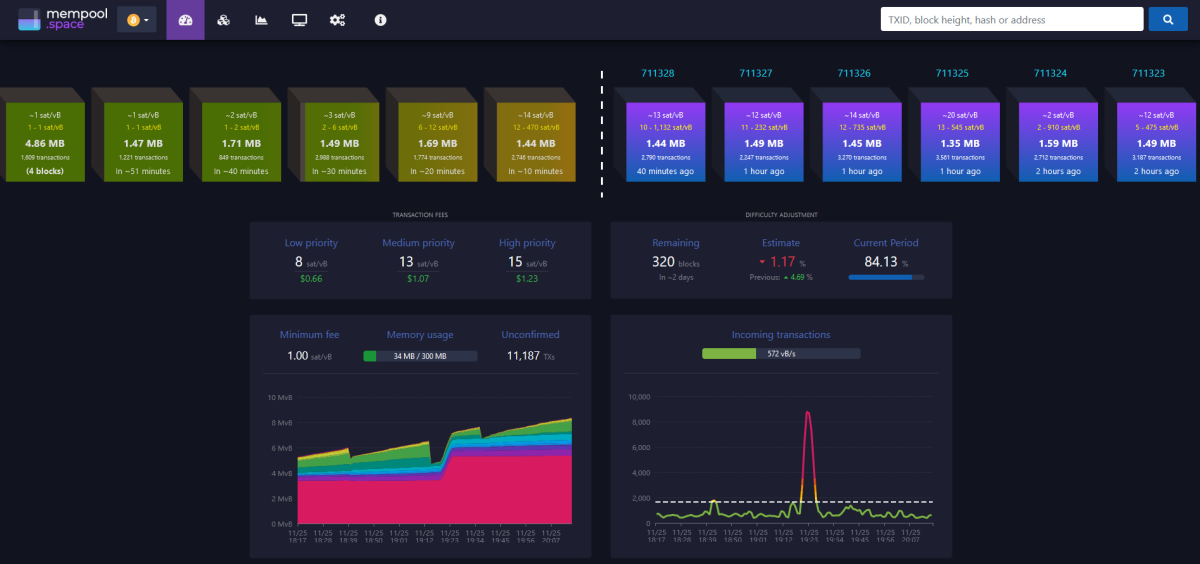
After confirmation on chain, the Mullvad account is topped off and should show that you have time remaining. Make considerations about selecting a server location from Mullvad’s long list of servers. If you’re planning on running ASICs behind your VPN, then I recommend connecting to a server relatively close to your actual geographic location to try and help reduce any latency as much as possible.
The way Mullvad works is with configuration files that assign a unique public/private key pair for each tunnel address. The basic idea here is that I want to have a primary tunnel set up for the ASICs, but I also want a secondary tunnel setup with another server in a different geographic location just in case the primary tunnel connection goes offline. This way, my mining internet traffic will automatically switch over to the other tunnel and there will be no interruption in concealing my public IP address or encrypting my traffic data. I’m also going to set up other tunnels specifically for my WiFi network and my”LANwork”network.
To do this, I will need as many key pairs as I want tunnels. One Mullvad subscription includes up to five key pairs. Navigate to https://mullvad.net/en/account/#/wireguard-config/ and select your platform, e.g, Windows. Then click on”Generate Keys”for as many key pairs as you want, up to five keys. Then click on”Manage Keys”below that to see your list.

*All keys and sensitive information presented in this guide have been nuked prior to publishing. Be cautious about sharing this information with anyone, you want to keep your Mullvad keys private.
You can see that I generated four keys for this guide, which I will destroy after I’m finished using them as examples. Each configuration file needs to be set up with a specific Mullvad server of your choosing.
Select the”Public Key”you are interested in creating a configuration file for by selecting the circle under the”Use”column next to the appropriate public key.Select the country, city and server you want to configure with this public key.Click on”Download File.”Save the configuration file in a convenient place because you will need to open it in a moment.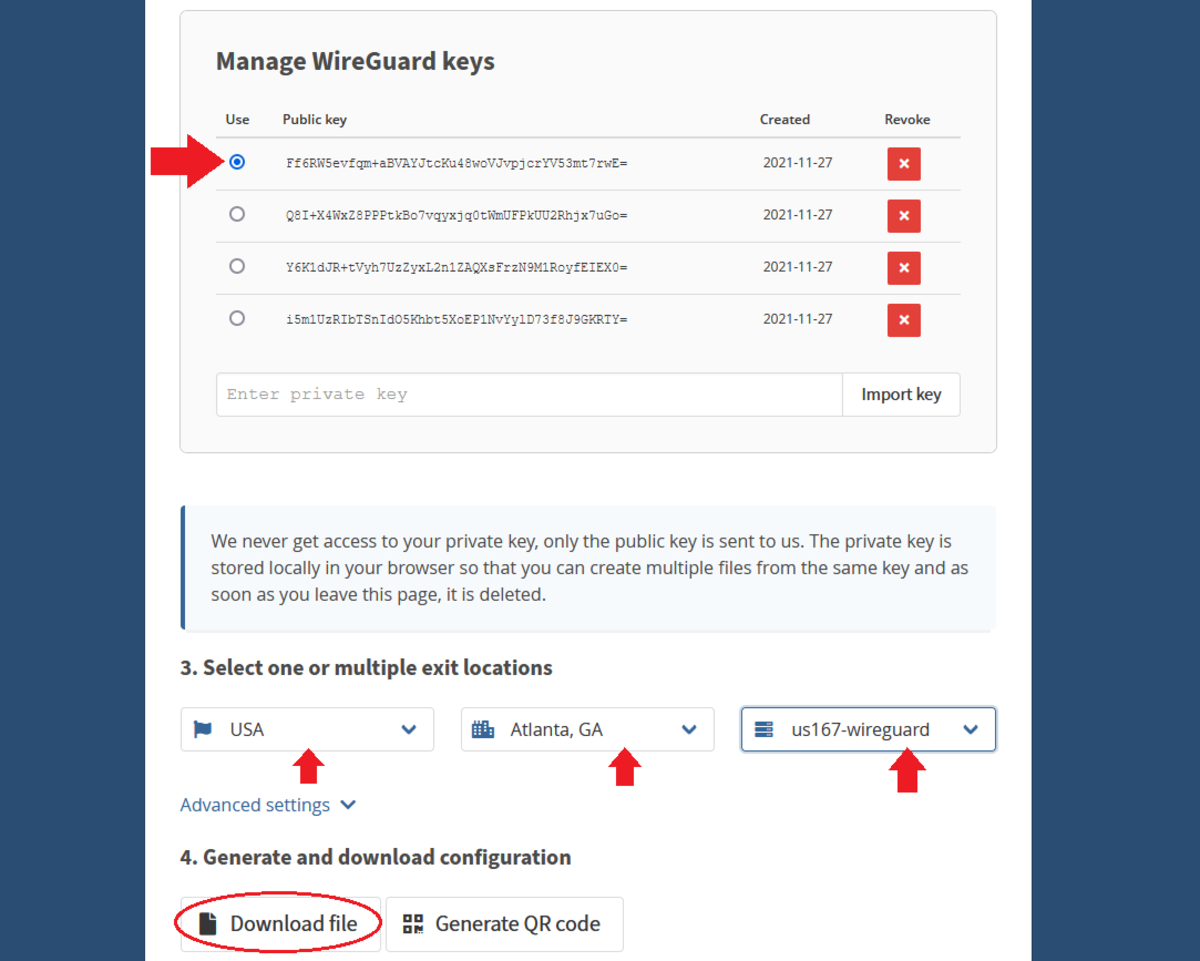
*Remember, for each tunnel to a new server you want to configure, you will need to use a separate public key. If you try to assign two tunnels to the same key, pfSense will encounter problems with your VPN.
Repeat this process for as many keys as you generated, selecting a different server for each unique key and generating the configuration file. I found it helpful to name the configuration file as the city and server used.

Now, navigate back to pfSense and go to”VPN>WireGuard>Settings”and click on”Enable WireGuard”and then”Save.”
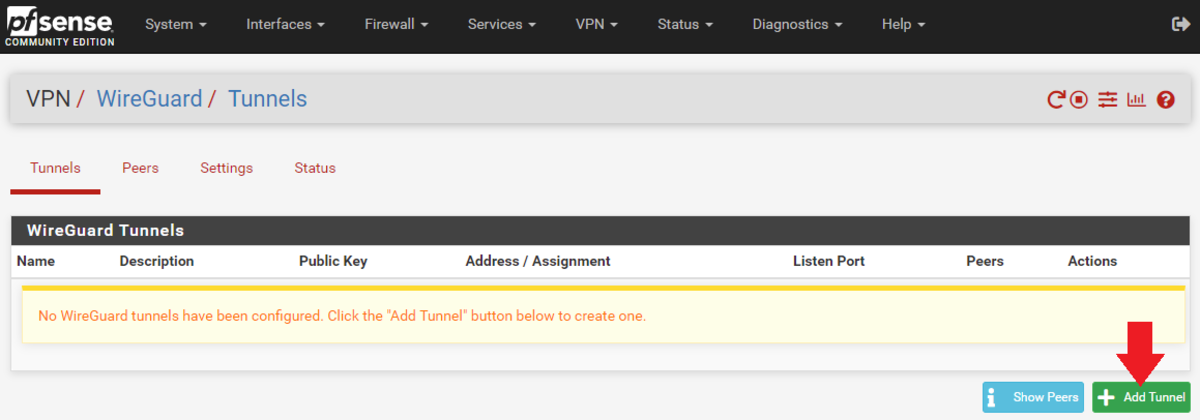
 Navigate to the”Tunnels”tab and select”Add Tunnel.”
 Open your first Mullvad configuration file with a text editor like Notepad and keep it to the side.In WireGuard, add a”Description”for your tunnel that describes what it is, like”Mullvad Atlanta US167.”Copy/paste the”PrivateKey”from the Mullvad configuration file and add it to the”Interface Keys”dialog box.Click on”Save Tunnel,”then”Apply Changes”at the top of the page.
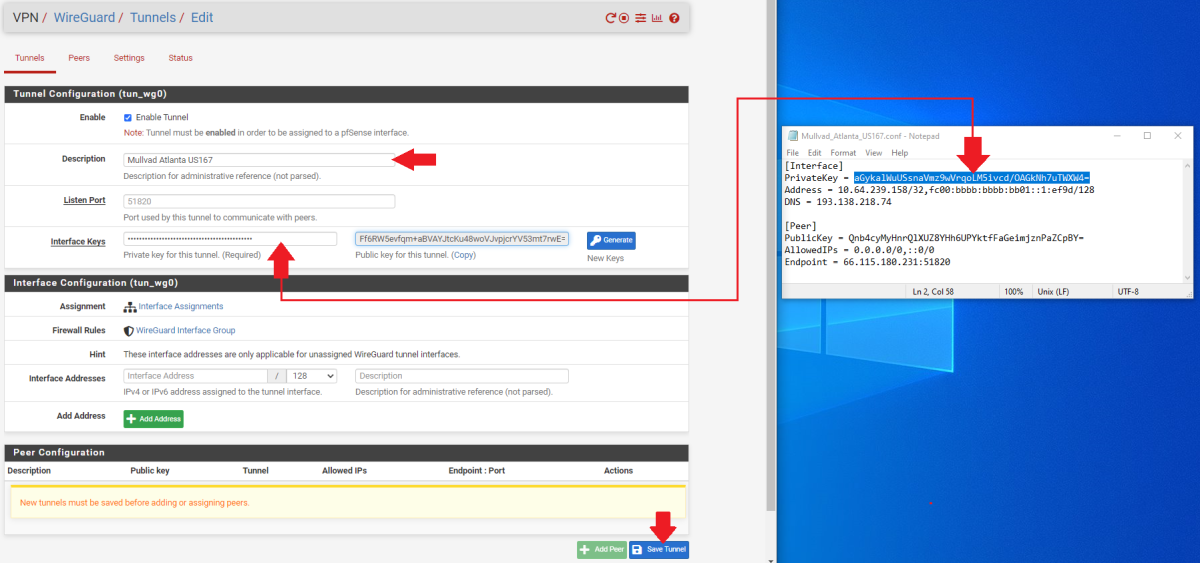
WireGuard will automatically generate the public key when you paste the private key and hit the”tab”key on your keyboard. You can verify that the public key was correctly generated by comparing it to the key on the Mullvad website that you generated earlier.

Repeat this process for as many tunnels as you want. Make sure you use the correct Mullvad configuration file for each one as they all contain different public/private key pairs, IP addresses, and endpoints.
Each tunnel will get its own peer. You can add a”Peer”by first navigating to the”Peer”tab next to the”Tunnels”tab that you were just on. Then click on”Add Peer.”
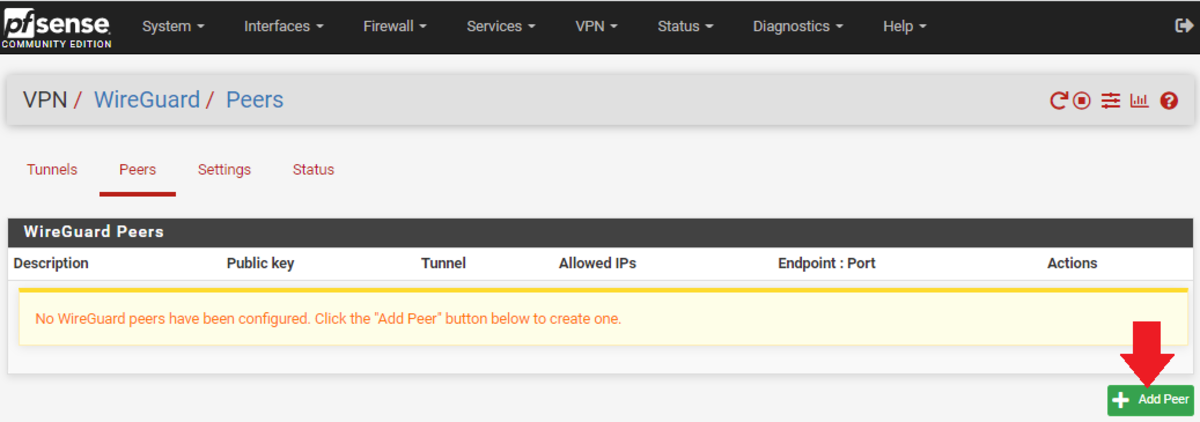 Select the appropriate tunnel from the drop-down menu for this peer.Add a”Description”for your tunnel that describes what it is, like”Mullvad Atlanta US167.”Uncheck the”Dynamic Endpoint”box.Copy/paste the”Endpoint”IP address and port from the Mullvad configuration file into the”Endpoint”fields in WireGuard.You can give 30 seconds to the”Keep Alive”field.Copy/paste the”PublicKey”from the Mullvad configuration file into the”Public Key”field in WireGuard.Change the”Allowed IPs”to”0.0.0.0/0″for IPv4. You can also add a descriptor like”Allow All IPs”if you want.Click on”Save,”then select”Apply Changes”at the top of the page.
Repeat this process for as many peers as you have tunnels. Make sure you use the correct Mullvad configuration file for each one as they all contain different public/private key pairs, IP addresses and endpoints.
At this point, you should be able to navigate to the”Status”tab and observe the handshakes taking place by clicking on”Show Peers”in the lower right-hand corner.
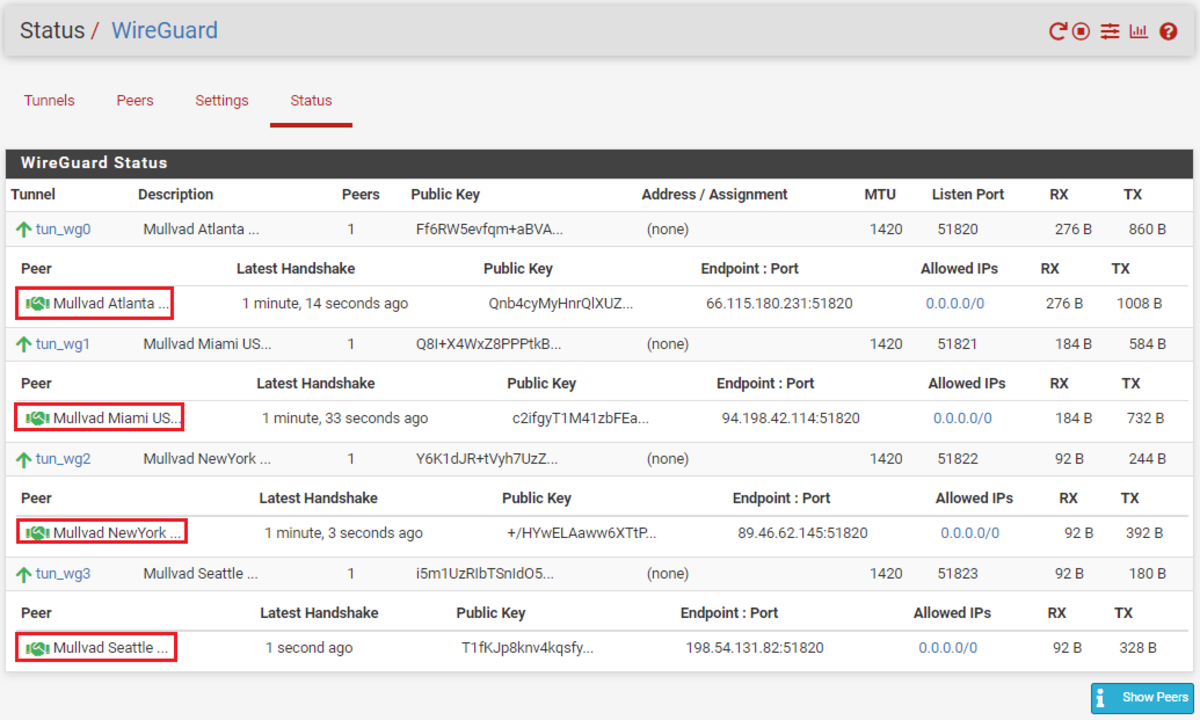
Next, the interfaces need to be assigned for each tunnel.
Navigate to”Interfaces>Interface Assignments”Select each tunnel from the drop-down menu and add it to your list.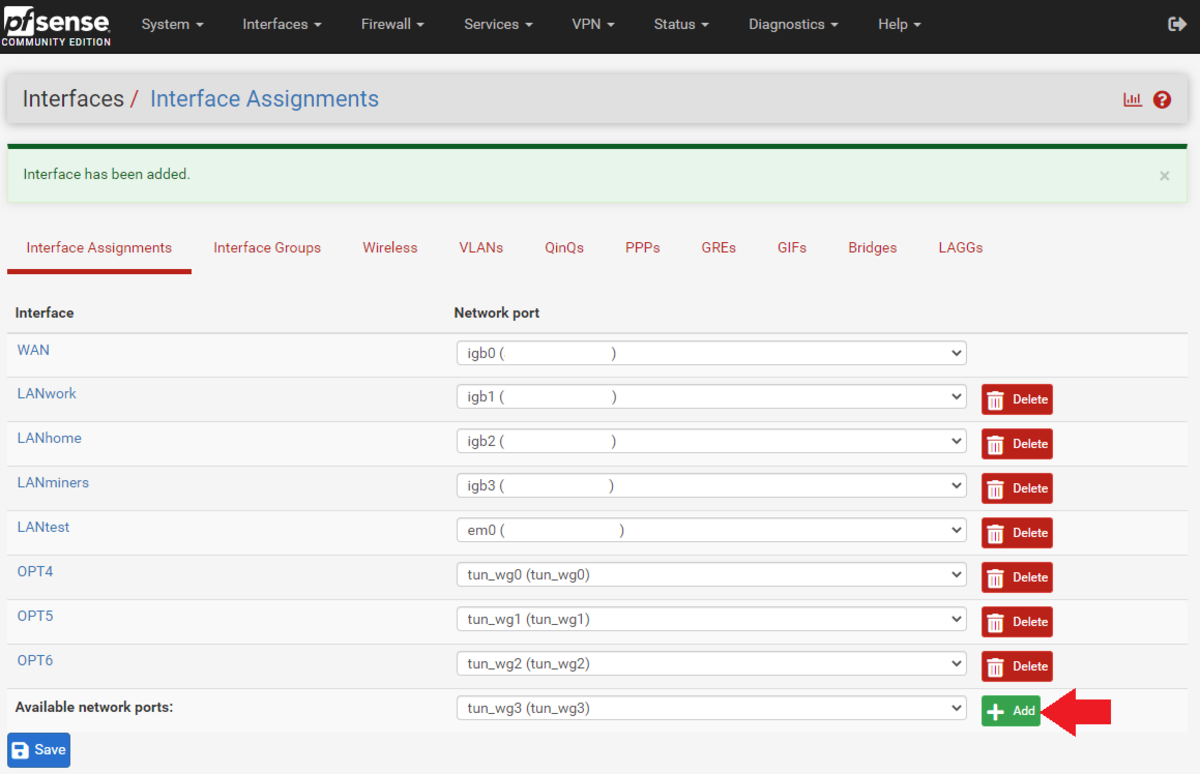
After all of your tunnels are added, click on the blue hyperlink next to each added tunnel to configure the interface.
Click on the”Enable Interface”boxEnter your description — I just used the VPN server name for example:”Mullvad_Atlanta_U S167″Select”Static PIv4″Type”1420″in the”MTU & MSS”boxesNow, copy/paste the host IP address from your Mullvad configuration file in the”IPv4 Address”dialog box.Then, click on”Add A New Gateway”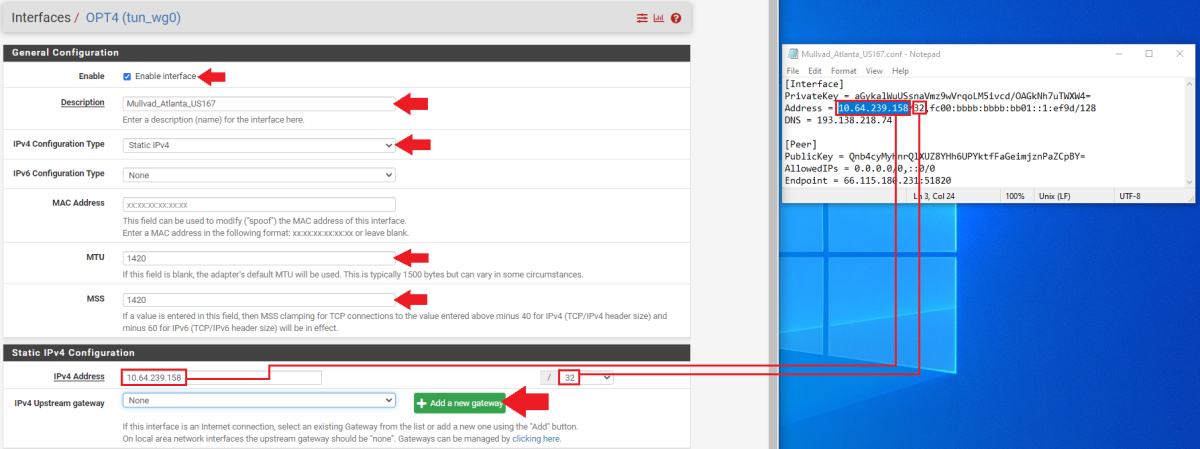
After clicking on”Add A New Gateway,”you will be presented with the below pop-up dialog. Enter a name for your new gateway, something easy like the name of your tunnel appended with”GW”for “GateWay.” Then, enter the same host IP address from the Mullvad configuration file. You can also add a description if you want, such as”Mullvad Atlanta US167 Gateway.”Then click on”Add.”

Once you are back at the interface configuration page, click on”Save”at the bottom of the page. Then click on”Apply Changes”at the top of the page.

Repeat that process to create a gateway for each tunnel interface you added. Make sure you use the correct Mullvad configuration file for each one as they all contain different host IP addresses.
At this point, you can navigate to your dashboard and monitor the status of your gateways. If you have not done so already, you can customize your dashboard to monitor several stats in pfSense. Click on the”+”sign in the upper right-hand corner of your dashboard and then a list of available stat monitors will drop down and you can select the ones you want.
On my dashboard, for example, I have three columns, starting with the”System Information.”In the second column, I have the”Installed Packages”summary,”WireGuard”status, and a list of my interfaces. In the third column, I have the”Gateway”status and”Services”status. This way, I can quickly check and monitor the status of all sorts of things.
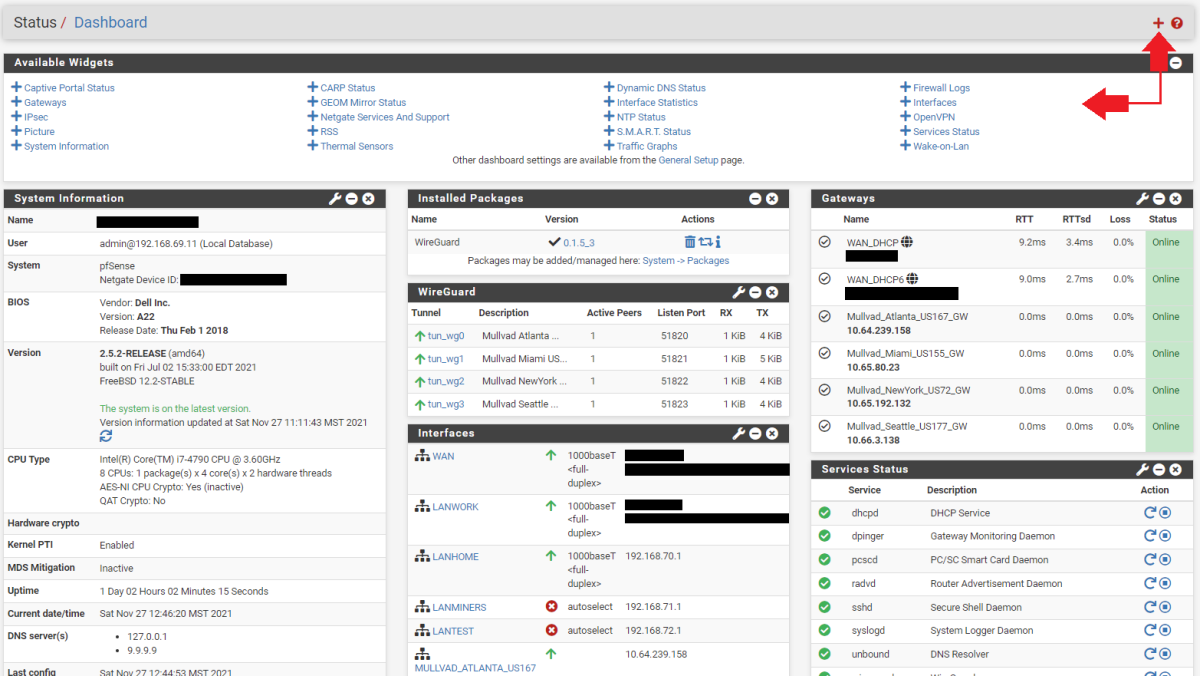
What I want to point out about the dashboard is that in the”Gateways”section, you will notice that all of the gateways are online. The gateways will be online so long as the tunnel is active, even if the remote side is not responding. This is because they are the local interface, so right now they are useless since even if the remote side goes down, they will still show as online. In order to enable the ability to monitor latency so that these gateways can provide some useful stats, I need to give these gateways a public domain name system (DNS) address to monitor.
You’ll notice that all the tunnel ping times are zero milliseconds. That’s because I’m not sending any data out through these tunnels. By pinging a public DNS server, pfSense can get some useful metrics and make decisions about which tunnel will provide the least latency or if a remote server goes down to reroute traffic.
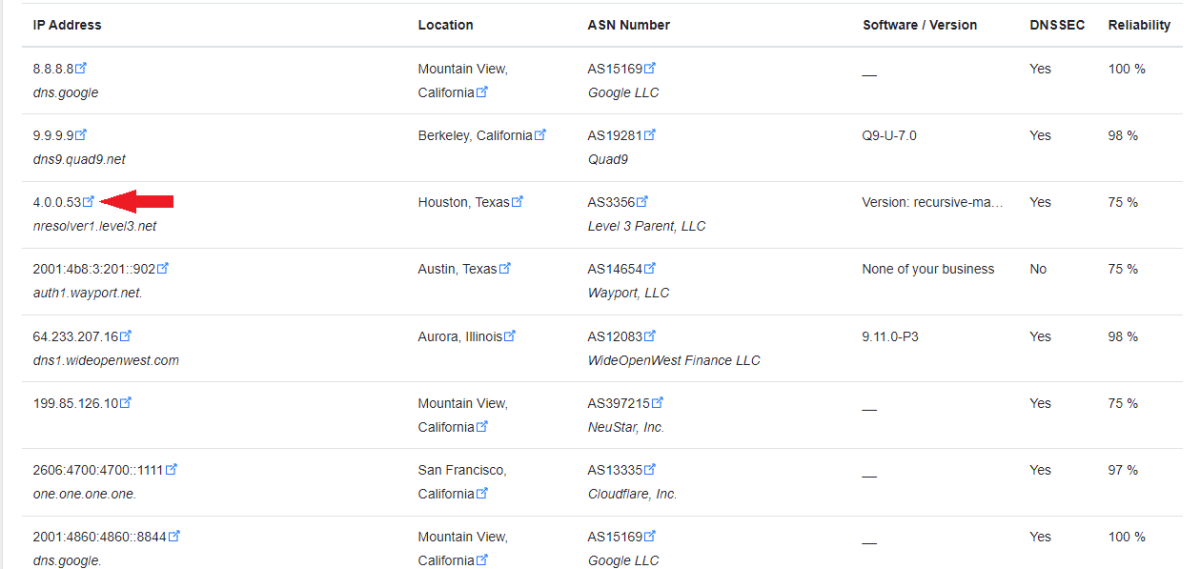
You can find a public DNS server to monitor at this website or a number of other public DNS server listings. Watch for the recorded uptime percentage, the more the better. You want to find public DNS IPv4 IP addresses to monitor on your IPv4 gateways. Each gateway will need a separate DNS address to monitor.
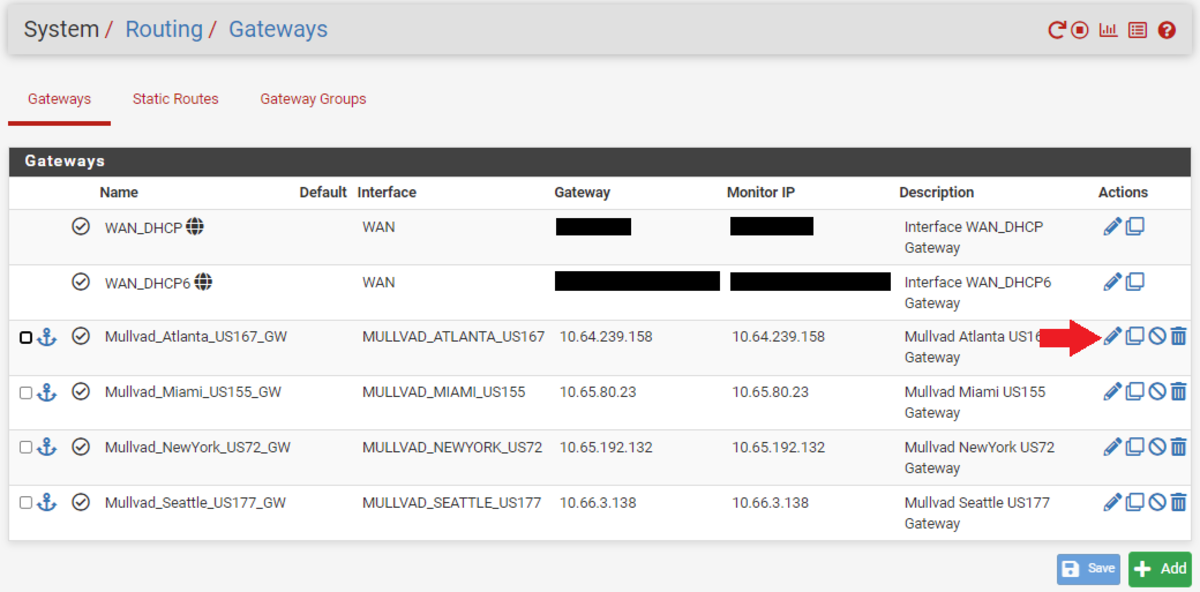
Once you have your public DNS addresses, navigate to”System>Routing>Gateways”in pfSense. Click on the pencil icon next to your gateway. You can see that the”Gateway Address” and the”Monitor IP”address are the same on all the gateways. That is why the ping time is zero milliseconds and this is also why pfSense will think the gateway is always up.
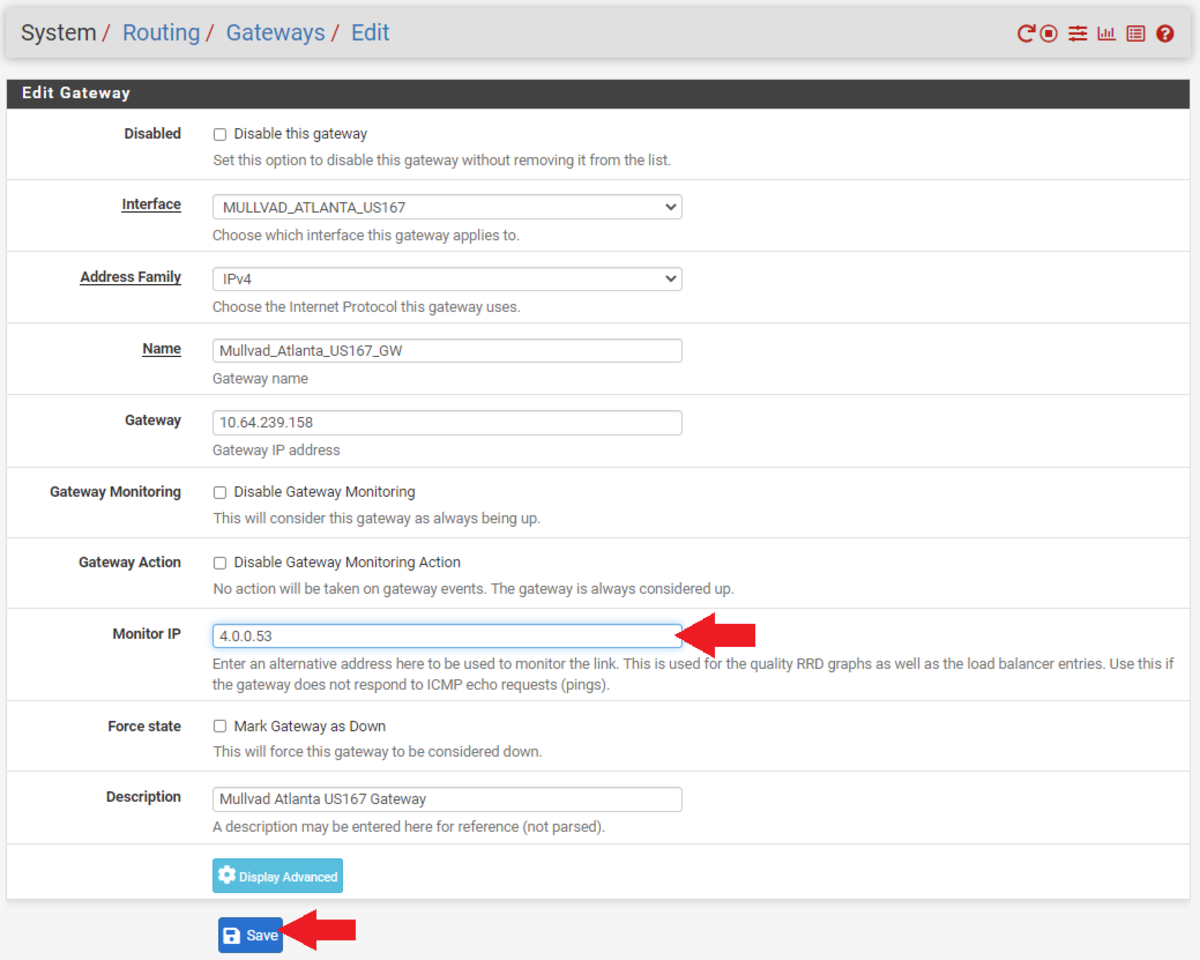
Enter the public DNS IP address that you want to monitor in the”Monitor IP”field and then click on”Save”at the bottom of the screen. Then click on”Apply Changes”at the top of the screen. Remember, gateways cannot share the same DNS monitor address so use a different public DNS server for each gateway to monitor.
Now, if you go back to your dashboard and look at your gateway monitor, you should see that there are some actual latency metrics to observe. With this information, you can set up your gateways in order of priority based on which ones have the lowest latency for your internet traffic. So, for example, if you are mining Bitcoin, then you will want to prioritize your ASICs to go through the tunnel with the lowest latency first. Then if that tunnel fails, the firewall can automatically switch them to the next tier gateway with the second to smallest latency and so on.

Everything is looking good so far, the tunnels are active and there is data going through the gateways. Next, we need to define some outbound network address translation (NAT) mapping on the firewall.
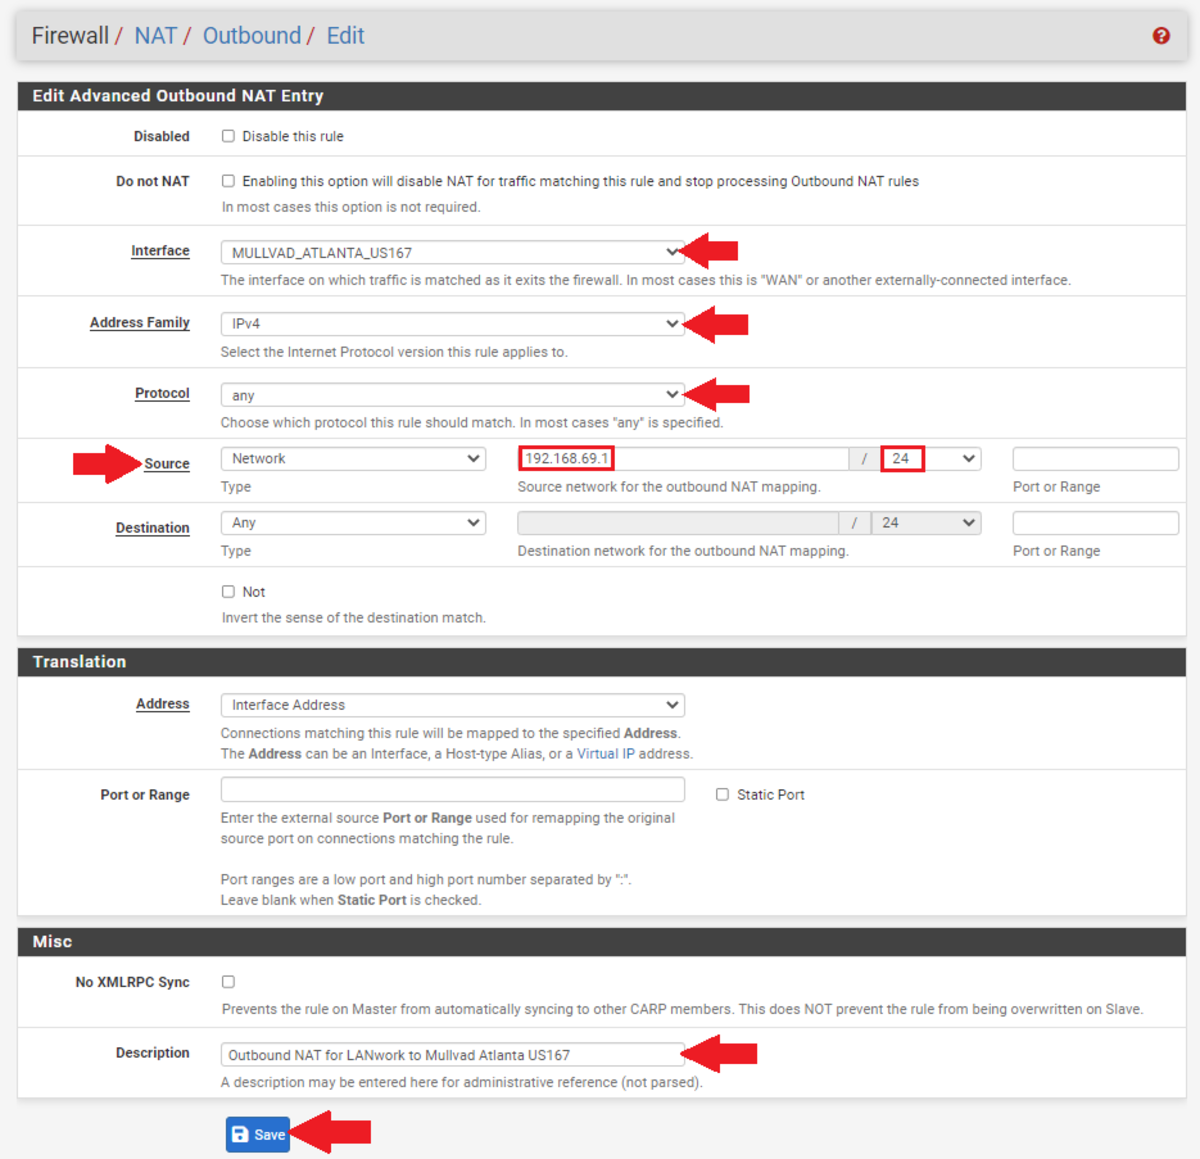
Navigate to the”Firewall”tab, then”NATm”then the”Outbound”tab. This will pull up a list of all your network mappings from your WANs to your LANs. Since we have some new interfaces defined, we want to add these mapping to the list.Click on”Hybrid Outbound NAT Rule Generation”under the”Outbound NAT Mode”section.Scroll to the bottom of the page and click on”Add” Choose your interface from the drop-down menuSelect”IPv4″for the”Address Family”Select”any”for the”Protocol”Make sure”Source”is on”Network”and then enter the local IP address range for the LAN you want going down this tunnel. For example, I want my”LANwork”going through this tunnel to Atlanta, so I entered”192.168.69.1/24.”Then, enter a description if you want, such as”Outbound NAT for LANwork to Mullvad Atlanta US167.”Then, click on”Save”at the bottom of the page and”Apply Changes”at the top of the page.
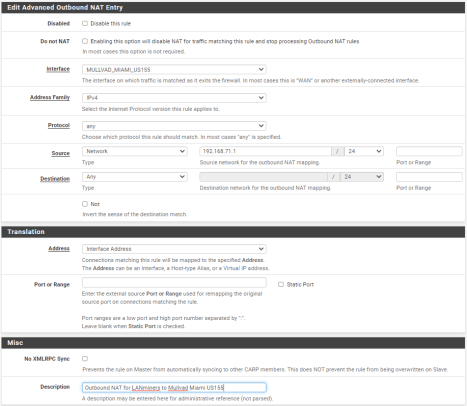
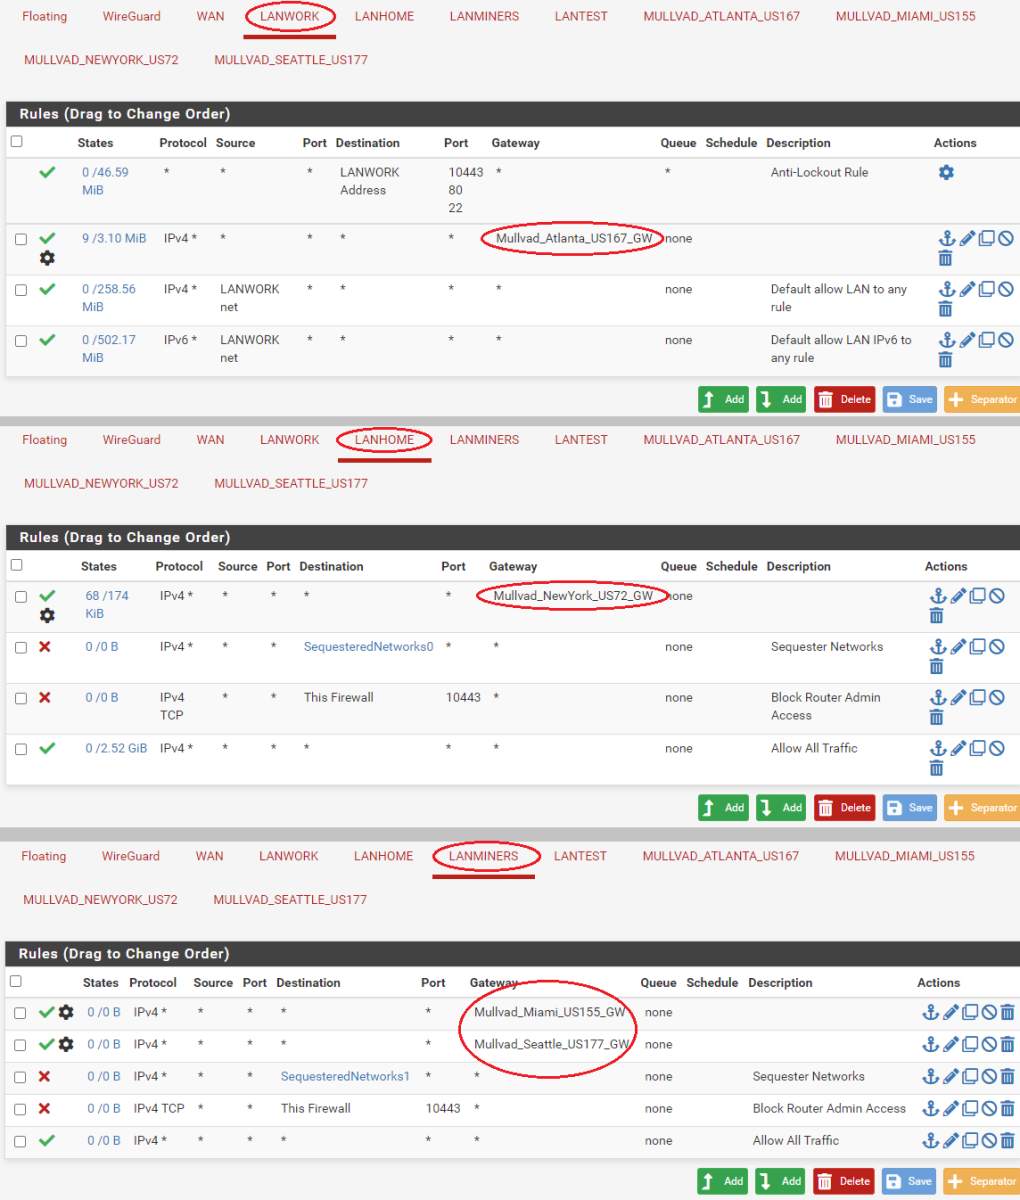
Rep eat this process for each of the tunnel interfaces. You will notice that I have my”LANwork”network going to the Atlanta tunnel, my”LANhome”network going to the New York tunnel, and I have”LANminers”network set up for both the Miami and Seattle tunnels. You can set a mapping for your mining LAN to all five of your tunnels if you want. You can also have multiple LANs mapped to the same tunnel if you want, there is a lot of flexibility.
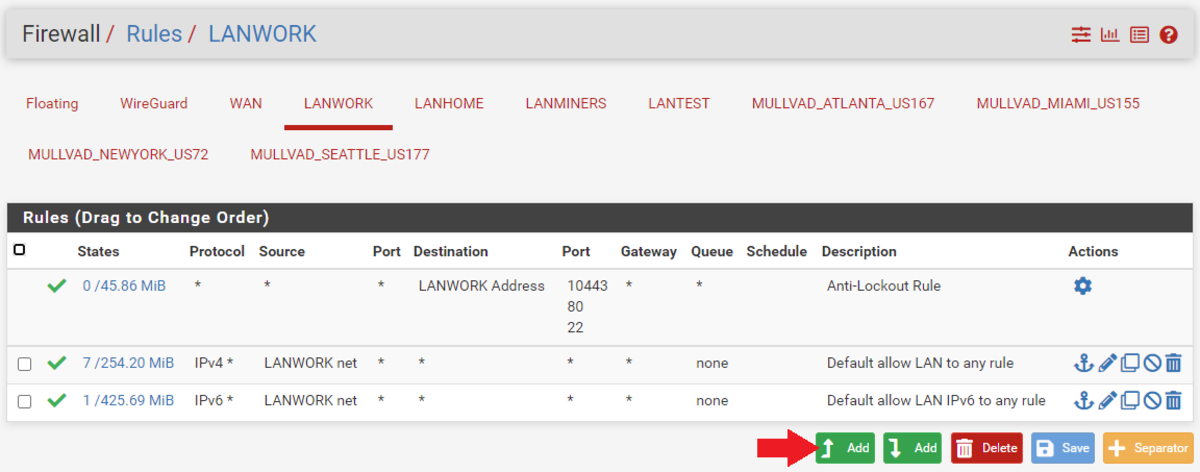
With the mappings all in place, we can add firewall rules. Navigate to”Firewall>LAN,”then click on”Add,””LAN”being whichever LAN you want to add a rule to. For example, I’m setting up my”LANwork”network in this screenshot:
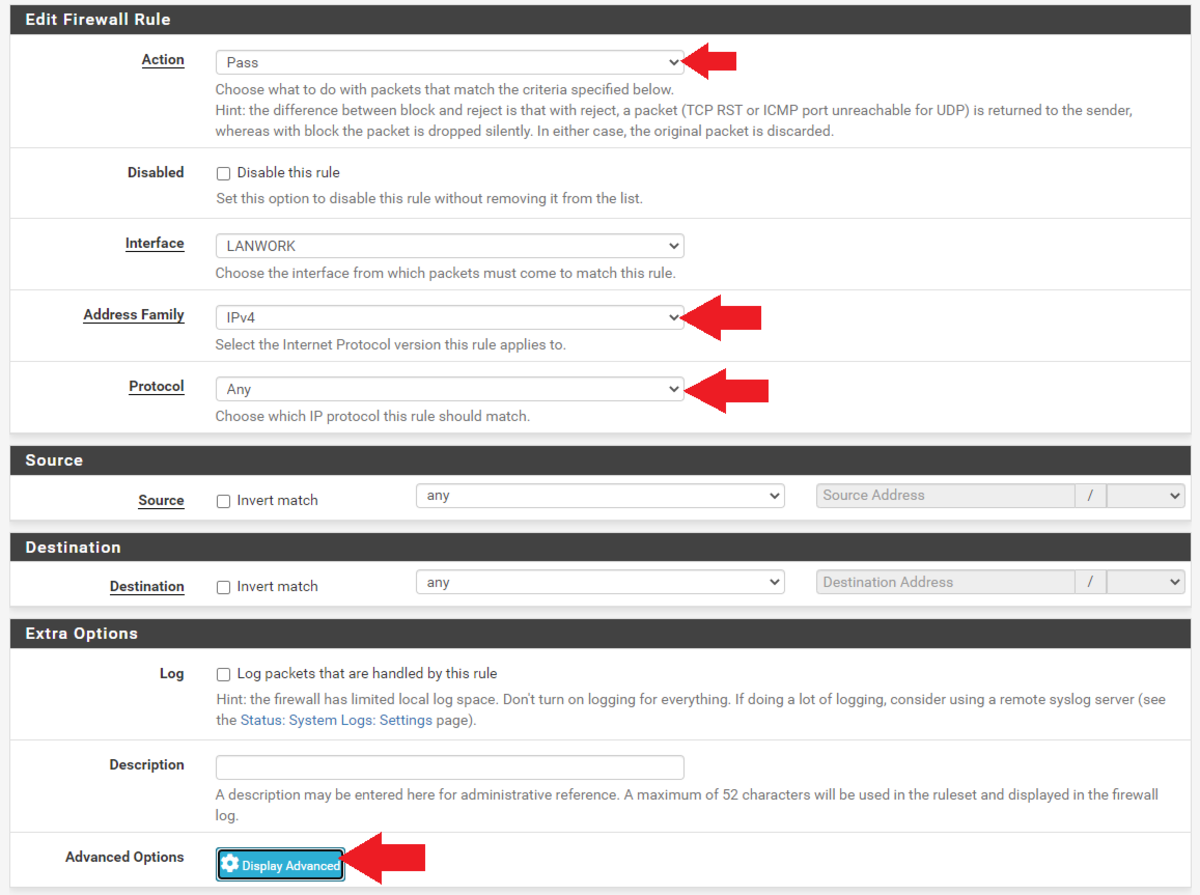
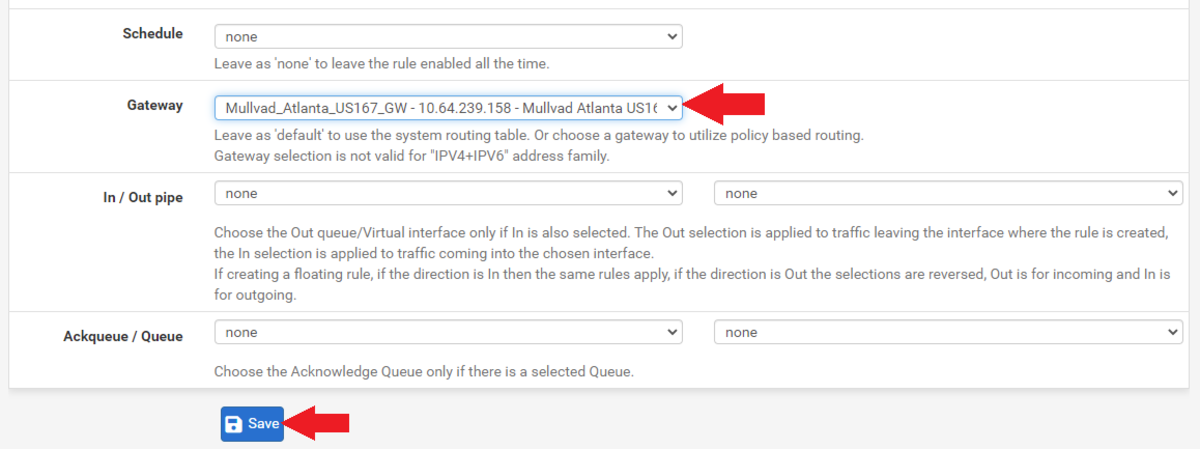
 Set”Action”to”Pass”Set”Address Family”to”IPv4″Set”Protocol”to”Any”Then click on”Display Advanced”
 Scroll down to”Gateway”and select the gateway you have set up for this LANClick on”Save” at the bottom of the screen, then click on”Apply Changes”at the top of the screen
Then, do the same thing with your next LAN until you have all of your LANs set up with a gateway rule. Here is a snapshot of my LAN gateway rules, you’ll notice that I added two gateway rules to my”LANminers”network. In a later step, I will show you how to set up the a utomatic load balancing between tunnels for the mining LAN which will replace the two rules I just added to”LANminers,”but I want to make sure everything is set up and working correctly first.
To double check that everything is working so far and that each of my LANs is getting different public-facing IPs, I will enter“ifconfig.co” into a web browser from each LAN. If everything is working correctly, then I should have different locations for each LAN I plug into and ping from:

Everything worked as planned, first try. While connected to each LAN, I was able to disable the corresponding firewall rule and refresh the page and watch my IP address change back to my actual rough geographic area.
If you recall, I had set up two tunnels for my”LANminers”network. When I disabled the one firewall rule corresponding to the Miami tunnel and refresh my browser, it immediately switched to an IP address in Seattle.

So, each LAN is sending traffic through a different tunnel and all of my tunnels are working as expected. However, in regards to my”LANminers”network, I want pfSense to automatically switch between the Miami and Seattle tunnels based on latency or downed servers. With a couple more steps, I can get this configured to switch automatically and replace the two firewalls rules with a new single rule.
Navigate to”System>Routing”and then the”Gateway Groups”tab.
 Enter a group name like”Mullvad_LB_LANMiners.”The”LB”is for”Load Balance.”Set all of the other gateway priorities to”Never,”except the two gateways you are interested in for your miners. In this case, I’m using my Miami and Seattle gateways. I have those priorities both set to”Tier 1,”or you could use all five of your tunnels if you wanted.Set the trigger level to”Packet Loss or High Latency”Add a description if you want, such as”Load Balance LANminers Mullvad Tunnels”Click on”Save” at the bottom of the screen, then”Apply Changes”at the top of the screen
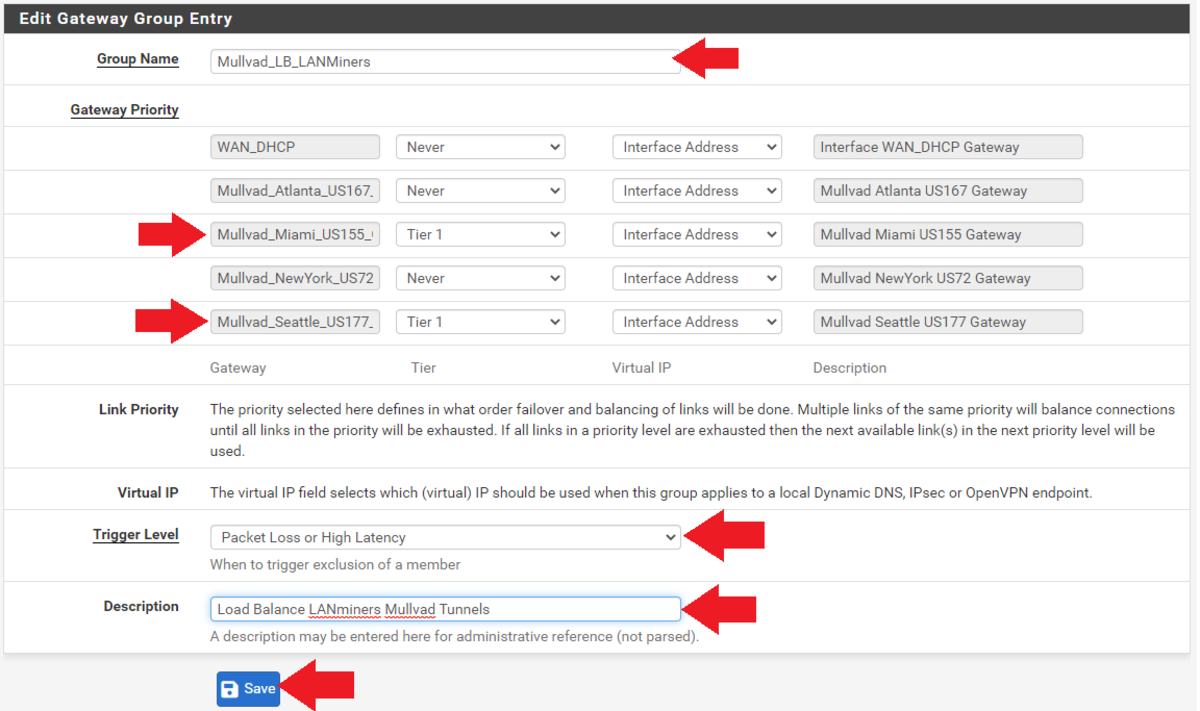
If you navigate to”Status>Gateways”and then the”Gateway Groups”tab, you should be able to see your new gateway group online. In theory, if you route traffic to”Mullvad_LB_LANminers”then it should balance traffic between the two gateways based on latency.

Now, this gateway group can be used in a firewall rule to policy route that traffic accordingly. Navigate to”Firewall>Rules”and then the”LANminers”tab or whatever your mining LAN is named.
Go ahead and disable the two rules you set up previously for testing the VPN tunnels by clicking on the crossed out circle next to the rule. Click on”Apply Changes,”then click on”Add”at the bottom.
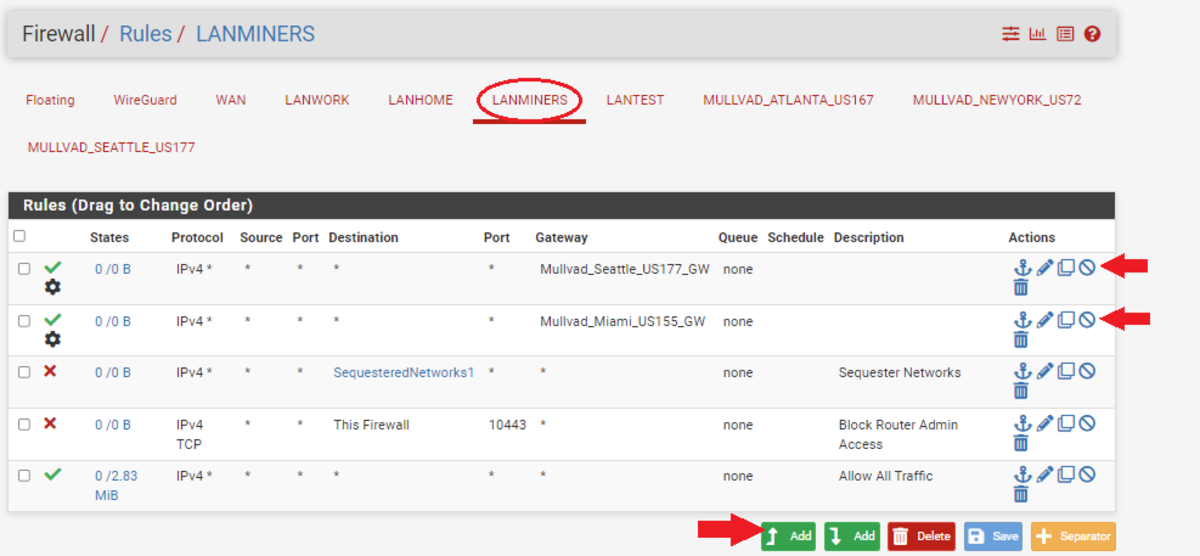 Set the protocol to”Any”Click on”Display Advanced”
 Scroll down to”Gateway”and select the load balance gateway group you createdClick on”Save”at the bottom of the page and click on”Apply Changes”at the top of the page
That should be all that is needed to get your ASICs to switch from one VPN tunnel to another VPN tunnel automatically based on latency or downed servers. To test this, plug a laptop into your dedicated Ethernet port on your network card for your mining LAN. This is”igb3″in my case.
Make sure your WiFi is off. Open a web browser and type”ifconfig.co”in the URL bar. The results should put you in the location of one of your VPN tunnels. In my case, it was Miami.
Then, back in pfSense, navigate to”Interfaces>Assignments”and click on the hyperlink for that tunnel interface. In my case, it is the”Mullvad_Miami_US155″interface.
At the very top of that configuration page, uncheck the box for”Enable Interface.”Then, click on”Save”at the bottom of the screen and then click on”Apply Changes”at the top of the screen. This has just disabled the Miami tunnel that my LANminers was sending traffic through.
Back on the laptop, refresh the browser with the ifconfig.co page. It should now be putting your location in Seattle, or wherever your secondary tunnel was set to. Sometimes, I have to completely close my browser and re-open it to clear the cache.

Make sure you go back to your Miami interface and re-check the box to enable that interface, then save, and apply. Then, you can navigate back to”Firewall>Rules,”then your mining LAN and delete the two rules you had disabled.
That’s it, you should be good to go. Keep in mind that firewall rules work in a top-down fashion. Next, I’ll get into how to help prevent ad tracking.
Step Nine: How To Configure Ad-Blocker Capabilities
Advertising companies are very interested in you and as much information as they can get about you. Unfortunately, when you browse the internet, it is easy to leak this sought after information.
This information is monetized to target specific audiences with products and services with surgical-like precision. You may have experienced doing an online search for something and then later noticed advertisements popping up in your social media feed that match your recent searches. This is made possible by gathering as much information about your internet searches, which websites you visit, which pictures you look at, what you download, what you listen to, your location, what’s in your shopping cart, what payment methods you use, the time and date of all this activity, then linking that information to uniquely-identifiable constants like the specific web browser you are using and on which device you are using it.
Combine this information with your IP address, ISP account and social media profile and you can start to see how there is a honeypot of information about you that you may not want so readily available to corporations, law enforcement, strangers or hackers. Between cookies, browser fingerprinting and behavioral tracking it can seem like the odds are stacked against you. But there are simple steps you can take to start guarding your privacy now. It would be a shame to allow perfect be the enemy of good and hold you back from getting started.
In this section, you will see how to incorporate ad-blocking capabilities by modifying the DNS server and DHCP server settings in your firewall. At a high level, you type a website name into your web browser, that gets sent to a DNS server (usually your ISP’s DNS server), and that server translates the human-readable text into an IP address and sends that back to your browser so it knows which web server you are trying to reach. Additionally, targeted ads are also sent to you this way.
I recommend starting this exercise by visiting https://mullvad.net/en/.
Then, click on the”Check for leaks”link to see where you could improve.

If you get DNS leaks, depending on which browser you are using, you may find helpful instructions from Mullvad here to harden your browser and help prevent ad and tracking at the browser level. Then try again.
If you have problems blocking ads with your preferred browser, consider using a more privacy-focused browser like UnGoogled Chromium:
Select your operating system and the latest versionDownload the installer.exeVerify the hash valueRun the installer and then configure your basic settings like default search engine
Tor is another browser I would recommend to use as much as possible, just in general.
Mullvad provides a few different DNS-resolving servers that can be found listed in this Mullvad article. For this example, I will use the”100.64.0.3″server for the ad-tracker blocking. Make sure to refer to the Mullvad website for the latest updated DNS server IP addresses as these may change occasionally.
In pfSense, navigate to”System>General”then scroll down to the”DNS Server Settings”section and type”100.64.0.3″into the DNS Server field with your WAN gateway selected. If you used my recommendation from the beginning of the guide, then this should already be set but you will need to follow the DHCP instructions below.
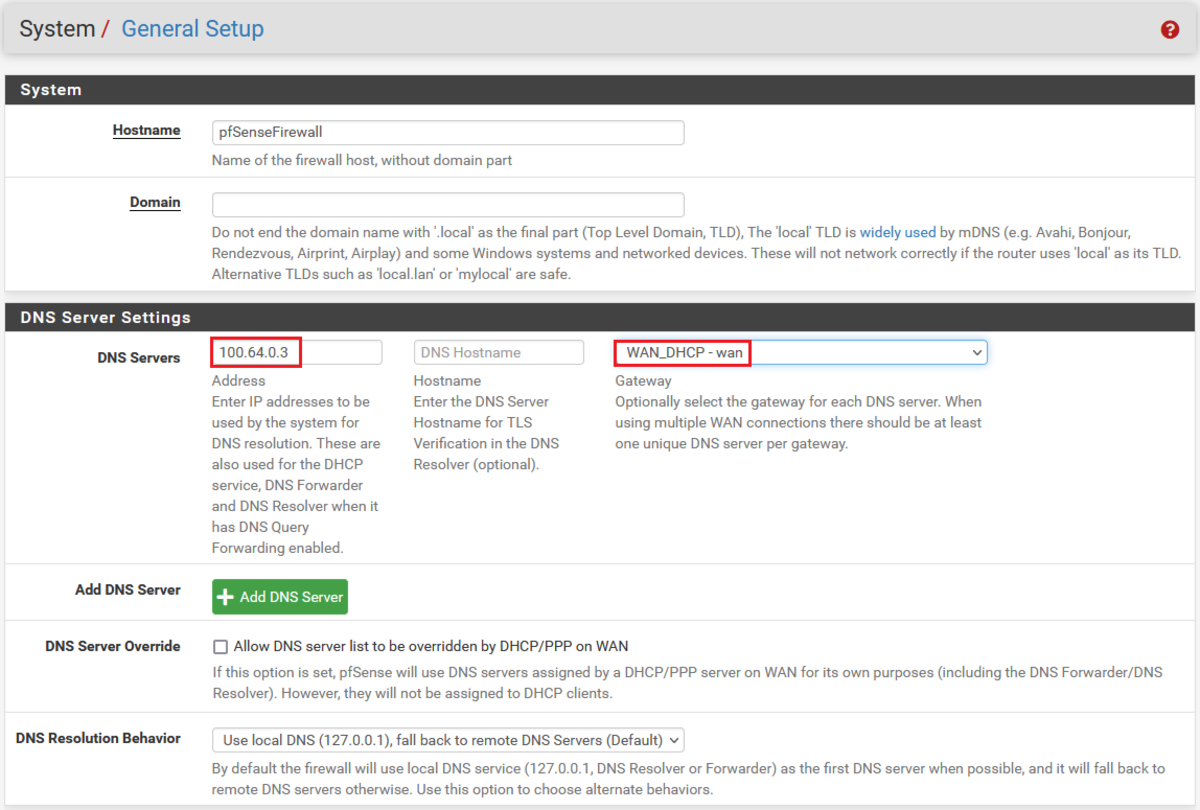
Click on”Save”at the bottom of the page.
Next, navigate to”Services>DHCP Server”and scroll down to”Servers.”In the field for”DNS Servers,”enter”100.64.0.3″and click on”Save”at the bottom of the page. Repeat this step for all of your LANs if you have multiple networks setup.

Now you should have an ad-tracker blocking DNS server configured at the firewall level to help protect all of your internet browsing. Then, if you took the additional measures of configuring your web browser or upgrading to a privacy-focused web browser, then you have taken a big leap forward in guarding your privacy on your desktop devices.
I also recommend considering using UnGoogled Chromium or Bromite on mobile. If you are interested in more mobile devices privacy measures, check out my guide on CalyxOS here.

Step 10: How To Check For Latency Caused By The VPN
There is reasonable concern that using a VPN may introduce latency to your mining traffic. The problem with that is you will get fewer rewards.
When there is latency present, your ASIC may continue hashing a block header that is no longer valid. The longer your ASIC spends hashing an invalid block header, the more”stale”hash rate you will send to the pool. When the pool sees hashes coming in for a block header that is no longer valid, the pool rejects that work. This means that your ASIC just wasted some computing power for nothing, although this is on the scale of milliseconds, when an ASIC is calculating trillions of hashes every second, it can add up fast.
Typically, this is a very small ratio compared to the amount of work that is accepted by the pool. But you can start to see how significant and continuous latency could have an impact on your mining rewards.
Generally speaking, the closer two servers are to each other, the less latency there will be. With a VPN, I have to send my mining traffic to the VPN’s server and then from there it goes to the pool’s server. In an effort to try and mitigate latency by geographic proximity, I used three VPN servers that were between my location and the pool’s server. I also wanted to be cognizant of the risk in having a regional internet outage, so I also added two VPN servers that were not between the pool and me. With my”LANminers”network configured to load balance traffic between five different tunnels, I started a five-day test.
The first two-and-a-half days (60 hours) were spent mining with the VPN on. The second two-and-a-half days were spent mining with the VPN turned off. Here is what I found:
In the first 60 hours, my ASIC had 43,263 accepted packets and 87 rejected packets. This equates to 0.201%, or in other words, 0.201%, of my expended resources not being rewarded.
After 120 hours, my ASIC had 87,330 accepted packets and 187 rejected packets. By subtracting the initial 60-hour readings, I was left with 44,067 accepted packets and 100 rejected packets while the VPN was turned off. This equates to 0.226%. Surprisingly, this is slightly more of a rejection ratio without the privacy benefits of a VPN given the same amount of time.
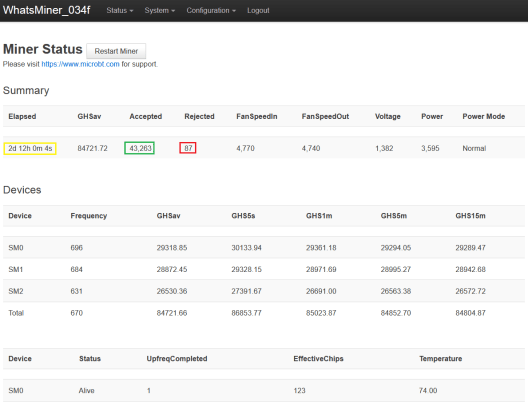
In conclusion, by balancing my mining traffic between five VPN tunnels, I was able to gain the privacy benefits of a VPN without reducing the efficiency of my mining operation. In fact, in terms of rejected ratio, my miner did better using the VPN than not using the VPN.
If you are interested in learning more about the topics covered in this guide, check out these additional resources:
Thanks for reading! I hope that this article helped you understand the basics of using an old desktop to install a network and flash with pfSense to create a versatile firewall, how to configure separate LANs, how to set up a mesh WiFi router, how to create a Mullvad VPN account and how to use WireGuard to configure VPN failovers to minimize latency on your mining operation.
This is a guest post by Econoalchemist. Opinions expressed are entirely their own and do not necessarily reflect those of BTC Inc or Bitcoin Magazine.
