Google ฟอร์มช่วยให้คุณรวบรวมคำตอบและความคิดเห็นจากผู้ตอบในรูปแบบต่างๆ ไม่ว่าจะเป็นแบบทดสอบง่ายๆ หรือแบบยาว แบบสอบถาม. แม้ว่าจะมีฟีเจอร์เนทีฟที่มีประโยชน์หลายอย่าง แต่ Google ฟอร์มยังไม่ให้คุณส่งการแจ้งเตือนทางอีเมลถึงตัวคุณเองหรือผู้ตอบแบบเนทีฟ

ภาพหลังมาถึงรูปภาพหากคุณต้องการขอบคุณผู้ใช้สำหรับการตอบสนองและเวลาของพวกเขา ในทางกลับกัน หากแบบฟอร์มของคุณรองรับผู้ชมในวงกว้างและมีหลายแผนกที่เกี่ยวข้อง การกลั่นกรองคำตอบของแบบฟอร์มทั้งหมดนั้นใช้เวลานาน
โชคดีที่คุณมีวิธีแก้ไขปัญหาชั่วคราวสองสามวิธีที่คุณสามารถส่งอีเมลได้ ให้กับเจ้าของหรือบุคคล ในตอนนี้ มีสองวิธีในการดำเนินการนี้
คุณสามารถปิดอีเมลตามการตอบกลับในแบบฟอร์มของคุณ หรือคุณสามารถส่งคำตอบขึ้นอยู่กับคำตอบที่ผู้ใช้เลือก และตามที่ระบุไว้ก่อนหน้านี้ ทั้งสองวิธีต้องการความช่วยเหลือจากส่วนเสริมภายนอก และเนื่องจากคุณจะยิงอีเมลออกจากบัญชีของคุณ คุณจะต้องให้การอนุญาตที่เกี่ยวข้องกับส่วนเสริมหรือฟังก์ชันที่เกี่ยวข้อง
เมื่อเราจัดการเรียบร้อยแล้ว มาเริ่มกันเลย เรา?
วิธีส่งอีเมลทั่วไปโดยใช้ Google ฟอร์ม
การส่งอีเมลทั่วไปถึงผู้ใช้ หรือให้เจ้าของโชคดีที่ไม่มีวิทยาศาสตร์จรวด ส่วนเสริมการแจ้งเตือนแบบฟอร์มที่มีชื่อเหมาะสมช่วยให้คุณสามารถส่งอีเมลขอบคุณไปยังผู้ใช้อย่างง่าย
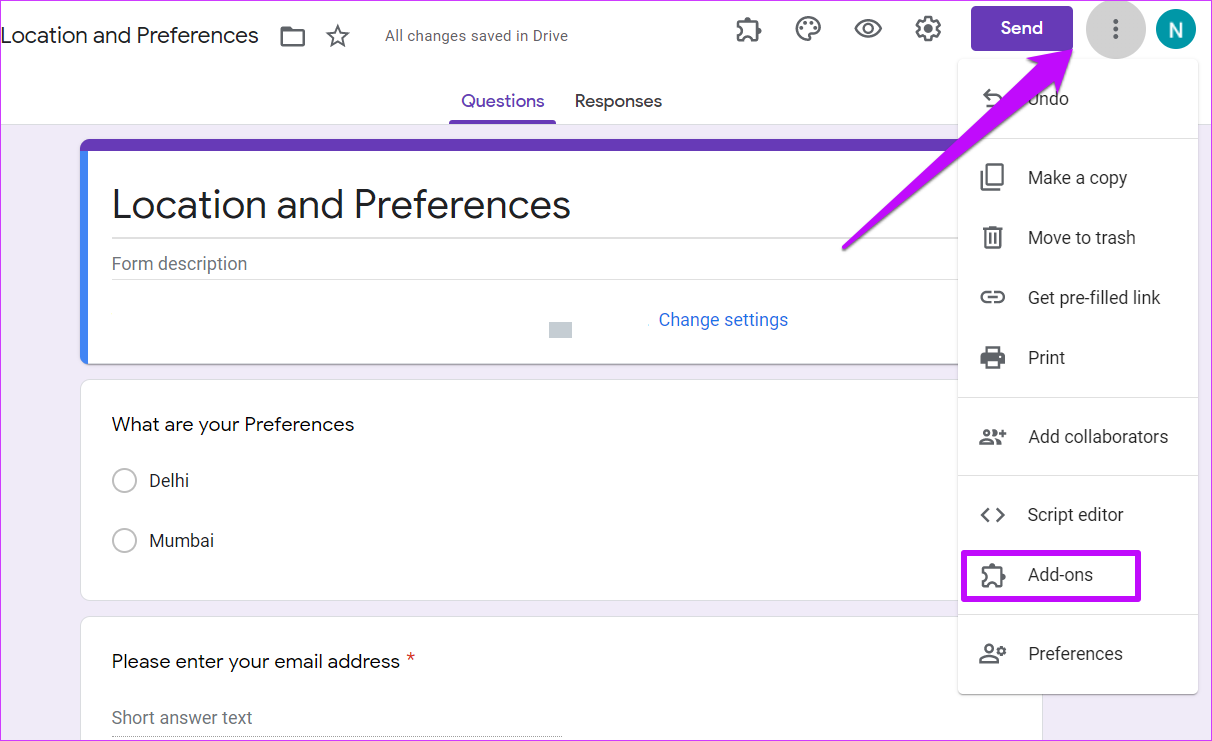
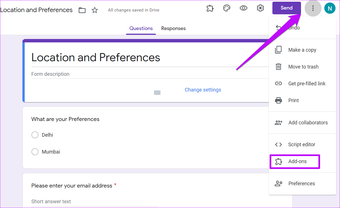
ขั้นตอนที่ 1: เมื่อคุณสร้างแบบฟอร์มแล้ว คลิกที่สาม เมนูจุดทางด้านขวาและเลือกโปรแกรมเสริมจากรายการ ซึ่งจะนำคุณไปยัง Google Marketplace
ขั้นตอนที่ 2: ตอนนี้ ค้นหา Form Notifications และคลิกเพื่อติดตั้ง
ขั้นตอนที่ 2: p>
ต่อไป สร้างแบบฟอร์ม หากคุณต้องการส่งอีเมลถึงผู้ตอบโดยตรง ให้เลือกช่องกาเครื่องหมายรวบรวมอีเมลใต้การตั้งค่า
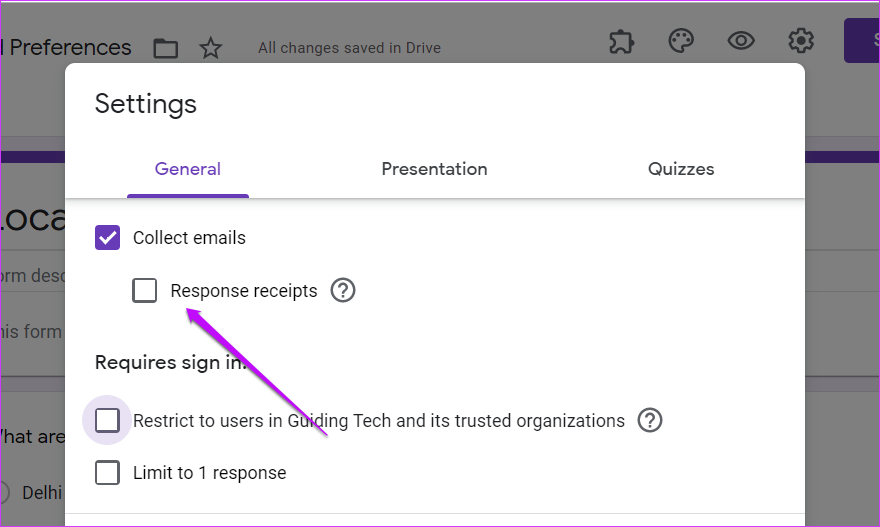
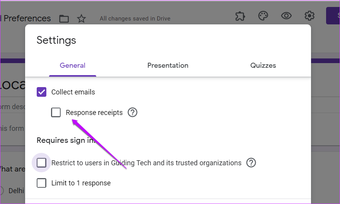
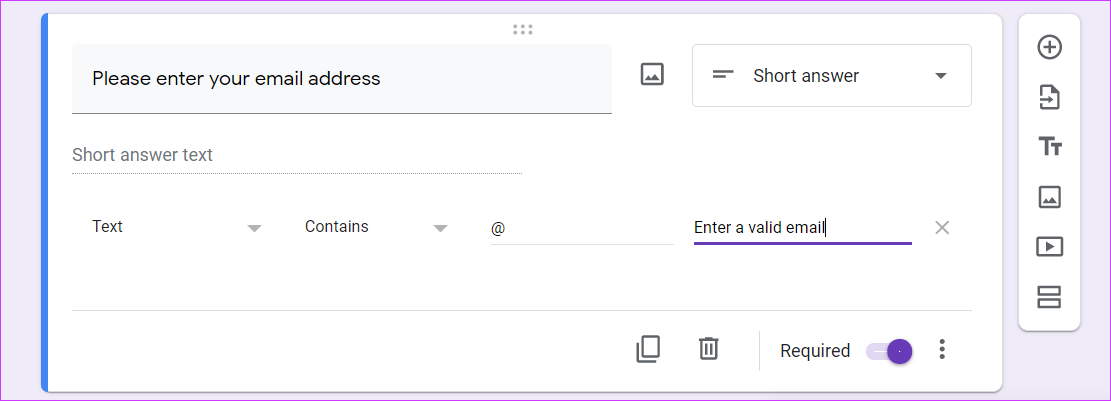
หรือมิฉะนั้น คุณสามารถตั้งค่าคำถามในแบบฟอร์มเพื่อขออีเมลจากผู้ใช้และทำเครื่องหมายว่าจำเป็นดังที่แสดงด้านล่าง
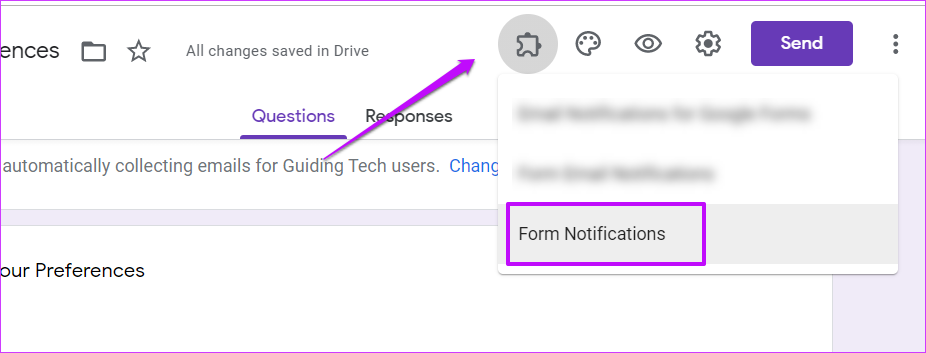
ขั้นตอนที่ 3: เมื่อเสร็จแล้ว ให้คลิกที่ไอคอน Add-on เล็กๆ แล้วเลือกการแจ้งเตือนแบบฟอร์ม คุณจะเห็นข้อความแจ้งที่มุมล่างขวา

สลับปุ่มสำหรับอีเมลขอบคุณ

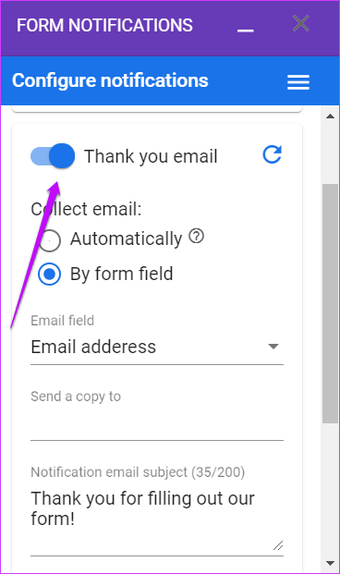
ดังที่ได้กล่าวไว้ก่อนหน้านี้ คุณสามารถใช้ฟิลด์ Automatically หรือฟิลด์ Form เลือกหนึ่งที่เหมาะสมกับความต้องการของคุณมากที่สุด ในเวลาเดียวกัน คุณสามารถเพิ่มสำเนาลับสำหรับอีเมลโดยกรอกข้อมูลในฟิลด์’ส่งสำเนาไปที่’
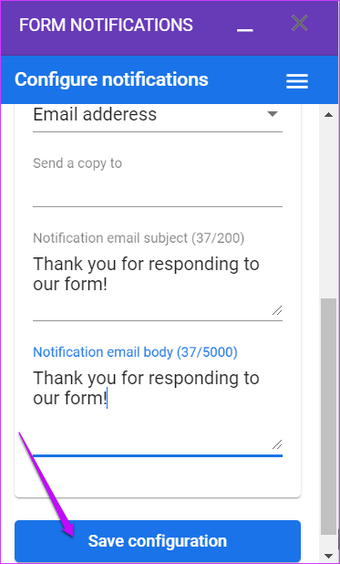
ขั้นตอนที่ 4: ถัดไป เพิ่มหัวเรื่องและเนื้อหาของ อีเมลและที่เกี่ยวกับมัน! บันทึกการตั้งค่าและคลิกที่ไอคอนแสดงตัวอย่างที่ด้านบนเพื่อดูว่าการกำหนดค่าปัจจุบันเหมาะกับคุณหรือไม่

นี่เป็นส่วนเสริมที่เรียบง่ายและการกำหนดค่านั้นง่ายและตรงไปตรงมา และแท็กที่เผยแพร่โดย Google Cloud ทำให้เชื่อถือได้เช่นกัน
นอกเหนือจากข้างต้น คุณยังสามารถส่งอีเมลถึงตัวคุณเอง (หรือถึงผู้สร้าง) เมื่อแบบฟอร์มมีจำนวนการตอบกลับคงที่.
ในการทำเช่นนั้น ให้สลับปุ่มสำหรับ’แจ้งเตือนเมื่อตอบกลับแบบฟอร์ม’อีเมลของผู้สร้างจะถูกเติมโดยอัตโนมัติในช่องผู้รับ ไม่มีการฮาร์ดโค้ดและคุณสามารถป้อนที่อยู่อีเมลอื่นได้เช่นกัน
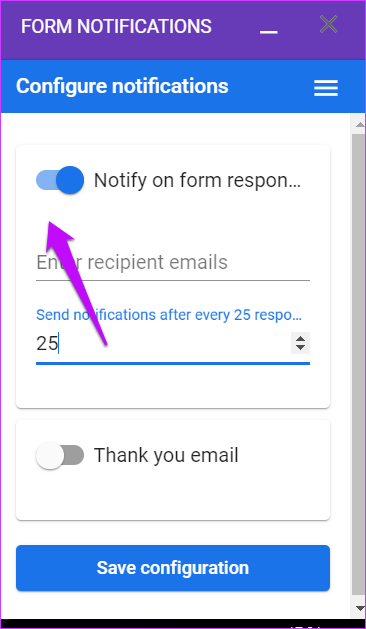

เมื่อเสร็จแล้ว ให้เพิ่มเกณฑ์การแจ้งเตือนและกดปุ่มบันทึก จากนี้ไป แบบฟอร์มของคุณจะส่งอีเมลเมื่อข้ามเกณฑ์การตอบกลับ
วิธีส่งการตอบกลับตามการตอบกลับ
ให้เราใส่ไว้ตรงนั้น ถ้าคุณต้องการส่งคำตอบตามคำตอบในแบบฟอร์ม มันไม่ง่ายเหมือนขั้นตอนข้างต้น ในที่นี้ คุณจะต้องปรับแต่ง App Script ของสเปรดชีตที่เชื่อมต่อ
โชคดีที่ถ้าคุณมีรูปแบบง่ายๆ ก็ควรดำเนินการได้อย่างง่ายดาย ในกรณีของเรา เรามีแบบฟอร์มง่ายๆ ที่เราจะขอให้ผู้ตอบแบบสอบถามระบุสถานที่ในวันหยุดที่ต้องการ


และขึ้นอยู่กับคำตอบที่พวกเขาให้ไว้ในแบบฟอร์ม อีเมลจะถูกเรียกใช้ไปยังที่อยู่อีเมลที่ตั้งค่าไว้ โดยธรรมชาติแล้ว โค้ดสามารถปรับแต่งได้ตามความต้องการในแบบฟอร์มของคุณ
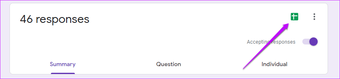
ขั้นตอนที่ 1: เมื่อสร้างแบบฟอร์มแล้ว ให้คลิกที่แท็บ”ตอบกลับ”แล้วแตะที่ไอคอนสเปรดชีตเล็กๆ ทางขวา. การดำเนินการนี้จะเชื่อมต่อแบบฟอร์มของคุณกับสเปรดชีต

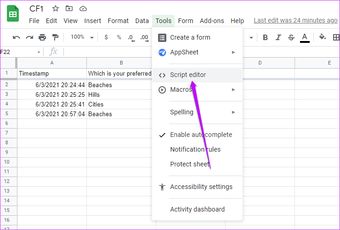
ขั้นตอนที่ 2: ตรงไปที่สเปรดชีตและคลิกที่เครื่องมือ > ตัวแก้ไขสคริปต์

<ประเภทแหล่งที่มา="image/webp"srcset="https://br.atsit.in/th/wp-content/uploads/2021/06/e0b8a7e0b8b4e0b898e0b8b5e0b8aae0b988e0b887e0b8ade0b8b5e0b980e0b8a1e0b8a5e0b895e0b8b2e0b8a1e0b881e0b8b2e0b8a3e0b895e0b8ade0b89ae0b881-20.webp 740w, https://br.atsit.in/th/wp-content/uploads/2021/06/e0b8a7e0b8b4e0b898e0b8b5e0b8aae0b988e0b887e0b8ade0b8b5e0b980e0b8a1e0b8a5e0b895e0b8b2e0b8a1e0b881e0b8b2e0b8a3e0b895e0b8ade0b89ae0b881-21.webp 700w, https://cdn.guidingtech.com/imager/assets/2021/06/1948637/2-How-to-Send-Email-Based-on-Response-in-Google-Forms-4_40dd5eab97016030a3870d712fd9ef0 webp 500w, https://br.atsit.in/th/wp-content/uploads/2021/06/e0b8a7e0b8b4e0b898e0b8b5e0b8aae0b988e0b887e0b8ade0b8b5e0b980e0b8a1e0b8a5e0b895e0b8b2e0b8a1e0b881e0b8b2e0b8a3e0b895e0b8ade0b89ae0b881-22.webp 340w"size="(min-width:976px) 700px, (min-width:448px) 75vw, 90vw"data-sizes="auto">
ในโปรแกรมแก้ไขสคริปต์ ให้วางโค้ดต่อไปนี้
ฟังก์ชัน checkLocation(e) { var subject=""; ค่า var=e.namedValues; var prefLocation=""; สำหรับ (ป้อนค่า) { var label=คีย์; var data=ค่า [คีย์]; prefLocation=data; Logger.log (ข้อมูล); }
}
ที่นี่ e คือเหตุการณ์ที่จะเกิดขึ้นเมื่อมีการส่งแบบฟอร์ม ในขณะที่ e.namedValues object จะนำข้อมูลแบบฟอร์มมาให้คุณในรูปแบบของอาร์เรย์
เมื่อบันทึกข้อมูลแล้ว คำสั่ง For จะวนรอบอาร์เรย์เพื่อนำข้อมูลมาให้คุณ ในท้ายที่สุด ข้อมูลแบบฟอร์มสำหรับการตอบกลับนั้นจะถูกกำหนดให้กับตัวแปร prefLocation
ขั้นตอนที่ 3: ในขณะเดียวกัน ให้คลิกที่นาฬิกาเล็กๆ บนแผงด้านซ้ายเพื่อเข้าถึงทริกเกอร์ และเลือกเพิ่มทริกเกอร์

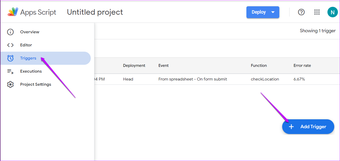
ที่นี่ เลือกจากสเปรดชีตเป็นแหล่งของเหตุการณ์และในแบบฟอร์มส่งเป็นประเภทเหตุการณ์

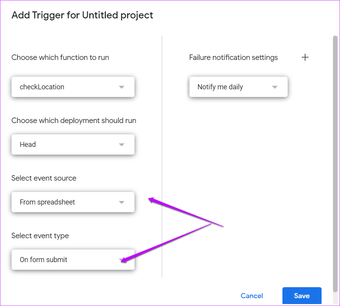
The above will make sure that the function we have written above will only be triggered when the form is submitted. And on submission, it will only pull data from the connected spreadsheet.
Step 4: Now, head back to the Script Editor to modify the code as per your requirement.
In our case, we want an email to be shot off to a particular email ID when a respondent answers Hills, and so on.
So, we have added a simple If and Else-If condition to the code,
 function checkLocation(e) { var subject=""; var values=e.namedValues; var prefLocation=""; for (Key in values) { var label=Key; var data=values[Key]; prefLocation=data; Logger.log(data); if (prefLocation=="Hills"){ subject="You have an email for Hills Location"; GmailApp.sendEmail('[email protected]', subject, prefLocation); }else if (prefLocation=="Beaches"){ subject="You have an email for Beaches Location"; GmailApp.sendEmail('[email protected]', subject, prefLocation); } else if(prefLocation=="Cities") { subject="You have an email for Cities Location"; GmailApp.sendEmail('[email protected]', subject, prefLocation); }
}
}
Naturally, you will have to provide permission for the GmailApp.sendEmail function to work. It’s a one-time process though.
Step 5: Now that, everything is in place, save your code by clicking on the Save icon as shown below.

Now, run the code. Unfortunately, in the absence of an event, you won’t be able to run the code directly from the Script Editor.
To get your code running, submit your form. If everything is in the right place, the odds are that you will get an email.
Once done, you can tweak the code as per your requirement and add individual If-Else conditions. At the same time, you can also draft the body of the email as per the data.
How to Check for Errors
To run a code without errors at the first go is rare, and to be honest, there are plenty of things that can go wrong. To check for error, head over to the Executions tab, and you will see all the instances the function has been called.

Click to see the errors. Here, you can also see how the function has been called. A Trigger tag translates into a form submission, while an Editor tag means that the function was run through the Editor.
At the same time, if you want to cross-check the value of the function, just add the Logger.log(variable) to log the data.

For instance, we had invoked Logger.log(prefLocation) inside the individual If-Else conditions, and our log looked like the one above.
To Code or Not to Code
The second method may look a tad complicated. But once you get the hang of how the individual functions are called, the odds are the going will get a little easier.
But at the end of the day, if you do not want to get your hands dirty, you can check out the Email Notifications Forms add-on. This one is designed for sending emails based on conditional responses. However, the Conditional Formatting feature is not free and approximately costs around $4 per month for a single user license.
So, if you need to send responses for your forms on an occasional basis, you can paste the code above on the App Script editor.
The above article may contain affiliate links which help support Guiding Tech. However, it does not affect our editorial integrity. The content remains unbiased and authentic.