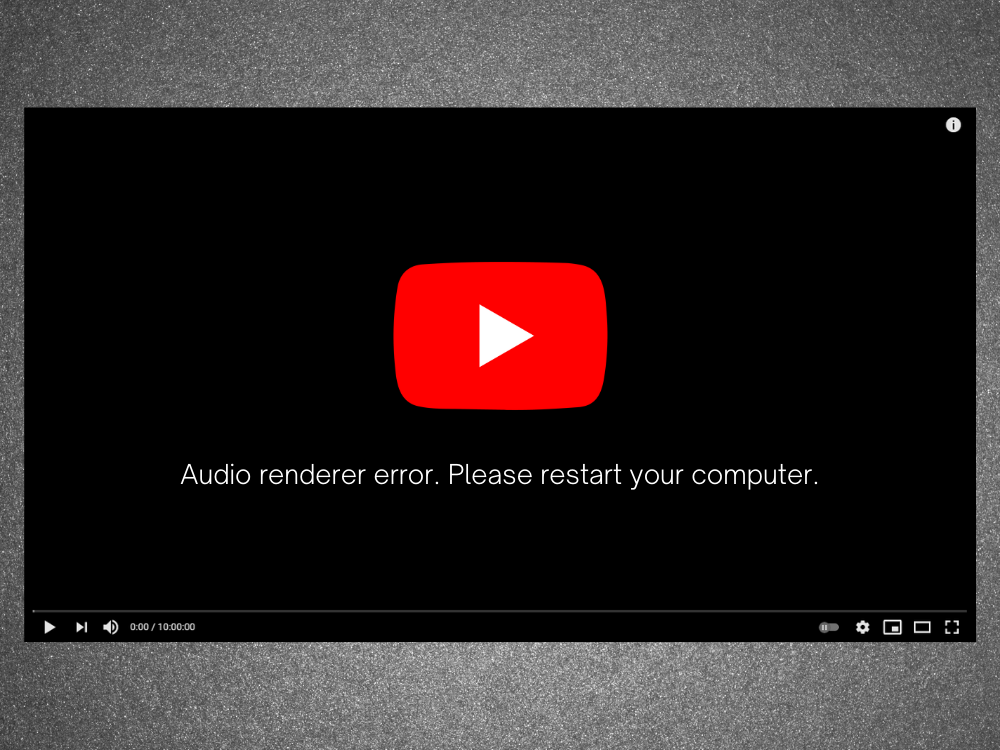
ปัญหาเกี่ยวกับคอมพิวเตอร์เกิดขึ้นเป็นระยะ ๆ ดังนั้นคุณต้องเตรียมพร้อมที่จะดำเนินการในทุกสถานการณ์ ตัวอย่างเช่นหากมี ไม่มีเสียงมาจากพีซี Windows 10 ของคุณ อาจเกิดจากปัญหาต่างๆเช่นข้อผิดพลาดของตัวแสดงผลเสียง แต่ไม่จำเป็นต้องตกใจเพราะคุณสามารถแก้ปัญหานี้ได้โดยทำตามคำแนะนำด้านล่าง
ข้อผิดพลาดของ Audio Renderer: โปรดรีสตาร์ทคอมพิวเตอร์ของคุณ!
ข้อผิดพลาดของโปรแกรมแสดงเสียงโปรดรีสตาร์ทคอมพิวเตอร์ของคุณ เป็นข้อความแสดงข้อผิดพลาดที่ปรากฏบนหน้าจอเมื่อคอมพิวเตอร์ของคุณไม่สามารถเล่นแทร็กเสียง สามารถเกิดขึ้นได้ทุกที่ไม่ว่าคุณจะพยายามดูวิดีโอบน YouTube หรือภาพยนตร์ในโปรแกรมเล่นสื่อของคุณ
พฤติกรรมแปลก ๆ ในบางครั้งเสียงจะเล่นโดยไม่มีปัญหาใด ๆ จนกระทั่งเกิดข้อผิดพลาดกะทันหันและปิดเสียงทั้งหมดที่มาจากคอมพิวเตอร์ของคุณ ขอให้คุณรีสตาร์ทคอมพิวเตอร์ซึ่งดูเหมือนจะช่วยแก้ปัญหาได้
อย่างไรก็ตามการรีบูตเครื่องพีซีเป็นเพียงวิธีแก้ปัญหาชั่วคราวเนื่องจากข้อผิดพลาดจะปรากฏขึ้นอีกครั้งในที่สุด เมื่อถึงจุดนั้นคุณถูกบังคับให้เข้าสู่ลูปการรีสตาร์ทคอมพิวเตอร์เพื่อให้เสียงดำเนินต่อไป เป็นเรื่องง่ายที่จะดูว่าเหตุใดจึงทำให้ผู้ใช้รู้สึกหงุดหงิดโดยเฉพาะอย่างยิ่งเมื่อต้นตอของปัญหาไม่ชัดเจน
เราได้ทดสอบปัญหานี้สนทนากับผู้ใช้หลายคนและรวบรวมรายการวิธีแก้ปัญหาที่เป็นไปได้ที่แก้ไขข้อผิดพลาดของตัวแสดงผลเสียงบนพีซีส่วนใหญ่ที่ใช้ Windows 10
วิธีแก้ไขข้อผิดพลาดของตัวแสดงเสียงใน Windows 10
ข้อผิดพลาดในการแสดงเสียงอาจเกิดจากปัญหากับเว็บเบราว์เซอร์หรือการตั้งค่าคอมพิวเตอร์ของคุณ การอดทนอดกลั้นเป็นสิ่งสำคัญเพราะอาจต้องใช้เวลาสักพักจนกว่าคุณจะหมดทางเลือกทั้งหมด
ก่อนที่จะเริ่มแก้ไขปัญหาที่น่ารำคาญนี้ควร ตั้งค่าจุดคืนค่าระบบ ช่วยให้คุณสามารถเปลี่ยน Windows 10 ให้กลับสู่สถานะเสถียรได้ในกรณีที่คุณพบปัญหาเพิ่มเติมระหว่างทาง
1. ล้างแคชการท่องเว็บ
ผู้ใช้หลายคนรายงานว่าได้รับข้อผิดพลาดของโปรแกรมแสดงเสียงบน YouTube อาจเกิดจากปัญหาเบราว์เซอร์เช่นแคชและคุกกี้ที่บันทึกไว้ วิธีง่ายๆในการแก้ไขคือ การรีเฟรชเว็บเบราว์เซอร์อย่างหนัก . เพื่อให้สิ่งนี้เกิดขึ้นเพียงเลือกแท็บ YouTube แล้วกด Ctrl + Shift + R จากนั้นตรวจสอบว่าคุณยังคงได้รับข้อผิดพลาดหรือไม่
แม้ว่าจะเป็นการแก้ไขชั่วคราวเท่านั้นเนื่องจากคุณยังต้องล้างแคชของเบราว์เซอร์ด้วยวิธีดั้งเดิม
วิธีล้างแคช Chrome:
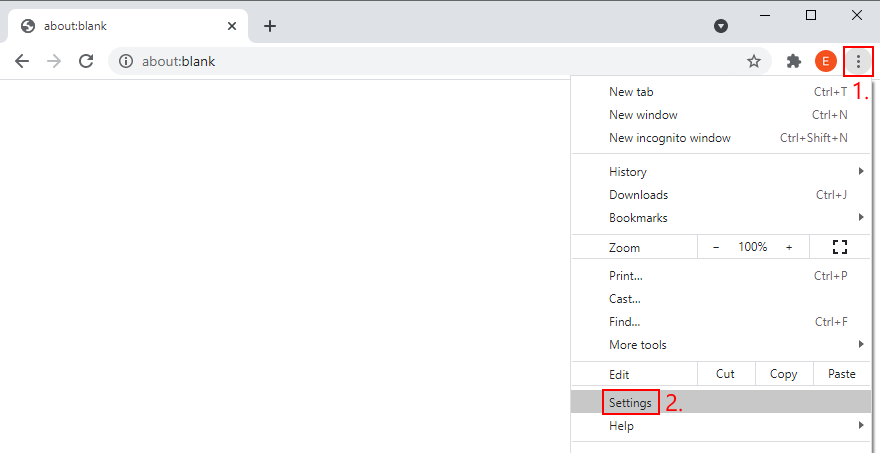
- เปิด Chrome และเปิดเมนู เพิ่มเติม ที่มุมขวาบน
- ไปที่ การตั้งค่า
- ข้ามไปที่ ความเป็นส่วนตัวและความปลอดภัย ทางด้านซ้าย
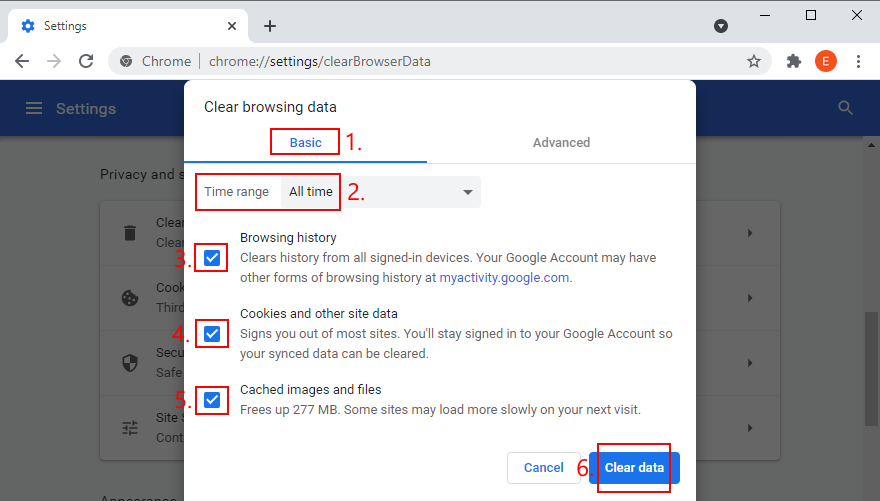
- คลิก ล้างข้อมูลการท่องเว็บ หรือคุณสามารถป้อนที่อยู่
chrome://settings/clearBrowserData
- อยู่ในส่วน พื้นฐาน
- ตั้งค่า ช่วงเวลา เป็น ตลอดเวลา
- ตรวจสอบให้แน่ใจว่าได้เปิดใช้งานตัวเลือกต่อไปนี้:
- ประวัติการเข้าชม
- คุกกี้และข้อมูลอื่น ๆ ของไซต์
- รูปภาพและไฟล์แคช
- คลิก ล้างข้อมูล
- รีสตาร์ท Chrome แล้วลองดู YouTube เลย
วิธีล้างแคชของ Firefox:
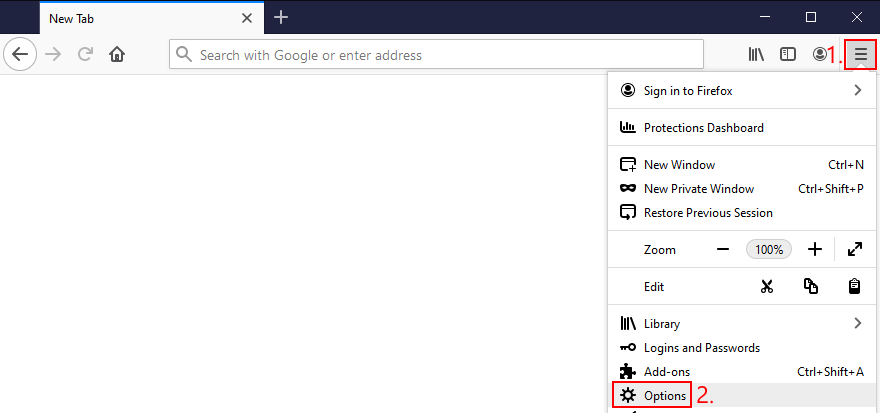
- เปิด Firefox แล้วคลิกปุ่ม ≡ แฮมเบอร์เกอร์
- เลือก ตัวเลือก
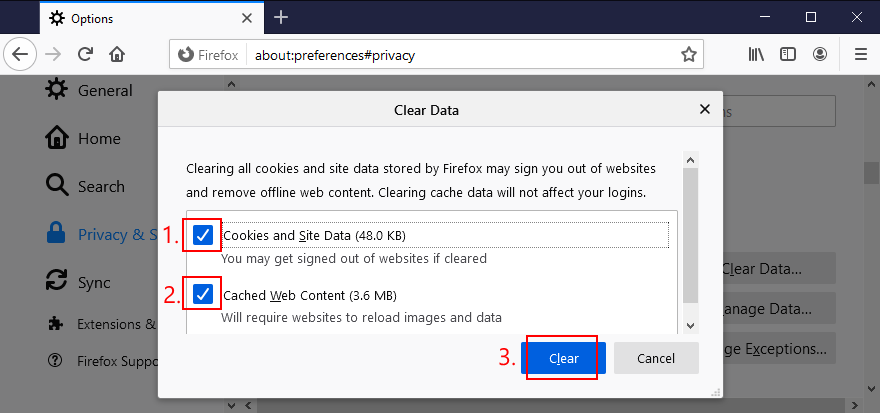
- ไปที่ ความเป็นส่วนตัวและความปลอดภัย แล้วคลิก ล้างข้อมูล

- ตรวจสอบว่าได้เลือกการตั้งค่าถัดไป:
- คุกกี้และข้อมูลไซต์
- เนื้อหาเว็บที่แคช
- คลิก ล้าง
- เปิด Firefox ใหม่และตรวจสอบข้อผิดพลาดเกี่ยวกับเสียง
วิธีล้างแคช Microsoft Edge:
- เริ่ม Microsoft Edge
- คลิกปุ่ม เพิ่มเติม ที่มุมขวาบน

- เลือก การตั้งค่า
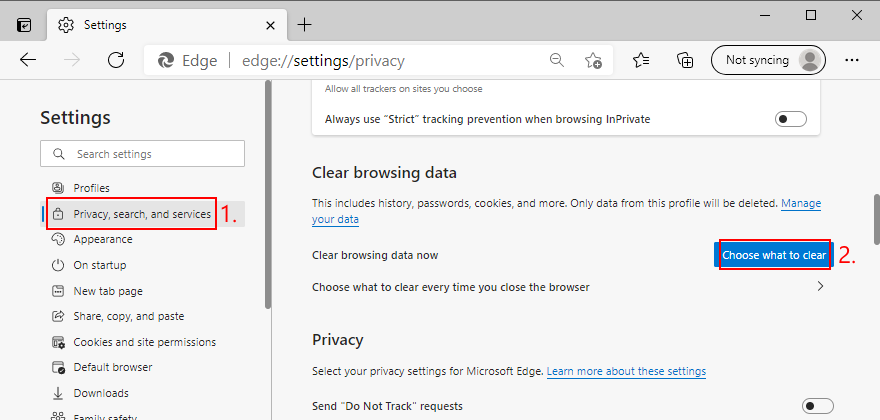
- ข้ามไปที่ ความเป็นส่วนตัวการค้นหาและบริการ คุณสามารถใช้ที่อยู่
edge://settings/privacyได้ - ที่ ล้างข้อมูลการท่องเว็บทันที คลิก เลือกสิ่งที่จะล้าง
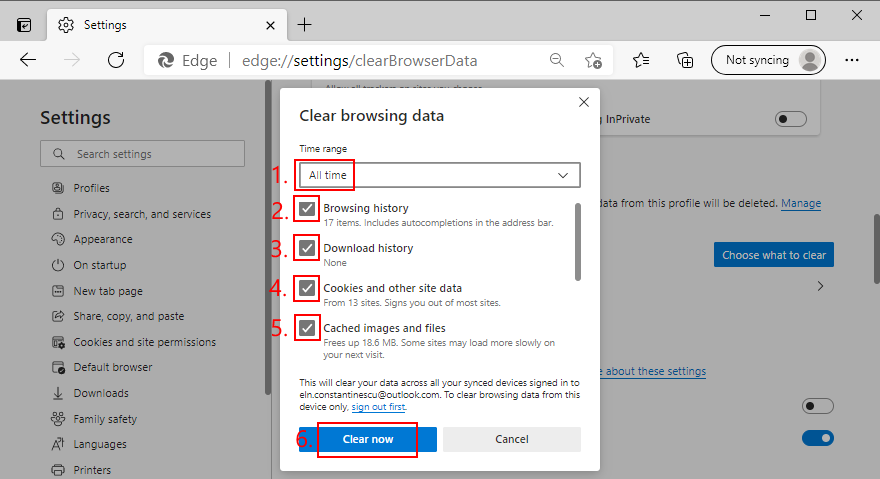
- ตั้งค่า ช่วงเวลา เป็น ตลอดเวลา
- ทำเครื่องหมายในช่องของตัวเลือกต่อไปนี้:
- ประวัติการเข้าชม
- ประวัติการดาวน์โหลด
- คุกกี้และข้อมูลอื่น ๆ ของไซต์
- รูปภาพและไฟล์แคช
- คลิก ล้างเดี๋ยวนี้
- รีสตาร์ท Edge และพยายามเพลิดเพลินกับ YouTube โดยไม่มีปัญหาเรื่องเสียง
2. เรียกใช้ตัวแก้ไขปัญหาเสียง
Windows 10 มาพร้อมกับเครื่องมือแก้ปัญหาในตัวที่แก้ไขปัญหาเสียงทั่วไป เป็นเรื่องที่คุ้มค่าหากคุณเบื่อที่จะจัดการกับข้อผิดพลาดของตัวแสดงผลเสียง
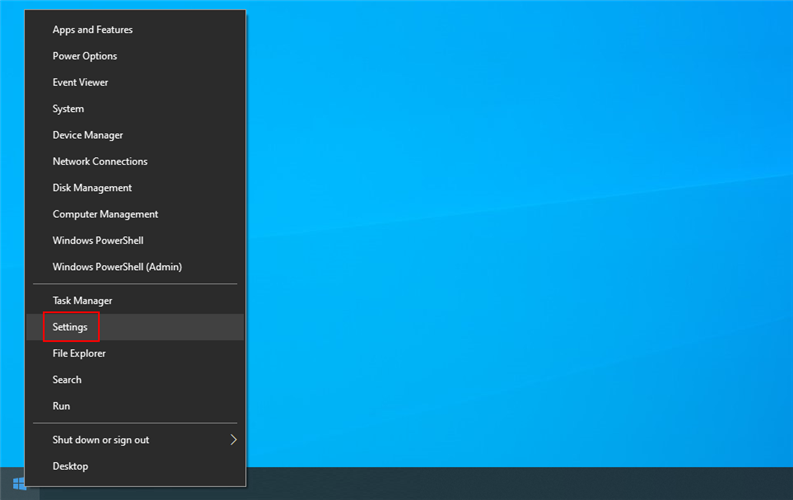
- คลิกขวาที่ปุ่ม เริ่ม ของ Windows 10 แล้วไปที่ การตั้งค่า
- เลือก อัปเดตและความปลอดภัย

- ไปที่ แก้ไขปัญหา ทางด้านซ้าย
- คลิก เครื่องมือแก้ปัญหาเพิ่มเติม

- เลือก การเล่นเสียง และคลิก เรียกใช้เครื่องมือแก้ปัญหา

- ปฏิบัติตามคำแนะนำบนหน้าจอ
- ตรวจสอบข้อผิดพลาดเกี่ยวกับเสียง
3. เปิดใช้งานอุปกรณ์เสียง
หากคุณเชื่อมต่ออุปกรณ์เสียงหลายเครื่องเข้ากับคอมพิวเตอร์ของคุณคุณอาจทำให้การตั้งค่าอุปกรณ์เสียงเสียหายโดยไม่รู้ตัวและปิดใช้งานอะแดปเตอร์เสียงหลัก วิธีเปิดใช้งานอีกครั้งมีดังนี้:
- คลิกปุ่ม เริ่ม พิมพ์ แผงควบคุม และเปิดแอปนี้
- ไปที่ส่วน เสียง
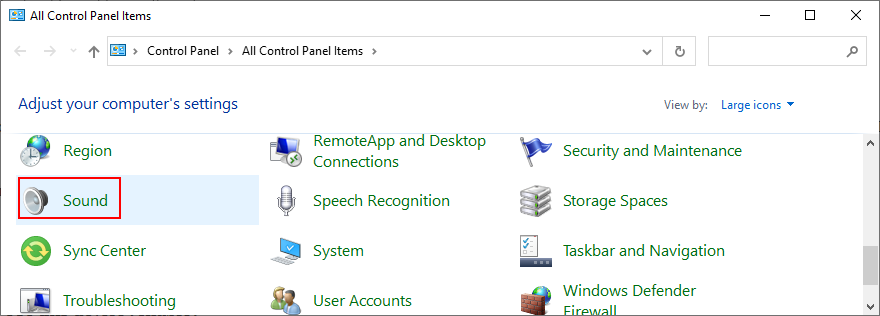
- สลับไปที่แท็บ การเล่น
- เลือกอุปกรณ์เสียงของคุณจากรายการ
- คลิก คุณสมบัติ
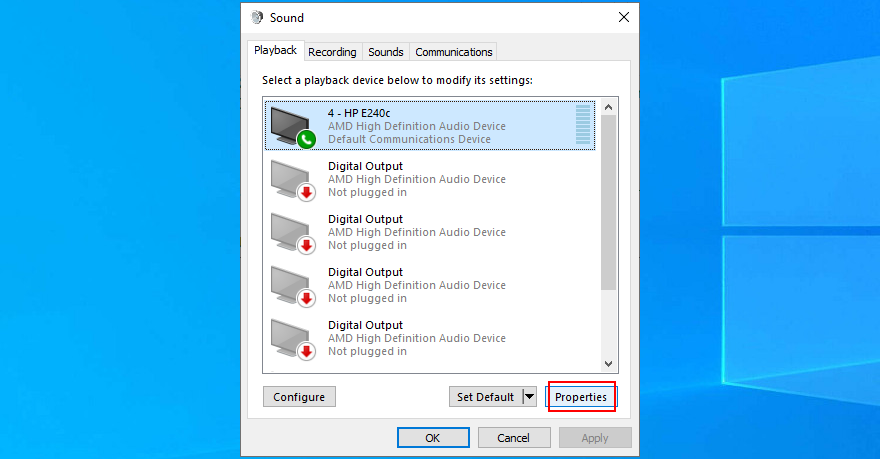
- ในแท็บ ทั่วไป ตั้งค่า การใช้อุปกรณ์ เป็น ใช้อุปกรณ์นี้ (เปิดใช้งาน)
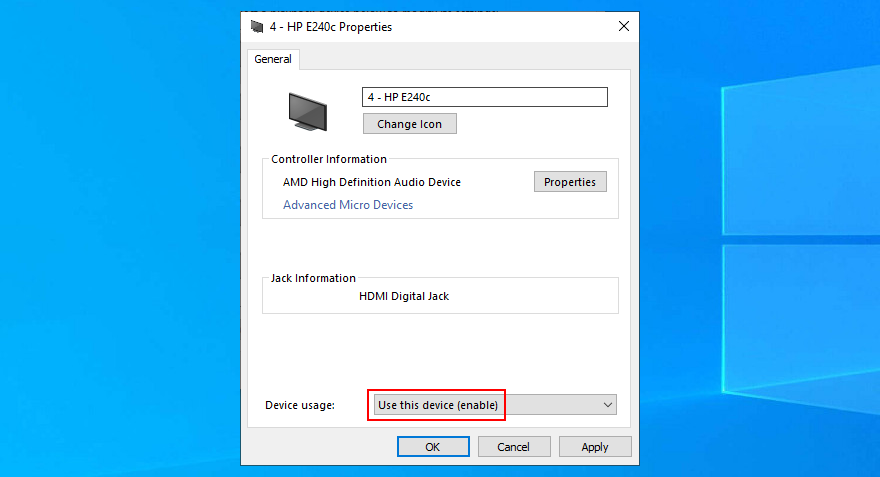
- คลิก ใช้ และออก
- ตรวจสอบปัญหาเกี่ยวกับเสียงทันที
4. เริ่มบริการ Windows Audio ใหม่
เสียงทั้งหมดที่ออกจากคอมพิวเตอร์ของคุณดำเนินการโดยบริการพื้นหลัง หากบริการนั้นไม่ทำงานในขณะนี้ถูกขัดจังหวะบ่อยครั้งหรือไม่เริ่มทำงานโดยอัตโนมัติเมื่อบูต Windows คุณควรคาดหวังปัญหาต่างๆเช่นข้อผิดพลาดของตัวแสดงผลเสียง
แต่คุณสามารถแก้ไขปัญหานี้ได้โดยเริ่มบริการ Windows Audio ใหม่ โดยมีวิธีดังนี้:
- กดแป้น Windows พิมพ์ Services และเปิดแอปนี้
- ค้นหาและคลิกขวาที่ Windows Audio
- ไปที่ คุณสมบัติ
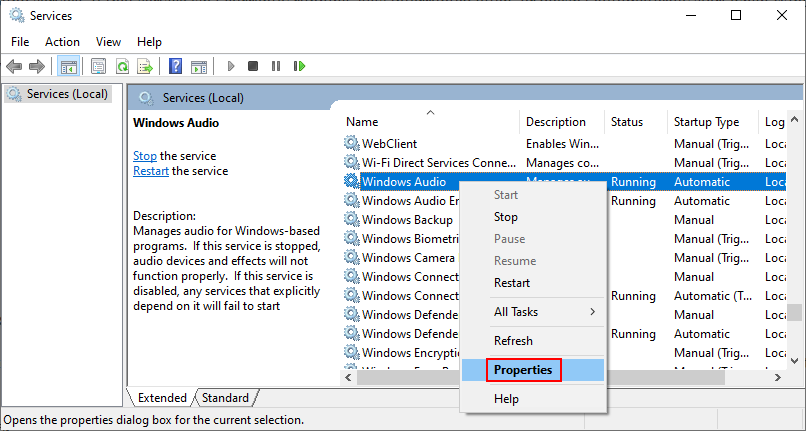
- อยู่ในแท็บ ทั่วไป
- ตั้งค่า ประเภทการเริ่มต้น เป็น อัตโนมัติ
- หาก สถานะบริการ ระบุว่า หยุด ให้คลิกปุ่ม เริ่ม
- คลิก ใช้ และออกจาก
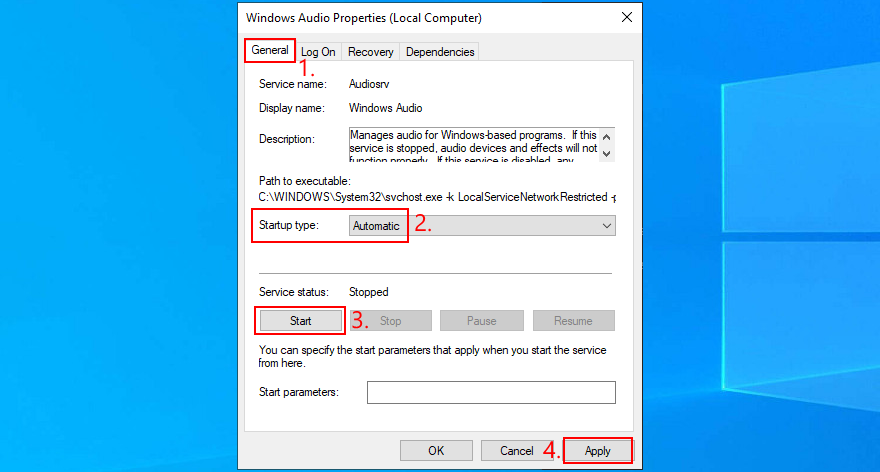
- ตรวจสอบปัญหาเกี่ยวกับเสียง
5. ซิงโครไนซ์ความถี่เสียง (ไดรเวอร์ ASIO)
ผู้ใช้ที่มีไดรเวอร์ ASIO4ALL ได้รายงานความขัดแย้งกับการตั้งค่าเสียงของระบบ โดยเฉพาะอย่างยิ่งหากไม่ได้กำหนดอัตราการสุ่มตัวอย่างไว้ที่ค่าเดียวกันในทั้งสองส่วนคอมพิวเตอร์จะเริ่มประสบปัญหาเกี่ยวกับเสียง วิธีแก้ปัญหานี้ได้อย่างง่ายดายมีดังนี้:
- คลิกปุ่ม เริ่ม พิมพ์ แผงควบคุม แล้วกด เข้าสู่
- เลือกพื้นที่ เสียง

- ในแท็บ การเล่น เลือกอุปกรณ์เสียงของคุณแล้วคลิก คุณสมบัติ

- เปลี่ยนเป็นแท็บ ขั้นสูง
- เขียนอัตราตัวอย่างที่ระบุไว้ที่ รูปแบบเริ่มต้น
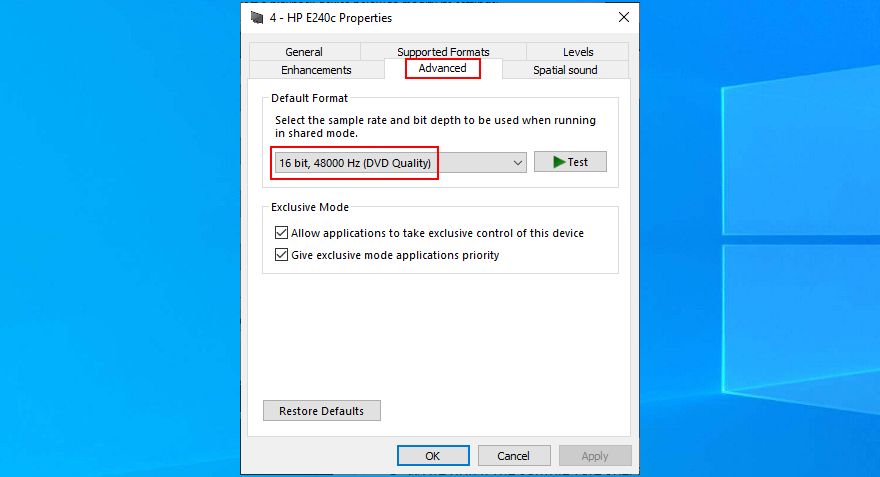
- ออกจากพื้นที่นี้
- เปิดยูทิลิตี้ ASIO
- เปลี่ยนเป็นแท็บ เสียง
- ตั้งค่า อัตราตัวอย่าง เป็นค่าเดียวกับใน Windows
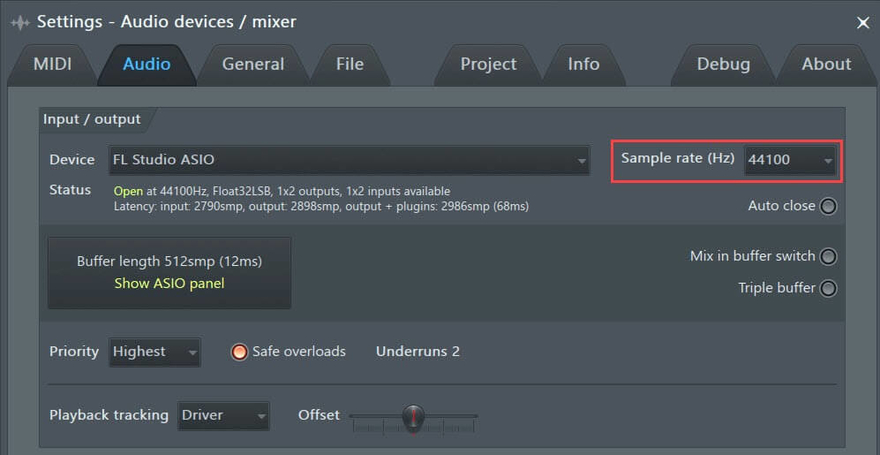
- รีสตาร์ทพีซีของคุณและตรวจสอบผลลัพธ์
6. เรียกใช้การทดสอบเสียง (แล็ปท็อป HP)
ผู้ใช้ HP สามารถเปลี่ยนไปใช้เครื่องมือวินิจฉัยเสียงที่เรียกว่า HP PC Hardware Diagnostics (UEFI) วิธีการใช้งานมีดังนี้:
- รีสตาร์ทแล็ปท็อป HP ของคุณ
- ในระหว่างการรีบูตให้กดปุ่มอย่างรวดเร็วเพื่อให้คุณสามารถเข้าถึง HP PC Hardware Diagnostics (UEFI)
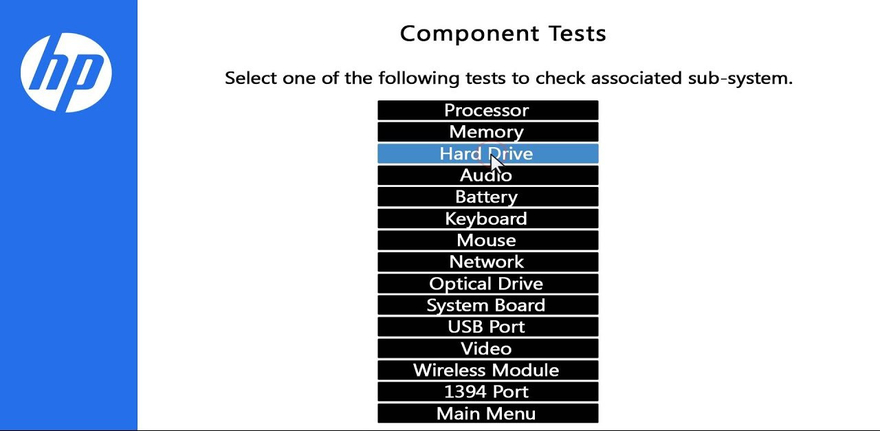
- ไปที่ส่วน เสียง
- คลิก เรียกใช้ครั้งเดียว เพื่อเริ่มประเมินอุปกรณ์เสียงของคุณ
- เลือก ลำโพง และปฏิบัติตามคำแนะนำบนหน้าจอ
- ทำการทดสอบและบูต Windows ให้เสร็จสมบูรณ์
- ตรวจสอบปัญหาเกี่ยวกับเสียง
คุณยังสามารถดาวน์โหลด HP Audio Check ได้จาก เว็บไซต์อย่างเป็นทางการ และใช้เพื่อทำการทดสอบเพิ่มเติม
7. ตั้งค่าอุปกรณ์เสียงเริ่มต้น
Windows มีปัญหาในการระบุอุปกรณ์เสียงเริ่มต้นในบางครั้ง และนี่คือสาเหตุที่อาจแสดงข้อผิดพลาดของตัวแสดงผลเสียงไม่ว่าคุณจะได้รับจาก YouTube หรือที่อื่นก็ตาม ในการแก้ไขปัญหาที่น่ารำคาญนี้คุณต้องตั้งค่าอุปกรณ์เสียงที่คุณชื่นชอบเป็นค่าเริ่มต้นอีกครั้ง โดยมีวิธีดังนี้:
- กดปุ่ม Win พิมพ์ Control Panel และเปิดแอปนี้
- คลิก เสียง

- เลือกอุปกรณ์เสียงของคุณจากแท็บ การเล่น
- คลิก ตั้งค่าเริ่มต้น
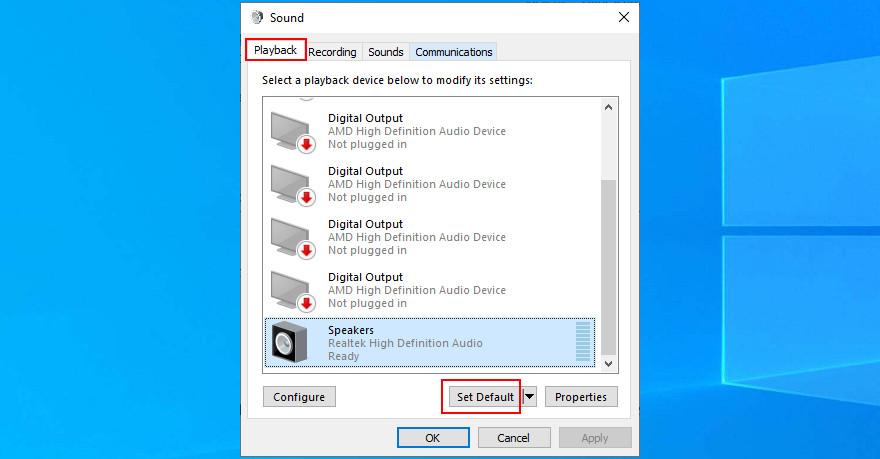
- หากปุ่ม ตั้งค่าเริ่มต้น เป็นสีเทาให้เลือกอุปกรณ์อื่นเพื่อตั้งเป็นค่าเริ่มต้นจากนั้นกลับไปที่ตัวเลือกแรกของคุณ
- คลิก ใช้ และออกจากพื้นที่นี้
- ตรวจสอบปัญหาเกี่ยวกับเสียง
8. ติดตั้งอะแดปเตอร์เสียงอีกครั้ง
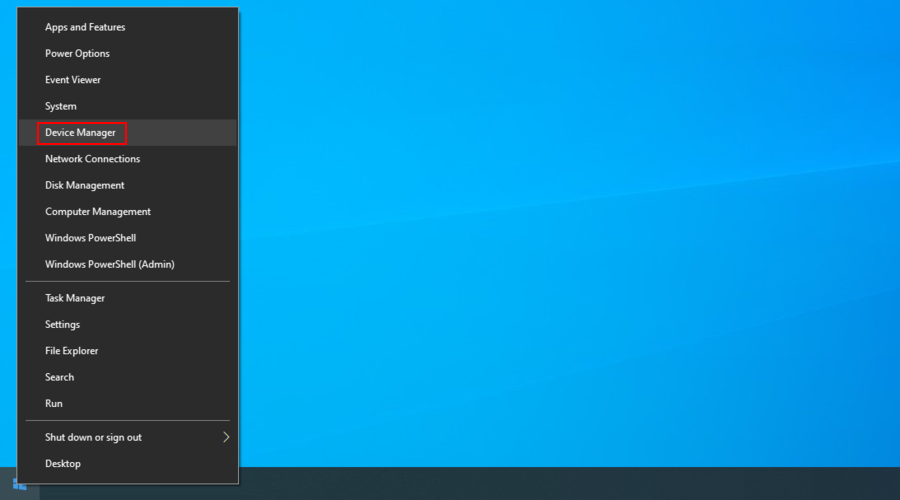
อะแดปเตอร์เสียงของคุณอาจเชื่อมต่อกับคอมพิวเตอร์ของคุณไม่ถูกต้อง อย่างไรก็ตามคุณสามารถติดตั้งใหม่ได้อย่างง่ายดายโดยไม่เป็นอันตรายต่อพีซีของคุณในกระบวนการ สิ่งที่คุณต้องทำมีดังนี้:
- Right-click the Start button and select Device Manager
- Extend the Audio inputs and outputs group
- Identify your main audio device, right-click it, and select Uninstall device
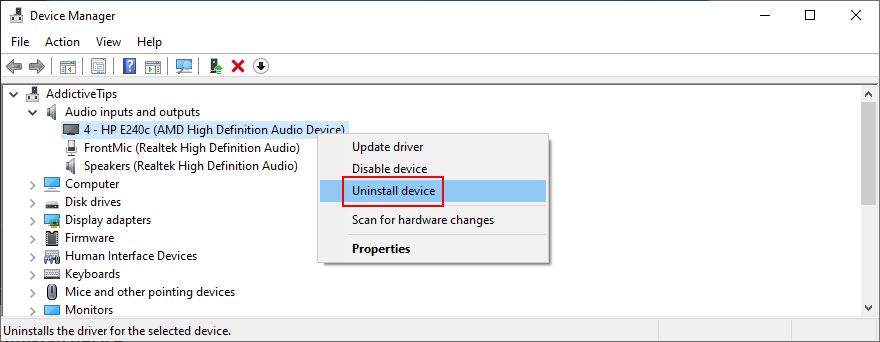
- Select any entry from the list
- Open the Action menu and click Scan for hardware changes
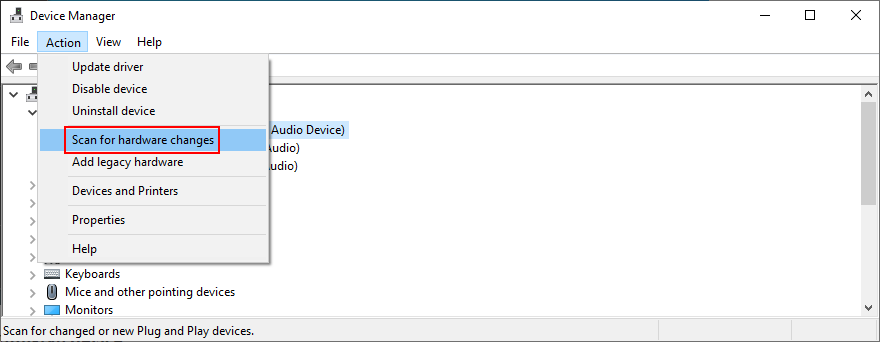
- Restart your computer. Windows will auto-reinstall the missing audio driver
- Check for sound problems
9. Update the audio driver
Even if your sound adapter is correctly installed, perhaps it’s equipped with an obsolete driver that’s no longer supported by Windows 10. It would certainly explain the audio renderer error. However, you can easily update the audio driver:
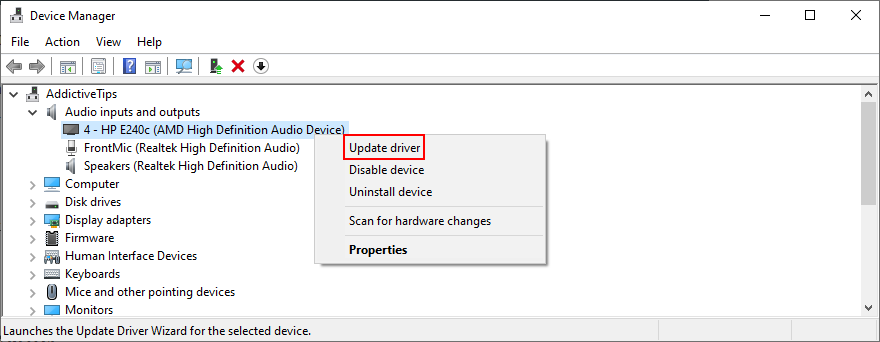
- Click the Start button, type Device Manager, and press Enter
- Expand the Audio inputs and outputs category
- Right-click your primary audio adapter and select Update driver
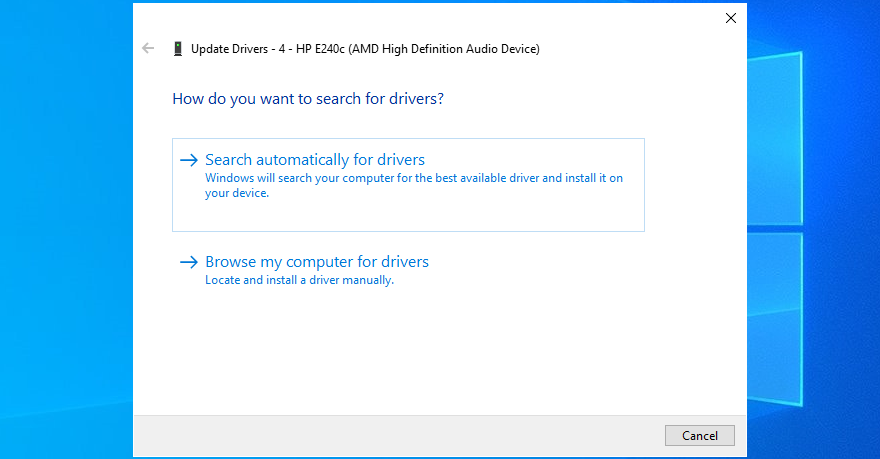
- Click Search automatically for updated driver software
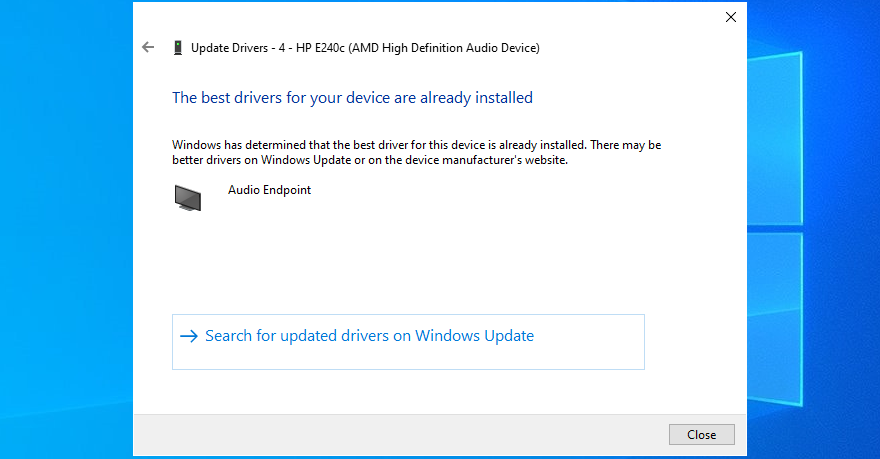
- If you see the The best drivers for your device are already installed message, click Search for updated drivers on Windows Update
- Reboot your PC and check for additional audio issues
It’s possible that Microsoft fails to find a newer audio driver using Windows Update. In that case, you should head over to the manufacturer website of your sound adapter, then find, download, and install a newer driver that’s compatible with your OS configuration.
However, if you don’t want to go through that trouble as well as risk installing an incompatible driver that could cause more problems, we suggest opting for a driver updating software solution. You can use it to keep all your device drivers in check.
10. Roll back the audio driver
If you have recently updated your sound driver, perhaps you installed an incompatible version that’s throwing you the audio renderer error. To fix it, you should roll back to the previous driver version. Here’s how:
- Head over to Device Manager
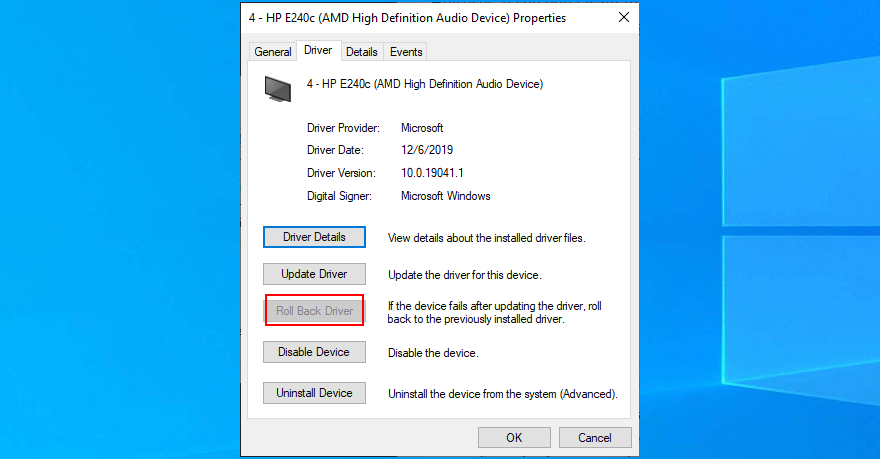
- Right-click your audio device and go to Properties
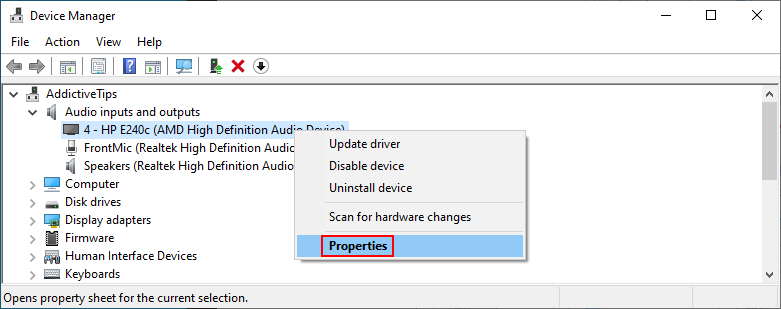
- Select the Driver tab
- Click Roll Back Driver and follow the given instructions
- If the button is greyed out, it means that your operating system doesn’t have the previous driver version, so you can skip this solution
- Restart your computer and inspect results
11. Check the audio cable
It’s a good idea to check your audio cable to see if there’s anything wrong with it since hardware problems can cause audio renderer errors, too. If you have multiple audio inputs on your computer, try sticking the audio jack somewhere else in case you have malfunctioning jacks.
In fact, if you have several external playback devices plugged into your machine, it’s a good idea to remove the ones you’re not currently using. Furthermore, make sure that you didn’t accidentally swap the audio and microphone jacks in the process.
12. Disable audio mixing software
Certain audio mixing tools are not fully compatible with the Windows 10 sound drivers, resulting in conflicts and the audio renderer error message. As soon as you start an audio mixing tool and configure sound drivers, the application overrides the system settings, causing various problems.
To fix this problem, you just need to disable your audio mixing tools when trying to watch a movie offline or a clip on YouTube.
13. Update your web browser
If you’re getting the audio renderer error message on YouTube when trying to enjoy a video, it’s a good idea to update your web browser to the latest version.
How to update Google Chrome:
- Open the More menu on the top-right corner
- Visit the Help submenu and click About Google Chrome. Alternatively, you can visit the
chrome://settings/helpaddress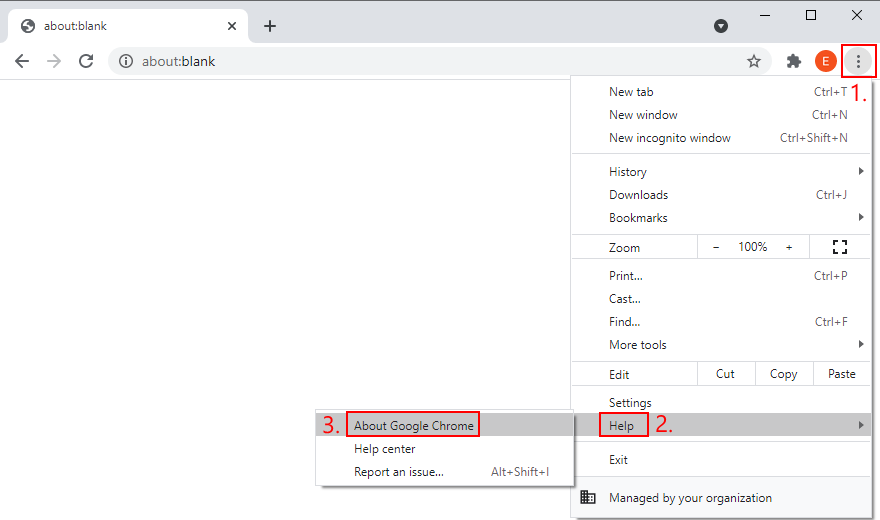
- Wait until Chrome downloads and installs any available updates
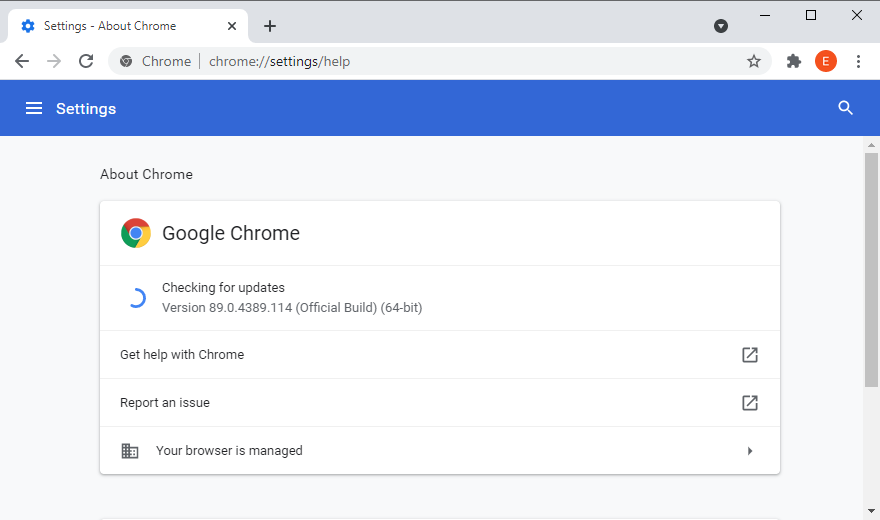
- Click Relaunch and try to watch YouTube
How to update Mozilla Firefox:
- Open the ≡ hamburger menu on the upper-right corner
- Select the Help section and click About Firefox
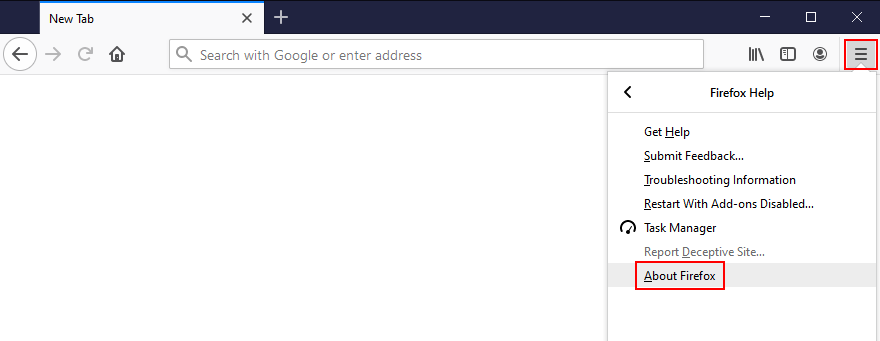
- If Firefox finds any updates, give it time to install them
- When it’s over, restart the web browser and check for audio issues
How to update Microsoft Edge:
- Click the More button on the top-right corner
- Go to the Help & feedback menu and click About Microsoft Edge
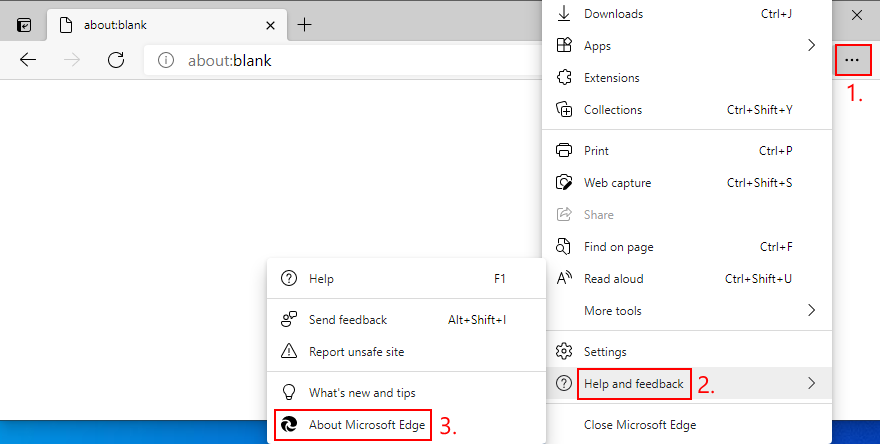
- Else, you can go to the
edge://settings/helpaddress - Wait until Edge finds and installs any updates
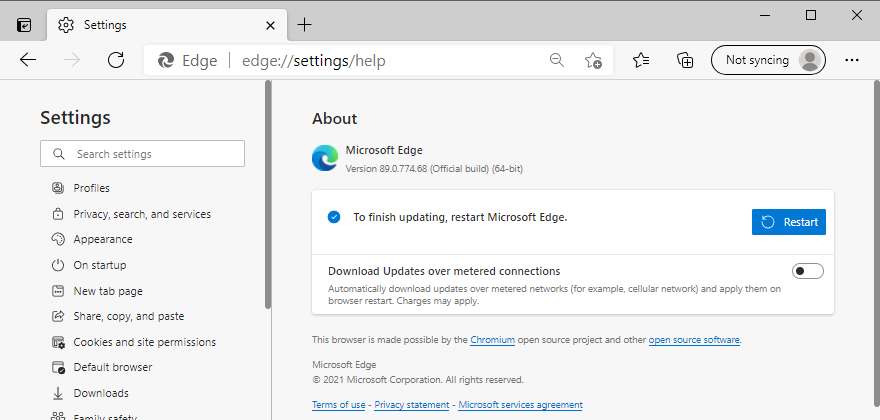
- Restart the browser and inspect results
14. Disable hardware acceleration
Modern web browsers take advantage of your computer’s hardware acceleration to improve the page loading speed and enhance your overall browsing experience. However, users report that it has interfered with the audio driver, causing rendering errors. To fix this issue, you have to turn off hardware acceleration for each browser.
How to disable hardware acceleration in Google Chrome:
- Open the More button and go to Settings

- Scroll down to the bottom of the page and click Advanced
- At System, turn off Use hardware acceleration when available

- Relaunch Chrome and check for audio errors
How to disable hardware acceleration in Mozilla Firefox:
- Click the ≡ hamburger button and go to Options (or visit the
about:preferencesaddress)
- In the General tab, scroll down to Performance
- Uncheck Use recommended performance settings
- Also uncheck Use hardware acceleration when available
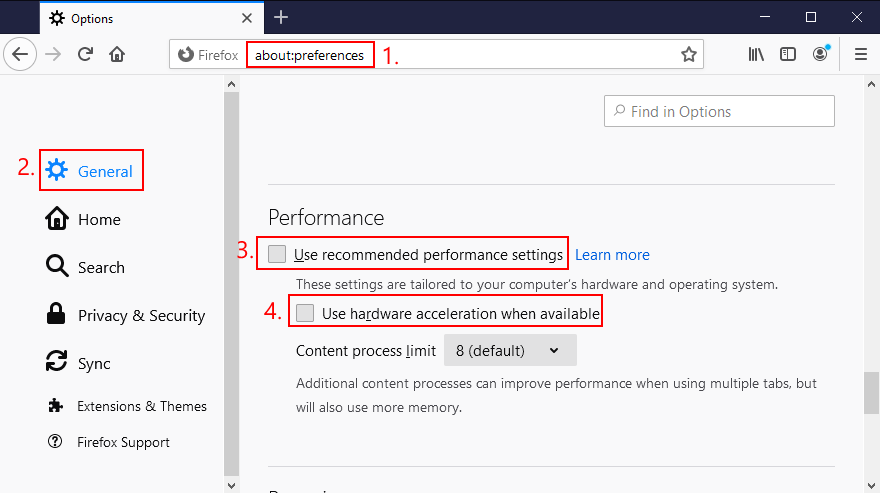
- Restart Firefox and check for audio errors
How to disable hardware acceleration in Microsoft Edge:
- Open the More menu and head over to Settings

- Jump to the System section on the left side (or visit
edge://settings/system) - Turn off Use hardware acceleration when available
- Click the Restart button

- Watch YouTube and check for audio errors
15. Disable your ad blocker
Many YouTube users who have encountered the audio renderer error said that they managed to fix this problem by deactivating the ad blocker built into the web browser. Otherwise, you should whitelist YouTube to make sure that video ads are permitted.
For example, if you’re using Adblock Plus, here’s how you can whitelist YouTube:
- Go to the Adblock Plus settings panel
- Jump to the Whitelisted websites area
- Type
youtube.comand click Add website
- Go to YouTube and check for audio rendering issues
16. Try using a different web browser
An unforeseen number of browser settings can interfere with multimedia features, so it’s a good idea to change your web browser. Switch to an application that has default settings. You can import your bookmarks and other website data, but make sure to leave the browser configuration untouched.
Then, head over to YouTube or the platform that throws the audio renderer error to test it out. If it works, you can stick to the new browser for audio and use your preferred application for everything else.
17. Update Windows 10
It’s essential to keep Windows 10 updated to the latest edition so that you can take advantage of the newest features, hotfixes, and security patches. If there’s a known problem with the audio, it will likely get fixed in the upcoming system update.
How to run Windows Update:
- Press the Win key, type Check for updates, and press Enter
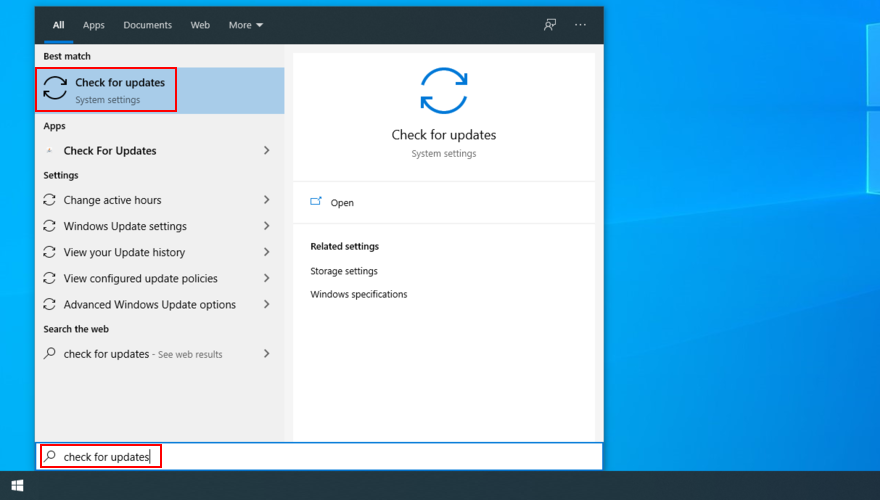
- Click Check for updates and wait

- If it finds any updates, click Download
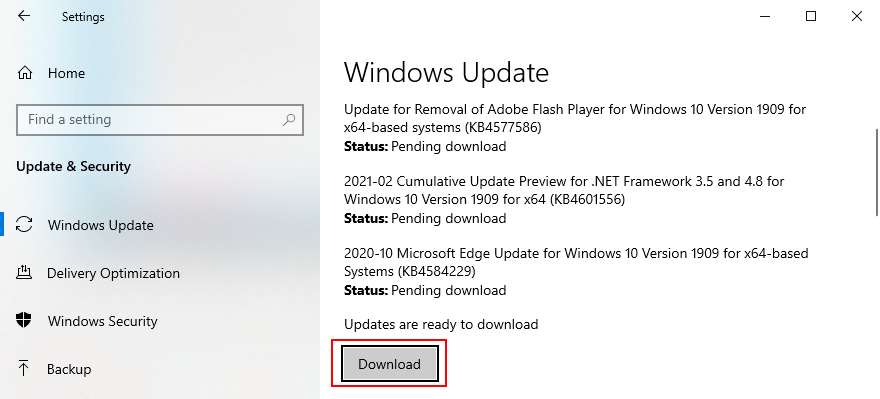
- Leave your PC unattended while it’s busy with updates. It might restart several times
- Check for audio rendering issues
18. Uninstall system updates
On the other hand, a recent Windows update may have compromised your entire operating system, causing various problems like the audio renderer error. When this happens, you have to uninstall the malfunctioning update. Here’s how:
- Press the Win key, type control panel, and hit Enter
- Go to Programs and Features
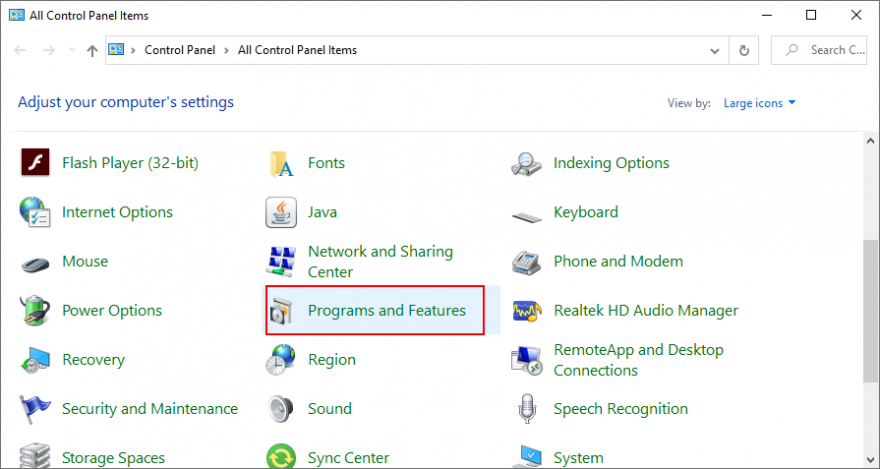
- Click View installed updates on the left side

- Click the Installed On column to sort the updates (newest first)
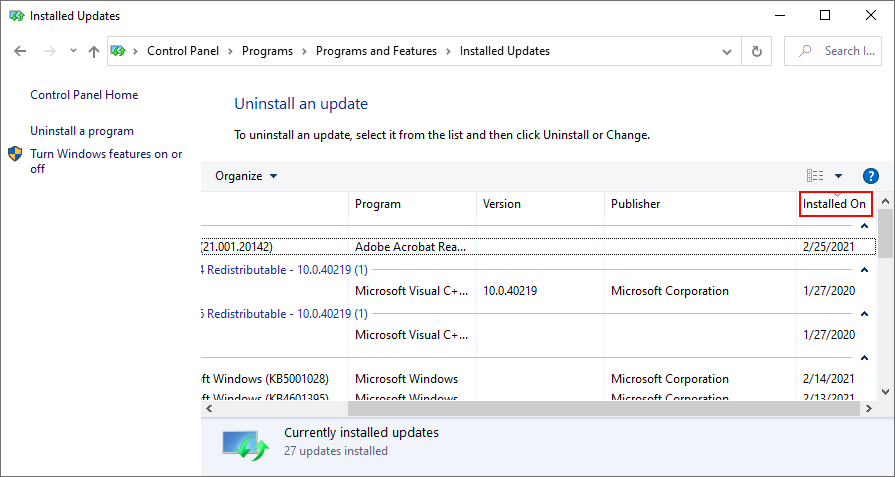
- Right-click the first update in the list and select Uninstall
- Click Yes to confirm
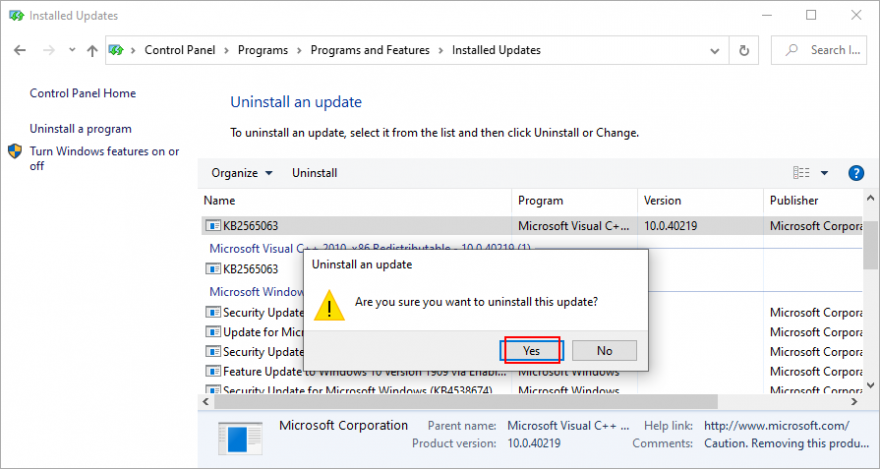
- Restart your PC and check for audio errors
19. Sign in with a different PC account
Windows 10 sometimes experiences issues due a lack of permissions caused by your account. To solve this problem, you can try signing in with a different profile. For example, if you’re currently logged in with the Microsoft account, switch to a local user account (or the other way around).
How to sign in with a Microsoft account:
- Right-click the Start button and select Settings
- Go to Accounts
- Click Login to your Microsoft account
- Enter your email address and password
- Click Verify to confirm your identity
- Log out of Windows 10
- Log back in using the Microsoft account
- Check for audio renderer errors
How to create a local user account:
- Right-click the Start button and go to Settings

- Select Accounts

- Click Sign in with a local account instead
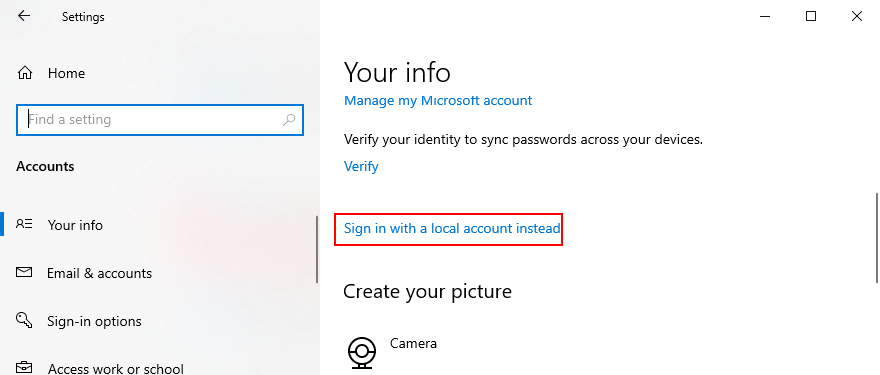
- Specify your computer password or PIN
- At Enter your local account info, set a new username and password
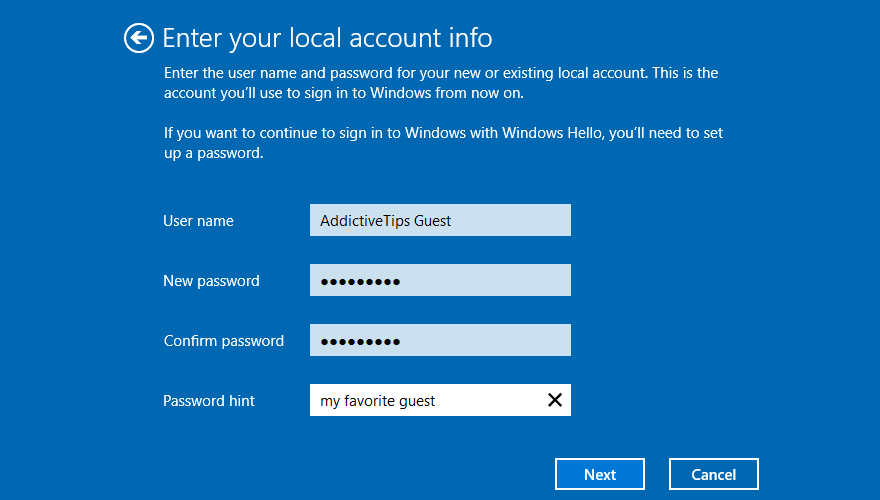
- Click Next and then Sign out and finish
- Log back in to Windows 10 using the new local account
- Check for audio issues
20. Reset BIOS
DELL users have reported that they were experiencing the audio renderer error due to incorrect BIOS settings. And they were able to solve it by restoring BIOS to default settings. Here’s how you can easily do that:
- Restart your computer
- During reboot, rapidly press the key displayed on the screen to access BIOS
- Locate and access the advanced BIOS options
- Enable the setting that resets BIOS configuration data
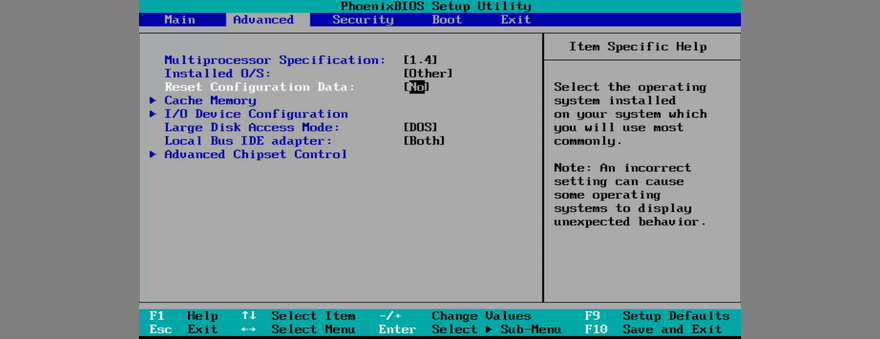
- Save the current BIOS settings and exit
- Wait until Windows boots, then check for audio issues
21. Update BIOS
Another way to deal with BIOS issues on DELL systems is by updating it to the latest version since an obsolete BIOS is known to cause system stability and even audio problems. Here’s how:
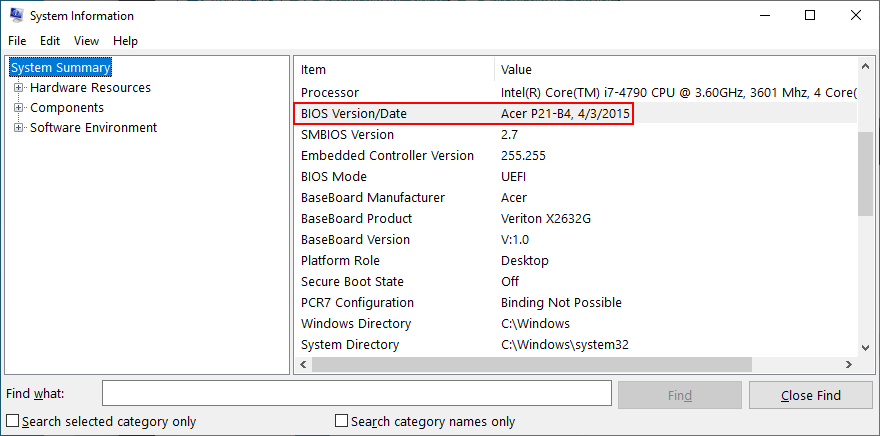
- Press the Win key, type System Information, and open this app
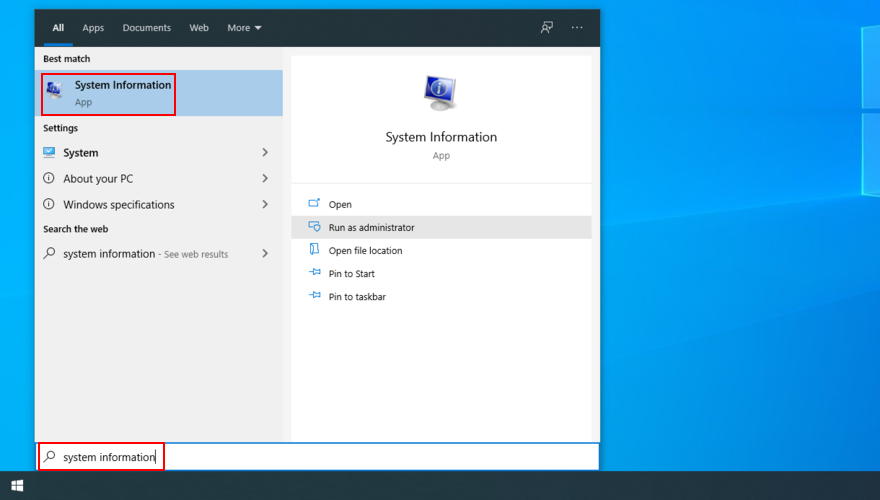
- Go to the System Summary section
- Write down the info displayed at BIOS Version/Date
- Go to the website of your BIOS manufacturer
- Find and download a newer BIOS version that’s compatible with your PC
- Unzip the BIOS setup file to a USB flash drive
- Restart your computer and access BIOS
- Back up the current BIOS version to the pen drive
- Start BIOS setup

- Don’t turn off or restart your PC during setup
- Boot Windows as normal and check for audio issues
22. Use System Restore
If the audio renderer error was caused by a software event that you can’t pinpoint, you can fix it by rolling back Windows 10 to a previous restore point. Here’s how to do its easily:
- Make sure you’re logged in to Windows 10 with admin rights
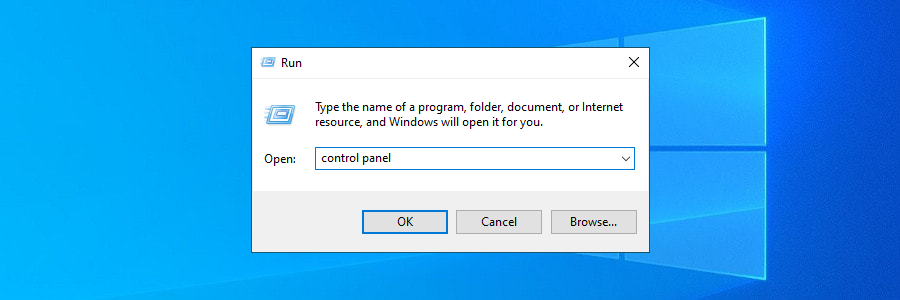
- Press Win key + R, type control panel, and press Enter
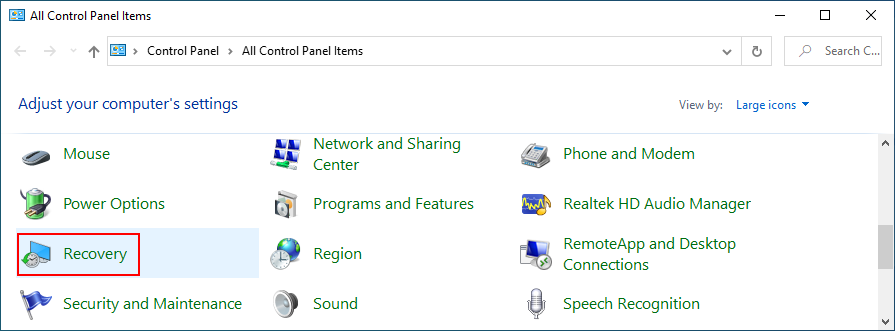
- Go to the Recovery area
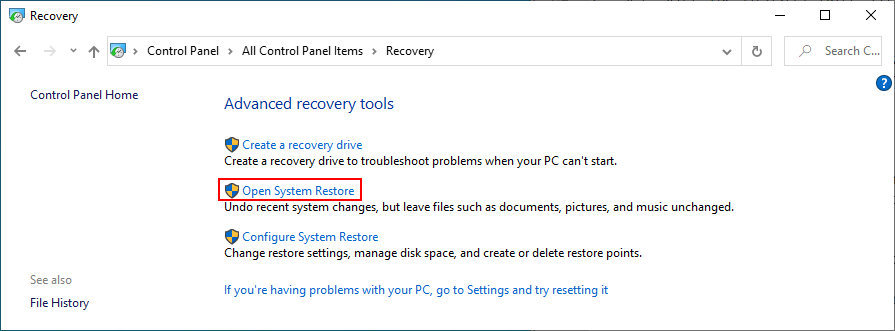
- Click Open System Restore
- Select a system restore point from the list

- Click Next and follow the on-screen instructions
- Restart your PC and check for audio issues
The Audio renderer error can be fixed
To review, you can stumble upon the audio renderer error when trying to watch a video on YouTube, in your media player, or anywhere else. It’s caused by a hardware or software issue which you should be able to fix.
For instance, you can clear browser cache, run the audio troubleshooter, make sure the sound device is enabled and set as default, restart the Windows Audio service, synchronize the sample rate for ASIO drivers, as well as run audio tests on HP laptops.
It’s also a good idea to reinstall the audio adapter, update the audio driver or roll back to a compatible version, check the cables and remove extra peripheral devices, disable any audio mixing software, update your web browser, as well as disable hardware acceleration.
Furthermore, you can turn off your ad blocker, try using a different browser, update Windows 10 or uninstall unstable system updates, sign in to Windows 10 using a different account, reset BIOS and update it to the latest version, as well as roll back Windows 10 using System Restore mode.
How did you manage to finally get rid of the audio renderer error? Did we miss any essential steps? Let us know in the comment area below.
