เมื่อต้องทำงานจากที่บ้านมีบางสิ่งที่แย่ไปกว่าการไปประชุมล่าช้าเนื่องจากเว็บแคมล้มเหลว ผู้ใช้ประเภทอื่น ๆ ก็ได้รับผลกระทบจาก กล้องที่ทำงานผิดพลาด เช่นเกมเมอร์
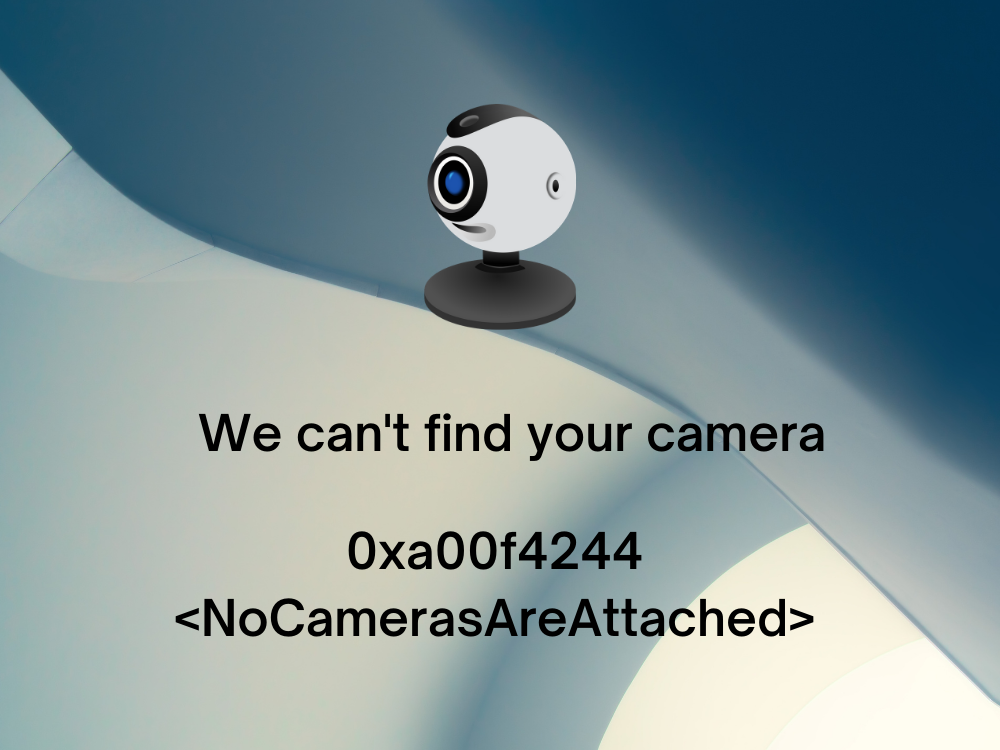
0xa00f4244 NoCamerasAreAttached เป็นข้อความแสดงข้อผิดพลาดทั่วไปที่แสดงบนหน้าจอของผู้ใช้ Windows 10 เมื่อพยายามเปิดแอปกล้องถ่ายรูป หน้าจอเว็บแคมเปลี่ยนเป็นสีดำ และแสดงข้อความสีขาวเช่น ในภาพด้านล่าง
เราไม่พบกล้องของคุณ
มักเกิดขึ้นกับแล็ปท็อปหรือจอภาพที่มีเว็บแคมในตัว แต่ข้อผิดพลาดอาจเกิดขึ้นกับอะแดปเตอร์เว็บแคมภายนอกได้เช่นกัน ไม่ต้องกังวลเพราะคุณควรจัดการเรื่องนี้ได้โดยไม่ต้องติดต่อผู้เชี่ยวชาญ โดยทั่วไปแล้วจะเป็นการแก้ไขง่ายๆที่ไม่เคยคิดเลยเช่นการกดคีย์ผสมที่เปิดใช้เว็บแคม
การแก้ไข: 0xa00f4244 NoCamerasAreAttached
ก่อนที่จะพยายามซ่อมแซมรหัสข้อผิดพลาด NoCamerasAreAttached 0xa00f4244 บนคอมพิวเตอร์ของคุณคุณควร สร้างจุดคืนค่าระบบ โซลูชันสุดท้ายในรายการนี้เป็นขั้นสูงและทำการเปลี่ยนแปลงที่สำคัญกับคอมพิวเตอร์ของคุณ ในกรณีที่เกิดข้อผิดพลาดคุณสามารถย้อนกลับ Windows 10 ไปยังจุดคืนค่าที่เสถียรได้เสมอแล้วลองอีกครั้ง
แม้ว่าการแก้ไขด้านล่างจะได้รับการปรับแต่งสำหรับแอปกล้องถ่ายรูป แต่ก็สามารถนำไปใช้กับแอปอื่น ๆ ได้เช่นกัน (ตัวอย่างเช่นหาก เว็บแคมไม่ทำงานบน Skype )
1. เรียกใช้ Windows Update
เนื่องจากแอป Camera มีข้อผิดพลาด 0xa00f4244 NoCamerasAreAttached และเนื่องจากแอป Camera ทำงานร่วมกับ Windows คุณควรตรวจสอบการอัปเดตระบบและดาวน์โหลดการอัปเดตที่มี วิธีทำให้เกิดขึ้นได้อย่างง่ายดายมีดังนี้:
- กดปุ่ม Win พิมพ์ ตรวจหาการอัปเดต และกด Enter
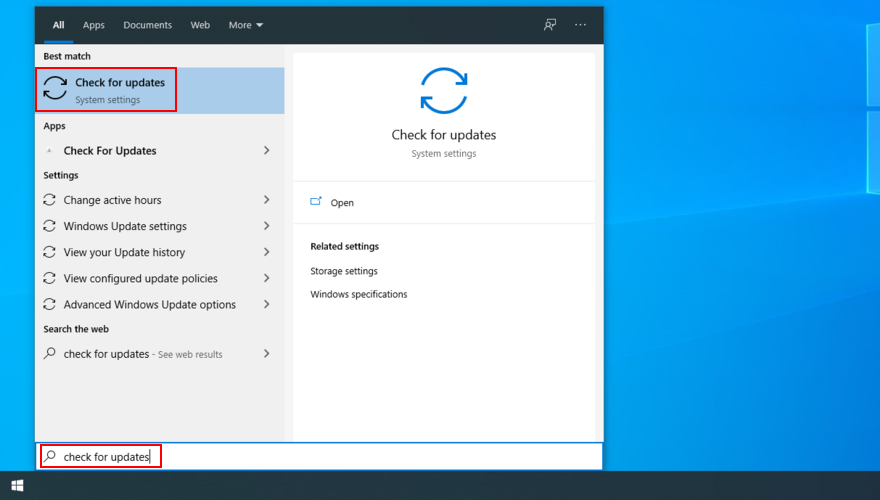
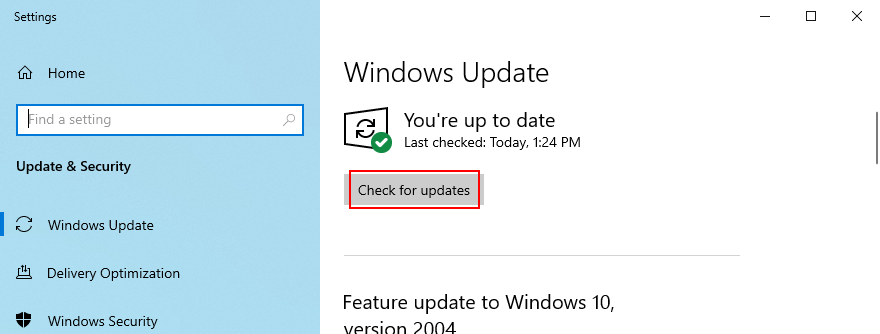
- คลิก ตรวจหาการอัปเดต และรอจนกว่าการค้นหาออนไลน์จะเสร็จสมบูรณ์
- หากมีข้อมูลใด ๆ ให้คลิก ดาวน์โหลด
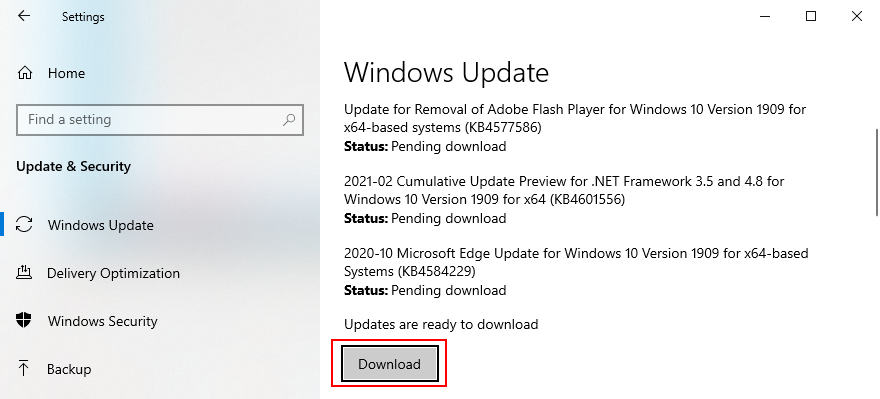
- อย่าปิดหรือรีสตาร์ทพีซีของคุณในระหว่างการอัปเดต
- เมื่อเสร็จแล้วให้เปิดแอปกล้องถ่ายรูปและตรวจสอบข้อผิดพลาด
2. ตรวจสอบฝาปิดเว็บแคมสายเคเบิลและสวิตช์
แล็ปท็อปและจอภาพบางรุ่นที่มีเว็บแคมในตัวจะมีฝาปิดหรือปุ่มต่างๆที่คุณต้องกดหรือดึงเพื่อสลับเว็บแคม เป็นมาตรการรักษาความปลอดภัยจากผู้ลักลอบใช้เว็บแคม ตัวอย่างเช่นแล็ปท็อป MSI ต้องการให้คุณกด FN + F6 เพื่อสลับเว็บแคม ในขณะเดียวกันระบบ ASUS ทำงานร่วมกับ F10
เนื่องจากข้อความแสดงข้อผิดพลาด 0xa00f4244 NoCamerasAreAttached ระบุอย่างชัดเจนว่า Windows มีปัญหาในการระบุเว็บแคมของคุณโปรดกดปุ่มหรือพลิกสวิตช์เพื่อเปิดเว็บแคมอีกครั้ง
ในบางกรณีจำเป็นต้องเชื่อมต่อจอภาพของคุณกับหน่วยคอมพิวเตอร์โดยใช้สายเคเบิลพิเศษสำหรับเว็บแคมแม้ว่าอุปกรณ์จะติดตั้งอยู่ในจอแสดงผลก็ตาม ตรวจสอบสายเคเบิลของเคสเว็บแคมและเสียบเข้าไป
หากติดตั้งสายเคเบิลแล้วให้ลองถอดและใส่กลับเข้าไปใหม่ คุณยังสามารถลองใช้พอร์ต USB อื่นได้ในกรณีที่พอร์ตดั้งเดิมทำงานผิดปกติ
3. ตรวจสอบสิทธิ์ของเว็บแคม
อุปกรณ์และแอปของคุณต้องการการเข้าถึงเว็บแคม ตัวอย่างเช่น Microsoft Teams ไม่สามารถทำงานกับเว็บแคมได้ โดยไม่ได้รับอนุญาตจากคุณ มิฉะนั้นคุณจะยังคงเห็น NoCamerasAreAttached 0xa00f4244 บนหน้าจอของคุณ โดยเฉพาะอย่างยิ่งสำหรับผู้ใช้ที่เพิ่งผ่านการอัปเดต Windows ครั้งใหญ่หรือผู้ที่รีเฟรชระบบปฏิบัติการ
- ลงชื่อเข้าใช้ Windows 10 ด้วยสิทธิ์ของผู้ดูแลระบบ
- คลิกขวาที่ปุ่ม เริ่ม และไปที่ การตั้งค่า
- เลือก ความเป็นส่วนตัว
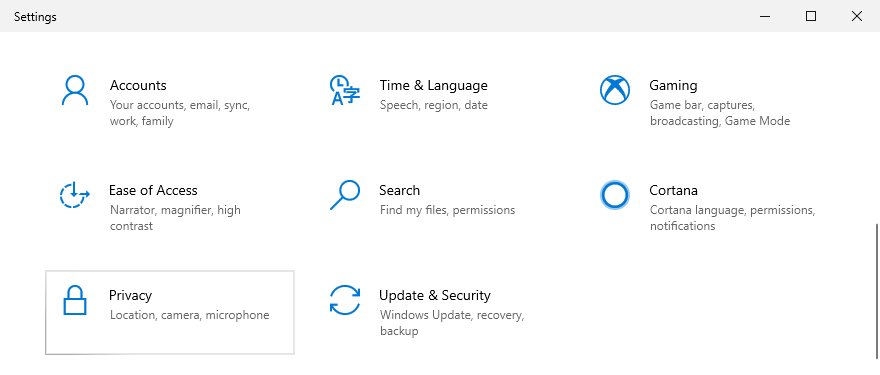
- ที่สิทธิ์ของแอปทางด้านซ้ายให้เลือก กล้อง
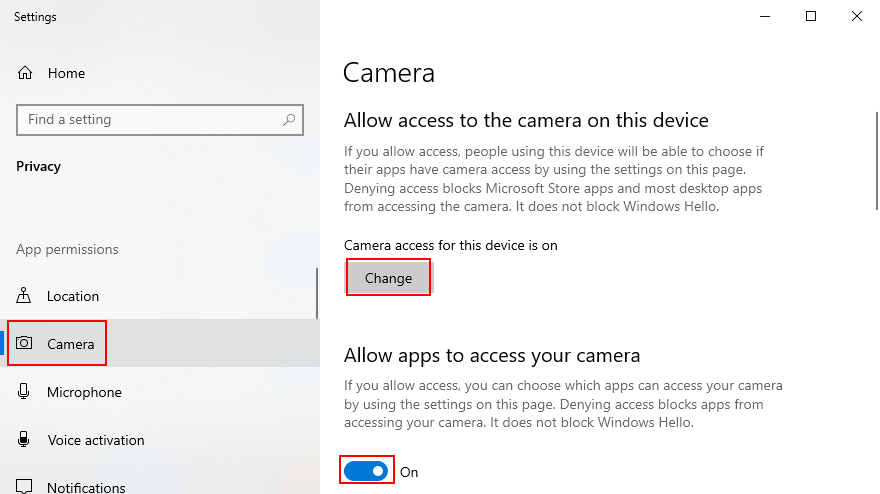
- คลิก เปลี่ยน และตรวจสอบให้แน่ใจว่าได้เปิดใช้งาน การเข้าถึงกล้องสำหรับอุปกรณ์นี้ แล้ว คุณยังสามารถอนุญาตให้เข้าถึงกล้องไปยังแอพอื่น ๆ เช่น Skype
- เปิดใช้งาน อนุญาตให้แอปเข้าถึงกล้องของคุณ
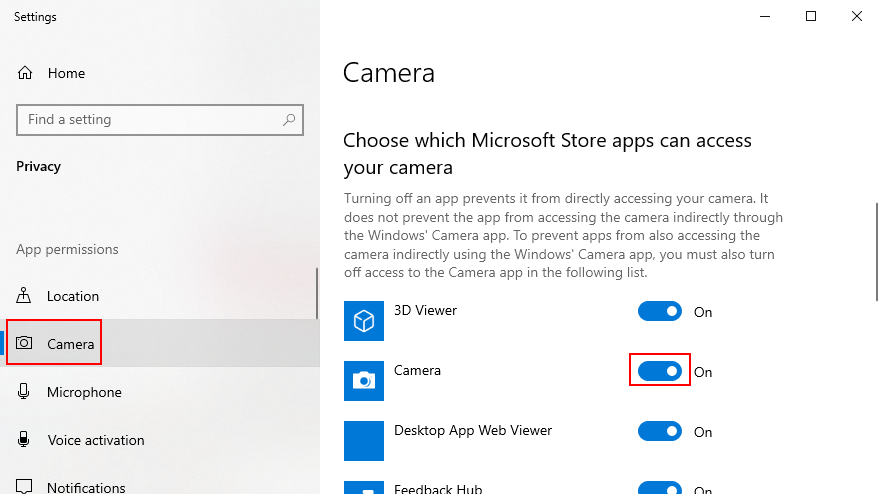
- ที่ เลือกแอป Microsoft Store ที่สามารถเข้าถึงกล้องของคุณได้ ให้ตั้งค่า กล้องถ่ายรูป เป็น เปิด
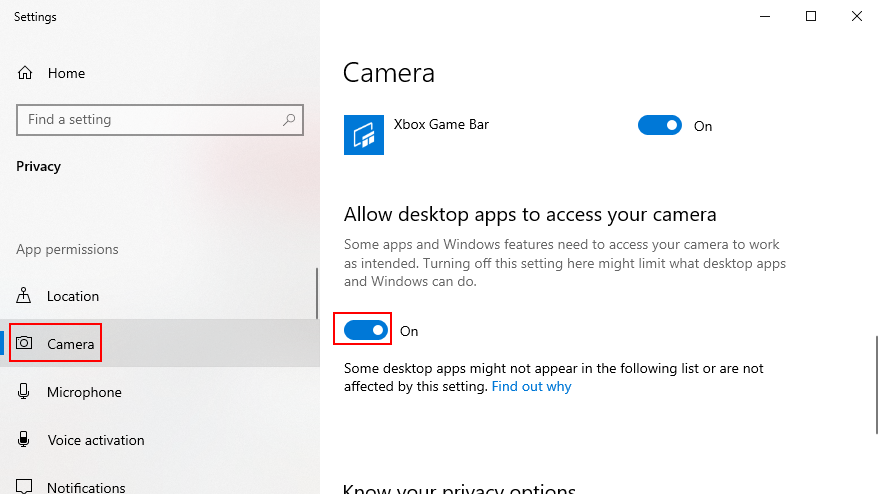
- เลื่อนลงไปที่ อนุญาตให้แอปเดสก์ท็อปเข้าถึงกล้องของคุณ และตั้งค่าเป็น เปิด
4. ตรวจสอบความเข้ากันได้ของเว็บแคม
หากคุณซื้อหรือรับเว็บแคมเมื่อนานมาแล้วอาจเป็นไปได้ว่า Windows 10 ไม่รองรับฮาร์ดแวร์ในกรณีนี้คุณไม่ต้องทำอะไรนอกจากซื้อเว็บแคมใหม่ มีเคล็ดลับง่ายๆในการค้นพบสิ่งนี้อย่างรวดเร็วนั่นคือการค้นหาไฟล์ชื่อ stream.sys สิ่งที่คุณควรทำมีดังนี้:
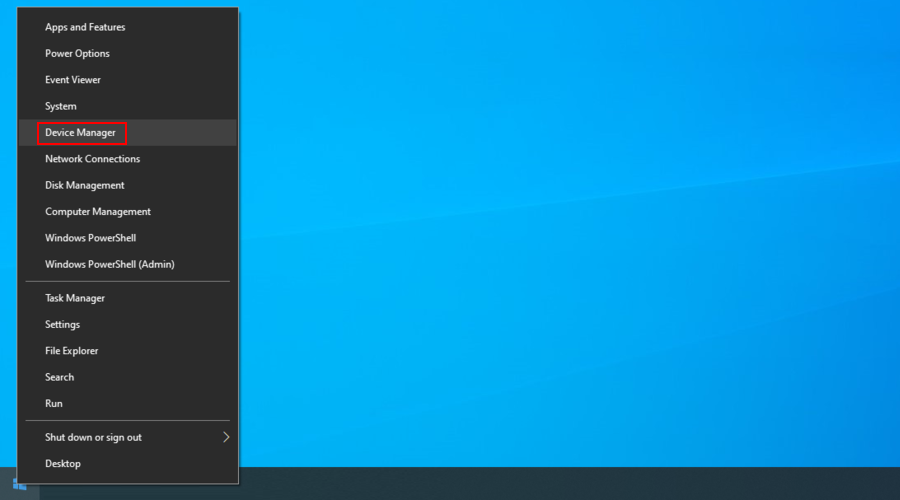
- คลิกขวาที่ปุ่ม เริ่ม และเลือก ตัวจัดการอุปกรณ์
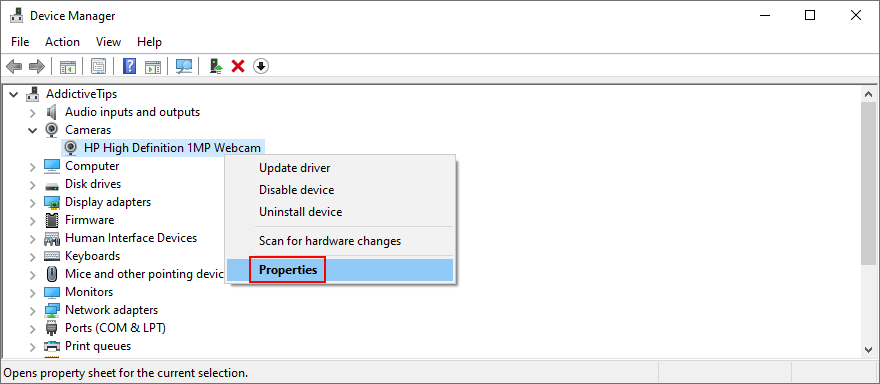
- ขยายหมวดหมู่ กล้องถ่ายรูป เพื่อค้นหาเว็บแคมของคุณ
- คลิกขวาที่อุปกรณ์เว็บแคมและเลือก คุณสมบัติ
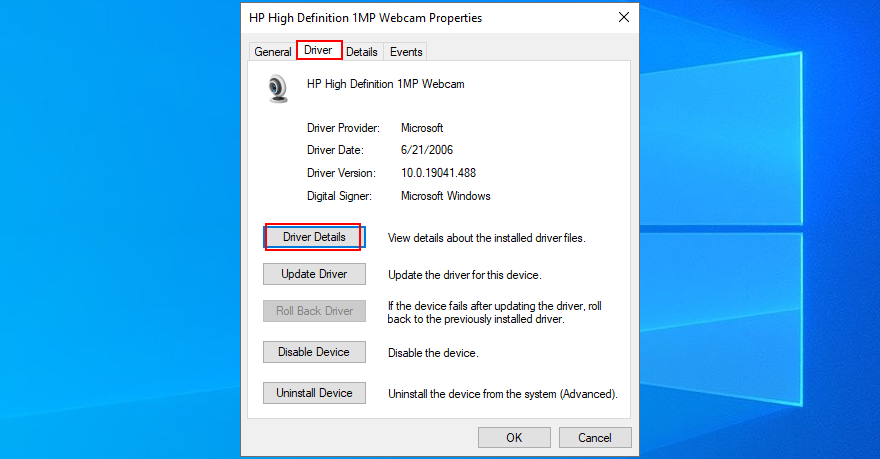
- สลับไปที่แท็บ ไดรเวอร์ แล้วคลิก รายละเอียดไดรเวอร์
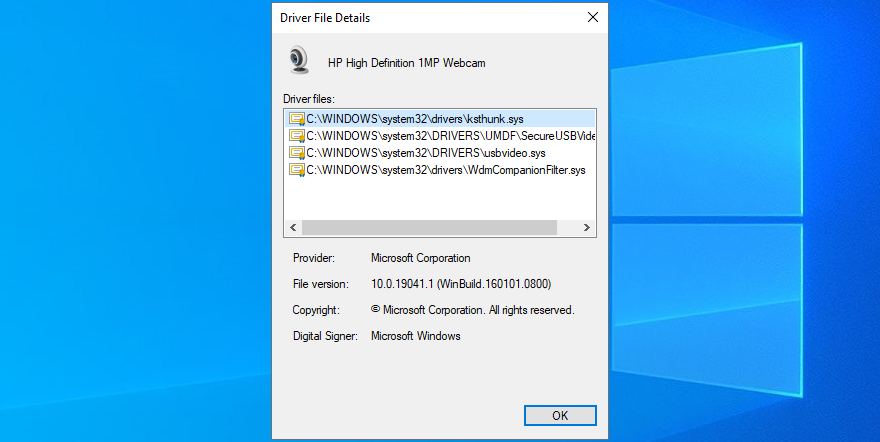
- ในรายการไฟล์ให้มองหา stream.sys หากคุณพบแสดงว่าเว็บแคมไม่ได้รับการสนับสนุนจาก Windows 7 และเวอร์ชันที่ใหม่กว่าดังนั้นคุณต้องเปลี่ยนเว็บแคมใหม่ ไม่เช่นนั้นคุณควรไปที่
หากคุณ ไม่พบเว็บแคมของคุณ ในตัวจัดการอุปกรณ์ ดูวิธีแก้ไขปัญหานี้
5. ตรวจสอบไดรเวอร์เว็บแคม
ในข้อความแสดงข้อผิดพลาด: คุณควรตรวจสอบไดรเวอร์เว็บแคมของคุณเพื่อให้แน่ใจว่าทุกอย่างทำงานเป็นปกติ มีสามวิธีในการนี้: การติดตั้งอุปกรณ์ใหม่การอัปเดตไดรเวอร์หรือการย้อนกลับไดรเวอร์
วิธีติดตั้งอุปกรณ์เว็บแคมใหม่:
- คลิกขวาที่ปุ่ม เริ่ม และไปที่ ตัวจัดการอุปกรณ์

- มองหาเว็บแคมของคุณในกลุ่ม กล้องถ่ายรูป
- คลิกขวาที่รายการเว็บแคมและเลือก ถอนการติดตั้งอุปกรณ์
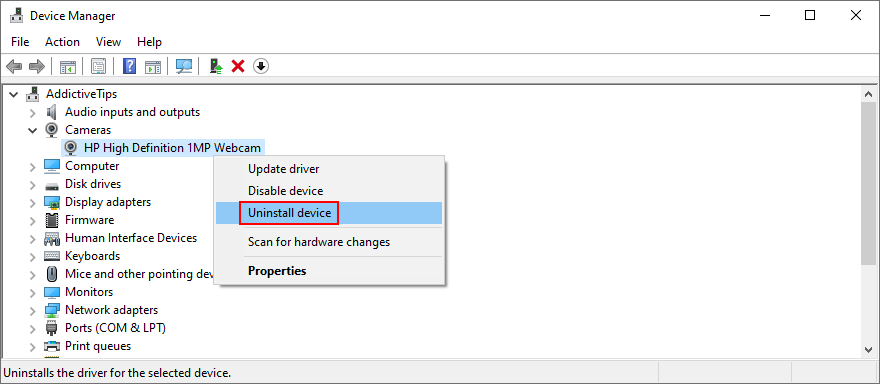
- ดำเนินการลบอุปกรณ์
- คลิกขวาที่รายการใดก็ได้แล้วเลือก สแกนหาการเปลี่ยนแปลงฮาร์ดแวร์
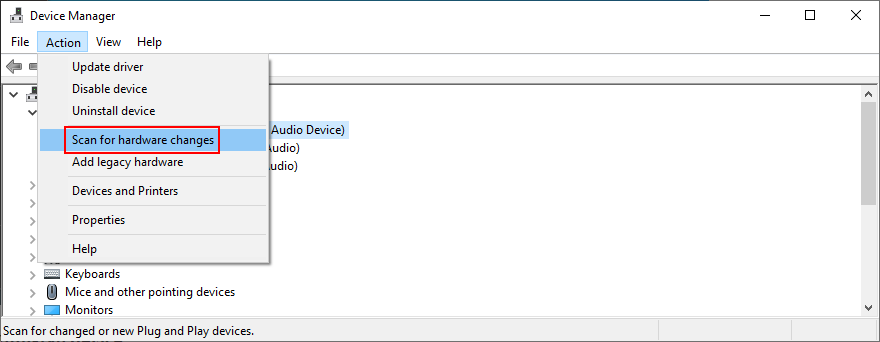
- รีสตาร์ทคอมพิวเตอร์ของคุณ Windows จะติดตั้งอะแดปเตอร์เว็บแคมใหม่โดยอัตโนมัติ
- เปิดแอปกล้องถ่ายรูปและตรวจสอบข้อผิดพลาด
วิธีอัปเดตไดรเวอร์กล้องของคุณ:
- ใน ตัวจัดการอุปกรณ์ คลิกขวาที่เว็บแคมของคุณแล้วเลือก อัปเดตไดรเวอร์
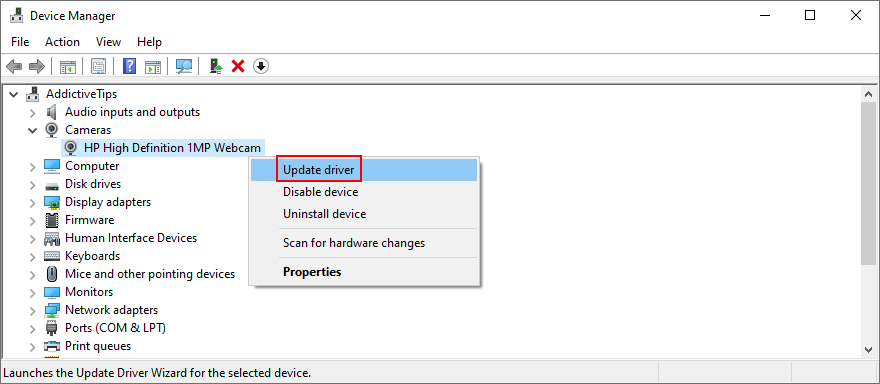
- คลิก ค้นหาไดรเวอร์โดยอัตโนมัติ และรอ

- หากการค้นหาออนไลน์ไม่ส่งคืนสิ่งใดให้คลิก ค้นหาไดรเวอร์ที่อัปเดตบน Windows Update
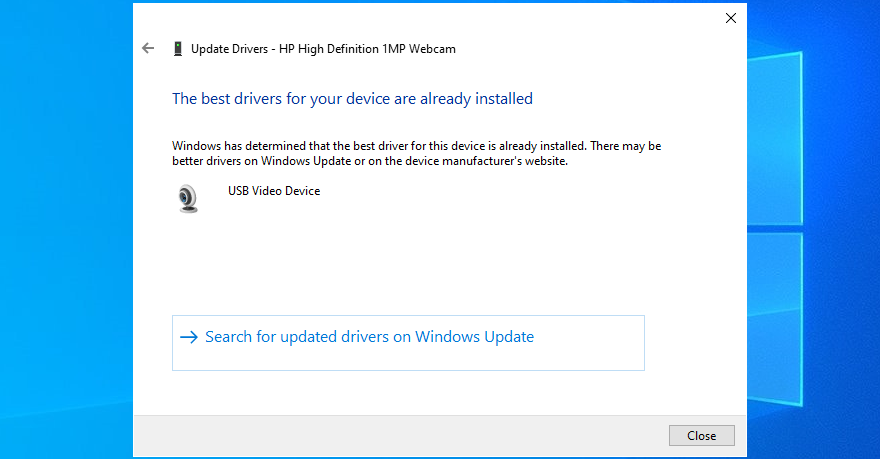
หาก Windows ไม่พบไดรเวอร์รุ่นใหม่สำหรับเว็บแคมของคุณให้ไปที่เว็บไซต์อย่างเป็นทางการเพื่อค้นหาและดาวน์โหลดเวอร์ชันที่ใหม่กว่า จากนั้นทำตามขั้นตอนด้านบนอีกครั้งและใช้ปุ่ม เรียกดูคอมพิวเตอร์เพื่อหาซอฟต์แวร์ไดรเวอร์ เพื่ออัปเดตไดรเวอร์เว็บแคมด้วยตนเอง
ในทางกลับกันหากคุณติดตั้งไดรเวอร์ที่เข้ากันไม่ได้โดยบังเอิญคุณต้องทำการย้อนกลับ
วิธีย้อนกลับไดรเวอร์เว็บแคมของคุณ:
- ไปที่ ตัวจัดการอุปกรณ์

- คลิกขวาที่เว็บแคมของคุณแล้วเลือก คุณสมบัติ

- เปลี่ยนไปที่แท็บ ไดรเวอร์
- คลิก ย้อนกลับไดรเวอร์ และปฏิบัติตามคำแนะนำ
- หากปุ่ม ย้อนกลับไดรเวอร์ เป็นสีเทาแสดงว่าคุณไม่สามารถทำการย้อนกลับได้ดังนั้นคุณสามารถข้ามขั้นตอนทั้งหมดนี้ได้
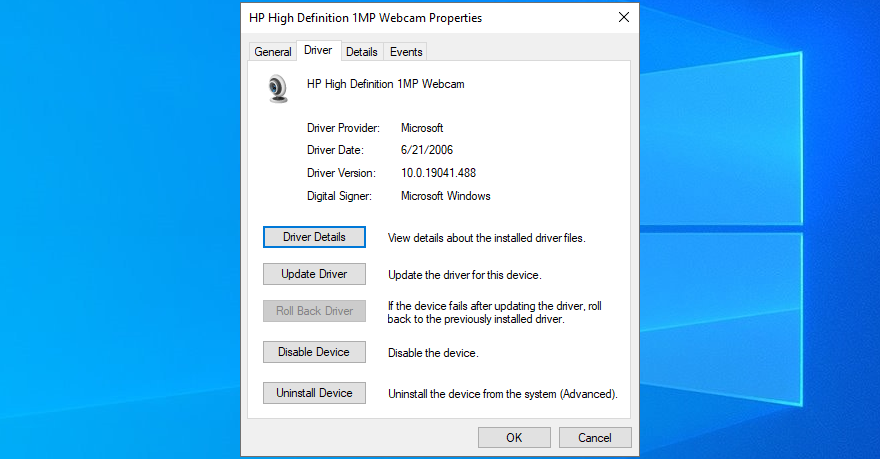
- รีสตาร์ทพีซีของคุณและเปิดแอปกล้องถ่ายรูปเพื่อตรวจสอบผลลัพธ์
6. สแกนคอมพิวเตอร์ของคุณเพื่อหามัลแวร์
คอมพิวเตอร์ของคุณอาจติดมัลแวร์เมื่อเร็ว ๆ นี้โดยไม่รู้ตัว ด้วยเหตุนี้เอเจนต์ที่เป็นอันตรายอาจปิดใช้งานกระบวนการและบริการที่สำคัญของระบบที่เกี่ยวข้องกับแอปกล้องถ่ายรูปและนั่นคือเหตุผลที่คุณยังคงเห็นข้อความแสดงข้อผิดพลาด 0xa00f4244 NoCamerasAreAttached
แต่คุณสามารถเรียกใช้การสแกนมัลแวร์และลบการติดไวรัสเพื่อกู้คืนการตั้งค่าคอมพิวเตอร์ได้ หากคุณไม่ได้ติดตั้งเครื่องมือป้องกันไวรัสของ บริษัท อื่นคุณสามารถใช้ Windows Defender ได้
วิธีเรียกใช้การสแกนมัลแวร์ด้วย Windows Defender:
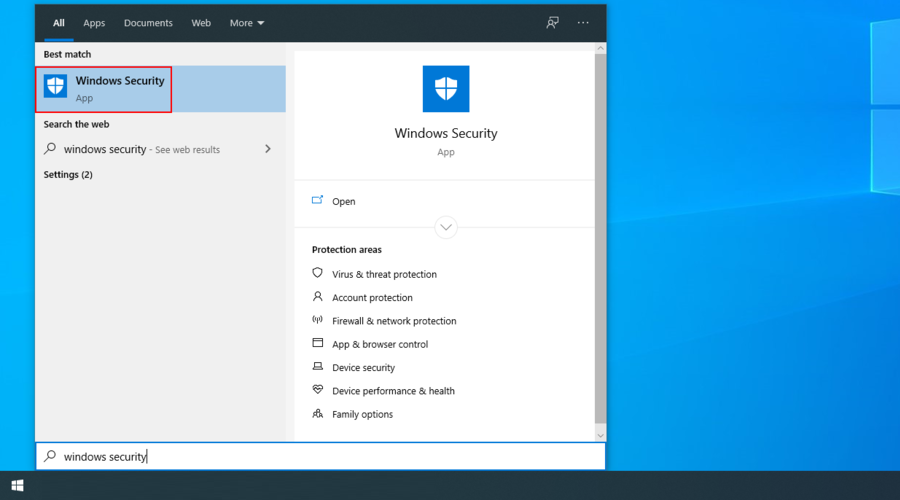
- คลิกปุ่ม เริ่ม พิมพ์ Windows Security แล้วกด Enter
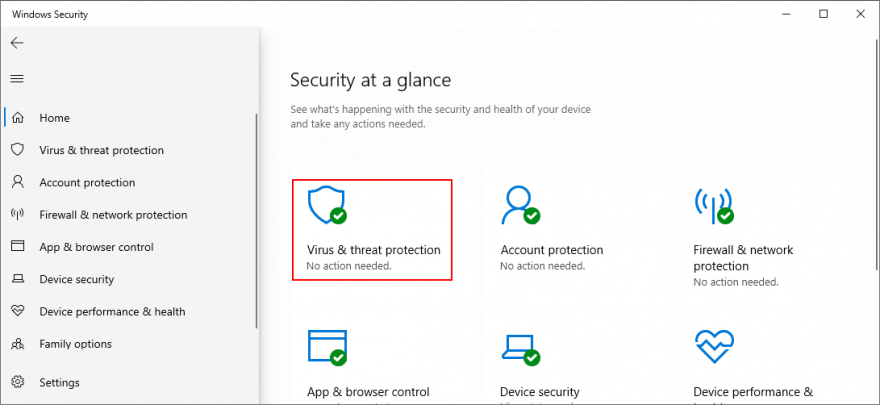
- เลือก การป้องกันไวรัสและภัยคุกคาม
- คลิก ตัวเลือกการสแกน
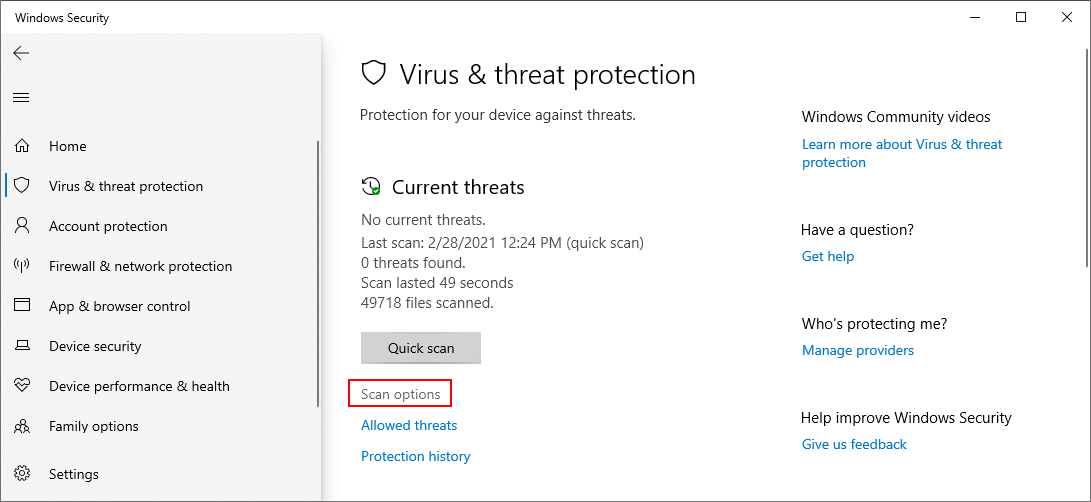
- เลือก สแกนด่วน แล้วคลิก สแกนเลย
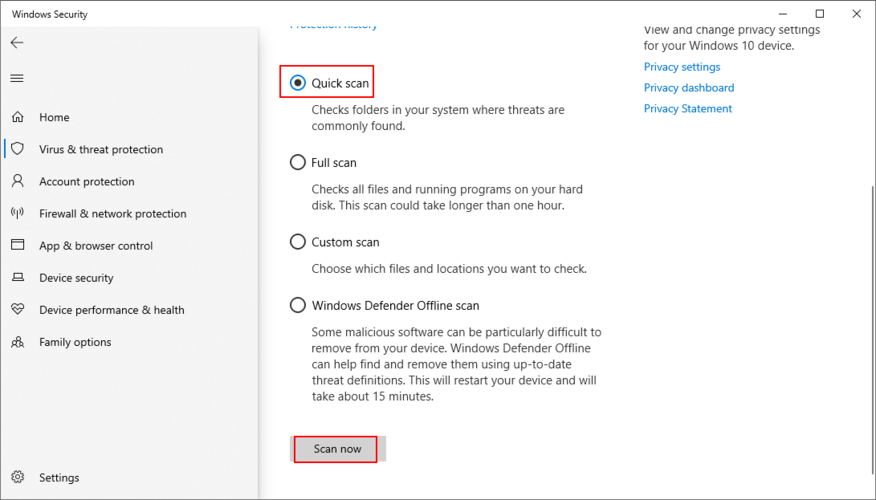
- หากผลการสแกนไม่พบสิ่งที่น่าสงสัยให้เรียกใช้การสแกนอีกครั้งโดยใช้โหมด Windows Defender Offline scan
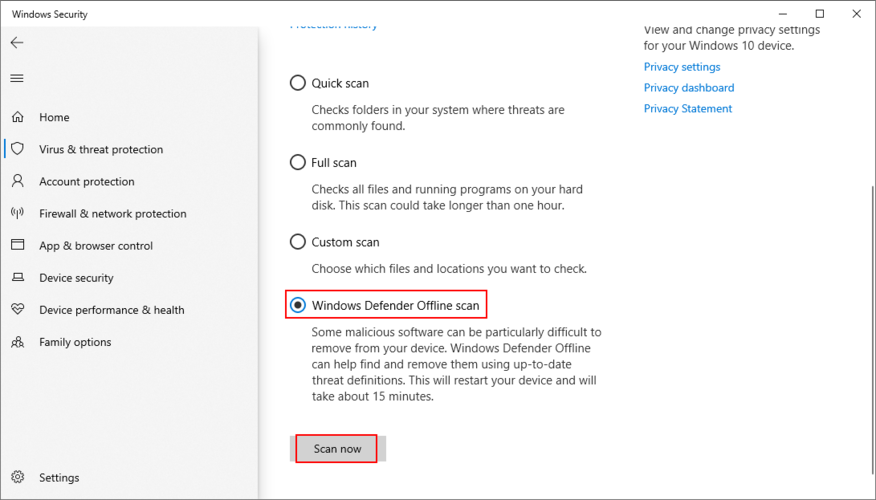
- รีบูตเครื่องคอมพิวเตอร์ของคุณ
- เปิดแอปกล้องถ่ายรูปและตรวจสอบข้อผิดพลาด
7. ตรวจสอบแอปพลิเคชันความปลอดภัยอินเทอร์เน็ตของคุณ
หากคุณมีโซลูชันการรักษาความปลอดภัยทางไซเบอร์ติดตั้งอยู่ในคอมพิวเตอร์ของคุณอาจมีคุณลักษณะพิเศษเฉพาะสำหรับการบล็อกการเข้าถึงเว็บแคมเพื่อป้องกันไม่ให้สายลับเฝ้าดูทุกการเคลื่อนไหวของคุณ
เนื่องจากแอปพลิเคชันลบล้างการตั้งค่าคอมพิวเตอร์ของคุณอาจเป็นสาเหตุที่ทำให้คุณได้รับรหัสข้อผิดพลาด NoCamerasAreAttached 0xa00f4244 ต่อไป
ในการแก้ไขปัญหานี้เพียงแค่ค้นหาคุณสมบัติเว็บแคมในโปรแกรมรักษาความปลอดภัยอินเทอร์เน็ตของคุณและปิดลงเพื่อให้เว็บแคมเข้าถึงแอปพลิเคชันทั้งหมดที่คุณติดตั้งไว้
8. ตรวจสอบสิทธิ์ของแอปกล้องถ่ายรูป
ในโซลูชันก่อนหน้านี้เราได้กล่าวว่าการตรวจสอบสิทธิ์ของเว็บแคมในการตั้งค่าความเป็นส่วนตัวของระบบปฏิบัติการของคุณมีความสำคัญเพียงใด อย่างไรก็ตามการตรวจสอบสิทธิ์ของแอปกล้องถ่ายรูปนั้นสำคัญไม่แพ้กันเพื่อให้แน่ใจว่าทุกอย่างทำงานได้ตามปกติ วิธีทำให้เกิดขึ้นดังต่อไปนี้:
- กดปุ่ม Win พิมพ์ กล้องถ่ายรูป และไปที่ การตั้งค่าแอป
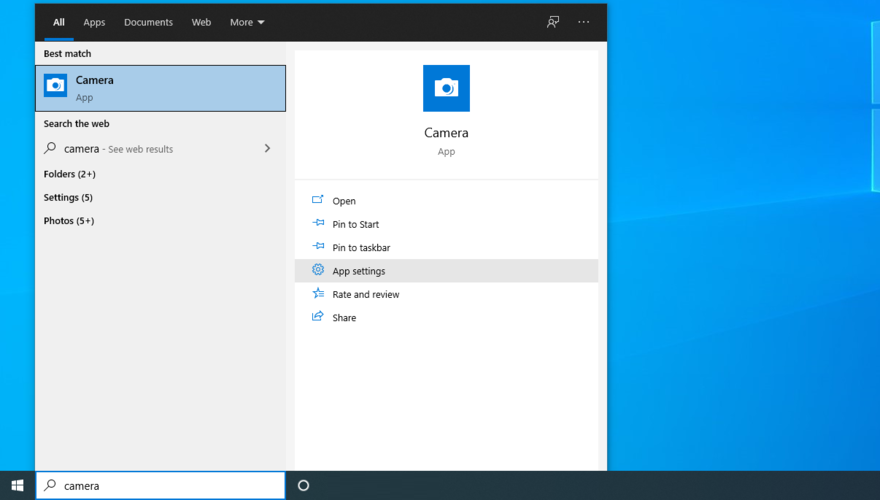
- At App permissions, enable Camera, Microphone, Videos, and Background apps
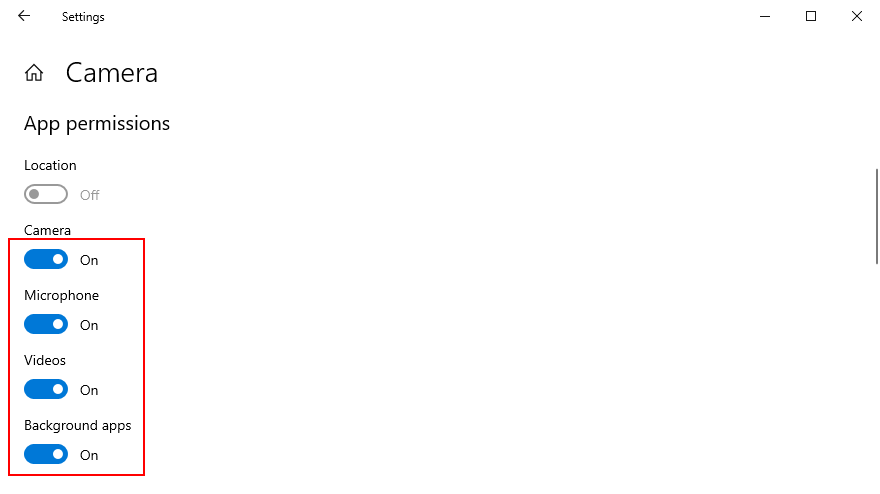
- Open the Camera app and check for errors
9. End any processes currently using your webcam
Windows Camera is just one app that requires webcam access, but there might be others currently running on your computer, such as Skype, Zoom, or Microsoft Teams. To avoid software conflicts, it’s a good idea to terminate all other processes besides the Camera app. Here’s how to do it easily:
- Right-click the taskbar and select Task Manager

- Locate all apps with camera access beside Camera
- Select each app and click Disable
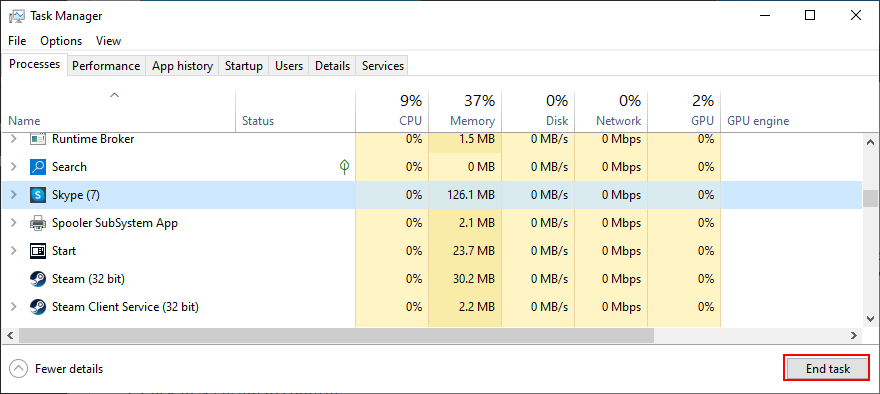
- Also, disable the Camera app
- Relaunch Windows Camera and check for errors
10. Reset the Camera app
If there’s something wrong with the Camera app that could trigger the 0xa00f4244 NoCamerasAreAttached error code, you can easily reset its settings from Microsoft Store. However, keep in mind that all app data will be deleted. Here’s what you have to do:
- Click the Start button, type Camera, and click App settings

- Scroll down and click the Reset button
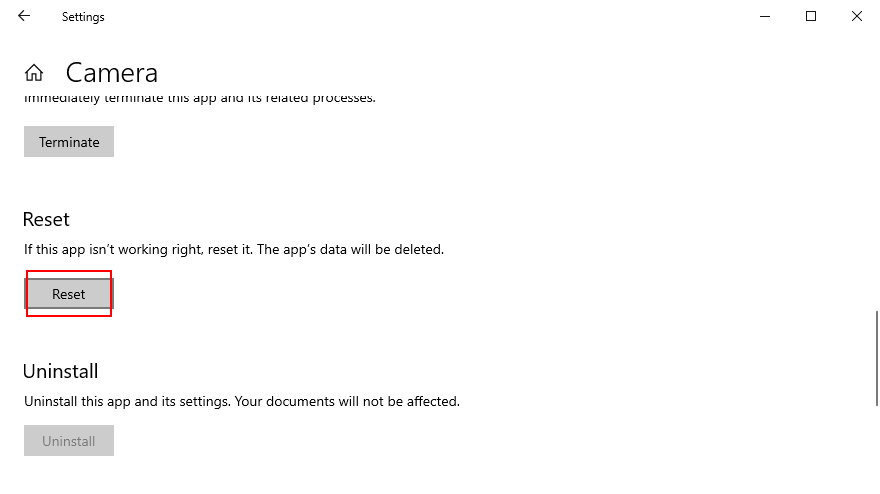
- Click Reset again to confirm
- Open the Camera app and check for errors
11. Reinstall the Camera app
The reset option sometimes fails to fix the 0xa00f4244 NoCamerasAreAttached error. A better but more complicated solution is to uninstall the Camera app and set it up again. To do this, you must first make sure that all its processes are properly closed.
How to terminate all Camera app processes:
- Press the Windows button, type Camera, and select App settings

- Scroll down and click Terminate
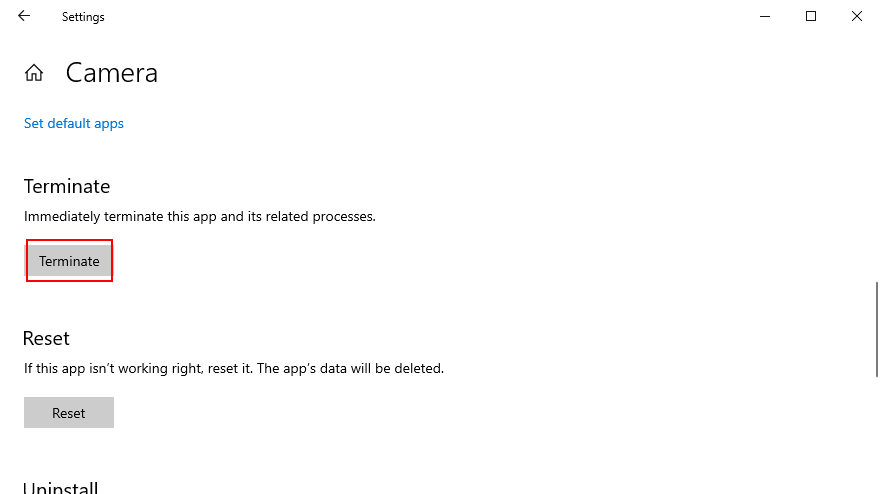
- Right-click the taskbar and go to Task Manager

- Look for the Camera process. If you can still find it here, select it and click End task
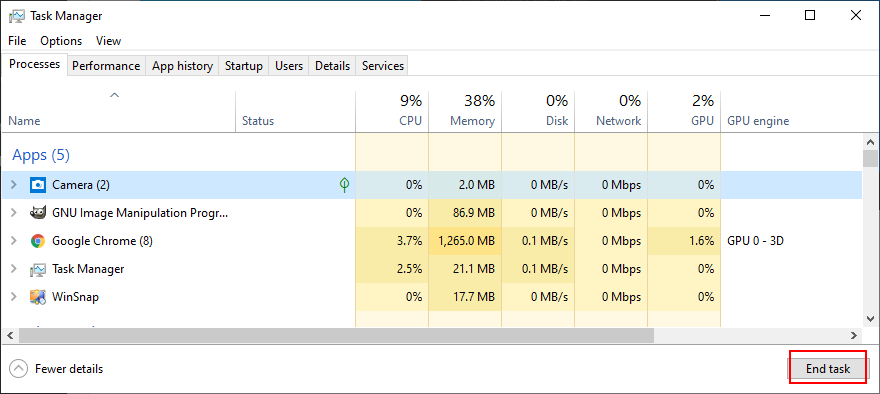
How to reinstall the Camera app using Apps and Features:
- คลิกขวาที่ปุ่ม เริ่ม และไปที่ แอปและคุณลักษณะ
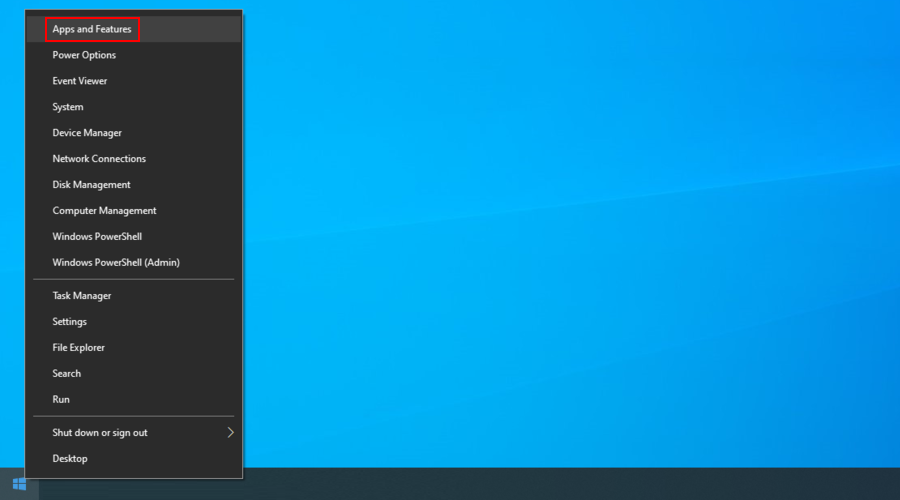
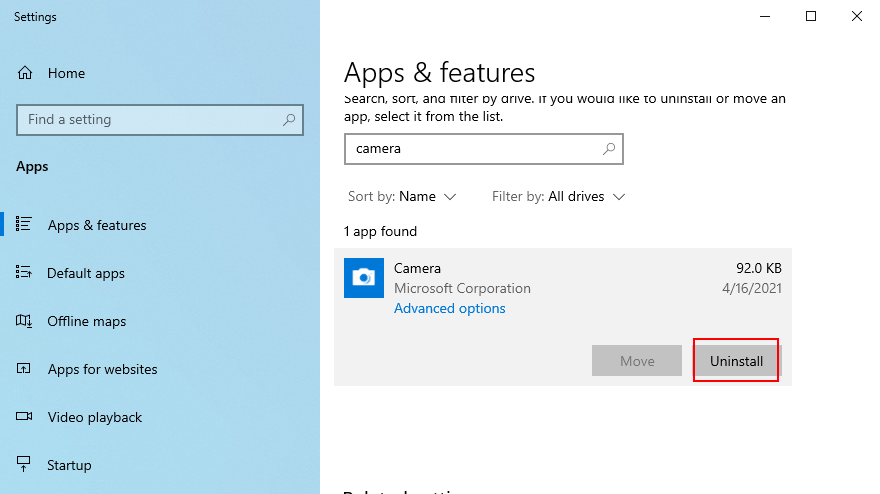
- Find and select Camera (by Microsoft Corporation)
- Click Uninstall and proceed with the app removal
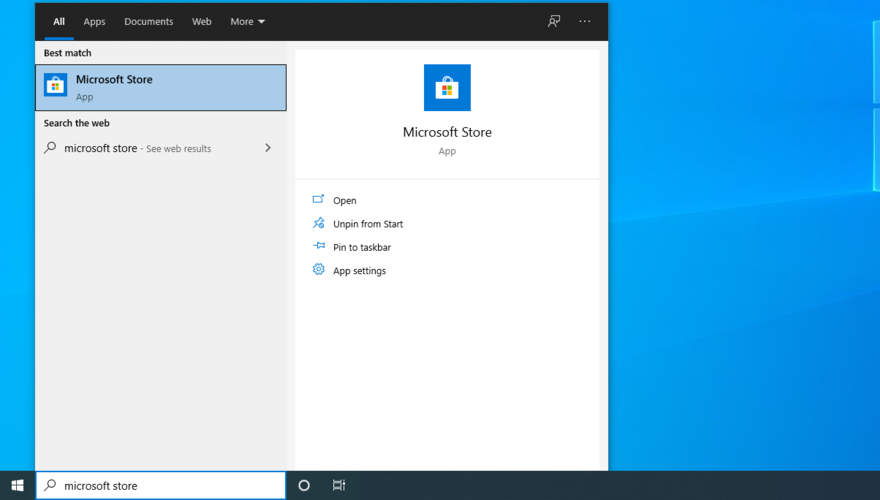
- Press the Win key, type Microsoft Store, and hit Enter
- Click the Search button on top, type Windows Camera, and select this app
- Click Get and then Install
If you can’t remove the Camera app from Apps and Features because the Uninstall button is greyed out, you can force the app’s uninstall with the help of PowerShell.
How to reinstall the Camera app using PowerShell:
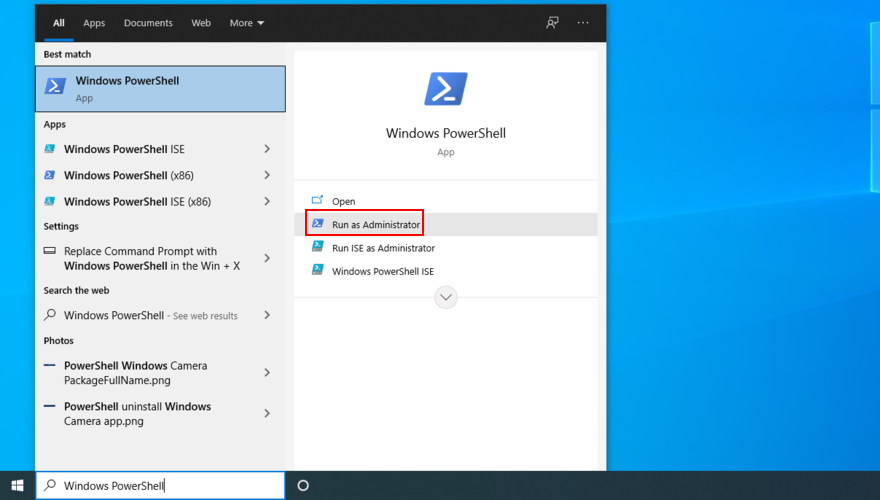
- Click the Start button, type Windows PowerShell, and select Run as administrator
- Type
Get-AppxPackage-allusers | Select Name, PackageFullNameand press Enter
- Locate the Name entry that says
Microsoft.WindowsCamera - Copy the
PackageFullNameassociated with that entry (e.g.Microsoft.WindowsCamera_2018.826.98.0_x64__8wekyb3d8bbwe)
- Type
Remove-AppxPackage PackageFullNameand replacePackageFullNamewith what you copied (e.g.Remove-AppxPackage Microsoft.WindowsCamera_2018.826.98.0_x64__8wekyb3d8bbwe). Press Enter
- Type
Add-AppxPackage-register “C:\Program Files\WindowsApps\PackageFullName\appxmanifest.xml”-DisableDevelopmentMode. ReplacePackageFullNamewith what you copied (e.g.Remove-AppxPackage Microsoft.WindowsCamera_2018.826.98.0_x64__8wekyb3d8bbwe). Press Enter
Launch the Camera app and check if you still get the 0xa00f4244 NoCamerasAreAttached error.
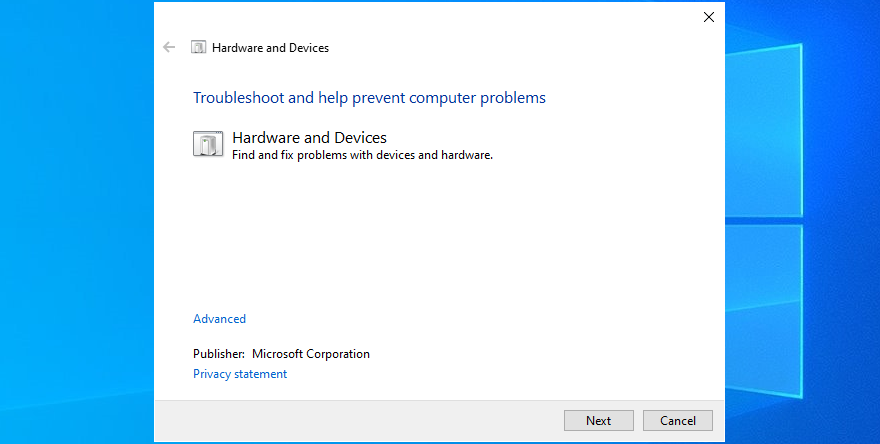
12. Run the Hardware and Devices troubleshooter
Windows has a built-in troubleshooter prepared to repair common issues with hardware devices. It’s worth a shot to repair webcam problems and works with multiple apps (for instance, if Zoom won’t work with your camera).
- Press the Win key + R, type
msdt.exe-id DeviceDiagnostic, and press Enter
- Click Next and follow the wizard instructions
- If the troubleshooter finds a solution, click Apply this fix
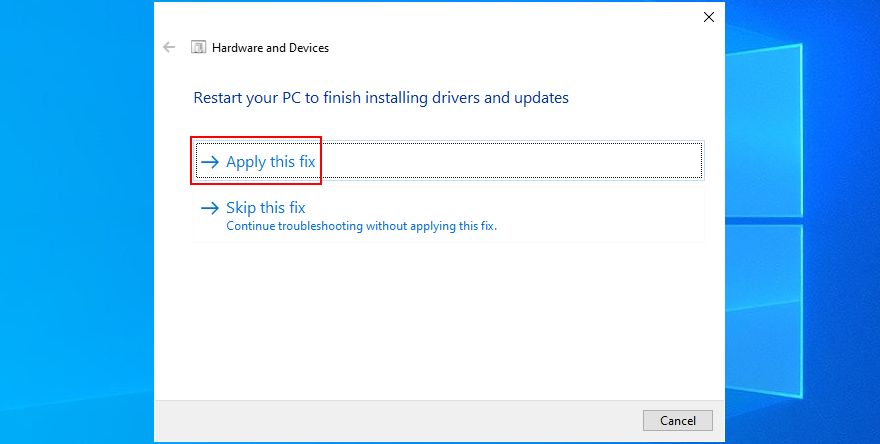
- Restart your computer
- Launch the Camera app and check for additional errors
13. Run the Microsoft Store troubleshooter
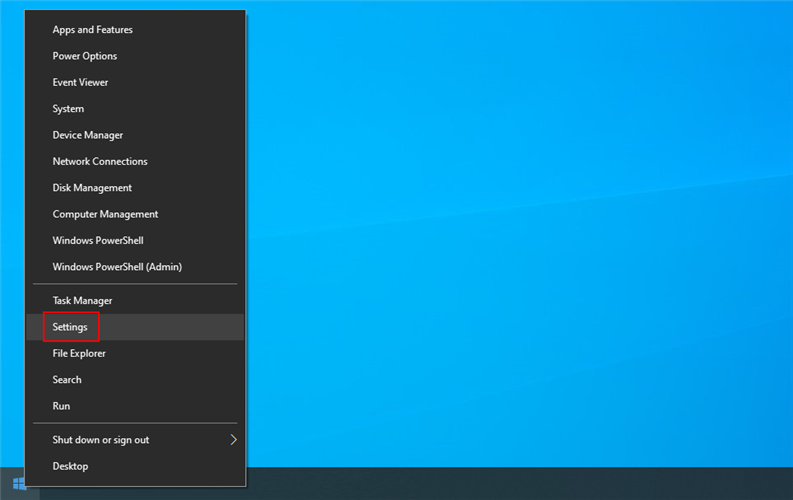
Since Windows Camera is a Microsoft Store, you should also troubleshoot this application, especially if you have trouble running other Store apps, too.
- คลิกขวาที่ปุ่ม เริ่ม และเลือก การตั้งค่า
- คลิก อัปเดตและความปลอดภัย
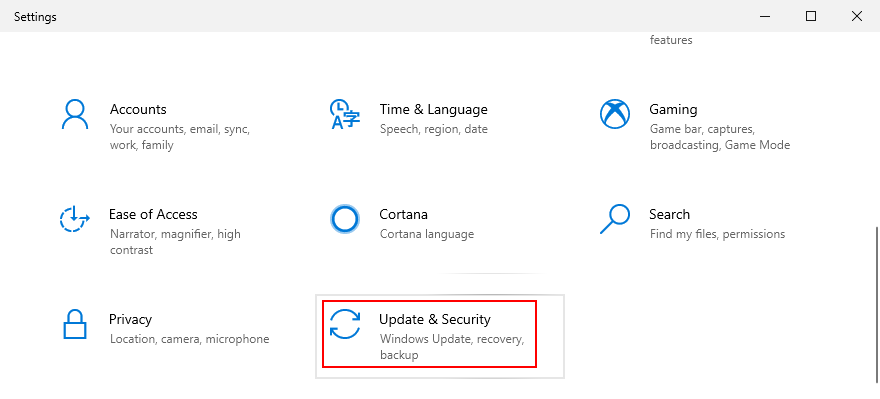
- Select Troubleshoot on the left side
- คลิก เครื่องมือแก้ปัญหาเพิ่มเติม

- Scroll down to the bottom of the window
- เลือก Windows Store Apps และคลิก เรียกใช้เครื่องมือแก้ปัญหา

- Follow the on-screen instructions
- If the troubleshooter finds any solutions, apply them
- Restart your PC
- Open the Camera app and check for errors
14. Uninstall recent third-party software
If you have recently installed third-party software applications, they might not be fully supported by Windows 10, resulting in various functionality issues. In some cases, they can even cause error 0xa00f4244 NoCamerasAreAttached in your Camera app. But you can fix this problem by removing the problematic apps.
How to remove recent apps:
- Right-click the Start button and select Apps and Features

- Set Sort by to Install date
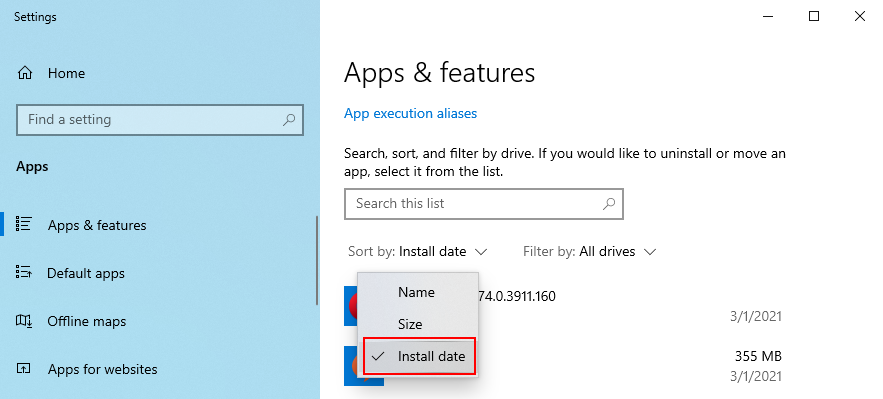
- Select the first entry in the list and click Uninstall
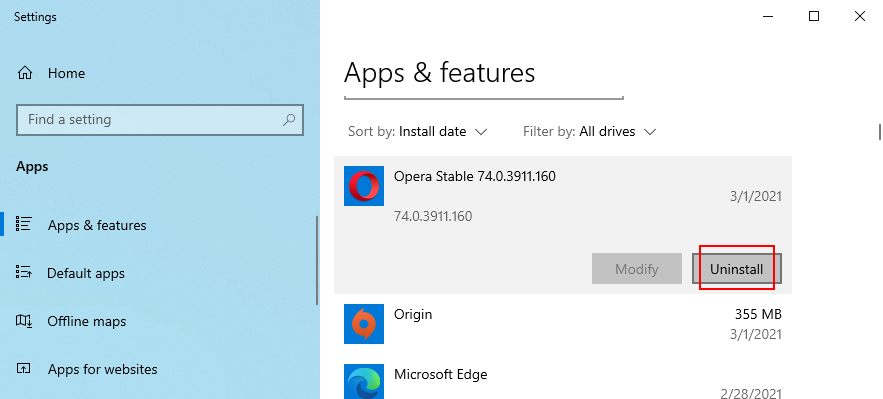
- Click Uninstall again to confirm and proceed with its removal
- Reboot your computer and try to use the Camera app
15. Uninstall recent system updates
A system update that rolled out lately might not be fully compliant with Windows 10, resulting in problems with Microsoft Store apps. It can be tricky to tell, but it makes sense if you started receiving the 0xa00f4244 NoCamerasAreAttached error code right after finishing a system update.
To test this, you can uninstall the most recent Windows update. Don’t worry since you can reinstall it later anyway.
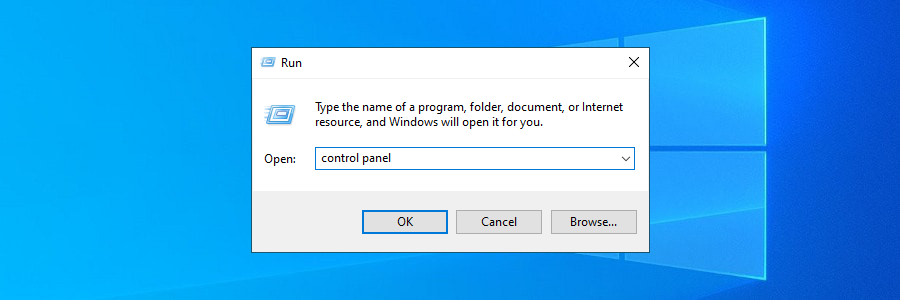
- Press Win key + R, type control panel, and press Enter
- Click Programs and Features
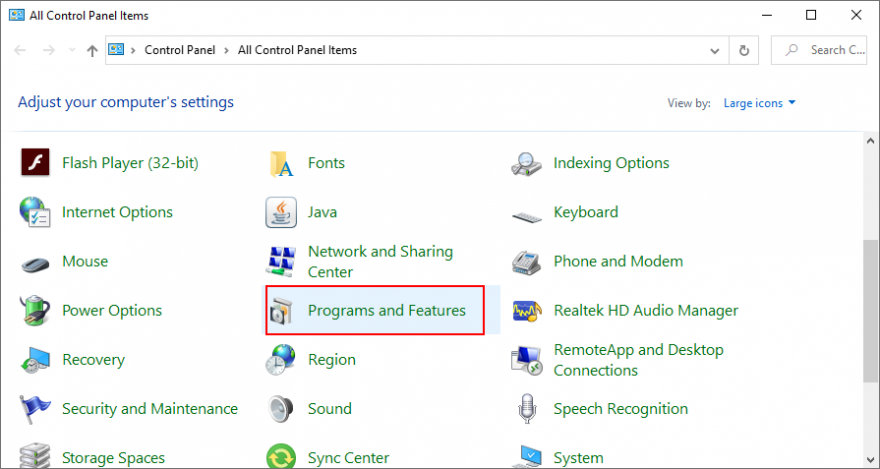
- Select View installed updates on the left side
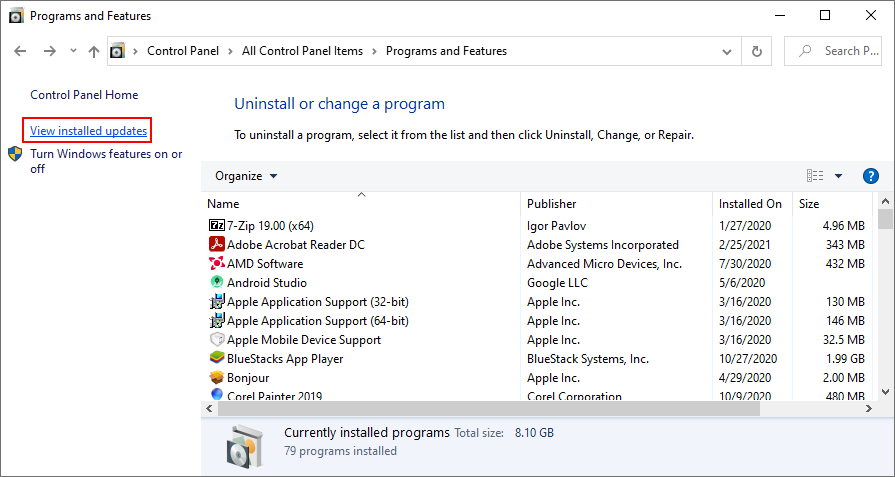
- Click the Installed On column to sort the updates (newest first)
- Double-click the first update on the list
- Click Yes to confirm its removal
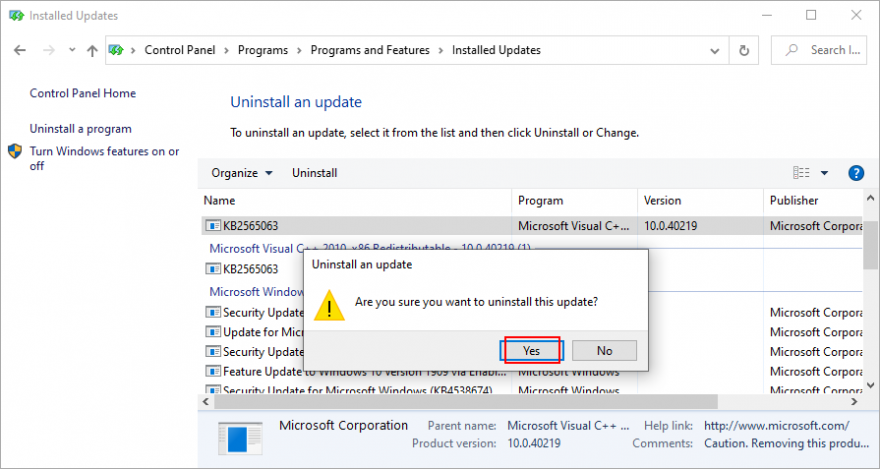
- Reboot your PC and open the Camera app
16. Fix corrupt system files
Your operating system might have damaged or missing files that are directly related to the Windows Camera app. However, you can fix this problem without having to use third-party software solutions, thanks to SFC (System File Checker) and DISM (Deployment Image Servicing and Management).
Get started by running SFC:
- Press the Windows key + R, type cmd, and press Ctrl + Shift + Enter to open Command Prompt with admin rights

- Type sfc/scannow and press Enter
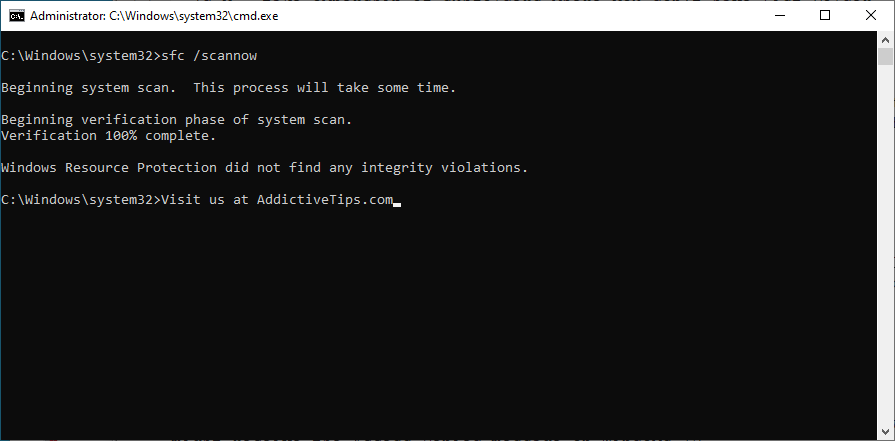
- Wait until SFC finds and fixes any issues
- Exit CMD and restart your PC
- Open the Camera app and check for errors
If SFC doesn’t do the trick, then you can turn to DISM to verify the component store of the Windows image.
How to use DISM:
- Open Command Prompt with elevation rights
- Run
DISM/online/cleanup-image/scanhealth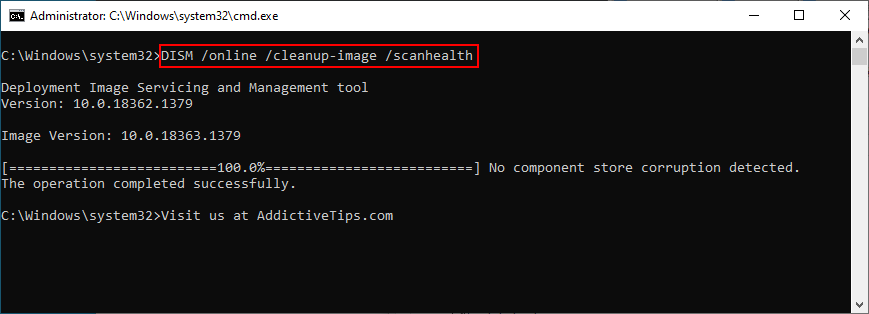
- If DISM reports any issues, run
DISM/online/cleanup-image/restorehealth - Reboot your PC and restart CMD as admin
- Run the SFC command
- Restart your computer, open the Camera app, and check for errors
17. Reset BIOS settings to default
Several users reported that they got rid of the 0xa00f4244 NoCamerasAreAttached error message by resetting BIOS settings to default. It’s an easy task that requires just a couple of clicks. สิ่งที่คุณต้องทำมีดังนี้:
- Reboot your PC and quickly press the key shown on the screen to enter BIOS mode
- Go to the advanced BIOS settings
- Find the option that resets configuration data and enable it
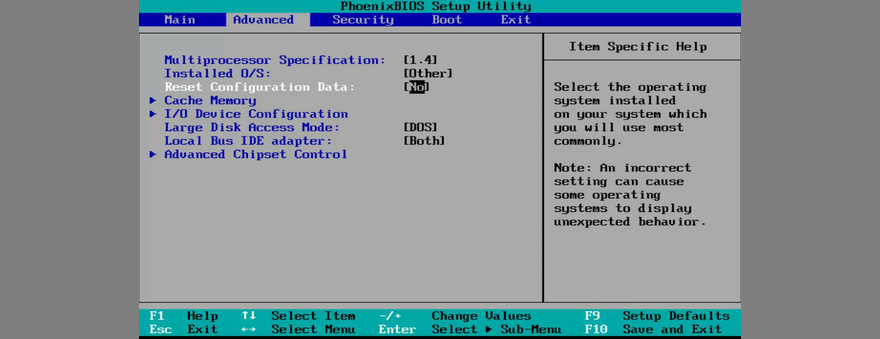
- Save the current BIOS configuration and exit to Windows
- Open the Camera app to check for improvements
18. Check a registry setting
Microsoft Store apps like Camera or Skype need a specific registry in order to function normally. If it doesn’t exist, then you can wake up with error messages like 0xa00f4244 NoCamerasAreAttached.
But you can check this issue by taking a look in Registry Editor and by adding the entry if it’s missing. Don’t worry since there’s no risk of damaging your PC because you will create a registry backup first.
- Click the Start button, type Registry Editor, and select Run as administrator
- Click Yes if prompted by UAC (User Account Control)
- Open the File menu and select Export
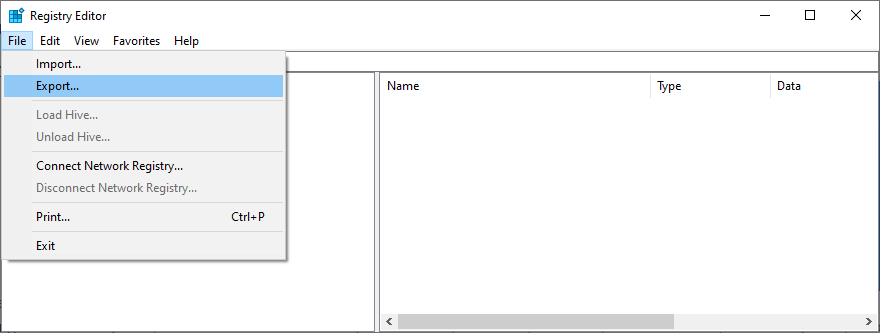
- Write a file name and indicate a folder where you want to save the registry backup. Then, click Save
- If you’re running 32-bit Windows, visit the following location
Computer\HKEY_LOCAL_MACHINE\SOFTWARE\Microsoft\Windows Media Foundation\Platform
- For 64-bit Windows, go to this address instead
Computer\HKEY_LOCAL_MACHINE\SOFTWARE\WOW6432Node\Microsoft\Windows Media Foundation\Platform
- Check if you have an entry called EnableFrameServerMode

- Otherwise, open the Edit menu, click New, and select DWORD (32-bit) Value
- Rename the entry to EnableFrameServerMode
- Double-click EnableFrameServerMode and set its Value Data to 0
- Set Base to Hexadecimal and click OK
- Exit Registry Editor and restart your PC
- Open the Camera app to see if it works now
If you have started experiencing other issues on your computer after making this registry change, you can roll back settings by double-clicking the.reg backup file you previously created. Or, if you didn’t create a backup, simply revisit that registry location and delete the EnableFrameServerMode entry.
19. Create a new user profile
It’s pretty rare, but the Camera app might not be working properly due to data corruption in your user profile. As a result, you get the 0xa00f4244 NoCamerasAreAttached error on your screen. But you can fix this problem by setting up a new local user profile. Here’s how to do it:
- คลิกขวาที่ปุ่ม เริ่ม และไปที่ การตั้งค่า
 li>
li>
- Select Accounts
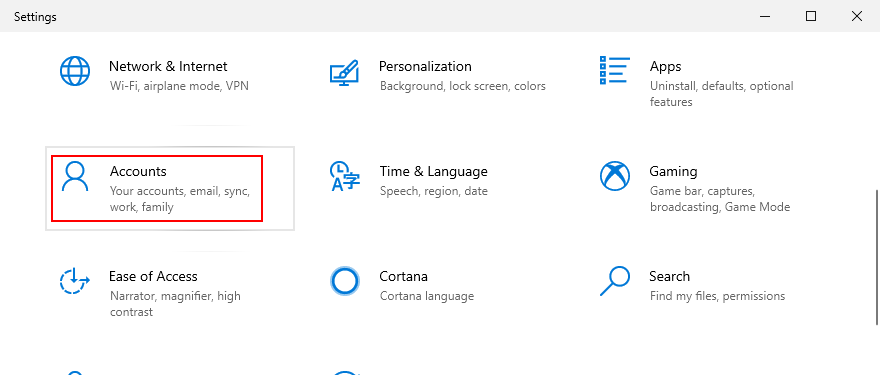
- If you’re logged in with your Microsoft account, click Sign in with a local account instead. Otherwise, click Add someone else to this PC
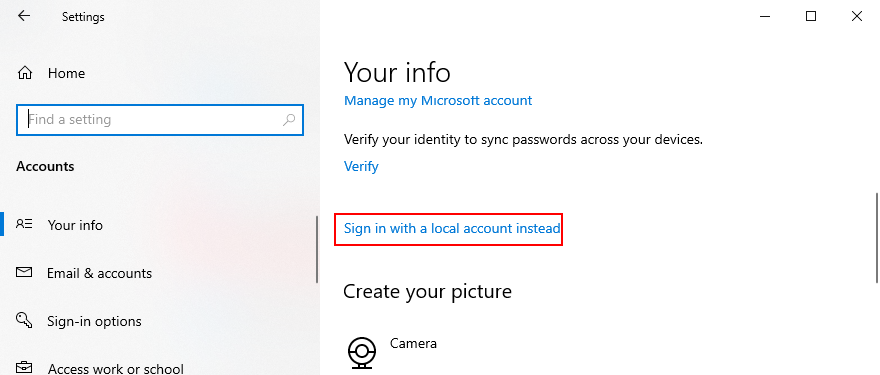
- Set up the username and password of the new account
- Click Change account type and select Administrator
- Log out of your current account and log back in with the new one
- Try to use the Camera app now
20. Use System Restore
Finally, if you can’t pinpoint the software event that caused the 0xa00f4244 NoCamerasAreAttached error code, you can roll back Windows 10 if there are any restore points created before the Camera app started acting up. However, keep in mind that it will affect your programs, so you will lose apps installed after the restore point was made.
- Make sure you’re signed in to Windows 10 with the admin role
- Press Win key + R, type control panel, and hit Enter

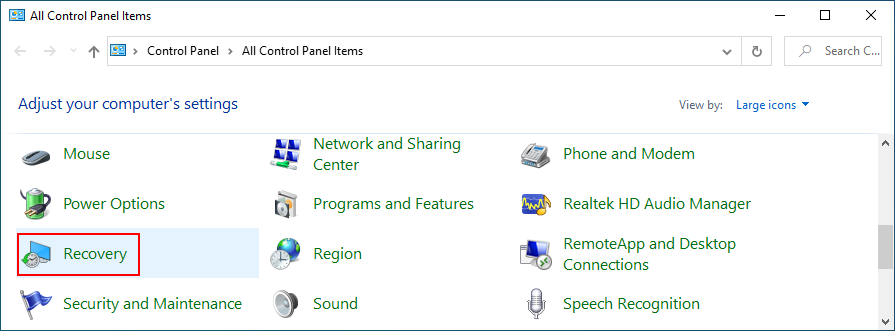
- Select Recovery
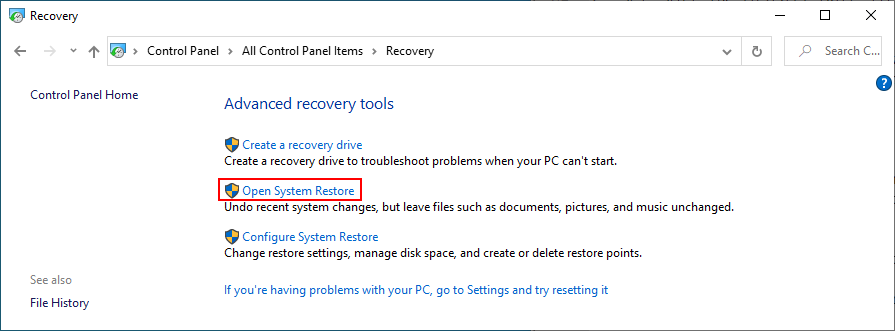
- Click Open System Restore
- Select a restore point from the list
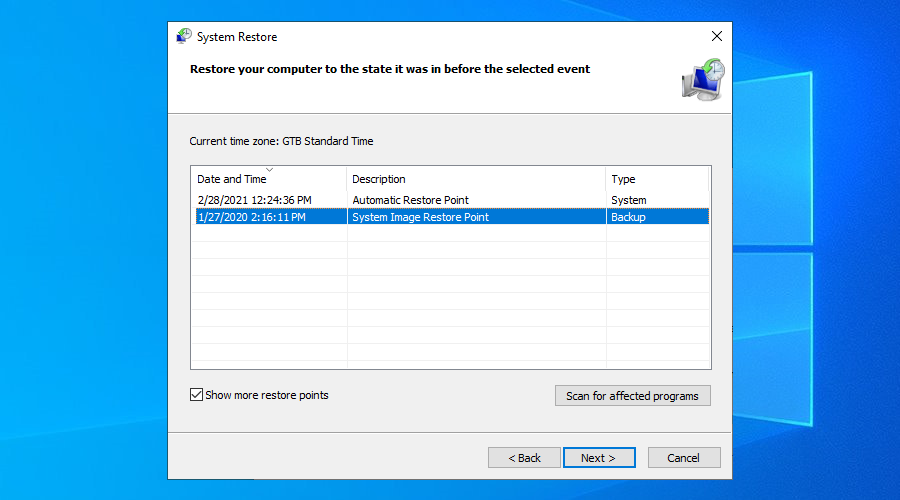
- Click Scan for affected programs if you want to learn more about the changes
- Click Next and proceed with the instructions
- System Restore might take a while. Once it finishes, restart your PC
- Launch the Camera app and try to use it now
The 0xa00f4244 NoCamerasAreAttached error can be fixed
To recap, 0xa00f4244 NoCamerasAreAttached is an error code that appears in the Windows Camera app, preventing you from using your camera. To fix this problem, you can run Windows Update, check the webcam cover, cable and switch, review webcam permissions, verify webcam compatibility, and inspect the webcam drivers.
It’s also a good idea to scan your PC for malware, check the settings of your Internet security solution, verify Camera app permissions, end all processes currently using your webcam, reset or reinstall the Camera app, as well as to run the Hardware and Devices troubleshooter.
Moreover, you can run the Microsoft Store troubleshooter, uninstall recent third-party software and system updates, fix corrupt system files, reset BIOS settings to default, add a registry entry if it’s missing, create a new user profile, and use System Restore.
How did you manage to get rid of error 0xa00f4244 NoCamerasAreAttached on your Windows 10 PC? Tell us about your experience in the comment section below.

