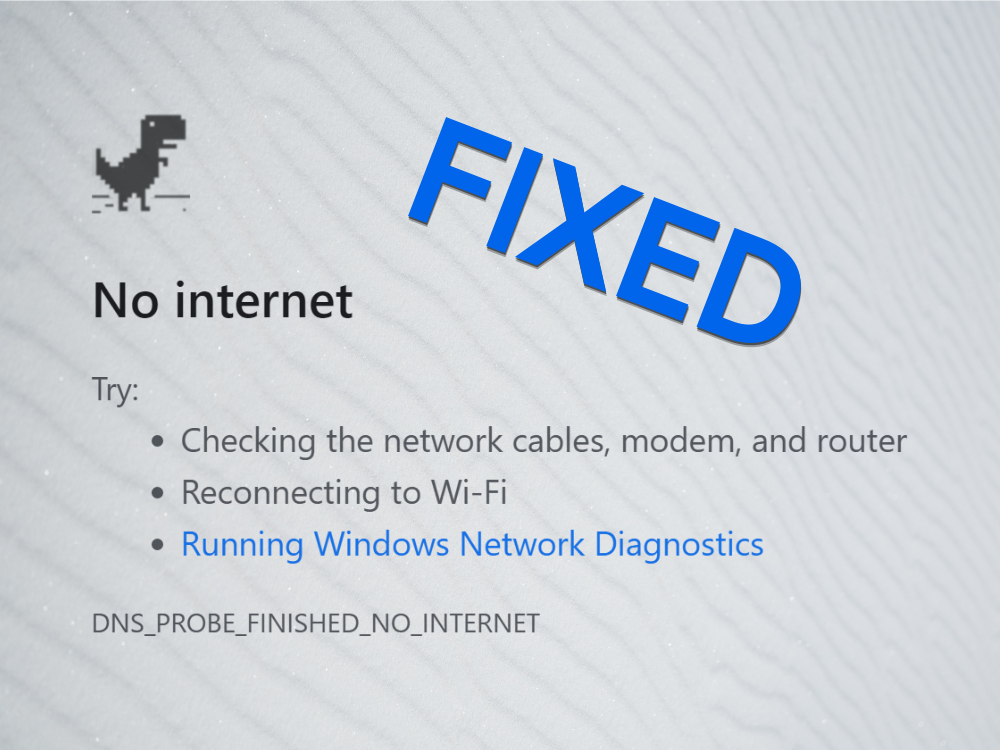
DNS_PROBE_FINISHED_NO_INTERNET เป็นข้อความแสดงข้อผิดพลาดที่ Google Chrome แสดงเมื่อพยายามเข้าถึงเว็บไซต์ใด ๆ แสดงถึงปัญหากับเซิร์ฟเวอร์ DNS ของคุณซึ่งทำให้คุณไม่สามารถนำทางอินเทอร์เน็ตและดูเนื้อหาโปรดของคุณได้
มีหลายวิธีในการจัดการข้อผิดพลาดนี้โดยไม่ต้องอาศัยความช่วยเหลือจากผู้เชี่ยวชาญ อย่างไรก็ตามจำเป็นต้องพิจารณาว่ามีบางอย่างผิดปกติกับเว็บเบราว์เซอร์การตั้งค่าคอมพิวเตอร์หรือการเชื่อมต่ออินเทอร์เน็ตหรือไม่
วิธีแก้ไขข้อผิดพลาด DNS_PROBE_FINISHED_NO_INTERNET บนแพลตฟอร์มใด ๆ
ตรวจสอบวิธีแก้ไขปัญหาต่อไปนี้และตรวจสอบให้แน่ใจว่าได้ทำทีละขั้นตอน เราได้พิจารณาแพลตฟอร์ม Windows 10 และ macOS แล้ว
1. ลองใช้เบราว์เซอร์อื่น
วิธีที่ง่ายที่สุดในการค้นหาว่า DNS PROBE FINISHED NO INTERNET ชี้ให้เห็นปัญหากับเว็บเบราว์เซอร์ของคุณหรือไม่คือการพยายามใช้แอปพลิเคชันอื่นเพื่อเข้าถึงอินเทอร์เน็ต
หากคุณสามารถท่องเว็บด้วยเบราว์เซอร์อื่นเช่น Firefox, Edge หรือ Safari ได้สำเร็จจะทำให้สิ่งต่างๆง่ายขึ้นเนื่องจากคุณต้องแก้ปัญหา Chrome มิฉะนั้นแสดงว่าเป็นปัญหาใหญ่ที่ไม่เพียง แต่ส่งผลกระทบต่อ Chrome เท่านั้น แต่ยังรวมถึงคอมพิวเตอร์ทั้งเครื่องและอาจเชื่อมต่ออินเทอร์เน็ตด้วย
2. รีสตาร์ท Chrome
อาจฟังดูง่ายเกินไปที่จะทำงาน แต่การรีสตาร์ท Google Chrome มักจะแก้ไขข้อผิดพลาด DNS_PROBE_FINISHED_NO_INTERNET อย่างไรก็ตามคุณต้องแน่ใจว่าได้ปิดกระบวนการทั้งหมดอย่างถูกต้องก่อนที่จะรีสตาร์ท
วิธีรีสตาร์ท Chrome บน Windows 10 อย่างถูกต้อง:
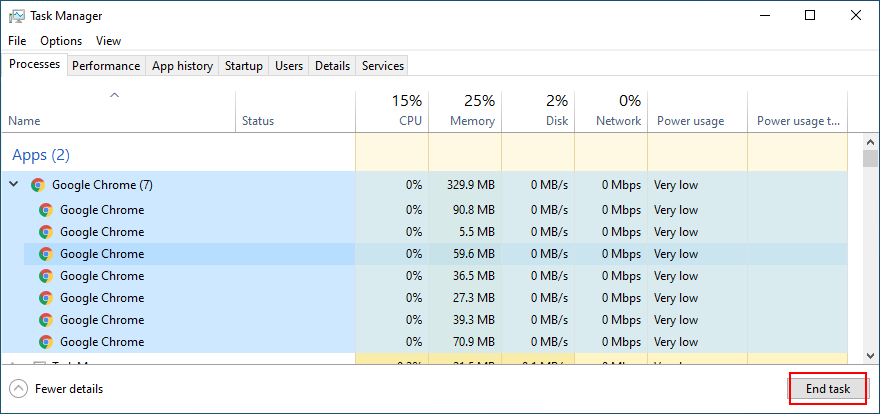
- คลิกขวาที่แถบงานแล้วไปที่ ตัวจัดการงาน

- ในแท็บ กระบวนการ ค้นหาและเลือก Google Chrome และโครงสร้างกระบวนการทั้งหมด
- คลิก สิ้นสุดงาน
- เปิด Chrome และตรวจสอบข้อผิดพลาด DNS
วิธีรีสตาร์ท Chrome บน Mac อย่างถูกต้อง:
- เลือกหน้าต่าง Chrome
- คลิกปุ่ม Apple และเลือก Force Quit จากเมนู
- เปิด Chrome ขึ้นมาใหม่และตรวจสอบผลลัพธ์
3. ล้างแคชของเบราว์เซอร์
ปัญหาการเชื่อมต่อ DNS อาจเกิดจากแคชของเบราว์เซอร์เช่นคุกกี้ที่บันทึกไว้ ดังนั้นจึงเป็นความคิดที่ดีที่จะล้างแคชของ Chrome ก่อนที่จะพยายามเข้าถึงหน้าเว็บใด ๆ สิ่งที่คุณต้องทำมีดังนี้
วิธีล้างแคช Chrome (Windows และ Mac):
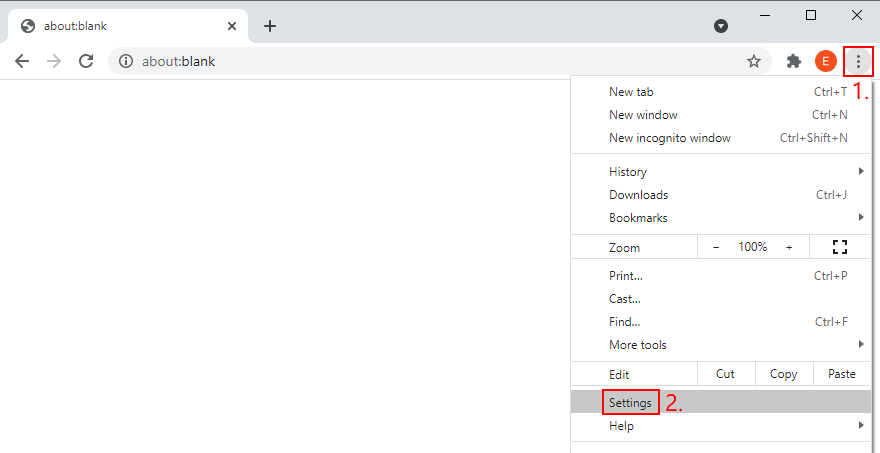
- เปิดไฟ Chrome แล้วคลิกปุ่ม เพิ่มเติม ที่มุมขวาบน
- เลือก การตั้งค่า จากเมนู
- ข้ามไปที่ส่วน ความเป็นส่วนตัวและความปลอดภัย (หรือไปที่ที่อยู่
chrome://settings/privacyเป็นทางลัด) - คลิก ล้างข้อมูลการท่องเว็บ

- อยู่ในส่วน พื้นฐาน
- ตั้งค่า ช่วงเวลา เป็น ตลอดเวลา
- ตรวจสอบให้แน่ใจว่าได้เปิดใช้งานตัวเลือกต่อไปนี้:
- ประวัติการเข้าชม
- คุกกี้และข้อมูลอื่น ๆ ของไซต์
- รูปภาพและไฟล์แคช
- คลิก ล้างข้อมูล เมื่อคุณพร้อม

- รีสตาร์ท Chrome และตรวจสอบข้อผิดพลาด DNS
4. อัปเดต Chrome
ใน Windows และ macOS รุ่นล่าสุดจำเป็นอย่างยิ่งที่จะต้องอัปเดต Chrome ให้เป็นเวอร์ชันล่าสุดอยู่เสมอ ด้วยวิธีนี้คุณจะสามารถเข้าถึงคุณลักษณะใหม่ ๆ ได้ทันทีไม่เพียง แต่ยังมีการปรับปรุงและแก้ไขข้อผิดพลาด DNS ที่ทราบอีกด้วย
วิธีอัปเดต Chrome บน Windows และ Mac:
- เปิด Chrome แล้วคลิกปุ่ม เพิ่มเติม
- ไปที่ส่วน ความช่วยเหลือ
- คลิก เกี่ยวกับ Google Chrome คุณสามารถไปที่
chrome://settings/help ที่อยู่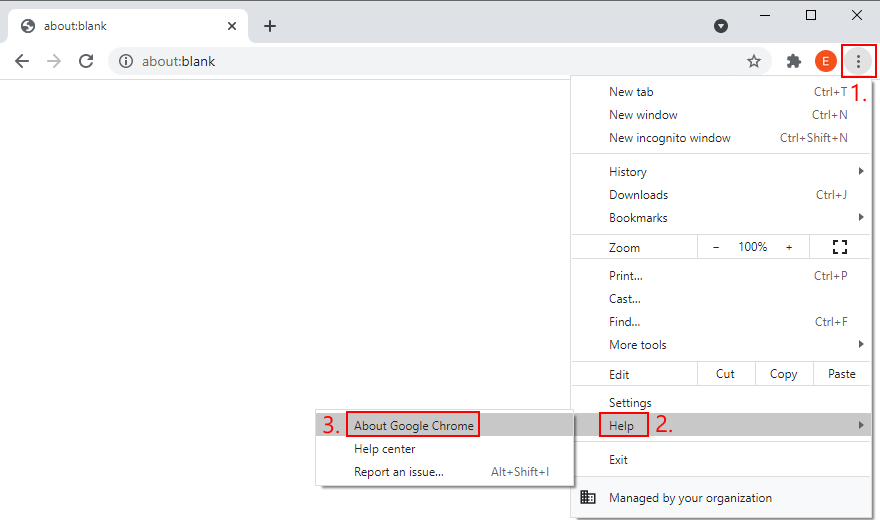
- รอจนกว่า Chrome จะค้นพบและดำเนินการอัปเดต
- รีสตาร์ทเบราว์เซอร์เมื่อเสร็จสิ้นและตรวจสอบปัญหา DNS
5. รีเซ็ต Chrome เป็นการตั้งค่าเริ่มต้น
หากคุณหรือส่วนขยายเบราว์เซอร์กำหนดการตั้งค่าใน Chrome มากเกินไปอาจทำให้การกำหนดค่า DNS ยุ่งเหยิงได้เช่นกัน เป็นการยากที่จะค้นหาและแก้ไขตัวเลือกที่ใช้งานไม่ได้ วิธีแก้ปัญหาที่ง่ายและสวยงามกว่าคือการรีเซ็ต Chrome เป็นค่าเริ่มต้น
วิธีคืนค่า Chrome เป็นการตั้งค่าจากโรงงานบน Windows และ Mac:
- เปิดเมนู เพิ่มเติม และเลือก การตั้งค่า (หรือไปที่ที่อยู่
chrome://settings/)
- ลงไปที่ด้านล่างสุดของหน้าแล้วคลิก ขั้นสูง
- ในส่วน รีเซ็ตและล้างข้อมูล ให้คลิก กู้คืนการตั้งค่ากลับเป็นค่าเริ่มต้นเดิม
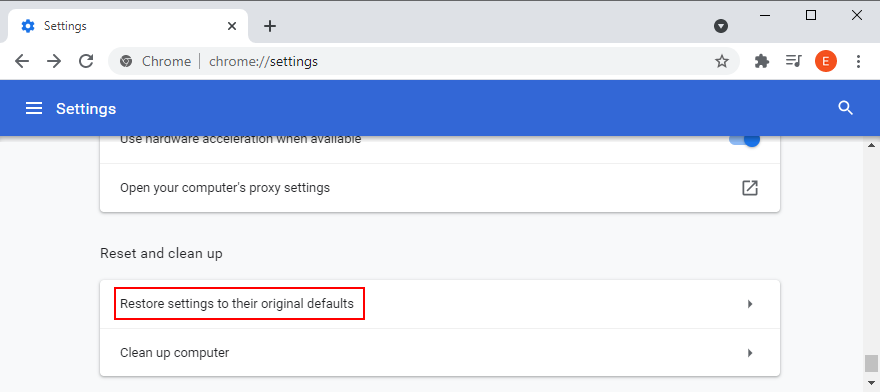
- เมื่อถูกขอให้ยืนยันให้คลิก รีเซ็ตการตั้งค่า
- รีสตาร์ท Chrome และตรวจสอบปัญหา DNS
6. ปิดใช้งานส่วนขยายของ Chrome
ส่วนขยายของเบราว์เซอร์บางตัวได้รับอนุญาตให้เปลี่ยนการกำหนดค่า IP และ DNS ของ Chrome เช่น VPN บริการ และเครื่องมือพร็อกซี หากทำไม่ถูกต้องอาจตัดการเข้าถึงอินเทอร์เน็ตไปยังเบราว์เซอร์ทั้งหมดของคุณ
ในการแก้ไขปัญหานี้คุณควรถอนการติดตั้งส่วนขยาย Chrome ที่น่าสงสัยหรือไม่รู้จัก สิ่งที่คุณต้องทำ (Windows และ Mac) มีดังนี้:
- จากเมนู เพิ่มเติม ไปที่ เครื่องมือเพิ่มเติม
- เลือก ส่วนขยาย หรือไปที่
chrome://extensionsที่อยู่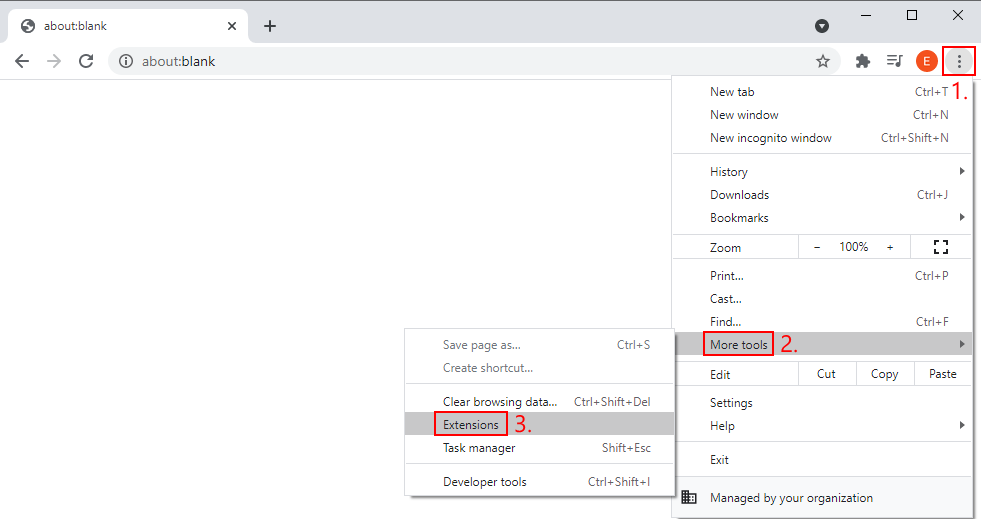
- ลบส่วนขยายที่เข้าถึงการกำหนดค่า IP และ DNS ของคุณรวมถึง VPN และเครื่องมือพร็อกซี
- เปิด Chrome ขึ้นมาใหม่และตรวจสอบผลลัพธ์
7. ติดตั้ง Chrome ใหม่
หาก Chrome ยังคงแสดงข้อผิดพลาด DNS_PROBE_FINISHED_NO_INTERNET ให้คุณหลังจากลองวิธีแก้ไขปัญหาข้างต้นขอแนะนำให้นำออกจากคอมพิวเตอร์ของคุณแล้วติดตั้งใหม่
วิธีติดตั้ง Chrome ใหม่อย่างถูกต้องบน Windows 10:
- คลิกขวาที่แถบงานแล้วเลือก ตัวจัดการงาน

- เลือก Google Chrome แล้วคลิก สิ้นสุดงาน

- คลิกขวาที่ปุ่ม เริ่ม และตรงไปที่ แอปและคุณลักษณะ
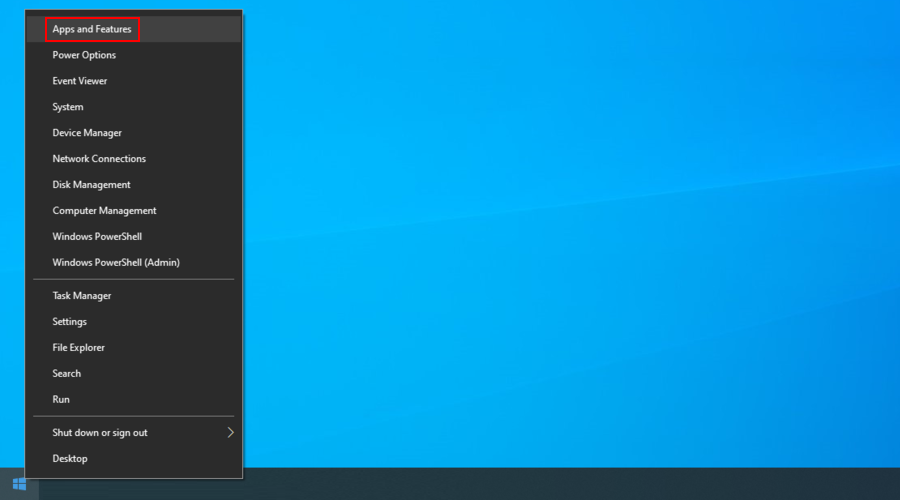
- ค้นหาและเลือก Google Chrome
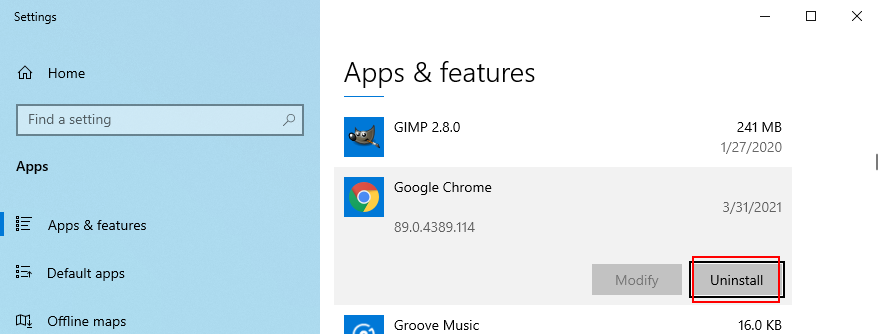
- คลิก ถอนการติดตั้ง แล้วคลิกอีกครั้งเพื่อยืนยัน
- ดำเนินการลบต่อไป
- ดาวน์โหลด Chrome จาก เว็บไซต์อย่างเป็นทางการ
- เปิด Chrome และตรวจสอบข้อผิดพลาด DNS
วิธีติดตั้ง Chrome บน Mac ใหม่อย่างถูกต้อง:
- เปิด Chrome และเปิดเมนู Apple
- คลิก บังคับออก
- ใช้แอป Finder เพื่อติดตาม Chrome
- ลากและวาง Chrome ไปที่ ถังขยะ
- หากถูกถามให้ป้อนชื่อผู้ใช้และรหัสผ่านของผู้ดูแลระบบเพื่อยืนยันการนำแอปออก
- เลือก ล้างถังขยะ ใน ไฟน์เดอร์
- ดาวน์โหลด Chrome จาก เว็บไซต์อย่างเป็นทางการ
- เปิด Chrome และพยายามเยี่ยมชมเว็บไซต์
8. ใช้ Chrome เวอร์ชันเสถียร
Chrome มีช่องทางการเผยแพร่หลายช่องทาง พร้อมให้ดาวน์โหลด: เสถียรเบต้านักพัฒนาและ Canary สามเวอร์ชันล่าสุดช่วยให้คุณสามารถเข้าถึงคุณลักษณะใหม่ ๆ และการปรับปรุงที่ต้องผ่านการทดสอบก่อนที่จะเข้าถึงเวอร์ชันเสถียร บางคนไม่เคยทำ
แม้ว่าจะเป็นเรื่องน่าตื่นเต้นที่ได้อยู่ในแถวหน้าและค้นพบคุณลักษณะใหม่ ๆ ของ Chrome แต่ก็ไม่เสถียรอย่างไม่น่าเชื่อและควรหลีกเลี่ยงหากคุณไม่ต้องการประสบปัญหาการเชื่อมต่ออินเทอร์เน็ตเช่นข้อผิดพลาด DNS_PROBE_FINISHED_NO_INTERNET
เพียงยึดติดกับ Chrome เวอร์ชันเสถียรแล้วคุณจะพบ สามารถดาวน์โหลดได้จาก เว็บไซต์อย่างเป็นทางการ
คุณสามารถดาวน์โหลดเวอร์ชันเบต้านักพัฒนาหรือ Canary แยกกันเนื่องจากจะไม่แทนที่เวอร์ชันเสถียร แต่อย่าใช้เมื่อคุณต้องการการเชื่อมต่ออินเทอร์เน็ตที่เชื่อถือได้
9. ดาวน์เกรด Chrome (Windows)
หากคุณมี Windows รุ่นเก่าอาจไม่รองรับ Google Chrome รุ่นล่าสุดอย่างสมบูรณ์ ซึ่งอาจนำไปสู่ปัญหาทุกประเภทเมื่อ Chrome พัฒนาขึ้นและระบบปฏิบัติการของคุณจะถูกทิ้งไว้เบื้องหลัง
ทางออกที่ปลอดภัยที่สุดคือการย้ายไปยัง Windows 10 เนื่องจากคุณสามารถใช้ประโยชน์จากโปรแกรมแก้ไขความปลอดภัยที่ออกโดย Microsoft และปกป้องคอมพิวเตอร์ของคุณจากมัลแวร์
อย่างไรก็ตามหากเป็นไปไม่ได้คุณควรดาวน์เกรด Chrome เป็นเวอร์ชันเก่าซึ่งยังใช้งานได้กับระบบปฏิบัติการที่ล้าสมัยของคุณ โปรดทราบว่าโปรไฟล์ผู้ใช้และข้อมูลแคชทั้งหมดของคุณจะถูกลบออกไป
วิธีปิดใช้งานการอัปเดตอัตโนมัติของ Chrome:
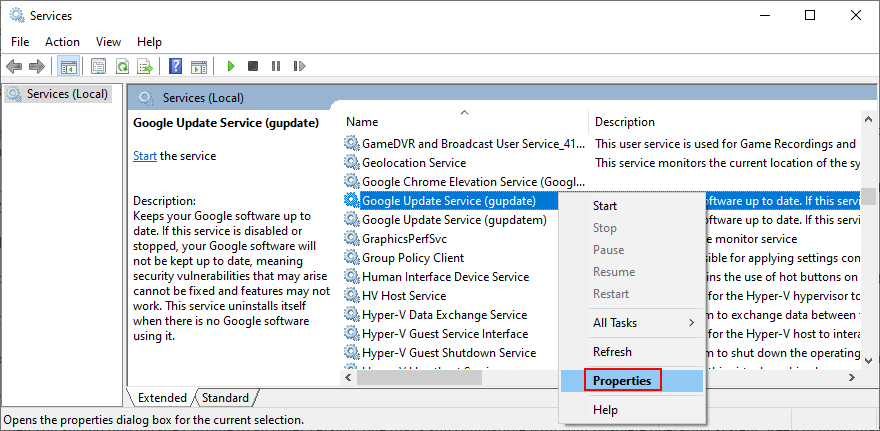
- คลิกปุ่ม เริ่ม ค้นหา บริการ และเปิดแอปนี้
- ค้นหา Google Update Service (gpupdate) คลิกขวาแล้วไปที่ คุณสมบัติ
- ตั้งค่า ประเภทการเริ่มต้น เป็น ปิดใช้งาน
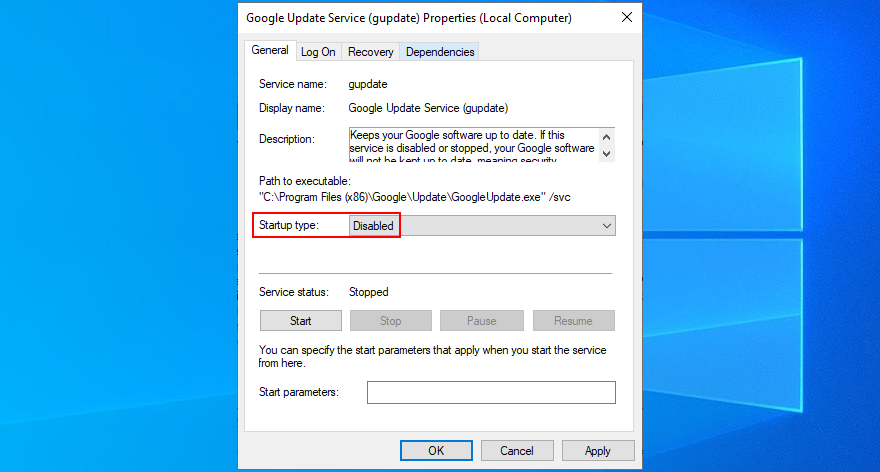
- คลิก ใช้ และออก
- ดับเบิลคลิกที่ Google Update Service (gpupdatem) เพื่อดูคุณสมบัติ
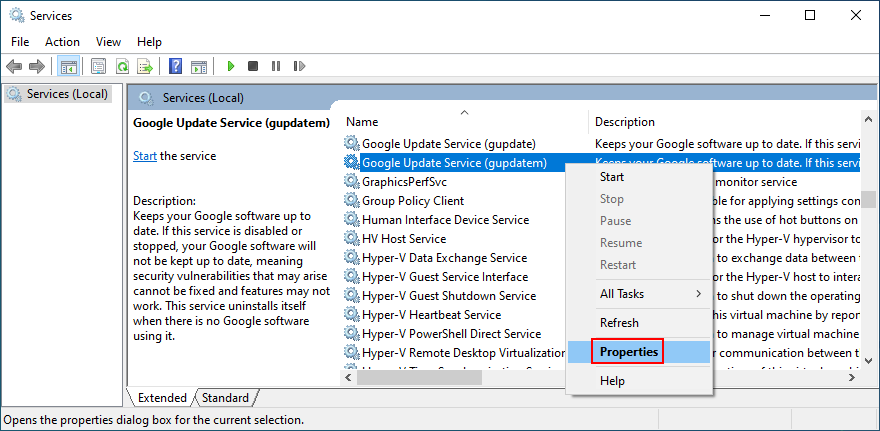
- ตั้งค่า ประเภทการเริ่มต้น เป็น ปิดใช้งาน
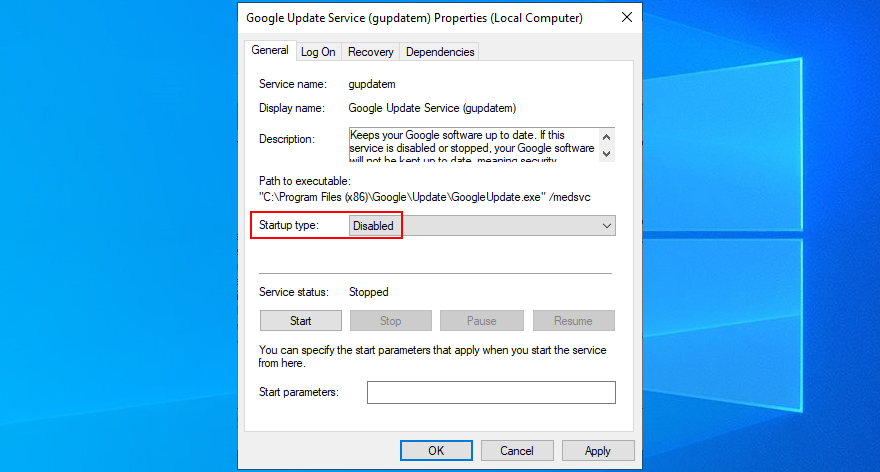
- คลิก ใช้ และออกจากบริการ
วิธีถอนการติดตั้ง Chrome:
- คลิกขวาที่ปุ่ม เริ่ม แล้วเลือก แอปและคุณลักษณะ

- เลือก Google Chrome แล้วคลิก ถอนการติดตั้ง

- ดำเนินการตามขั้นตอนการนำออก
วิธีติดตั้ง Chrome รุ่นเก่า:
ขออภัย Google ไม่อนุญาตให้ผู้ใช้ดาวน์โหลด Chrome เวอร์ชันเก่าด้วยเหตุผลด้านความปลอดภัย อย่างไรก็ตามคุณยังสามารถค้นหา Chrome เวอร์ชันเก่าได้ในเว็บไซต์ของบุคคลที่สามเช่น SlimJet
โปรดทราบว่าคุณจะดาวน์โหลดและติดตั้งไฟล์เหล่านั้นโดยยอมรับความเสี่ยงเอง ขอแนะนำข้อควรระวัง
10. เริ่มบริการไคลเอ็นต์ DNS ใหม่ (Windows)
เซิร์ฟเวอร์ DNS ของ Windows ดำเนินการโดยบริการไคลเอ็นต์ DNS ซึ่งจะต้องทำงานโดยอัตโนมัติทุกครั้งที่เริ่มต้นระบบและยังคงทำงานอยู่ในขณะที่คุณทำงานบนคอมพิวเตอร์ของคุณ
อย่างไรก็ตามหากมีบางอย่างผิดปกติกับบริการไม่น่าแปลกใจที่คุณจะได้รับข้อผิดพลาด DNS PROBE FINISHED NO INTERNET ใน Chrome นอกจากนี้ยังหมายความว่าการเชื่อมต่ออินเทอร์เน็ตของคุณถูกปิดใช้งานบนแอปพลิเคชันใด ๆ ที่คุณพยายามใช้ไม่ใช่เฉพาะ Chrome
วิธีเริ่มบริการไคลเอ็นต์ DNS ใหม่:
- กดปุ่ม Win + R พิมพ์ services.msc และกด Enter

- ค้นหาและคลิกขวาที่ ไคลเอ็นต์ DNS
- ไปที่ คุณสมบัติ
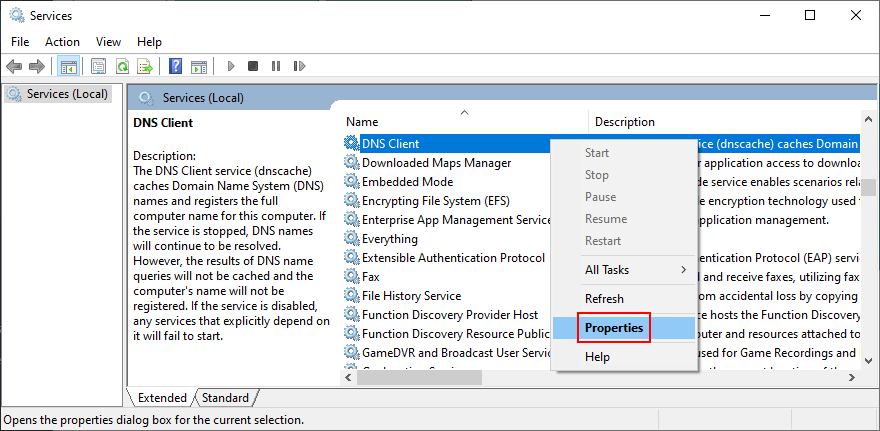
- ตั้งค่า ประเภทการเริ่มต้น เป็น อัตโนมัติ
- หาก สถานะบริการ ระบุว่า หยุด ให้คลิกปุ่ม เริ่ม
- คลิก ใช้ และออก
หากปุ่มบริการไคลเอ็นต์ DNS เป็นสีเทาสิ่งที่ต้องทำมีดังนี้:
- กดปุ่ม Win + R พิมพ์ regedit และกด Enter

- คลิก ใช่ หากได้รับแจ้งจาก UAC (User Account Control)
- คัดลอกและวางที่อยู่ต่อไปนี้:
คอมพิวเตอร์ \ HKEY_LOCAL_MACHINE \ SYSTEM \ CurrentControlSet \ Services \ Dnscache
- ค้นหาและคลิกสองครั้งที่รายการ เริ่ม

- ตั้งค่า ข้อมูลค่า เป็น 2
- ตั้งค่า ฐาน เป็น เลขฐานสิบหก

- Click OK and exit Services
- Restart your PC
- Launch Chrome and check for DNS errors
11. Use Google DNS servers
By default, your computer uses the DNS servers assigned by your ISP. If they are too slow for Chrome, then your web browser might show the DNS_PROBE_FINISHED_NO_INTERNET error as a warning. You can fix this issue by changing your DNS servers to something else.
We suggest using Google Public DNS because it provides free, public, and secure DNS servers optimized for Chrome. However, you can also try others like OpenDNS or Cloudflare.
How to set Google Public DNS servers on Windows 10:
- Make sure to log in to Windows 10 with an admin account
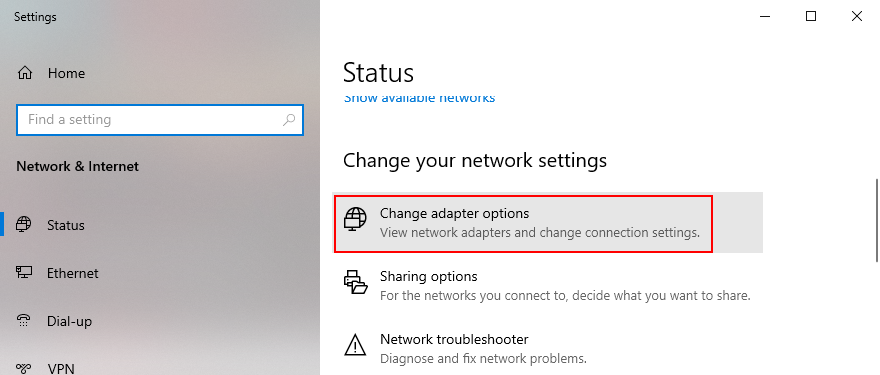
- Click the connections icon in the systray and then Network & Internet settings
- Press Change adapter options
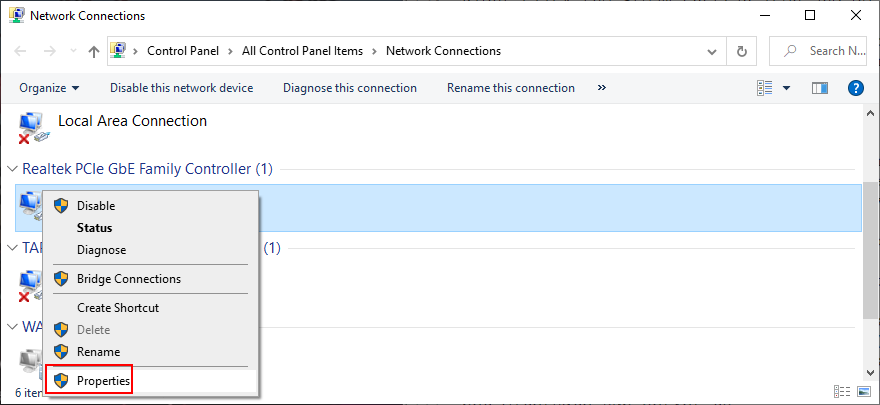
- Choose your Internet connection from the list, right-click it, and go to Properties
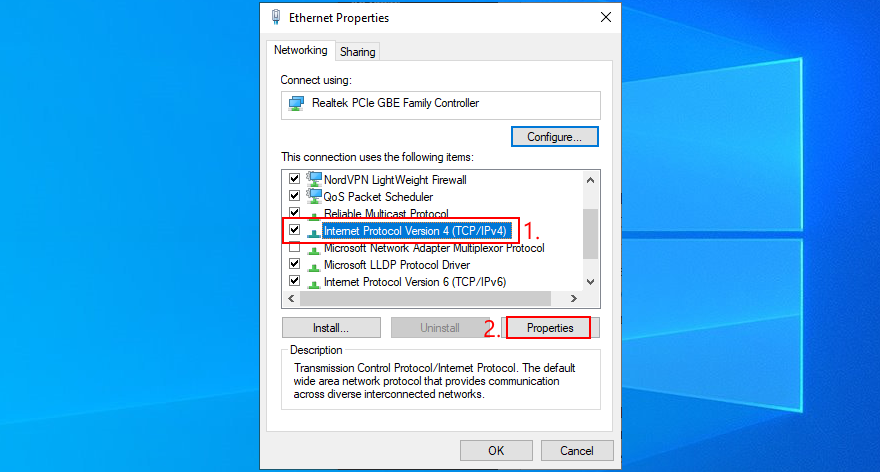
- Select the Internet Protocol Version 4 (TCP/IPv4) entry and click Properties
- Remain in the General section
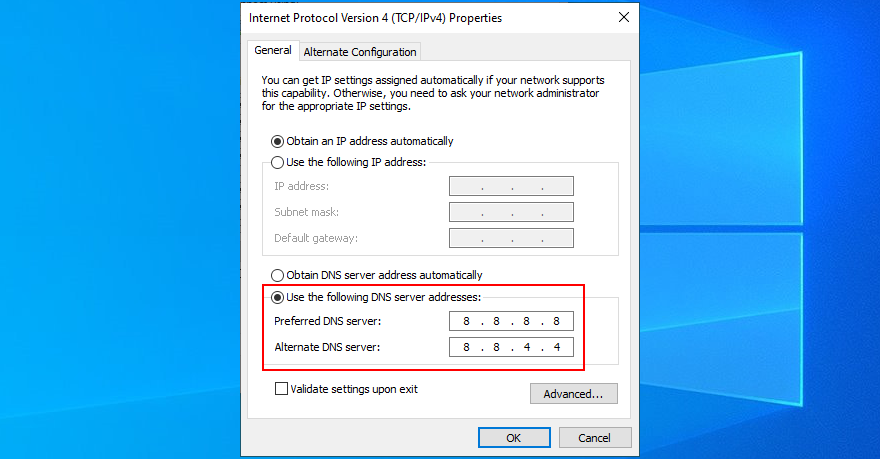
- Select Use the following DNS server addresses
- Set Preferred DNS server to 8.8.8.8
- Set Alternate DNS server to 8.8.4.4
- Check the Validate settings upon exit option
- Click OK and exit
- Try to use Chrome now
How to set Google Public DNS servers on Mac:
- Open the Apple menu on the upper-right part of the screen
- Select System Preferences
- Go to Network > Advanced
- Choose the DNS section
- Click the + symbol and write 8.8.8.8
- Press it again to also add 8.8.4.4
- Click OK and exit
- Launch Chrome and check for DNS errors
12. Clear the DNS cache
Just like your web browser, the system’s DNS cache might get full and cause connectivity errors instead of loading the pages you’re attempting to access. But you can fix this problem by entering a couple of lines of code in Command Prompt on Windows and Terminal on Mac, in order to clear the DNS cache.
How to clear the DNS cache on Windows 10:
- Press the Win key, search for Command Prompt, and open this app
- Paste the following lines of code (press Enter after each one):
-
ipconfig/flushdns
-
ipconfig/registerdns
-
ipconfig/release
-
ipconfig/renew
-
netsh winsock reset
-
- Exit Command Prompt and restart your PC
- Fire up Chrome and check for DNS errors
How to clear the DNS cache on macOS:
- Open the Terminal app
- Type
sudo killall-HUP mDNSResponderand press Return - When asked, write your admin username and password to confirm
- Restart macOS
- Launch Chrome and inspect results
13. Run a ping test
A ping test helps you measure the connectivity signal between your device and Chrome. You can use it as a guide to figure out if the Internet connection is too slow or doesn’t work at all. It’s possible to use ping in Command Prompt on Windows or Terminal on Mac. Alternatively, you can turn to third-party ping applications.
How to run a ping test on Windows 10:
- Click the Start button, search for Command Prompt, and open this application
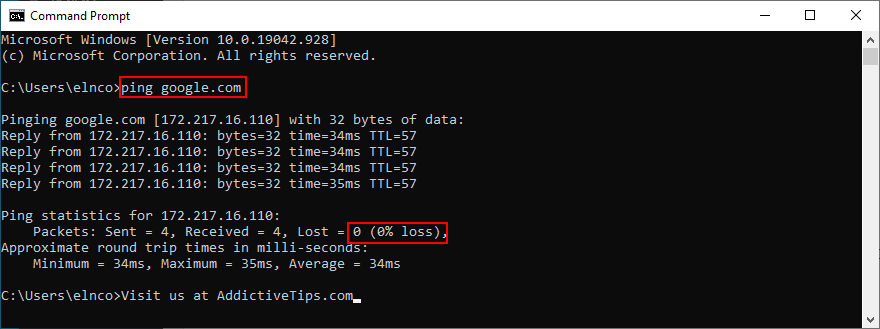
- Ping Google by typing
ping google.comand pressing Enter - Wait until the ping test is complete
- Check out the % loss noted at Ping statistics
How to run a ping test on Mac:
- Go to Applications > Utilities
- Launch the Terminal app
- Type
ping.google.comand press Return - Patiently wait while the ping test is working
- Note the 0% packet loss written at Server ping statistics
If you have 100% packet loss, it means that your device can’t reach Google at all, indicating an issue with your Internet connection. Any value lower than 100% says that the connection is active but unstable. It’s good news because you can take action to improve it.
14. Visit a website by IP address
You normally visit a website by entering its domain in the Chrome address bar. However, if the DNS resolver isn’t doing its job properly and shows the DNS_PROBE_FINISHED_NO_INTERNET instead, try entering the domain’s IP address.
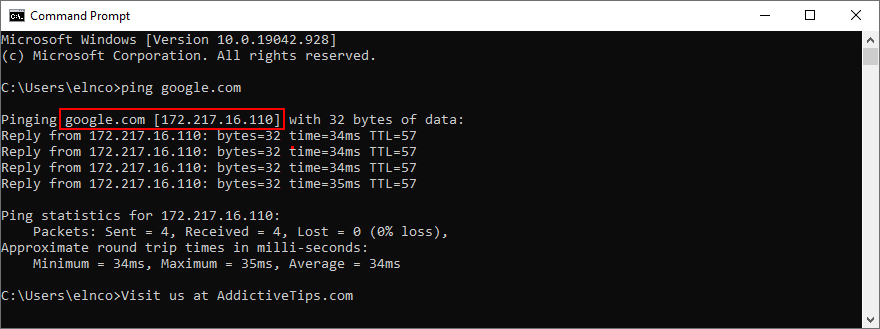
To discover a domain’s name, you can use the ping command with the help of Command Prompt on Windows or Terminal on macOS. No administrative rights are required. Just send the ping website_name command. For example, if you want to find out the IP address used by Google, type ping google.com.
Right before the logging details, you can spot the IP address next to the domain name. In the example below, the domain name is google.com and its IP is 172.217.20.14.
In the next step, launch Chrome, enter the IP address in the address bar, and see what happens. If Google loads after visiting 172.217.20.14, it means that your DNS resolver is at fault and there’s nothing wrong with your device or Internet connection.
15. Disable the VPN or proxy
A lot of privacy-concerned users turn to VPN or proxy tools to hide their IP address and encrypt their data traffic. It has numerous benefits, like accessing websites that aren’t normally available to your country.
However, the IP address change could affect Chrome entirely, especially if you’re using a free VPN or proxy server (they are notoriously unreliable). To stay on the safe side and restore the connectivity of your web browser, you should disable any VPN or proxy services.
For example, if you have a proxy or VPN browser extension installed on Chrome, make sure to turn it off. When it comes to desktop applications designed for Windows or Mac, uninstall them from Apps and Features. Or, if you have system-wide manual connections set up, here’s how to deactivate them.
How to disable VPN and proxy on Windows 10:
- Click the network icon in the notifications area and select Network & Internet settings
- Go to VPN on the left panel
- Select any active VPN connections and click Disconnect
- Shift your attention to the Proxy area on the left side
- Disable Automatically detect settings and Use setup script
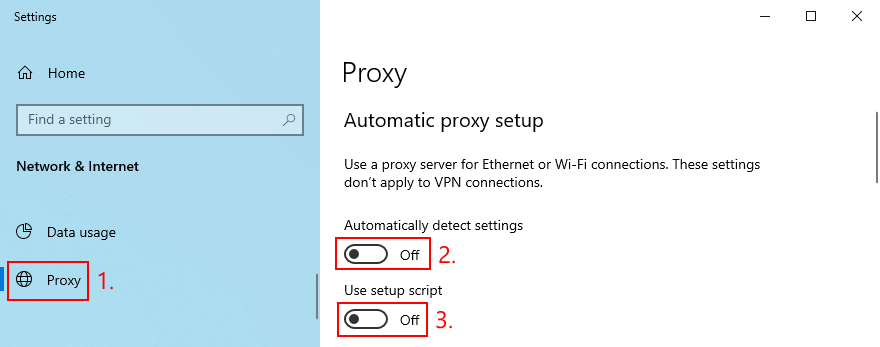
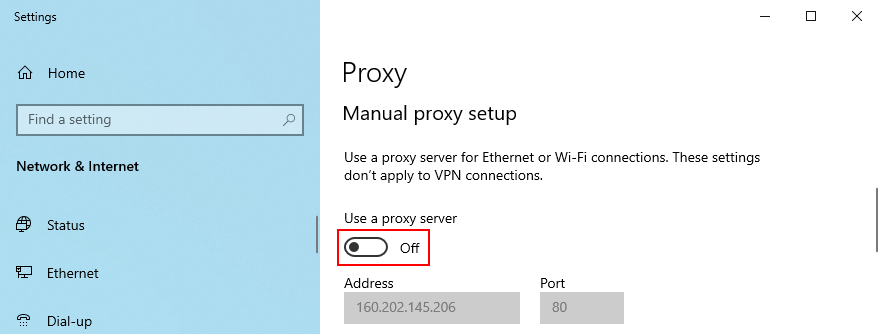
- Scroll down and also turn off Use a proxy server
- Reboot your PC
- Fire up Chrome and check for DNS issues
How to disable VPN and proxy on macOS:
- คลิกปุ่ม Apple ที่มุมบนซ้าย
- Select System Preferences
- Head over to Network
- Choose VPN on the left side
- If there’s an ongoing VPN connection, click Disconnect
- Choose your Internet connection from the list and go to Advanced
- Select the Proxies tab and turn off all settings
- Click OK and restart macOS
- Launch Chrome and check for DNS errors
16. Check firewall settings for Chrome
Under normal circumstances, Chrome gets added as an exception to the system firewall at installation. However, your firewall settings might have been changed in the meantime. It’s not unusual but can be fixed without any issues.
How to add Chrome as an exception to the firewall on Windows 10:
- Sign in to Windows 10 with elevation rights
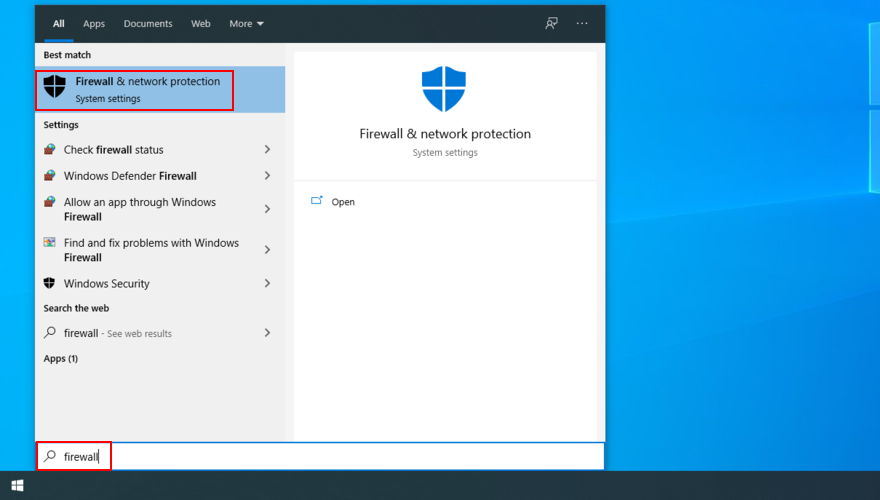
- Press the Win key button, search for firewall, and open Firewall & network protection
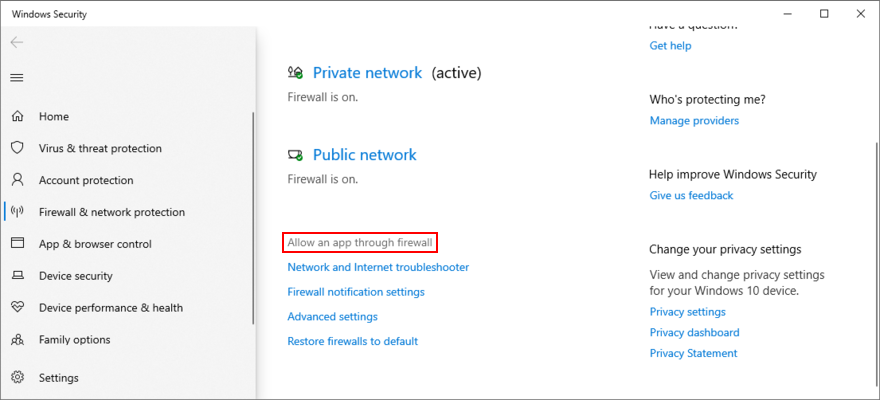
- Click Allow an app through firewall
- Then, click Change settings
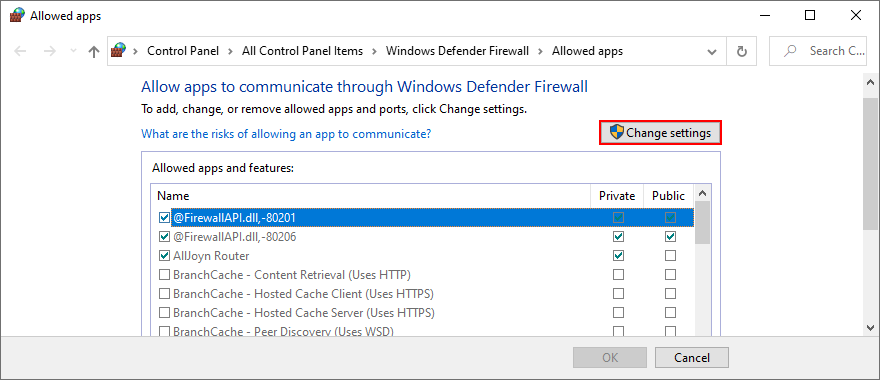
- Try to find Google Chrome on this list. If it’s not there, click Allow another app and then Browse to track down and add the Chrome executable file (on Windows 64-bit, it’s in
C:\Program Files (x86)\Google\Chrome\Application\chrome.exeby default) - Tick the Private and Public boxes next to Google Chrome
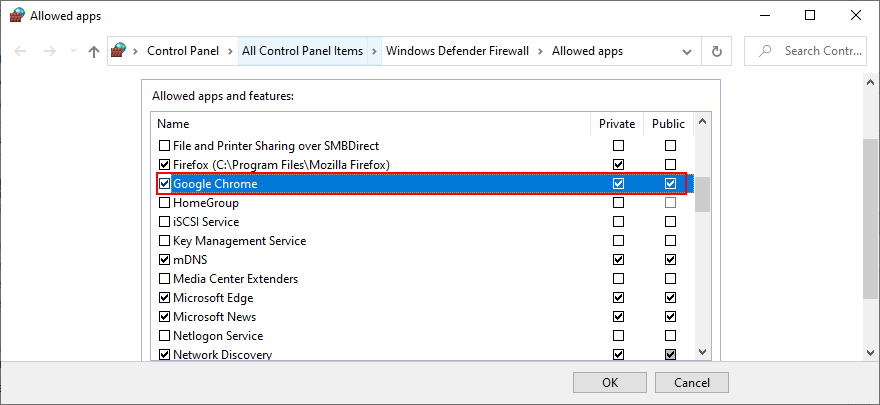
- Click OK
- Fire up the web browser and try to access something
If you have a third-party firewall installed that overrides Windows Firewall, adjust the steps above for that application.
How to add Chrome as an exception to the firewall on macOS:
- เปิดเมนู Apple
- Go to System Preferences > Security
- Choose the Firewall section
- Press the lock symbol and specify your admin username and password if required
- Go to Firewall > Firewall Options > Add Application
- Choose Google Chrome and click Add
- Click OK
- Open the Chrome app and check for DNS errors
17. Uninstall antivirus tools
If you have third-party Internet security solutions installed on your computer, you should check their settings since they might be configured to block browser traffic as a security measure. However, when it comes to free antivirus tools, it’s safer to just remove them from your PC.
Just head over to the Apps and Features section of Windows, locate your security solution, and proceed with the uninstallation process. On Mac, you just have to drag the app to the Trash using Finder.
18. Verify parental control settings
Many parents turn to specialized solutions to protect the online privacy of their children and prevent them from accessing websites with inappropriate content: parental control tools. Some of them also give you the possibility to schedule allowed times for Internet navigation.
If you have such a program installed on your computer, check its settings and make sure to temporarily turn it off while you’re using Google Chrome. Otherwise, you might wake up with the DNS_PROBE_FINISHED_NO_INTERNET error due to permission issues.
19. Inspects the Hosts file (Windows)
The Windows Hosts file contains information about your TCP/IPv4 configuration. It can also be used to block access to specific websites. If you’re receiving the DNS error when trying to reach a particular page although Chrome seems to load others without any problems, it’s worth inspecting and modifying the Hosts file. โดยมีวิธีดังนี้:
- Press Win key + R to open File Explorer
- Visit the following location:
C:\Windows\System32\drivers\etc
- Locate the Hosts file and copy it to create a backup

- Open the Hosts file in a text editor like Notepad (you must run the text editor with admin rights)
- Look for any lines that mention the website you’re trying to visit. For example, if you can’t access Google, try to locate
127.0.0.1 https://www.google.comor something similar - Delete those lines and save the new Hosts file
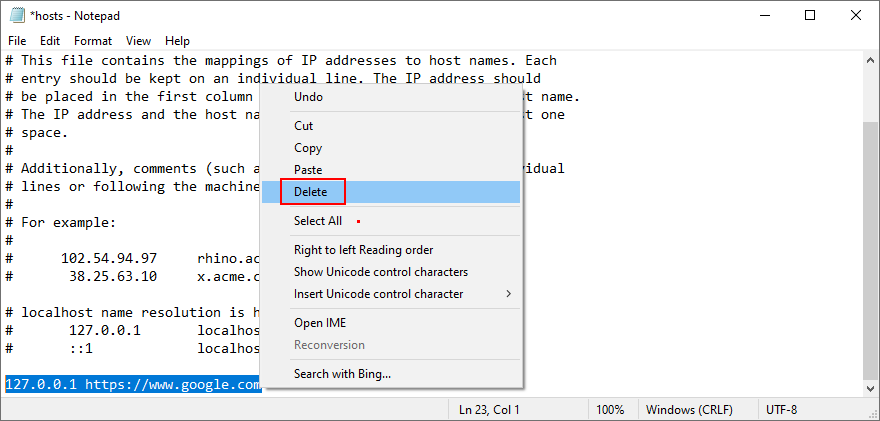
- Launch Chrome and try to access your website now
- If you need to restore the previous Hosts version, you just have to replace the newest file with the backup
20. Update your OS
Your operating system should have automatic access to updates, but that’s not always possible. In case you haven’t updated your OS for a long time, you should take care of that issue right away. It’s an opportunity to resolve a wide range of PC problems, including the DNS PROBE FINISHED NO INTERNET error on Google Chrome.
วิธีอัปเดต Windows 10:
- Click the Start button, search for Check for updates, and hit Enter
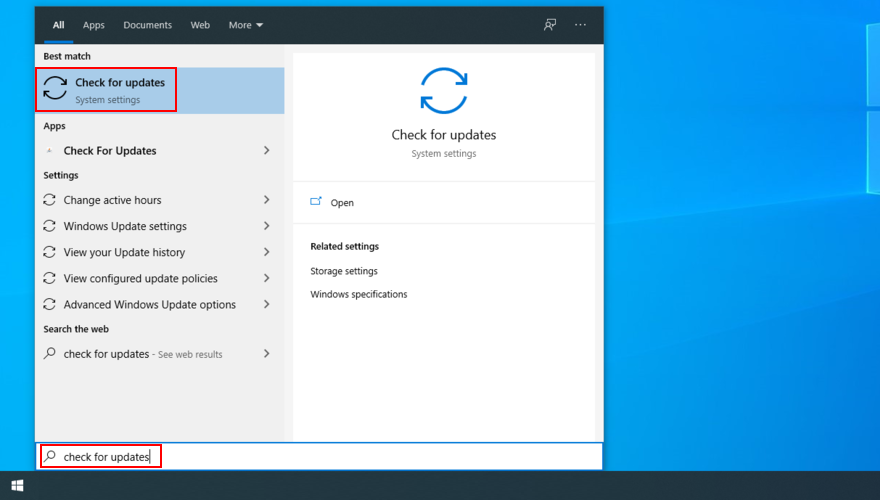
- If the auto-search doesn’t begin automatically, press the Check for updates button
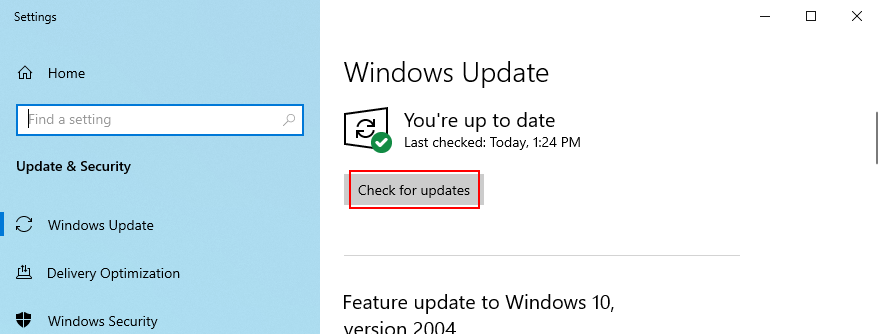
- Wait until Windows locates any available updates. If it finds anything, click Download
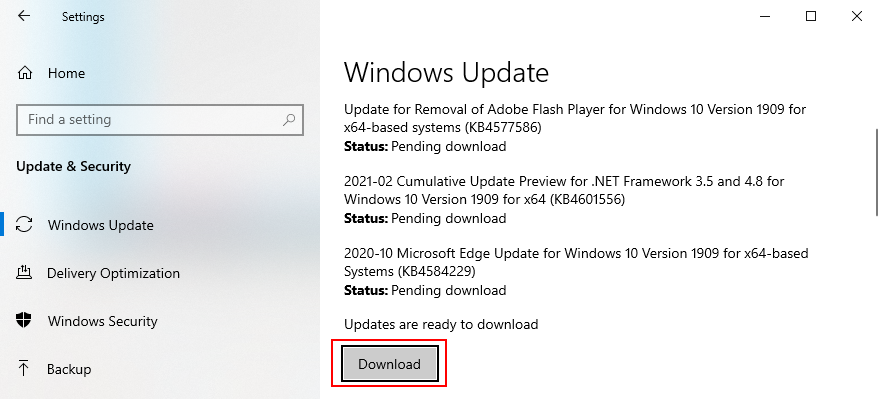
- Your PC might restart one or more times to complete the update
- When it finishes, launch Chrome and check for DNS issues
วิธีอัปเดต macOS:
- คลิกปุ่ม Apple ที่มุมบนซ้าย
- Press Software Update
- macOS will start looking for and downloading new updates
- When it finishes, restart the computer
- Launch Chrome and check for DNS errors
21. Check the network driver
There might be something wrong with your network device, which is causing DNS errors in your web browser. Try reinstalling the network adapter, updating its driver, or downgrading an incompatible driver to a stable version. Here’s everything you need to know.
How to reinstall the network device on Windows 10:
- Press Windows key + R, type devmgmt.msc, and press Enter
- In Device Manager, open the Network adapters category
- Identify your network adapter, right-click it, and select Uninstall device
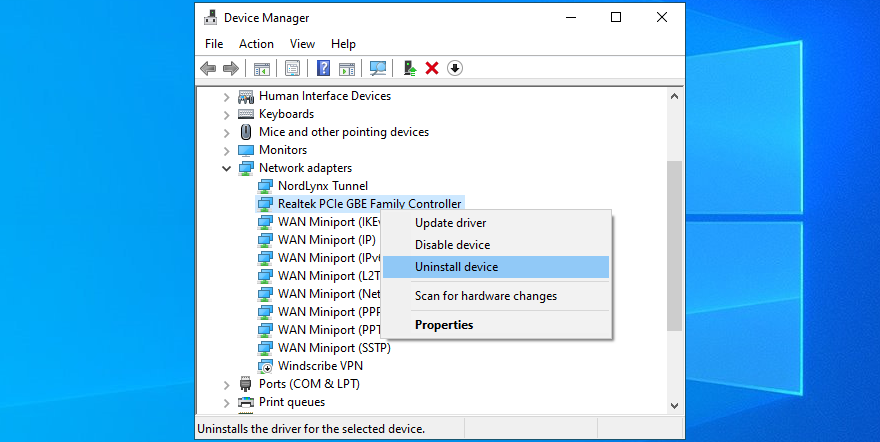
- Proceed with the removal steps
- เปิดเมนู การดำเนินการ และคลิก สแกนหาการเปลี่ยนแปลงฮาร์ดแวร์
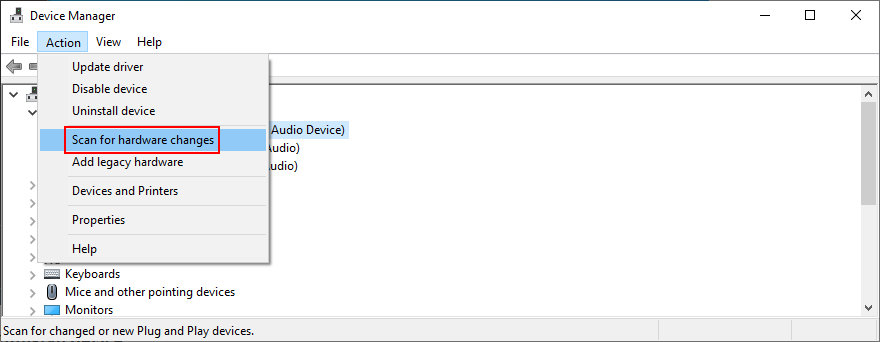
- Restart your PC. Windows will auto-reinstall the missing network adapter
- Check Chrome for DNS errors
How to update the network driver on Windows 10:
- Go to Device Manager
- Expand the Network adapters group
- Right-click your network adapter and choose Update driver
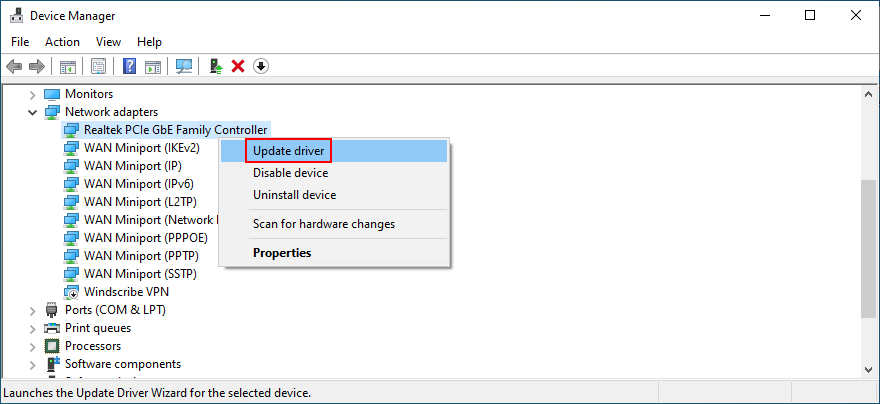
- Click Search automatically for updated driver software
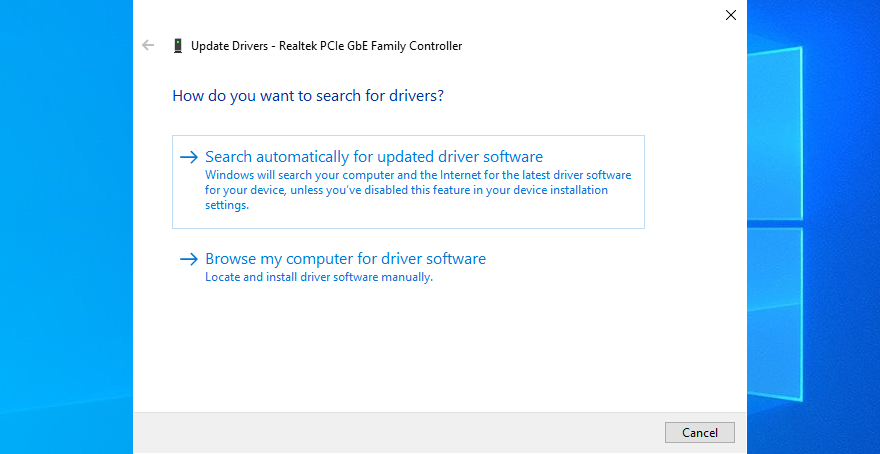
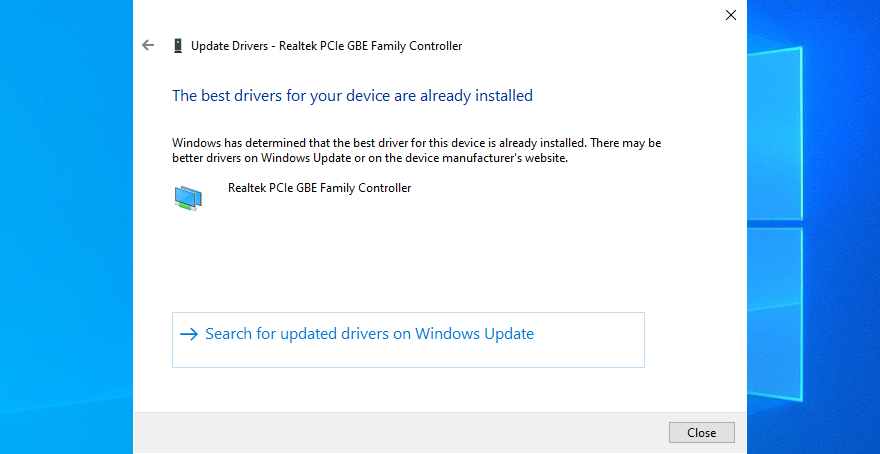
- If the online search doesn’t return any results, click Search for updated drivers on Windows Update. However, if you have already used Windows Update in a previous solution, you can skip this step
- Reboot your PC
- Start Chrome and check for DNS errors
If Windows can’t find a network driver available for download, you should visit the manufacturer’s website and look for a newer version yourself. Alternatively, you can turn to a driver update app to update all your device drivers and avoid getting incompatible versions that could cause system stability issues.
On the other hand, if you have already installed a network driver that doesn’t support Windows 10, you should roll it back to the previous, stable version.
How to roll back the network driver on Windows 10:
- Open Device Manager
- Right-click your network device and go to Properties
- เปลี่ยนไปที่แท็บ ไดรเวอร์
- Click Roll Back Driver and follow the step-by-step instructions
- If the button is greyed out, it means that you can’t perform the rollback because a previous version doesn’t exist on your computer
- Restart your computer
- Launch Chrome and check for DNS issues
22. Check IPv4 and IPv6 connectivity
If you don’t have Internet access at all but get the DNS PROBE FINISHED NO INTERNET error when trying to visit a webpage in Chrome, you should check the IPv4 and IPv6 settings of your Internet connection.
For example, if your network doesn’t support IPv6 connections but has it enabled in the properties panel, make sure that your device is still getting assigned with an IPv4 address, regardless of whether IPv6 is enabled or not.
How to verify IPv4 and IPv6 on Windows 10:
- Right-click the Start button and select Network Connections
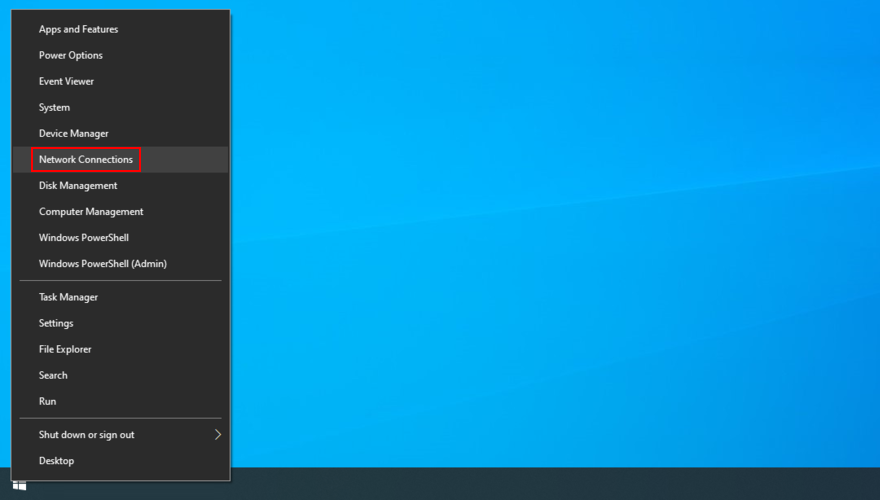
- Click Change adapter options

- Right-click your Internet connection and go to Properties

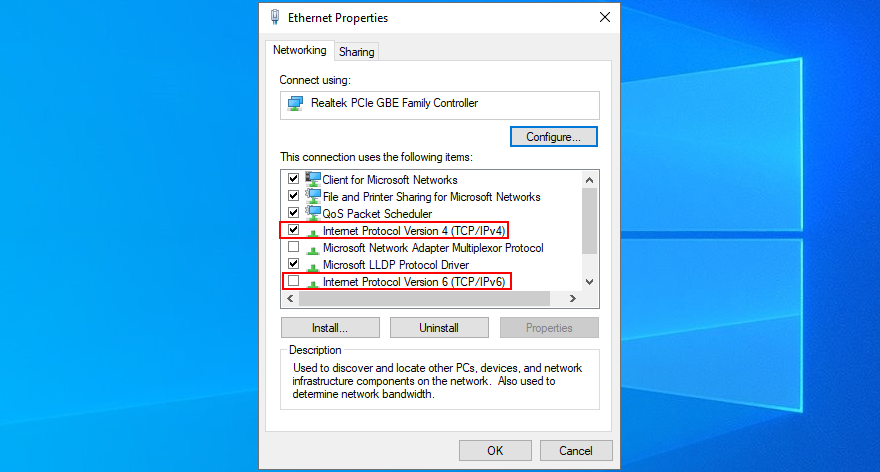
- Check the box next to Internet Protocol Version 4 (TCP/IPv4)
- Uncheck the box next to Internet Protocol Version 6 (TCP/IPv6)
- Click OK
- Launch Chrome and try to use it
23. Run the Internet Connections troubleshooter (Windows)
You can run the Internet Connections troubleshooter built into Windows 10 to resolve common issues that could have a negative impact on your browsing experience and trigger the DNS_PROBE_FINISHED_NO_INTERNET error in Chrome. โดยมีวิธีดังนี้:
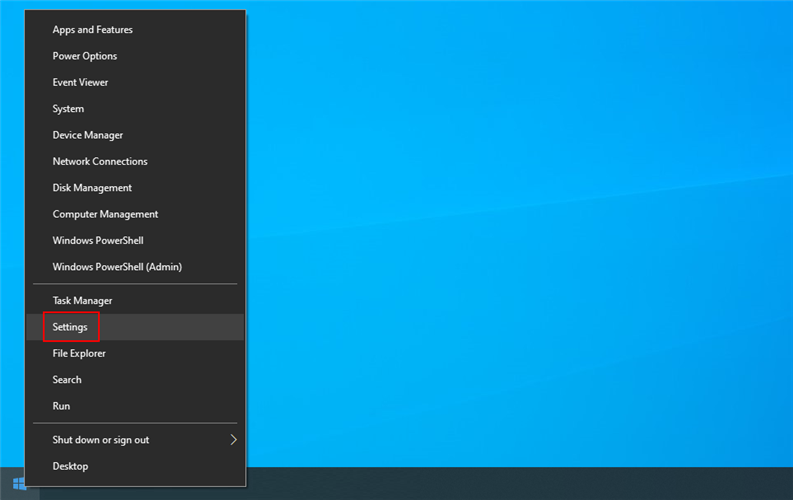
- Press the Windows key, search for Settings, and press Enter
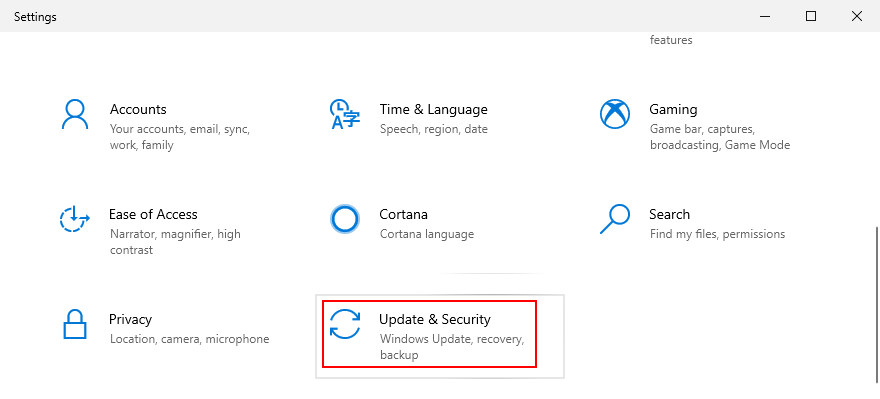
- Go to the Update & Security area
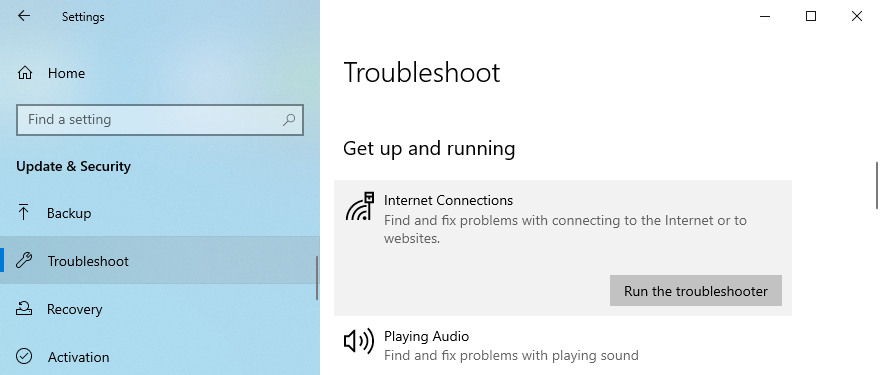
- Select Troubleshoot
- คลิก เครื่องมือแก้ปัญหาเพิ่มเติม

- Select Internet Connections and click Run the troubleshooter
- Proceed with the wizard steps
- Restart your computer and try to use Chrome now
24. Reboot your router and modem
To refresh your Internet connectivity settings, it’s a good idea to shut down your router and modem, wait for a few minutes, and then start them up again. Then, you can shift your attention to your computer, fire up Chrome, and see if you can access any pages.
The DNS_PROBE_FINISHED_NO_INTERNET issue can be solved
To recap, DNS_PROBE_FINISHED_NO_INTERNET is an error message that appears in Chrome and prevents you from going online. It describes a problem with the DNS servers, which can be used by incorrect DNS, computer, or Internet settings. There are multiple ways to repair it.
You should try using a different browser, restart Chrome, clear the browsing cache, update Chrome, reset it to default settings, disable any third-party browser extensions, reinstall the application, and always use the Chrome stable channel.
Furthermore, you should downgrade Chrome if you’re using an older Windows version, restart the DNS client service, use Google DNS servers, clear the DNS cache, run a ping test, visit a website by IP address instead of domain name, and turn off any VPN or proxy apps.
It’s also a good idea to check firewall settings, uninstall antivirus tools, check parental control settings, examine the Hosts file, update your operating system, check the network driver, check IPv4 and IPv6 connectivity, run the Internet Connections troubleshooter, as well as reboot your router and modem.
How did you manage to fix the DNS_PROBE_FINISHED_NO_INTERNET error on your device? แจ้งให้เราทราบในส่วนความคิดเห็นด้านล่าง
