ข้อผิดพลาด Blue Screen of Death เป็นสิ่งที่หลีกเลี่ยงไม่ได้ในคอมพิวเตอร์ Windows และอาจเกิดขึ้นได้เนื่องจากปัญหาต่าง ๆ กับซอฟต์แวร์หรือฮาร์ดแวร์ของคุณ สิ่งที่สำคัญที่สุดคือ ข้อผิดพลาด BSOD สามารถ ได้รับการแก้ไข โดยไม่ต้องติดต่อฝ่ายสนับสนุนด้านเทคนิคของ Microsoft
VIDEO SCHEDULER INTERNAL ERROR คืออะไร
VIDEO SCHEDULER INTERNAL ERROR คือข้อความแสดงข้อผิดพลาดที่ปรากฏขึ้นบนหน้าจอของคุณหลังจากเปลี่ยนเป็นสีน้ำเงิน สิ่งที่เกิดขึ้นคือ Windows 10 จะล็อกคุณไว้เพื่อป้องกันความเสียหายที่อาจเกิดขึ้นกับคอมพิวเตอร์ของคุณ
เกิดจากปัญหากับการ์ดแสดงผลของคุณและมักเกิดขึ้นกับ NVIDIA GPU บางที การ์ดแสดงผลจะตรวจไม่ถูกต้อง โดยพีซีของคุณ อย่างไรก็ตามคุณสามารถแก้ไขข้อผิดพลาดนี้ได้โดยไม่ต้องขอความช่วยเหลือจากผู้เชี่ยวชาญ
ปัญหาที่อาจเกิดขึ้นได้มีดังนี้:
- ระบบปฏิบัติการหรือ BIOS ที่ล้าสมัย
- การติดมัลแวร์หรือความเสียหายของรีจิสทรี
- การโอเวอร์คล็อก
- ซอฟต์แวร์ความปลอดภัยที่เข้ากันไม่ได้การอัปเดตระบบหรืออุปกรณ์ต่อพ่วง
- การตั้งค่าไฟร์วอลล์ไม่ถูกต้อง
- ไดรเวอร์ GPU ที่ล้าสมัยหรือเข้ากันไม่ได้
วิธีแก้ไข VIDEO SCHEDULER INTERNAL ERROR บน Windows 10
ในการกำจัดรหัสหยุด VIDEO SCHEDULER INTERNAL ERROR คุณต้องแก้ไขปัญหาพื้นฐานเกี่ยวกับจอแสดงผลของคุณ อย่างไรก็ตามก่อนที่จะเริ่มดำเนินการแก้ไขปัญหาคุณควร สร้างจุดคืนค่าระบบ คุณจะสามารถเปลี่ยน Windows 10 กลับเป็นด่านก่อนหน้าได้ในกรณีที่คุณต้องเริ่มใหม่ตั้งแต่ต้น
1. ตรวจสอบการอัปเดตระบบ
เริ่มต้นด้วยการอัปเดต Windows 10 เป็นเวอร์ชันล่าสุด โดยปกติสิ่งนี้ควรเกิดขึ้นโดยอัตโนมัติบนคอมพิวเตอร์ของคุณ อย่างไรก็ตามหากปิดใช้งานการอัปเดตอัตโนมัติคุณต้องทริกเกอร์ด้วยตนเอง มันค่อนข้างง่าย:
- คลิกปุ่ม เริ่ม พิมพ์ ตรวจหาการอัปเดต แล้วกด Enter
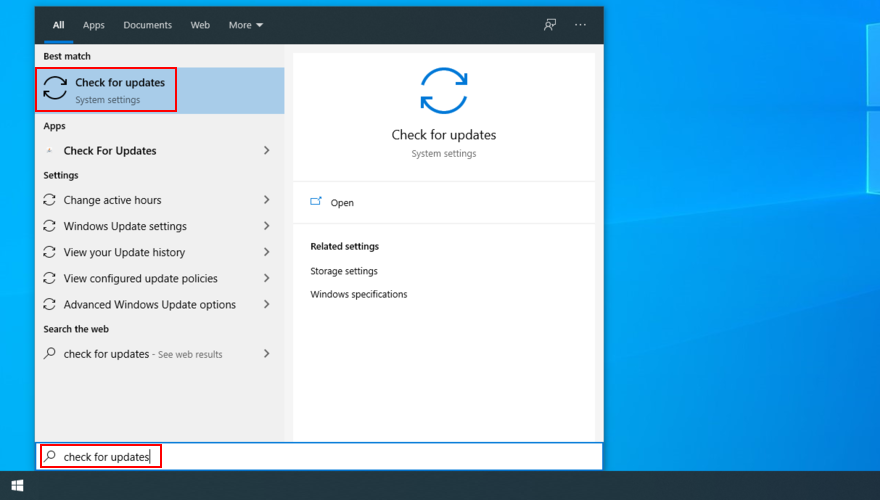
- ระบบปฏิบัติการของคุณควรเริ่มค้นหาการอัปเดตทันที หากไม่เป็นเช่นนั้นให้คลิก ตรวจหาการอัปเดต
- คลิก ดาวน์โหลด เพื่อรับการอัปเดตที่รอดำเนินการ

- พีซีของคุณอาจรีสตาร์ทหลายครั้ง เมื่อเสร็จสิ้นให้ตรวจสอบข้อผิดพลาด BSOD
หาก Windows 10 ไม่สามารถดำเนินการให้เสร็จสมบูรณ์ อัปเดต ลองเริ่มการทำงานของ Windows Update และบริการที่ขึ้นต่อกัน
2. เรียกใช้การทดสอบความเครียดของ GPU
วิธีที่ดีที่สุดในการระบุปัญหาของการ์ดแสดงผลของคุณคือ เรียกใช้การทดสอบความเครียดของ GPU เพื่อดูประเภทของ Artifact ที่คุณได้รับ แม้ว่าจะใช้เวลานานกว่า แต่การทดสอบควรใช้เวลาอย่างน้อยหนึ่งชั่วโมงเพื่อให้ละเอียด ในตอนท้ายเป็นความคิดที่ดีที่จะบันทึกอุณหภูมิสูงสุด
การค้นหาเครื่องมือที่เหมาะสมเพื่อทำการทดสอบความเครียดบนการ์ดแสดงผลของคุณอาจเป็นเรื่องยาก หากคุณยังไม่แน่ใจเราขอแนะนำให้เลือก FurMark , MSI Afterburner หรือ GPU-Z
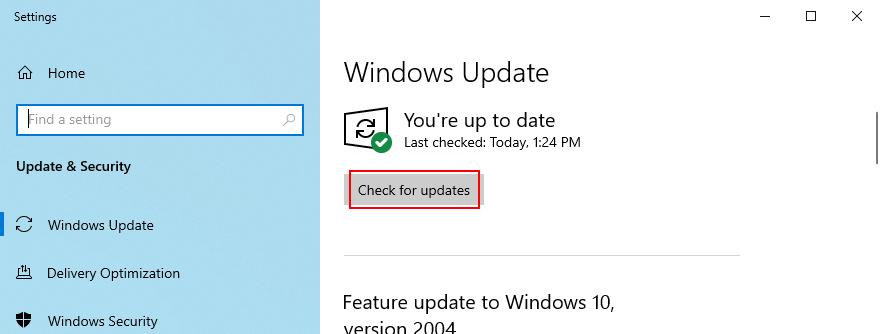
3. เรียกใช้การสแกนมัลแวร์
ข้อผิดพลาดภายในของ Windows 10 VIDEO SCHEDULER INTERNAL ERROR อาจเกิดจากการติดไวรัส ดังนั้นจึงควรเรียกใช้การสแกนมัลแวร์บนคอมพิวเตอร์ของคุณเพื่อค้นหาและกำจัดภัยคุกคามไม่ว่าคุณจะใช้ Windows Defender หรือแอปพลิเคชันป้องกันมัลแวร์ของบุคคลที่สาม
วิธีใช้ Windows Defender:
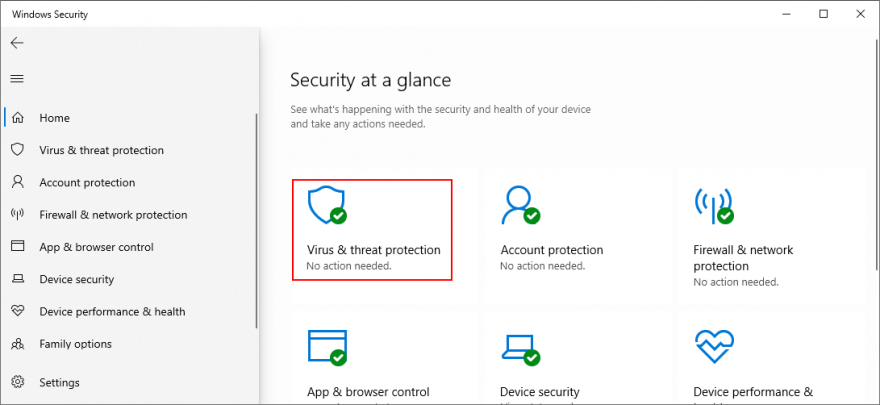
- กดปุ่ม Win พิมพ์ Windows Security และกด Enter เพื่อเปิดแอปพลิเคชันนี้
- เลือก การป้องกันไวรัสและภัยคุกคาม
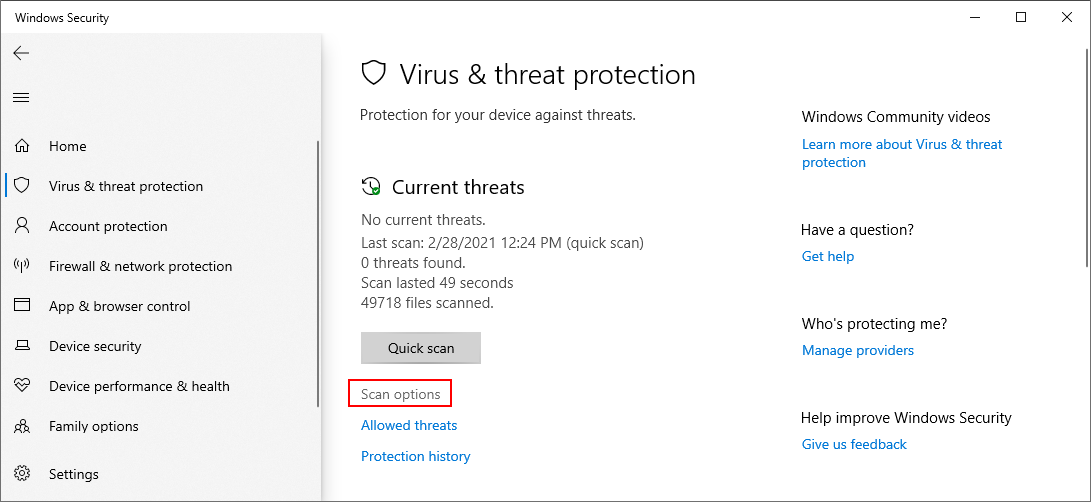
- คลิก ตัวเลือกการสแกน
- เลือก สแกนด่วน จากรายการโหมดสแกน
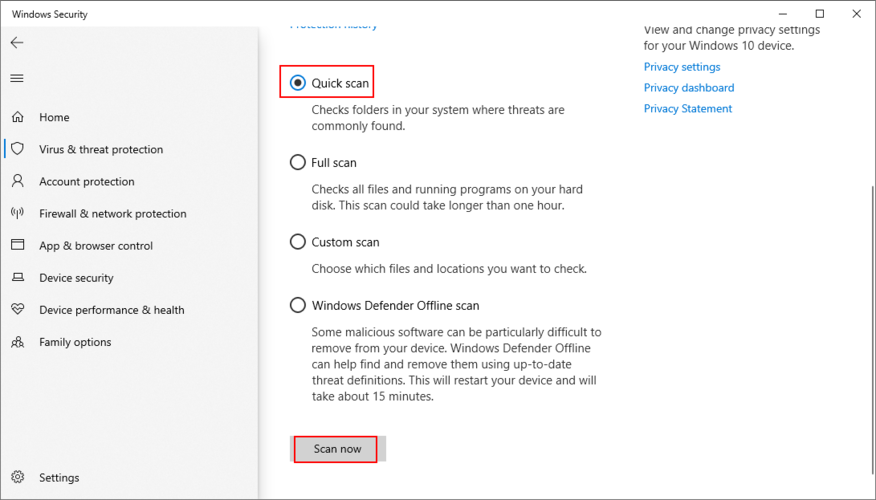
- คลิก สแกนเดี๋ยวนี้
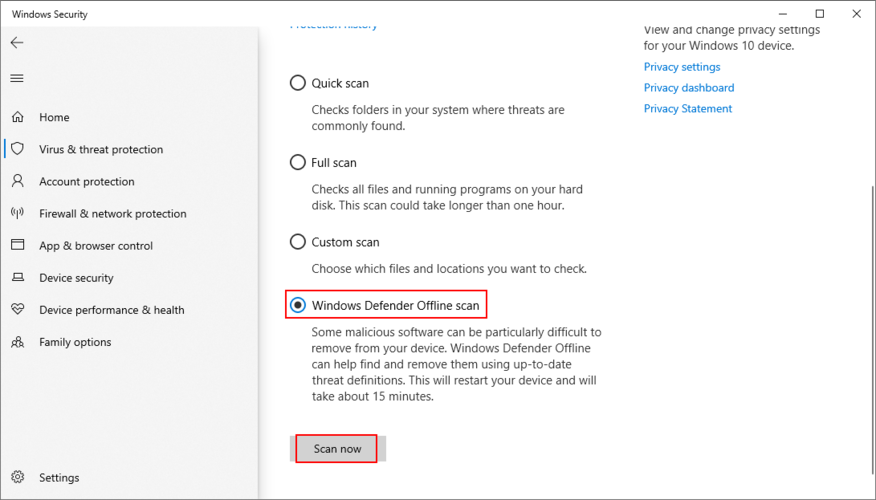
- อดทนรอในขณะที่ Defender ทำการสแกนและอนุญาตให้ลบการติดเชื้อใด ๆ หากไม่พบสิ่งที่น่าสงสัยให้เรียกใช้การตรวจสอบอีกครั้งโดยใช้โหมด การสแกน Windows Defender Offline
- เมื่อ Defender ทำงานได้แล้วให้รีสตาร์ทพีซีของคุณ
- ตรวจสอบข้อผิดพลาดของหน้าจอสีน้ำเงิน
4. แก้ไขรีจิสทรีของระบบ
หากรีจิสทรีของ Windows ได้รับการแก้ไขมากเกินไปเนื่องจากการติดตั้งซอฟต์แวร์มากเกินไปอาจทำให้เกิดความเสียหายทำให้เรียกใช้รหัสหยุด BSOD เช่น VIDEO_SCHEDULER_INTERNAL_ERROR ได้ อย่างไรก็ตามคุณสามารถแก้ไขได้โดยไม่ต้องรีเซ็ตพีซีหรือใช้ System Restore
- สร้างการสำรองข้อมูลรีจิสทรี:
- คลิกปุ่ม เริ่ม ค้นหา Registry Editor และเปิดแอปนี้
- เปิดเมนู ไฟล์ และเลือก ส่งออก
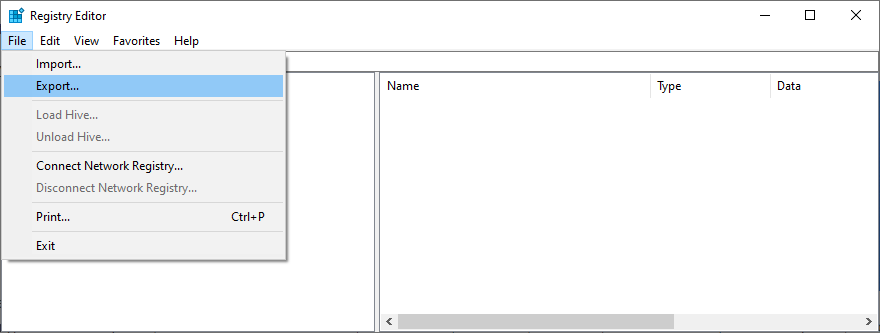
- ระบุชื่อไฟล์และบันทึกโฟลเดอร์สำหรับไฟล์. reg
- คลิก บันทึก
- ออกจาก Registry Editor
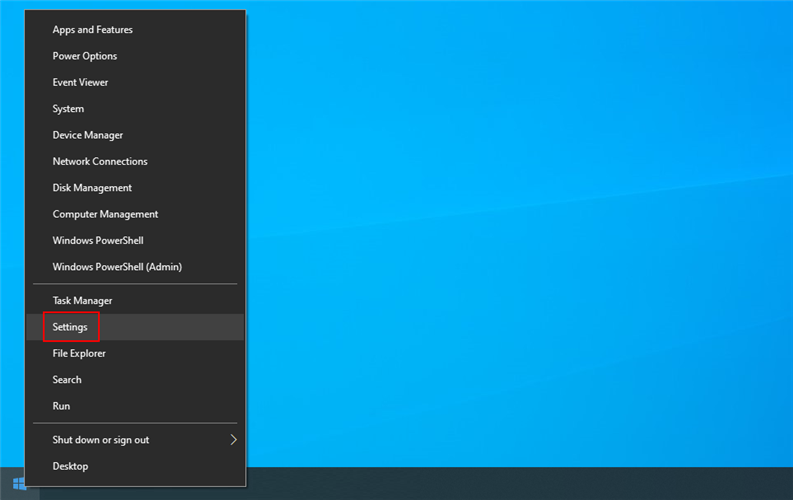
- คลิกขวาที่ปุ่ม เริ่ม และไปที่ การตั้งค่า
 li>
li>
- คลิก อัปเดตและความปลอดภัย

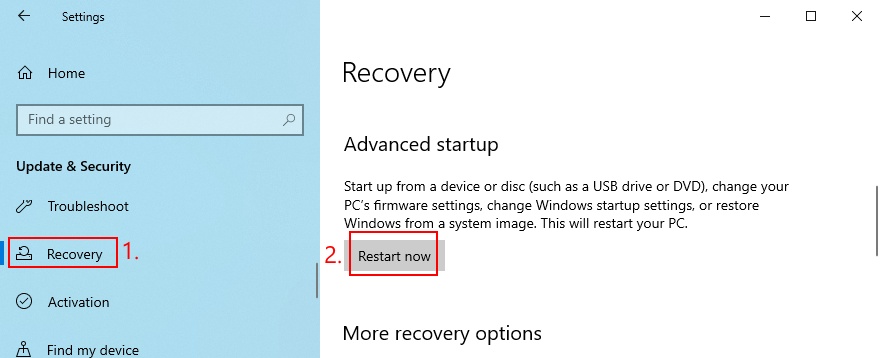
- ข้ามไปที่ การกู้คืน ทางด้านซ้าย
- ที่ การเริ่มต้นขั้นสูง คลิก รีสตาร์ททันที

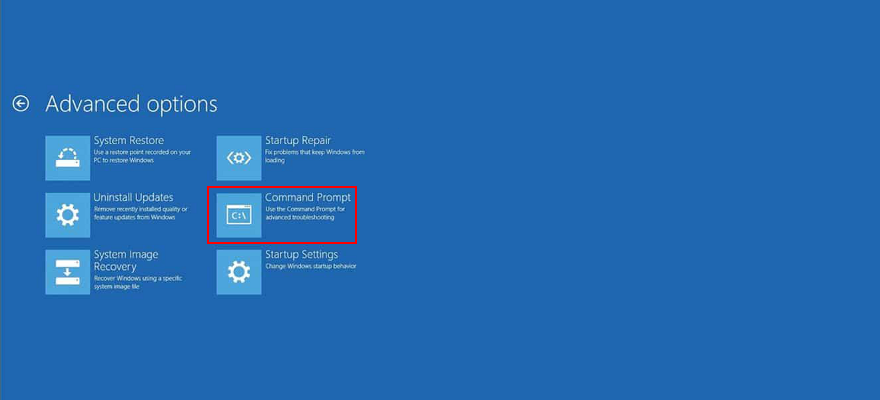
- Windows 10 จะรีบูตในโหมด การเริ่มต้นขั้นสูง เลือก แก้ไขปัญหา > ตัวเลือกขั้นสูง
- คลิก พร้อมรับคำสั่ง
- วางคำสั่งต่อไปนี้ (กด Enter หลังแต่ละคำสั่ง):
-
cd c: \ Windows \ System32 \ config
-
ren c: \ Windows \ System32 \ config \ DEFAULT DEFAULT.old
-
ren c: \ Windows \ System32 \ config \ SAM SAM.old
-
ren c: \ Windows \ System32 \ config \ SECURITY SECURITY.old
-
ren c: \ Windows \ System32 \ config \ SOFTWARE SOFTWARE.old
-
ren c: \ Windows \ System32 \ config \ SYSTEM SYSTEM.old
-
คัดลอก c: \ Windows \ System32 \ config \ RegBack \ DEFAULT c: \ Windows \ System32 \ config \
-
คัดลอก c: \ Windows \ System32 \ config \ RegBack \ DEFAULT c: \ Windows \ System32 \ config \
-
คัดลอก c: \ Windows \ System32 \ config \ RegBack \ SAM c: \ Windows \ System32 \ config \
-
คัดลอก c: \ Windows \ System32 \ config \ RegBack \ SECURITY c: \ Windows \ System32 \ config \
-
คัดลอก c: \ Windows \ System32 \ config \ RegBack \ SYSTEM c: \ Windows \ System32 \ config \
-
คัดลอก c: \ Windows \ System32 \ config \ RegBack \ SOFTWARE c: \ Windows \ System32 \ config \
- รีสตาร์ทพีซีของคุณ
- ตรวจสอบว่าคุณยังคงได้รับรหัสหยุด VIDEO SCHEDULER INTERNAL ERROR หรือไม่
- คลิก อัปเดตและความปลอดภัย
5. ปิดใช้งานการโอเวอร์คล็อก
เกมเมอร์บางคนโอเวอร์คล็อกคอมพิวเตอร์เพื่อดึง GPU, CPU หรือ RAM ออกมามากขึ้นเพื่อปรับปรุงความต้องการของระบบสำหรับเกมที่มีความต้องการสูง อย่างไรก็ตามหากทำไม่ถูกต้องหรือหากตัวทำความเย็นไม่มีพลังมากพอที่จะรักษาความร้อนที่เพิ่มขึ้นอาจทำให้หน้าจอของคุณเปลี่ยนเป็นสีน้ำเงินเพื่อป้องกันฮาร์ดแวร์ของคุณไม่ให้ร้อนเกินไป
ทางออกที่ดีกว่าคือปิดซอฟต์แวร์โอเวอร์คล็อกของคุณ จากนั้นจำลองสถานการณ์ที่นำไปสู่ VIDEO SCHEDULER INTERNAL ERROR ในตอนแรกเช่นการเปิดตัวเกมใดเกมหนึ่ง
6. รีเซ็ต BIOS
BIOS มีตัวเลือกเจ๋ง ๆ มากมายที่คุณสามารถกำหนดค่าได้รวมถึงการโอเวอร์คล็อกการแคชและการแรเงา อย่างไรก็ตามเช่นเดียวกับในโซลูชันก่อนหน้านี้หากคุณไม่ทำในสิ่งที่คุณกำลังทำอยู่คุณอาจได้รับอันตรายจากพีซีของคุณเนื่องจากการตั้งค่า BIOS ที่ไม่ถูกต้อง ในการแก้ไขปัญหานี้คุณต้องกู้คืนตัวเลือก BIOS กลับเป็นค่าจากโรงงาน
- รีสตาร์ทคอมพิวเตอร์ของคุณ
- ก่อนที่ Windows จะบู๊ตให้กดปุ่มที่แสดงบนหน้าจอเพื่อเข้าสู่โหมด BIOS
- เข้าถึงการตั้งค่าขั้นสูง
- ค้นหาและเปิดใช้งานตัวเลือกที่รีเซ็ตการกำหนดค่า BIOS เป็นค่าเริ่มต้น
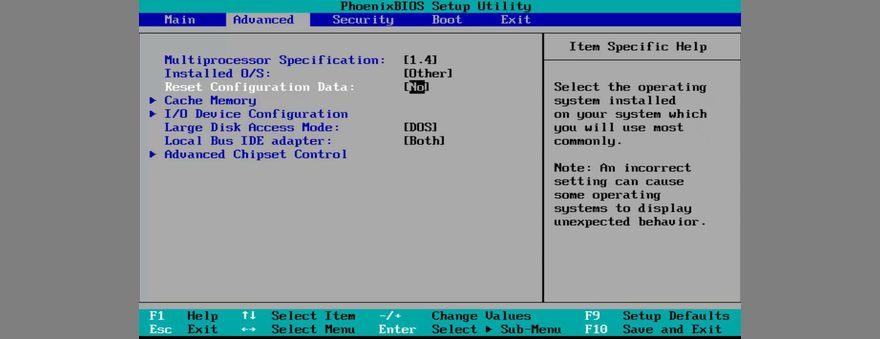
- บันทึกการตั้งค่า BIOS ปัจจุบันและออก
- หลังจากบูตระบบปฏิบัติการแล้วให้ตรวจสอบข้อผิดพลาด BSOD เพิ่มเติม
7. อัปเดต BIOS
เนื่องจากเรากำลังคุยเรื่อง BIOS อยู่จึงควรตรวจสอบว่ามันล้าสมัยหรือไม่ เช่นเดียวกับระบบปฏิบัติการแอปพลิเคชันและเฟิร์มแวร์เราเตอร์ของคุณควรอัปเดต BIOS เป็นเวอร์ชันล่าสุดเพื่อใช้ประโยชน์จากคุณสมบัติใหม่ล่าสุด
- เชื่อมต่อแฟลชไดรฟ์ USB เปล่าเข้ากับพีซีของคุณ
- กดแป้น Windows ค้นหา ข้อมูลระบบ และเปิดแอปนี้
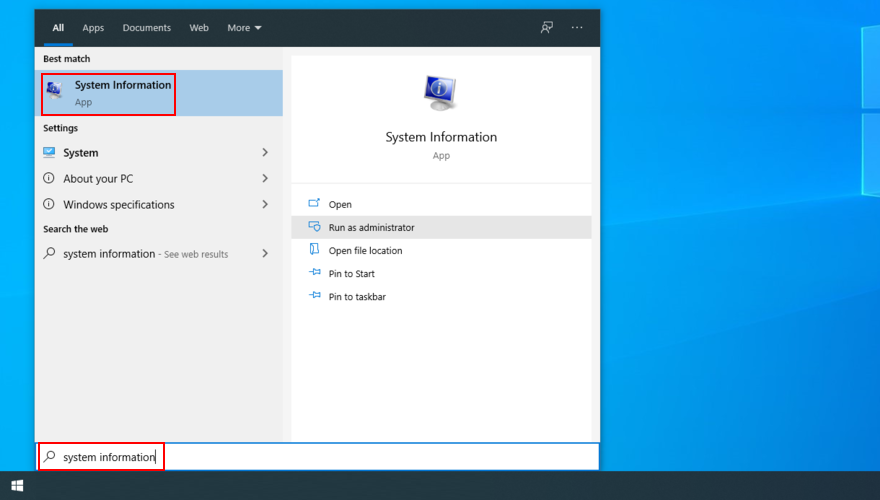
- ไปที่ส่วน สรุประบบ
- จดบันทึกข้อมูลที่แสดงใน เวอร์ชัน/วันที่ของ BIOS และ ผู้ผลิต BaseBoard

- โดยคำนึงถึง ผู้ผลิต BaseBoard โปรดไปที่เว็บไซต์อย่างเป็นทางการของผู้ผลิต BIOS ของคุณ
- ตรวจสอบรายละเอียดที่เปิดเผยใน เวอร์ชัน/วันที่ของ BIOS และใช้เพื่อค้นหา BIOS เวอร์ชันใหม่ที่เข้ากันได้กับระบบปฏิบัติการของคุณ
- ดาวน์โหลดไฟล์เก็บถาวร BIOS และแตกไฟล์ลงในไดรฟ์ปากกา
- รีสตาร์ทพีซีของคุณและเข้าสู่โหมด BIOS โดยกดปุ่มที่แสดงบนหน้าจออย่างรวดเร็ว
- สร้างข้อมูลสำรองของ BIOS เวอร์ชันปัจจุบันและบันทึกลงในแฟลชไดรฟ์ USB
- เริ่มการอัปเดต BIOS และทำตามขั้นตอนบนหน้าจอ
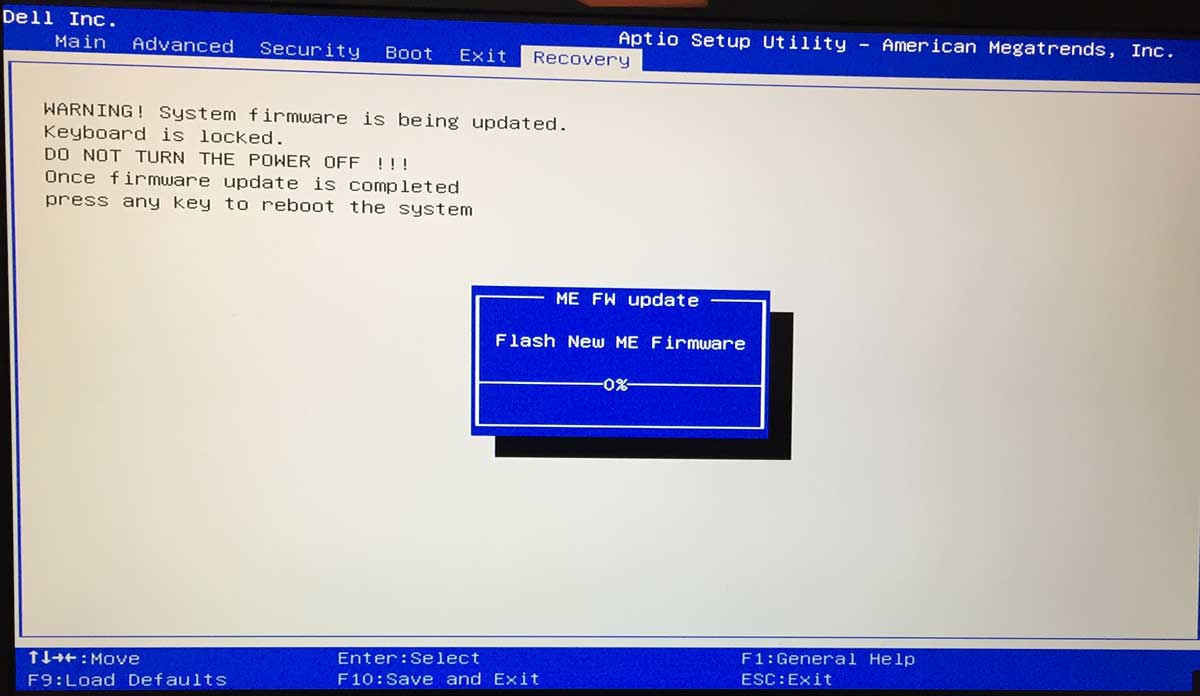
- อดทนรอในระหว่างการอัปเดตและอย่ารีสตาร์ทหรือปิดพีซีของคุณ
- เริ่ม Windows 10 ตามปกติ
- ตรวจสอบ VIDEO SCHEDULER INTERNAL ERROR

8. ถอนการติดตั้งเครื่องมือรักษาความปลอดภัยของ บริษัท อื่น
โซลูชันซอฟต์แวร์ของ บริษัท อื่นไม่ทั้งหมดที่สนับสนุน Windows 10 อย่างสมบูรณ์ในความเป็นจริงบางส่วนอาจทำให้เกิดปัญหาการแสดงผลและทำให้เกิดข้อความแสดงข้อผิดพลาด BSOD เช่น VIDEO SCHEDULER INTERNAL ERROR ในการแก้ไขปัญหานี้คุณควรกำจัดแอปพลิเคชันความปลอดภัยของบุคคลที่สามทั้งหมดที่ติดตั้งเมื่อเร็ว ๆ นี้
- คลิกขวาที่ปุ่ม เริ่ม แล้วเลือก แอปและคุณลักษณะ
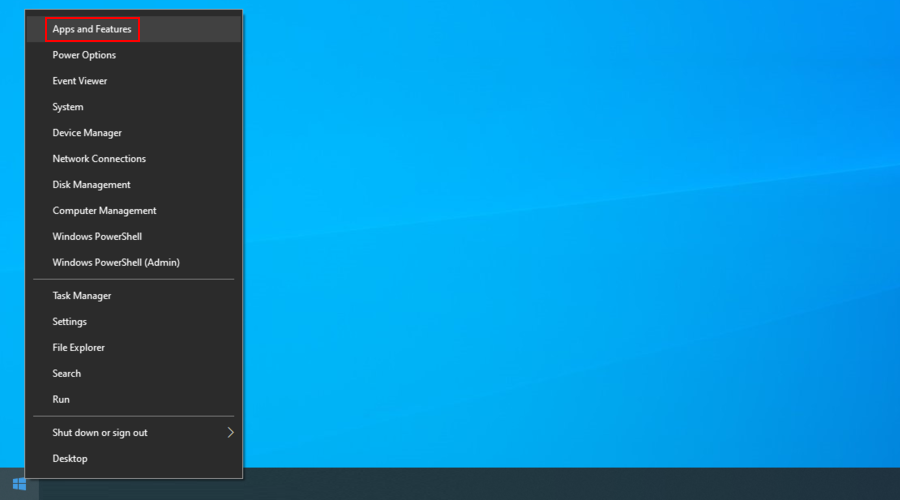
- ตั้งค่า เรียงตาม เป็น วันที่ติดตั้ง (ใหม่สุดก่อน)
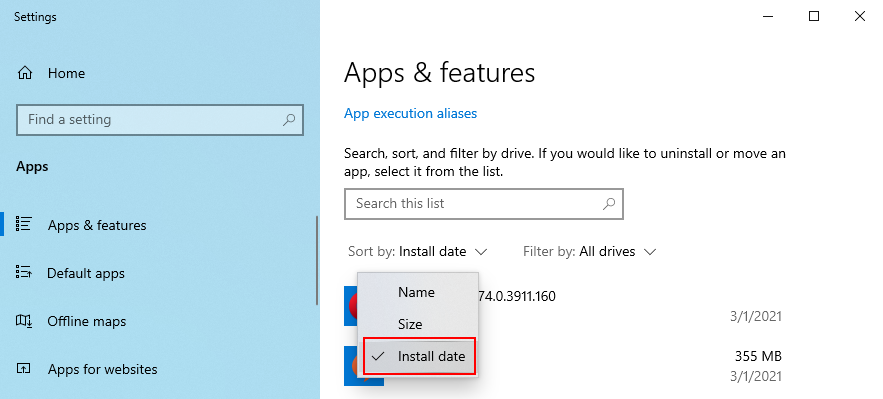
- เลือกโปรแกรมรักษาความปลอดภัยแล้วคลิก ถอนการติดตั้ง
- คลิก ถอนการติดตั้ง อีกครั้งเพื่อยืนยัน
- ดำเนินการลบต่อไป
- รีบูตพีซีของคุณและตรวจสอบข้อผิดพลาด BSOD
โปรแกรมถอนการติดตั้งในตัวของ Windows 10 สามารถลบโปรแกรมออกจากคอมพิวเตอร์ของคุณเท่านั้น หากคุณกำลังมองหาวิธีลบไฟล์ที่เหลือและกู้คืนการตั้งค่ารีจิสทรีเราขอแนะนำให้ใช้ ตัวกำจัดแอปพลิเคชันเฉพาะ ที่ทำงานได้อย่างละเอียด
9. ถอนการติดตั้งการอัปเดตระบบ
หากคุณเริ่มรับรหัสหยุด VIDEO_SCHEDULER_INTERNAL_ERROR หลังจากการอัปเดตระบบล่าสุดนั่นอาจเป็นจุดที่คุณควรให้ความสนใจ การอัปเดต Windows บางรายการอาจทำให้เกิดปัญหาด้านความเสถียรเนื่องจากไม่สนับสนุนการกำหนดค่าระบบของคุณอย่างสมบูรณ์ดังนั้นจึงเป็นการดีกว่าที่จะกำจัดออกและรอจนกว่า Microsoft จะเปิดตัวการอัปเดตที่เชื่อถือได้
วิธีถอนการติดตั้งการอัปเดต Windows ล่าสุด:
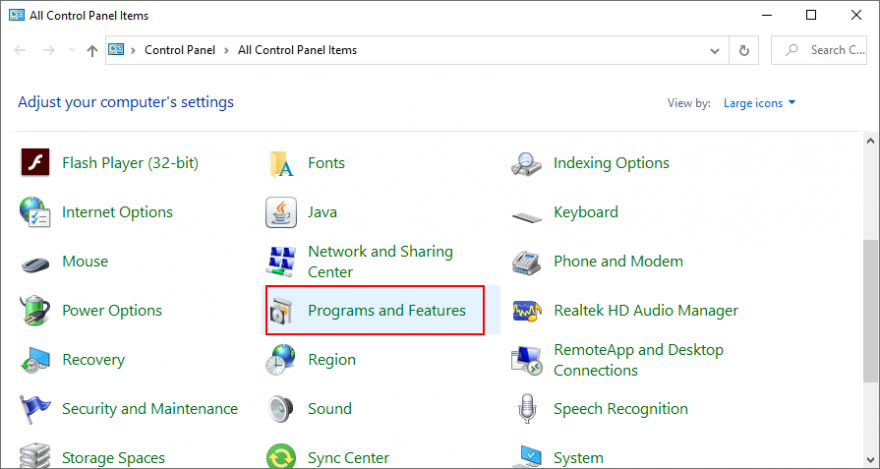
- กดปุ่ม Windows + R พิมพ์ แผงควบคุม และกด Enter
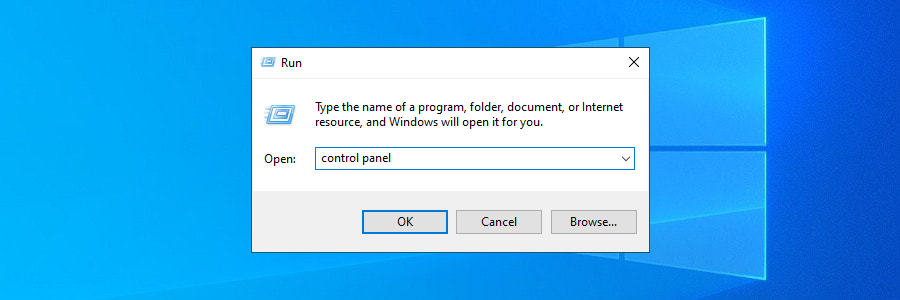
- ไปที่ โปรแกรมและคุณลักษณะ
- คลิก ดูการอัปเดตที่ติดตั้ง
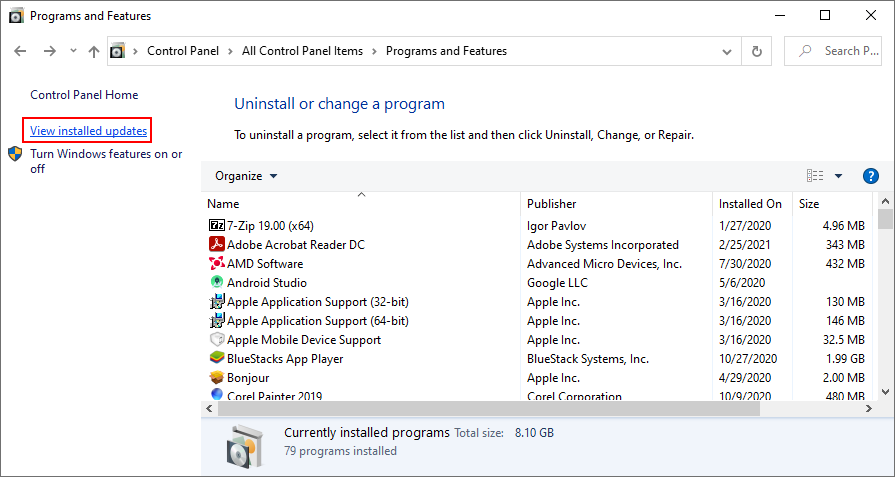
- คลิกที่คอลัมน์ ติดตั้งบน เพื่อจัดเรียงการอัปเดตตามวันที่ (ใหม่สุดก่อน)
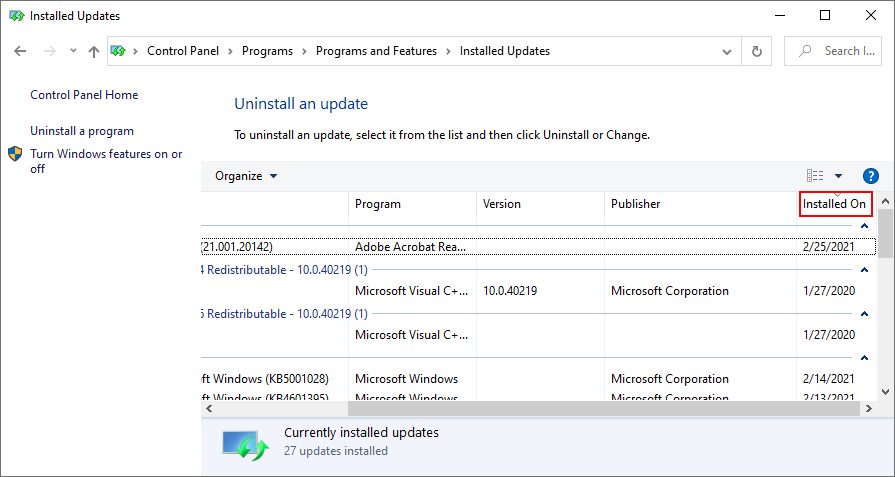
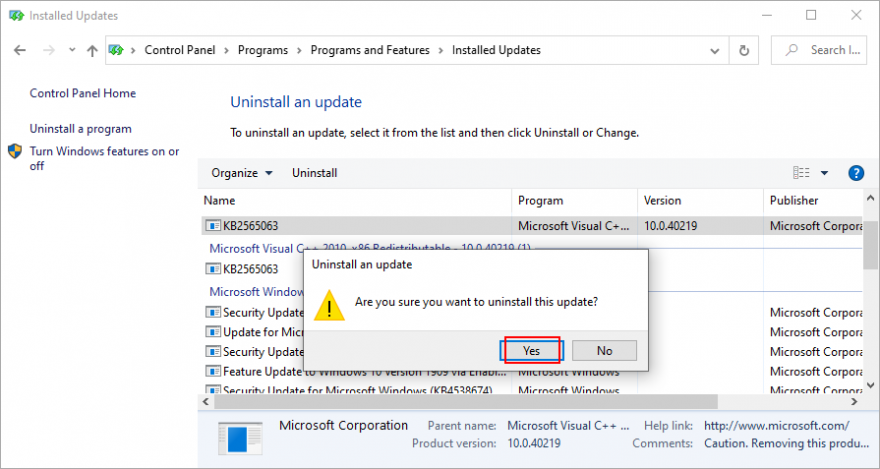
- คลิกขวาที่การอัปเดตแรกในรายการแล้วเลือก ถอนการติดตั้ง
- เมื่อถูกถามว่าแน่ใจหรือไม่ให้คลิก ใช่
- Reboot your PC and check for BSOD errors
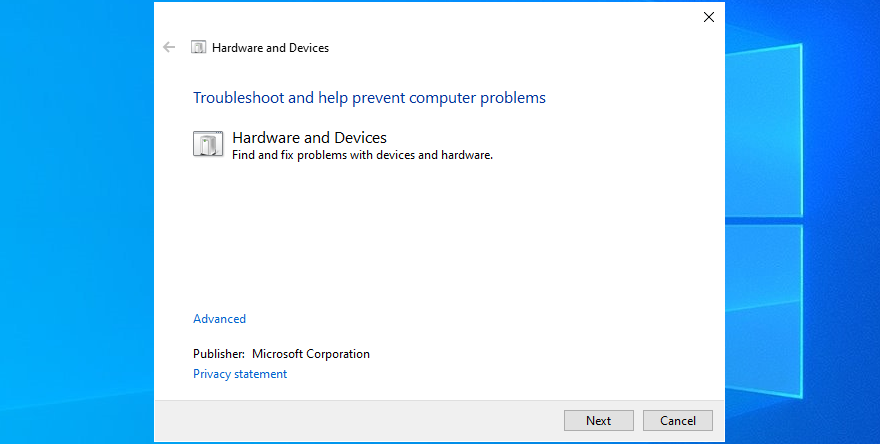
10. Run the Hardware and Devices troubleshooter
Windows has a troubleshooter designed to fix common errors with your hardware and devices. It’s a good idea to use it for getting rid of the the VIDEO SCHEDULER INTERNAL ERROR.
- Press the Win key + R, type msdt.exe-id DeviceDiagnostic, and hit the Enter key

- Click Next and follow the given instructions
- If it finds a way to repair your hardware and devices, click Apply this fix
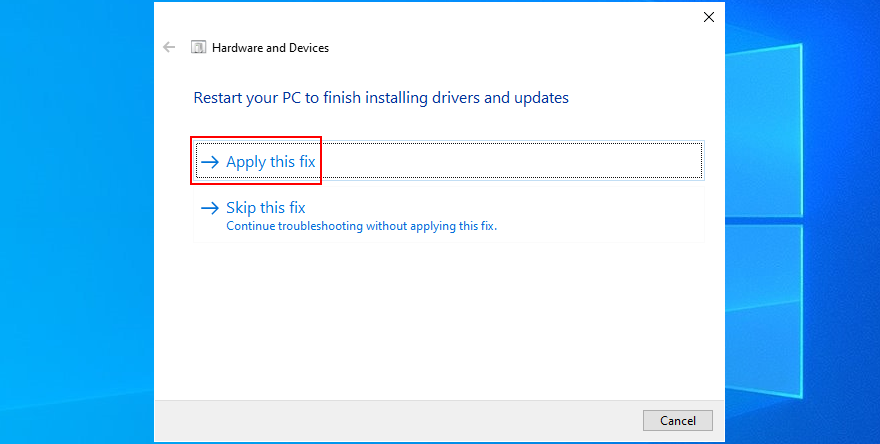
- Restart Windows 10
- See if you are still getting blue screen messages
11. Remove recent peripheral devices
The hardware components you recently attached to your desktop or laptop might not be functioning correctly. Or, they could be incompatible with your operating system. So it’s a good idea to detach them, then start your PC and check for blue screen errors.
If you can’t tell which device is at fault, just shut down your computer and unplug everything, except for your mouse and keyboard. Then, boot Windows and confirm that your PC is no longer crashing.
Replug one device at a time and see what happens with your computer. When you get the VIDEO SCHEDULER INTERNAL ERROR again, you will know for sure which component is malfunctioning. In that case, you should send it back to the manufacturer to fix it.
12. Disable your antivirus software
Your antivirus software solution might be blocking critical system processes that your computer needs to function correctly. Otherwise, you could end up with blue screen messages such as VIDEO SCHEDULER INTERNAL ERROR.
It typically happens when you have a third-party anti-malware application installed, which isn’t compatible with your operating system. Or, if you have two or more security tools with real-time protection, those components might clash, leading to PC crashes.
To resolve this problem, make sure to turn off any third-party software solutions. And, if you have multiple such programs installed, remove them to restore the stability of your computer.
13. Turn off the firewall
Other security issues might be caused by your firewall, which blocks Internet access to critical components that Windows requires, such as Windows Update. If you or someone else with access to your PC has messed up the firewall settings, then you should restore them to default.
Furthermore, some third-party firewall applications might have a default configuration that’s wrong for your PC, so you should remove them. If you’re not in this situation, here’s how to temporarily turn off Windows Firewall:
- Make sure you’re signed in as the PC administrator
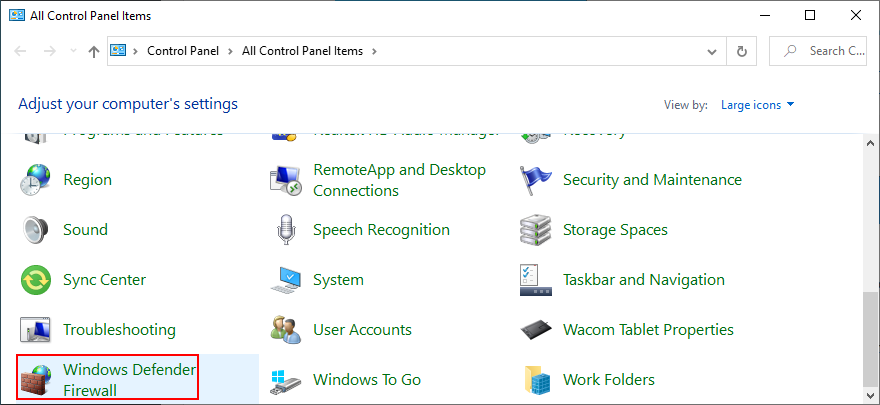
- Click the Start button, search for Control Panel, and open this app
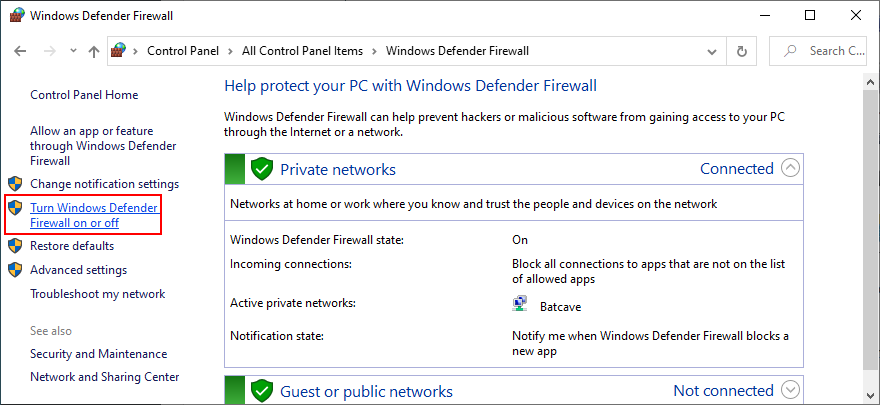
- Go to Windows Defender Firewall
- Click Turn Windows Defender on or off on the left side
- Select Turn off Windows Defender Firewall (not recommended) at both Private network settings and Public network settings
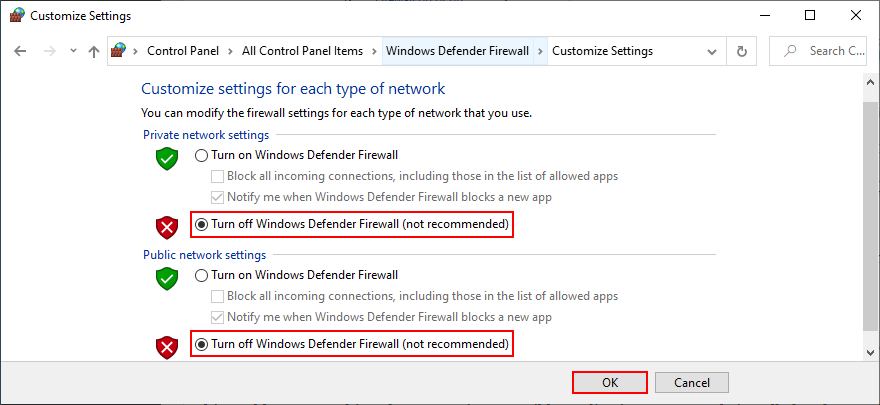
- Click OK and restart your PC
- Check for BSOD errors
It’s not a good idea to leave your firewall turned off because it means exposing your machine to Internet dangers. Make sure to turn it back on as soon as possible by retracing the steps above.
14. Update your GPU driver
If your graphics adapter is outdated, it’s no wonder that VIDEO SCHEDULER INTERNAL ERROR pops up on your screen. To resolve this problem, you just have to update your GPU driver to the newest version.
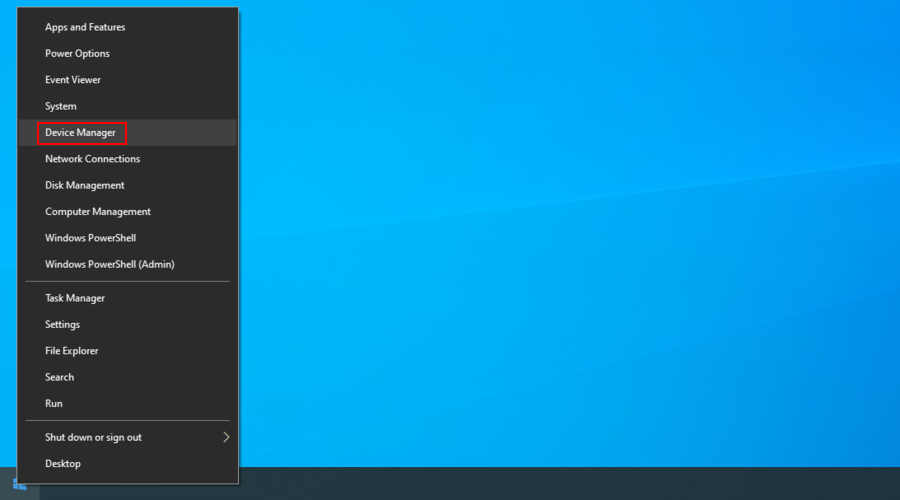
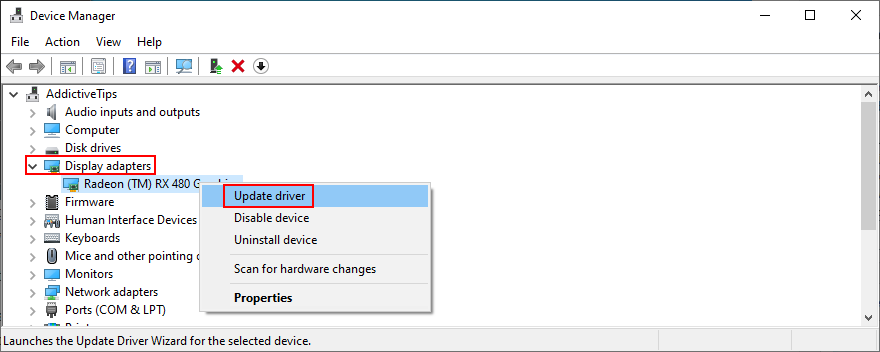
- Right-click the Windows 10 Start button and select Device Manager
- Expand the Display adapters category
- Right-click your graphics device and choose Update driver
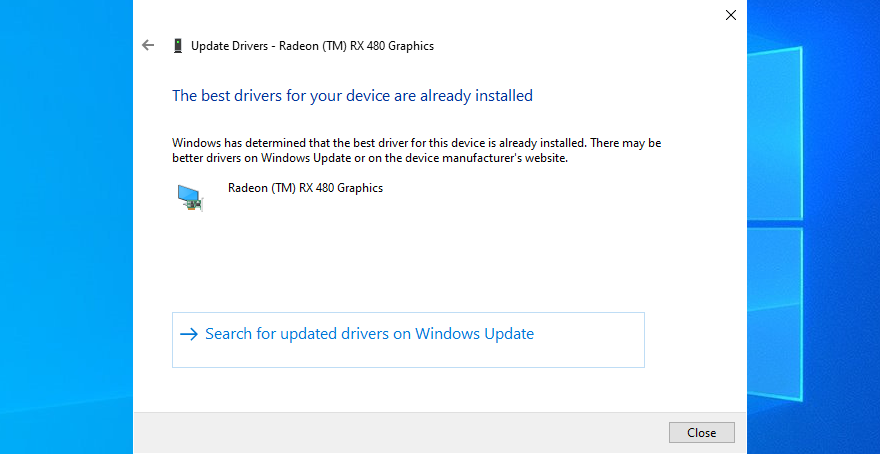
- When prompted with two options, select Search automatically for drivers
- If you see the The best drivers for your device are already installed message, click Search for updated drivers on Windows Update. However, if you have already updated Windows 10, you can skip this step
Windows is not that great at tracking down newer drivers on the Internet, although they are available for download. A better solution is to visit the website of your manufacturer to find and download the latest driver.
However, if you don’t want to go through that trouble or risk getting an incompatible driver, you can use a driver update software solution to keep all your drivers in check.
15. Roll back the graphics driver
On the other hand, if you have already installed a driver that’s damaged or incompatible with your graphics card, you should immediately roll back to the previous version, assuming that it still exists on your hard disk.
- Go back to Device Manager
- Right-click your graphics device and select Properties
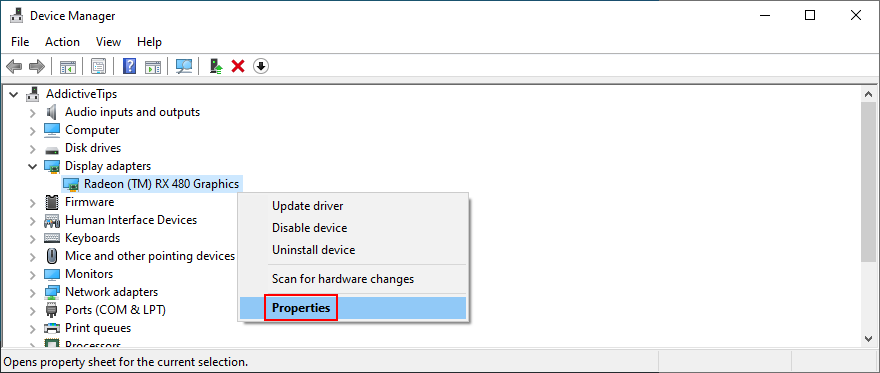
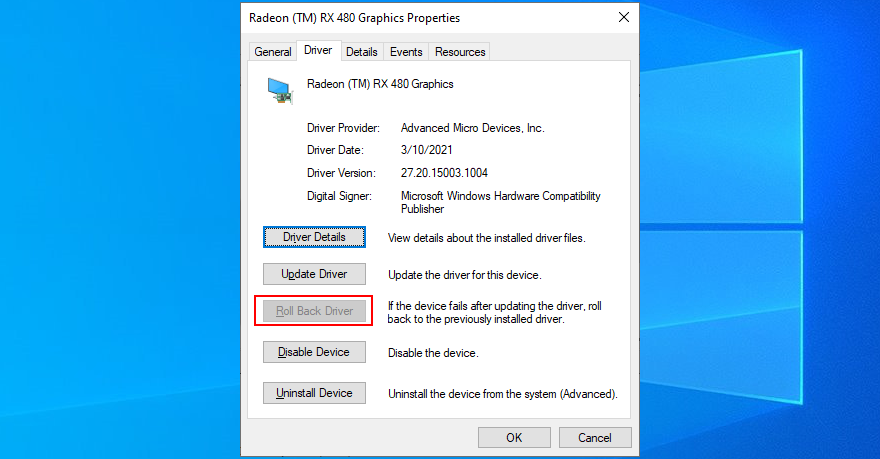
- Select the Driver area
- Click Roll Back Driver and follow the steps
- If the button is greyed out and can’t be clicked, it means that you can’t make the rollback because a previous driver doesn’t exist on your PC
16. Disable hardware acceleration
Some games, web browsers, and other programs have a built-in option for improving performance by accelerating your hardware. However, it should be a feature reserved for high-end computers only.
Otherwise, you risk getting system crashes and blue screen messages because your hardware is overworked. If you have a low-end computer with a GPU card on a budget, make sure to disable hardware acceleration in all our apps.
How to disable hardware acceleration in Google Chrome:
- Launch Google Chrome
- คลิกปุ่ม เพิ่มเติม ที่มุมขวาบน
- เลือก การตั้งค่า (หรือไปที่
chrome://settings/)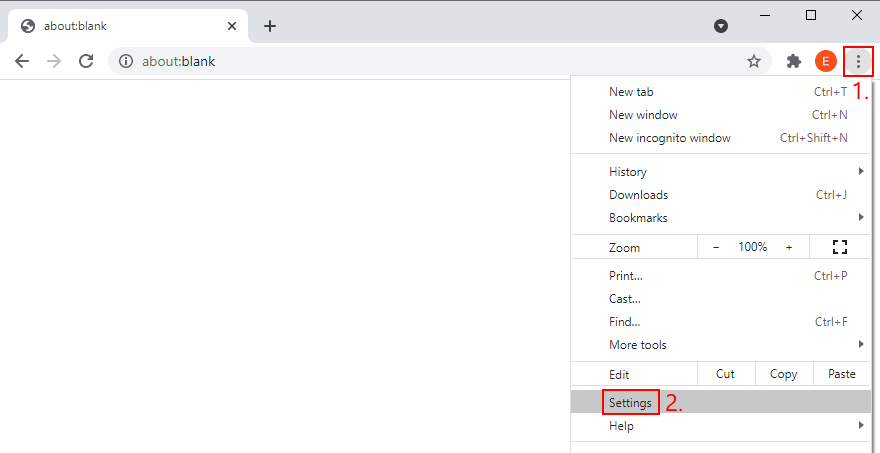
- Jump to the Advanced section
- At System, turn off Use hardware acceleration when available
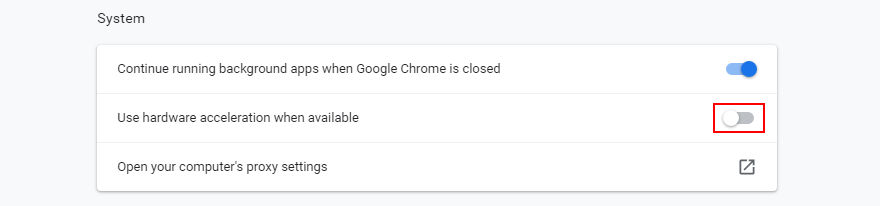
- Relaunch your web browser
How to disable hardware acceleration in Mozilla Firefox:
- Open Mozilla Firefox
- Click the ≡ button on the upper-right part
- Go to Options (or visit
about:preferences)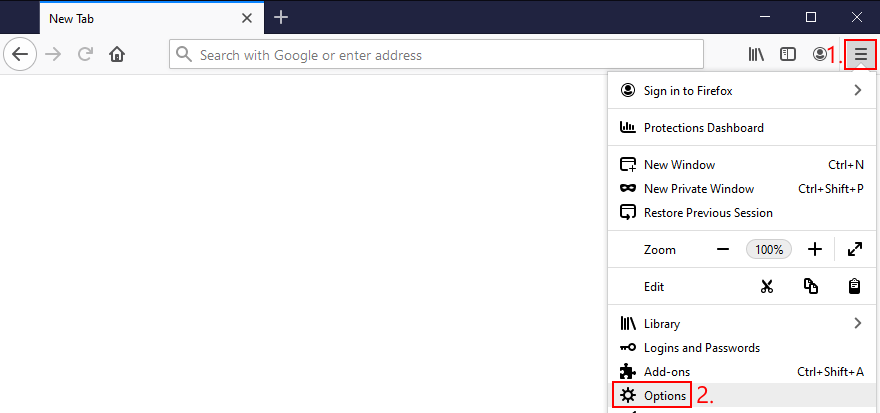
- In General, locate the Performance section
- Disable Use recommended performance settings
- When shown, also disable Use hardware acceleration when available
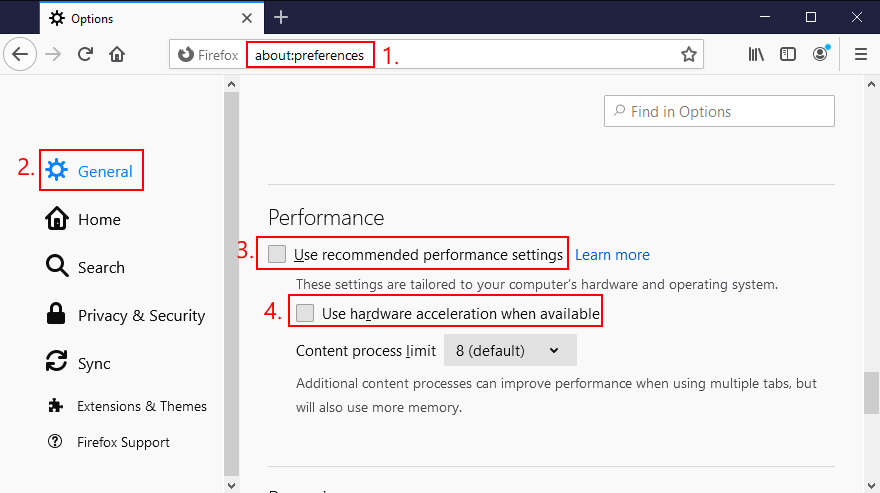
- รีสตาร์ท Firefox
How to disable hardware acceleration in Microsoft Edge:
- Open Microsoft Edge
- Click the More button on the upper-right corner
- Go to Settings
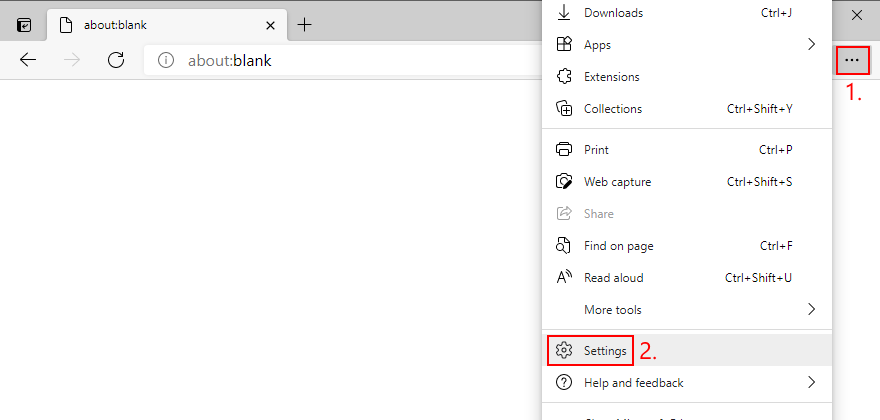
- Jump to the System area (or visit
edge://settings/system) - Switch off Use hardware acceleration when available
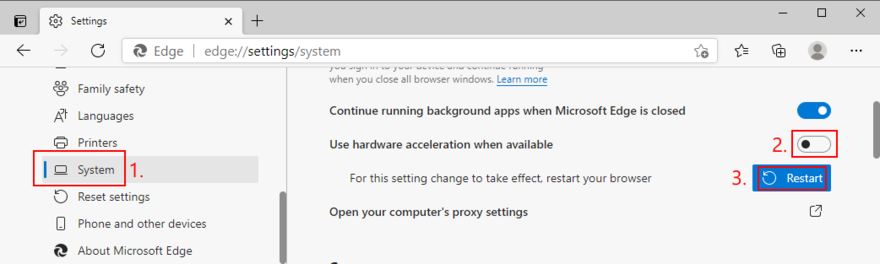
- Click Restart
17. Remove and reseat your hardware
Circling back to your computer’s hardware, the last resort is to remove and reseat all components. It means shutting down your computer and unpluging all components and cards, including your monitor, motherboard, graphics card, and memory.
Make sure to carefully clean off dust, switch ports if you have two or more ports of the same kind, as well as check and change cables if you have any to spare. When it comes to your monitor, try switching from Displayport to HDMI (or vice versa).
Take your time and arm yourself with a bit of patience while doing this. Once you’re ready, insert all cards into the right slots firmly but without applying force. Then, boot your PC and inspect results to see if you’re still getting VIDEO SCHEDULER INTERNAL ERROR.
18. Fix hard drive errors
Hard drive corruption and bad sectors could be the reason why your computer is acting up and preventing you from using it. But you can fix HDD errors without having to install a third-party application, thanks to CHKDSK (Check Disk).
How to use CHKDSK:
- Press Win key + R, type cmd, and press Ctrl + Shift + Enter to open Command Prompt as admin

- Click Yes if prompted by UAC (User Account Control)
- If Windows is installed on the C: drive, run
chkdsk c:/f. Otherwise, replacec:with the right partition letter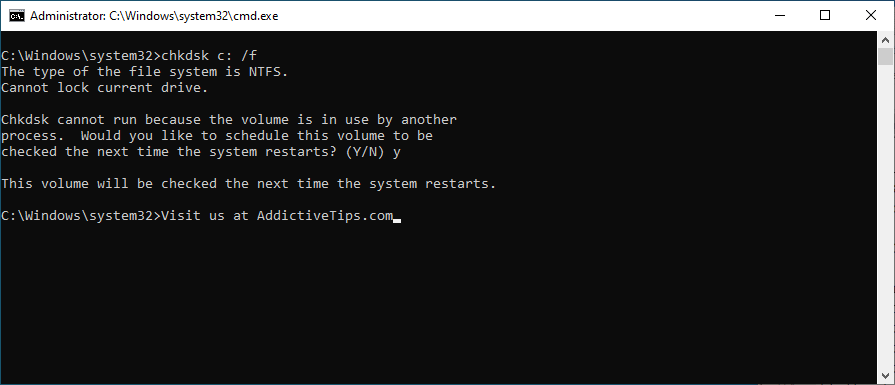
- When asked to schedule CHKDSK at the next system boot, type y and press Enter
- Exit Command Prompt and restart your PC
- CHKDSK will scan and repair disk errors during boot. Once it finishes, check if you still get BSOD error messages
19. Repair corrupt system files
If your operating system has any corrupt or missing files, it could be why your computer keeps crashing and shows VIDEO SCHEDULER INTERNAL ERROR on your screen. But you should be able to resolve this problem without having to reinstall Windows, thanks to SFC (System File Checker).
How to use SFC:
- Click the Start button, type Command Prompt, and select Run as administrator
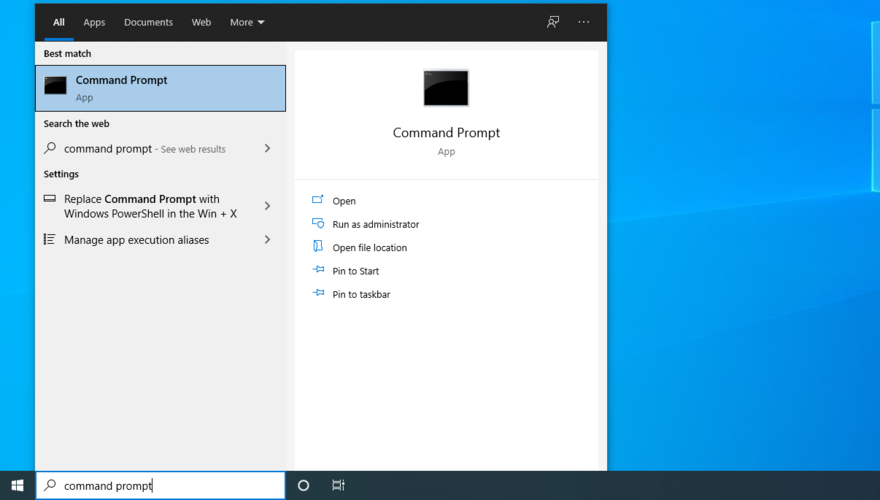
- Type
sfc/scannowand press Enter
- Wait until SFC finishes its job. Once it’s done, restart your PC
- Check if you still get blue screen messages
More serious problems about damaged system files can be handled by DISM (Deployment Image Servicing and Management). It’s an internal tool that verifies and repairs the component store of the Windows image.
How to use DISM:
- Launch Command Prompt with elevated rights
- Type
DISM/online/cleanup-image/scanhealthand press Enter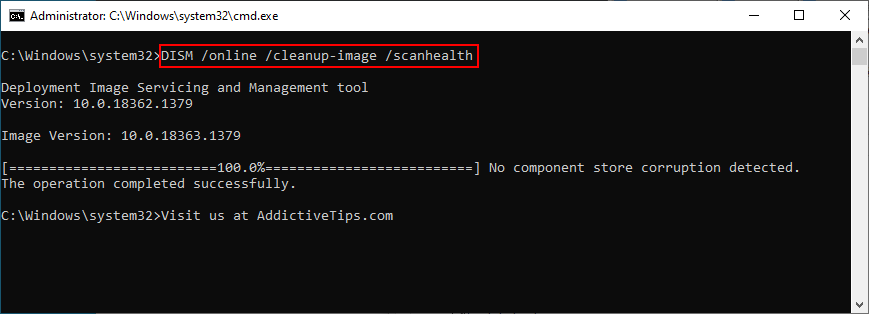
- If DISM finds any errors, type
DISM/online/cleanup-image/restorehealthand press Enter to fix them - Patiently wait while it’s doing its job. Then, restart your PC
- Open Command Prompt as admin again
- Run SFC (
sfc/scannow) - Restart your PC one last time and check for BSOD errors
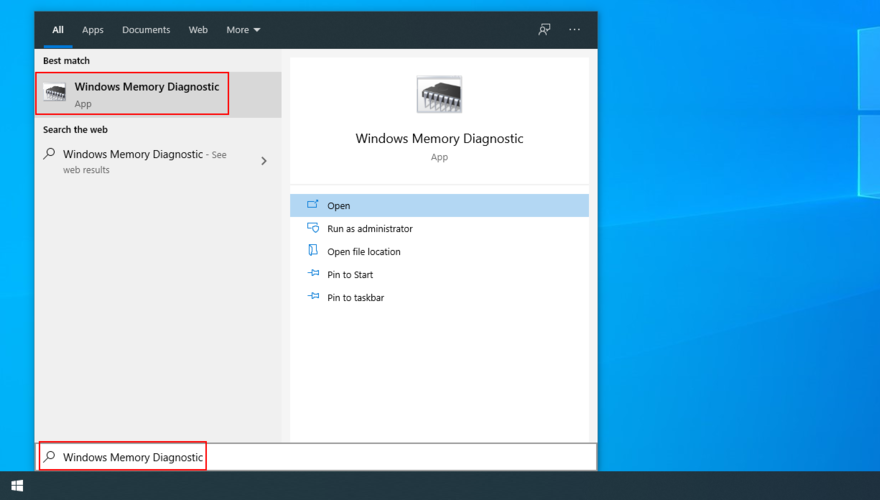
20. Check your RAM
It’s a good idea to inspect your RAM card at the software level to find and resolve any problems which might be causing VIDEO SCHEDULER INTERNAL ERROR. You can easily do this by turning to a built-in system tool called Windows Memory Diagnostic.
How to use Windows Memory Diagnostic:
- Save all projects you’re currently working on and quit all applications
- Press the Windows key, search for Windows Memory Diagnostic, and open this app
- Click Restart now and check for problems (recommended)
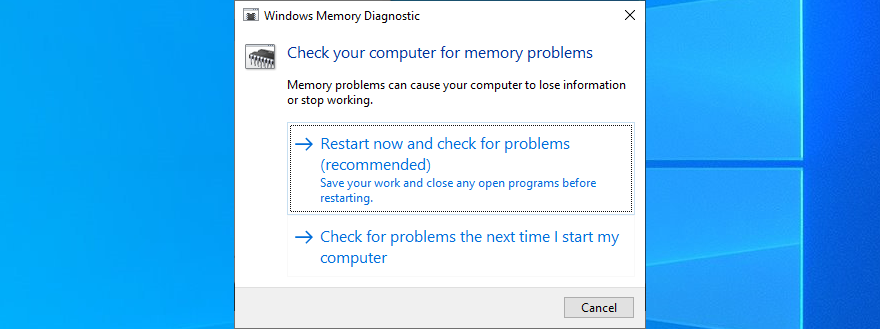
- After Windows restarts, it will find and fix any RAM issues
- Once it’s complete, check if you still get BSOD messages
For additional information about your memory card, check out MemTest86.
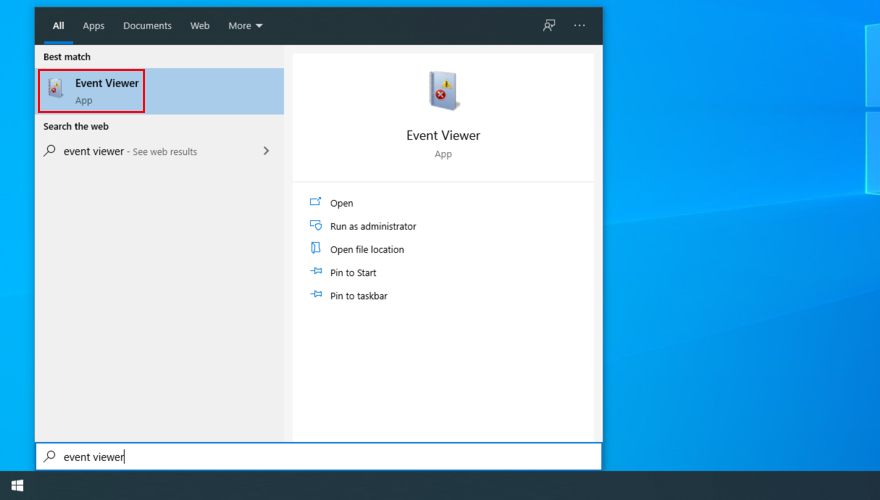
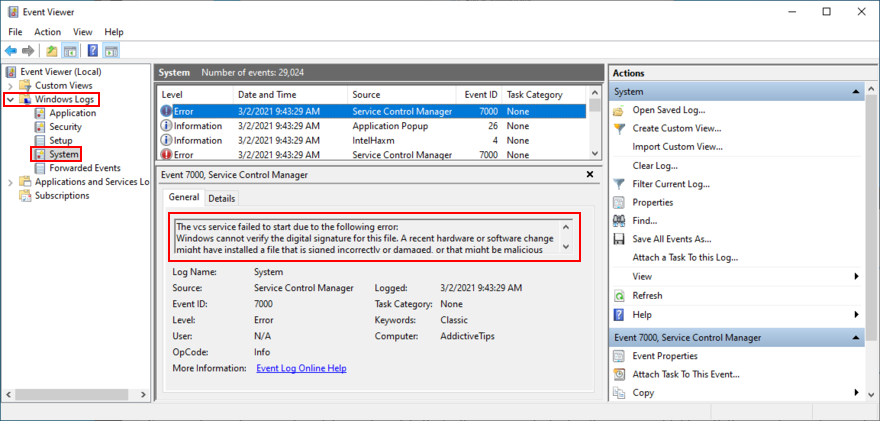
21. Use Event Viewer
It can be difficult to solve VIDEO SCHEDULER INTERNAL ERROR if you don’t know which drivers are involved in the system crash. But you can get in-depth information by turning to Windows Event Viewer.
- When Windows reboots after a system crash, immediately click the Start button, type Event Viewer, and press Enter to open this app
- Select Windows Logs on the left side and go to System
- Choose the first entry in the list to discover more details about VIDEO SCHEDULER INTERNAL ERROR. You can analyze the information shown in the General and Details tabs
If you prefer a simpler approach toward investigating blue screen errors, we suggest checking out BlueScreenView. It’s a third-party app that gives you the possibility to analyze minidumps (.dmp files) left behind by BSOD events, showing all relevant information in a user-friendly interface.
22. Use System Restore
If you’re the type of user who frequently creates system restore points, then you should be able to roll back Windows 10 to a previous state. The only condition is that the checkpoint must have been created before you started getting VIDEO SCHEDULER INTERNAL ERROR.
It’s a simple way to erase any unpredictable software events that could have sent your computer into a spiral. Just keep in mind that any applications installed after the checkpoint will disappear, so you have to reinstall them.
How to use System Restore:
- Click the Start button, search for Control Panel, and open this app
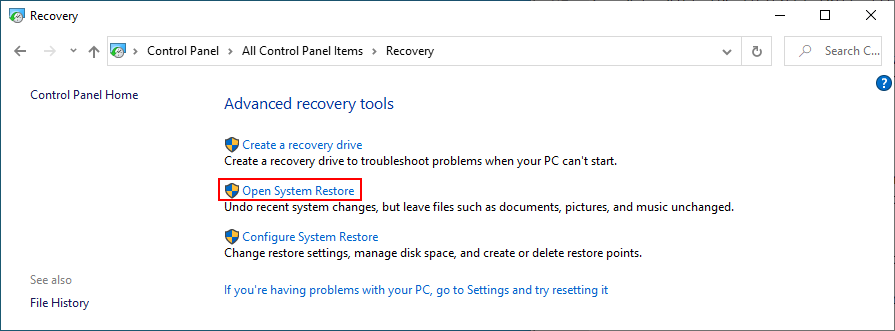
- Select Recovery
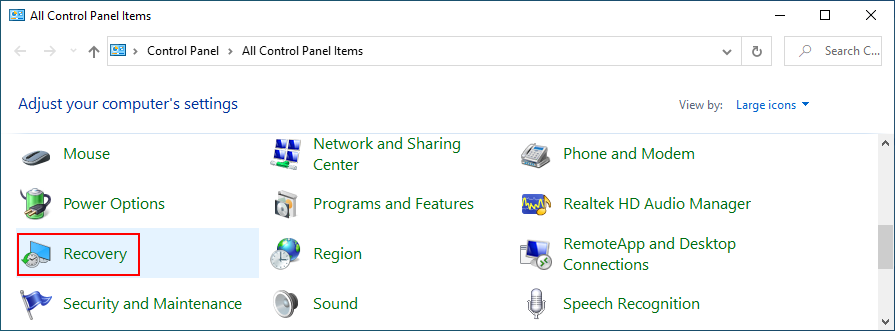
- Click Open System Restore (you need administrator rights)
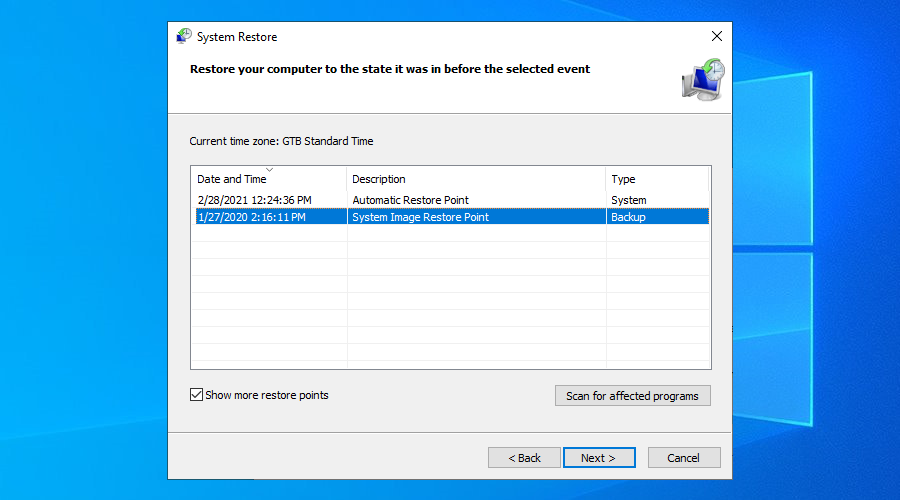
- If this option is visible, click Show more restore points to get a better view of all available restore points
- Choose a restore point created before you started experiencing system crashes. You can click Scan for affected programs to find out which applications you will have to reinstall later
- Once you select a restore point, click Next and follow the on-screen instructions
- It will take a while, and your computer will reboot later
- Check if your system still crashes now
23. Start Windows 10 in Safe Mode
Booting Windows 10 in Safe Mode means turning off all non-essential drivers, processes, and services to create a secure environment. It’s a great way to get your PC working again, without any BSOD errors.
- Interrupt the Windows startup sequence three times to trigger Advanced startup mode
- Go to the Troubleshoot section
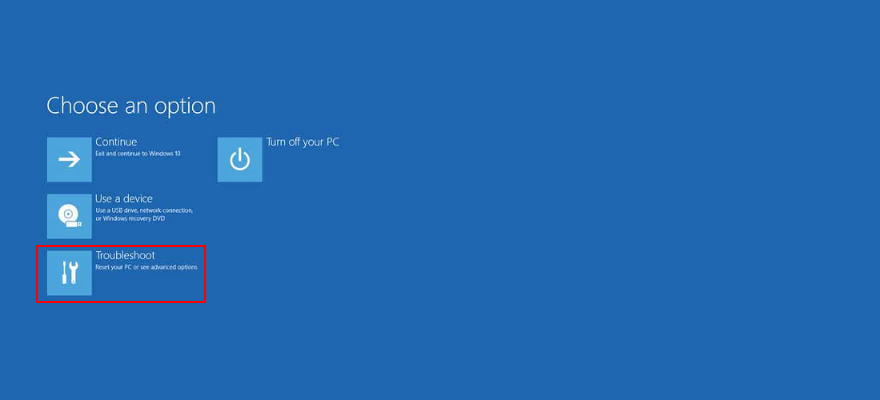
- Select Advanced options > Startup Settings
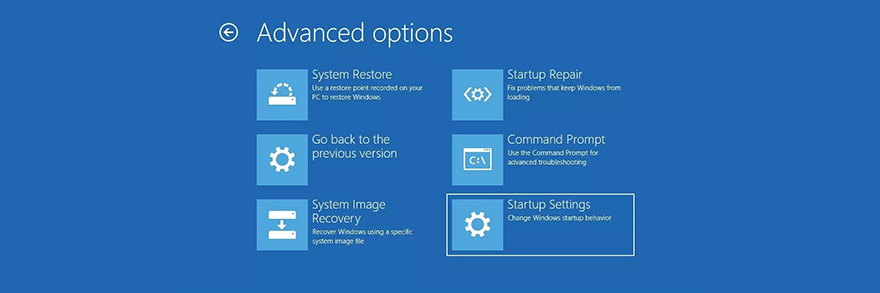
- Click Restart
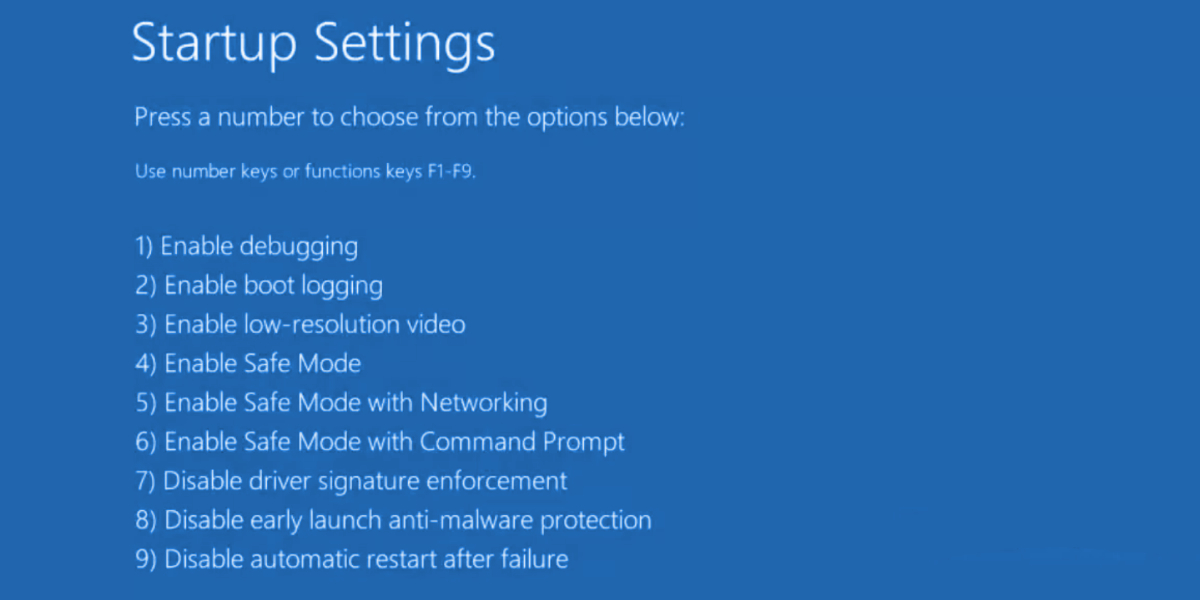
- Press F4 to boot Windows in Safe Mode
- After Windows boots, check for BSOD errors
24. Use Display Driver Uninstaller
You can use Display Driver Uninstaller (DDU) to reset your NVIDIA software and drivers with minimum effort. Here’s how to use it.
- Download Display Driver Uninstaller from the official website
- Unzip the downloaded files
- Start Windows 10 in Safe Mode
- Launch the DDU executable file
- At Select device type, choose GPU-Z
- At Select device, pick NVIDIA
- Click Clean and restart
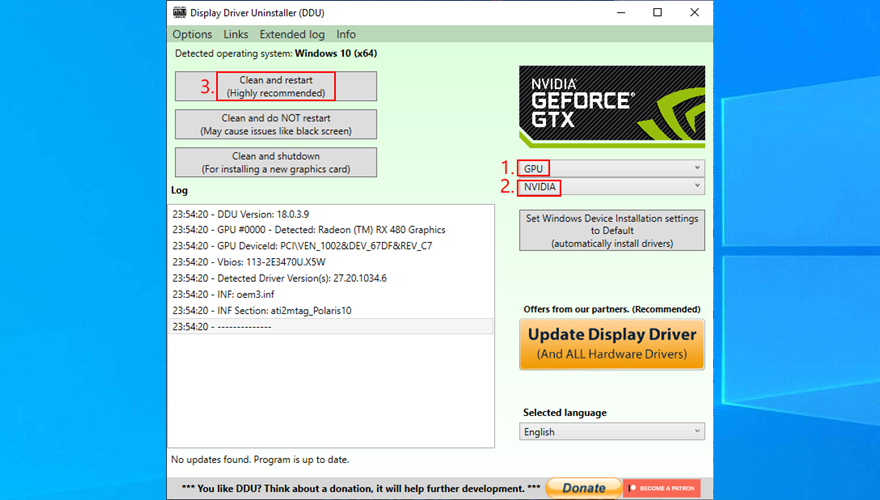
- Check for BSOD errors
25. Lower your monitor refresh rate
Many users overclock their monitors on Windows 10. However, it has been reported that it sometimes causes blue screen errors such as VIDEO SCHEDULER INTERNAL ERROR. To fix this problem, you should lower the refresh rate. For instance, if you pumped it up to 75 GHz, try setting it to 60 Hz.
- Right-click the Windows 10 desktop and access Display settings

- Scroll down and select Advanced display settings
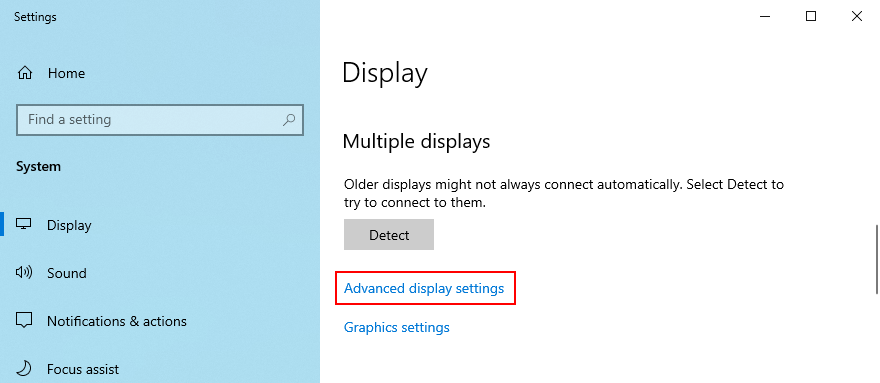
- If you have multiple monitors, choose your primary display from the list
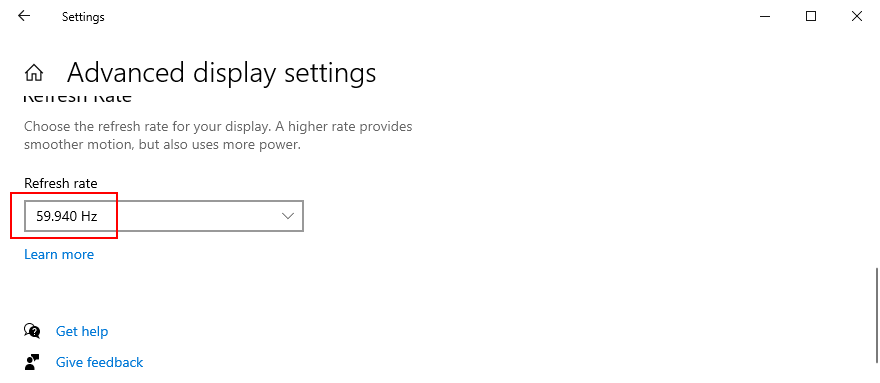
- Set Refresh rate to one step lower
- Check the new settings. If you’re pleased with the new monitor configuration, click Keep changes. Otherwise, select Revert and try a different refresh rate (lower, not higher)
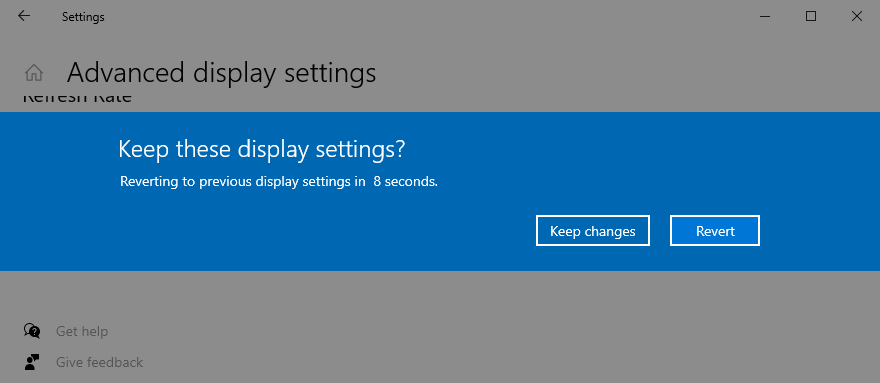
- Once you are comfortable with the monitor refresh rate, check for BSOD errors
Worth mentioning is that, if you have multiple monitors installed on your PC, you should lower the refresh rate of each display to fix VIDEO_SCHEDULER_INTERNAL_ERROR.
26. Check your disk space
If you don’t have enough disk space on your computer, Windows will not be able to properly conduct its processes, resulting in system stability issues and BSOD stop codes like VIDEO_SCHEDULER_INTERNAL_ERROR.
To resolve this problem, you just have to increase the disk space. For example, you can use a partition manager like Windows Disk Management to allocate more disk space from a large partition (e.g. D:) to the Windows drive (e.g. C:).
How to use Disk Management:
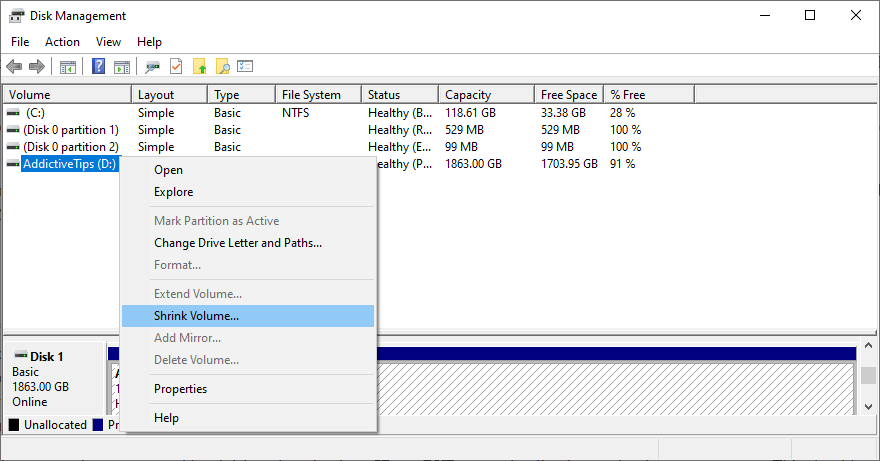
- Press Windows key + R, type diskmgmt.msc, and press Enter to open Disk Management
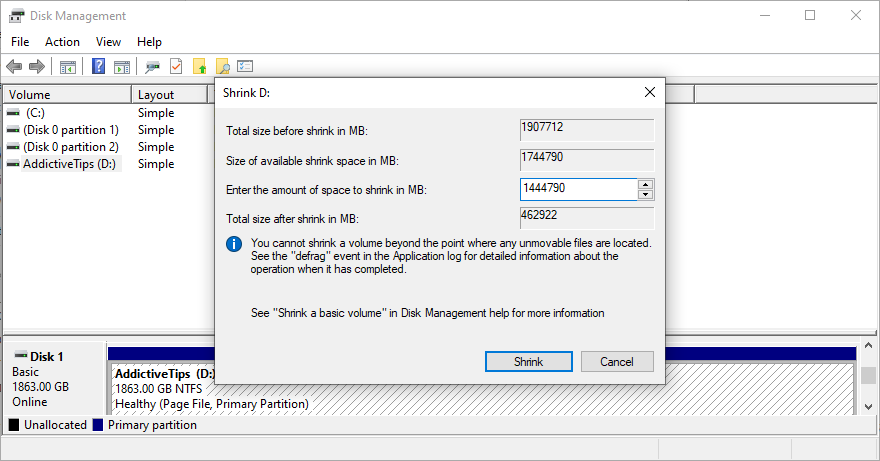
- Select a large partition on the list that doesn’t have Windows installed (e.g. D:)
- Right-click the large partition and select Shrink Volume
- Set the new volume size by taking out a considerable chunk, then click Shrink
- Choose the Windows drive (e.g. C:), right-click it, and pick Extend Volume
- Specify the new drive size by adding the chunk you just acquired
- Finalize extending the volume and restart your PC. The Windows drive should now have more disk space
- Check if you still get blue screen errors
An alternative solution is to delete large files you don’t need anymore, like uninstalling applications and games. Plus, you can transfer important data to external hard disks, upload it to a cloud storage account, or burn it to DVD discs. For junk files, you can turn to a system cleaner or Windows Disk Cleanup.
How to use Disk Cleanup:
- Visit Downloads and Recycle Bin to save or restore important files since these folders will be cleared
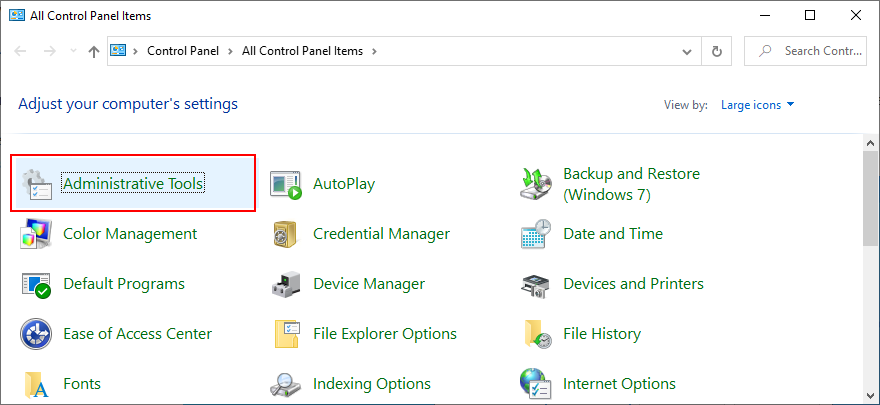
- Click the Start button, search for Control Panel, and open this app
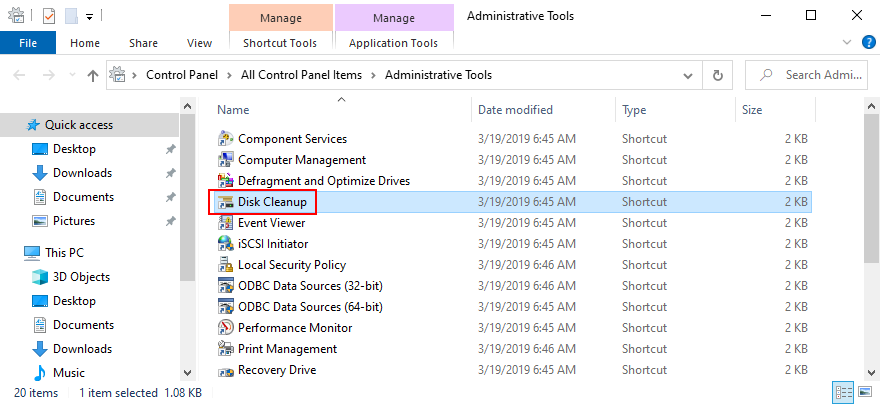
- Go to Administrative Tools
- Open Disk Cleanup
- Choose the Windows drive (e.g. C:) and click OK
- Select all files from the list and click Clean up system files (you need admin rights)
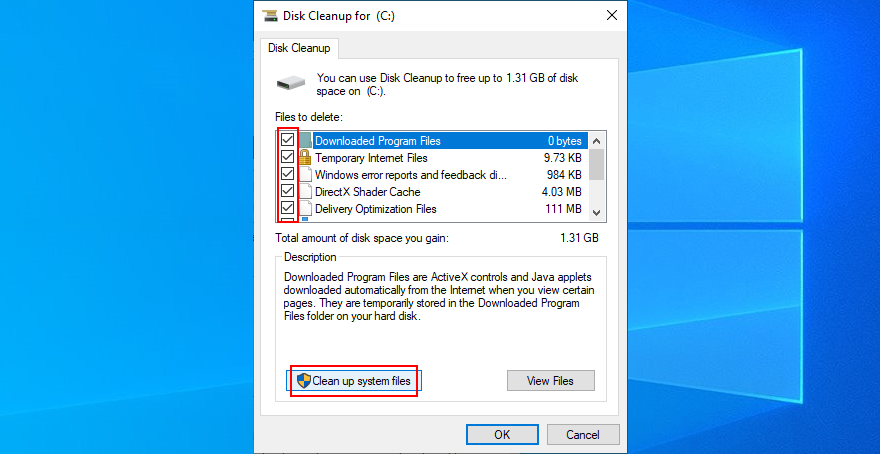
- After the file search, select all items again and click OK
- Patiently wait while Windows performs the cleanup and don’t use your computer during this time
- After it’s done, reboot your PC and check for BSOD issues
27. Reset Windows 10
When all other solutions are unsuccessful in their attempts to fix VIDEO SCHEDULER INTERNAL ERROR, it’s time to factory reset Windows 10. Don’t worry since your personal files will be left untouched. But all your software applications will be removed.
- Right-click the Start button and go to Settings
- Select Update & Security
- Switch to the Recovery section
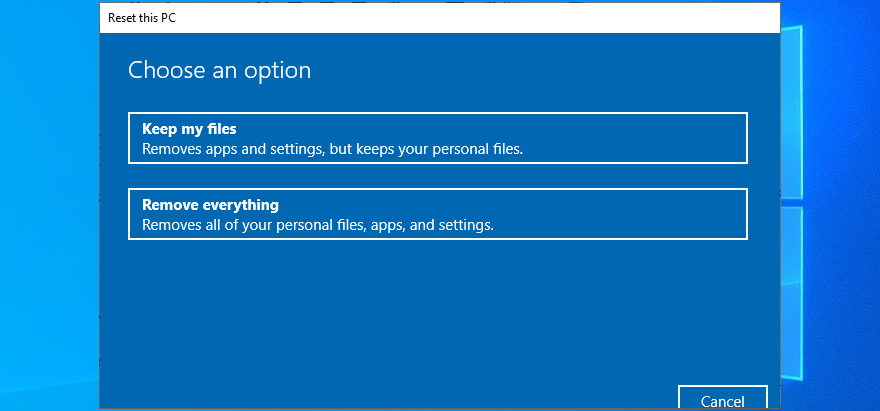
- At Reset this PC, click Get started
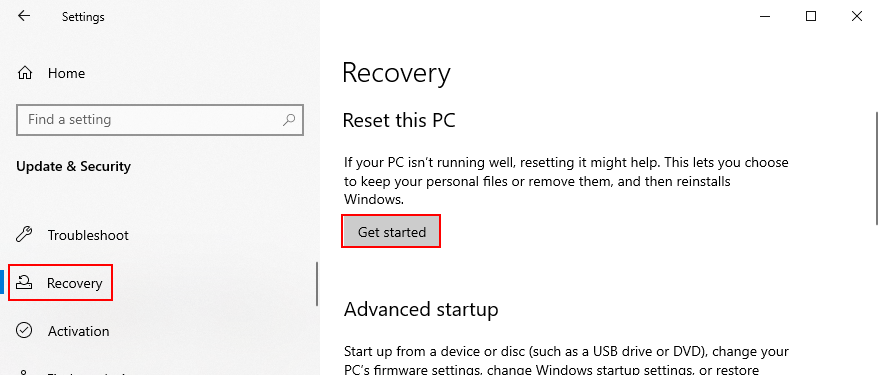
- Select Keep my files and follow the step-by-step instructions
VIDEO SCHEDULER INTERNAL ERROR can be resolved
To review, VIDEO SCHEDULER INTERNAL ERROR is a nasty blue screen message that indicates a problem with your graphics card (usually NVIDIA). However, it can be also tied to other computer components, like your CPU, motherboard, or even software changes.
To fix this issue, start by running Windows Update and performing a GPU stress test. You should also check your PC for malware, repair corrupt registry settings, turn off your overclocking tools, reset and update BIOS, uninstall third-party security tools and broken system updates, as well as run the internal Hardware and Devices troubleshooter.
Furthermore, it’s a good idea to unplug your external devices, temporarily turn off your antivirus software and firewall, update your GPU driver or roll it back to a stable version, deactivate hardware acceleration, remove and reseat your hardware components, fix hard drive and operating system errors, or check your memory card for issues.
If that doesn’t work either, you should use Event Viewer to find out more details about the crash, roll back Windows 10 to a previous restore point, start the operating system in Safe Mode, use Display Driver Uninstaller to reset your NVIDIA software and drivers, lower your monitor refresh rate, check for insufficient disk space, as well as reset Windows 10.
In the worst case scenario, you might have to ditch your graphics card and upgrade to a superior model. For example, it’s well known that gamers need powerful GPU cards to handle resource-demanding processes.
What solution solved VIDEO SCHEDULER INTERNAL ERROR on your Windows 10 computer? Tell us all about it in the comment section below.