จะเซ็นเอกสารแบบดิจิทัลจาก iPhone หรือ Mac ได้อย่างไร? แม้ว่าจะไม่ใช่คำถามสำคัญ แต่ก็เกิดขึ้นเป็นครั้งคราวสำหรับข้อตกลงดิจิทัล ใบเสร็จเร่งด่วน การยืนยันตนเอง ฯลฯ ข่าวดีก็คือ คุณสามารถสร้างลายเซ็นและเซ็นเอกสารบน iPhone, iPad และ Mac ของคุณได้หลายวิธี.
ฉันได้กล่าวถึงรายละเอียดเหล่านี้อย่างละเอียดแล้ว ดังนั้น เลือกอันที่เหมาะกับใบเรียกเก็บเงินของคุณ มาเริ่มกันเลย!
วิธีเซ็นเอกสารบน iPhone และ iPad
ทั้งหมดนี้ต้องขอบคุณเครื่องมือ Markup ที่ทำให้คุณสามารถสร้างลายเซ็นที่เขียนด้วยลายมือได้อย่างง่ายดายและใช้ในการเซ็น PDF และรูปถ่าย จาก iPhone และ iPad
เลือกวิธีการที่เหมาะสมจากรายการต่อไปนี้ ทั้งนี้ขึ้นอยู่กับตำแหน่งหรือประเภทไฟล์ของคุณ
ฉัน. ลงชื่อใน PDF บน iPhone โดยใช้แอปไฟล์
- เปิดแอปไฟล์และเลือกเอกสาร PDF
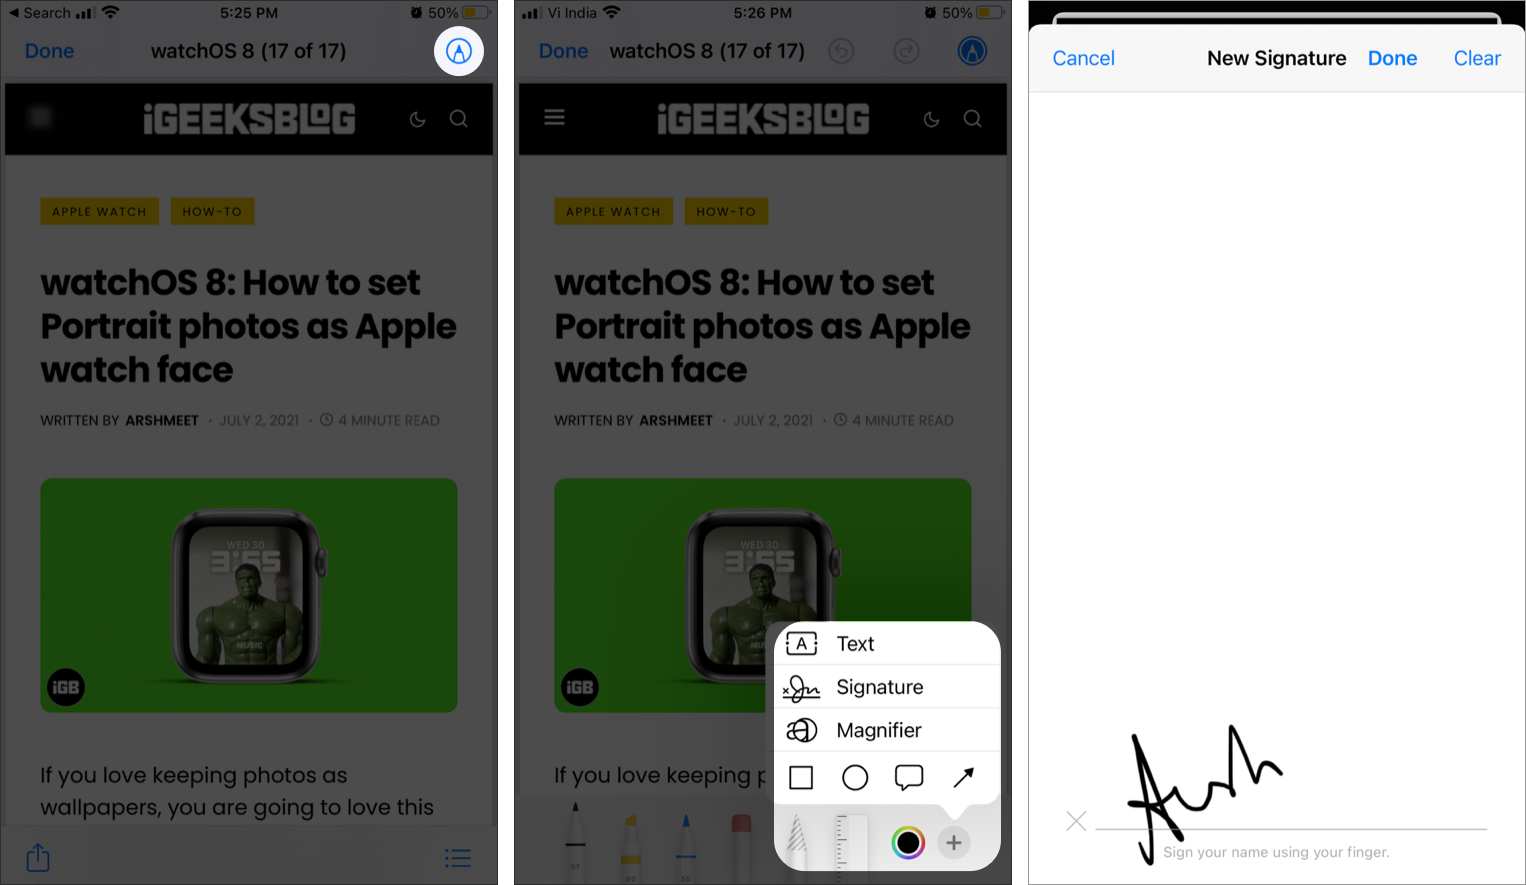
- แตะไอคอน มาร์กอัป
- เลือกไอคอน + แล้วแตะ ลายเซ็น
- ลงชื่อโดยใช้นิ้วหรือสไตลัสที่เข้ากันได้
- แตะล้างเพื่อเริ่มต้นใหม่และเสร็จสิ้นเมื่อคุณพอใจแล้ว
ลายเซ็นจะแสดงในเอกสาร
- ปรับขนาดหากจำเป็น และย้ายไปยังตำแหน่งที่ต้องการ
- กดลายเซ็นค้างไว้เพื่อ ตัด คัดลอก ลบ หรือ ทำซ้ำ ลายเซ็น
- แตะเสร็จสิ้น
strong> เพื่อบันทึก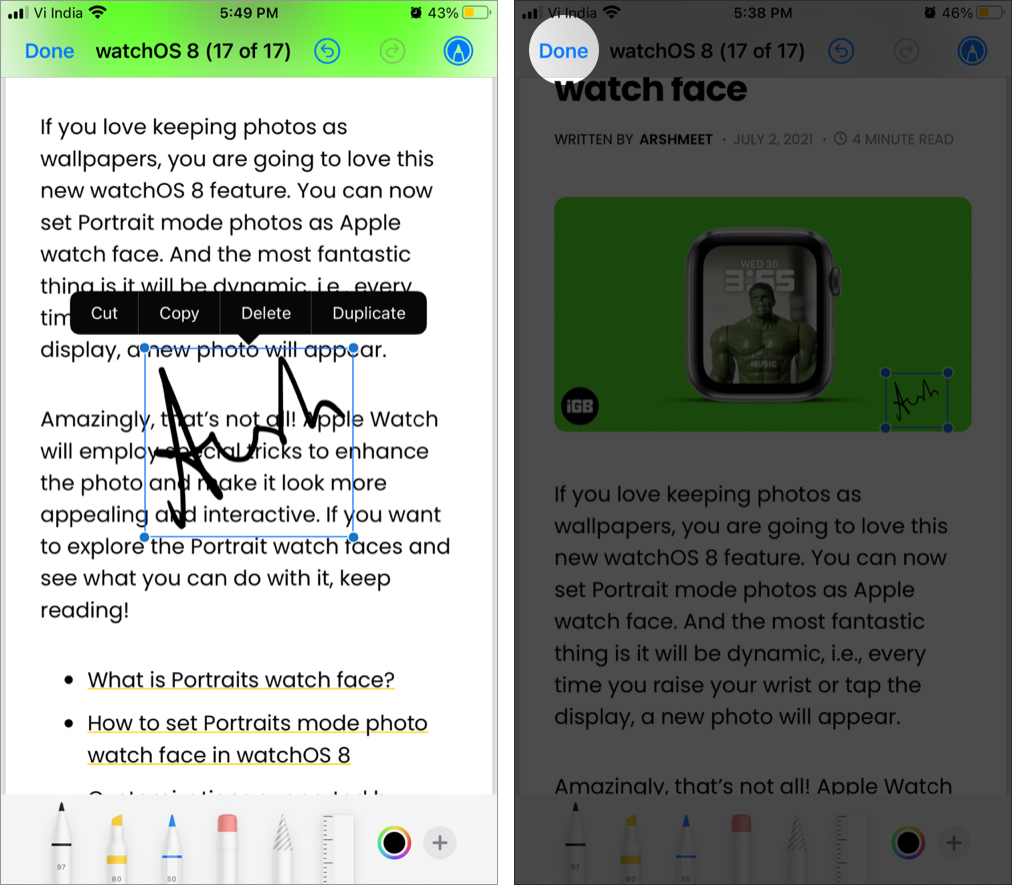
หมายเหตุ: เมื่อบันทึกแล้ว คุณจะไม่ สามารถย้อนกลับการเปลี่ยนแปลง ดังนั้น หากคุณไม่แน่ใจ ให้ทำซ้ำไฟล์ก่อนลงนาม
หากต้องการเพิ่มลายเซ็นเพิ่มเติม:
ไปที่ไฟล์ แอป → PDF → ไอคอนมาร์กอัป → ไอคอน + → ลายเซ็น → เพิ่มหรือลบลายเซ็น → ไอคอน + → ลงชื่อ → แตะ เสร็จสิ้น.
II. เซ็นเอกสารที่สแกนบน iPhone โดยใช้แอพ Notes
ขออภัย คุณไม่สามารถแทรกลายเซ็นลงในบันทึกย่อธรรมดาได้ คุณลักษณะนี้จะใช้ได้เฉพาะเมื่อคุณ สแกนเอกสารผ่าน Notes แอปหรือเพิ่มรูปภาพหรือ PDF ลงในโน้ต
- แตะและเปิดเอกสารที่สแกน/PDF/รูปภาพในแอปโน้ต
- แตะ ไอคอนแบ่งปัน ที่ด้านบนขวา
- เลือกตัวเลือก มาร์กอัป จากแผ่นแบ่งปัน
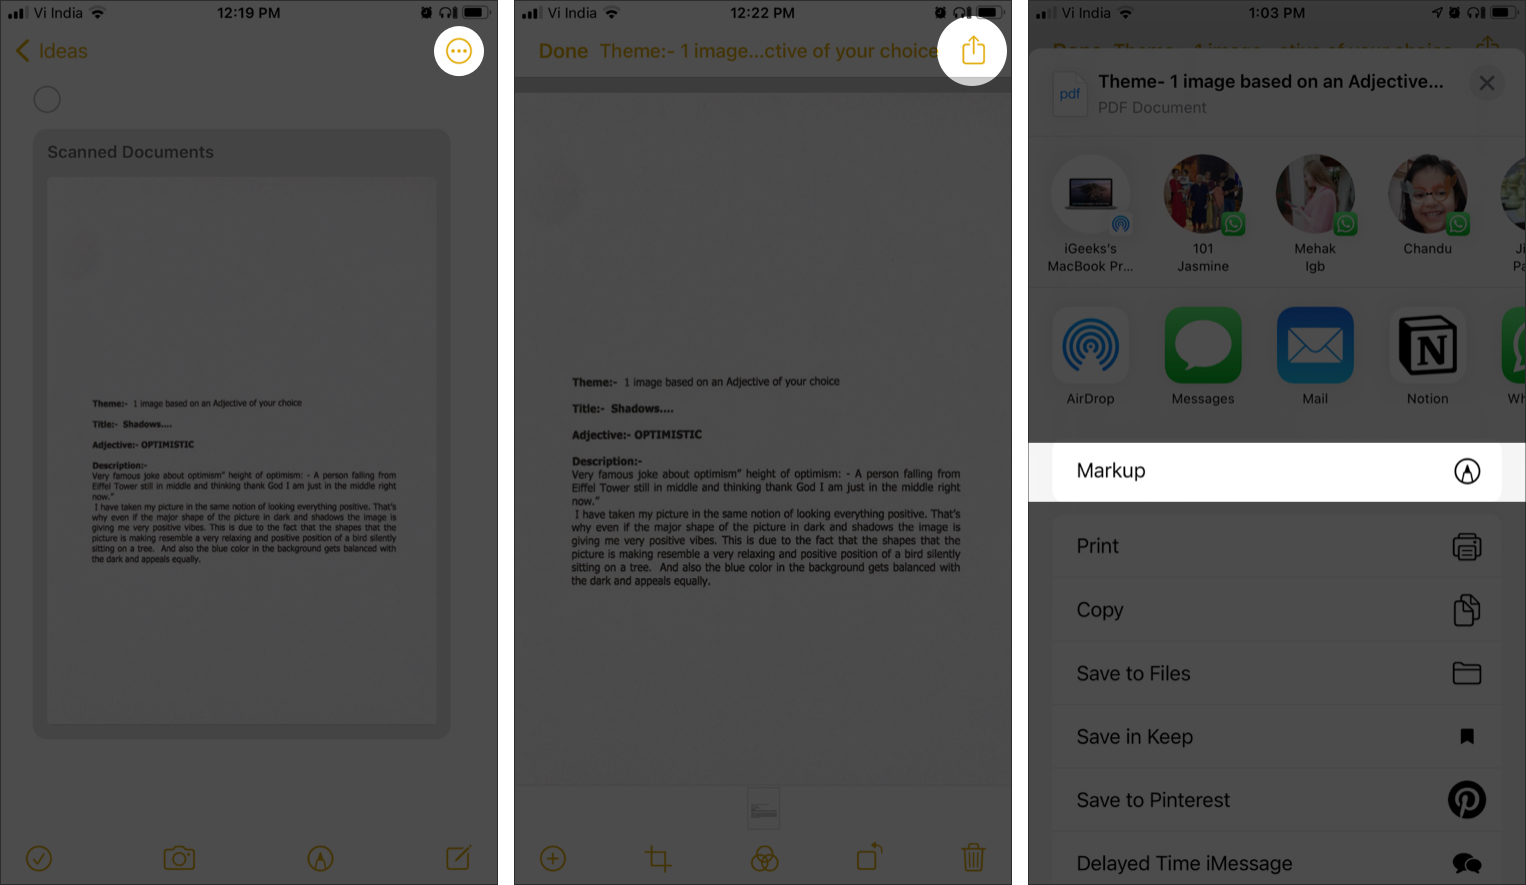
- กดปุ่ม +ไอคอน ที่ด้านล่างขวาและเลือก ลายเซ็น.


ตอนนี้ สร้างลายเซ็นหรือเลือกจาก ลายเซ็นที่บันทึกไว้ แตะเสร็จสิ้นเพื่อบันทึกการเปลี่ยนแปลง
III. ลงชื่อในเอกสารด้วยรูปถ่ายบน iPhone
บางครั้งคุณอาจต้องพิสูจน์หลักฐานยืนยันตัวตนด้วยตนเองและแชร์ต่อ หรือแทนที่จะเป็น PDF คุณอาจได้รับรูปถ่ายใบเสร็จสำหรับลายเซ็นของคุณ หรือคุณสามารถเลือกที่จะจับภาพหน้าจอเอกสารและเพิ่มลายเซ็นโดยใช้แอพรูปภาพ นี่เป็นวิธีที่ง่ายที่สุดในการเซ็นเอกสารของคุณบน iPhone
- เปิดแอป Photos แล้วเปิดรูปภาพหรือเอกสารที่คุณต้องการเซ็น
- แตะ แก้ไข ที่ด้านบนขวา
- ที่นี่ เลือก ไอคอนสามจุดที่ ที่ด้านบนขวา
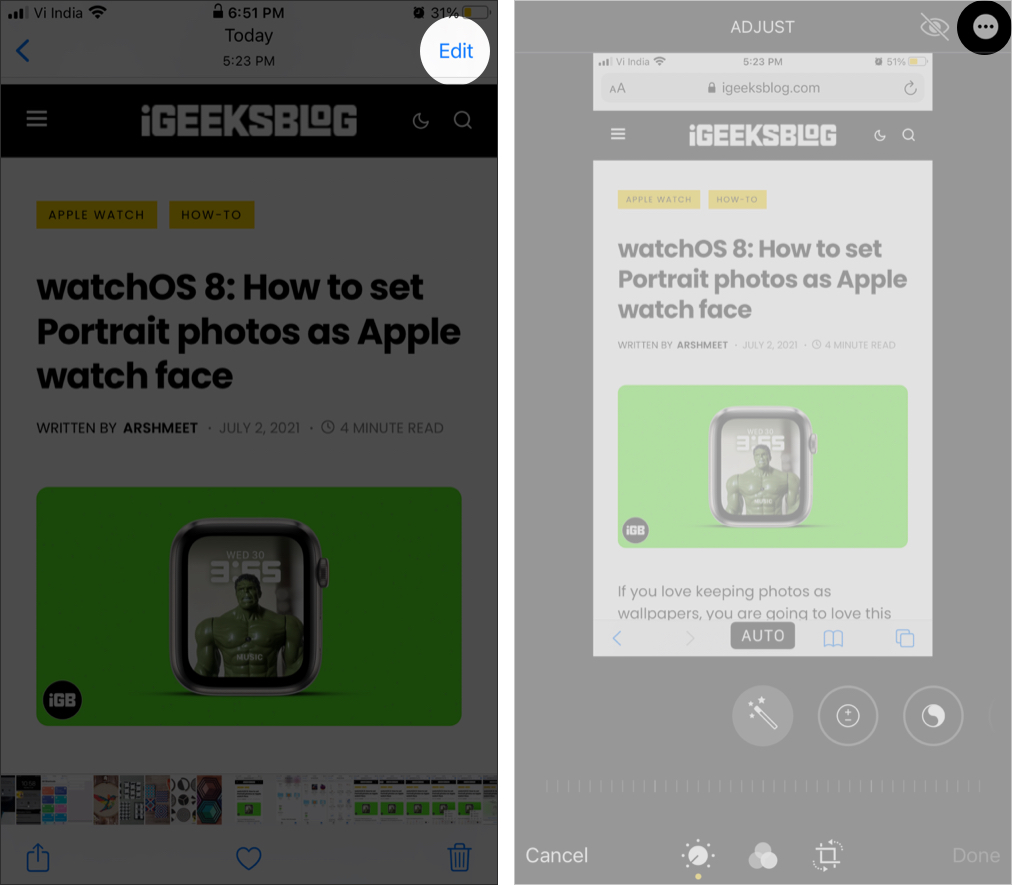
- แตะ มาร์กอัป → ไอคอน + → ลายเซ็น.
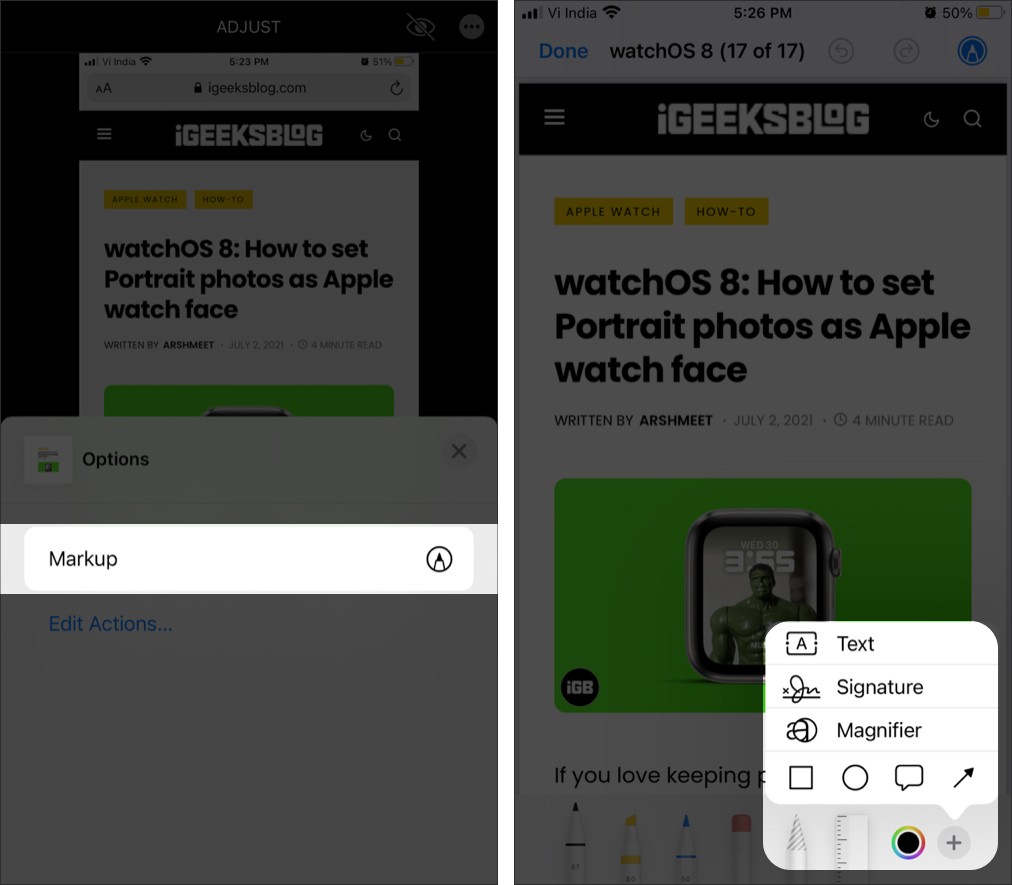
ดังที่แสดงในส่วนก่อนหน้า เลือกลายเซ็น → แก้ไข → แตะ เสร็จสิ้น → กด เสร็จสิ้นอีกครั้งเพื่อยืนยันการเปลี่ยนแปลง
หมายเหตุ: ขอขอบคุณ Revert feature นี่เป็นวิธีเดียวที่คุณสามารถเลิกทำและลบ ลายเซ็น
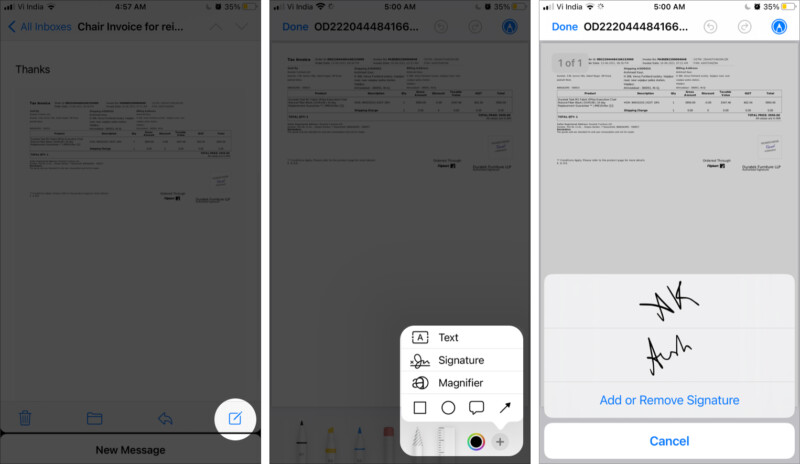
IV. ลงชื่อและส่งเอกสารผ่านแอป Mail ของ Apple
หากได้รับไฟล์ในอีเมลที่ต้องการลายเซ็นดิจิทัล คุณสามารถจัดการสิ่งนั้นได้จากแอป Mail ดั้งเดิมของ Apple
เพียงแตะไฟล์เพื่อเปิด/ดูตัวอย่าง → เลือกเครื่องมือทำเครื่องหมาย → ทำซ้ำ การฝึกซ้อมอธิบายไว้ในส่วนก่อนหน้านี้
หมายเหตุ: ฉันยังทดสอบฟีเจอร์นี้ใน Gmail และ Spark แต่ยังไม่พร้อมใช้งานสำหรับพวกเขา
วิธีการลงนามในเอกสาร Mac
เครื่องมือมาร์กอัปเข้ามาช่วยอีกครั้ง อย่างไรก็ตาม คุณไม่สามารถสัมผัสหน้าจอของ Mac ของคุณได้ ดังนั้นคุณจะเซ็นชื่อหรือชื่อย่อของคุณบนเส้นประได้อย่างไร
ที่น่าทึ่งคือ Apple ได้รวมเอาวิธีที่ชาญฉลาดสามวิธีในแอป Preview เพื่อช่วยคุณทำ ดังนั้น. มาลองดูกัน
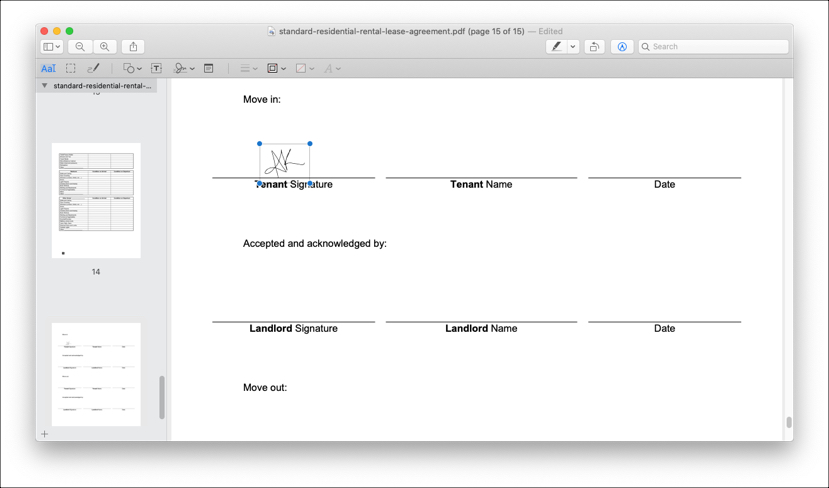
เพิ่มลายเซ็นลงใน PDF บน Mac Preview
- เปิดเอกสารด้วยดูตัวอย่าง
- ไปที่หน้าที่คุณต้องการลงชื่อ
- คลิก ไอคอนมาร์กอัป ที่ด้านบนขวา
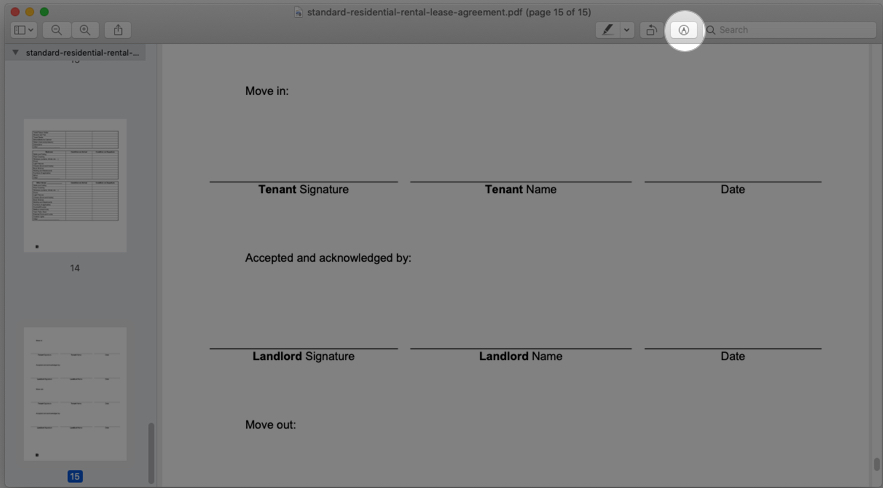

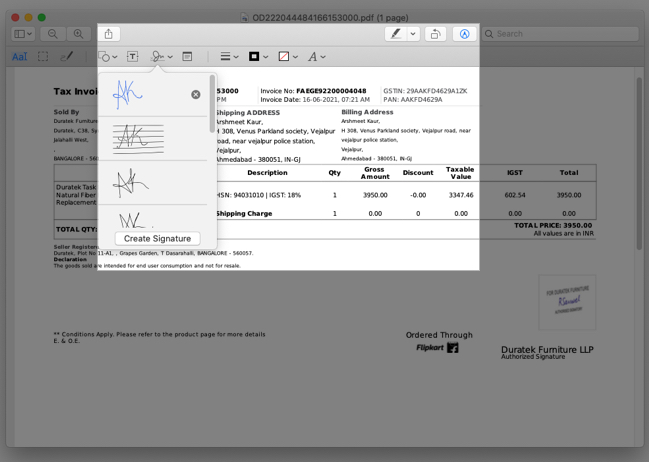
- ถัดไป ให้กดไอคอน ลายเซ็น .
- เลือกลายเซ็นจากรายการหรือคลิก สร้างลายเซ็น.

คุณจะมีสามตัวเลือกที่นี่ มาทำความเข้าใจกันอย่างละเอียด


ผม. ใช้แทร็กแพดเพื่อสร้างลายเซ็น
- ตรวจสอบให้แน่ใจว่าได้เลือกแท็บแทร็กแพด และเลือก คลิกที่นี่เพื่อเริ่มต้น li>
- ตอนนี้ เลื่อนนิ้วของคุณ เหนือแทร็กแพดเพื่อสร้างลายเซ็นและกดปุ่มใดก็ได้เพื่อหยุด

- Click Clear to start over again or Done to save the signature.
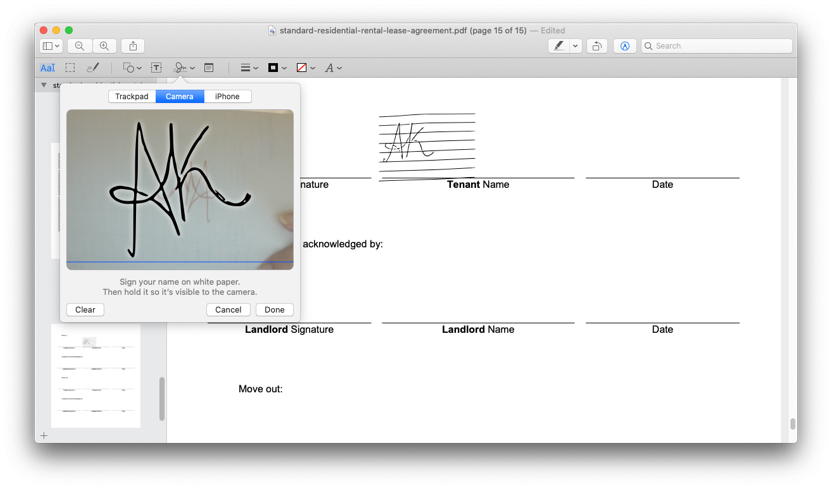
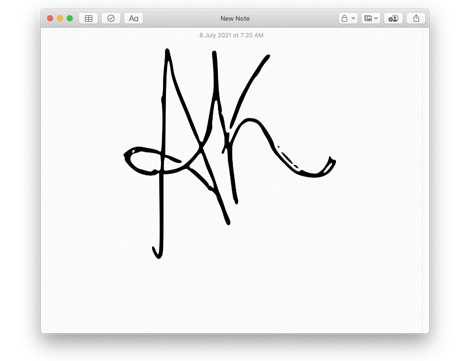
II. Create a signature using Mac’s Camera
- Move to the Camera tab.
- Sign on a white paper and show it to the camera.
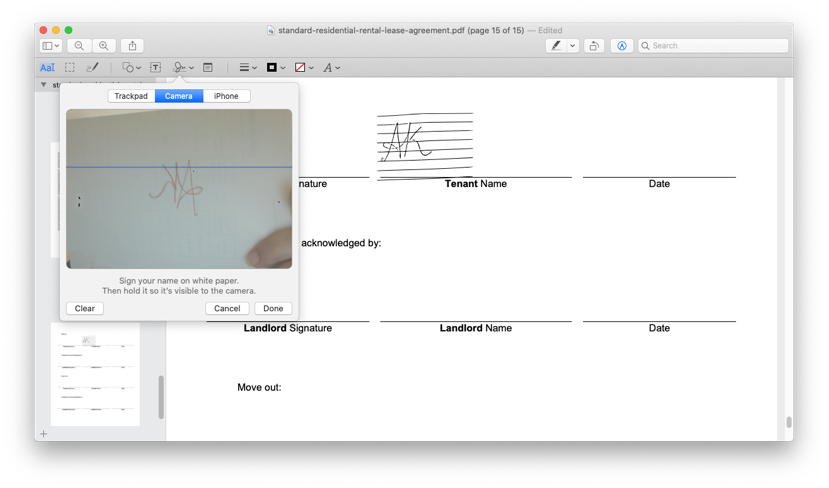
- Mac will read and show a mirror im age of the signature, click Done to save it.
Note: Try using plain paper, or something like this may happen. (27)
III. Use iPhone to create a signature on a Mac
- Open the iPhone Tab.
- The paired iPhone will instantly have a similar screen.
Rotate to landscape orientation for better access. - Use your finger or stylus to sign; it will instantly reflect on Mac’s screen.


- Tap Done on iPhone or Mac to save the signature.


Once you have created and inserted the signature into the file, resize and move it to the desired location → press command + S to save the changes.
Sign documents in the mail on Mac
You can directly sign PDFs and photos attached in a mail. The good thing is that you are not restricted to the native Mail app. Almost all third-party mail apps support the feature.
- Open the mail with the attachment you want to sign.
- Double-click the attachment; it will open in Preview.
- Now, click the Markup icon → Signature → Add Sign.
- Save the copy on your Mac and reattach to share it.
How to create a transparent signature on Mac
Why would I need a copy of my signature without background? Because you can’t sign word documents or files of other formats with the Markup.
Also, you may want to sign your digital artwork, add a personalized signature to mail, or something. This trick can help you do all that and more.
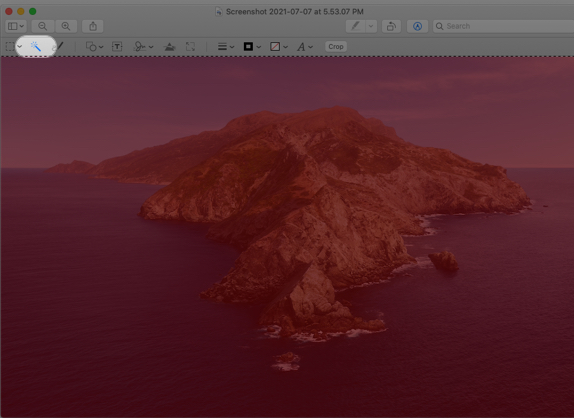
- Take a random screenshot of your screen.
- Open the screenshot in Preview and click the Markup tool.
- Click the Instant Alpha tool (the wand-like icon).
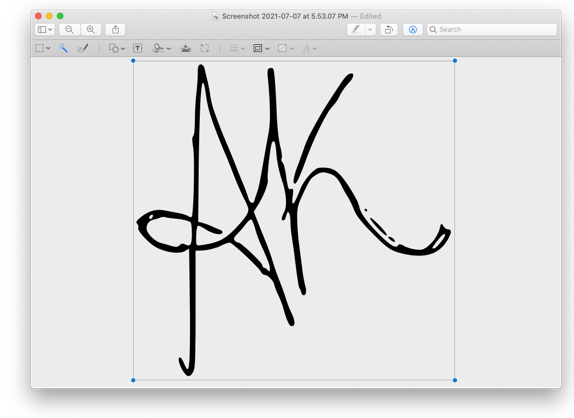
- Drag your cursor across the photo until it turns completely pink.
- Now, press Delete on your keyboard twice without releasing the cursor. (38)
- Insert your signature in the empty frame and expand it as much as possible.
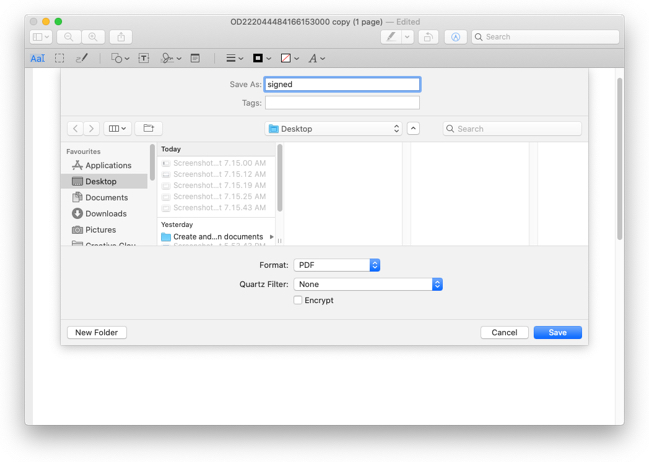
- Finally, go to File from the menu bar and click Export.
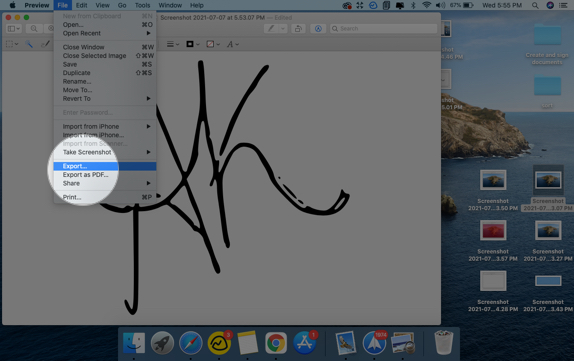
Save the image as PNG, TIFF, or JPEG 2000 (formats that support an alpha channel) and ensure that the setting is enabled to preserve the transparency of the background. (40,40a)
Once done, you are free to use this image as you will! Here’s an example.
How to delete saved signature from iPhone, iPad, and Mac
Don’t want to retain the signature for security reasons, or just had too much fun signing, and now you require a clean-up? Whatever the reason, here’s how you can do it.
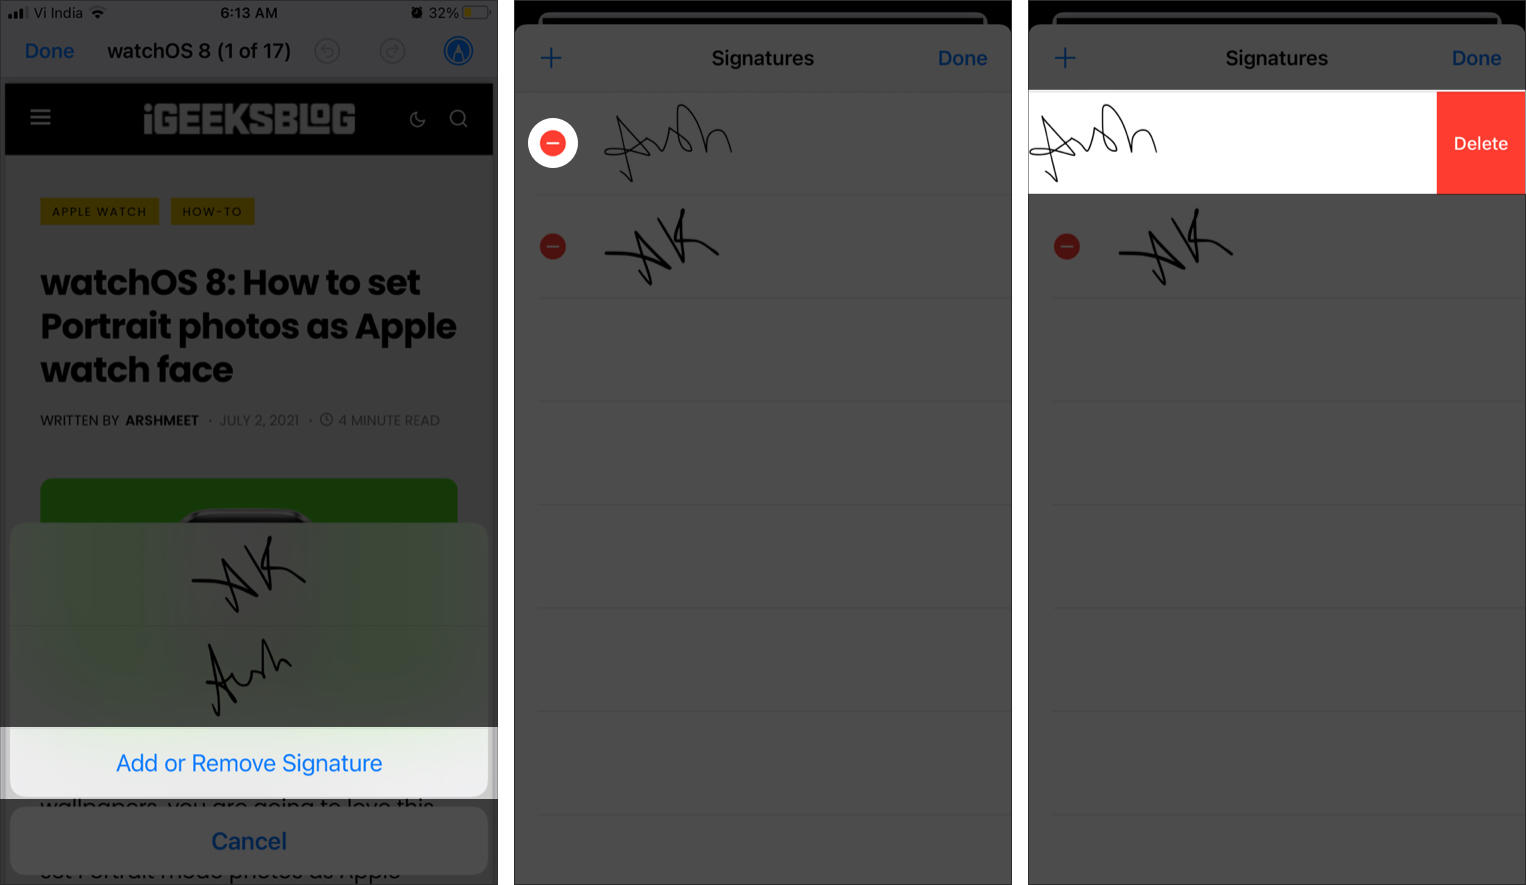
From iPhone and iPad
- Open any PDF file or photo and invoke the Markup tool.
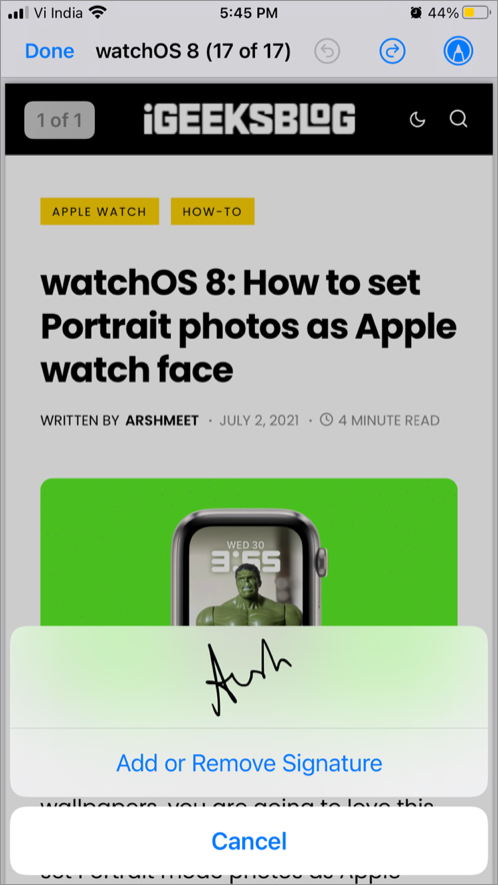
- Tap the + icon → Signature and select Add or Remove Signature.
- Here, tap the – icon → select Delete.
- Tap Done to exit.
From Mac
- Open a document or photo with Preview and click the Markup icon.
- Click the Signature icon and simply take the cursor to the signature.
- Select the X icon to delete it.

Huff! Who knew we have so many options of creating an electronic signature and signing documents using your iPhone, iPad, and Mac. All the love to Apple developers for incorporating such a handy gem into the Markup tool.
I hope the article was helpful to you. Feel free to shoot out any related queries or questions in the comment section below. I will be happy to help.
Check out the below for more hidden hacks: