หน้าจอคอมพิวเตอร์มีแนวโน้มที่จะเกิดปัญหาต่างๆเช่น หน้าจอตะกุกตะกัก ในบางกรณี Windows 10 ตรวจไม่พบจอภาพภายนอก
ผู้ใช้หลายคนรายงานว่าหน้าจอแล็ปท็อปกะพริบใน Windows 10 ซึ่งทำให้ทำกิจกรรมใด ๆ บนคอมพิวเตอร์ได้ยากโดยเฉพาะการเล่นเกม
ผู้ใช้มักจะตำหนิและเปลี่ยนจอภาพหรือโน้ตบุ๊กเพียงเพื่อจบลงด้วยหน้าจออื่นที่กะพริบ อย่างไรก็ตามแทบจะไม่เกิดกรณีที่ชิ้นส่วนฮาร์ดแวร์ทำงานผิดพลาด แต่คุณควรเปลี่ยนความสนใจไปที่ส่วนประกอบของซอฟต์แวร์

อะไรทำให้หน้าจอกะพริบ (Windows 10)
เมื่อหน้าจอเดสก์ท็อปหรือแล็ปท็อปของคุณเริ่มกะพริบใน Windows 10 มักเกิดปัญหากับไดรเวอร์การแสดงผลหรือแอปพลิเคชันซอฟต์แวร์ที่เข้ากันไม่ได้ คุณสามารถทำการทดสอบอย่างรวดเร็วโดยตรวจสอบตัวจัดการงานและตรวจสอบว่าแถบงาน กำลังกะพริบ
ตรวจสอบการกะพริบของตัวจัดการงาน
- กด Ctrl + Shift + Esc เพื่อเริ่ม ตัวจัดการงาน
- หากทั้งหน้าจอของคุณกะพริบรวมถึงตัวจัดการงานคุณควรตรวจสอบไดรเวอร์การแสดงผลของคุณด้วย
- มิฉะนั้นหากจอภาพกะพริบยกเว้นตัวจัดการงานคุณควรตรวจสอบแอปที่เข้ากันไม่ได้ที่ติดตั้งบนคอมพิวเตอร์ของคุณ
ไม่ว่าปัญหาจะเกิดจากอะไรคุณสามารถทำให้จอภาพของคุณทำงานได้ตามปกติอีกครั้งโดยทำตามคำแนะนำง่ายๆด้านล่างนี้
วิธีแก้ไขหน้าจอแล็ปท็อปกระพริบ/กะพริบ
ก่อนที่จะเริ่มแก้ไขปัญหาการแสดงผลของคุณคุณควร สร้างจุดคืนค่าระบบ ด้วยวิธีนี้คุณสามารถเลิกทำการเปลี่ยนแปลงและย้อนกลับ Windows 10 ได้อย่างราบรื่นเพื่อใช้โซลูชันต่างๆจากรายการนี้
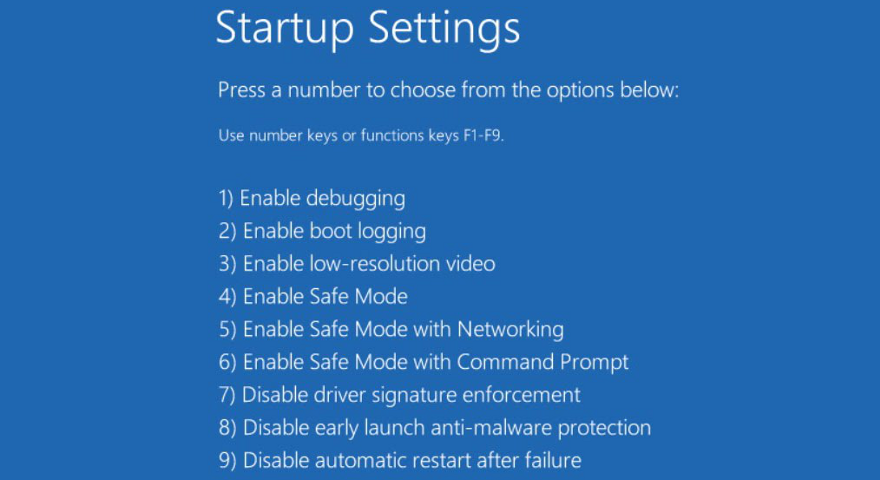
1. เริ่ม Windows 10 ในเซฟโหมด
หากคุณไม่สามารถใช้คอมพิวเตอร์ได้เลยตรวจสอบให้แน่ใจว่า บูต Windows 10 ในเซฟโหมด เพื่อยุติบริการกระบวนการและไดรเวอร์ทั้งหมดที่อาจทำให้เกิดปัญหาในการแสดงผล สิ่งที่คุณต้องทำมีดังนี้:
- ปิดคอมพิวเตอร์ของคุณ
- เปิดพีซีของคุณและขัดจังหวะลำดับการบูตสามครั้งเพื่อ เปิดโหมดการเริ่มต้นขั้นสูง
- เมื่อคุณเห็นหน้าจอสีน้ำเงินพร้อมตัวเลือกมากมายให้เลือก แก้ไขปัญหา
- ไปที่ ตัวเลือกขั้นสูง > การตั้งค่าการเริ่มต้น

- คลิก เริ่มต้นใหม่
- กด F4 เพื่อบูต Windows ในเซฟโหมด

2. เรียกใช้คลีนบูต
หาก Safe Mode ไม่ทำงานคุณสามารถ ทำการคลีนบูตบน Windows 10 เพื่อวินิจฉัยและแก้ไขการตั้งค่าระบบขั้นสูงที่อาจทำให้เกิดปัญหาการกะพริบของหน้าจอแล็ปท็อป วิธีทำให้เกิดขึ้นดังต่อไปนี้:
- กดปุ่ม Win ค้นหา การกำหนดค่าระบบ และเปิดโปรแกรมนี้
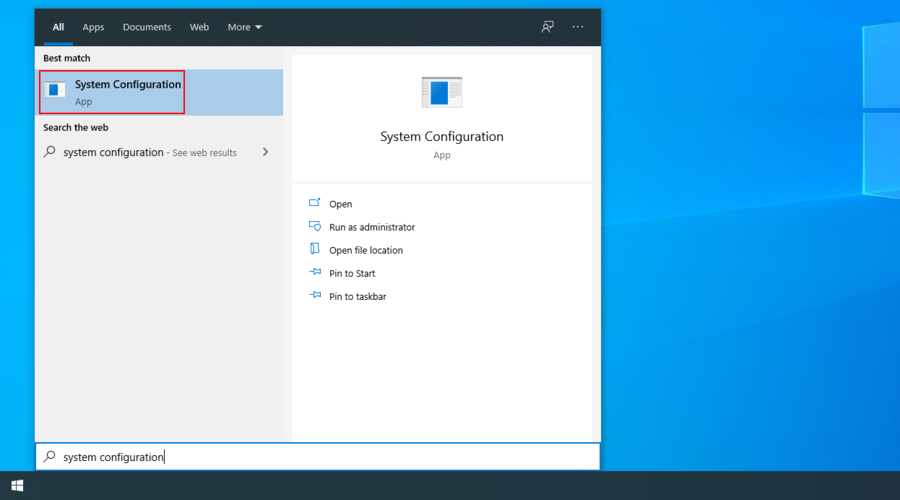
- เปลี่ยนไปที่แท็บ บริการ
- ปิดใช้งาน ซ่อนบริการทั้งหมดของ Microsoft แล้วคลิก ปิดใช้งานทั้งหมด

- ออกจากแอป
- กด Ctrl + Shift + Esc เพื่อเริ่ม ตัวจัดการงาน
- ไปที่ส่วน การเริ่มต้น
- สำหรับทุกแอปพลิเคชันที่มีสถานะ เปิดใช้งาน ให้เลือกและคลิก ปิดใช้งาน
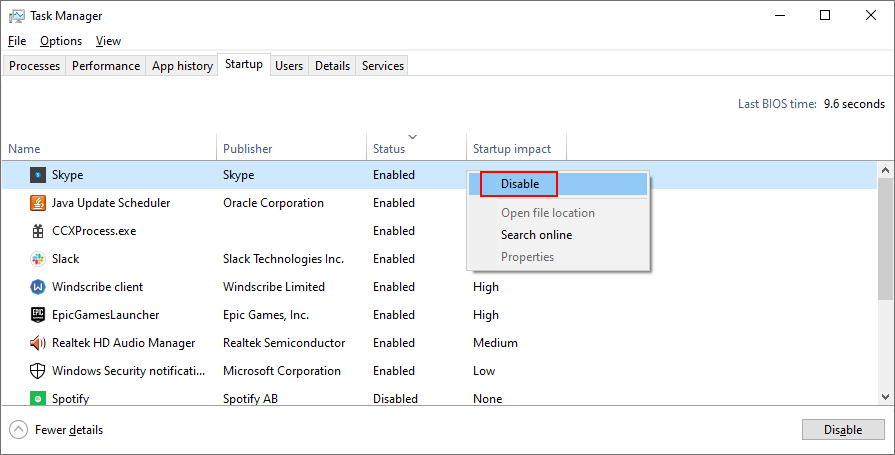
- รีสตาร์ทคอมพิวเตอร์ของคุณในสถานะคลีนบูต
- ตรวจสอบปัญหาการกะพริบของหน้าจอทันที


3. ติดตั้งการ์ดแสดงผลของคุณใหม่
เป็นไปได้ว่าอะแดปเตอร์กราฟิกของคุณไม่ได้ติดตั้งอย่างถูกต้องบนคอมพิวเตอร์ของคุณ ในกรณีนี้คุณสามารถติดตั้งใหม่ได้อย่างรวดเร็วจาก Device Manager โดยไม่ต้องติดตั้งโปรแกรมซอฟต์แวร์ของ บริษัท อื่น
อย่างไรก็ตามเพื่อให้แผนนี้ใช้งานได้คุณต้องมีการ์ดแสดงผลเพิ่มเติม วิธีทำให้เกิดขึ้นดังต่อไปนี้:
- คลิกขวาที่ปุ่ม เริ่ม และเลือก ตัวจัดการอุปกรณ์
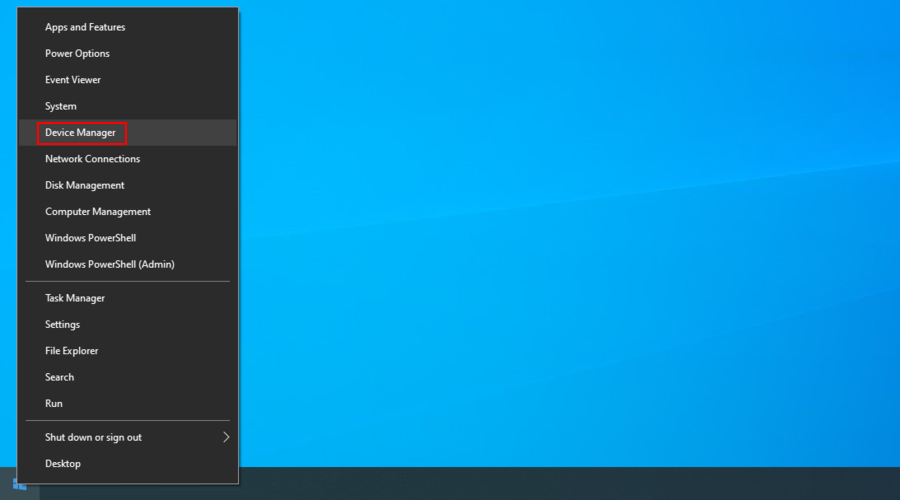
- ขยายกลุ่ม การ์ดแสดงผล
- หากการ์ดแสดงผลมีเครื่องหมายอัศเจรีย์สีเหลืองให้คลิกขวาแล้วเลือก ถอนการติดตั้งอุปกรณ์
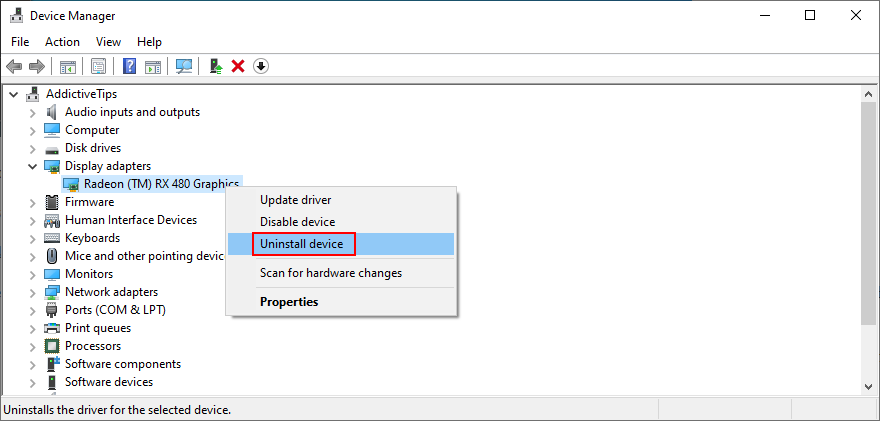
- ไม่ต้องกังวลหากจอภาพของคุณเป็นสีดำทั้งหมด รีสตาร์ทคอมพิวเตอร์เนื่องจาก Windows จะติดตั้งอะแดปเตอร์ที่ขาดหายไปใหม่โดยอัตโนมัติ
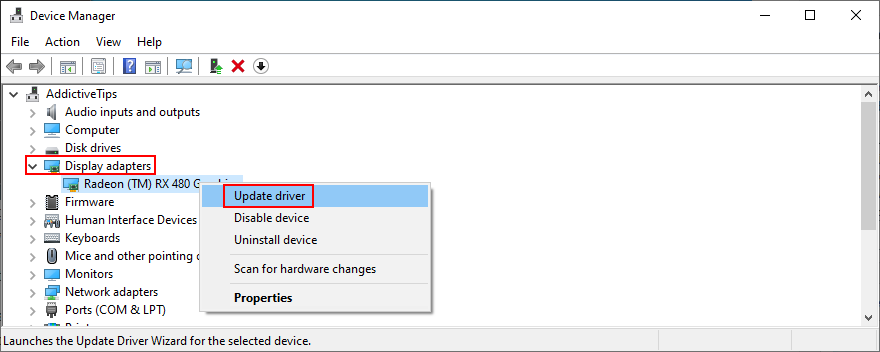
4. อัปเดตไดรเวอร์กราฟิกของคุณ
สถานการณ์ที่เป็นไปได้มากกว่าที่ทำให้หน้าจอแล็ปท็อปกะพริบและกะพริบใน Windows 10 เกี่ยวข้องกับไดรเวอร์กราฟิกที่ล้าสมัย ในกรณีนี้คุณต้องอัปเดตไดรเวอร์ให้เป็นเวอร์ชันล่าสุด
- กดปุ่ม Win + R พิมพ์ devmgmt.msc และกด Enter เพื่อเปิด ตัวจัดการอุปกรณ์
- เลือกการ์ดแสดงผลของคุณคลิกขวาแล้วเลือก อัปเดตไดรเวอร์

- เลือก ค้นหาไดรเวอร์โดยอัตโนมัติ
- หากการค้นหาออนไลน์ไม่ส่งคืนสิ่งใดให้เลือก ค้นหาไดรเวอร์ที่อัปเดตบน Windows Update
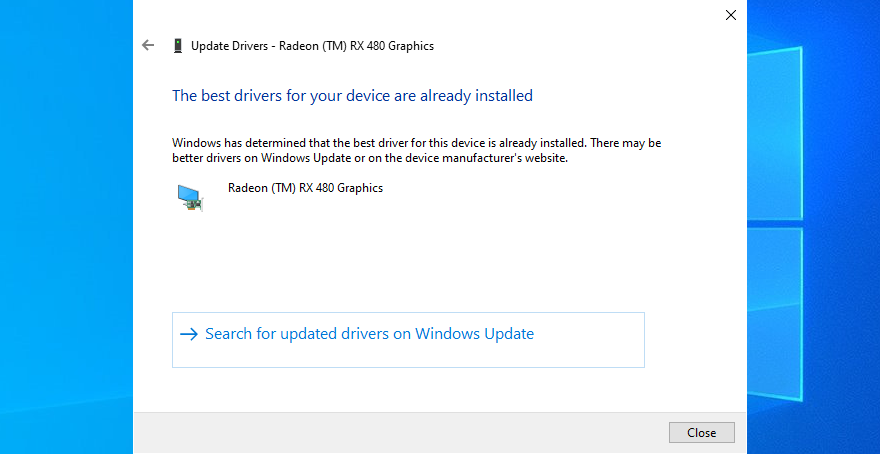
- ดำเนินการตามคำแนะนำบนหน้าจอ
- รีสตาร์ทคอมพิวเตอร์และตรวจสอบผลลัพธ์
น่าเสียดายที่ Microsoft มักไม่พบไดรเวอร์รุ่นใหม่ด้วยความช่วยเหลือของ Windows Update ในกรณีนี้คุณสามารถไปที่เว็บไซต์ของผู้ผลิตไดรเวอร์ของคุณเพื่อค้นหาและดาวน์โหลดเวอร์ชันที่ใหม่กว่าจากนั้นติดตั้งบนพีซีของคุณ
อย่างไรก็ตามมีความเสี่ยงเนื่องจากคุณอาจหาไดรเวอร์ผิดโดยไม่ได้ตั้งใจและทำให้เกิดปัญหาในการแสดงผลมากขึ้น วิธีแก้ปัญหาที่ปลอดภัยกว่าคือใช้ เครื่องมืออัปเดตไดรเวอร์ . ตรวจพบไดรเวอร์ของคุณและติดตั้งเวอร์ชันที่ใหม่กว่าโดยอัตโนมัติ นอกจากนี้คุณยังสามารถใช้เพื่อให้ไดรเวอร์ทั้งหมดของคุณอยู่ในการตรวจสอบไม่ใช่แค่อะแดปเตอร์แสดงผลเท่านั้น
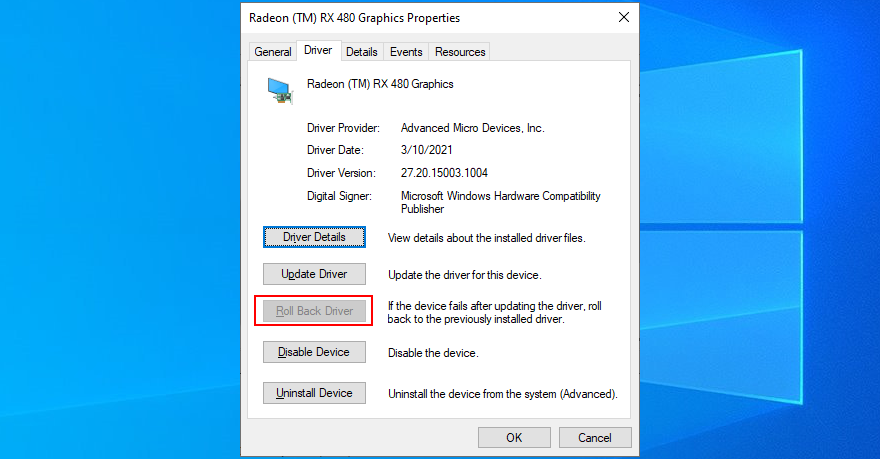
5. ย้อนกลับไดรเวอร์กราฟิกของคุณ
หากคุณติดตั้งไดรเวอร์การแสดงผลที่เข้ากันไม่ได้คุณต้องลบออกทันทีเพื่อแก้ไขปัญหาการกะพริบของหน้าจอใน Windows 10 อย่างไรก็ตามเพื่อให้วิธีนี้ใช้งานได้คุณต้องมีไดรเวอร์กราฟิกเวอร์ชันก่อนหน้าบนพีซีของคุณ วิธีตรวจสอบง่ายๆมีดังนี้:
- คลิกขวาที่ปุ่ม เริ่ม และไปที่ ตัวจัดการอุปกรณ์
- เลือกอุปกรณ์กราฟิกของคุณคลิกขวาที่รายการแล้วเลือก คุณสมบัติ
- เลือกแท็บ ไดรเวอร์
- คลิก ย้อนกลับไดรเวอร์ และดำเนินการตามคำแนะนำทีละขั้นตอน หากปุ่มนี้เป็นสีเทาคุณจะไม่สามารถทำการย้อนกลับได้เนื่องจากไม่มีไดรเวอร์ก่อนหน้านี้ในฮาร์ดดิสก์ของคุณ
6. เรียกใช้ตัวแก้ไขปัญหาความเข้ากันได้ของโปรแกรม
หากหน้าจอแล็ปท็อปของคุณยังคงกะพริบแม้ว่าตัวจัดการงานจะยังคงอยู่อย่างสมบูรณ์อาจมีปัญหากับแอปพลิเคชันที่เข้ากันได้ที่ทำงานบนคอมพิวเตอร์ของคุณ ตัวอย่างเช่นหากคุณมีโปรแกรมเก่าที่ไม่รองรับ Windows 10 อย่างเป็นทางการโปรแกรมเหล่านี้อาจเป็นโปรแกรมที่ทำให้คุณลำบาก
การระบุแอปเก่าและล้าสมัยอาจเป็นเรื่องยาก อย่างไรก็ตามคุณสามารถไปที่ตัวแก้ไขปัญหาความเข้ากันได้ของโปรแกรมเพื่อขอความช่วยเหลือ เป็นเครื่องมือง่ายๆใน Windows 10 ซึ่งค้นหาและแก้ไขปัญหาความเข้ากันได้กับแอปรุ่นเก่า วิธีใช้เพื่อประโยชน์ของคุณมีดังนี้:
- คลิกขวาที่ปุ่ม เริ่ม และไปที่ การตั้งค่า
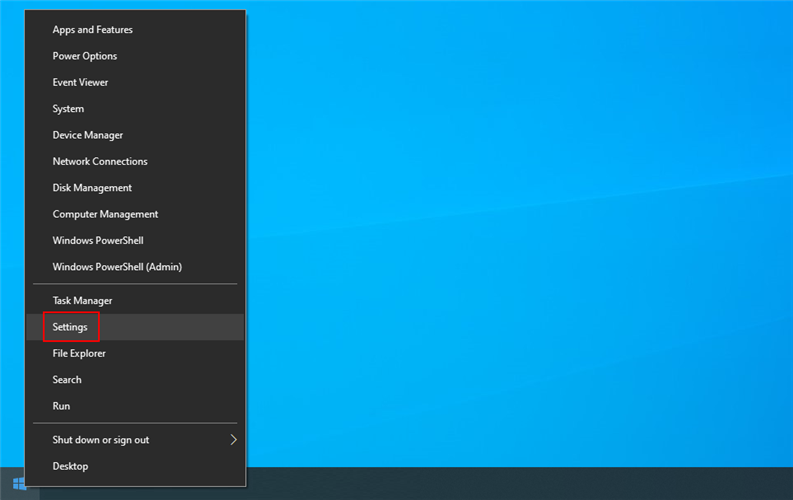 li>
li>
- เลือก แก้ไขปัญหา ทางด้านซ้าย
- คลิก เครื่องมือแก้ปัญหาเพิ่มเติม

- ที่ ค้นหาและแก้ไขปัญหาอื่น ๆ ค้นหาและเลือก ตัวแก้ไขปัญหาความเข้ากันได้ของโปรแกรม
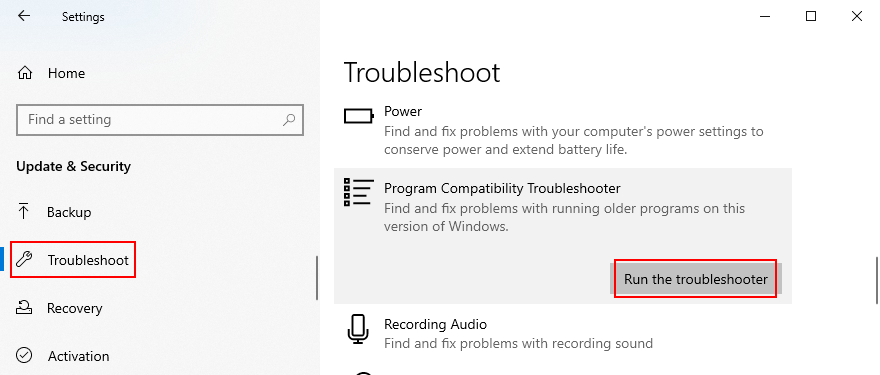
- คลิก เรียกใช้เครื่องมือแก้ปัญหา
- วิซาร์ดจะแสดงรายการโปรแกรมที่ติดตั้งทั้งหมด เลือกอันเก่าคลิก ถัดไป แล้วทำตามคำแนะนำทีละขั้นตอน คุณอาจต้องทำหลาย ๆ ครั้งสำหรับหลาย ๆ แอป
- หลังจากที่เครื่องมือแก้ปัญหาทำงานให้ตรวจสอบว่าหน้าจอของคุณยังคงกะพริบอยู่หรือไม่

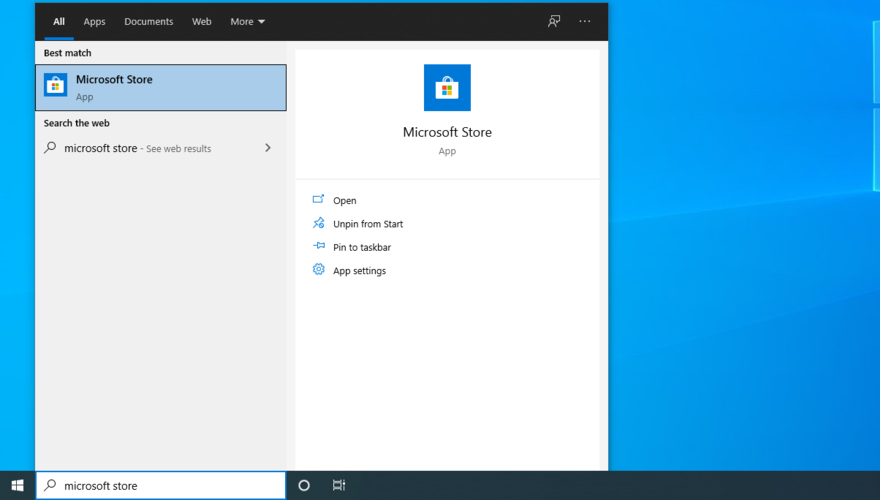
7. อัปเดตโปรแกรมของคุณ
จำเป็นอย่างยิ่งที่จะต้องอัปเดตแอปพลิเคชัน Windows ของคุณให้เป็นเวอร์ชันล่าสุดอยู่เสมอ มิฉะนั้นหน้าจอของคุณอาจเริ่มกะพริบเนื่องจากปัญหาการแสดงผล เมื่อพูดถึงแอป Microsoft Store มันเป็นเรื่องง่ายมาก
วิธีอัปเดตแอป Microsoft Store:
- คลิกปุ่ม เริ่ม ค้นหา Microsoft Store และกด Enter เพื่อเปิดแอปนี้
- เปิดเมนู เพิ่มเติม จากมุมขวาบน
- ไปที่ ดาวน์โหลดและอัปเดต
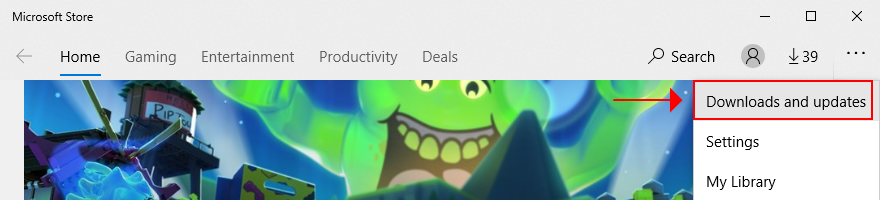
- ที่มุมขวาบนให้คลิก รับการอัปเดต
เมื่อพูดถึงแอปพลิเคชันที่ได้รับจากที่อื่นยกเว้น Microsoft Store คุณต้องอัปเดตทีละรายการด้วยตนเอง หรือคุณสามารถเปลี่ยนไปใช้เครื่องมือของบุคคลที่สามที่อัปเดตโปรแกรมซอฟต์แวร์ทั้งหมดของคุณในคราวเดียวเช่น CCleaner (มีส่วนประกอบการอัปเดตซอฟต์แวร์), SUMo หรือ IObit Software Updater
8. ถอนการติดตั้งแอปพลิเคชันเก่า
หากการเรียกใช้โปรแกรมในโหมดความเข้ากันได้สำหรับ Windows รุ่นเก่าไม่สามารถทำได้คุณควรลบโปรแกรมเหล่านั้นออกจากคอมพิวเตอร์ของคุณ โดยมีวิธีดังนี้:
- คลิกขวาที่ปุ่ม เริ่ม แล้วเลือก แอปและคุณลักษณะ
- ค้นหาแอปพลิเคชันของคุณในรายการเลือกและคลิก ถอนการติดตั้ง
- คลิก ถอนการติดตั้ง อีกครั้งเพื่อยืนยัน
- ทำตามคำแนะนำการนำออก
- หากหน้าจอแล็ปท็อปของคุณยังกะพริบอยู่ให้ถอนการติดตั้งโปรแกรมที่เข้ากันไม่ได้เพิ่มเติม
9. ติดตั้งโปรแกรมใหม่
เมื่อพูดถึงแอปพลิเคชันใหม่คุณควรติดตั้งใหม่เพื่อแก้ไขปัญหาที่อาจทำให้หน้าจอกะพริบบน Windows 10 เพียงดำเนินการตามขั้นตอนการถอนการติดตั้งจากโซลูชันก่อนหน้าจากนั้นดาวน์โหลดและติดตั้งแต่ละโปรแกรม จากเว็บไซต์อย่างเป็นทางการ เป็นวิธีง่ายๆในการแก้ไขปัญหาหน้าจอแล็ปท็อปกระพริบบน Windows 10
10. ตรวจสอบการอัปเดตระบบ
Windows 10 ควรมีการเข้าถึงการอัปเดตระบบตลอดเวลาเพื่อให้คุณได้รับประโยชน์จากคุณลักษณะใหม่ล่าสุดการปรับปรุงโปรแกรมแก้ไขด่วนและโปรแกรมแก้ไขด้านความปลอดภัย หากระบบปฏิบัติการของคุณไม่ตรวจหาการอัปเดตโดยอัตโนมัตินี่คือวิธีปรับใช้งานด้วยตนเอง:
- กดแป้น Windows พิมพ์ ตรวจหาการอัปเดต และกด Enter
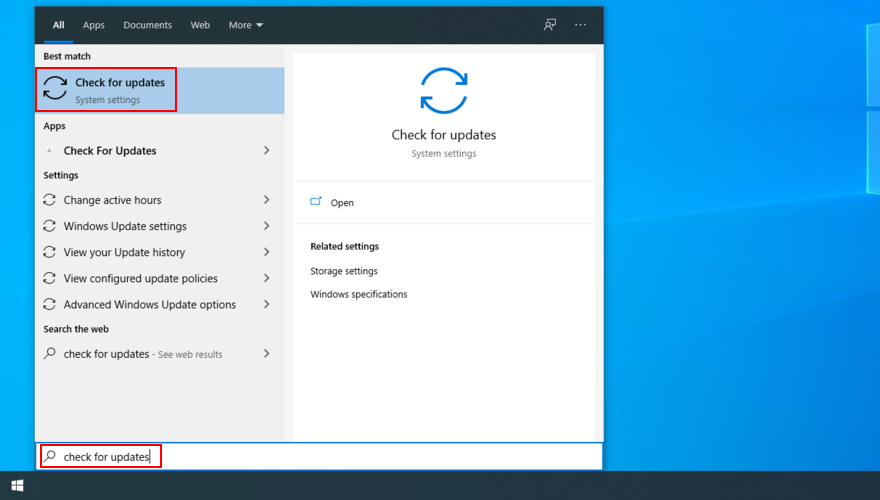
- คลิก ตรวจหาการอัปเดต และรอ
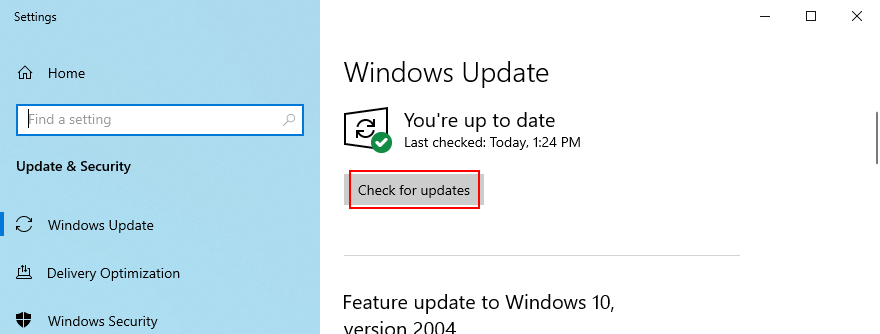
- หากมีการอัปเดตที่รอดำเนินการให้คลิก ดาวน์โหลด
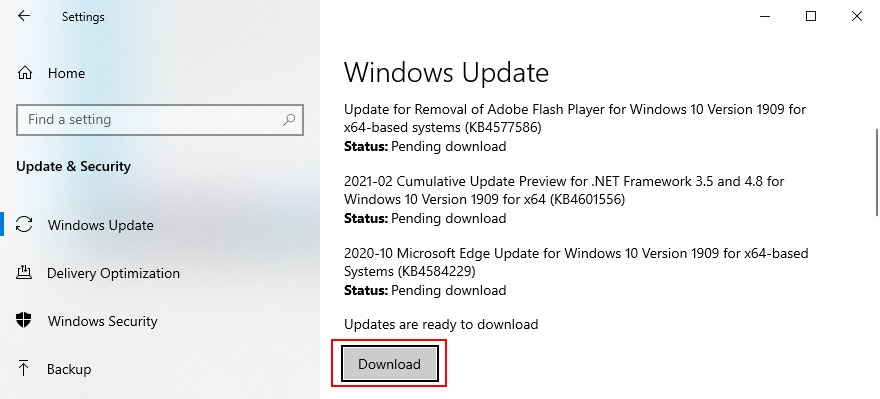
- อดทนรอในขณะที่ Windows ดำเนินการอัปเดต อาจใช้เวลาสักครู่โดยเฉพาะอย่างยิ่งหากคุณไม่ได้ทำมาเป็นเวลานานหรือหลังจากติดตั้งใหม่ คอมพิวเตอร์ของคุณอาจรีบูตหลายครั้ง
หากระบบปฏิบัติการของคุณแสดงข้อผิดพลาดและปฏิเสธการอัปเดตให้ใช้ ตัวแก้ไขปัญหา Windows Update
11. เรียกใช้ตัวแก้ไขปัญหาฮาร์ดแวร์และอุปกรณ์
หากมีบางอย่างผิดปกติกับการ์ดแสดงผลของคุณคุณสามารถเรียกใช้เครื่องมือแก้ปัญหาภายในเพื่อแก้ไขปัญหาทั่วไป คุณสามารถค้นหาได้ใน การตั้งค่า > เครื่องมือแก้ปัญหาเพิ่มเติม อย่างไรก็ตามหาก ตัวแก้ไขปัญหาฮาร์ดแวร์และอุปกรณ์หายไป จากคอมพิวเตอร์ของคุณคุณสามารถเปิดใช้งานได้จากแอป Run โดยมีวิธีดังนี้:
- คลิกขวาที่ปุ่ม เริ่ม แล้วคลิก เรียกใช้
- พิมพ์
msdt.exe-id DeviceDiagnosticแล้วกด Enter
- คลิก ถัดไป และปฏิบัติตามคำแนะนำที่กำหนด
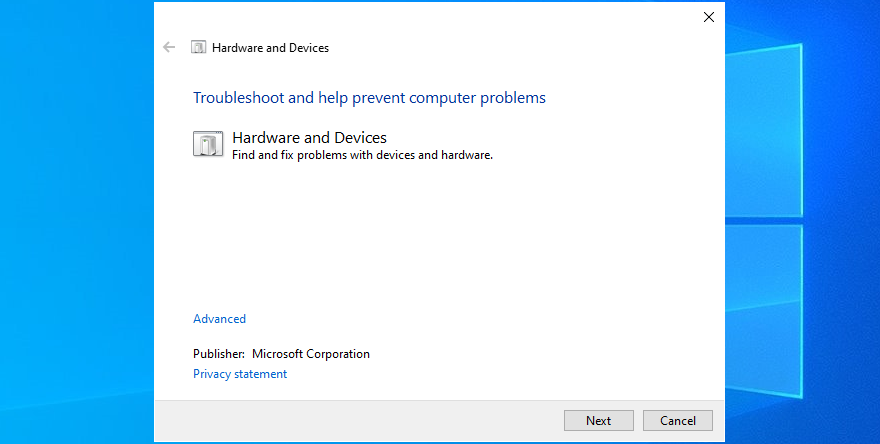
- หากเครื่องมือแก้ปัญหาพบวิธีแก้ไขให้คลิก ใช้การแก้ไขนี้

- รีบูตเครื่องคอมพิวเตอร์และตรวจสอบการกะพริบของหน้าจอ


12. เรียกใช้ CHKDSK
CHKDSK (Check Disk) คือยูทิลิตี้การแก้ไขปัญหาที่มาพร้อมกับ Windows ซึ่งคุณสามารถใช้เพื่อสแกนหาข้อผิดพลาดในฮาร์ดไดรฟ์และแก้ไขเซกเตอร์เสีย หากปัญหาการกะพริบของหน้าจอของคุณเกิดจากความเสียหายของ HDD CHKDSK เป็นวิธีที่จะดำเนินการต่อไป สิ่งที่คุณต้องทำมีดังนี้:
- บันทึกโครงการที่กำลังดำเนินอยู่ทั้งหมดและยุติแอปพลิเคชันทั้งหมด
- Press Win key + R, type cmd, and press Ctrl + Shift + Enter to launch Command Prompt with administrator rights

- Click Yes if prompted by UAC (User Account Control)
- If Windows is installed on the default C: drive, run
chkdsk c:/f. Else, make sure to replacec:with the correct drive letter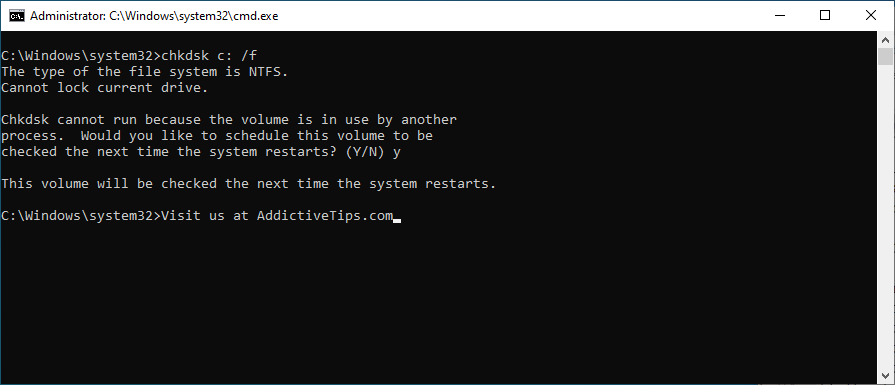
- Type y and hit Enter when asked to confirm scheduling the tool at the next system boot
- Exit Command Prompt and restart your PC
- CHKDSK will check and fix disk errors before Windows boot
- Once it’s over and Windows starts, check if your screen still flickers
13. Check your monitor cables
If you have a Windows 10 desktop, shift attention to the cable that connects your monitor to your computer unit. It doesn’t matter if it’s HDMI, VGA, or something else. Unplug the cable from both ends and carefully connect it again.
And, if you have at least one more identical port, try using it, just in case the original port is malfunctioning. If it doesn’t work, you might have to replace the cable.
14. Clean your hardware
Too much dust accumulated in your hardware components can be damaging to your computer. For example, if the graphics card is dusty, it could cause your screen to flicker on Windows 10.
However, you should be able to resolve this problem by taking your computer unit or laptop apart, in order to carefully dust off all components. Pay special attention to the GPU card and cooler while doing so.
The complexity of this task depends on your computer’s make and model. But don’t dive into it without consulting your manufacturer’s website or at least a YouTube tutorial.
15. Remove and reseat your graphics card
Removing and reseating your GPU card means taking it out of its socket and then putting it back in. It’s a simple way to give your graphics adapter a jolt and fix laptop flashing problems on Windows 10 computers.
Just be careful when plugging the graphics card back in. Do it firmly but without applying force. Then, start your operating system to see if the monitor problem was resolved.
16. Change your monitor refresh rate
Monitor overlocking helps improve the refresh rate to have a smoother experience on your computer, especially when it comes to playing fast-paced games like shooters or FPS. However, if the refresh rate settings are incorrect, you can end up with screen flickering on Windows 10.
To fix this problem, you just have to decrease your monitor’s refresh rate to a setting that’s comfortable for you and which doesn’t cause any display problems. Here’s how you can make it happen:
- Right-click an empty space on the desktop and go to Display settings

- Click Advanced display settings
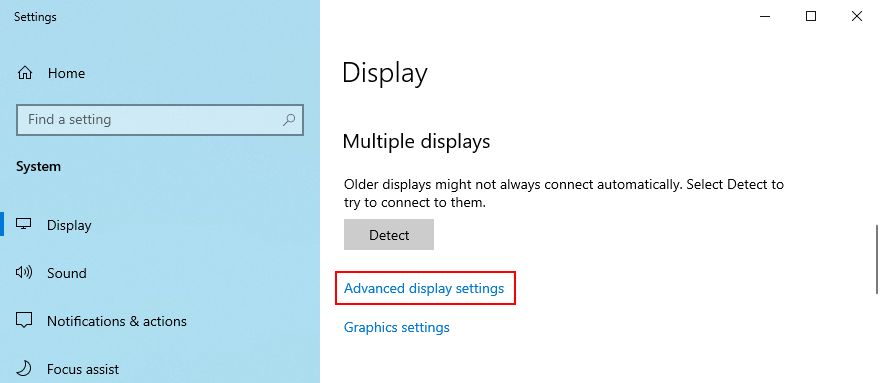
- If you have two or more monitors, make sure to pick the primary display from the list
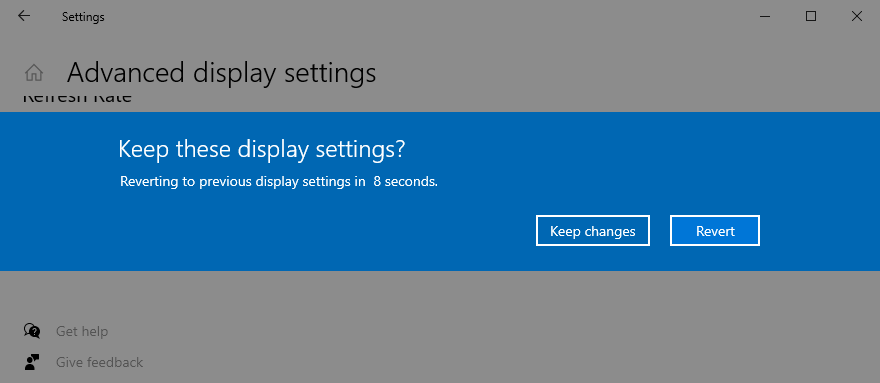
- Open the Refresh rate menu and select a value
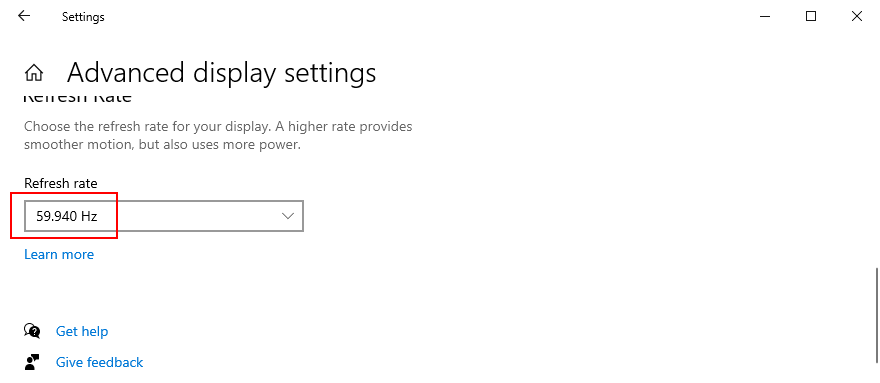
- Inspect the new settings to decide if you want to Keep changes or Revert to the previous refresh rate, depending on whether or not your screen keeps flickering
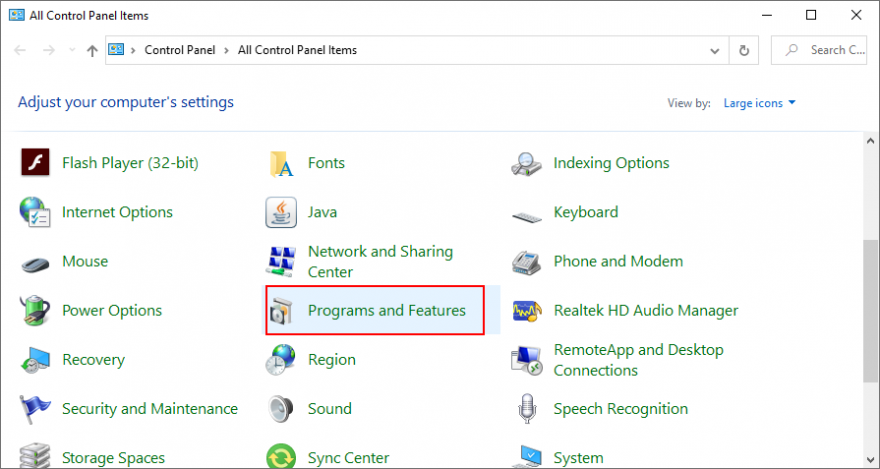
17. Uninstall system updates
Some Windows updates cause computer problems and should be immediately removed. This could also be the reason why your laptop screen keeps flashing. Here’s what you need to do:
- Click the Start button, search for Control Panel, and open this app
- Select Programs and Features
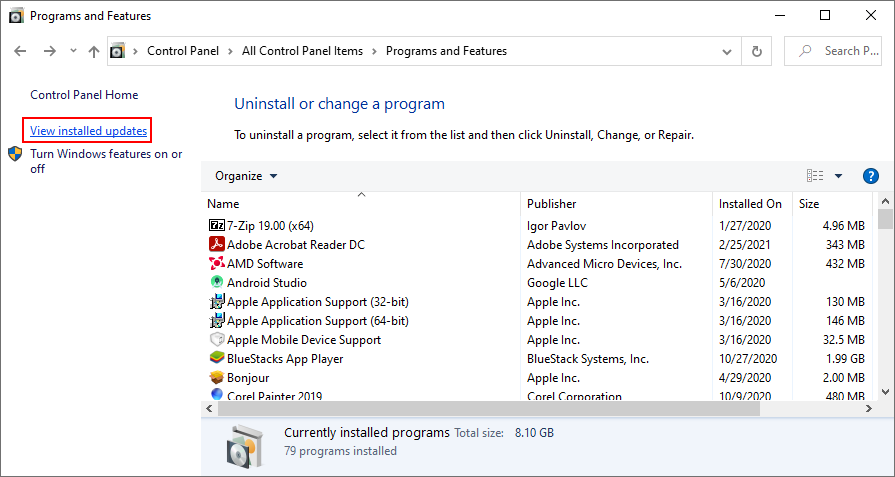
- Click View installed updates on the left side
- Press the Installed On column to sort the updates by date of installation (newest first)
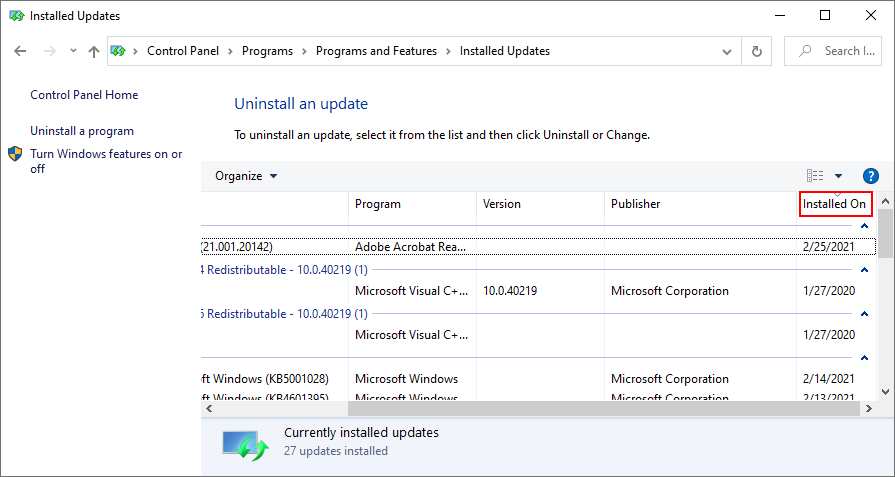
- Double-click the first update in the list and select Uninstall
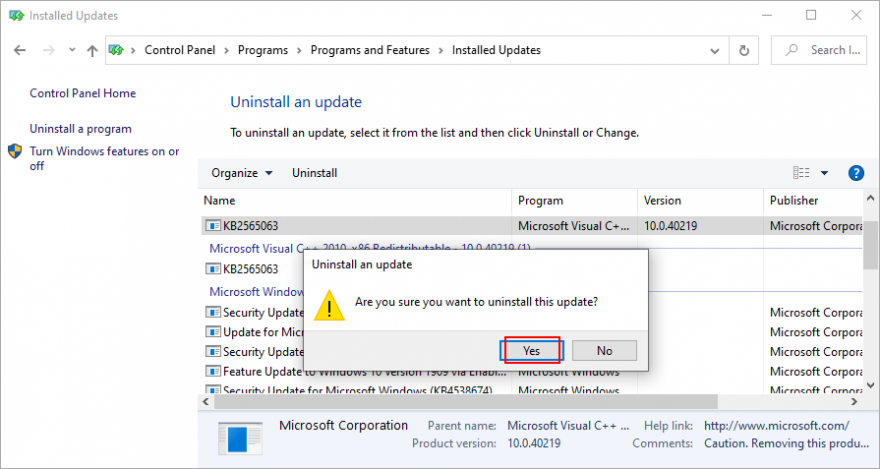
- Click Yes to confirm its removal
- Restart your computer and check for screen flickering problems now
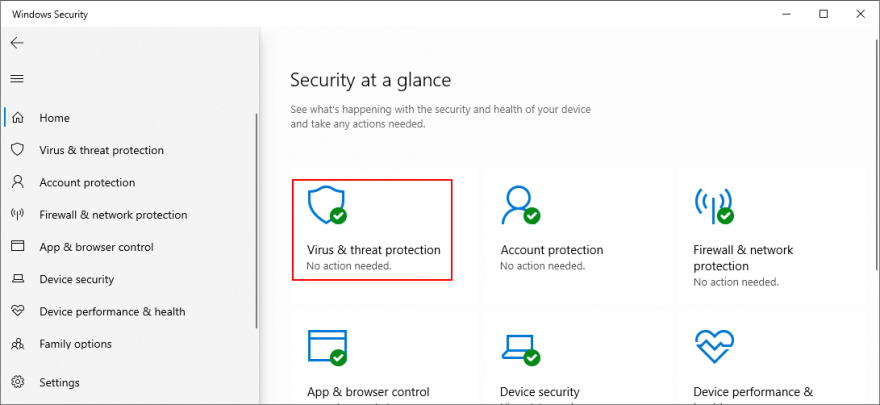
18. Run a malware scan
If your computer was recently under attack, it’s possible that a malware agent has infiltrated your operating system and disabled essential files that Windows 10 needs to work properly. It’s rare, but it’s possible that your graphics drivers are affected, too.
So it’s a good idea to regularly run a malware scan and keep your computer’s security in check. Unless you have a third-party Internet security solution installed, here’s how you can use Windows Defender:
- Press the Win key, search for Windows Security, and open this app

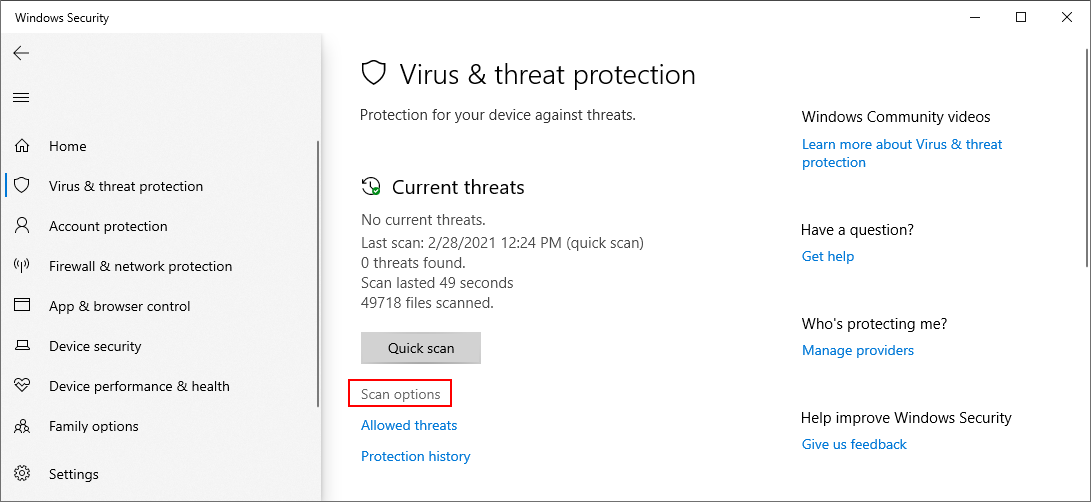
- Go to Virus & threat protection
- Click Scan options
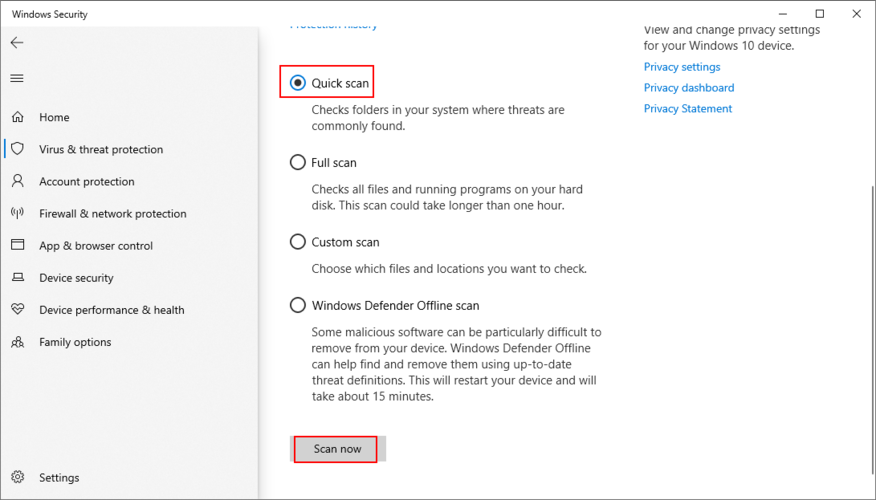
- Select Quick scan and click Scan now
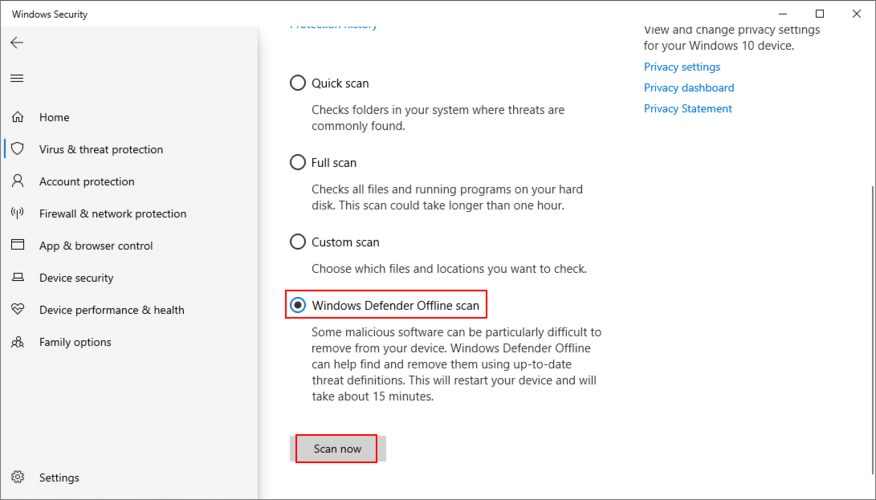
- Don’t use your computer while Windows is looking for malware. If it doesn’t find anything, select Windows Defender Offline scan and click Scan now
- Proceed with the given instructions to remove any infected files
- Restart your PC and inspect results
19. Disable the Windows Desktop Manager service
Windows Desktop Manager (dwm.exe) is a process in charge of Windows effects, such as live taskbar thumbnails and transparent windows. It’s enabled by default on Windows 10.
However, many users claim that Windows Desktop Manager causes screen flickering on their Windows 10 computers, and terminating its process resolved the problem. Here’s what you need to do.
How to stop the dwm.exe service:
- Right-click the Windows 10 taskbar and select Task Manager (or press Ctrl + Shift + Esc)

- Select the Processes tab
- Scroll down to the the Windows processes group
- Find and select Desktop Window Manager Session Manager
- Click End task
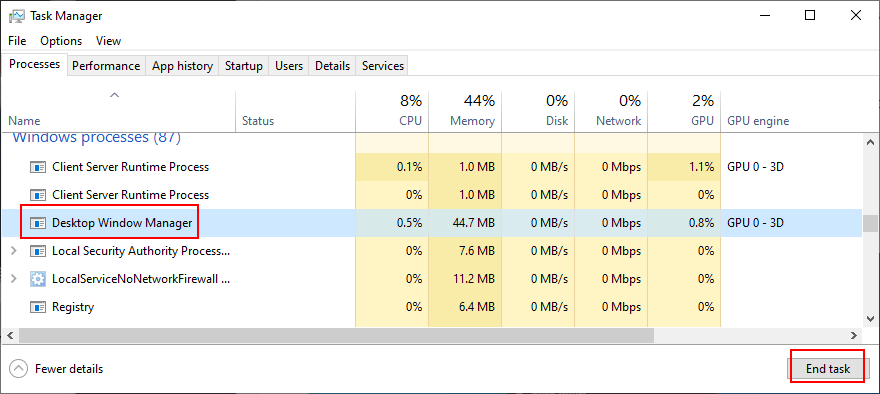
- Exit Task Manager
If the Windows Desktop Manager process gets restarted automatically, then you have to disable this option using the Services tool.
How to disable the dwm.exe autostart:
- Click the Start button, search for Services, and open this app
- Find and double-click Desktop Window Manager Session Manager to view its properties
- Set Startup type to Disabled
- If the Service status says Running, click the Stop button
- Click Apply to common changes
- You should also find and disable the Problem Reports and Solution Control Panel service
- Check for screen flickering issues now
20. Use System Restore
You can roll back Windows 10 to a restore point that was created before your computer’s screen started to act strange and flicker. It’s a simple way to erase all modifications at the software level. However, it also means that your programs and games installed after the checkpoint will disappear from your PC, so you have to set them up again.
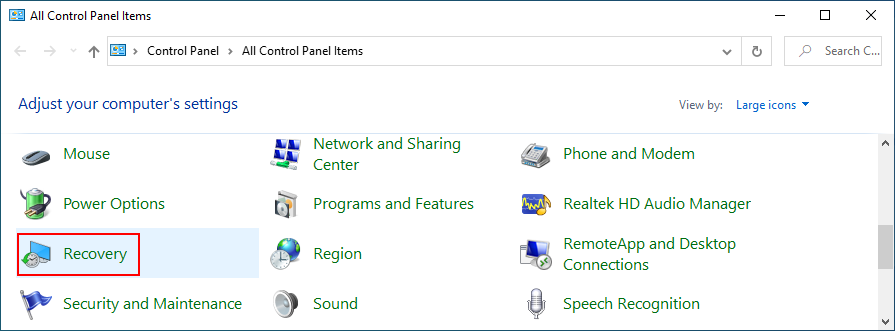
How to roll back Windows 10:
- Make sure to sign in to Windows 10 with administrator rights
- Search for Control Panel and open this tool
- Go to Recovery
- Click Open System Restore
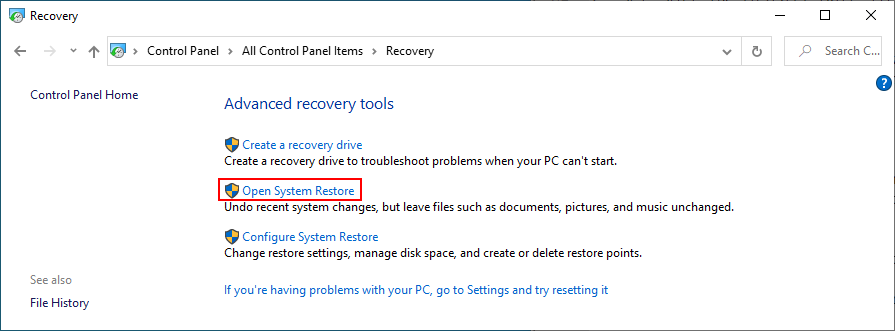
- If there are multiple checkpoints available, click Show more restore points to get a better view. Plus, you can click Scan for affected programs to discover what applications you will have to reinstall
- Select a restore point, click Next, and follow the steps
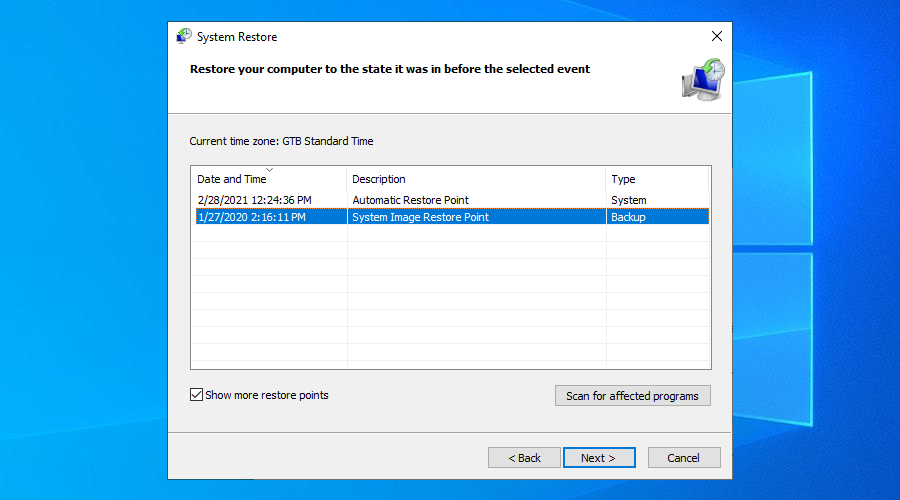
- After your computer reboots, check for screen flickering issues
21. Reset Windows 10
Regrettably, System Restore sometimes fails to work. If you have exhausted all your options up until this point and still can’t get rid of laptop screen flashing, it’s time to perform a factory reset on Windows 10. Only your applications will be gone, so your personal files will remain intact.
How to reset Windows 10:
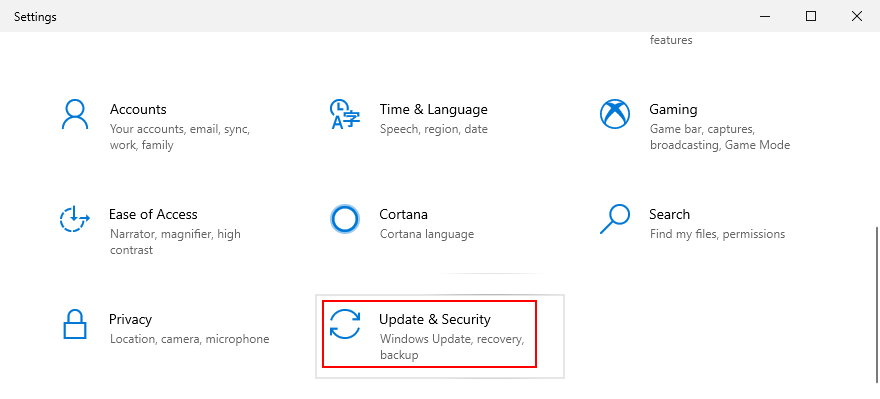
- Click the Start button, search for Settings, and open this app
- Go to Update & Security
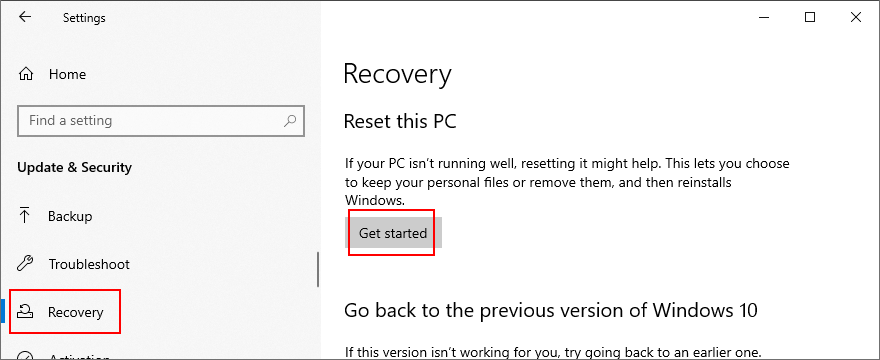
- Select Recovery and click Get started
- When prompted with two options, pick Keep my files
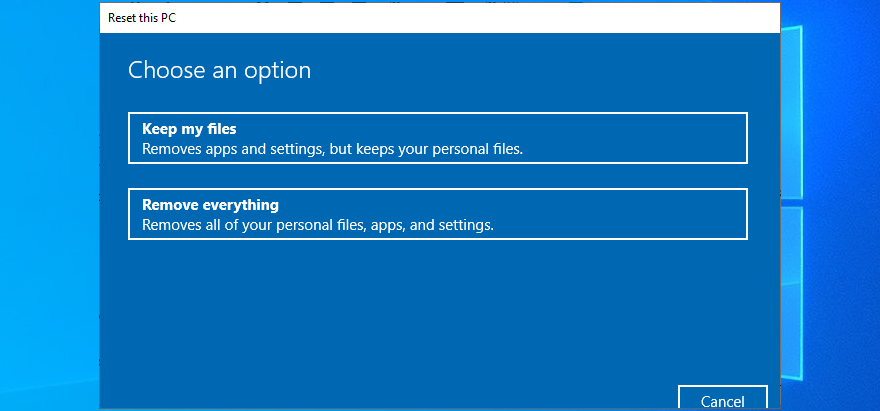
- Proceed with the on-screen instructions until your computer is reset
Screen flashing can be avoided on Windows 10
To recap, screen flickering issues on Windows 10 are usually caused by display problems. You can narrow down the search by inspecting Task Manager to see if it’s also flashing.
For instance, you should start Windows 10 in Safe Mode or run a clean boot, reinstall your display adapter, update or roll back your graphics driver, run Program Compatibility Troubleshooter, update, uninstall or reinstall programs, check for system updates, as well as run the Hardware and Devices troubleshooter.
It’s also a good idea to scan your hard drive for errors with the help of CHKDSK. Furthermore, you should inspect your monitor cables, clean your hardware, remove and reseat your graphics card, lower your monitor refresh rate, uninstall system updates, perform a malware scan, or disable the Windows Desktop Manager service.
If all fails, you can try to roll back Windows 10 to a previous restore point or perform a factory reset. But you might also have to consider replacing your monitor.
Which solution solved the screen flashing problem on your computer? Tell us all about it in our comments section below.