เมาส์เป็นสิ่งที่ขาดไม่ได้สำหรับคอมพิวเตอร์เดสก์ท็อปและคนส่วนใหญ่ใช้เมาส์บนแล็ปท็อปเนื่องจากทัชแพดหรือไม้ชี้นั้นค่อนข้างอึดอัด เกมเมอร์น่าจะเป็นตัวอย่างที่ดีกว่าของผู้ชมที่ชื่นชมคุณภาพของเมาส์ที่ดีอย่างแท้จริงพร้อมความรู้สึกสบายปุ่มมากมายและเวลาตอบสนองที่ยอดเยี่ยม
คุณแทบจะไม่พบเมาส์ไร้สายในที่เก็บอุปกรณ์ของเกมเมอร์ เมื่อเปรียบเทียบกับเมาส์แบบมีสายแล้วจะมีเวลาตอบสนองที่น้อยกว่าเนื่องจากเชื่อมต่อกับคอมพิวเตอร์ของคุณผ่านดองเกิล USB แบบไร้สาย
อย่างไรก็ตามผู้ใช้ประเภทอื่น ๆ ชอบเมาส์ไร้สายสำหรับกิจกรรมบนพีซีทั่วไปการท่องอินเทอร์เน็ตการสตรีมและการทำงาน อย่างไรก็ตามเมื่อเมาส์ไร้สายของคุณไม่ทำงานคุณอาจถูกล่อลวงให้ทิ้งเมาส์ไปที่เมาส์แบบมีสายซึ่งจะไม่ทำให้คุณผิดหวัง

เมาส์ไร้สายไม่ทำงาน
ก่อนดำเนินการดังกล่าวคุณควรแก้ไขปัญหานี้เพื่อดูว่าสามารถแก้ไขได้อย่างง่ายดายหรือไม่ ปัญหาการทำงานของเมาส์อาจเกิดขึ้นได้ไม่ว่าจะเป็นยี่ห้อใดรวมถึง Microsoft, Logitech และ HP
สถานการณ์ที่ไม่ต้องการบางอย่างที่คุณอาจพบ:
วิธีแก้ปัญหาเมาส์โดยไม่ใช้เมาส์
ปัญหาแรกเป็นเรื่องละเอียดอ่อน: วิธีแก้ไขปัญหาเมาส์บนคอมพิวเตอร์ของคุณหากคุณไม่สามารถใช้เมาส์เพื่อนำทาง Windows 10 ได้วิธีแก้ปัญหาที่ชัดเจนที่สุดในกรณีนี้คือการใช้อุปกรณ์ชี้ตำแหน่งอื่น ตัวอย่างเช่นหากคุณมีแล็ปท็อปคุณสามารถเปลี่ยนไปใช้ทัชแพดหรือไม้ชี้ได้
หากคุณไม่มีเมาส์ตัวที่สองบนเดสก์ท็อปให้ลองใช้อุปกรณ์ชี้ตำแหน่งอื่นเช่นแท็บเล็ตวาดภาพ หรือคุณสามารถพึ่งพาแป้นพิมพ์ของคุณในการนำทางด้วยคอมพิวเตอร์ได้อย่างเต็มที่แม้ว่าจะต้องใช้เวลาฝึกฝนสักหน่อยในการเรียนรู้วิธีสลับแท็บและหน้าต่างตลอดจนวิธีดำเนินการที่คล้ายกับการคลิกปุ่ม
คุณสามารถลองใช้ Cortana หรือโซลูชันซอฟต์แวร์รู้จำเสียงอื่นบนพีซี Windows 10 ของคุณได้ อย่างไรก็ตามเราเชื่อว่าวิธีที่ดีที่สุดในการแก้ปัญหาเมาส์คือการตั้งค่า รีโมต การเชื่อมต่อเดสก์ท็อป จากคอมพิวเตอร์เครื่องอื่นโดยใช้แอป Remote Desktop Connection ในตัวหรือแอปพลิเคชันของบุคคลที่สามเช่น TeamViewer
วิธีแก้ไขเมาส์ไร้สายหากไม่ทำงานบน Windows 10
ทำตามวิธีการเหล่านี้ทีละขั้นตอนเพื่อแก้ไขปัญหาการทำงานของเมาส์ไร้สายของคุณบนคอมพิวเตอร์ Windows 10
1. ตรวจสอบว่าระบบทั้งหมดของคุณหยุดทำงานหรือไม่
เริ่มต้นด้วยการตรวจสอบว่าระบบปฏิบัติการทั้งหมดของคุณหยุดทำงานหรือไม่เนื่องจากเมาส์ของคุณอาจทำงานได้ดีจริง หากเซสชันการเล่นเกมของคุณถูกตัดให้สั้นลงคุณสามารถบอกได้อย่างง่ายดายตั้งแต่หน้าต่างเกมและเสียงค้าง
อย่างไรก็ตามหากไม่มีอะไรเกิดขึ้นบนหน้าจอของคุณเมื่อเมาส์ไร้สายของคุณหยุดทำงานให้ตรวจสอบว่าแป้นพิมพ์ใช้งานได้หรือไม่ หากมีไฟ LED ให้กดปุ่ม Num Lock หรือ Caps Lock เพื่อดูว่าเปิดอยู่หรือไม่ หรือกด Ctrl + Alt + Del เพื่อดูว่าหน้าจอของคุณเปลี่ยนเป็นสีน้ำเงินหรือไม่และแสดงตัวเลือกการใช้พลังงานและตัวจัดการงาน
เมื่อคุณพิจารณาแล้วว่าทุกอย่างทำงานได้อย่างสมบูรณ์ยกเว้นเมาส์ของคุณให้ดำเนินการตามแนวทางแก้ไขปัญหาต่อไปนี้
2. รีสตาร์ทคอมพิวเตอร์ของคุณ
เรารู้ว่ามันฟังดูงี่เง่า แต่การรีสตาร์ทคอมพิวเตอร์อาจเพียงพอที่จะรีสตาร์ทเมาส์ไร้สายและทำให้มันทำงานได้อย่างถูกต้องอีกครั้ง เป็นไปได้ว่าบริการและไดรเวอร์หยุดทำงานเนื่องจากกระบวนการทำงานอื่น ๆ ดังนั้นการรีบูต Windows 10 ควรทำตามเคล็ดลับ
3. ตรวจสอบความเข้ากันได้ของเมาส์
หากคุณเพิ่งซื้อเมาส์ใหม่หรือได้รับเป็นของขวัญอาจจะไม่รองรับระบบปฏิบัติการของคุณ หายากแล้วในปัจจุบันเนื่องจากเมาส์สมัยใหม่ส่วนใหญ่รองรับ Windows 10
แต่อาจเกิดขึ้นได้โดยเฉพาะอย่างยิ่งหากแบรนด์ยังใหม่หรือไม่เป็นที่รู้จัก เพียงเข้าไปที่เว็บไซต์ของผู้ผลิตเมาส์ของคุณหรือติดต่อฝ่ายสนับสนุนลูกค้าเพื่อยืนยันว่าเมาส์ USB ของคุณเข้ากันได้กับระบบของคุณ
4. ตรวจสอบแบตเตอรี่ของเมาส์
พลิกเมาส์ของคุณเพื่อตรวจสอบว่าไฟเปิดอยู่หรือไม่ ในขณะที่ทำเช่นนั้นให้มองใกล้ ๆ เพื่อให้แน่ใจว่าแสงไม่ได้ถูกปกคลุมด้วยฟิล์มใสบาง ๆ บางทีเพื่อนร่วมงานของคุณอาจอยากเล่นตลกกับคุณ
อย่างไรก็ตามหากไฟไม่สม่ำเสมอหรือดับแสดงว่าแบตเตอรี่ของคุณเหลือน้อยหรือหมดดังนั้นคุณควรเปลี่ยนใหม่ เมื่อทำเช่นนั้นให้ตรวจสอบว่าเมาส์ไร้สายของคุณใช้งานได้หรือไม่
5. ขยับเข้าใกล้ตัวรับสัญญาณ USB มากขึ้น
ผู้ใช้บางคนเชื่อมต่อแล็ปท็อปผ่านสมาร์ททีวีผ่านสาย HDMI และพยายามนำทางคอมพิวเตอร์ด้วยเมาส์จากระยะไกล อย่างไรก็ตามเมาส์ไร้สายไม่ได้สร้างมาสำหรับระยะไกลดังนั้นคุณควรขยับเข้าใกล้ตัวรับสัญญาณ USB เพื่อให้ได้สัญญาณที่ดีขึ้น เหมือนกับการเคลื่อนสมาร์ทโฟนของคุณเข้าใกล้เราเตอร์เพื่อเชื่อมต่ออินเทอร์เน็ต
นอกจากนี้คุณควรตรวจสอบให้แน่ใจว่าตัวรับสัญญาณ USB ของเมาส์ไม่ได้กีดขวางโดยวัตถุใด ๆ หรืออยู่ใกล้กับอุปกรณ์อื่น ๆ เช่นเตาอบไมโครเวฟหรือสมาร์ทโฟนเนื่องจากการรบกวนอาจทำให้เมาส์ไร้สายของคุณหยุดทำงานบนคอมพิวเตอร์ Windows 10 ของคุณ
6. ใช้พอร์ต USB อื่น
อาจมีปัญหากับพอร์ต USB ของคุณไม่ใช่เมาส์ ถอดปลั๊กตัวรับสัญญาณ USB ออกจากเดสก์ท็อปหรือแล็ปท็อปของคุณแล้วลองใช้พอร์ตอื่นที่เหมือนกัน บนเดสก์ท็อปคุณสามารถลองด้านหน้าหรือด้านหลังของหน่วยคอมพิวเตอร์ได้
อย่างไรก็ตามหากโน้ตบุ๊กของคุณไม่มีพอร์ตมากเกินไปให้เชื่อมต่อฮับ USB แบบหลายพอร์ตจากนั้นต่อตัวรับสัญญาณ USB ของคุณเข้ากับฮับเพื่อดูว่าเมาส์ไร้สายของคุณใช้งานได้หรือไม่
7. ลองใช้เมาส์บนคอมพิวเตอร์เครื่องอื่น
เมาส์ของคุณอาจไม่ทำงานผิดปกติ แต่มีบางอย่างผิดปกติกับการตั้งค่าคอมพิวเตอร์ของคุณ วิธีที่ง่ายที่สุดในการพิสูจน์สิ่งนี้คือการเชื่อมต่อตัวรับสัญญาณ USB ของเมาส์เข้ากับคอมพิวเตอร์เครื่องอื่นเพื่อดูว่าใช้งานได้หรือไม่
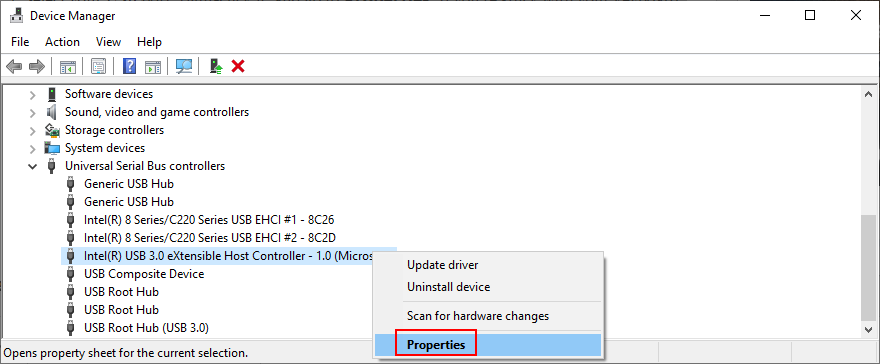
8. ติดตั้งเมาส์และอุปกรณ์ USB อีกครั้ง
เป็นไปได้ว่าเมาส์และอุปกรณ์ USB ของคุณไม่ได้ติดตั้งอย่างถูกต้องบนคอมพิวเตอร์ Windows 10 ของคุณ แต่คุณสามารถแก้ไขได้อย่างรวดเร็วจาก Device Manager
ใช้เมาส์
- คลิกขวาที่ปุ่ม เริ่ม และไปที่ ตัวจัดการอุปกรณ์
- ขยายเมนู เมาส์และอุปกรณ์ชี้ตำแหน่งอื่น ๆ คลิกขวาที่เมาส์แล้วเลือก ถอนการติดตั้งอุปกรณ์
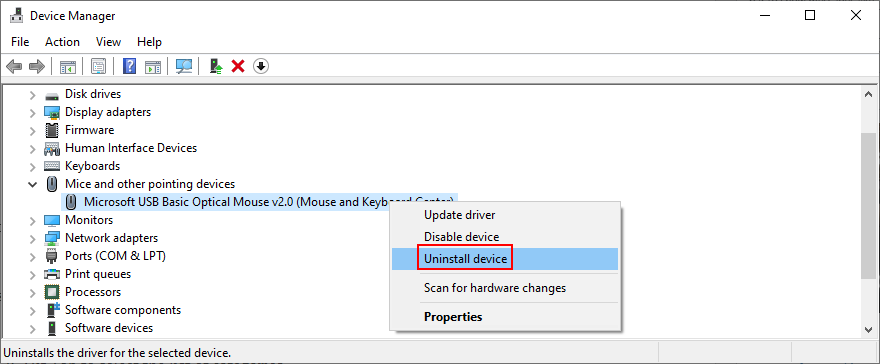
- เลือกช่อง ลบซอฟต์แวร์ไดรเวอร์สำหรับอุปกรณ์นี้
- คลิก ถอนการติดตั้ง
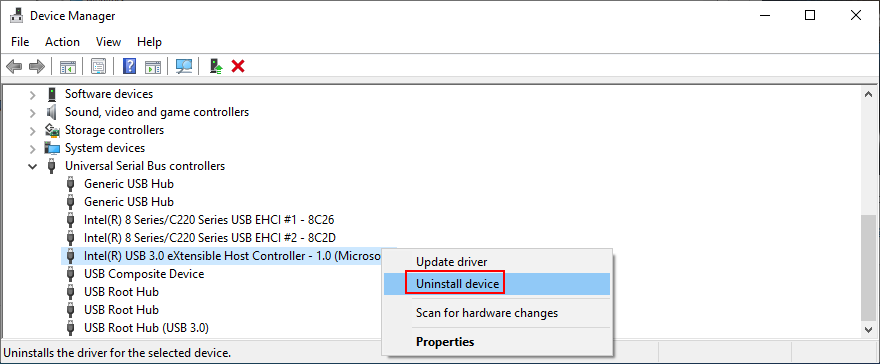
- กลับไปที่หน้าต่างหลักของ Device Manager
- เปิดกลุ่ม คอนโทรลเลอร์ Universal Serial Bus
- ทำตามขั้นตอนเดียวกันนี้เพื่อถอนการติดตั้งอุปกรณ์สำหรับพอร์ต USB ของคุณ
- เปิดเมนู การทำงาน
- เลือก สแกนหาการเปลี่ยนแปลงฮาร์ดแวร์
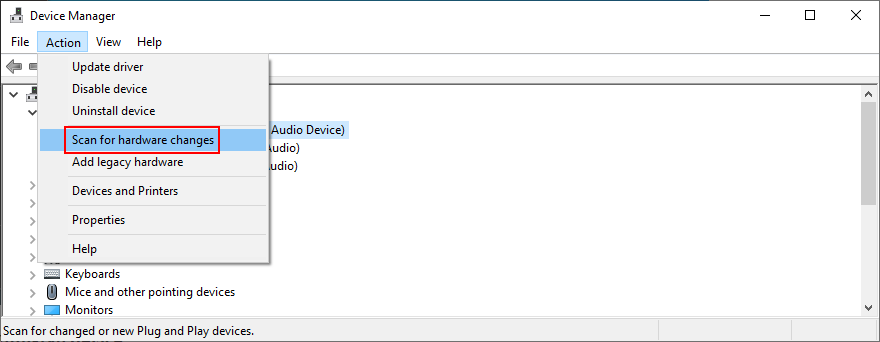
- รีสตาร์ทคอมพิวเตอร์ของคุณ Windows จะติดตั้งอุปกรณ์ที่หายไปใหม่โดยอัตโนมัติ
- ตรวจสอบเมาส์ของคุณตอนนี้
การใช้แป้นพิมพ์
- กด Win + R พิมพ์ devmgmt.msc และกด Enter เพื่อเปิด อุปกรณ์ ผู้จัดการ
- กด แท็บ เพื่อเลือกรายการหมวดหมู่
- ใช้ปุ่มลูกศรเพื่อเลื่อนลงไปที่หมวดหมู่ เมาส์และอุปกรณ์ชี้ตำแหน่งอื่น ๆ
- กด Spacebar เพื่อขยายกลุ่มนี้
- กดปุ่มเมนู (สี่เหลี่ยมผืนผ้าที่มีสามบรรทัด) หรือใช้ Shift + F10 เพื่อเปิดเมนูบริบท
- กดปุ่มลูกศรลงสามครั้งเพื่อเลือก ถอนการติดตั้งอุปกรณ์ และกด เข้าสู่
- กด Tab จนกว่าคุณจะเลือก ลบซอฟต์แวร์ไดรเวอร์สำหรับอุปกรณ์นี้ แล้วกด Spacebar เพื่อทำเครื่องหมายในช่อง
- กด แท็บ เพื่อเลือกปุ่ม ถอนการติดตั้ง และกด เข้าสู่
- กด Alt + F4 เพื่อปิดหน้าต่างทั้งหมดจนกระทั่งกล่องโต้ตอบปิดเครื่องปรากฏขึ้น
- ใช้แป้นลูกศรขึ้นหรือลงเพื่อเลือกตัวเลือก ปิดเครื่อง แล้วกด เข้าสู่
- หลังจากพีซีรีสตาร์ท Windows จะติดตั้งอุปกรณ์ที่หายไปอีกครั้ง
- ตรวจสอบว่าเมาส์ไร้สายของคุณใช้งานได้หรือไม่
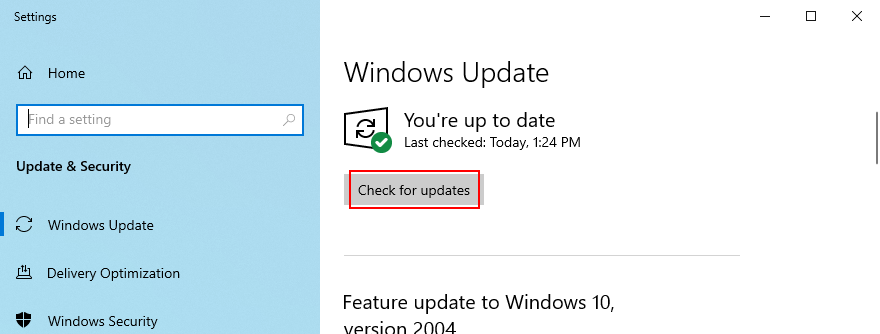
9. อัปเดตไดรเวอร์เมาส์และ USB
หากการติดตั้งอุปกรณ์ใหม่ไม่สามารถแก้ไขเมาส์ USB ของคุณได้อาจเป็นไปได้ว่าไดรเวอร์ของอุปกรณ์นั้นล้าสมัย แต่คุณสามารถแก้ปัญหานี้ได้โดยใช้ Device Manager
- เข้าถึง ตัวจัดการอุปกรณ์ และนำทางโดยทำตามคำแนะนำใน โซลูชัน 8 จากรายการนี้
- คลิกขวาที่อะแดปเตอร์เมาส์ (หรือกดปุ่มเมนูหรือ Shift + F12 ) แล้วเลือก อัปเดตไดรเวอร์ (หรือกดปุ่มลง ลูกศรหนึ่งครั้งแล้วกด Enter )
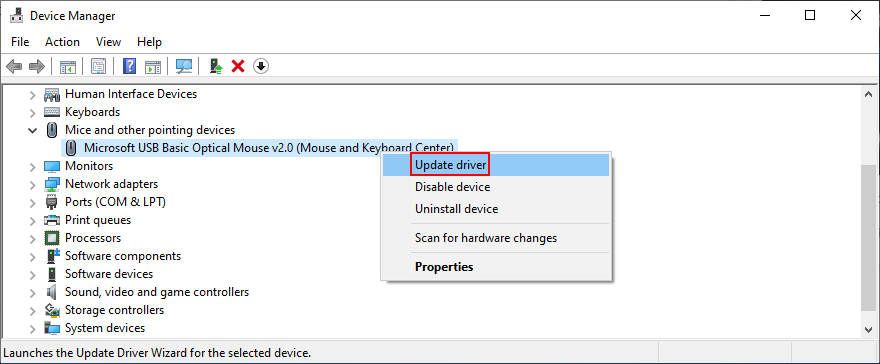
- คลิก ค้นหาไดรเวอร์โดยอัตโนมัติ (หรือกด Tab เพื่อเลือกตัวเลือกนี้จากนั้นกด Enter )
- หากคุณได้รับข้อความ ไดรเวอร์ที่ดีที่สุดสำหรับอุปกรณ์ของคุณได้รับการติดตั้งแล้ว ให้คลิก ค้นหาไดรเวอร์ที่อัปเดตบน Windows Update (หรือกด แท็บ > เพื่อเลือกตัวเลือกนี้และกด Enter )
- เมื่อเปิดการตั้งค่า Windows Update แล้วระบบปฏิบัติการของคุณควรเริ่มค้นหาการอัปเดตทันที หากไม่เป็นเช่นนั้นให้คลิก ตรวจหาการอัปเดต (หรือกด แท็บ จนกว่าคุณจะเลือกการตั้งค่านี้และกด Enter )
- อดทนรอในขณะที่ Windows ค้นหาการอัปเดต หากมีสิ่งใดที่รอดำเนินการให้คลิก ดาวน์โหลด หรือ ติดตั้งทันที (ขึ้นอยู่กับว่าหน้าจอของคุณแสดงอะไร)
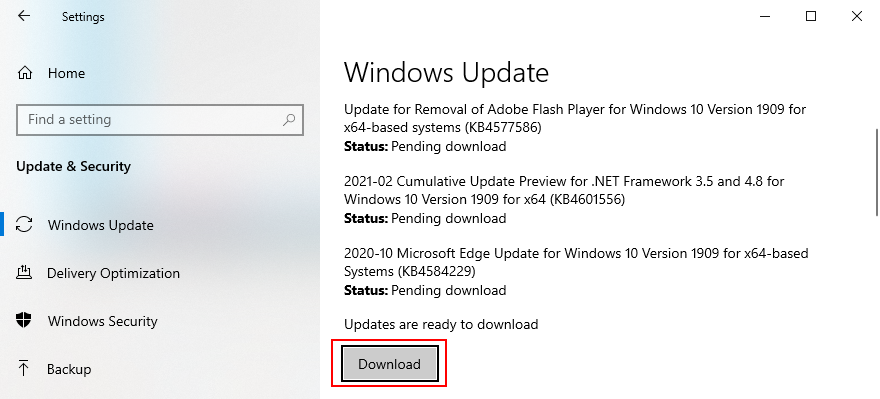
- รีสตาร์ทคอมพิวเตอร์ของคุณเพื่อเสร็จสิ้นการอัปเดตระบบ
- กลับไปที่ Device Manager และทำตามขั้นตอนเดียวกันนี้เพื่ออัปเดตพอร์ต USB ของคุณจากเมนู คอนโทรลเลอร์ Universal Serial Bus อย่างไรก็ตามไม่จำเป็นต้องตรวจสอบการอัปเดตระบบหากคุณได้ทำสิ่งนี้กับไดรเวอร์เมาส์แล้ว
น่าเสียดายที่ Windows 10 ไม่มีประสิทธิภาพในการติดตามไดรเวอร์โดยใช้ Windows Update มีวิธีแก้ปัญหาสองประการที่นี่: คุณสามารถดาวน์โหลดและติดตั้งไดรเวอร์ด้วยตัวเองหรือหันไปใช้ แอปพลิเคชันอัปเดตไดรเวอร์
สำหรับการอัปเดตด้วยตนเองคุณต้องไปที่เว็บไซต์ผู้ผลิตเมาส์ของคุณเพื่อค้นหาและดาวน์โหลดไดรเวอร์รุ่นใหม่ที่เข้ากันได้กับระบบปฏิบัติการของคุณ อย่างไรก็ตามหากคุณไม่ต้องการเสี่ยงที่จะได้รับไดรเวอร์ที่ไม่รองรับและสร้างความเสียหายมากขึ้นคุณสามารถหันไปใช้แอปพลิเคชันพิเศษที่ตรวจจับและอัปเดตไดรเวอร์ทั้งหมดของคุณโดยอัตโนมัติ
10. ย้อนกลับเมาส์หรือไดรเวอร์ USB
หากคุณได้ติดตั้งไดรเวอร์เมาส์ที่เข้ากันไม่ได้คุณควรลบออกจากคอมพิวเตอร์ของคุณทันทีและย้อนกลับไปเป็นเวอร์ชันก่อนหน้า แม้ว่าคุณจะไม่แน่ใจในเรื่องนี้ แต่ก็ยังควรดำเนินการย้อนกลับหากเป็นไปได้ สิ่งที่คุณต้องทำมีดังนี้:
- เข้าถึงและเรียกดู ตัวจัดการอุปกรณ์ โดยทำตามขั้นตอนที่มีรายละเอียดใน โซลูชัน 8 จากรายการนี้
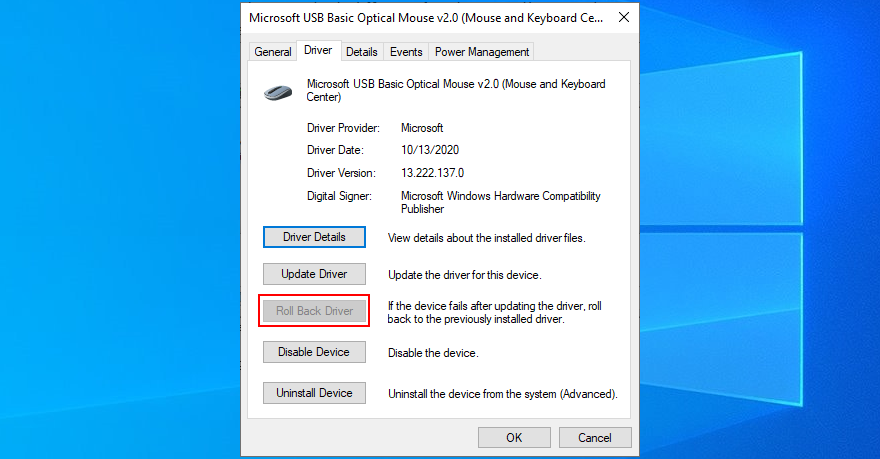
- คลิกขวาที่อุปกรณ์เมาส์ของคุณแล้วเลือก คุณสมบัติ (หรือกดปุ่มเมนูหรือ Shift + F12 กดลูกศรขึ้นหนึ่งครั้งและ กด Enter )
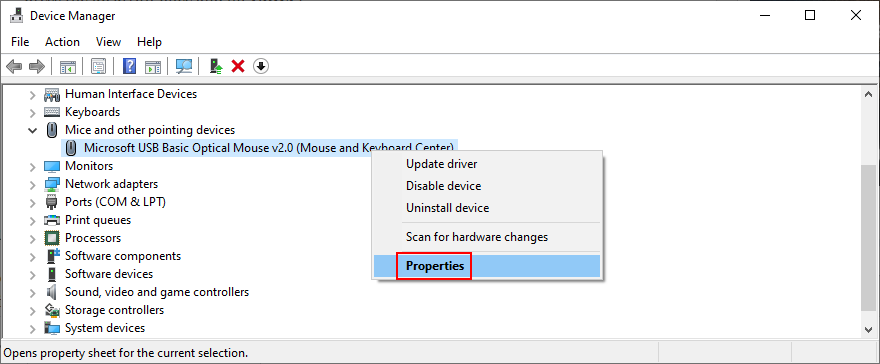
- คลิกแท็บ ไดรเวอร์ (หรือกด แท็บ จนกว่าคุณจะเลือกแท็บ ทั่วไป และกดปุ่มลูกศรขวาเพื่อไปที่ คนขับรถ )
- คลิก ย้อนกลับไดรเวอร์ และปฏิบัติตามคำแนะนำบนหน้าจอ (หรือกด Tab สามครั้งเพื่อเลือก ย้อนกลับไดรเวอร์ และกด เข้าสู่ )
- หากปุ่ม ย้อนกลับไดรเวอร์ เป็นสีเทาแสดงว่าคุณไม่สามารถทำการย้อนกลับได้เนื่องจากไม่มีเวอร์ชันก่อนหน้าของไดรเวอร์ในพีซีของคุณ
- ทำเช่นเดียวกันกับพอร์ต USB ของคุณในประเภท คอนโทรลเลอร์ Universal Serial Bus เพื่อดำเนินการย้อนกลับหากได้รับอนุญาต
11. ตรวจสอบการตั้งค่าการจัดการพลังงาน USB
การตั้งค่าพอร์ต USB ที่ไม่ถูกต้องอาจเป็นอีกสาเหตุหนึ่งที่ทำให้เมาส์ไร้สายของคุณไม่ทำงานบนคอมพิวเตอร์ Windows 10 ของคุณ โดยค่าเริ่มต้นระบบปฏิบัติการของคุณได้รับอนุญาตให้ปิดใช้งานพอร์ต USB เมื่อไม่ได้ใช้งานเพื่อประหยัดพลังงาน แต่จะมีปัญหาเมื่อพอร์ตไม่เปิดเมื่อคุณเสียบตัวรับสัญญาณ USB วิธีจัดการกับปัญหานี้มีดังนี้
- ไปที่ ตัวจัดการอุปกรณ์ และไปรอบ ๆ โดยใช้คำแนะนำที่ให้ไว้ใน โซลูชัน 8 จากรายการนี้
- ขยายกลุ่ม คอนโทรลเลอร์ Universal Serial Bus
- เลือกอุปกรณ์ USB ของคุณคลิกขวาแล้วไปที่ คุณสมบัติ หากคุณติดแป้นพิมพ์ให้กดปุ่มเมนูหรือ Shift + F12 กดลูกศรขึ้นหนึ่งครั้งแล้วกด Enter เพื่อ เข้าถึง คุณสมบัติ
- สลับไปที่ส่วน การจัดการพลังงาน (กด แท็บ จนกว่าคุณจะเลือกพื้นที่แท็บและใช้แป้นลูกศรเพื่อไปที่ การจัดการพลังงาน )
- ยกเลิกการเลือก อนุญาตให้คอมพิวเตอร์ปิดอุปกรณ์นี้เพื่อประหยัดพลังงาน (กด Tab เพื่อเลือกตัวเลือกนี้จากนั้นกด Spacebar )

- คลิก ตกลง (กด Tab จนกว่าคุณจะเลือก ตกลง จากนั้น Enter )
- รีบูตพีซีของคุณ (กด Alt + F4 จนกว่าคุณจะไปถึงเมนูปิดเครื่องจากนั้นเลือก รีสตาร์ท แล้วกด Enter แข็งแรง>)
- ตรวจสอบว่าเมาส์ไร้สายของคุณใช้งานได้หรือไม่
12. เรียกใช้ตัวแก้ไขปัญหาฮาร์ดแวร์และอุปกรณ์
Windows 10 มีตัวแก้ไขปัญหาภายในสำหรับส่วนที่สำคัญทั้งหมดของระบบรวมถึงฮาร์ดแวร์และอุปกรณ์ สามารถช่วยคุณแก้ไขปัญหาทั่วไปที่อาจทำให้เมาส์หรือพอร์ต USB ทำงานไม่ถูกต้องดังนั้นจึงคุ้มค่าที่จะลองทำดู โดยปกติคุณจะพบได้ใน การตั้งค่า > เครื่องมือแก้ปัญหา แต่ถ้า ตัวแก้ไขปัญหาฮาร์ดแวร์และอุปกรณ์ขาดหายไป จากรายการนั้นคุณสามารถเปิดใช้งานได้โดยใช้เครื่องมือเรียกใช้ โดยมีวิธีดังนี้:
- กดปุ่ม Win + R พิมพ์
msdt.exe-id DeviceDiagnosticแล้วกด Enter - คลิก ถัดไป (กด Tab จนกว่าคุณจะเลือก ถัดไป และกด Enter )
- ทำตามขั้นตอนของวิซาร์ดและใช้การแก้ไขที่มีอยู่
- รีสตาร์ทระบบปฏิบัติการของคุณ
- ลองใช้เมาส์ USB ของคุณตอนนี้

13. ปิดใช้งานโหมดเริ่มต้นอย่างรวดเร็ว
Fast Startup เป็นคุณลักษณะของ Windows 10 ที่ทำให้แน่ใจว่ากระบวนการและบริการทั้งหมดไม่ได้ปิดตัวลงเพื่อที่จะเริ่มระบบปฏิบัติการของคุณได้เร็วขึ้นหลังจากปิดระบบ อย่างไรก็ตามเป็นที่ทราบกันดีว่า Fast Startup ทำให้เกิดปัญหากับผู้ใช้ Windows หลายประการรวมถึง ข้อผิดพลาด Blue Screen of Death
ในบางกรณีอาจทำให้เมาส์ไร้สายของคุณทำงานไม่ถูกต้อง อย่างไรก็ตามคุณสามารถแก้ไขปัญหานี้ได้อย่างง่ายดายโดย ปิดใช้งาน Fast Startup บน Windows 10 สิ่งที่คุณต้องทำมีดังนี้:
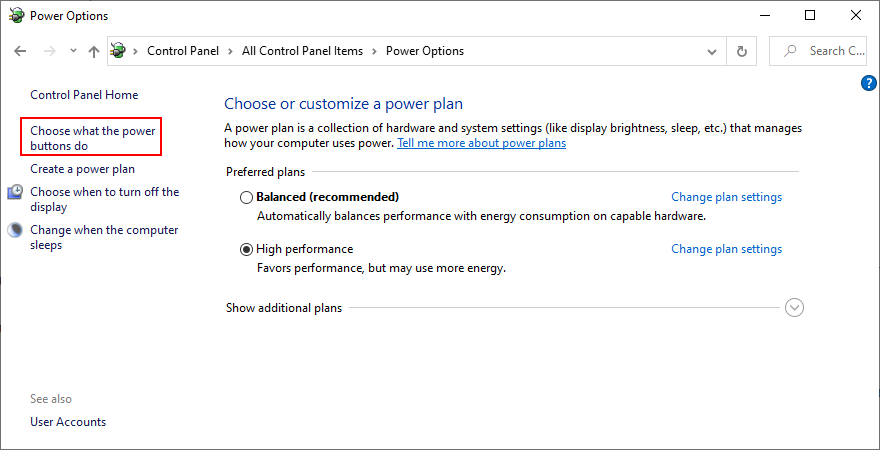
- อย่าลืมลงชื่อเข้าใช้ Windows 10 โดยใช้บัญชีผู้ดูแลระบบ
- กดปุ่ม Win + R พิมพ์ control panel แล้วกด Enter > เพื่อเปิดแอปนี้
- คลิก ตัวเลือกการใช้พลังงาน (หรือใช้ปุ่มลูกศรเพื่อเลื่อนไปรอบ ๆ เลือก ตัวเลือกการใช้พลังงาน และกด Enter )

- เลือก เลือกการทำงานของปุ่มเปิด/ปิด ทางด้านซ้าย (หรือกด Tab เพื่อเลือกตัวเลือกนี้และ Enter เพื่อคลิก)
- คลิก เปลี่ยนการตั้งค่าที่ไม่สามารถใช้งานได้ในขณะนี้ (หรือกด Tab จนกว่าจะเลือกตัวเลือกจากนั้นกด Enter )
- ปิดใช้งาน เปิดการเริ่มต้นอย่างรวดเร็ว (ใช้ แท็บ หรือแป้นลูกศรเพื่อเลือกตัวเลือกจากนั้นกด Spacebar เพื่อยกเลิกการเลือกช่อง)
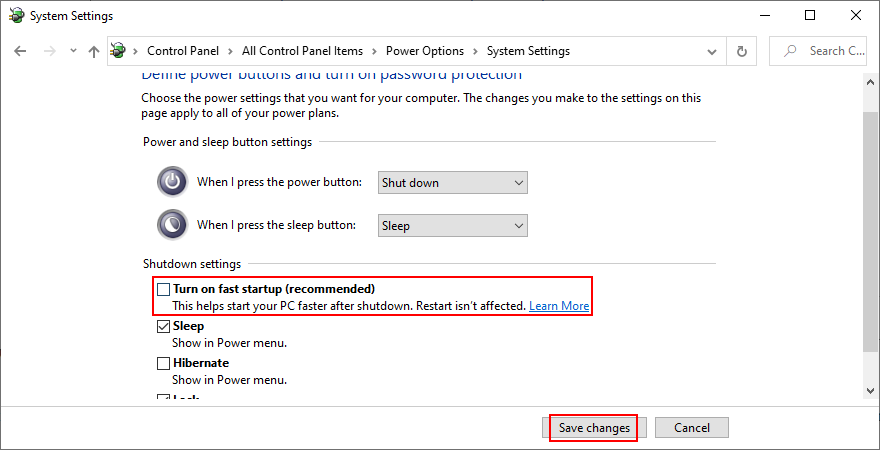
- คลิก บันทึกการเปลี่ยนแปลง (ใช้ แท็บ หรือแป้นลูกศรเพื่อเลือกปุ่มจากนั้นกด Enter )
- รีสตาร์ทคอมพิวเตอร์และลองใช้เมาส์ไร้สายตอนนี้
14. ปิดแอปพลิเคชันที่ทำงานอยู่ทั้งหมด
หากคุณเปิดตัวแอปพลิเคชันหรือเกมที่ต้องการทรัพยากรไม่น่าแปลกใจที่เมาส์ USB ของคุณจะค้างทุกครั้ง แต่คุณสามารถแก้ไขปัญหานี้ได้โดยการยุติโปรแกรมทั้งหมดที่คุณไม่ได้ใช้งานอยู่ในขณะนี้ วิธีที่ดีที่สุดคือการยุติงานจากตัวจัดการงาน
วิธียุติกระบวนการทำงาน:
- คลิกปุ่ม เริ่ม ค้นหา ตัวจัดการงาน และกด Enter เพื่อเปิดแอปนี้
- อยู่ในแท็บ กระบวนการ หากคุณอยู่ในพื้นที่อื่นให้ใช้ แท็บ เพื่อเลือกแท็บและปุ่มลูกศรเพื่อสลับไปยังส่วน กระบวนการ
- เลือกแอปพลิเคชันที่ไม่ได้ใช้งานแล้วคลิก สิ้นสุดงาน หรือใช้แป้น Tab เพื่อเลือกรายการของกระบวนการและกดแป้นลูกศรเพื่อนำทาง เมื่อคุณเลือกแอปแล้วให้กด Tab จนกว่าคุณจะเลือกปุ่ม สิ้นสุดงาน แล้วกด Enter (หรือกดปุ่มเมนูหรือ Shift + F12 เพื่อเปิดเมนูคลิกขวาจากนั้นใช้ลูกศรขึ้นและลงเพื่อเลือก สิ้นสุดงาน และกด Enter )
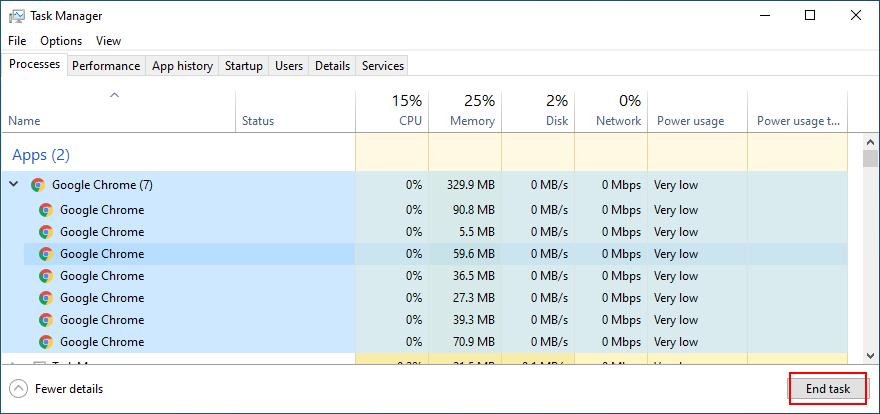
- ทำสิ่งนี้กับแอปพลิเคชันทั้งหมดที่คุณไม่รู้จักหรือใช้งาน
- ลองใช้เมาส์ไร้สายของคุณตอนนี้
It might be necessary to restart the computer after exiting all applications. However, if all or part of these programs are scheduled to automatically run at Windows boot, then your work will have been in vain. In that case, you should return to Task Manager to disable all startup apps.
How to disable startup apps:
- Click the Start button, type Task Manager, and press Enter to open this app
- Go to the Startup tab. If you’re using a keyboard, press the Tab key until you select the tabs area, and use the arrow keys to navigate to Startup
- Select an app and click Disable. Or, press Tab until you select the list of apps, use the arrow keys to navigate and select an app. Then press Tab until you select the Disable button and hit Enter (or press the menu button or Shift + F12 to open the context menu, use the arrow keys to select Disable, and press Enter)
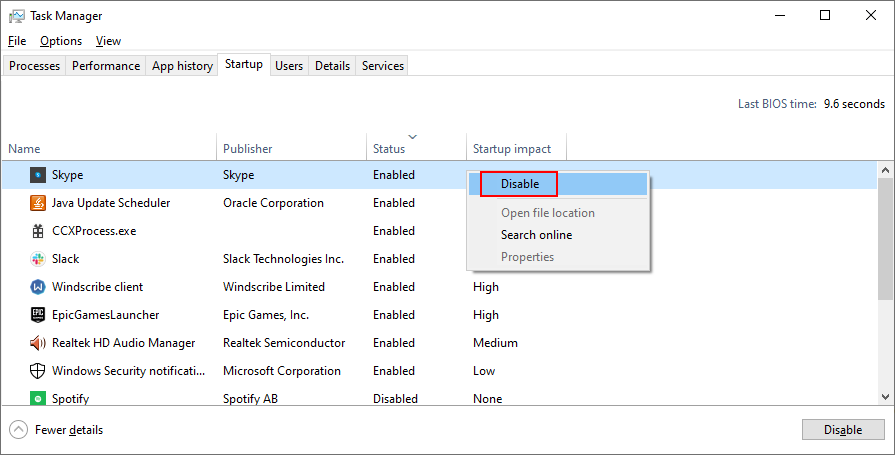
- Do this for all startup apps with the Enabled status
- Restart your computer and see if you can use your USB mouse now
15. Run a clean boot
A better idea than disabling startup apps is running a clean boot on Windows 10. In addition to stopping all programs that automatically run at Windows startup, you will be also disabling scheduled services. It’s a step forward toward fixing your wireless mouse if it’s not working on your Windows 10 PC.
- Press Win key + R, type msconfig, and hit Enter to open the System Configuration app
- Stay in the General tab. If you’re somewhere else, press Tab until you select the tabs area and use the arrow keys to go to General
- At Startup selection, select Selective startup and disable Load system services and Load startup items. Or, press Tab until you reach Selective startup, use the arrow keys to select Load system services and Load startup items, then press Spacebar at each setting to disable it

- Click Apply and exit. Or press Tab until you reach the Apply button, hit Enter, and press Esc
- Follow the instructions at Solution 14 from this list to disable startup apps
- Restart your computer and check your cordless mouse for issues
16. Start Windows 10 in Safe Mode
Running Windows 10 in Safe Mode means starting your operating system in a basic state, with all non-important drivers and files disabled. It’s a bit more strict than clean boot, but it helps you narrow down the root of the problem.
If your wireless mouse works in Safe Mode, it means that there’s no problem with the default Windows settings and standard drivers. Here’s what you need to do:
- Shut down your computer, turn it on, and then shut it down by force. Do this three times to boot to Troubleshoot mode
- Go to Troubleshoot > Advanced options > Startup Settings. If you can’t use a mouse, then use the Tab key to navigate and Enter to access options

- Select Restart and press F4 to start Windows in Safe Mode (without networking features)
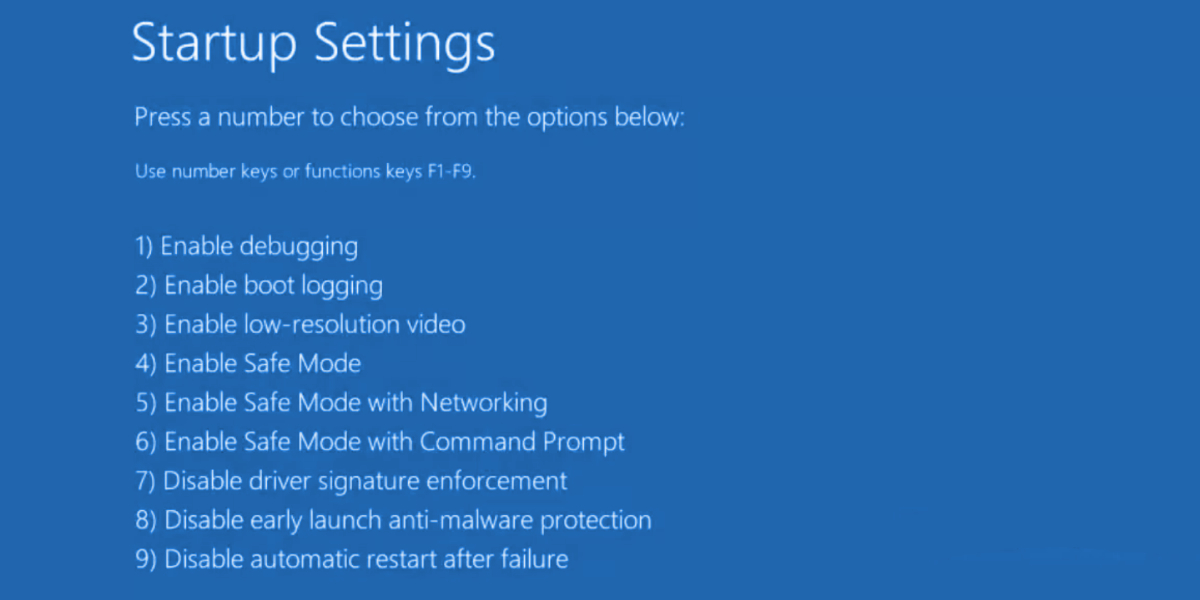
- After Windows boots, check if you can use your USB mouse
17. Unplug other peripheral devices
Your USB mouse might interfere with other external devices currently attached to your computer. If you have recently purchased or received a new device as a gift, like a webcam or Wi-Fi adapter, try unplugging it from your PC to see if this fixed your mouse issue.
If you’re unsure, unplug everything except for your mouse and keyboard. Then, shut down your computer, start Windows again, and inspect results. If your wireless mouse is working now, start plugging in your devices one at a time until your mouse starts malfunctioning again.
Once you spot the bad apple, you can reinstall the device, repair it, send it back to your manufacturer if you have a warranty, or just drop and replace it with something else.
18. Run SFC
Any corrupt files in your operating system could be causing device functionality issues, even with your mouse. However, you should be able to fix damaged files by turning to an internal Windows utility called SFC (System File Checker). Here’s how to use it:
- Press Windows key + R, type cmd, and press Ctrl + Shift + Enter to open Command Prompt as administrator
- Type
sfc/scannowand press Enter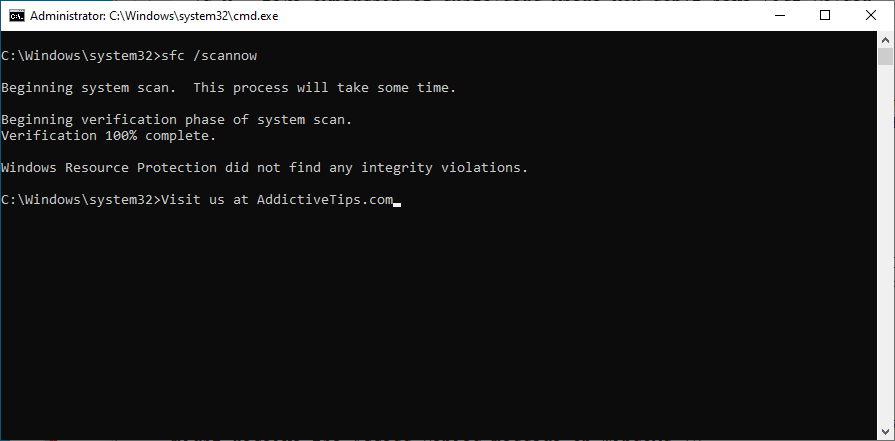
- Patiently wait while SFC does its job. Once it finishes, restart your computer
- Check if you can use your USB mouse now
19. Uninstall system updates
Long-time Windows users are familiar with the fact that certain system updates shouldn’t be released because they end up harming computers. A bad update could be the reason why your wireless mouse isn’t working properly anymore, especially if you have recently gone through an update. To solve this matter, you should uninstall the most recent Windows update. Here’s how:
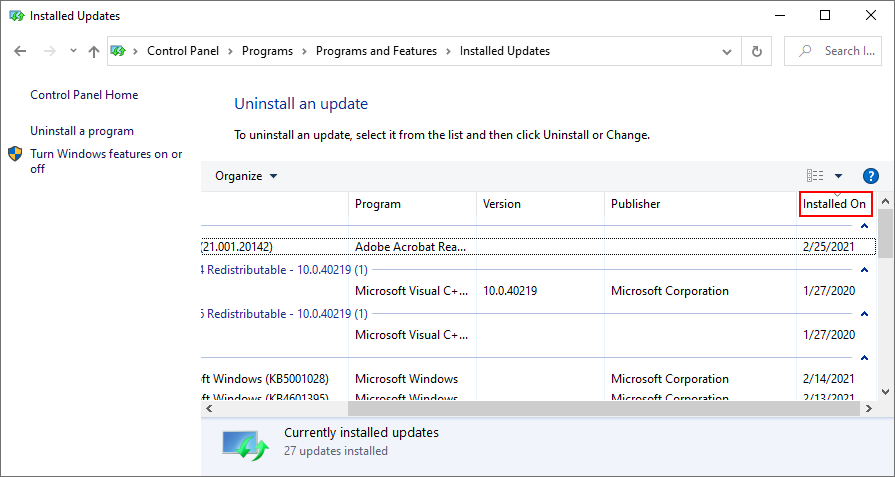
- Press Win key + R, type appwiz.cpl, and press Enter
- Click View installed updates. Or, press Tab until you select View installed updates, then press Enter
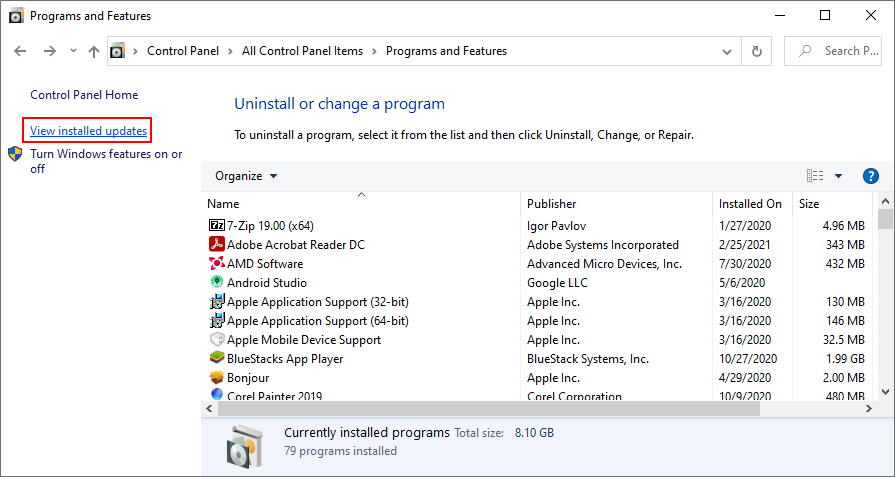
- Click the Installed on column to sort updates by date of installation (newest first). Or, press Tab until you select the Name column, then use the arrow keys to go to Installed On, and press Enter once or twice
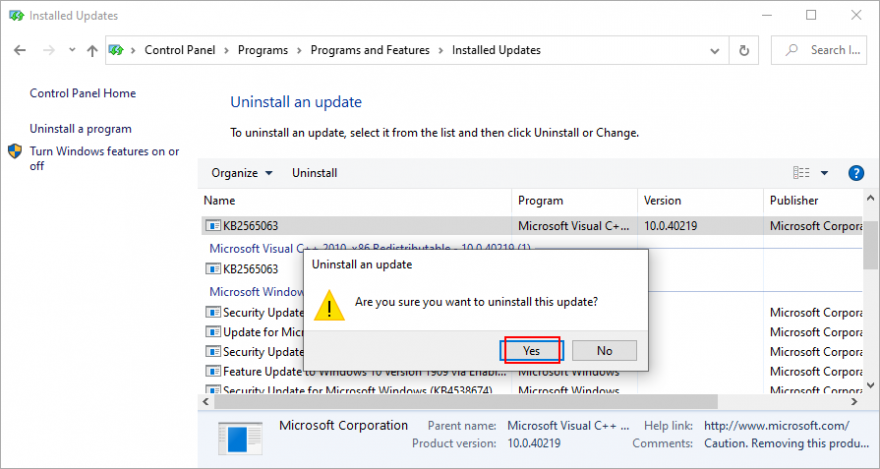
- Double-click the first update in the Microsoft Windows category and click Yes to confirm uninstall. Or, press Tab until you select the updates area, use the arrow keys to navigate to the update, then press Enter to perform the uninstall and Enter again to confirm (on the Yes option)
- Restart your computer and check your mouse
20. Check your PC for malware
If your computer has viruses and if critical files in charge of your mouse device were infected, it’s no wonder that your wireless mouse is not working anymore on Windows 10. But you can run a malware scan to fix this problem. If you don’t have a third-party security solution installed, turn to Windows Defender.
How to use Windows Defender:
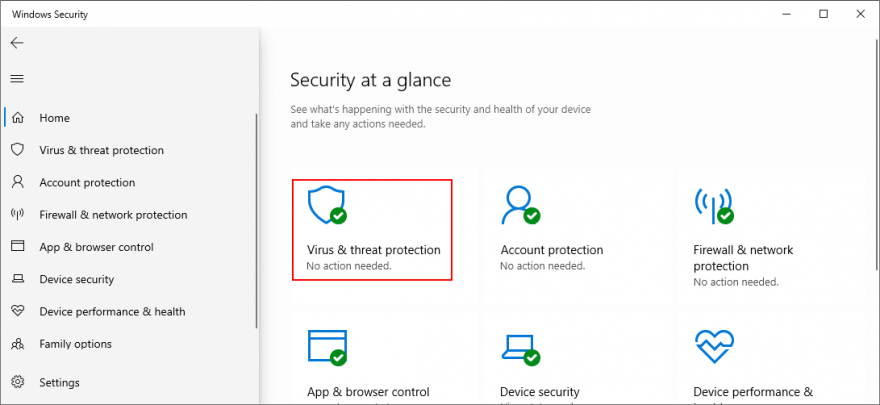
- Press the Win key, type Windows Security, and press Enter to open this program
- Click Virus & threat protection (or, press Tab until you select this option and hit Enter)
- Click Scan options or use the arrow keys to navigate there and hit Enter
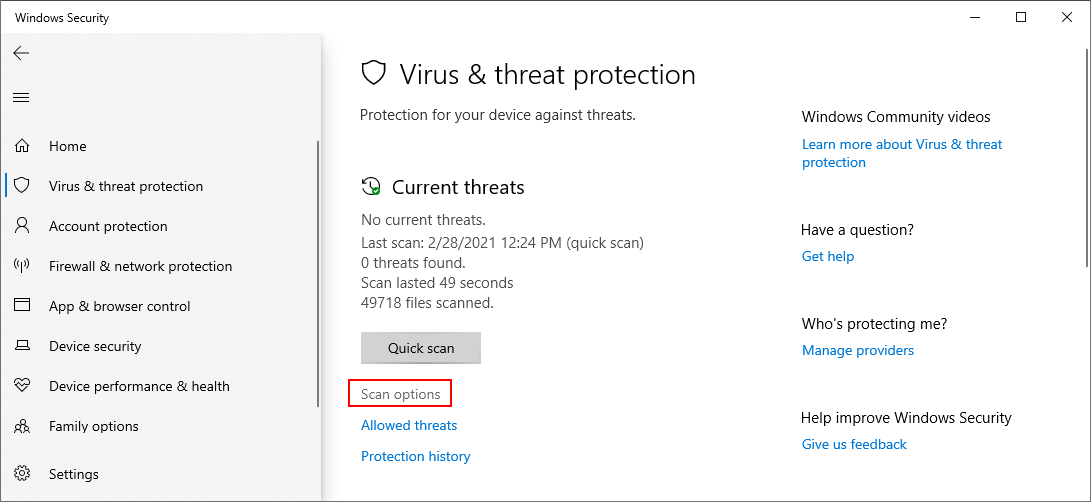
- Select Quick scan and click Scan now. Or, press Tab until you select the scan options, hit Spacebar at Quick scan, then press Tab to select Scan now and hit Enter
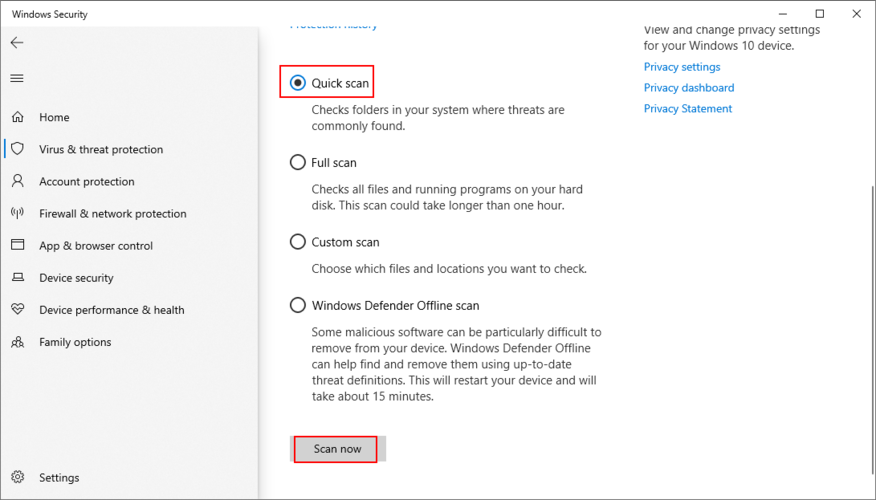
- If the search is unsuccessful, run another scan after selecting Windows Defender Offline scan mode
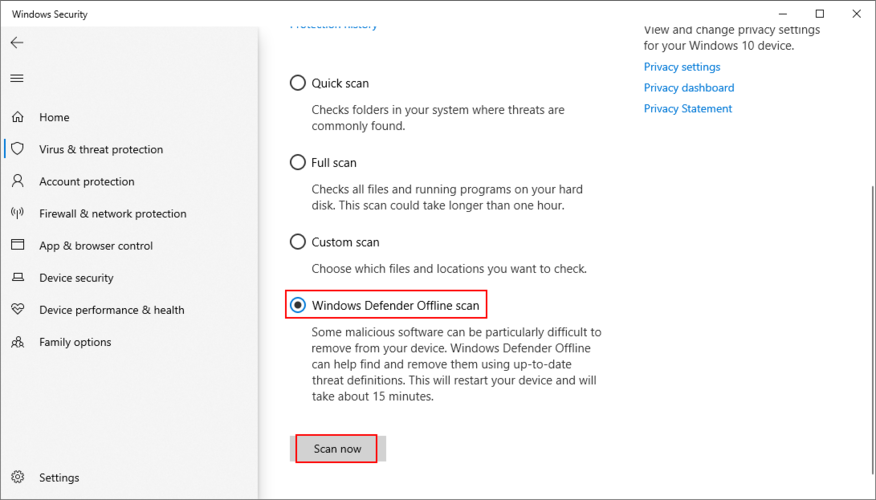
- Patiently wait until the scan is carried out and allow Windows to remove any infected files
- Restart your computer and check if your mouse works now
21. Uninstall game controller software
You can use a PS4 controller on Windows 10 to play awesome games like Dark Souls, for example. However, certain game controller software applications can interfere with your mouse’s USB receiver, preventing you from using it on your computer.
If you recently installed tools like MotioninJoy, Keysticks or JoyToKey, you should remove them from your computer to restore the functionality of your wireless mouse.
How to uninstall game controller apps:
- Press Win key + R, type appwiz.cpl, and press Enter
- Find the app in the list, double-click it, and click Yes to confirm its removal
- Click Yes again if prompted by UAC (User Account Control) to uninstall
- If you’re glued to your keyboard, press Tab until you reach the list of apps, use the arrow keys to navigate to the game controller tool, then press Enter and follow the removal instructions
22. Change BIOS or UEFI settings
USB settings can be enabled and disabled from BIOS or UEFI mode. If you or someone else with access to your computer has changed the BIOS configuration, perhaps the USB support was deactivated there and must be turned on again. It’s really easy to make it happen:
- Restart your computer (press Alt + F4, press Tab to select Restart from the menu, then hit Enter)
- Before Windows boots, quickly press the key shown on the screen to access BIOS setup
- Using your arrow keys, navigate to the Devices section
- Depending on your BIOS type, find and access any area about USB
- Make sure to enable USB support
- Save the current BIOS configuration and quit to Windows
- Check if you can use your wireless mouse now
23. Check if you have the mouhid.sys file
mouhid.sys (Mouse HID Driver) is the kernel device driver responsible for your mouse interface. Without this file, you can’t use any mouse, no matter what you do. Get started by verifying that you have this item.
Where to find mouhid.sys:
- Press Win + R to open File Explorer
- Navigate to the address bar by pressing Tab
- Hit the Enter key and paste the following location:
%SystemRoot%\System32\drivers\
- Press Enter
- Search for the mouhid.sys file in this list
- If you find it, press Win key + R, type cmd, press Ctrl + Shift + Enter to launch Command Prompt as admin
- Type
sc config mouhid start=demandand press Enter to restore the mouhid.sys configuration to default - If the file’s not there or if it’s changed or damaged, you must create a Windows installation media disc and restore it from there
How to create Windows installation media:
- Connect an empty USB flash drive to your PC
- Download Media Creation Tool from the official website
- Launch the program and follow the instructions to create a Windows installation media USB disk
How to restore mouhid.sys from the Windows installation media:
- Sign in to Windows 10 using an administrative account
- Make sure the pen drive with the Windows installation media is plugged into the PC
- Download 7-Zip and install it on your PC
- Press Win + E to open File Explorer
- Navigate to the USB flash drive
- Open the Sources folder
- Locate the install.esd file
- Right-click install.esd (or press the menu key or Shift + F12) and open it with 7-Zip (Open archive)
- Browse the install.esd file contents in 7-Zip, then locate and copy the mouhid.sys file
- Switch back to File Explorer and go to the following location:
%SystemRoot%\System32\drivers\
- Paste the mouhid.sys file here. If it already exists, overwrite the existing item
- Restart your computer
If the mouhid.sys file is currently being used by Windows, it won’t allow you to overwrite it. However, there are a couple of workarounds: taking ownership and using Unlocker to delete the corrupt file.
How to take ownership of mouhid.sys:
- Sign in to Windows 10 using an administrator account
- Press Win key + E to open File Explorer
- Navigate to:
%SystemRoot%\System32\drivers\
- Right-click mouhid.sys and go to Properties. Or, press the menu key or Shift + F12, hit the up arrow, and press Enter
- Switch to the Security section. Or, press Tab until you select the area of tabs, then press the right arrow to go to Security
- Click Advanced. Or, press Tab until you select that button and press Enter
- Next to Owner, click Change. Or, press Tab until you select Change, then press Spacebar
- Type Administrators and click Check names. Or, press Tab to select Check names, then hit Enter
- Press OK, then Apply and OK twice
- Once returned to the Properties panel, click Edit (press Tab to select the option, then Enter)
- At Full control, click Allow. Or, press Tab until you reach the Allow box and press Spacebar to enable it
- Click Apply (press Tab until you reach Apply and hit the Enter key)
- After confirming the action, exit all windows
How to delete mouhid.sys with Unlocker:
- Download Unlocker. The app is not available for download from the official website anymore, but you can find it on third-party mirror websites
- Unzip and install the application. Be careful during setup since Unlocker offers to download and install unrelated, third-party programs. You can refuse those offers by unchecking their options before clicking Next
- If you get an error when trying to unzip or install Unlocker, it means that Windows Defender or your third-party antivirus tool is blocking it (the threat is called
PUA:Win32/Presenoker). You must allow it on your device to be able to use Unlocker. Don’t worry since you can delete it afterward - Launch the Unlocker app
- Using the built-in file browser, navigate to the
%SystemRoot%\System32\drivers\location (if Windows is installed on the default C: drive, then go to Windows > System32 > drivers) - Select the mouhid.sys file and press OK
- Open the No action menu and select Delete, then press OK
- Since it’s a system file currently being used by your computer, Unlocker will offer to delete it during the next Windows boot. Accept this offer
- Reboot your computer
- Open File Explorer using Win key + E
- Navigate to the location where you copied the mouhid.sys file from the Windows installation media. Copy it again
- Now, go to
%SystemRoot%\System32\drivers\and paste the file. You shouldn’t get permission errors anymore - Restart your computer again. Your wireless mouse should work now on Windows 10
24. Use System Restore
Rolling back Windows 10 to a previous checkpoint when your mouse still worked in a simple way to fix the problem if it occurred due to an unknown software event. However, this means that System Restore must have been enabled on your PC a long time ago, and that you have at least one restore point created before your cordless mouse stopped working. Here’s what you need to do:
- Log in to Windows 10 with an admin account
- Press Win key + R, type control panel, and hit Enter
- Select Recovery. Or, use the arrow keys to navigate to this option and press Enter
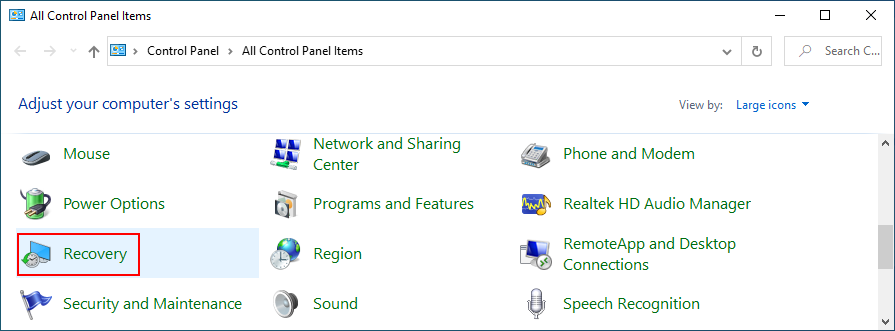
- Click Open System Restore. Or, press Tab until you reach the Advanced recovery tools menu, move to Open System Restore using the arrow keys, and hit Enter
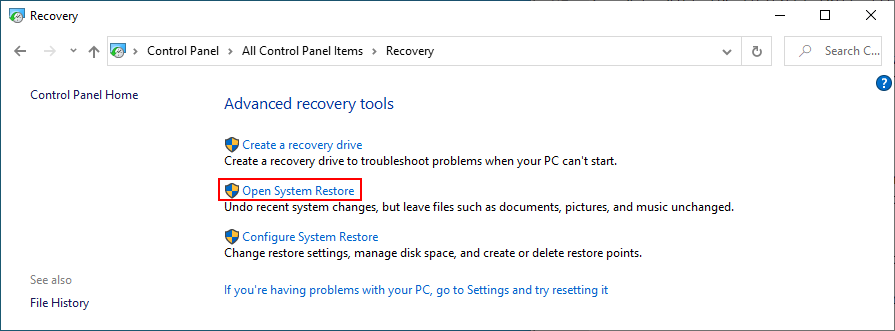
- Select a restore point from the list and click Next. Or, use Tab to switch to the list of restore points, move with the arrow keys to select a checkpoint, press Tab until you reach the Next button, and hit Enter
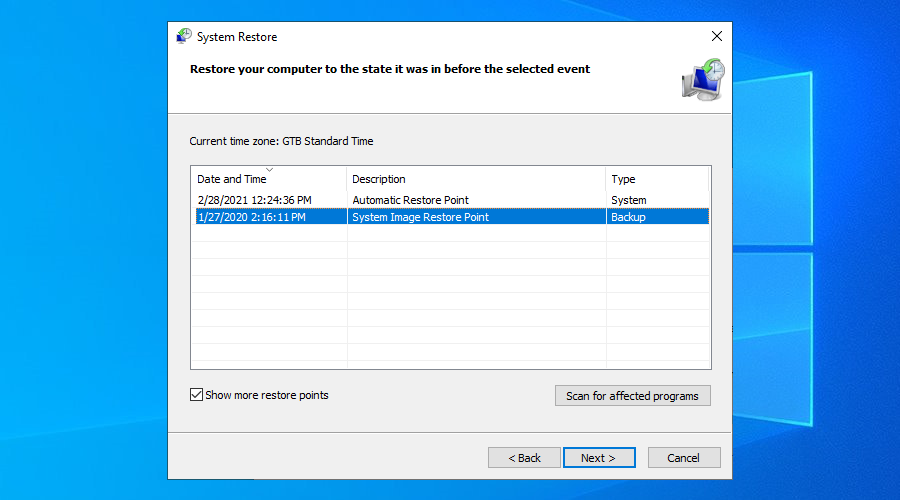
- Follow the on-screen instructions
- After Windows restarts, check if you still have problems with your wireless mouse
25. Use Event Viewer
If you still can’t figure out what’s wrong in order to fix the problem, we recommend getting in touch with the tech support of your mouse manufacturer. They should be able to shed some light on the matter.
Before doing so, it’s a good idea to collect as much information as possible about your mouse, and the best way to do that is by using Event Viewer.
How to use Event Viewer:
- Press the Windows key, type Device Manager, and hit Enter to open this app
- Extend the Mice and other pointing devices group. Or, press Tab, use the arrow keys to navigate to the category, and press the right arrow key to extend the group
- Right-click your mouse adapter and go to Properties. Or, press the menu key or Shift + F12, press the up arrow, and hit Enter
- Switch to the Events tab. Or, press Tab until you reach the tabs area and use the arrow keys to go to Events
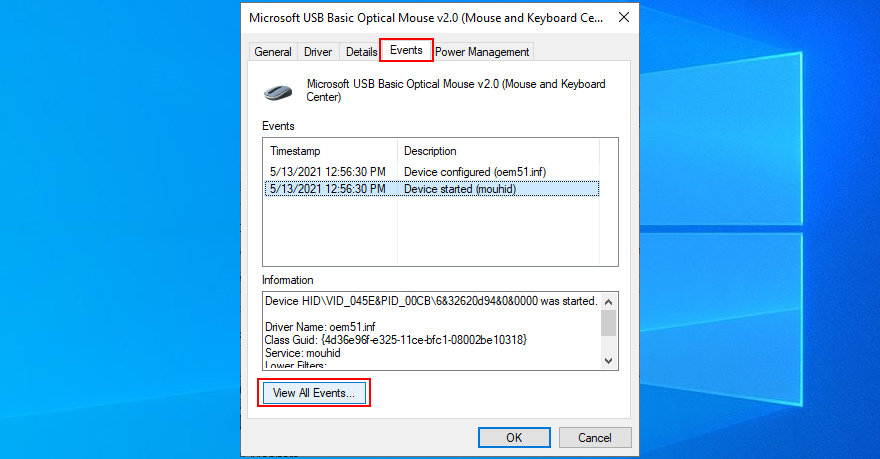
- Click View All Events. Or, press Tab until you select that button and press Enter
- Copy the information found in the events list (at General and Details)
If you don’t want to contact tech support, you can look up more information on Google based on the mouse events registered by your system. You could also plug the USB receiver into another PC to compare the event logs.
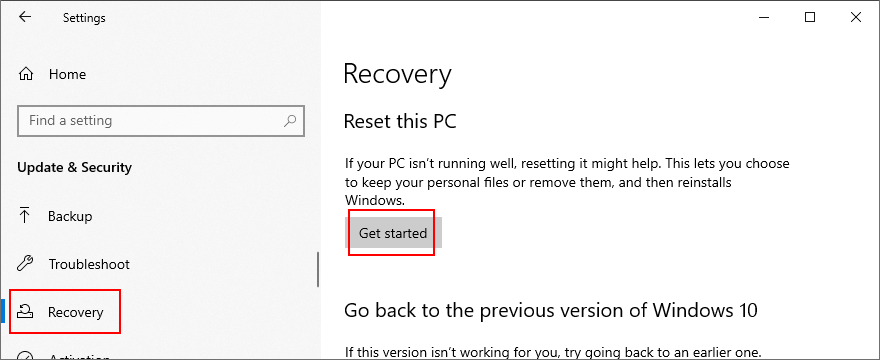
26. Reset Windows 10
Performing a factory reset on Windows 10 is the last resort to restore the original system files. However, you should only proceed with this solution if you’re absolutely sure that your mouse is supported by your operating system and not damaged in any way.
Your personal files will be left untouched, so you don’t need to perform backups. But you will have to reinstall all your applications and games installed on the same drive as Windows.
How to reset Windows 10:
- Press the Win key, type Reset this PC, and hit Enter
- At Reset this PC, click Get started. Or, press Tab until you select this button, then hit Enter
- Choose Keep my files
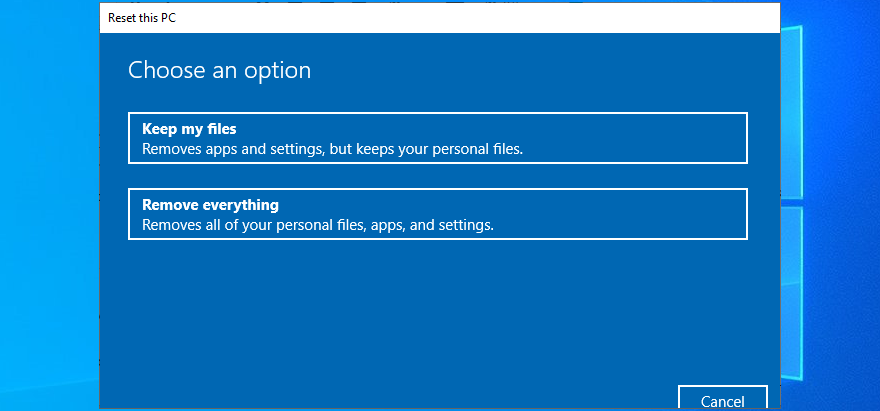
- Proceed with the on-screen steps
You can fix a non-working wireless mouse
To review, if your cordless mouse is not working on Windows 10, there could be a problem with the device or your computer settings. The most delicate part is troubleshooting the problem without a mouse, unless you can control your PC remotely from another computer. Still, your keyboard is your friend.
Get started by checking if your entire system is frozen. You can try simple solutions like restarting your PC, checking the mouse compatibility and battery, moving closer to the USB receiver and ensuring that it’s not obstructed, connecting to a different USB port, and trying to use the malfunctioning mouse on another machine.
Next, you should reinstall the mouse and USB devices, update or roll back their drivers, check the USB power management settings, run the internal Hardware and Devices troubleshooter, turn off Fast Startup, terminate all running programs, run a clean boot, start Windows 10 in Safe Mode, and unplug other external devices except for the mouse USB receiver.
Furthermore, you can run SFC to find and fix corrupt system files, uninstall bad system updates, check your PC for malware, uninstall any game controller tools, change BIOS or UEFI settings, check if you have the mouhid.sys file, use System Restore to roll back to a previous checkpoint, and consult Event Viewer to get more details before contacting tech support.
If everything fails but you’re certain that the USB mouse works on any other computer, you can reset Windows 10 to factory settings and, subsequently, reinstall all system files that might be corrupt, missing, or damaged.
How did you manage to get your wireless mouse working again? Tell us all about it in the comments below.