0xc000021a เป็นข้อผิดพลาด Blue Screen of Death ที่อาจเกิดขึ้นใน Windows 10, 8.1, 8, 7, Vista และ XP หรือที่เรียกว่า STOP 0xC000021A, STATUS_SYSTEM_PROCESS_TERMINATED, HALT: c000021a {Fatal System Error} และ STOP c000021a ใน Windows 10 จะมาพร้อมกับ พีซีของคุณประสบปัญหาและจำเป็นต้องรีสตาร์ท ข้อความ
ผู้ใช้หลายคนรายงานว่าได้รับรหัสหยุดนี้หลังจากอัปเกรด Windows 10 เป็นรุ่นที่ใหม่กว่า โดยปกติจะแสดงบนหน้าจอเมื่อพยายามบูตเข้าสู่ Windows ทำให้ แก้ไขข้อผิดพลาด BSOD นี้ โดยใช้เครื่องมือที่มีใน BIOS และโหมดการเริ่มต้นขั้นสูง
ด้วยเหตุนี้คุณอาจต้องขอความช่วยเหลือจากผู้เชี่ยวชาญ แต่ไม่จำเป็นสำหรับการแก้ไขปัญหาที่คล้ายกับ ข้อผิดพลาดของอุปกรณ์บูตเข้าไม่ได้ ตราบใดที่คุณทำตามคำแนะนำง่ายๆด้านล่าง
วิธีแก้ไขข้อผิดพลาด 0xc000021a BSOD บน Windows 10
รหัสหยุดของ Windows 0xc000021a อาจเกิดจาก Winlogon.exe (Windows Logon Subsystem) หรือ Csrss.exe (ระบบย่อยรันไทม์ไคลเอ็นต์/เซิร์ฟเวอร์) หากส่วนประกอบหลักใด ๆ เหล่านี้หยุดทำงานอย่างถูกต้อง ในกรณีนี้คุณต้องแก้ไขกระบวนการที่ทำงานผิดพลาด
1. เริ่ม Windows 10 ในเซฟโหมดด้วยระบบเครือข่าย
หากคุณไม่สามารถบูตระบบปฏิบัติการได้เนื่องจากข้อผิดพลาด 0xc000021a ให้ลอง เริ่ม Windows 10 ในเซฟโหมด ด้วยคุณสมบัติระบบเครือข่าย เป็นสภาพแวดล้อมการบูตที่ปลอดภัยซึ่งปิดใช้งานไดรเวอร์บริการและกระบวนการเสริมทั้งหมดที่อาจทำให้เกิดปัญหานี้ สิ่งที่คุณต้องทำมีดังนี้:
- ขัดจังหวะลำดับการบูตสามครั้งติดต่อกันเพื่อ เปิดการแก้ไขปัญหา Windows
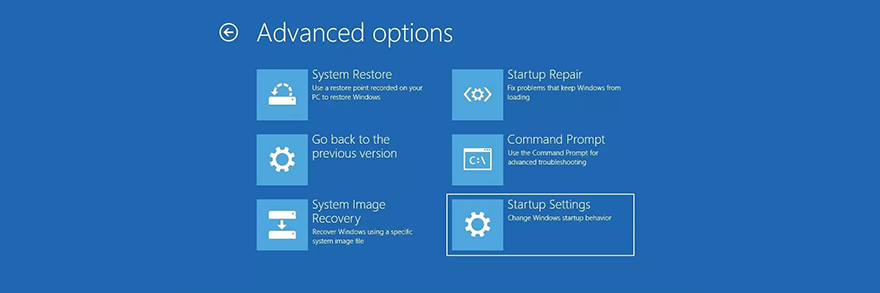
- เลือก แก้ไขปัญหา > ตัวเลือกขั้นสูง > การตั้งค่าการเริ่มต้น
- คลิก รีสตาร์ท และรอสักครู่
- กด F5 เพื่อเปิดใช้งาน Safe Mode with Networking
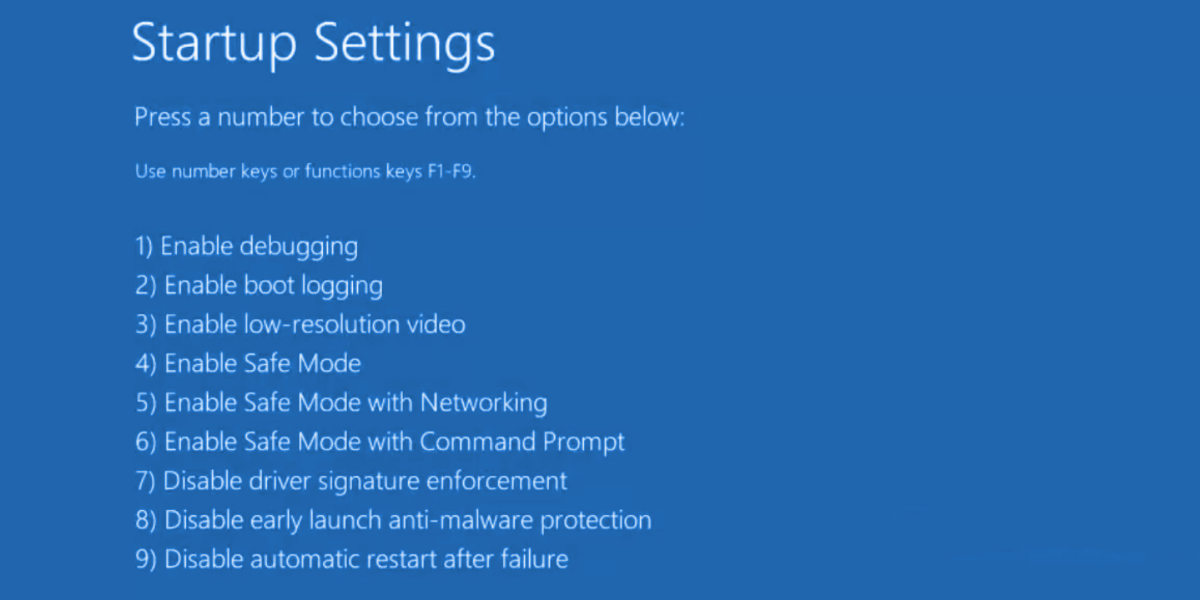
Windows 10 ควรเริ่มต้นทันที หากไม่เป็นเช่นนั้นให้กลับไปที่ การตั้งค่าการเริ่มต้น และกด F4 เพื่อเปิดใช้งาน Safe Mode ที่ไม่มีคุณสมบัติเครือข่าย
2. คลีนบูต Windows 10
หากเซฟโหมดสำเร็จคุณสามารถ รัน Windows 10 boot ใหม่ทั้งหมด เพื่อทำการเปลี่ยนแปลงอย่างถาวรอย่างน้อยก็จนกว่าคุณจะมีโอกาสแก้ไขข้อผิดพลาด 0xc000021a อย่างละเอียด
- เริ่ม Windows 10 ใน Safe Mode
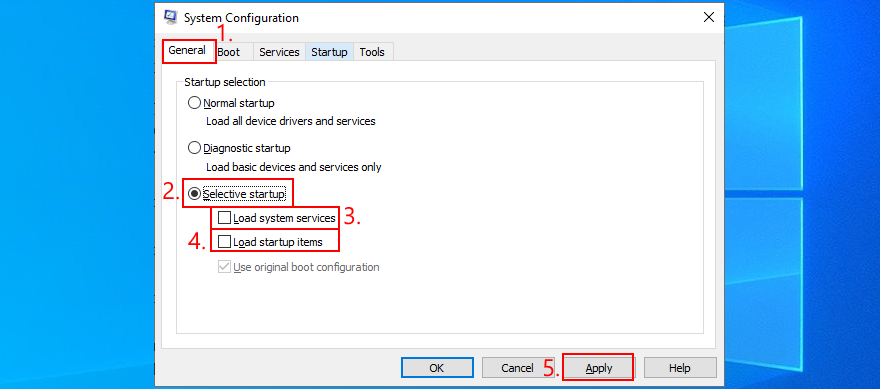
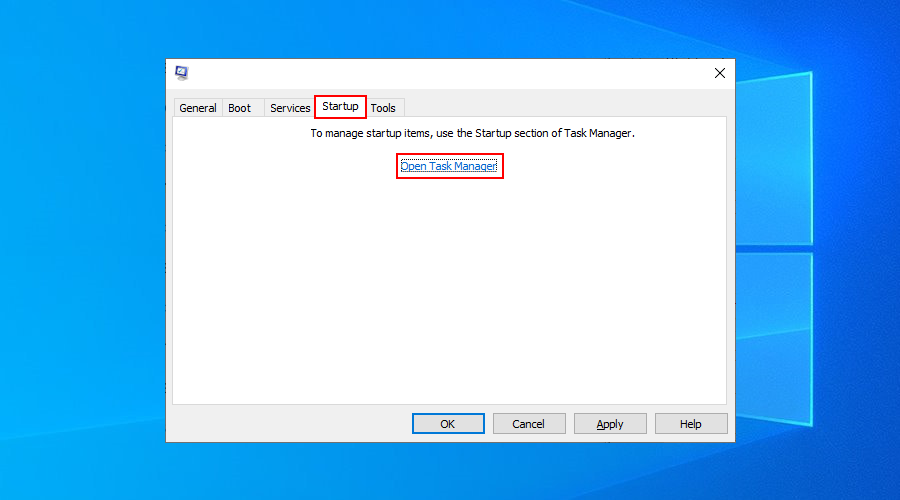
- กดปุ่ม Win + R พิมพ์ msconfig และกด Enter เพื่อเปิด ระบบ การกำหนดค่า แอป
- เลือกแท็บ ทั่วไป
- เลือก Selective Startup
- ยกเลิกการเลือกช่อง โหลดบริการระบบ และ โหลดรายการเริ่มต้น
- คลิก ใช้
- เปลี่ยนไปที่แท็บ เริ่มต้น
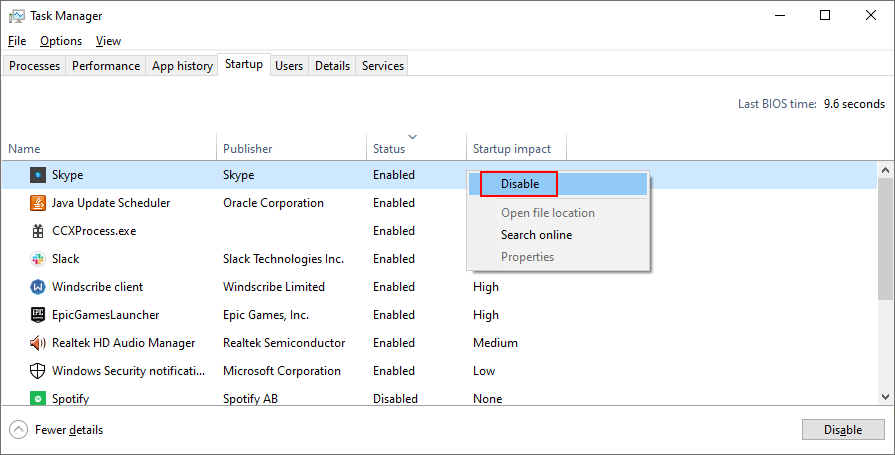
- คลิก เปิดตัวจัดการงาน
- เลือกแอปที่มีสถานะ เปิดใช้งาน แล้วคลิก ปิดใช้งาน ทำเช่นนี้กับแอปที่เปิดใช้งานทั้งหมด

- รีสตาร์ทคอมพิวเตอร์ของคุณ
3. เรียกใช้การซ่อมแซมการเริ่มต้น
คุณสามารถแก้ไขข้อผิดพลาดที่ทำให้ระบบปฏิบัติการของคุณไม่สามารถบูตได้โดย เรียกใช้เครื่องมือซ่อมแซมการเริ่มต้นระบบ ในเมนูแก้ไขปัญหาก่อนบูต อย่างไรก็ตามคุณต้องใช้แผ่นติดตั้ง Windows 10 ของคุณ หากยังไม่มีคุณสามารถใช้คอมพิวเตอร์เครื่องอื่นสร้างขึ้นมาได้
วิธีสร้างสื่อการติดตั้ง Windows 10 (บนพีซีที่ใช้งานได้):
- เชื่อมต่อแฟลชไดรฟ์ USB และอย่าลืมคัดลอกไฟล์ที่คุณอาจต้องการในภายหลังเนื่องจากไดรฟ์จะได้รับการฟอร์แมต
- ดาวน์โหลดเครื่องมือสร้างสื่อจาก เว็บไซต์อย่างเป็นทางการ
- เปิดแอปพลิเคชันและปฏิบัติตามคำแนะนำ
วิธีเรียกใช้ Startup Repair (บนพีซีที่ทำงานผิดพลาด):
- เสียบแฟลชไดรฟ์ USB เข้ากับพีซี
- เปิดและปิดพีซีของคุณสามครั้งเพื่อไปที่เมนู การเริ่มต้นขั้นสูง
- เลือก แก้ไขปัญหา > ตัวเลือกขั้นสูง > การซ่อมแซมการเริ่มต้นระบบ
- เลือกบัญชีพีซีของคุณและป้อนรหัสผ่านเพื่อดำเนินการต่อ
- ทำตามคำแนะนำทีละขั้นตอน
4. ปิดใช้งานการบังคับใช้ลายเซ็นไดรเวอร์
ตามค่าเริ่มต้น Windows ไม่อนุญาตให้ใช้ไดรเวอร์ที่ไม่ได้ลงชื่อบนพีซีของคุณ ดังนั้นหากคุณเพิ่งติดตั้งไดรเวอร์จากแหล่งที่มาของบุคคลที่สามระบบปฏิบัติการของคุณจะไม่บูตเนื่องจากการบังคับใช้ลายเซ็นไดรเวอร์ ในทางกลับกันสิ่งนี้นำไปสู่ข้อผิดพลาด 0xc000021a
แต่คุณสามารถแก้ไขได้โดย การปิดใช้งานไดรเวอร์ การบังคับใช้ลายเซ็น :
- บังคับให้ Windows โหลดหน้าจอการแก้ไขปัญหา (ขัดจังหวะลำดับการบูตสามครั้ง)
- ไปที่ แก้ไขปัญหา > ตัวเลือกขั้นสูง > การตั้งค่าการเริ่มต้น
- คลิก เริ่มต้นใหม่
- กด F7 เพื่อปิดใช้งาน การบังคับใช้ลายเซ็นไดรเวอร์

- ลองเริ่ม Windows 10 ทันที
หากไม่ได้ผลคุณสามารถใช้ Command Prompt:
- เลือก แก้ไขปัญหา > ตัวเลือกขั้นสูง > พร้อมรับคำสั่ง
- เลือกบัญชีของคุณและป้อนรหัสผ่านเพื่อดำเนินการต่อ
- เรียกใช้
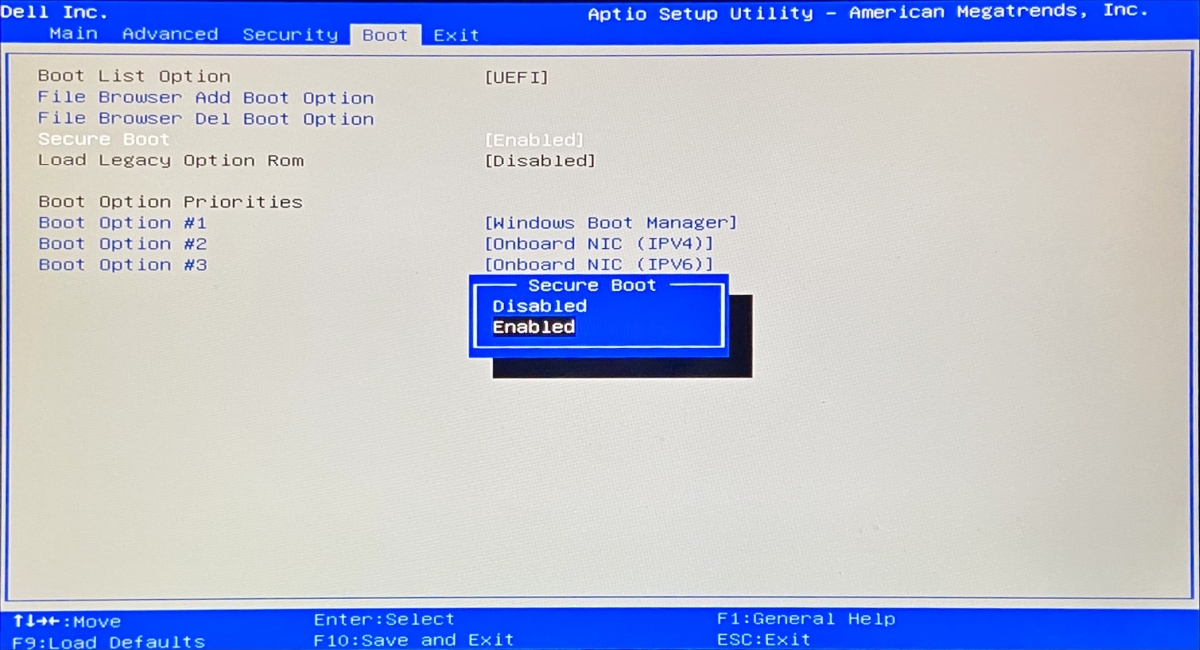
bcdedit/set การทดสอบการลงชื่อบนหากแสดงข้อความ การดำเนินการเสร็จสมบูรณ์ ให้ลองบูต Windows 10 แต่ถ้ามีข้อความว่า Protected by Secure Boot policy คุณต้องปิด Secure Boot จากเฟิร์มแวร์ UEFI
วิธีปิด Secure Boot จากการตั้งค่าเฟิร์มแวร์ UEFI:
- ในเมนูการแก้ไขปัญหาไปที่ แก้ไขปัญหา > การตั้งค่าเฟิร์มแวร์ UEFI
- คลิก เริ่มต้นใหม่
- หลังจาก เข้าถึง BIOS ให้เลือก ส่วน การตรวจสอบสิทธิ์
- ตั้งค่า Secure Boot เป็น Disabled

- บันทึกการตั้งค่า BIOS และออก ตอนนี้คุณสามารถเรียกใช้คำสั่ง
bcdedit/set testingigning บนใน Command Prompt ได้
หากคุณต้องการเปิดใช้งานการบังคับใช้ลายเซ็นไดรเวอร์อีกครั้งให้เรียกใช้พรอมต์คำสั่งอีกครั้งและใช้คำสั่ง bcdedit/set การทดสอบการปิด
5. แก้ไขความเสียหายของฮาร์ดไดรฟ์
ความล้มเหลวของฮาร์ดดิสก์อาจทำให้เกิดปัญหากับกระบวนการ Winlogon.exe และ Csrss.exe ทำให้เกิดข้อผิดพลาด 0xc000021a แต่คุณสามารถแก้ไขข้อผิดพลาด HDD โดยใช้ CHKDSK (Check Disk) จากสภาพแวดล้อมคอนโซล
- บูตคอมพิวเตอร์ของคุณไปที่เมนูการแก้ไขปัญหา
- ไปที่ แก้ไขปัญหา > ตัวเลือกขั้นสูง > พร้อมรับคำสั่ง
- เลือกบัญชีของคุณและป้อนรหัสผ่านเพื่อดำเนินการต่อ
- หากติดตั้ง Windows ไว้ในไดรฟ์ C: ให้เรียกใช้
chkdsk c:/f/rมิฉะนั้นตรวจสอบให้แน่ใจว่าได้แทนที่c:ด้วยตัวอักษรพาร์ติชันที่ถูกต้อง- หากคุณไม่แน่ใจว่า Windows อยู่ที่ไหนให้เลือกอักษรระบุไดรฟ์ (เช่น
run c:) และแสดงรายการไดเร็กทอรี (เช่นrun dir) ทำเช่นนี้กับอักษรระบุไดรฟ์หลาย ๆ ตัวจนกว่าคุณจะพบโฟลเดอร์ Windows
- หากคุณไม่แน่ใจว่า Windows อยู่ที่ไหนให้เลือกอักษรระบุไดรฟ์ (เช่น
6. ซ่อมแซมไฟล์ระบบที่เสียหาย
ในการซ่อมแซมไฟล์ปฏิบัติการที่เสียหายเช่น Winlogon.exe และ Csrss.exe คุณสามารถไปที่ SFC (System File Checker) :
- ในเมนูแก้ไขปัญหาไปที่ แก้ไขปัญหา > ตัวเลือกขั้นสูง > พร้อมรับคำสั่ง
- เลือกบัญชีพีซีของคุณและป้อนรหัสผ่านเพื่อดำเนินการต่อ
- เรียกใช้
sfc/scannowและรอ - อาจจำเป็นต้องใส่สื่อการติดตั้ง Windows 10 เพื่อกู้คืนไฟล์ระบบ
หาก SFC ไม่สำเร็จคุณสามารถใช้ DISM (Deployment Image Servicing and Management) เพื่อตรวจสอบที่เก็บส่วนประกอบของอิมเมจ Windows:
- ตรวจสอบว่าพีซีของคุณเชื่อมต่อกับอินเทอร์เน็ตแล้ว
- ใน Command Prompt ให้
เรียกใช้ DISM/online/cleanup-image/scanhealth - หาก DISM พบข้อผิดพลาดใด ๆ ให้แก้ไขโดยเรียกใช้
DISM/online/cleanup-image/restorehealth - เรียกใช้ SFC (
sfc/scannow) อีกครั้ง
7. อัปเดตไดรเวอร์เก่า
หากคุณไม่เคยอัปเดตไดรเวอร์หรือไม่ได้ดำเนินการมาเป็นเวลานานอาจเป็นสาเหตุที่ทำให้คุณได้รับข้อผิดพลาด 0xc000021a ก่อนที่จะบูต Windows แต่คุณควรจะสามารถแก้ปัญหานี้ได้โดยใช้ เครื่องมืออัปเดตไดรเวอร์ ในเซฟโหมด หรือคุณสามารถอัปเดตไดรเวอร์ได้โดยไม่ต้องติดตั้งแอปพลิเคชันของบุคคลที่สาม:
- เริ่ม Windows 10 ในเซฟโหมดด้วยระบบเครือข่าย
- หลังจากระบบบูทให้คลิกขวาที่ปุ่ม เริ่ม แล้วเลือก ตัวจัดการอุปกรณ์
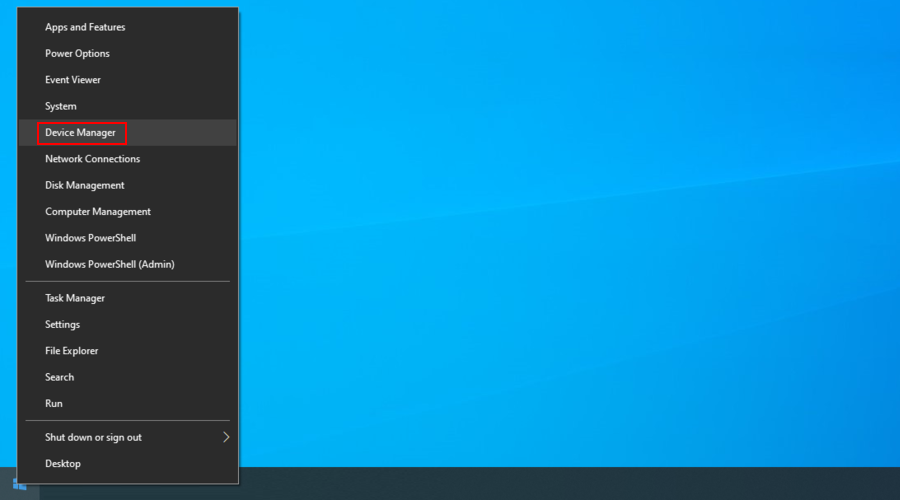
- ดับเบิลคลิกที่อุปกรณ์เพื่อเข้าถึงคุณสมบัติ
- เปลี่ยนไปที่แท็บ ไดรเวอร์ และตรวจสอบ วันที่ของผู้ขับขี่ หากเก่ากว่าหนึ่งปีให้ตรวจสอบการอัปเดตโดยคลิกปุ่ม อัปเดตไดรเวอร์

- คลิก ค้นหาไดรเวอร์โดยอัตโนมัติ ดำเนินการนี้สำหรับไดรเวอร์ที่ล้าสมัยทั้งหมด

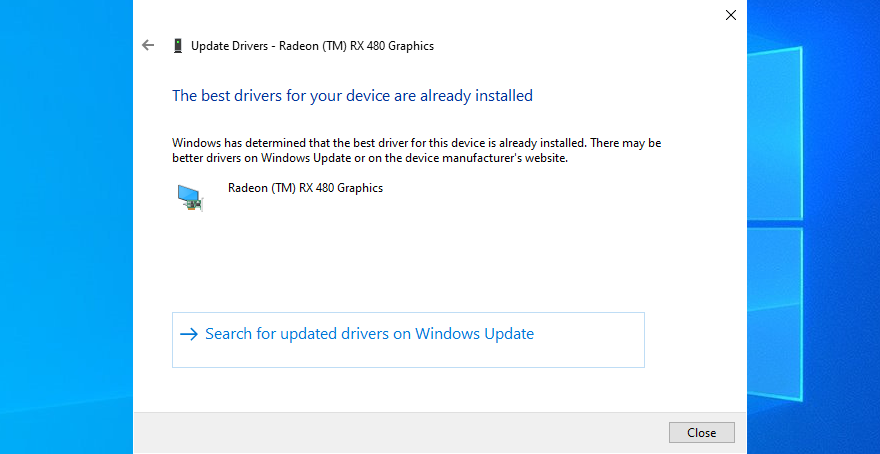
หากคุณได้รับข้อความ ไดรเวอร์ที่ดีที่สุดสำหรับอุปกรณ์ของคุณได้รับการติดตั้งแล้ว สำหรับไดรเวอร์ใด ๆ ให้คลิก ค้นหาไดรเวอร์ที่อัปเดตบน Windows Update คุณต้องทำสิ่งนี้เพียงครั้งเดียวเนื่องจาก Windows Update ควรดาวน์โหลดและติดตั้งไดรเวอร์ที่มีทั้งหมด
ในทางกลับกันหาก Windows ไม่พบไดรเวอร์รุ่นใหม่คุณสามารถไปที่เว็บไซต์ของผู้ผลิตอุปกรณ์ของคุณเพื่อดาวน์โหลดไดรเวอร์ใหม่ล่าสุด ตรวจสอบให้แน่ใจว่าได้รับไดรเวอร์ที่เข้ากันได้กับอุปกรณ์และระบบปฏิบัติการของคุณ จากนั้นทำตามขั้นตอนด้านบนอีกครั้ง แต่เลือก เรียกดูคอมพิวเตอร์ของฉันเพื่อหาไดรเวอร์ เพื่อทำการติดตั้งด้วยตนเอง
8. ย้อนกลับไดรเวอร์ที่เข้ากันไม่ได้
ไดรเวอร์ที่ไม่รองรับอาจทำให้เกิดปัญหาร้ายแรงในคอมพิวเตอร์ของคุณรวมถึงข้อผิดพลาดหน้าจอสีน้ำเงินเช่น 0xc000021a หลังจากปิดใช้งานการบังคับใช้ลายเซ็นไดรเวอร์ (ดู โซลูชัน 4 ) คุณควรย้อนกลับไดรเวอร์ที่ทำงานผิดปกติเหล่านี้เพื่อให้สามารถอัปเดตได้อย่างถูกต้อง
- เริ่ม Windows 10 ในเซฟโหมดด้วยระบบเครือข่าย
- กดปุ่ม Win + R พิมพ์ devmgmt.msc และกด Enter เพื่อเปิด ตัวจัดการอุปกรณ์
- ขยายหมวดหมู่ทั้งหมดและมองหาอุปกรณ์ที่มีเครื่องหมายอัศเจรีย์สีเหลือง
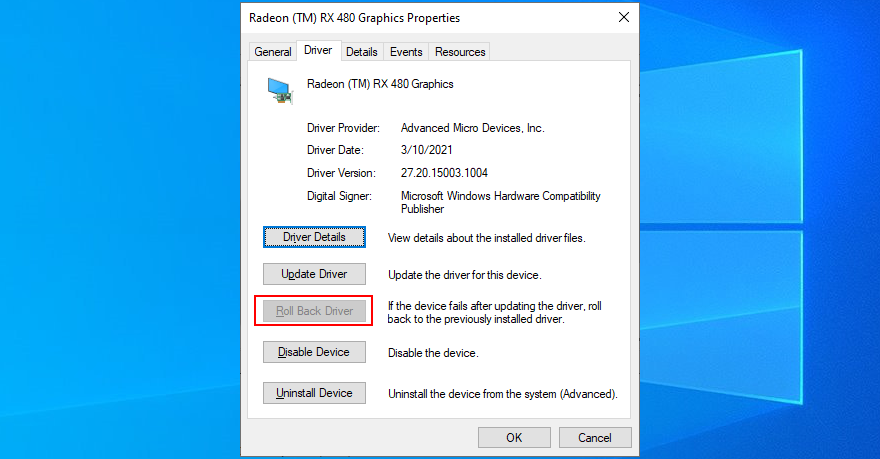
- ดับเบิลคลิกที่อุปกรณ์แล้วเลือกแท็บ ไดรเวอร์
- คลิก ย้อนกลับไดรเวอร์ และปฏิบัติตามคำแนะนำ หาก Roll Back Driver เป็นสีเทาคุณจะไม่สามารถทำการย้อนกลับได้เนื่องจากไม่มีไดรเวอร์ก่อนหน้านี้บันทึกไว้ในคอมพิวเตอร์ของคุณ
9. ซ่อมแซมรีจิสทรีของระบบ
รีจิสทรีของ Windows อาจมีรายการที่เสียหายซึ่งจำเป็นสำหรับการบูตระบบ อย่างไรก็ตามคุณสามารถกู้คืนรีจิสทรีเป็นการกำหนดค่าเริ่มต้นจากสภาพแวดล้อมบรรทัดคำสั่งก่อนที่จะบูตได้
- ขัดจังหวะลำดับการบูตสามครั้งเพื่อเรียกเมนู การเริ่มต้นขั้นสูง
- เลือก แก้ไขปัญหา > ตัวเลือกขั้นสูง > พร้อมรับคำสั่ง
- เลือกบัญชีของคุณและป้อนรหัสผ่านเพื่อดำเนินการต่อ
- พิมพ์คำสั่งต่อไปนี้ (กด Enter หลังข้อความแต่ละบรรทัด):
-
cd% SystemRoot% System32 \ config
-
เปลี่ยน% SystemRoot% System32 \ config \ DEFAULT DEFAULT.old
-
ren% SystemRoot% System32 \ config \ SAM SAM.old
-
ren% SystemRoot% System32 \ config \ SECURITY SECURITY.old
-
เปลี่ยน% SystemRoot% System32 \ config \ SOFTWARE SOFTWARE.old
-
เปลี่ยน% SystemRoot% System32 \ config \ SYSTEM SYSTEM.old
-
คัดลอก% SystemRoot% System32 \ config \ RegBack \ DEFAULT% SystemRoot% System32 \ config \
-
คัดลอก% SystemRoot% System32 \ config \ RegBack \ DEFAULT% SystemRoot% System32 \ config \
-
คัดลอก% SystemRoot% System32 \ config \ RegBack \ SAM% SystemRoot% System32 \ config \
-
คัดลอก% SystemRoot% System32 \ config \ RegBack \ SECURITY% SystemRoot% System32 \ config \
-
คัดลอก% SystemRoot% System32 \ config \ RegBack \ SYSTEM% SystemRoot% System32 \ config \
-
คัดลอก% SystemRoot% System32 \ config \ RegBack \ SOFTWARE% SystemRoot% System32 \ config \
-
- ลองบูต Windows เดี๋ยวนี้
10. แก้ไข BCD
BCD (ข้อมูลการกำหนดค่าการเริ่มระบบ) รับผิดชอบการดำเนินการเริ่มต้นระบบ Windows 10 ได้รับความเสียหาย แต่อย่างใดจึงไม่น่าแปลกใจที่หน้าจอคอมพิวเตอร์ของคุณจะเปลี่ยนเป็นสีน้ำเงินและแสดงข้อผิดพลาด 0xc000021a แต่คุณสามารถแก้ไข BCD ได้จากพรอมต์คำสั่ง:
- ในเมนูการแก้ไขปัญหาไปที่ แก้ไขปัญหา > ตัวเลือกขั้นสูง > พร้อมรับคำสั่ง
- เลือกบัญชีของคุณและใช้รหัสผ่านเพื่อดำเนินการต่อ
- เขียนคำสั่งถัดไป (กด Enter หลังแต่ละคำสั่ง):
-
bootrec/repairbcd
-
bootrec/osscan
-
bootrec/repairmbr
-
- ออกจาก Command Prompt แล้วลองบูต Windows 10
11. ถอนการติดตั้งแอปของบุคคลที่สาม
คุณอาจติดตั้งแอปพลิเคชันซอฟต์แวร์ของ บริษัท อื่นที่ไม่รองรับระบบปฏิบัติการของคุณหรือมีข้อขัดแย้งกันเอง ตัวอย่างเช่นโซลูชันป้องกันไวรัสสองตัวที่มีเอ็นจิ้นแบบเรียลไทม์ที่แตกต่างกันมีแนวโน้มที่จะปะทะกันและทำให้เกิดข้อผิดพลาดหน้าจอสีน้ำเงิน ในการแก้ปัญหานี้คุณต้องถอนการติดตั้งโปรแกรมใด ๆ ที่เพิ่มลงในพีซีของคุณเมื่อเร็ว ๆ นี้:
- เริ่ม Windows 10 ใน Safe Mode
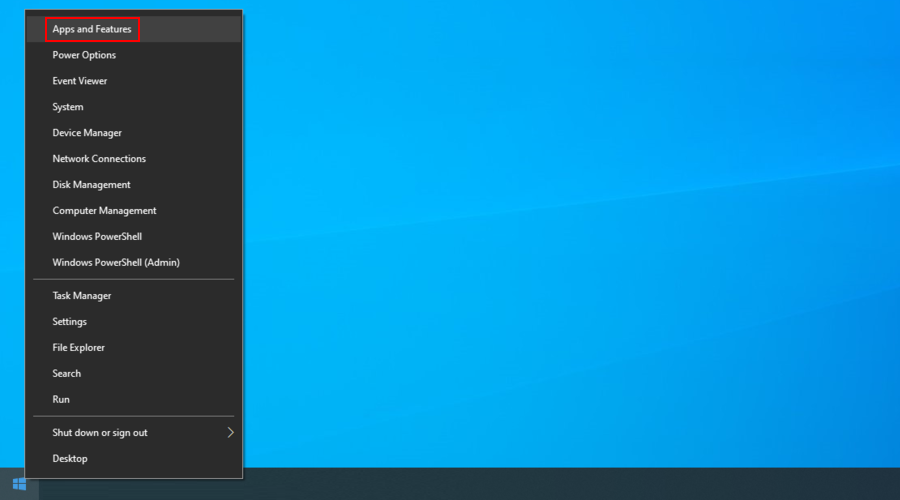
- คลิกขวาที่ปุ่ม เริ่ม และไปที่ แอปและคุณลักษณะ
- ตั้งค่า เรียงตาม เป็น วันที่ติดตั้ง เพื่อดูโปรแกรมล่าสุดก่อน
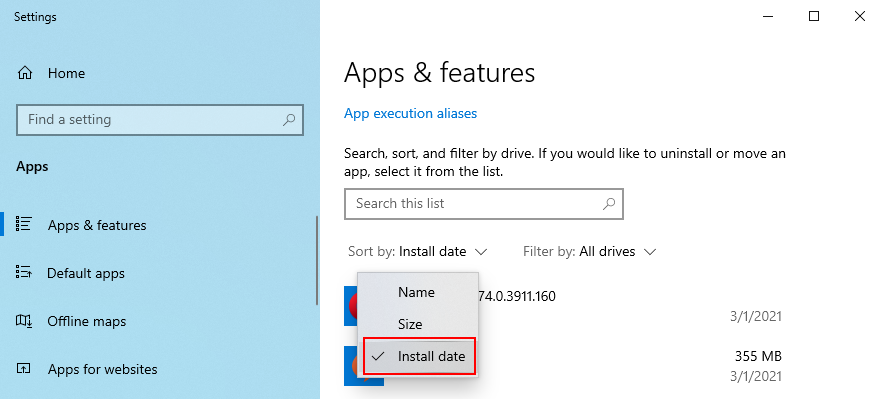
- เลือกแอปแรกในรายการคลิก ถอนการติดตั้ง และอีกครั้งเพื่อยืนยัน
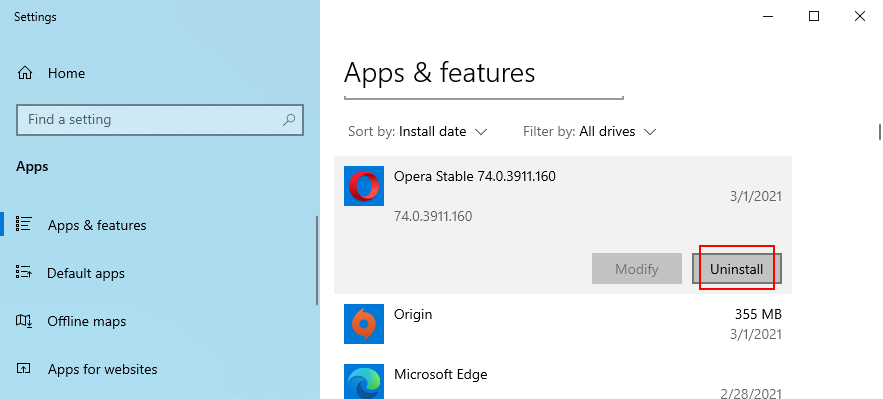
- ทำสิ่งนี้กับทุกโปรแกรมที่เพิ่งติดตั้ง
- ลองบูตระบบปฏิบัติการของคุณตามปกติตอนนี้
12. ถอนการติดตั้งการอัปเดตระบบ
ไม่เพียง แต่แอปพลิเคชันซอฟต์แวร์เท่านั้น แต่การอัปเดตระบบที่ทำงานผิดพลาดอาจเป็นอันตรายต่อคอมพิวเตอร์ของคุณได้ คุณสามารถลบออกก่อนบูตได้:
- ขัดจังหวะลำดับการบูตสามครั้งโดยการปิดและเปิดพีซีของคุณ
- เมื่อแสดงหน้าจอ การเริ่มต้นขั้นสูง ให้ไปที่ แก้ไขปัญหา > ตัวเลือกขั้นสูง > ถอนการติดตั้งการอัปเดต
- เลือกและถอนการติดตั้งการอัปเดต Windows ล่าสุด
- ลองบูตระบบปฏิบัติการของคุณเดี๋ยวนี้
13. ถอดปลั๊กอุปกรณ์ภายนอก
หากคุณเพิ่งเชื่อมต่ออุปกรณ์ใหม่กับคอมพิวเตอร์ของคุณเช่นอะแดปเตอร์ Wi-Fi เว็บแคมเครื่องพิมพ์หรือไดรฟ์ปากกา USB อาจมีปัญหาความเข้ากันได้ซึ่งส่งผลให้เกิดข้อผิดพลาด BSOD เช่น 0xc000021a อาจเกิดขึ้นได้กับอุปกรณ์พลักแอนด์เพลย์
แต่คุณควรจะแก้ไขได้โดยถอดสาย USB ออกจากพีซีของคุณ นอกจากนี้ยังควรเปลี่ยนพอร์ต USB ในกรณีที่พอร์ต USB บางพอร์ตทำงานไม่ถูกต้อง
14. รีเซ็ต BIOS
การกำหนดค่า BIOS ที่ไม่ถูกต้องอาจทำให้คอมพิวเตอร์ของคุณเสียชีวิตได้ หากคุณหรือบุคคลอื่นที่สามารถเข้าถึงพีซีของคุณได้เข้าถึงโหมด BIOS เพื่อเปิดใช้งานการโอเวอร์คล็อกการแชโดว์การแคชหรืออย่างอื่นคุณควร คืนค่าการกำหนดค่า BIOS เป็นค่าเริ่มต้น เพื่อให้อยู่ในด้านที่ปลอดภัย
- ในเมนูการแก้ไขปัญหาเลือก แก้ไขปัญหา > ตัวเลือกขั้นสูง > การตั้งค่าเฟิร์มแวร์ UEFI
- คลิก รีสตาร์ท เพื่อเข้าสู่โหมด BIOS
- ค้นหาตัวเลือกที่รีเซ็ตข้อมูลการกำหนดค่า BIOS ของคุณเป็นค่าเริ่มต้นและเปิดใช้
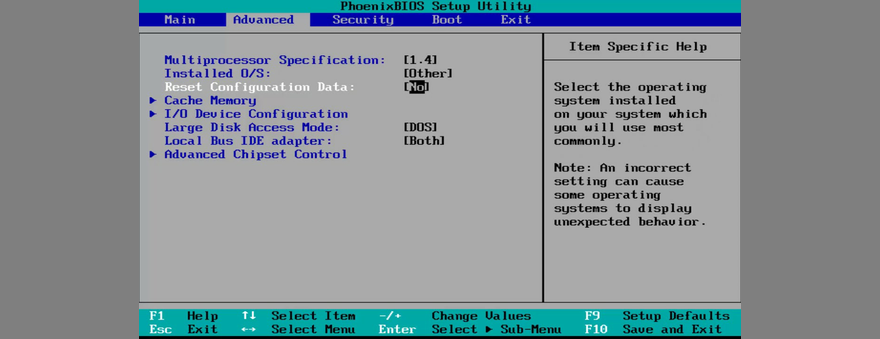
- บันทึกการตั้งค่า BIOS ใหม่และออก
- ลองบูต Windows 10
15. อัปเดต BIOS
BIOS จำเป็นต้องได้รับการอัปเดตเป็นประจำเช่นเดียวกับแอปพลิเคชันซอฟต์แวร์หรือระบบปฏิบัติการของคุณ หากคุณไม่เคยทำสิ่งนี้คุณควรทำทันที But you need to use a pen drive and a working computer to download the BIOS installation files. Here are the complete steps:
- On your malfunctioning PC, reach the Advanced Startup menu (turn the PC off and on three times)
- Go to Troubleshoot > Advanced Options > UEFI Firmware Settings
- Click Restart to reach the BIOS setup mode
- In the main section, write down the BIOS manufacturer, current version, and install date
- Shift your attention to the working PC. Connect a USB flash drive
- Visit the manufacturer’s website and find a newer BIOS version by comparing it to the BIOS current version and install date
- Download the BIOS setup file and unzip the archive to the pen drive
- Disconnect the USB flash drive and plug it into the malfunctioning PC
- Follow the steps above to access the BIOS menu
- Create a backup of the current BIOS version
- Start the BIOS update and follow the steps
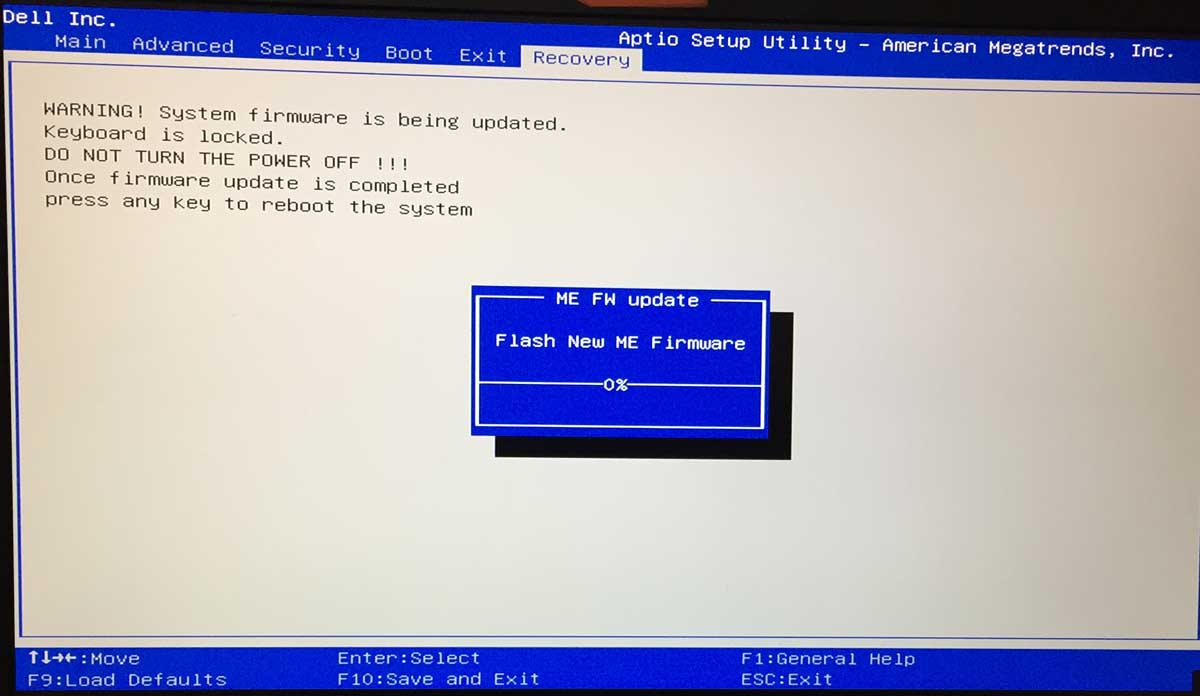
- Try to boot Windows after the update is complete
16. Disable Fast Boot
Fast Boot preloads the Windows drivers in order to boot your PC faster. But it’s known to sometimes cause Blue Screen of Death errors, so it’s a good idea to deactivate Fast Boot. สิ่งที่คุณต้องทำมีดังนี้:
- Boot Windows 10 to the troubleshoot menu
- Select Troubleshoot > Advanced Options > UEFI Firmware Settings
- Click Restart
- Access the advanced BIOS options
- Deactivate Fast Boot
- Save the BIOS settings and exit
- Try to boot Windows 10 now
17. Enable Legacy BIOS boot
In some cases, switching from UEFI to Legacy BIOS mode helps fix BSOD errors:
- Go to Troubleshoot > Advanced Options > UEFI Firmware Settings
- Click Restart
- Find and access the Boot area of BIOS
- Select UEFI/BIOS Boot Mode and press Enter
- Enable Legacy BIOS Boot Mode
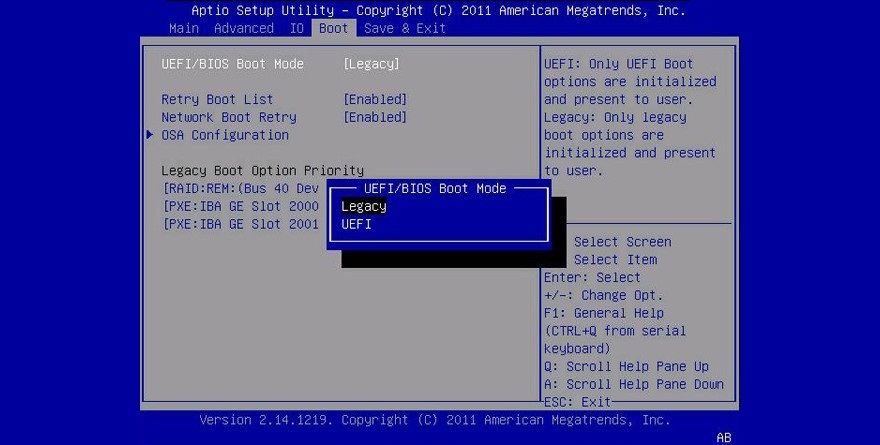
- Save the current configuration and exit
18. Inspect Event Viewer
If you can’t identify the exact problem that’s causing the 0xc000021a error, you can consult the Windows 10 internal logging utility called Event Viewer:
- Right after a system crash, start Windows 10 in Safe Mode
- Click the Start button, search for Event Viewer, and open this app
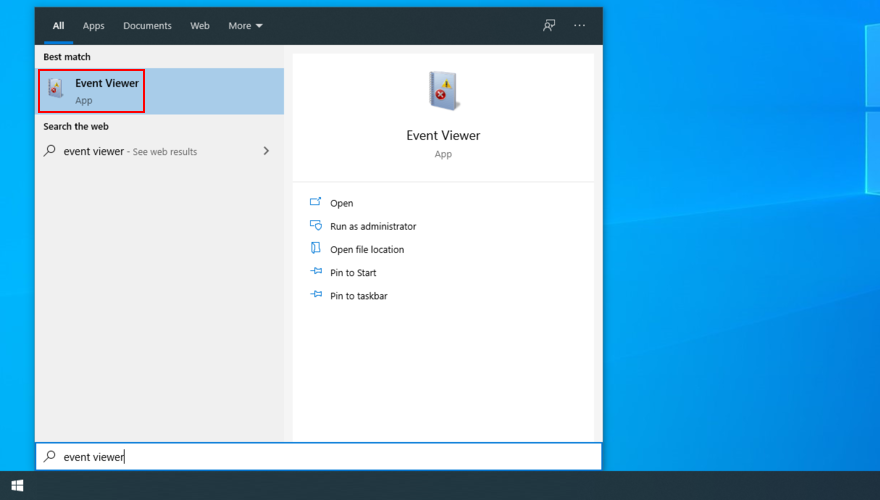
- Select Windows Logs > System on the left part of the window
- Choose the first entry that says Error
- Inspect the General and Details tab for more information

You can use this information to perform an online search and discover more workarounds for your specific problem. If you think that Event Viewer is difficult to use, we suggest checking out BlueScreenView. It’s a third-party app that doesn’t need installation and gives you the possibility to examine minidump files left behind by BSOD errors in a user-friendly interface.
19. Roll back Windows 10
You can roll back Windows 10 to a restore point that was recorded on your PC before you started experiencing error code 0xc000021a. However, this means losing all applications installed after the restore point was created. Here’s how to make it happen:
- In Advanced Startup, select Troubleshoot > Advanced Options > System Restore
- Select a restore point or click Show more restore points to view older restore points. You can also click Scan for affected programs to see which applications will be lost
- Click Next and follow the remaining instructions. Your PC will restart to complete the operation
20. Run a malware scan
A likely scenario is that a malware agent infected your computer and damaged the Winlogon.exe and Csrss.exe, leading to error 0xc000021a. Since you can’t boot Windows to run a full scan, you can use a third-party solution like Kaspersky Free Rescue Disk to create an emergency disk that will scan your PC for malware before boot. You need a USB flash drive and a second, working PC:
- Connect a USB flash drive into the working PC
- Download Kaspersky Free Rescue Disk from the official website
- Burn the downloaded ISO image to a USB flash drive, CD or DVD
- Unplug the pen drive and attach it to the malfunctioning PC
- Before Windows boots, quickly press the key displayed on the screen to access the BIOS boot menu
- Boot your computer from the pen drive or disc
- Update the antivirus database
- Run a system scan using Kaspersky Free Rescue Disk
- Follow the instructions to remove any infected files
21. Check the system memory
Any problems with the computer’s RAM can affect the entire operating system and cause functionality issues that lead to BSOD error code 0xc000021a. However, you can check the system memory without having to install third-party software applications, thanks to the internal utility named Windows Memory Diagnostic.
วิธีใช้ Windows Memory Diagnostic:
- In the Advanced Startup menu, go to Troubleshoot > Advanced options > Command Prompt
- Select your admin account and input your password
- Run
mdsched.exeto open the Windows Memory Diagnostic app - Click Restart now and check for problems
Before Windows boot, Windows Memory Diagnostic will run a standard test to evaluate the system memory. However, we suggest performing an extended text since it shows more relevant information. Press F1 to visit the options area, select Extended, and press F10 to confirm.
You might have to remove and reset the RAM card and then perform a new test using this tool. However, if the memory card is malfunctioning, you must replace it with a new one. For example, if you’re a hardcore gamer, check out the best RAM cards for gaming.
22. Run System Image Recovery
If you have created a system backup at some point on your computer, you can use System Image Recovery to restore the backup and regain the functionality of your operating system. สิ่งที่คุณต้องทำมีดังนี้:
- Interrupt the Windows startup sequence three times in a row to reach the troubleshoot menu
- Select Troubleshoot > Advanced Options > System Image Recovery
- Follow the on-screen steps
Keep in mind that you can’t use the system image created by another computer to restore the backup on your malfunctioning PC.
23. Use a Linux live distro
If you can’t get rid of Windows error code 0xc000021a no matter what you try, you should prepare your PC for a reset. Before doing that, though, you can create and use a Linux live distro to access your hard disk files and create backups.
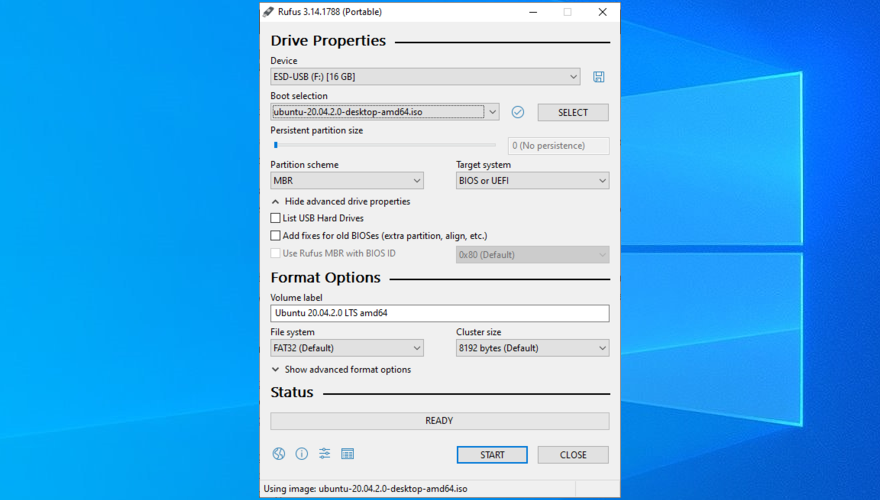
You just need a tool that creates bootable USB drives, like Rufus, a user-friendly Linux distro like Ubuntu, and a working PC for creating the live disk. Here are the complete steps:
How to create an Ubuntu live disk with Rufus:
- Connect a USB flash drive to the working PC and make sure to copy any important files since the disk will be formatted
- Download Ubuntu from the official website
- Download Rufus from the official website
- Install and run Rufus
- Select the USB drive letter
- At Boot section, choose Disk or ISO image
- Click SELECT and add the Ubuntu ISO file
- Set Partition scheme to MBR
- At File system, select FAT32
- Click START
How to boot Ubuntu from the USB flash drive:
- Unplug the flash drive from the working PC and attach it to the malfunctioning computer
- Turn on the malfunctioning PC and, before Windows boot, quickly press the key shown on the screen for accessing the boot sequence menu (e.g. F12)
- Choose the USB flash drive and press Enter to boot Ubuntu
- Once Ubuntu boots, copy all important files from your hard drive and write down all serial numbers from your licensed software applications
24. Reset Windows 10
Once you have successfully backed up your files and application keys using a Linux live distro like Ubuntu, you can focus on repairing your operating system. And the easiest way to do this is by resetting Windows 10 to factory mode. You don’t need a Windows 10 installation media disk for this solution. However, all applications and files will be deleted.
- Turn on your PC
- Interrupt the PC boot three times in a row to boot to the troubleshoot menu
- Select Troubleshoot > Advanced options > Reset this PC
- Click Remove everything and follow the remaining instructions
- After Windows reset, you must configure the initial computer setup
Windows stop code 0xc000021a can be fixed
To review, 0xc000021a is a Blue Screen of Death error that usually occurs when the Winlogon.exe and Csrss.exe processes stop working properly. There are multiple approaches to fixing this problem at both software and hardware level.
For instance, you can start Windows 10 in Safe Mode with or without networking features, perform a clean system boot, run Startup Repair, disable Driver Signature Enforcement, fix hard drive corruption and damaged system files, update old drivers or roll back unsupported ones, repair the system registry and BCD, as well as uninstall third-party apps or system updates.
It’s also a good idea to unplug external devices with compatibility problems, reset and update BIOS, disable Fast Boot, enable Legacy BIOS boot, consult Event Viewer for more details about the BSOD error, roll back Windows 10 to a stable restore point, check your computer for malware before boot, verify the system memory, and restore a system backup using System Image Recovery.
However, if all solutions fail, it’s time to reset Windows 10 to factory mode by deleting all applications and personal files. Before doing so, however, you can create and use a disk with a Linux live distro (like Ubuntu) to access your hard drive and back up important files and application serial numbers.
How did you manage to get rid of the 0xc000021a stop code? Tell us all about it in the comments below.