Quando se trata de trabalhar em casa, há poucas coisas piores do que atrasar-se para uma reunião devido a uma falha na webcam. Outros tipos de usuários também são afetados por câmeras com defeito , como jogadores.
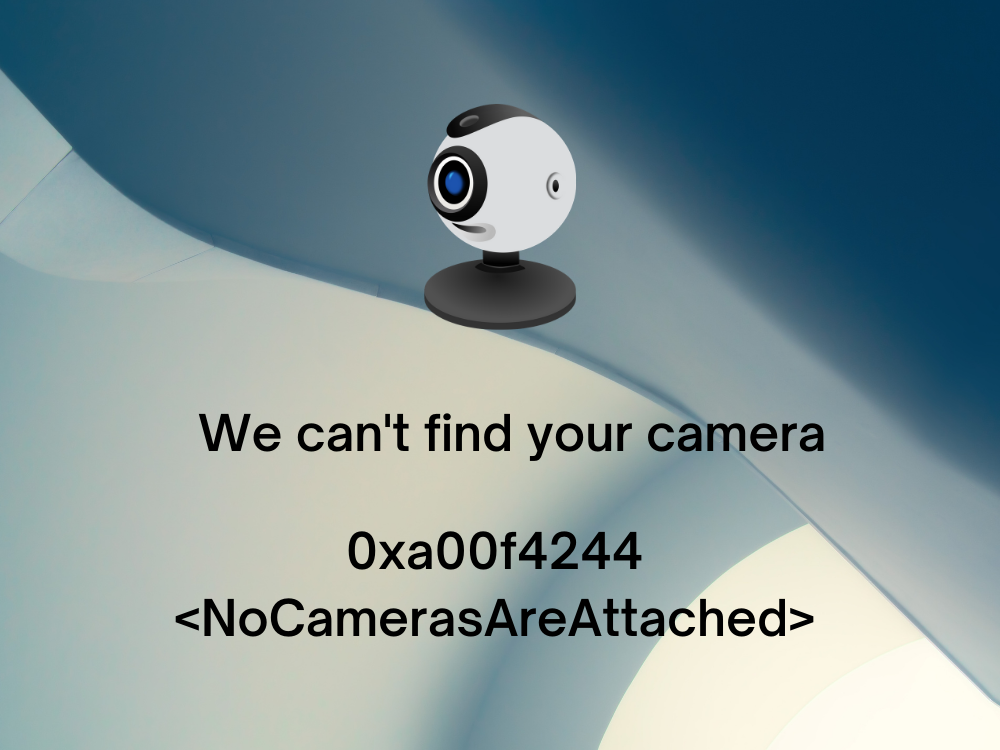
0xa00f4244 NoCamerasAreAttached é uma mensagem de erro comum exibida na tela de usuários do Windows 10 ao tentar iniciar o aplicativo Câmera. A tela da webcam fica preta e mostra texto em branco, como na imagem abaixo.

Não conseguimos encontrar sua câmera
Isso geralmente acontece com laptops ou monitores com webcams integradas. Mas o erro também pode ocorrer em adaptadores externos de webcam. Não se preocupe, pois você deve ser capaz de lidar com este assunto sem recorrer a um profissional. Normalmente, é uma solução simples que nunca passou pela sua cabeça, como pressionar uma combinação de teclas que ativa a webcam.
CORREÇÃO: 0xa00f4244 NoCamerasAreAttached
Antes de tentar reparar o código de erro 0xa00f4244 NoCamerasAreAttached em seu computador, é uma boa ideia criar um ponto de restauração do sistema . As últimas soluções desta lista são avançadas e fazem alterações significativas no seu computador. Caso algo dê errado, você sempre pode reverter o Windows 10 para um ponto de restauração estável e tentar novamente.
Embora as correções abaixo sejam personalizadas para o aplicativo Câmera, elas também podem ser aplicadas a outros aplicativos (por exemplo, se seu a webcam não está funcionando no Skype ).
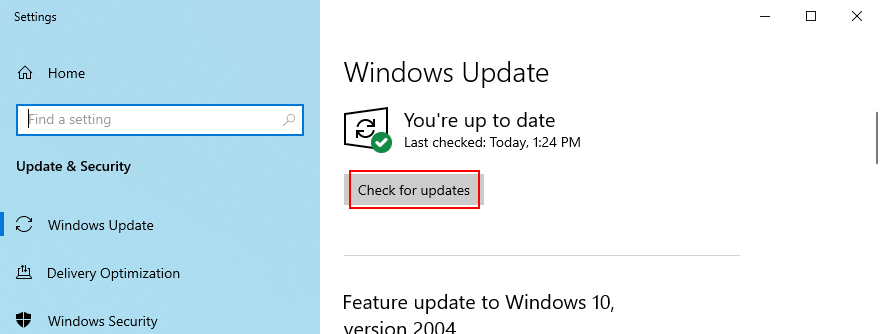
1. Execute o Windows Update
Como o erro 0xa00f4244 NoCamerasAreAttached é acionado pelo aplicativo Câmera e como o aplicativo Câmera está interligado ao Windows, você deve verificar se há atualizações do sistema e baixar todas as atualizações disponíveis. Veja como fazer isso acontecer facilmente:
- Pressione a tecla Win , digite Verificar atualizações e pressione Enter
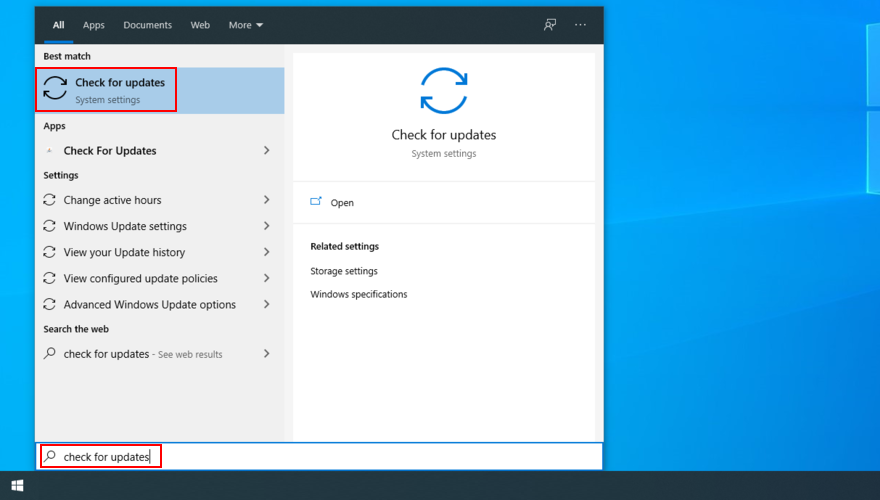
- Clique em Verificar atualizações e aguarde até que a pesquisa online seja concluída
- Se houver algo disponível, clique em Baixar
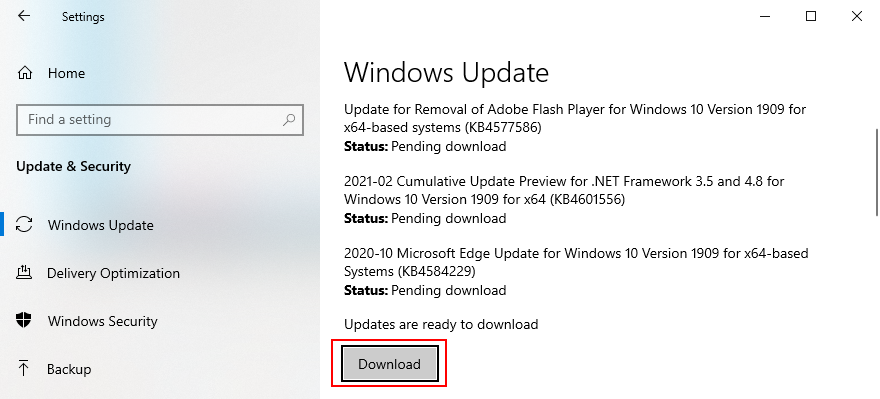
- Não desligue ou reinicie o seu PC durante a atualização
- Quando terminar, inicie o aplicativo Câmera e verifique se há erros
2. Verifique a tampa, o cabo e o interruptor da webcam
Alguns laptops e monitores com webcams integradas têm tampas ou botões que você deve empurrar ou puxar fisicamente para alternar a webcam. É uma medida de segurança contra sequestradores de webcam. Por exemplo, os laptops MSI exigem que você pressione FN + F6 para alternar a webcam. Enquanto isso, os sistemas ASUS funcionam com F10.
Como a mensagem de erro 0xa00f4244 NoCamerasAreAttached indica claramente que o Windows tem problemas para identificar sua webcam, certifique-se de apertar o botão ou girar o botão responsável por religar a webcam.
Em certos casos, é necessário conectar o monitor à unidade do computador usando um cabo especial para a webcam, mesmo se o dispositivo estiver embutido na tela. Verifique se há um cabo na caixa da webcam e conecte-o.
Se o cabo já estiver instalado, tente desconectá-lo e reconectá-lo. Você também pode tentar usar uma porta USB diferente, caso a porta original não esteja funcionando corretamente.
3. Verifique as permissões da webcam
Seu dispositivo e aplicativos requerem acesso à webcam. Por exemplo, Microsoft Teams não consegue trabalhar com uma webcam sem sua permissão. Caso contrário, você continuará vendo 0xa00f4244 NoCamerasAreAttached em sua tela. Isso se aplica especialmente a usuários que passaram recentemente por uma grande atualização do Windows ou que atualizaram o sistema operacional.
- Faça login no Windows 10 com direitos de administrador
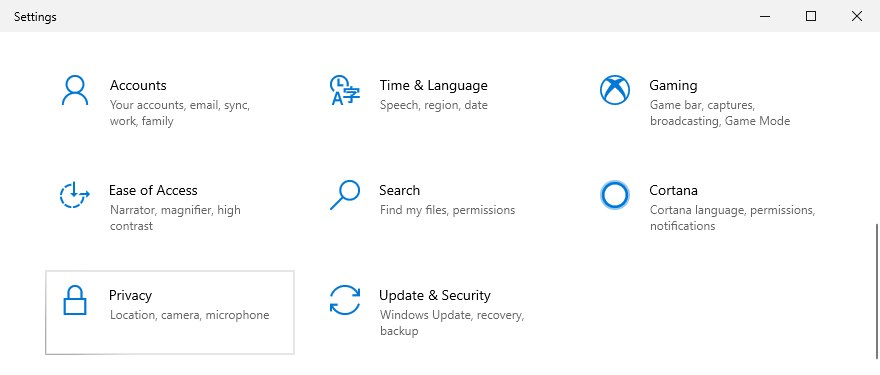
- Clique com o botão direito do mouse no botão Iniciar e vá para Configurações
- Selecione Privacidade
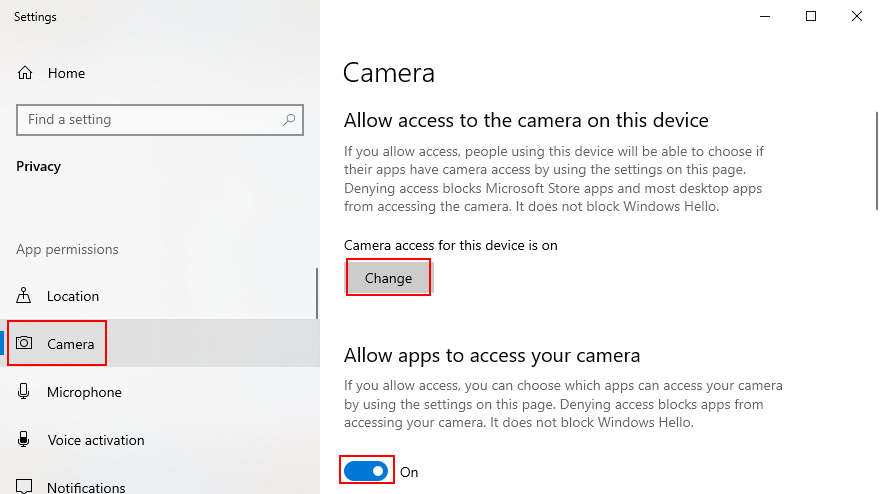
- Nas permissões do aplicativo no lado esquerdo, selecione Câmera
- Clique em Alterar e certifique-se de que Acesso à câmera para este dispositivo esteja ativado. Você também pode permitir o acesso da câmera a outros aplicativos, como o Skype
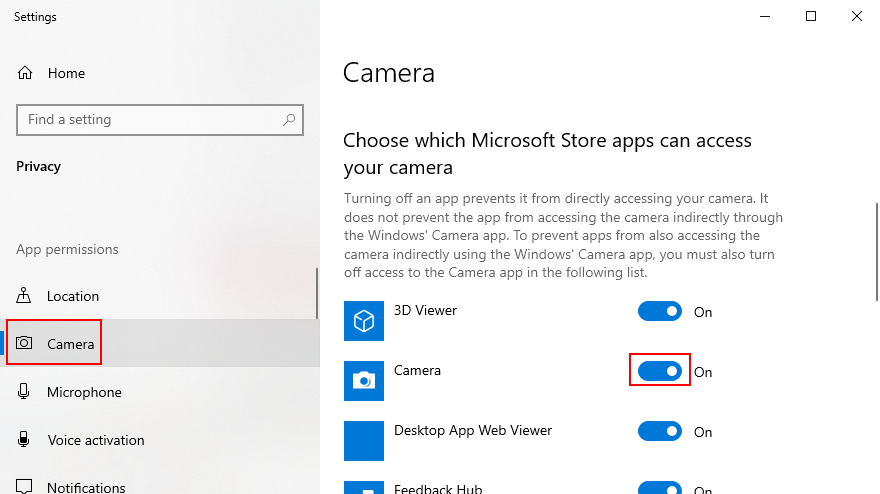
- Ative Permitir que os aplicativos acessem sua câmera
- Em Escolha quais aplicativos da Microsoft Store podem acessar sua câmera , defina Câmera como Ligada
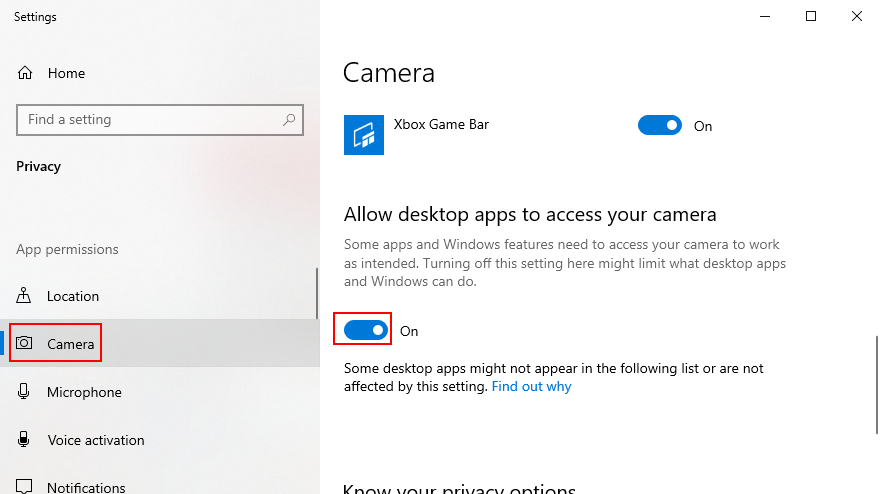
- Role para baixo até Permitir que aplicativos da área de trabalho acessem sua câmera e defina-o como Ligado
- Selecione Privacidade
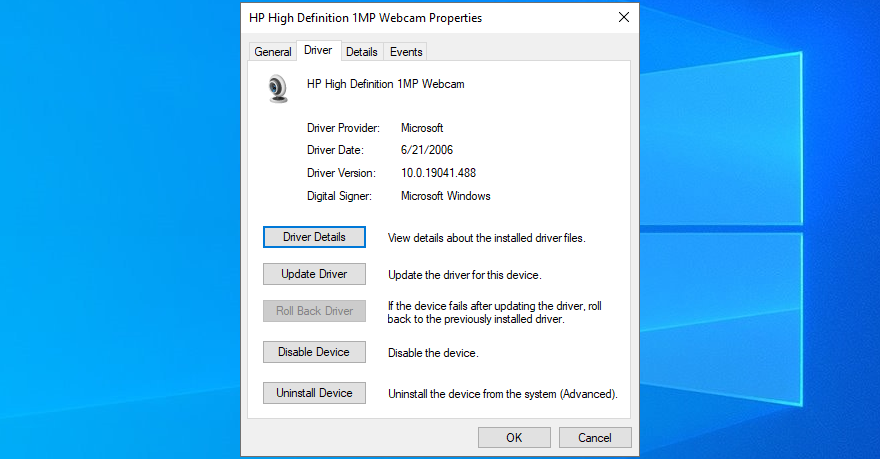
4. Verifique a compatibilidade da webcam
Se você comprou ou recebeu sua webcam há muito tempo, é possível que o hardware não seja compatível com o Windows 10. Nesse caso, não há nada a fazer exceto comprar uma nova webcam. Há um truque simples para descobrir isso rapidamente: encontrar um arquivo chamado stream.sys. Aqui está o que você deve fazer:
- Clique com o botão direito no botão Iniciar e selecione Gerenciador de dispositivos
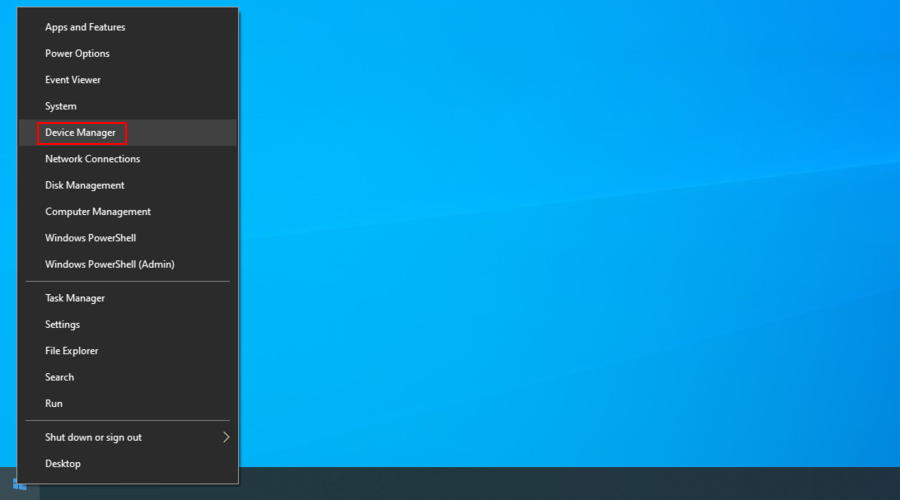
- Expanda a categoria Câmeras para procurar sua webcam
- Clique com o botão direito do mouse no dispositivo de webcam e selecione Propriedades
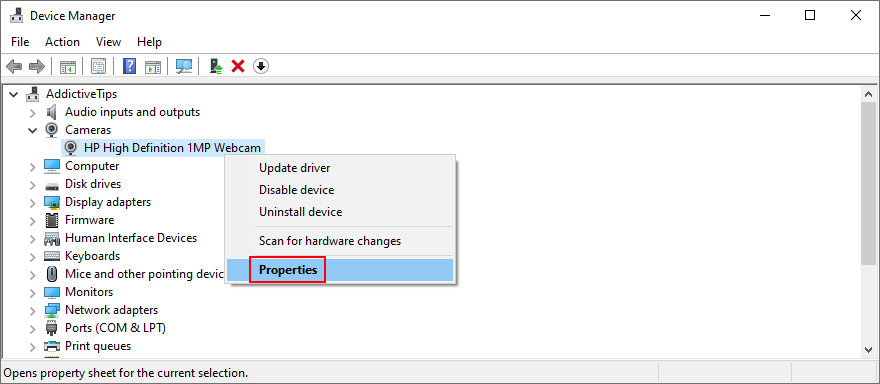
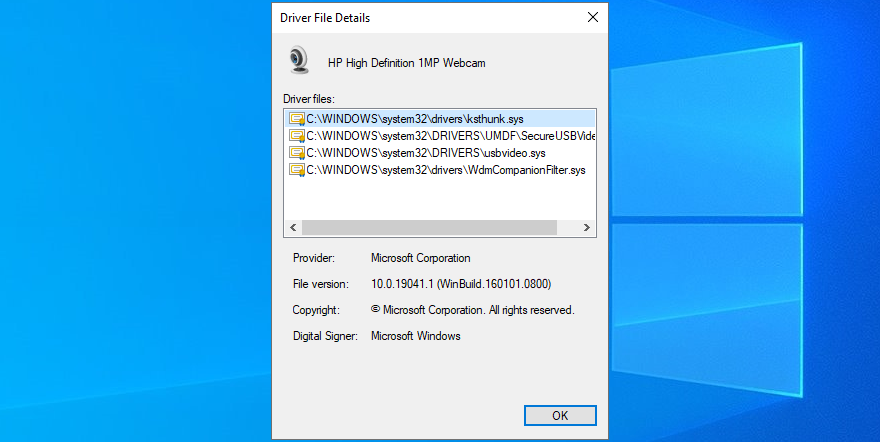
- Mude para a guia Driver e clique em Detalhes do driver

- Na lista de arquivos, procure stream.sys . Se você encontrá-lo, significa que a webcam não é compatível com o Windows 7 e versões mais recentes, portanto, você deve substituí-la por uma nova. Caso contrário, você pode ir
Se você não conseguir encontrar sua webcam no Gerenciador de dispositivos , descubra como corrigir esse problema.
5. Verifique os drivers da webcam
Isso diz na mensagem de erro: você deve inspecionar os drivers da sua webcam para garantir que tudo está funcionando bem. Existem três abordagens para isso: reinstalar o dispositivo, atualizar o driver ou reverter o driver.
Como reinstalar o dispositivo de webcam:
- Clique com o botão direito no botão Iniciar e vá para Gerenciador de dispositivos
- Procure sua webcam no grupo Câmeras
- Clique com o botão direito na entrada da webcam e selecione Desinstalar dispositivo
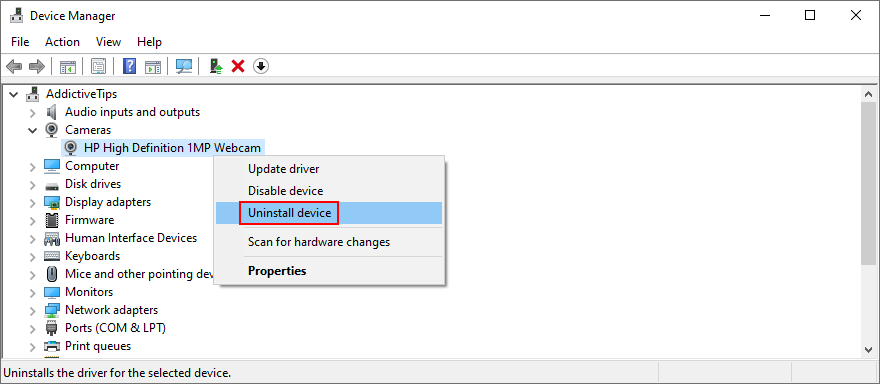
- Prossiga com a remoção do dispositivo
- Clique com o botão direito em qualquer entrada e selecione Verificar se há alterações de hardware
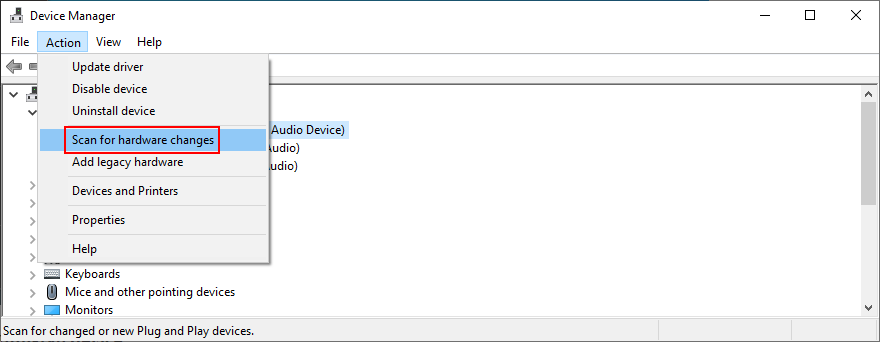
- Reinicie o seu computador. O Windows irá reinstalar automaticamente os adaptadores da webcam
- Abra o aplicativo Câmera e verifique se há erros
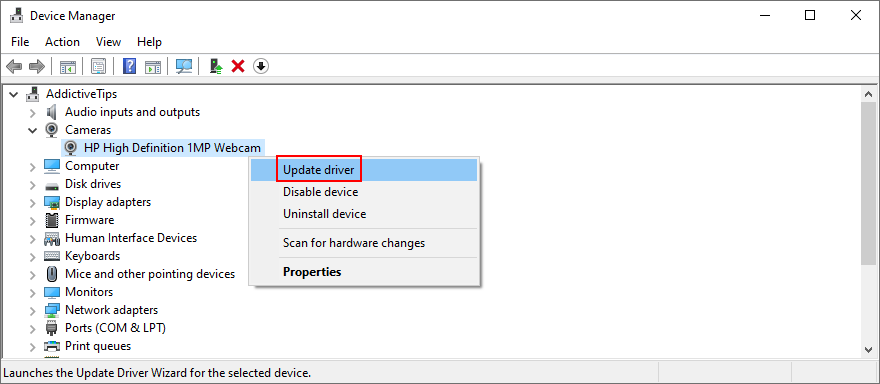
Como atualizar o driver da câmera:
- No Gerenciador de dispositivos , clique com o botão direito em sua webcam e selecione Atualizar driver
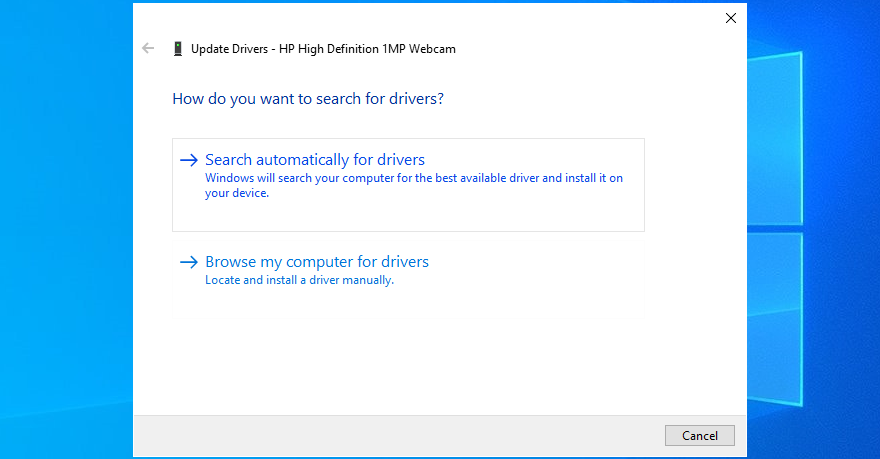
- Clique em Pesquisar drivers automaticamente e aguarde
- Se a pesquisa online não retornar nada, clique em Pesquisar drivers atualizados no Windows Update
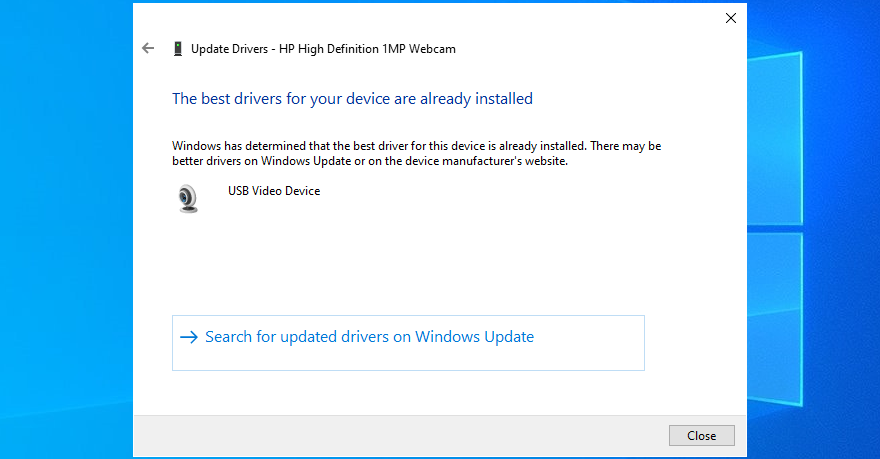
Se o Windows não conseguir encontrar um driver mais recente para sua webcam, vá para o site oficial para localizar e fazer download de uma versão mais recente. Em seguida, refaça as etapas acima e use Procurar software de driver em meu computador para atualizar manualmente o driver da webcam.
Por outro lado, se você instalou acidentalmente um driver incompatível, será necessário executar uma reversão.
Como reverter o driver da webcam:
- Acesse Gerenciador de dispositivos
- Clique com o botão direito em sua webcam e selecione Propriedades
- Mude para a guia Driver
- Clique em Reverter driver e siga as instruções
- Se o botão Reverter driver estiver esmaecido, você não poderá executar uma reversão, portanto, pode pular toda esta etapa
- Reinicie seu PC e abra o aplicativo Câmera para inspecionar os resultados
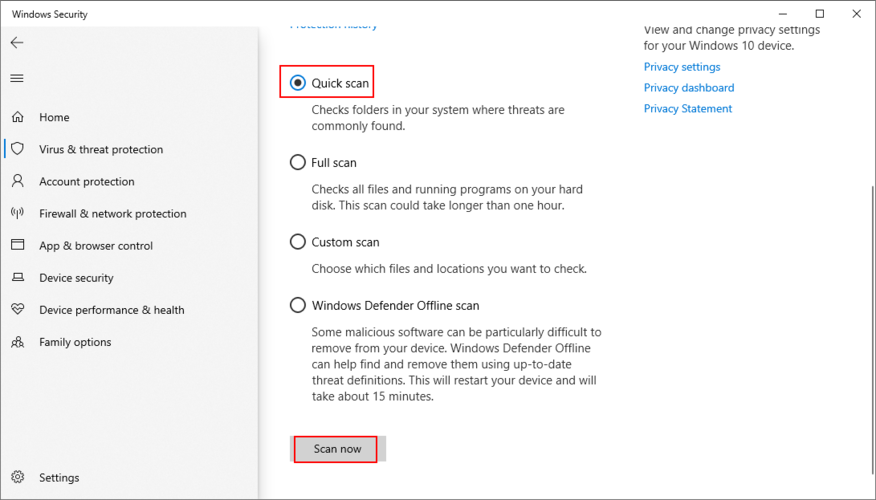
6. Faça uma varredura em seu computador em busca de malware
Seu computador pode ter sido infectado recentemente com malware, mesmo sem você perceber. Como resultado, o agente malicioso pode ter desativado processos e serviços críticos do sistema relacionados ao aplicativo Câmera, e é por isso que você continua vendo a mensagem de erro 0xa00f4244 NoCamerasAreAttached.
Mas você pode executar uma verificação de malware e remover qualquer infecção para restaurar as configurações do computador. Se você não tiver uma ferramenta antivírus de terceiros instalada, pode usar o Windows Defender.
Como executar uma verificação de malware com o Windows Defender:
- Clique no botão Iniciar , digite Segurança do Windows e pressione Enter
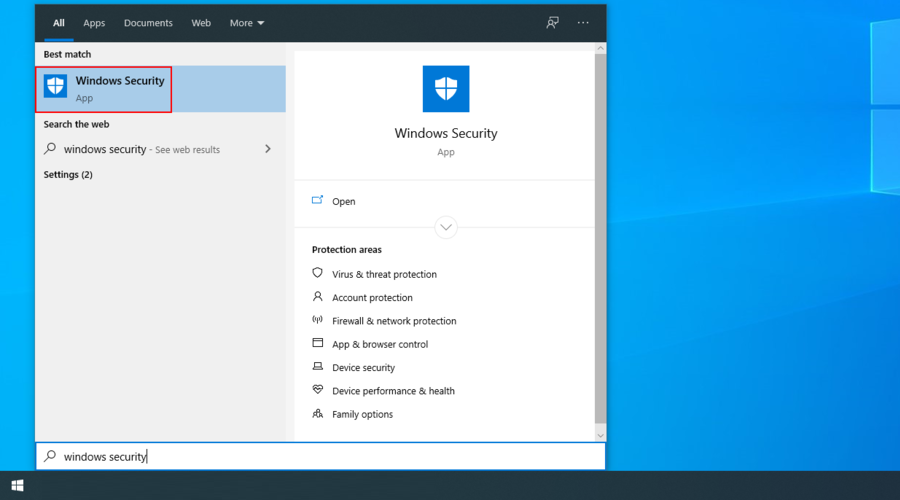
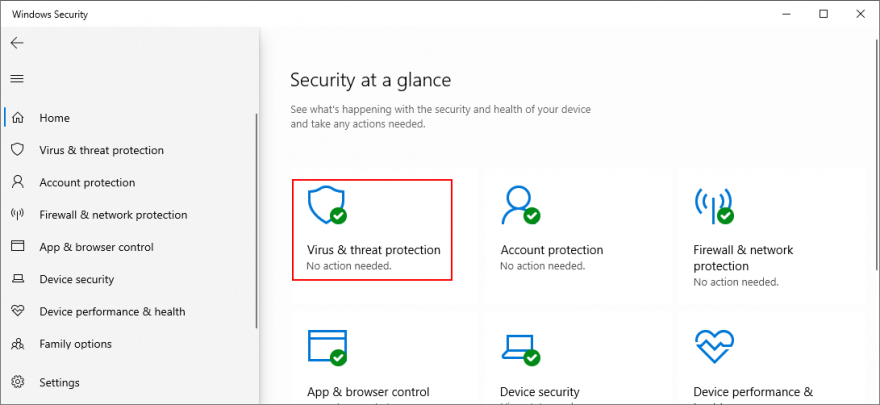
- Selecione Proteção contra vírus e ameaças
- Clique em Opções de verificação
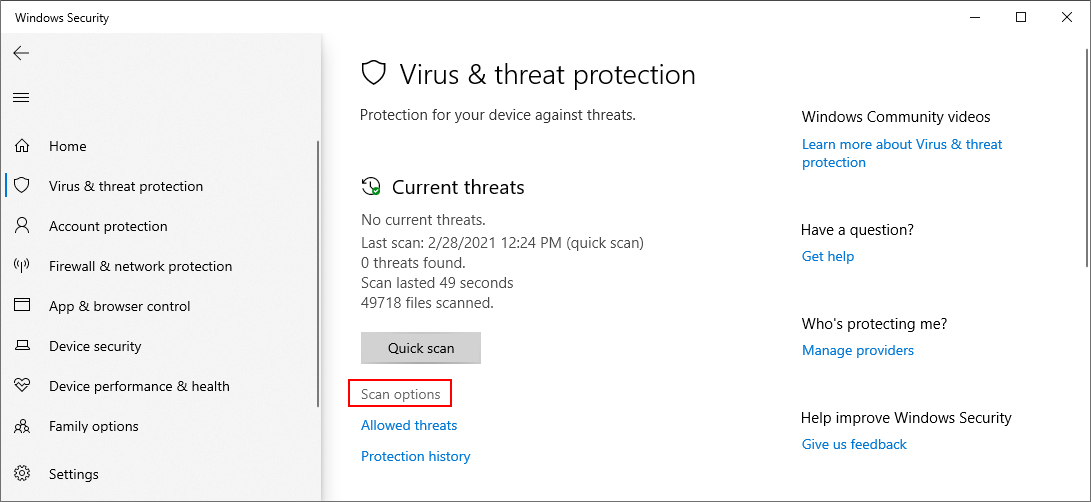
- Selecione Verificação rápida e clique em Verificar agora
- Se os resultados da verificação não revelarem nada suspeito, execute outra verificação usando o modo Verificação offline do Windows Defender
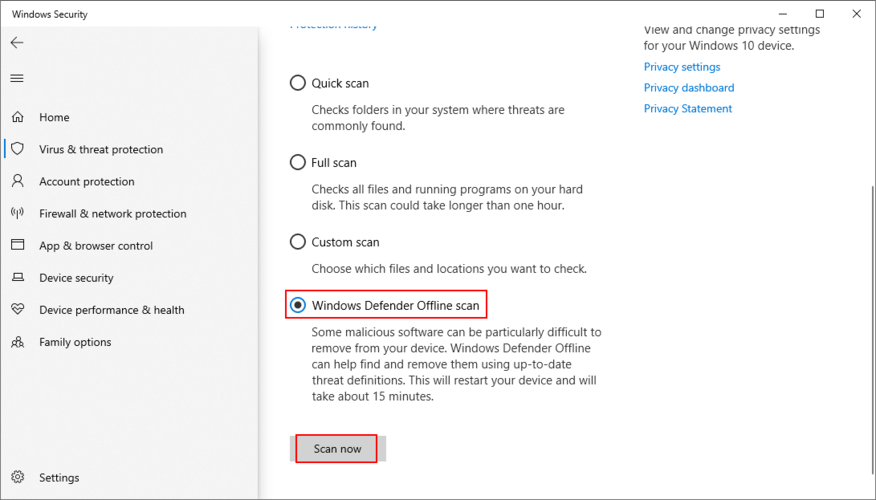
- Reinicie o seu computador
- Abra o aplicativo Câmera e verifique se há erros
7. Verifique seu aplicativo de segurança da Internet
If you have a cyber-security solution installed on your computer, it could have a special feature dedicated to blocking webcam access, in an effort to stop spies from watching your every move.
Since the application overrides your computer settings, it could be the reason why you keep getting the 0xa00f4244 NoCamerasAreAttached error code.
To fix this problem, just locate the webcam feature in your Internet security program and shut it down to allow webcam access to all your installed applications.
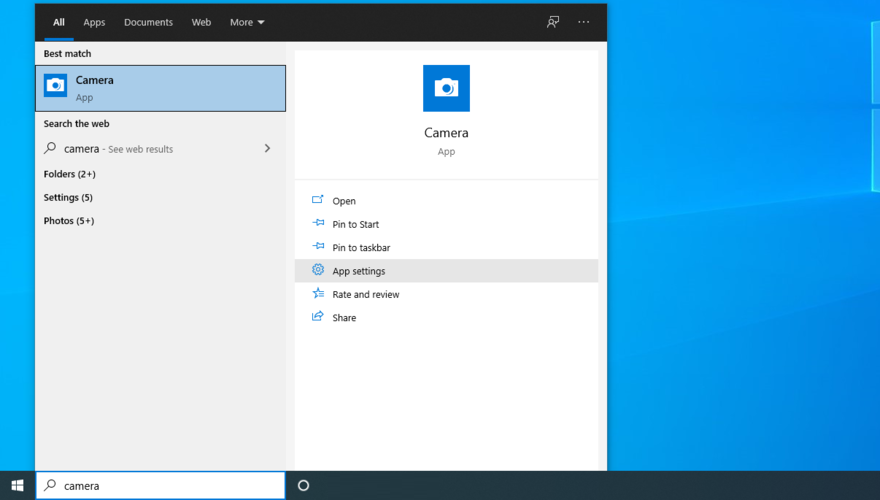
8. Review Camera app permissions
In a previous solution, we said how important it is to verify webcam permissions in the privacy settings of your operating system. However, it’s equally important to check the permissions of the Camera app to make sure that everything is in working order. Here’s how to make it happen:
- Press the Win key, type Camera, and go to App settings
- At App permissions, enable Camera, Microphone, Videos, and Background apps
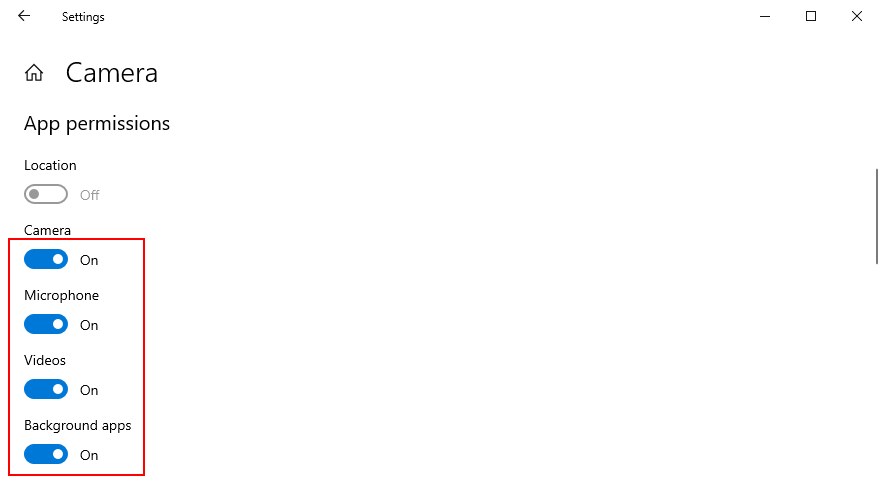
- Open the Camera app and check for errors
9. End any processes currently using your webcam
Windows Camera is just one app that requires webcam access, but there might be others currently running on your computer, such as Skype, Zoom, or Microsoft Teams. To avoid software conflicts, it’s a good idea to terminate all other processes besides the Camera app. Here’s how to do it easily:
- Right-click the taskbar and select Task Manager

- Locate all apps with camera access beside Camera
- Select each app and click Disable
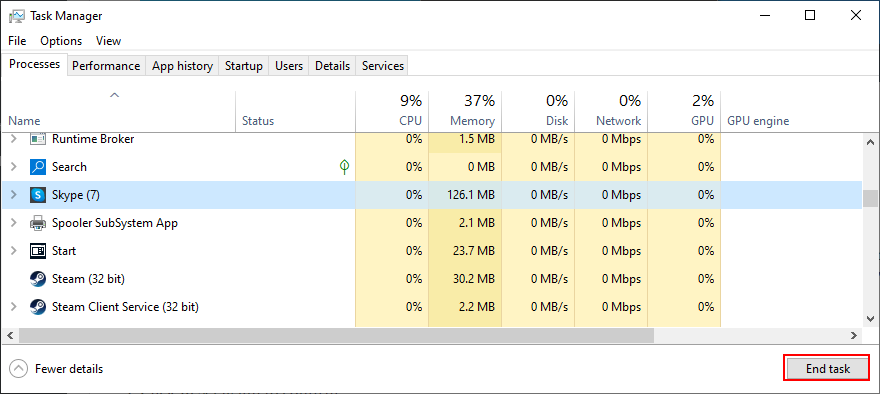
- Also, disable the Camera app
- Relaunch Windows Camera and check for errors
10. Reset the Camera app
If there’s something wrong with the Camera app that could trigger the 0xa00f4244 NoCamerasAreAttached error code, you can easily reset its settings from Microsoft Store. However, keep in mind that all app data will be deleted. Here’s what you have to do:
- Click the Start button, type Camera, and click App settings
- Scroll down and click the Reset button
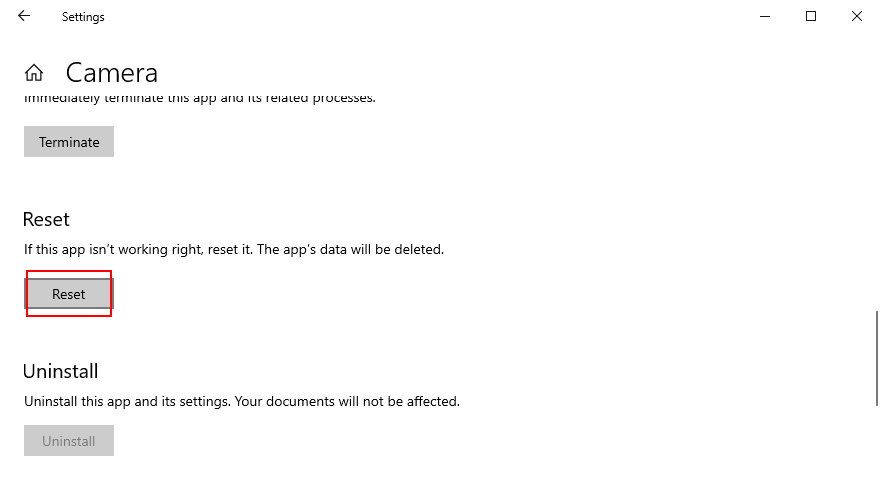
- Click Reset again to confirm
- Open the Camera app and check for errors
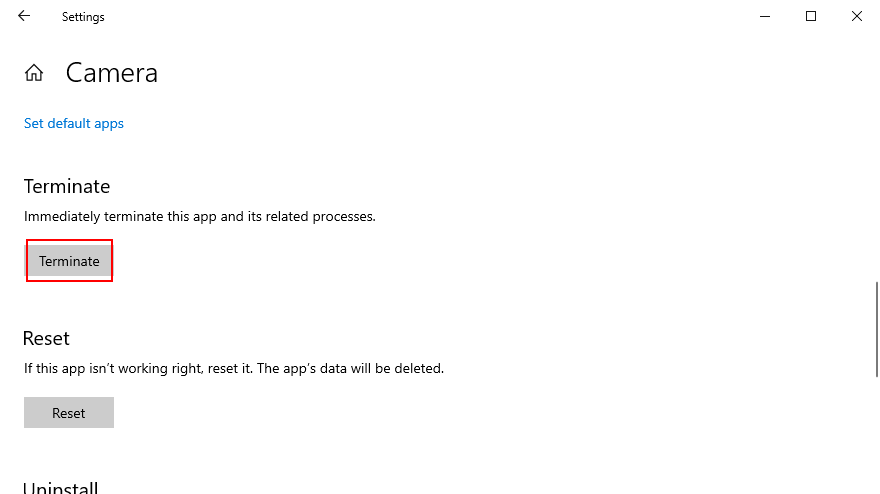
11. Reinstall the Camera app
The reset option sometimes fails to fix the 0xa00f4244 NoCamerasAreAttached error. A better but more complicated solution is to uninstall the Camera app and set it up again. To do this, you must first make sure that all its processes are properly closed.
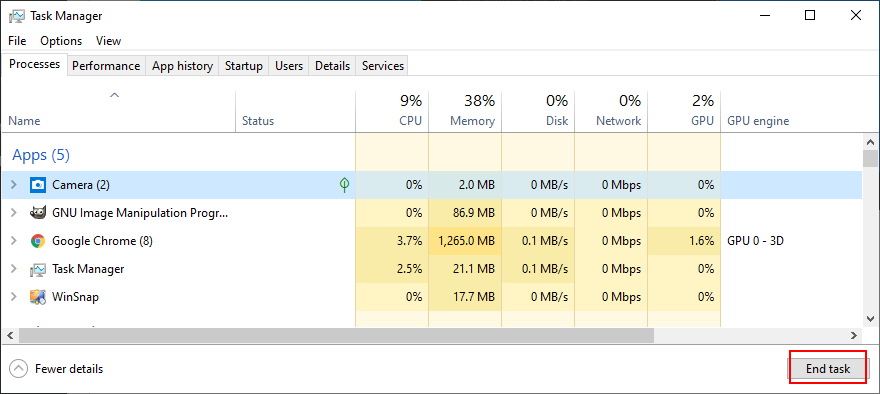
How to terminate all Camera app processes:
- Press the Windows button, type Camera, and select App settings
- Scroll down and click Terminate
- Right-click the taskbar and go to Task Manager
- Look for the Camera process. If you can still find it here, select it and click End task
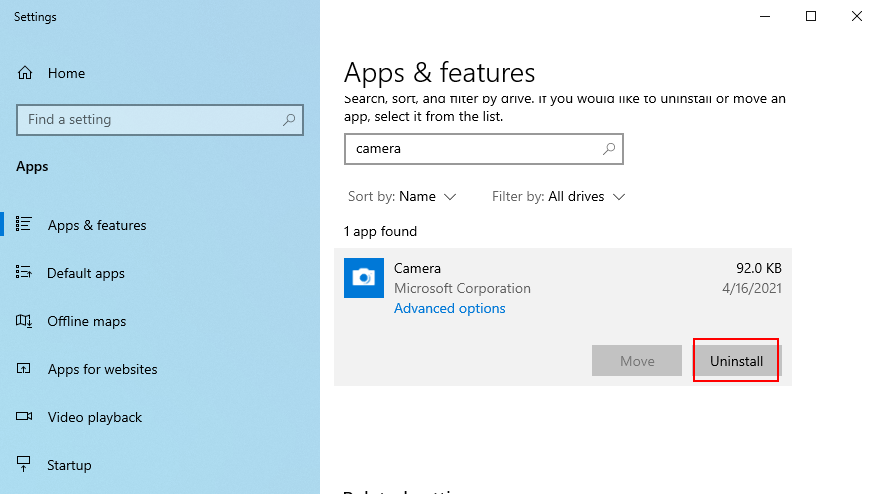
How to reinstall the Camera app using Apps and Features:
- Right-click the Start button and go to Apps and Features
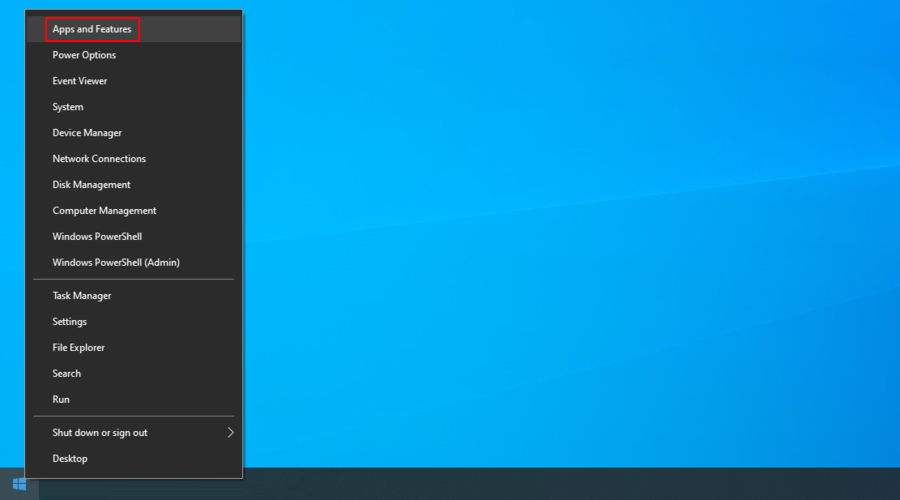
- Find and select Camera (by Microsoft Corporation)
- Click Uninstall and proceed with the app removal
- Press the Win key, type Microsoft Store, and hit Enter
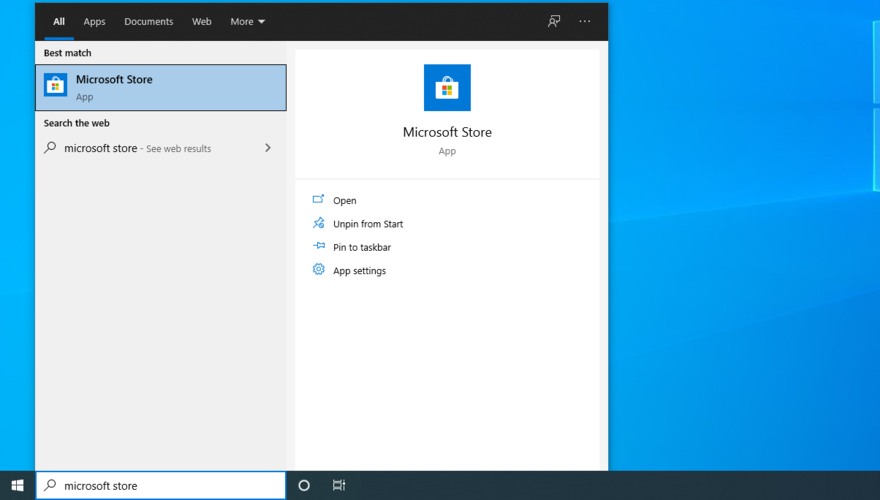
- Click the Search button on top, type Windows Camera, and select this app
- Click Get and then Install
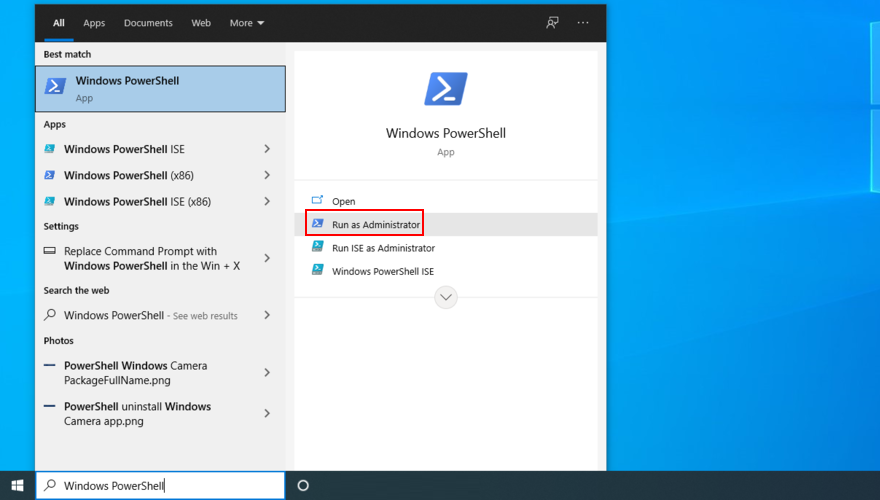
If you can’t remove the Camera app from Apps and Features because the Uninstall button is greyed out, you can force the app’s uninstall with the help of PowerShell.
How to reinstall the Camera app using PowerShell:
- Click the Start button, type Windows PowerShell, and select Run as administrator
- Type
Get-AppxPackage-allusers | Select Name, PackageFullNameand press Enter
- Locate the Name entry that says
Microsoft.WindowsCamera - Copy the
PackageFullNameassociated with that entry (e.g.Microsoft.WindowsCamera_2018.826.98.0_x64__8wekyb3d8bbwe)
- Type
Remove-AppxPackage PackageFullNameand replacePackageFullNamewith what you copied (e.g.Remove-AppxPackage Microsoft.WindowsCamera_2018.826.98.0_x64__8wekyb3d8bbwe). Press Enter
- Type
Add-AppxPackage-register “C:\Program Files\WindowsApps\PackageFullName\appxmanifest.xml”-DisableDevelopmentMode. ReplacePackageFullNamewith what you copied (e.g.Remove-AppxPackage Microsoft.WindowsCamera_2018.826.98.0_x64__8wekyb3d8bbwe). Press Enter
Launch the Camera app and check if you still get the 0xa00f4244 NoCamerasAreAttached error.
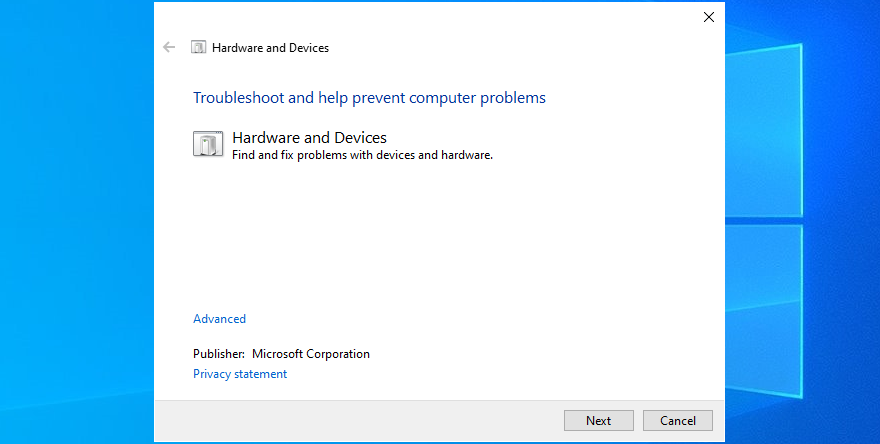
12. Run the Hardware and Devices troubleshooter
Windows has a built-in troubleshooter prepared to repair common issues with hardware devices. It’s worth a shot to repair webcam problems and works with multiple apps (for instance, if Zoom won’t work with your camera).
- Press the Win key + R, type
msdt.exe-id DeviceDiagnostic, and press Enter
- Click Next and follow the wizard instructions
- If the troubleshooter finds a solution, click Apply this fix
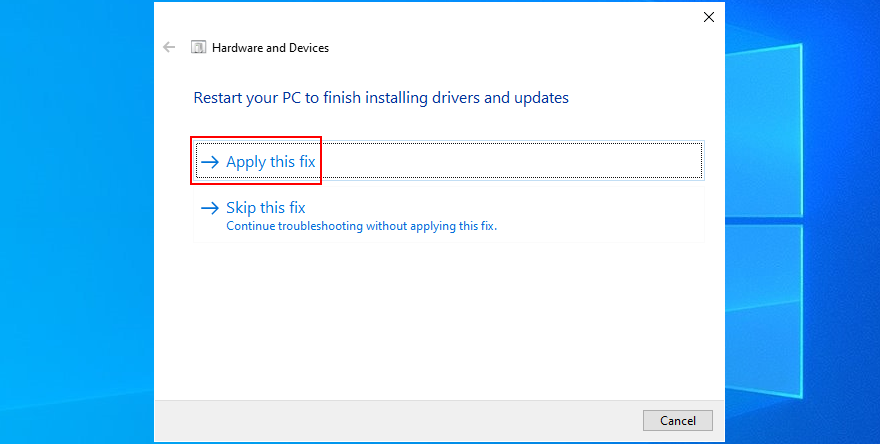
- Restart your computer
- Launch the Camera app and check for additional errors
13. Run the Microsoft Store troubleshooter
Since Windows Camera is a Microsoft Store, you should also troubleshoot this application, especially if you have trouble running other Store apps, too.
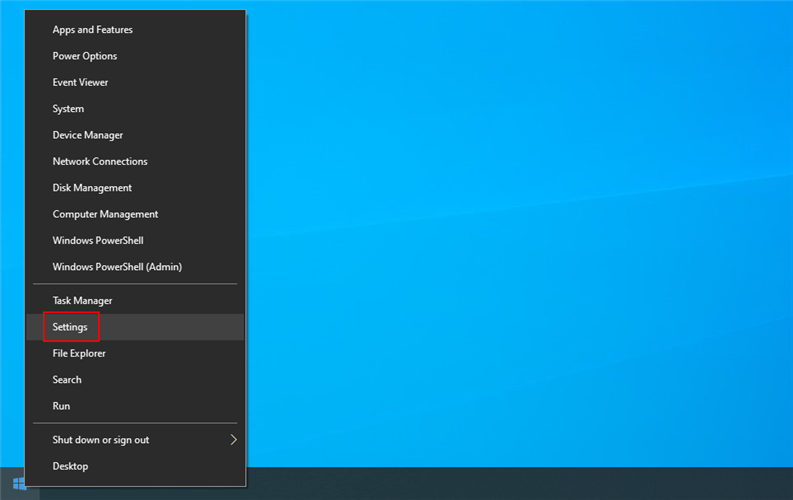
- Right-click the Start button and select Settings
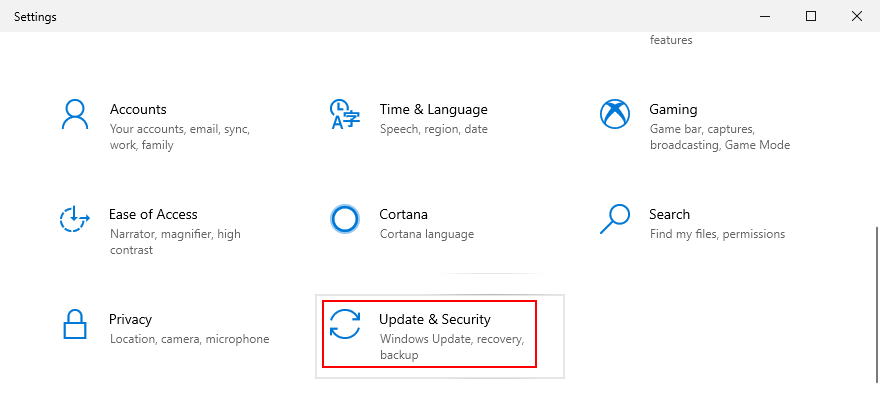
- Click Update & Security
- Select Troubleshoot on the left side
- Click Additional troubleshooters
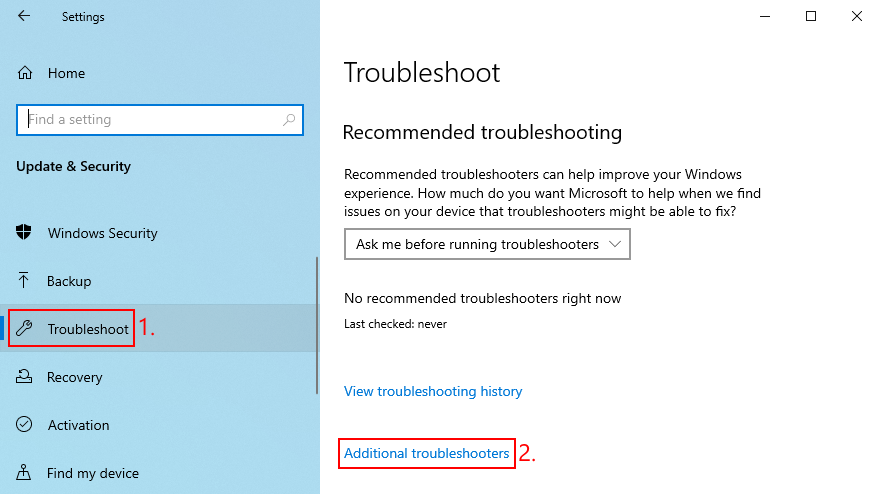
- Scroll down to the bottom of the window
- Select Windows Store Apps and click Run the troubleshooter
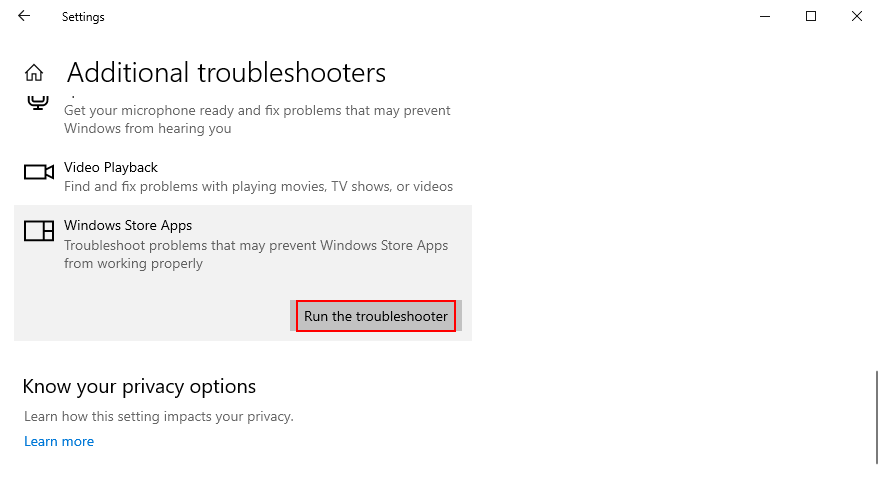
- Follow the on-screen instructions
- If the troubleshooter finds any solutions, apply them
- Restart your PC
- Open the Camera app and check for errors
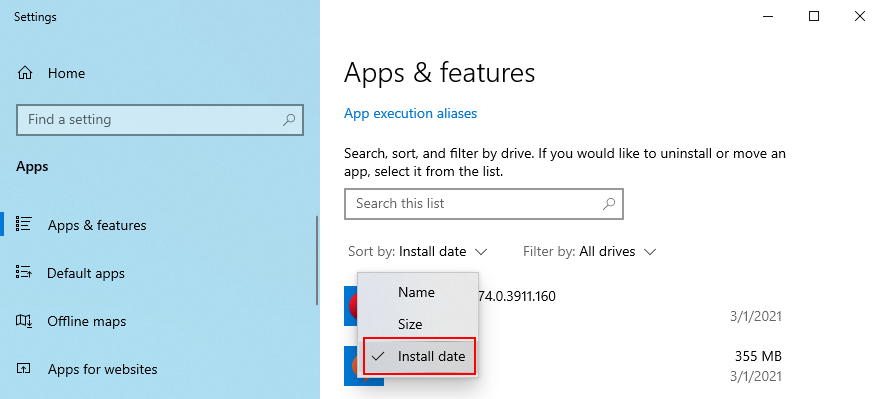
14. Uninstall recent third-party software
If you have recently installed third-party software applications, they might not be fully supported by Windows 10, resulting in various functionality issues. In some cases, they can even cause error 0xa00f4244 NoCamerasAreAttached in your Camera app. But you can fix this problem by removing the problematic apps.
How to remove recent apps:
- Right-click the Start button and select Apps and Features
- Set Sort by to Install date
- Select the first entry in the list and click Uninstall
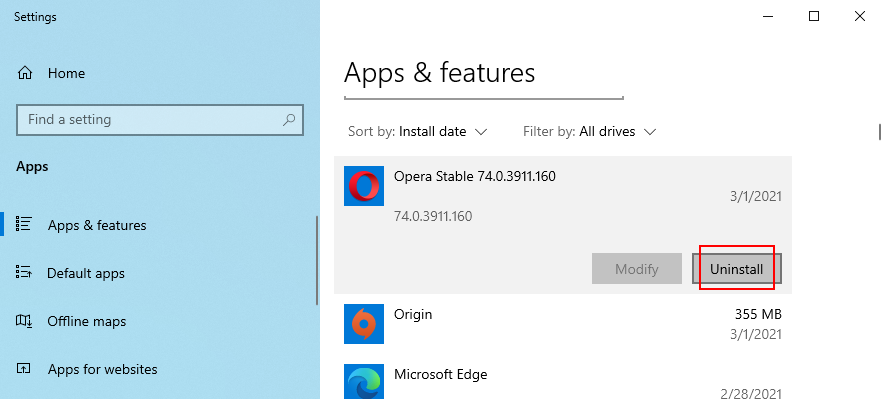
- Click Uninstall again to confirm and proceed with its removal
- Reboot your computer and try to use the Camera app
15. Uninstall recent system updates
A system update that rolled out lately might not be fully compliant with Windows 10, resulting in problems with Microsoft Store apps. It can be tricky to tell, but it makes sense if you started receiving the 0xa00f4244 NoCamerasAreAttached error code right after finishing a system update.
To test this, you can uninstall the most recent Windows update. Don’t worry since you can reinstall it later anyway.
- Press Win key + R, type control panel, and press Enter
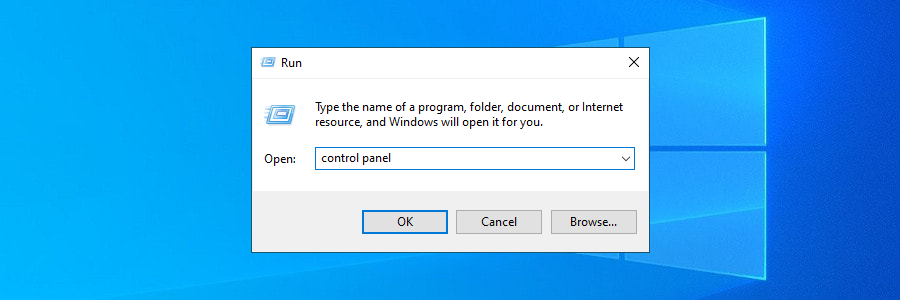
- Click Programs and Features

- Select View installed updates on the left side
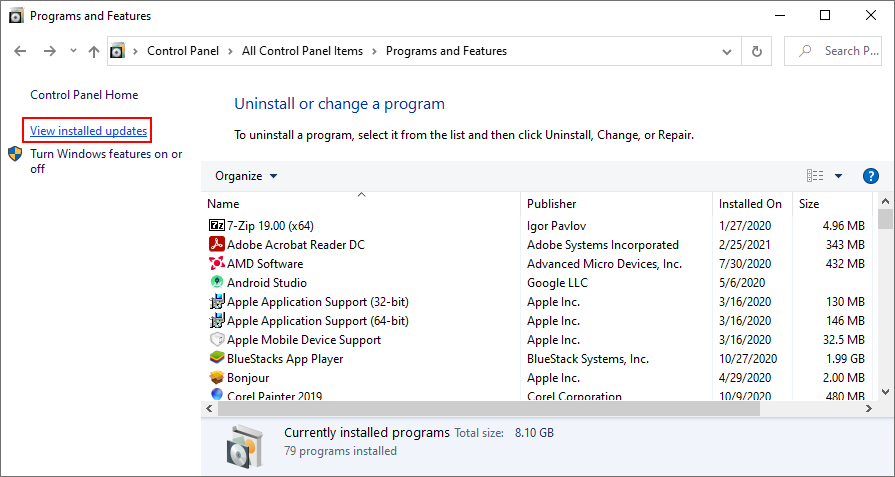
- Click the Installed On column to sort the updates (newest first)
- Double-click the first update on the list
- Click Yes to confirm its removal
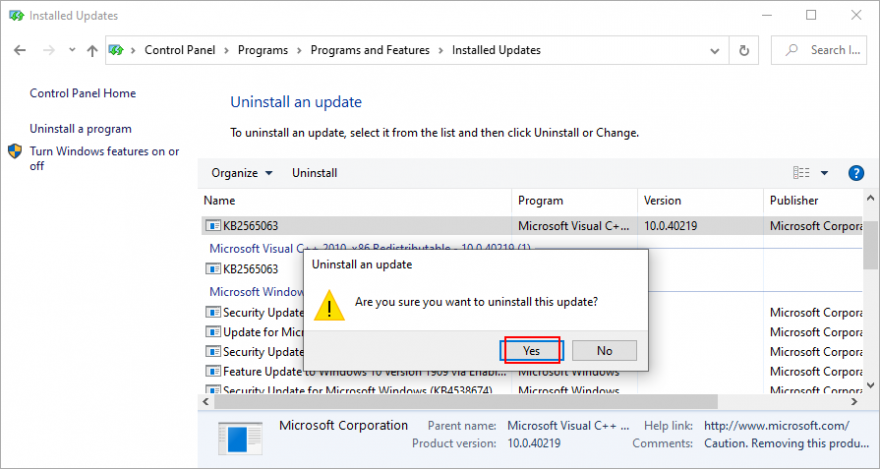
- Reboot your PC and open the Camera app
16. Fix corrupt system files
Your operating system might have damaged or missing files that are directly related to the Windows Camera app. However, you can fix this problem without having to use third-party software solutions, thanks to SFC (System File Checker) and DISM (Deployment Image Servicing and Management).
Get started by running SFC:
- Press the Windows key + R, type cmd, and press Ctrl + Shift + Enter to open Command Prompt with admin rights

- Type sfc/scannow and press Enter
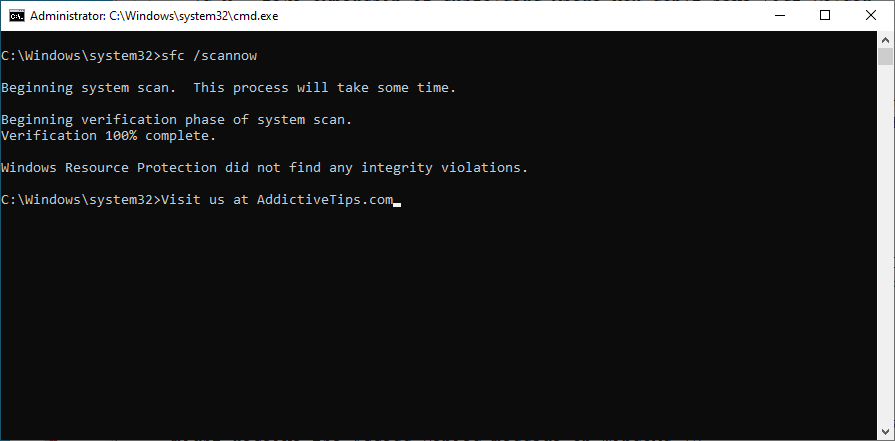
- Wait until SFC finds and fixes any issues
- Exit CMD and restart your PC
- Open the Camera app and check for errors
If SFC doesn’t do the trick, then you can turn to DISM to verify the component store of the Windows image.
How to use DISM:
- Open Command Prompt with elevation rights
- Run
DISM/online/cleanup-image/scanhealth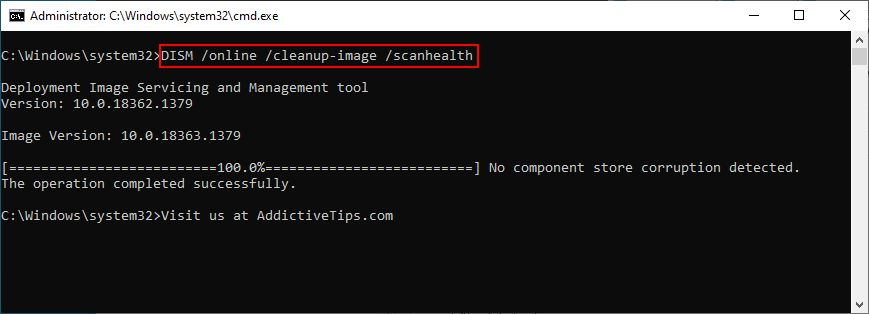
- If DISM reports any issues, run
DISM/online/cleanup-image/restorehealth - Reboot your PC and restart CMD as admin
- Run the SFC command
- Restart your computer, open the Camera app, and check for errors
17. Reset BIOS settings to default
Several users reported that they got rid of the 0xa00f4244 NoCamerasAreAttached error message by resetting BIOS settings to default. It’s an easy task that requires just a couple of clicks. Here’s what you need to do:
- Reboot your PC and quickly press the key shown on the screen to enter BIOS mode
- Go to the advanced BIOS settings
- Find the option that resets configuration data and enable it

- Save the current BIOS configuration and exit to Windows
- Open the Camera app to check for improvements
18. Check a registry setting
Microsoft Store apps like Camera or Skype need a specific registry in order to function normally. If it doesn’t exist, then you can wake up with error messages like 0xa00f4244 NoCamerasAreAttached.
But you can check this issue by taking a look in Registry Editor and by adding the entry if it’s missing. Don’t worry since there’s no risk of damaging your PC because you will create a registry backup first.
- Click the Start button, type Registry Editor, and select Run as administrator
- Click Yes if prompted by UAC (User Account Control)
- Open the File menu and select Export
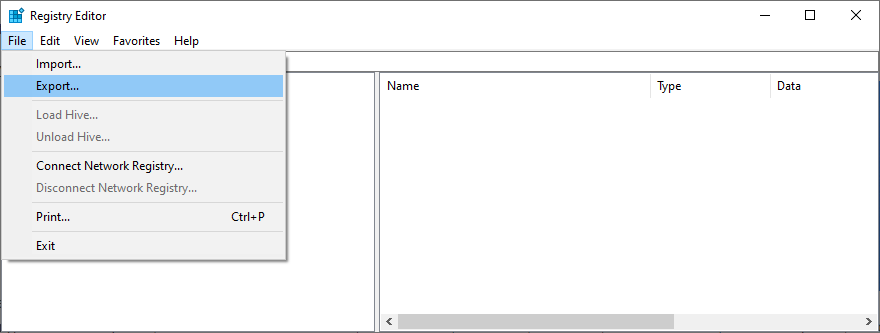
- Write a file name and indicate a folder where you want to save the registry backup. Then, click Save
- If you’re running 32-bit Windows, visit the following location
Computer\HKEY_LOCAL_MACHINE\SOFTWARE\Microsoft\Windows Media Foundation\Platform
- For 64-bit Windows, go to this address instead
Computer\HKEY_LOCAL_MACHINE\SOFTWARE\WOW6432Node\Microsoft\Windows Media Foundation\Platform
- Check if you have an entry called EnableFrameServerMode
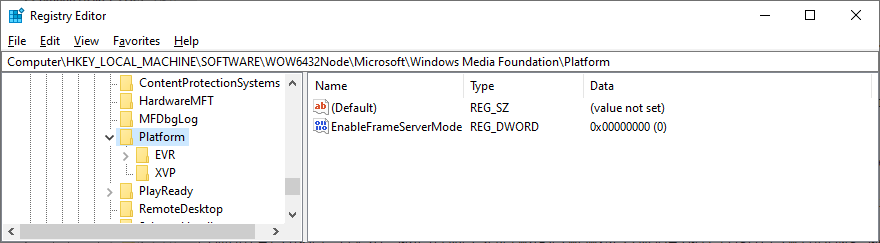
- Otherwise, open the Edit menu, click New, and select DWORD (32-bit) Value
- Rename the entry to EnableFrameServerMode
- Double-click EnableFrameServerMode and set its Value Data to 0
- Set Base to Hexadecimal and click OK
- Exit Registry Editor and restart your PC
- Open the Camera app to see if it works now
If you have started experiencing other issues on your computer after making this registry change, you can roll back settings by double-clicking the.reg backup file you previously created. Or, if you didn’t create a backup, simply revisit that registry location and delete the EnableFrameServerMode entry.
19. Create a new user profile
It’s pretty rare, but the Camera app might not be working properly due to data corruption in your user profile. As a result, you get the 0xa00f4244 NoCamerasAreAttached error on your screen. But you can fix this problem by setting up a new local user profile. Here’s how to do it:
- Right-click the Start button and go to Settings
- Select Accounts
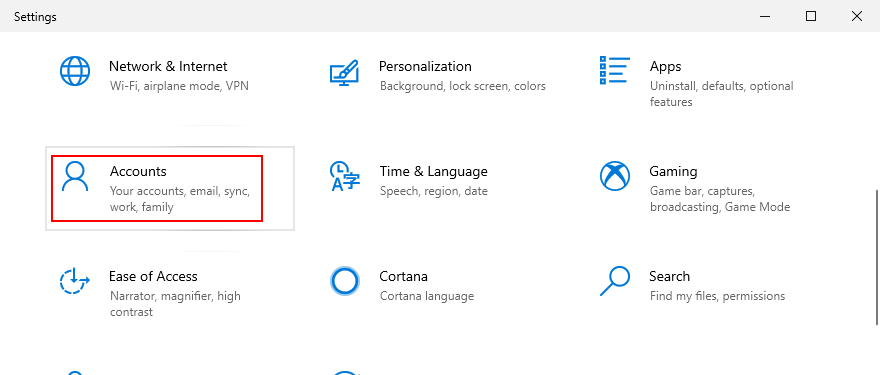
- If you’re logged in with your Microsoft account, click Sign in with a local account instead. Otherwise, click Add someone else to this PC
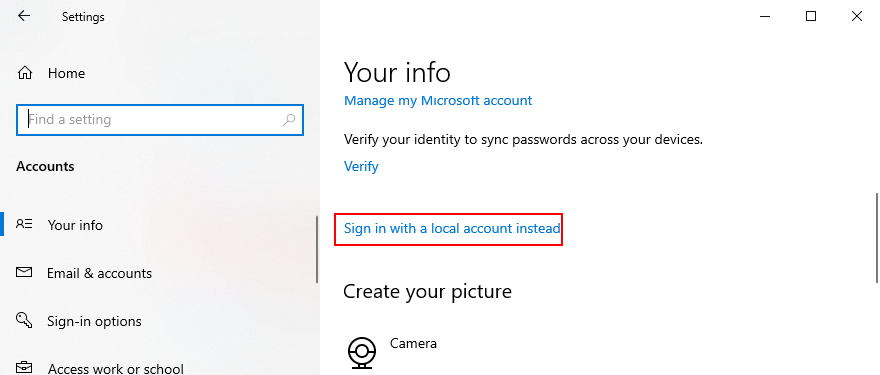
- Set up the username and password of the new account
- Click Change account type and select Administrator
- Log out of your current account and log back in with the new one
- Try to use the Camera app now
20. Use System Restore
Finally, if you can’t pinpoint the software event that caused the 0xa00f4244 NoCamerasAreAttached error code, you can roll back Windows 10 if there are any restore points created before the Camera app started acting up. However, keep in mind that it will affect your programs, so you will lose apps installed after the restore point was made.
- Make sure you’re signed in to Windows 10 with the admin role
- Press Win key + R, type control panel, and hit Enter
- Select Recovery
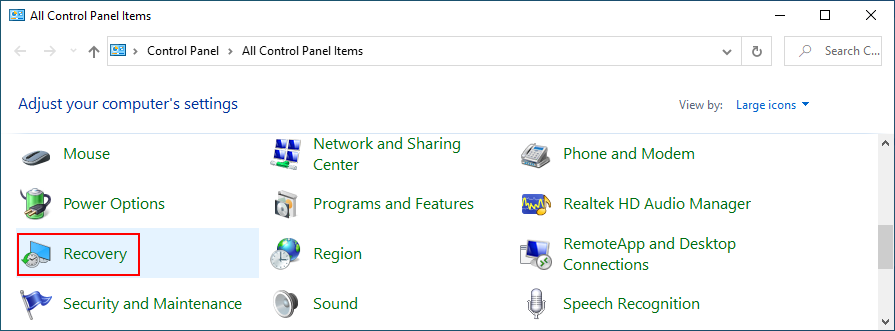
- Click Open System Restore
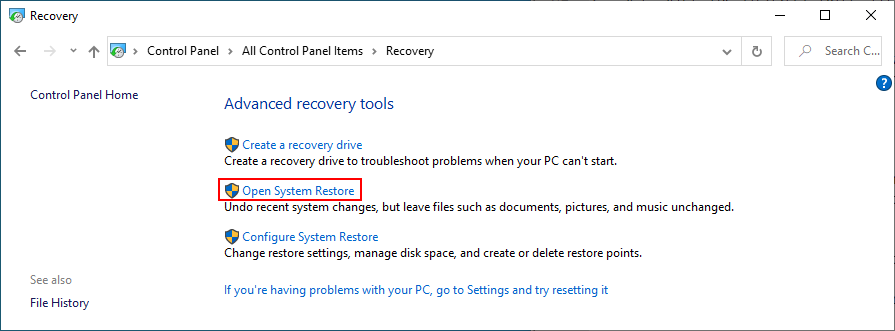
- Select a restore point from the list
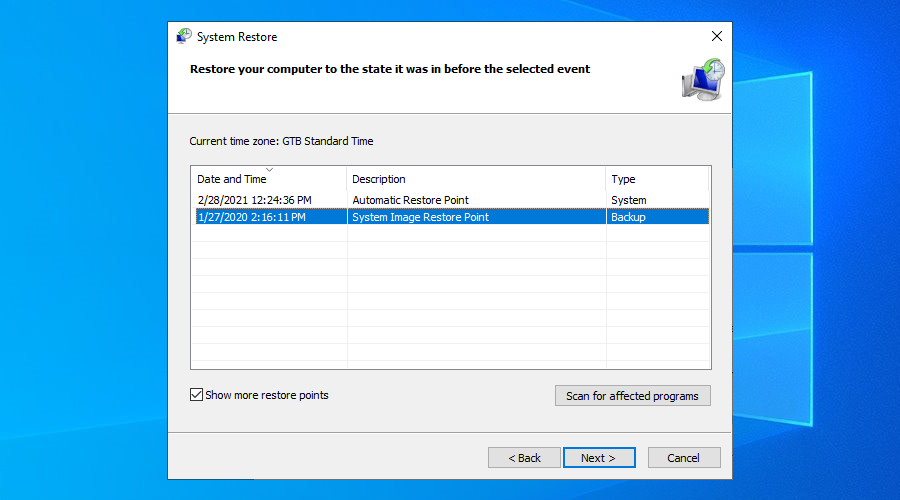
- Click Scan for affected programs if you want to learn more about the changes
- Click Next and proceed with the instructions
- System Restore might take a while. Once it finishes, restart your PC
- Launch the Camera app and try to use it now
The 0xa00f4244 NoCamerasAreAttached error can be fixed
To recap, 0xa00f4244 NoCamerasAreAttached is an error code that appears in the Windows Camera app, preventing you from using your camera. To fix this problem, you can run Windows Update, check the webcam cover, cable and switch, review webcam permissions, verify webcam compatibility, and inspect the webcam drivers.
It’s also a good idea to scan your PC for malware, check the settings of your Internet security solution, verify Camera app permissions, end all processes currently using your webcam, reset or reinstall the Camera app, as well as to run the Hardware and Devices troubleshooter.
Moreover, you can run the Microsoft Store troubleshooter, uninstall recent third-party software and system updates, fix corrupt system files, reset BIOS settings to default, add a registry entry if it’s missing, create a new user profile, and use System Restore.
How did you manage to get rid of error 0xa00f4244 NoCamerasAreAttached on your Windows 10 PC? Tell us about your experience in the comment section below.