O guia mais informativo para personalizar o Google Chrome ao seu gosto.
O Google Chrome está dominando o mundo dos navegadores há mais de uma década com quase 70% de participação no mercado de navegadores (móveis e desktops) em todo o mundo. O Chrome superou todos os navegadores graças à sua velocidade, guias em sandbox, design elegante e facilidade de uso. Outra razão que torna o Chrome o navegador mais popular e amplamente utilizado no mundo é que ele é altamente personalizável.
Se o Google Chrome for seu navegador principal para as necessidades do dia-a-dia, você pode ficar entediado com sua aparência e desempenho ao longo do tempo. Portanto, personalizar e otimizar seu navegador pode elevar sua experiência de navegação.
O Google Chrome oferece várias maneiras de personalizar suas configurações, desde alterar temas e planos de fundo até modificar configurações de cookies e definir permissões de sites. Se você não conhece as extensas opções de personalização do Chrome e sua capacidade de transformar completamente seu navegador favorito, nós o cobrimos.
Índice
Personalizar a página/página inicial da nova guia em Google Chrome
Quando você inicia o Chrome ou abre uma nova guia no navegador, a primeira página que você verá é a página inicial que contém uma barra de pesquisa do Google e alguns atalhos de sites. Se você está cansado de olhar para o mesmo fundo branco toda vez que abre o navegador, pode personalizar esta página ao seu gosto. Você pode alterar a imagem de fundo ou a cor da página, adicionar ou remover atalhos e o tema.
Para fazer isso, inicie o navegador Chrome e abra uma nova página de guia. Em seguida, clique no botão’Personalizar Chrome’localizado no canto inferior direito da janela.
It também é possível que seja apenas um’ícone de lápis’se você já personalizou a página inicial. Nesse caso, clique no ícone de’lápis’conforme mostrado abaixo.
Uma janela pop-up aparecerá com as opções para personalizar a página inicial. Na guia”Plano de fundo”, você pode escolher entre a coleção de planos de fundo do Google ou fazer upload do seu próprio.
Para escolher entre os planos de fundo disponíveis, role para baixo na lista de coleções do Google e selecione um. Por exemplo, se você selecionar ‘Paisagem’, que conterá dezenas de imagens de fundo impressionantes. Cada categoria pode conter dezenas a centenas de imagens selecionadas.
Escolha um da coleção e clique no botão’Concluído’na parte inferior.
Você pode ativar a opção’Atualizar diariamente’se quiser uma nova imagem para o plano de fundo todos os dias.
Depois de fazer isso, a imagem escolhida será aplicada como imagem de fundo para a nova página de guia imediatamente.
Para fazer upload de sua própria foto para o plano de fundo, clique na opção”Fazer upload do dispositivo”na guia de plano de fundo.
Em seguida, selecione a imagem de sua escolha no seu dispositivo e clique em’Abrir’para defini-la como plano de fundo.
Sua imagem personalizada será definida como plano de fundo da nova guia.
Você também pode escolher cores de fundo sólidas para fundos, se desejar. Para fazer isso, selecione a coleção’Cores sólidas’na parte inferior da guia Plano de fundo.
Em seguida, escolha o seu cor desejada e clique em’Concluído’para aplicar uma cor sólida ao plano de fundo.
O resultado:
Personalizar atalhos do site na página inicial
Ao abrir uma nova guia (página inicial), a página será mostrar ícones de atalho com logotipos de sites. Esses ícones de atalho permitem que você acesse rapidamente seus sites favoritos e os mais visitados. Você pode optar por exibir atalhos gerados automaticamente com base nos sites que você mais visitou ou adicionar os seus próprios. Veja como você pode fazer isso:
Abra uma nova guia em branco e clique no ícone’Personalizar'(lápis) no canto inferior direito.
Na janela Personalizar esta página, vá para a guia’Atalhos’e escolha entre a opção’Meus atalhos’ou’Sites mais visitados’e clique em’Concluído’.
Se você não quiser mostrar atalhos na página inicial, ative a opção’Ocultar atalhos’, e clique em’Concluído’.
Os atalhos estão ocultos na página inicial abaixo.
Para adicionar atalhos à página inicial, clique no ícone’+'(Adicionar atalho) no final da atalhos.
Na caixa de diálogo Adicionar atalho janela, dê um nome ao seu atalho e insira a URL do site nos respectivos campos e clique em’Concluído’.
Para editar ou excluir atalhos da página inicial, passe o mouse sobre o ícone de atalho e clique no botão’Mais ações'(três pontos) quando ele se tornar visível.
Em seguida, selecione’Editar atalho’para modificar o atalho ou selecione a opção’Remover’para excluir o atalho.
Mudando o esquema de cores do Google Chrome
Se você quiser alterar o layout de todo o layout do Google Chrome, você pode aplicar um tema ou alterar o esquema de cores do seu navegador. Vamos ver como fazer isso:
Abra uma nova guia ou página inicial e clique no ícone’Personalizar'(lápis) no canto inferior direito.
Depois disso, vá para a guia’Cor e tema’e escolha um esquema de cores abaixo de Personalizar esta página. Em seguida, clique em”Concluído”para salvar suas alterações. Como você pode ver, cada esquema de cores tem duas cores. Há uma cor mais escura para a janela e guias do navegador e uma cor mais clara para a guia ativa.
A cor escolhida esquema será aplicado imediatamente ao seu navegador.
Se você não gostar de nenhum dos esquemas de cores predefinidos, você pode aplicar um esquema de cores personalizado ao seu navegador. Para fazer isso, volte para a guia”Cor e tema”na janela Personalizar esta página e clique na opção”Cor personalizada”(aquela com um ícone de seleção de cores).
No painel Color Picker, você pode escolher a cor desejada e clicar em’Concluído’.
O Color Picker também pode ajudá-lo a escolher cores de qualquer imagem que você possa ter (online ou no seu dispositivo). Por exemplo, você pode manter o seletor de cores acima aberto e navegar na Internet ou pesquisar no dispositivo a imagem que você gosta. Em seguida, use o seletor de cores para escolher as cores da imagem.
Para fazer isso, navegue até a imagem (online ou offline) que você gosta e abra o painel do seletor de cores. Por exemplo, ao navegar na internet, se você encontrar uma imagem que goste, mantenha essa imagem aberta lado a lado com o navegador ou em segundo plano. Em seguida, clique no ícone”seletor de cores”no painel do seletor de cores.
E então use o círculo para escolher uma cor de qualquer imagem.
Em seguida, clique em’Concluído’para salvar as alterações.
Adicionar página inicial personalizada ao Chrome
Por padrão, quando você clica no botão Página inicial, o Chrome abre uma nova guia como a página inicial. Mas se você quiser adicionar um site personalizado para a página inicial que será iniciado toda vez que você clicar no botão Home, é fácil de fazer.
Abra o navegador Chrome, clique no botão de três pontos (reticências verticais) no canto superior esquerdo da janela e selecione’Configurações’no menu.
Em seguida, vá para o Aba’Aparência’à esquerda. Por padrão, o botão Home está desabilitado na barra de menus. Para ativar o botão de início, ative a alternância ao lado de’Mostrar botão de início’.
Uma vez ativado, o botão home aparecerá antes da barra de endereço.
Quando você clique no botão home, uma nova guia é aberta por padrão. Para adicionar um site personalizado à página inicial, selecione a segunda opção no botão Mostrar página inicial e insira o endereço do site que você deseja para a página inicial. Por exemplo,”www.google.com”.
Agora, toda vez que você clicar no botão inicial, a página do mecanismo de pesquisa do Google será carregada como a página inicial.
Personalizar a página inicial/nova guia do Google Chrome com GIFs
Você não pode usar apenas imagens e temas para personalizar sua página inicial do Google, mas também GIFs. O Chrome permite que você adicione seus GIFs favoritos como plano de fundo na página inicial ou na nova guia e é muito fácil de fazer:
Primeiro, localize o GIF que deseja usar como plano de fundo. Em seguida, clique com o botão direito nele e selecione’Renomear’ou pressione F2 para renomear o arquivo.
Google Chrome não aceita o formato GIF, então altere o formato GIF para PNG. Exclua’.GIF’e certifique-se de adicionar’.PNG’após o nome, conforme mostrado abaixo.
Em na caixa de prompt, clique em’Sim’para aplicar as alterações.
Observação: Você pode encontrar GIFs perfeitos para o seu navegador nesses sites gratuitamente – GIPHY, GIPER, Gfycat, Reddit, etc.
Se você vir um gif de que gosta no internet, clique com o botão direito do mouse no gif e selecione a opção’Salvar imagem como…’para baixar o gif.
No Nome do campo, exclua’.GIF’e adicione’.PNG’após o nome, conforme mostrado abaixo.
No menu suspenso’Salvar como tipo’, altere de’gif’para’Todos os arquivos’
Em seguida, clique em’Salvar’para armazenar o arquivo como um arquivo de imagem PNG.
Depois disso, abra uma nova página da guia do Google Chrome e clique no ícone de lápis (Personalizar esta página) no canto inferior direito.
Na guia Background, clique na opção’Upload from device’e encontre o GIF que você salvo como um arquivo PNG anteriormente.
Em seguida, selecione o arquivo PNG e clique em’Abrir.
Agora, sua página do Google Chrome reproduzirá o GIF que você enviou como plano de fundo para a página inicial.
Personalização de fontes no Google Chrome
Se você deseja personalizar o estilo, o tamanho e a família da fonte no Google Chrome, siga estas instruções.
Abra o Google Chrome e navegue até Configurações clicando nos três pontos no canto superior direito e selecionando”Configurações”.
Em seguida, selecione’Aparência’à esquerda e escolha um dos cinco tamanhos de fonte predefinidos no menu suspenso ao lado de’Tamanho da fonte’. Médio é o tamanho recomendado para escrever e exibir caracteres. Mas você também pode escolher entre Muito pequeno, Pequeno, Grande ou Muito grande.
Se preferir definir seu próprio tamanho de fonte personalizado e altere outras configurações de fonte, selecione’Personalizar fontes’abaixo para ver mais configurações.
Aqui, você pode usar o controle deslizante’Tamanho da fonte’na parte superior para ajustar a fonte ao tamanho desejado. Você pode selecionar um tamanho de fonte de’9’pt (tamanho do ponto) até’72’pt, com’16 pt’sendo o padrão. Você também pode alterar o’Tamanho mínimo da fonte’usando o controle deslizante abaixo (de 0 a 24 pt sendo 0 o padrão)
Abaixo dos controles deslizantes de tamanho da fonte, você pode alterar o estilo da fonte para Fonte padrão, Fonte com serifa, Fonte sem serifa e Fonte de largura fixa usando os menus suspensos.
Ao alterar o estilo da fonte, você verá a visualização abaixo do menu suspenso.
Alterando o tema no Google Chrome
A maneira mais fácil e rápida de alterar a aparência do navegador Chrome é alterar o tema. Nas versões anteriores do Chrome, você só podia aplicar temas por meio da extensão, mas agora os temas têm uma seção separada com uma grande coleção. Há duas maneiras de alterar no Chrome: por meio dos temas predefinidos do Google ou de um tema personalizado.
Inicie o navegador Chrome, clique no ícone de três pontos na parte superior e selecione”Configurações”.
Nas Configurações, selecione a guia’Aparência’ à esquerda e selecione o’Tema’à direita.
Isso redirecionará você para a loja Chrome Webs. Agora, vá para a guia’Temas'(se você ainda não estiver lá) e navegue pela galeria de temas divididos por categorias amplas.
Escolha um tema que você goste e clique nele. Se você deseja ver mais temas em uma categoria específica, clique em’Ver todos’.
Na página do tema , clique no botão”Adicionar ao Chrome”para aplicar o tema.
O tema será baixado e aplicado a o navegador. Depois que o tema for aplicado, o botão se transformará em’Adicionado ao Chrome’e você verá um botão’Desfazer’no canto superior esquerdo até fechar a loja virtual. Se você não gostar do tema, clique em’Desfazer’para removê-lo.
Criando Tema personalizado no Google Chrome
Mesmo que o Google Chrome tenha vários ótimos temas pré-projetados na Chrome Web Store, você ainda pode criar seus próprios temas para o navegador. Nesta seção, veremos como usar uma extensão do Google ou um aplicativo de terceiros para criar um tema personalizado:
Primeiro, abra o Google Chrome e faça login na sua Conta do Google. Acesse a página de extensão Chrome Theme Creator na Web Store e clique em”Adicionar ao Chrome”se a opção está disponível. Se você vir o’Visitar site’, clique nesse botão para ir para o site ThemeBeta (site do desenvolvedor do Theme Creator).
Como alternativa, você pode acessar diretamente o site ThemeBeta, que é um chrome on-line criador do tema.
Comece dando um nome ao tema que você está criando no campo’Digite o nome do tema’no canto superior esquerdo da página.
Em seguida, vá para a guia’Imagens’na parte superior-companhia esquerda rner da página e configurar diferentes partes do tema. Conforme você passa o mouse sobre cada configuração no painel do lado esquerdo, o respectivo elemento ou parte do tema será destacado em vermelho na imagem de visualização à direita.
Para começar, clique no botão’Choose Image’ para o ‘NTP Background’para configurar o plano de fundo principal.
Selecione a imagem que deseja para o plano de fundo principal do seu dispositivo e clique em’Abrir’.
Observação: Existem vários sites onde você pode baixar imagens gratuitamente (como Pexels , Unsplash e Wallpaper.com.). Mas as imagens vetoriais funcionam melhor para temas do que as imagens de pixel.
Como alternativa, você pode clicar na caixa branca ao lado do botão para escolher uma cor para o plano de fundo em vez de uma imagem.
Depois de carregar a imagem, a opção NTP Background à esquerda mostrará’Loaded’e uma visualização será exibida no lado direito da tela.
Você pode usar os controles abaixo da imagem de visualização para configurar a imagem como posição, tamanho e repetição. Selecione a”tela de preenchimento”para garantir que a imagem de plano de fundo não deixe espaços em branco no plano de fundo.
Em seguida, clique no botão’Escolher Imagem’para escolher uma imagem ou na caixa para escolher uma cor para a interface do usuário (quadro) excluindo a barra de ferramentas e a lista de guias. Na maioria das vezes, a imagem do quadro tende a funcionar melhor se for igual à imagem de fundo NTP.
Você pode optar por configurar a mesma imagem para o quadro como plano de fundo ou uma imagem diferente.
Depois disso , carregue uma imagem ou escolha uma cor para a”Barra de ferramentas”, que inclui a guia ativa, a barra de favoritos e a área ao redor da barra de pesquisa.
Para abas não ativas, use a opção’Tab Bacgrounds’para configurá-la. Aqui, usamos a cor vermelha para configurar as guias em vez de uma imagem.
A opção’Sobreposição de quadro’é usado para configurar uma segunda imagem que sobrepõe a imagem do quadro. No entanto, ele substituirá a maior parte da imagem de fundo no quadro. Isso é opcional.
A configuração de atribuição NTP (opcional) é usada para inserir uma imagem no canto inferior direito para fins de marca d’água.
Caso você não tenha gostado de nenhuma das imagens adicionadas para configurações específicas (Para exemplo de atribuição NTP), clique no botão’X’ao lado do marcador’Carregado’relevante para remover a imagem.
Em seguida, mude para a guia’Cores’e qualquer uma das cores para os respectivos elementos do tema. Quando você passar pela opção, ele destacará o respectivo elemento na visualização na cor vermelha.
Para alterar um esquema de cores, clique no ícone quadrado ao lado do respectivo componente e escolha uma cor no painel seletor de cores.
Após configurar as opções, vá até a aba’Pack’e use as opções abaixo para baixe ou instale temas.
Para instalar o tema criado como uma extensão para o Chrome sem salvá-lo, selecione o botão’Pack and Install’. Para baixar o tema criado, clique no botão’Pack and Download’.
No entanto, é melhor fazer o download do theme em um arquivo zip, extraia seu conteúdo e instale-o. Para fazer isso, clique em’Pack and Download Zip File’para baixar o tema em um arquivo zip. Caso o Chrome mostre um aviso de que uma extensão maliciosa ou de terceiros pode danificar seu dispositivo, selecione’Manter’para baixar o arquivo.
Depois que o arquivo zip for baixado, extraia o arquivo e armazene o arquivo extraído pasta no seu dispositivo e lembre-se de onde você salvou a pasta.
Você pode renomear a pasta se quiser para que ele pode ser facilmente localizado mais tarde. Se você tentou instalar o tema diretamente da ferramenta Themebeta, poderá receber uma mensagem de erro, pois é um tema de terceiros.
Para evitar isso, você precisa ativar o modo Desenvolvedor no navegador. Clique no menu do Chrome (três pontos) no navegador, passe o cursor sobre”Mais ferramentas”e selecione”Extensões”no submenu.
Na página”Extensões”, alterne a chave”Modo de desenvolvedor”para a direita para ativá-la.
Depois que o modo de desenvolvedor estiver ativado, três opções ficarão visíveis no canto superior esquerdo da página. Agora, clique no botão’Carregar descompactado’para importar os arquivos de tema personalizados.
Selecione a pasta da qual você extraiu o arquivo zip e clique no botão’Selecionar pasta’.
O tema personalizado será aplicado imediatamente. Uma pequena caixa de aviso aparecerá para informar que um novo tema foi instalado. Se você deseja desfazer as alterações, selecione o botão’Desfazer’na caixa de prompt.
Embora, há existem outras ferramentas e sites além do Themebeta que podem ajudá-lo a criar um tema personalizado para o Chrome, nem todas as ferramentas de terceiros podem ser confiáveis. Algumas ferramentas de terceiros podem conter códigos maliciosos que podem prejudicar seu navegador.
Desinstalar temas no Google Chrome
Caso o tema que você aplicou não funcionou como você esperava , you can always uninstall any themes with these steps:
Open a new tab or the homepage and click the pencil icon (Customize this page) at the bottom right corner.
Next, go to the’Color and Theme’section on the left and click the’Uninstall’button next to your current theme. Then, click ‘Done’ to save the changes.
Create and Customize Profiles in Google Chrome
Google Chrome profiles can help you keep track of bookmarks, history, passwords, and settings across all your connected device. If your chrome browser is used by multiple users, you can set up multiple profiles, so that each user can browse and perform their online task separately. This can help distinguish each profile with separate browsing history and preference.
Google Chrome Profiles can be created with or without a Gmail account. By linking your Google account with your Chrome profile, you can access your browser preferences and its content (like Bookmarks, history, passwords, etc.) across different devices. You can create multiple profiles and easily switch between the profiles with two clicks.
When you are setting up your Google Chrome for the first time (after installing), you will be asked to sign in with your Google account. By doing so, a profile will be created with your Gmail account. But if you haven’t already set up a profile or you want to create a new profile, here’s how you can do that:
Open Google Chrome and click the profile icon in the top right beside the three dots. Then, click Add at the bottom of the menu.
A new Google Chrome window will open. Here, click ‘Sign in’ to create a profile with a Google account.
Then, enter your email and password to sign in with your Google Account.
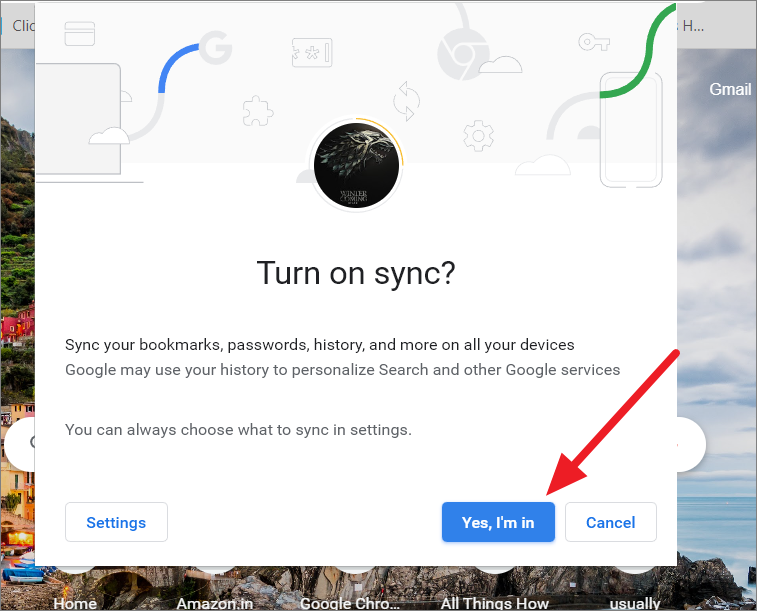
Then, you will be asked to turn on the sync. Click ‘Yes, I’m’ to sync your bookmarks, passwords, history, and other settings on all your devices. You can choose what to sync in the sync settings.
Once you do that, the profile will be created and you will be signed in. To customize the profile, click the profile icon and select the pencil icon.
Now, you can give the desired name to your profile and pick a theme color of your choice.
If your Google account already has a profile photo, it will be automatically applied to your Chrome profile as well. However, you can also choose a desired avatar for your chrome profile under the Pick an avatar section. If you have multiple profiles, choosing a different avatar for each profile will help differentiate them.
Although you can easily switch between profiles once the browser is open, you can also add a desktop shortcut to directly access this profile. To do that, scroll down to the bottom of the Customize profile settings and toggle the ‘Create desktop shortcut’ option.
This will create separate shortcuts for the selected profile on your desktop as shown below.
To create a Chrome profile without a Google account, select the ‘Continue without an account’ option instead.
In the next page, type the name for the profile, pick a theme color and click ‘Done’. If you want to create a shortcut for this profile, make sure the ‘Create a desktop shortcut’ option is selected.
However, the profile without the Google account is limited to the device itself. The history, bookmarks, passwords, and settings on this profile are stored in the computer itself and it will not be shared with your other devices not unless you link a Gmail to the profile and turn on sync.
To switch between profiles, click the profile icon and select the profile you want to switch to. Alternatively, you can click the cogwheel (Manage Profiles) to open the profiles menu and then select the profile to switch.
This will open the selected profile in a new window.
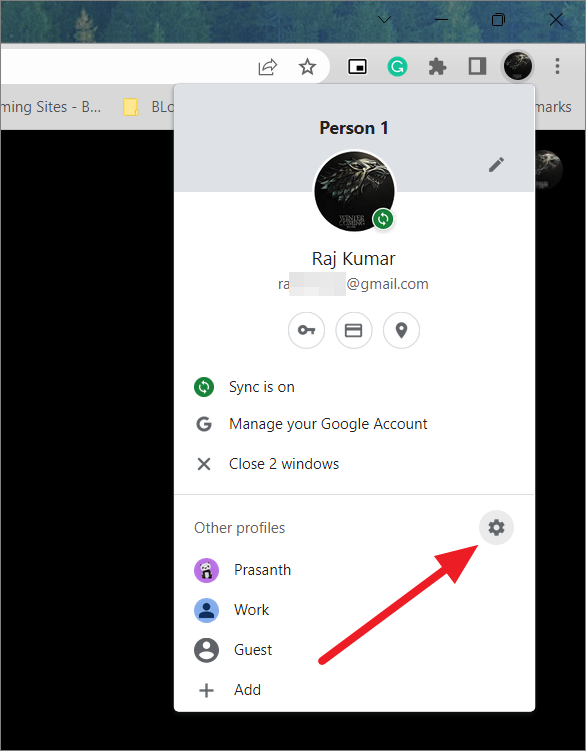
To remove a profile, click the profile icon in the browser window and select the cogwheel icon from the menu.
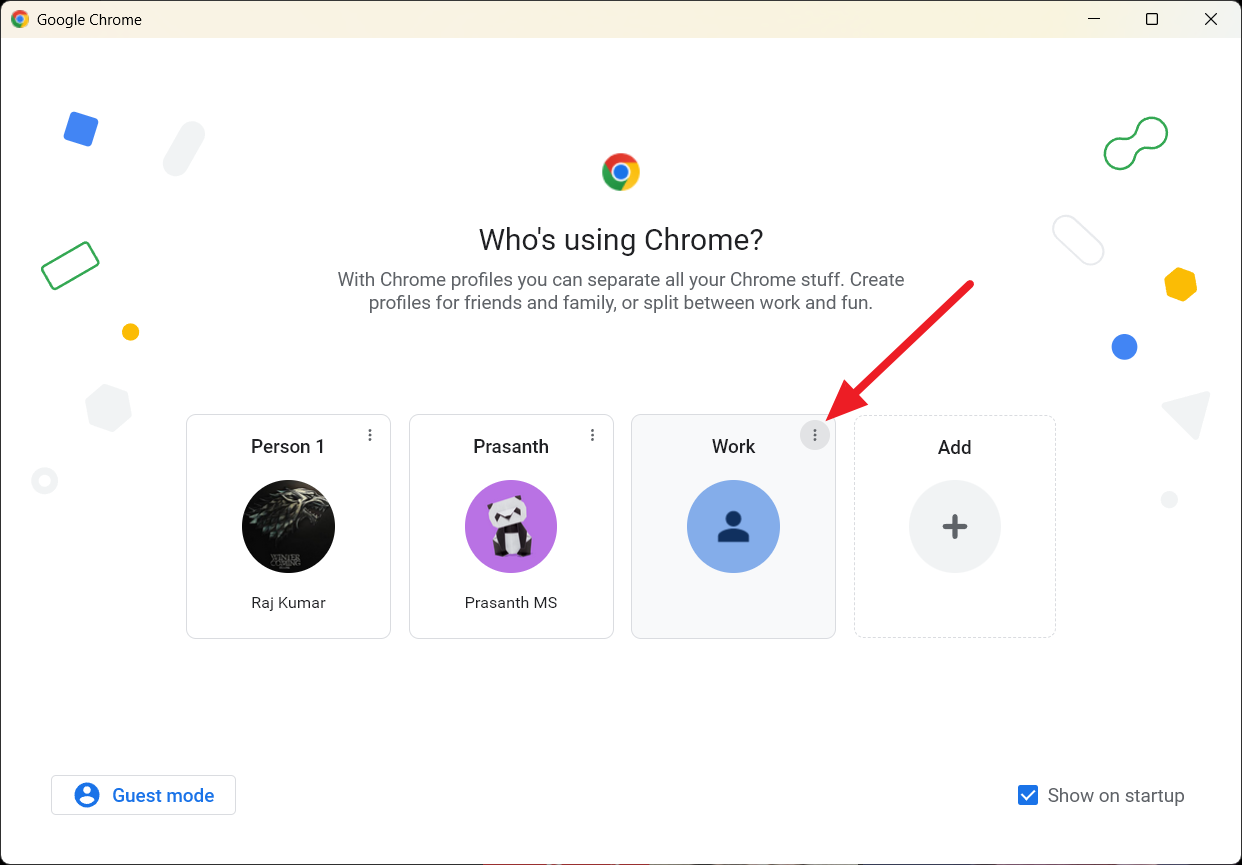
In the profile menu, click the three dots icon on the profile you want to remove.
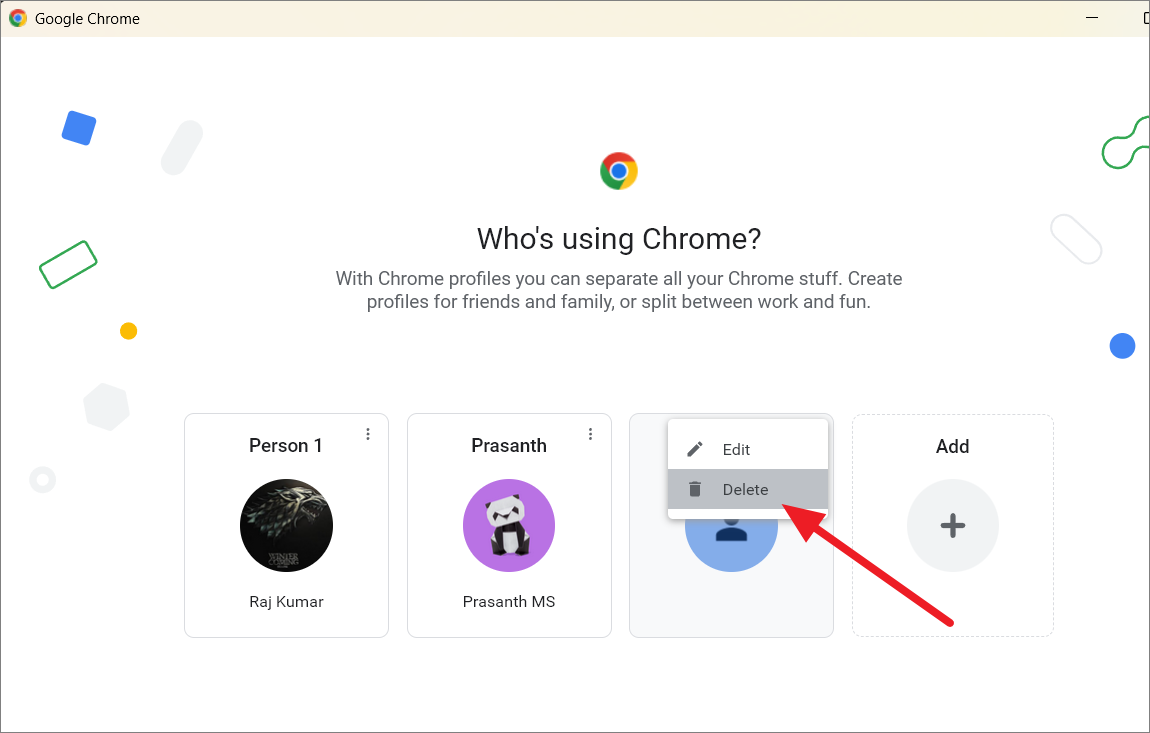
Then, select the ‘Delete’ option to remove the profile.
Once you set up your chrome profile with a Google account, both accounts are integrated. When you sign out of your Google account (like Gmail, or YouTube) on Chrome, you will also be signed out of your chrome profile and your bookmarks, history, passwords, and more are no longer being synced to your account but will remain on the device. But your Chrome profile will still be active and all your bookmarks, history, and passwords will only be stored on the device.
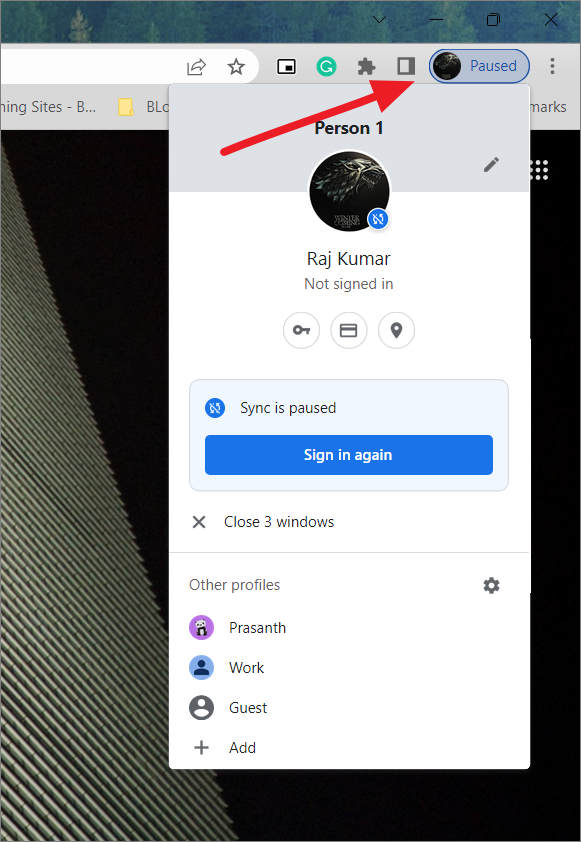
When you sign out of your Google Account, your Chrome will show syncing is paused. To resume the syncing, you just need to sign in to your Google account again.
If you want to sign in to Google sites or apps (YouTube, Gmail, etc.) without signing into Chrome, follow these steps:
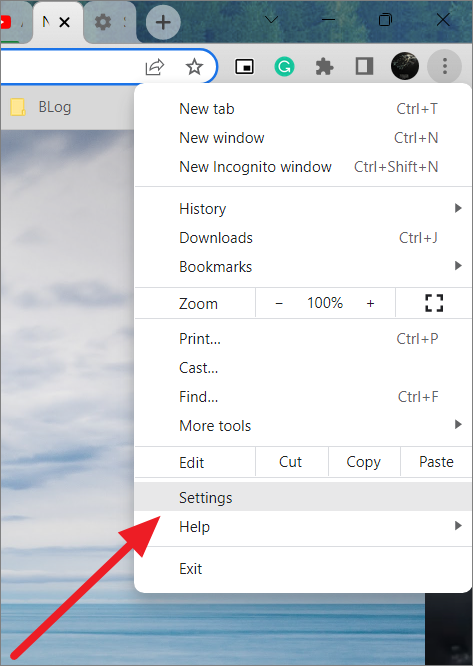
Click the three dots menu and select ‘Settings’ to open Chrome settings.
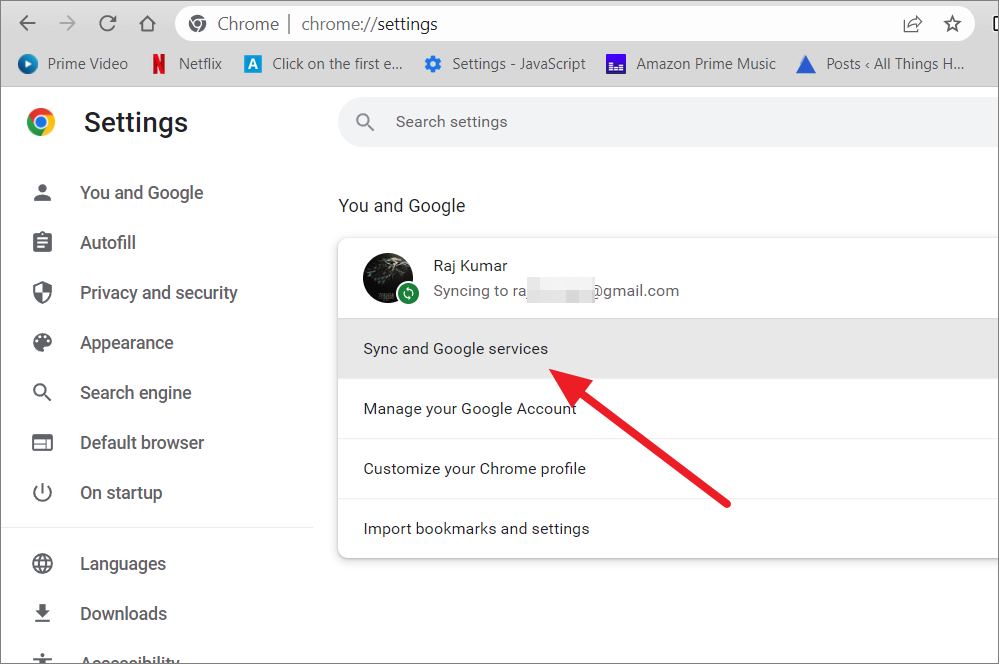
In the Settings, select the ‘You and Google’ tab on the left and click ‘Sync and Google services’ on the right.
Under the Other Goog le services section, turn off the toggle that says ‘Allow Chrome sign-in’.
In the pop-up window, click the ‘Turn off’ button.
You will be signed out of your Google sites and Chrome. You will need to sign in to the Google account to use your Google sites again.
Manage What You Sync on Chrome
Once Sync is enabled, you can choose to sync every Google data from the current device with your other devices or customize what you want to sync. For example, you can choose to not sync your passwords and payment methods across other devices for security purposes. Here’s how you can do that:
To turn on sync on Chrome if it’s not enabled already, click on the three dots icon at the top-right corner and then select ‘Settings’ from the drop-down menu.
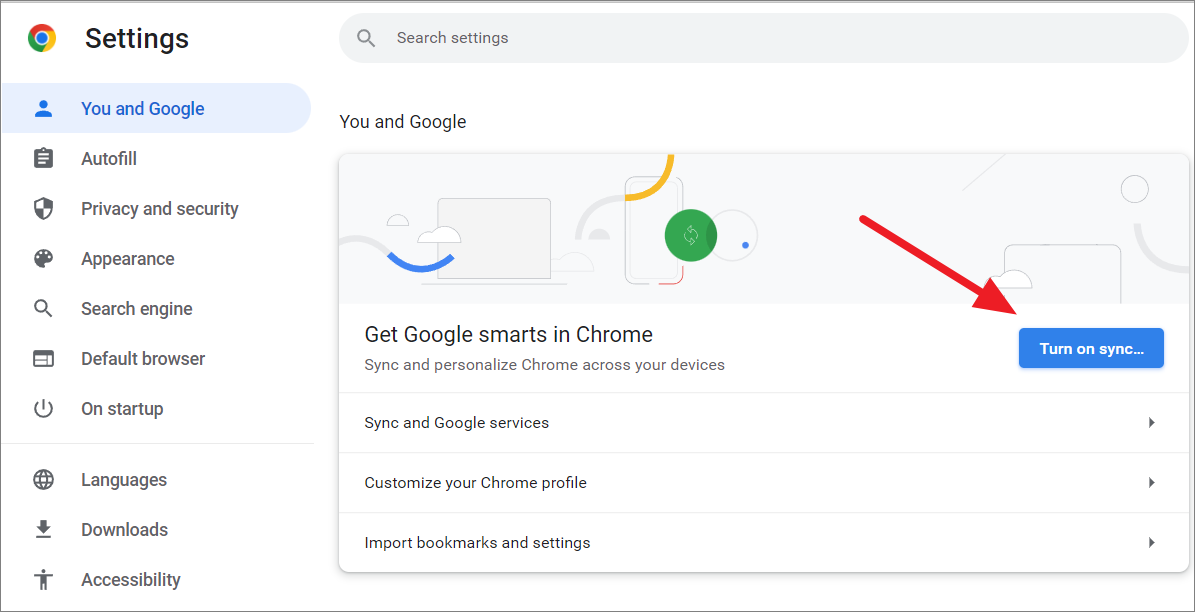
In the You and Google section, click ‘Turn on Sync..’ on the right.
Then, select ‘Yes, I’m in’ to confirm.
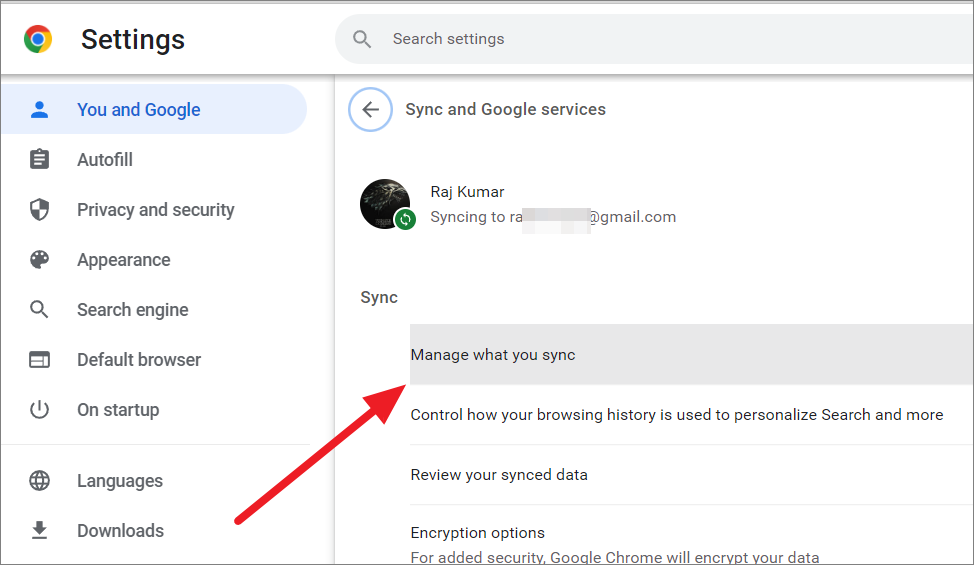
After that, select the ’Sync and Google services’ option under You and Google.
Next, click on the ‘Manage what you sync’ option under the Sync section.
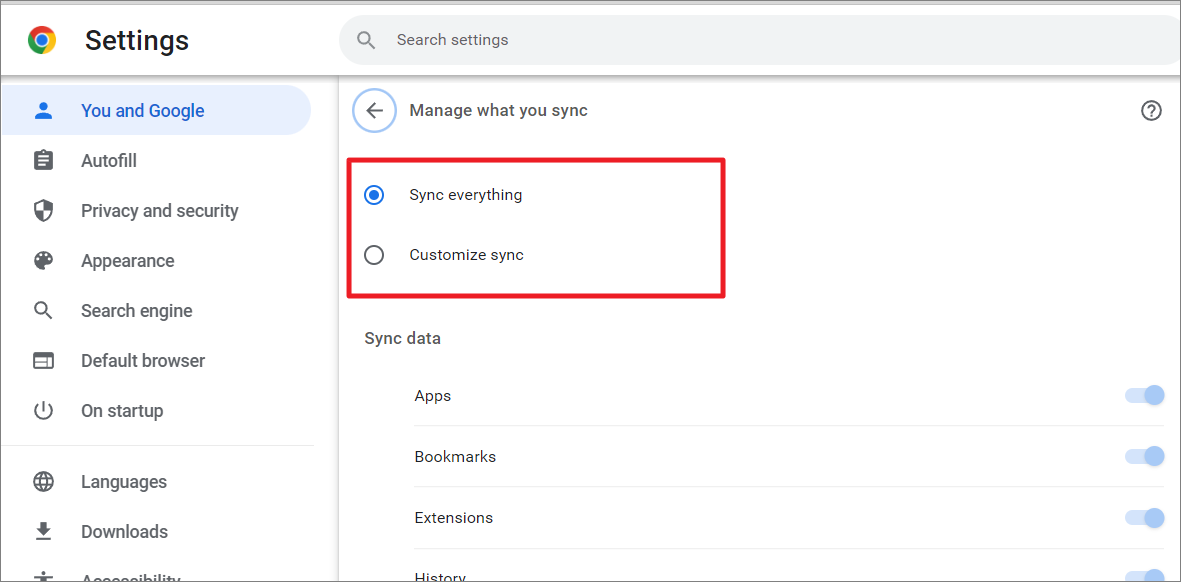
Under, Manage what you sync, choose ‘Sync everything’ to sync every Google data or the ‘Customize sync’ option to choose what you want to sync.
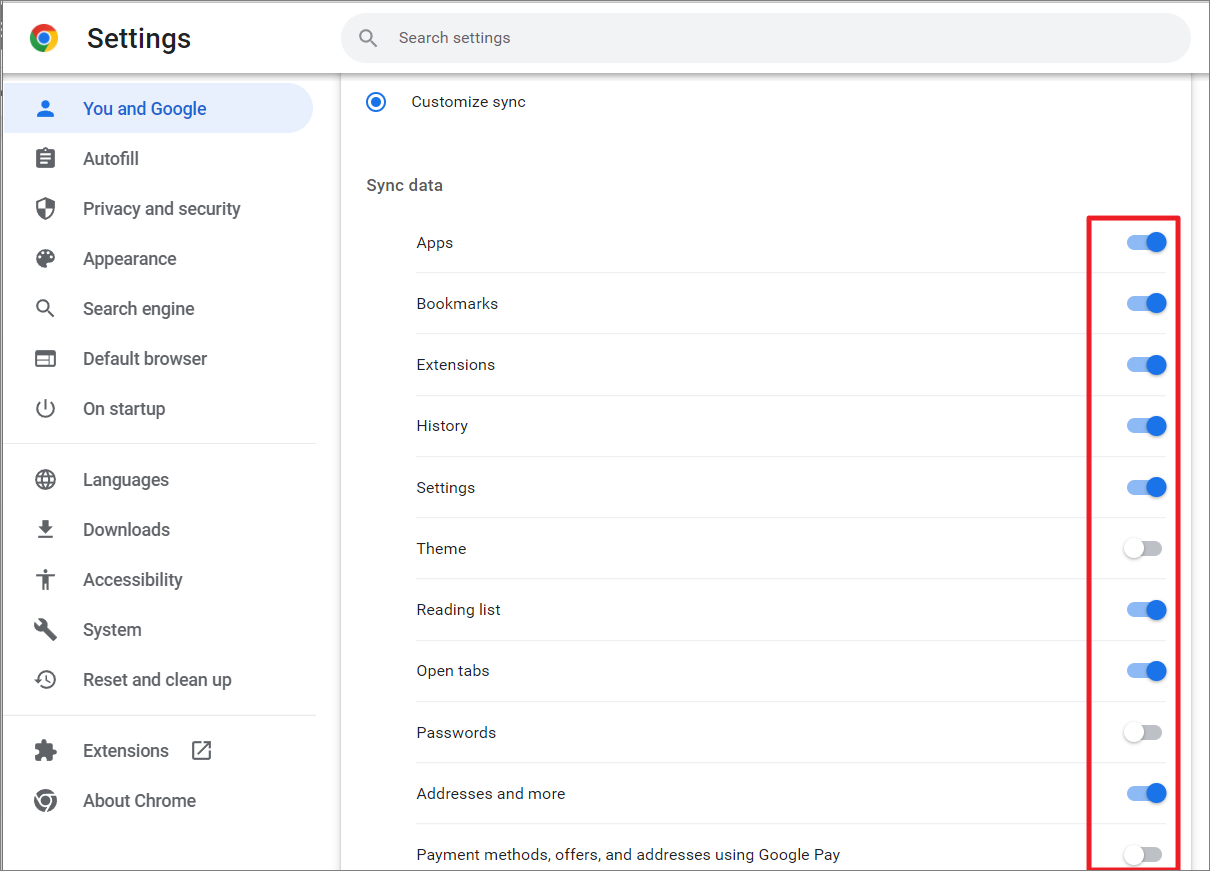
After selecting the ‘Customize sync’ option, you can control what you want to sync using the toggles below.
Customize Google Chrome Startup
When you launch your chrome browser, one of the three things will happen – open a new tab, restore tabs from the previous session, and open a specific website. Let us configure how you want your chrome to start up every time your launch the browser.
Open the Chrome Settings by clicking the three dots and selecting ‘Settings’.
When the Settings open, go to the ‘On startup’ section on the left and choose one of the three options on the right.
To always start the browser with a new tab or homepage, select the first option ‘Open the New Tab page’.
To restore the tabs from the last session, select the ‘Continue where you left off’ option.
Now, Chrome will reopen the tabs that were open when the browser was closed.
To open a specific webpage or set of pages. select the third option ‘Open a specific page or set of pages’. You can select ‘Add a new page’ or ‘Use current pages’ to open the startup.
In case, you want to automatically open a specific website at startup in Chrome, click the ‘Add a new page’ option.
In the prompt box, type or copy and paste the URL of the site you want to open at startup and click ‘Add’. Repeat the process to add more pages to the list.
Above, you will see a list of all the currently opened pages in your chrome. As you add more individual sites to the list, they will be added to the bottom of the list.
After adding the pages, you need to remove all the other current pages from the list. To do that, click the three dots and select ‘Remove’. Repeat the process until all the unwanted pages are removed.
If you want to open all the currently opened pages at every startup then select the ‘Use current pages’ option.
Organize Tabs in Google Chrome
When you are browsing all day, you can easily end up with dozens of tabs, if not hundreds. Most of us don’t want to close websites we regularly visit and then dig through the browser history or bookmarks to reopen those sites, so we leave those tabs open but they can quickly become overwhelming.
With so many tabs open, it will be harder to find any specific tab or know which tab is what as you can barely recognize the text next to each icon. So Chrome has a solution called ‘Tab groups’ which allows you to manage your tabs by grouping them together, labeling them, and color coding them.
By grouping tabs, you can have different groups for different purposes. For example one for work, one for articles you want to read later, one for YouTube videos, one for comparing items on shopping websites, etc.
Here’s how you can group your tabs and declutter your browser:
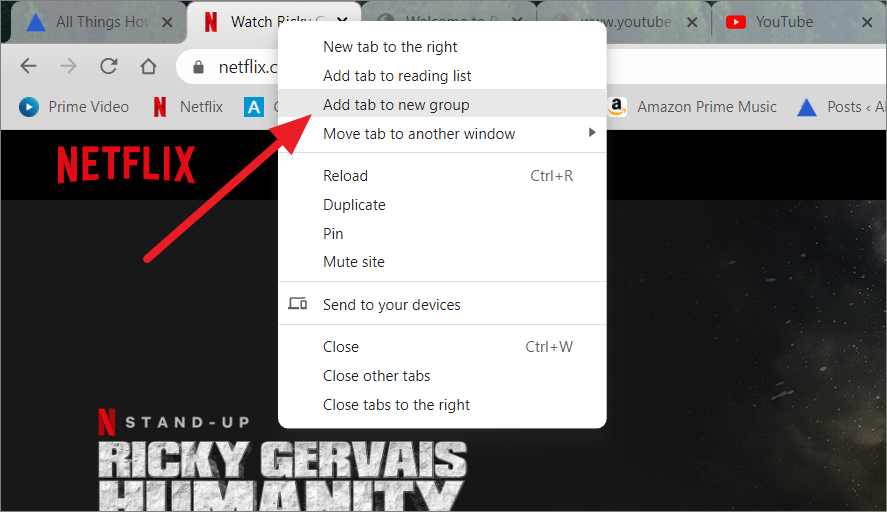
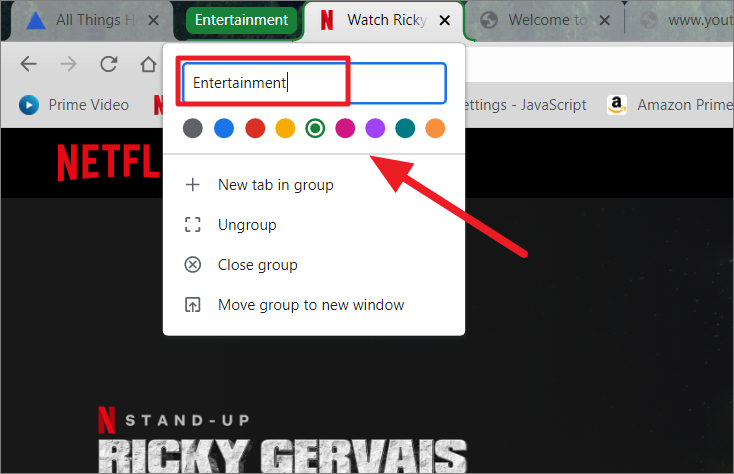
Let’s assume you have multiple tabs open on your Chrome browser. Now, right-click on the tab you want to add to the group and select the ‘Add tab to new group’ option from the context menu.
A small Group menu window will appear below the tab. Now, enter a name for your group and choose a color by clicking one of the dots. As you type the name and select the color coding, the group label will appear to the left of the selected tab as shown below. After that, click away or press Enter to save the group.
You can also create groups without names but instead of the label, only the color circle will appear.
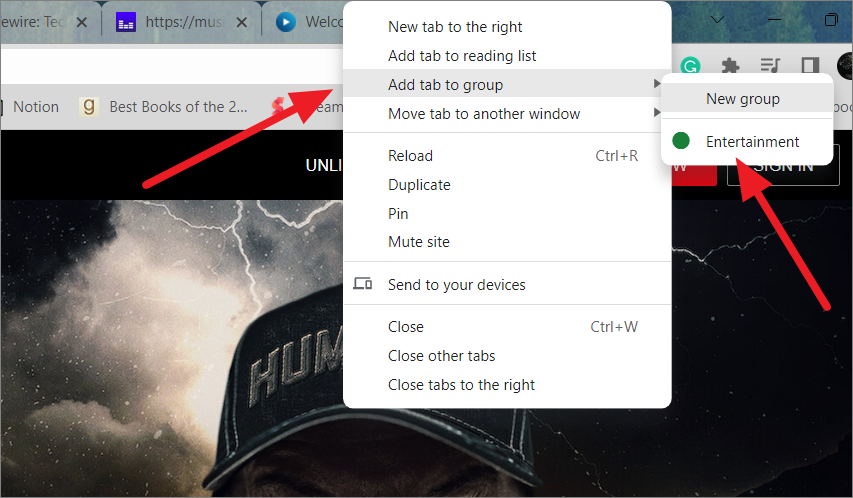
Once the group is created, you can add more tabs to the created group by right-clicking any tab and selecting the ‘Add tab to group’ option, and then choosing the group from the sub-menu.
Follow the same procedure to create more groups and categorize your tabs with different groups.
When you need more space on your tab bar, simply click once on your Tab Group label/colored circle to collapse, then click again to reopen or expand the grouped tab. Mind you the collapsed tabs will still be open and running inside the group. For example, if one of the grouped tab is playing a video, it will still be playing after collapsing.

Assume you have two tab groups:
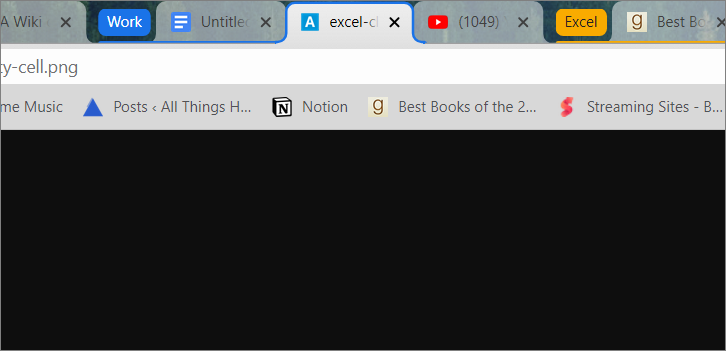
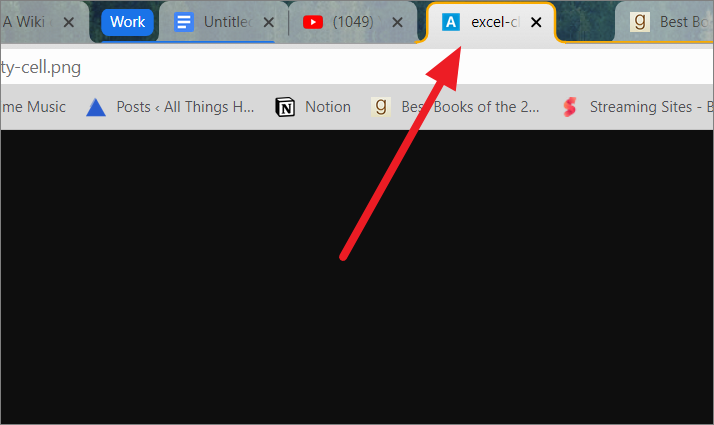
You can move tabs between those group by dragging the tab over another existing group until the color encapsulates it and release it. Now, the tabs will be part of that other group.
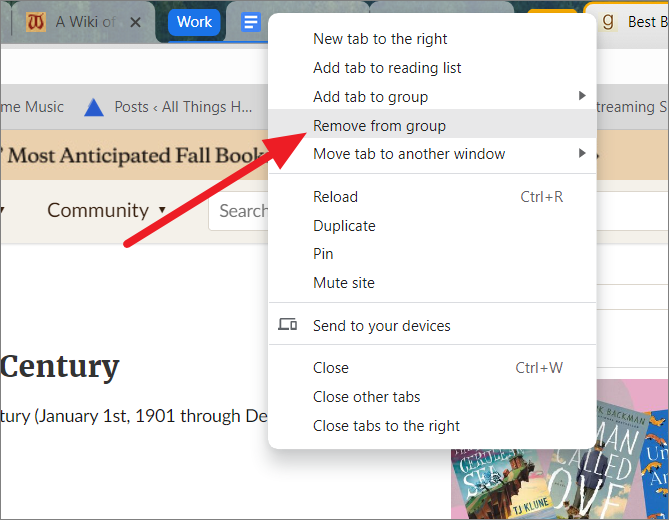
If you want to remove a specific tab from a group, right-click that tab and select ‘Remove from group’.
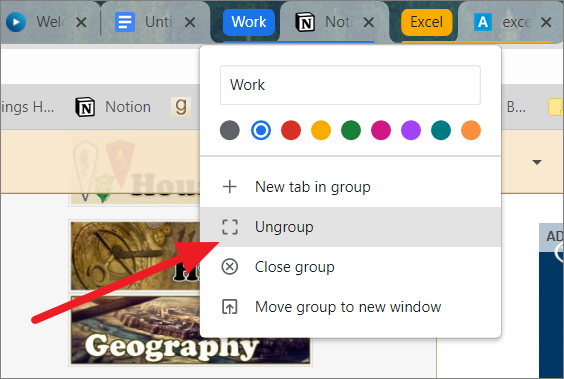
If you don’t want a group but still want the tabs in it, right-click the group and select ‘Ungroup’.
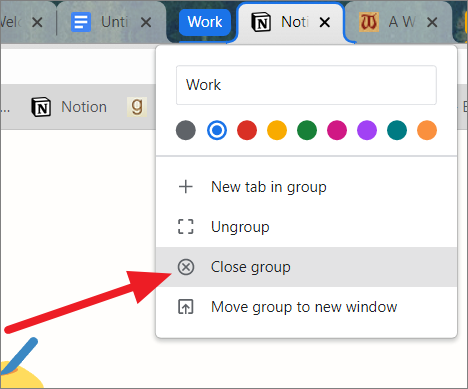
If you no longer need a group and tabs within it, right-click the group and select ‘Close group’ to close all the tabs at once and delete the group as well.
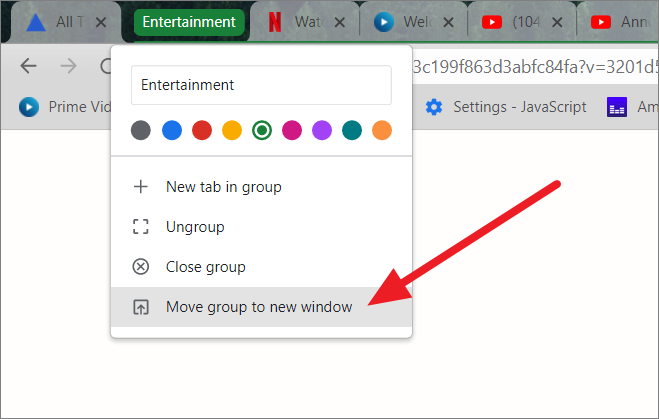
In case you want to move the group with the tabs to a separate window, select the ‘Move group to new window’ option.
S et Chrome as the Default Browser
The default browser in Windows is Microsoft Edge, so whenever you click a link the site will load in Microsoft edge which is slower than Google Chrome. If you would like to set Google Chrome as your default browser, follow these steps:
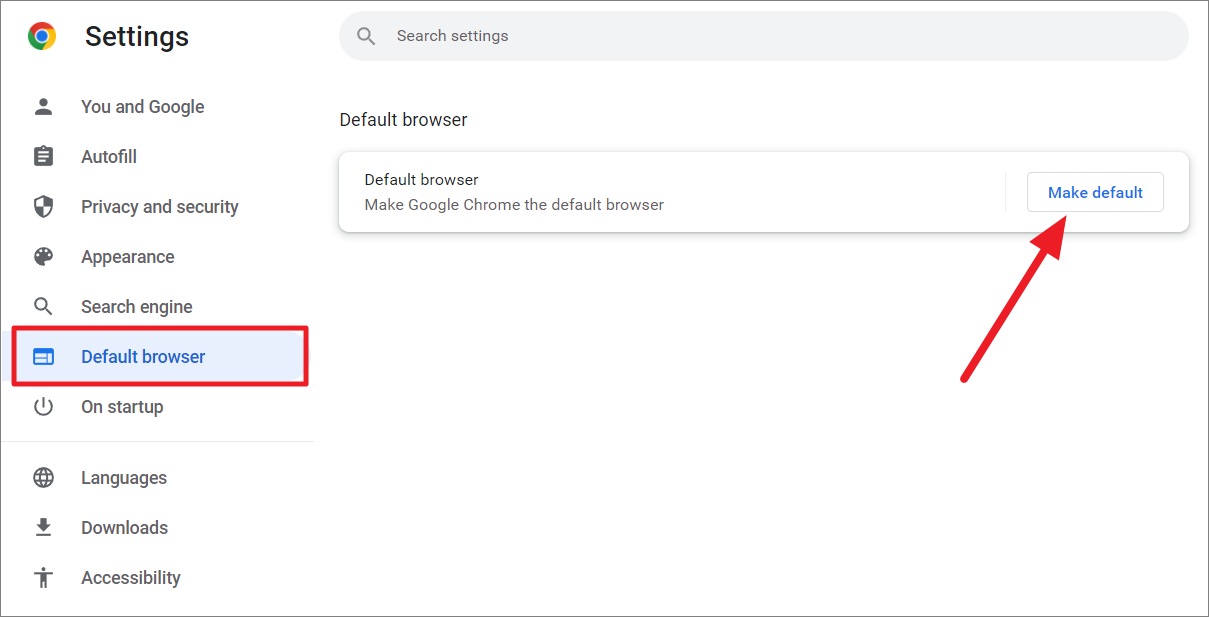
First, open Chrome Settings by clicking the Chrome menu in the top-right corner of the browser, then selecting ‘Settings’. In the Settings tab, go to ‘Default browser’ on the left panel and click the ‘Make default’ button on the right.
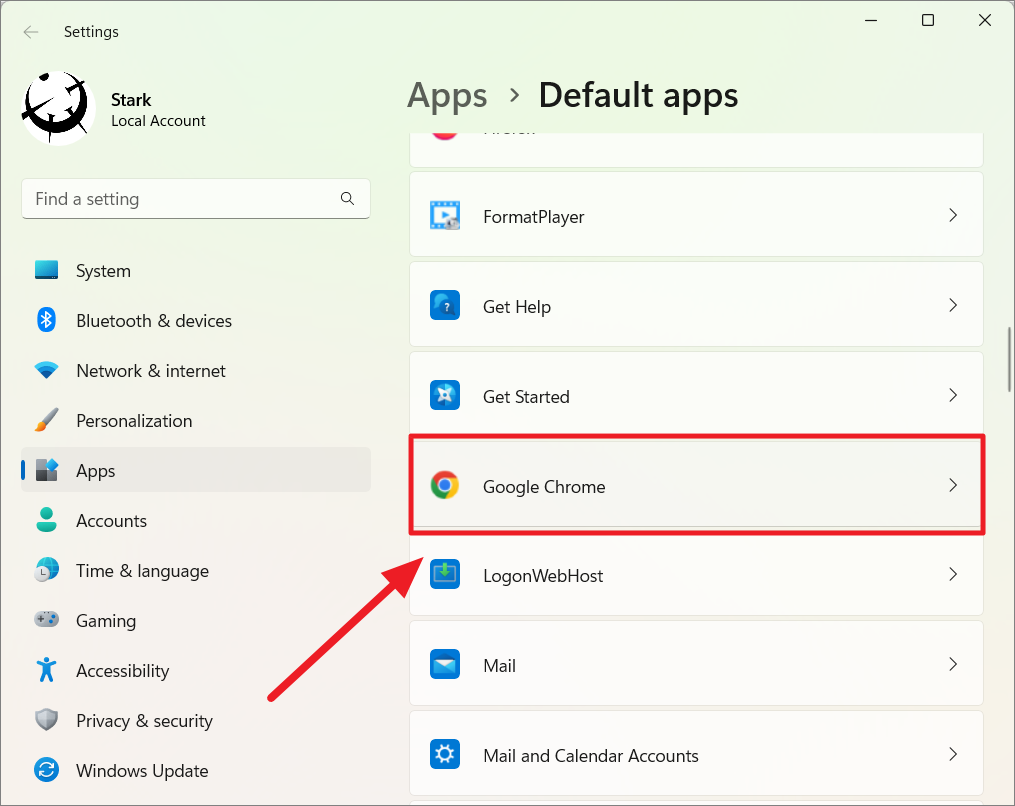
This will redirect you to the ‘Default Apps’ window in the Windows Settings. Alternatively, you can open Windows settings (Win+I), go to ‘Apps’ and then select ‘Default apps’ on the right pane.
Now, scroll down the list of apps, find and select ‘Google Chrome’. Alternatively, you can search for Google Chrome in the ‘search apps’ field to find the app.
Now, click the ‘Set default’ button at the top of the page to make Google Chrome your default browser.
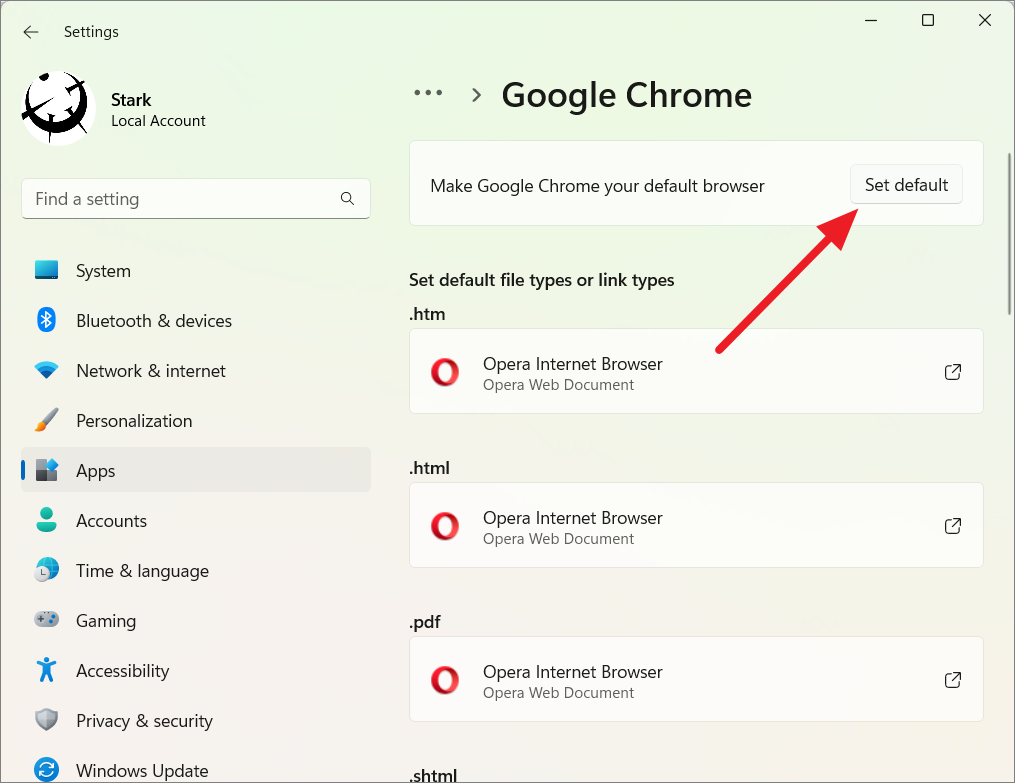
You will see a list of supported file types or link types below with their default browser. Now, click on the individual default app tile present under each file type on the list to change the default app to Chrome.
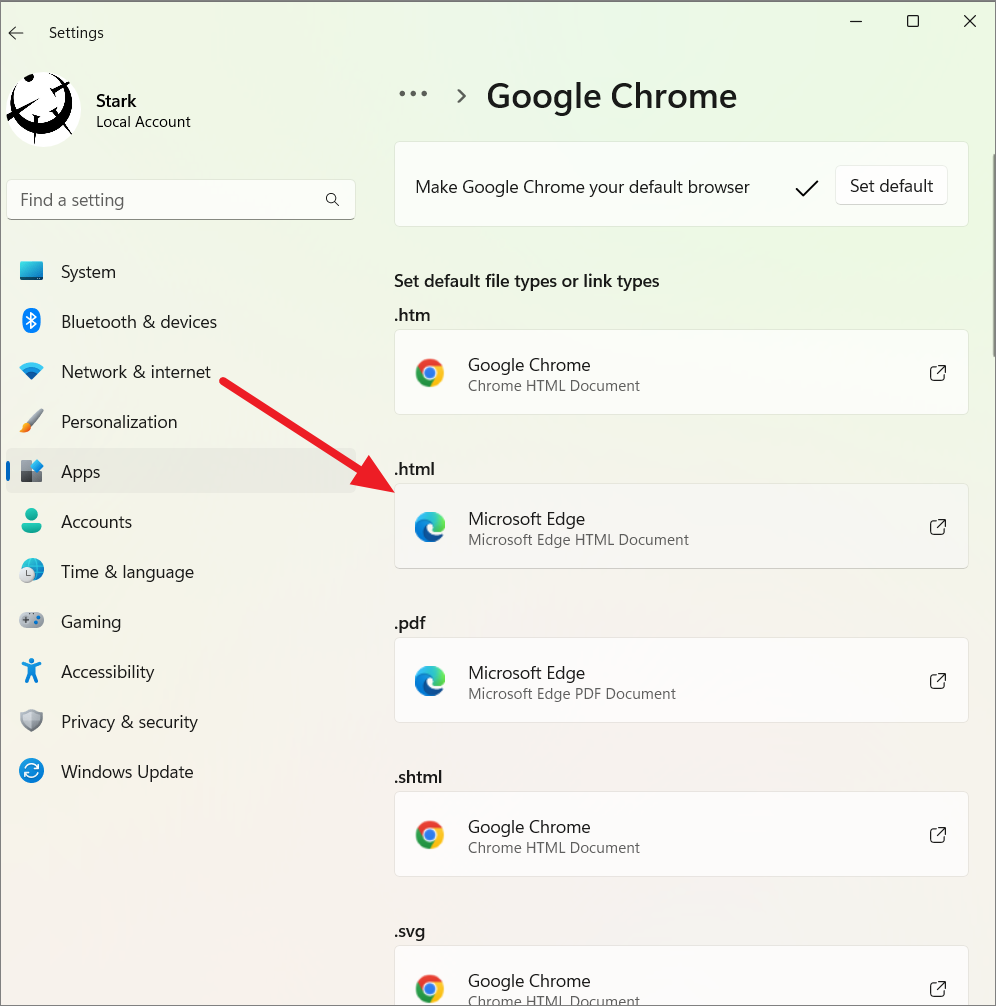
Then, select ‘Google Chrome’ from the overlay menu and click ‘OK’ to apply.
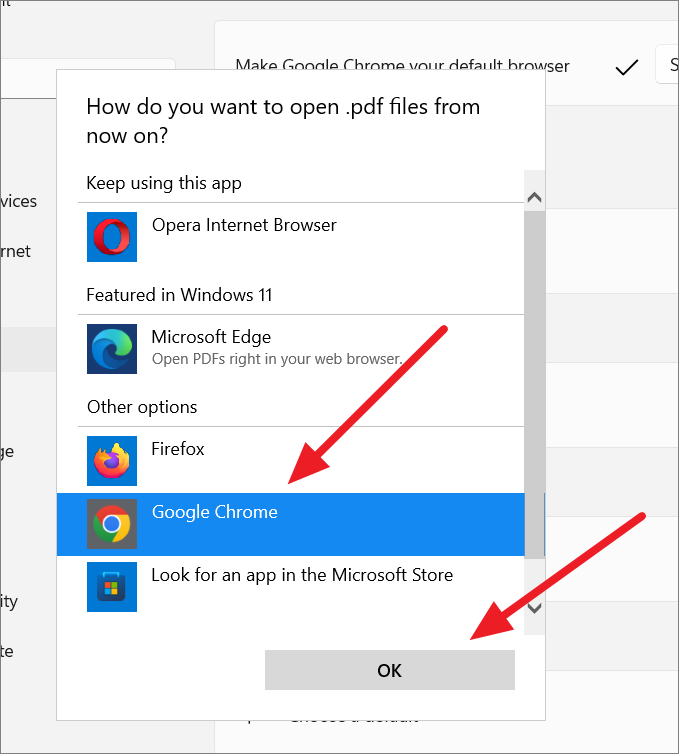
After that repeat the above process for all the file/link types you wish to open with Google Chrome.
Customize the Chrome Search Engine
By default, Google is the default search engine in Google Chrome. Although Google is the most preferred and popular search engine in the world, you don’t necessarily need to use Google as the default search engine in Chrome especially when they are known to track, monitor, and collect data about its users. There are some alternatives to Google such as Microsoft’s Bing, DuckDuckGo (if you care about privacy), Baidu, etc.
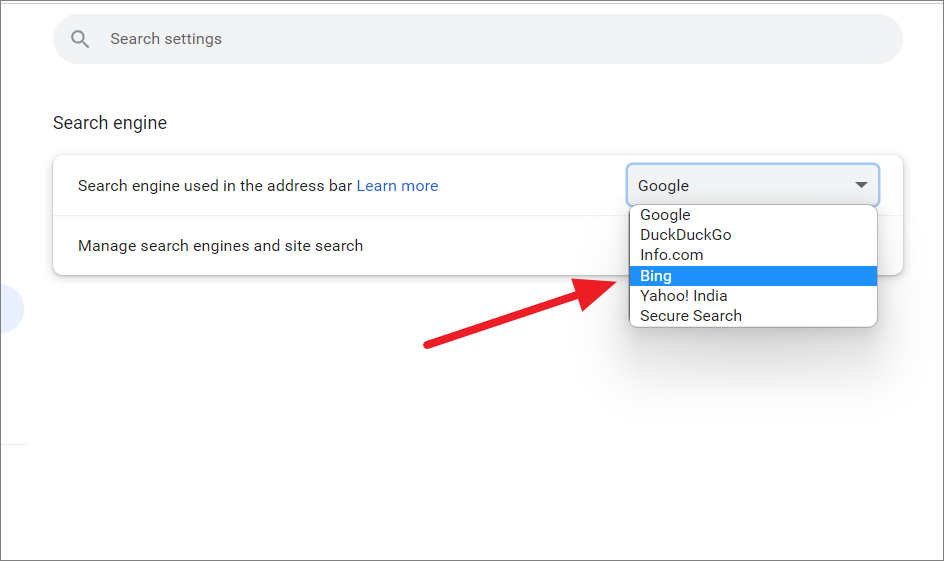
To change the default search engine on Chrome, open Chrome Settings and select ‘Search engine’ on the left side panel or type chrome://settings/search directly in the address bar and hit Enter.

Next, select the search engine of your choice from the drop-down next to the text that says ‘Search engine used in the address bar’. Here, we are selecting ‘Bing’ as the default search engine.
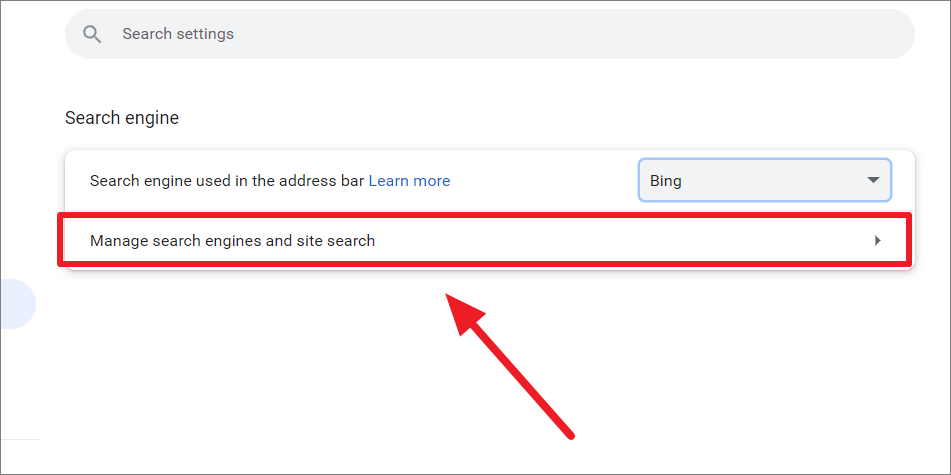
To customize the search engines, click the ‘Manage search engines and site search’ option below.
After setting the default search engine, whatever you type on the address bar will be searched using the default search engine. However, if you want to use a search engine other than the default to quickly search for a specific topic, you can use the keyboard shortcut with search shortcuts. Here’s how you can do that:
First, choose one of the two keyboard shortcuts you want to use along with the shortcuts.
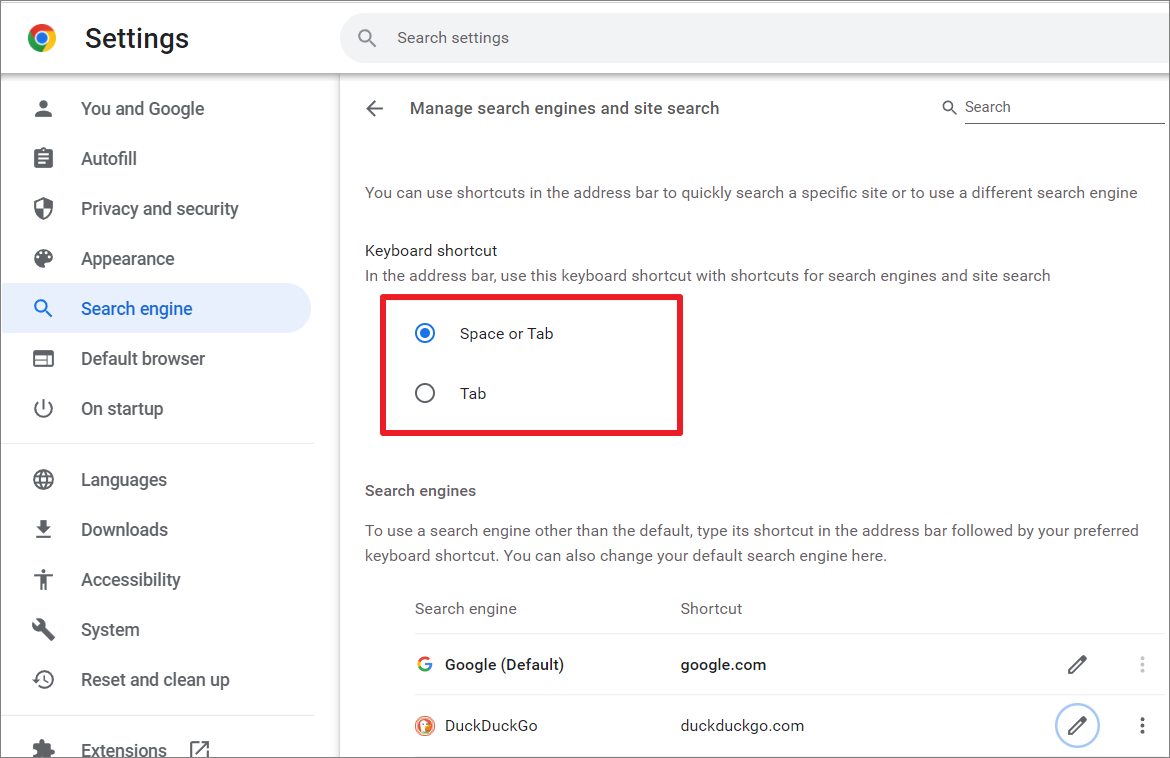
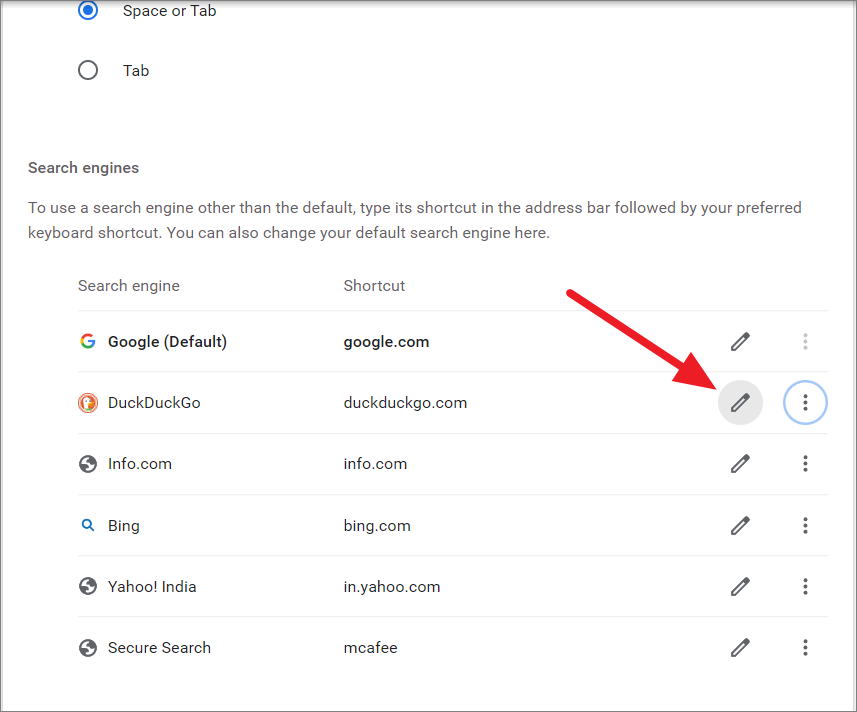
Below the Search engine section, we have a list of search engines and their shortcuts. You can also edit, set, and remove the default search engine here. Google also provides shortcuts for each search engine but you can use anything you want for the shortcuts.
To edit a search engine, click the pencil icon next to the respective search engine name.
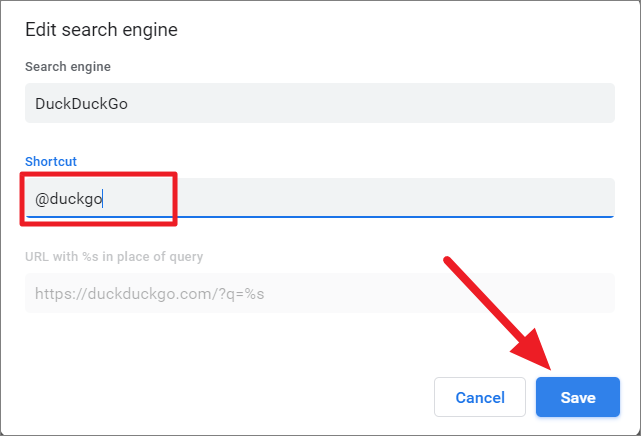
Now, type your desired shortcut in the ‘Shortcut’ field and click ‘Save’. For example, the shortcut for the DuckDuckGo search is duckduckgo.com which is a bit long. So, we are going to use @duckgo instead.
To quickly use a search engine other than the default, type its shortcut in the address bar followed by the keyboard shortcut (Tab or Space). Then, type the query and hit Enter.
The search engine name will appear (e.g. Search DuckDuckGo). Now type the query that you want to search for and hit Enter.
The search results will appear from the search engine (DuckDuckGo).
How to Setup and Use Custom Search Engine
You have seen how to change the default search engine to one of the 6 given search engines and customize them. But you can also set up a custom search engine to search your favorite site using the address bar. If you often search a specific site then you can set up that site as a custom search engine to directly search the site using the address bar instead going to the site first. Here’s how you can do that:
To set up a custom search engine, open Chrome Settings, select ‘Search engine’ in the left pane, and click ‘Manage search engines’ on the right.
Scroll down to the ‘Site search’ section and click ‘Add’ to create a custom engine.
Now, you need to fill out these details, however, getting the URL for the search engine is a bit tricky but it’s easy to do.
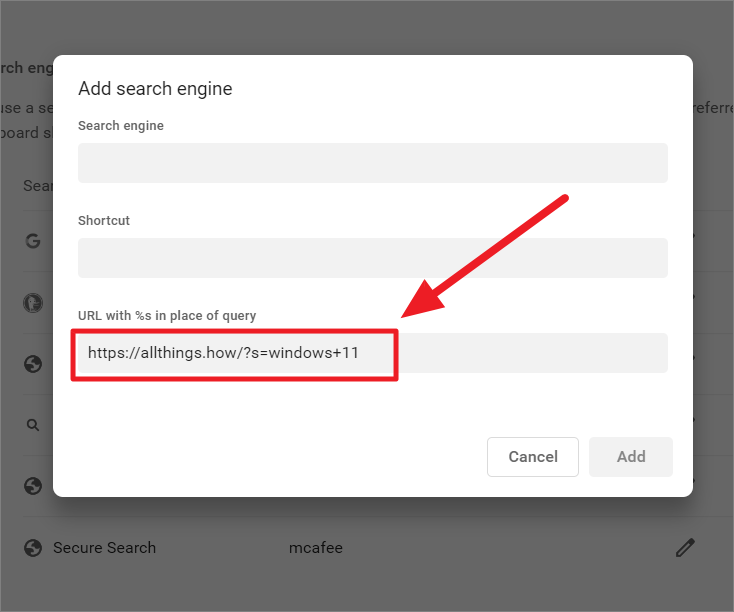
Here, we are searching for Windows 11 articles with the search term ‘Windows 11’.
Next, copy the URL from the address bar.
Now go back to the Add search engine dialog box in the Chrome Settings and paste the URL you copied from the website in the ‘URL with %s in place of query’ field.
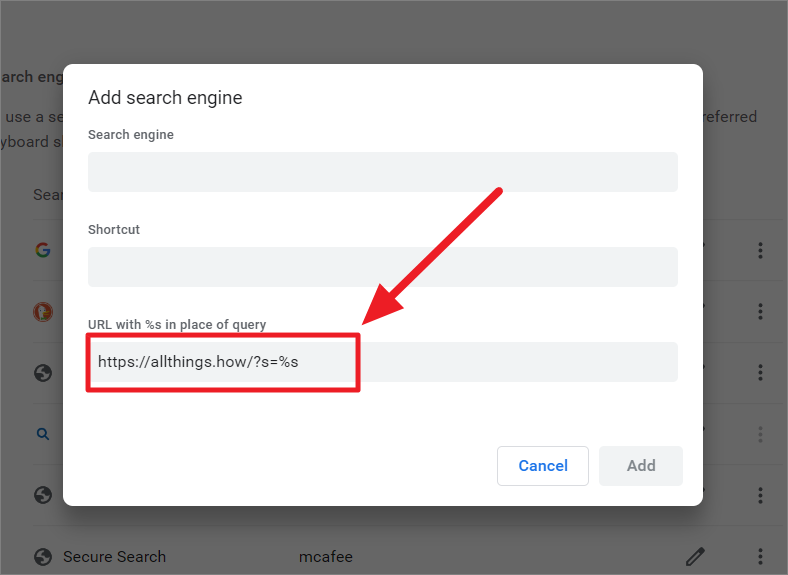
After that provide a name for the search engine in the Search engine box. This name will be displayed right next to the address bar when you use the shortcut to activate the custom search engine.
Then, enter the shortcut you want to use for the search engine in the Shortcut field. For shortcuts, you can use anything you want but make it short, easy to remember, and quick to type. Here we are using @all. Finally, click ‘Add’ to add the custom search engine to chrome.
Now a custom search engine is added to chrome for the site. The custom search engine can only be used to search the site specified in the URL feild.
To use custom search engine to search the site using the address bar, type the shortcut in the address bar (@all) followed by the Keyboard shortcut you selected in the settings (Tab or Space).
Once the search engine name appears on the left, type your search term or query and press Enter.
The search results will appear on the chosen site as shown below.
In case you often search on the site that you added the custom search engine for, you can set that custom engine as your default search engine. By doing that, you can search that website using the address bar without the shortcut and keyboard shortcut.
To do that go back to the ‘Manage search engines and site search’ settings, and click the three dots icon to the right of the custom search engine you created under the ‘Site search’ section. And select ‘Make default’ from the context menu.
To disable the custom search engine, select ‘Deactivate’. If you want to remove the search engine altogether, select ‘Delete’ instead.
A custom search engine is also very helpful especially if the site you are trying to search doesn’t have a search bar or search function of its own.
Turn Off Auto-Complete and Auto-Fill Features in Chrome
Chrome sends cookies and searches from the address bar and search bar to your search engine so that it will auto-complete the next time you are about search something in the search engine. Search engines like Google will also show suggestions based on the current trending and popular searches which can be distracting and annoying. Here’s how you can turn off auto-complete and suggestions in Chrome:
Open Google Chrome settings, and select ‘Sync and Google services’ on the ‘You and Google’ section.
Then, scroll down to the ‘Other Google services’ section and turn off the toggle next to the ‘Auto-complete searches and URLs’ option.
To disable Chrome from auto-filling the addresses you might have entered on any site, select the ‘Autofill section’ on Chrome settings.
Then, turn off the switch next to ‘Save and fill addresses’.
Customize Privacy and Security of Google Chrome
Google Chrome has its own privacy and security tools to put you in control and protect you from malware and dangerous sites. Chrome allows you to customize your privacy controls, including allowing/blocking cookies, site permissions, content settings, etc.
Enable or Disable Cookies in Google Chrome
Cookies are small files created by the websites you are visiting and sent to your browser, allowing the sites to remember certain information about you such as your device, browser preferences, and online activity. Cookies help keep you signed in, personalize your browsing experience, and make subsequent visits easier.
While most cookies are safe and necessary for sites to work properly, some sites use cookies to track the user’s browsing behavior to exploit users and infringe upon users’ privacy. Let us see how to allow or block cookies, delete stored cookies, and set preferences for certain websites in Google Chrome.
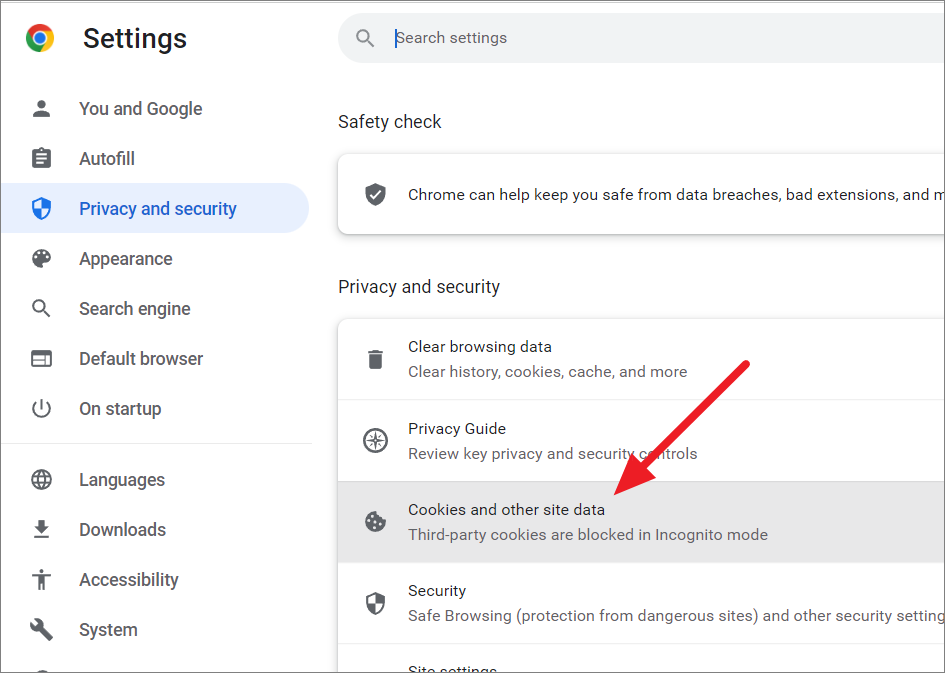
First, open Google Chrome Settings, then click ‘Privacy and security’ in the navigation pane on the left. Then, click on the ‘Cookies and other site data’ option from the right section.
After that, you will see a list of options relating to Cookies and other collected data. Now, choose your preferred Cookies settings to apply the changes immediately. By default, Google blocks third-party cookies in incognito mode.
Allow all cookies – This option will allow websites to store all cookies including first-party cookies (which are cookies directly stored by the website (or domain) you’re visiting.) as well as third-party cookies (which are cookies sent by a website other than the one you are currently visiting). Block third-party cookies in Incognito – This option will allow cookies first-party and third-party cookies except under the incognito mode. If you are browsing in Incognito Mode, it will block all third-party cookies (which are used by websites to track your behavior on other websites). Block third-party cookies – This option will allow enough cookies for most sites to work properly but it will block all third-party cookies (tracking cookies). Sites can still use cookies to improve your browsing experience, such as keeping you signed in, remembering your browser preference, etc. Block all cookies (not recommended)-If you select this option, all cookies will be blocked including first and third-party cookies. Sites won’t be able to save users’ login information, and preferences or keep track of users’ activity on the site. Some websites won’t even work properly.
Clear Cookies When You Exit Site
Clearing cookies regularly can fix certain problems, like loading or formatting issues to improve your browsing experience. However, you don’t wait until something goes wrong with a site and then clear the cookies to fix it, instead you can set up chrome to clear all the cookies and site data each time you close the browser. Clearing cookies after every session will also prevent the ad targetting sites from tracking your behavior across different sessions.
To do this, scroll down to the ‘Clear cookies and site data when you close all windows’ option under the same Cookies and other data site data settings. Then, off the toggle next to it.
Now, every time you close the browser, chrome will delete all cookies and site date. However, every time you close and reopen the browser, you will need to log in to the site.
You can also enable or disable preload pages on Google chrome. This option allows chrome to preload the pages that Chrome thinks you might visit. Under the Cookies and other site data settings, turn on or off the ‘Preload pages for faster browsing and searching’ option according to your preference.
Allow or Block Specific Websites to Always Use Cookies in Chrome
As we mentioned before most websites require cookies to work properly but some sites need them more than others. But if you have enabled global ‘Block all cookies’ setting, then all cookies will be blocked for every site you visit. For some websites, cookies are essential pieces of information required to save your personal preferences, interests, and settings, or even to run user analytics. Without cookies, you may not receive full user experience on certain websites while some other sites won’t even let you access them.
So you shouldn’t go all out and enable or disable all cookies in Chrome. That’s why Chrome allows you to choose different Cookie settings for specific websites. You can allow cookies from most sites while blocking of some them or you can block cookies from most websites while only letting a handful of websites use cookies. Here’s how you can whitelist specific websites to use cookies or blocklist specific websites from using cookies:
Open Chrome Settings, navigate to the ‘Privacy and security’ section on the left panel, and select the ‘Cookies and other site data’ tile on the right pane.
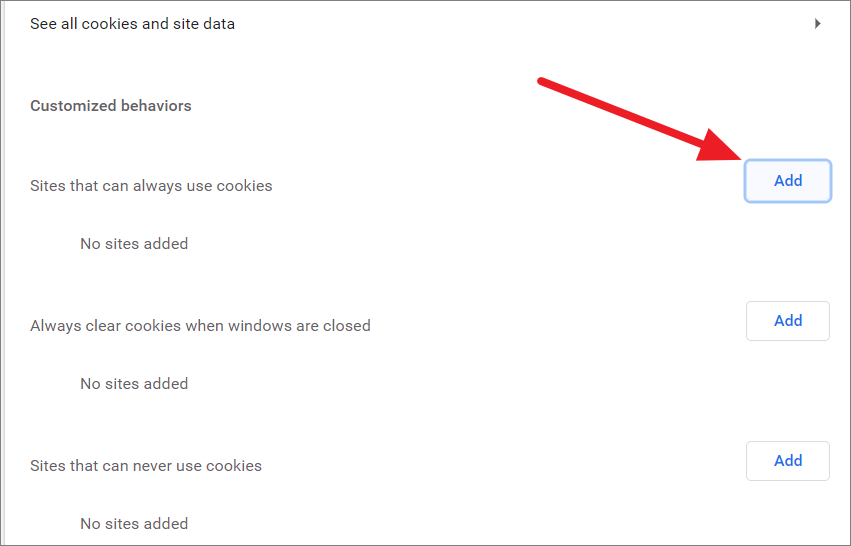
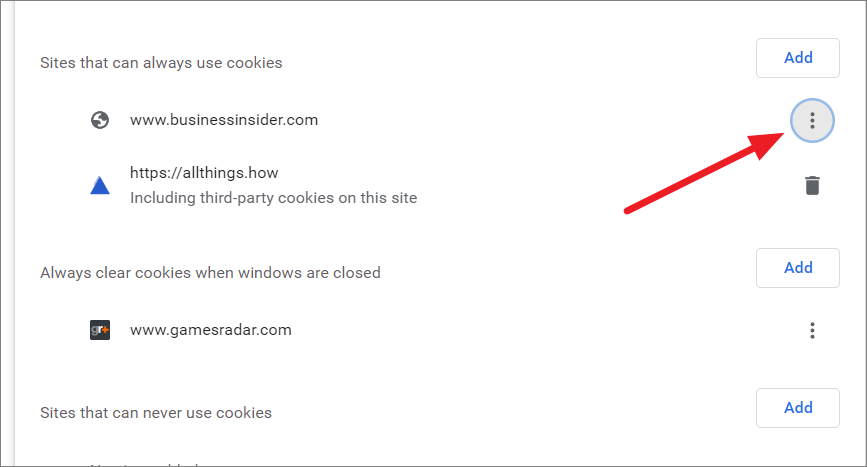
Then, scroll a bit further down to the Customized behaviors section and you will see three different settings for cookies behavior:
Sites that can always use cookies Always clear cookies when windows are closed Sites that can never use cookies
Whitelist a Website to Always Use Cookies
To allow a specific website to always use cookies, click the ‘Add’ button next to ‘Sites that can always use cookies’.
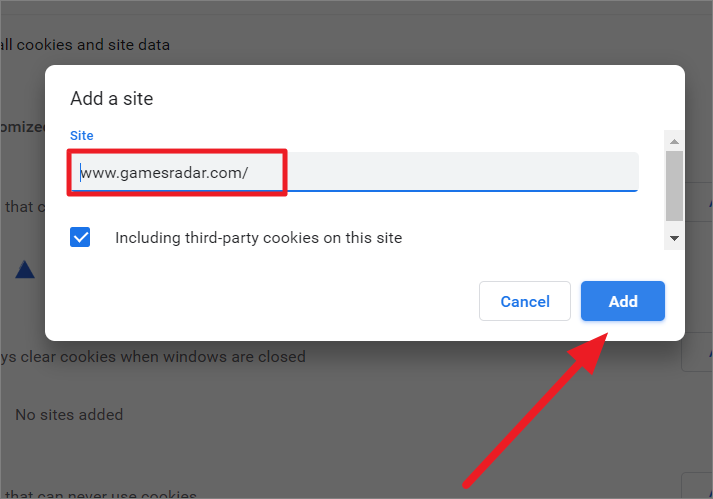
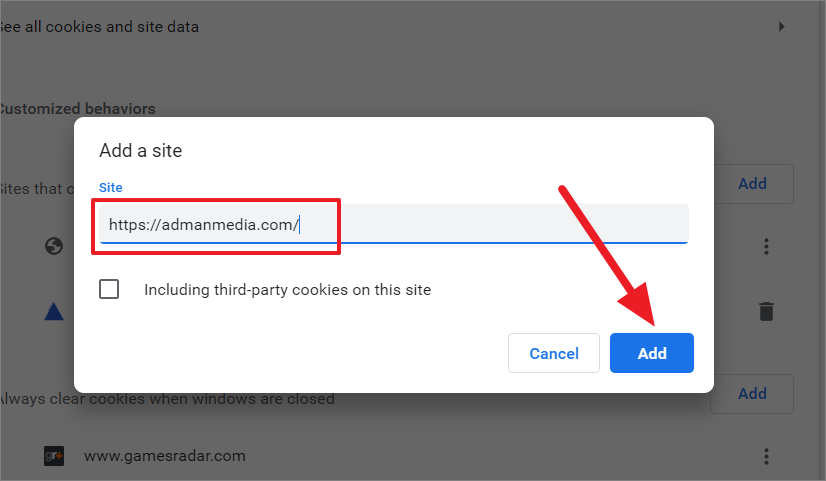
In the Add a site pop-up window, enter the website address for which you wish to allow cookies.
If you wish to allow third-party cookies as well, check the box before the ‘Including third-party cookies on this site’ option. Otherwise, leave it unchecked. Then, click on the ‘Add’ button.
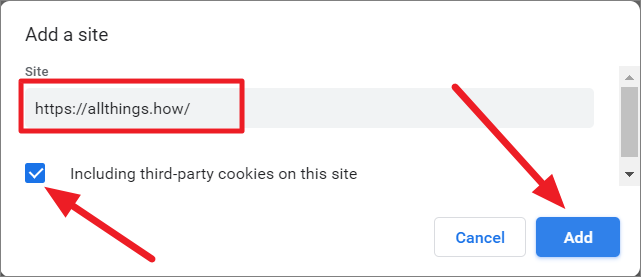
When adding a site, make sure to include the ‘www’ prefix before the domain name.
Otherwise, you will not get the ‘More actions’ (three-dots button) for the added website.
Clear Cookies When You Exit
To always clear cookies for a specific website when you exit, click the ‘Add’ button next to the ‘Always clear cookies when windows are closed’ option.
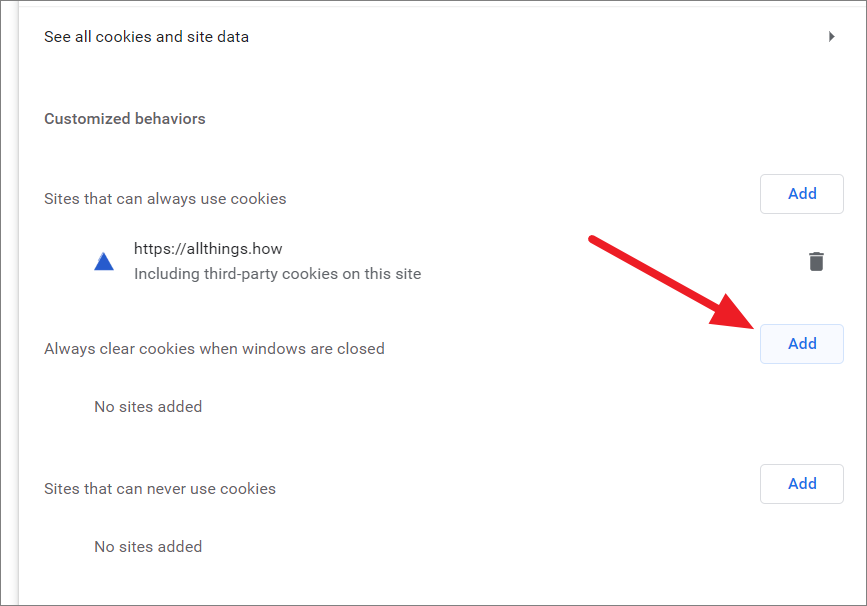
Then, enter the website address for which you wish to clear cookies when you exit it. After that, click ‘Add’ to add the site to the list. If you want to allow third-party cookies as well, check the box before the ‘Including third-party cookies on this site’ option. Otherwise, leave it unchecked.
Blocklist a Website from Using Cookies
If you wish to stop a certain website from tracking you, you can add those sites to the block list. To block a specific site from using cookies, click the ‘Add’ button for ‘Sites that can never use cookies’.
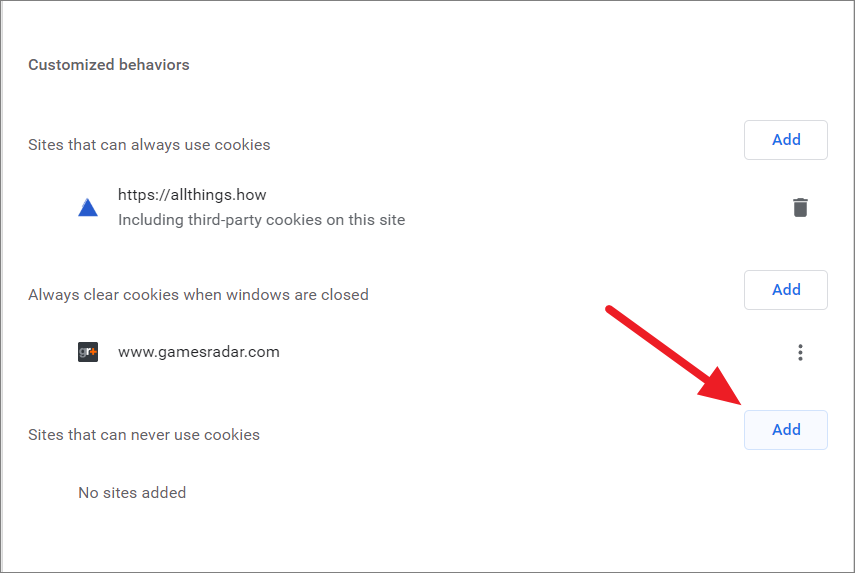
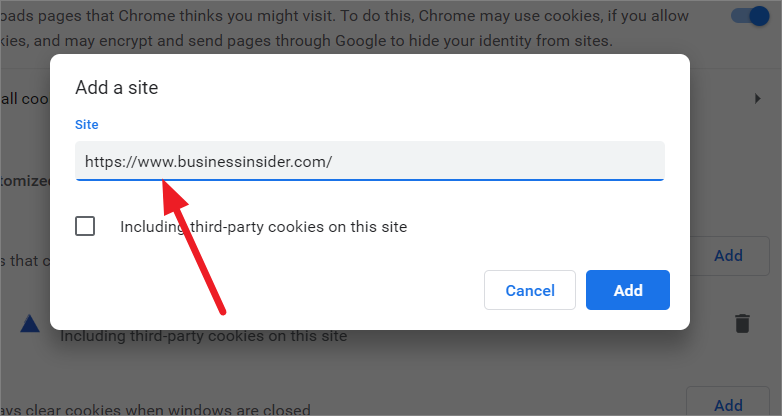
In the site field, enter the URL of the site you wish to blocklist and click ‘Add’.
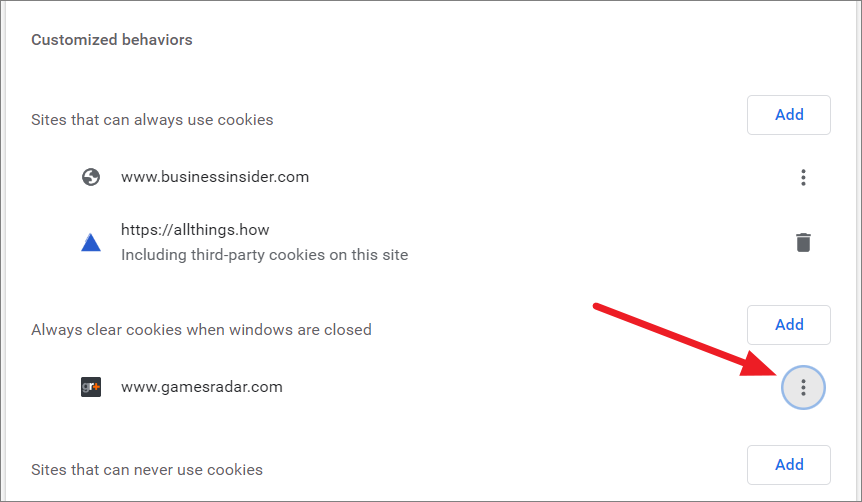
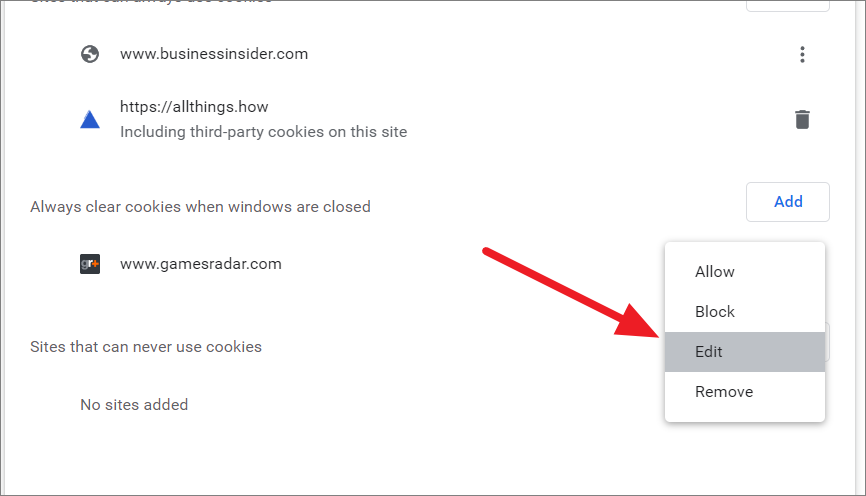
To change the cookies settings for an added website, click the three-dots button, and select your desired option.
If you wish to edit the added site, select ‘Edit’. To remove the site from the list, select ‘Remove’.
Websites with https://prefix or an IP address can also be used to whitelist or blocklist a website.
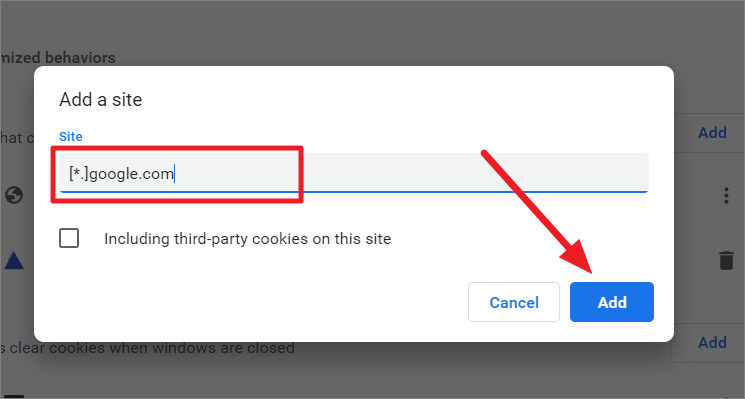
You can also allow, block, or clear cookies for all the subdomains of a specific domain by including a wildcard asterisk (*) before the address. For example, [*.]google.com will cover google subdomains (apps) such as news.google.com, mail.google.com, meet.google.com, etc.
Once you have added the website to the customized behavior list, it will ignore your global cookies settings. For instance, if added a site to always use cookies, it will use cookies even if your global setting is set to block them.
Customize Chrome Security
Chrome offers safe browsing protection against harmful URLs, dangerous sites, dodgy downloads, data harvesters, etc. There are multiple levels of security provided by Google under its Safe Browsing feature.
Under the ‘Privacy and security’ section, select the ‘Security’ tile on the right.
Now, choose one of the following three protection levels. By default, Chrome uses the Standard level of safe browsing protection.
Standard protection – This level provides protection against websites, harmful URLs, downloads, and extensions. Under this mode, you can select whether to improve security on the web by sending some your URLs and some information to Google and getting warnings about password breaches. Enhanced protection – This level provides more advanced protection against dangerous websites, risky downloads, and extensions. In this mode, Chrome sends additional information to Google about your activity for more accurate threat assessments. Enhanced mode helps improves security for you and everyone on the web No protection (not recommended) – This mode provides no protection against dangerous websites, risky downloads, and extensions. However, you’ll still get safe browsing protection when using some Google services, like Gmail and Search.
Under the Advanced section, you will have options to choose to always use HTTPS protocol for secure connections, configure DNS, manage phones which phones you can use as security keys, and manage certificates (HTTPS/SSL).
Customize Site Permission and Content Settings in Chrome
Another important customization you can make in Chrome is managing the permissions given to the websites that you visit to protect your privacy and security. Websites often ask you for permission to improve the user experience on their site. It’s up to you to grant access or revoke access to various features and hardware the microphone, camera, location, notifications, etc. In this section, we will see how to manage permission and content settings for individual sites or all the sites you visit.
Control Permission for All Sites in Chrome
You can easily control permission for all the websites you visit from Chrome Settings. Here’s how you do it:
Open Chrome Settings, select the ‘Privacy & security’ tab present on the left side and click ‘Site settings’ on the right side.
On the Site settings page, scroll down to the ‘Permissions’ section. Then, click on any one of the categories to change its permissions.
Turn On/Off Locations on All Sites
Many websites ask you for geolocation permission to determine your device’s location so they can target ads on their sites. It is not recommended to share your location with most sites, however, some sites need to know your location to work properly, like news, food delivery sites, or online retailers.
To share or turn off the location for all the sites in chrome, click on the ‘Location’ tile present under the Permission section.
On the Location page, choose the ‘Sites can ask for your location’ option so that sites can request your location should they require it. Or, choose ‘Don’t allow sites to see your location’ to turn off your location for all sites. However, features that need your location won’t work if you choose the latter option.
Below the Customized behaviors section, you will see the list of websites that already have permission to access your location and websites that don’t have your permission. These sites are exempt from the above global settings.
Turn On/Off Camera on All Sites
To turn on or off the camera on all sites, go back to the ‘Site Settings’, and select ‘Camera’.
On the next page, choose your camera device from the drop-down menu above and choose one of the options under Default behavior. If you select ‘Sites can ask to use your camera’, websites will send a notification asking your permission to use the camera. Otherwise, if you choose ‘Don’t allow sites to use your camera’, no websites will be able to use your camera.
Same as before, the website with exceptions from global settings will be listed below the customized behaviors.
Turn On/Off Microphones on Sites
To turn on or turn off microphones for sites, select the ‘Microphone’ option under Permissions.
Then, choose your desired microphone device from the drop-down menu above and select one of the options below – ‘Sites can ask to use your microphone’ or ‘Don’t allow sites to use your microphone’.
Turn Off Notification from Sites
Let us see how to manage notifications from websites in Chrome:
Go to ‘Site Settings’ under ‘Privacy and security’ and select ‘Notifications’ under Permissions.
On the Notifications page, you have three options. If you select ‘Sites can ask to send notification’, any site can send you notification requests. If you select ‘Use quieter messaging’, sites are blocked from sending you notifications that will interrupt your browsing experience. If the ‘Don’t allow sites to send notification’ is selected, all notifications from all sites are blocked even ones that are required by site features to function.
When ‘Use quieter messaging’ is enabled, sites will show that notifications are blocked next to the address bar and they will require permission to send you push notifications.
You can also allow or block individual sites from sending notifications by adding them to the whitelist or blocklist using the options below.
Turn On or Off Background sync
You can control whether the recently closed sites can finish the tasks like uploading images or sending messages.
To do that, select ‘Background sync’ under Permissions.
Then, choose ‘Recently closed sites can finish sending and receiving data’ to finish the tasks after closing a site or ‘Don’t allow closed sites to finish sending or receiving data’ to stop the background tasks after closing a webpage.
In addition to primary site permission (Camera, Microphone, Location, Notification, etc.) there are a number of permissions that can enable or disable for sites such as Motion sensors, Automati c downloads, USB devices, etc. You can access more permissions settings by clicking the ‘Additional permissions’ drop-down menu.
Manage Content Settings for Sites
Similar to permissions, chrome also has several content settings that allow you to manage content on websites. You can control whether sites can use cookies, JavaScript, load images, send pop-ups or use redirects, play sound, show Ads, etc.
To do this, you can use the different content settings below the ‘Content’ and ‘Additional content settings’ sections.
Customize Permissions and Content Settings for Individual Sites in Chrome
You could also change permissions and content settings for individual sites instead of applying the global default settings. Here’s how you can do that:
First, open the website for which you wish to change permission and content settings. Now, click on the ‘lock’ icon left to the address bar (right before the URL) to reveal an overlay window. Now, click the ‘Site settings’ option.
This will open the Chrome settings tab in the Chrome browser. Here, you will see the list of all permissions, content settings, and their current status for the selected website.
To change any permission or a setting, click the respective drop-down and choose your required option. You can grant or revoke permissions or let the website ask you every time it wants to use the feature.
If you want to reset all permission for the particular website, click the ‘Reset permissions’ button at the top.
Then, confirm the action by clicking the Reset button in the pop-up window.
Alternatively, you can go to Chrome settings and navigate to ‘Privacy and Security’ > ‘Site settings’ > ‘View permissions and data stored across sites’. This will open the All sites page where you can see the list of all the websites you have visited. Here, find the website where you wish to change the permission or settings. If you can’t find the site you are looking for, use the search function above to find the site.
Then, click the small arrow button (like a play button) beside the website name to view the permissions.
After that, change permissions and settings for the website using the drop-down menus.
Then, reload the site for which the permissions have changed to apply the updated settings.
Change Languages in Google Chrome
Google Chrome allows you to change its user int erface language (preferred language) from over 200 available languages. It also offers translation services for web pages in different language into a specific language. Here’s how you can set your preferred language in Chrome:
First, open Chrome settings, and select the ‘Languages’ tab on the left navigation panel.
Next, click on the ‘Add language’ option below to add a different language to your preferred list.
An Add languages box will appear. Scroll through the list to find the language you wish to add or just type the name of the language in the ‘Search languages’ field to find it. Then, check the tickbox of your preferred language and click ‘Add’. You can also add multiple languages at a time.
The added languages will be at the bottom of the list. You can reorder the languages to reflect your preference. To do that, click the three dots button next to the language you want to move and choose to move up, down, or to the top.
To change the language of the Google Chrome user interface, click the three dots button and select the ‘Display Google Chrome in this language’ option.
Select the ‘Offer to translate pages in this language’ option for translating pages that aren’t in the languages you use into a preferred language.
After choosing the language, click the ‘Relaunch’ to rel oad the browser and apply the changes.
Customize Live Caption in Chrome
Google added a new feature called live caption which automatically transcribes an audio or video playing in the browser and displays it as captions (subtitles) at the bottom of the browser. Some users find live captions useful while others find it annoying and distracting. Here’s how you can turn on/off live caption as well as customize it.
In Chrome Settings, go to the ‘Accessibility’ section on the left. Then, toggle the switch beside ‘Live Caption’ to turn On or Off the feature.
If you want to customize the text size and style for the live caption, click the ‘Caption preferences’ option below.
This will open Windows’ live caption settings in the Settings app. To change the style of the caption, click the drop-down menu next to ‘Caption style’.
Then, select one of the preset options to change the style.
If you don’t like the preset caption style, you can create your caption style by clicking the ‘Edit’ button.
In the next window, give a name to your caption style, then choose a color, opacity, size, font, and effects for the text. As you change the settings, you can see a preview of the caption in the video above.
Then, you can change the color and opacity of the background and window. Once you made your changes, you can close the settings as your changes are automatically saved.
Prevent Web Apps from Running in the Background
Many websites like Google continue to run background apps even after you shut down the browser. If you don’t want websites to keep running in the background, go to the ‘System’ tab in the Chrome settings. Then, turn off the toggle for ‘Continue running background apps when Google Chrome is closed’.
Reset Customization Settings in Chrome
If your browser not working properly after some customization, you can reset all of the Chrome customization settings to their default values to fix it.
In Chrome Settings, go to the ‘Reset and clean up’ section on the left and select the ‘Restore settings to their original defaults’ option.
In the prompt box, click on the ‘Reset settings’ button to revert every setting to its default, and delete extensions, cookies, and other site data.
Customize Google Chrome With Flags
Chrome Flags are hidden experimental features and settings that are currently being tested by Google and are not available by default. You can use Chrome flags to customize the functionality of your Chrome and improve your browsing experience.
To access Chrome Flags, just type chrome://flags in the Chrome address bar and hit Enter. The will open a page with a list of experimental features available to your Chrome.
Scroll down the list of features and look for interesting flags. You can also use the ‘Search flags’ field at the top to quickly find the desired flag. Each feature or setting will have a drop-down with three options – Enable, Disable, and Default. To enable a feature, simply click on the drop-down right next to the feature and select ‘Enabled’.
Here’s a list of some of the best flags and settings you can use to customize your browser.
Heavy Ad Intervention Smooth Scrolling Parallel Downloading Dark Mode Reader Mode Tab Hover Cards System Notifications Localhost Testing Enable LiteVideos, etc.
That’s it.