Todos os anos, milhares de pessoas e organizações em todo o mundo recorrem a seus semelhantes com um simples pedido-doar parte de seu dinheiro em apoio a uma organização, um indivíduo ou uma causa. Existem tantos motivos para pedir doações quanto motivos para doar. As formas de pedir um donativo também são muitas.
Se você ou sua organização planejam usar um site WordPress em suas doações, provavelmente você já se deparou com o Plugin de doações GiveWP para WordPress . Certamente é um dos plug-ins de doações mais populares e úteis que existem e faz um ótimo trabalho não apenas permitindo que você aceite doações em seu site, mas também para configurar tudo em um instante.
Acha que precisará de ajuda para fazer isso? Não se preocupe. Neste artigo, mostraremos a você:
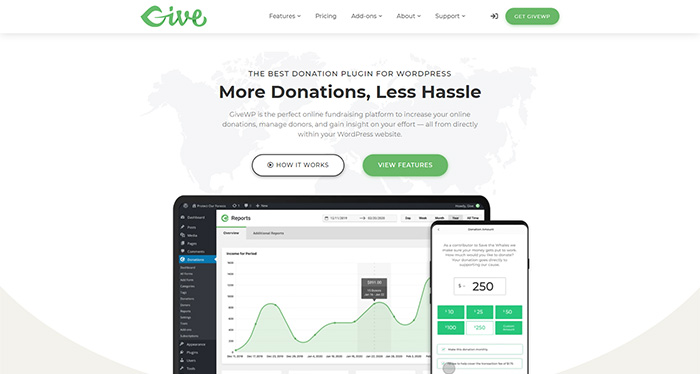
GiveWP é um plugin de doações incrivelmente popular para WordPress- um dos mais populares . Tem mais de cem mil instalações ativas, está disponível em 21 idiomas e tem 407 classificações de cinco estrelas para uma classificação média de 4,7. Há muito o que amar em GiveWP .
O plug-in é rico em recursos que tornam mais fácil para você configurar doações em seu site e para que os doadores façam doações. Com apenas o plug-in básico, você obtém :
-
Criar formulários de doação . Esta é a principal funcionalidade do plug-in e é como as pessoas podem fazer doações para o seu site.
-
Facilite os pagamentos . Você pode usar o PayPal e o Stripe imediatamente, desde que tenha contas nos serviços. Mais processadores também estão disponíveis.
-
Acompanhe o desempenho de seus formulários . Graças aos relatórios integrados, você terá acesso fácil a todas as estatísticas relevantes.
-
Acompanhe seus doadores . A ferramenta de gerenciamento de doadores que vem com o plugin o torna uma ferramenta de mini-CRM.
Isso é apenas o começo. Give, os criadores do plugin, lançaram add-ons gratuitos que permitem que você faça coisas interessantes, como adicionar uma contagem regressiva ao seu formulário, adicionar um pixel para retargeting do Facebook ou conectar-se à plataforma Double the Donation para uma possível doação correspondência .
Com complementos pagos, você pode expandir o número de opções de pagamento que pode oferecer aos seus doadores. Você pode configurar doações recorrentes, integrar Mailchimp ou Constant Contact aos seus formulários, permitir que os doadores dêem em sua moeda, enviar recibos dedutíveis de impostos, recuperar taxas de cartão de crédito e fazer muitas e muitas outras coisas. Para resumir, a razão de usar GiveWP para doações é que é um ótimo plugin.

Antes de começar a arrecadar fundos, certifique-se de verificar com as autoridades locais sobre quaisquer pré-requisitos legais que você possa precisar cumprir. Se você precisar registrar uma instituição de caridade em uma ONG, certifique-se de fazer isso. Você não precisa ser uma instituição de caridade para usar GiveWP, no entanto. No entanto, é melhor permanecer no lado certo da lei-e do código tributário . Com isso cuidado, você pode começar a trabalhar na lista de itens essenciais.
Site do WordPress
GiveWP é um plugin para WordPress e precisa de um site WordPress para funcionar. Existem dois “tipos” de sites WordPress-WordPress.com e WordPress.org . Embora pareçam ser quase iguais, eles são, na verdade, bastante diferentes . Tanto que é muito melhor usar a versão.org do que a versão.com para o seu site de doações.
Resumindo, a versão.org do WordPress permite que você faça todas as coisas legais, como instalar plug-ins e usar temas fantásticos para organizações sem fins lucrativos para expandir a aparência do seu site e o que ele pode fazer. A versão.com permite que você faça parte disso, mas apenas se você assinar um plano pago. E mesmo assim, você não terá tanta liberdade quanto teria com um site.org . Se você insistir, no entanto, você pode usar GiveWP com WordPress.com se tiver um plano de negócios com a plataforma.
Idealmente, você usará o WordPress 4.8.5 ou mais recente . A versão mínima do PHP recomendada é 5.6, embora seu host deva fornecer a versão mais recente possível. A versão mínima do MySQL exigida pelo plug-in é 5.5 e, por fim, o servidor onde seu site está localizado precisa ser compatível com TLS e ter um certificado SSL que passe pelo menos nos testes TLS 1.2.
Processador de pagamento
A versão gratuita do GiveWP vem com suporte para PayPal Standard, PayPal Donations, Stripe e doações offline . O Stripe vem com uma taxa de 2% sobre cada doação-não se aplica a doações recorrentes e pode ser eliminado se você obtiver o complemento pago do Stripe. A estrutura de taxas de doações do PayPal é um pouco mais complexa, dependendo se você é uma organização de caridade e a moeda da doação.
Se desejar expandir as opções de gateway de pagamento à sua disposição-ou remover a cobrança de 2% de Stripe-você precisará de complementos adicionais . Por meio deles, você terá acesso a gateways de pagamento, incluindo:
-
Authorize.Net
-
Mollie
-
CCAvenue
-
GoCardless
-
Quadrado
-
Paymill
A lista completa é mais longa e dependerá de sua localização-nem todos os gateways oferecem seus serviços em todos os países.
O plug-in
Finalmente, você precisará do próprio plug-in. Você pode obtê-lo diretamente no WordPress.org -o GiveWP é gratuito para usar, após tudo. Você terá acesso a um punhado de add-ons gratuitamente, junto com os principais recursos para gerenciamento de doadores, monitoramento de desempenho e as opções básicas de pagamento.
Se você deseja algo mais do plug-in, há duas maneiras de obtê-lo. Você pode encontrar os complementos que oferecem exatamente o que você deseja e comprá-los individualmente . Você também pode se inscrever em um dos três planos diferentes que costumam estar à venda e podem começar a partir de US $ 175 por ano.
Quanto mais caro for o plano, mais vantagens ele oferece. Todos os planos pagos oferecem acesso a todos os complementos de marketing, todos os gateways de pagamento, recibos em PDF e suporte mais rápido . Os dois planos principais também fornecem acesso ao switcher de moeda, doações recorrentes e ao gerenciador de campo do formulário, entre outras opções. Finalmente, o plano superior dá acesso ao suporte VIP e cinco sites com licença de acesso total para atualizações automáticas .
Temas WordPress de doação
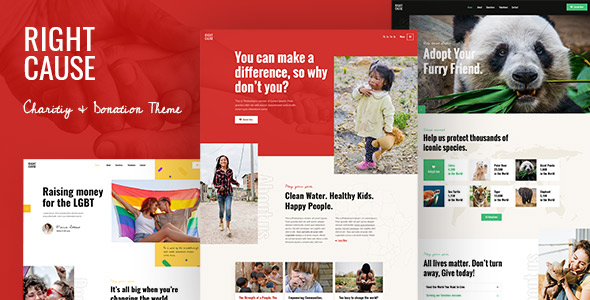
RightCause
Cha ridade e tema de doação

HaveHeart
Tema de arrecadação de fundos e caridade

Goodwish
Tema de caridade e sem fins lucrativos
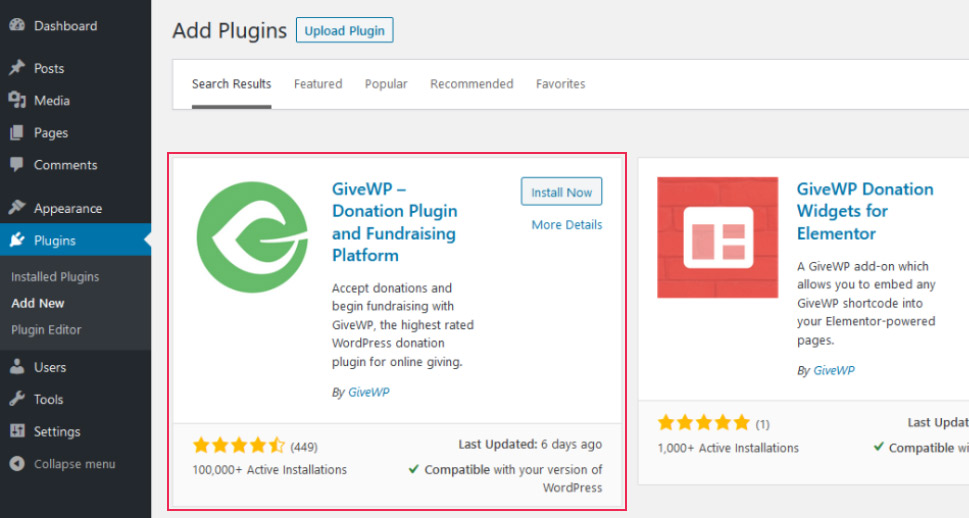
Depois de decidir sobre o plano GiveWP, configurar um site e decidir qual gateway de pagamento deseja usar, você pode ir em frente e instalar o plug-in. Vá para Plugins> Adicionar novo , pesquise GiveWP, instale e ative o plug-in.
Com o plug-in instalado, você pode decidir ver as configurações primeiro. Vá para Doações> Configurações . Você encontrará seis guias diferentes lá, e cada uma delas terá várias subguias abaixo dela. Não se preocupe, entretanto, porque GiveWP fez um bom trabalho explicando o que cada opção faz .
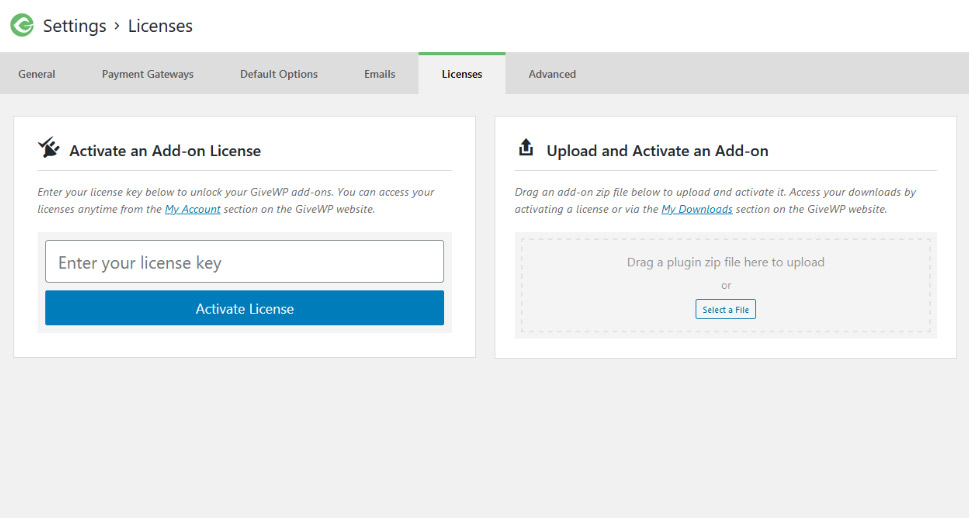
Licenças
Antes de correr direto para a primeira guia nas configurações, a guia Geral, você pode visitar a guia Licenças primeiro. É aqui que você pode inserir a chave de licença dos complementos que planeja usar e também é onde você pode fazer o upload e ativá-los .
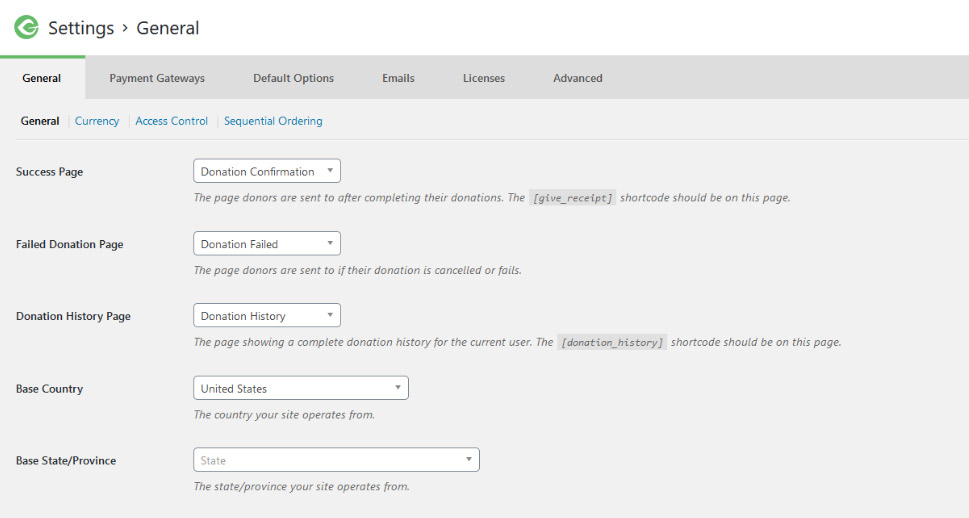
Geral
A primeira subguia da guia Geral possui o mesmo nome. Nesta subguia, você poderá definir as páginas para as quais os doadores são enviados quando sua doação é bem-sucedida ou falha, bem como a página que contém o histórico de doações . Você não precisa se preocupar em criar essas páginas-o plug-in fará isso por você. O país de base e o estado a partir do qual seu site opera também são definidos nesta página.
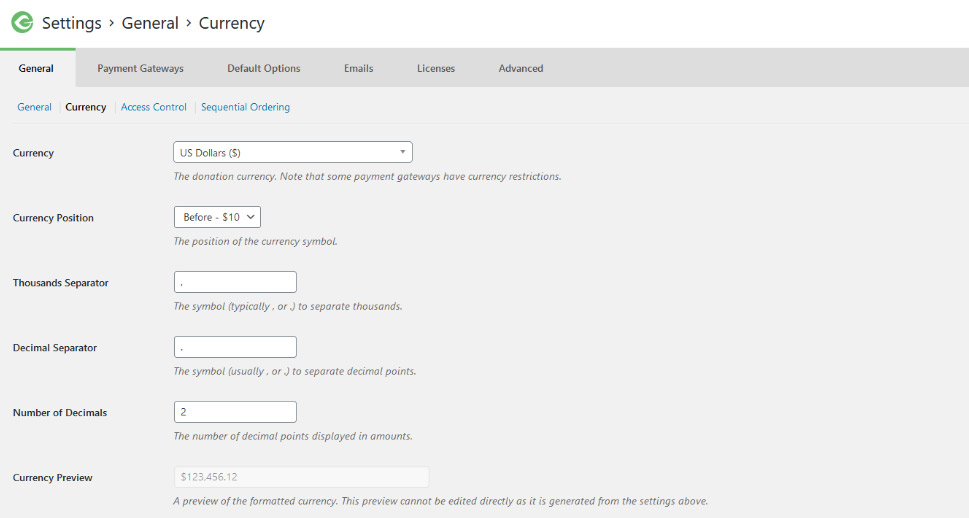
A próxima subguia é Moeda, e é onde você define a moeda da doação, a posição do símbolo da moeda, os milhares e os separadores decimais, bem como o número de casas decimais exibidas .
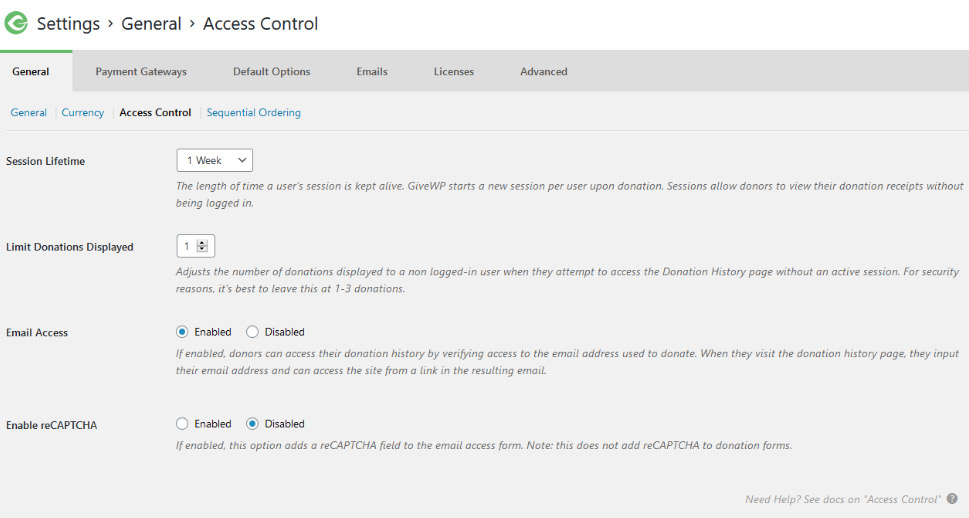
Na subguia Controle de acesso, você pode definir a duração de cada sessão. Quando alguém doa, o plug-in inicia uma sessão e, enquanto dura, o doador pode ver sua doação sem fazer login. Você pode limitar o número de doações exibidas para um usuário que não está conectado e também pode definir isso os doadores podem visitar seu histórico usando o endereço de e-mail de sua doação . Esta subguia também é onde você pode ativar o reCAPTCHA.
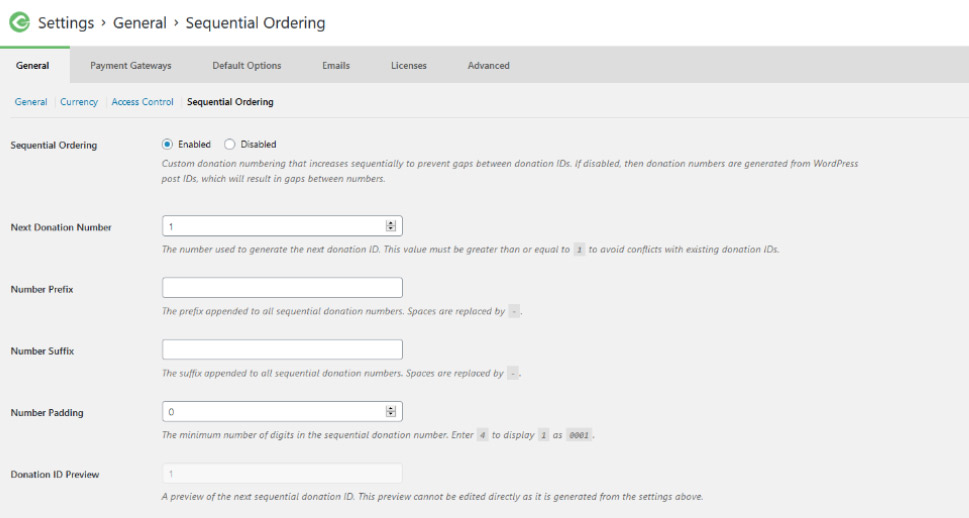
A ordem sequencial é onde você pode definir a numeração das doações para que não haja lacunas na sequência . Isso é importante porque alguns países exigem que as IDs de doação sejam sequenciais em ordem. Se este for o caso do seu país, você não quer deixar o WordPress lidar com IDs de doação para você-você pode vir aqui e definir o próximo número de doação, o prefixo e o sufixo do número-ambos os quais suportam tags relacionadas à data, e o número mínimo de dígitos no número sequencial-o preenchimento numérico.
Gateways de pagamento
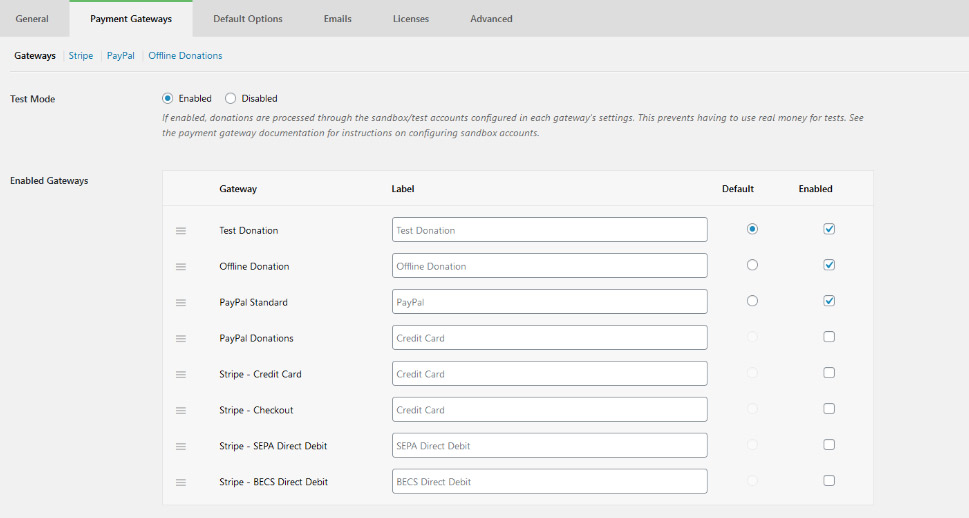
A subguia Gateways da guia Gateways de pagamento é o local onde você pode ativar ou desativar o modo de teste -um recurso inestimável que permite usar as contas de teste para processar pagamentos de teste. É também o lugar onde você pode habilitar os gateways que deseja usar e selecionar o padrão.
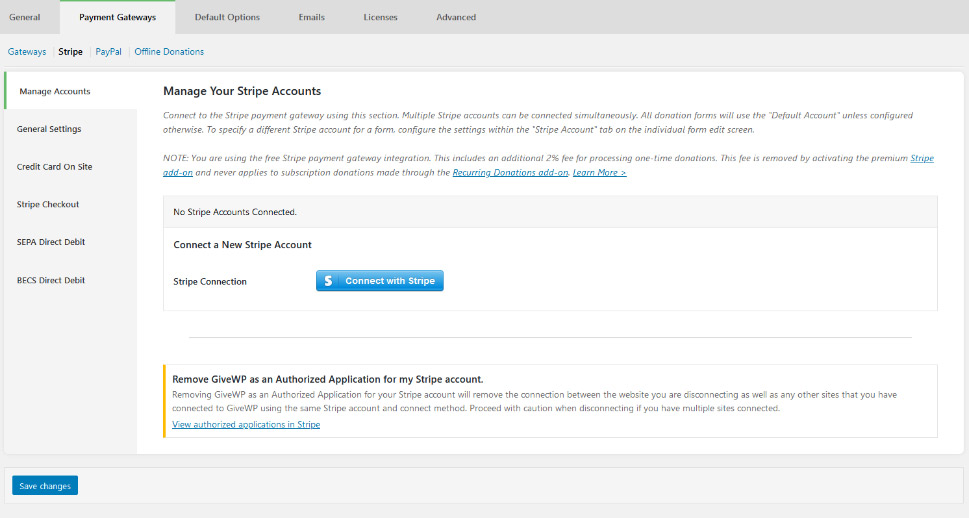
O próximo é um conjunto de opções que permite conectar sua conta Stripe ao plug-in. A conexão da conta Stripe é feita facilmente por meio de uma série de etapas que começam quando você clica no botão azul”Conectar com Stripe”. Uma série de prompts ajudará você a conectar contas ou se inscrever em uma nova conta do Stripe, caso tenha pulado essa etapa.
In the Stripe General Settings, you’ll configure the Stripe Webhooks – a crucial step in establishing communication between the plugin and Stripe. The Statement Descriptor is where you can put the name of your website or organization, and you can choose whether to collect billing details and send receipt emails to donors.

In Credit Card on Site options, you can choose to show single or multiple credit card fields on the donation forms. The Stripe Checkout option lets you choose the type of checkout method, select the checkout heading – the name of your website or organization or cause, and select a background image to appear in the header section of the Stripe modal window. It can help with conversion rates.

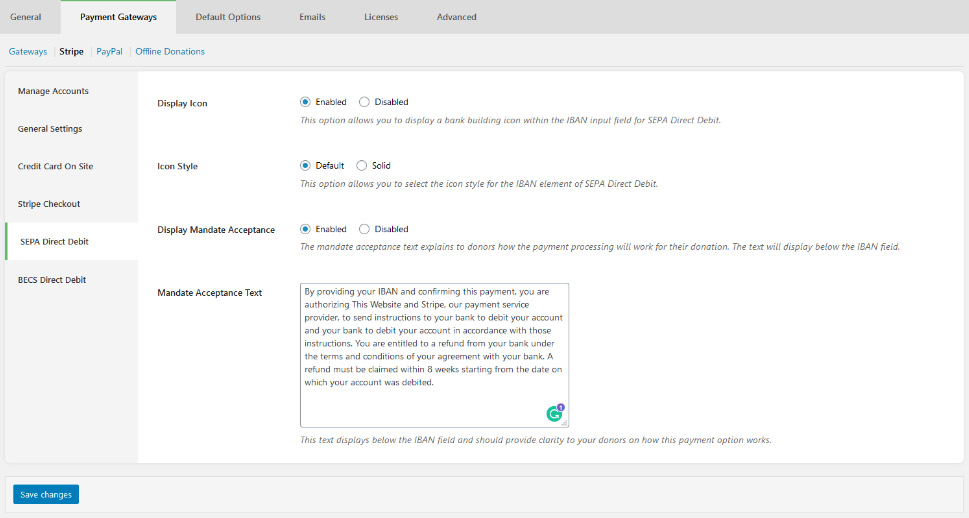
Finally, the SEPA and BECS Direct Debit options each contain the settings to display a bank building icon, choose the style of the icon, display the mandate acceptance text, and write the text.
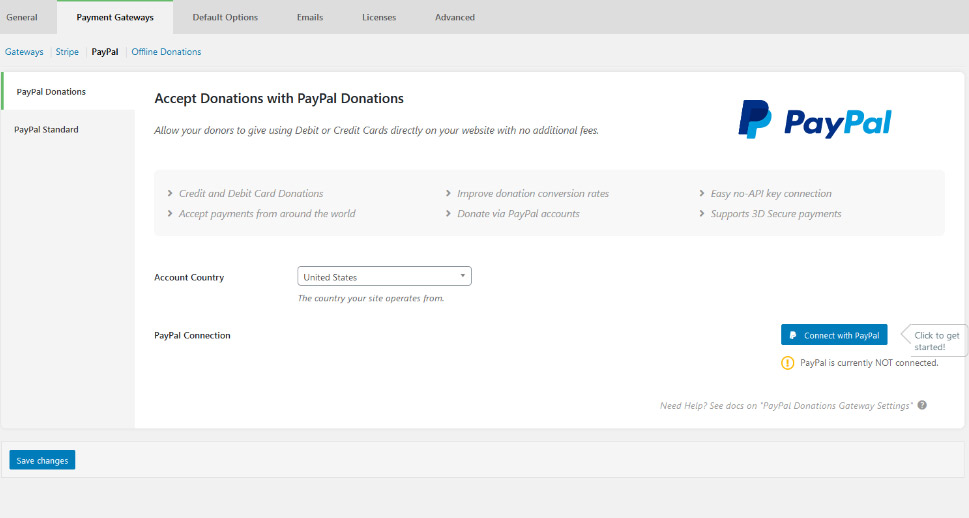
Next are the PayPal options. First you have PayPal Donations – the preferred method of payment you can enable by choosing your country and clicking the blue “Connect with PayPal” button. You will need a business account with PayPal for this to work. You might also be eligible to pay slightly lower fees if you can prove to PayPal if you have a charitable organization. Either way, clicking the button will let you connect the plugin to your PayPal Business account, or create a new one if you don’t have one already.
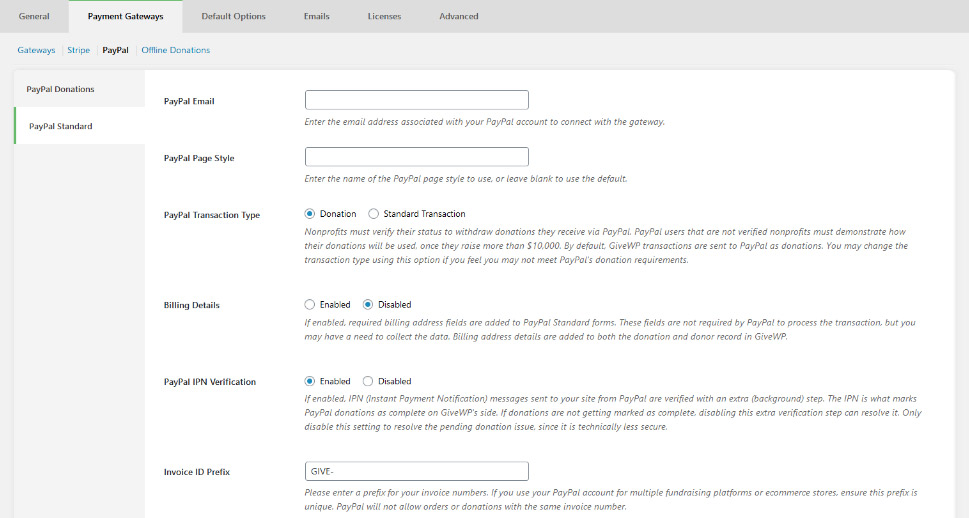
PayPal Standard might still be available, but it’s deprecated by PayPal which is why GiveWP encourages its users to use PayPal Donations. If you still want to try the Standard version out, you’ll need little more than an email address connected to a Business account. The other options you’ll be able to set include page style, transaction type, billing details requirements, IPN verification, and the invoice ID prefix.
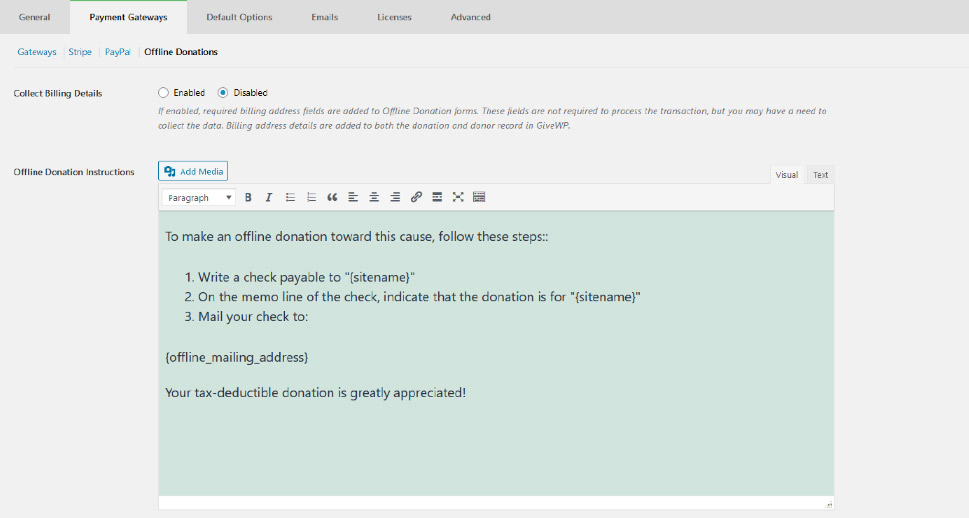
In the Offline Donations subtab, you’ll be able to decide whether to collect the billing information or not. It’s also the place where you’ll write the instructions for offline donations that will be sent to donors who choose to give offline.
Default Options
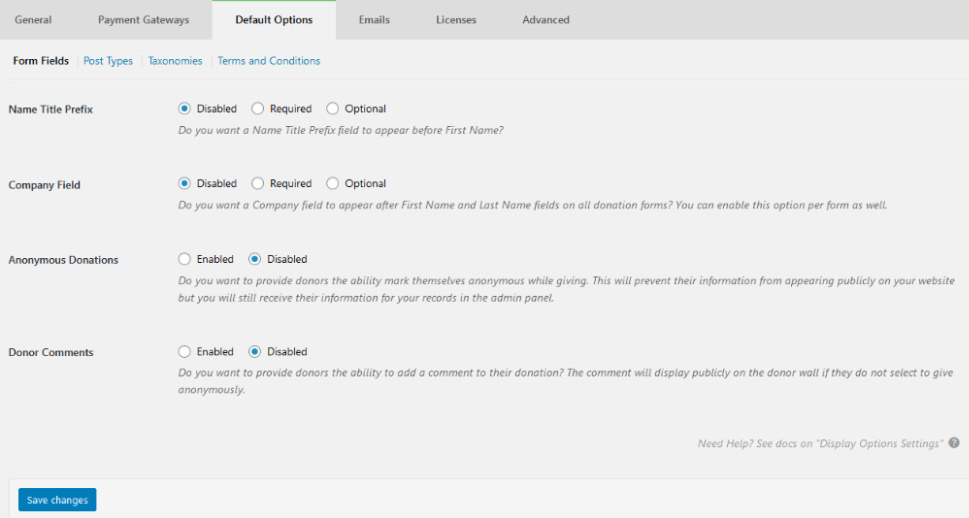
The Form Fields subtab is concerned with adding name title prefixes and company fields. However, it’s also the place where you can enable anonymous donations and allow donors to add a comment. Both of these can choose what you can and cannot display on your website later, in the Donor Wall.
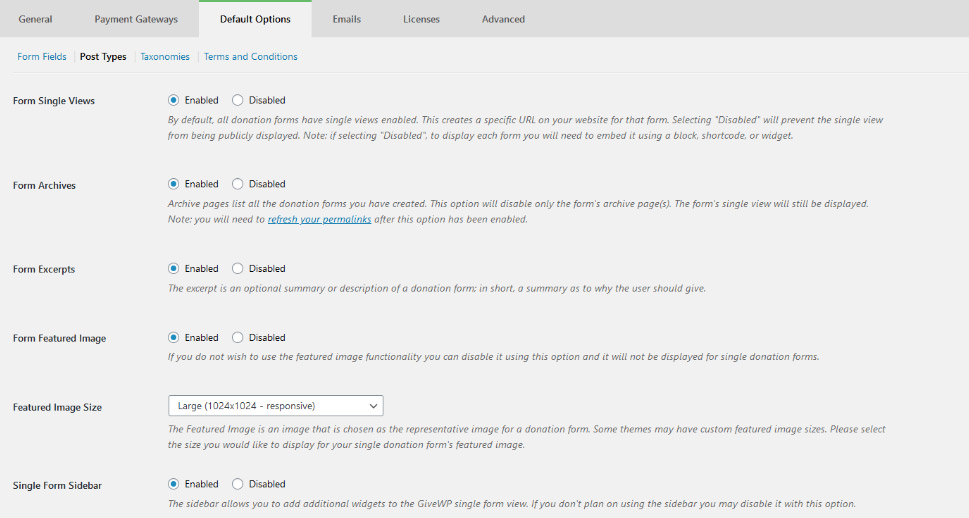
Under Post Types, you’ll have the option to enable or disable Form Single Views, deciding whether or not to assign your form a URL on your website. You’ll also be able to enable or disable form archives, pages that display all the forms you’ve created. Form excerpts and featured images are also enabled in this subtab, and you’ll be able to set the image size.
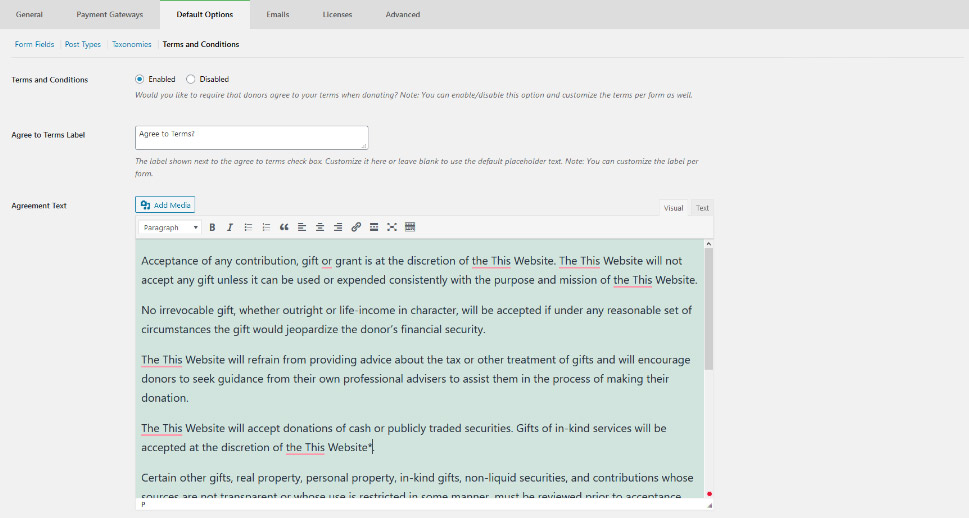
Under Taxonomies, you will be able to choose whether to enable categories and tags for forms. Finally, in Terms and Conditions, you’ll be able to choose whether you need the donors to agree with your terms and conditions, and you’ll also be able to provide the text of the agreement.
Emails
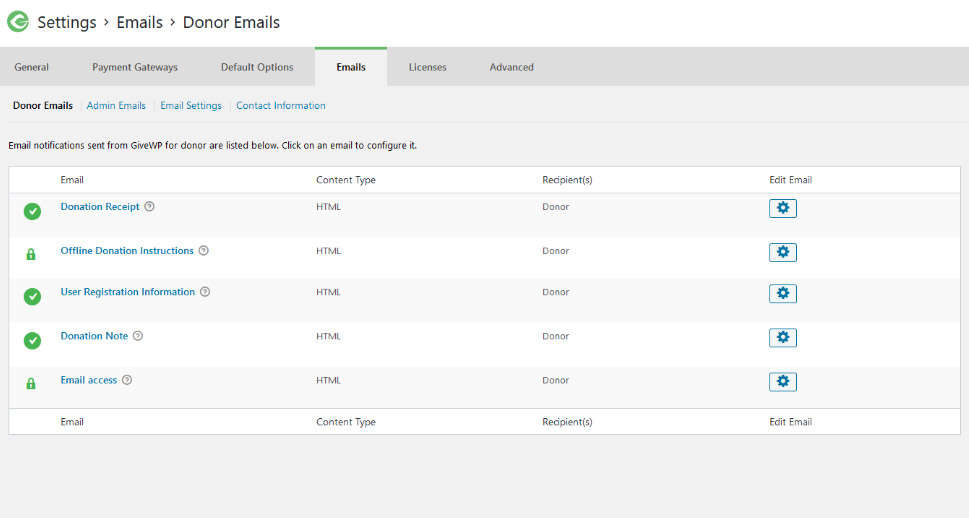
Under the Emails tab, you will find options for both donor and admin emails, sorted by the action that triggers them. You’ll have the option to disable each of the email types, choose their subjects, headers, the body of the message, the type of the content, and the email recipients where applicable.
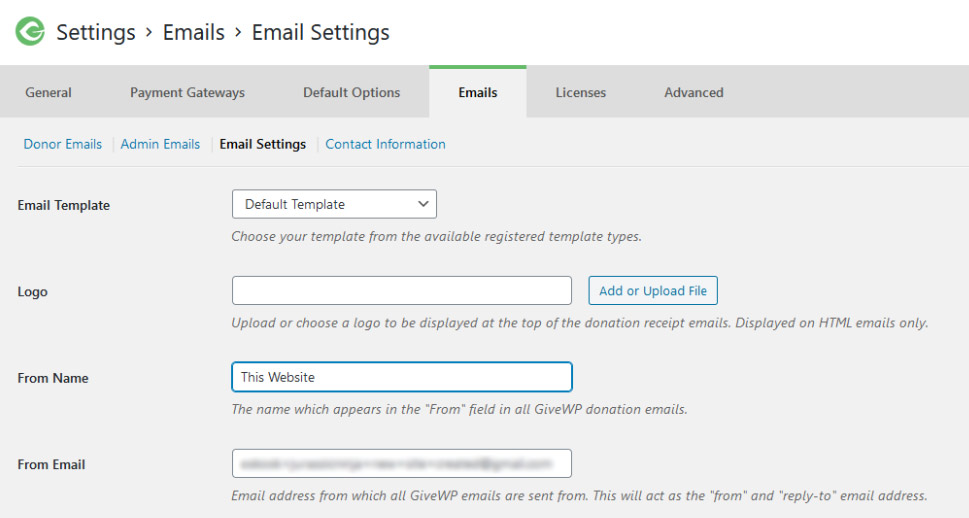
Under Email Settings, you’ll be able to choose the email template, add a logo to the email, choose the name that appears in the “From” field, as well as the email address of the sender. The Contact Information is where you enter the admin email address, as well as the offline mailing address.
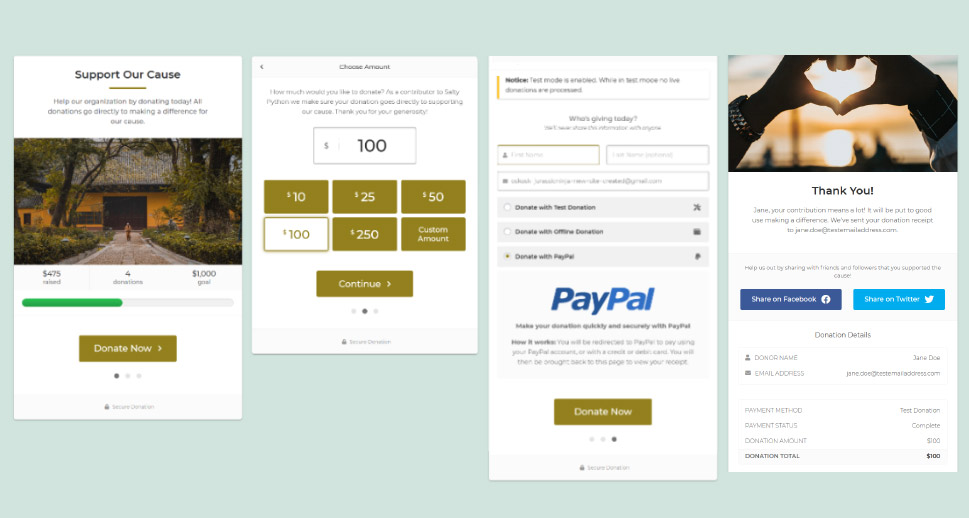
After you’ve set everything up, the next step would be to create your very first donation form. Head straight for Donations > Add Form and face the first choice – which form template to use. The multistep donation form guides the donor through the donation process in four steps. The legacy donation form has it all laid out in a single field. The choice is aesthetic, sure, but it might also come down to compatibility with your theme – so make sure to test whatever you choose.
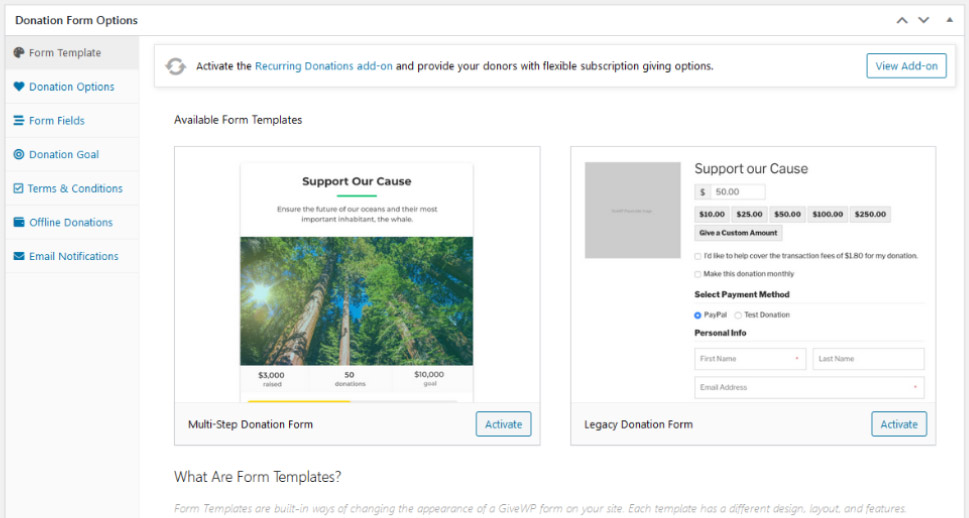
Whichever template you choose, click on the “Activate” button near it to see the options for that specific template. We’ll use the multistep form.
Form Template
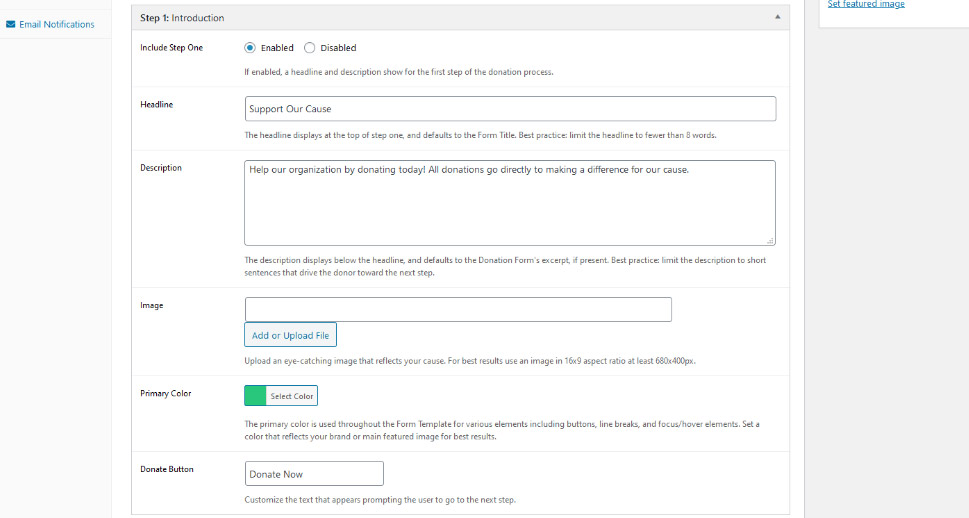
The first step is the introduction – it’s not a mandatory step so you can disable it if you want to. However, leaving it in gives you a chance to use your words and visuals to bring your cause closer to the donor.
If you have a dedicated landing page for the form, it makes perfect sense to skip this step. If you decide to keep it in, make sure you write a captivating headline, a good description, choose an appropriate image and pick a good primary color – one of the only styling options at your disposal from within the plugin.
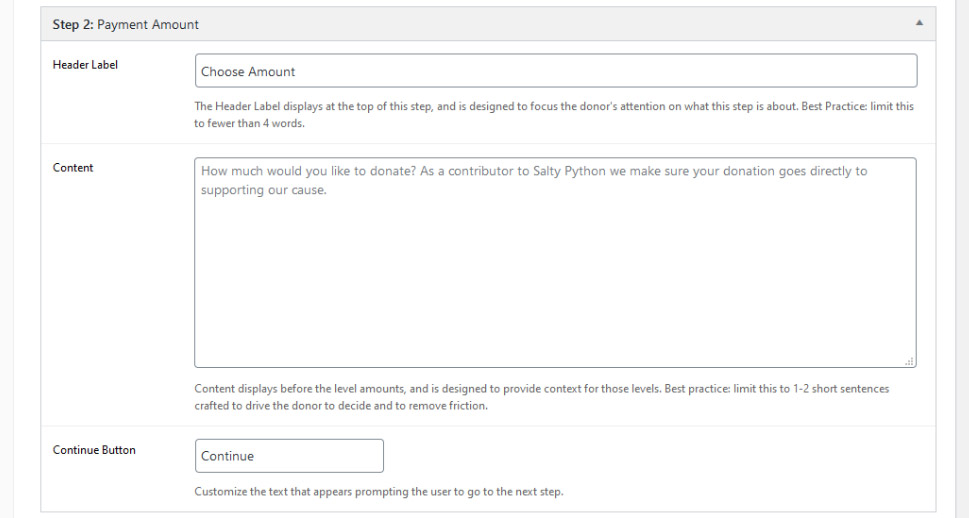
The second step is where people will get to choose the amount of money to donate. You’ll have the option of writing a header label, content, and choosing the text on the button that moves the donor on to the next step.
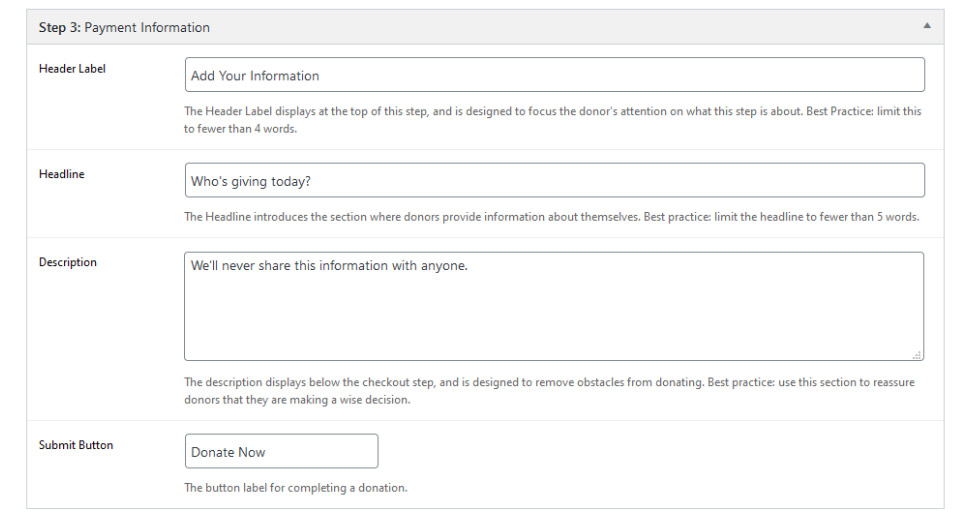
The third step is concerned with payment information. Customize it with the text for the header label, headline, content, and the submit button.
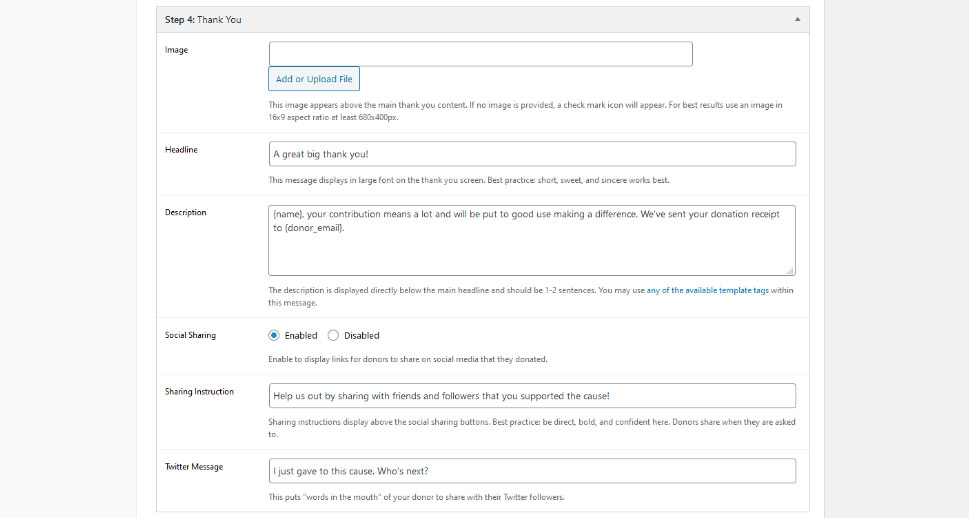
The final step is the thank-you step. Use it to show appreciation of the person donating to your cause and choose whether you want to enable social sharing. Underneath the form, you’ll be able to fill out an excerpt and choose the author.
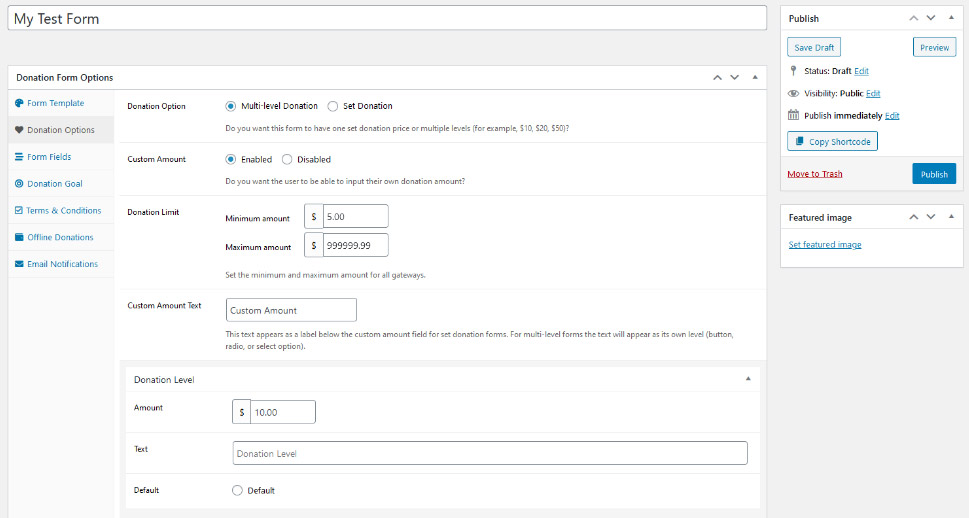
Donation Options
In the Donation Options, you’ll be able to choose whether you want the donation to be multilevel or set. You can disable the custom amount and set donation limits. If you choose multilevel donation, you’ll be able to set the amount for each level, as well as the text that follows it. You’ll also be able to pick the level that will be viewed as default.
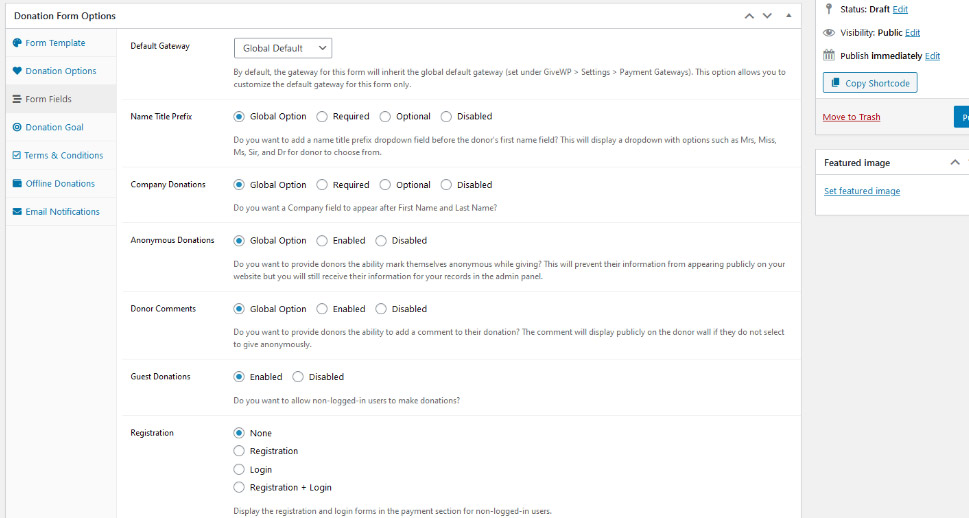
Form Fields
Form Fields deal with options you’ve probably already set. For starters, you can choose the default gateway for this form, or use the one that’s been set as default globally. You’ll see familiar options such as the name title prefix, anonymous donations, and donor comments. You can choose to give them values specific to this form, or you can use the global setting you’ve already made.
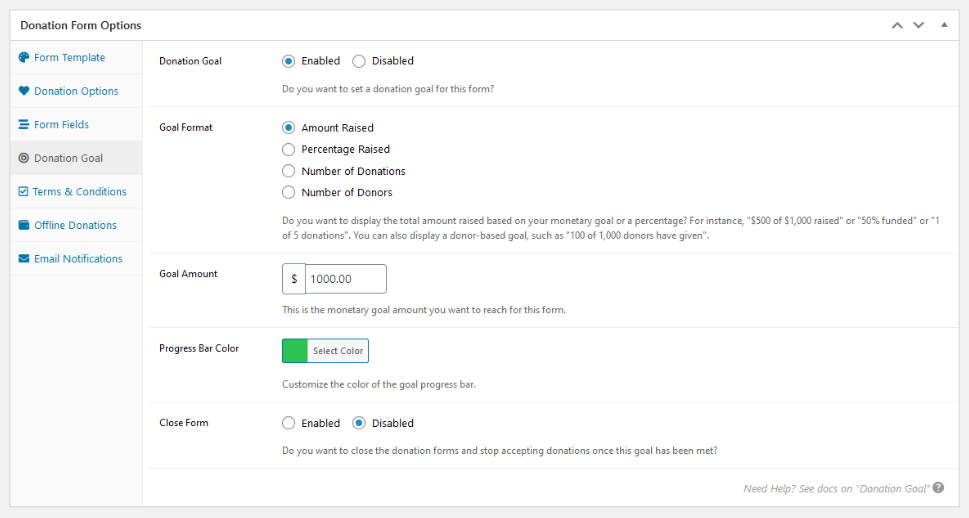
Donation Goal
If you want, you can enable a donation goal. It can be amount raised, percentage raised, number of donations, or number of donors. You can set the limit, choose the color of the progress bar, and pick whether you want to use a close form or not.
The remaining options – Terms and Conditions, Offline Donations, Email Notifications – are the same options you’ve already had the chance to set in the Settings. If you want to do something different than what you’ve already set – disable them, enable them, change them – you can do so here. If you’re happy with the global settings, you can skip them altogether.
As soon as you press the “publish” button, your first donation form will go live! It will have its permalink if you want to use it as a standalone page, and it will also have a shortcode you can use to insert it into a page.
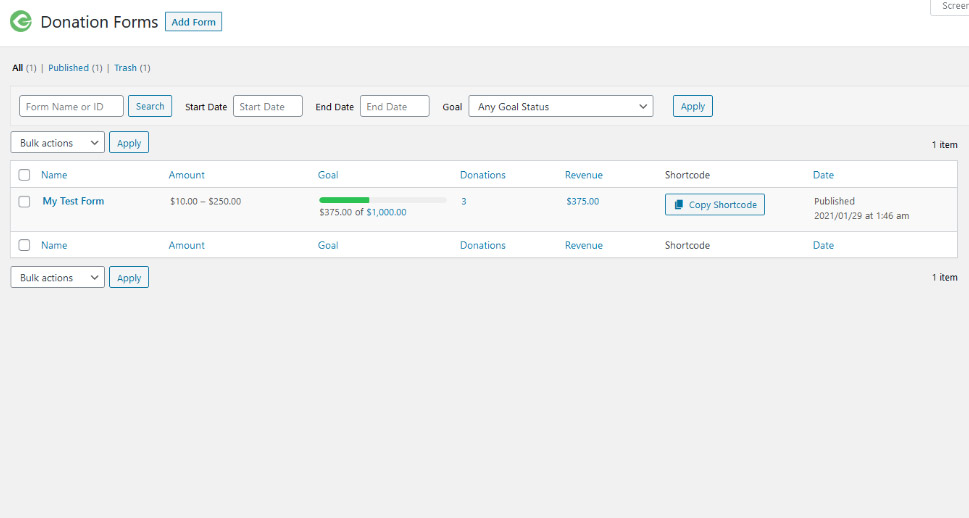
Adding the Form to a Post
If you head over to Donations > All Forms, you’ll find your form. Click on the “Copy Shortcode” button, and you’ll be able to insert your form on any post or page on your website.
When using the block editor, you’ll notice that GiveWP has added a couple of new blocks, including the donation form block. Add it to a post, and use the dropdown menu to choose the form you want to add.

You’ll see how the donation form looks in your post. You’ll also be able to test it, if you’re still in test mode, to see if you’ve connected everything well. If all goes according to the plan, you’ll be able to go through all the steps and see the thank you page.
Make a Test Donation
The next thing you should probably do is check whether you’ve configured everything well. While still in test mode, head over to a page or a post that contains your form and see whether you can create a couple of test payments. You can connect to Stripe while its test mode is toggled on to test it. PayPal Standard doesn’t have a test mode – if you see a page where you can make a payment, everything’s connected well, no need to finish the payment. Test donations and offline donations don’t need any other settings, either.
Create a couple of donations, and then head over to Donations > Donations, and check out your donations and donors. The offline donation will be marked as Pending, but that’s by design. You’ll have to manually switch offline donations to “completed” in the future once you receive them.
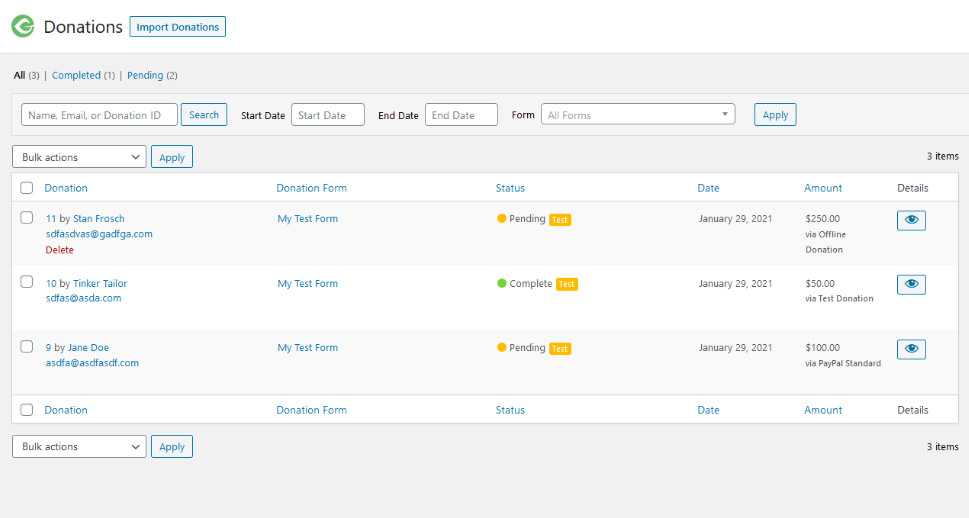
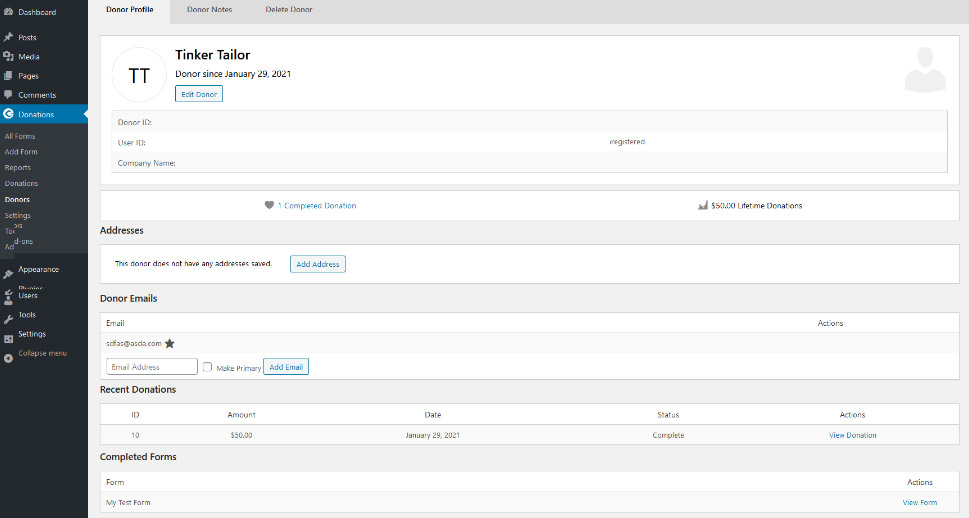
But now that you have a couple of donations, you’ll also have a couple of donors. Head over to Donations > Donors, and you’ll see a list of your donors. Clicking on any of their names will open their profile.
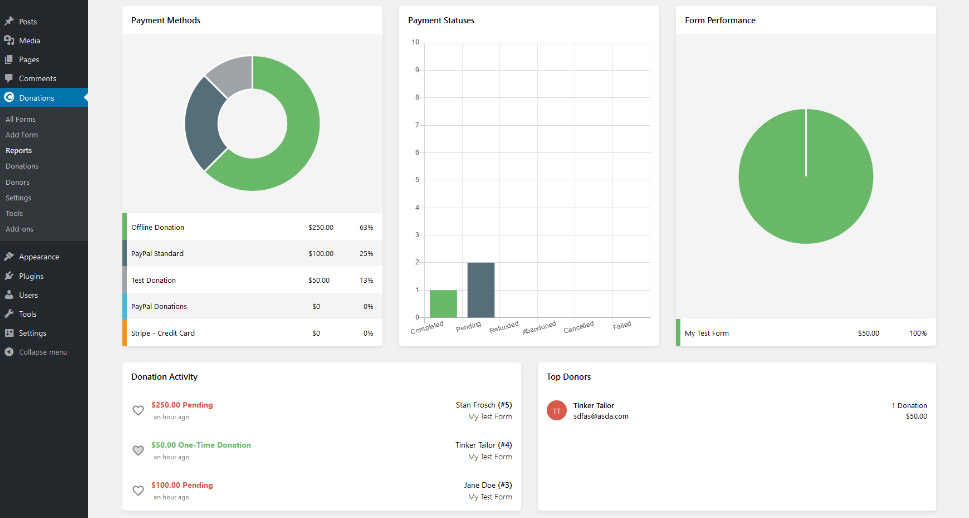
If you head over to Donations > Reports, you’ll start seeing some statistics for your forms, too. These will get better and more useful the more data there is in them.
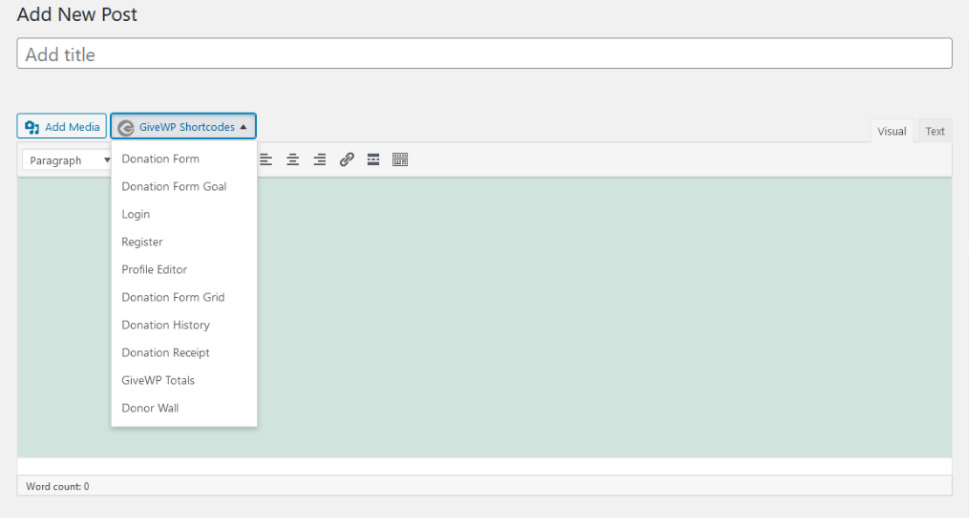
From there on, you can explore the plugin a bit more. You can see what other blocks the plugin lets you add using the block editor – you don’t have to add the whole form to a post, for example. You can add just a block that will serve as a link that takes the donor to the form. You can also add the donor wall – a block with names of all the donors who didn’t want to be anonymous. And if you have the classic editor, you can play around with the shortcode builder, which doesn’t work with the new block editor.
And then, when you think you’ve set up the plugin well and you’ve tested it thoroughly to provide it, you can go back to Donations > Settings > Payment Gateways, and under Gateways turn the Test Mode off. Your website and GiveWP will be in business then.
Change the Way Your Forms Look
You might have noticed that GiveWP gives you very limited customization options when it comes to how the forms look. There’s no add-on that can help with styling, either – you will have to do it the old fashioned way. So get ready to add some custom CSS to your website. At least that’s how you style the legacy form.
Styling the multistep form is slightly different. This type of form loads on your page as an iframe, which is a document within your page. That way, it’s loaded independently from your WordPress theme, which is great for avoiding conflicts, but it also means that you’ll have to add custom code to your website in order to change the way this form looks.
Let’s Wrap It Up!
Want to raise funds for a local animal shelter? Looking for ways to help people stricken with specific illnesses? Or are you trying to save the planet by bringing green technologies into communities that desperately need them?
Unfortunately, the world is full of causes worthy of your time and your donators’ money. You probably won’t have a problem picking one that’s closest to your heart – or one where you can make the biggest impact. Thanks to WordPress and GiveWP, you won’t have much trouble giving people a way to donate to your cause.