Você não gostaria de mover seu aplicativo para fora do ambiente de desenvolvimento local e colocá-lo em um URL acessível publicamente? Ainda assim, encontrar um serviço bom (e gratuito) para implantar seu aplicativo Node.js não é tão fácil.
Neste tutorial, veremos como implantar uma API Node.js construída com Express.js e MySQL para três serviços diferentes. Usaremos o aplicativo API para linguagens de programação que criei para minha postagem anterior em Node.js e MySQL .
Todos os serviços listados nesta postagem são totalmente gratuitos e a melhor parte é que você não precisa pegar seu cartão de crédito-não será necessário. No entanto, só um lembrete: quando não pagamos nada, haverá algumas compensações a serem feitas.
Pré-requisitos
Conforme mencionado acima, usaremos a API de linguagens de programação, que está conectada ao MySQL em freeDB.tech . Antes de continuar, no entanto, certifique-se de:
- Você tem uma conta GitHub e conhece os fundamentos do Git/GitHub, como bifurcar um repositório
- Você pode adicionar aplicativos de terceiros à sua conta GitHub para autenticação e outros fins
Vamos começar! Para prosseguir, bifurque este repositório GitHub , pois o usaremos como exemplo.
1. Qovery
Qovery se autodenomina “a maneira mais simples de implantar seus aplicativos full-stack”. Você precisará encaixar seu aplicativo Node.js para que ele seja facilmente implantado no Qovery, então vá em frente e siga este tutorial para Node.js e Docker se seu aplicativo ainda não estiver encaixado.
A IU do Qovery é intuitiva e muito útil. Começaremos registrando-se no Qovery. Vá para a página de login/inscrição e clique no botão Entrar com GitHub . Depois de autorizar o Qovery no Github, você deve estar logado no console do Qovery. Depois de fazer login, clique no botão Criar um novo projeto no canto superior esquerdo:

Consequentemente, veremos a seguinte tela:

Selecione QoveryCommunity como a organização e digite programming-language-ap `no campo Nome do projeto . Clique em Criar e veremos a próxima tela:

Em seguida, clique em Ir para o projeto . Você deve ver algo semelhante à página abaixo:
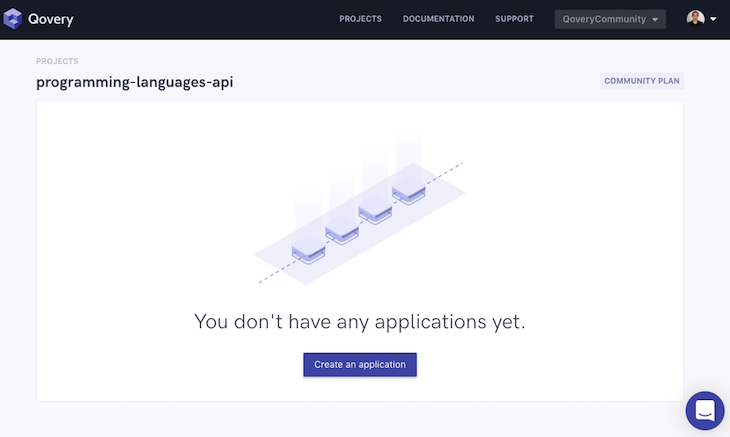
Nesta página, clique em Criar um aplicativo .
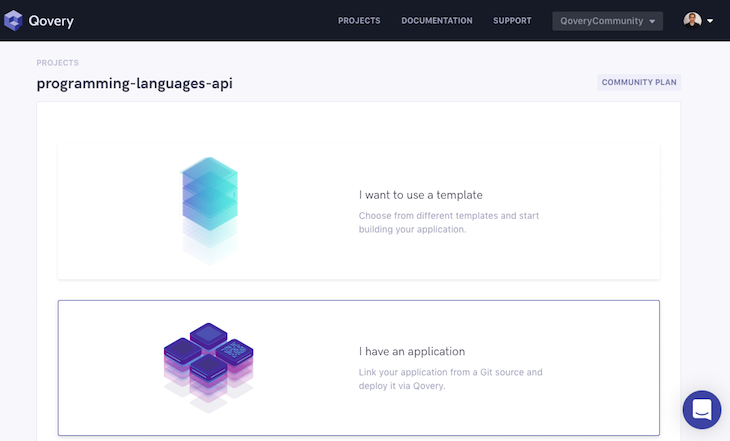
Em seguida, clique em Tenho um aplicativo .

Agora selecione Conectar ao GitHub e escolha a API de linguagens de programação do repo que criamos anteriormente.
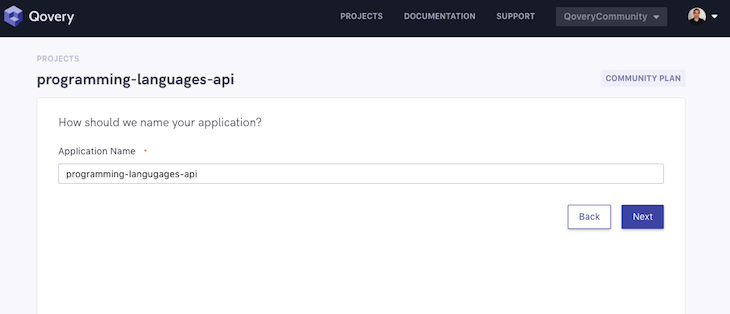
Depois disso, verifique o nome do aplicativo (você pode alterá-lo se quiser) e clique em Avançar .

Na tela de seleção do banco de dados, clique em Avançar sem selecionar nenhum banco de dados, pois nosso banco de dados MySQL já está hospedado e configurado em um serviço diferente.
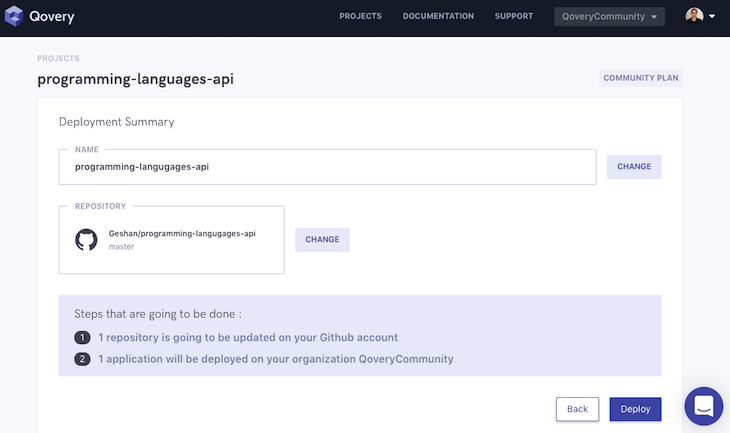
Por fim, clique em Implementar e aguarde algum tempo até que o aplicativo esteja pronto.

Em seguida, clique no botão “ Vá para o botão do projeto ”.

Aguarde mais algum tempo para que o aplicativo seja implantado. Você verá a mudança de status para executando, como abaixo:

Clique no link Abrir para ver nosso aplicativo em execução:

Podemos adicionar /programming-languages ao URL para ver a lista de nossas linguagens de programação servidas pela API GET da seguinte maneira:

Ótimo! Nosso aplicativo está rodando em Qovery. Além de fácil implantação, o Qovery também oferece outros ótimos recursos, como um ambiente e URL para cada filial. Para obter mais recursos, dê uma olhada nos documentos do Qovery .
2. Vercel
Vercel , anteriormente conhecido como Zeit, atua como uma camada sobre o AWS Lambda para executar seus aplicativos. É uma plataforma sem servidor que pode executar uma variedade de coisas com um foco mais forte no front-end. Felizmente, Node.js é um dos tempos de execução oficiais no Vercel. Nossa API Express Node.js regular pode ser executada no Vercel com um arquivo vercel.json bem configurado. Vamos ver como:

Vá para a página de inscrição do Vercel e clique em Continuar com GitHub . Depois de se autenticar, clique em Novo projeto :
Você verá a tela abaixo:
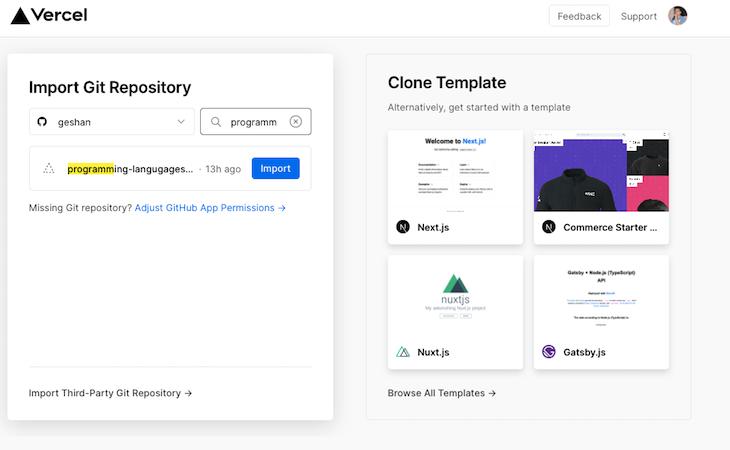
Na lista de seus repositórios GitHub, pesquise por programação , encontre o repositório de API de linguagens de programação e clique em Importar .

Consequentemente, clique em Selecionar em sua conta pessoal-observe que apenas contas pessoais são gratuitas no Vercel.

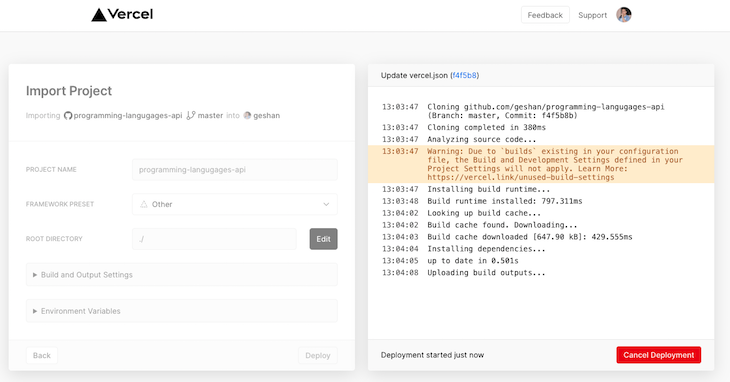
After that click, Continue to confirm the root is the base folder, as above.
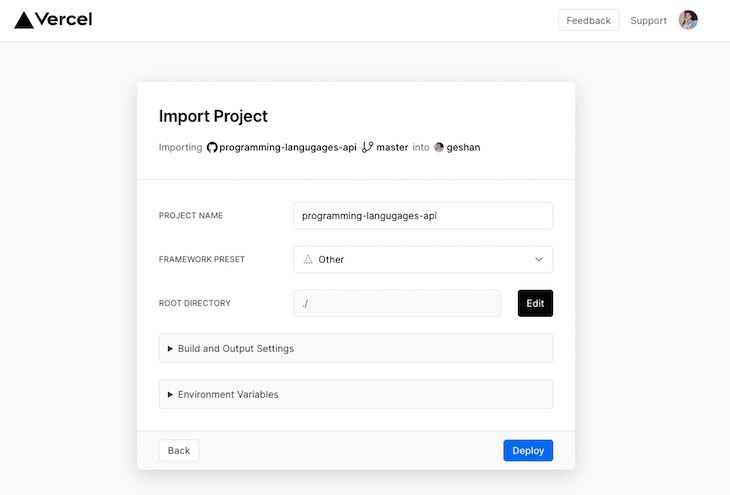
In the above screen, select Other as the framework and click Deploy. It will take some time to build the project:
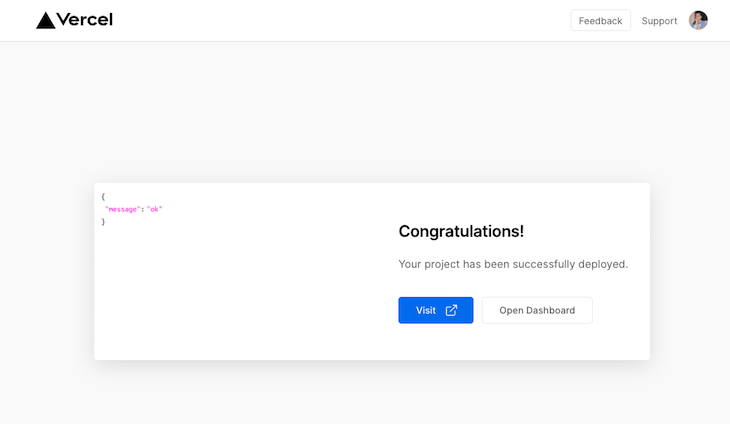
Then you will see the congratulations page to visit the deployed project:
When you click Visit, you’ll see something like the below:
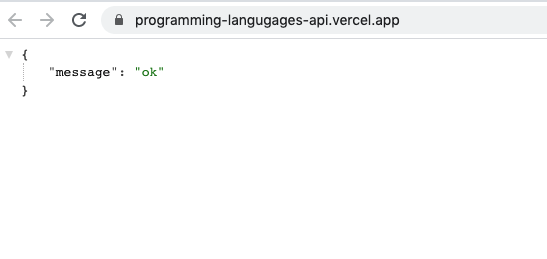
To check the database connection, we can add /programming-languages to view the following output:

Hurray! Our app is running on Vercel now. Please be careful of the vercel.json file in the repo — that config is required for Vercel to run the Node.js build for our project.
3. Heroku
Heroku is a pioneer in the platform-as-a-service market. It started out as a Ruby deployment service and has expanded to support languages like Node.js, Python, and PHP, to name a few.
Let’s proceed to deploy our application to Heroku. First, you will need to sign up:
Then log in to Heroku.

On the dashboard page, click on New and then Create new app, as above.
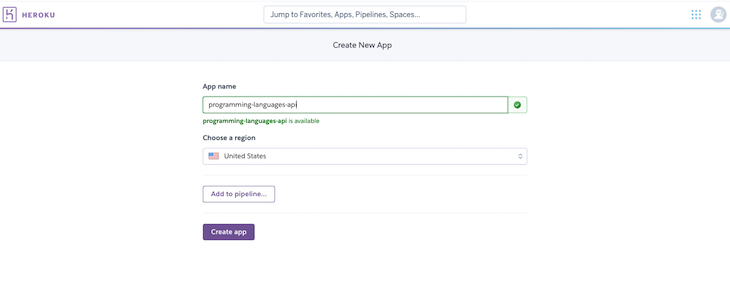
After that, type in a name for the app, like programming-languages-api in the above case. You might need to type in something different and available. Consequently, hit the “Create app” button.

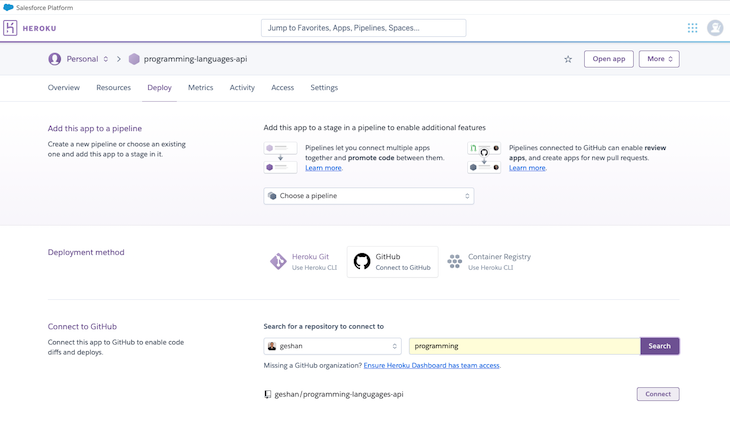
On the above screen, click GitHub and select Connect beside the programming-languages-api repo you had forked in the first step.
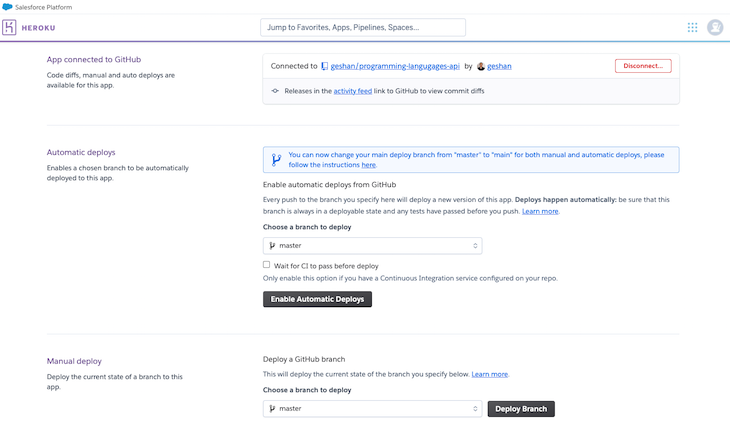
After that, scroll down and click Deploy Branch for the master branch.
We will see the build, deployment logs, and a success message, like below:
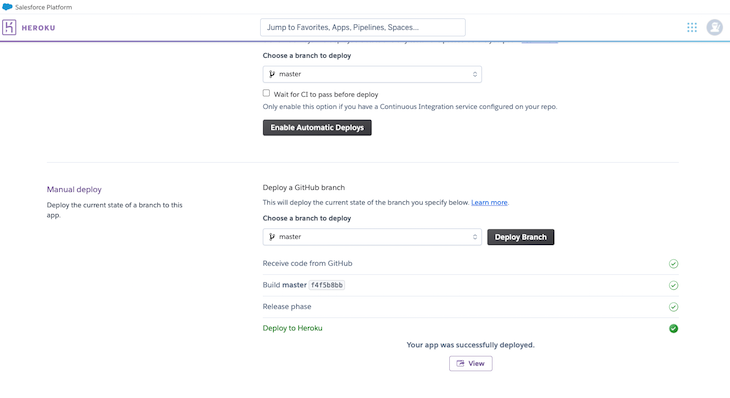
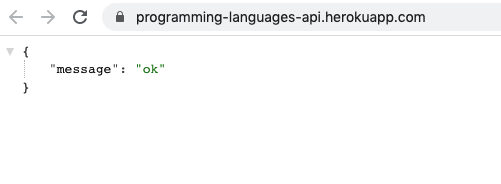
Click on View to see an output like below:
Next, we can add /programming-languages to the URL to see that the app is able to connect to the database and render the rows correctly:
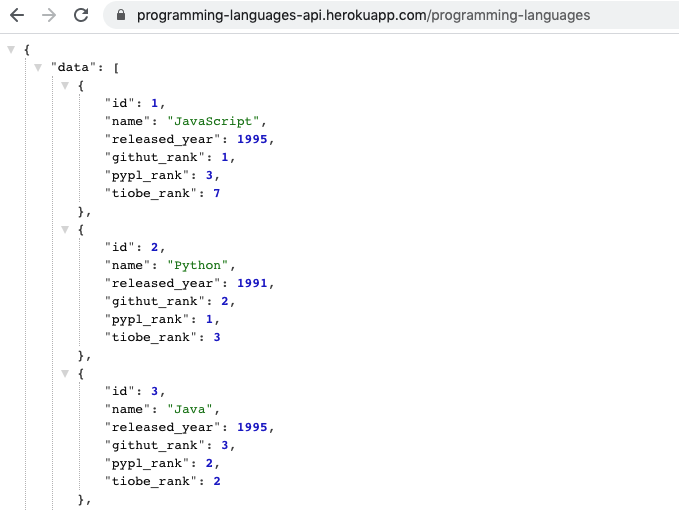
Yay! Our app is working fine on Heroku, too. Another tip is to turn on the Enable Automatic Deploys for your master/main branch. This means each change to the main branch will be automatically deployed.
You can find the Enable Automatic Deploy button above the Manual deploy section, as seen below:

One issue with the Heroku free plan is that the dyno sleeps after 30 minutes of inactivity. A workaround is to use Kaffeine to keep your apps awake even after 30 minutes of no requests hitting it.
Other options to consider
Those were the three amazing services that let us deploy a Node.js application for no cost at all, with no need to enter our credit card number. Of course, there are other services with which you could potentially run your Node.js app for no cost, but you will need to enter your billing information.
Here are some options I have tried:
- Google Cloud Run: part of the Google Cloud platform that runs serverless containers. You could get up to 2 million requests per month for free
- Fly.io: a CDN-as-backend kind of concept. Deploy your app servers close to your users. You could run three small VMs for free
- Openode.io: free only for open source projects. but the most affordable plan is $0.75 per month with 50 MB memory
If you are comfortable putting down your credit card, any of the above options work in a pinch.
Conclusão
All the above free services have a command line tool, too. If you are more comfortable with the CLI, you can give that a try as well.
The next good step would be to try mapping custom domains to your apps where applicable. It would be good to look at deployment logs and application logs on the mentioned services.
Till next time, happy deploying!
The post 3 services to deploy your Node.js app for free appeared first on LogRocket Blog.