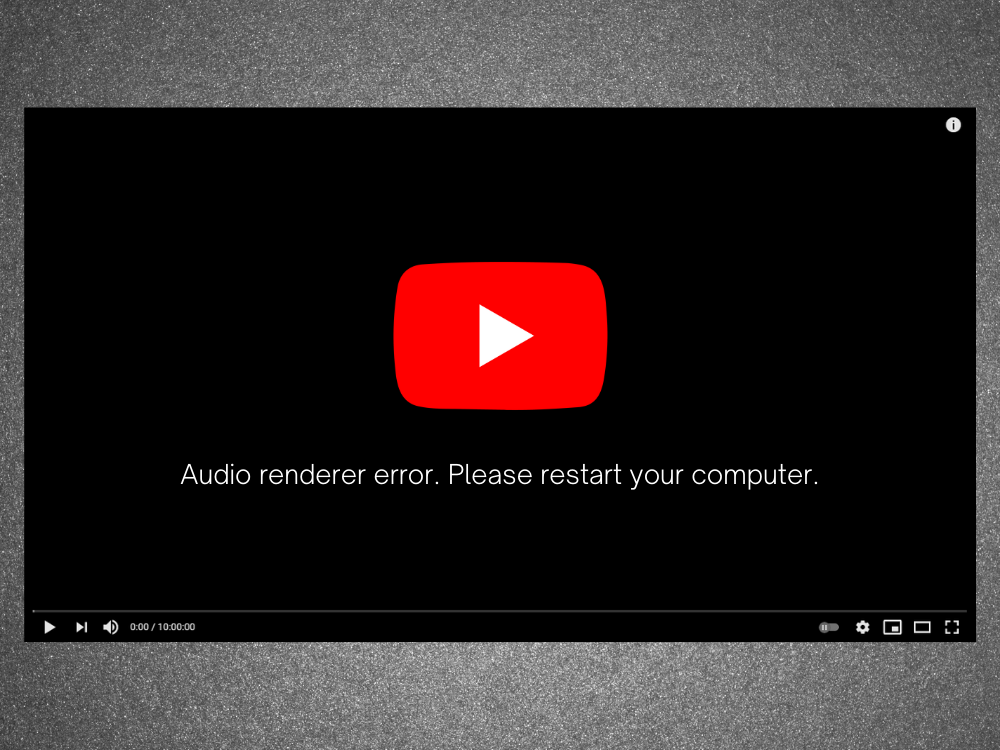
Os problemas do computador acontecem de vez em quando, portanto, você deve estar preparado para agir em qualquer situação. Por exemplo, se houver nenhum som sai do seu PC com Windows 10 , isso pode ser causado por vários problemas, como o erro do renderizador de áudio. Mas não há necessidade de pânico, pois você pode solucionar esse problema seguindo as instruções abaixo.
Erro do renderizador de áudio: reinicie o computador!
Erro do renderizador de áudio, reinicie o computador é uma mensagem de erro que aparece na tela quando o computador não consegue reproduzir as faixas de áudio. Pode ocorrer em qualquer lugar, quer você esteja tentando assistir a um vídeo no YouTube ou um filme em seu reprodutor de mídia.
O comportamento é estranho. Às vezes, o áudio é reproduzido sem problemas até que o erro ocorra repentinamente e desative todos os sons provenientes do computador. Ele gentilmente pede que você reinicie seu computador, o que parece resolver o problema.
No entanto, a reinicialização do PC é apenas uma solução temporária, já que o erro aparece novamente eventualmente. Nesse ponto, você é forçado a entrar em um loop de reinicialização do computador apenas para manter o som. É fácil ver por que isso é tão frustrante para os usuários, especialmente quando a raiz do problema não está clara.
Testamos esse problema, conversamos com vários usuários e reunimos uma lista de possíveis soluções que resolvem o erro do renderizador de áudio na maioria dos PCs com Windows 10.
Como corrigir erro de renderizador de áudio no Windows 10
O erro de renderização de áudio pode ser causado por um problema com o navegador da web ou com as configurações do computador. É importante ter paciência, porque pode demorar um pouco até que você esgote todas as opções.
Antes de começar a solucionar esse problema irritante, é aconselhável configurar um ponto de restauração do sistema . Ele permite que você reverta o Windows 10 para um estado estável caso encontre mais problemas ao longo do caminho.
1. Limpe o cache de navegação
Muitos usuários relatam ter recebido o erro do renderizador de áudio no YouTube. Isso pode ser causado por um problema de navegador, como cache e cookies salvos. Uma maneira simples de corrigir isso é atualizar seu navegador da web intensamente . Para que isso aconteça, basta selecionar a guia YouTube e pressionar Ctrl + Shift + R . Em seguida, verifique se ainda recebe o erro.
É apenas uma correção temporária, pois você ainda precisa limpar o cache do navegador da maneira tradicional.
Como limpar o cache do Chrome:
- Inicie o Chrome e abra o menu Mais no canto superior direito
- Vá para Configurações
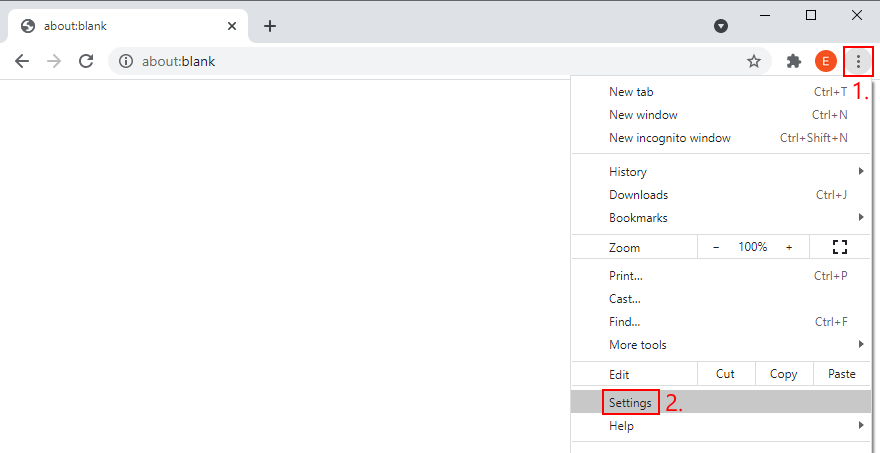
- Vá para Privacidade e segurança no lado esquerdo
- Clique em Limpar dados de navegação . Como alternativa, você pode inserir o endereço
chrome://settings/clearBrowserData
- Permaneça na seção Básico
- Defina Intervalo de tempo como Todo o tempo
- Certifique-se de que as seguintes opções estejam ativadas:
- Histórico de navegação
- Cookies e outros dados do site
- Imagens e arquivos armazenados em cache
- Clique em Limpar dados
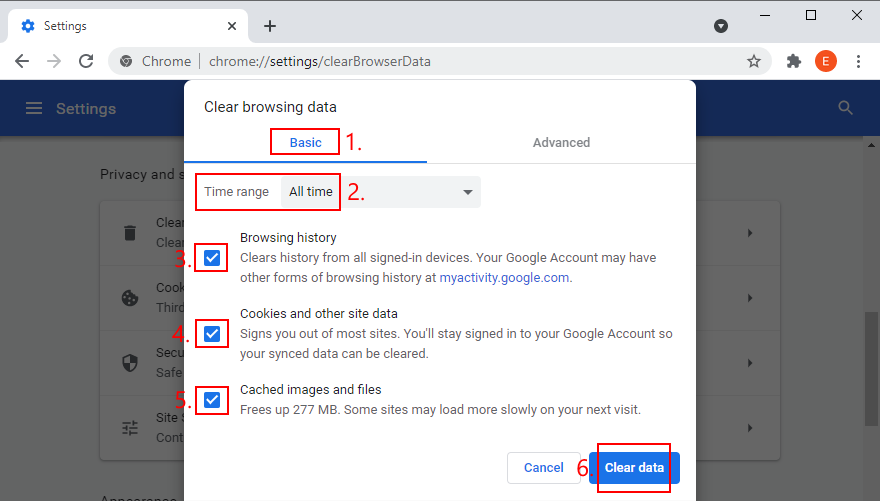
- Reinicie o Chrome e tente assistir o YouTube agora
Como limpar o cache do Firefox:
- Abra o Firefox e clique no ≡ botão de hambúrguer
- Selecione Opções
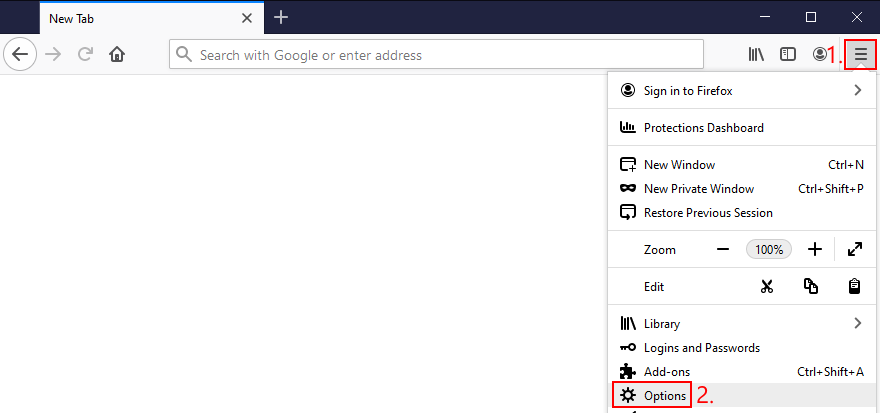
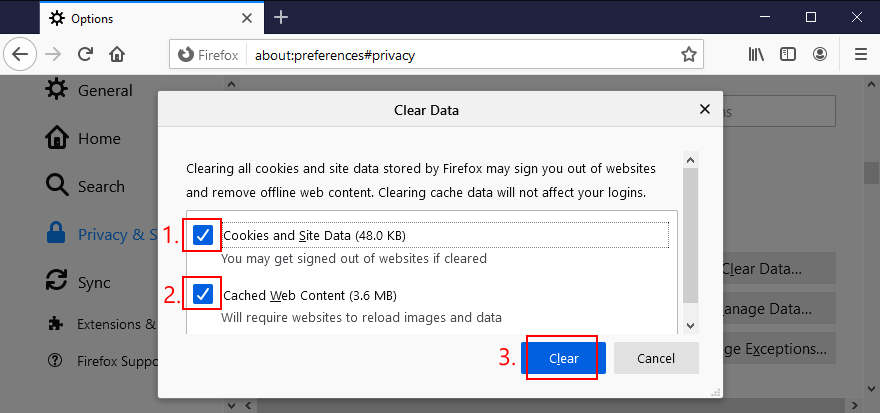
- Vá para Privacidade e segurança e clique em Limpar dados

- Verifique se as próximas configurações estão selecionadas:
- Cookies e dados de sites
- Conteúdo da web em cache
- Clique em Limpar
- Reinicie o Firefox e verifique se há erros de áudio
Como limpar o cache do Microsoft Edge:
- Inicie o Microsoft Edge
- Clique no botão Mais no canto superior direito
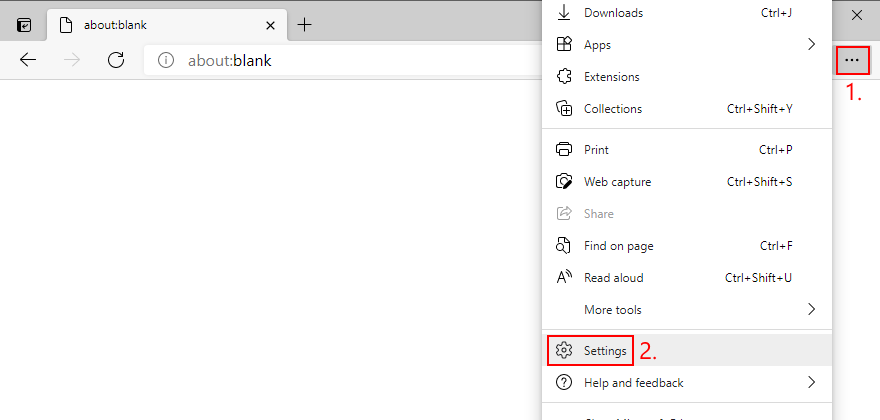
- Selecione Configurações
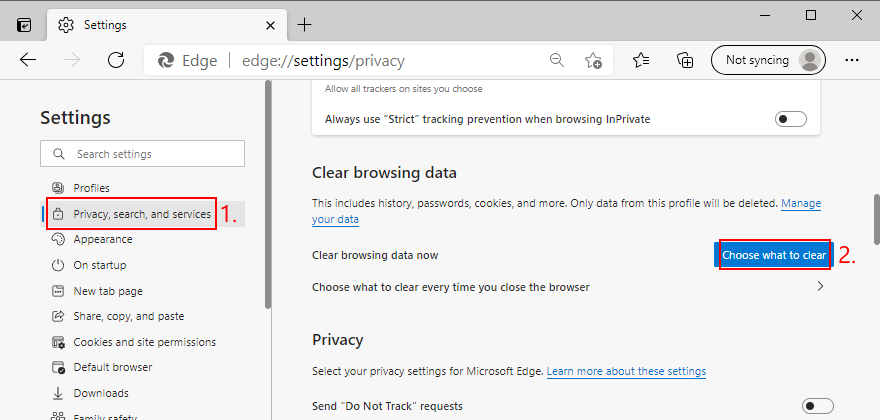
- Vá para Privacidade, pesquisa e serviços . Caso contrário, você pode usar o endereço
edge://settings/privacy- Em Limpar dados de navegação agora , clique em Escolha o que limpar
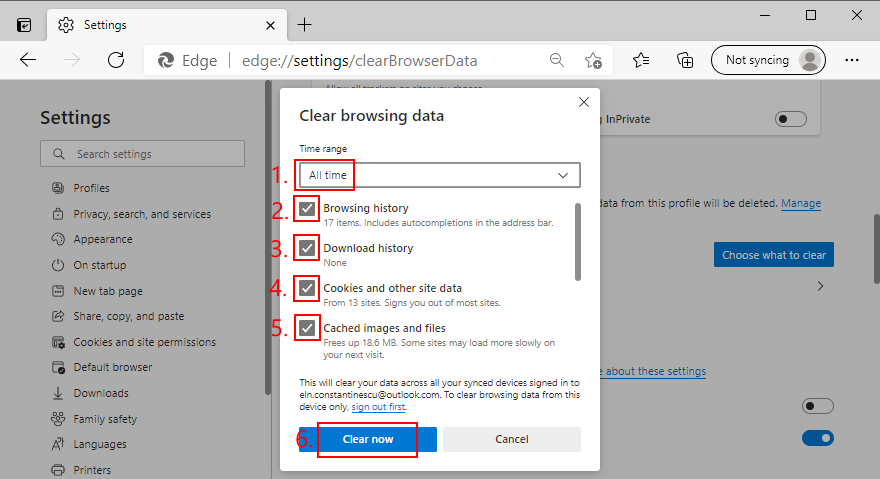
- Defina Intervalo de tempo como Todo o tempo
- Marque as caixas das seguintes opções:
- Histórico de navegação
- Histórico de download
- Cookies e outros dados do site
- Imagens e arquivos armazenados em cache
- Clique em Limpar agora
- Reinicie o Edge e tente curtir o YouTube sem problemas de áudio
- Vá para Privacidade, pesquisa e serviços . Caso contrário, você pode usar o endereço
2. Execute o solucionador de problemas de áudio
O Windows 10 vem com um solucionador de problemas integrado que corrige problemas comuns de áudio. Vale a pena tentar se você se cansou de lidar com o erro do renderizador de áudio.
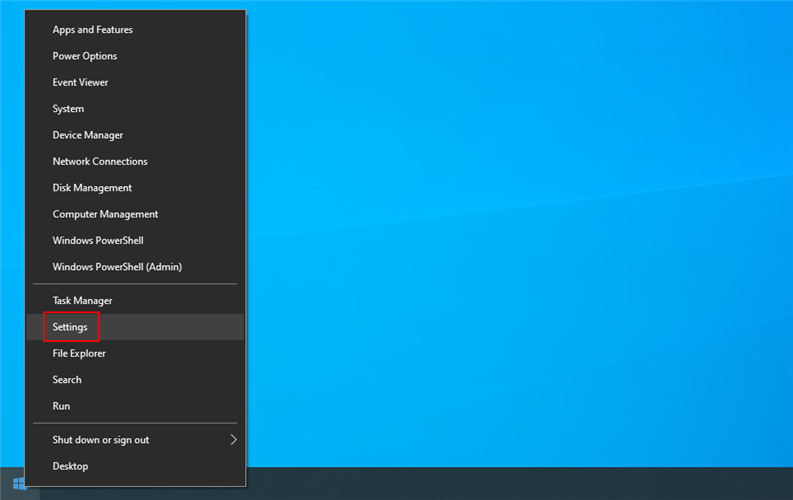
- Clique com o botão direito do mouse no botão Iniciar do Windows 10 e vá para Configurações
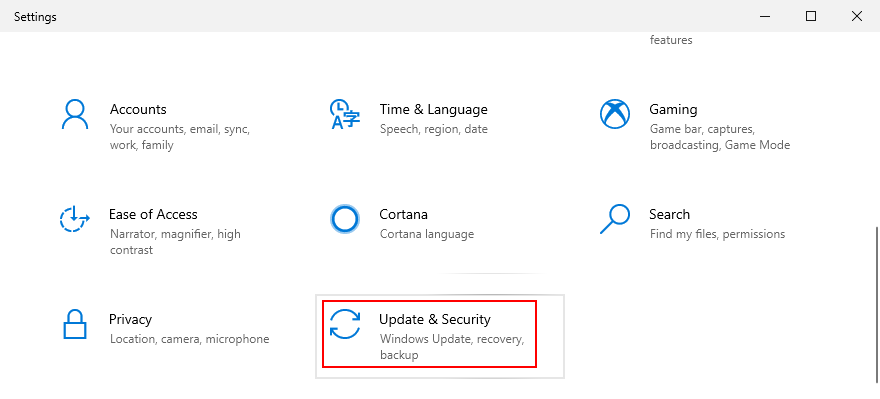
- Selecione Atualização e segurança
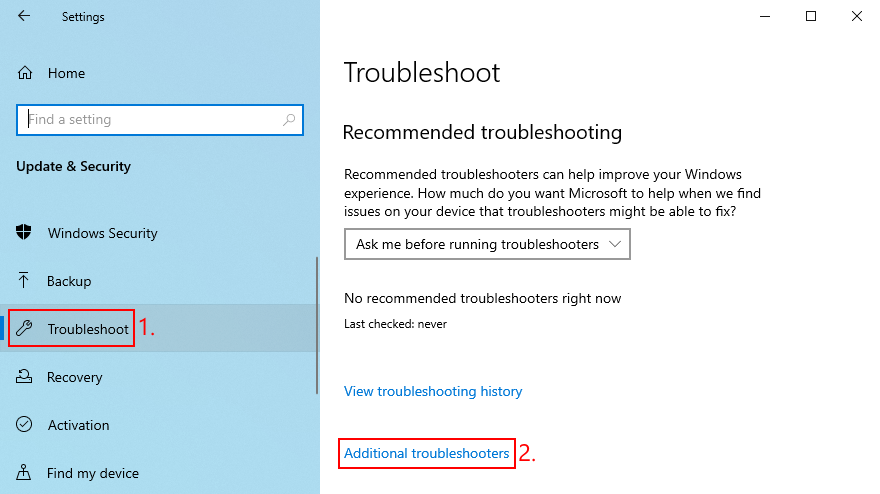
- Vá para Solução de problemas no lado esquerdo
- Clique em Solucionadores de problemas adicionais
- Selecione Reproduzindo áudio e clique em Executar o solucionador de problemas

- Siga as instruções na tela
- Verifique se há erros de áudio
3. Habilite o dispositivo de som
Se você conectou vários dispositivos de áudio ao computador, pode ter desordenado inadvertidamente as configurações do dispositivo de som e desativado o adaptador de áudio principal. Veja como reativá-lo:
- Clique no botão Iniciar , digite Painel de controle e abra este aplicativo
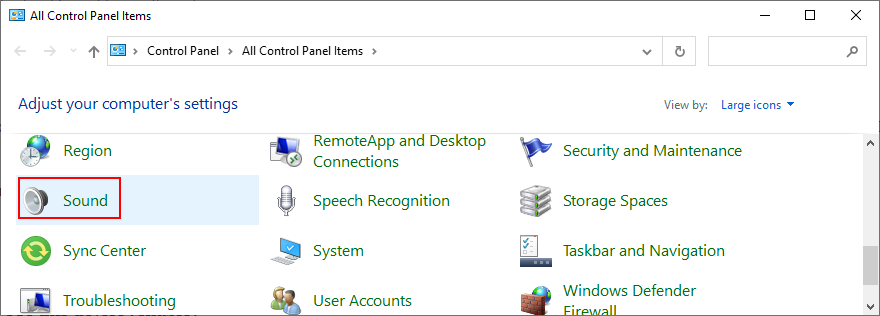
- Vá para a seção Som
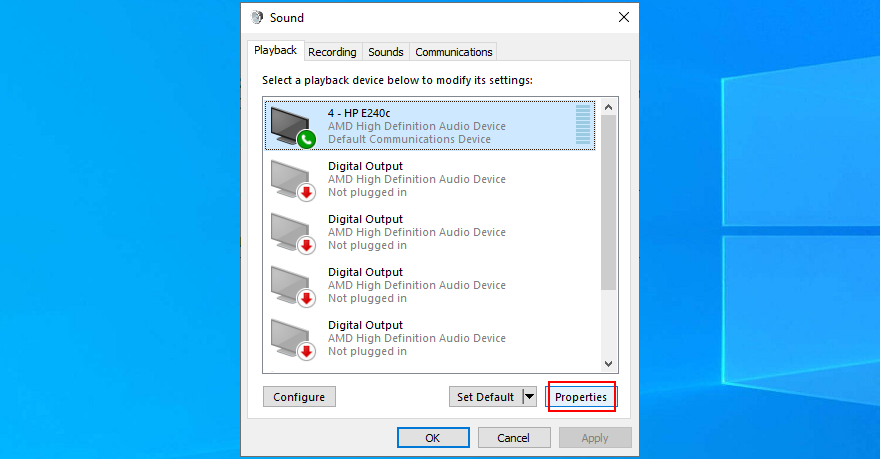
- Mude para a guia Reprodução
- Selecione seu dispositivo de áudio na lista
- Clique em Propriedades
- Na guia Geral , defina Uso do dispositivo para Usar este dispositivo (habilitar)
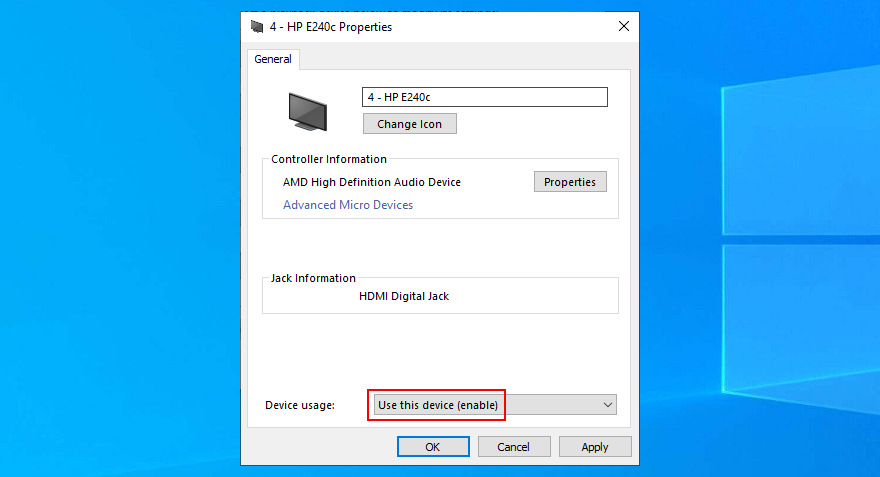
- Clique em Aplicar e saia
- Verifique se há problemas de áudio agora
4. Reinicie o serviço Windows Audio
Todos os sons que saem do seu computador são operados por um serviço de segundo plano. Se esse serviço não estiver em execução no momento, for interrompido com frequência ou não iniciar automaticamente quando o Windows for inicializado, você deve esperar problemas como o erro do renderizador de áudio.
Mas você pode corrigir esse problema reiniciando o serviço de áudio do Windows. Veja como:
- Pressione a tecla Windows , digite Serviços e abra este aplicativo
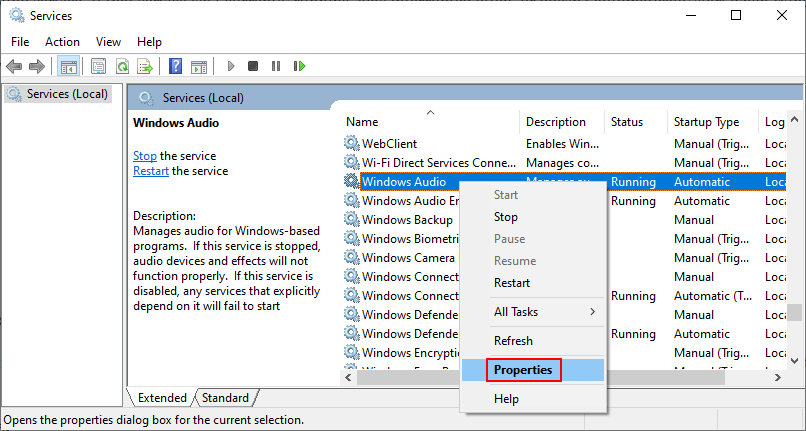
- Encontre e clique com o botão direito em Áudio do Windows
- Vá para Propriedades
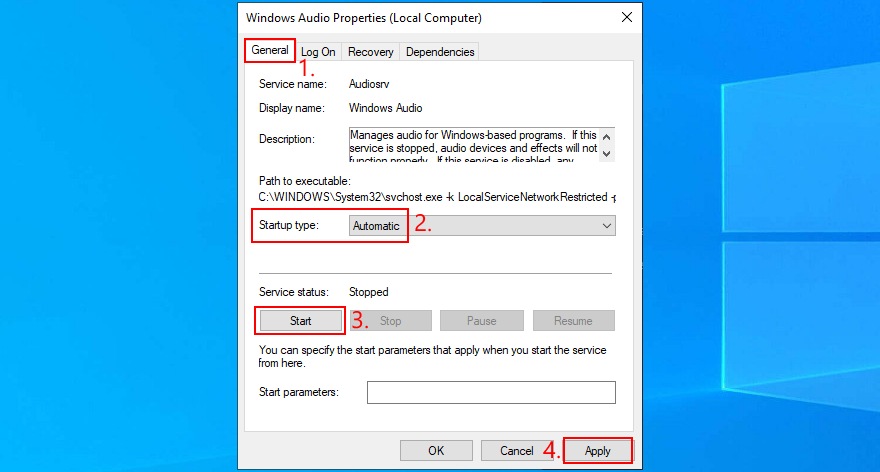
- Permaneça na guia Geral
- Defina Tipo de inicialização para Automático
- Se o status do serviço disser Parado , clique no botão Iniciar
- Clique em Aplicar e saia de
- Verifique se há problemas de áudio
5. Sincronizar a frequência de áudio (drivers ASIO)
Usuários com drivers ASIO4ALL relataram conflitos com as configurações de áudio do sistema. Mais especificamente, se a taxa de amostragem não for definida com o mesmo valor em ambas as partes, o computador começará a ter problemas de som. Veja como resolver esse problema facilmente:
- Clique no botão Iniciar , digite Painel de controle e pressione Enter
- Selecione a área Som

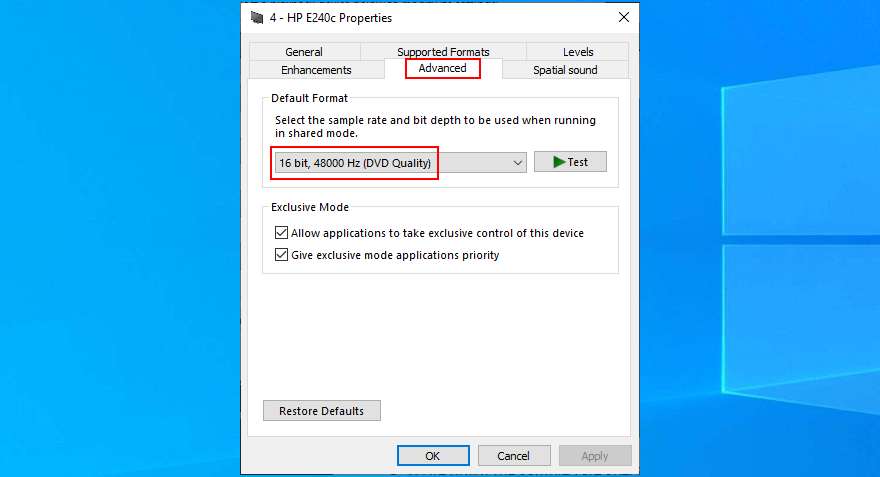
- Na guia Reprodução , selecione seu dispositivo de áudio e clique em Propriedades

- Mude para a guia Avançado
- Anote a taxa de amostragem especificada em Formato padrão
- Saia desta área
- Abra o utilitário ASIO
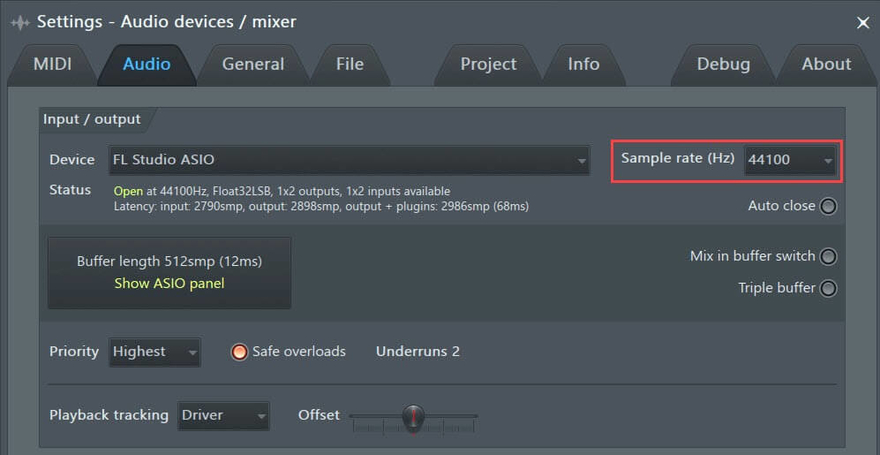
- Mude para a guia Áudio
- Defina Taxa de amostragem com o mesmo valor do Windows
- Reinicie o seu PC e inspecione os resultados
- Selecione a área Som
6. Execute testes de áudio (laptops HP)
Os usuários da HP podem recorrer a uma ferramenta de diagnóstico de áudio chamada HP PC Hardware Diagnostics (UEFI). Veja como usá-lo:
- Reinicie seu laptop HP
- Durante a reinicialização, pressione rapidamente a tecla que concede acesso ao HP PC Hardware Diagnostics (UEFI)
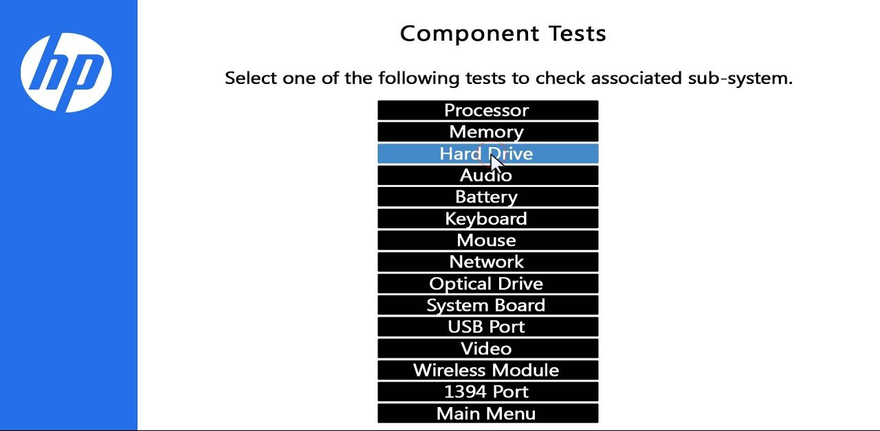
- Vá para a seção Áudio
- Clique em Executar uma vez para começar a avaliar seus dispositivos de áudio
- Selecione Alto-falante e siga as instruções na tela
- Conclua o teste e inicialize o Windows
- Verifique se há problemas de áudio
Você também pode baixar o HP Audio Check do site oficial e use-o para executar testes adicionais.
7. Defina o dispositivo de áudio padrão
Às vezes, o Windows tem problemas para identificar o dispositivo de som padrão. E é também por isso que ele pode mostrar o erro do renderizador de áudio, seja no YouTube ou em qualquer outro lugar. Para resolver este problema irritante, você só precisa definir seu dispositivo de áudio favorito como padrão novamente. Veja como:
- Pressione a tecla Win , digite Painel de controle e abra este aplicativo
- Clique em Som

- Escolha seu dispositivo de áudio na guia Reprodução
- Clique em Definir padrão
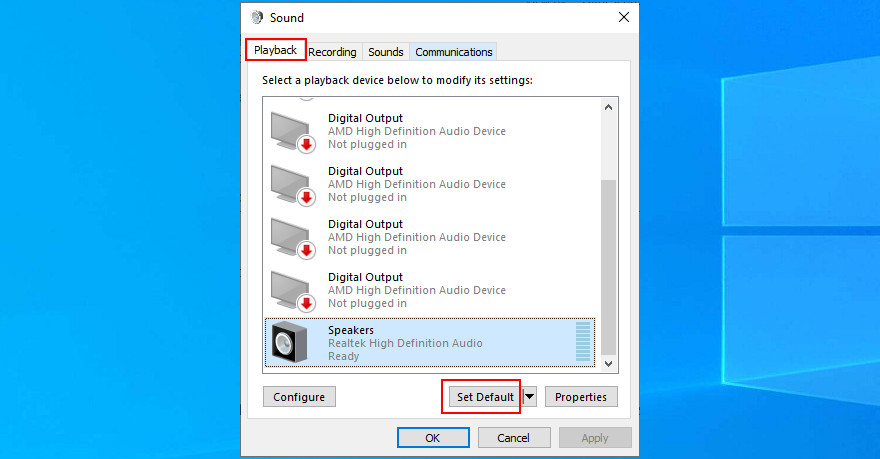
- Se o botão Definir padrão estiver esmaecido, selecione qualquer outro dispositivo para defini-lo como padrão e volte para a primeira opção
- Clique em Aplicar e saia desta área
- Verifique se há problemas de áudio
8. Reinstale o adaptador de áudio
Seu adaptador de áudio pode não estar conectado corretamente ao seu computador. No entanto, você pode reinstalá-lo sem esforço, sem danificar seu PC no processo. Aqui está o que você precisa fazer:
- Right-click the Start button and select Device Manager
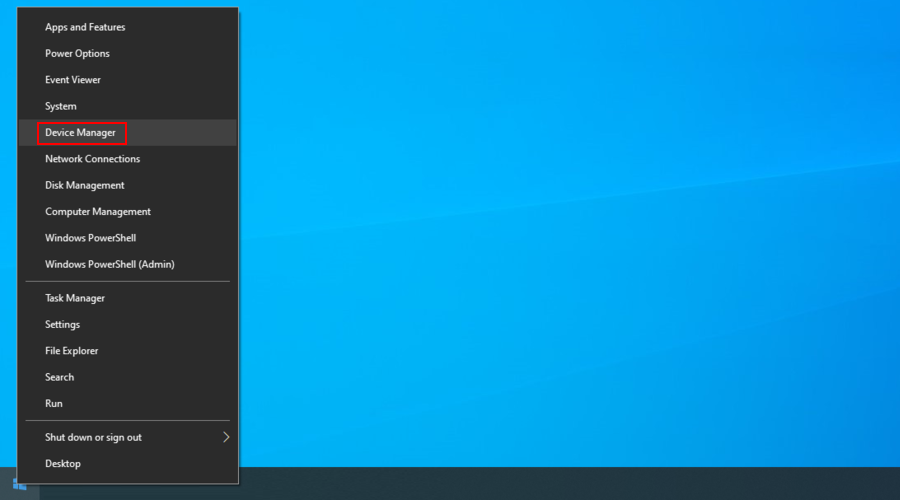
- Extend the Audio inputs and outputs group
- Identify your main audio device, right-click it, and select Uninstall device
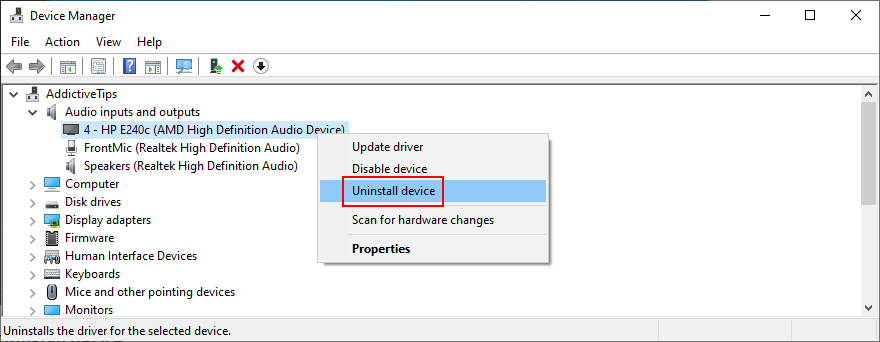
- Select any entry from the list
- Open the Action menu and click Scan for hardware changes
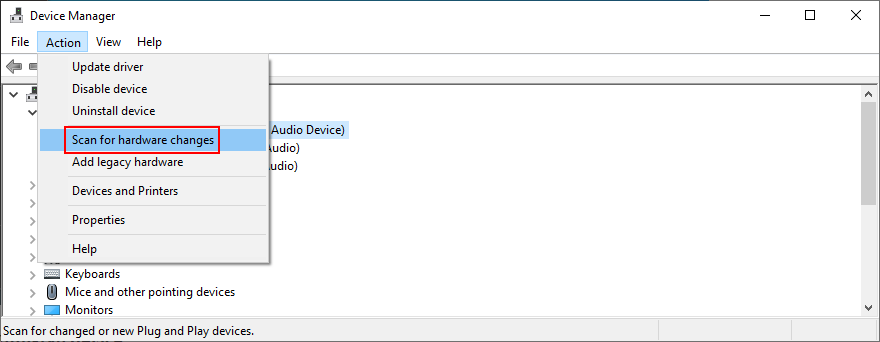
- Restart your computer. Windows will auto-reinstall the missing audio driver
- Check for sound problems
9. Update the audio driver
Even if your sound adapter is correctly installed, perhaps it’s equipped with an obsolete driver that’s no longer supported by Windows 10. It would certainly explain the audio renderer error. However, you can easily update the audio driver:
- Click the Start button, type Device Manager, and press Enter
- Expand the Audio inputs and outputs category
- Right-click your primary audio adapter and select Update driver
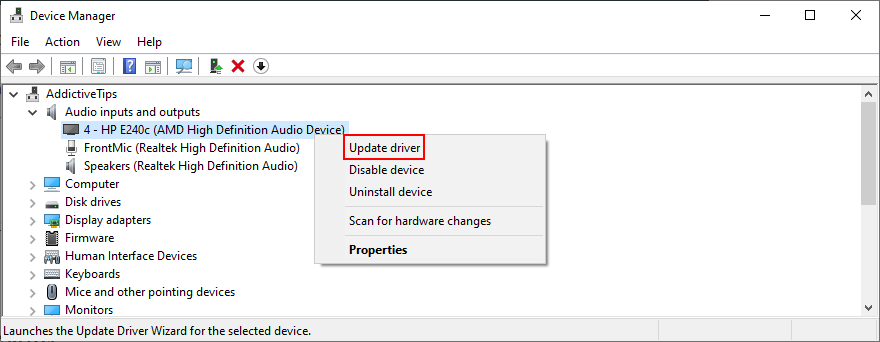
- Click Search automatically for updated driver software
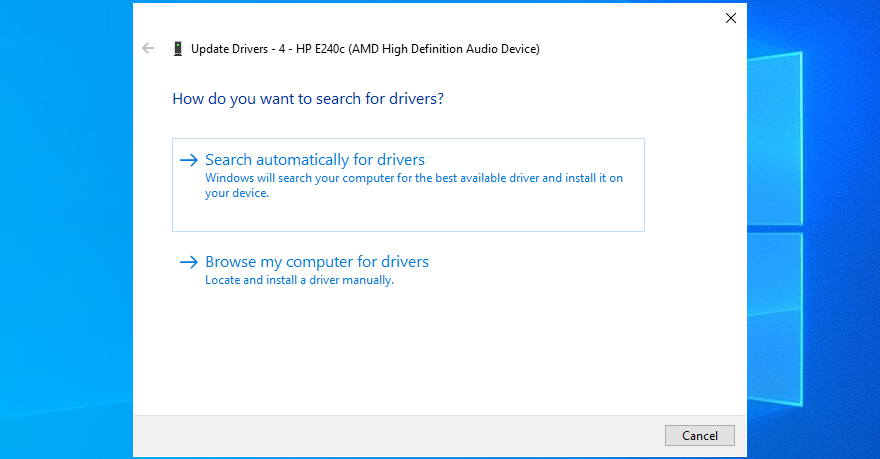
- If you see the The best drivers for your device are already installed message, click Search for updated drivers on Windows Update
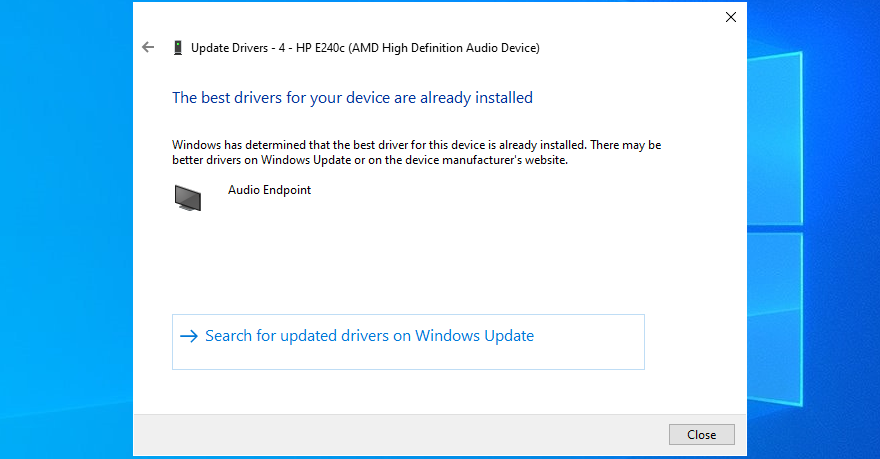
- Reboot your PC and check for additional audio issues
It’s possible that Microsoft fails to find a newer audio driver using Windows Update. In that case, you should head over to the manufacturer website of your sound adapter, then find, download, and install a newer driver that’s compatible with your OS configuration.
However, if you don’t want to go through that trouble as well as risk installing an incompatible driver that could cause more problems, we suggest opting for a driver updating software solution. You can use it to keep all your device drivers in check.
10. Roll back the audio driver
If you have recently updated your sound driver, perhaps you installed an incompatible version that’s throwing you the audio renderer error. To fix it, you should roll back to the previous driver version. Here’s how:
- Head over to Device Manager
- Right-click your audio device and go to Properties
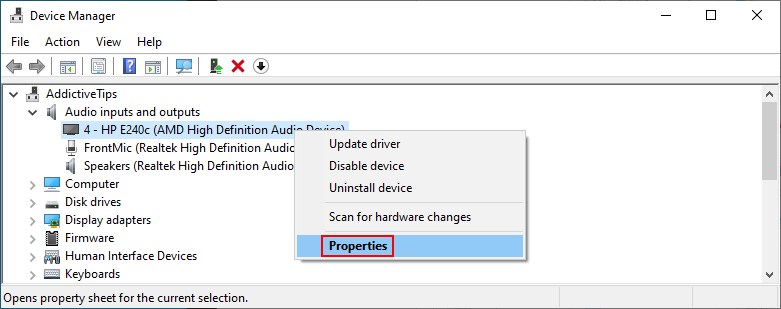
- Select the Driver tab
- Click Roll Back Driver and follow the given instructions
- If the button is greyed out, it means that your operating system doesn’t have the previous driver version, so you can skip this solution
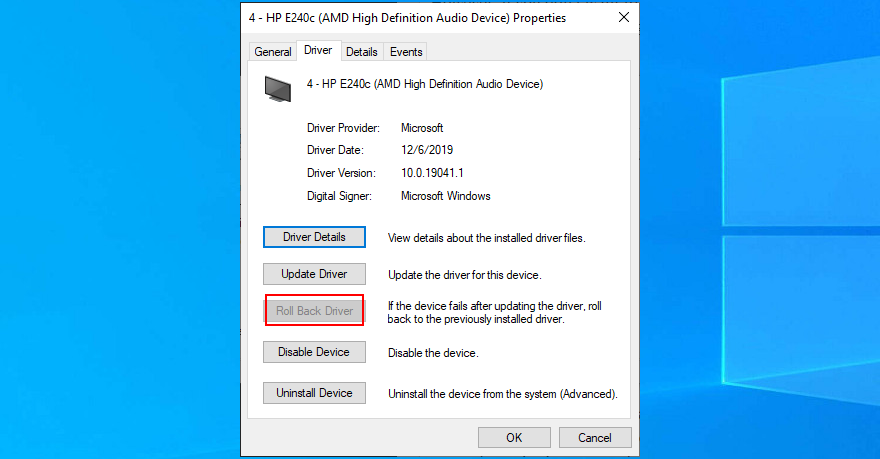
- Restart your computer and inspect results
11. Check the audio cable
It’s a good idea to check your audio cable to see if there’s anything wrong with it since hardware problems can cause audio renderer errors, too. If you have multiple audio inputs on your computer, try sticking the audio jack somewhere else in case you have malfunctioning jacks.
In fact, if you have several external playback devices plugged into your machine, it’s a good idea to remove the ones you’re not currently using. Furthermore, make sure that you didn’t accidentally swap the audio and microphone jacks in the process.
12. Disable audio mixing software
Certain audio mixing tools are not fully compatible with the Windows 10 sound drivers, resulting in conflicts and the audio renderer error message. As soon as you start an audio mixing tool and configure sound drivers, the application overrides the system settings, causing various problems.
To fix this problem, you just need to disable your audio mixing tools when trying to watch a movie offline or a clip on YouTube.
13. Update your web browser
If you’re getting the audio renderer error message on YouTube when trying to enjoy a video, it’s a good idea to update your web browser to the latest version.
How to update Google Chrome:
- Open the More menu on the top-right corner
- Visit the Help submenu and click About Google Chrome. Alternatively, you can visit the
chrome://settings/helpaddress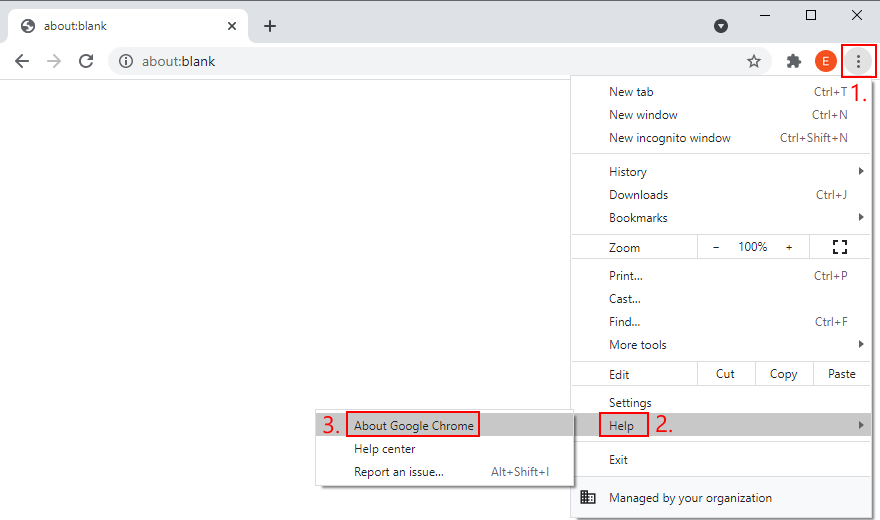
- Wait until Chrome downloads and installs any available updates
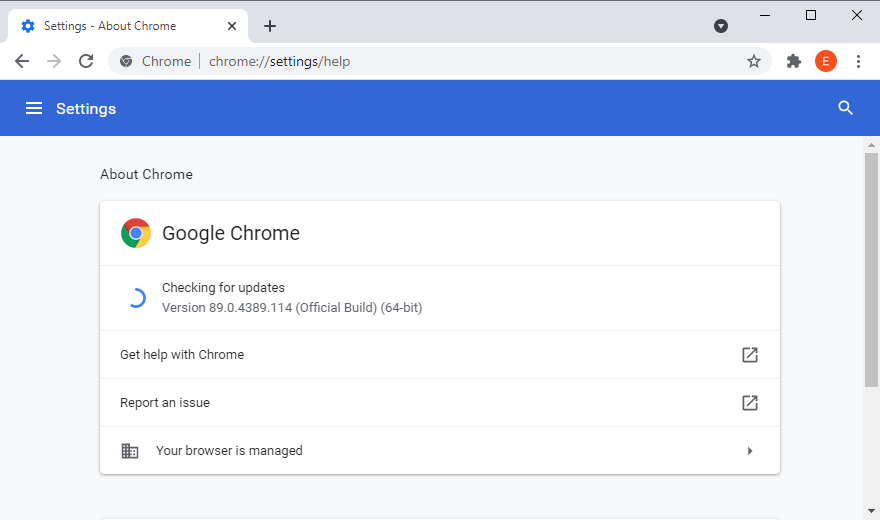
- Click Relaunch and try to watch YouTube
How to update Mozilla Firefox:
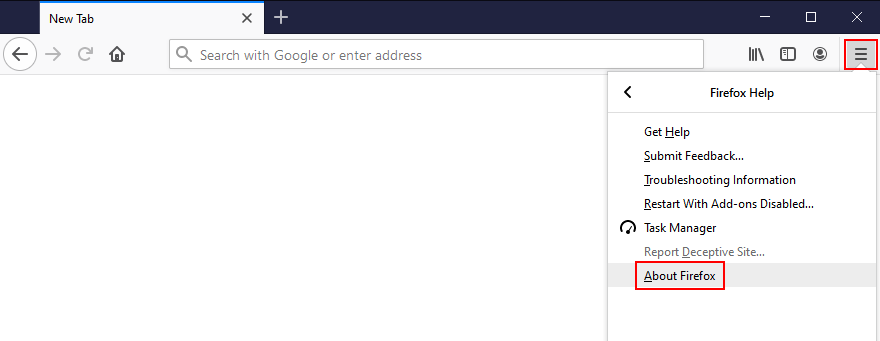
- Open the ≡ hamburger menu on the upper-right corner
- Select the Help section and click About Firefox
- If Firefox finds any updates, give it time to install them
- When it’s over, restart the web browser and check for audio issues
How to update Microsoft Edge:
- Click the More button on the top-right corner
- Go to the Help & feedback menu and click About Microsoft Edge
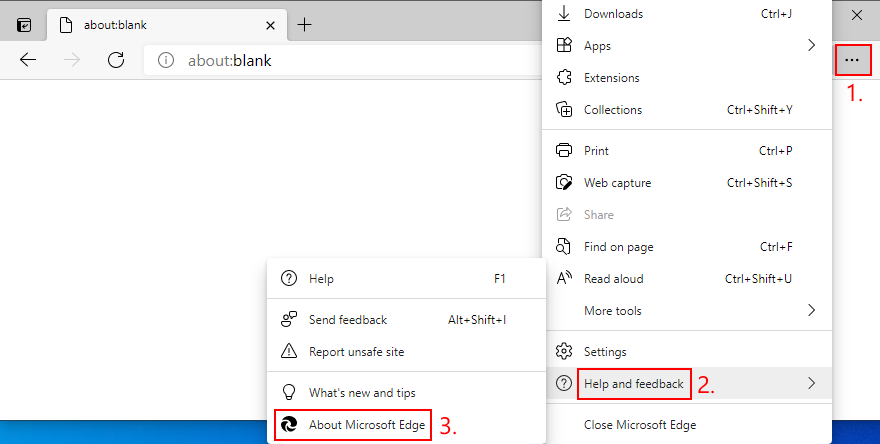
- Else, you can go to the
edge://settings/helpaddress - Wait until Edge finds and installs any updates
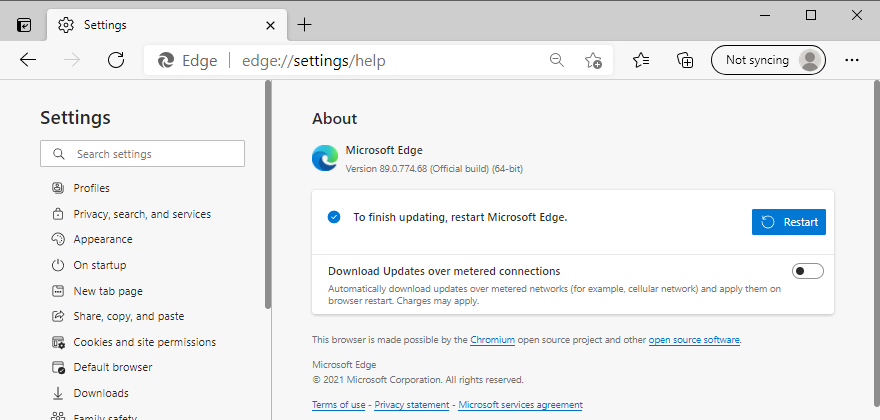
- Restart the browser and inspect results
14. Disable hardware acceleration
Modern web browsers take advantage of your computer’s hardware acceleration to improve the page loading speed and enhance your overall browsing experience. However, users report that it has interfered with the audio driver, causing rendering errors. To fix this issue, you have to turn off hardware acceleration for each browser.
How to disable hardware acceleration in Google Chrome:
- Open the More button and go to Settings

- Scroll down to the bottom of the page and click Advanced
- At System, turn off Use hardware acceleration when available

- Relaunch Chrome and check for audio errors
How to disable hardware acceleration in Mozilla Firefox:
- Click the ≡ hamburger button and go to Options (or visit the
about:preferencesaddress)
- In the General tab, scroll down to Performance
- Uncheck Use recommended performance settings
- Also uncheck Use hardware acceleration when available
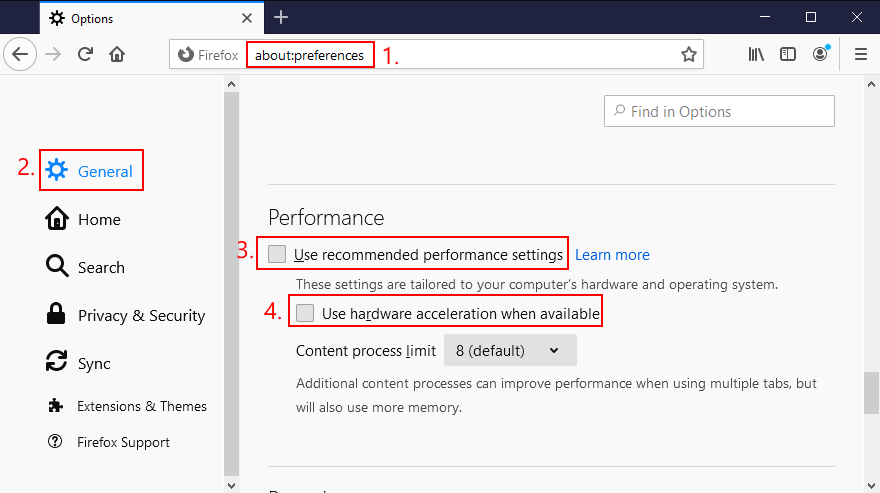
- Restart Firefox and check for audio errors
How to disable hardware acceleration in Microsoft Edge:
- Open the More menu and head over to Settings

- Jump to the System section on the left side (or visit
edge://settings/system) - Turn off Use hardware acceleration when available
- Click the Restart button

- Watch YouTube and check for audio errors
15. Disable your ad blocker
Many YouTube users who have encountered the audio renderer error said that they managed to fix this problem by deactivating the ad blocker built into the web browser. Otherwise, you should whitelist YouTube to make sure that video ads are permitted.
For example, if you’re using Adblock Plus, here’s how you can whitelist YouTube:
- Go to the Adblock Plus settings panel
- Jump to the Whitelisted websites area
- Type
youtube.comand click Add website
- Go to YouTube and check for audio rendering issues
16. Try using a different web browser
An unforeseen number of browser settings can interfere with multimedia features, so it’s a good idea to change your web browser. Switch to an application that has default settings. You can import your bookmarks and other website data, but make sure to leave the browser configuration untouched.
Then, head over to YouTube or the platform that throws the audio renderer error to test it out. If it works, you can stick to the new browser for audio and use your preferred application for everything else.
17. Update Windows 10
It’s essential to keep Windows 10 updated to the latest edition so that you can take advantage of the newest features, hotfixes, and security patches. If there’s a known problem with the audio, it will likely get fixed in the upcoming system update.
How to run Windows Update:
- Press the Win key, type Check for updates, and press Enter
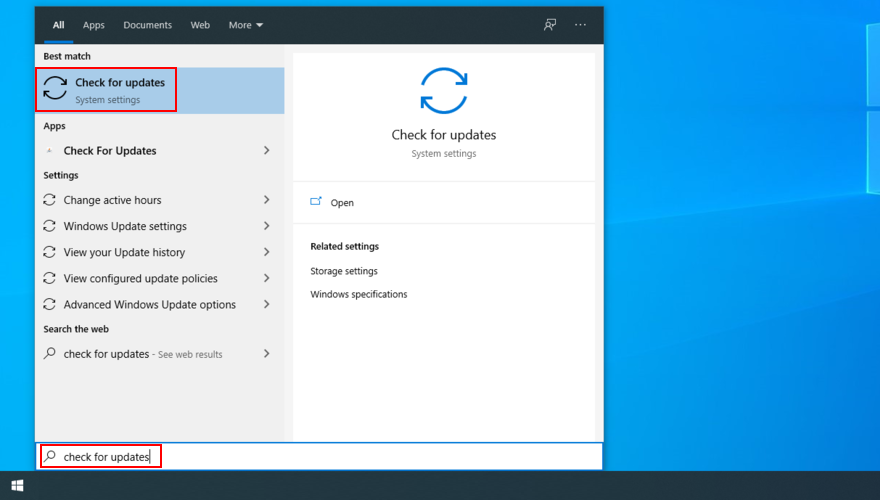
- Click Check for updates and wait
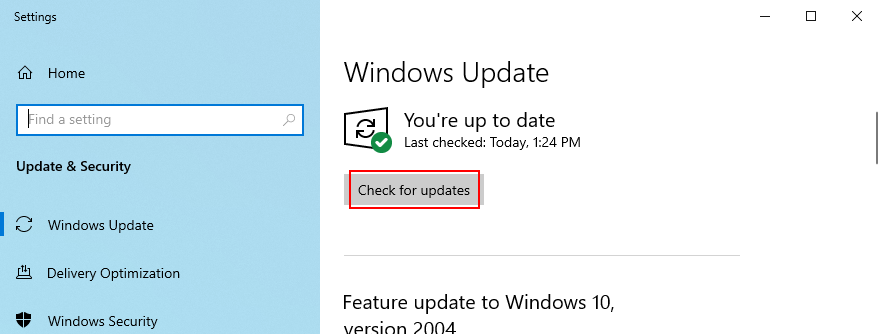
- If it finds any updates, click Download
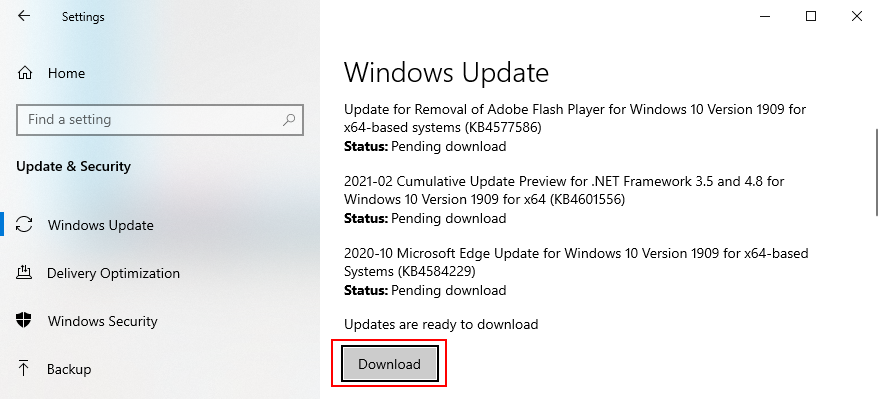
- Leave your PC unattended while it’s busy with updates. It might restart several times
- Check for audio rendering issues
18. Uninstall system updates
On the other hand, a recent Windows update may have compromised your entire operating system, causing various problems like the audio renderer error. When this happens, you have to uninstall the malfunctioning update. Here’s how:
- Press the Win key, type control panel, and hit Enter
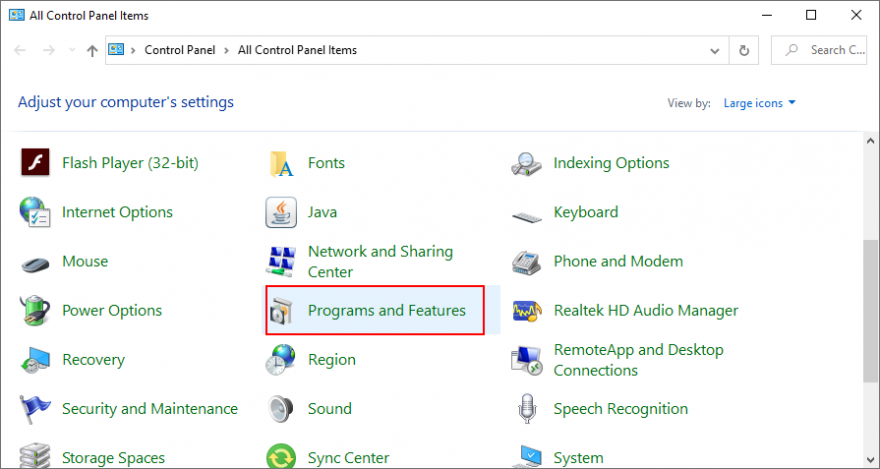
- Go to Programs and Features
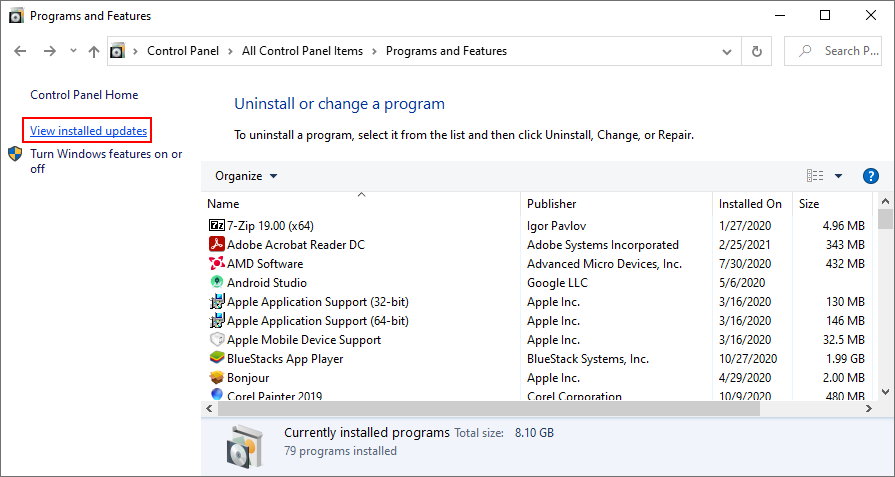
- Click View installed updates on the left side
- Click the Installed On column to sort the updates (newest first)
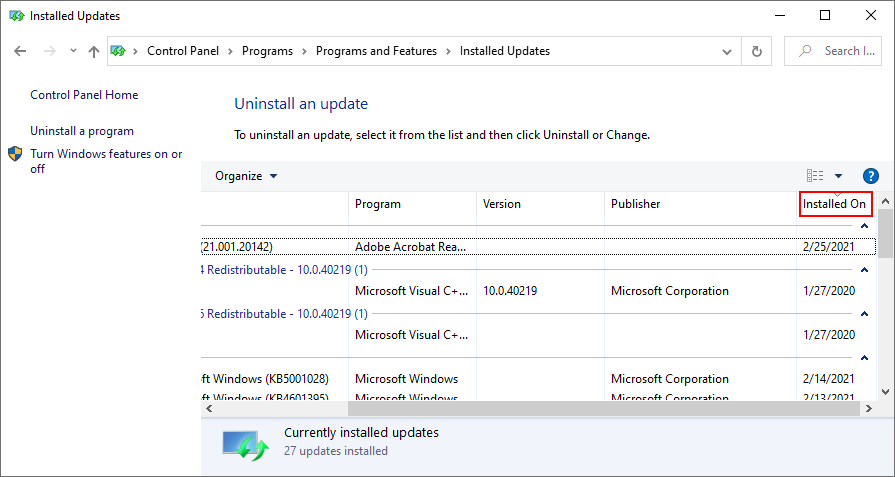
- Right-click the first update in the list and select Uninstall
- Click Yes to confirm
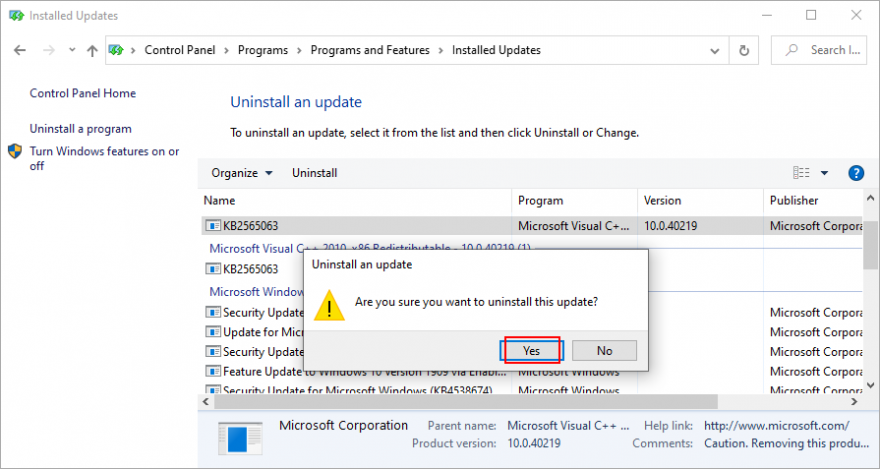
- Restart your PC and check for audio errors
19. Sign in with a different PC account
Windows 10 sometimes experiences issues due a lack of permissions caused by your account. To solve this problem, you can try signing in with a different profile. For example, if you’re currently logged in with the Microsoft account, switch to a local user account (or the other way around).
How to sign in with a Microsoft account:
- Right-click the Start button and select Settings
- Go to Accounts
- Click Login to your Microsoft account
- Enter your email address and password
- Click Verify to confirm your identity
- Log out of Windows 10
- Log back in using the Microsoft account
- Check for audio renderer errors
How to create a local user account:
- Right-click the Start button and go to Settings

- Select Accounts
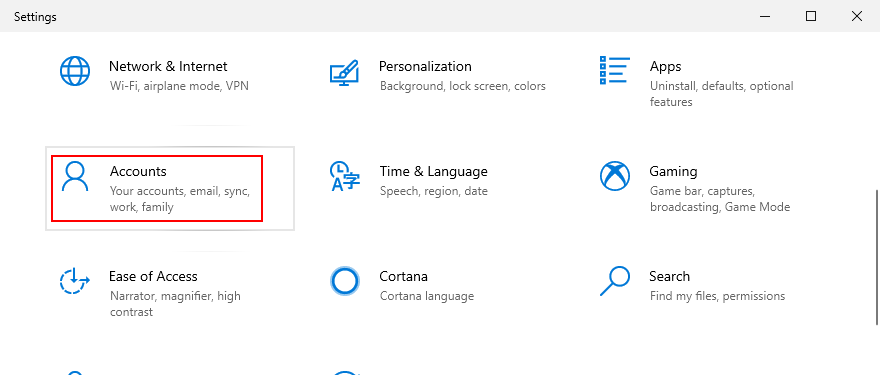
- Click Sign in with a local account instead
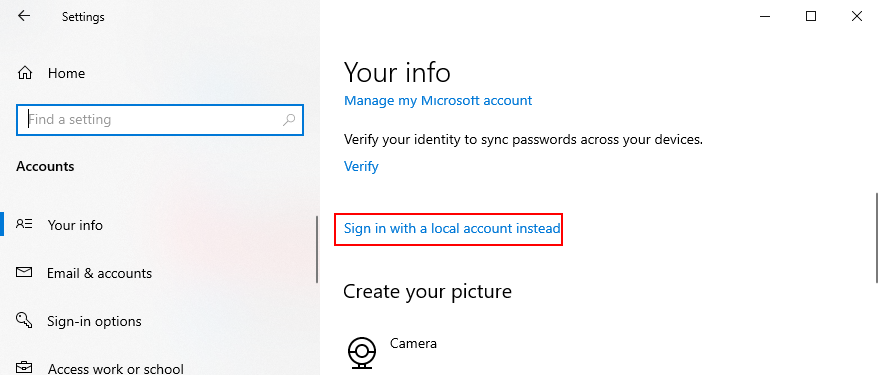
- Specify your computer password or PIN
- At Enter your local account info, set a new username and password
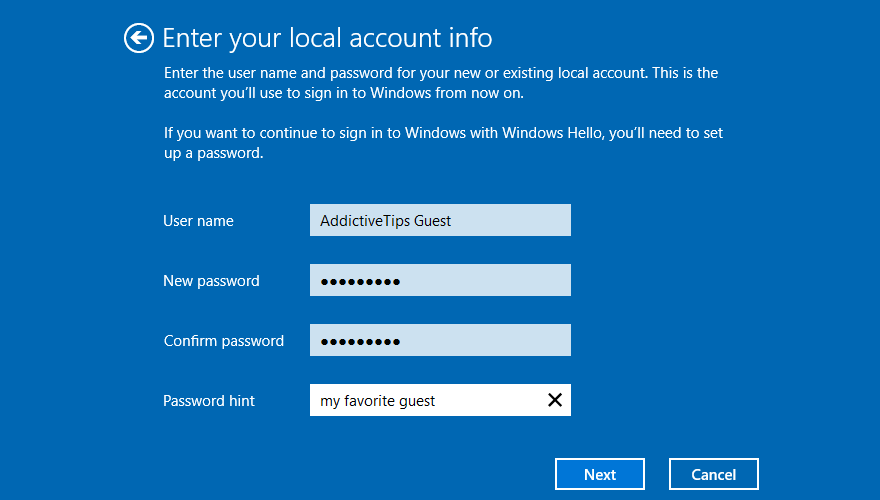
- Click Next and then Sign out and finish
- Log back in to Windows 10 using the new local account
- Check for audio issues
20. Reset BIOS
DELL users have reported that they were experiencing the audio renderer error due to incorrect BIOS settings. And they were able to solve it by restoring BIOS to default settings. Here’s how you can easily do that:
- Restart your computer
- During reboot, rapidly press the key displayed on the screen to access BIOS
- Locate and access the advanced BIOS options
- Enable the setting that resets BIOS configuration data
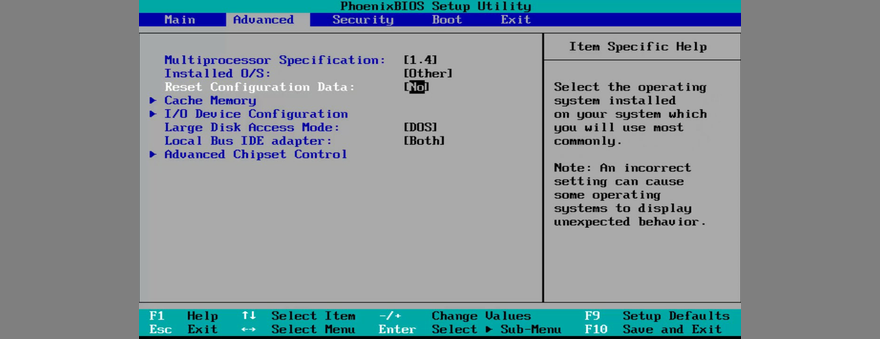
- Save the current BIOS settings and exit
- Wait until Windows boots, then check for audio issues
21. Update BIOS
Another way to deal with BIOS issues on DELL systems is by updating it to the latest version since an obsolete BIOS is known to cause system stability and even audio problems. Here’s how:
- Press the Win key, type System Information, and open this app
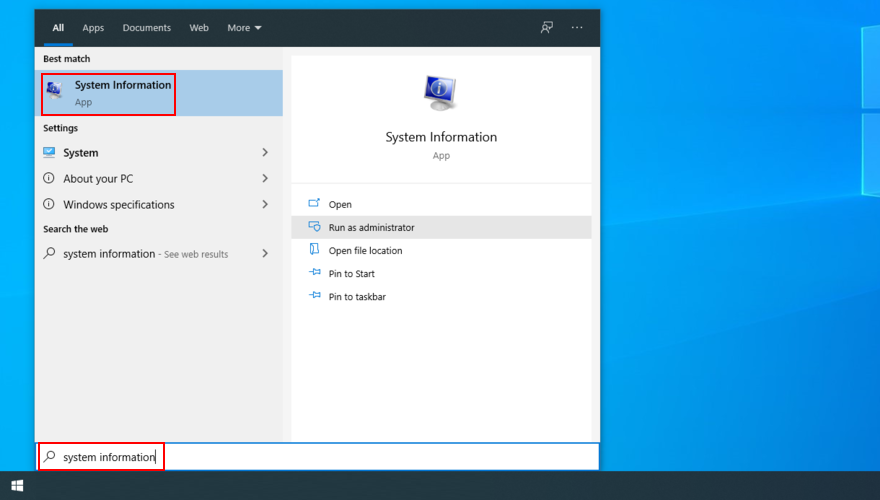
- Go to the System Summary section
- Write down the info displayed at BIOS Version/Date
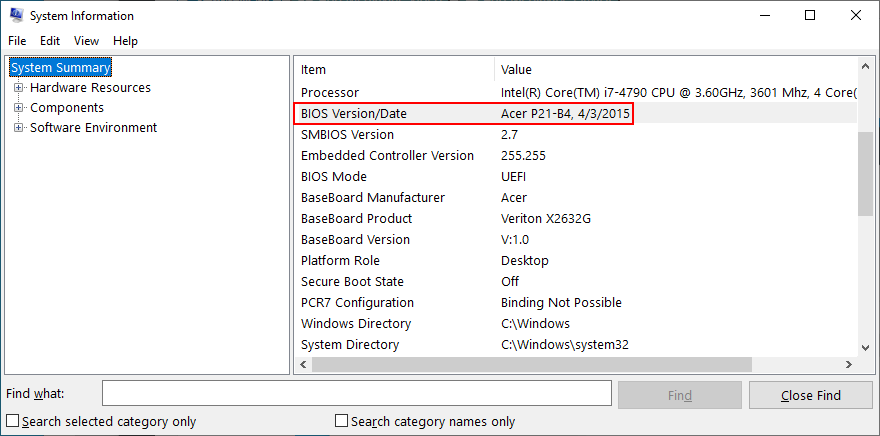
- Go to the website of your BIOS manufacturer
- Find and download a newer BIOS version that’s compatible with your PC
- Unzip the BIOS setup file to a USB flash drive
- Restart your computer and access BIOS
- Back up the current BIOS version to the pen drive
- Start BIOS setup
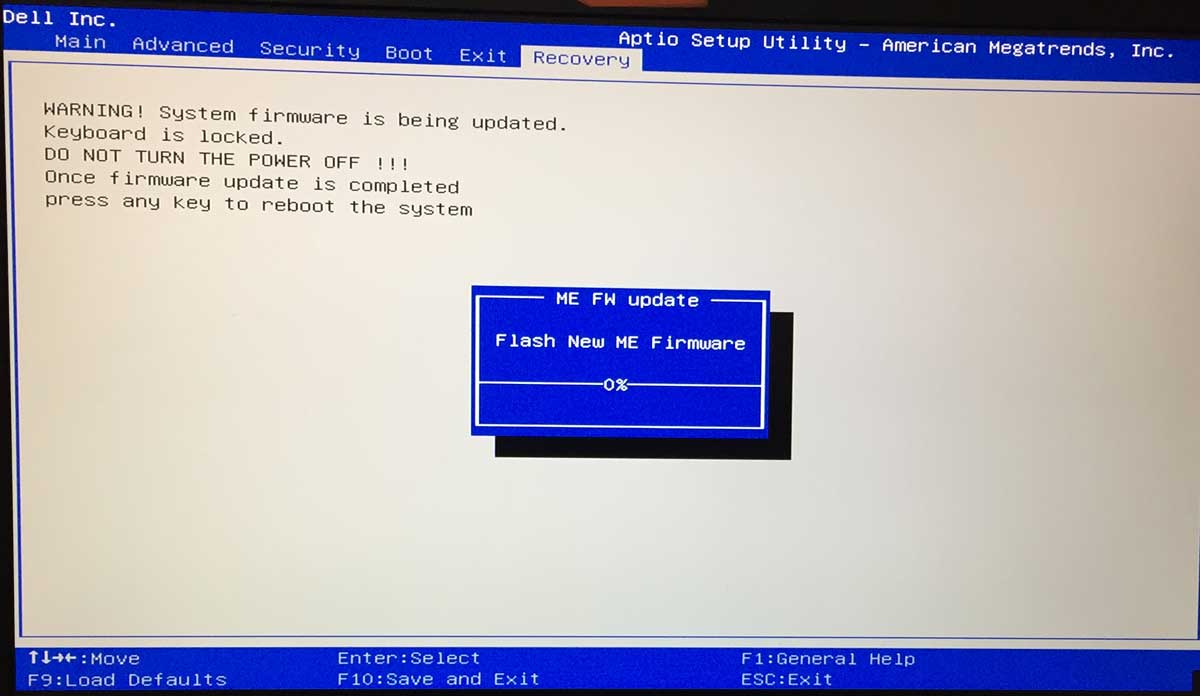
- Don’t turn off or restart your PC during setup
- Boot Windows as normal and check for audio issues
22. Use System Restore
If the audio renderer error was caused by a software event that you can’t pinpoint, you can fix it by rolling back Windows 10 to a previous restore point. Here’s how to do its easily:
- Make sure you’re logged in to Windows 10 with admin rights
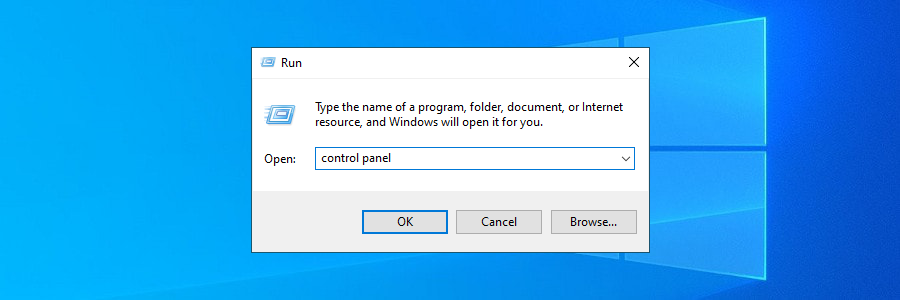
- Press Win key + R, type control panel, and press Enter
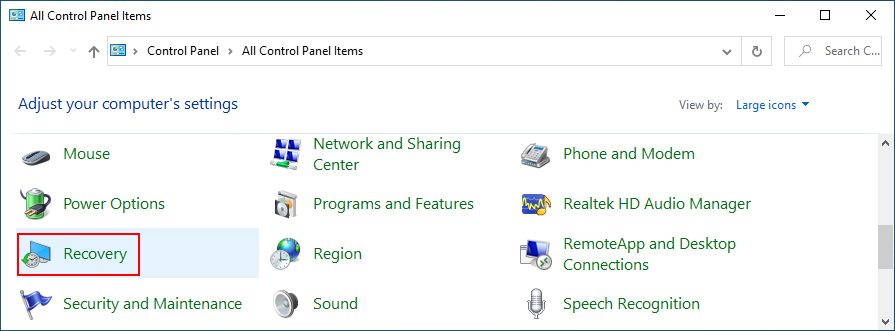
- Go to the Recovery area
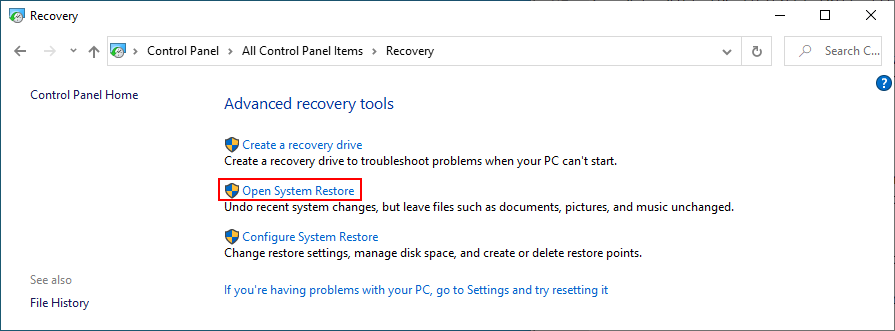
- Click Open System Restore
- Select a system restore point from the list
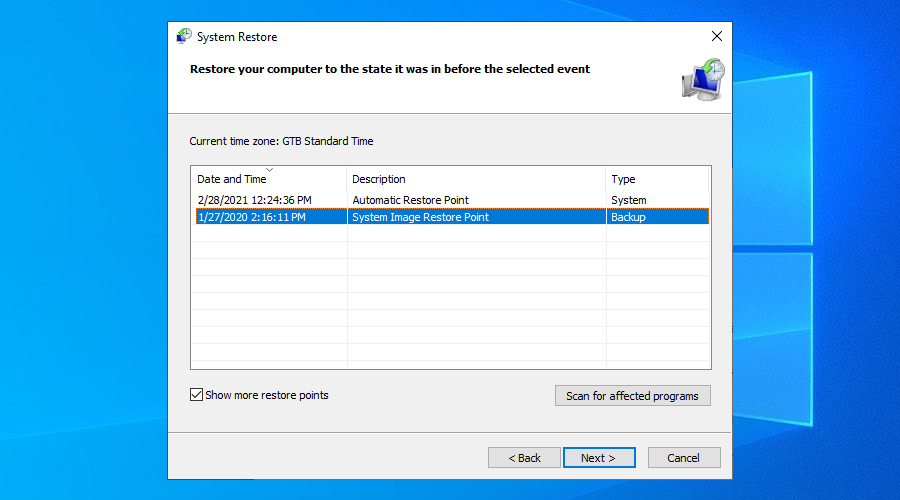
- Click Next and follow the on-screen instructions
- Restart your PC and check for audio issues
The Audio renderer error can be fixed
To review, you can stumble upon the audio renderer error when trying to watch a video on YouTube, in your media player, or anywhere else. It’s caused by a hardware or software issue which you should be able to fix.
For instance, you can clear browser cache, run the audio troubleshooter, make sure the sound device is enabled and set as default, restart the Windows Audio service, synchronize the sample rate for ASIO drivers, as well as run audio tests on HP laptops.
It’s also a good idea to reinstall the audio adapter, update the audio driver or roll back to a compatible version, check the cables and remove extra peripheral devices, disable any audio mixing software, update your web browser, as well as disable hardware acceleration.
Furthermore, you can turn off your ad blocker, try using a different browser, update Windows 10 or uninstall unstable system updates, sign in to Windows 10 using a different account, reset BIOS and update it to the latest version, as well as roll back Windows 10 using System Restore mode.
How did you manage to finally get rid of the audio renderer error? Did we miss any essential steps? Let us know in the comment area below.
