Introduction
Forms are probably the most ubiquitous elements on the web today. You’d be hard pressed to find critical application without one or more forms.
They are especially critical in finance applications where conversion success rates could be the difference between a windfall and bleak numbers for companies. According to conversion authority SaleCycle, 26% of people abandoned their purchase during checkout due to a long or complex process. That hurts the bottom line of any company!
To get the highest impact from a form, it’s best to keep it simple. We can accomplish this by employing the “one thing per page pattern” theory popularized by Adam Silver, and we can easily achieve this by employing multi-step wizards.
What are multi-step wizards?
Multi-step wizards are a solution allowing complex challenges to be broken down to a list of steps needed to accomplish a goal. Sometimes branching conditional logic is used to narrow the path to be taken by the user.
Multi-step wizards allow us to eliminate cognitive overload by a significant factor and heighten user understanding of what is required from them when they fill out a form.
Next, we’ll take a look at Formik and see why it is such a great fit for form management in React.
What is Formik?
Formik is a small library that helps make form management easy.
According to Jared Palmer, the creator of the library, Formik was created as a way to standardize the flow of data through forms while maintaining minimal impact to the look and feel of input components.
My goal with Formik was to create a scalable, performant, form helper with a minimal API that does the really really annoying stuff, and leaves the rest up to you.
Formik is beneficial because it:
- Allows declarative form management while abstracting the mundane and repetitive drone associated with working with forms in React
- Keeps forms familiar and intuitive. If you know a bit of React and know about forms, then you can use Formik
- Makes no assumptions about your current state management solutions. You could be using Redux or MobX and it will play nice with either
Why use Formik for multi-step wizards?
Formik is a good fit for building multi-step wizards because we can keep form state localized and managed by Formik.
Formik allows us to maintain a single form management solution with the following benefits:
- Formik is well-documented, so it can easily be referenced
- It makes it easier to maintain singular context when building apps
- Leverages many practices already employed in building HTML forms, making Formik forms feel natural and less contrived
Now, let’s look at a solution for managing server state on the frontend.
An introduction to React Query
React Query is a React library that makes fetching, caching, synchronizing, and updating server state in your React applications a breeze.
React Query exists as a solution because managing server-side state on the client is a well-documented pain. Typically, you’d have to provide:
- Proper caching solutions with easy cache invalidation (notoriously difficult, according to Phil Karlton)
- Deduplication mechanisms for identifying duplicate data and merging them into one request to save on the overhead of multiple requests
- Memoizing and normalizing data into a state where it is easier to access in a consistent fashion
Why use React Query?
React Query is one of the best libraries for managing server-side state, and it’s packed with benefits. It can help:
- Drop the number of lines of code you need to make trivial requests
- Make your applications feel more performant by saving on bandwidth and memory
- Serve as a decoupling layer for remote calls because you can make REST/GraphQL requests — React Query will handle both use cases without a fuss
React Query has been particularly helpful for me as in the past as I’ve had to make HTTP calls and use Paul Armstrong’s handy package normalizr and Redux selectors as a caching solution. This usually involved significant boilerplate and complexity for me.
To illustrate these benefits better, we’ll build a small proof-of-concept application with Formik and React Query.
Creating a concept crypto portfolio management wizard
We’ll create a small demo React app that allows users to add cryptocurrencies and specify third-party crypto marketplaces (like Robinhood & Coinbase) where they’d like to manage their portfolios.
Users then get to provide API tokens for the respective marketplaces selected.
Prerequisites
- You have Node (version 6 and greater) and NPM installed
- You have an intermediate to advanced level understanding of React
Setting up the React project
First, create a new React project and start up the development server:
npx create-react-app crypto-portfolio
cd crypto-portfolio
npm start
We need to install dependencies for routing, styling modules, form management, and HTTP requests.
npm install react-router-dom node-sass formik axios react-query classnames --save
A personal preference of mine is to use absolute imports because I find them cleaner and much more easy to reason about. You can add absolute imports by creating a jsconfig.json file with the content below at the root directory:
{ "compilerOptions": { "baseUrl": "src" }, "include": ["src"]
}
For proper accessibility, we need to have each wizard screen contained in its own route. We’ll be employing a system of nested routes that allow us reflect semantic relationships via URLs.
We’ll update the src/index.js file to register our router:
import React from 'react';
import ReactDOM from 'react-dom';
import './index.css';
import AppRouter from 'components/AppRouter'; ReactDOM.render( <React.StrictMode> <AppRouter /> </React.StrictMode>, document.getElementById('root')
);
For our top-level routes, let’s define an AppRouter component that should help us set up a top-level route for portfolio creation. Create an AppRouter.js file at src/components :
import React, { Suspense, lazy } from "react"
import { BrowserRouter, Route, Switch } from "react-router-dom";
import NotFound from 'screens/NotFound' const Portfolio = lazy(() => import("screens/Portfolio")) function AppRouter() { return ( <BrowserRouter> <Suspense fallback={<NotFound />}> <Switch> <Route component={Portfolio} path="/portfolio" /> <Route component={NotFound} /> </Switch> </Suspense> </BrowserRouter> );
} export default AppRouter;
Here, we’re leveraging Suspense so we can lazy-load our route components for better performance. We also referenced NotFound and Portfolio components, which we will create shortly. The NotFound component is a trivial component displaying a simple error message.
Create src/screens/NotFound.js and fill it out:
function NotFound() { return ( <div> <h2>Page not found</h2> </div> )
} export default NotFound
Our Portfolio component provides a mounting point to introduce the Formik provider. We set up the Formik provider, provide default values for the form, and assemble routes for each wizard screen. We also define some redirects to take care of possible incomplete URLs from our users.
We’ll import some styles from our Portfolio.module.scss CSS module. We also intend on creating an array list of routes that allows us to define information about the steps in the wizard.
And we plan on using a custom StepsRouter component to render the routes and a Steps indicator so users can get a visual on their progress.
Let’s create a Portfolio.js file at src/screens/Portfolio and add some code.
import React, { Suspense } from "react"
import { BrowserRouter, Redirect, Route, Switch } from "react-router-dom";
import { Formik } from "formik";
import styles from './Portfolio.module.scss'
import stepsComposer from './steps'
import StepsRouter from 'components/StepsRouter'
import NotFound from 'screens/NotFound' const initialFormValues = { portfolioName: '', marketplaces: {}
} function Portfolio({ match: { url } }) { return ( <div className={styles.Portfolio__Container}> <Formik initialValues={initialFormValues}> <BrowserRouter> <Suspense fallback={<NotFound />}> <Switch> <StepsRouter steps={stepsComposer({ url })} /> <Route exact path={`${url}/create`} render={() => <Redirect to={`${url}/create/add-name`} />} /> <Route path="/" render={() => <Redirect to={`${url}/create`} />} /> <Route component={NotFound} /> </Switch> </Suspense> </BrowserRouter> </Formik> </div> )
}
export default Portfolio
Setting up the enhanced custom router
Let’s define the steps for our wizard in a steps.js file at src/screens/Portfolio. We’ll supply information about the route —mainly the component we intend to render, its path, and the label for it on the step indicator.
import { lazy } from "react" const AddName = lazy(() => import("./screens/AddName"))
const SelectCrypto = lazy(() => import("./screens/SelectCrypto"))
const AddKeys = lazy(() => import("./screens/AddKeys")) const stepsComposer = ({ url }) => [ { path: `${url}/create/add-name`, Component: AddName, label: "Add Name" }, { path: `${url}/create/select-crypto`, Component: SelectCrypto, label: "Select Crypto" }, { path: `${url}/create/add-keys`, Component: AddKeys, label: "Add Keys" }
] export default stepsComposer
With our list of steps in hand, we need to create our StepsRouter component. Our StepsRouter component will pick up the list of steps we listed earlier and render each one.
Let’s also define an EnhancedRoute component that will receive an extra prop that will be useful to us going forward.
We’ll create the StepsRouter.js file at src/components/StepsRouter.
import { Route } from "react-router-dom"; import EnhancedRoute from "./EnhancedRoute"; const StepsRouter = ({ steps }) => { return ( <> {steps.map((step, index) => ( <Route path={step.path} key={index} render={props => <EnhancedRoute {...props} step={step} steps={steps} />} /> ))} </> );
} export default StepsRouter;
Now we need to define the EnhancedRoute component that is responsible for enhancing the props passed to the wizard screen routes. We’ll create EnhancedRouter.js at the same directory as the previous.
import { generateStepsList } from "utils"; function EnhancedRoute ({ step, steps, ...props }) { const { match, location: { pathname } } = props; const { Component } = step const stepsList = steps.map(generateStepsList({ route: { pathname, ...match }, })); return ( <Component {...props} stepsList={stepsList} /> )
} export default EnhancedRoute
Notice we defined a generateStepsList utility function, so we need to create the utils.js file at the src directory. This utility will return a fully resolved path for a route.
/** * Generates a list of steps for display by the steps component. * * This function returns a function that accepts a step object and returns * the object with extra properties. * * @param {Object} route * @returns {Function} */
export function generateStepsList({ route }) { const routeParams = route.params const routeParamKeys = Object.keys(routeParams) // Swap out any dynamic routes with their param values so "/portfolio/:portfolioId" becomes "/portfolio/1" const replaceParams = (path, param) => path.replace(`:${param}`, routeParams[param]); const createStepEntry = ({ path, label }) => { let routePath = routeParamKeys.length ? routeParamKeys.reduce(replaceParams, path) : path let active = route.pathname === path return { path: routePath, active, label }; } return createStepEntry; }
Now we need to create the Steps.js component at src/components/Steps. This component will display and give us visual progress updates.
We’ll use the classnames package to help us manage the conditional statements used to style the indicators, and we’ll store information about the active step, the last step, and the completed steps.
import React from "react";
import { Link } from "react-router-dom";
import styles from "./Steps.module.scss";
import classNames from "classnames/bind"; let cx = classNames.bind(styles); function Steps({ steps }) { const activeIdx = steps.reduce((acc, curr, idx) => curr.active ? idx: acc, 0) return ( <div className={styles.Steps__Wrapper}> <ol className={styles.Steps}> {steps.map(({ label, path, active }, idx) => { const isLastStep = idx === steps.length - 1; const completed = idx < activeIdx const stepWidth = 100 / (steps.length); let stepClasses = cx({ Step: true, Step__Last: isLastStep, Step__Current: active, Step__Completed: completed }); const checkmarkClass = completed ? 'checkmark-primary': 'checkmark-default' return ( <li className={stepClasses} style={{ left: `${stepWidth/2}%` }} key={idx}> <Link to={path} className={styles.Step__Milestone}> <i className={`checkmark ${checkmarkClass}`} /> </Link> {active ? ( <span className={styles.Step__Label}>{label}</span> ) : ( <Link to={path} className={styles.Step__Label}> {label} </Link> )} </li> ); })} </ol> </div> );
} Steps.defaultProps = { steps: [],
}; export default Steps;
We also need to define styling for the Steps component. Let’s create src/components/Steps/Steps.module.scss and add the content below:
$secondary: #0056D8;
$light-gray: #F0F1F3;
$gray: #CCC;
$pale-blue: #D3E0F2; .Steps__Wrapper { display: block; } .Steps { position: relative; display: flex; padding: 0; list-style: none; width: inherit; } .Step { position: relative; font-size: 12px; flex: 1; } .Step__Label { color: $gray; } .Step { &::before { content: ""; width: 100%; height: 8px; background-color: $gray; position: absolute; } &__Milestone { width: 28px; height: 28px; border-radius: 100%; display: flex; align-items: center; justify-content: center; background: $light-gray; border: 2px solid $gray; position: relative; bottom: 10px; position: relative; } } .Step__Completed { &::before { background: $secondary; } .Step__Milestone { background: $pale-blue; color: $secondary; border-color: $secondary; } } .Step__Completed .Step__Label, .Step__Current .Step__Label { color: $secondary; } .Step__Current { .Step__Milestone { background: $secondary; border-color: $secondary; } .Step__Label { font-weight: bolder; } } .Step__Last::before { content: ""; display: none; }
We’ll also define a few global styles at src/index.css. You can take a look at the styles here.
At this point, you should have a visual indicator that looks like this:

Creating the AddName screen
We can now create our first screen: the AddName screen. Create AddName.js at src/screens/Portfolio/screens.
import { Field } from "formik";
import { Link } from "react-router-dom";
import Steps from "components/Steps";
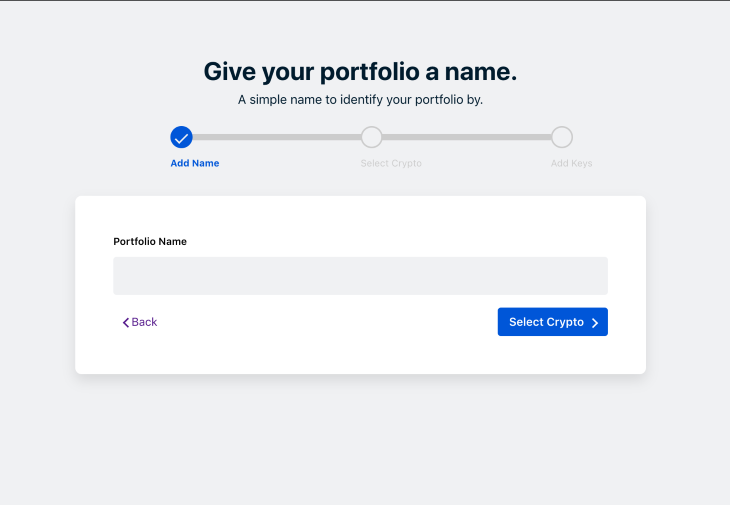
import styles from 'screens/Portfolio/Portfolio.module.scss' function AddName({ stepsList, ...props }) { return ( <div> <section className={styles.Section__Heading}> <h2 className={styles.Section__Heading__Title}>Give your portfolio a name.</h2> <p>A simple name to identify your portfolio by.</p> </section> <div className={styles.Steps__Container}> <Steps steps={stepsList} /> </div> <section className={styles.Form__Card}> <label className={styles.Form__Label}>Portfolio Name</label> <Field type="text" name="portfolioName" className={styles.Form__Field} /> <div className={styles.Form__Button__Container}> <Link to={`/portfolio`} className="btn"> <span className="chevron left" /> Back </Link> <Link to={`/portfolio/create/select-crypto`} className="btn btn-primary"> Select Crypto <span className="chevron right" /> </Link> </div> </section> </div> )
} export default AddName
Our AddName screen should look like this:
Setting up a mock JSON API
For our next screen, we’ll need to run a mock JSON server, which we’ll use to fetch a list of crypto and marketplaces associated with them.
First of all, run npm install -g json-server to install the json-server package we’ll use for mocking.
Next, create a crypto.json file at a new directory we’ll name mocks at the root directory. We’ll add some seed data to the file.
{ "crypto": [ { "id": 1, "label": "Bitcoin", "name": "bitcoin", "marketplaces": [ {"id":1, "label": "Robinhood", "brand_url": "http://localhost:3000/brands/robinhood.svg", "name":"robinhood"}, {"id":2, "label": "Coinbase", "brand_url": "http://localhost:3000/brands/coinbase.svg", "name":"coinbase"} ] }, { "id": 2, "label": "Ethereum", "name": "ethereum", "marketplaces": [ {"id":1, "label": "Robinhood", "brand_url": "http://localhost:3000/brands/robinhood.svg", "name":"robinhood"}, {"id":2, "label": "Coinbase", "brand_url": "http://localhost:3000/brands/coinbase.svg", "name":"coinbase"} ] } ], "marketplaces": [ {"id":1, "label": "Robinhood", "brand_url": "http://localhost:3000/brands/robinhood.svg", "name":"robinhood"}, {"id":2, "label": "Coinbase", "brand_url": "http://localhost:3000/brands/coinbase.svg", "name":"coinbase"} ]
}
We’ll start the JSON server by visiting the shell and running the below command, which makes data from the mock available at port 3001.
json-server --watch mocks/data.json --port 3001
Building the select crypto screen
We need to add a couple of specialized form controls for the crypto selection screen. I’ve pre-built a CheckboxCard and a CheckboxRound component to save time. You may read the source for the CheckboxCard and the CheckboxRound if you desire.
We can now create the SelectCrypto screen. We’ll be doing a lot in this screen, as we’ll need to define a new CryptoField component that is responsible for showing crypto marketplace information. When the component mounts, we will preselect all crypto marketplaces so the user finds it easier to eliminate options.
For this screen, we’ll use the Formik context hook, which allows us to get and set values for our form. We also use React-Query to fetch.
I defined utility functions to help with our HTTP request management and take care of error/success responses. Update src/utils and add this code:
import axiosInstance from 'axios' const REACT_APP_API_BASE_URL = "http://localhost:3001" export const axios = axiosInstance.create({ baseURL: REACT_APP_API_BASE_URL,
}); export function handleResponse(response) { if (response.data) { return Promise.resolve(response.data); } return Promise.resolve(response);
} export function handleError(error) { if (error.data) { return Promise.reject(error.data); } return Promise.reject(error);
} export const fetchAll = (resource) => axios.get(resource).then(handleResponse).catch(handleError);
As part of our development process, we’ll iterate through the cryptocurrencies list we fetched and render a CryptoField component for each entry.
Create SelectCrypto.js at src/screens/Portfolio/screens and add the below:
import { useEffect } from 'react'
import { useQuery } from "react-query";
import { Link } from "react-router-dom";
import { useFormikContext } from "formik"; import Steps from "components/Steps";
import CryptoField from "components/CryptoField";
import styles from 'screens/Portfolio/Portfolio.module.scss'
import { fetchAll } from 'utils' function SelectCrypto({ stepsList }) { const { values, setFieldValue } = useFormikContext(); const { isLoading, error, data: cryptocurrencies } = useQuery( "cryptocurrencies", () => fetchAll("/crypto") ); useEffect(() => { // Prefill all marketplaces by reducing the cryptocurrencies list if (!Object.keys(values.marketplaces).length) { let marketplaces = cryptocurrencies.reduce((acc, curr) => { return { ...acc, [curr.id]: curr.marketplaces.map(({ id }) => id), }; }, {}); // Use the context hook to replace the marketplaces object setFieldValue("marketplaces", marketplaces); } }, [cryptocurrencies, setFieldValue, values.marketplaces]); if (isLoading) return <p>Loading...</p> if (error) return <p>Error</p> return ( <div> <section className={styles.Section__Heading}> <h2 className={styles.Section__Heading__Title}>Select the crypto you wish to manage</h2> <p>Pick cryptocurrencies and choose exchanges to trade them on.</p> </section> <div className={styles.Steps__Container}> <Steps steps={stepsList} /> </div> <section className={styles.Form__Card}> {cryptocurrencies.map((crypto, idx) => ( <div className="mb-2" key={idx}> <CryptoField crypto={crypto} selectedMarketplaces={values.marketplaces[crypto.id] || []} /> </div> ))} <div className={styles.Form__Button__Container}> <Link to={`/portfolio/create`} className="btn"> <span className="chevron left" /> Back </Link> <Link to={`/portfolio/create/add-keys`} className="btn btn-primary"> Add Keys <span className="chevron right" /> </Link> </div> </section> </div> )
}
export default SelectCrypto
Creating the CryptoField Component
The CryptoField component displays a cryptocurrency and the marketplaces associated with it.
It receives the following as props:
- A
cryptoobject that contains a list of marketplaces to be selected by a user - A
selectedMarketplacesarray that contains theidfor each selected marketplace
Let’s create the CryptoField.js file at src/components/CryptoField and add some code. At the moment, we’re rendering a checkbox component and displaying a description. We’re using the FieldArray component from Formik to handle working with the marketplaces array and the render prop for the FieldArray can receive helpers as arguments.
Our strategy is to mark a cryptocurrency “selected” if it has at least one marketplace selected.
import React from "react";
import { FieldArray } from "formik"; import CheckboxRound from "components/CheckboxRound"; const descriptions = { bitcoin: "Bitcoin was the first cryptocurrency to successfully record transactions on a secure, decentralized blockchain-based network.", ethereum: "Ethereum is a decentralized computing platform which runs smart contracts and uses the Ether cryptocurrency built on top of the open source Ethereum blockchain"
} const CryptoField = ({ crypto, selectedMarketplaces }) => { return ( <FieldArray name={`marketplaces.${crypto.id}`} render={(arrayHelpers) => ( <section className=""> <section className="d-flex align-items-center"> <CheckboxRound checked={selectedMarketplaces.length} onChange={() => { if (selectedMarketplaces.length) { selectedMarketplaces.map(() => arrayHelpers.pop()); } else { crypto.marketplaces.map(({ id }) => arrayHelpers.push(id)); } }} id={crypto.name} /> <div className="ml-4 d-flex"> <img src={crypto.brand_url} alt={`${crypto.label} logo`} className="mr-6" /> <b className="h6">{crypto.label}</b> </div> </section> <div className="w-100 mb-4 ml-3"> {descriptions.hasOwnProperty(crypto.name) ? ( <p className="text-muted small">{descriptions[crypto.name]}</p> ) : null} </div> </section> )} /> )
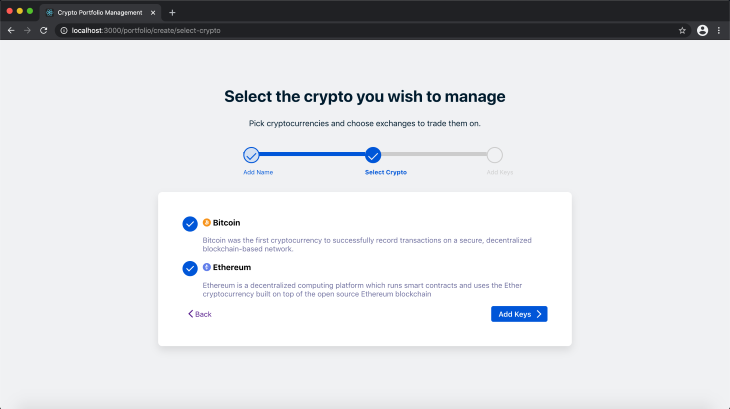
} export default CryptoField
Here’s what our screen should look like:
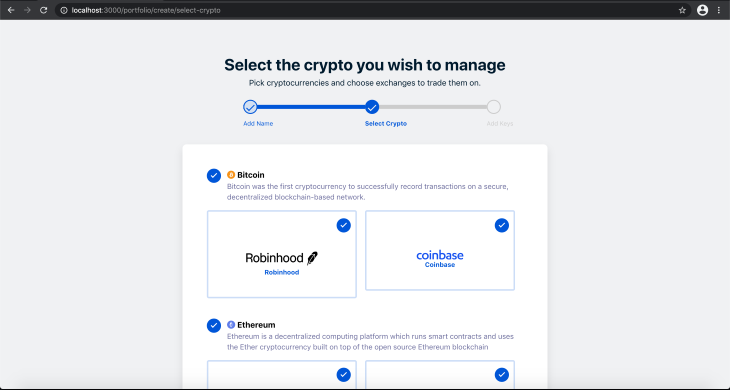
We need to display the marketplaces, so let’s make an update to the CryptoField component. We will loop through marketplaces list and display a CheckboxCard for each marketplace.
<div className="d-flex mb-3"> {crypto.marketplaces.map((marketplace, idx) => { const marketplaceSelected = selectedMarketplaces.includes(marketplace.id); return ( <section className="mr-4 flex-1" key={idx}> <CheckboxCard checked={marketplaceSelected} onChange={(e) => { if (marketplaceSelected) { arrayHelpers.remove( selectedMarketplaces.indexOf(marketplace.id) ); } else { arrayHelpers.push(marketplace.id); } } } label={marketplace.label} > <img src={marketplace.brand_url} alt="Marketplace logo" /> </CheckboxCard> </section> ); })} </div>
Now we have a complete interface.
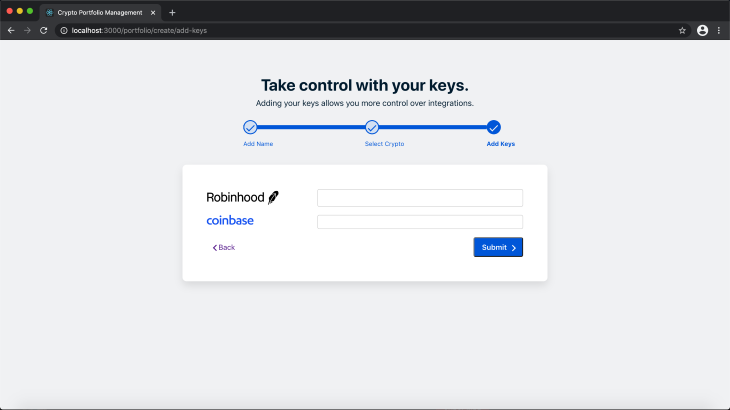
Completing the AddKey screens and multi-step wizards
The AddKey screen is pretty similar to the SelectCrypto screen. We’ll allow users to update keys on only marketplaces they selected. To do this, we need to fetch the IDs of the marketplaces, pass them into a Set (to get rid of duplicates), then use them to create a list to iterate through.
Make this update to src/screens/Portfolio/AddKeys.js.
import { useState, useEffect } from "react";
import { useQuery } from "react-query";
import { Link } from "react-router-dom";
import { fetchAll } from 'utils'
import { useFormikContext } from "formik"; import Steps from "components/Steps";
import styles from 'screens/Portfolio/Portfolio.module.scss'
import MarketplaceKeyField from "components/MarketplaceKeyField"; function AddKeys({ stepsList }) { const [selectedMarketplaces, setSelectedMarketplaces] = useState([]) const { isLoading, error, data: marketplacesList = [] } = useQuery( "marketplaces", () => fetchAll("/marketplaces") ); const marketplaces = marketplacesList.reduce((acc, curr) => ({ ...acc, [curr.id]: curr }), {}) const { values } = useFormikContext(); useEffect(() => { const selectedMarketplaces = [ ...new Set( Object.values(values.marketplaces).reduce( (vendorsList, vendor) => [...vendorsList, ...vendor], [] ) ) ] setSelectedMarketplaces(selectedMarketplaces) }, [values.marketplaces]) if (isLoading) return <p>Loading...</p> if (error) return <p>Error</p> return ( <div> <section className={styles.Section__Heading}> <h2 className={styles.Section__Heading__Title}>Take control with your keys.</h2> <p>Adding your keys allows you more control over integrations.</p> </section> <div className={styles.Steps__Container}> <Steps steps={stepsList} /> </div> <section className={styles.Form__Card}> {selectedMarketplaces.map((marketplaceId, idx) => ( <div className="mb-4" key={idx}> <MarketplaceKeyField marketplace={marketplaces[marketplaceId]} /> </div> ))} <div className={styles.Form__Button__Container}> <Link to={`/portfolio/create/select-crypto`} className="btn"> <span className="chevron left" /> Back </Link> <button type="submit" className="btn btn-sm btn-primary font-weight-bold" > Submit <span className="chevron right" /> </button> </div> </section> </div> )
}
export default AddKeys
Creating the MarketplaceKeyField component
We need to define the MarketplaceKeyField component, which will be display the input fields for the marketplaces. We’ll use the useField Formik hook to get and set single field values.
Create MarketplaceKeyField.js at src/components/Marketplace/MarketplaceKeyField and update.
import { FieldArray, useField } from "formik"; const MarketplaceKeyField = ({ marketplace }) => { const identifier = `secrets.${marketplace.id}`; const [field, , helpers] = useField(identifier); return ( <FieldArray name={`marketplaces.${marketplace.id}`} render={() => { return ( <div className="d-flex"> <label htmlFor={identifier} className="mr-4" style={{ width: "50%" }}> <img src={marketplace.brand_url} alt={marketplace.label} className="img img-responsive" /> </label> <input className="d-inline-block w-100" id={identifier} name={identifier} value={field.value || ""} autoSave={false} onChange={(e) => helpers.setValue(e.target.value)} type="password" /> </div> ); }} /> )
} export default MarketplaceKeyField
Handling form submits with Formik
With our wizard screens and controls all set up, we need a way to send the information collected to a server for persistence and any further processing.
Let’s update the Portfolio component and wrap the routes in a <form/> element. We’ll make use of a render function to gain access to the Formik submit handler and then pass that handler to the form.
return ( <div className={styles.Portfolio__Container}> <Formik initialValues={initialFormValues} onSubmit={handleFormSubmit}> {({ handleSubmit }) => ( <form onSubmit={handleSubmit}> {/* ...Rest of the Router goes here */} </form> </Formik> </div>
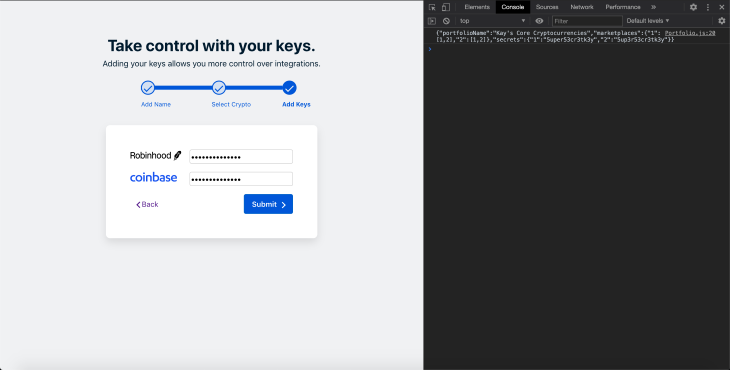
We’ll define the submit handler shortly. When using react-query, information is persisted to the backend by using mutations. We’ll create our very first mutation and a mutation request handler that logs our payload. If you have a functional server, you can initiate an actual HTTP or graphql request.
import { useMutation } from "react-query"; const portfolioCreationRequest = async (payload) => { console.log(JSON.stringify(payload)) setTimeout(() => { return Promise.resolve("success"); }, 3000) }; function Portfolio({ match: { url, path }, history }) { const mutation = useMutation(portfolioCreationRequest, { onSuccess: () => { history.push(`${path}/success`); }, }); const handleFormSubmit = (values) => { const { portfolioName, marketplaces, secrets } = values; const payload = { portfolioName, marketplaces, secrets } mutation.mutate(payload) }
// ... rest of the component
}
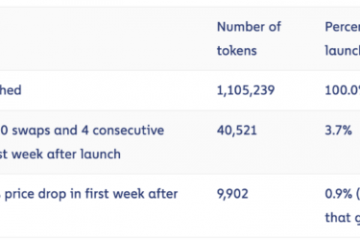
Testing it out, we get to see the payload was successfully logged.
Conclusion
Formik and React-Query are formidable tools for React engineers and you can use them to create consistent solutions to recurring problems.
I encourage a deeper delve into Formik and React Query documentation because we utilized just a small subset of their API surfaces.
You can find the full source code on GitHub.
The post Building multi-step wizards with Formik and React Query appeared first on LogRocket Blog.