Então você quer começar um blog.
Mas você não quer ler outro daqueles tutoriais que recomendam o Bluehost, criadores de páginas lentos e temas/plug-ins não confiáveis.
Você sabe que a maioria dos blogueiros de sucesso não os está usando (eles apenas querem comissões) e que para passar nos vitais essenciais da web , você precisa criar seu blog pensando na velocidade desde o início.
É por isso que este é um guia avançado para iniciar um blog. Em vez de hospedagem compartilhada, usaremos o esquema de dados Cloudways DigitalOcean . Em vez de Elementor, Modelos do Astra Starter com Gutenberg. Em vez do DNS de GoDaddy ou NameCheap, usaremos Cloudflare . E em vez de Yoast, Rank Math . Os únicos custos são domínio, hospedagem e atualizações opcionais (Astra, Rank Math e dados de WP Rocket ). Sim, sou um afiliado deles, mas são muito melhores/mais rápidos do que outras alternativas.
Essas mudanças simples resultarão em um blog mais rápido e mais amigável ao SEO. Claro, isso exigirá algumas etapas extras. Mas vai valer a pena começar com o pé direito em longo prazo, em vez de ter que mudar de tema ou ficar preso a um contrato de hospedagem de 3 anos depois de perceber que o serviço é ruim.
As ferramentas que você usa para construir seu blog têm um grande impacto na velocidade, SEO e design. É muito mais fácil fazer isso corretamente desde o início.

Por que comecei este blog
Eu precisava de dinheiro para sair da casa dos meus pais!
Na verdade, estou sendo 100% honesto. Deus abençoe meus pais, mas eles sempre tiveram problemas de dinheiro e eu vi o preço que isso cobrava em quase todos os aspectos de suas vidas. Sempre pensei, isso vai mudar.
A renda passiva me atraiu para blogs e marketing de afiliados. O potencial ilimitado para obter mais tráfego, vendas e leitores me viciou.
Mas, como muitos, fiquei desanimado depois de incontáveis noites trabalhando sem resultados. Decidi fazer uma última”farra de blogs”e se isso não funcionasse, eu iria seriamente desistir. Você conhece aquelas histórias sobre compositores se trancando em uma sala até o álbum terminar?
Avance 1 mês depois.
Eu acordo em uma manhã de julho de 2017 com um grande pico no meu Google Analytics. Parecia Dogecoin em seus melhores dias. Na mesma semana, arrumei minhas coisas e me mudei para Denver, Colorado.
Avance até os dias de hoje e este blog me rendeu bem mais de meio milhão de dólares. Ele recebe 3.000 visitantes/dia e carrega em cerca de 1 segundo (eu sou um nerd rápido). Se você não percebeu, eu ensino as pessoas sobre WordPress (velocidade, SEO e marketing de afiliados). Todas as coisas que irei cobrir neste guia.
1. Compre um domínio de NameCheap
NameCheap é um ótimo lugar para obtenha o seu nome de domínio. É sem dúvida mais barato que GoDaddy (especialmente se você for barato como eu e usar dados Honey ). Eles também oferecem privacidade de domínio gratuita para toda a vida.
Alguns hosts (por exemplo, Bluehost) oferecem nomes de domínio gratuitos, mas sua hospedagem não é boa. Outros hosts (por exemplo, SiteGround) oferecem nomes de domínio, mas são mais caros do que NameCheap e GoDaddy. NameCheap e GoDaddy são bons lugares para obter seu domínio, mas não hospedagem. Vamos nos inscrever para domínio e hospedagem separadamente porque os melhores registradores de domínio não são os melhores hosts .
Qual deve ser o seu domínio?
- Escolha um nome de domínio memorável
- Não escolha domínios por causa de palavras-chave
- Escolha um domínio.com (sem necessidade de extensões)
- Experimente wordoid.com para obter ideias para o seu nome de domínio
2. Inscreva-se para hospedagem na nuvem
Cloudways DigitalOcean é o que eu recomendo para novos blogs.
É significativamente mais rápido do que a hospedagem compartilhada. Cloudways Vultr HF é ainda mais rápido que o DigitalOcean, mas houve relatórios de interrupções. Cloudways também lançou DigitalOcean Premium , mas com base em testes recentes, você fica melhor com o DigitalOcean regular ou Vultr HF.
Se você deseja testá-los, aqui estão 3 sites de demonstração em diferentes servidores Cloudways. Cada um usa o mesmo modelo, plug-ins e configuração do Astra Starter no painel do Cloudways.
Tenha cuidado com Bluehost, SiteGround, GoDaddy e outros hosts WordPress. Bluehost é lento e de propriedade de EIG , SiteGround tem um TTFB lento e GoDaddy hasn não tem sido bom há muito tempo. Eles podem ser baratos no início, mas você corre o risco de um TTFB lento, limites de CPU, tempos de inatividade e grandes renovações.
Por que Cloudways?
- Anfitrião classificado em primeiro lugar em mais de 15 pesquisas do Facebook
- TTFB deve ser consistentemente inferior a 200 ms
- Eles atualizam continuamente sua tecnologia de velocidade
- Múltiplos níveis de cache (Redis, memcached, Varnish)
- O suporte é excelente, conforme refletido em suas avaliações da Trustpilot
- SSL grátis, teste, proteção de bot, gerenciamento de cron job
- Preços mensais sem contratos de longo prazo ou grandes renovações
- O gerente de comunidade é muito útil se você tiver dúvidas
- Eles têm um Grupo de usuários do Cloudways no Facebook para fazer perguntas
- Novos servidores adicionados regularmente (ou seja, DO Premium + Vultr High Frequency)
- Se ainda não tiver certeza de usá-los, leia minha análise completa do Cloudways
Cloudways é consistentemente classificado como o host nº 1 nas pesquisas do Facebook ( clique na imagem para ampliar ).


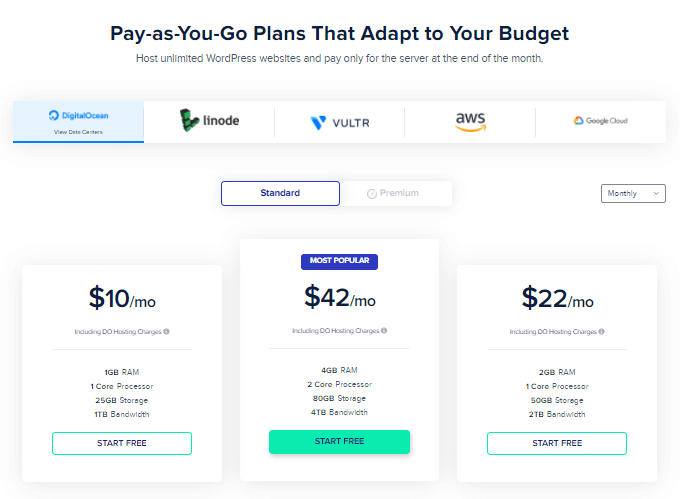
Etapa 1 : inscreva-se em Cloudways (US $ 10/mês 1 GB DigitalOcean é perfeito para novos blogs).
Etapa 2 : Preencha suas informações, verifique seu e-mail e ative sua conta Cloudways.

3. Inicie um servidor
Etapa 1 : Assim que estiver no painel do Cloudways, inicie um servidor.
Etapa 2 : Nomeie seu aplicativo/servidor e escolha um servidor. 1 GB de DigitalOcean deve ser suficiente para um novo blog (eu só aumentaria se você estiver planejando executar WooCommerce ou plug-ins que consomem muitos recursos). Selecione o data center mais próximo de seus visitantes. Quando terminar, clique em Iniciar agora .
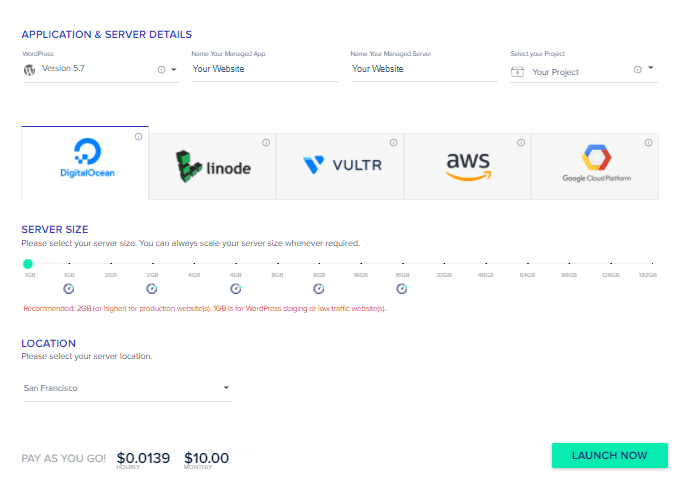
Etapa 3 : Aguarde a criação do seu servidor.
4. Torne seu servidor mais rápido
Etapa 1 : Aumente o limite de memória para 256 MB (Servidores → Configurações e pacotes).

Etapa 2 : use PHP 8.0, MariaDB 10.4 e instale Redis (Servidores → Configurações e pacotes).

Etapa 3 : ative o Redis (servidores → Gerenciar serviços).

5. Conecte seu domínio e adicione SSL
Etapa 1 : Adicione seu domínio ao Cloudways (Aplicativos → Gerenciamento de domínio).

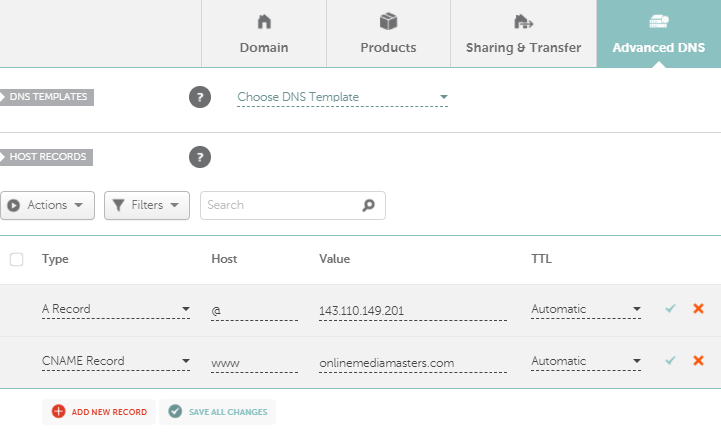
Etapa 2 : atualize seus registros DNS em NameCheap (Dashboard → Domain List → Manage → Advanced DNS → Add New Record. O valor A Record é o IP público encontrado em “Detalhes de acesso” em Cloudways. O CNAME é o seu nome de domínio . Use a mesma formatação abaixo.
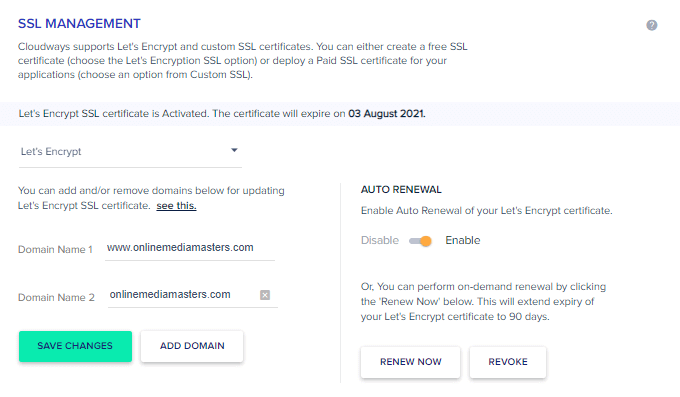
Etapa 3 : adicione gratuitamente Let’s Encrypt SSL (Aplicativos → Certificado SSL) e ative a renovação automática.
6. Altere DNS para Cloudflare
O DNS do NameCheap é lento.
Para velocidades ainda mais rápidas, vamos mover seu DNS do NameCheap para o Cloudflare, já que o DNS deles é mais rápido. Caso contrário, um DNS lento pode causar latência e tornar seu blog WordPress lento.
Etapa 1 : inscreva-se gratuitamente para uma conta Cloudflare , adicione seu site e execute a varredura solicitada pelo Cloudflare. Você acabará chegando a uma página onde a Cloudflare atribui a você 2 nameservers.

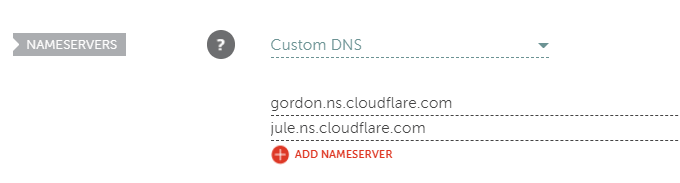
Etapa 2 : Adicionar servidores de nomes Cloudflare a NameCheap. Vá para Painel → Lista de Domínio → Gerenciar → Servidores de Nomes → DNS Personalizado . Adicione os dois servidores de nomes fornecidos pela Cloudflare.
8. Faça login no painel do WordPress
Etapa 1 : Encontre seus detalhes de login do WordPress em Cloudways (Aplicativos → Detalhes de acesso). Será algo como: yourdomainname.com/wp-admin/. Você também encontrará um link para seu site.

Etapa 2 : Faça login e explore seu painel do WordPress.

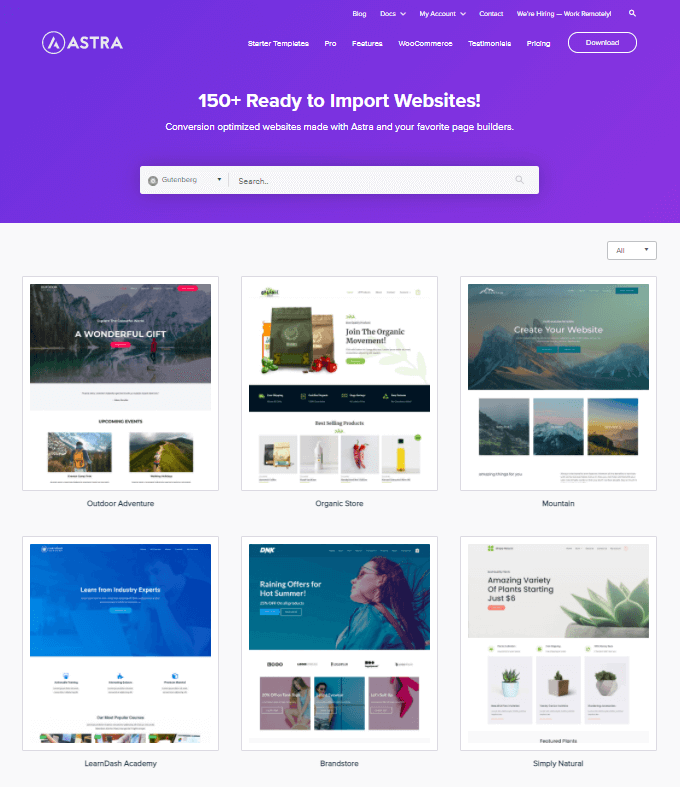
7. Importe um modelo pré-projetado do Astra Starter
Modelos do Astra Starter são modelos de sites pré-concebidos.
Eles são uma das escolhas mais populares para temas rápidos do WordPress . GeneratePress e Oxygen Builder são outras alternativas populares (também são leves). Mas, especialmente porque o Astra tem um modelo para quase todos os setores, é difícil não encontrar um modelo que você vai adorar.
Por que Astra?
- Projetos incríveis
- São importação com um clique
- Eles são responsivos a dispositivos móveis
- Eles carregam rápido (especialmente Gutenberg)
- Desenvolvedores confiáveis (Brainstorm Force)
Etapa 1 : No WordPress, vá para Plug-ins → Adicionar novo → pesquisar/instalar Modelos iniciais .

Etapa 2 : Vá para Aparência → Modelos iniciais. No canto superior direito, filtre por Editor de bloco . Isso garante que você esteja usando o editor de blocos de Gutenberg, que é mais rápido do que a maioria dos construtores de páginas . Tanto a WP Rocket quanto eu construímos nosso site em Gutenberg. O tema Hello do Elementor é rápido, mas a maioria dos temas Elementor não é e você precisará otimizá-lo (o mesmo com Divi). Eles adicionam JavaScript, CSS e invólucros div extras ao seu site, o que prejudica os princípios vitais da web. Mas escolha o que você deseja. A maioria dos temas do Astra é gratuita, enquanto outros são premium . Usarei o tema do Blog de viagens neste guia.
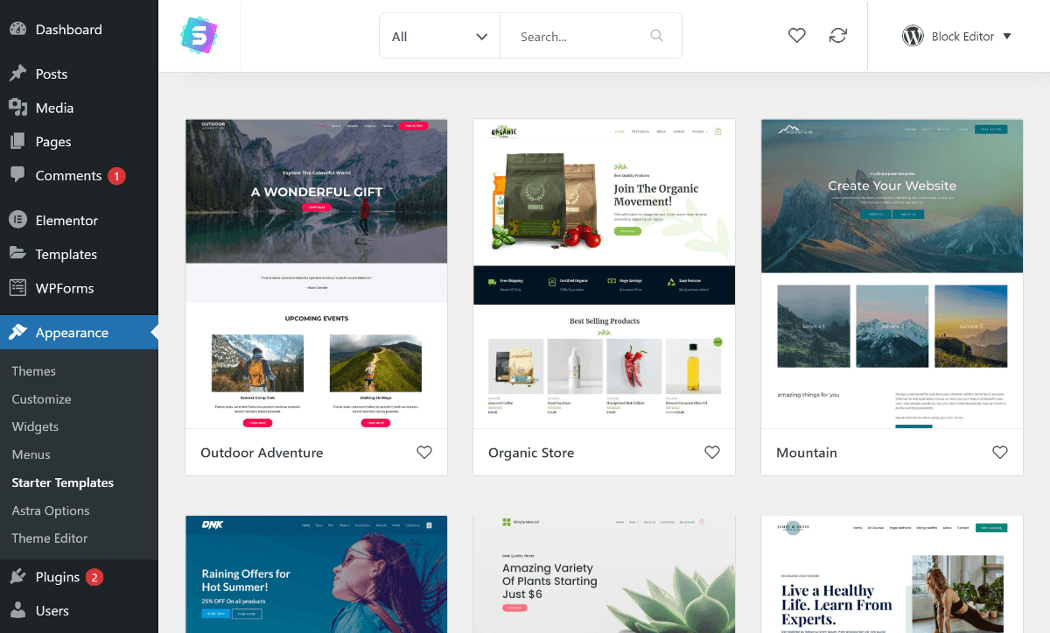
Etapa 3 : quando estiver pronto, importe o modelo clicando em Importar site completo . O Astra fará o download do modelo (conteúdo, plug-ins, widgets e configurações do personalizador do WordPress) para o seu próprio blog. Se você quiser alterar os modelos depois de já ter importado um, siga as mesmas etapas para importar o site completo, apenas você verá uma opção para “excluir o site importado anteriormente”.


Etapa 4 : atualize seu site e ele se parecerá exatamente com o modelo.

Parabéns! Agora você tem um blog WordPress com velocidade otimizada, equipado com hospedagem em nuvem, SSL, DNS da Cloudflare e Gutenberg.
9. Projete seu blog
Não vou cobrir o design (muito) porque:
- É algo fácil de aprender sozinho.
- Existem muitos tutoriais do YouTube sobre Astra e Gutenberg.
- O objetivo principal desta postagem é focar na velocidade, SEO e marketing de afiliados.
- Muitos de vocês já são capazes de projetar (ou estão usando algo diferente do Astra).
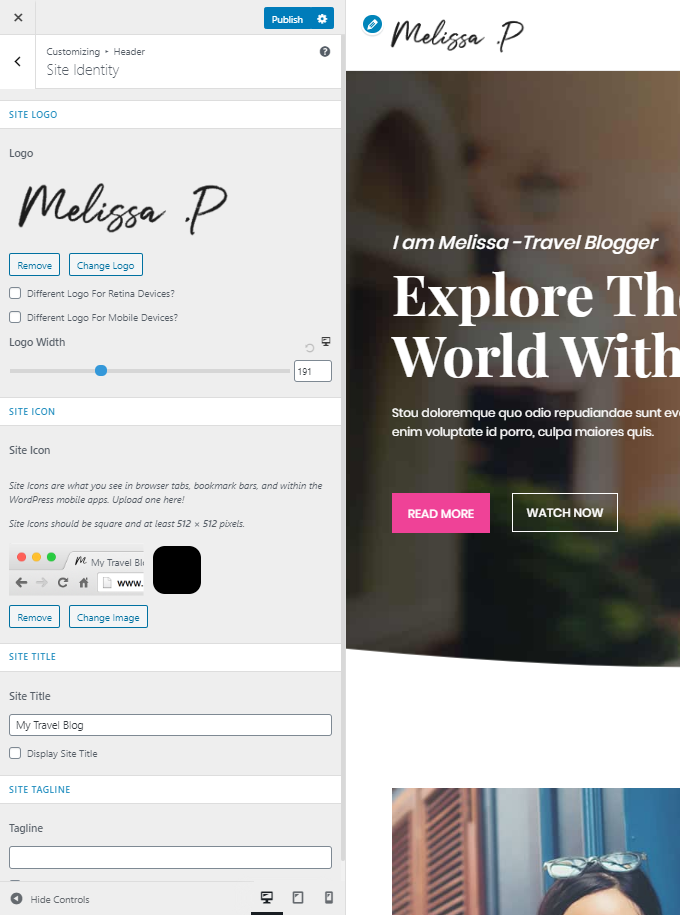
Você pode alterar a maioria das coisas sobre o design do seu blog em Aparência → Opções do Astra .
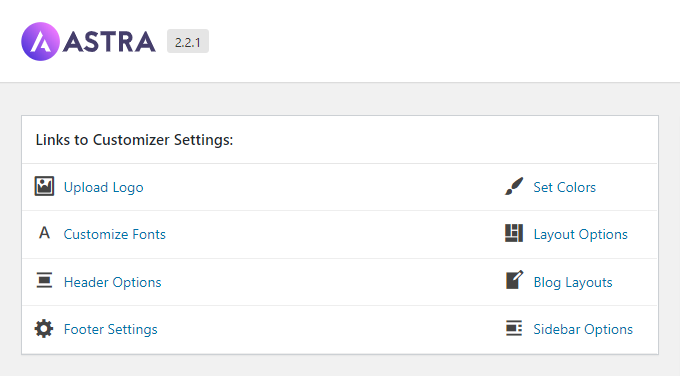
Coisas que você pode fazer nas opções do Astra:
- Nomeie seu blog
- Faça upload do seu logotipo
- Faça upload de um favicon (ícone do site de 16x16px)
- Alterar layout do rodapé + área de direitos autorais
- Alterar família da fonte, tamanho, peso, altura da linha
- Alterar o layout do menu de navegação no desktop/celular
- Alterar o layout de páginas/postagens (largura total, barra lateral, etc)
- Personalize a barra lateral (se houver) e sua largura
- Alterar a cor do texto, tema, link, foco do link, cabeçalho, plano de fundo
- Personalize as informações do seu blog (autor, datas de publicação, categoria, etc.)
Você também vai querer aprender Gutenberg.
10. Instale o foguete WP
A otimização da velocidade não está completa sem um bom plug-in de cache.
Cloudways tem seu próprio plugin Breeze , mas WP Rocket has more features (speed optimizations) and should result in better core web vital scores. Feel free to try both if you like.
WP Rocket is consistently rated the #1 cache plugin in Facebook polls (click image to enlarge).
Step 1: Get 10% off WP Rocket by subscribing to their newsletter on their coupons page.
Step 2: Install WP Rocket and configure the settings (click image to enlarge).
11. Install Rank Math
Rank Math is quickly overtaking Yoast as the top-rated SEO plugin.
It’s more lightweight (less lines of code) with less ads and more SEO features than Yoast and most other SEO plugins (it’s also awesome for adding schema). The free version comes with nearly everything in Yoast Premium, but they do have a pro version. Most people only get the pro version if they need to add multiple schema types, otherwise the free version will work fine.
Rank Math is the #1 SEO plugin in most recent Facebook polls (click image to enlarge).
Step 1: Install Rank Math, create a profile, and connect your site. Run the Advanced setup wizard to setup key settings or migrate from another SEO plugin. Otherwise, go to the settings.
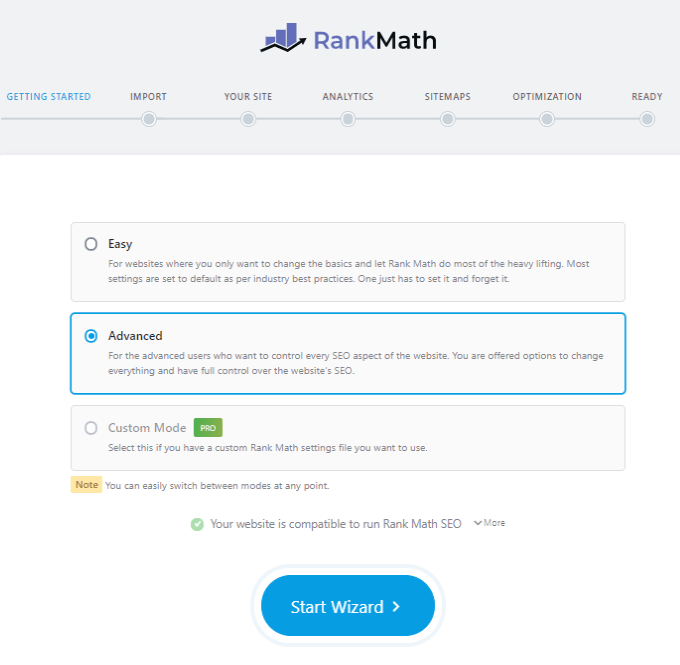
Step 2: Configure the settings (click image to enlarge). These depend on whether you’re using Rank Math free vs. Pro. They also depend on which modules you want to use. For example, I don’t use WooCommerce or AMP so those modules are disabled. And I personally don’t use the link counter, SEO Analysis, or role manager. So those are disabled too. Learn the features and figure out which modules work best for you. Below are suggested settings for the free version.
Key Rank Math Settings
- Configure modules
- Strip category base
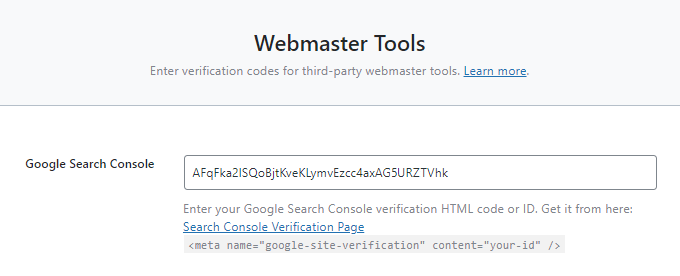
- Setup Google Search Console + other Webmaster Tools
- Index pages/posts, then noindex thin/unhelpful content (i.e. tags)
- Set a default OpenGraph thumbnail (12oo x 630 pixels) for Facebook
- Noindex misc pages in most cases (date archives, archive subpages, etc)
- Configure default SEO titles, meta descriptions, and schema for pages/posts
- Enable “bulk editing” so you can bulk edit your SEO titles and improve CTRs
- Only index category pages if you design them and have lots of posts in categories
- Configure the sitemap and submit to Google Search Console + other Webmaster Tools

12. Research keywords for blog posts
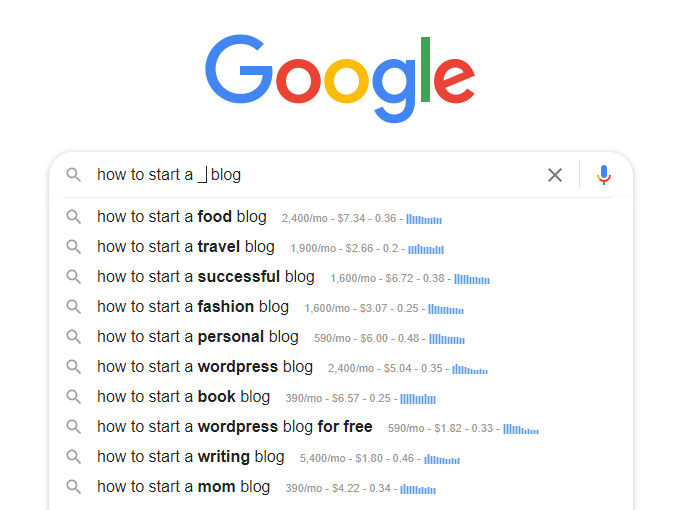
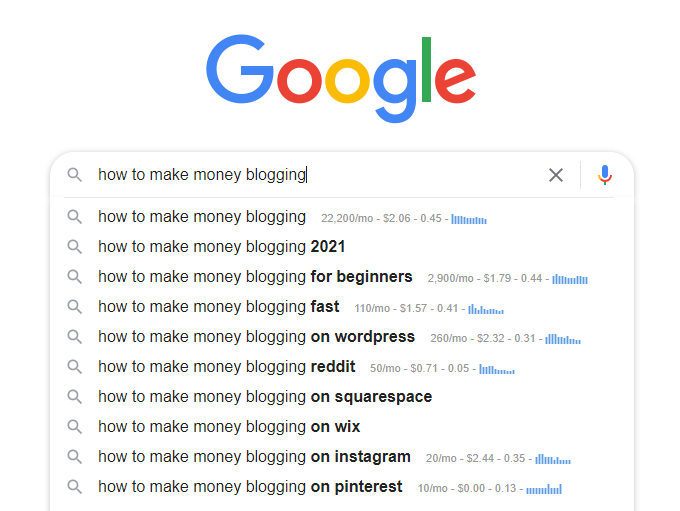
Google Autocomplete is a great place to find keywords for blog posts.
Tools like Keywords Everywhere (paid) show a keyword’s monthly searches, CPC, and estimated competition. However, you should always Google the keyword and look at the top results to visually see the competition. Are authority websites dominating the top results? Is their content strong (in-depth, lots of comments, and links)? Do their authors keep it current?
The best keywords have a blend of profitability, monthly searches, and low competition. When you find one, the main goal should be to create better content than whoever’s in the top results.


13. Add keywords
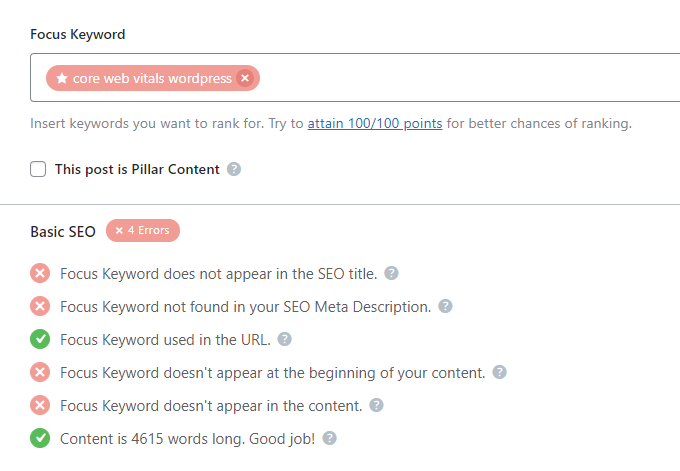
Once you have a keyword (topic) to write about, use that keyword in the blog post:
- Post title
- Permalink (shortened)
- SEO title (ideally in front)
- A few times in the content body, once in the first few sentences
That’s it! SEO plugins will tell you to add your keyword to subheadings, image alt text, meta descriptions, and increase keyword density. You usually don’t need to do this for many reasons:
- Keyword stuffing penalties
- It makes your content sound unnatural
- It doesn’t always make sense to use the exact keyword
- Sometimes, your images don’t exactly describe the keyword
- SEO plugins sometimes only detect exact matches when partial matches are good too
- Google often doesn’t use meta descriptions and uses excerpts from your content instead
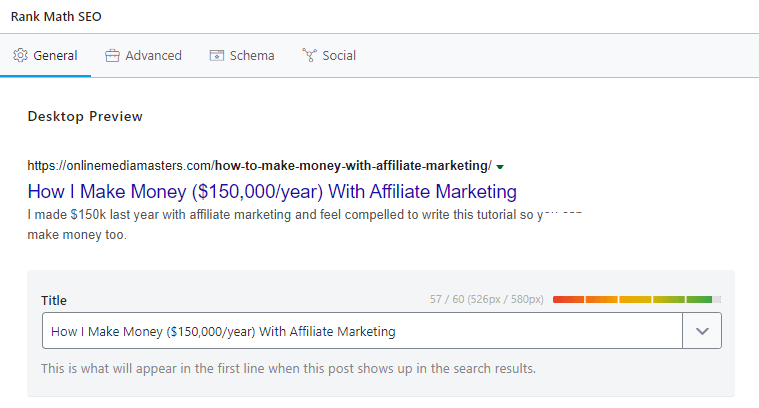
14. Write catchy SEO titles
Google your keyword, look at everyone else’s SEO title, then write yours differently. While it’s usually best to use your keyword in front, sometimes a “catchier” SEO title can be written with your keyword sprinkled throughout the text. Numbers and power words usually perform well.

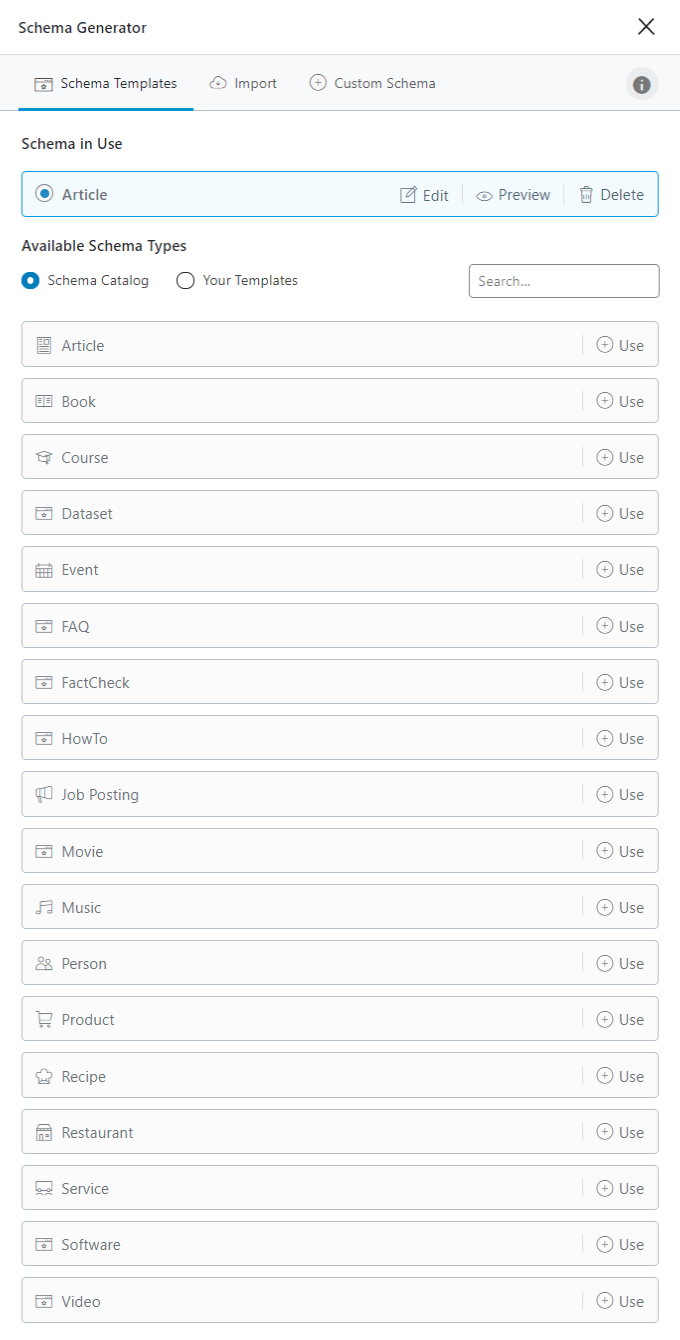
15. Add schema
In WordPress blogs, schema is often used with reviews, FAQs, and recipes (although there are many other supported data types). As an affiliate blog, I personally use reviews/FAQs the most.
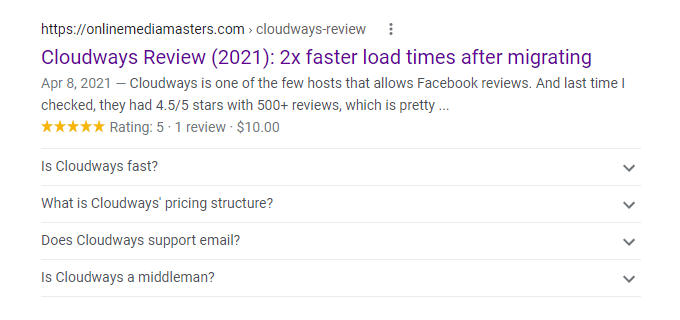
Rank Math supports most schema types, adds the markup properly, and is easy. Otherwise, I recommend Schema Pro or Google Data Highlighter. Other schema plugins don’t always add the markup properly (and may be outdated) which can cause schema errors in Search Console.
Add Schema Using Rank Math
- Edit a post
- Scroll down to the Schema section
- Choose your schema type
- Fill out the required information
- Check for schema errors in Search Console
Google has cracked down on FAQ schema. Just like featured snippets, they should be objective (not just your opinion) and a highly relevant question. Answer The Public is a great tool for this.
16. Add a table of contents
Here’s why you should a table of contents to posts:
- It can be used in list featured snippets.
- Easy for users to find what they’re looking for.
- Anchors lets people link and jump to specific sections on the post.
- Encourages you to write organized, in-depth content (length is strength).
There are a couple good TOC plugins (i.e. Lucky and Gutenberg Blocks). Or you can design colored backgrounds in CSS and create your TOC manually for each post using HTML code.
item-one">Item One
item-two">Item Two
item-three">Item Three
17. Give your post a banner image
The same banner image can be cropped/resized to be used in multiple places:
- Main graphic – usually at top of a post
- Featured image – on your main blog page
- Twitter og:image – 1024x512px in Rank Math
- Facebook og:image – 1200x630px in Rank Math
- Featured snippet – sometimes used in Google’s search results
18. Monetize your blog with affiliate links
So how the hell do I make $150,000/year with affiliate marketing?
Just look at this post. I try to give you tons of value but also use affiliate links to Cloudways, NameCheap, Astra Starter Templates, Rank Math Pro, WP Rocket, and MailChimp. That’s why “how to start a blog” tutorials are so popular (and competitive). There’s so many things to offer.
You need traffic before getting approved for most affiliate programs.
If you have a large following somewhere else (i.e. YouTube), you may be able to convince affiliates to approve you. Otherwise, you need to crank out high quality, SEO-friendly content. Once you have a lot of traffic (and a history of sales), affiliates will be the ones approaching you.
Write content with affiliates in mind.
Even if you haven’t gotten approved for a program yet, you can still prepare. Take my blog for example. I promoted Rank Math even when they didn’t have an affiliate program. When they added one and approved me, it took less than an hour to replace normal links with affiliate links. Same thing with Oxygen Builder. I naturally mention them because they’re a fast builder. They don’t have an affiliate program yet, but I bet they might in the future. And if they do, I’ll be ready.
Amazon: the elephant in the room.
Amazon’s low commissions (4-10%) are probably the biggest drawback. What scares me even more is how powerful they are. They reduced commission rates in the past, so what makes you think they won’t do it again? Do they really need their affiliates? Why would someone come to your blog instead of going directly to Amazon? Sure, there are successful Amazon affiliates (a common strategy I see is YouTubers reviewing video equipment). But I like to promote growth companies since they tend to treat affiliates better. There were just too many red flags for me.
The wild, wild hosting industry.
Ahh, hosting. So many scumbags in this industry. Hosts will do anything to get new customers, and affiliates will do anything to make those high commissions. If you’re entering this industry, I just encourage you to be truthful. Recommend the host you actually use. Don’t run a hosting speed test with caching/CDN turned on with one host, and not the others. Point out cons, and please don’t be another “how to start a blog” Bluehost affiliate. There’s already enough of them. The industry is ultra competitive and I know there’s no way I’m going to rank for keywords like “how to start a blog” or “SiteGround reviews.” You’re going to have to be more clever than that.
Don’t put your eggs in one basket.
IMO, SiteGround went downhill in 2020. Since I try to be truthful, I mentioned issues I had with them on my blog (and to them, but they didn’t care). Ironically, one was how they cancelled Asian affiliate accounts. When they saw my complaints, they cancelled my affiliate account and before I knew it, we parted ways. They were 80%+ of my affiliate income at the time. Thankfully, I anticipated SiteGround would do this and I had partnered with Cloudways around the same time. I changed all my content/recommendations from SiteGround to Cloudways, sales stayed the same (they eventually increased), and all is good to this day. But what if Amazon did this to me? What if I only had a couple affiliates to choose from? I have seen so many Amazon affiliates (specifically) get crushed when accounts get cancelled, commissions get reduced, or Amazon writes their own articles to outrank their affiliates. Don’t lay your eggs in one basket my friends.
Read the fine details.
- What’s the cookie period?
- Do you have to climb tiers?
- Do they offer sub-affiliate sales?
- Do they offer recurring commissions?
Where to find affiliates.
Many affiliates run their own program which you can usually find a link to in the footer of their website. Others are part of large affiliate marketplaces like ShareASale, Impact, or CJ Affiliate.
Add affiliate links to your blog.
Login to your affiliate dashboard and start creating affiliate links (remember to use deep links too). Next, add them to an affiliate link management plugin (I use Thirsty Affiliates). Once your affiliate links are in Thirsty Affiliates, configure the Thirsty Affiliate settings. Remember to choose a link prefix (I use/go/), enable statistics, and nofollow + sponsored affiliate links which is recommended by Google. Thirsty Affiliates Pro has an automatic keyword linking feature which can be convenient, but I chocks manually.
Thirsty Affiliates Pro includes autolinking features.
which tracks stats on each link. Remember to cloak affiliate links (using a prefix like/go/) and to use rel=”nofollow and rel=”sponsored” for each affiliate link.
How I increased conversations from 2% to 7%.
Social proof and coupon codes! For social proof, this was adding Facebook polls, migration results (Tweets and Facebook posts when people moved to Cloudways), and conversations of people recommending Cloudways. For coupon codes, Cloudways gave me the code: OMM25. Whenever someone uses that code, even if they don’t click my affiliate link, it credits me a sale. This is great for YouTube (it replaces directing people to affiliate links in the video description).
Is it really passive income?
Kind of. A couple times, I didn’t work on my blog for several months and still maintained my affiliate income. But as time went on, my content started to get outdated, sales dropped, and I needed to get back to work. Things can change in your industry, with affiliates, technology, etc. You need to write new content and keep your existing content updated. Especially in the beginning when you’re starting off with no content, it can be a lot of work without a paycheck.
Write affiliate disclaimers.
You’re legally obligated to tell people if you’re an affiliate. Write an affiliate disclaimer page, write a short affiliate disclaimer in the post, or use (aff link) whenever you use an affiliate link.
Affiliate Disclaimer – I’m an affiliate for Cloudways, NameCheap, WP Rocket, and other tools in this tutorial. This means I get a commission from the sale at no expense to you. I did my best to select the best, fastest tools. I also donate a good chunk of this blog’s affiliate income to GoFundMe campaigns and your support is much appreciated.
How long does it take to get sales?
It can take several months to get your first sale and several years to make enough money to sustain a living. Other than spending more time on content, the biggest tips I can give is to target long-tail, profitable keywords, (but not too competitive) and promote high ticket items. Run the numbers and figure out how many sales you need to make each day to make a living.
Here’s the equation:
My commissions are $xxx per sale and I have xxx daily readers. If xxx of the readers click affiliate links, and xxx convert, I’ll make $xxx/day.
Here’s roughly what it looks like for my blog: My commissions are $150 per sale and I have 3,000 daily readers. If 43 of the readers click affiliate links and 3 convert, I’ll make $450/day.
19. Add a GDPR notice
GDPR compliance is mandatory.
Use this cookie notice plugin to let users know your website uses cookies and provide a link to your privacy policy page. In addition, you should use contact forms (and blog comments) with consent checkboxes and anonymize IPs in Google Analytics. Kinsta has a nice GDPR checklist.

20. Install Search Console + Analytics
In the Rank Math section, you should have installed Search Console (sign up and add the verification code to Rank Math → General Settings → Webmaster Tools → Search Console).
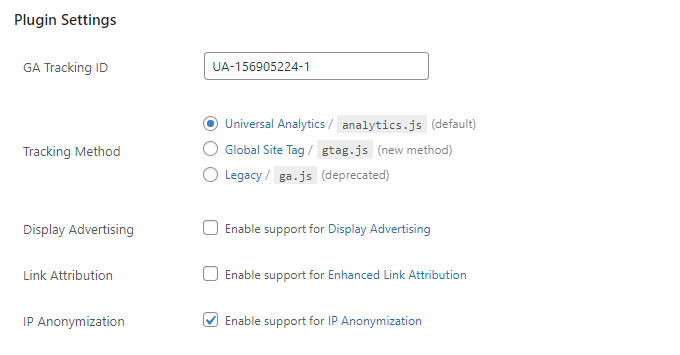
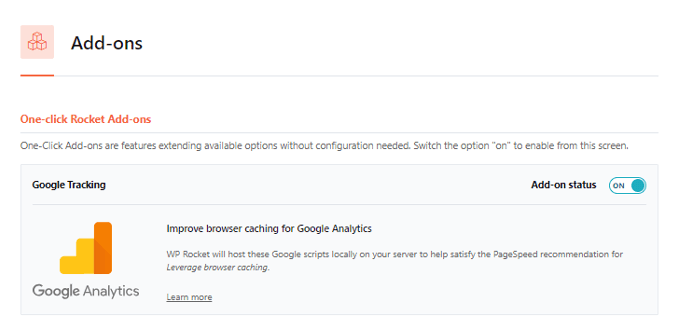
To add Google Analytics, I recommend Jeff Starr’s GA Google Analytics plugin. It lets you anonymize IPs (for GDPR) and use a smaller tracking code size (analytics.js is 18.4 KB while gtag.js v4 is 51.5 KB according to Perfmatters). Once you’re done setting it up, enable the Google Tracking add-on in WP Rocket to host your Google Analytics tracking code locally.
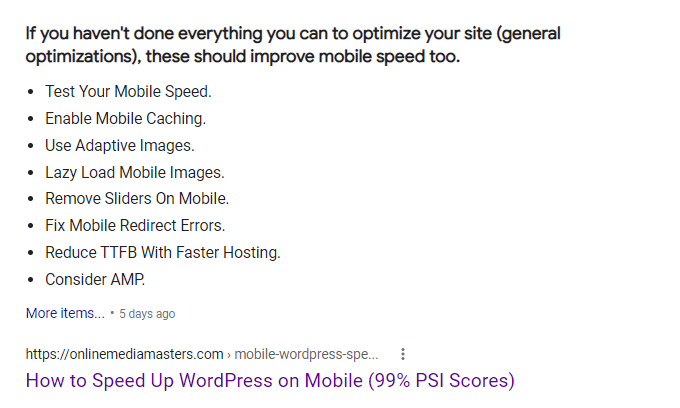
21. Optimize for core web vitals
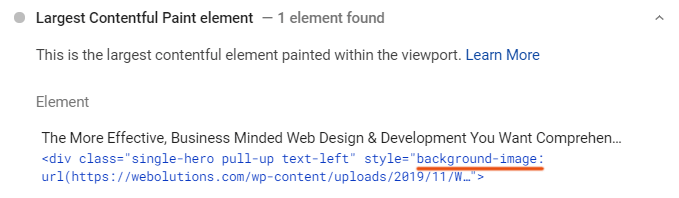
On your journey, keep an eye on your mobile core web vitals report in Search Console.

As you add more plugins, images, and third-party code, they will inevitably hurt core web vitals. Using this guide, you’ve already built a blog on a fast infrastructure. Now it’s time to keep it fast. Lighthouse (preferred) and PageSpeed Insights show you specific recommendations to optimize your blog. These recommendations should improve both core web vitals and Lighthouse scores:
Optimize your LCP element.
Your LCP (largest contentful paint) element is usually an image or background image. For me, it’s the purple background image that loads across my entire site. Optimize this as best you can (use correct dimensions, specify dimensions, compress it, use the right image file type, exclude it from lazy load if it appears above the fold, and consider using an image CDN). Remember to also optimize your logo, favicon, sidebar, footer, and other images that load across your entire blog.
Avoid layout shifts.
Your CLS (cumulative layout shift) score should ideally be “0.” Use Google’s Layout Shift Debugger to find layout shifts. Specify dimensions of images, videos, iframes. If you use AdSense, reserve space for it by specifying ad dimensions in the div code. Use font-display:swap by adding the necessary code to your font’s CSS (or use the Swap Google Fonts Display plugin). Test settings in your cache plugin, specifically optimizing CSS delivery and asynchronous CSS. When using animations, use transform: scale() instead of changing the height/width attributes, and use transform: translate() to move elements around instead of using top, right, bottom, left.

Host fonts, analytics, Avatars, and GTM locally.
Serve fonts locally instead of fonts.gstatic.com and minimize the number of font families, weights, and icons. OMGF and WP Rocket’s Google Tracking add-on can help host files locally. For hosting Avatars locally, use the WP User Avatar plugin to upload a locally hosted avatar.
Optimize CSS + JavaScript with Autoptimize.
Autoptimize often does a better job at optimizing CSS + JavaScript files than cache plugin. In the Autoptimize settings, optimize CSS and JavaScript code, then aggregate CSS and JS files.
Defer JavaScript with Async JavaScript.
If you have render-blocking resources, try installing Async JavaScript and clicking “apply defer.”
Optimize images with ShortPixel.
ShortPixel optimizes images with compression, WebP, stripping EXIF data, and scaling options.
Unload unused assets.
Asset CleanUp and Perfmatters let you disable unused CSS and JavaScript from pages/posts where they don’t need to load. Asset CleanUp also has a pro version which lets you disable custom CSS. I use Perfmatters since the UI/UX is better. Both can also help with bloat removal.
Optimize third-party code.
Third-party code can be from Google Analytics, AdSense, Tag Manager, Maps, and even social sharing buttons/widgets. You can find your blog’s third-party code in Lighthouse. Besides not using too much third-party code, you can host files locally, lazy load videos, replace YouTube iframes with preview images, and delay third-party JavaScript in WP Rocket or Flying Scripts.
Preload, prefetch, and preconnect.
Browser resource hints should always be tested to make sure they have a positive impact on load time. Try preloading your LCP element and fonts, prefetch domains of third-party code, and preconnect your CDN URL and third-party fonts (fonts.gstatic.com) if you’re using them.
Avoid slow plugins.
See my list of common slow plugins, use Query Monitor to find slow plugins on your blog, and the WP Hive Chrome Extension to find slow plugins while searching the WordPress repository.
Configure Cloudflare settings.
We previously moved to Cloudflare’s DNS in step 6, but you can also use page rules, automatic platform optimization, Brotli, and hotlink protection to make your WordPress blog even faster.
22. Build your email list from the start
Don’t wait to build your email list.
MailChimp is free up to 2,000 contacts. Using the MailChimp plugin, you can connect your account, create sign up forms, and start collecting emails in no time. Subscribers are usually your most loyal followers who will read new posts, share content, and complete call to actions.
23. Create and embed YouTube videos
YouTube and blogs work together so nicely.
You create videos, optimize them for YouTube keywords, and embed the video on your blog. Embedding the video improves the quality of your blog’s content tremendously, and the engagement it gets on your blog helps the video rank higher in YouTube. Double whammy.
I also find the competition in YouTube to be less competitive than Google, but videos can get outdated quickly. If you’re interested in YouTube, be sure to check out my YouTube SEO guide.
24. Get help from WordPress Facebook Groups
I’ve seen a lot of spammy Facebook groups, but these ones are actually super helpful and can give you lots of support. I added asterisks next to the Groups I personally find the most helpful.
25. Tools: the full list of tools used in this tutorial
I use all them except for LuckyWP Table Of Contents, OMGF, and Asset CleanUp.
If you liked this, you’ll also like my WordPress SEO Guide. Hope you enjoyed this one:)
Cheers,
Tom