Criar um aplicativo que atenda às necessidades de um mercado local é fundamental para desenvolvedores que desejam melhorar a satisfação do usuário e atingir as metas de negócios aumentando as taxas de conversão.
Com os aplicativos React, existem muitas opções de internacionalização disponíveis para atingir esse tipo de público. Neste guia, revisaremos uma das soluções mais populares que existem: i18next.
Essa estrutura adapta perfeitamente um aplicativo a mercados e culturas locais específicos, graças ao processo de localização, também conhecido como l10n.
A localização vai além da tradução de palavras de um idioma para outro. Além da tradução, ele nos ajuda a considerar as diferenças culturais, como moeda, localização da unidade, formatação de número e data, pluralização e até mesmo a aparência local.
O framework i18next é flexível devido ao seu suporte para plug-ins, permitindo-nos adicionar recursos que, de outra forma, teríamos que construir nós mesmos.
Também temos opções para separar as traduções em arquivos diferentes e carregá-los quando necessário. Isso significa que não precisamos carregar todos os arquivos de tradução antes de carregar uma página, reduzindo o tempo de carregamento lento.
Nosso foco, por enquanto, está na pasta src . Lá, temos todos os nossos componentes React contendo o conteúdo que podemos localizar.
Instalação dos pacotes i18next e react-i18next
Para localizar um aplicativo React usando o i18next, devemos adicionar os pacotes i18next e react-i18next ao nosso projeto.
i18next fornece todas as funcionalidades de tradução, enquanto react-i18next adiciona alguns recursos extras do React, como Hooks, HOCs, adereços de renderização e muito mais.
Instale-os executando o seguinte comando:
npm install react-i18next i18next
Definindo o arquivo de configuração
Crie um arquivo chamado i18n.js na pasta src e adicione esta configuração de tradução:
Ao importar a instância i18n do núcleo i18next , podemos vincular o módulo react-i18next a ele por meio do initReactI18next objeto fornecido pelo módulo. Isso garante que a estrutura i18next passe a instância i18n para o módulo react-i18next .
Invocar a função use () carrega e vincula quaisquer plug-ins à instância i18n .
Também adicionamos as propriedades dos objetos resources , lng e fallbackLng . Em resources , fornecemos o objeto translation para dois idiomas, inglês e japonês.
Conforme visto no objeto translation , definimos nossa mensagem em um formato JSON, fornecendo a ela uma chave exclusiva em todo o local suportado.
Neste projeto, estamos traduzindo para o idioma de destino usando o Google Tradutor .
Acessando a mensagem traduzida via t()
i18next por meio da instância i18n fornece uma função de tradução chamada t () . Ele aceita uma chave que procura o objeto de tradução e retorna a string que corresponde à chave para o idioma atual.
Dependendo do tipo de componente React, podemos acessar t () de diferentes maneiras, como usando:
Abra o arquivo components/Content.js e importe o gancho useTranslation , assim:
import {useTranslation} from'react-i18next';
Então, acima da instrução return , adicione esta linha:
const {t, i18n}=useTranslation ();
A partir do Gancho, podemos acessar a função t e a instância i18n . Precisamos apenas da função t para traduzir nosso conteúdo. Posteriormente neste guia, usaremos a instância i18n para alterar o idioma do aplicativo. Por enquanto, podemos remover o i18n .
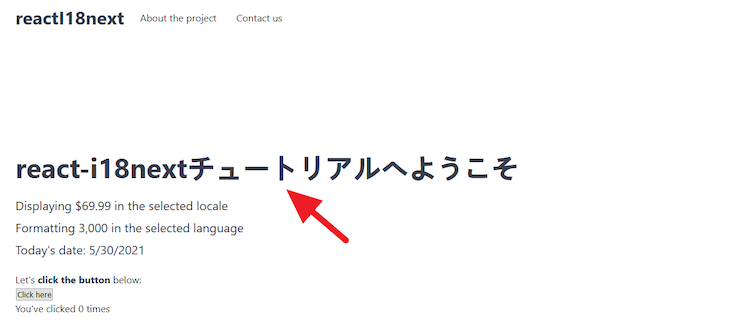
Em seguida, substitua o texto h1 pela função t contendo a chave de tradução para que tenhamos o seguinte:
Agora veremos o texto em japonês renderizado assim que recarregarmos a página:
Carregamento lento do arquivo de tradução do servidor
No momento, temos todas as nossas traduções carregadas no arquivo de configuração. Isso não é ideal, especialmente se estivermos trabalhando em um projeto maior, onde adicionamos mais idiomas e conteúdo.
i18next fornece uma maneira melhor de otimizar nosso código, separando as traduções do código e carregando-as quando necessário. Para fazer isso, instalaremos um plug-in.
Instalando i18next-http-backend
O pacote i18next-http-backend carrega os arquivos de tradução do servidor de backend:
npm install i18next-http-backend
Em seguida, atualize o arquivo de configuração i18n.js para incluir o plug-in:
Por padrão, este plug-in espera carregar nossos arquivos de tradução do diretório public/locales/{lng}/translation.json , onde lng é o código do idioma.
Embora também possamos alterar o diretório de o arquivo de configuração para um diretório personalizado, nos limitaremos ao padrão.
Vamos criar o arquivo translation.json para cada um dos idiomas com suporte. Neste caso, ofereceremos suporte para inglês, árabe, francês e japonês.
A estrutura do arquivo deve ser semelhante a esta:
public ├── localidades │ ├── ar │ │ └── translation.json │ ├── pt │ │ └── translation.json │ ├── fr │ │ └── translation.json │ ├── ja │ │ └── translation.json
Dentro do arquivo en/translation.json , adicione este:
 { "welcome text":"Bem-vindo ao tutorial react-i18next"
}
No arquivo ar/translation.json , adicione este:
 { "texto de boas-vindas":"مرحبًا بك في البرنامج التعليمي react-i18next"
}
Use o Google Translate para os outros locais suportados. Posteriormente, atualizaremos nossos arquivos de tradução para acomodar outro texto.
Lembre-se de salvar todos os arquivos.
Agora podemos remover a propriedade resources no arquivo src/i18n.js , pois agora podemos carregar as traduções do backend.
O arquivo de configuração agora se parece com este:
Se salvarmos o arquivo e recarregarmos o front-end, encontraremos uma falha no aplicativo. A estrutura i18next espera que lidemos com o estado do aplicativo enquanto esperamos que o texto de tradução carregue do back-end.
Para fazer isso, envolveremos o componente de nível superior dentro de um componente Suspense do React. Isso nos permite exibir algum fallback-por exemplo, um indicador de carregamento-durante a fase de espera.
Abra o arquivo src/index.js e use o componente Suspense , assim:
ReactDOM.render ( Carregando...
}> , document.getElementById ("root")
);
A seguir, importe o componente Suspense na parte superior do arquivo:
import React, {Suspense} de"react";
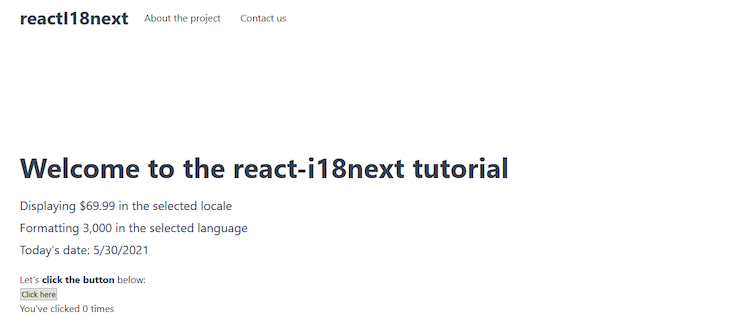
O prop fallback aceita uma string de texto ou qualquer elemento React que gostaríamos de renderizar. Salve o arquivo e o aplicativo deve funcionar.
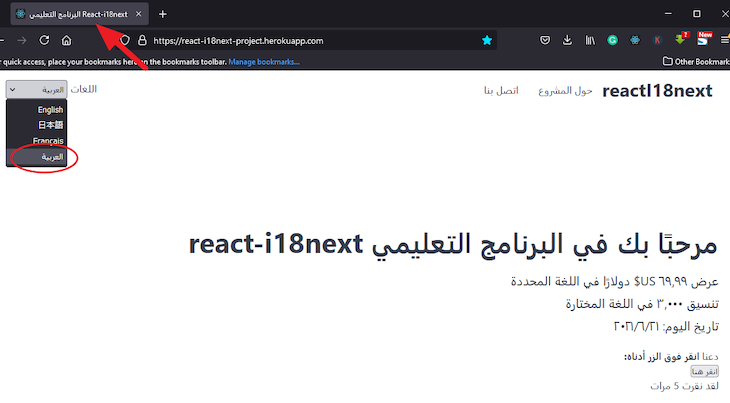
Se alterarmos a propriedade lng no arquivo de configuração para ar ou qualquer um dos idiomas suportados, veremos a tradução no frontend.
Agora que cobrimos os fundamentos, vamos traduzir rapidamente o conteúdo da outra página.
Interpolação, formatação e pluralização
Até o momento, vimos como traduzir uma string de texto simples. Conforme mencionado anteriormente, a localização vai além da tradução entre idiomas. As diferenças culturais devem ser consideradas.
A partir de agora, abordaremos como formatar e traduzir uma mensagem rica em texto. Se olharmos para nosso aplicativo, veremos que temos números, a data e a localização da moeda para formatar para diferentes localidades.
Também temos uma contagem numérica que aumenta conforme os usuários clicam em um botão e deve formatar o texto para respeitar a pluralização.
Interpolação
Quando o texto tem um número ou data que deve ser formatado, usamos interpolação. Esta é uma das funcionalidades que permite inserir valores em nossas traduções.
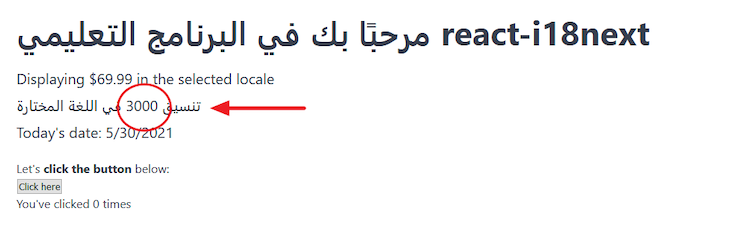
Usando o texto de frontend, “Formatting 3.000 no idioma selecionado,” iremos interpolar “3000” no texto.
No arquivo en/translation.json , adicione ao JSON:
 { ... "formatNumber":"Formatando {{num}} no idioma selecionado"
}
Observe como estamos substituindo o número por um espaço reservado.
No arquivo árabe, adicione este:
 { ... "formatNumber":"تنسيق {{num}} في اللغة المختارة"
}
Certifique-se de adicionar traduções para os outros locais suportados e salvar todos os arquivos.
A seguir, usaremos a função de tradução, t () , para traduzir e formatar nossa mensagem com base no idioma atual.
Em components/Content.js , encontre este elemento:
Formatando 3.000 no idioma selecionado
Substitua por este:
{t ("formatNumber", {num: 3000})}
Aqui, estamos passando o número a interpolar como o segundo argumento da função t () . O num usado na propriedade do objeto deve corresponder ao espaço reservado nos arquivos de tradução-em nosso caso, {{num}} .
Salve o arquivo e teste o trabalho.
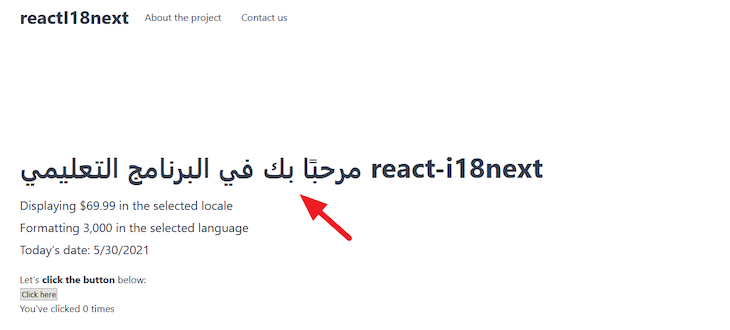
Se alterarmos a propriedade lng no arquivo i18n.js para ar , teremos isto:
Em seguida, devemos formatar o número interpolado com base no idioma atual.
Neste projeto, vamos usar o Intl API para formatar para nós; é simples e funciona bem com o i18next. Esta API Intl por meio de seu objeto Intl nos fornece os construtores necessários.
Para formatarmos, precisamos apenas dos construtores Intl.NumberFormat () e Intl.DateTimeFormat () .
Para formatar o número que interpolamos anteriormente, devemos adicionar outra opção de tradução chamada interpolação dentro da configuração e definir uma função que lida com a formatação.
O foco está na função formato . Lá, definimos uma condição que verifica se o valor que precisamos formatar é um número. Devemos então retornar o valor formatado no idioma atual usando a API Intl.
Para garantir que a condição retorne verdadeiro, devemos atualizar o espaço reservado, {{}} , em nossa tradução para incluir o número .
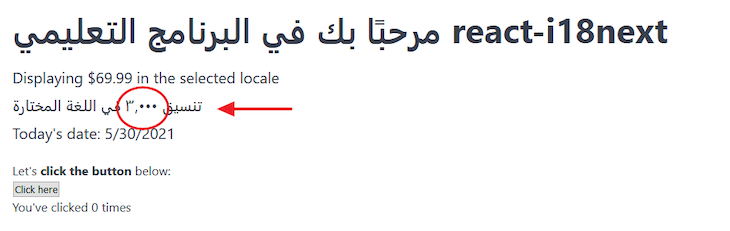
Para inglês, atualize en como o seguinte:
"formatNumber":"Formatando {{num, número}} no idioma selecionado"
Para árabe, atualize ar da seguinte forma:
"formatNumber":"تنسيق {{num, number}} في اللغة المختارة"
Atualize os arquivos de tradução para os outros locais suportados também e salve-os.
Agora, o aplicativo deve ter a seguinte aparência:
Usando a mesma abordagem, vamos traduzir o outro texto no arquivo components/Content.js e formatar a data e a colocação da moeda.
Atualize o en/translation.json para incluir o seguinte:
 { ... "formatCurrency":"Exibindo {{price, currency}} no local selecionado", "formatDate":"Data de hoje: {{hoje, data}}"
}
No ar/translation.json , adicione:
 { ... "formatCurrency":"عرض {{preço, moeda}} دولارًا في اللغة المحددة", "formatDate":"تاريخ اليوم: {{hoje, data}}"
}
Mais uma vez, adicione traduções para os outros locais suportados.
Depois disso, atualize o arquivo components/Content.js para acessar as traduções:
 const Content=()=> { //... Retorna (   {t ("texto de boas-vindas")}   {t ("formatCurrency", {price: 69,99})}   {t ("formatNumber", {num: 3000})}   {t ("formatDate", {today: new Date ()})}   );
};
Finalmente, no arquivo i18n.js , atualize a função formato :
 formato: (valor, formato, lng)=> { //... if (format==="data") { retornar novo Intl.DateTimeFormat (lng).format (valor); } if (formato==="moeda") { return new Intl.NumberFormat (lng, { estilo:"moeda", moeda:"USD", }). formato (valor); }
},
Neste arquivo, estamos usando o construtor Intl.DateTimeFormat () para formatar a data. Observe como estamos fornecendo opções adicionais para Intl.NumberFormat () para formatar a moeda. Encontre a lista de códigos de moeda aqui .
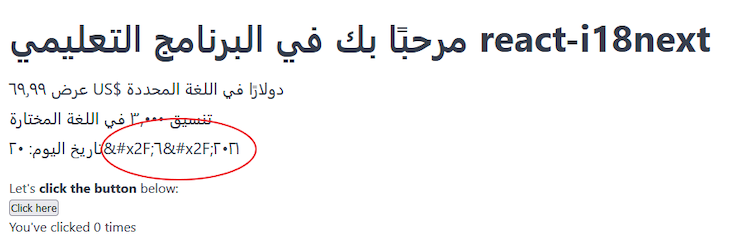
Salve todos os arquivos e recarregue o front-end.
Por padrão, o i18next escapa valores para reduzir os ataques de cross-site scripting (XSS), vistos na imagem abaixo.
Mas, um aplicativo React é protegido por XSS. Portanto, vamos evitar que o i18next escape do valor adicionando escapeValue na interpolação e atribuindo um valor false .
 interpolação: { formato: (valor, formato, lng)=> { //... }, escapeValue: false//reage já a cofres de xss
},
Salve e recarregue o front-end e ele deve funcionar.
Pluralização
No momento, em nosso aplicativo, clicar no botão de contagem de front-end não altera a declaração de contagem. Por exemplo, quando a contagem é singular, a declaração deve ser “Você clicou 1 vez.”
Então, vamos começar a adicionar traduções aos vários arquivos de tradução. Atualize o arquivo en/translation.json para incluir o seguinte:
Aqui, estamos substituindo a contagem dinâmica na mensagem por um marcador. Esta variável de espaço reservado deve ser chamada de contagem . Também estamos fornecendo o equivalente no plural de nossa tradução.
Para informar a seguir se devemos renderizar a mensagem no singular ou no plural, devemos passar a chave clickCount , sem _plural , junto com o valor de contagem dinâmica para o t função na renderização.
Se a contagem for 1 , a mensagem no singular renderiza, caso contrário, renderiza no plural.
Vamos atualizar os arquivos de tradução para as outras localidades. Para o arquivo ja/translation.json , adicione o seguinte:
Observe que não estamos adicionando o equivalente no plural. Isso ocorre porque o japonês ( ja ) tem apenas uma forma no plural. Consulte a forma plural para cada idioma .
Como o inglês, o francês tem duas formas plurais. No entanto, algumas das palavras têm a mesma forma no singular e no plural.
Por exemplo, se traduzirmos a mensagem para o francês, teremos o seguinte no arquivo fr/translation.json :
Para árabe, existem cinco formas plurais ao lado do singular, então devemos definir todas as formas, assim:
 clickCount_0;//c=0 ou seja, zero
clickCount_1;//c=1 ou seja, singular
clickCount_2;//c=2 ou seja, dois
clickCount_3;//3 <=c <=10 ou seja, poucos
clickCount_4;//11 <=c <=99 ou seja, muitos
clickCount_5;//>=100 ou seja, outro
Devemos manter o mesmo nome de chave, que, em nosso caso, é clickCount , assim como usamos nos outros arquivos de tradução.
O i18next seleciona automaticamente o formulário adequado com base na contagem. Quando a contagem é 0 , 1 ou 2 , o i18next renderiza as traduções atribuídas às suas respectivas chaves clickCount_0 , clickCount_1 e clickCount_2 .
No entanto, quando a contagem está entre 3 e 10 , o i18next renderiza traduções atribuídas a clickCount_3 , 11 para 99 renderiza traduções atribuídas a clickCount_4 , e uma contagem em 100 ou acima renderiza traduções atribuídas a clickCount_5 .
Se traduzirmos a string “Você clicou {{n}} vezes” para o árabe, onde “n” é um número de 0 a infinito, podemos usar o Google Translate para obter o seguinte:
If we save the file and reload the frontend, we’ll see the menu items and all the page content properly translated.
Detecting a user’s language
We must provide an option for users to switch languages in the frontend while persisting the selected locale in the browser storage. This enables content to display in the preferred language on a subsequent visit.
i18next provides a plugin for this, so let’s install it using this command:
npm install i18next-browser-languagedetector
Once installed, import and add the plugin to the configuration file:
//...
import LanguageDetector from"i18next-browser-languagedetector"; i18n //... .use(LanguageDetector) .init({ fallbackLng:"en", detection: { order: ["path","localStorage","htmlTag","cookie"], caches: ["localStorage","cookie"],//cache user language on }, interpolation: { //... }, }); export default i18n;
In the setup, we removed the lng property since the app now depends on the plugin to detect the current language. In the detection property, we’ve specified the order to detect the user’s language.
The first item in the order has the highest priority and decreases in that order. This means that the plugin first checks the path, followed by localStorage, and so on.
We must specify the path as the first item in the array to access the locale content through the path. However, note the user’s locale is still detected from the other specified storage.
Save the file and reload the frontend; test the project by passing a locale to the URL path http://localhost:3000/ar.
Creating a language switcher
To create a language switcher, begin by opening the components/Header.js file and adding the supported languages above the return statement:
{/* Language switch dropdown here */} Languages{""}
Save the file. The code should be self-explanatory because it is basic React.
The switcher should now display in the frontend, although it is not working yet. We need to make the dropdown element a controlled component.
All we need to do is to pass a value prop and onChange to the select element:
The value prop takes the current locale while onChange triggers a function that updates the locale.
We can get the current locale value from the storage by installing a package called js-cookie. This allows us to get the locale string from the cookie:
npm install js-cookie
Next, import the Cookies object at the top of the Header.js file:
The code is updating the language dropdown to the user’s selection. We must go a step further and update the application language.
As mentioned earlier, the i18n instance is required to change the language. Now, we can use it to grab the changeLanguage() API to accept the user’s selected language.
Like the t function, we also have access to the i18n instance from the useTranslation() Hook.
If we temporarily open the browser devtools and add a dir="rtl" to the body element, we’ll see the content displayed from right to left. In our app, we need to locate the body element and add the dir attribute when the page loads.
Update the Arabic language in the languages array to include its direction in the components/Header.js file:
The find() method allows us to get the language object for the selected locale. In this object, we have access to the Arabic direction, which we assign to the body.dir attribute when the page loads.
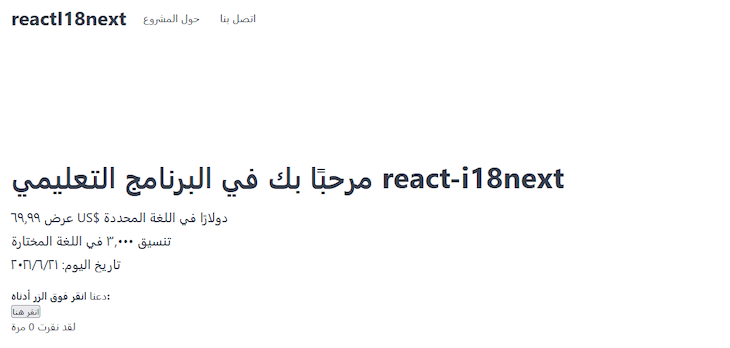
Translating the application title
Here, we will add translations for our app title and the Languages text beside the dropdown.
Save the file and test the app. Everything should work as expected.
Congratulations! We’re done!
Conclusão
I’m excited you are here. You’ve learned a lot in regards to using the i18next framework in a React application. We covered almost all the use cases needed to utilize i18next. Now, you know how to use it to localize a React application.
If you enjoyed this guide, please share it around the web. And if you have questions or contributions, please let me know through the comment section.
Reconhecidamente, este será um começo lento, mas o Google está lançando dois planos de fundo virtuais incrivelmente legais para o Google Meet no Android e no iOS que permitem aos usuários não apenas alterar seus Read more…
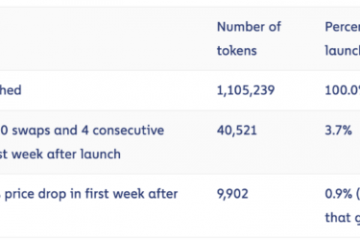
De acordo com o estudo mais recente conduzido pela Chainalysis, usuários involuntários gastaram cerca de US$ 4,6 bilhões em criptomoedas, adquirindo-as em esquemas fraudulentos no ano passado, que resultaram na criação de mais de 1,1 Read more…
O principal mercado de NFT, OpenSea, fez alguns anúncios importantes nas últimas horas. Por meio de sua conta oficial no Twitter, a OpenSea listou várias alterações em sua estrutura de taxas e royalties, que devem Read more…