The rapid technological advancements in recent years have significantly reduced office paperwork. But there’s still a long way to go until the world goes completely paperless. On the other hand, some are skeptical about this idea and suggest it may never come true. Until then, we still need to use printers and scanners when paperwork is required.
If you own an HP printer or scanner, or an all-in-one device, you may have occasionally come across unexpected scanning errors. Let’s see how you can quickly troubleshoot scanning issues on HP devices.
How Do I Fix “An Error Occurred When Scanning” on HP Printers?
Run the Print and Scan Doctor
The HP Print and Scan Doctor for Windows is a handy tool that helps you detect and repair various issues preventing your HP devices from running properly.
- First, you need to download the tool from HP and then run the HPPSdr executable file.
- Launch the tool, hit the Start button, and select the problematic printer or scanner.
- You can then select Fix Printing or Fix Scanning.
- If the troubleshooter returns a red X icon, this means your printer is not working properly. Follow the on-screen instructions to fix the device.
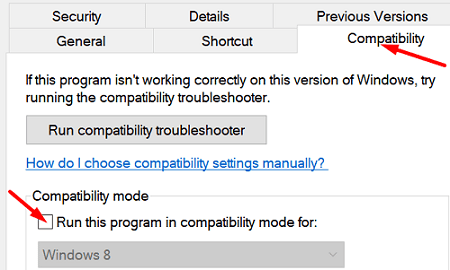
Run HP Smart App in Compatability Mode
Several users solved this problem by running the HP app in compatibility mode for Windows 7 or 8.1. The app was developed on older Windows versions. Some minor incompatibility issues might occasionally arise on the latest Windows 10 versions. That might explain why the scanning errors occur shortly after installing the latest Windows 10 updates.
Right-click on the app, go to Properties, click on the Compatibility tab, and run the app in compatibility mode for Windows 8.1.
Update Your Drivers
Make sure you’re running the latest printer drivers on your computer. Launch the Device Manager and locate your printer. Depending on your system configuration and printer connection, you may need to select Other devices, Universal Serial Bus controllers, or simply the Printers section.
So, right-click on your printer and select Update driver. Check if the error persists. If this is the case, right-click on your printer again and select Uninstall device. Restart your computer to automatically install the latest drivers.
Do a Root Uninstall and Reinstall
- Unplug all your USB cables, go to Control Panel and select Programs and features.
- Select your HP printer and click on the Uninstall option.
- Navigate to Devices and Printers (or Printers and scanners) and locate your HP printer. If it’s still listed there, right-click on it and select Remove.
- Press the Windows and R keys and run the printui.exe /s command.
- Then click on the Drivers tab and locate your HP printer driver.
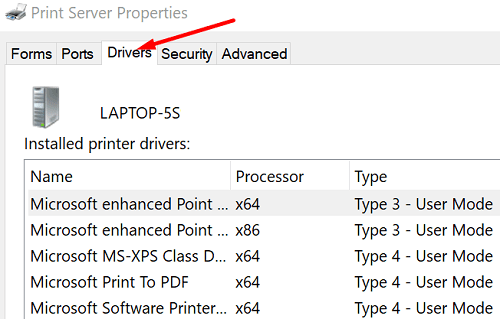
- Select the drive and remove it from your device.
- Hit the Apply button and close the window.
- Relaunch a new Run window, enter c:/programdata, and hit Enter.
- Navigate to the Hewlett Packard folder, and remove any printer-related files and folders.
- Restart your computer and reinstall your printer.
Keep in mind that the printer should be directly connected to a wall outlet. If it’s connected to a surge protector, remove the device and try again.
Conclusion
If your HP printer stopped scanning, update your drivers and run the HP Smart App in Compatibility Mode. Then run the Print and Scan Doctor and perform a root uninstall if the problem persists. Let us know if you managed to fix the problem with the help of this quick guide.