Webbrowser-Fehler treten bei allen Benutzern auf, die meisten können jedoch in wenigen einfachen Schritten behoben werden. Beispielsweise wird Google Chrome häufig gestoppt Arbeiten aufgrund verschiedener Probleme mit dem DNS-Resolver, Internetverbindungseinstellungen oder Konflikten mit anderen installierten Softwareprogrammen.
Was bedeutet DNS_PROBE_FINISHED_NXDOMAIN in Google Chrome?
Alle Browserfehler, die DNS enthalten, beziehen sich auf ein Problem mit dem DNS-Resolver, der für die Suche nach Websites verantwortlich ist, indem er den in die Adressleiste eingegebenen Domainnamen in eine IP-Adresse übersetzt.
NXDOMAIN bedeutet nicht vorhandene Domäne . Wenn Sie also beide kombinieren, bedeutet DNS_PROBE_FINISHED_NXDOMAIN, dass Ihr DNS-Resolver eine Website nicht identifizieren kann, da ihre Domain nicht vorhanden ist.
Dies ist ein häufiger Fehler, der normalerweise auftritt, wenn versucht wird, auf nicht mehr vorhandene Websites zuzugreifen, da der Serverhost derzeit gewartet wird oder die Domäne abgelaufen ist. Oder vielleicht haben Sie einen Tippfehler im Domainnamen.
DNS_PROBE_FINISHED_NXDOMAIN wird von dem Fehler Diese Website kann nicht erreicht werden begleitet, zusammen mit einer zusätzlichen Meldung, in der empfohlen wird, vor dem Versuch, eine Website zu besuchen, nach Tippfehlern zu suchen. Es wird nur in Chrome-und Chromium-basierten Webbrowsern wie Microsoft Edge oder Opera angezeigt.
In Firefox lautet dieselbe Fehlermeldung Hmm. Wir haben Probleme, diese Website zu finden.

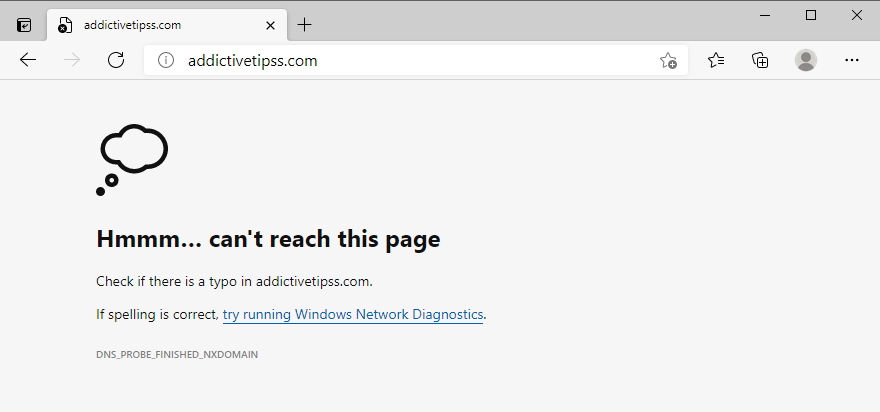
In der Zwischenzeit zeigt Microsoft Edge an, dass Hmmm… diese Seite nicht erreichen kann.
Safari sagt, dass Safari den Server nicht finden kann . Der Fehler DNS_PROBE_FINISHED_NXDOMAIN ist unter Android selten. Stattdessen wird möglicherweise ERR_NAME_NOT_RESOLVED angezeigt Nachricht.
So beheben Sie den DNS_PROBE_FINISHED_NXDOMAIN-Fehler auf einem beliebigen Gerät
Beseitigen Sie zunächst die offensichtliche Lösung: Suchen Sie nach Tippfehlern. Stellen Sie nach dem Löschen sicher, dass die Domain, auf die Sie zugreifen möchten, tatsächlich vorhanden ist.
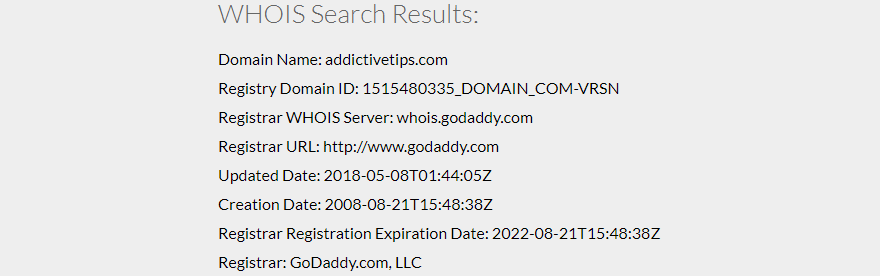
Der einfachste Weg, dies festzustellen, ist die Verwendung eines beliebigen whois-Dienstes: Suchen Sie bei Google nach whois , greifen Sie auf eine whois-Website zu, geben Sie den Namen der Domain ein, auf die Sie zugreifen möchten, und sehen Sie, auf welche Ergebnisse tauchen auf. Achten Sie besonders auf das Erstellungs-und Ablaufdatum.
Eine andere Möglichkeit besteht darin, dass die Domain derzeit nicht verfügbar ist. Sie müssen also nur warten, bis sie wieder gesichert ist. Wenn Sie erfolglos versuchen, auf Ihre eigene Website zuzugreifen, wenden Sie sich an Ihren Domain-Host, um zu erfahren, was gerade passiert.
Wenn zu diesem Zeitpunkt immer noch die Fehlermeldung DNS_PROBE_FINISHED_NXDOMAIN in Google Chrome auftritt, fahren Sie mit den folgenden Lösungen fort.
1. Verwenden Sie einen anderen Webbrowser
Wir sagen nicht, dass Sie Google Chrome fallen lassen sollten, wenn es Ihr Lieblingsbrowser ist. Wenn Sie jedoch auf die problematische Website zugreifen können, indem Sie sich an einen anderen Browser wenden, wissen Sie zumindest, dass mit Chrome etwas nicht stimmt. In diesem Fall können Sie die Liste möglicher Probleme eingrenzen und sich auf die Reparatur von Chrome konzentrieren.
2. Versuchen Sie, auf andere Websites zuzugreifen
Es ist wichtig herauszufinden, ob Sie auf andere Websites zugreifen können, indem Sie deren Domainnamen in die Adressleiste von Chrome eingeben. Wenn sich das Laden aller Seiten weigert, liegt möglicherweise ein größeres Problem in Bezug auf Ihre Internetverbindung oder Geräteeinstellungen vor.
3. Stellen Sie eine Verbindung zu einem anderen Netzwerk her
Die Internetverbindung, die Sie derzeit verwenden, funktioniert möglicherweise nicht mehr. Oder das Wi-Fi-Signal ist zu schlecht, um Websites zu laden. Wenn Ihr Router Dual-Band-Unterstützung bietet, stellen Sie sicher, dass Sie eine Verbindung zum 5-GHz-WLAN-Netzwerk anstelle von 2 GHz herstellen, da das Signal besser ist. Möglicherweise müssen Sie jedoch näher an den Router heranrücken.
Wenn Sie jedoch mit einem öffentlichen, unverschlüsselten Wi-Fi-Netzwerk verbunden sind, müssen Sie die Bandbreite mit allen teilen. Daher ist eine langsame Verbindung zu erwarten, die sogar Browserfehler wie DNS_PROBE_FINISHED_NXDOMAIN auslösen kann.
Versuchen Sie nach Möglichkeit, eine Verbindung zu 3G/4G-Mobilfunkdaten herzustellen, da die Verbindung möglicherweise besser ist als ein Wi-Fi-Netzwerk. Oder wechseln Sie vom 3G/4G-Modus in den Wi-Fi-Modus, falls Ihnen die Bandbreite ausgeht.
4. Starten Sie Ihren Computer und Router
neu
Es klingt einfach genug, funktioniert aber normalerweise. Ein Neustart Ihres Desktops, Laptops, Smartphones oder Tablets kann ausreichen, um die DNS_PROBE_FINISHED_NXDOMAIN-Fehlermeldung zu entfernen und erneut auf Ihre bevorzugten Websites zuzugreifen.
Währenddessen ist es eine gute Idee, auch Ihren Router neu zu starten, um seinen Cache zu leeren. Suchen Sie einfach den kleinen Schalter auf der Rückseite des Routers, halten Sie ihn einige Sekunden lang gedrückt, lassen Sie ihn dann los und warten Sie, bis Ihre Internetverbindung wieder hergestellt ist.
5. Starten Sie Ihren Webbrowser
neu
Das Herunterfahren und Neustarten von Google Chrome reicht möglicherweise aus, um den Internetzugang wiederherzustellen. Stellen Sie einfach sicher, dass alle Prozesse geschlossen sind, bevor Sie die Anwendung neu starten.
So starten Sie Chrome unter Windows korrekt neu:
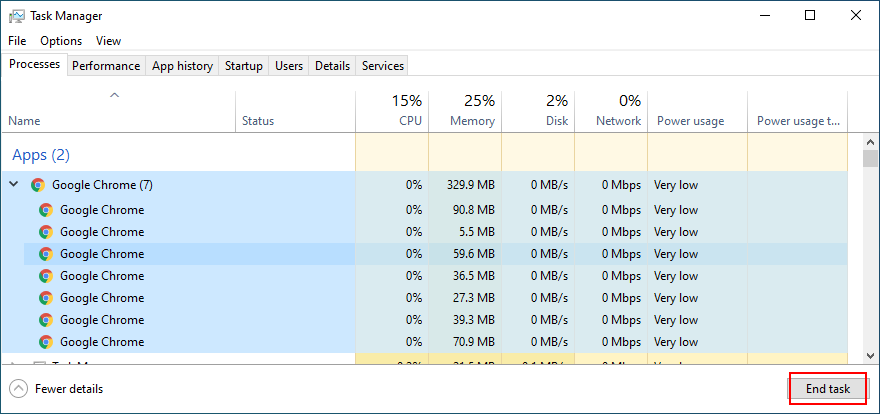
- Drücken Sie Strg + Umschalt + Esc , um den Task-Manager
- Bleiben Sie auf der Registerkarte Prozesse
- Suchen Sie den gesamten Baum von Google Chrome und wählen Sie ihn aus

- Klicken Sie auf Aufgabe beenden
- Öffnen Sie Chrome erneut
zu öffnen
So starten Sie Chrome unter macOS korrekt neu:
- Wählen Sie das Fenster Google Chrome
- Öffnen Sie das Menü Apple in der oberen linken Ecke
- Wählen Sie Beenden erzwingen
- Starten Sie Chrome erneut
So starten Sie Chrome unter Android korrekt neu:
- Wechseln Sie auf Ihrem Android-Gerät zum Abschnitt Einstellungen
- Wählen Sie Apps und tippen Sie auf Chrom
- Tippen Sie auf Stopp erzwingen
- Kehren Sie zu Ihrem Startbildschirm zurück und starten Sie die Chrome-App
So starten Sie Chrome unter iOS korrekt neu:
- Wischen Sie vom unteren Bildschirmrand nach oben und halten Sie in der Mitte an
- Streichen Sie nach links oder rechts, um Chrom
- Wischen Sie zur Vorschau der App, um die App zu schließen.
- Öffnen Sie die Chrome-App erneut
auszuwählen
6. Aktualisieren Sie Ihren Webbrowser
Ihr Webbrowser sollte bei jedem Start standardmäßig automatisch nach Updates suchen. Wenn dies jedoch aus irgendeinem Grund nicht der Fall ist, müssen Sie das Update auslösen und Ihren Browser auf den neuesten Stand bringen.
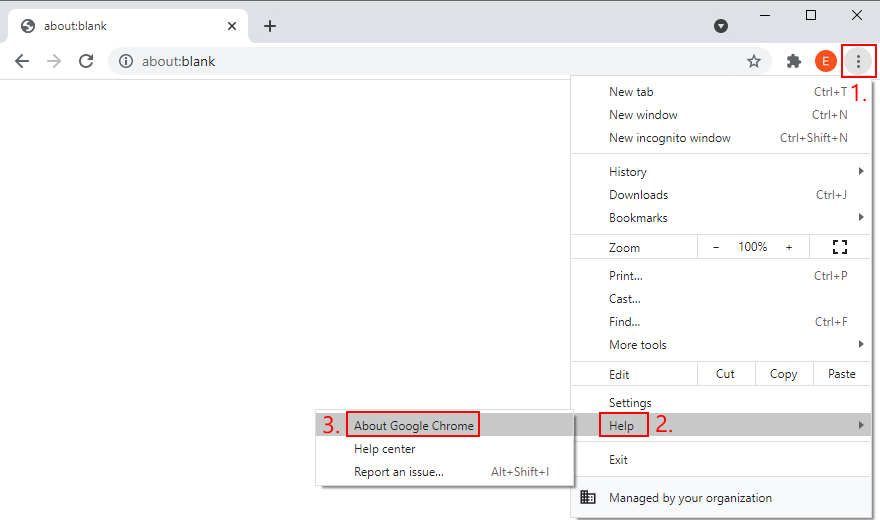
So aktualisieren Sie Chrome unter Windows und MacOS:
- Starten Sie Chrome
- Öffnen Sie das Menü Mehr in der oberen rechten Ecke
- Wählen Sie Hilfe und klicken Sie auf Über Google Chrome (oder besuchen Sie
chrome://settings/help) - Chrome überprüft und wendet Updates automatisch an

- Starten Sie nach Abschluss des Vorgangs den Webbrowser
- Überprüfen Sie, ob Sie auf Seiten zugreifen können
neu
So aktualisieren Sie Chrome unter Android:
- Starten Sie die Play Store App
- Tippen Sie auf Ihr Google-Konto
- Wählen Sie Meine Apps & Spiele aus dem Menü
- Suchen Sie unter Updates nach Chrome und tippen Sie auf Update
- Wenn Sie es nicht finden können, bedeutet dies, dass Chrome bereits aktualisiert wurde.
- Öffnen Sie Chrome und suchen Sie nach DNS-Fehlern
So aktualisieren Sie Chrome unter iOS:
- Starten Sie den App Store
- Suchen Sie nach Chrome und tippen Sie auf Update
- Wenn Öffnen anstelle von Aktualisiert angezeigt wird, bedeutet dies, dass die App bereits aktualisiert wurde
- Starten Sie Chrome jetzt und überprüfen Sie es auf DNS-Probleme
7. Browser-Cache löschen
Wenn der Chrome-Cache voll ist, kann dies zu Problemen beim Laden der Seite und sogar zum DNS_PROBE_FINISHED_NXDOMAIN-Fehler auf Ihrem Gerät führen. Sie können dieses Problem jedoch lösen, indem Sie Chrome-Site-Daten leeren und Cache .
So löschen Sie den Chrome-Cache unter Windows und MacOS:
- Öffnen Sie Google Chrome
- Klicken Sie auf die Schaltfläche Mehr und wählen Sie Einstellungen
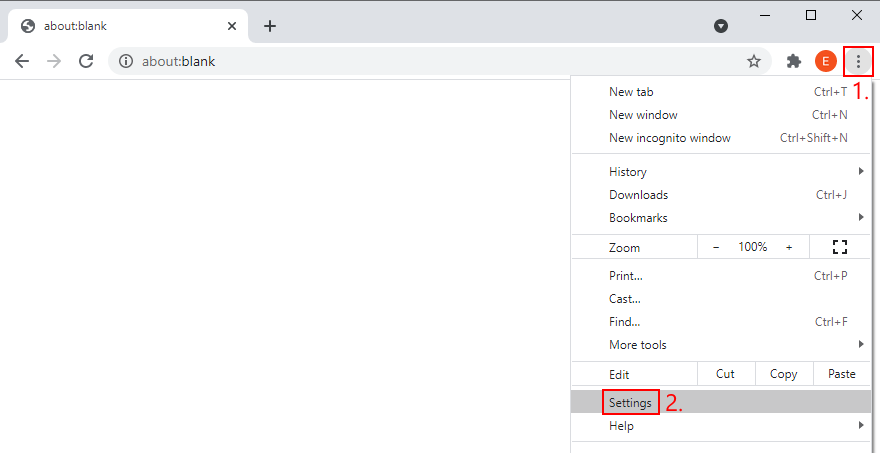
- Gehen Sie zu Datenschutz und Sicherheit
- Klicken Sie auf Browserdaten löschen (oder besuchen Sie
chrome://settings/clearBrowserData )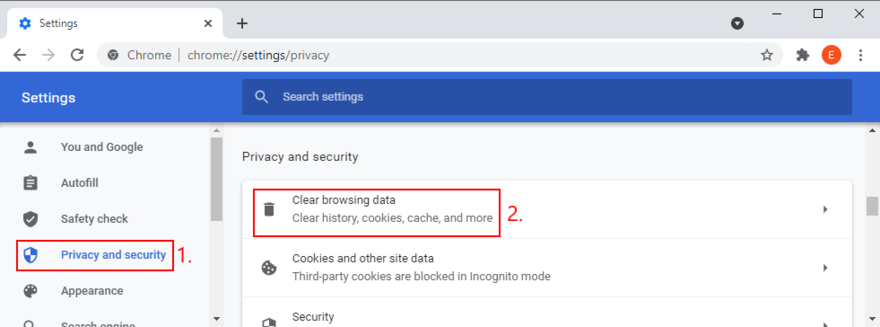
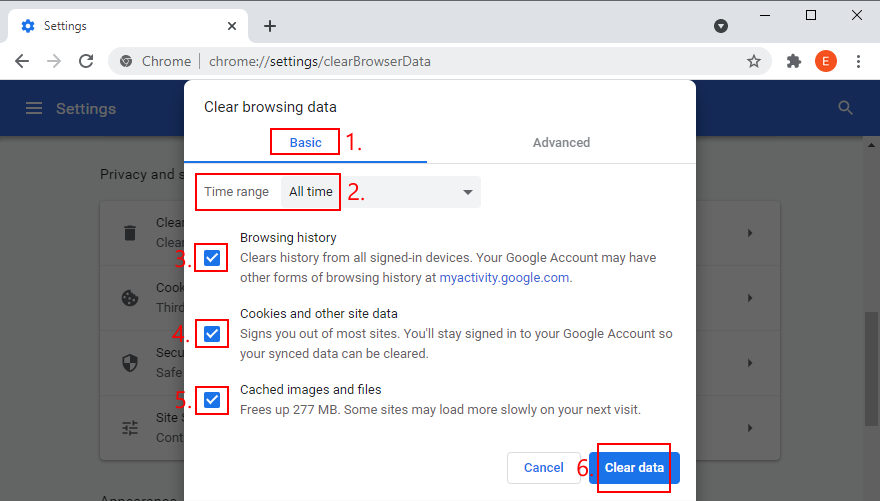
- Stellen Sie auf der Registerkarte Basis Zeitbereich auf Alle Zeiten
- Überprüfen Sie die folgenden Optionen:
- Browserverlauf
- Cookies und andere Site-Daten
- zwischengespeicherte Bilder und Dateien
- Klicken Sie auf Daten löschen
- Starten Sie Chrome
ein
neu
So löschen Sie den Chrome-Cache unter Android und iOS:
- Starten Sie die Chrome-App
- Öffnen Sie das Menü Mehr und gehen Sie zu Geschichte
- Wählen Sie Browserdaten löschen…
- Bleiben Sie im Bereich Basic
- Überprüfen Sie alle Optionen:
- Browserverlauf
- Cookies und Site-Daten
- zwischengespeicherte Bilder und Dateien
- Klicken Sie auf Daten löschen
- Starten Sie die Chrome-App
neu
8. Setzen Sie Ihre DNS-Einstellungen zurück
Eine einfache und effiziente Möglichkeit zum Zurücksetzen Ihrer DNS-Konfiguration ist Leeren des DNS-Server-Cache . Dies ähnelt dem Löschen Ihres Browser-Caches, wodurch Fehlermeldungen wie DNS_PROBE_FINISHED_NXDOMAIN beseitigt werden können.
So setzen Sie die DNS-Einstellungen unter Windows zurück:
- Klicken Sie auf die Schaltfläche Start , suchen Sie nach Eingabeaufforderung und starten Sie diese App
- Schreiben Sie die folgenden Befehle (drücken Sie nach jeder Zeile die Eingabetaste ):
-
ipconfig/flushdns
-
-
ipconfig/registerdns
-
ipconfig/release
-
ipconfig/erneuern
-
Netsh Winsock Reset
- Beenden Sie CMD und starten Sie Ihren PC neu.
- Starten Sie Chrome und suchen Sie nach Fehlern
So setzen Sie die DNS-Einstellungen unter macOS zurück:
- Starten Sie die Terminal-App
- Geben Sie
sudo killall-HUP mDNSResponderein und drücken Sie Return - Wenn Sie dazu aufgefordert werden, geben Sie den Benutzernamen und das Kennwort ein, die Ihrem Administratorkonto zugeordnet sind.
- Starten Sie Ihren Mac neu
- Öffnen Sie Chrome und versuchen Sie jetzt, auf Websites zuzugreifen.
So setzen Sie die DNS-Einstellungen unter Android und iOS zurück:
- Gehen Sie zum Abschnitt Einstellungen
- Wählen Sie Allgemein > Zurücksetzen
- Tippen Sie auf Netzwerkeinstellungen zurücksetzen
- Starten Sie Chrome und suchen Sie nach Fehlern
Eine alternative Möglichkeit, Ihre DNS-Konfiguration unter Android oder iOS zu aktualisieren, besteht darin, das Gerät neu zu starten oder den Flugzeug -Modus umzuschalten. Sie können auch die Chrome-App öffnen, chrome://net-internals/# dns aufrufen und auf die Schaltfläche Host-Cache löschen klicken.
9. Starten Sie den DNS-Clientdienst
neu
Wenn der DNS-Server nicht reagiert Auf Ihrem Windows-PC können Sie den DNS-Clientdienst neu starten, der für das Auflösen und Zwischenspeichern von Domänennamen verantwortlich ist. Es lohnt sich, diese Lösung auszuprobieren, wenn Sie den DNS_PROBE_FINISHED_NXDOMAIN-Fehler in Chrome und anderen Chromium-basierten Webbrowsern reparieren möchten.
So starten Sie den DNS-Clientdienst neu:
- Klicken Sie auf die Schaltfläche Start , suchen Sie nach Diensten und öffnen Sie diese App
- Suchen Sie den DNS-Client und doppelklicken Sie darauf, um auf seine Eigenschaften zuzugreifen.
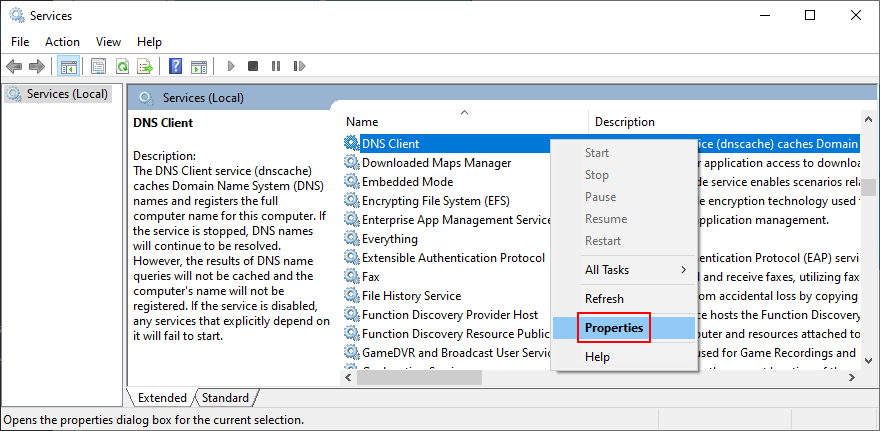
- Setzen Sie den Starttyp auf Automatisch
- Wenn der Dienst derzeit gestoppt ist, klicken Sie auf Start
- Klicken Sie auf Übernehmen und beenden Sie
- Starten Sie Chrome und überprüfen Sie die Ergebnisse
Wenn Sie nicht auf die DNS-Client-Schaltflächen klicken können, verwenden Sie die nächste Lösung:
- Drücken Sie die Taste Windows , suchen Sie nach Registrierungseditor und starten Sie dieses Tool
- Gehen Sie zum nächsten Speicherort, indem Sie die folgende Zeile kopieren und einfügen:
Computer \ HKEY_LOCAL_MACHINE \ SYSTEM \ CurrentControlSet \ Services \ Dnscache
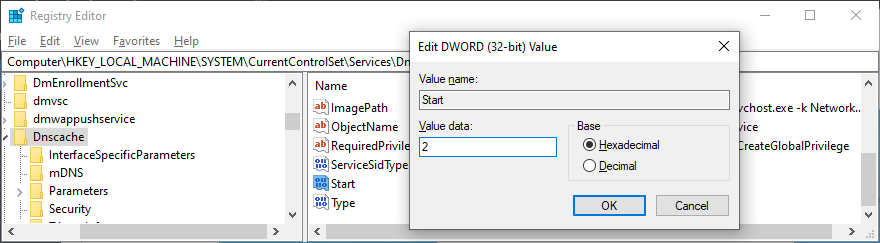
- Doppelklicken Sie in der Liste der Registrierungseinträge auf Start
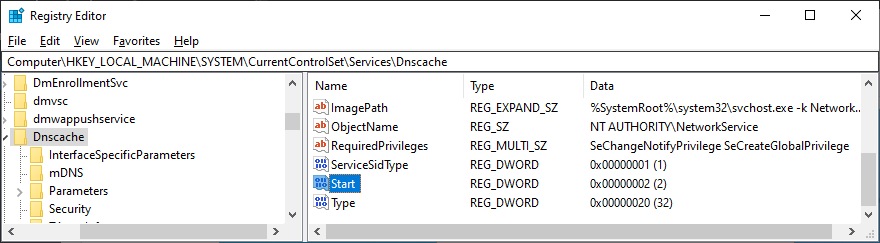
- Setzen Sie Wertdaten auf 2 und Basis auf Hexadezimal
- Klicken Sie auf OK
- Beenden Sie die Dienste und starten Sie Chrome neu.
- Überprüfen Sie, ob weitere Fehler vorliegen.
10. Ändern Sie Ihre DNS-Server
Wenn das Leeren Ihrer DNS-Server und das Neustarten des DNS-Clientdienstes nicht ausreicht, funktioniert Ihr DNS-Resolver möglicherweise nicht mehr ordnungsgemäß. In diesem Fall sollten Sie Ihre DNS-Server ändern zu etwas Zuverlässigerem.
Sie können beispielsweise den Von Google bereitgestellte DNS-Server , da diese kostenlos, sicher und schnell sind.
So verwenden Sie Google DNS unter Windows 10:
- Klicken Sie mit der rechten Maustaste auf die Schaltfläche Start und gehen Sie zu Netzwerkverbindungen
- Klicken Sie unter Erweiterte Netzwerkeinstellungen auf Adapteroptionen ändern

- Klicken Sie mit der rechten Maustaste auf Ihre Internetverbindung und wählen Sie Eigenschaften (Sie benötigen Administratorrechte)

- Doppelklicken Sie auf der Registerkarte Netzwerk auf Internetprotokoll Version 4 (TCP/IPv4) , um auf seine Eigenschaften zuzugreifen.
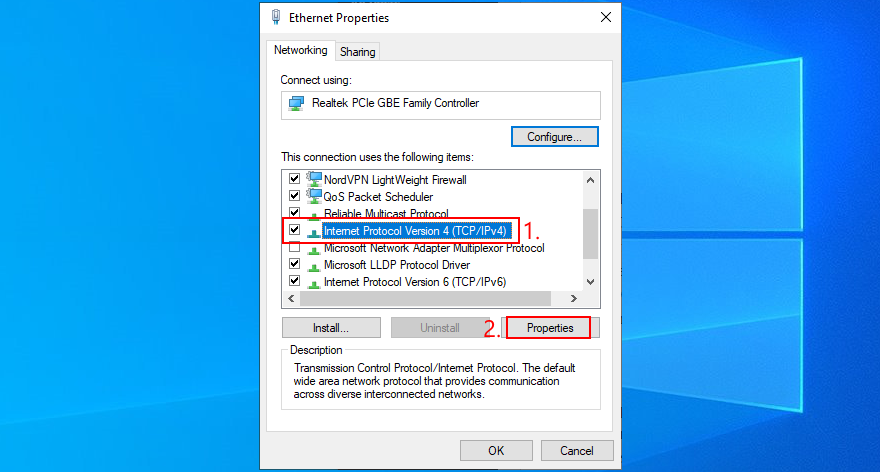
- Wählen Sie im Bereich Allgemein die Option Folgende DNS-Serveradressen verwenden
- Geben Sie unter Bevorzugter DNS-Server 8.8.8.8
- Setzen Sie Alternativer DNS-Server auf 8.8.4.4

- Aktivieren Sie Einstellungen beim Beenden überprüfen und klicken Sie auf OK
- Starten Sie Chrome und suchen Sie nach Fehlern
ein
So verwenden Sie Google DNS unter macOS:
- Öffnen Sie das Menü Apple und gehen Sie zu Systemeinstellungen
- Wählen Sie Netzwerk und klicken Sie auf Erweitert
- Wechseln Sie in den Bereich DNS
- Klicken Sie auf + und schreiben Sie 8.8.8.8
- Klicken Sie erneut darauf, um auch 8.8.4.4
- Drücken Sie OK und kehren Sie zum Desktop
- Starten Sie Chrome, um die Ergebnisse zu überprüfen.
hinzuzufügen
zurück
So verwenden Sie Google DNS unter Android:
- Wählen Sie auf Ihrem Android-Gerät Einstellungen
- Gehen Sie zu Netzwerk & Internet
- Tippen Sie auf Erweitert > Privates DNS
- Wählen Sie Privates DNS konfigurieren
- Geben Sie dns.google ein und kehren Sie zum Startbildschirm
- Öffnen Sie die Chrome-App und suchen Sie nach DNS-Fehlern
zurück
So verwenden Sie Google DNS unter iOS:
- Gehen Sie mit Ihrem iPhone oder iPad zu Einstellungen
- Öffnen Sie Wi-Fi
- Suchen Sie Ihr Netzwerk und tippen Sie auf i , um die Eigenschaften
- Wählen Sie DNS und geben Sie 8.8.8.8, 8.8.4.4
- Zum Startbildschirm zurückkehren
- Starten Sie die Chrome-App und suchen Sie nach Problemen
anzuzeigen
ein
11. Führen Sie die Problembehandlung für Internetverbindungen
aus
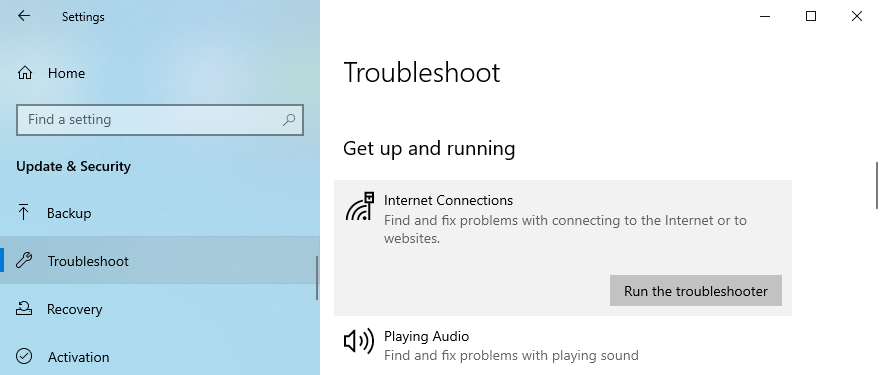
Windows 10 wird mit einer internen Fehlerbehebung geliefert, um häufig auftretende Probleme mit der Internetverbindung zu beheben. Es ist einen Versuch wert, wenn Sie nach einer schnellen und einfachen Möglichkeit suchen, den DNS_PROBE_FINISHED_NXDOMAIN-Fehler in Ihrem Chromium-basierten Webbrowser zu beheben.
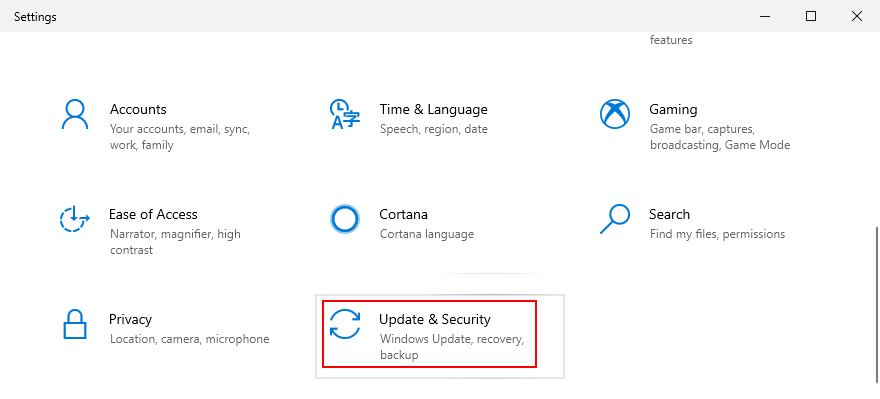
- Drücken Sie die Taste Win , suchen Sie nach Einstellungen und öffnen Sie diese App
- Wählen Sie Update & Sicherheit

- Springe zu Fehlerbehebung links
- Klicken Sie auf Zusätzliche Problemlöser

- Wählen Sie Internetverbindungen und klicken Sie auf Führen Sie die Problembehandlung aus.
- Follow the on-screen steps and apply any fixes. You might be asked to restart your computer
- Open the web browser and try to access a domain


12. Turn off Chrome extensions
Some web browser extensions can interfere with the way Chrome or your DNS resolver works, preventing pages from loading properly. It’s one of the reasons why you might get error DNS_PROBE_FINISHED_NXDOMAIN.
To fix this problem, you should disable the guilty Chrome extensions. It can mean anything that controls your IP and DNS settings, like proxy and VPN extensions for Chrome.
How to disable Chrome extensions:
- Launch Google Chrome
- Open the More menu from the top-right corner
- Select More tools and click Extensions (or visit
chrome://extensions)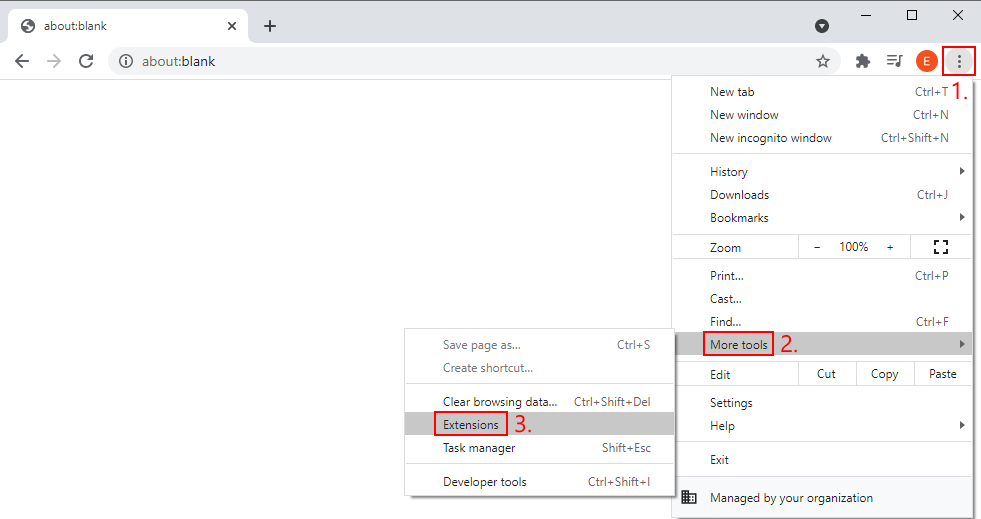
- Click the slider button to deactivate extensions

- Restart Chrome and check for DNS errors
13. Disable your VPN or proxy
Since we’re discussing software applications capable of changing your IP and DNS configuration, such as VPN and proxy tools, it’s a good idea to turn them off at the system level.
If you have dedicated apps installed on Windows 10, macOS, Android, or iOS, you just have to switch them off. However, if you’re using the built-in device settings for VPN or proxy, here’s what you need to do.
How to disable VPN and proxy on Windows 10:
- Right-click the Start button and go to Network Connections
- Jump to VPN on the left side
- Disconnect any active VPN connections
- Switch to the Proxy area on the left
- Turn off Automatically detect settings and Use setup script
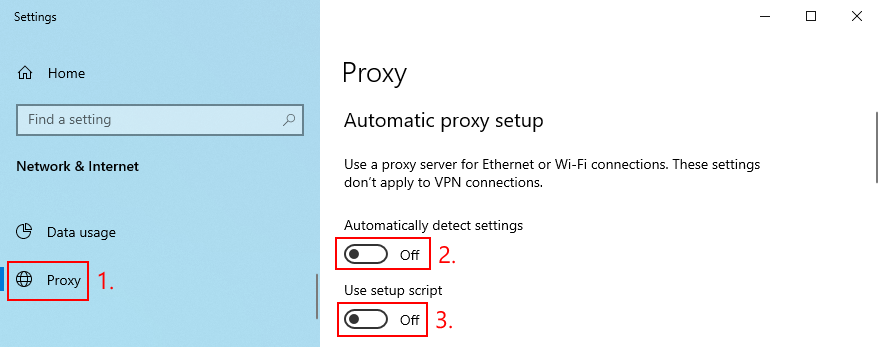
- At the bottom of the window, also disable Use a proxy server

- Launch Chrome and check for DNS errors
How to disable VPN and proxy on macOS:
- Open the Apple menu and select System Preferences
- Go to Network > VPN
- Click Disconnect if you have any active VPN connections
- Select your Internet connection and click Advanced
- Go to the Proxies area and disable all proxy settings
- Click OK
- Fire up Chrome and inspect results
How to disable VPN and proxy on Android:
- On your Android device, open the Settings menu
- Go to Network > VPN
- Disconnect any VPN entries
- Tap and hold your Internet connection to pick Modify network
- Select Show advanced options
- At Proxy, select None
- Open the Chrome app and try to access a webpage
How to disable VPN and proxy on iOS:
- Open the Settings area
- Go to General > VPN
- Make sure to deactivate any VPN connections
- Select your Wi-Fi and access advanced settings
- At HTTP Proxy, select Off
- Launch the Chrome app and check for issues
14. Restore Chrome to default
Any number of customized browser settings can change the way Chrome connects to the Internet. Your safest bet is to restore the Chrome options to default.
How to reset Chrome on Windows and macOS:
- Launch the Chrome app and open the More menu
- Go to Settings > Advanced
- At Reset and clean up, click Restore settings to their original defaults (or visit
chrome://settings/reset)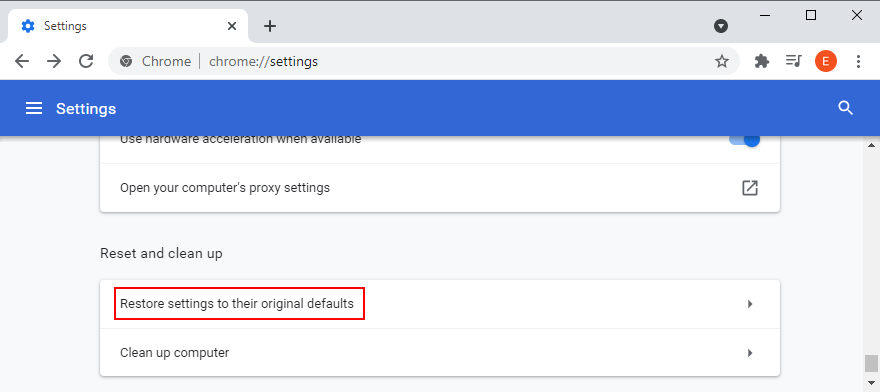
- Click Reset settings to confirm
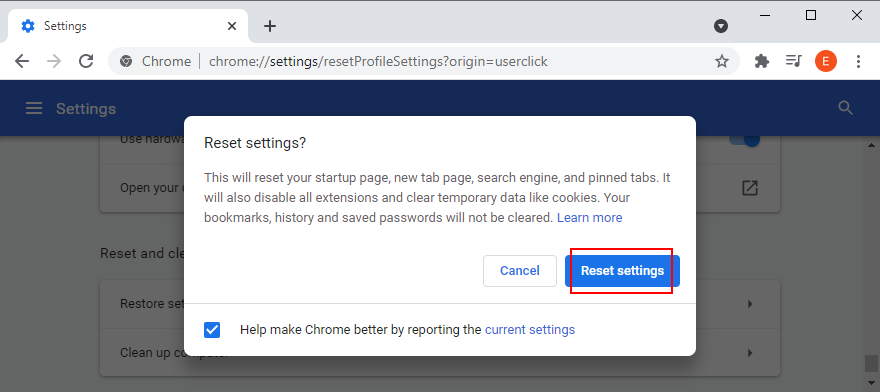
- Restart the browser and check for DNS errors
How to reset Chrome on Android:
- Open the Settings menu of your Android device
- Go to Apps
- Locate and select Chrome
- Tap Storage > Manage storage
- Tap Clear all data and OK to confirm
- Open the Chrome app and check for DNS issues
How to reset Chrome on iOS:
- Open the Chrome app on your iPhone or iPad
- Go to the Settings menu and tap Privacy
- Select Clear Browsing Data
- Choose all items from the list
- Tap Clear Browsing Data to confirm
- Restart the Chrome app and check for DNS errors
15. Reinstall Chrome
If restoring the Chrome settings to default won’t fix the DNS_PROBE_FINISHED_NXDOMAIN error on your device, you should reinstall the web browser.
How to reinstall Chrome on Windows 10:
- Press Ctrl + Shift + Esc to launch Task Manager
- In the Processes tab, select Chrome and click End task
- Right-click the Start button to select Apps and Features
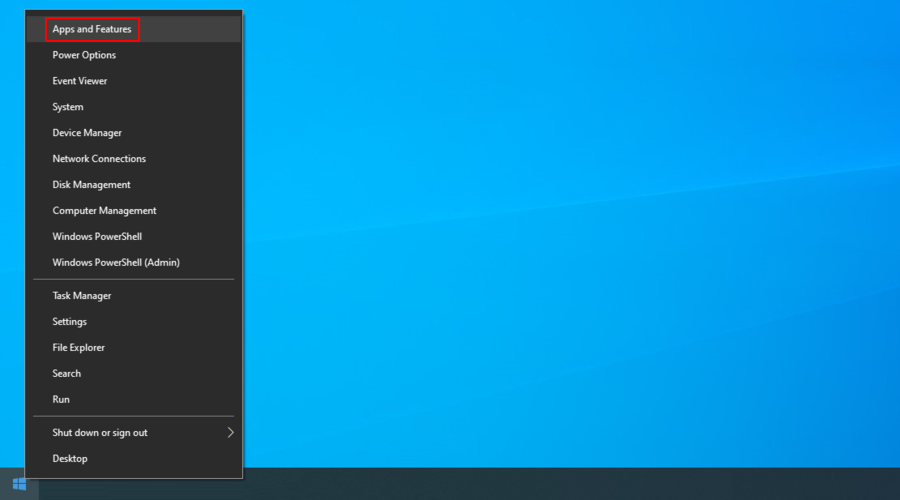
- Select Google Chrome and click Uninstall

- Proceed with the removal steps
- Download Chrome from the official website
- Install Chrome as usual, launch it, and check for DNS errors
How to reinstall Chrome on macOS:
- Select the Google Chrome window
- Open the Apple menu and click Force Quit
- Using the Finder app, find Chrome and drag it to the Trash
- If asked, enter your admin username and password to confirm
- Select Empty Trash to eliminate Chrome from your Mac
- Download Chrome from the official website
- Set up the web browser and try to access webpages now
How to reinstall Chrome on Android:
- Open Play Store
- Locate Chrome and tap Uninstall
- Reboot your Android
- Using Play Store, find Chrome and tap Install
How to reinstall Chrome on iOS:
- On your home screen, tap and hold Chrome
- Select Remove App and then Delete App
- Tap Delete to confirm
- Using the App Store, locate Chrome and tap the cloud symbol to install it
16. Stick to the Chrome Stable channel
You can try many release channels of Chrome when using the application to navigate the Internet: Stable, Beta, Developer, and Canary. However, you should stick to the Stable channel if you don’t want unexpected surprises like error DNS_PROBE_FINISHED_NXDOMAIN.
Although the other release channels give you access to new and exciting features, they aren’t as reliable as the Stable channel. It’s the one officially available for download on the Google website.
On the other hand, you should know that it’s possible to also have the other versions of Chrome installed separately from the Stable version if you’re keen on testing the latest trends.
17. Downgrade Chrome
Older OS editions like Windows XP don’t officially support the latest Google Chrome update, so you should expect browsing issues and error codes like DNS_PROBE_FINISHED_NXDOMAIN when trying to go online.
In that cases, it’s safer to downgrade Chrome to an older version that still works with your obsolete operating system. Before doing so, however, it’s necessary to stop Chrome from automatically updating itself. Here are the complete steps for Windows.
How to disable Chrome auto-updates:
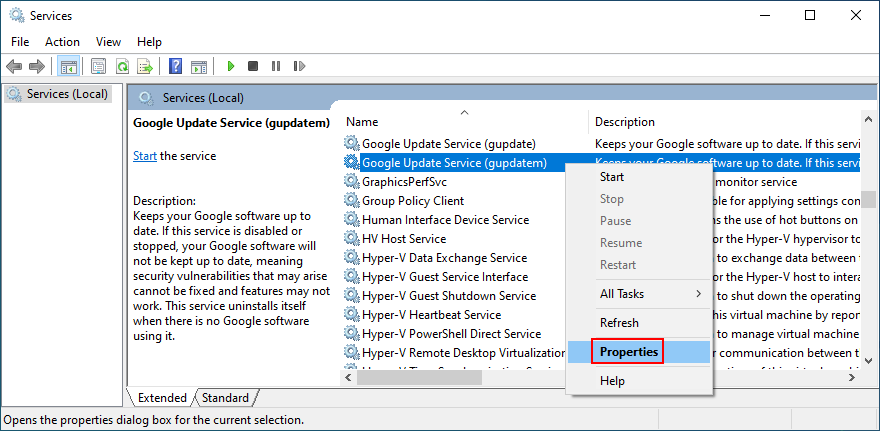
- Press Win key + R, type services.msc, and press Enter to open Services

- Find Google Update Service (gupdate) in the list of services
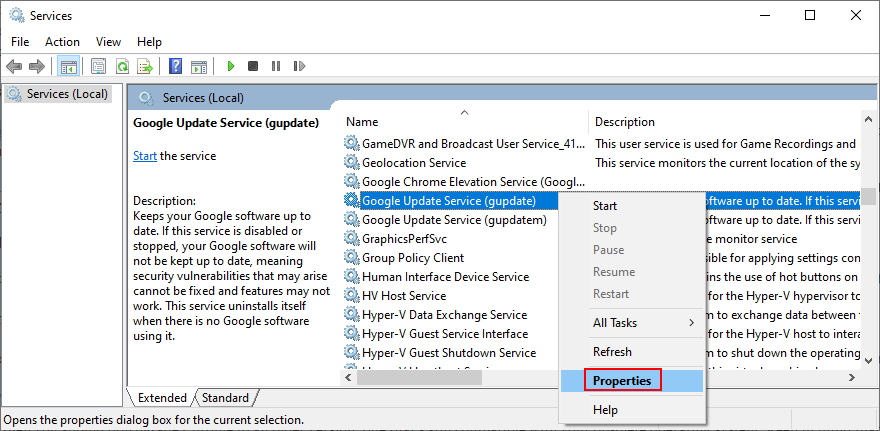
- Double-click this entry to view its properties
- Set Startup type to Disabled
- Click Apply and return to the main window
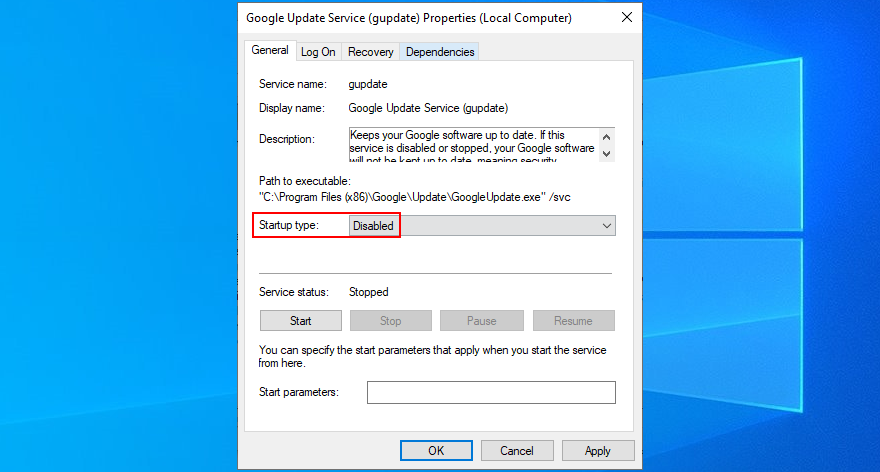
- Also locate and double-click Google Update Service (gupdatem) to access its properties
- Set Startup type to Disabled
- Click Apply and quit Services

How to uninstall Chrome:
- Press Win key + R, type appwiz.cpl, and press Enter to access Programs and Features (Add/Remove Programs) in Control Panel

- Find Google Chrome, right-click it, and select Uninstall
- Proceed with the uninstall wizard steps
How to install old Chrome:
Older versions of Chrome are not available for download on the official website since Google can’t guarantee the security of your computer. But you can track down old Chrome on mirror websites like SlimJet.
Be careful when downloading files from third-party, unknown sources because Google can’t guarantee their safety. Make sure that your computer’s security solution is up to date.
18. Check for malware
If your device was recently infected with malware, it’s possible that the attack damaged essential files used by the DNS resolver of Google Chrome. As a result, you keep seeing the DNS_PROBE_FINISHED_NXDOMAIN error code on your screen.
However, you can turn to Chrome’s built-in malware detection tool for help (previously known as Chrome Cleanup Tool).
How to remove malware with Chrome:
- Launch Google Chrome
- Open the More menu and go to Settings
- Scroll down to the bottom of the page and click Advanced
- At Reset and clean up, click Clean up computer (or visit
chrome://settings/cleanup)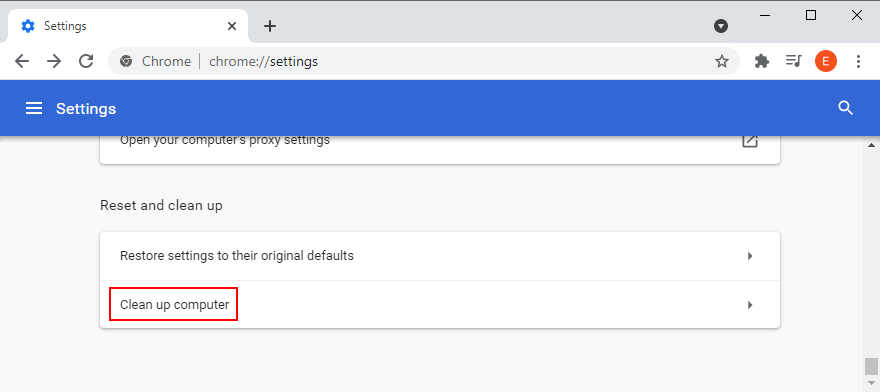
- At Find harmful software, click Find
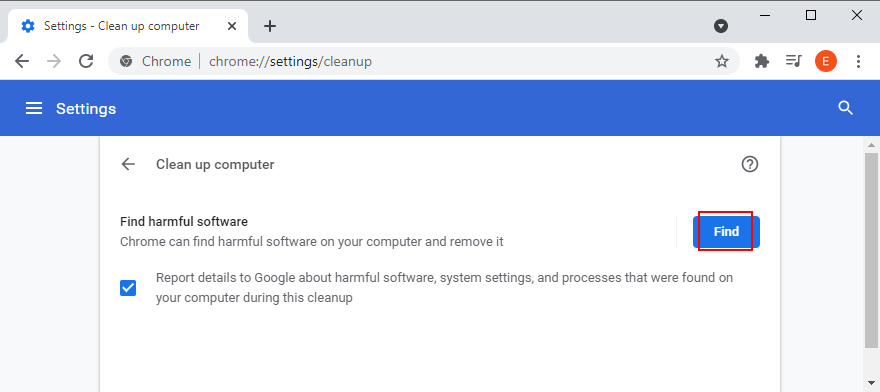
- Allow Chrome to find and remove any malware
- Restart the web browser and check for DNS errors
If Chrome’s integrated security tool doesn’t solve anything, you can turn to Windows Defender unless you have a third-party anti-malware application installed on your Windows 10 PC.
How to remove malware with Windows Defender:
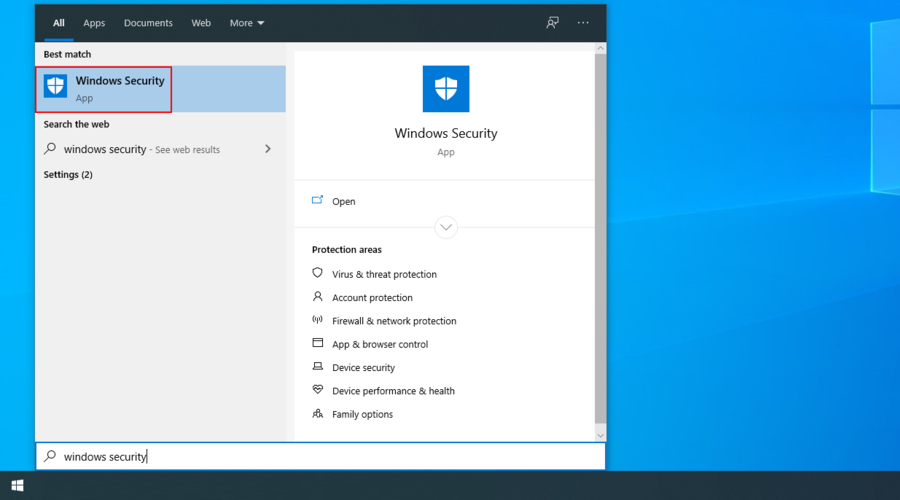
- Press the Win key, search for Windows Security, and launch this app
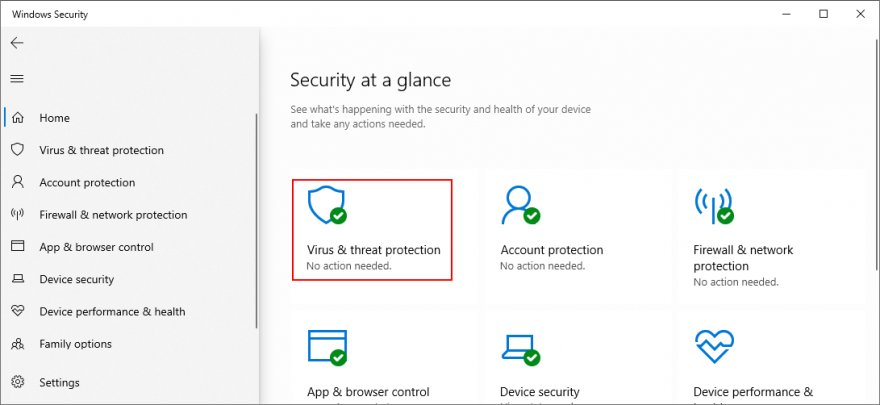
- Select Virus & threat protection
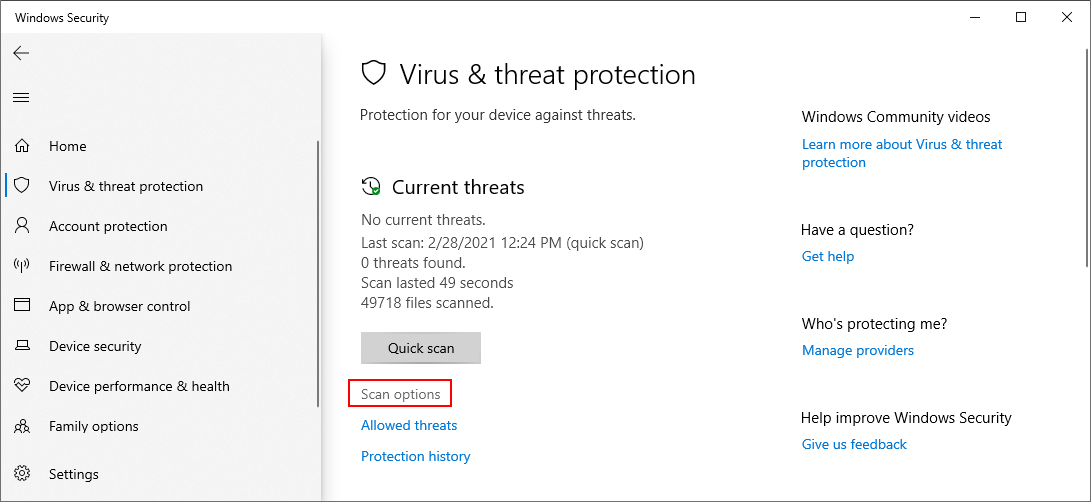
- Click Scan options
- Choose Quick scan and click Scan now
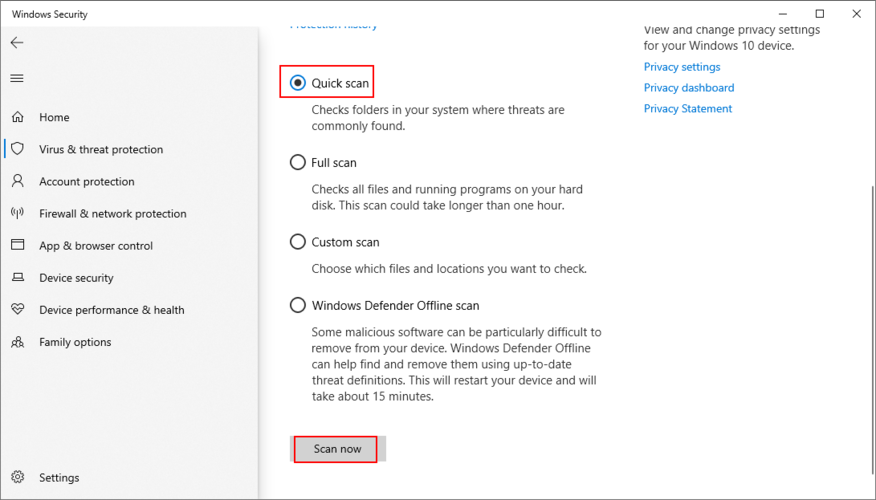
- If the malware search doesn’t return any results, run another scan using Windows Defender Offline scan mode
- Restart your PC
- Fire up Chrome and check for errors
On macOS, iOS, and Android, you have to use a third-party security solution to find and remove malicious threats.
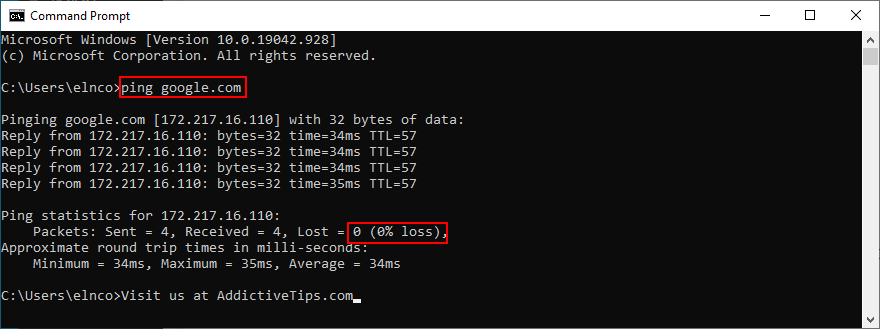
19. Run a ping test
When trying to access a particular website using Google Chrome, you should run a ping test to check the connection strength between your computer and the remote server. It helps you find out if the Internet connection is too slow or doesn’t get established at all.
On Windows and macOS, it’s not necessary to install third-party ping tools since you can use the console environments. However, there’s no way to avoid this on Android or iOS. We’re using the Google website as an example below.
How to use the ping command on Windows 10:
- Press Win key + R, type cmd, and press Enter to launch Command Prompt
- To ping Google, type
ping google.comand hit Enter - Patiently wait while the ping test is carried out
- At Ping statistics, take note of the % loss
How to use the ping command on macOS:
- Go to Applications and select Utilities
- Open the Terminal app
- Type
ping.google.comand hit Return - After the ping test completes, take note of the packet loss (at Server ping statistics)
The amount of packet loss tells you everything there is to know about the Internet connection to the server. 0% packet loss means that the connection is perfect, while 100% packet loss indicates that your computer can’t reach the remote server at all. Anything lower than 100% packet loss tells you the the Internet connection works but isn’t at full capacity.
20. Check your Hosts file
The Hosts file contains TCP/IP information about how your computer communicates with other websites. If you can’t access a specific webpage in Chrome and get the DNS_PROBE_FINISHED_NXDOMAIN error instead, you should check if the page is blocked in Hosts.
In case it is, you just have to delete its line. Here’s how to make it happen on Windows PC:
- Open Windows Explorer (press Win key + E)
- Go to the next destination:
C:\Windows\System32\drivers\etc
- Select and copy the hosts file to create a backup of the current configuration
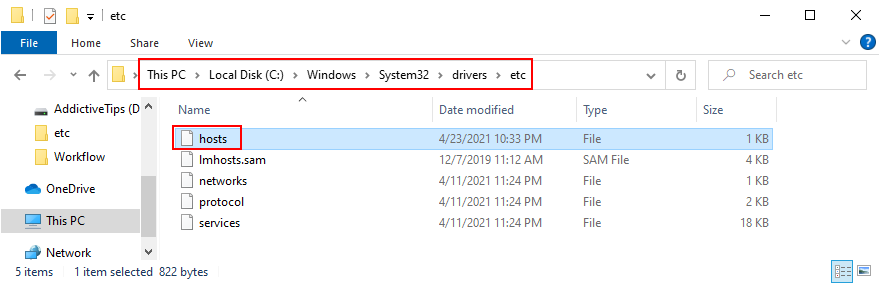
- Open the hosts file in a text editor with administrative rights (like Notepad)
- Locate any lines of text that mention the website you’re attempting to visit in Chrome. For example, if you can’t go to Google, look for any lines containing
google.com - Delete those lines and press Ctrl + S to save the new Hosts file
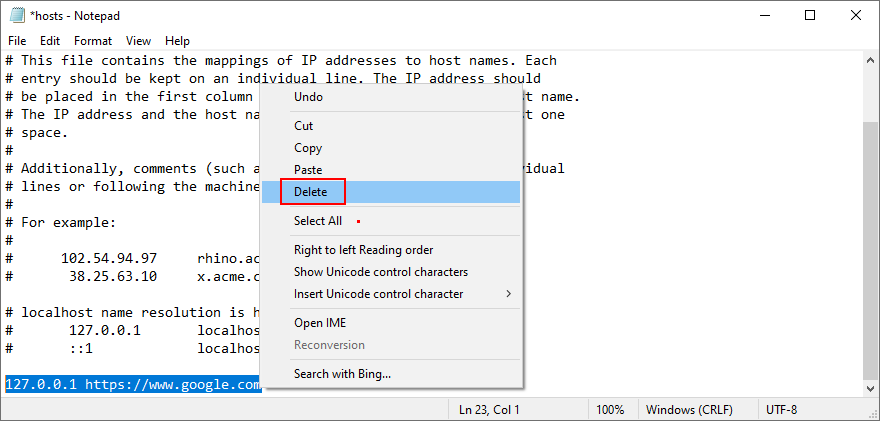
- Exit the text editor and launch Google Chrome
- Try to access that website now
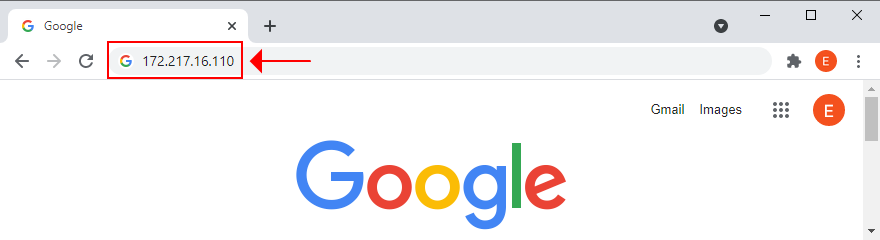
21. Visit websites by IP address
An alternative way to visit a website is by entering its IP address instead of domain. It’s an easy workaround for resolving the DNS_PROBE_FINISHED_NXDOMAIN error in Chrome if it was caused by a faulty DNS resolver.
However, you first need to discover the IP address of the domain. The easiest way to do this on Windows is by turning to Command Prompt and using the ping command. On macOS, you can use the ping command in the Terminal app to achieve the same results.
In the example below, we’re trying to find out the IP address of Google: ping google.com. As you can tell from the screenshot, Google’s IP address is revealed in square brackets.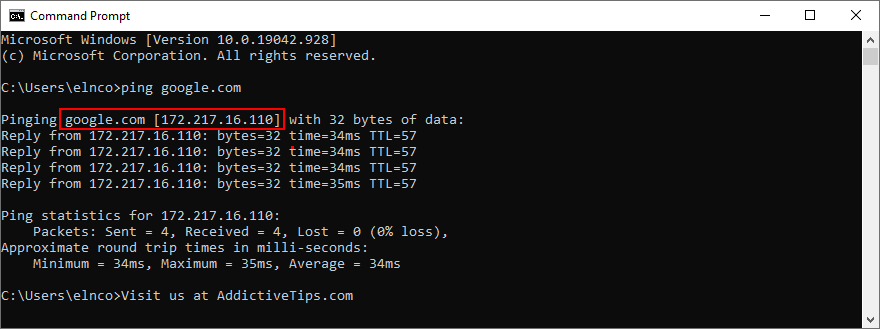
The only condition is for the ping command to return anything below 100% packet loss (at Ping statistics). Otherwise, your PC won’t be able to tell you the IP address of a domain that’s currently down or doesn’t exist.
Next, copy the IP address by selecting it in Command Prompt and pressing Enter. You can now launch Google Chrome to paste the IP address in the address bar and hit the Enter key.
23. Disable third-party antivirus tools
If you have a third-party anti-malware solution installed, it might have an incorrect default configuration that conflicts with Google Chrome, resulting in error DNS_PROBE_FINISHED_NXDOMAIN. It usually applies to free security programs, which are mostly unreliable.
But you should be able to resolve this problem by temporarily turning off your antivirus application to check if Google Chrome works. If you can’t disable it, then we suggest removing the application from Apps and Features on Windows 10, or by dragging it to the Trash on macOS.
24. Check for system updates
An obsolete operating system can harm all your installed applications, including Google Chrome. If you haven’t updated Windows 10, macOS, iOS, or Android for a long time, you shouldn’t postpone it any longer since it could be the reason why you receive error DNS_PROBE_FINISHED_NXDOMAIN.
How to update Windows 10:
- Press the Win key, type Check for updates, and press Enter
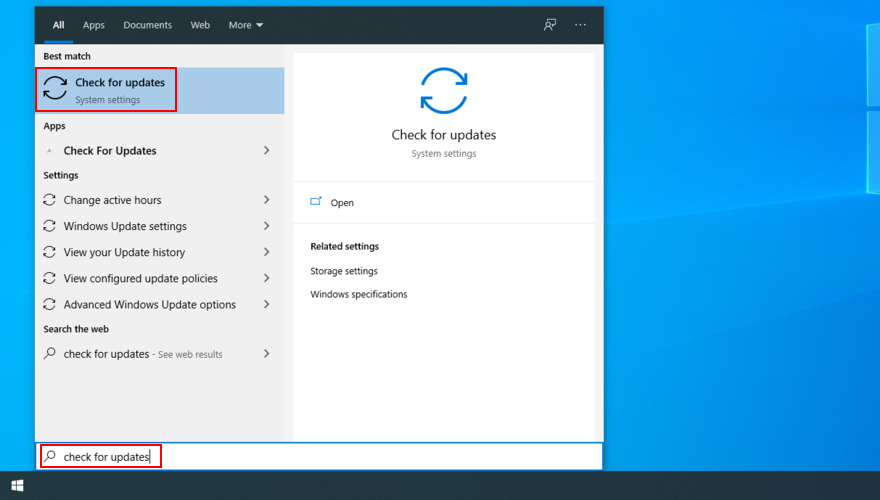
- Windows should start looking for updates automatically. If it doesn’t, click Check for updates
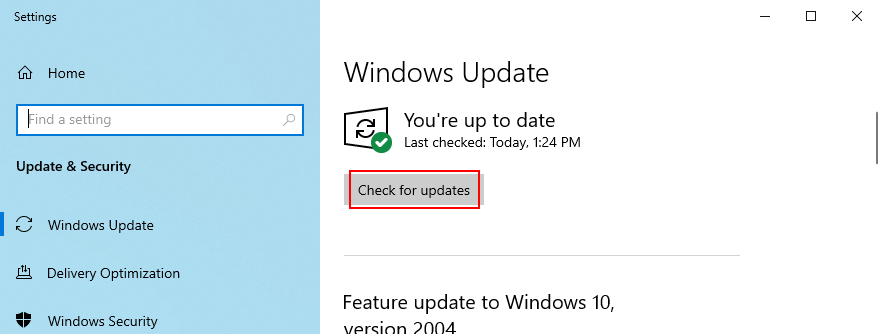
- If there are any pending updates that don’t start downloading right away, click Download
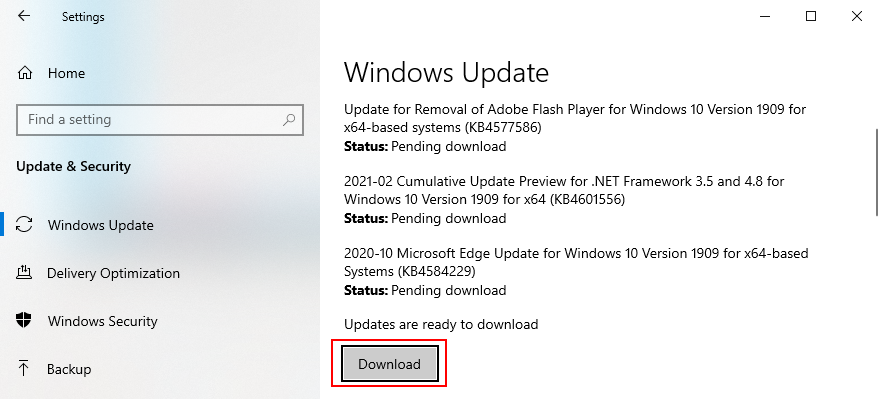
- Wait until your operating system updates itself. It might take a while
- Restart your computer and try to use Chrome now
How to update macOS:
- Open the Apple menu and select Software Update
- Mac will begin installing any system updates it finds
- When it’s done, restart the computer
- Open the Chrome app and see if it works now
How to update Android:
- Make sure that your Android device is charged
- Go to Settings > System > Advanced
- Tap System Update and wait
- Reboot your Android and try to use Chrome now
How to update iOS:
- Your iPhone or iPad should have a full battery
- Visit Settings > General > Software Update
- Tap Download and Install
- If there isn’t enough free disk space, iOS will ask for permission to temporarily remove some apps to make room. Tap Continue since the apps will be added back later
- Tap Install and authorize the update by using your passcode or fingerprint
- Restart iOS
- Start the Chrome app and check for DNS errors
25. Check the network drivers
Your network device might not be properly installed into your PC, especially if you’re using a new piece of hardware like a Wi-Fi adapter with plug-and-play features. But you can easily quickly reinstall the device to fix this issue.
How to reinstall the network device on Windows:
- Click the Start button, search for Device Manager, and open this app
- Extend the Network adapters group
- Select your network interface, right-click it, and select Uninstall device
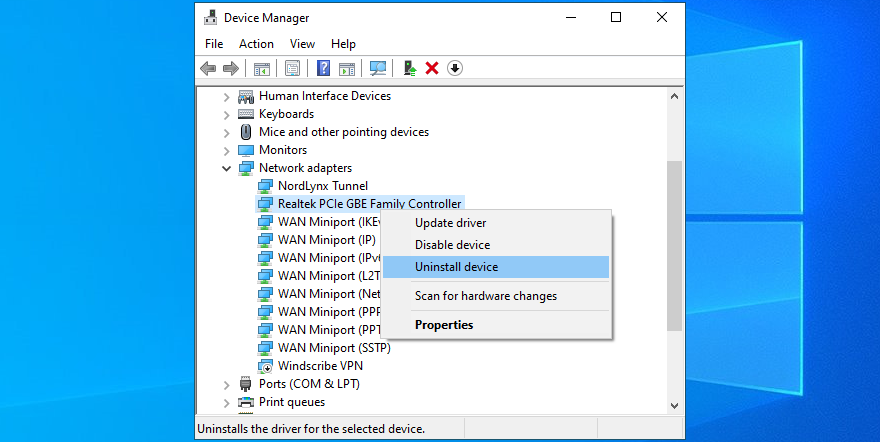
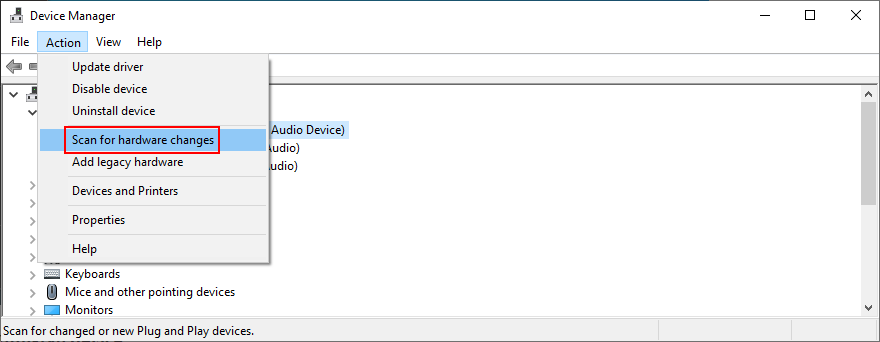
- Open the Action menu and click Scan for hardware changes
- Restart your PC. Windows will automatically reinstall the missing adapter
- Launch Chrome and try to access a webpage now
It’s also possible that your network driver is outdated, causing web browsing errors and hampering your Internet navigation experience overall.
How to update the network drivers on Windows:
- Return to Device Manager
- Right-click your network adapter and select Update driver
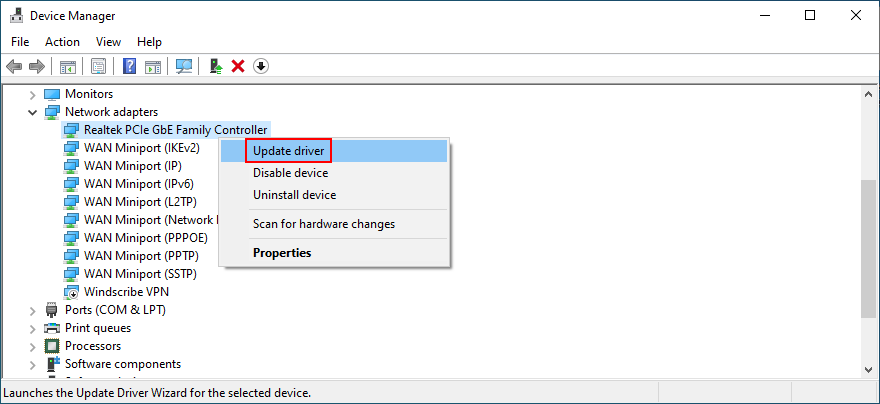
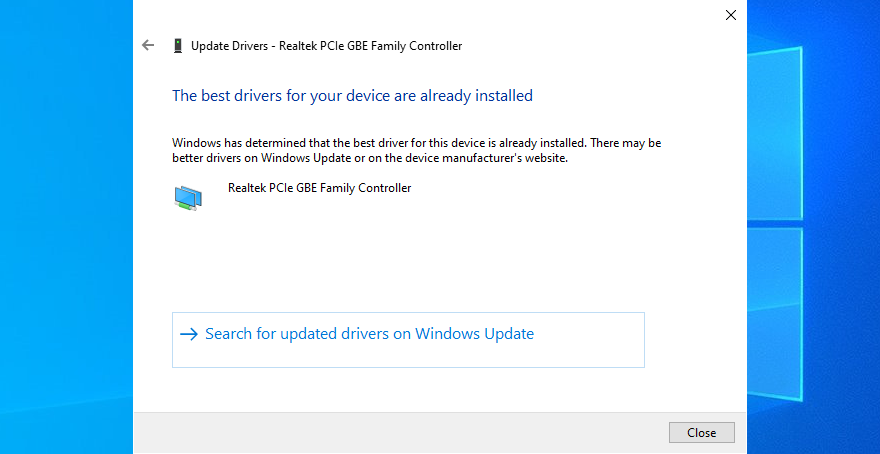
- Click Search automatically for updated driver software

- If it doesn’t find anything, click Search for updated drivers on Windows Update. However, if you have already used Windows Update, then you can skip this step
- Follow the on-screen instructions
- Restart your PC and try to use Chrome now
Alternatively, you can manually download the latest network driver and install it on your PC. But, if you don’t want to risk getting an incompatible driver, you should turn to a driver update application. Besides, it can help you update all your drivers at once.
On macOS, just follow the steps in a previous solution we described to update the operating system.
If you have accidentally installed an incompatible network driver, then you should roll back to the previous version in order to avoid web browsing issues.
How to roll back the network driver on Windows:
- Go to Device Manager
- Right-click your network adapter and select Properties
- Switch to the Driver tab
- Click Roll Back Driver and follow the instructions. If the button’s greyed out, you can’t perform the rollback, so you might as well skip this step
- Restart your PC and check for DNS errors in Chrome
26. Check IPv4 and IPv6 connectivity
It’s a good idea to check the IPv4 and IPv6 settings of your computer. Some users have reported that, although their ISP doesn’t support IPv6 connections, having IPv6 mode enabled on their PC has caused network connectivity issues. So you should turn off IPv6 to stay on the safe side.
How to check IPv4 and IPv6 on Windows 10:
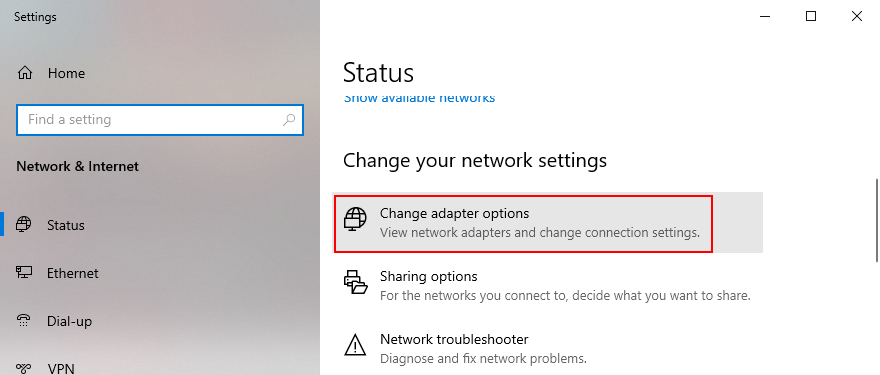
- Click the network icon in the system tray and select Network & Internet settings
- Click Change adapter options
- Select your Internet connection, right-click it, and go to Properties (you need elevation rights)
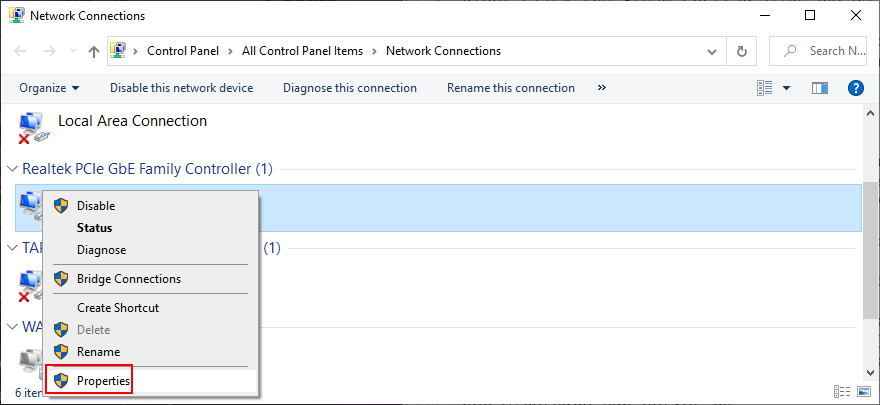
- Remain in the Networking tab
- Check the Internet Protocol Version 4 (TCP/IPv4) box
- Uncheck the Internet Protocol Version 6 (TCP/IPv6) box
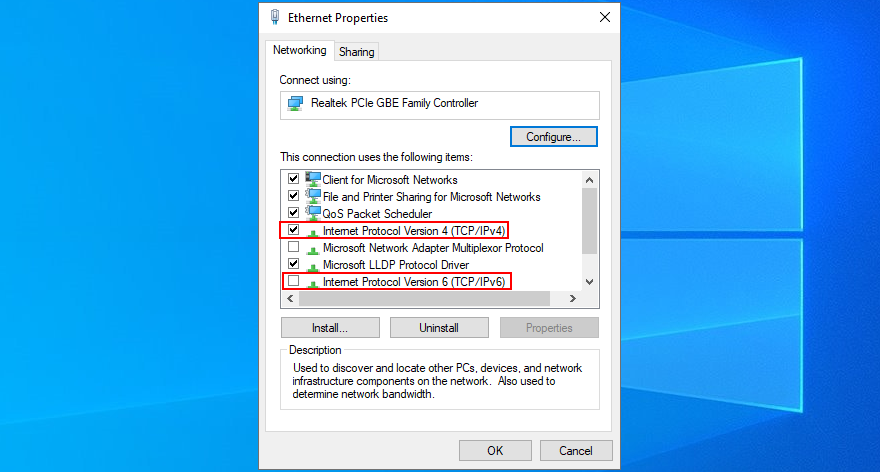
- Click OK and exit
- Fire up Chrome and try to access a webpage now
27. More ways to improve your Internet connection
Here are some suggestions to help make your Internet connection faster and get rid of the DNS_PROBE_FINISHED_NXDOMAIN error in Google Chrome:
- Exit all applications with Internet access that you’re not currently using (except Chrome), such as torrenting clients, gaming platforms like Steam, and other web browsers like Mozilla Firefox or Microsoft Edge
- If your router has dual-band support, connect to the 5 Ghz Wi-Fi network
- Move your desktop, tablet, smartphone or tablet closer to the router to get a better signal
- Disconnect other devices from your Wi-Fi network
- On desktops and tablets, switch to wired mode
- On tablets and smartphones, toggle Wi-Fi and 4G mobile data mode
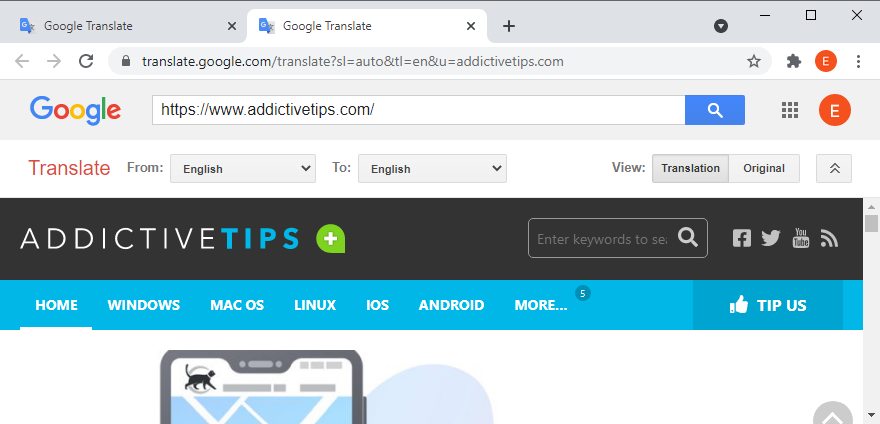
28. Use Google Translate
A nifty trick to access a website that’s blocking your connection due to your DNS resolver is to turn to Google Translate. The online service is capable of translating entire webpages. Since you’re using Google as a proxy to reach a specific domain, your IP won’t be blocked by that website anymore. Keep in mind that it only works if the website is not down.
Here’s an example:
- Go to Google Translate
- Type or paste the website you’re trying to access
- Set the preferred language in the translated area
- Click the button that opens a new tab
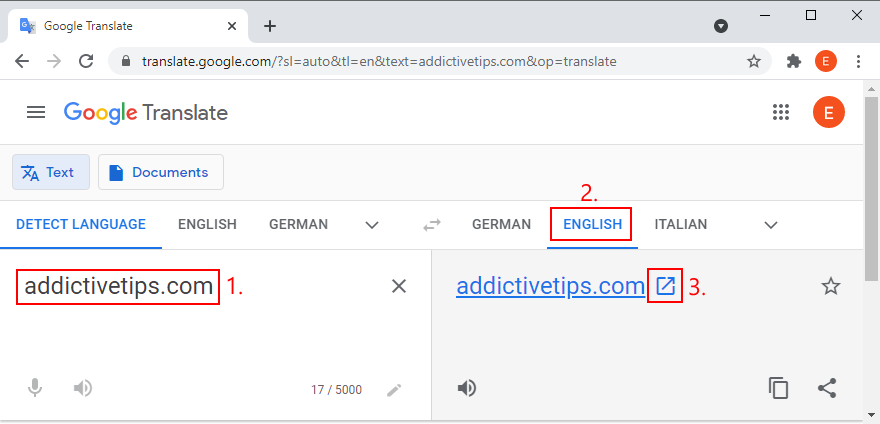
- View and navigate the website in Google Translate
29. Use a premium VPN service
We previously mentioned that you should disable your VPN service to get rid of the DNS_PROBE_FINISHED_NXDOMAIN error. However, that only applies to free applications that are poorly built and offer only basic protection. Using a premium VPN service is different, and we can’t think of a finer example than NordVPN. We think it’s the best VPN that checks all the boxes.

NordVPN has a built-in DNS resolver that speeds up your Internet connection, prevents your DNS queries from getting hijacked, and helps you access blocked websites. It also has support for custom DNS servers if you prefer using something else. However, keep in mind that its DNS resolver comes into effect only after connecting to a VPN server.
Furthermore, NordVPN is capable of unblocking streaming services like Netflix. It supports all popular platforms, including Windows, macOS, Linux, Android, and iOS. Plus, it allows up to six simultaneous connections. You can even set it up on your router to share VPN access and DNS features with all devices connected to your Wi-Fi network.
Lastly, a premium subscription comes with support for a Smart DNS service, which you can use to watch Netflix on devices without native VPN support, such as PS4, PS5 or Xbox One. You can read all about this awesome service in our NordVPN review.
DNS_PROBE_FINISHED_NXDOMAIN can be fixed
To review, DNS_PROBE_FINISHED_NXDOMAIN is an error message that pops on Chrome and other Chromium-based web browsers like Microsoft Edge or Opera. It can happen on any platform, including Windows, macOS, Android, and iOS. The error prevents your browser from accessing webpages due to DNS issues, but you can fix it.
For example, try accessing other websites, using another web browser, or connecting to a different network. You should also restart your device, router and browser application, update your operating system and web browser, clear browser cache, reset your DNS settings, and restart the DNS Client service.
It’s also a good idea to change your DNS servers, run the Internet Connections troubleshooter, disable Chrome extensions, VPN and proxy tools, restore Chrome to its default configuration, reinstall the web browser, use the Chrome stable channel, or downgrade Chrome if you’re running an obsolete Windows version.
Furthermore, you should check your device for malware, run a ping test, review your Hosts file, visit websites by IP address instead of domain, disable any third-party antivirus utilities, check the network driver, IPv4 and IPv6 connectivity, take additional steps toward speeding up your Internet connection, use Google Translate as a proxy, and use a premium VPN service with proprietary DNS servers like NordVPN.
Did these solutions help repair error DNS_PROBE_FINISHED_NXDOMAIN on your device? Did we miss anything important? Leave us a comment in the section below and tell us more.