Tutti gli utenti Windows alla fine affrontano i problemi del computer, a seconda di come utilizzano il PC e della loro attenzione durante la navigazione in Internet. Problemi di schermata blu paralizzano la tua macchina e ti impediscono di usarla. Tuttavia, indipendentemente dalla gravità del problema, Gli errori BSOD possono essere corretti .

Che cos’è l’ERRORE DI PAGINA NELL’AREA SENZA PAGINE?
L’ERRORE DI PAGINA NELL’AREA SENZA PAGINE è un errore BSOD. Di solito è accompagnato dal codice 0x00000050 e può verificarsi su qualsiasi iterazione di Windows, inclusi Windows 10, 8, 7, Vista e XP.
Il codice di arresto indica che il sistema operativo in uso non è in grado di identificare un file di sistema essenziale nella memoria, sia che si tratti della memoria principale, del processore o della scheda video. Di conseguenza, Windows si spegne e visualizza una schermata blu per prevenire la perdita di dati e il danneggiamento dei file.
Come correggere l’errore di pagina in un’area senza pagine su Windows 10
La risoluzione dei problemi relativi al codice di arresto PAGINA ERRATA IN AREA NON DI PAGINA potrebbe richiedere molto tempo. Tuttavia, è importante armarsi di pazienza. È anche una buona idea avere un altro dispositivo con accesso a Internet in standby, al fine di cercare ulteriori informazioni sul Web quando potrebbero sorgere nuovi problemi.
Inoltre, a meno che ERRORE DI PAGINA NELL’AREA NON DI PAGINA provochi un ciclo di avvio su Windows 10, dovresti crea un punto di ripristino del sistema e persino un backup completo dei tuoi file e applicazioni personali come misura di sicurezza. Dopo averlo fatto, controlla le seguenti soluzioni.
1. Riavvia il tuo PC
Inizia con una semplice soluzione alternativa che potrebbe eliminare il codice di arresto PAGINA ERRORE NELL’AREA NON DI PAGINA se si tratta di un problema occasionale: riavvio forzato del PC. Significa rimuovere tutta la cache temporanea memorizzata dal tuo computer per eseguire un riavvio pulito.
Come riavviare il computer:
- Spegni Windows (premi Alt + F4 e seleziona Spegni )
- Scollega il cavo di alimentazione dal desktop. Se hai un laptop, estrai la batteria
- Tieni premuto il pulsante di accensione per 20-30 secondi. Sui tablet, tieni premuti contemporaneamente il pulsante di accensione e il volume verso il basso per questo periodo di tempo
- Ricollega il cavo di alimentazione al desktop o ricollega la batteria al laptop
Accendi il computer e avvia Windows
2. Esegui Windows Update
Se non hai mai aggiornato Windows 10 o è passato troppo tempo dall’ultimo aggiornamento, non rimandare più questo evento. Verifica la presenza di eventuali segni che indicano che il tuo computer è pronto per eseguire un aggiornamento, come un piccolo punto rosso sulle notifiche o sul pulsante di accensione, che segnala un aggiornamento in sospeso.
Tuttavia, se hai disabilitato gli aggiornamenti automatici di Windows 10 , puoi eseguire manualmente il controllo e consentire al tuo sistema operativo di ottenere le funzionalità più recenti, i miglioramenti, gli hotfix e le patch di sicurezza.
Come verificare manualmente la disponibilità di aggiornamenti di sistema:
- Fai clic con il pulsante destro del mouse sul pulsante Start e seleziona Impostazioni
- Vai a Aggiornamento e sicurezza
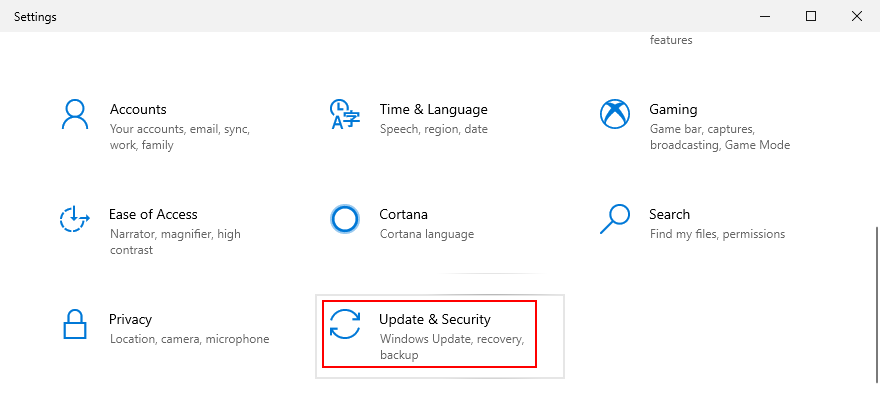
- Passa a Windows Update sul lato sinistro
- Se sono presenti aggiornamenti in sospeso, fai clic su Installa ora o Riavvia ora . Altrimenti, fai clic su Verifica aggiornamenti , quindi su Scarica

- Attendi pazientemente che il tuo sistema operativo venga aggiornato. Potrebbe riavviare il PC più volte
- Vai a Aggiornamento e sicurezza
3. Correggi gli errori del disco rigido
Il danneggiamento del disco rigido e i settori danneggiati possono causare errori di schermata blu come PAGE FAULT IN NONPAGED AREA. Può accadere, ad esempio, quando un’operazione di formattazione della partizione viene interrotta improvvisamente da un’interruzione di corrente.
Quando ciò accade, puoi passare a un’utilità della riga di comando interna chiamata CHKDSK (Check Disk) per scansionare il tuo HDD e correggere eventuali errori.
Come utilizzare CHKDSK:
- Fai clic sul pulsante Start , cerca Prompt dei comandi e fai clic su Esegui come amministratore . Se richiesto da UAC (controllo dell’account utente), fare clic su Sì
- Digita
chkdsk c:/f/rse il tuo sistema operativo è installato sull’unità C: predefinita. Altrimenti, sostituiscic:con la lettera di partizione corretta. Premi il tasto Invio
- Ti verrà chiesto di programmare CHKDSK per il prossimo riavvio del sistema. Digita y e premi Invio per confermare
- Esci dal prompt dei comandi e riavvia il PC
- La scansione e la riparazione del disco verranno eseguite prima dell’avvio di Windows
- Digita
4. Ripara i file di sistema corrotti
Non solo il guasto del disco rigido può causare GUASTI DI PAGINA NELL’AREA NON DI PAGINA, ma anche qualsiasi file di sistema danneggiato, modificato o mancante di cui Windows necessita per eseguire i suoi processi. Per questo scenario, puoi utilizzare SFC (System File Checker) , un altro strumento da riga di comando integrato.
Come utilizzare SFC:
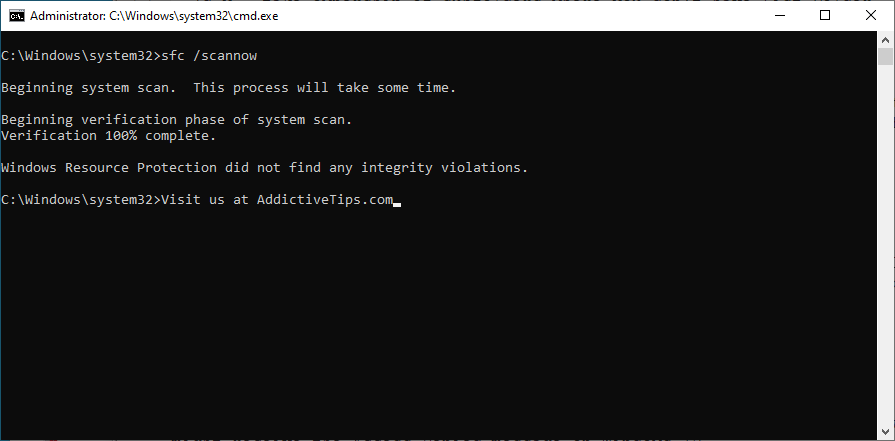
- Premi il tasto Win + R , digita cmd e premi Ctrl + Maiusc + Invio per avviare il Prompt dei comandi con diritti di elevazione
- Esegui
sfc/scannowe consenti a Windows di trovare e correggere eventuali violazioni dell’integrità
- Esci dal prompt dei comandi
- Riavvia il computer
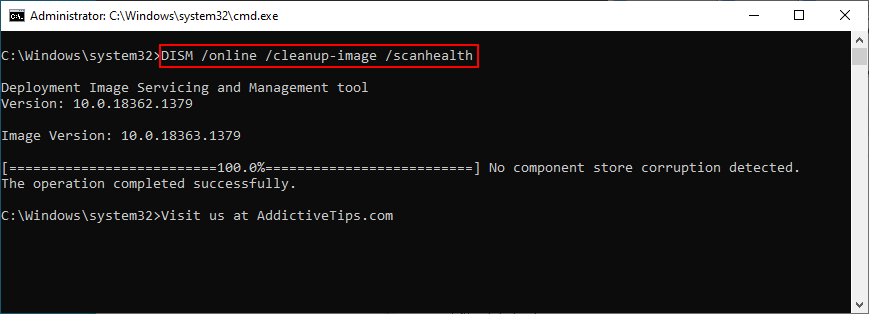
Se SFC non riesce a trovare alcun problema o se non è sufficiente per riparare il codice di interruzione PAGE FAULT IN NONPAGED AREA, puoi rivolgerti a DISM (Deployment Image Servicing and Management) per correggere l’archivio componenti dell’immagine del sistema operativo.
Come utilizzare Gestione e manutenzione immagini distribuzione:
- Premi il tasto Win , digita Prompt dei comandi , seleziona questa app e fai clic su Esegui come amministratore
- Esegui il comando
DISM/online/cleanup-image/scanhealth
- Se DISM non trova nulla di sbagliato nel tuo PC, puoi uscire. Altrimenti, esegui
DISM/online/cleanup-image/restorehealthper risolvere i problemi - Dopo che DISM ha completato la sua attività, esci dal prompt dei comandi e riavvia il PC
- Avvia nuovamente CMD con diritti di elevazione
- Esegui SFC (
sfc/scannow) per eseguire un controllo del sistema - Esci dal prompt dei comandi e riavvia il PC un’ultima volta
5. Controlla i driver di dispositivo
Dispositivi non installati correttamente sul tuo computer o driver obsoleti o incompatibili con il tuo sistema operativo potrebbero essere un altro motivo per cui continui a vedere l’errore PAGINA IN AREA NON DI PAGINA su una schermata blu. Ad esempio, molti utenti segnalano problemi con i driver video AMD. Ecco cosa devi fare.
Reinstalla i tuoi dispositivi:
- Fai clic sul pulsante Start , cerca Gestione dispositivi e apri questa applicazione
- Estendi tutti i menu del dispositivo
- Cerca qualsiasi dispositivo con un punto esclamativo giallo
- Fai clic con il pulsante destro del mouse e seleziona Disinstalla dispositivo
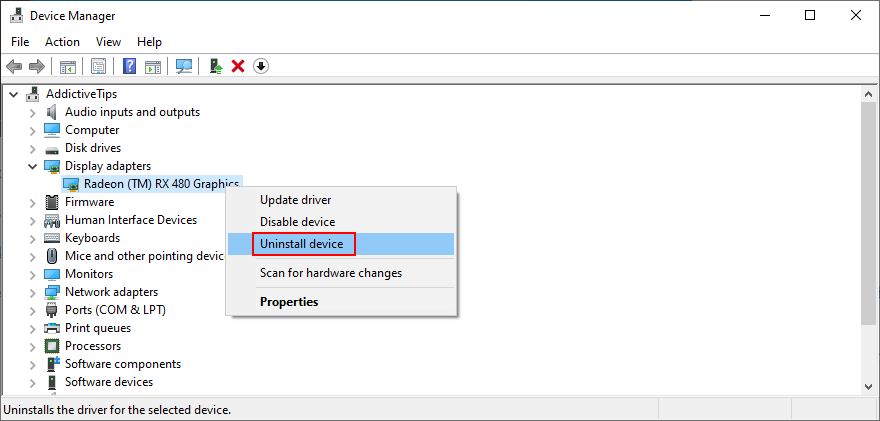
- Fai clic su Disinstalla per confermare
- Apri il menu Azione e seleziona Rileva modifiche hardware
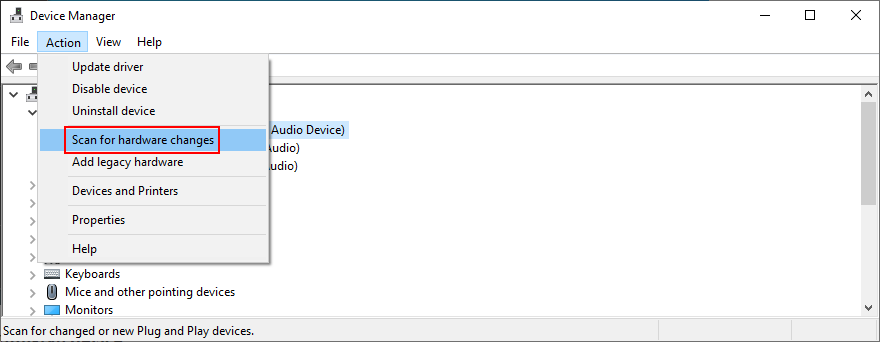
- Se il dispositivo non viene reinstallato automaticamente, riavvia il PC
Aggiorna i vecchi driver:
- Fare clic con il pulsante destro del mouse sul pulsante Start e visitare Gestione dispositivi
- Seleziona un dispositivo, fai clic con il pulsante destro del mouse e scegli Aggiorna driver . Se non sei sicuro di quali dispositivi selezionare, ti suggeriamo di iniziare con la tua scheda video

- Quando ti viene chiesto cosa fare, fai clic su Cerca automaticamente i conducenti
- Se viene visualizzato il messaggio I migliori driver per il dispositivo sono già installati , fai clic su Cerca driver aggiornati su Windows Update . Ma se hai già verificato la disponibilità di aggiornamenti di sistema, salta questo passaggio

- Segui le istruzioni sullo schermo per finalizzare l’aggiornamento del driver
- Riavvia il computer


Può essere difficile capire quali driver devono essere aggiornati sul tuo PC. Se non vuoi perdere molto tempo cercando di risolvere questo problema, usa un applicazione aggiornamento driver . Rileva automaticamente tutti i driver obsoleti sul PC e si offre di installarli tutti. Inoltre, non rischierai che un driver non sia supportato dal tuo sistema operativo.
Se hai installato accidentalmente un driver incompatibile per qualsiasi dispositivo, ripristinalo alla versione precedente e stabile. Dopodiché, puoi lasciare il tuo PC così com’è e controllare se ricevi ancora il codice di arresto PAGINA GUASTO IN AREA NON DI PAGINA, oppure aggiornare correttamente i tuoi driver utilizzando i passaggi precedenti che abbiamo descritto.
Ripristina i driver non supportati:
- Premi il tasto Win + R , digita devmgmt.msc e premi Invio per aprire Gestione dispositivi
- Seleziona il dispositivo difettoso e apri il menu di scelta rapida
- Vai a Proprietà
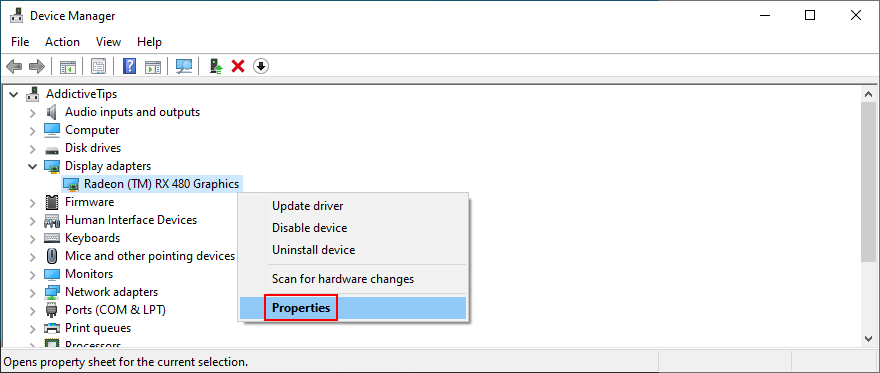
- Passa alla sezione Driver
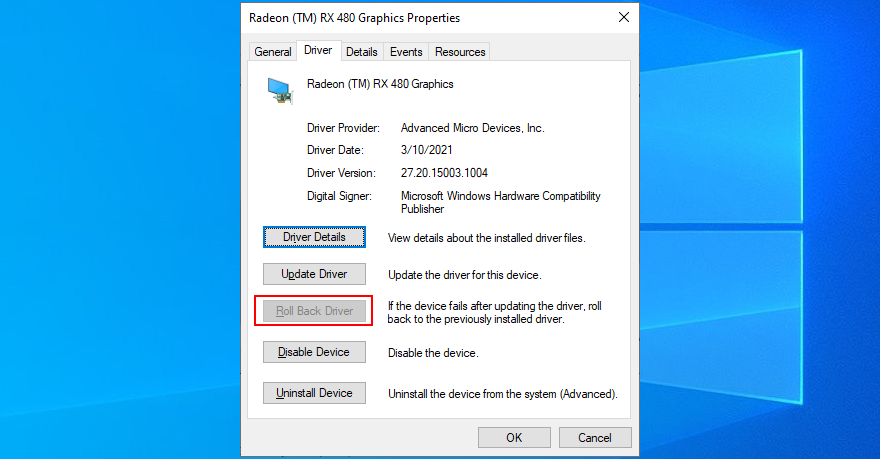
- Fai clic su Ripristina driver e segui le istruzioni fornite. Se non puoi fare clic su questo pulsante perché è disattivato, non puoi eseguire il rollback perché non esiste una versione precedente del driver sul tuo PC. Basta saltare questa parte delle soluzioni
6. Esegui una scansione antimalware
Un’infezione da virus può essere abbastanza potente da danneggiare i file di sistema critici di cui Windows necessita per funzionare normalmente. Di solito accade agli utenti che non hanno una soluzione antivirus installata, la mantengono sempre spenta o non si esercitano con i suggerimenti per la sicurezza quando sono online.
Per mettere alla prova questa teoria, devi solo avviare la tua applicazione anti-malware ed eseguire una scansione per vedere cosa mostrano i risultati. Se non hai installato una soluzione di sicurezza di terze parti, sposta la tua attenzione su Windows Defender.
Come utilizzare Windows Defender:
- Fai clic sul pulsante Start , cerca Windows Defender e apri questa app
- Vai a Protezione da virus e minacce
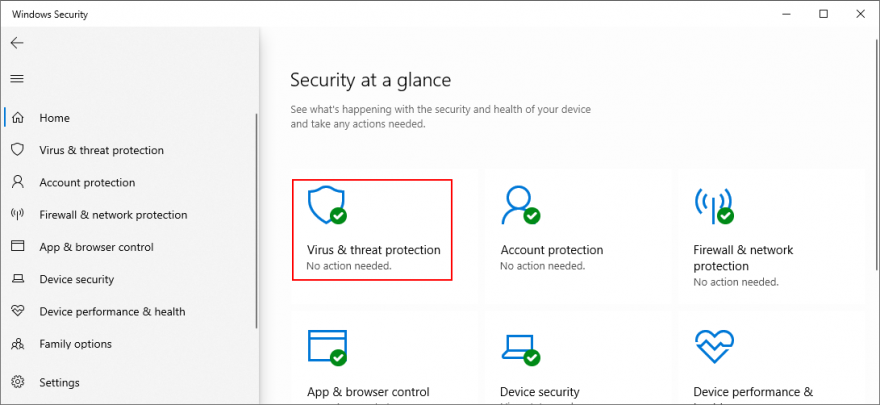
- Fai clic su Opzioni di scansione
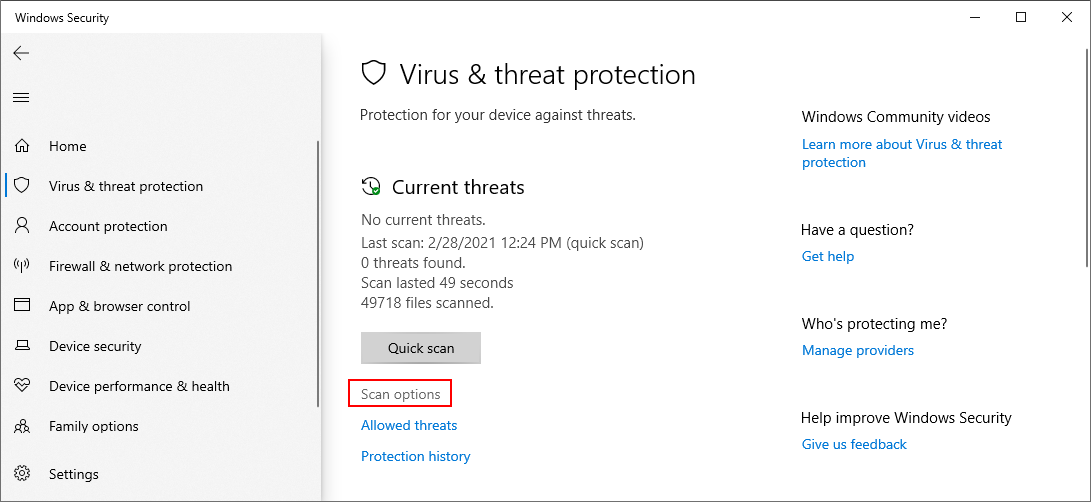
- Nell’elenco delle opzioni di scansione, seleziona Scansione rapida e fai clic su Esegui scansione ora
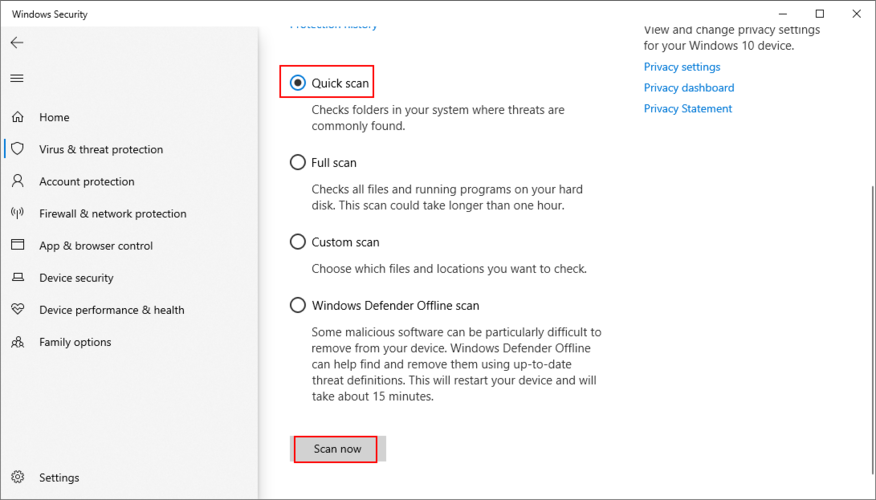
- Il difensore inizierà la scansione. Non spegnere o riavviare il PC durante questo periodo
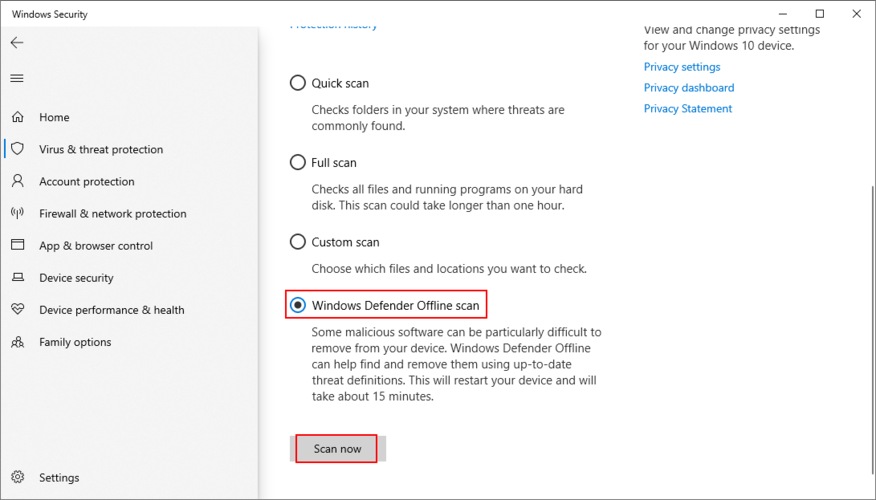
- Se i risultati della scansione risultano a mani vuote, esegui un’altra scansione utilizzando l’opzione Scansione offline di Windows Defender
- Se rileva minacce dannose, consenti a Defender di rimuovere o mettere in quarantena i file infetti
- Riavvia il PC e verifica se questo ha risolto i problemi di arresto anomalo
7. Esegui un avvio pulito
Un avvio pulito di Windows 10 significa avviare il sistema operativo disabilitando tutti i programmi che vengono eseguiti automaticamente non appena si accende il computer. Alcuni agenti malware sono abbastanza subdoli da infiltrarsi nei programmi di avvio, quindi un avvio pulito aiuterà a risolvere questo problema.
Come pulire l’avvio di Windows 10:
- Premi il tasto Win + R , digita msconfig e premi Invio per avviare Configurazione di sistema
- Rimani nella scheda Generale
- In Selezione avvio
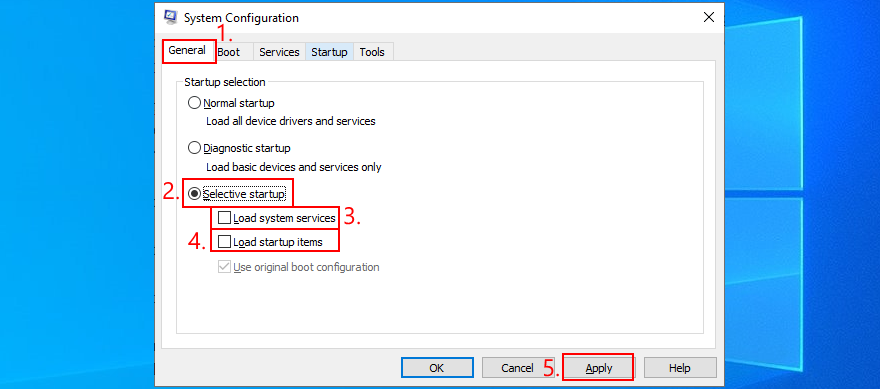
- Seleziona Avvio selettivo
- Deseleziona Carica servizi di sistema
- Deseleziona Carica elementi di avvio
- Fai clic su Applica ed esci
- Premi Ctrl + Maiusc + Esc per aprire Task Manager
- Passa alla scheda Avvio
- Per ogni applicazione con lo stato Abilitato , selezionala e fai clic su Disabilita
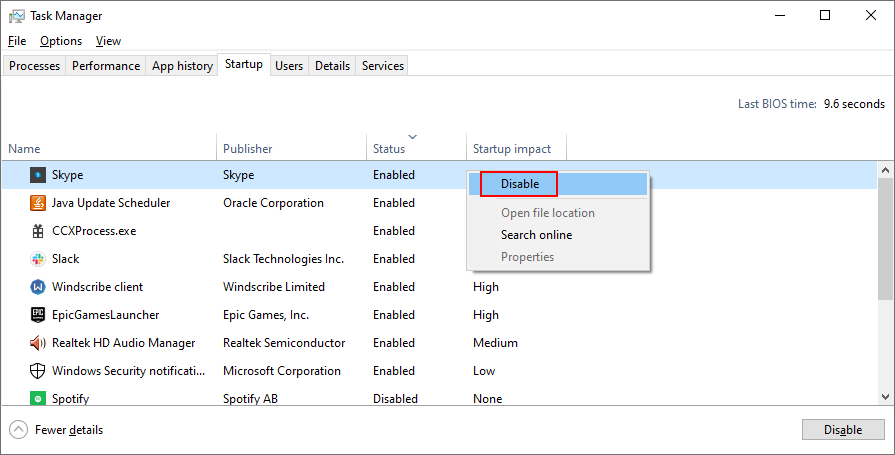
- Esci dal desktop e riavvia il PC
- Controlla se il tuo sistema continua a bloccarsi
8. Avvia Windows 10 in modalità provvisoria
Per creare un ambiente sicuro per la risoluzione dei problemi relativi agli errori BSOD, si consiglia di avvia Windows 10 in modalità provvisoria . Il sistema operativo verrà avviato solo con i driver, i processi e i servizi necessari. Quindi è un modo semplice per restringere la ricerca disabilitando tutti i componenti software che potrebbero causare il codice di arresto GUASTO DELLA PAGINA NELL’AREA NON DI PAGINA.
- Fai clic sul pulsante Start sul desktop e apri il menu di alimentazione
- Tieni premuto Maiusc e fai clic su Riavvia per avvia Windows in modalità di risoluzione dei problemi
- Se non riesci ad accedere al desktop perché l’errore della schermata blu invia il tuo PC a un ciclo di avvio, interrompi tre volte la sequenza di avvio di Windows per accedere alla modalità Avvio avanzato
- Vai a Risoluzione dei problemi > Opzioni avanzate > Impostazioni di avvio

- Fai clic su Riavvia
- Premi F4 per avviare Windows in modalità provvisoria
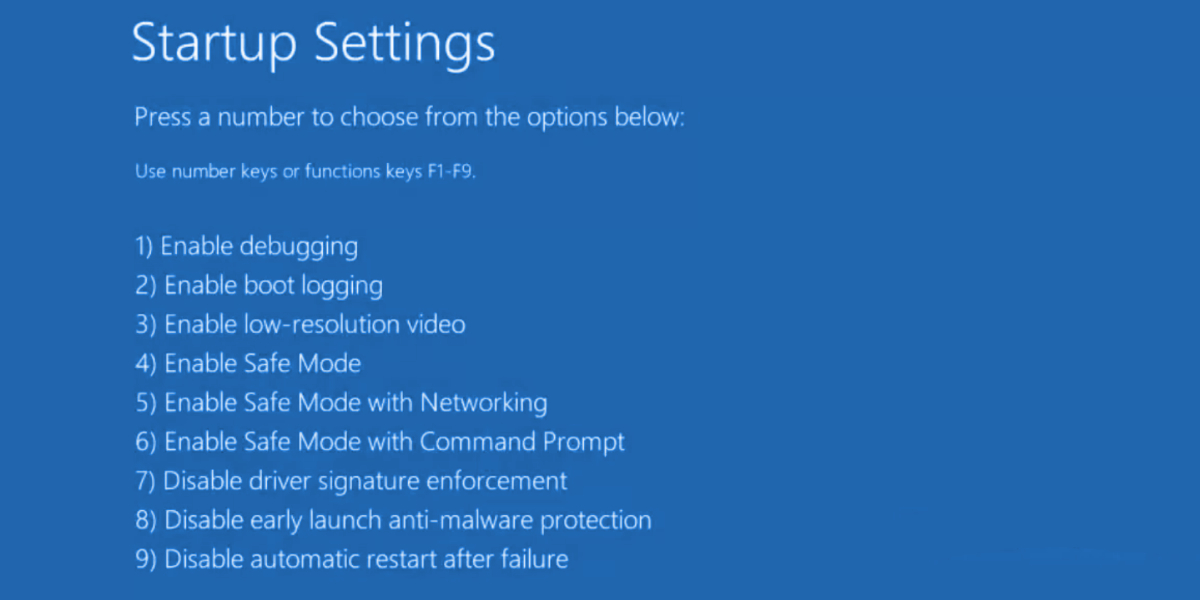
- Verifica se continui a ricevere errori di schermata blu dopo l’avvio di Windows
- Premi F4 per avviare Windows in modalità provvisoria

9. Usa il programma di disinstallazione del driver video
È una buona idea controllare accuratamente i driver della GPU poiché qualsiasi problema in quel reparto può influire sulla tua esperienza di gioco e streaming. Peggio ancora, può persino causare errori di schermata blu come ERRORE DI PAGINA IN AREA NON DI PAGINA su Windows 10 o versioni precedenti.
Ti consigliamo di utilizzare Display Driver Uninstaller (DDU) per ripristinare il software e i driver del dispositivo senza troppi problemi. Funziona con NVIDIA, AMD e Intel. Può persino riavviare Windows in modalità provvisoria per eseguire queste operazioni in modo sicuro.
Come utilizzare il programma di disinstallazione del driver di visualizzazione:
- Crea un punto di ripristino del sistema o un backup completo se non l’hai già fatto
- Scarica Display Driver Uninstaller dal ufficiale sito web
- Decomprimi il file scaricato da qualche parte sul tuo PC
- Apri il file eseguibile DDU
- Se ottieni L’app che stai tentando di installare non è un’app verificata da Microsoft , fai clic su Installa comunque
- Estrai i file del programma in qualsiasi cartella
- Se hai aggiornamenti di Windows in sospeso, assicurati di installarli
- Avvia Windows 10 in modalità provvisoria seguendo le istruzioni della Soluzione 6 in questo elenco. Tuttavia, quando raggiungi la schermata Impostazioni di avvio , assicurati di selezionare F5 per abilitare la modalità provvisoria con rete
- Avvia Display Driver Uninstaller.exe
- Lascia la configurazione predefinita e fai clic su OK per accedere alla finestra principale di DDU
- Seleziona il tipo di dispositivo e il dispositivo dai due menu sul lato destro
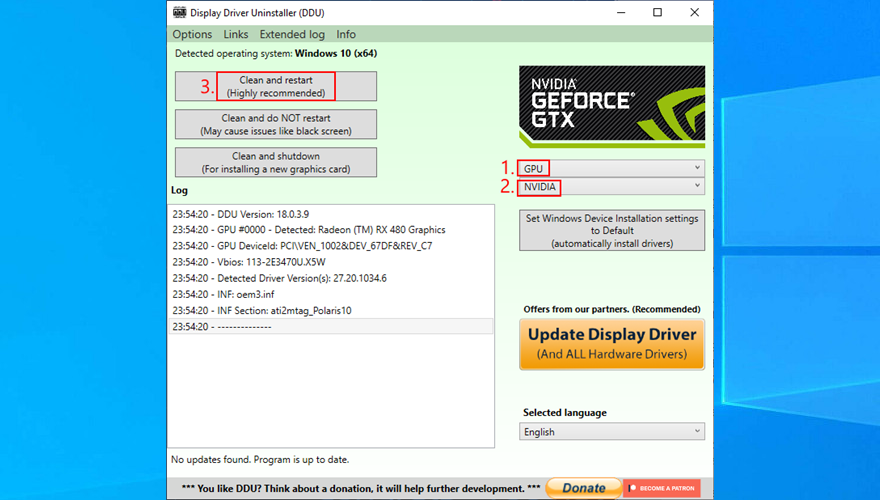
- Click Clean and restart
10. Repair and reinstall.NET Framework
Microsoft.NET Framework is a required dependency for your operating system and many software applications made by Windows. So, if there’s something wrong with the component package, this could result in software conflicts, system errors, and even blue screen messages like PAGE FAULT IN NONPAGED AREA.
However, you can fix a broken.NET Framework by installing a straightforward and practical tool released by Microsoft for this very purpose.
How to use Microsoft.NET Framework Repair Tool:
- Download Microsoft.NET Framework Repair Tool from the official website
- Launch the setup file
- Agree to the license terms and click Next to check your PC for issues
- If it finds any problems, like reregistering or restarting the Windows Installer service, click Next to apply all fixes
After completing the wizard steps and exiting to the desktop, check if you still get the PAGE FAULT IN NONPAGED AREA stop code on your PC. If you do, it’s a good idea to reinstall.NET Framework. Don’t worry since it’s pretty basic.
How to reinstall Microsoft.NET Framework:
- Right-click the Start menu and go to Apps and Features
- Find and select any entry that includes .NET Framework
- Click Uninstall and then again to confirm removal
- Do this for all .NET Framework entries
- Open a web browser
- Go to the .NET Framework official download page
- In the Supported versions category, click the recommended entry
- Download the runtime version (for non-developers)
- Open the downloaded file and install.NET Framework
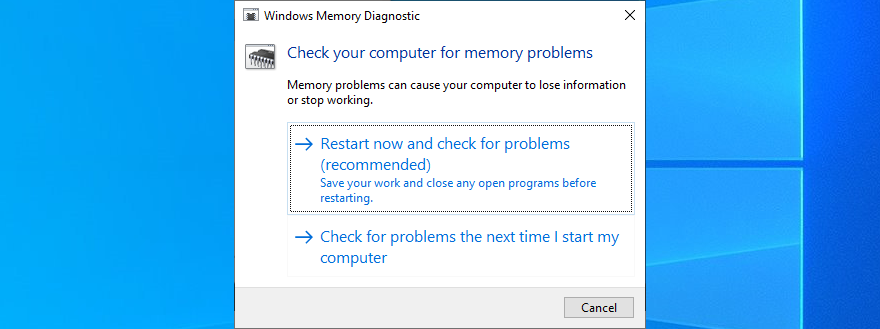
11. Run Windows Memory Diagnostic
The PAGE FAULT IN NONPAGED AREA blue screen error could be caused by issues with your system memory. A simple way to test this is by running Windows Memory Diagnostic, a tool that comes integrated with Windows 10.
- Save all ongoing projects and terminate all applications
- Press Win key + R, type mdsched.exe, and press Enter
- Click Restart now and check for problems
Before Windows boots, it engages in memory testing. There are three tests available: Basic, Standard, and Extended. By default, it runs the Standard test. However, it’s a good idea to switch to the Extended version. Although it takes more time, it’s more thorough.
To to this, press F1 to access Options. Then, select Extended and press F10 to apply. After the memory diagnosis is done, Windows will start as normal and show you the results in the notifications center. It might take a few seconds or minutes, just be patient until you get notified.
If you’re looking for a more advanced solution, we suggest checking out MemTest86.
12. Remove and reseat the memory slots
If Windows Memory Diagnostic doesn’t indicate any errors and you still can’t shake off the PAGE FAULT IN NONPAGED AREA error, you should remove and reseat your memory slots. But you need to be a bit handy with your computer.
It means removing all cables, taking apart your desktop, unpluging the memory sticks from their slots, then attaching them back. You could also try different memory slots if you have multiple options available.
However, you might have to consider replacing your RAM card if it’s damaged beyond repair.
13. Temporarily disable your antivirus
Security alerts could mean that your anti-malware tool is blocking access to critical system files that Windows needs to function at optimal parameters. You can quickly check this by temporarily turning off your antivirus solution.
Some applications don’t allow you to disable them due to security problems, however. In that case, you’re better off removing the program from your computer.
Furthermore, if you have two or more anti-malware programs installed, each with its own real-time engine, it’s absolutely necessary to uninstall all except one. That’s because multiple real-time safeguards can clash with each other, leading to severe computer problems, even blue screen errors like PAGE FAULT IN NONPAGED AREA.
14. Temporarily turn off your firewall
Just like your antivirus application, your antivirus could be blocking Internet access to system files that really need it. For example, Windows Update needs web access or it can’t bring your system up to speed, and Microsoft Store won’t work either.
In some rare cases, incorrect firewall settings can lead to BSOD errors such as PAGE FAULT IN NONPAGED AREA. Here’s what you need to.
How to disable your firewall:
- Log in to Windows using an administrator account
- Press Windows key + R, type control panel, and hit Enter
- In Control Panel, select Windows Defender Firewall
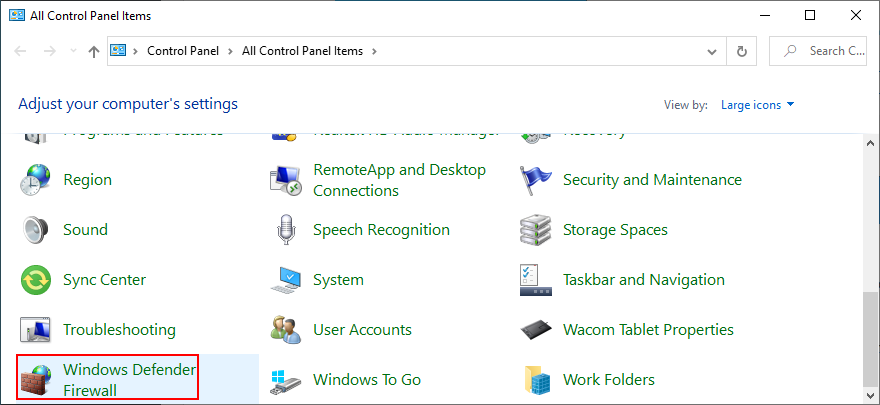
- Click Turn Windows Defender on or off to open this section
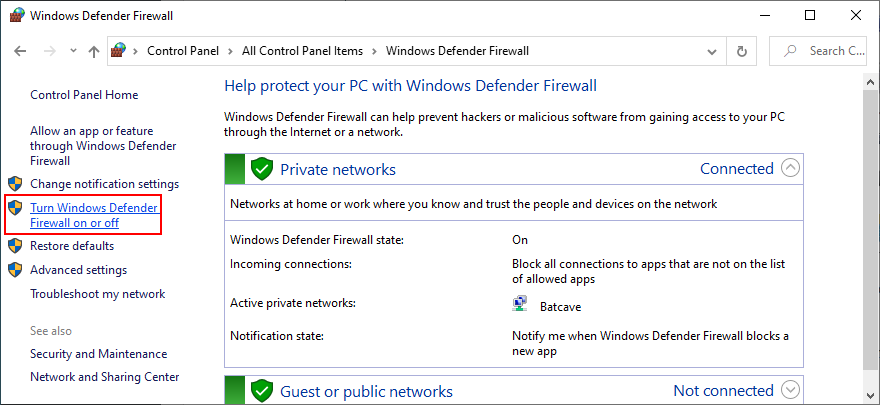
- Set Turn off Windows Defender Firewall at Private network settings and Public network settings
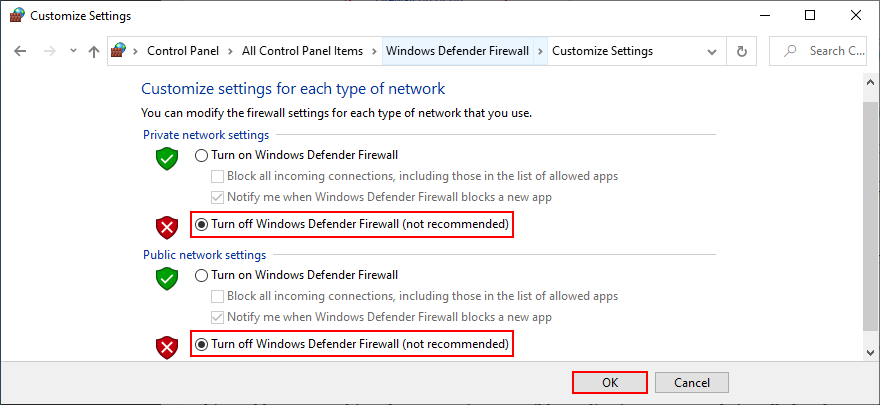
- Click OK to confirm
- Reboot your PC and check if you still get BSOD errors
Even if this solution solved the computer crash, you shouldn’t leave the firewall turned off since it means leaving your system vulnerable to malware attacks. Instead, you should restore firewall settings to their factory values.
How to restore firewall settings to default:
- Click the Start button, type firewall, and open Firewall & network protection
- Click Restore firewalls to default to open a new area
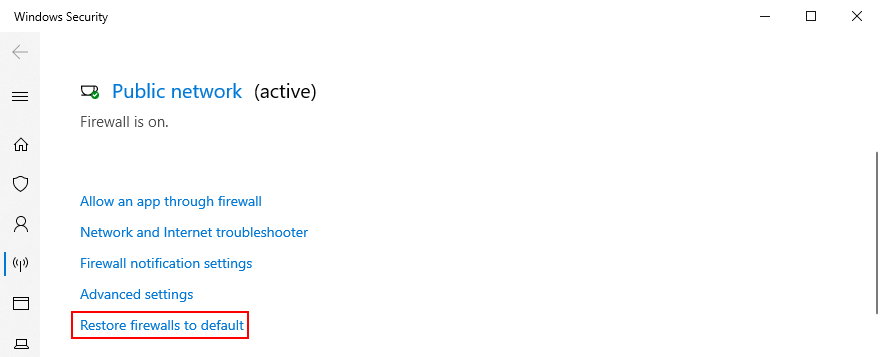
- Then, click Restore defaults and Yes to confirm
- Exit all windows
15. Check the storage space
If you don’t have enough storage space available on your computer, Windows won’t be able to start its processes and download the files it needs to work properly. In turn, this can lead to blue screen errors like PAGE FAULT IN NONPAGED AREA. But you can fix this issue by adding more storage space.
For instance, you can use a partition manager like Disk Management to increase the capacity of your Windows drive.
How to use Disk Management:
- Click the Start button, search for Disk Management, and open this tool
- By taking into account the values shown in the Capacity, Free Space and % Free columns, choose a partition besides the one that contains Windows
- Right-click the drive and select Shrink Volume

- Specify the new drive size and click Shrink
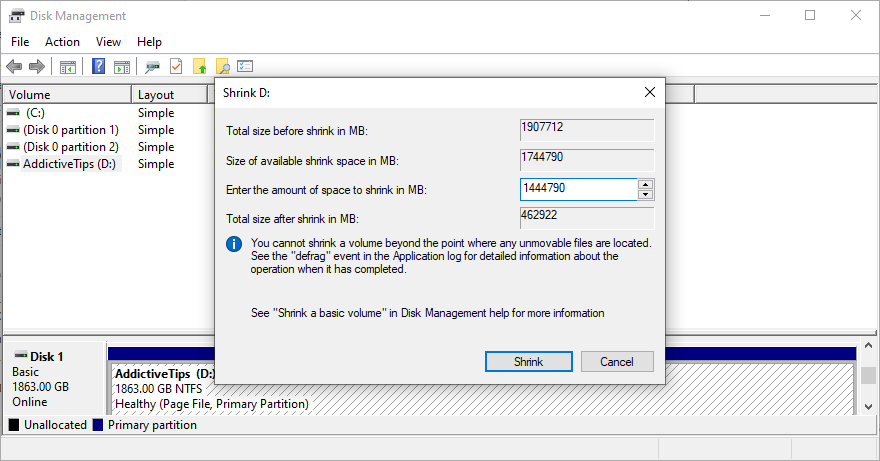
- Then, shift your attention to the partition with Windows. Right-click it and select Extend Volume
- Set its new size by adding all the available disk space. Click Extend
- Restart your computer and check if you still have blue screen issues
Another way to increase the storage space is by removing files. Make sure to uninstall large games and applications you don’t use anymore, as well as to move large photos, videos, documents, and other personal files somewhere else.
For example, you can back up your data to a removable storage unit, burn it to DVDs, or upload it to a cloud storage account. Remaining junk files on your computer can be eliminated with the help of a specialized cleaning solution such as CCleaner. Or, if you don’t want to install anything, use the Windows Disk Cleanup program.
How to use Disk Cleanup:
- Make sure you’re logged in to Windows 10 with an administrator account
- Open File Explorer by pressing Win key + E
- Go to the Downloads and Recycle Bin locations. Review containing files and copy or restore the ones you’d like to keep since these folders will be cleared by Disk Cleanup
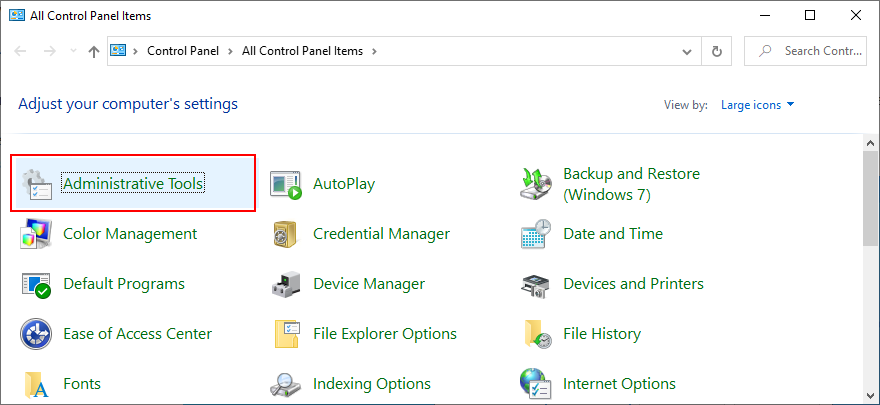
- Press the Windows key, search for Control Panel, and open this app
- Select Administrative Tools
- Double-click Disk Cleanup to launch this utility

- Select the drive that contains Windows and click OK
- At Files to delete, select all items. Then, click Clean up system files
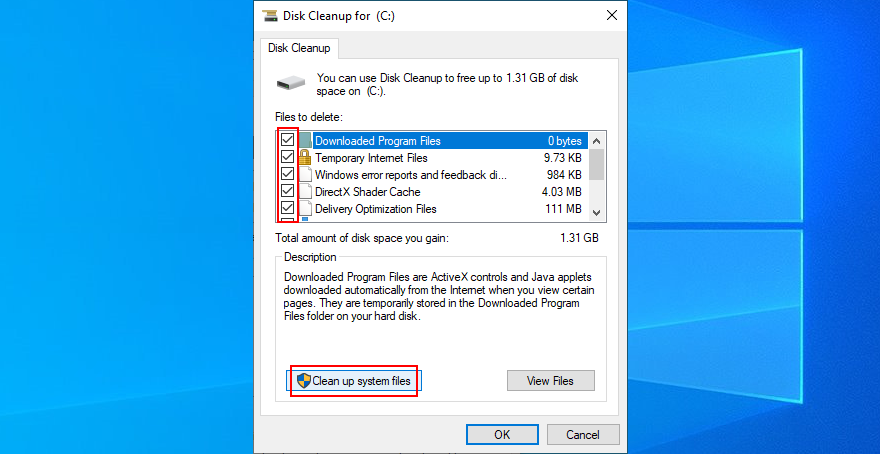
- It will begin a file search. Once it’s over, make the same selection and click OK
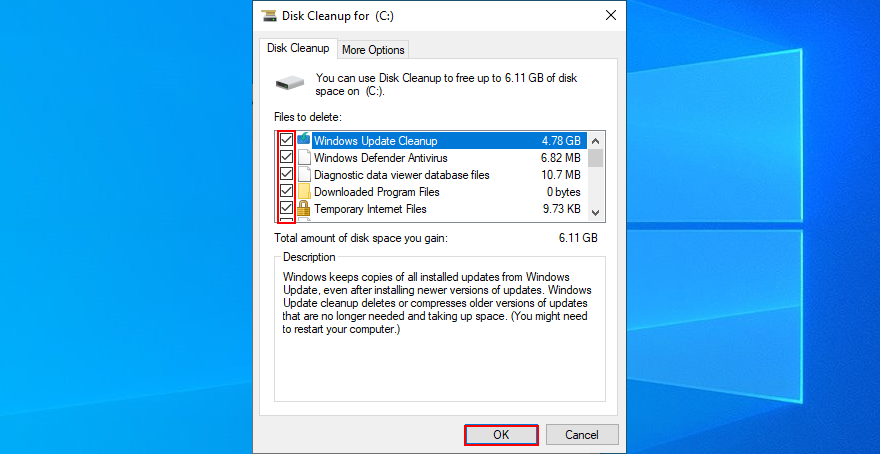
- The cleanup task might take a while. Don’t turn off or restart your PC during this time
- Once it finishes, restart your computer
- Check if your system still crashes
16. Run Hardware and Devices troubleshooter
As we mentioned in the beginning of this article, the PAGE FAULT IN NONPAGED AREA stop code can be caused by a malfunctioning device. An easy way to find and fix device problems is by using the dedicated troubleshooter that’s built into Windows 10.
Normally, you can track down this tool in Settings > Troubleshoot. But if Hardware and Devices troubleshooter is missing, you can run it with a simple command.
How to use Hardware and Devices troubleshooter:
- Click the Start menu, type Run, and open this app
- Type
msdt.exe-id DeviceDiagnosticand press Enter to launch the troubleshooter - Click Next to proceed to the next wizard step
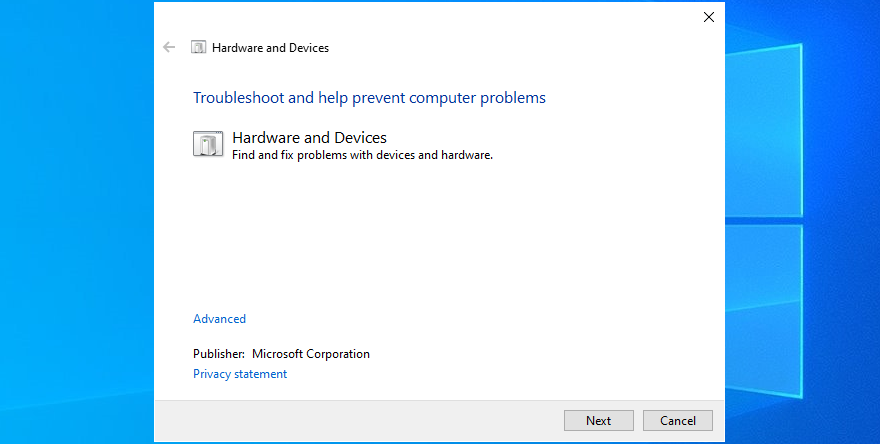
- Windows will start checking for hardware issues right away. If it finds any solutions, click Apply this fix
- Complete the wizard steps and restart your machine
- Check if you still have blue screen problems
17. Disable hardware acceleration
Hardware acceleration is a technique used by certain applications to improve your graphics experience by demanding more power from your hardware. However, if your computer is not powerful enough to handle hardware acceleration properly or if it’s overworked, you shouldn’t be surprised when you get BSOD errors like PAGE FAULT IN NONPAGED AREA.
To fix this problem, make sure to disable hardware acceleration in all your applications, especially when it comes to gaming launchers or emulators. Here’s how to make it happen in your web browser.
How to turn off hardware acceleration in Google Chrome:
- In Chrome, open the More menu on the top-right corner
- Go to Settings. Alternatively, enter the
chrome://settings/address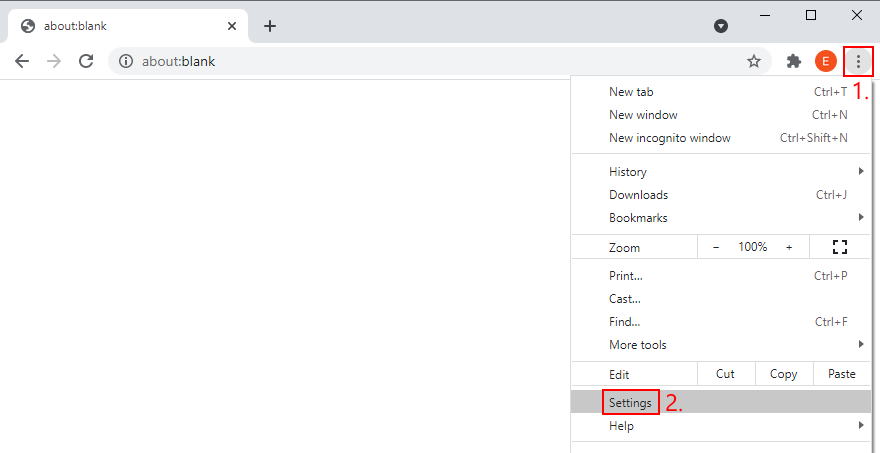
- Scroll down to the bottom of the screen and click Advanced to extend this section
- Switch off Use hardware acceleration when available
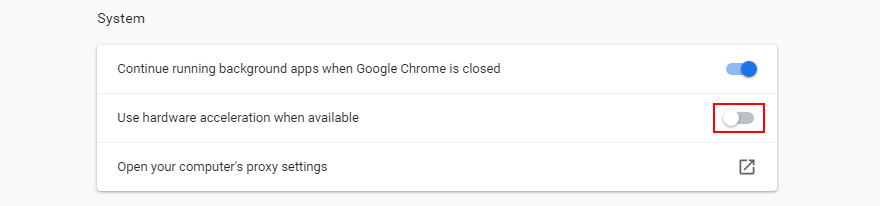
- Restart Chrome
How to deactivate hardware acceleration in Mozilla Firefox:
- In Firefox, open the ≡ menu from the upper-right corner
- Select Options. Or, you can visit the
about:preferencesaddress instead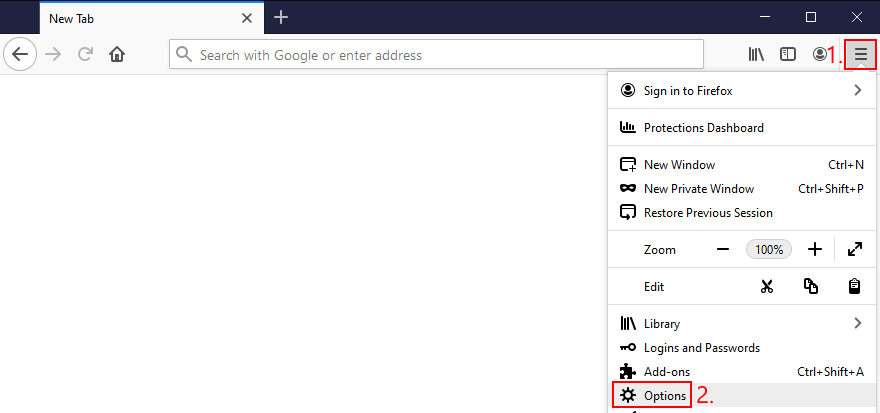
- In the General area, locate Performance
- Disable Use recommended performance settings and then Use hardware acceleration when available
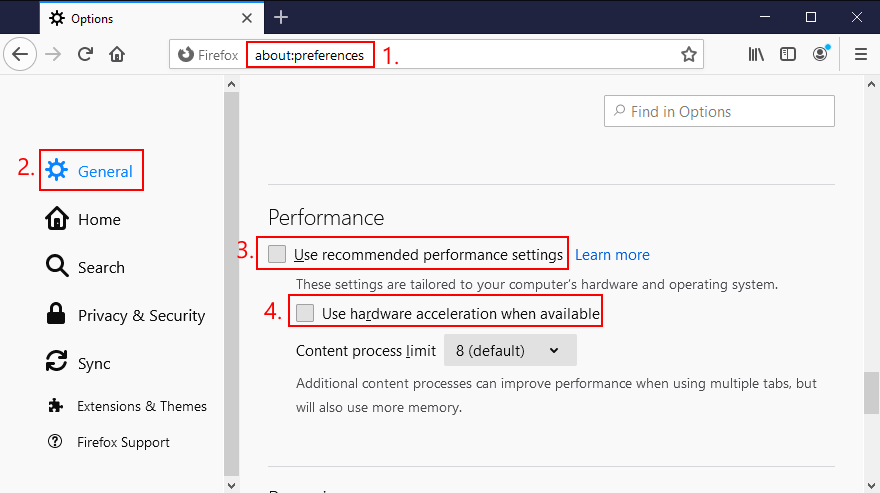
- Relaunch Firefox
How to disable hardware acceleration in Microsoft Edge:
- In Edge, open the More menu next to the address bar
- Select Settings
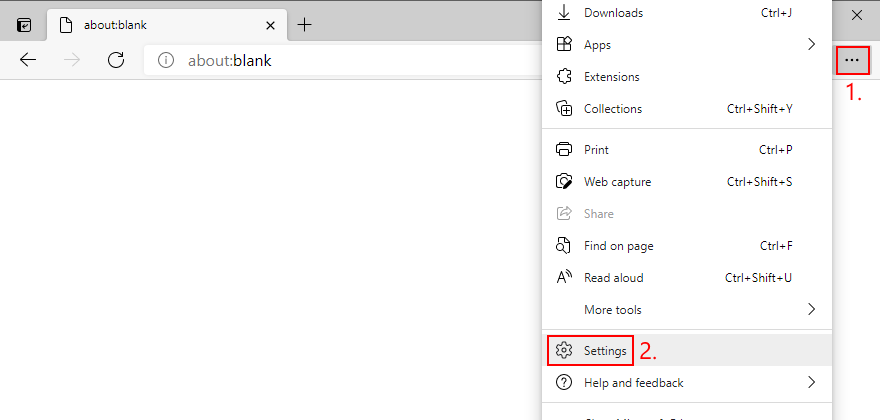
- Go to System (or, visit the
edge://settings/systemaddress) - Turn off Use hardware acceleration when available
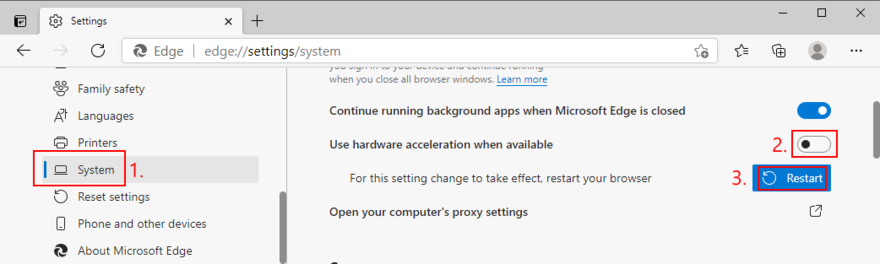
- Restart Edge
18. Roll back Windows
At this point, it might be a simpler idea to roll back Windows 10 to a restore point. However, this solution works only if System Restore is enabled on your computer and if you, your system or your applications have created a restore point before your PC started experiencing stability issues.
Before proceeding with System Restore, though, keep in mind that you will lose all applications installed beyond the restore point, so you will have to reinstall them afterward.
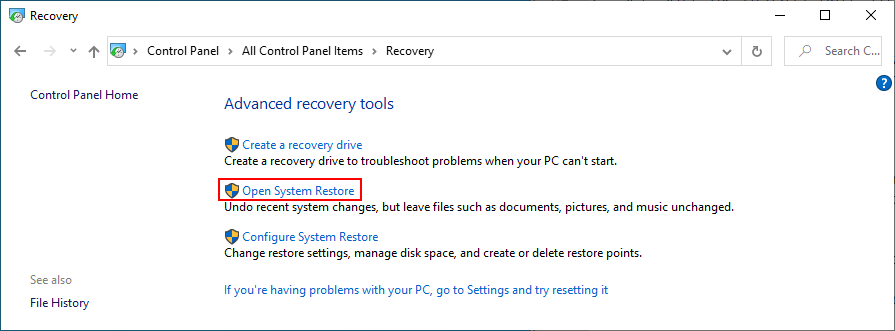
How to use System Restore:
- Sign in to Windows 10 using elevated rights
- Click the Start button, type Control Panel, and launch this tool
- Go to the Recovery section

- Click Open System Restore to open this area
- If necessary, select Show more restore points. You can also click Scan for affected programs to find out which applications you will have to reinstall
- Select a restore point and click Next
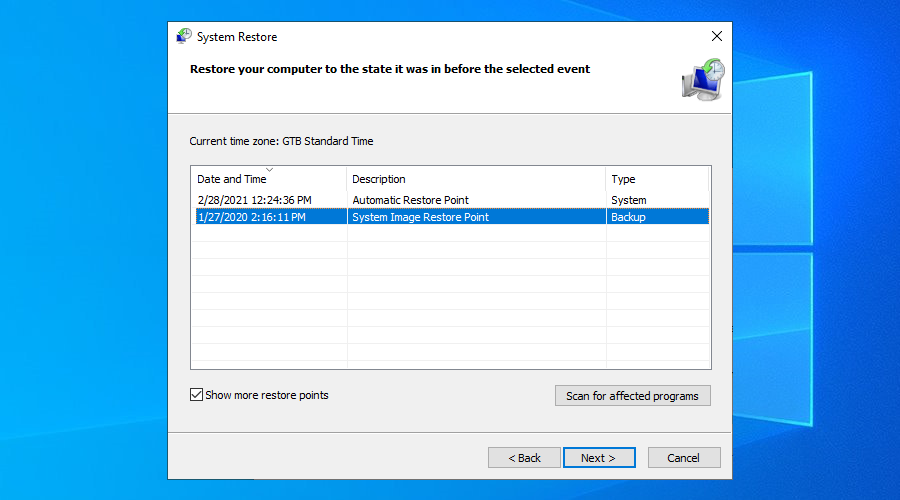
- Follow the wizard steps and complete system recovery. Windows will reboot
- Check if your system is still crashing and showing a blue screen
19. Find out more about the BSOD error
If you prefer getting in touch with tech support and asking for help in troubleshooting PAGE FAULT IN NONPAGED AREA, it’s a good idea to gather and share as many details as possible about the error. A handy tool for this job is Event Viewer, an internal Windows 10 tool.
How to use Event Viewer:
- Press Win key + R, type eventvwr.msc, and press Enter to open Event Viewer
- Go to Windows Logs > System on the left side
- Click the first entry in the list. You can find out more details about the BSOD error in the General and Details tab
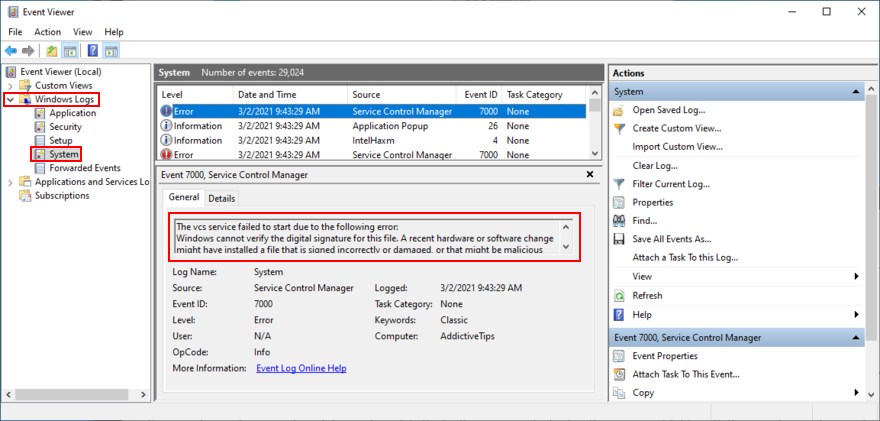
- Make sure to copy this text and paste it somewhere safe. You can also use it to look more information on the Internet
Casual users looking for a simpler way to access the event details created by this BSOD error can use BlueScreenView. It’s a third-party tool that you don’t need to install: just download and run. It’s lightweight, easy to use, and offers an intuitive interface for analyzing minidump (.dmp) files created by blue screen events.
20. Remove newly installed software
Some software applications don’t fully support Windows 10 or have settings that clash with the system configuration. So it’s a good idea to uninstall these incompatible programs and restore the stability of your PC.
For example, many users have reported that uninstalling uTorrent or Tencent Gaming Buddy fixed the PAGE FAULT IN NONPAGED AREA error. Pay special attention to any new and suspicious apps you installed, like free driver updaters, VPN services, proxy servers, torrenting clients, or gaming emulators.
How to uninstall recent software:
- Right-click the Start button and head over to Apps and Features
- Set Sort by to Install date (newest first)
- Select the first (newest) suspicious app in the list and click Uninstall
- Click Uninstall again to confirm. Proceed with the removal instructions
- Restart your computer and check if this fixed the system crash
- If not, remove the next suspicious programs in the list of newly installed software
If you prefer a better solution, we recommend checking out dedicated application removers. These are tools specialized in thoroughly uninstalling programs by getting rid of any leftover files and registry entries.
21. Unplug external devices
If you have recently attached an old or new device to your computer unit, like a USB flash drive, an external hard disk, a wireless adapter or a webcam, perhaps it’s causing stability issues with your computer.
Just unplug the device and see what happens when you boot Windows again. If you’re unsure, detach everything, aside from your mouse and keyboard. Then, start your operating system to confirm that you’re not getting blue screen errors anymore.
It’s also a good idea to change USB ports since any one of them could be malfunctioning. Moreover, you should check the cables and replace any damaged ones.
22. Fix the system registry
The Windows registry contains essential information about your operating system and how its software components interact with each other. If it has corrupt, missing or modified data, it’s no wonder that you keep seeing stop code PAGE FAULT IN NONPAGED AREA.
This usually happens after installing and uninstalling software programs from unknown sources, which are too invasive when it comes to the system registry. You can try using a registry cleaner to solve this issue but, if you don’t want to install third-party apps, here’s what you need to do.
How to repair the registry:
- Press Win key + R, type regedit, and press Enter to open Registry Editor
- Open the File menu and click Export
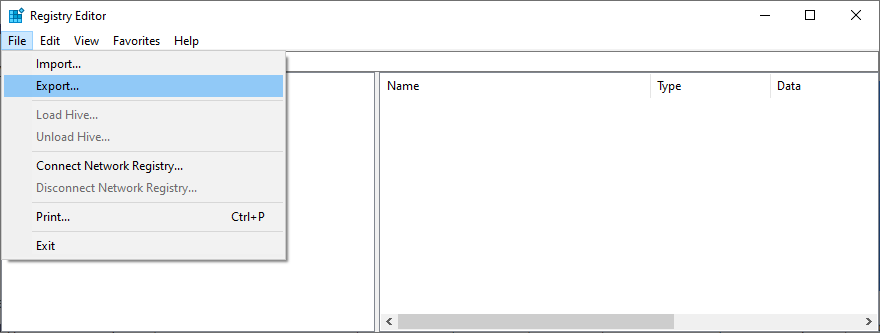
- Set a name and destination to save the registry backup file. Click Save
- Exit Registry Editor
- Press the Win key and open the power menu
- Hold down Shift and click Restart to reboot Windows in Advanced Startup mode
- Go to Troubleshoot > Advanced options > Command Prompt
- Type the following commands and make sure to press Enter after each one:
-
cd c:\Windows\System32\config
-
ren c:\Windows\System32\config\DEFAULT DEFAULT.old
-
ren c:\Windows\System32\config\SAM SAM.old
-
ren c:\Windows\System32\config\SECURITY SECURITY.old
-
ren c:\Windows\System32\config\SOFTWARE SOFTWARE.old
-
ren c:\Windows\System32\config\SYSTEM SYSTEM.old
-
copy c:\Windows\System32\config\RegBack\DEFAULT c:\Windows\System32\config\
-
copy c:\Windows\System32\config\RegBack\DEFAULT c:\Windows\System32\config\
-
copy c:\Windows\System32\config\RegBack\SAM c:\Windows\System32\config\
-
copy c:\Windows\System32\config\RegBack\SECURITY c:\Windows\System32\config\
-
copy c:\Windows\System32\config\RegBack\SYSTEM c:\Windows\System32\config\
-
copy c:\Windows\System32\config\RegBack\SOFTWARE c:\Windows\System32\config\
-
- Exit Command Prompt and boot to Windows
- Check for BSOD errors
23. Check the Windows page file
The Windows page file (also known as the swap file) is in charge of your system’s virtual memory size. It’s useful when your OS moves data from RAM to the virtual memory size when the memory is full, in order to prevent data loss and corruption.
Normally, the swap file doesn’t pose a problem for modern computers with plenty of RAM. However, even if you have enough memory, the page file shouldn’t be left disabled or to a low value.
Otherwise, your computer might crash when it gets too busy trying to run multiple applications at the same time. As a result, it shows a blue screen and the PAGE FAULT IN NONPAGED AREA stop code due to incorrect page file settings.
In this case, you should change the virtual memory size on Windows 10:
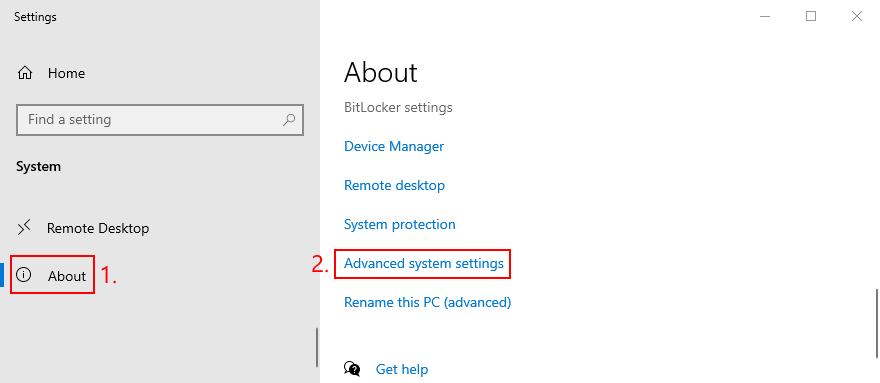
- Right-click the Start button and go to System
- Jump to the About section
- Click Advanced system settings
- At Performance, click Settings

- Switch to the Advanced tab
- At Virtual memory, check if Total paging file size for all drives is larger than 0 MB. If it is, you can skip this entire solution. Otherwise, click Change

- Disable Automatically manage paging file size for all drives
- Select the partition that contains Windows
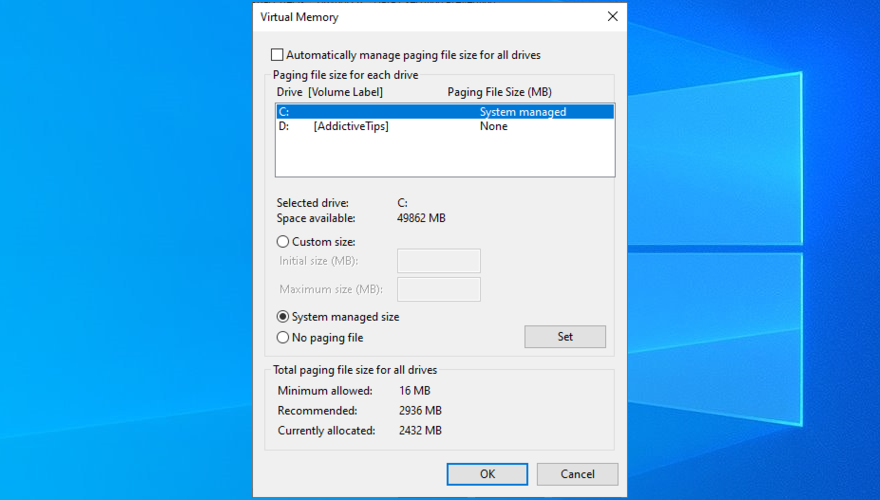
- You have two options here
- Select System managed size to allow Windows to dynamically set the page file size by adapting to the system settings (recommended for most users, especially on Windows 10)
- Or, select Custom size in order to fill it out on your own (for experts)
- Click OK and exit
- Restart your computer and check for errors
24. Disable Fast Startup
Windows 10 has a special feature called Fast Startup, which speeds up the boot process by not terminating all processes and services at shutdown. Although it has its obvious benefits, Fast Startup is sometimes guilty for blue screen errors like FAULT IN NONPAGED AREA.
But you can disable Fast Startup on Windows 10:
- Log in to your operating system using an admin account
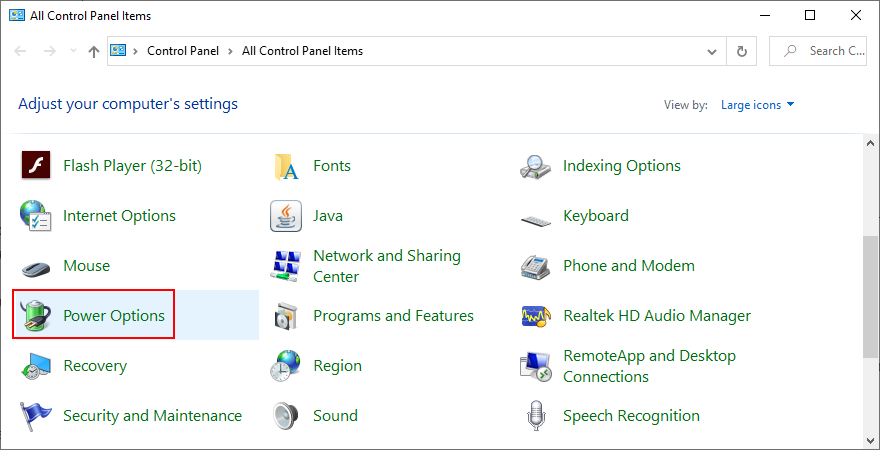
- Click the Start button, search for Control Panel, and launch this app
- Go to Power Options
- Click Choose what the power buttons do
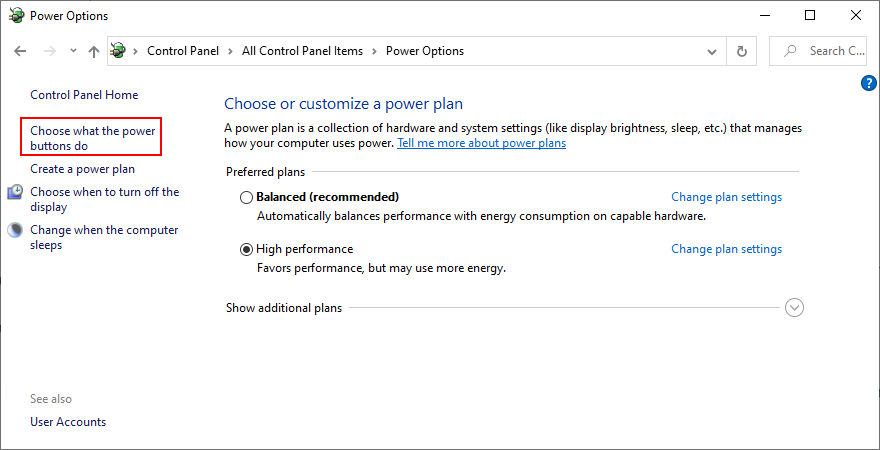
- Click Change settings that are currently unavailable
- Uncheck Turn on fast startup and click Save changes
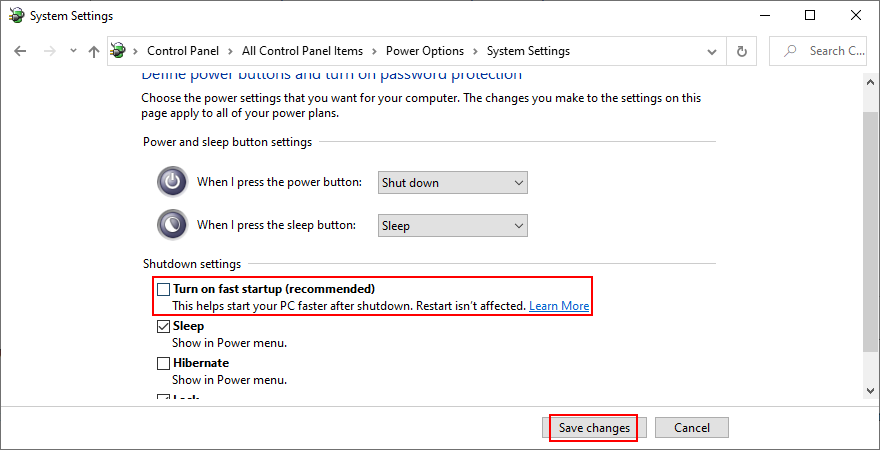
- Exit and restart your PC
- Check if your computer still crashes
25. Change your monitor refresh rate
You might be underclocking or overclocking your monitor without even realizing it. As unconformable as it may be for the eyesight, incorrect refresh rate settings could send your computer into a spiral due to fatal graphics errors.
To fix it, just modify the monitor’s refresh rate on Windows 10:
- Right-click an empty spot on the desktop to open the context menu
- Go to Display settings

- Scroll down to the end of the page and click Advanced display settings
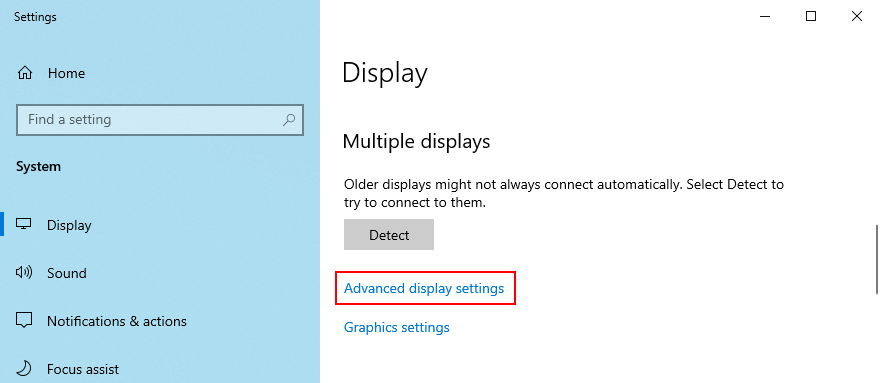
- If you have two or more displays, select the primary one
- Open the Refresh rate menu and pick another value. It’s usually recommended to go lower, but you can test more possibilities
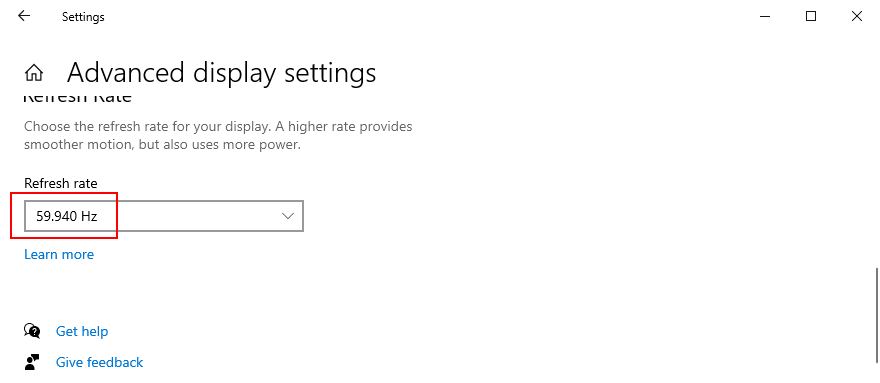
- Check if you are comfortable with the new settings. If so, click Keep changes. Otherwise, select Revert and then pick another refresh rate
- Once you find the right setting, restart your PC and check for additional system crashes
26. Disable overclocking
Gamers prefer overclocking software solutions to amp up their computer settings and enhance their gaming experience, particularly when the PC doesn’t meet the game’s minimum system requirements. But it’s not usually a good idea for your PC’s health.
If you’re using a dedicated tool for overclocking your RAM and speeding up your PC, disable that setting since it could be the reason why your computer freezes and shows the PAGE FAULT IN NONPAGED AREA (it’s directly tied to the RAM).
You might have to take one step further and uninstall the overclocking tool from your PC. However, if the overclocking setting was configured in BIOS, skip this step and check out the next solution.
27. Reset BIOS
If you configured BIOS settings, such as overclocking or caching, maybe you made a wrong move that triggered system crashes. It’s not necessary to identify and repair the exact BIOS settings since you can reset the entire BIOS configuration to default. Here’s how:
- Restart Windows
- Before system boot, press the key shown for accessing BIOS setup mode
- Go to the advanced section
- Locate and enable the setting that restores BIOS to default

- Quit to Windows
- Check system crashes
28. Update BIOS
If the PAGE FAULT IN NONPAGED AREA stop code wasn’t resolved in the previous solution, you should update BIOS to the latest version if you have never done this. In addition to improving the BIOS, you might also get access to new options.
How to update BIOS:
- Find an empty pen drive and plug it into your PC
- On the Windows desktop, click the Start button, type System Information, and launch this app
- Select the System Summary section
- Check out the information shown at BIOS Version/Date and BaseBoard Manufacturer
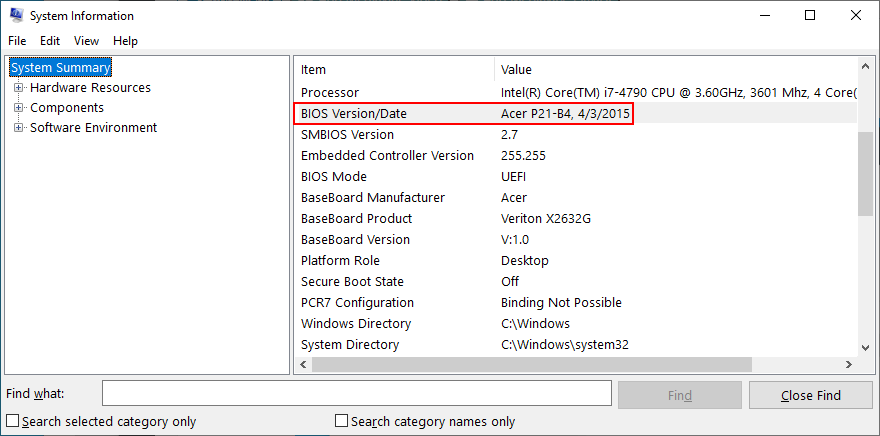
- Visit the official website of your BIOS manufacturer to find and download a newer BIOS version
- Unzip the downloaded file the USB flash drive
- Restart your computer and enter BIOS mode
- Create a backup of the current BIOS version and save it to the pen drive
- Begin the BIOS update. It may take a while
29. Reset Windows 10
The last resort is resetting Windows 10 to factory mode. You don’t have to back up your personal files since they will be left untouched. But your entire set of games and applications installed on the Windows drive will be gone, so you will have to reinstall everything from scratch.
How to reset Windows 10:
- Press the Win key, type Reset this PC, and hit Enter
- Click Get started
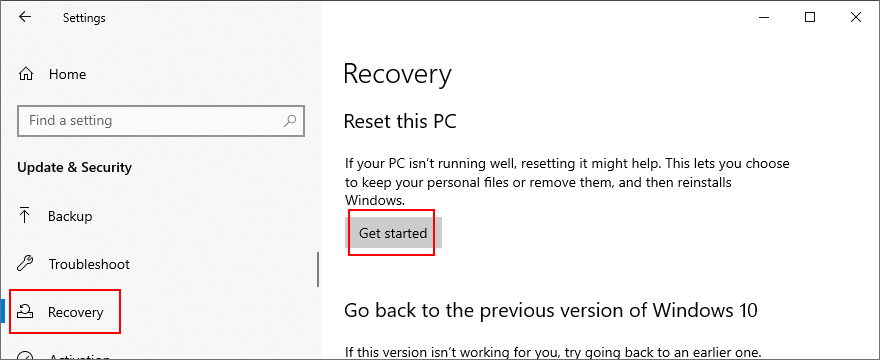
- Select Keep my files

- Follow the instructions
- After PC restart, configure the initial Windows settings
CONCLUSION: Stop code PAGE FAULT IN NONPAGED AREA can be fixed
To review, PAGE FAULT IN NONPAGED AREA is a blue screen error that tells you about a critical system file which can’t be found by Windows in the system memory. Your computer shuts down in an effort to prevent major data loss.
There are multiple approaches toward fixing this issue, but you should start with something as simple as hard-rebooting your PC and running Windows Update. Next, you can repair hard disk errors and corrupt system files, check your device drivers, run a malware scan, and clean boot Windows 10 or start it in Safe Mode.
It’s also a good idea to reinstall your drivers using Display Driver Uninstaller. Plus, you can repair and reinstall.NET Framework, check your memory using Windows Memory Diagnostic, remove and reseat the memory slots, temporarily disable your antivirus and firewall, check the storage space, and run Hardware and Devices troubleshooter.
Furthermore, you can disable hardware acceleration, roll back Windows, use Event Viewer, uninstall recent software, unplug external devices, fix the system registry, check the Windows page file, disable Fast Startup, change your monitor refresh rate, turn off overclocking, reset and update BIOS, or reset Windows 10.
How did you manage to get rid of the PAGE FAULT IN NONPAGED AREA stop code on your computer? Let us know in the comments below.