AirPods zijn klein, maar ze bevatten veel innovatie en kunnen verschillende dingen doen waarvan u zich misschien niet bewust bent. Om je te helpen er het maximale uit te halen, heb ik de 35 beste AirPods-tips en-trucs op een rij gezet om je ervaring te verbeteren. Sommige hiervan ken je misschien al, terwijl een paar die in iOS 15 zijn toegevoegd misschien nieuw zijn. Dus kijk tot het einde.
Opmerking: de meeste tips hier zijn van toepassing op AirPods 1e generatie, 2e generatie en AirPods Pro, tenzij anders vermeld.
Coole tips en trucs voor AirPods in iOS 15
1. Conversation Boost
Als jij, je ouders, grootouders of vrienden lichte gehoorproblemen hebben, kan de nieuw geïntroduceerde functie Conversation Boost hen helpen om beter te horen tijdens alledaagse gesprekken.
Als je praat met iemand en de AirPods Pro in uw oor zitten, nemen hun straalvormende microfoons de stem van de andere persoon op en isoleren deze voor duidelijkheid wanneer u zich in een lawaaierige omgeving bevindt. Versterk het dus zodat u duidelijk hoort.


Als je Conversation Boost wilt gebruiken, breng je de iPhone Control Center en lang indrukken de volumeschuifregelaar. Je kunt Conversation Boost inschakelen en het omgevingsgeluid instellen, de toon en de links-rechts balans aanpassen.
2. Kondig elke app-melding in je oren aan
Vroeger kon je meldingen krijgen van de Berichten-app aangekondigd terwijl je AirPods draagt. Met iOS 15 worden standaard alleen tijdgevoelige meldingen zoals die van Agenda of Herinnering aangekondigd. Maar je kunt het voor elke gewenste app inschakelen.
Hier leest u hoe u elke iOS 15 iPhone-app meldingen in uw AirPods kunt laten aankondigen.
- Open Instellingen
strong> en tik op Meldingen.
- Tik op Meldingen aankondigen.
- Tik in de lijst met apps op de gewenste app. Bijvoorbeeld Basecamp.
- Schakel Meldingen aankondigen in.
3. Kondig herinneringen aan met Siri op AirPods
Dit is slechts een uitbreiding van de bovenstaande functie. Stel dat u een locatiegebaseerde boodschappenlijstherinnering met meerdere vermeldingen. Als je in de supermarkt bent, leest Siri je boodschappenlijstje in je oren. Handig? Juist!
4. Zoek mijn voor AirPods
Nu kunnen uw AirPods Pro en AirPods Max het Zoek mijn-netwerk gebruiken. Hierdoor kun je ze vinden, zelfs als je ze hebt achtergelaten of kwijt bent geraakt op een verre plaats die het Bluetooth-bereik van je iPhone overschrijdt.
Vind mijn netwerk is een crowdsourced netwerk van miljoenen Apple-apparaten zoals iPhones, iPads, Macs, enz.., waarmee u Apple-apparaten kunt vinden, zelfs als ze offline en zelfs uitgeschakeld zijn! Je kunt hier meer informatie over vinden.
Tip: met de functie Scheidingswaarschuwing zal uw iPhone u waarschuwen als u uw AirPods achterlaat. Als u bijvoorbeeld het restaurant verlaat en uw AirPods op de salontafel laat staan.
5. Ruimtelijke audio met dynamische head-tracking
Momenteel kun je genieten van duizenden Apple Music-nummers in Dolby Atmos. We hebben een speciale gids die u laat zien hoe u moet dat op iPhone, iPad, Mac en Apple TV.
Later dit jaar (rond september) introduceert Apple ruimtelijke audio met dynamische head-tracking voor AirPods Pro en AirPods Max. Dit geeft je een nog meeslepende ervaring, aangezien het geluid zich dynamisch aanpast aan de bewegingen van je hoofd.
Basic AirPods-tips en trucs
6. Koppel AirPods met Apple Watch, iPad, Mac, Apple TV, Windows-pc en Android-telefoon
Apple wil de muren misschien graag gesloten houden voor verschillende dingen, zoals iMessage. Maar als het gaat om AirPods, Apple Music of Apple TV, hebben ze een liberale benadering.
Je kunt je AirPods gemakkelijk koppelen met bijna elke laptop, computer of telefoon, zolang deze Bluetooth ondersteunt. We hebben een aparte handleiding die u hoe u uw AirPods aansluit op Apple-of niet-Apple-apparaten.
We hebben zelfs een handleiding waarin u hoe AirPods te verbinden met PS4 en Xbox One Controller!
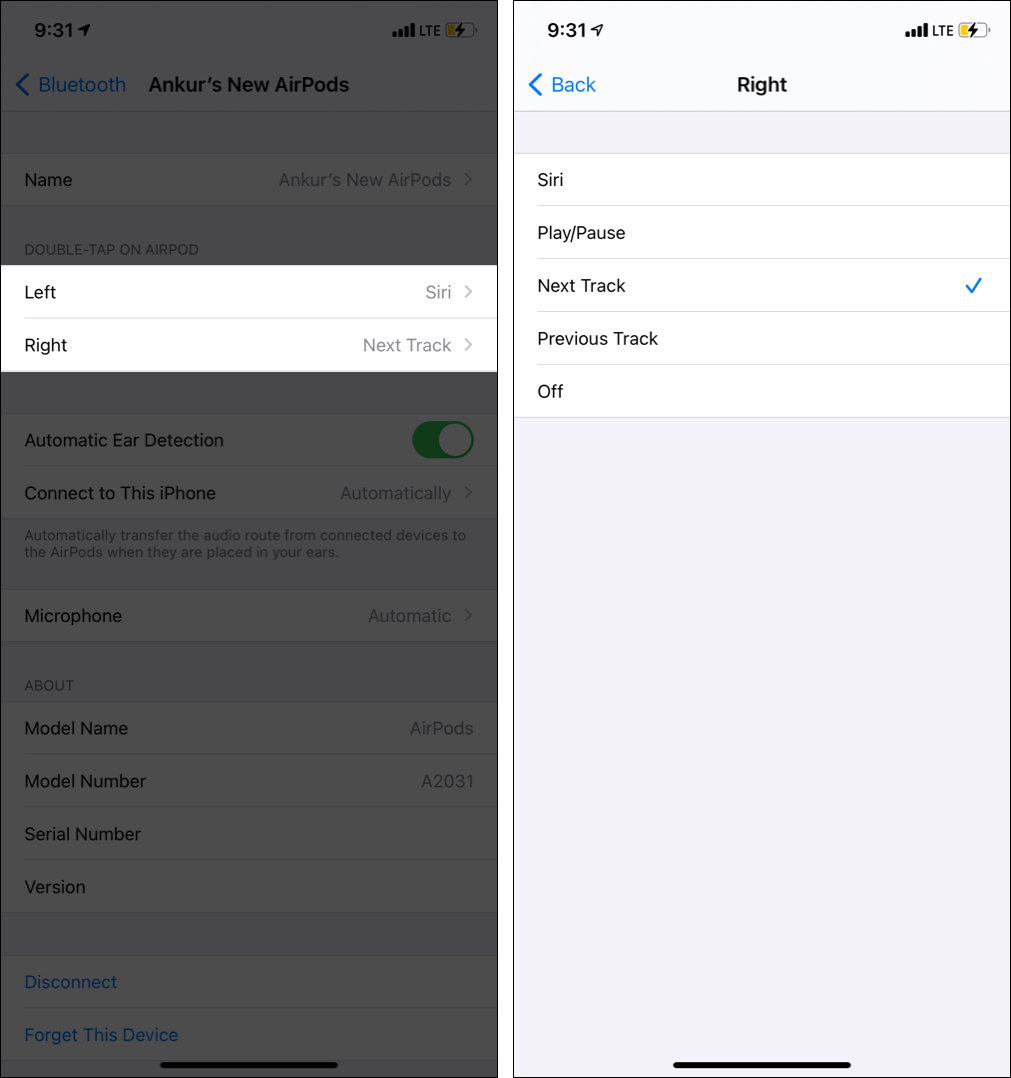
7. Pas de tikopdrachten van elke AirPod aan
Elke AirPod (eerste en tweede generatie) kan een reeks acties uitvoeren, zoals Siri bellen, van nummer veranderen of afspelen/pauzeren wanneer u dubbeltikt op het bovenste gedeelte van de AirPod. Als u AirPods Pro gebruikt, kunt u hetzelfde doen door op de stick te drukken.
Om aangepaste acties toe te wijzen aan elke AirPod, sluit u deze aan op uw iPhone of iPad en volgt u de onderstaande stappen.
- Open Instellingen en tik op Bluetooth.
- Tik op (i) naast de AirPods-naam.
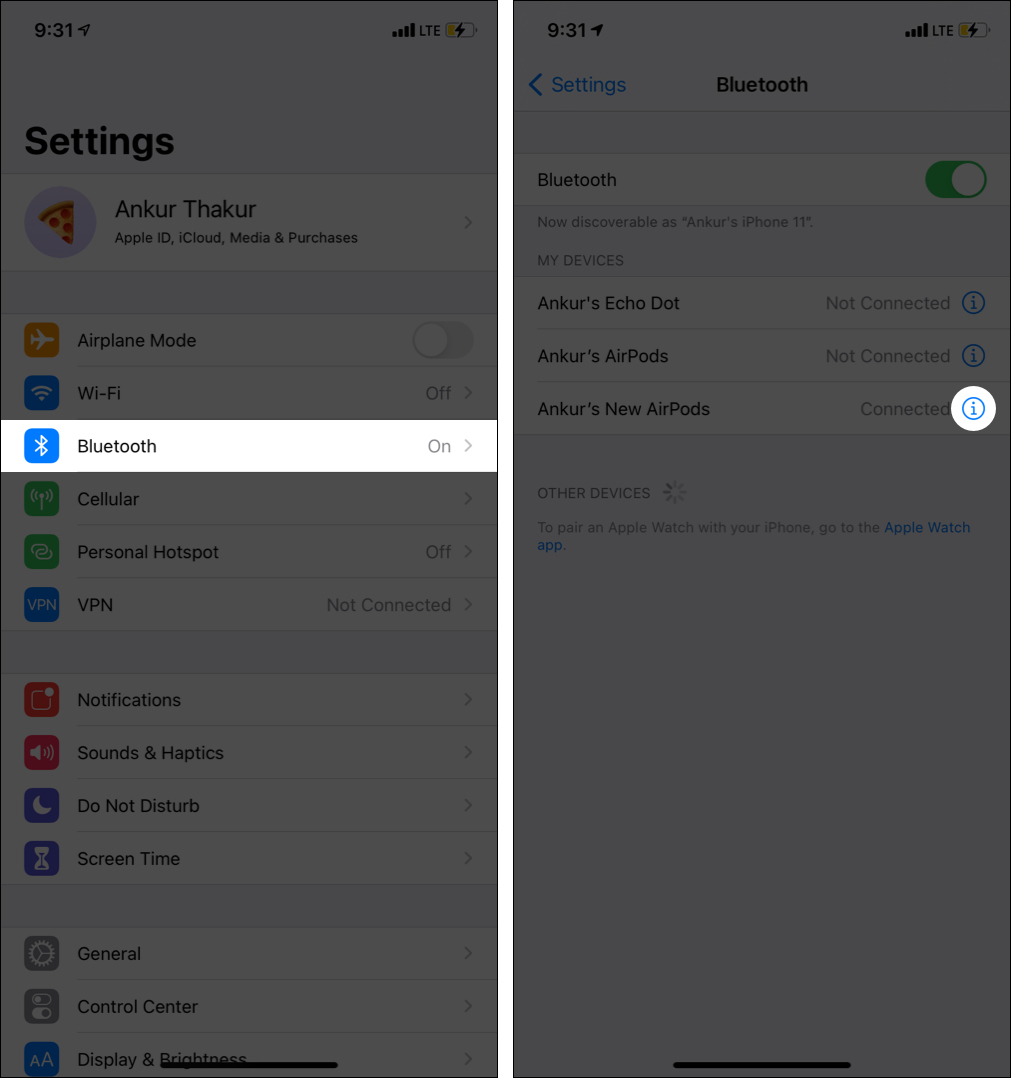
- Tik op Links of Rechts en kies voor beide de gewenste acties. Ik heb links dubbeltikken ingesteld om Siri te bellen en rechts dubbeltikken om het volgende nummer af te spelen.

8. Siri gebruiken op AirPods
Siri is de almachtige stemassistent op alle Apple-apparaten, en AirPods vormen daarop geen uitzondering. Je kunt Siri (uiteraard van het gekoppelde apparaat-iPhone, iPad, Mac) gebruiken via je AirPods. Dubbeltik hiervoor en houd de AirPods Pro-stick ingedrukt of zeg ‘Hey Siri.’ Zodra je de Siri-toon hoort, geef je deze een commando.
9. Het volume wijzigen met AirPods
In tegenstelling tot AirPods Max is er geen gemakkelijke manier om het volume te verhogen of te verlagen met normale AirPods. Maar je kunt Siri oproepen en hem vragen’volume in te stellen op 50%‘of iets dergelijks.
10. Kies tussen linker-of rechtermicrofoon
Standaard wordt de microfoon (bij oproepen of Siri) automatisch tussen de twee pods geschakeld. U kunt echter instellen dat u de microfoon van elke kant wilt gebruiken.
- Tik in iPhone Instellingen op Bluetooth.
- Tik op (i) naast AirPods-naam.
- Tik op Microfoon en kies de gewenste optie.

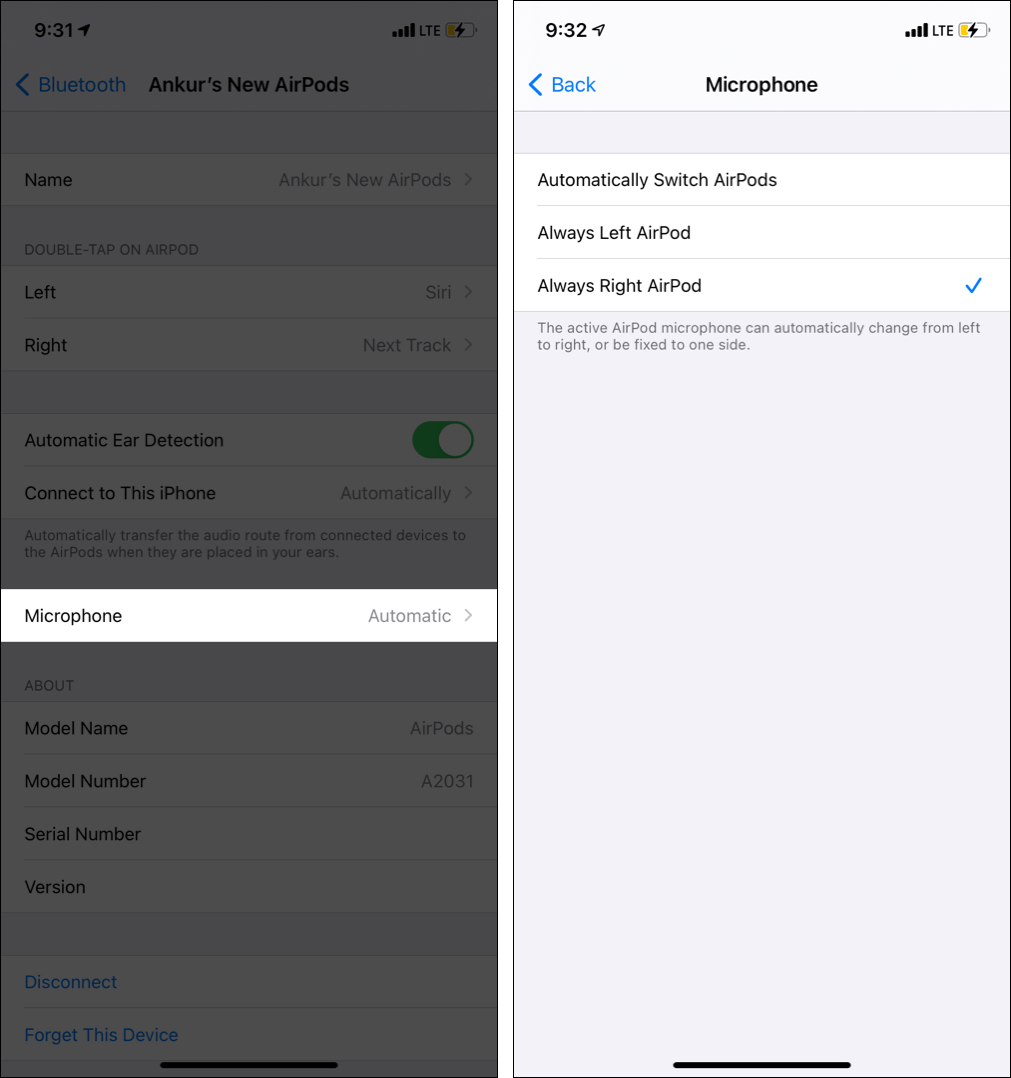
Opmerking: stel dat u de linker AirPods als microfoon instelt. Zelfs als het uit het oor of in de oplaadcassette zit, is het de toegewezen microfoon. Het is dus mogelijk dat u de microfoon niet kunt gebruiken als u de rechter AirPod gebruikt en de linker in de hoes.
11. Gebruik AirPods als externe microfoon met Live Listen
Als je een AirPods 2e generatie of de Pro-versie hebt, verandert de functie Live Listen je iPhone in een microfoon en fungeren de AirPods in je oor als luidspreker. Hierdoor kun je het gesprek duidelijk horen op een drukke plaats.
Je kunt het zelfs gebruiken als een sluipend apparaat; plaats de iPhone gewoon op een bureau en als u zich binnen het Bluetooth-bereik bevindt, kunt u het gesprek daarheen horen via uw AirPods. Ga naar ons artikel over hoe te gebruiken Live luisteren voor een beter begrip.
12. Deel telefoongesprekken met iemand anders
Er is slechts één AirPod-microfoon tegelijk in actie. Maar als je wilt, kun je de ene AirPod aan iemand bij jou in de buurt geven terwijl de andere in je oor blijft. Hierdoor kunnen beiden de andere persoon horen praten. Vrij eenvoudig, maar het onthouden waard.
13. Wat je Apple AirPods-lampjes zeggen
Misschien heb je een klein statuslampje gezien wanneer je de AirPods-oplaadcassette opent. Als uw case draadloos opladen ondersteunt, bevindt dit lampje zich aan de buitenkant van de case.
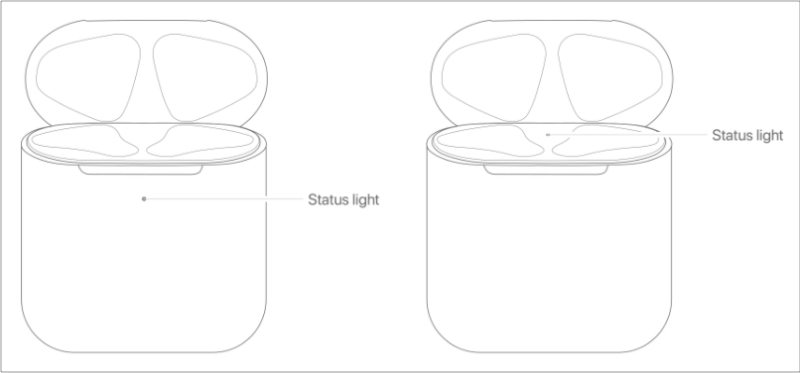
Soms is het wit, soms groen of oranje/oranje, en soms is het knipperen. Dit is wat de verschillende AirPods-lampjes betekenen.
- Groen lampje wanneer AirPods in de hoes zitten en het oplaaddeksel open is: betekent dat de AirPods volledig zijn opgeladen.
- Groen lampje wanneer AirPods niet in de case zitten en het oplaaddeksel open is: betekent dat de oplaadcase volledig is opgeladen.
- Oranje licht wanneer AirPods in de hoes zitten en het oplaaddeksel open: betekent dat de AirPods minder dan één keer volledig zijn opgeladen.
- Amberkleurig lampje wanneer AirPods niet in de hoes zitten en wordt opgeladen deksel is open: betekent dat de oplaadcassette minder dan één keer volledig is opgeladen.
- Wit knipperend lampje: betekent koppelingsmodus.
- Amber knipperend lampje : betekent dat je je AirPods opnieuw moet instellen.
- Geen licht: betekent dat er geen batterij meer is.
14. Audio delen met twee AirPods
Je kunt audio delen met iemand in de buurt. Hierdoor kun je allebei naar hetzelfde nummer luisteren dat op je iPhone wordt afgespeeld. Je kunt audio delen als je een iPhone 8 of nieuwer, nieuwere iPads en Apple TV 4K met tvOS 14 hebt.
De lijst met ondersteunde headsets is:
- AirPods Max
- AirPods Pro
- AirPods 1e en 2e generatie
- Powerbeats
- Solo Pro
- Powerbeats Pro
- Powerbeats3 Draadloos
- Beats Solo3 Draadloos
- Beats Studio3 Draadloos
- BeatsX
- Beats Flex
Als je aan de bovenstaande voorwaarden voldoet, ga dan naar dit bericht en leer hoe je audio kunt delen met je iPhone.
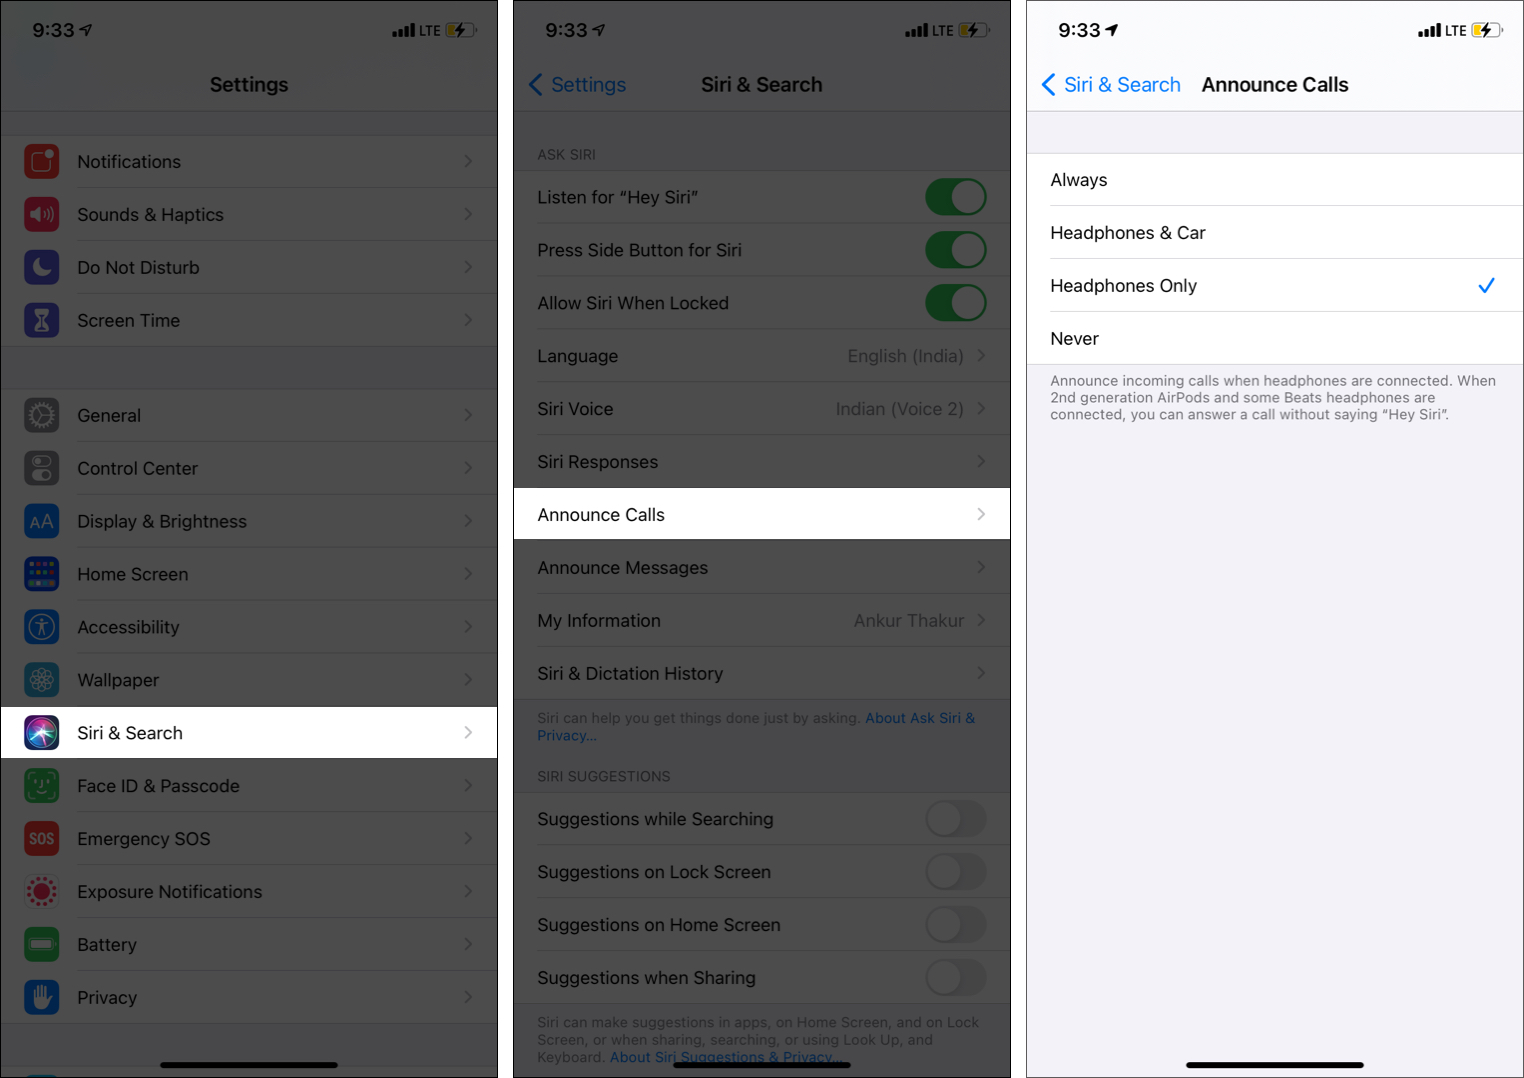
15. Laat Siri de naam van de beller aankondigen
Als je wordt gebeld, kan Siri je de naam van de beller in je oor vertellen. Dit werkt met alle Bluetooth-apparaten, inclusief AirPods. Zo werkt het.
- Open iPhone Instellingen en tik op Siri en zoeken (of Telefoon of FaceTime ).
- Tik op Oproepen aankondigen en selecteer Alleen hoofdtelefoon.
16. Berichten aankondigen via Siri
Met AirPods 2e generatie, AirPod Pro en sommige Beats-koptelefoons kan Siri berichten voorlezen zonder de iPhone te hoeven ontgrendelen.
Na het lezen van het bericht kan Siri zal luisteren en u kunt een antwoord dicteren. U hoeft niet’Hé Siri, antwoord‘te zeggen. U kunt gewoon spreken en Siri zal begrijpen dat u het bericht beantwoordt dat het voor u heeft voorgelezen.
- Tik in iPhone Instellingen op Siri en zoeken (of Meldingen).
- Tik op Berichten aankondigen en schakel het in.
- Kies de app (als je ziet). Voor Berichten kun je er verder voor kiezen om aan te kondigen voor iedereen, contacten, recente berichten of alleen favorieten.

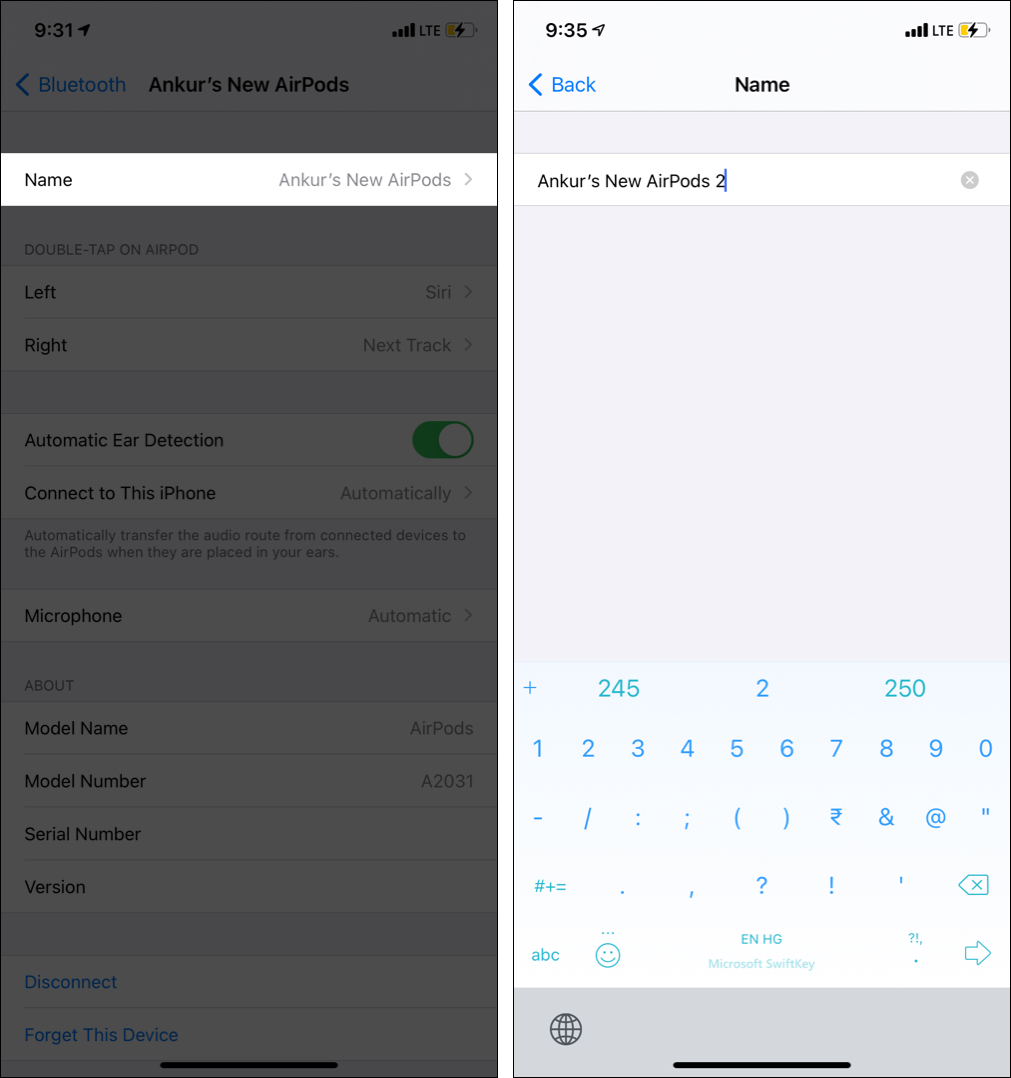
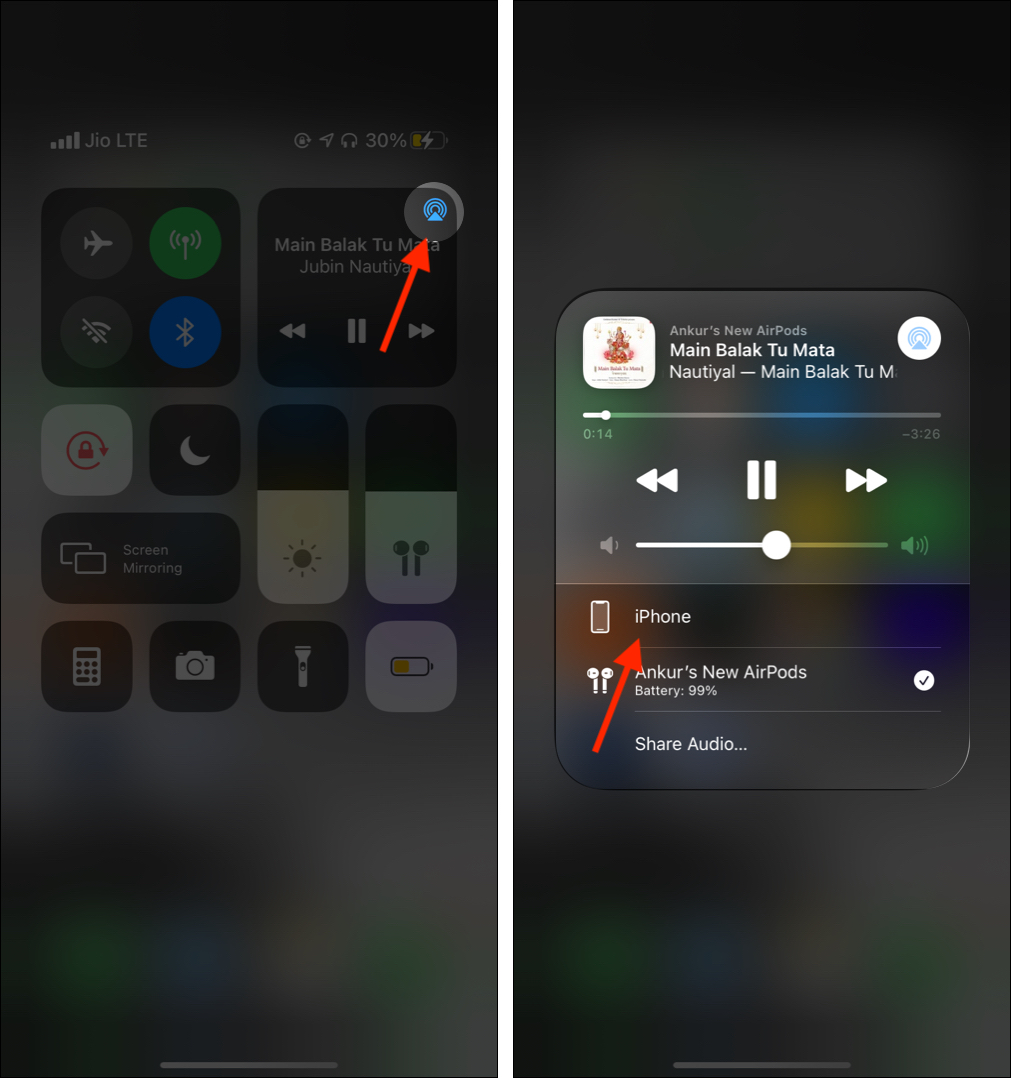
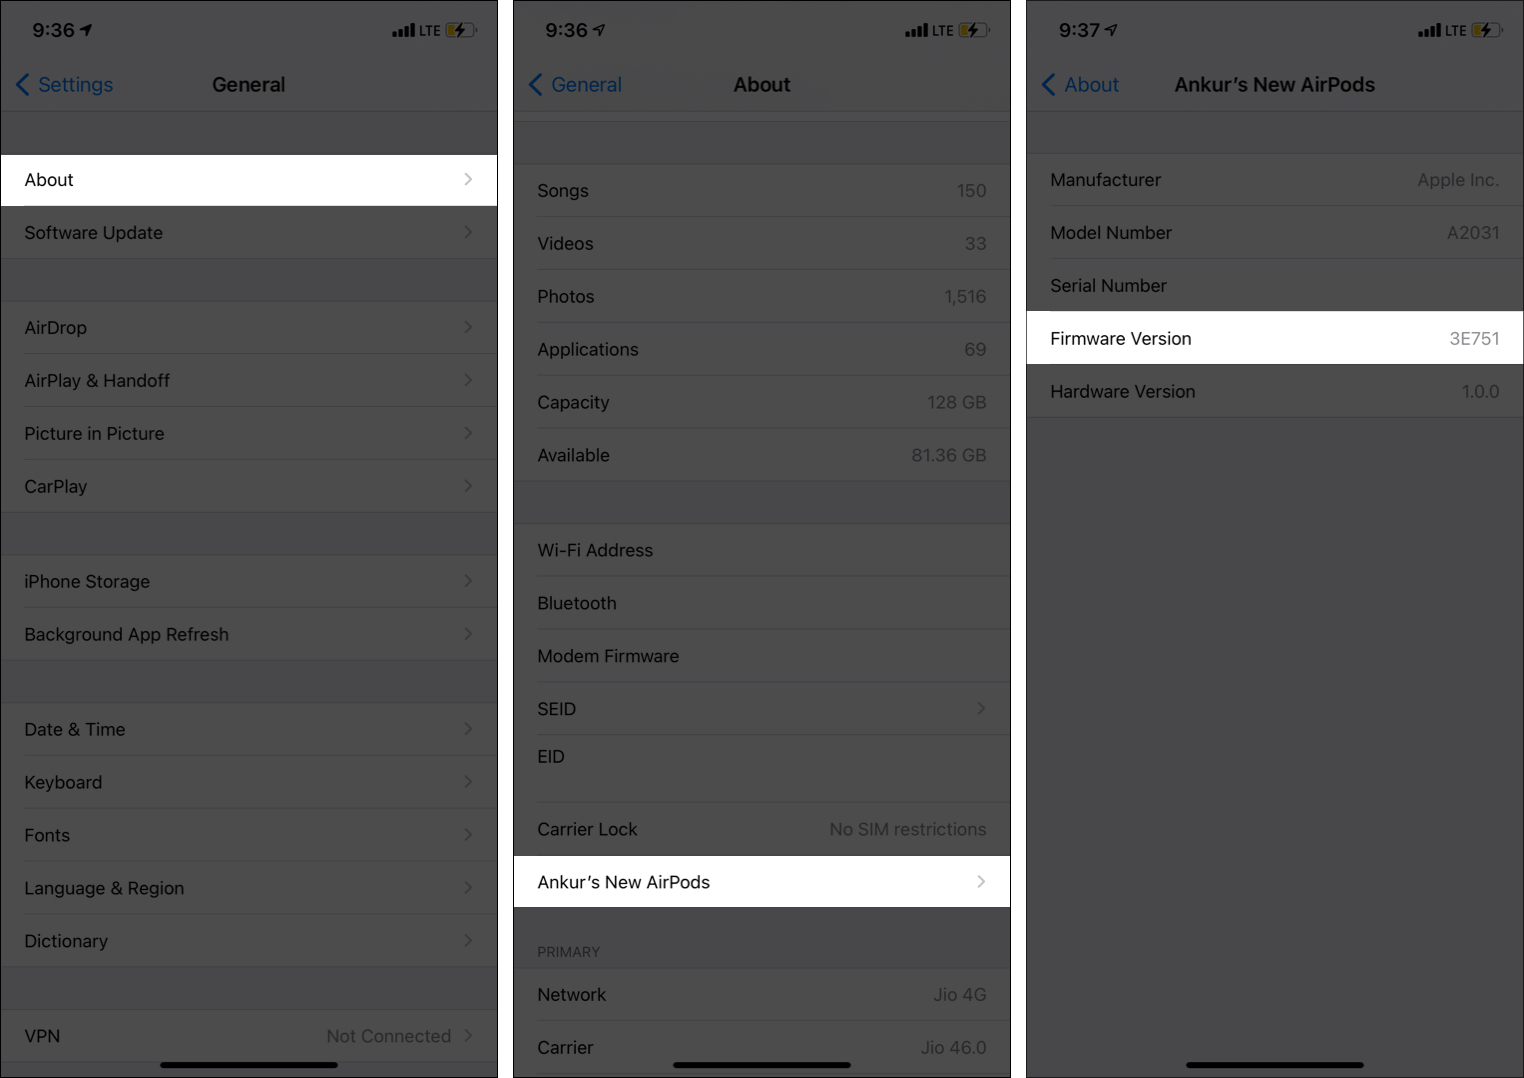
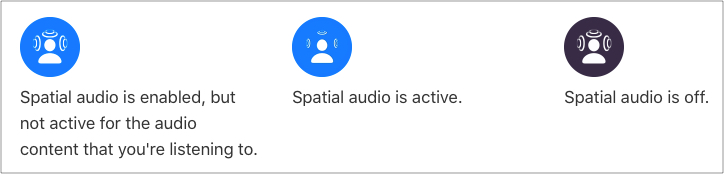
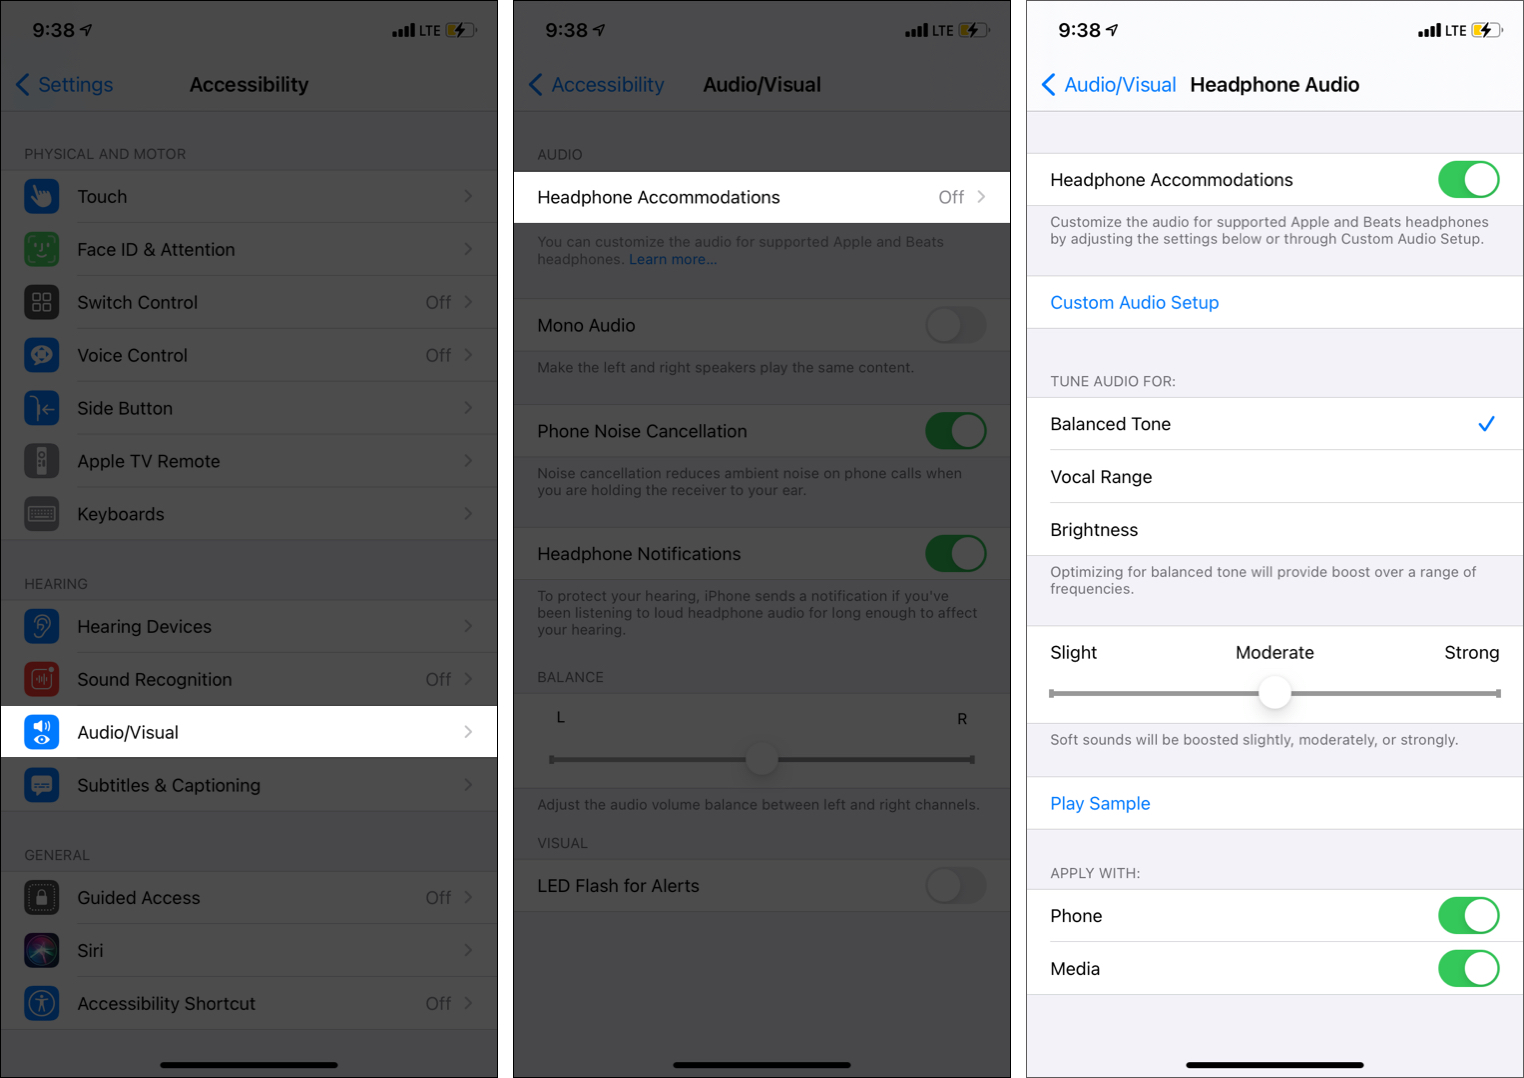
Dit is een zeer nuttige AirPods-oordop. Automatische oordetectie is standaard ingeschakeld. Dit betekent dat wanneer je de AirPods uit je oor haalt, de muziek pauzeert. Wanneer u het weer terugplaatst, wordt het hervat. Deze handige functie spaart ook de batterij. Maar als je wordt gestoord door de automatische pauze van muziek en video’s telkens wanneer je een pod uit je oor haalt om iemand te horen praten, kun je deze uitschakelen. Wilt u een leuke, aangepaste naam geven aan uw draadloze knop? Het is gemakkelijk. Audio plays via the AirPods, but you can change it to some other device like HomePod or the device’s internal speaker. Here’s how to do that. The AirPods charging case can juice up the tiny pods multiple times. Here’s how you can check the battery status of the case and the AirPods using the iPhone, Mac, or Apple Watch. I have been using the AirPods (1st and 2nd gen) for the last three years. And every time, I have noticed that both the pods do not discharge at the same rate. For example, sometimes, the left AirPod has a 34% charge while the right one has less than 10%. If you, too, have noticed this, you can continue using one of the AirPods while putting the other in the charging case. You may use this trick of using one AirPod at a time to get more listening time out of the charging case. Find My makes it possible to locate your misplaced or lost AirPods. You can play a sound or get directions to the location it was last connected to your device. I recently wrote a dedicated post that shows you how to find lost AirPods. Take a look. If you are like me, you may be taking extra steps to keep the AirPods and their case clean. But still, you might see dirt and wax accumulated in the AirPods grills and inside the lid. We have a dedicated post to help you keep your AirPods clean. You can check the firmware version by following the steps below. Tip: You may even follow these steps to ensure your AirPods have the latest firmware. If you face problems/difficulties using the AirPods, resetting it may help. This will disconnect them from the paired devices, and you will have to pair them again. You can learn how to reset your AirPods. You might be using an excellent case for your iPhone, a screen protector, and some other helpful accessories. Similarly, you can customize your AirPods with ear hooks, a cover for the charging case, strap, etc. Here are some posts that might help you find the right accessory. Spatial Audio on AirPods Pro and AirPods Max let you enjoy a theater-like sound that elevates your video experience. It gives you a feeling that the sound is coming from various directions. Here’s how to use it if you have iPhone 7 or later or a new iPad running iOS 14 or iPadOS 14. The video content, too, must be from a supported app (and Dolby Atmos 5.1 or 7.1 audio supported) Tip: You can control and see the status of Spatial Audio from the Control Center. For this, touch and hold the Volume slider. You will see one of the following icons. Constant sounds above 80db can potentially harm your listening abilities. Thus, you must also keep your headphone level in control. iOS 14 with AirPods and some Beats headphones can now show you real-time headphone audio levels on your iPhone. If you often play media on high volume, take a minute to learn more about this safety feature and see how to use it. If you have difficulty hearing low sounds, Headphone Accommodations in iOS 14 and iPadOS 14 help you by amplifying soft sounds and specific frequencies, making them easier to hear. It works with the following headphones. Next, here is how to set up Headphone Accommodations: You can use the Control Center to turn on ANC effortlessly. For this, press and hold the volume slider and choose Noise Cancellation. You can use Transparency mode via the same steps. Tip: One of the coolest things about AirPods Pro is that you can choose to enable noise cancellation even for one AirPod Pro. Open iPhone or iPad Settings → Accessibility → AirPods. Now, toggle on Noise Cancellation on One AirPod. If you think that controlling noise cancellation or Transparency mode is quite simple from the iPhone, let me tell you that it’s equally straightforward from Apple Watch. When listening to audio through your smartwatch, simply wake the screen of your watch and hit the tiny AirPlay icon. After that, choose Noise Cancellation, Transparency, or Off. Switching between Active noise cancellation and Transparency Mode is as straightforward as it can ever get. Simply press and hold either AirPod Pro stems to cycle between noise cancellation and Transparency. A tiny ding sound will confirm that you have successfully switched to ANC or TM. Depending on your convenience, you can fine-tune the duration of Force Sensor. For instance, you can choose to keep the default option when it seems to be in line with your taste. But if you want to get the better of it, you have the option to choose short or shorter. While most folks would find the default press speed of the AirPods Pro up to the task, it might not suit everyone’s convenience. If you feel the same, you can choose to fine-tune your earbuds’ press speed with ease. While it’s easy to take out the AirPod from the case, some may find it inconvenient – especially those who hold the earbud wrongly. To take the earbuds out comfortably, push on the back of each bud, and it will pop out between your forefinger and thumb. These are some of the tips and tricks that will help you use your AirPods to the fullest. Next, I would like to answer two related questions that several people ask. AirPods are compatible with almost any unrestricted Bluetooth device. This means you can pair it with iPhone, iPad, Apple Watch, Mac, Windows PC, Android phone and tablet, Chromebook, and much more. AirPods 1st and 2nd generation are neither sweat/water-resistant nor waterproof. AirPods Pro are sweat and water-resistant but not waterproof. This makes AirPods Pro ideal for heavy, sweaty workout and water splashes, but they can not be used while swimming, showering, rain, etc. The charging case of any AirPods are neither water-resistant nor waterproof. You may also like to read:
18. De naam van je AirPods wijzigen
19. Switch the audio output on iOS and macOS
20. Check AirPods battery status
21. Use one AirPod
22. How to find your misplaced AirPods
23. How to clean your AirPods
24. Check your AirPods firmware version
25. Reset AirPods
26. Get accessories for your AirPods
Advanced AirPods hacks
27. Use Spatial Audio on AirPods Pro
28. Measure real-time headphone audio levels
29. Headphone Accommodations on AirPods Pro
30. Enable noise cancellation on AirPods Pro
31. Control AirPods Pro noise cancellation and Transparency from Apple Watch
32. Use AirPods Pro noise cancellation and Transparency Mode
33. Customize AirPods Pro Force Sensor
34. Customize AirPods Pro control press speed and duration
35. How to take out the AirPods Pro comfortably out of the case
FAQs