Nie ma nic gorszego niż przygotowanie się do gry wideo ze znajomymi tylko po to, aby przeszkadzać mu Niebieski ekran śmierci (BSOD), który przejmuje twój komputer, wyłącza się wszystko i uniemożliwia robienie czegokolwiek poza ponownym uruchomieniem.
Błędy BSOD różnią się i wskazują dokładnie problem, który powoduje wyłączenie komputera i zapobiega uszkodzeniu sprzętu i poważnej utracie danych. Problem polega na tym, że kody błędów mogą być trudne do odszyfrowania bez wiedzy technicznej.
 Twój komputer napotkał problem i musi zostać ponownie uruchomiony, komunikat i wskazuje nvlddmkm.sys jako problematyczny plik. nvlddmkm.sys to sterownik, a jego pełna nazwa to Sterownik trybu jądra NVIDIA.
AWARIA VIDEO TDR w systemie Windows 10 – NAPRAW
Przed znalezieniem obejścia błędu VIDEO TDR FAILURE dobrze jest utwórz punkt przywracania systemu. Jeśli coś się stanie i musisz cofnąć wszystkie zmiany, możesz łatwo przywrócić system Windows 10 do punktu kontrolnego i rozpocząć rozwiązywanie problemów od podstaw.
1. Nvlddmkm.sys nie powiodło się? Uruchom system Windows 10 w trybie awaryjnym
Jeśli masz trudności z używaniem komputera, ponieważ system natychmiast ulega awarii, wyświetla niebieski ekran i wchodzi w pętlę ponownego uruchamiania, możesz uruchom system Windows 10 w trybie awaryjnym:
- Włącz i wyłącz komputer trzy razy, aby uruchomić tryb rozwiązywania problemów z systemem Windows 10
- Przejdź do Rozwiązywanie problemów > Opcje zaawansowane > Ustawienia uruchamiania

- Kliknij Uruchom ponownie i poczekaj chwilę
- Naciśnij F5, aby włączyć Tryb awaryjny z obsługą sieci
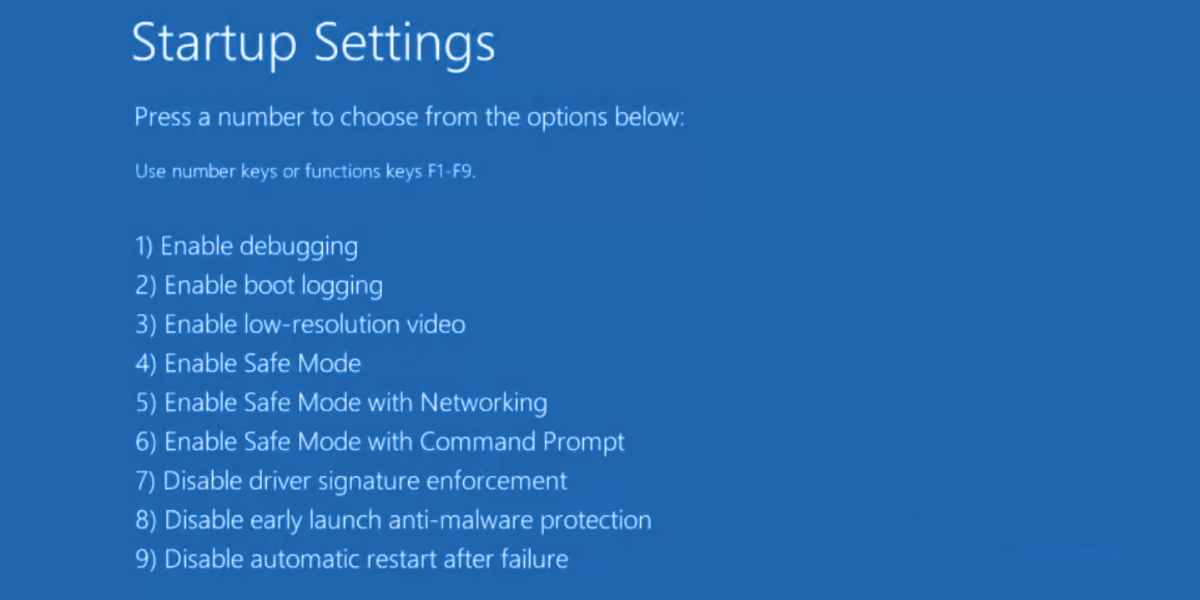
- Po uruchomieniu systemu Windows sprawdź, czy nadal pojawia się błąd nvlddmkm. Jeśli nadal to robisz, wykonaj powyższe kroki, aby przejść do opcji trybu awaryjnego i wybierz F4, aby włączyć Tryb awaryjny bez funkcji sieciowych
2. Uruchom czysty rozruch
Jeśli tryb awaryjny okazał się kluczem do stabilizacji systemu operacyjnego i zapobiegania wyświetlaniu błędów BSOD, możesz wyczyść system Windows 10, aby wyłączyć uruchamianie i usługi, które mogą działać nieprawidłowo i powodować błąd VIDEO TDR FAILURE.
- Wykonaj czynności opisane w Rozwiązaniu 1, aby uruchomić system Windows 10 w trybie awaryjnym
- Kliknij przycisk Start , wyszukaj pozycję Konfiguracja systemu i uruchom tę aplikację

- Na karcie Ogólne wybierz opcję Uruchamianie selektywne
- Wyłącz Załaduj usługi systemowe i Załaduj elementy startowe
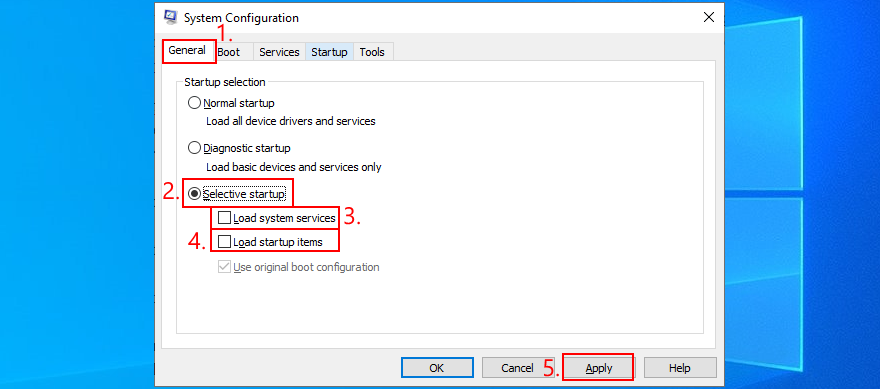
- Kliknij Zastosuj i przejdź do sekcji Uruchamianie
- Kliknij Otwórz Menedżera zadań
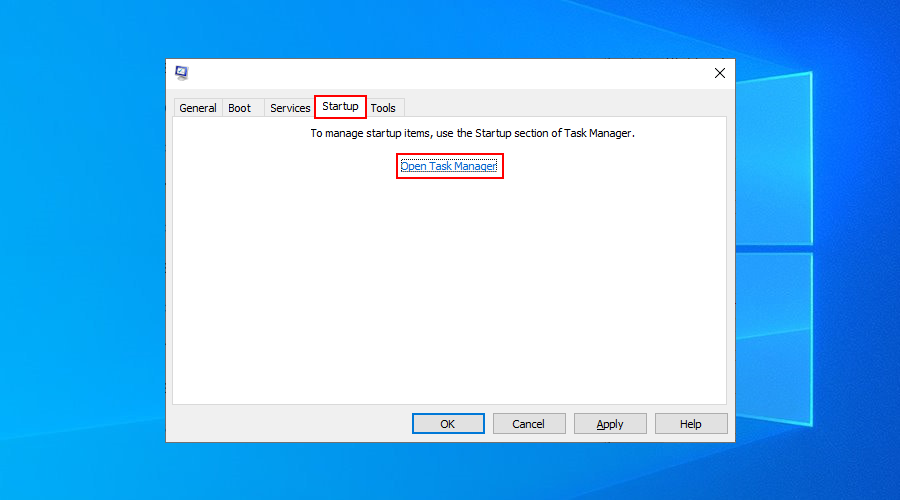

- Uruchom ponownie komputer i sprawdź wyniki
3. Sprawdź aktualizacje systemu
Jeśli od dłuższego czasu nie korzystasz z usługi Windows Update, być może przegapiłeś krytyczne aktualizacje mające na celu naprawienie błędów systemowych. Ponieważ jest to tak ważny składnik systemu operacyjnego, Windows Update powinien działać w tle i wyświetlać monit o oczekującej aktualizacji. Ale jeśli automatyczne aktualizacje systemu zostały wyłączone na Twoim urządzeniu, należy je uruchomić ręcznie.
- Naciśnij klawisz Wygraj, wpisz Sprawdź aktualizacje i naciśnij Enter
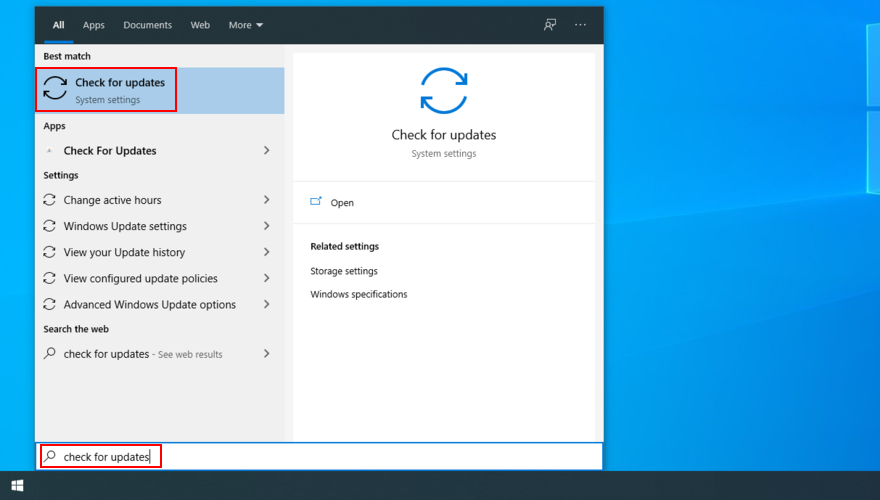
- Kliknij Sprawdź aktualizacje i poczekaj

- Jeśli system Windows coś znajdzie, kliknij Pobierz
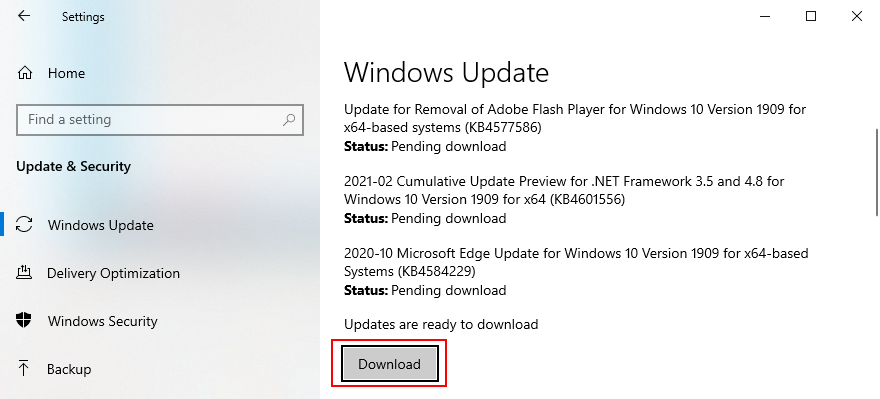
- Cierpliwie czekaj, aż nowe aktualizacje systemu zostaną pobrane i zainstalowane
- Uruchom ponownie komputer
4. Wyłącz oprogramowanie do podkręcania
Ludzie używają narzędzi do przetaktowywania pamięci do poprawić ich wrażenia z gry. Jeśli jednak komputerowi nie towarzyszy chłodnica, która jest wystarczająco wydajna, aby utrzymać dodatkowe ciepło, system Windows ostatecznie wyłączy się i wyświetli komunikat na niebieskim ekranie, taki jak AWARIA VIDEO TDR, aby zapobiec uszkodzeniu dysku twardego i utracie danych.
O ile nie wiesz dokładnie, co robisz, wyłącz wszelkie narzędzia do przetaktowywania, takie jak MSI Afterburner, CPU-Z lub GPU-Z i zresetuj ustawienia zegara komputera do domyślnych. Jeśli skonfigurowałeś przetaktowywanie w BIOS-ie, sprawdź następne rozwiązanie na tej liście.
5. Zresetuj BIOS do ustawień domyślnych
BIOS komputera zawiera szeroki zakres ustawień dostosowywania zaprojektowanych w celu poprawy wydajności systemu. Niestety, ten plan może z łatwością przynieść odwrotny skutek, jeśli Ty lub ktoś inny mający dostęp do Twojego komputera bezcelowo zmieniłeś ustawienia BIOS-u, takie jak podkręcanie i buforowanie.
Może to nawet prowadzić do błędów niebieskiego ekranu, takich jak nvlddmkm.sys. Najprostszym sposobem rozwiązania tego problemu jest resetowanie BIOS do ustawień domyślnych.
- Włącz komputer
- Przed uruchomieniem systemu Windows szybko naciśnij klawisz widoczny na ekranie, aby dostęp do konfiguracji BIOS
- Dostęp do zaawansowanej sekcji BIOS
- Znajdź i włącz opcję, która resetuje dane konfiguracji BIOS do wartości domyślnych
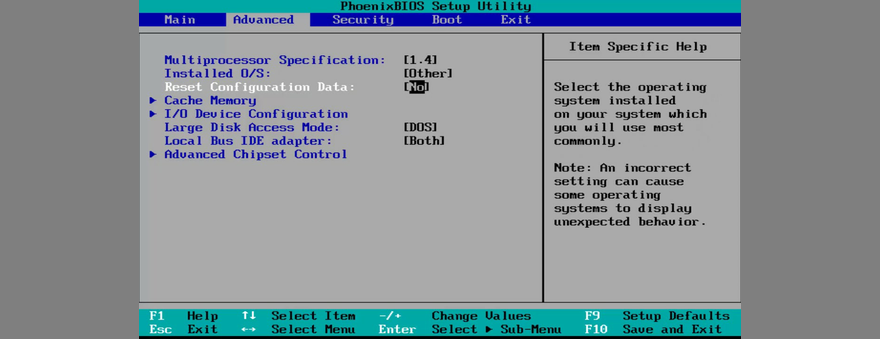
- Zapisz bieżące ustawienia i wyjdź
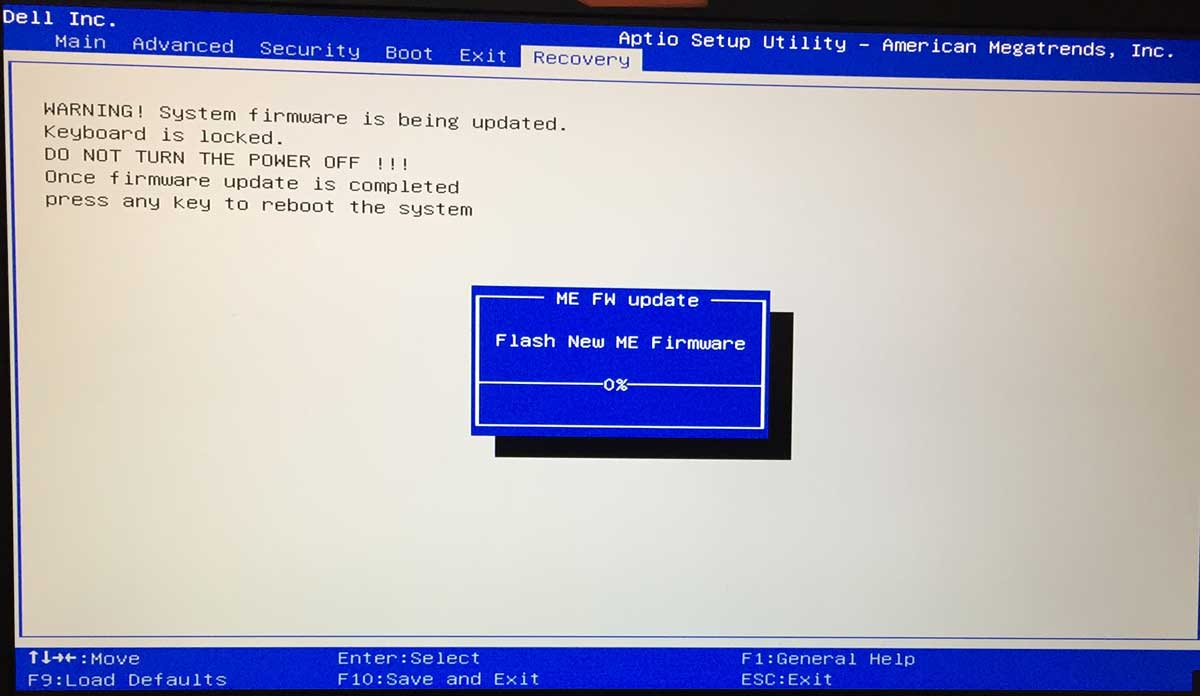
6. Zaktualizuj BIOS
Jeśli nie aktualizowałeś BIOS przez długi czas lub nigdy tego nie robiłeś, powinieneś od razu to zrobić. Potrzebujesz tylko pamięci flash USB i połączenia z Internetem.
- Podłącz dysk flash USB do komputera
- Uruchom system i naciśnij klawisz pokazany na ekranie, aby wejść do konfiguracji BIOS
- W głównej sekcji BIOS możesz znaleźć producenta BIOS-u, wersję i datę instalacji
- Korzystając z tych informacji, uruchom system Windows na nieprawidłowo działającym komputerze lub użyj innego komputera z dostępem do Internetu, otwórz przeglądarkę internetową i odwiedź witrynę producenta systemu BIOS
- Znajdź i pobierz najnowszą wersję systemu BIOS, która jest zgodna z Twoim systemem operacyjnym
- Rozpakuj pobrany plik na dysk flash USB
- Wróć do menu BIOS, utwórz kopię zapasową aktualnej wersji BIOS do przechowywania i zapisz kopię zapasową na dysku flash USB
- Uruchom aktualizację oprogramowania układowego systemu i upewnij się, że w tym czasie nie wyłączasz ani nie uruchamiasz ponownie komputera
7. Przywróć plik nvlddmkm.sys
NVIDIA ma kopię zapasową pliku nvlddmkm.sys gdzieś na twoim komputerze, więc wszystko, co musisz zrobić, to go znaleźć, skopiować i nadpisać uszkodzony plik nvlddmkm.sys.
- Otwórz Eksplorator Windows, naciskając klawisze Win + E
- W pasku adresu wpisz
%SystemRoot%\System32\Drivers - Zlokalizuj plik nvlddmkm.sys i zmień jego nazwę na nvlddmkm.sys.old
- W okienku nawigacji Eksploratora Windows kliknij Ten komputer
- Kliknij wewnątrz pola Przeszukaj ten komputer i wyszukaj nvlddmkm.sy_
- Skopiuj plik nvlddmkm.sy_
- Naciśnij klawisze Win + R, wpisz cmd i naciśnij Enter, aby otworzyć Wiersz polecenia
- Uruchom
chdir desktop - Następnie uruchom
expand-r nvlddmkm.sy_ nvlddmkm.sys - Wyjdź z wiersza polecenia
- Przejdź na pulpit i skopiuj plik nvlddmkm.sys
- Wróć do
%SystemRoot%\System32\Driversi wklej plik - Uruchom ponownie komputer i sprawdź, czy nie ma błędów BSOD
8. Wyczyść systemowe pliki cookie i pliki tymczasowe
System Windows zapisuje pliki cookie i pliki tymczasowe, które powinny być regularnie usuwane, aby wyczyścić pamięć podręczną systemu i zrobić miejsce na nowe dane. Jeśli tak się nie stanie, może to prowadzić do problemów ze stabilnością systemu i błędów niebieskiego ekranu śmierci, takich jak AWARIA VIDEO TDR.
Aby rozwiązać ten problem, wystarczy wyczyścić systemowe pliki cookie i pliki tymczasowe za pomocą specjalistycznych narzędzi, takich jak CCleaner . Lub, jeśli nie chcesz instalować żadnych aplikacji innych firm, możesz skorzystać z wbudowanego narzędzia Oczyszczanie dysku.
Jak korzystać z funkcji Oczyszczanie dysku:
- Kliknij przycisk Start, wyszukaj Oczyszczanie dysku i otwórz tę aplikację
- Wybierz dysk, na którym zainstalowany jest system Windows (zwykle C:) i kliknij OK
- Wybierz następujące pliki do usunięcia:
- Pobrane pliki programów
- Tymczasowe pliki internetowe
- Pliki tymczasowe
- Kliknij OK i Usuń pliki, aby potwierdzić
9. Zainstaluj ponownie kartę graficzną
Twój wyświetlacz graficzny mógł nie zostać poprawnie zainstalowany na Twoim komputerze. Możesz jednak łatwo to naprawić w Menedżerze urządzeń.
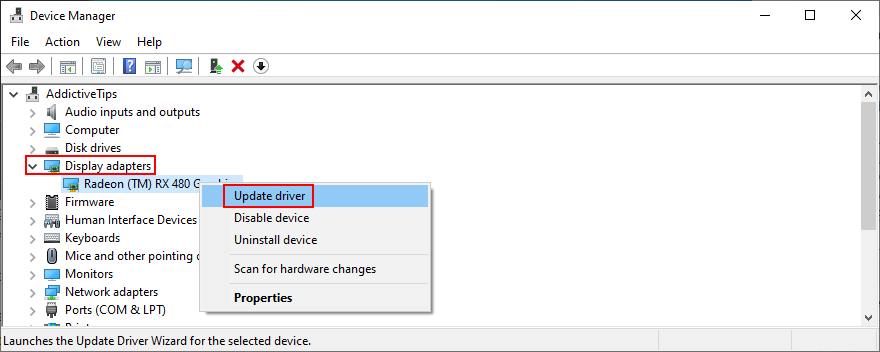
- Kliknij prawym przyciskiem myszy przycisk Start i wybierz Menedżer urządzeń
- Rozwiń kategorię Karty graficzne
- Kliknij prawym przyciskiem myszy kartę graficzną i wybierz Odinstaluj urządzenie
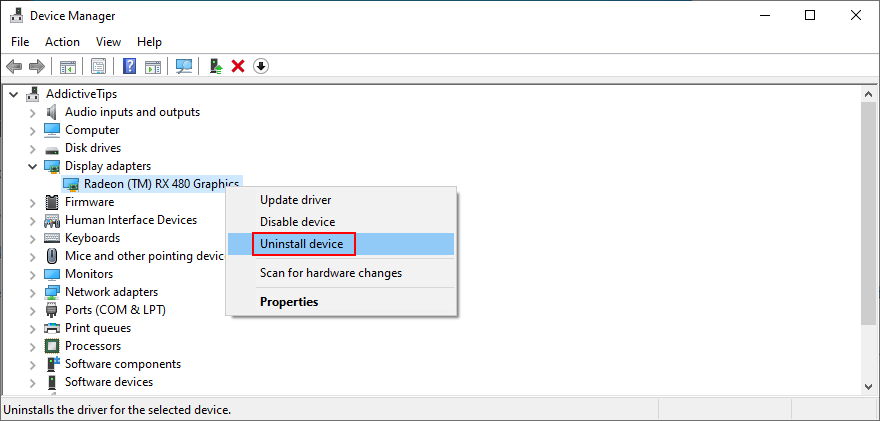
- Uruchom ponownie komputer. Windows automatycznie zainstaluje brakujące adaptery
10. Zaktualizuj sterowniki GPU
Nieaktualne sterowniki graficzne mogą powodować problemy z kartą wideo, problemy z grami, a nawet błędy niebieskiego ekranu, takie jak nvlddmkm.sys. Ale możesz zaktualizować przestarzały sterownik GPU przy minimalnym wysiłku.
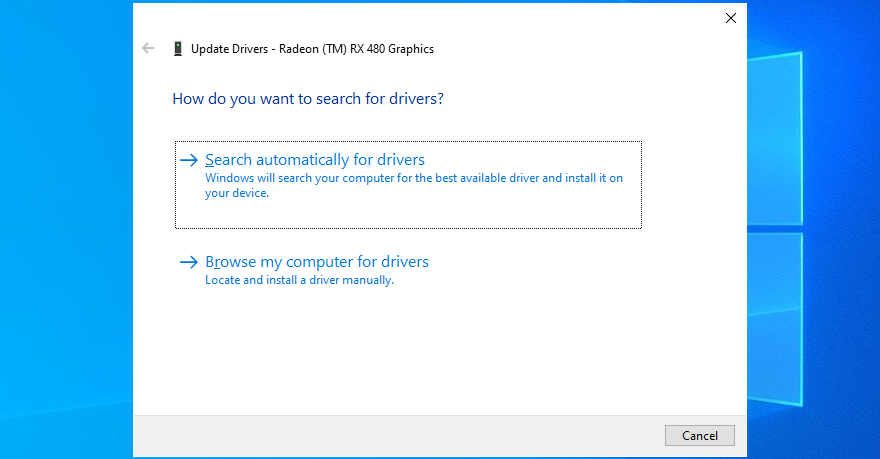
- Otwórz Menedżera urządzeń, kliknij prawym przyciskiem myszy kartę graficzną i wybierz Aktualizuj sterownik
- Kliknij Automatycznie wyszukaj sterowniki
- Jeśli pojawi się komunikat Najlepsze sterowniki dla Twojego urządzenia są już zainstalowane, kliknij Wyszukaj zaktualizowane sterowniki w Windows Update. Jeśli jednak sprawdziłeś już swój system pod kątem aktualizacji, nie musisz robić tego ponownie
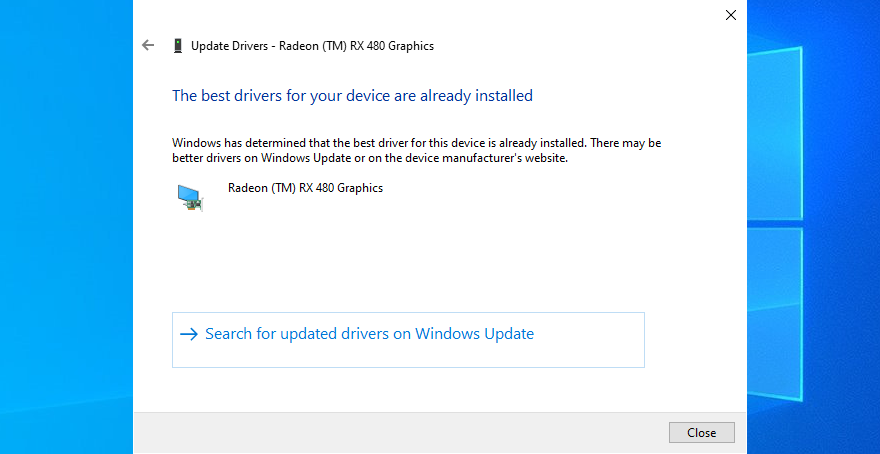
- Ponownie uruchom komputer, jeśli sterownik został pomyślnie zaktualizowany
Niestety system Windows często nie znajduje nowszych sterowników w swojej bazie danych lub przy użyciu składnika Windows Update. W takim przypadku możesz dwukrotnie kliknąć kartę GPU w Menedżerze urządzeń, przejść do karty Sterownik i znaleźć producenta sterownika, wersję oraz datę instalacji. Korzystając z tych informacji, odwiedź producenta witryny, aby pobrać i zainstalować najnowszy sterownik.
Jeśli jednak uznasz ten proces za trudny lub nie chcesz ryzykować pobierania nieobsługiwanego sterownika, możesz skorzystać z narzędzie do aktualizacji sterowników, które automatycznie wykrywa wszystkie przestarzałe sterowniki na Twoim komputerze i oferuje natychmiastową instalację najnowszych wersji. Nie ryzykujesz też uzyskania niekompatybilnych sterowników.
11. Przywróć nieobsługiwane sterowniki GPU
Mówiąc o niezgodnych sterownikach GPU, wielu użytkowników komputerów PC pobiera je z nieznanych źródeł, nie wiedząc, czy działają na ich komputerach.
Jeśli jesteś jednym z tych użytkowników, powinieneś natychmiast wycofać nieobsługiwany sterownik ekranu, aby przywrócić stabilność komputera, wyeliminować powtarzające się awarie systemu i kontynuować poprawną aktualizację sterownika.
- Przejdź do Menedżera urządzeń i kliknij dwukrotnie adapter GPU
- Przełącz się do sekcji Sterownik
- Kliknij Przywróć sterownik i postępuj zgodnie z instrukcjami wyświetlanymi na ekranie. Jeśli przycisk jest wyszarzony, oznacza to, że na Twoim komputerze nie jest zapisana żadna poprzednia wersja sterownika, więc możesz pominąć całe to rozwiązanie
12. Uruchom narzędzie do rozwiązywania problemów ze sprzętem i urządzeniami
System Windows 10 zawiera wewnętrzne narzędzia do rozwiązywania typowych problemów z różnymi komponentami komputera, w tym sprzętem i urządzeniami. Zwykle powinieneś być w stanie go znaleźć w ustawieniach rozwiązywania problemów. Jeśli jednak Brak narzędzia do rozwiązywania problemów ze sprzętem i urządzeniami w tej sekcji, oto jak możesz go od razu uruchomić:
- Naciśnij klawisze Win + R i uruchom
msdt.exe-id DeviceDiagnostic - Kliknij Dalej i poczekaj, aż narzędzie do rozwiązywania problemów przeskanuje Twój komputer
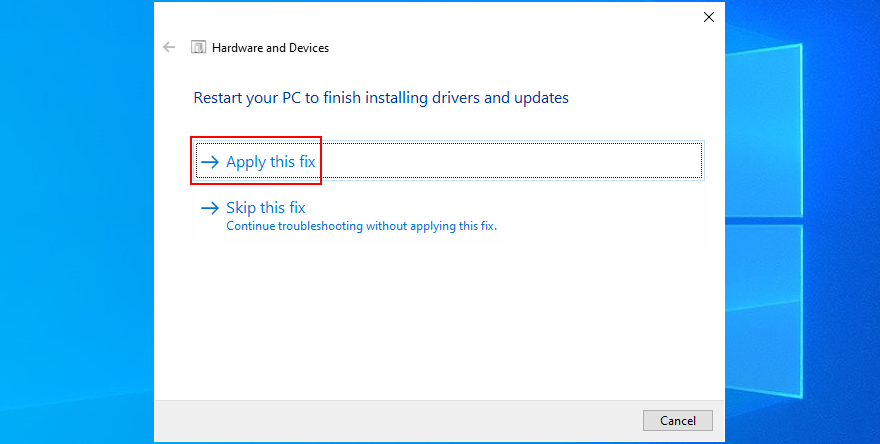
- Jeśli znajdzie jakieś obejście, kliknij Zastosuj tę poprawkę
- Uruchom ponownie komputer po zakończeniu i sprawdź błędy BSOD
13. Wyłącz przyspieszenie sprzętowe
Wiele aplikacji korzysta z akceleracji sprzętowej aby poprawić Twoje wrażenia, niezależnie od tego, czy mówimy o grach, przeglądaniu stron internetowych, przesyłaniu strumieniowym, czy o czymś innym. Jeśli zauważyłeś, że Twój komputer wyświetla błąd BSOD po uruchomieniu konkretnej aplikacji, sprawdź ustawienia programu i poszukaj opcji akceleracji sprzętowej, aby ją wyłączyć. Oto kilka sugestii.
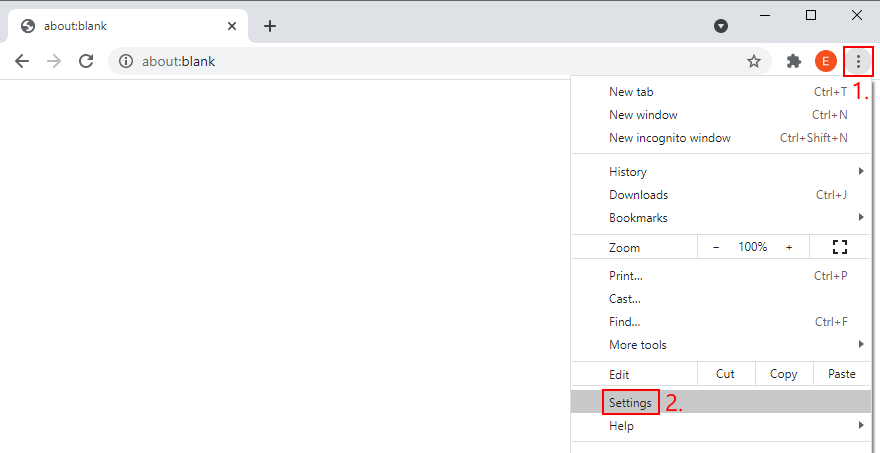
Jak wyłączyć przyspieszenie sprzętowe w Google Chrome:
- W Chrome otwórz menu Więcej i przejdź do Ustawienia

- Wybierz Zaawansowane > System (lub przejdź do
chrome://settings/system) - Wyłącz Użyj akceleracji sprzętowej, jeśli jest dostępna
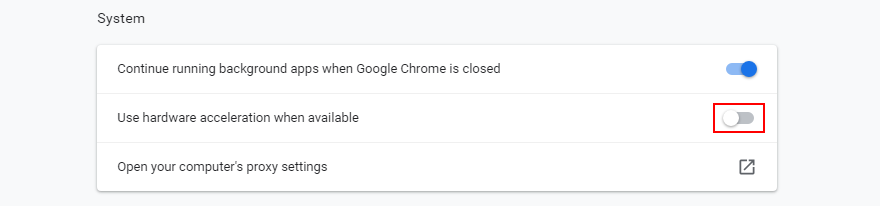
- Uruchom ponownie Chrome
Jak wyłączyć przyspieszenie sprzętowe w przeglądarce Mozilla Firefox:
- W Firefoksie otwórz menu ≡ i przejdź do Opcje (lub odwiedź
about:preferences)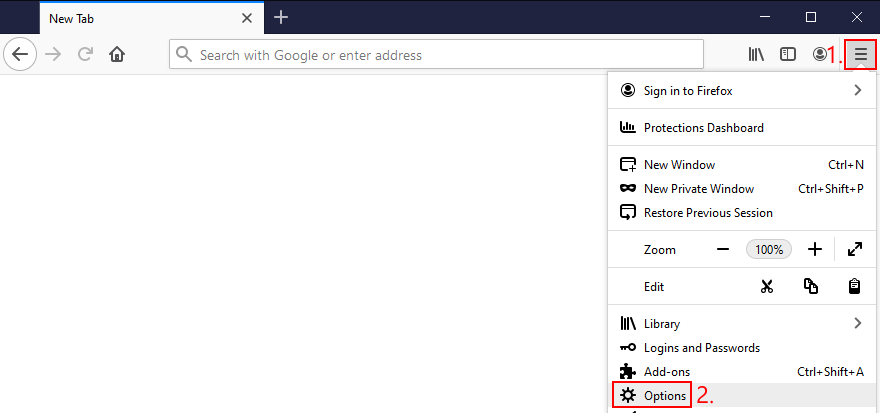
- In General, locate the Performance section
- Disable Use recommended performance settings
- Also disable Use hardware acceleration when available
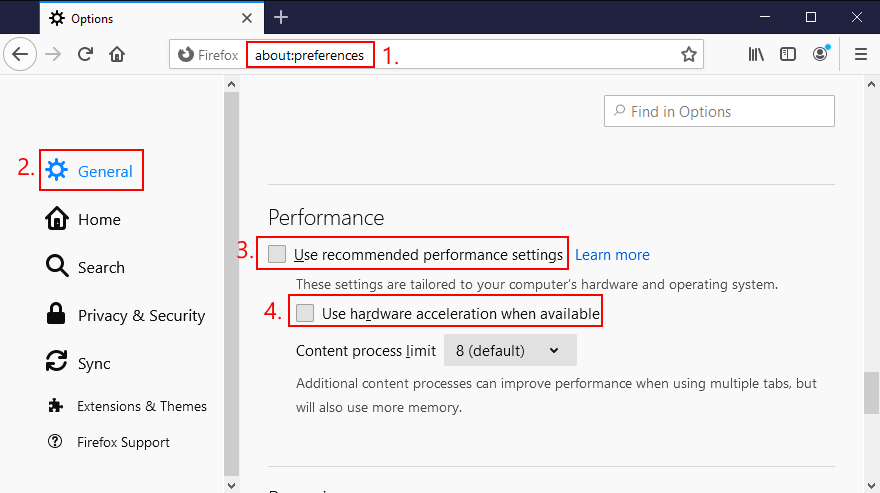
- Restart Firefox
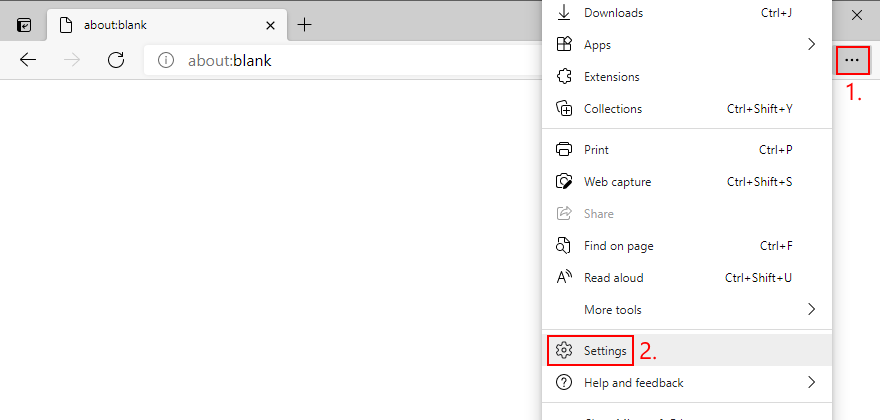
How to disable hardware acceleration in Microsoft Edge:
- In Edge, open the More menu and select Settings
- Go to System (or visit
edge://settings/system) - Disable Use hardware acceleration when available
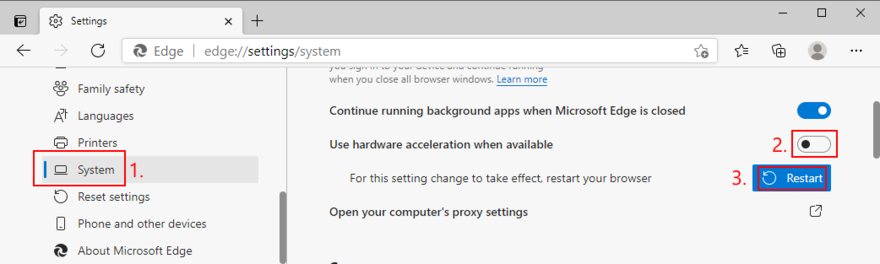
- Restart Edge
14. Analyze the crash dumps
If you’re the type of user who doesn’t shy away from the computer’s technical aspects, you can analyze the crash dumps left behind by the VIDEO TDR FAILURE error, in order to find out the exact driver that’s giving you trouble. Event Viewer is a great assistant for this role.
How to use Event Viewer:
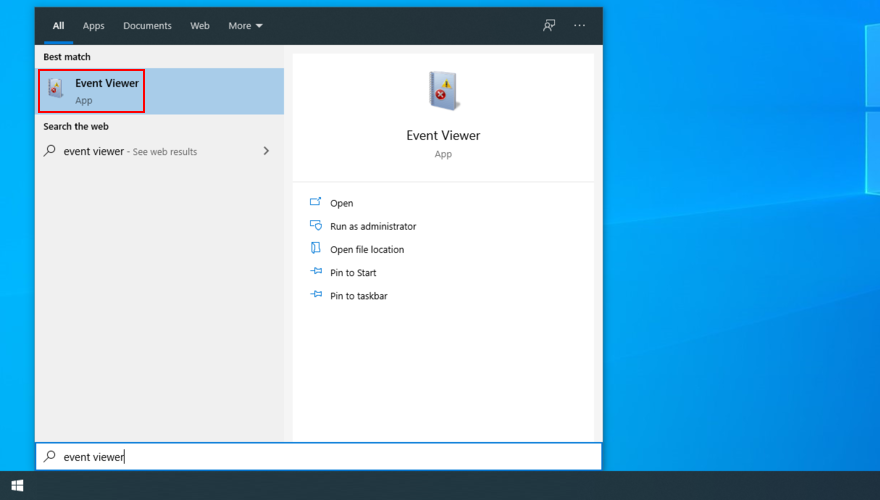
- Restart your PC after a system crash
- Immediately press the Win key, search for Event Viewer, and open this app
- In the navigation pane on the left side, go to Windows Logs > System
- Select the first entry that says Error
- Inspect the information from the General and Details tab
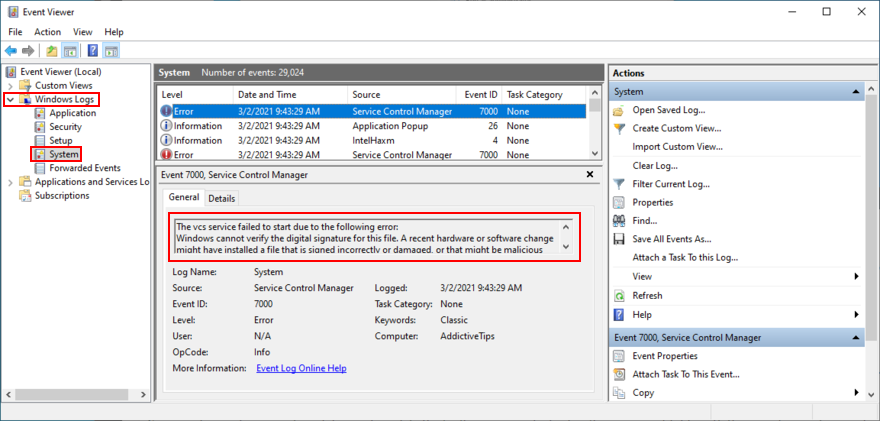
You can use this data to perform a Google search or get in touch with the Microsoft support team. However, if you find Event Viewer to be intimidating, we suggest using BlueScreenView instead. It has the same role but it’s wrapped in a simpler interface and has more intuitive options for analyzing minidump files.
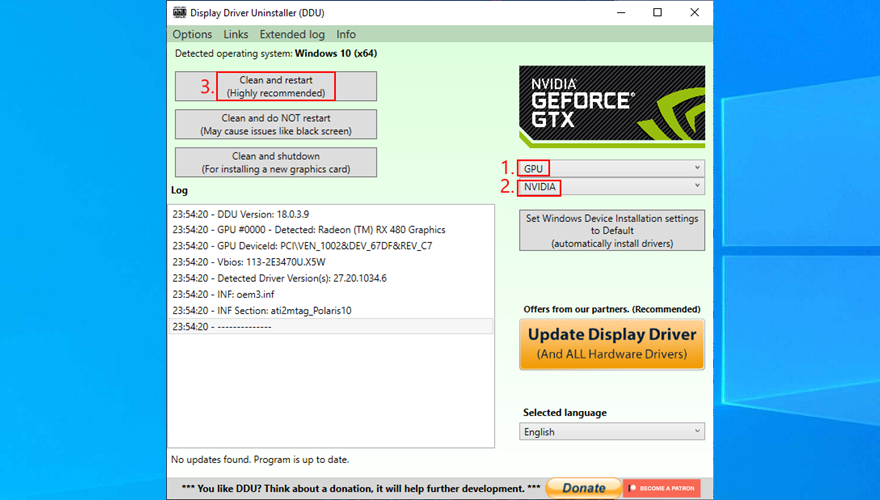
15. Use Display Driver Uninstaller
Display Driver Uninstaller (DDU) is an awesome application that can reset your GPU software and drivers. If display driver nvlddmkm stopped responding on your Windows 10 PC, you can use DDU to safely troubleshoot the BSOD error.
- Make sure to create a system restore point if you haven’t so far
- Download Display Driver Uninstaller from the official website
- Unzip the downloaded archive and open the DDU file
- Start Windows 10 in Safe Mode with Networking (see Solution 1 from this list)
- Open Display Driver Uninstaller.exe
- When prompted with the configuration window, leave everything as is and click OK to continue
- Select GPU and NVIDIA from the two menus on the right side
- Then, click Clean and restart
16. Remove and reseat the GPU card
It’s possible that your graphics card needs to be reattached to your computer unit. If it’s not properly connected, this could trigger Blue Screen of Death errors like the VIDEO TDR FAILURE stop code.
Shut down your desktop, unplug all cables, remove the computer chassis, and carefully detach the GPU card. Then, put it back in the same slot firmly but without using force. Turn on your computer and see if anything changed.
17. Try the GPU card on another computer
If your graphics card is malfunctioning and needs to be replaced, then all your efforts at attempting to resolve the blue screen problem at the software level will have been in vain.
A simple way to test this is by removing the GPU card from your computer and inserting it into another PC, preferably with a clean Windows installation. If the system starts glitching, it should be pretty clear that you need to replace your hardware. Check out the best GPU cards for gaming.
18. Check system memory
System memory issues can affect the entire computer, leading to blue screen errors like nvlddmkm.sys. You can easily run a check-up by turning to Windows Memory Diagnostic, a tool that comes bundled with Windows 10.
How to use Windows Memory Diagnostic:
- Save your current work and close all programs
- Press Win key + R, type
mdsched.exe, and hit the Enter key - Click Restart now and check for problems
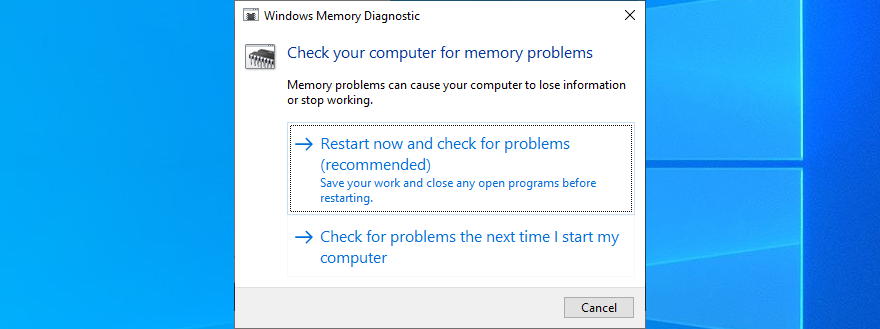
Your operating system will reboot and start running memory tests. It runs a standard test by default. However, if you have a bit of time on your hands, we suggest switching to the Extended test in order to obtain more accurate information about any potential RAM issues.
Press F1 to open the options section, select Extended, and press F10 to apply this setting. The entire memory test can take a long time, so you can leave your PC unattended since your intervention will not be required. Once the test is complete, Windows 10 boots as usual and shows the test results in the notifications center.
19. Use Startup Repair
If Windows 10 is experiencing boot problems, this can lead to all sorts of computer issues, including BSOD errors with the VIDEO TDR FAILURE stop code. But you can fix startup issues by running the Startup Repair tool from the Advanced Startup menu. Before doing so, you need an empty USB flash drive and Internet access to set up a system installation disk.
How to create a Windows 10 installation media disk:
- Plug a USB flash drive into the PC and make sure to save any important files saved there since the drive will be formatted
- Download Media Creation Tool from the official website
- Open Media Creation Tool and follow the steps to create a Windows 10 installation media disk on the USB flash drive
How to run Startup Repair:
- Make sure the USB flash drive with the Windows 10 installation media is plugged into the PC
- Click the Start button and open the menu with the power options
- While holding down the Shift key, click Restart to boot Windows 10 to the troubleshoot menu
- Go to Troubleshoot > Advanced options > Startup Repair
- Select your administrator account and enter your password to continue
- Follow the given instructions to complete the startup repair sequence
20. Fix HDD issues
Your hard drive may have corrupt files or bad sectors which prevent Windows from operating normally, But you can fix HDD issues without having to use a third-party software application, thanks to CHKDSK (Check Disk).
- Press Win key + R, type CMD, and press Ctrl + Shift + Enter to open Command Prompt with administrator rights

- If your OS is installed on the C: drive, run
chkdsk c:/f/r. Else, replacec:with the correct partition letter- If you don’t know Windows’ whereabouts, choose a drive letter when entering the run command (e.g.
run d:) and view its containing folders (run dir). Keep listing folders for multiple drive letters until you see the Windows directory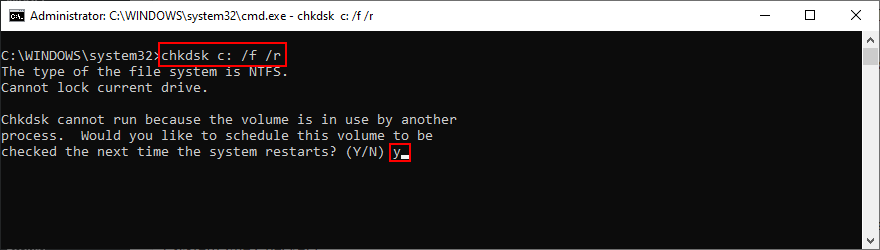
- If you don’t know Windows’ whereabouts, choose a drive letter when entering the run command (e.g.
- When asked to confirm scheduling CHKDSK during the next system reboot, type y and press Enter
- Restart your computer and wait for CHKDSK to do its job
21. Repair corrupt system files
Not only hard disk problems but also damaged, modified, or missing OS files can cause blue screen errors on your computer. To restore system files on Windows 10, you can run DISM (Deployment Image Servicing and Management) and SFC (System File Checker).
- Start Windows 10 in Safe Mode with Networking (see Solution 1)
- Click the Start button, type cmd, and open Command Prompt
- Run
DISM.exe/Online/Cleanup-image/RestoreHealth. However, if the Windows Update component is broken, this command won’t work. Instead, you can create a Windows 10 installation media disk (see Solution 19) and set it as the repair source:DISM.exe/Online/Cleanup-Image/RestoreHealth/Source:C:\RepairSource\Windows(replaceC:\RepairSource\Windowswith the full path to your Windows 10 installation media disk) - After DISM does its job, run SFC (
sfc/scannow). If SFC is successful, it shows the Windows Resource Protection did not find any integrity violations message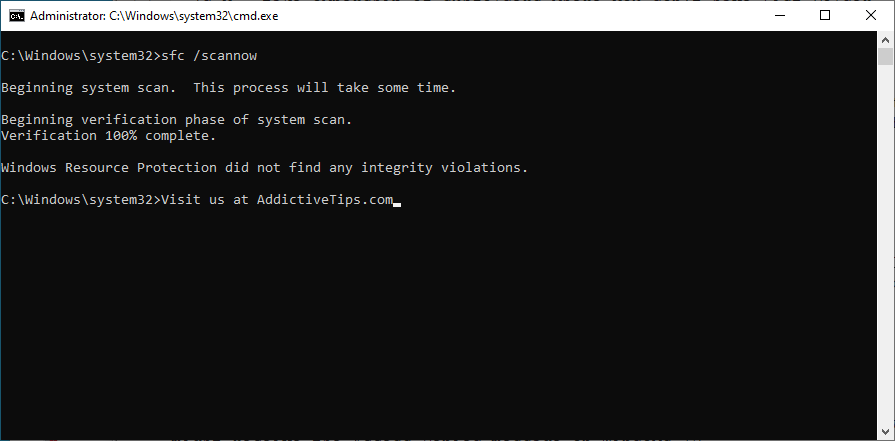
22. Disable Fast Startup
Fast Startup is a Windows component that boots your operating system faster by pre-loading drivers. Unfortunately, it’s known to cause serious PC problems. If drivers are not properly shut down and restarted, it could trigger blue screen errors like nvlddmkm.sys.
To solve this problem, you can disable Fast Startup:
- Press the Win key, search for Control Panel, and open this app
- Double-click Power Options
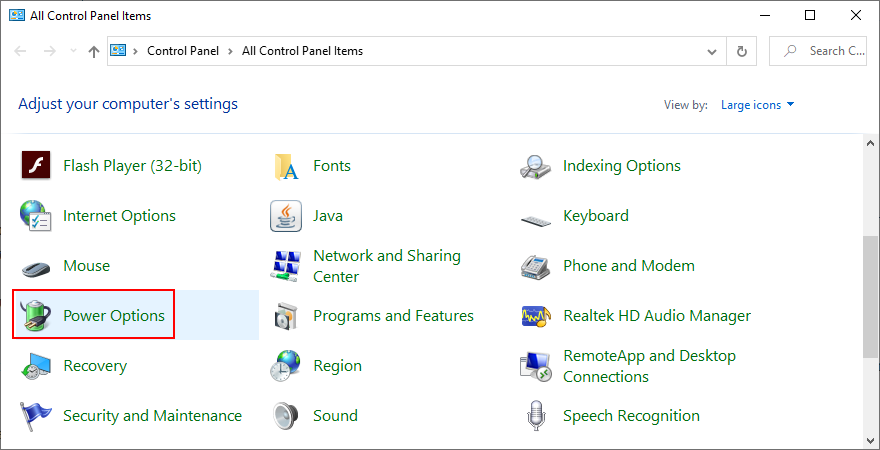
- Click Choose what the power buttons do
- Click Change settings that are currently unavailable (admin rights are required)
- Disable Turn on fast startup and click Save changes
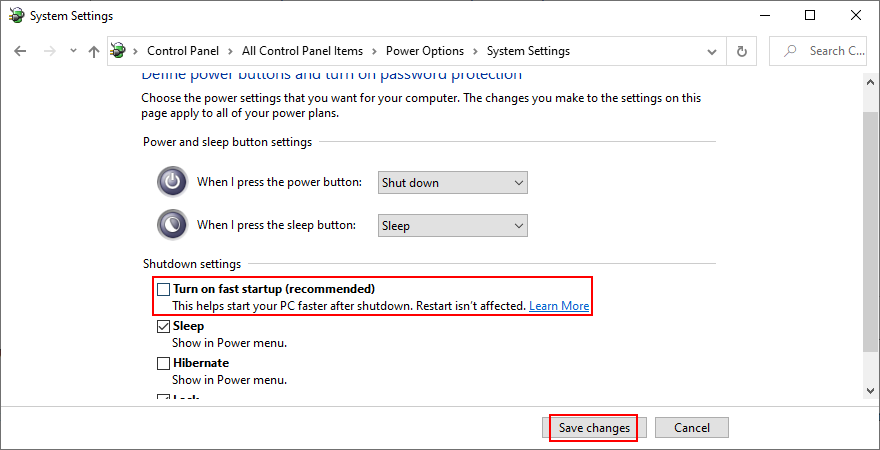
- Restart your computer
23. Disable the PCI Express power option
Many users reported that turning off the PCI Express power option helped fix the VIDEO TDR FAILURE error on their computer. Here’s what you need to do:
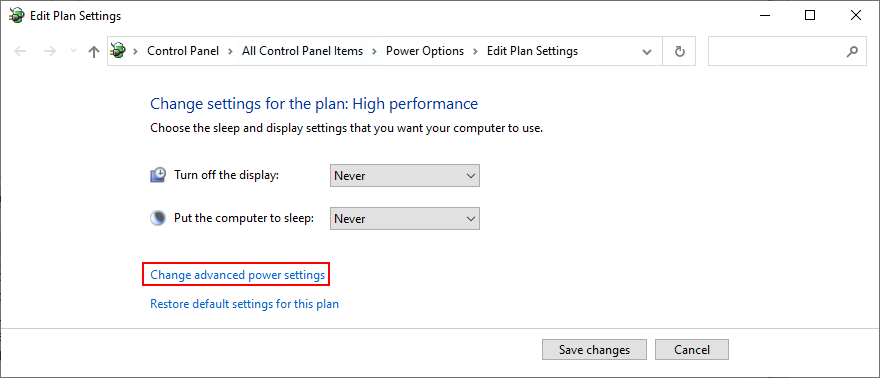
- Click the Start button, type edit power plan, and press Enter
- Click Change advanced power settings
- Expand the PCI Express group
- Set Link State Power Management to Off
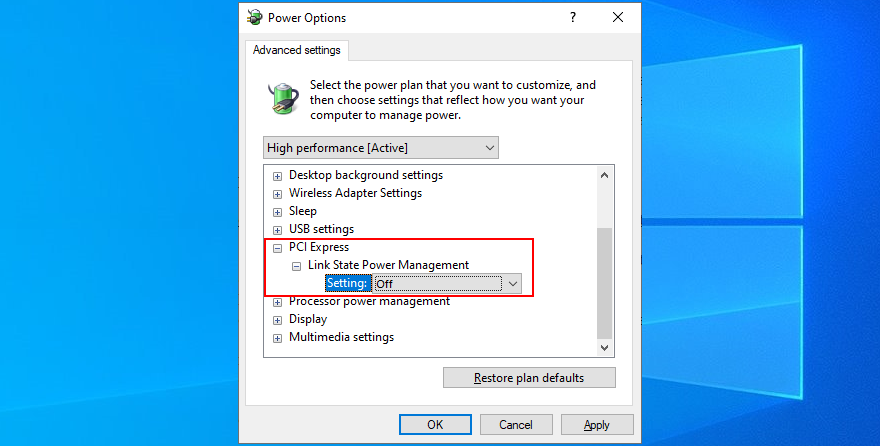
- Click Apply
- Restart your computer
24. Run a malware scan
Malware infections can be severe enough to corrupt critical system files and prevent you from running system tools like Task Manager or Command Prompt. If you suspect that your computer was recently infected with a virus, you should run a scan to eliminate any threats and regain the control of your PC.
How to run a malware scan with Windows Defender:
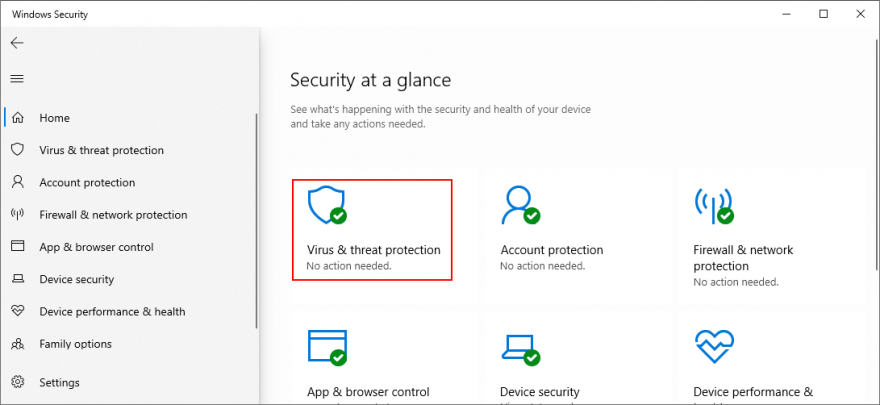
- Press the Windows key, type Windows Security, and launch this tool
- Select Virus & threat protection
- Click Scan options
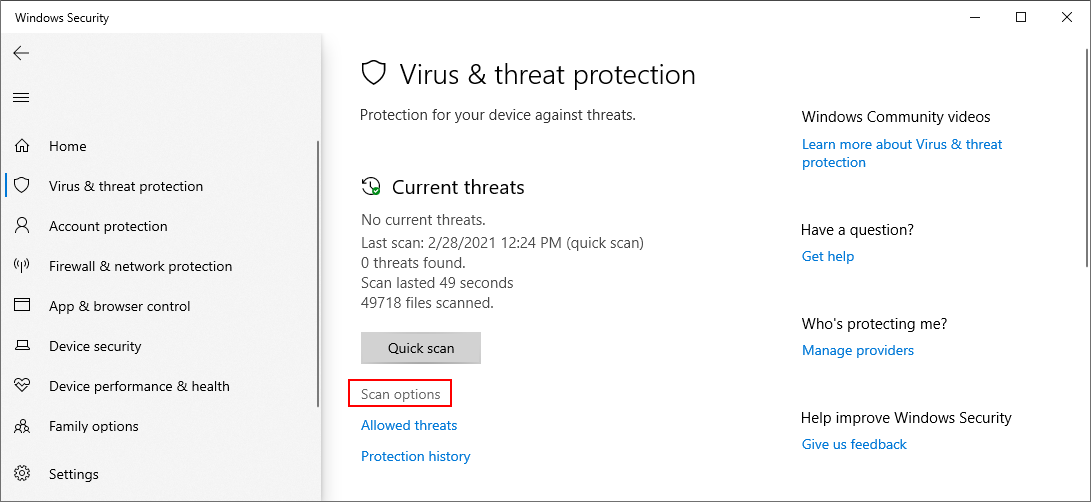
- Choose Quick scan and press Scan now

- If the computer search reveals nothing, select Windows Defender Offline scan and click Scan now
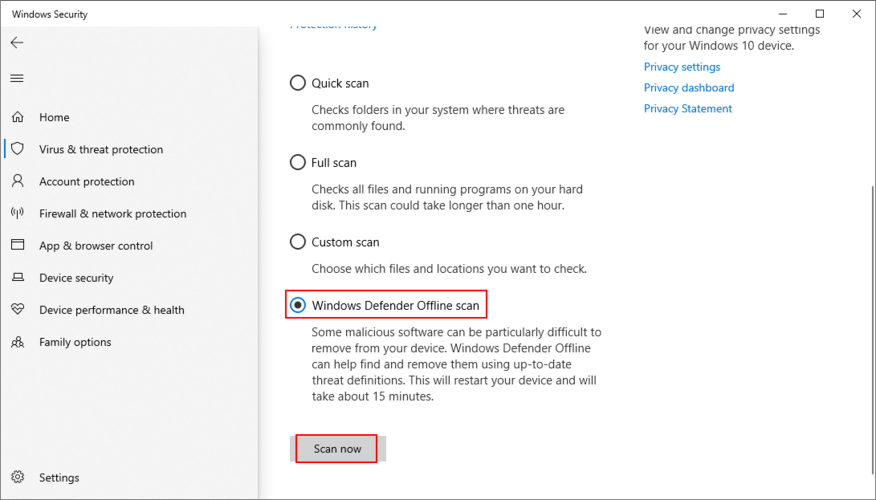
- Allow Windows Defender to remove or quarantine any threats. If you think it has wrongfully detected safe files as malware, make sure to add them to the whitelist in order to exclude the items from future scans
25. Fix the system registry
Missing, modified, corrupt, or incorrect registry settings can be devastating for your operating system and can even trigger blue screen errors like nvlddmkm.sys. But you can restore the original registry configuration from Command Prompt before system boot.
- Click the Start button and open the power menu
- Hold down the Shift key and click Restart to reboot Windows in Advanced Startup mode
- Select Troubleshoot > Advanced options > Command Prompt
- Pick your admin account and enter your password
- Run these commands (press Enter after each line):
-
cd %SystemRoot%System32\config
-
ren %SystemRoot%System32\config\DEFAULT DEFAULT.old
-
ren %SystemRoot%System32\config\SAM SAM.old
-
ren %SystemRoot%System32\config\SECURITY SECURITY.old
-
ren %SystemRoot%System32\config\SOFTWARE SOFTWARE.old
-
ren %SystemRoot%System32\config\SYSTEM SYSTEM.old
-
copy %SystemRoot%System32\config\RegBack\DEFAULT %SystemRoot%System32\config\
-
copy %SystemRoot%System32\config\RegBack\DEFAULT %SystemRoot%System32\config\
-
copy %SystemRoot%System32\config\RegBack\SAM %SystemRoot%System32\config\
-
copy %SystemRoot%System32\config\RegBack\SECURITY %SystemRoot%System32\config\
-
copy %SystemRoot%System32\config\RegBack\SYSTEM %SystemRoot%System32\config\
-
copy %SystemRoot%System32\config\RegBack\SOFTWARE %SystemRoot%System32\config\
-
- Start Windows as usual
26. Unplug external devices
If you have recently attached new hardware components into your desktop or laptop, such as a webcam, a USB flash drive, a microphone, headphones, or a wireless network adapter, it’s possible that the device is experiencing compatibility issues with your Windows 10 PC, triggering the VIDEO TDR FAILURE stop code as a result.
You can easily test this by unplugging all external devices from your PC, except for your keyboard and mouse, in order to inspect results. If the keyboard and mouse are also brand new, try replacing them if you have others.
27. Use System Restore
System Restore allows you to revert Windows 10 to a checkpoint that was recorded before you started experiencing blue screen errors. However, it means that System Restore must be enabled on your computer and at least one restore point must have been created prior to the BSOD event.
Even if you didn’t manually set up a restore point, it’s possible that some of your applications did, such as driver updaters, so it doesn’t hurt to at least check.
How to use System Restore:
- Sign in to Windows 10 using an administrator account
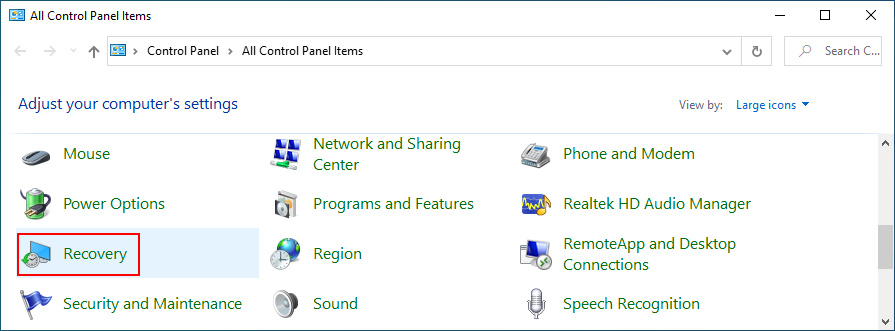
- Press the Win key, type Control Panel, and launch this app
- Go to Recovery
- Click Open System Restore
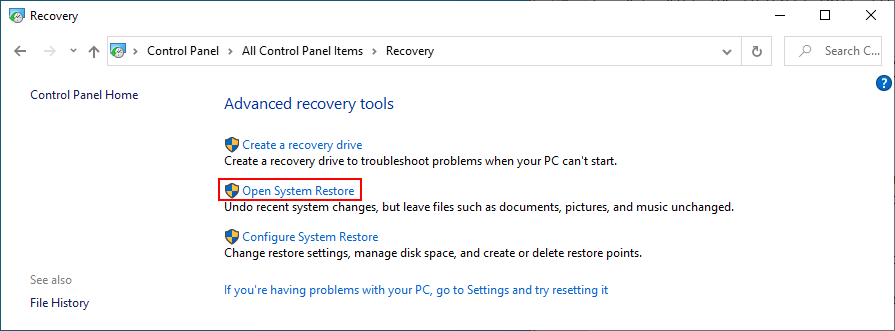
- Select a restore point or click Show more restore points to evaluate more options. You can also click Scan for affected programs to find out which applications you will have to reinstall after restore
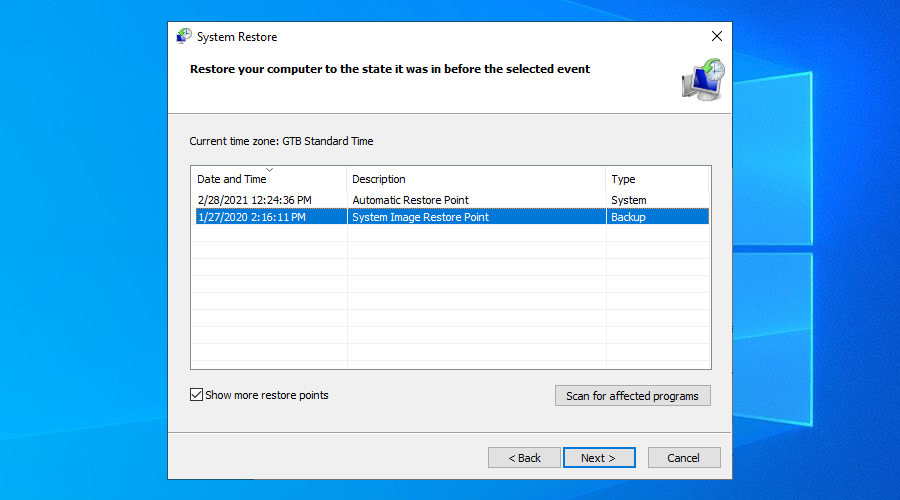
- Click Next and follow the instructions. Your PC will reboot
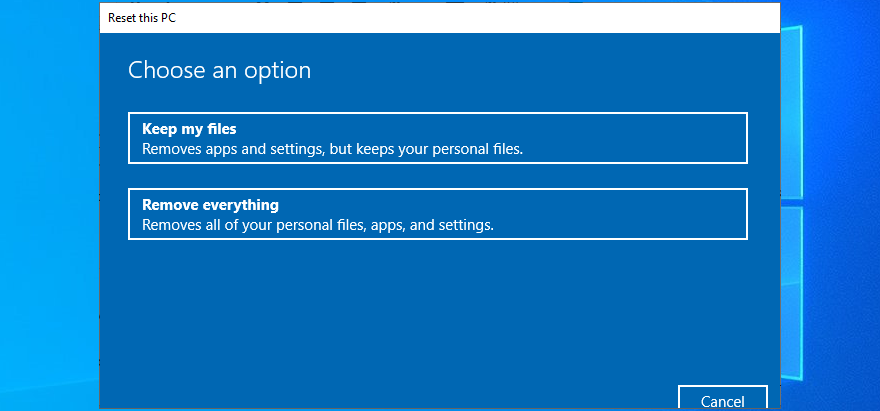
28. Reset Windows 10
If everything failed up until this point, you should prepare Windows 10 for factory reset in order to uninstall all programs and restore system settings to default. The good news is that your personal files will be left untouched.
But make sure to write down all applications you will have to install, save program preferences, and get hold of serial keys required for reactivation. Then, proceed to the following steps:
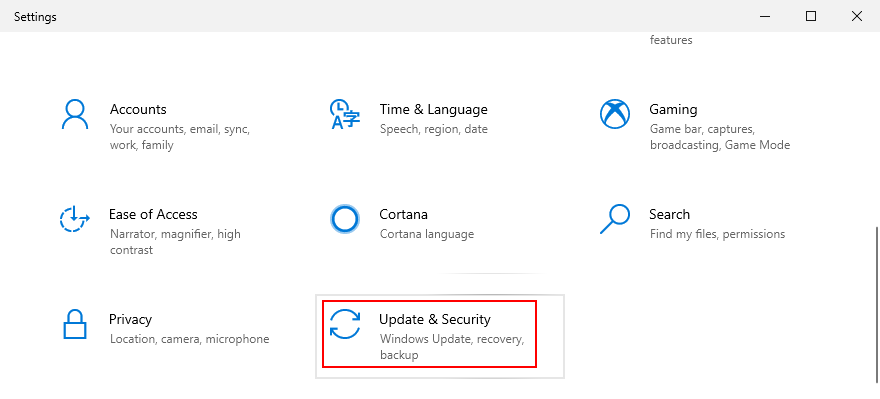
- Right-click the Start button and go to Settings
- Select Update & Security
- Choose Recovery and click Get started
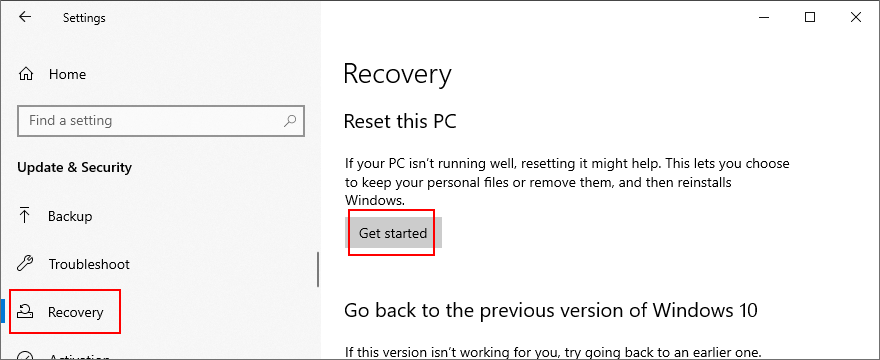
- Click Keep my files and follow the remaining instructions
Stop code VIDEO TDR FAILURE (nvlddmkm.sys) can be fixed on Windows 10
To recap, VIDEO TDR FAILURE is a BSOD error that indicates a problem with your video settings. If it’s accompanied by the nvlddmkm.sys file, it means that you can troubleshoot the file errors to get rid of system crashes.
To fix this problem, you can start Windows 10 in Safe Mode, run a clean system boot, check for system updates, disable overclocking software, reset and update BIOS, restore the nvlddmkm.sys file, clear system cookies and temp files, reinstall the graphics adapter, as well as update or roll back GPU drivers.
It’s also a good idea to run the Hardware and Devices troubleshooter, disable hardware acceleration, analyze crash dumps, use Display Driver Uninstaller, remove and reseat the GPU card, try the GPU card on another computer, check system memory, use Startup Repair, or fix HDD issues and corrupt system files.
In addition, you can disable Fast Startup and the PCI Express power option, run a computer malware scan, fix the system registry, unplug external devices, and use System Restore to roll back Windows 10 to a previous checkpoint. If all these solutions fail, you can go to the last resort, which means resetting Windows 10 to factory settings.
How did you manage to fix the nvlddmkm.sys file and VIDEO TDR FAILURE stop code? Tell us all about it in the comments section below.
