0x80080005 เป็นรหัสข้อผิดพลาด รายงาน โดยผู้ใช้จำนวนมากเมื่อพยายามเรียกใช้ Windows Update ป้องกันไม่ให้ระบบปฏิบัติการของคุณดาวน์โหลดและใช้การอัปเดตล่าสุดซึ่งอาจทำให้เกิดปัญหาร้ายแรงในระยะยาว
ตัวอย่างเช่นคุณอาจมี ปัญหาในการอัปเดตแอป Microsoft Store โดยไม่มีการอัปเดตระบบล่าสุด ข้อผิดพลาดนี้อาจเกิดจากข้อผิดพลาดของซอฟต์แวร์หรือฮาร์ดแวร์ โดยปกติจะเกี่ยวข้องกับการตั้งค่าการเชื่อมต่อคอมพิวเตอร์หรือเครือข่ายของคุณซึ่งหมายความว่าคุณควรจะแก้ไขได้อย่างง่ายดายโดยใช้วิธีแก้ไขปัญหาด้านล่างนี้
วิธีแก้ไขข้อผิดพลาดในการอัปเดต Windows 10 0x80080005
ก่อนเริ่มกระบวนการแก้ไขปัญหาโปรดตรวจสอบว่า สร้างจุดคืนค่าระบบ บนพีซีของคุณ หากคุณพบปัญหาเพิ่มเติมระหว่างนี้คุณสามารถเลิกทำได้โดยย้อน Windows 10 กลับไปที่จุดคืนค่า
นอกจากนี้คุณควรลองเรียกใช้ Windows Update เพื่อยืนยันข้อผิดพลาด:
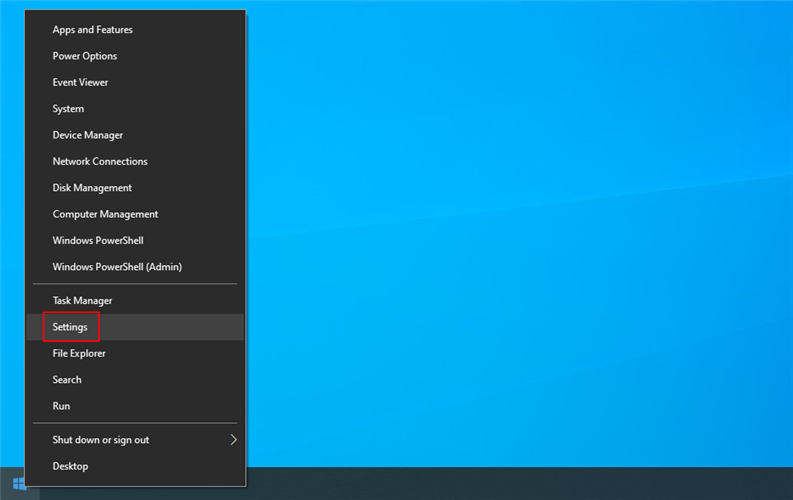
- คลิกขวาที่ปุ่ม เริ่ม และไปที่ การตั้งค่า
 li>
li>
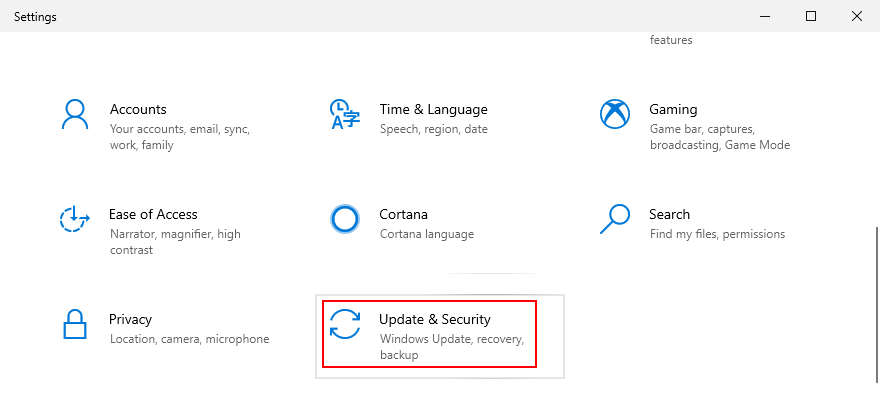
- เลือก อัปเดตและความปลอดภัย
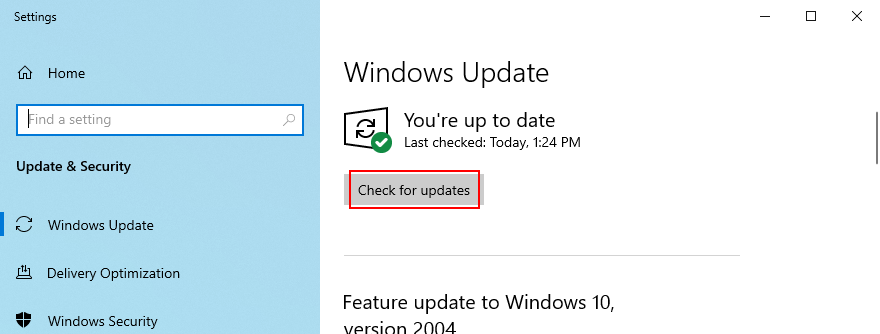
- คลิก Windows Update ทางด้านซ้าย
- คลิก ตรวจสอบการอัปเดต
- เลือก อัปเดตและความปลอดภัย
1. เรียกใช้ตัวแก้ไขปัญหา Windows Update
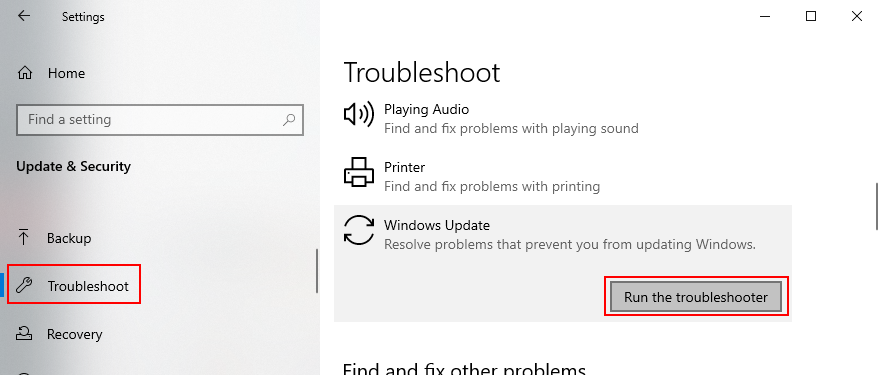
คุณสามารถเริ่มต้นด้วยวิธีง่ายๆ: ใช้ ตัวแก้ไขปัญหา Windows Update ออกแบบมาเพื่อระบุและแก้ไขปัญหาทั่วไปที่ทำให้ระบบปฏิบัติการของคุณไม่ได้รับการอัปเดต วิธีการใช้งานมีดังนี้:
- คลิกปุ่ม เริ่ม ค้นหา การตั้งค่า และเปิดแอปนี้

- ไปที่ อัปเดตและความปลอดภัย

- ข้ามไปที่ แก้ไขปัญหา ทางด้านซ้าย
- คลิก เครื่องมือแก้ปัญหาเพิ่มเติม

- เลือก Windows Update แล้วคลิก เรียกใช้เครื่องมือแก้ปัญหา
- ทำตามขั้นตอนของวิซาร์ดและใช้การแก้ไข
- รีสตาร์ทพีซีของคุณแล้วลองเรียกใช้ Windows Update ทันที
2. ใช้ Windows Update Diagnostic
หากเครื่องมือแก้ปัญหาในตัวไม่สามารถดำเนินการดังกล่าวได้คุณสามารถเปิดใช้ Windows Update Diagnostic ได้ เป็นเครื่องมือที่ Microsoft สร้างขึ้นเพื่อวินิจฉัยและแก้ไขปัญหา Windows Update ซึ่งต้องติดตั้งแยกต่างหาก วิธีการใช้งานมีดังนี้:
- อย่าลืมลงชื่อเข้าใช้ Windows 10 ด้วยบัญชีผู้ดูแลระบบ
- ดาวน์โหลด Windows Update Diagnostic จาก เว็บไซต์อย่างเป็นทางการ
- เปิดแอป
- ในวิซาร์ดเลือก Windows Update แล้วคลิก ถัดไป
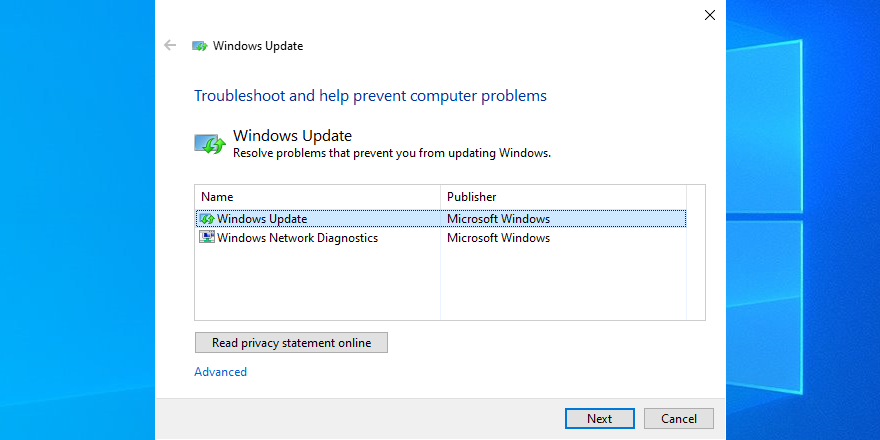
- ทำตามคำแนะนำทีละขั้นตอน
- เมื่อเสร็จสิ้นให้เปิด Windows Update Diagnostic ขึ้นใหม่
- เลือก Windows Network Diagnostics แล้วคลิก ถัดไป
- หลังจากวิซาร์ดใช้การแก้ไขแล้วให้รีสตาร์ทพีซีของคุณ
- ลองเรียกใช้ Windows Update ทันที
3. เริ่มบริการ Windows Update ใหม่
Windows Update ถูกควบคุมโดยบริการที่ควรเริ่มต้นโดยอัตโนมัติเมื่อบูตระบบและทำงานตลอดเวลา หากไม่เกิดขึ้นด้วยเหตุผลบางประการคุณสามารถคาดหวังรหัสข้อผิดพลาดเช่น 0x80080005 โชคดีที่คุณสามารถแก้ไขปัญหานี้ได้อย่างง่ายดาย:
- คลิกปุ่ม เริ่ม ค้นหา บริการ และเปิดแอปนี้
- ค้นหาและคลิกสองครั้งที่ Windows Update เพื่อดูคุณสมบัติ
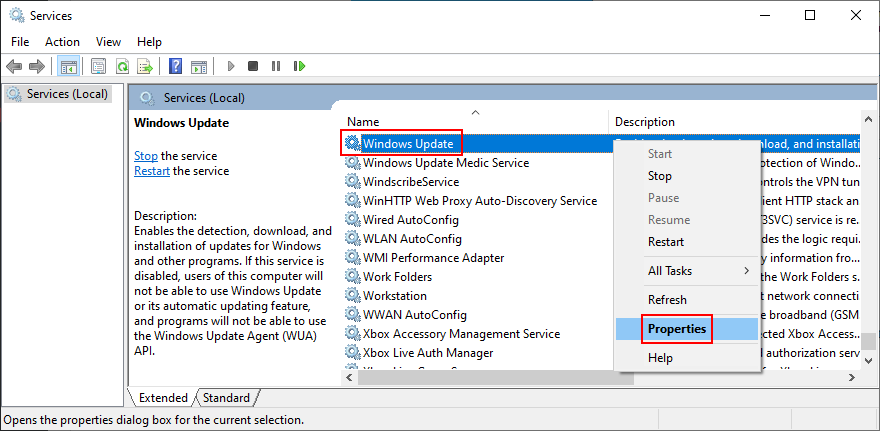
- อยู่ในแท็บ ทั่วไป
- ตั้งค่า ประเภทการเริ่มต้น เป็น อัตโนมัติ (Delayed Start)
- หากบริการหยุดให้คลิกปุ่ม เริ่ม
- คลิก ใช้ เพื่อยอมรับการเปลี่ยนแปลงและออกจากหน้าต่างหลักของบริการ

- ค้นหา Background Intelligent Transfer Service และ App Readiness เพื่อดำเนินการแบบเดียวกัน
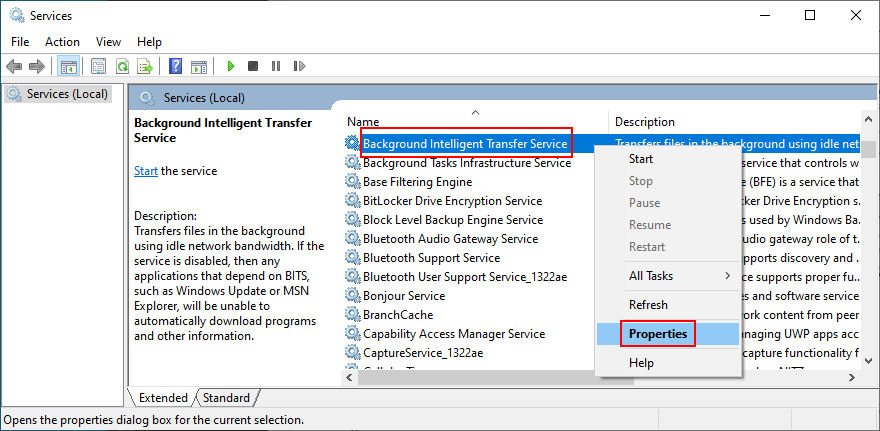
- ลองเรียกใช้ Windows Update
4. ปิดใช้งานบริการรายชื่อเครือข่าย
จำเป็นต้องมีบริการรายการเครือข่าย แต่ผู้ใช้บางรายรายงานว่าสาเหตุของปัญหา Windows Update ซึ่งนำไปสู่ข้อผิดพลาด 0x80080005 วิธีปิดมีดังนี้
- กดปุ่ม Win + R พิมพ์ services.msc แล้วกด Enter

- ค้นหาและคลิกสองครั้งที่ บริการรายการเครือข่าย
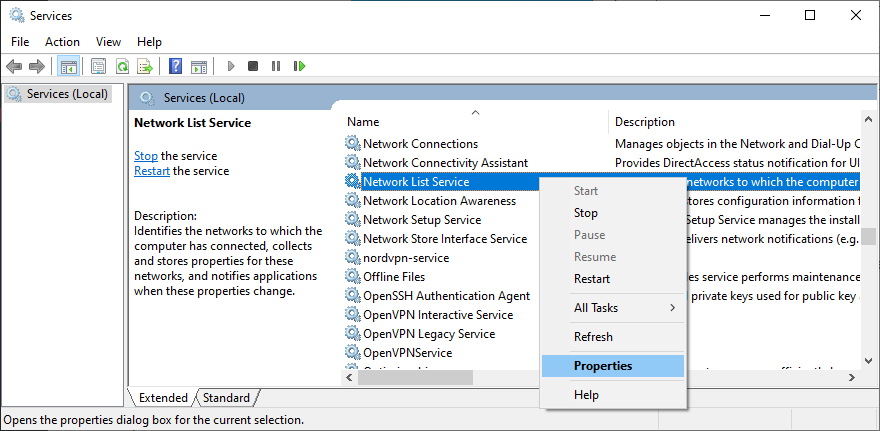
- ตั้งค่า ประเภทการเริ่มต้น เป็น ปิดใช้งาน

- หากบริการกำลังทำงานอยู่ให้คลิก หยุด
- คลิก ใช้ และออก
- ลองเรียกใช้ Windows Update ทันที
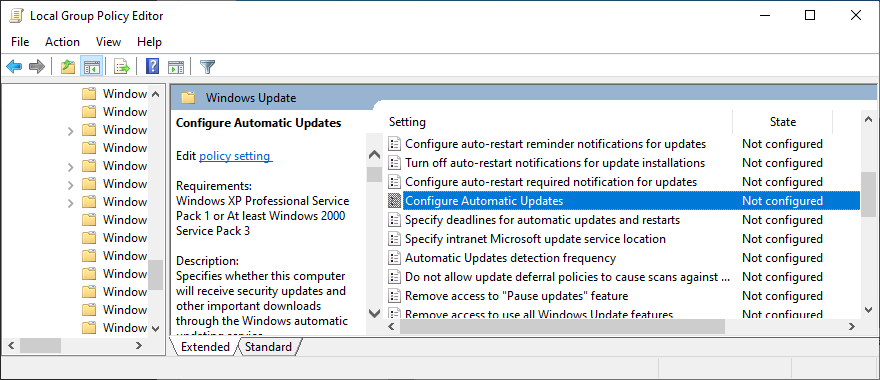
5. ตรวจสอบการตั้งค่านโยบายกลุ่ม
เป็นไปได้ว่ารหัสข้อผิดพลาดของ Windows Update 0x80080005 ถูกทริกเกอร์จากการตั้งค่าที่ไม่ถูกต้องในนโยบายกลุ่ม วิธีตรวจสอบและแก้ไขปัญหานี้มีดังนี้:
- กดปุ่ม Win + R พิมพ์ gpedit.msc และกด Enter เพื่อเปิด ตัวแก้ไขนโยบายกลุ่มในเครื่อง

- ไปที่ การกำหนดค่าคอมพิวเตอร์ > เทมเพลตการดูแลระบบ > ส่วนประกอบของ Windows > Windows Update
- ค้นหาและคลิกสองครั้งที่ กำหนดค่าการอัปเดตอัตโนมัติ เพื่อดูคุณสมบัติ
- เลือก เปิดใช้งาน แล้วคลิก ใช้
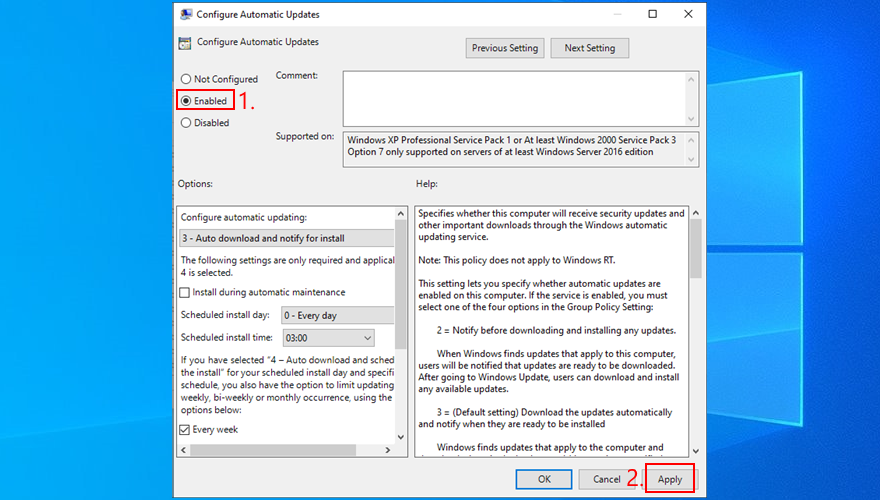
- รีบูตพีซีของคุณ
- ลองเรียกใช้ Windows Update
6. รีเซ็ต Windows Update
คุณสามารถรีเซ็ตส่วนประกอบ Windows Update ได้อย่างรวดเร็วเพื่อล้างแคชและแก้ไขปัญหาทั่วไปที่อาจนำไปสู่ข้อผิดพลาด 0x80080005 เพื่อให้สิ่งนี้เกิดขึ้นคุณต้องใช้พรอมต์คำสั่ง สิ่งที่คุณควรทำมีดังนี้:
- ตรวจสอบให้แน่ใจว่าได้ลงชื่อเข้าใช้ Windows 10 ด้วยสิทธิ์ระดับความสูง
- คลิกปุ่ม เริ่ม ค้นหา พรอมต์คำสั่ง และกด เข้าสู่
- คัดลอกและวางคำสั่งถัดไป (กด Enter หลังข้อความแต่ละบรรทัด):
- ออกจาก Command Prompt และรีสตาร์ทพีซีของคุณ
- ลองเรียกใช้ Windows Update
7. ถอดปลั๊กอุปกรณ์ต่อพ่วงทั้งหมด
อุปกรณ์ภายนอกใด ๆ ที่คุณเพิ่งเสียบเข้ากับคอมพิวเตอร์ของคุณอาจทำให้เกิดรหัสข้อผิดพลาด 0x80080005 เนื่องจากปัญหาความเข้ากันได้หรือไดรเวอร์ ลองนึกถึงฮาร์ดแวร์ชิ้นใหม่ที่คุณซื้อหรือได้รับเป็นของขวัญเช่นไดรฟ์ปากกา USB อะแดปเตอร์ Wi-Fi หรือเว็บแคมที่มีคุณสมบัติพลักแอนด์เพลย์
ในการจัดการเรื่องนี้ให้ปิดคอมพิวเตอร์ของคุณและถอดปลั๊กอุปกรณ์ต่อพ่วงทั้งหมดยกเว้นแป้นพิมพ์และเมาส์ของคุณ จากนั้นบูตระบบปฏิบัติการและเรียกใช้ Windows Update เพื่อยืนยันว่าคุณไม่ได้รับข้อผิดพลาดอีกต่อไป
คุณมีสองทางเลือกในจุดนี้: เปลี่ยนอุปกรณ์ทั้งหมดและถอดออกเมื่อใดก็ตามที่คุณต้องการเรียกใช้ Windows Update หรือแยกชิ้นส่วนอุปกรณ์ที่มีความผิดออกเพื่อแก้ไขหรือหยุดใช้งาน
8. เรียกใช้คลีนบูต
คลีน Windows 10 บูต หมายถึงการปิดส่วนประกอบที่ไม่จำเป็นทั้งหมดที่อาจทำให้เกิดปัญหากับซอฟต์แวร์เช่นไดรเวอร์บริการและกระบวนการต่างๆ สามารถช่วยคุณแยกแยะปัญหาที่นำไปสู่ข้อผิดพลาด Windows Update 0x80080005 สิ่งที่คุณต้องทำมีดังนี้:
- กดแป้น Windows ค้นหา การกำหนดค่าระบบ และกด Enter
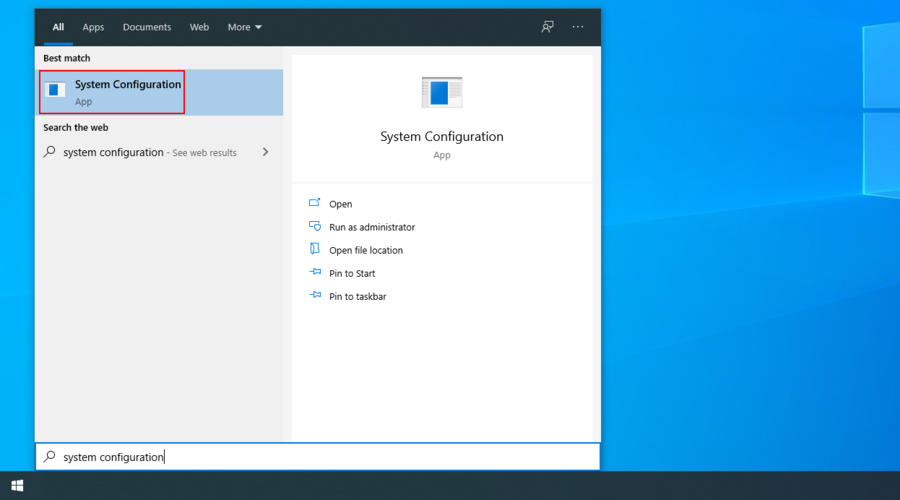
- เปลี่ยนไปที่แท็บ บริการ
- ยกเลิกการเลือก ซ่อนบริการทั้งหมดของ Microsoft แล้วคลิก ปิดใช้งาน

- ออกจาก การกำหนดค่าระบบ
- คลิกขวาที่แถบงานแล้วเลือก ตัวจัดการงาน

- เปลี่ยนไปที่แท็บ เริ่มต้น
- คลิกคอลัมน์ สถานะ เพื่อจัดเรียงแอปทั้งหมดตามสถานะ ( เปิดใช้งาน ก่อน)
- เลือกแอปแรกแล้วคลิก ปิดใช้งาน
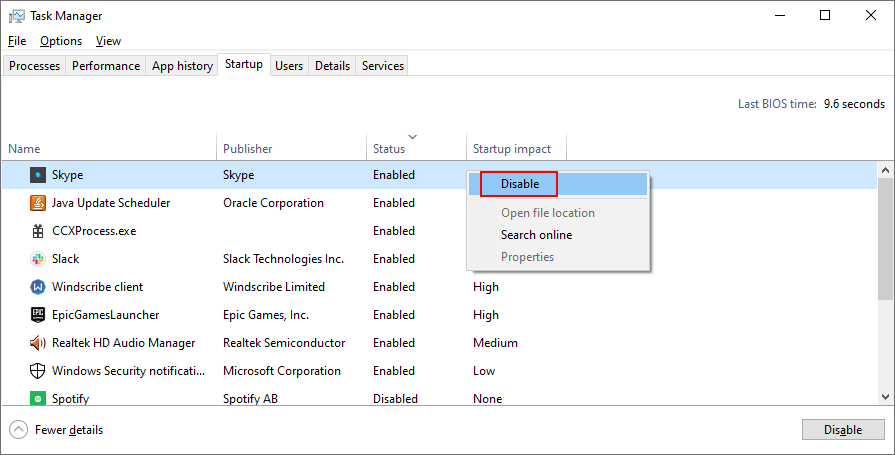
- ดำเนินการนี้กับทุกแอปที่มีสถานะ เปิดใช้งาน
- รีสตาร์ทพีซีของคุณ
- ลองเรียกใช้ Windows Update ทันที
9. ปิดไฟร์วอลล์ของคุณ
ไม่น่าเป็นไปได้ แต่ Windows Update อาจถูกบล็อกโดยไฟร์วอลล์ของคุณ โดยปกติจะเกิดขึ้นเมื่อคุณเปลี่ยนการตั้งค่าไฟร์วอลล์เริ่มต้นหรือติดตั้งแอปพลิเคชันไฟร์วอลล์ของ บริษัท อื่นที่ทำให้เกิดขึ้น
หากต้องการอยู่อย่างปลอดภัยคุณสามารถปิดไฟร์วอลล์ชั่วคราวเพื่อให้ Windows มีเวลาเพียงพอในการติดตั้งการอัปเดต ตรวจสอบให้แน่ใจว่าได้รีสตาร์ทในภายหลัง มิฉะนั้นคุณจะปล่อยให้คอมพิวเตอร์ของคุณสัมผัสกับมัลแวร์
วิธีปิดใช้งานและเปิดใช้งาน Windows Firewall อีกครั้ง:
- ลงชื่อเข้าใช้ Windows 10 ด้วยสิทธิ์ระดับผู้ดูแลระบบ
- คลิกปุ่ม เริ่ม ค้นหา แผงควบคุม และเปิดแอปนี้
- ค้นหาและคลิก Windows Defender Firewall
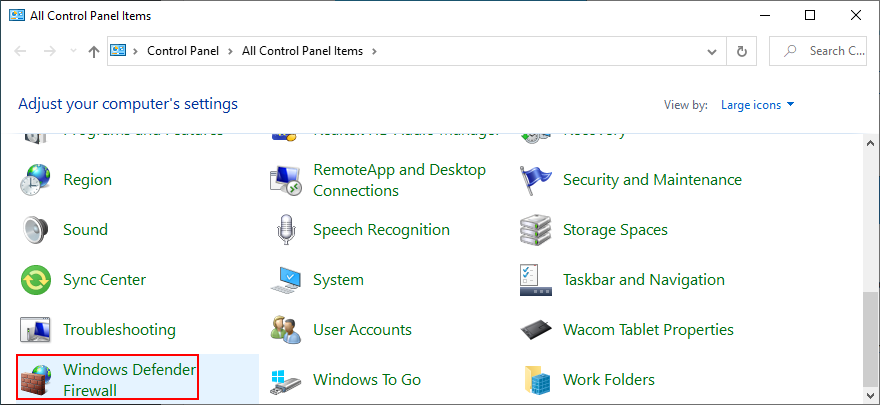
- คลิก เปิดหรือปิด Windows Defender ที่แผงด้านซ้าย

- เลือก ปิดไฟร์วอลล์ Windows Defender (ไม่แนะนำ) ที่ การตั้งค่าเครือข่ายส่วนตัว และ การตั้งค่าเครือข่ายสาธารณะ
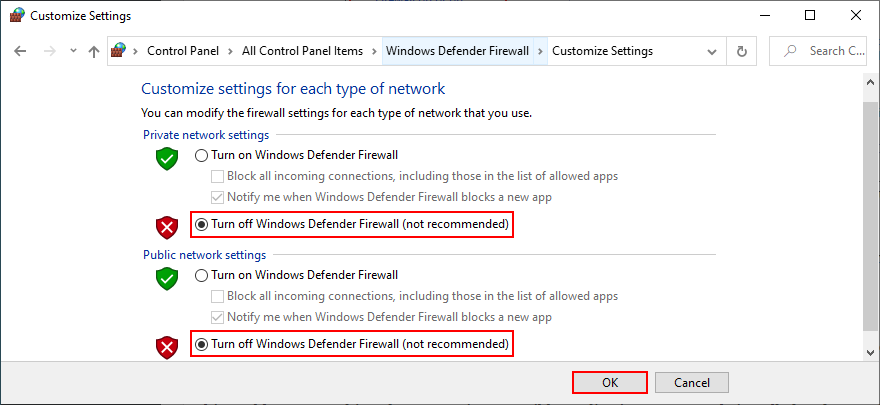
- คลิก ตกลง เพื่อยืนยัน
- ลองเรียกใช้ Windows Update
- หลังจากการอัปเดตเสร็จสิ้นให้กลับไปที่ แผงควบคุม > Windows Defender Firewall
- เลือก คืนค่าเริ่มต้น ทางด้านซ้าย
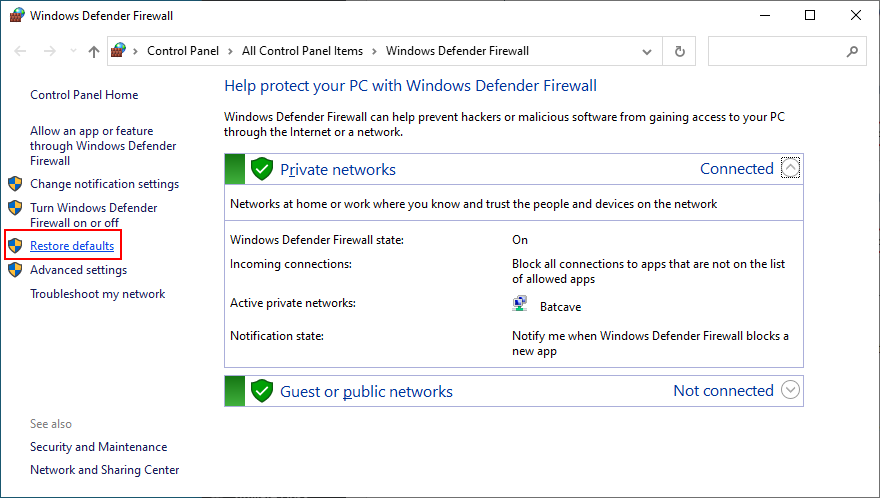
- คลิก คืนค่าเริ่มต้น และ ใช่ เพื่อยืนยัน
หากคุณมีไฟร์วอลล์ของ บริษัท อื่นที่เข้าควบคุม Windows Firewall ให้ปรับขั้นตอนด้านบนเพื่อปิดชั่วคราว
10. ถอนการติดตั้งซอฟต์แวร์ของ บริษัท อื่น
ในวิธีแก้ไขปัญหาก่อนหน้านี้เราได้กล่าวว่าไฟร์วอลล์ของ บริษัท อื่นที่มีการตั้งค่าที่ไม่ถูกต้องอาจบล็อก Windows Update และต่อมาจะเรียกรหัสข้อผิดพลาดเช่น 0x80080005 อย่างไรก็ตามอาจเป็นไปได้ว่าแอปพลิเคชันไฟร์วอลล์สร้างมาไม่ดีหรือไม่รองรับ Windows รุ่นของคุณอย่างสมบูรณ์
ไม่เพียง แต่ใช้กับแอปไฟร์วอลล์เท่านั้น แต่ยังรวมถึงโปรแกรมใด ๆ ที่สามารถเข้าถึงอินเทอร์เน็ต ซึ่งรวมถึงโซลูชันการรักษาความปลอดภัยอินเทอร์เน็ต บริการ VPN เว็บเบราว์เซอร์หรือไคลเอนต์ทอร์เรนต์
หากคุณเริ่มพบข้อผิดพลาดของ Windows Update ทันทีหลังจากเพิ่มซอฟต์แวร์ชิ้นใหม่ลงในพีซีของคุณนั่นอาจเป็นฝ่ายผิด แต่คุณควรจะสามารถแก้ไขปัญหานี้ได้โดยการถอนการติดตั้ง
วิธีถอนการติดตั้งซอฟต์แวร์ล่าสุด:
- คลิกขวาที่ปุ่ม เริ่ม แล้วเลือก แอปและคุณลักษณะ
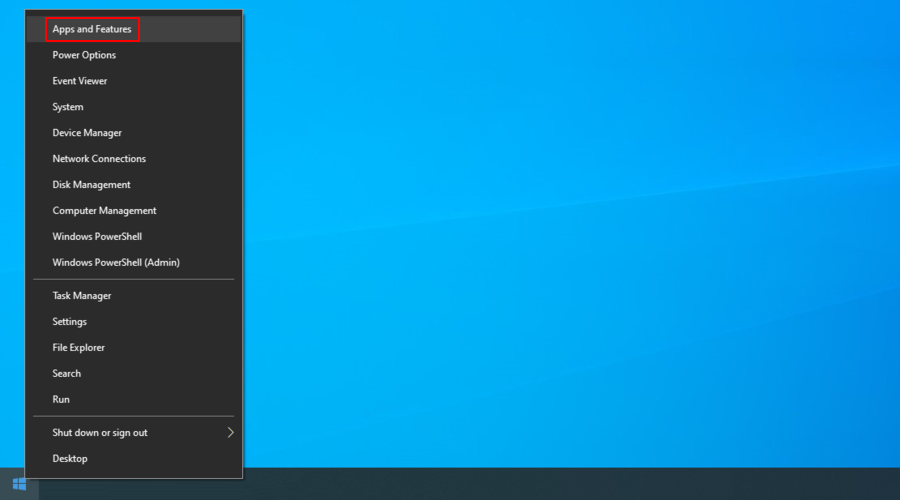
- In the Apps & features section, set Sort by to Install date (newest first)
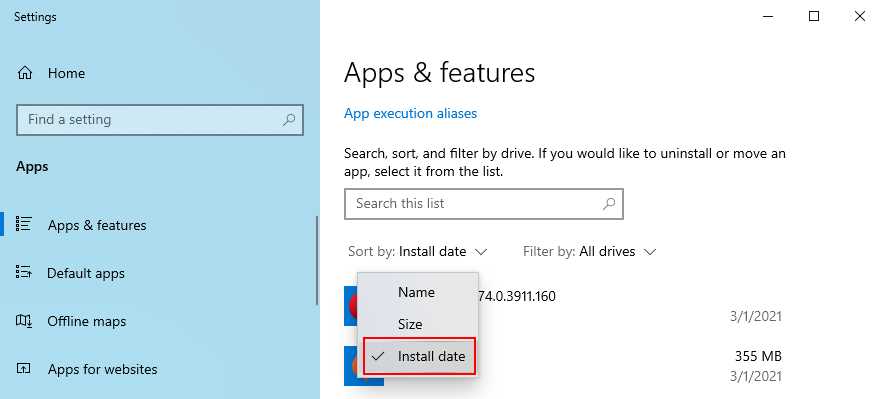
- Pick the first program in the list and click Uninstall
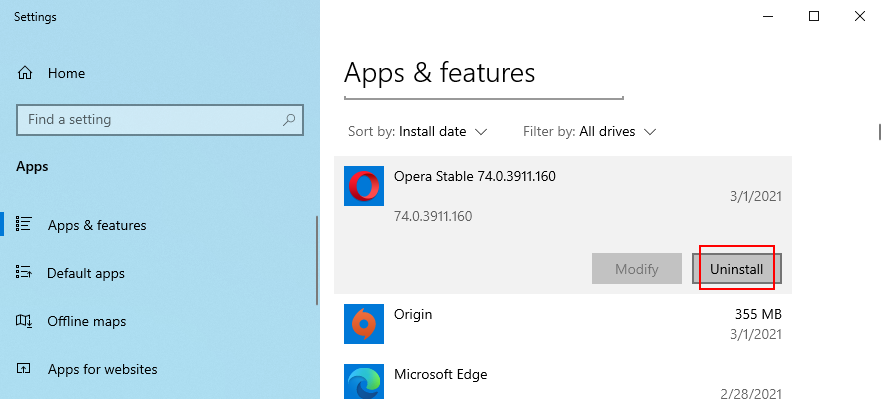
- Click Uninstall again to confirm and proceed with the wizard steps
- If you recently installed multiple fishy programs, make sure to remove all of them
- Reboot your PC and try running Windows Update
The Windows 10 built-in uninstaller is not that effective. If you prefer a more thorough solution that removes not only programs but also any leftover files and registry entries, use a third-party app uninstaller.
11. Uninstall system updates
Not only software applications can cause Windows Update issues but also a faulty system update. It’s not uncommon for Microsoft to push unreliable updates that affect the computers of millions of users. In some cases, this could even lead to error code 0x80080005.
But you can fix it by uninstalling the most recent Windows updates. โดยมีวิธีดังนี้:
- Press Win key + R, type appwiz.cpl, and press Enter

- Click View installed updates
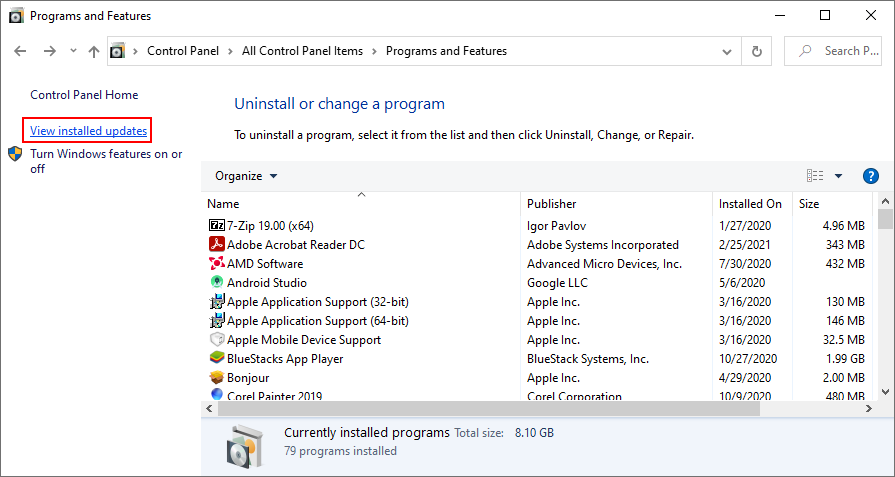
- Click the Installed On column to sort the updates by time (newest first)
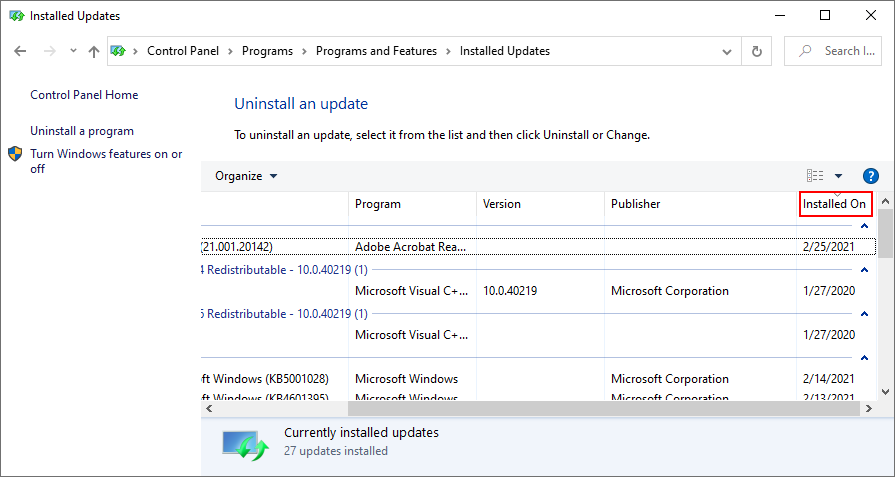
- Double-click the first entry in the Microsoft Windows category
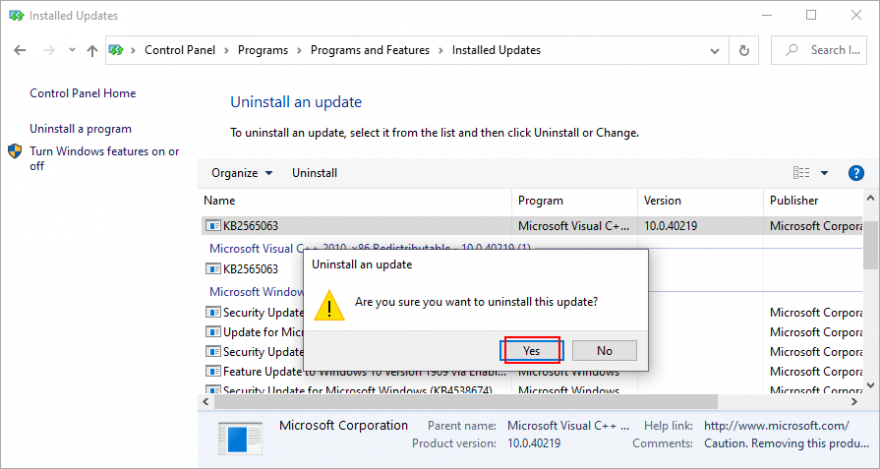
- Click Yes to confirm and proceed with the removal
- Restart your PC and try to run Windows Update now
- If Windows Update works now, make sure to avoid installing the same update that was giving you trouble
12. Check the disk space
If there isn’t enough free disk space on your computer, Windows Update might not be able to carry out its activities, like downloading files or running background processes. You can tell if you get the insufficient disk space message in the notifications center.
To fix this problem, you can increase the disk space on the C: drive (or wherever you have Windows installed) by turning to a partition manager. However, if you don’t want to install any third-party tools, Disk Management should do the trick.
How to use Disk Management:
- Right-click the Start button and select Disk Management
- Select a large drive that doesn’t contain Windows (like D:)
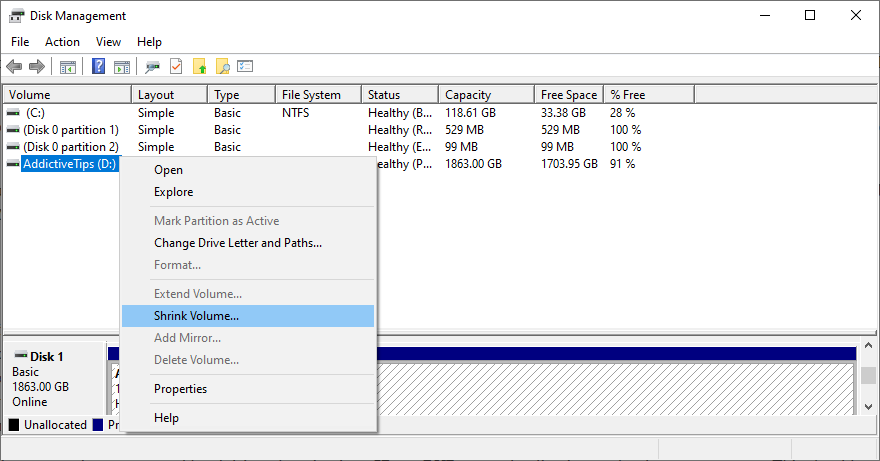
- Right-click D: and select Shrink Volume
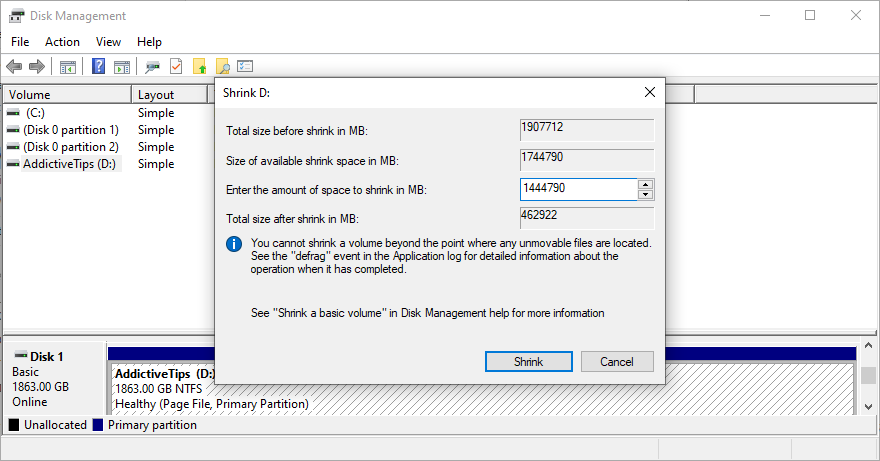
- Write the new volume size and click Shrink
- Return to the main window
- Right-click the C: drive (or where you have Windows installed) and choose Extend Volume
- Set the new volume size and click Extend
- Try to run Windows Update now
If your hard disk is not big enough to allocate disk space from one partition to another, a workaround is to remove files from your PC to make room for Windows Update. Move personal photos and videos to an external hard disk, burn them to DVDs, or upload them to cloud storage accounts.
You can also uninstall large games and applications, as well as get rid of junk files with the help of a system cleaner. Or, if you don’t want to install anything extra, check out the Windows Disk Cleanup utility.
How to use Disk Cleanup:
- Sign in to Windows 10 with admin rights
- Go to Downloads and Recycle Bin to back up or restore any files you would like to keep since these folders will be emptied
- Press Win key + E to open File Explorer
- Select the C: drive or where you have your OS installed
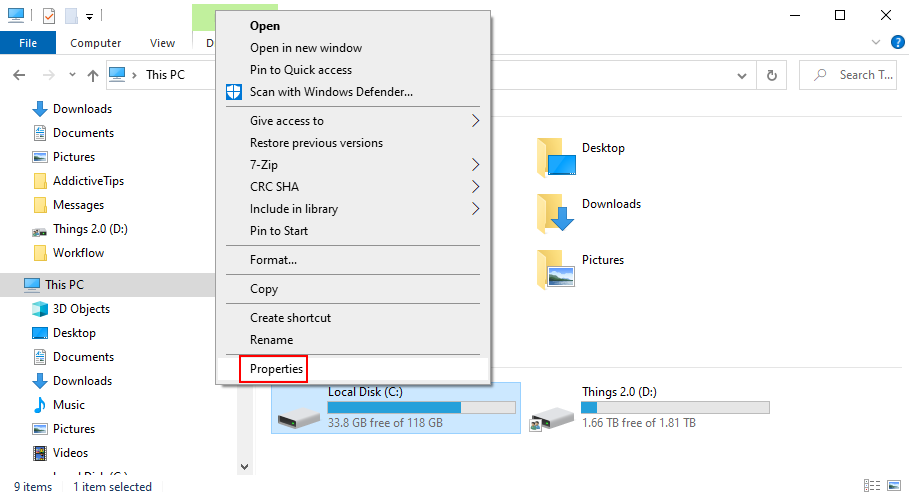
- Right-click the drive and go to Properties
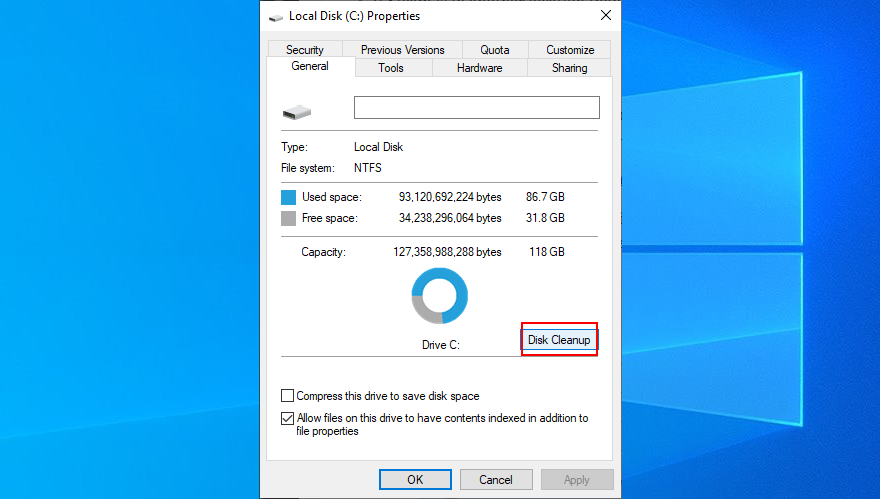
- In the General tab, click Disk Cleanup
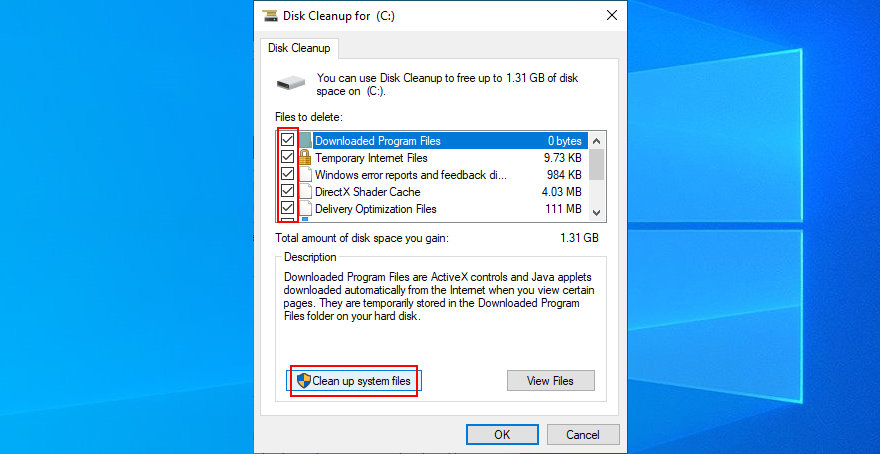
- At Files to delete, select everything and click Clean up system files
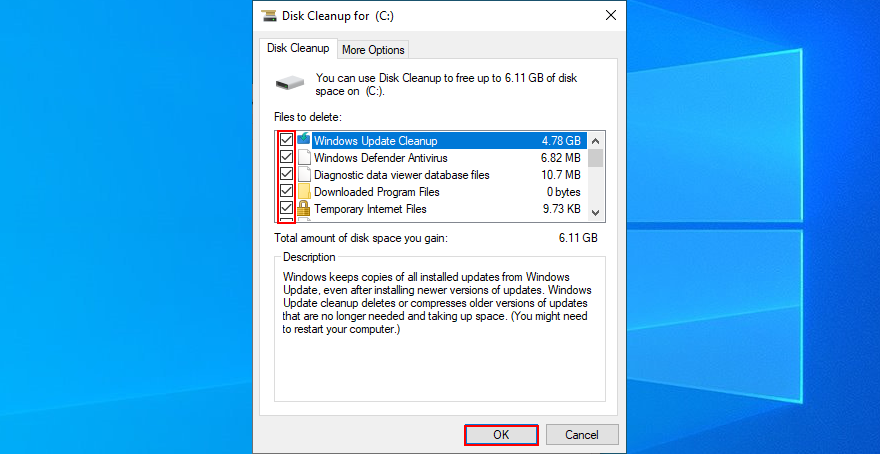
- Once the file search is over, choose all items again and press OK
- Restart your PC when the cleanup is over
- Try to run Windows Update now
13. Check the network drivers
It’s common for driver issues to interfere with all applications and system utilities that require Internet access, including Windows Update. For instance, if your network device is not working properly, it could be the reason why you keep getting error code 0x80080005. It’s also possible that your network driver is obsolete or incompatible with your operating system. สิ่งที่คุณต้องทำมีดังนี้:
How to quickly reinstall the network device:
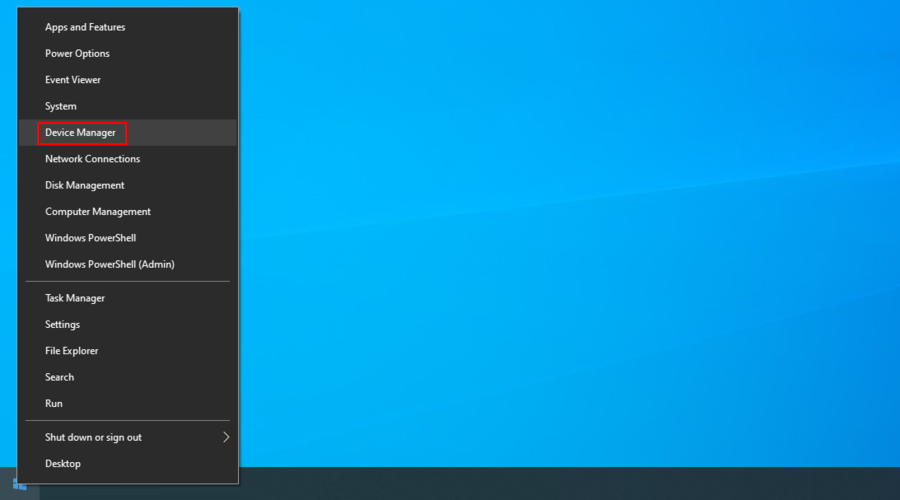
- Right-click the Start button and go to Device Manager
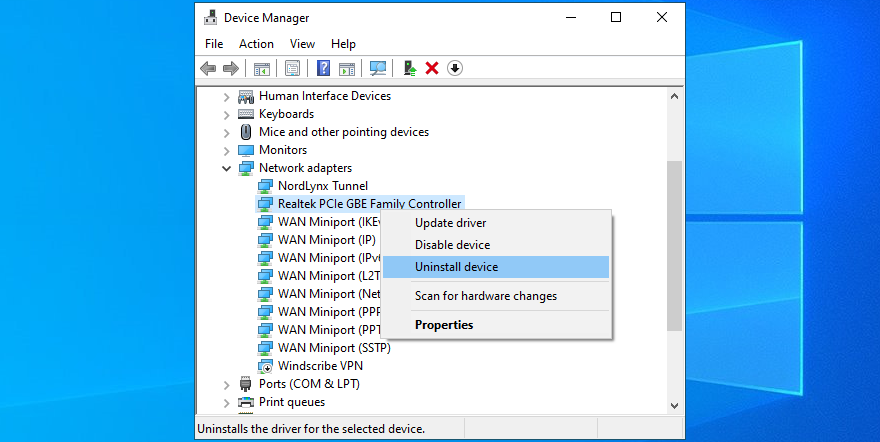
- Open the Network adapters category
- Select and right-click your main network device, then click Uninstall device
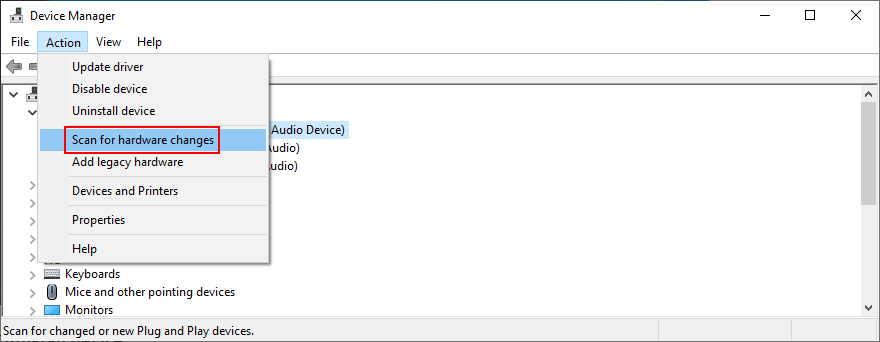
- เปิดเมนู การดำเนินการ และคลิก สแกนหาการเปลี่ยนแปลงฮาร์ดแวร์
- Restart your computer. Windows will auto-reinstall the missing network device
- Check for Windows Update errors
How to update your network driver:
- กลับไปที่ ตัวจัดการอุปกรณ์
- Right-click your network device and select Update driver
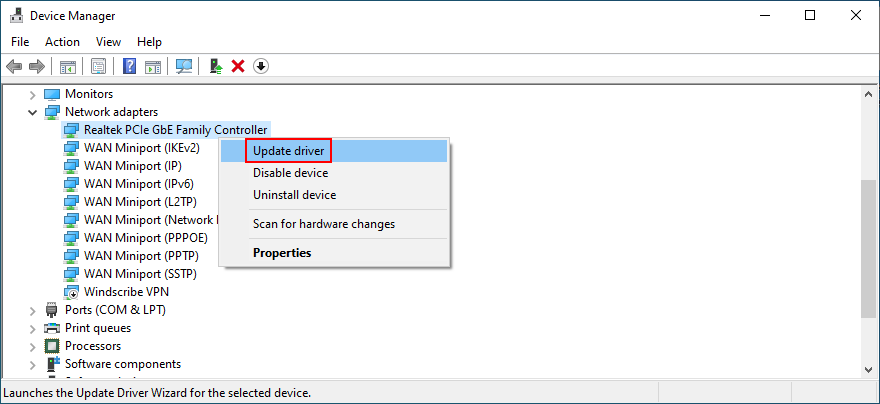
- When prompted with two options, click Search automatically for updated driver software
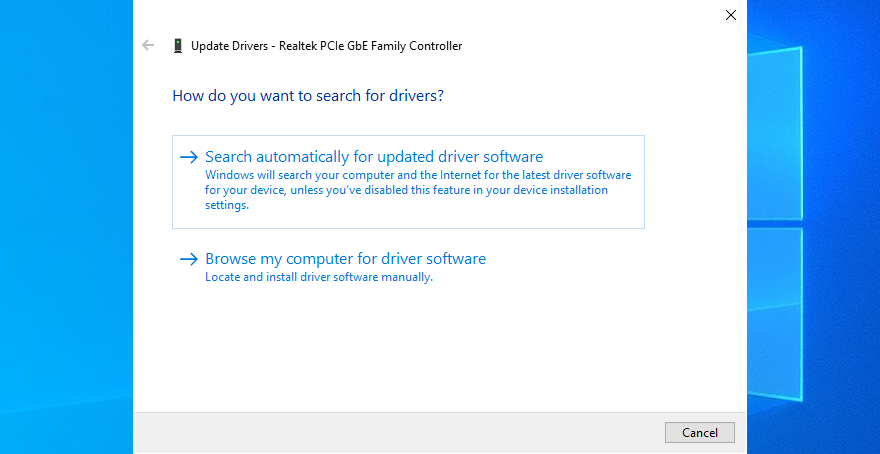
- Wait a bit until Windows checks for updates. If it doesn’t find anything, exit
If Windows fails to find a network driver, we suggest turning to a driver update tool. It identifies all outdated drivers on your PC and finds newer versions on the web that are compatible with your operating system. Furthermore, it can automatically download and install all drivers.
How to roll back an incompatible network driver:
- Go back to Device Manager
- Right-click your network adapter and go to Properties
- Switch to the Driver section
- Click Roll Back Driver and follow the on-screen steps
- If the button is greyed out, it means that no previous network driver exists on your PC, so you can’t complete the rollback
- If the rollback was successful, reboot your machine and try to run Windows Update
14. Repair hard disk and system errors
Data corruption in the hard disk or operating system can be devastating to all system utilities, including Windows Update. If you have a missing or damaged file that’s critical for the updater component, it’s no wonder that you get error codes like 0x80080005.
To fix HDD errors, you can use CHKDSK (Check Disk). When it comes to damaged system files, use SFC (System File Checker). Lastly, for more serious problems with the component store of the Windows image, turn to DISM (Deployment Image Servicing and Management).
How to use CHKDSK:
- Click the Start button, search for Command Prompt, and click Run as administrator
- Type
chkdsk c:/fif your operating system is installed on the C: drive. If it’s not, replacec:with the correct partition letter. Press Enter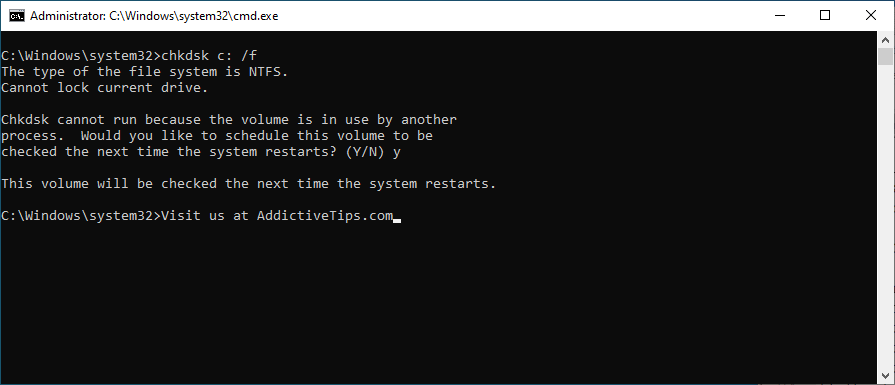
- When asked to confirm the CHKDSK scheduling at the next system boot, type y and hit Enter
- Reboot your PC
- During restart, CHKDSK will scan your hard disk and fix any errors
- After boot, try running Windows Update
How to use SFC:
- Press Win key + R, type cmd, and press Ctrl + Shift + Enter to run CMD as admin. Click Yes if prompted by UAC (User Account Control)

- Type
sfc/scannowand press Enter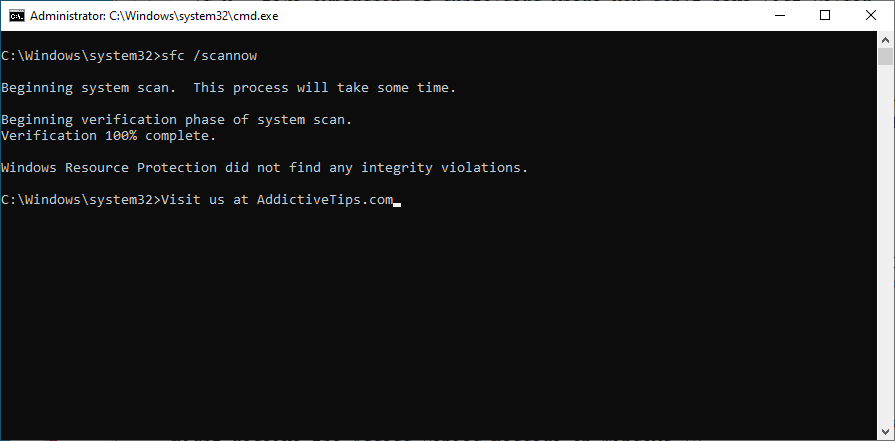
- Patiently wait while SFC performs the system scan and fixes any issues
- Restart your PC
- Run Windows Update and check if you still get error 0x80080005
How to use DISM:
- Launch Command Prompt as admin
- Run
DISM/online/cleanup-image/scanhealthto check the health of your operating system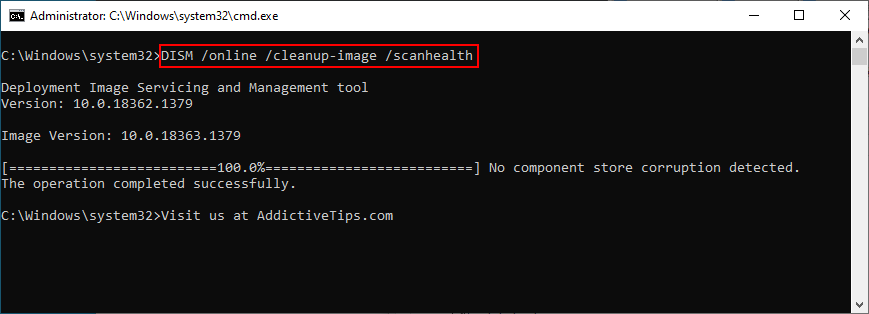
- If DISM finds any issues, type
DISM/online/cleanup-image/restorehealthand press Enter to fix them - Reboot your PC after the process is complete
- Open CMD as admin again
- Run SFC (
sfc/scannow)
- Restart your computer one last time
- Try to run Windows Update now
15. Run a malware scan
If your antivirus solution failed to fend off malware attacks, then an infection could have affected the entire operating system and its utilities, including Windows Update. You need to immediately perform a computer scan and remove any viruses from your PC.
How to run Windows Defender:
- Click the Start button, search for Windows Security, and press Enter

- Jump to Virus & threat protection
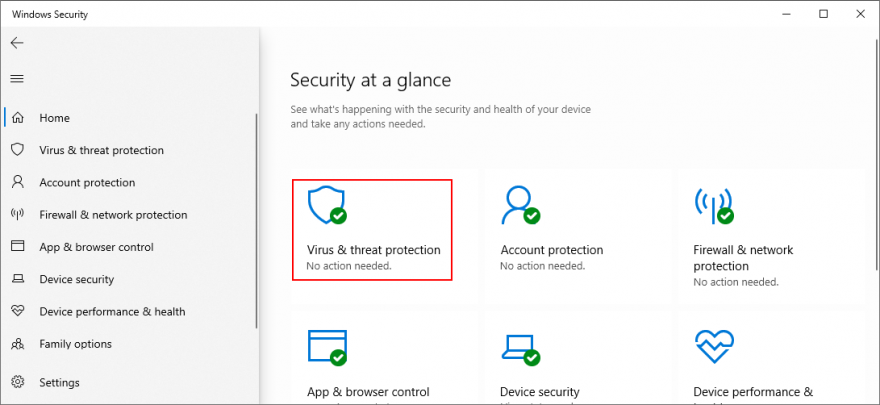
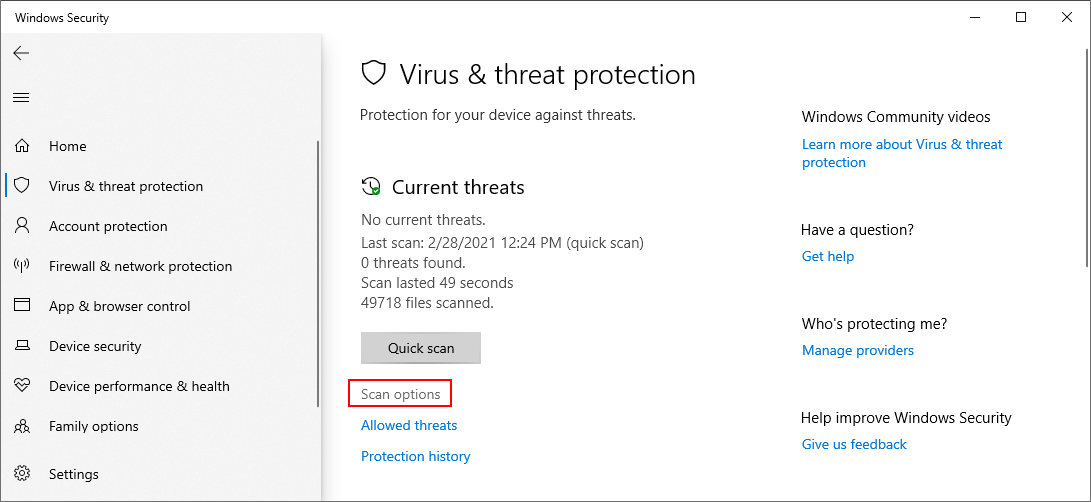
- Click Scan options
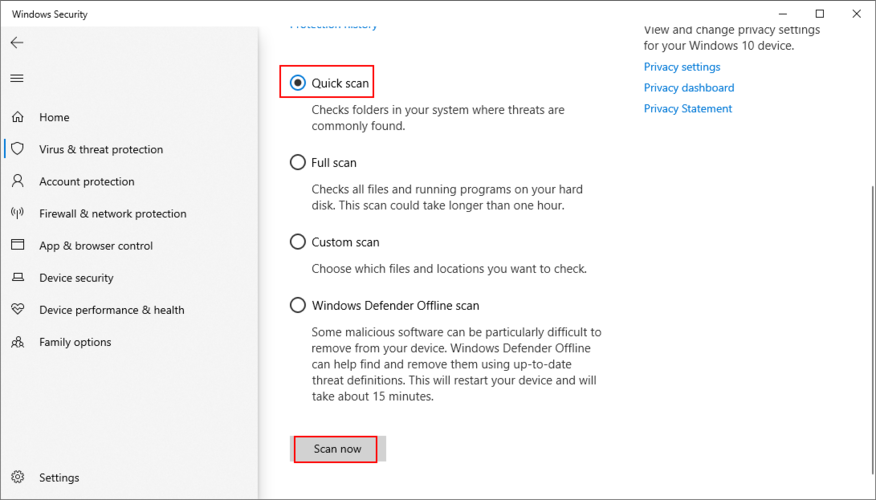
- Select Quick scan and click Scan now
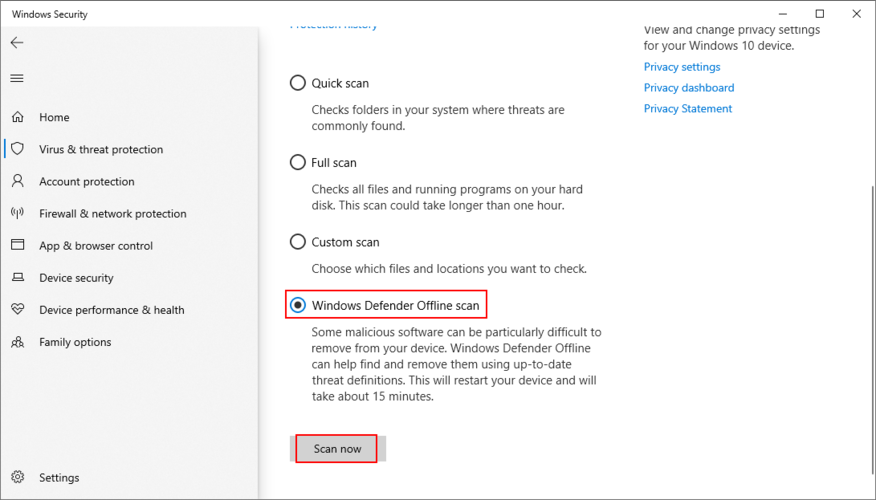
- Wait until Windows runs the scan. If it doesn’t find anything, select Windows Defender Offline scan and click Scan now
- Once the threats have been eliminated from your PC, restart
- Try to run Windows Update now
16. Turn off IPv6
It’s a bit unusual, but IPv6 connectivity may conflict with Windows Update if your network doesn’t support IPv6. In turn, this can lead to error codes like 0x80080005. Unless you’re absolutely sure that your ISP supports IPv6 (you can contact it and ask), it’s safer to disable IPv6 connections on your PC.
How to disable IPv6 on Windows 10:
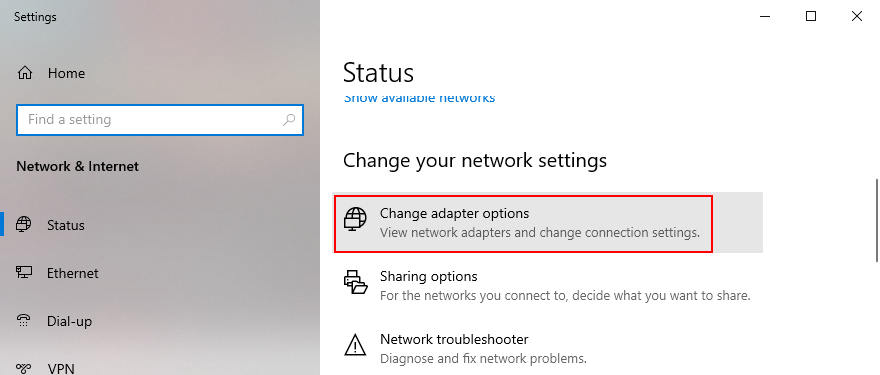
- Click the network icon in the system tray and visit Network & Internet settings
- Go to Change adapter options
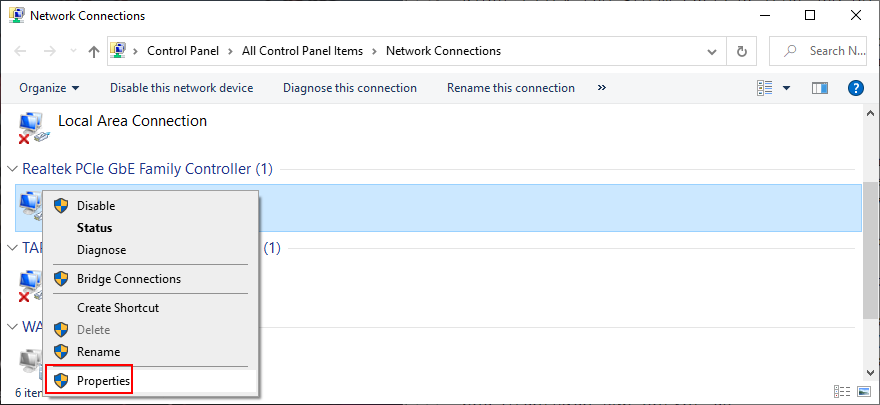
- Select your Internet connection, right-click it, and choose Properties (you need admin rights)
- Remain in the Networking tab
- Find and uncheck Internet Protocol Version 6 (TCP/IPv6)
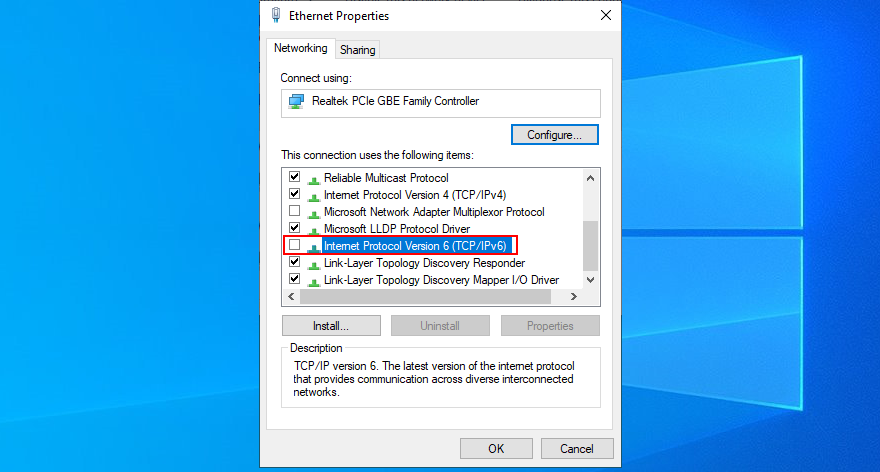
- Click OK and exit
- Try to run Windows Update now
It’s also a good idea to turn disable IPv6 connectivity from your router’s admin panel.
17. Fix registry settings
You can also fix the 0x80080005 Windows Update error code by fixing several system registry settings. Don’t worry since you don’t need any previous experience, as long as you follow the instructions below.
- Click the Start button, search for Registry Editor, and open this app
- If prompted by User Account Control, click Yes
- In Registry Editor, create a backup:
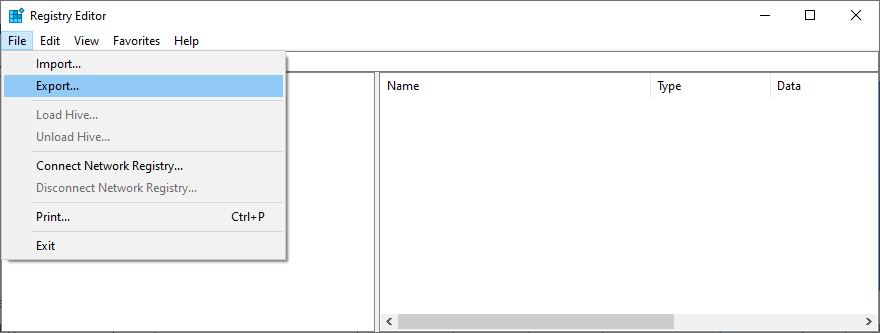
- Open the File menu
- Select Export
- Set a new file name and indicate a destination
- Click Save to save the current registry settings as backup (.reg format)
- Copy and paste the following address to visit this location:
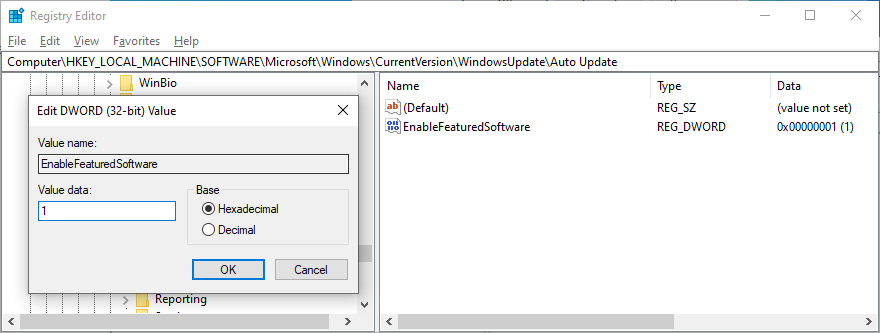
Computer\HKEY_LOCAL_MACHINE\SOFTWARE\Microsoft\Windows\CurrentVersion\WindowsUpdate\Auto Update
- If you spot the EnableFeaturedSoftware entry, check if Data is 0x00000001 (1). Otherwise:
- Double-click the entry
- Set Value data to 1
- Set Base to Hexadecimal
- Click OK
- If the EnableFeaturedSoftware entry doesn’t exist:
- Open the Edit menu
- Select New > DWORD (32-bit) Value
- Set the name to EnableFeaturedSoftware
- Double-click the entry
- Set Value data to 1
- Set Base to Hexadecimal
- Click OK
- Go to the following location:
HKEY_LOCAL_MACHINE\SOFTWARE\Microsoft\WindowsUpdate\UX
- Find and double-click IsConvergedUpdateStackEnabled
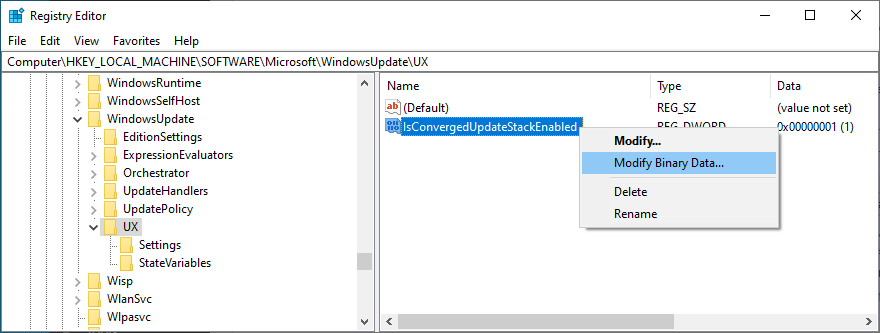
- Set Value data to 0
- Set Base to Hexadecimal
- Click OK
- Now, visit this address:
HKEY_LOCAL_MACHINE\SOFTWARE\Microsoft\WindowsUpdate\UX\Settings
- Locate UxOption
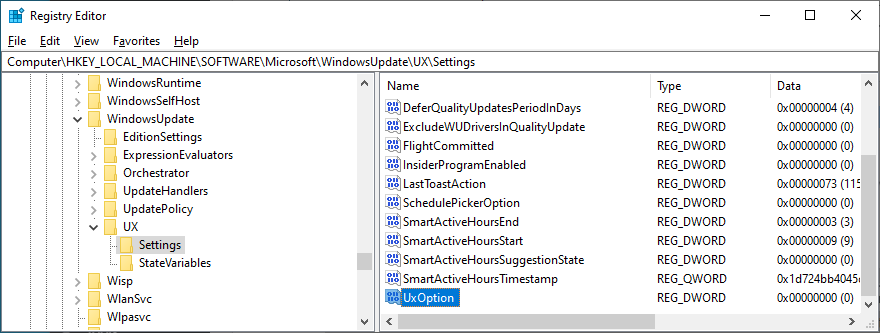
- Double-click the entry
- Set Value data to 0
- Set Base to Hexadecimal
- Click OK
- Finally, visit this location:
HKEY_LOCAL_MACHINE\SOFTWARE\Policies\Microsoft\SystemCertificates
- If you spot the CopyFileBufferedSynchronousIo entry, make sure that its data is set to 0x00000001 (1). If it’s not:
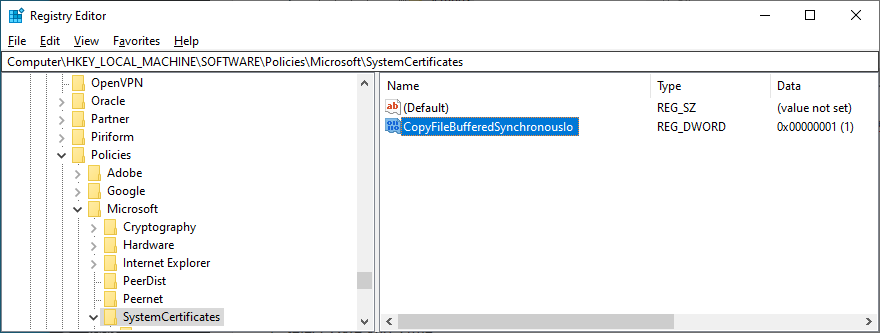
- Double-click the entry
- Set Value data to 1
- Set Base to Hexadecimal
- Click OK
- If CopyFileBufferedSynchronousIo doesn’t exist:Open the Edit menu
- Select New > DWORD (32-bit) Value
- Set the entry name to CopyFileBufferedSynchronousIo
- At Value data, write 1
- Set Base to Hexadecimal
- Click OK
- Exit Registry Editor and restart your computer
- Try to run Windows Update now
If, for any reason, you need to roll back the changes you made in the registry, just double-click the.reg backup file you previously created to restore the original registry configuration.
18. Fix Windows startup problems
The Windows advanced troubleshooting mode gives you the possibility to repair startup issues that might prevent your operating system from working properly. It’s worth a shot when it comes to repairing Windows Update errors. วิธีการใช้งานมีดังนี้:
- Make sure to save any ongoing projects
- Right-click the Start button and go to Settings

- เลือก อัปเดตและความปลอดภัย

- Jump to Recovery on the left side
- At Advanced startup, click Restart now
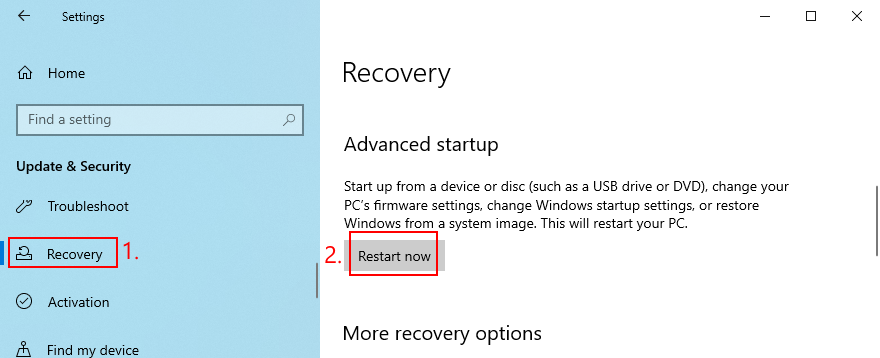
- Windows will restart in recovery mode. When the screen turns blue and loads various options, go to Troubleshoot
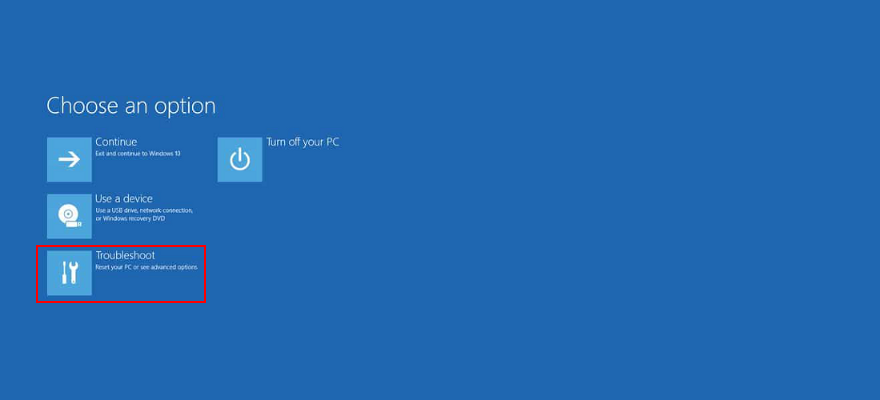
- Select Advanced options > Startup Repair

- Select your admin account and enter your password
- Follow the step-by-step instructions to fix startup problems
- After Windows starts, try running the system updater
19. Roll back Windows 10
For any other unforeseen software events that you can’t identify but may have damaged Windows Update, turn to System Restore. If you have created a restore point before starting to receive error code 0x80080005 on each attempt to update the OS, you can roll back Windows 10 to that state. โดยมีวิธีดังนี้:
- Click the Start button, search for Control Panel, and open this app
- Select the Recovery section
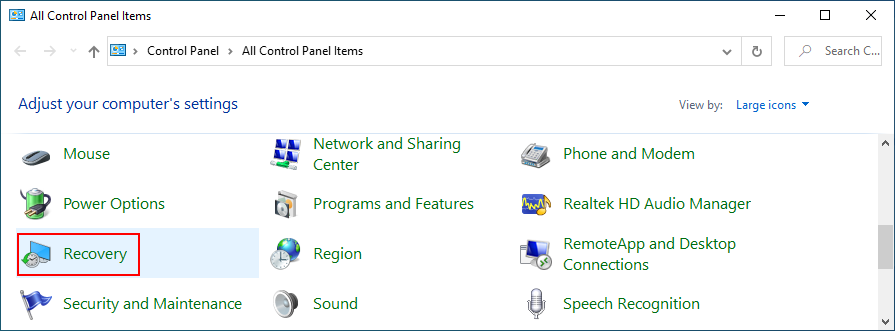
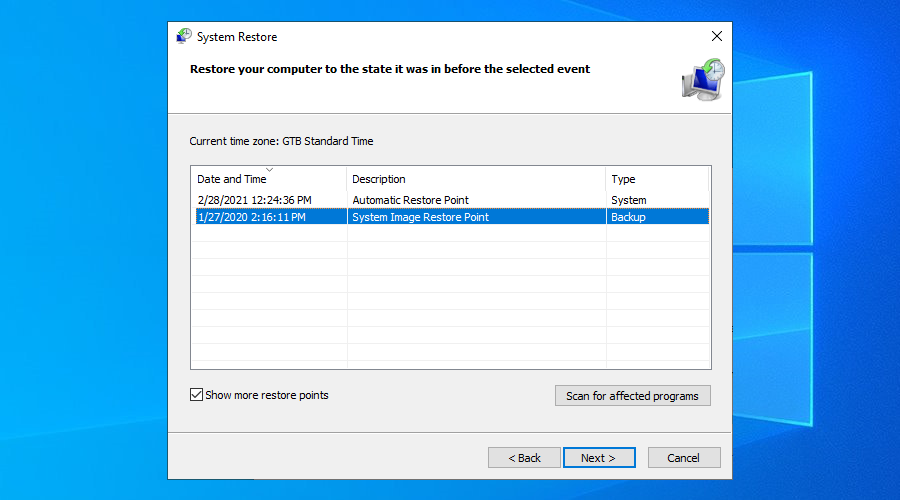
- Pick a restore point from the list or select Show more restore point to go back further
- To view which applications will be removed from your PC, click Scan for affected programs
- Click Next and follow the on-screen instructions
- After your PC restarts, try to run Windows Update
20. Reset Windows 10
Unfortunately, System Restore fails to work on many occasions. After exhausting all the previous solutions and still getting hampered by error code 0x80080005, it’s time to reset Windows 10.
Your files, downloads, and game saves will be left untouched. However, all your applications will disappear from your PC. สิ่งที่คุณต้องทำมีดังนี้:
- Right-click the Windows 10 Start button and select Settings

- Visit the Update & Security section

- Jump to Recovery
- At Reset this PC, click Get started
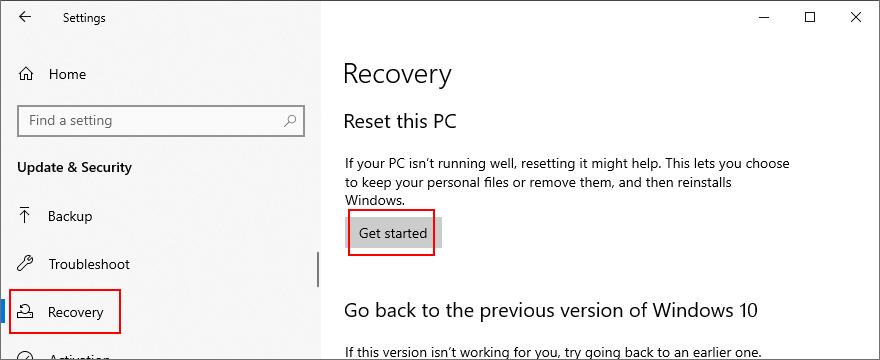
- When prompted with two options, select Keep my files
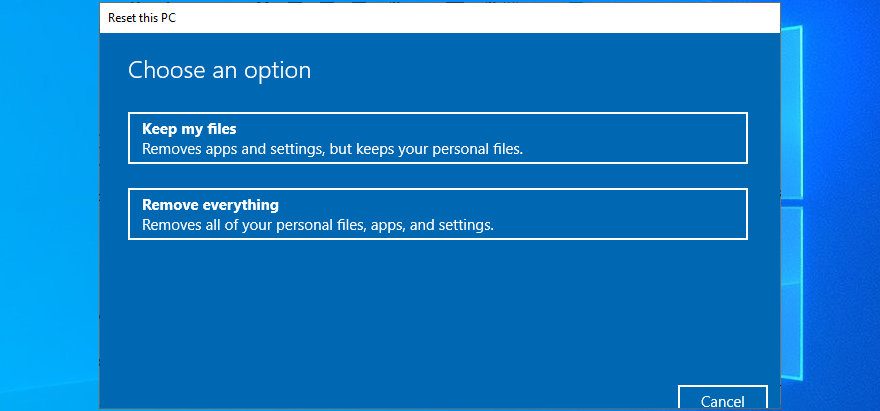
- Follow the on-screen steps to reset Windows 10
- Once the task is complete, run Windows Update to install all required updates
Windows Update error 0x80080005 can be fixed
To sum up, 0x80080005 is an error code that pops up on the screen when trying to run Windows Update. It’s typically caused by a hardware or software problem that can be resolved.
Start by running the Windows Update troubleshooter and using the Windows Update Diagnostic tool. If these fail, restart the Windows Update and dependent services, turn off Network List Service, check Group Policy settings, reset Windows Update components, and unplug all peripheral devices.
You can also run a clean boot, temporarily deactivate your firewall, uninstall recent third-party software and system updates, check the disk space and network drivers, as well as repair any hard disk and operating system errors.
It’s also a good idea to run a computer scan to remove any malware, disable IPv6 connectivity if you don’t use it, fix registry settings and Windows startup problems, and roll back Windows 10 to a previous checkpoint. If everything fails, it’s time to factory reset Windows 10.
How did you manage to get rid of 0x80080005?
Did we miss any important steps? Let us know in the comment area below.
