As compras no aplicativo são uma forma de aplicativos móveis receberem pagamentos dos usuários. Pode ser na forma de assinatura ou pagamento único para desbloquear um recurso ou conteúdo específico no aplicativo.
Neste tutorial, veremos como podemos implementar compras no aplicativo no React Native. Além do front-end, também vamos implementar o back-end para que possamos verificar as compras e atualizar os dados do usuário de acordo.
Pré-requisitos
Conhecimento de React, React Native e qualquer linguagem de programação é necessário para seguir este tutorial. Vamos usar especificamente PHP e Laravel para a parte de back-end deste tutorial, mas deve ser facilmente traduzível para outra linguagem de back-end também.
Para o lado do software, você precisa ter o ambiente de desenvolvimento React Native e o ambiente de desenvolvimento PHP configurados em sua máquina. Se sua linguagem de back-end principal for diferente, você pode simplesmente traduzir o código para a linguagem de programação de sua escolha.
Se você planeja usar compras no aplicativo no Android, precisa de um Conta de desenvolvedor do Google Play . Você também precisa ter uma conta do Google Cloud Platform .
Se você planeja usar compras no aplicativo no iOS, precisa ter um Apple conta do desenvolvedor . Pode ser sua conta pessoal da Apple ou como parte de uma equipe.
Visão geral do aplicativo
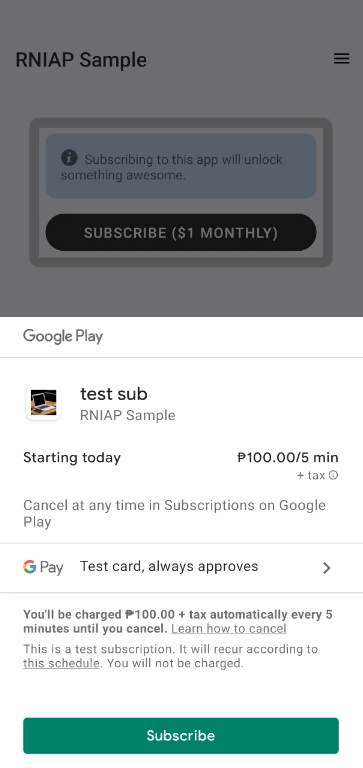
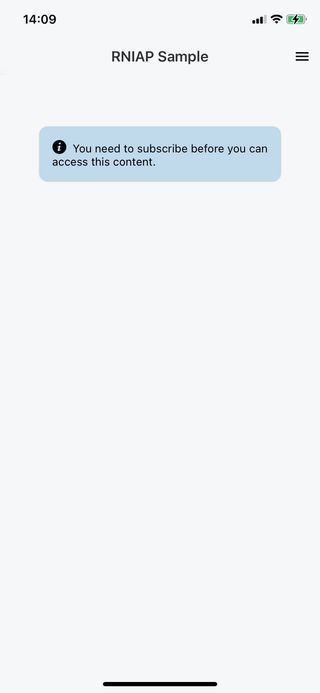
O aplicativo que iremos construir é baseado em assinatura. Basicamente, o usuário deve se inscrever usando compras no aplicativo para desbloquear um recurso pago do aplicativo. Vai ser assim no Android:
E assim será no iOS:
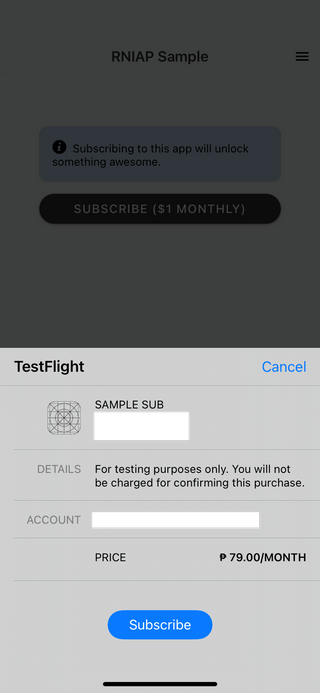
Depois que o usuário estiver inscrito, o conteúdo da página bloqueada ficará disponível para o usuário.
Você pode encontrar o código no repositório GitHub para o aplicativo React Native e o servidor.
Inicialize o projeto React Native
Crie um novo projeto de Expo vazio e defina seu nome como RNIAPSample :
expo init--template mínimo
Assim que o projeto for criado, instale todas as dependências:
npm install--save [email protected] react-native-restart react-native-simples-toast react-native-paper axios
Observe que, no momento em que este tutorial foi escrito, a versão mais recente das compras no aplicativo Expo é a 10.1.0. Mas há um problema com ele, e a única versão recente que está funcionando é a 9.1.0. Ao ler isso, tente instalar a versão mais recente primeiro, pois o problema já pode estar resolvido naquele momento.
Em seguida, instale os pré-requisitos do React Navigation:
expo install reagente-nativo-gesto-manipulador react-nativo-reanimado react-nativo-telas react-nativo-seguro-area-context @ react-native-community/masked-view
Em seguida, instale o React Navigation junto com alguns de seus navegadores-navegação de pilha e gaveta:
npm install--save @ react-navigation/native @ react-navigation/stack @ react-navigation/drawer
Em seguida, instale o expo-secure-store :
expo install expo-secure-store
Opcionalmente, você pode instalar o expo-device para determinar o nome do dispositivo do usuário. Não vamos usar isso no projeto, vamos simplesmente usar um valor embutido em código:
expo instalar expo-dispositivo
Finalmente, instale todas as dependências iOS correspondentes:
npx pod-install
Aqui está uma análise de todos os pacotes que acabamos de instalar:
-
expo-in-app-compras-Para implementar compras no aplicativo -
react-native-start-Para recarregar o aplicativo após o término da compra -
react-native-simple-toast-Para notificar o usuário com uma notificação do sistema após o término da compra -
react-native-paper-Para implementar o design de IU de material -
axios-Para enviar solicitações HTTP ao servidor -
@ react-navigation/native-Para implementar a navegação dentro do aplicativo -
expo-secure-store-Para armazenar informações confidenciais no aplicativo -
expo-device-Para determinar as informações do dispositivo, como nome ou fabricante do dispositivo
Configurando o servidor
Vamos continuar com a configuração do servidor. Primeiro, crie um novo projeto Laravel. Isso instalará a versão mais recente do Laravel. No momento em que este artigo foi escrito, é o Laravel 8:
composer criar-projeto laravel/laravel rniapserver
Depois de fazer isso, navegue dentro do diretório do projeto. Agora, ele servirá como o diretório raiz para todos os comandos que executaremos:
cd rniapserver
Em seguida, instale as dependências. Primeiro, temos o Laravel Sanctum . Isso fornece um sistema de autenticação para usuários de aplicativos móveis e SPAs:
compositor requer laravel/sanctum
Se isso falhar devido a um problema de memória, defina o limite de memória do PHP para ilimitado:
php-d memory_limit=-1/usr/local/bin/composer requer laravel/sanctum
Assim que o Sanctum estiver instalado, publique seu arquivo de configuração. Isso criará um arquivo config/sanctum.php :
fornecedor de artesão de php: publicar--provider="Laravel \ Sanctum \ SanctumServiceProvider"
Em seguida, instale a biblioteca Google Cloud PubSub . Isso permitirá que o servidor consuma notificações de assinatura PubSub. Receberemos essas notificações sempre que um usuário se inscrever na versão Android do aplicativo:
composer requer google/cloud-pubsub
Em seguida, crie o banco de dados. Usaremos esse banco de dados para armazenar usuários e suas informações de assinatura:
 mysql-u root-p
CRIAR BASE DE DADOS rniap;
Atualize o arquivo .env no diretório raiz do projeto para incluir suas credenciais de banco de dados:
 DB_DATABASE=rniap
DB_USERNAME=your_db_user
DB_PASSWORD=your_db_password
Migrar o banco de dados:
php artesão migrar
Em seguida, instale as dependências de front-end e compile-as:
 npm install
npm executar produção
Neste ponto, você pode tentar executar o servidor para verificar se ele funciona. Se você estiver em um Mac, você pode usar Laravel Valet para atender rapidamente ao projeto. Assim que o Valet estiver instalado, tudo o que você precisa fazer é executar os seguintes comandos no diretório raiz do projeto:
 link de manobrista
valet seguro
Isso o atribuirá a um domínio local rnniapserver.test e o protegerá com HTTPS.
Se você não estiver em um Mac, pode simplesmente usar artisan para servir ao projeto:
serviço artesanal de php
Se você obtiver a tela de boas-vindas padrão do Laravel depois de veiculada, está pronto para prosseguir. Caso contrário, certifique-se de que o diretório storage tenha as permissões corretas, pois geralmente é a causa para o projeto não funcionar.
Configuração de compras no aplicativo para Android
Nesta seção, configuraremos as compras no aplicativo para Android.
Esta seção pressupõe o seguinte:
- Você tem uma conta de desenvolvedor do Google Play
- Você já configurou um aplicativo no console do Google Play
- Você tem uma conta do Google Cloud Platform
- Você já configurou seu perfil de pagamentos no console do Google Play. Isso não é necessário no ambiente de teste, mas é bom estar ciente disso para evitar dores de cabeça desnecessárias mais tarde
Crie uma assinatura
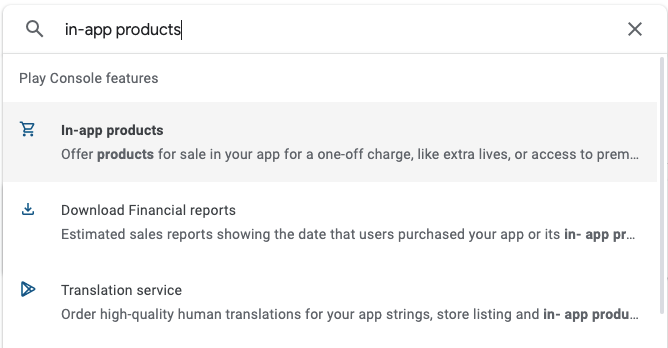
No Google Play Console, vá para Monetizar → Produto → Assinaturas . Você também pode pesquisar por “Produtos no aplicativo”, clicar no primeiro resultado e, na página, ele acessa, clique no link Assinaturas logo abaixo de Produtos no aplicativo menu:
A partir daí, clique em Criar assinatura . Forneça um valor para os seguintes campos:
- ID do produto
- Nome
- Descrição
- Período de faturamento
- Preço padrão
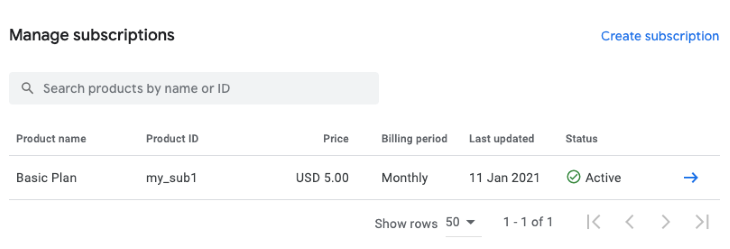
Depois de fazer isso, ele deve listar a inscrição que você acabou de criar. Anote o ID do produto , pois vamos precisar dele mais tarde, quando criarmos o aplicativo:
Configurar notificações
A próxima etapa é configurar notificações para assinaturas. É aqui que usamos o Google Cloud PubSub para que seu servidor receba notificações quando um usuário se inscreve em seu aplicativo. Esta seção pressupõe que você já tenha um projeto do Google Cloud existente. Caso contrário, você pode simplesmente clicar no projeto do Google Cloud atualmente selecionado no canto superior esquerdo. Isso abrirá o modal que permite criar um novo.
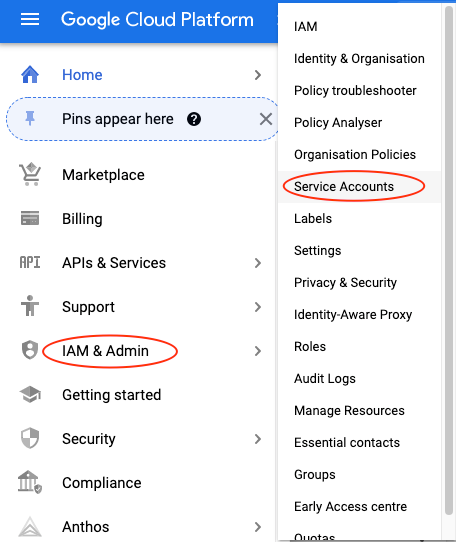
Depois de criar um projeto do Google Cloud, a primeira etapa é criar uma nova conta de serviço. Vá para a página de contas de serviço clicando em IAM e Admin → Contas de serviço :
Insira um nome e um ID exclusivo para a conta de serviço:
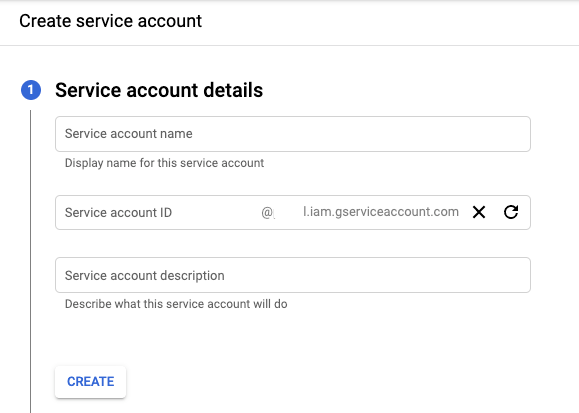
Ele também solicitará que você adicione uma função. Nós realmente não precisamos disso, então basta clicar em Continuar . Em seguida, ele pedirá para conceder acesso ao usuário. Conceda-o e clique em Concluir .
Depois de criar a conta de serviço, selecione-a e crie uma nova chave. Selecione JSON como o tipo de chave. Isso fará o download de um arquivo JSON. Isso servirá como método de autenticação para que seu servidor se conecte ao projeto do Google Cloud:
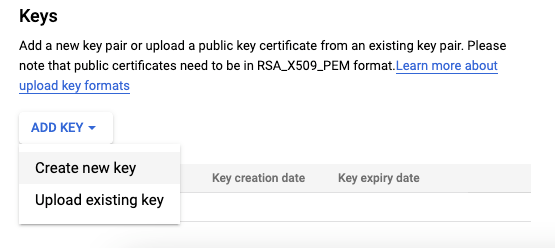
Copie o arquivo baixado para o diretório storage/app no servidor. Vamos usá-lo mais tarde para que possamos nos conectar ao Google Cloud PubSub.
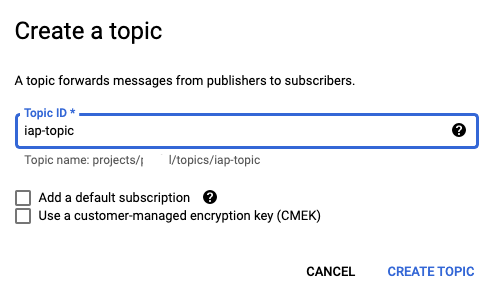
Em seguida, pesquise “pubsub”. Quando estiver lá, clique em Criar tópico e forneça um nome de tópico exclusivo. Isso servirá como o contêiner para a assinatura que você vai criar:
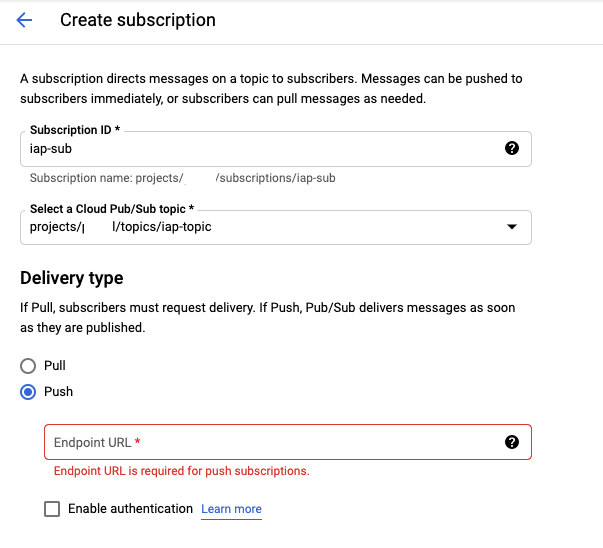
A seguir, crie uma assinatura. Forneça um ID exclusivo e selecione o tópico que você acabou de criar. O tipo de entrega é Push porque queremos que o serviço PubSub notifique automaticamente nosso servidor sempre que alguém se inscrever no aplicativo. Insira o endpoint da URL para onde a notificação será enviada. Você pode deixar todas as outras opções com seus padrões:
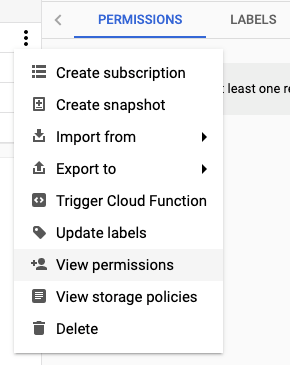
Em seguida, vá para a página de tópicos e clique no ponto triplo ao lado do tópico que você criou anteriormente e selecione Exibir permissões :
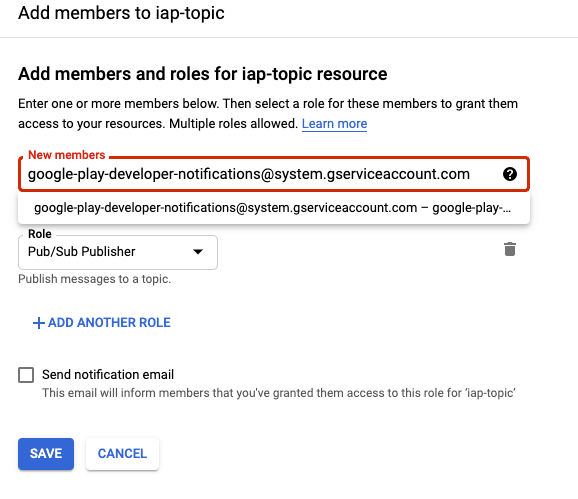
Adicione a conta de serviço [email protected] e conceda a ela o papel de Editor Pub/Sub . Certifique-se de salvar as alterações:
Depois de fazer isso, volte ao console do Google Play, pesquise “configuração de monetização” e clique no primeiro resultado. Você também pode rolar até a parte inferior do menu lateral e procurar o mesmo texto.
No campo de nome do tópico, insira o nome do tópico no formato projects/{project_id}/topics/{topic_id} . Você pode ver o project_id ao clicar no projeto atualmente selecionado. Embora o topic_id seja o que você inseriu anteriormente.
Para testá-lo, clique no botão Enviar notificação de teste para enviar um exemplo de notificação. Se você não obtiver nenhum erro, significa que funciona. Observe que o envio de uma notificação de teste do console do Google Play não enviará uma solicitação ao URL de push especificado nas configurações do Google Cloud PubSub. Como isso só será acionado se for uma notificação real acionada a partir do aplicativo. Basicamente, funciona assim:
- O usuário se inscreve pelo aplicativo
- O Google Play envia uma notificação ao tópico que você especificou na configuração de monetização
- O Google Cloud PubSub recebe a notificação e envia uma solicitação
POSTpara o endpoint de URL que você especificou - Seu servidor o recebe e processa a assinatura de acordo (implementaremos isso mais tarde)
Se não funcionar, certifique-se de que você não perdeu nenhuma etapa. Se ainda não funcionar depois disso, você pode ler a documentação completa aqui- configurar notificações do desenvolvedor em tempo real .
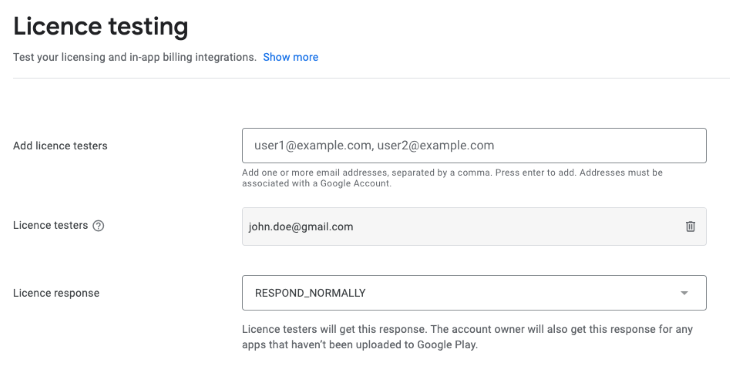
Adicionar testadores de licença
A última etapa é adicionar testadores de licença. Isso permite que você teste compras no aplicativo na versão de teste do seu aplicativo sem ter que pagar a assinatura ou taxa única que você adicionou anteriormente.
Para fazer isso, volte ao Google Play Console e pesquise “Teste de licença” ou procure no menu lateral. Observe que este menu não está dentro de um aplicativo específico, então você deve clicar no logotipo do Google Play Console no canto superior esquerdo e procurar por “Teste de licença” na parte inferior.
Nessa página, basta adicionar os e-mails das contas do Google que você usa para testar:
Configuração de compras no aplicativo para iOS
Esta seção pressupõe que você tenha o seguinte:
- Uma conta de desenvolvedor Apple
- Aplicativo correspondente em App Store Connect . Se você ainda não tem um aplicativo, pode criar um aqui
- Assinou o contrato de aplicativos pagos
- Adicionadas informações bancárias e fiscais. Você pode fazer isso no App Store Connect no menu Contratos, impostos e bancos
Quando estiver no painel de seu aplicativo, clique no link Gerenciar no menu Compras no aplicativo .
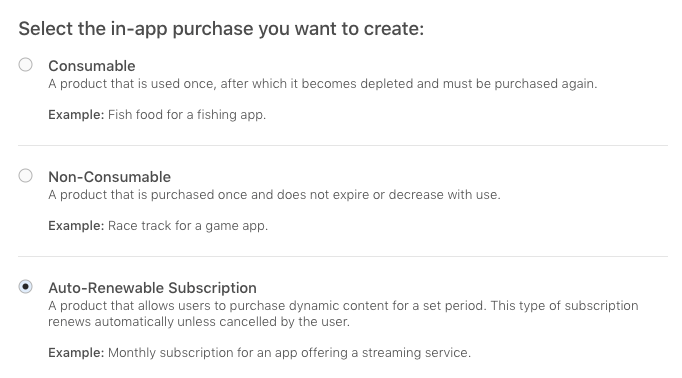
Role até o final da página até encontrar a seção de compras no aplicativo. Clique no botão Adicionar e o seguinte modal será mostrado. Selecione o tipo que você deseja. Nesse caso, queremos que o usuário tenha uma assinatura mensal, portanto, selecionamos Assinatura com renovação automática :
Next, enter a descriptive name for the subscription plan and its unique ID. Take note of this ID as we will refer to it later in the app:
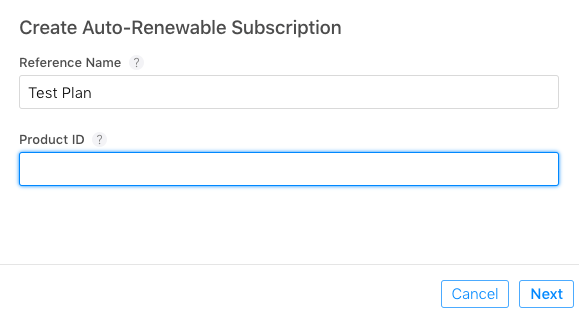
It may also ask you to put the plan in a group. This way, all related plans can be grouped together. Just enter a descriptive name for the group.
Once created, you still can’t use it when it’s saying “Missing Metadata” as its status. To make that disappear, you need to enter the following details:
- Subscription duration — How long does a subscription last before it gets renewed? The user has to pay the corresponding subscription price every time it’s renewed
- Subscription prices — How much do the subscriptions cost?
- Localizations — The descriptive text for the subscription. If you have selected a subscription group, you also need to add localization to describe it
- Review information — This will be used by the reviewers of your app when you submit it for listing to the App Store. It includes the screenshot and some text to describe what the subscription is all about. For the screenshot, they require a 640 x 920 image of the subscription screen in your app
Once you’ve filled up the above, the status of the in-app purchase will update to “ready to submit”. You should now be able to use it for testing.
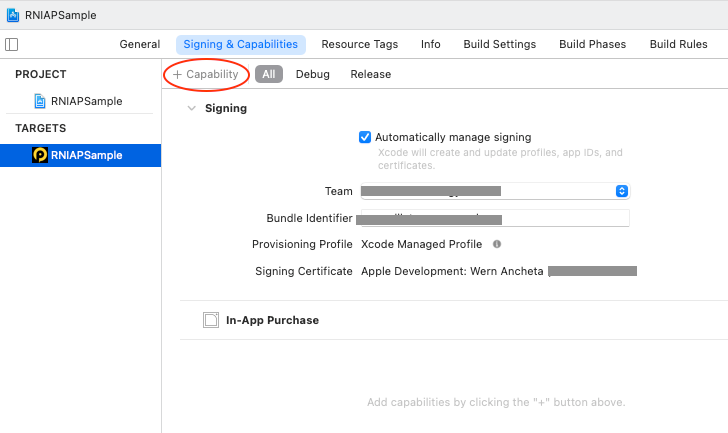
The last step is to open the ios/RNIAPSample.xcworkspace file on Xcode and add the In-App purchases capability. To do that, just click on the project navigator (located right below the close button on the upper left side of the screen. Click on the project then select the Signing & Capabilities tab. Then click on the + Capability button. On the modal window that shows up, search for “in-app purchases” and double-click on it. It should be listed as a capability once added:
Setting up the database schema
Now that we’re done with all the in-app purchase setup, it’s time to proceed with some more server setup. This time, we’re setting up the database and data seeder.
Update the default user migration file to remove all unnecessary fields and add the fields that we will be using:
//database/migrations/_create_users_table.php
Schema::create('users', function (Blueprint $table) { $table->id(); $table->string('name'); $table->string('email')->unique(); $table->string('password'); //$table->timestamp('email_verified_at')->nullable();//remove this //add these: $table->string('gplay_order_token')->nullable(); $table->string('gplay_order_id')->nullable(); $table->string('apple_order_id')->nullable(); $table->dateTime('datetime_subscribed')->nullable(); $table->dateTime('lastpayment_datetime')->nullable(); $table->rememberToken(); $table->timestamps();
});
Run the migrations:
php artisan migrate
This should create the users table and personal_access_tokens table. The latter is where we store the access tokens for mobile authentication. There is no concept of sessions in a mobile app, that’s why we use tokens instead to authenticate the user:
Note, we won’t be needing the password resets table and failed jobs table in this tutorial. We’re just leaving them as they are because they’re default migrations.
Setting up the user model
Now let’s update the user model to include the new fields we added earlier. While we’re here, you can also add the trait from Sanctum that allows us to create user tokens. We’ll see this in action later, but basically what it does is add the createToken() method to the user model:
//app/Models/User.phpNext, update the user factory to replace its current contents with the following:
//database/factories/UserFactory.php public function definition() { return [ 'name'=> $this->faker->name, 'email'=> $this->faker->unique()->safeEmail, 'password'=>'$2y$10$92IXUNpkjO0rOQ5byMi.Ye4oKoEa3Ro9llC/.og/at2.uheWG/igi',//password 'remember_token'=> Str::random(10), ]; }Uncomment the user factory in the database seeder:
//database/seeders/DatabaseSeeder.php public function run() { \App\Models\User::factory(10)->create();//uncomment this }Populate the database with user records. These will now serve as our test users which we can use for logging into the app and testing subscriptions:
php artisan db:seedBuilding the app
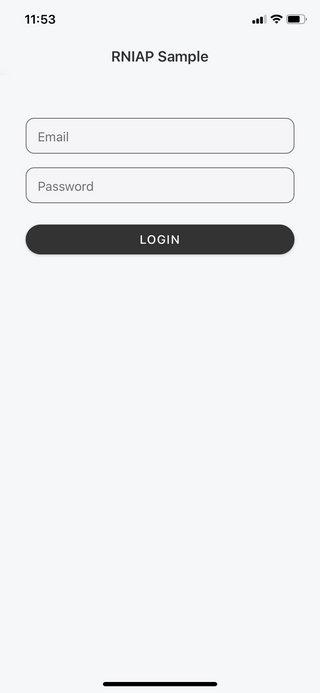
Now we’re finally ready to start building the app. We’ll first build the login screen and then proceed to the user-only screens such as the user account screen and the locked screen.
Login screen
Let’s start with the login screen:
//src/screens/LoginScreen.js import React, { useState, useCallback, useContext } from"react"; import { View, Text, StyleSheet, TouchableOpacity } from"react-native"; import { Button, TextInput, withTheme } from"react-native-paper"; import { SafeAreaView } from"react-native-safe-area-context"; import axios from"axios"; import * as SecureStore from"expo-secure-store"; import { AuthContext } from"../context/AuthContext"; import config from"../config"; const LoginScreen=({ navigation, theme })=> { const [email, setEmail]=useState(""); const [password, setPassword]=useState(""); const [buttonloading, setButtonLoading]=useState(false); const { colors }=theme; const loginText=buttonloading ?"Logging in..":"Login"; const { signIn }=useContext(AuthContext); //next: add code for logging in }; export default withTheme(LoginScreen);Next, add the function that gets executed when the user clicks on the login button. Here, we do the following:
- Send a request to the server to acquire a user token. This user token is what we will use to authenticate further requests to the server
- Once we get a response back, we securely store the token locally using the
expo-secure-storemodule. This will allow us to get it back later on when we need to make further requests to the server- Dispatch the
signInaction from the reducer. This allows us to update the UI accordingly:const login=useCallback(async ()=> { const device_name="some device";//note: you can use Expo device here setButtonLoading(true); try { const res=await axios.post( `${config.BASE_URL}/api/sanctum/token`, { email, password, device_name, } ); if (res.data) { const ok=await SecureStore.isAvailableAsync(); if (ok) { const { token, is_subscribed }=res.data; await SecureStore.setItemAsync("user_token", token); signIn({ token, is_subscribed, }); } setButtonLoading(false); } } catch (err) { setButtonLoading(false); alert(`Error occurred while trying to logins: ${err}`); } }, [email, password]);Next, return the UI for the login screen. This consists of the email and password field and the login button:
return (); setEmail(text)} value={email} placeholder="Email" keyboardType="email-address" /> setPassword(text)} value={password} placeholder="Password" secureTextEntry /> Add the styles:
const styles=StyleSheet.create({ container: { flex: 1, paddingRight: 30, paddingLeft: 30, flexDirection:"column", alignItems:"center", }, input: { fontSize: 15, height: 40, width:"100%", marginBottom: 10, backgroundColor:"#F5F5F7", }, button: { padding: 0, marginTop: 15, width:"100%", borderRadius: 20, }, });Here are the contents for the
config.jsfile://src/config.js const config={ APP_TITLE:"RNIAP Sample", BASE_URL:"YOUR NGROK URL", IOS_SUBSCRIPTION_ID:"YOUR IOS SUBSCRIPTION ID", ANDROID_SUBSCRIPTION_ID:"YOUR GOOGLE PLAY SUBSCRIPTION ID", }; export default config;We also imported the AuthContext earlier:
//src/context/AuthContext.js import React from"react"; export const AuthContext=React.createContext();There’s really nothing there since we will be populating it with methods within the
src/Root.jsfile later.Account screen
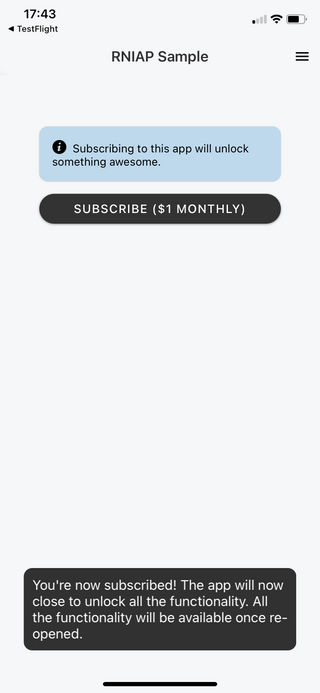
The Account screen is where the user can subscribe to the app in order to unlock premium features.
Start by importing the modules we need. The most important one here is
expo-in-app-purchases. This allows us to implement InApp purchases within a React Native app. Without this module, this tutorial wouldn’t exist. There’s also the React Native IAP library, but I haven’t tried it yet://src/screens/AccountScreen.js import React, { useState, useEffect } from"react"; import { StyleSheet, Platform } from"react-native"; import { Button, Card, withTheme } from"react-native-paper"; import { SafeAreaView } from"react-native-safe-area-context"; import * as SecureStore from"expo-secure-store"; import { getProductsAsync, purchaseItemAsync } from"expo-in-app-purchases"; import axios from"axios"; import AlertBox from"../components/AlertBox"; import config from"../config"; const defaultAlertMessage="Subscribing to this app will unlock something awesome.";Before we proceed, go ahead and add the code for the
AlertBoxcomponent. This is the only one that’s not included in the subscription flow so it’s better to add it now://src/components/AlertBox.js import React from"react"; import { View, Text, StyleSheet } from"react-native"; import { withTheme } from"react-native-paper"; import { Entypo } from"@expo/vector-icons"; const AlertBox=({ text, theme })=> { const { colors }=theme; return (); }; export default withTheme(AlertBox); const styles=StyleSheet.create({ alert: { padding: 15, marginBottom: 15, borderRadius: 10, }, alertText: { fontSize: 13, }, }); {""} {text} Going back inside the account screen, we check for the user’s subscription status by making a request to the server. This is where we use the user token we got from the login screen earlier:
//src/screens/AccountScreen.js const AccountScreen=({ navigation, theme })=> { const { colors }=theme; const [alertMessage, setAlertMessage]=useState(defaultAlertMessage); const [subscribed, setSubscribed]=useState(false); const [subscribeButtonLoading, setSubscribeButtonLoading]=useState(false); const subscribeText=subscribeButtonLoading ?"Subscribing...":"Subscribe ($1 monthly)"; useEffect(()=> { (async ()=> { try { const token=await SecureStore.getItemAsync("user_token"); const instance=axios.create({ baseURL: `${config.BASE_URL}/api`, timeout: 5000, headers: { Authorization: `Bearer ${token}` }, }); const res=await instance.get("/user"); if (res.data.is_subscribed==="yes") { setSubscribed(true); setAlertMessage("You are subscribed for $1/month."); } } catch (err) { alert("Problem ocurred while getting user info."+ err); } })(); }, []); //next: add code for subscribing user }Next, add the code for subscribing the user. This is where we use the
expo-in-app-purchasesmodule to accept payment from the user. On Android, this uses the Google Play Billing library. While on iOS it uses the Storekit framework.First, we fetch the subscription plans you created earlier on the Google Play Developer dashboard and Apple Store Connect dashboard. We use the
getProductsAsync()to do this. With the help ofPlatform.select(), we’re able to select the correct subscription plan based on the device’s operating system. If your plans have the same ID on both platforms, there’s no need to do this. Below that code is doing a similar thing. In this case, we’re usingPlatform.OSto determine the current platform. Once we have fetched the subscription plan and we know it exists, we call thepurchaseItemAsync()method to initialize the purchase.Note, calling the
getProductsAsync()method is a prerequisite to buying/subscribing to a product. Even if you already know the subscription ID beforehand, you still have to do it. Think of it as a handshake to Apple/Google’s servers before doing the actual thing.const subscribe=async ()=> { setSubscribeButtonLoading(true); try { const items=Platform.select({ ios: [config.IOS_SUBSCRIPTION_ID], android: [config.ANDROID_SUBSCRIPTION_ID], }); const subscription_plan=Platform.OS==="android"? config.ANDROID_SUBSCRIPTION_ID: config.IOS_SUBSCRIPTION_ID; const products=await getProductsAsync(items); if (products.results.length > 0) { setSubscribeButtonLoading(false); await purchaseItemAsync(subscription_plan); } senão { setSubscribeButtonLoading(false); } } catch (err) { setSubscribeButtonLoading(false); alert("error occured while trying to purchase:"+ err); } };The next step is to listen for purchases. We can’t do that from the account screen because it has to go through a lot of other code before it gets to that screen. By that time, the transaction will have already been marked as “complete”. We need to listen for incomplete transactions so we can make a request to the server along with its details.
The best place to listen for purchase transactions is from the entry point file. Start by importing all the modules we need:
//index.js import { registerRootComponent } from"expo"; import { connectAsync, setPurchaseListener, finishTransactionAsync, IAPResponseCode, } from"expo-in-app-purchases"; import RNRestart from"react-native-restart"; import Toast from"react-native-simple-toast"; import * as SecureStore from"expo-secure-store"; import { Platform } from"react-native"; import axios from"axios"; import App from"./App"; import config from"./src/config";Next, create an immediately invoked function expression (IIFE). This is where we:
- Call
connectAsync()— this connects to the App Store or Google Play Store to initialize the app so that it’s able to accept payments. None of the code in the account screen earlier will work if this isn’t called- Listen for purchases using
setPurchaseListener()— the callback function that you pass to it will get executed every time there’s an incoming purchase transaction. We only process it further if the response code we get is successful (eg. the payment transaction was successful). Otherwise, we inform the user that it failed. This can happen for two common reasons, the user cancelled or the payment failed- If the response code is successful, we loop through the results and check for the one that hasn’t been acknowledged yet
- Call the
finishTransactionAsync()method on the specificpurchase— this method also expects a second parameter which isconsumeItem. What you pass here will depend on the current platform. In Android, you need to set it tofalse. While in iOS, it should be set totrue. This is because in Android, there’s a concept of “consuming” a purchase. This is for things like one-time payment to unlock a specific feature or item such as the ones you see in games. SettingconsumeItemtofalsemeans that it’s a subscription and not a consumable. While in iOS, this isn’t necessary soconsumeItemhas a different meaning. You need to set it totruein order to mark the transaction as “finished” preventing it from triggering the purchase listener callback again- Since we don’t have the capacity to navigate to a specific screen from the index file, all we can do is reload the app. This also allows us to refresh it with the new subscription status of the user. Just be sure to inform the user using something like a toast message before you do so:
(async function init() { try { await connectAsync(); setPurchaseListener(async ({ responseCode, results, errorCode })=> { if (responseCode===IAPResponseCode.OK) { results.forEach(async (purchase)=> { if (!purchase.acknowledged) { const { orderId, purchaseToken, acknowledged, transactionReceipt, productId, }=purchase; const consumeItem=Platform.OS==="ios"; await finishTransactionAsync(purchase, consumeItem); const token=await SecureStore.getItemAsync( "user_token" ); const instance=axios.create({ baseURL: `${config.BASE_URL}/api`, timeout: 5000, headers: { Authorization: `Bearer ${token}` }, }); instance.post("/subscribe", { orderId, purchaseToken, transactionReceipt, platform: Platform.OS, }); Toast.show( "You're now subscribed! The app will now close to unlock all the functionality. All the functionality will be available once re-opened.", Toast.LONG ); setTimeout(()=> { RNRestart.Restart(); }, 5000); } }); } senão { alert(generalErrorMessage); } if (responseCode===IAPResponseCode.USER_CANCELED) { alert("You cancelled. Please try again."); } else if (responseCode===IAPResponseCode.DEFERRED) { alert( "You don't have permission to subscribe. Please use a different account." ); } }); } catch (err) { alert("Error occurred:"+ JSON.stringify(err)); } })();We will add the code for handling subscriptions in the server later. For now, let’s proceed to bring all the code together so we have a functional app.
Bringing it all together
It’s time to bring everything together. Create an
App.jsfile and add the following://App.js import { StatusBar } from"expo-status-bar"; import React from"react"; import { StyleSheet, View } from"react-native"; import Root from"./src/Root"; export default function App() { return (); } const styles=StyleSheet.create({ container: { flex: 1, justifyContent:"center", }, }); Next, create a
Root.jsfile. This is where we actually bring everything together. Since this is where we set up our navigation, all the screens have to be imported. By default, we display a splash screen. This will serve as a temporary screen while the app is determining whether a user is logged in or not. If a user is currently logged in, we display the locked screen (the screen whose content is locked until the user subscribes). Otherwise, we display the login screen://Root.js import React, { useEffect, useState, useReducer, useMemo } from"react"; import { createStackNavigator } from"@react-navigation/stack"; import { createDrawerNavigator } from"@react-navigation/drawer"; import { View, Text } from"react-native"; import { DefaultTheme, Provider as PaperProvider } from"react-native-paper"; import * as SecureStore from"expo-secure-store"; import axios from"axios"; import config from"./config"; import { NavigationContainer, DefaultTheme as NavigationDefaultTheme, } from"@react-navigation/native"; import { DrawerContent } from"./components/DrawerContent"; import SplashScreen from"./screens/SplashScreen"; import HomeStackScreen from"./screens/HomeStackScreen"; import MainStackScreen from"./screens/MainStackScreen"; import AccountStackScreen from"./screens/AccountStackScreen"; import { AuthContext } from"./context/AuthContext"; const theme={ ...DefaultTheme, dark: true, roundness: 10, colors: { ...DefaultTheme.colors, background:"#F6F8FA", primary:"#333", info:"#BFD9EC", }, fonts: { ...DefaultTheme.fonts, regular: 15, }, }; const MainStack=createStackNavigator(); const Drawer=createDrawerNavigator();Next, we use the
useReducer()hook to describe how the state would look based on the current action. In this case, we have three states:
RESTORE_TOKEN– This is the state for when the user is logged inSIGN_IN– The state for when the user signs in. This is the transition state between not being logged in and logged inLOGOUT– The state for when the user logs out. This updates the state to the defaults so that the login screen will be displayed instead:const App=()=> { const [loading, setLoading]=useState(true); const [state, dispatch]=useReducer( (prevState, action)=> { switch (action.type) { case"RESTORE_TOKEN": return { ...prevState, userToken: action.token, isLoading: false, isSubscribed: action.is_subscribed, }; case"SIGN_IN": return { ...prevState, userToken: action.token, isSubscribed: action.is_subscribed, }; case"LOGOUT": return { ...prevState, userToken: null, isLoading: false, }; } }, { isLoading: true, userToken: null, } ); }Next, we use
useEffect()to check if the user is subscribed in the server. This is where we dispatch theRESTORE_TOKENaction so that the locked screen will be displayed instead of the login screen:useEffect(()=> { (async ()=> { try { const token=await SecureStore.getItemAsync("user_token"); if (token) { const instance=axios.create({ baseURL: `${config.BASE_URL}/api/`, timeout: 60000, headers: { Authorization: `Bearer ${token}` }, }); const res=await instance.get("/user"); const is_subscribed=res.data.is_subscribed=="yes"; dispatch({ type:"RESTORE_TOKEN", token, is_subscribed }); } setLoading(false); } catch (err) { setLoading(false); } })(); }, []);Next, inside the
useMemo()hook, declare the actions which will be consumed by the reducer we created earlier. For thesignOutaction, we make a request to the server to sign the user out. This will revoke the token that was issued earlier when the user logged in. It’s also responsible for deleting the user token from the local storage. Lastly, it dispatches theSIGN_OUTaction so the user sees the login screen instead:const authContext=useMemo( ()=> ({ signIn: (data)=> { dispatch({ type:"SIGN_IN", token: data.token, is_subscribed: data.is_subscribed, }); }, signOut: async ()=> { try { const token=await SecureStore.getItemAsync("user_token"); const instance=axios.create({ baseURL: `${config.BASE_URL}/api`, timeout: 60000, headers: { Authorization: `Bearer ${token}` }, }); const signout_res=await instance.post("/signout"); await SecureStore.deleteItemAsync("user_token"); dispatch({ type:"LOGOUT"}); } catch (err) { console.log("error:", err); } }, }), [] );Lastly, add the code for returning the UI. This uses a
DrawerNavigatoras the root navigator, and aStackNavigatorfor each individual screen:if (loading) { return (); } return ( ); { if (state.userToken) { return ; } return null; }} > {state.userToken===null && ( )} {state.userToken !==null && ( )} Now let’s add the code for the components and screens we imported on the
Root.jsfile earlier.Here’s the code for the
SplashScreen://src/screens/SplashScreen.js import React from"react"; import { View, ActivityIndicator, StyleSheet } from"react-native"; const SplashScreen=({ bgColor, color })=> { return (); }; export default SplashScreen; const styles=StyleSheet.create({ container: { flex: 1, alignItems:"center", justifyContent:"center", }, }); Here’s the code for the
HomeStackScreen. This is the stack navigator for the login screen://src/screens/HomeStackScreen.js import React from"react"; import { createStackNavigator } from"@react-navigation/stack"; import { withTheme } from"react-native-paper"; import LoginScreen from"./LoginScreen"; import config from"../config"; const HomeStack=createStackNavigator(); const HomeStackScreen=({ navigation, theme })=> { const { colors }=theme; return (); }; export default withTheme(HomeStackScreen); Here’s the code for the
DrawerContentcomponent. This is responsible for rendering the contents of the drawer navigator and navigating to specific screens of the app. It’s also responsible for dispatching thesignOutaction://src/components/DrawerContent.js import React, { useCallback, useContext } from"react"; import { View, StyleSheet } from"react-native"; import { useTheme, Drawer } from"react-native-paper"; import { DrawerContentScrollView, DrawerItem } from"@react-navigation/drawer"; import { MaterialCommunityIcons } from"@expo/vector-icons"; import { MaterialIcons } from"@expo/vector-icons"; import { AuthContext } from"../context/AuthContext"; const icon_color="#FFF"; export const DrawerContent=(props)=> { const { signOut }=useContext(AuthContext); const logout=useCallback(()=> { try { props.navigation.closeDrawer(); signOut(); } catch (err) { alert( "An error ocurred while trying to sign out. Please try again." ); } }, []); return (); }; const styles=StyleSheet.create({ container: { flex: 1, backgroundColor:"#333", }, drawerContent: { flex: 1, }, drawerSection: { marginTop: 15, }, label: { fontSize: 16, color:"#FFF", }, }); ( )} label="Locked" labelStyle={styles.label} onPress={()=> { props.navigation.navigate("Locked"); }} /> ( )} label="Account" labelStyle={styles.label} onPress={()=> { props.navigation.navigate("AccountStack"); }} /> ( )} label="Sign Out" labelStyle={styles.label} onPress={logout} /> Here’s the code for the
MainStackScreen. This is the drawer navigator for theLockedStackScreen://src/screens/MainStackScreen.js import React from"react"; import { createStackNavigator } from"@react-navigation/stack"; import { IconButton, withTheme } from"react-native-paper"; import LockedStackScreen from"./LockedStackScreen"; const MainStack=createStackNavigator(); import config from"../config"; const MainStackScreen=({ navigation, theme })=> { const { colors }=theme; return (); }; export default withTheme(MainStackScreen); ( navigation.openDrawer()} /> ), }} /> Here’s the code for the
LockedStackScreen. This is the stack navigator for theLockedScreen://src/screens/LockedStackScreen.js import React from"react"; import { createStackNavigator } from"@react-navigation/stack"; const LockedStack=createStackNavigator(); import LockedScreen from"./LockedScreen"; const CalcStackScreen=({ navigation })=> { return (); }; export default CalcStackScreen; Lastly, we have the
LockedScreen. The user can access this screen from the drawer navigation, but they can’t see its content if they’re not subscribed. If the user is subscribed, that’s the only time that it will make a request to the server to fetch the locked content:
Here’s the code for the
LockedScreen://src/screens/LockedScreen.js import React, { useState, useEffect } from"react"; import { Image, StyleSheet } from"react-native"; import { Card, Button, withTheme } from"react-native-paper"; import { SafeAreaView } from"react-native-safe-area-context"; import * as SecureStore from"expo-secure-store"; import axios from"axios"; import { Entypo } from"@expo/vector-icons"; import AlertBox from"../components/AlertBox"; import config from"../config"; const LockedScreen=({ navigation, theme })=> { const { colors }=theme; const [subscribed, setSubscribed]=useState(false); const [content, setContent]=useState(null); useEffect(()=> { (async ()=> { try { const token=await SecureStore.getItemAsync("user_token"); const instance=axios.create({ baseURL: `${config.BASE_URL}/api`, timeout: 5000, headers: { Authorization: `Bearer ${token}` }, }); const res=await instance.get("/user"); if (res.data.is_subscribed==="yes") { setSubscribed(true); const content_res=await instance.get("/locked"); setContent(content_res.data); } } catch (err) { alert("Problem ocurred while getting user info."); } })(); }, []); return (); }; export default withTheme(LockedScreen); const styles=StyleSheet.create({ container: { flex: 1, paddingRight: 30, paddingLeft: 30, flexDirection:"column", }, card: { marginBottom: 20, }, image: { width:"100%", height: 200 } }); {subscribed && ( )} {!subscribed && ( )} Add the server code
It’s now time to proceed with the server side of things. We’ve only done a bit of setting up earlier, but we haven’t implemented the following yet:
- User authentication
- Android subscriptions
- iOS subscriptions
- Providing locked content data
Handling user auth
First let’s implement user auth. Add the following code to the API routes file:
group(function () { Route::get('/user', [AccountController::class,'get']); Route::post('/signout', [AccountController::class,'signout']);
}); Route::post('/sanctum/token', [TokenController::class,'get']);
Create the controllers:
php artisan make:controller AccountController
php artisan make:controller TokenController
Here’s the code for the TokenController.This is responsible for returning the user token based on the email and password supplied in the request. It makes use of the createToken() method we added earlier on the user model. This token is saved in the database so it’s valid for some time:
validate([ 'email'=>'required|email', 'password'=>'required', 'device_name'=>'required', ]); $user=User::where('email', $request->email)->first(); if (!$user || ! Hash::check($request->password, $user->password)) { throw ValidationException::withMessages([ 'email'=> ['The provided credentials are incorrect.'], ]); } return [ 'is_subscribed'=> $user->isSubscribed() ?"yes":"no", 'token'=> $user->createToken($request->device_name)->plainTextToken, 'email'=> $user->email, 'name'=> $user->name, ]; }
}
Next, we implement the fetching of user data and logging out. They’re both enclosed in the auth:sanctum middleware so they expect the user token to be passed in. If the token is valid, the code inside the method gets executed. The middleware modifies the request data such that we can call the user() method in the Request object to access the user’s data:
user(); $user->is_subscribed=$user->isSubscribed() ?'yes':'no'; return $user; } //next: add signout method
}
To log the user out, we call the tokens()→delete() method on the user object. This deletes all the token entries for that user from the personal_access_tokens table:
public function signout(Request $request)
{ $request->user()->tokens()->delete(); return'ok';
}
Handling subscriptions in Android
There are two steps for handling subscriptions in Android:
- Save the purchase token and order ID in the database when the app makes a request to the
/subscriberoute - Listen for notifications sent by Google Cloud PubSub and update the data created in the previous step. This is where we mark the user as subscribed
The first step adds the data required by the second step. While the second step verifies the data from the first step. We will use the google/cloud-pubsub package we installed earlier to handle the notifications sent by Google Cloud PubSub.
First, add the /subscribe route to the API routes:
//routes/api.php //..
use App\Http\Controllers\TokenController;
use App\Http\Controllers\SubscriptionController;//add this Route::middleware('auth:sanctum')->group(function () { //.. Route::post('/signout', [AccountController::class,'signout']); Route::post('/subscribe', [SubscriptionController::class,'subscribe']);//add this
});
Next, create the subscription controller:
php artisan make:controller SubscriptionController
Add the code for handling the subscription request. This captures the purchaseToken and orderId passed by the app:
user(); $this->verifySubscription($user, $platform, $purchase_token, $order_id, $receipt); return'ok'; } //next: add verifySubscription()
}
Next, add the code for updating the user’s subscription data. It says verifySubscription() because we will be updating this later to also handle iOS subscriptions:
private function verifySubscription($user, $platform, $purchase_token, $order_id, $receipt=null) { $gplay_data=[ 'gplay_order_token'=> $purchase_token, 'gplay_order_id'=> $order_id, ]; $user->update($gplay_data); }
Next is step two. This is where we listen for requests made by Google Cloud PubSub. Open the routes/web.php file and update the route which will handle it:
//routes/web.php
use Illuminate\Support\Facades\Route;
use App\Http\Controllers\PubsubController; Route::post('/pubsub', [PubsubController::class,'subscribe']);
Create the controller:
php artisan make:controller PubsubController
Add the following code to it:
 $project_id, 'keyFile'=> json_decode($key_file, true) ]); $req_body=file_get_contents('php://input'); $req_data=json_decode($req_body, true); $data=json_decode(base64_decode($req_data\['message'\]['data']), true); $purchase_token=$data\['subscriptionNotification'\]['purchaseToken']; $pubsub->consume($req_data); SubscribeUser::dispatch($purchase_token)->delay(now()->addSeconds(5)); return'ok'; }
}
The code above can be summarized in three steps:
- Get the data passed in the notification. We need to use
base64_decode()in order to make sense of the data because it has been encoded - Consume the notification by passing the request data to it
- Queue a job that is responsible for updating the database that the user is now subscribed. We’ve added a 5-second delay to make sure that the mobile app has already finished initializing the record which needs to be updated. In this case, it’s the user’s subscription record
We haven’t created the SubscribeUser job yet. Go ahead and do so:
php artisan make:job SubscribeUser
Add the following code to it:
notification_type=$notification_type; $this->purchase_token=$purchase_token; } public function handle() { $subscribe_codes=[1, 2, 4, 7]; $unsubscribe_codes=[3, 5, 10, 12, 13]; $user=User::where('gplay_order_token', $this->purchase_token) ->first(); if ($user) { if (in_array($this->notification_type, $subscribe_codes)) { $user->setSubscribed()->save(); } if (in_array($this->notification_type, $unsubscribe_codes)) { $user->setUnsubscribed()->save(); } } }
}
In the code above, the handle() method gets called when the job gets executed. This is where we check for the notification type. To keep things simple, we’re only going to handle subscription and cancellation notification types. This allows us to switch the user status whether they are currently subscribed or not subscribed.
For the subscribe codes we have:
- (1) SUBSCRIPTION_RECOVERED
- (2) SUBSCRIPTION_RENEWED
- (4) SUBSCRIPTION_PURCHASED
- (7) SUBSCRIPTION_RESTARTED
While for unsubscribe codes we have:
- (3) SUBSCRIPTION_CANCELED
- (5) SUBSCRIPTIONONHOLD
- (10) SUBSCRIPTION_PAUSED
- (12) SUBSCRIPTION_REVOKED
- (13) SUBSCRIPTION_EXPIRED
You can learn more about the various notification types in the documentation, real-time developer notifications reference guide.
Update the user model to include the setSubscribed() method. This updates the lastpayment_datetime field to the current datetime. This field needs to be updated every time the user’s subscription is renewed. This will allow us to use this field as the basis for determining if the user is still subscribed or not. Thankfully, Google PubSub will send notifications every time a user’s subscription is renewed so there’s no need to write additional code for handling that bit:
//app/Models/User.php
protected $fillable=[ //..
]; public function setSubscribed()
{ $this->datetime_subscribed=now(); $this->lastpayment_datetime=now()->toDateTimeString(); return $this;
}
Next, add the method for setting the user as unsubscribed. Here, we simply set the datetime_subscribed and last_payment_date as null. This will effectively deactivate the premium features for the user. Note that we don’t update the gplay_order_id and gplay_order_token because they’re used as the basis for the notifications. Without it, the server won’t know which user to update. They won’t change on resubscription or renewal of existing subscription so they’re perfect for our purpose:
public function setUnsubscribe()
{ $this->datetime_subscribed=null; $this->last_payment_date=null; return $this;
}
Lastly, add the config for the Google project. The project_id is the project value you see in the URL when you’re on the Google Cloud Console dashboard. While the config_path is the path to where you saved the service account config file earlier. It’s in the storage/app directory so you can simply refer to it as app/filename.json because storage_path() returns the path to the storage directory:
//config/services.php 'google_cloud'=> [ 'project_id'=> env('GOOGLE_PROJECT_ID'), 'config_path'=>'app/filename.json',
], //.env
GOOGLE_PROJECT_ID="YOUR GOOGLE PROJECT ID"
Handling subscriptions in iOS
To handle iOS subscriptions, we need to process the transactionReceipt we passed earlier from the app. The request will also be sent to the /subscribe route so it uses the same verifySubsription() method we created earlier. Go ahead and update the existing code with the following:
//app/Http/Controllers/SubscriptionController.php private function verifySubscription($user, $platform, $purchase_token, $order_id, $receipt=null) { $apple_iap_shared_secret=config('services.apple_iap.shared_secret'); $apple_iap_live_url=config('services.apple_iap.live_url'); $apple_iap_sandbox_url=config('services.apple_iap.sandbox_url'); if ($platform==='ios') { $req_body=json_encode([ 'receipt-data'=> $receipt, 'password'=> $apple_iap_shared_secret, 'exclude-old-transactions'=> true ]); $response_data=$this->sendRequest($apple_iap_live_url, $req_body); if ($response_data['status']===21007) { $response_data=$this->sendRequest($apple_iap_sandbox_url, $req_body); } $latest_receipt_info=$response_data\['latest_receipt_info'\][0]; $expire_in_ms=(int) $latest_receipt_info['expires_date_ms']; $expire=$expire_in_ms/1000; $current_timestamp=now()->timestamp; if ($current_timestamp <$expire) { $user->update([ 'datetime_subscribed'=> now(), 'lastpayment_datetime'=> now()->toDateTimeString(), 'apple_order_id'=> $latest_receipt_info['transaction_id'] ]); } } else if ($platform==='android') { $gplay_data=[ 'gplay_order_token'=> $purchase_token, 'gplay_order_id'=> $order_id, ]; $user->update($gplay_data); }
} //next: add sendRequest() method
In the above code, we’re verifying with Apple’s servers that the receipt data is indeed valid and hasn’t expired yet. This requires us to pass a JSON string containing the following:
receipt-data— ThetransactionReceiptvalue passed from the apppassword— The password for the in-app purchase. You can get this from App Store Connect. From your apps page, select the app in question. Then under in-app purchases, click manage. Click app-specific shared secret to generate the password you can supply to this fieldexclude-old-transactions— Set it totrueso you won’t get any old transactions
We verify the transactionReceipt on both the live and Sandbox URLs. This way, we can just have a single handler for verifying subscriptions for iOS. We verify with the Live one first and if it fails, we use the Sandbox URL. We know that the request is invalid if we get a response code of 21007.
For a valid response, you will get a latest_receipt_info field. Extract the first item from that to get the data for the latest receipt for that specific purchase.
We then extract the expires_date_ms and divide it by 1000 to get the actual timestamp value which we can compare to the current timestamp value of the date library of choice (eg. Carbon). If the resulting value is greater than the current timestamp, it means that it’s still valid.
Here’s the sendRequest() method:
private function sendRequest($url, $req_body) { $response=Http::withBody($req_body,'application/json')->post($url); $response_data=$response->json(); return $response_data;
}
Lastly, add the config for iOS:
//config/services.php 'apple_iap'=> [ 'shared_secret'=> env('APPLE_IAP_SECRET'), 'live_url'=>'https://buy.itunes.apple.com/verifyReceipt', 'sandbox_url'=>'https://sandbox.itunes.apple.com/verifyReceipt',
], //.env
APPLE_IAP_SECRET="YOUR IN APP PURCHASES SHARED SECRET"
Returning data for locked content
The final piece of the puzzle is adding the controller for the locked content. This is optional since we’ve already implemented all the parts required for the in-app purchases to work:
//routes/api.php
//...
use App\Http\Controllers\AccountController;
use App\Http\Controllers\LockedContentController;//add this Route::middleware('auth:sanctum')->group(function () { //.. Route::post('/signout', [AccountController::class,'signout']); Route::get('/locked', [LockedContentController::class,'get']);//add this
});
Next, create the controller:
php artisan make:controller LockedContentController
Add the following code:
user()->is_subscribed) { return asset('images/doge-meme.jpg'); } }
}
For the image, just save any image on your public/images directory.
Running the app
No tutorial is complete without running the app and seeing that it works. First, we need to make the server accessible to the internet. That way, it can be accessed from the app even when you’re running it on your phone. We can’t really test out in-app purchases in the Android emulator or iOS simulator, that’s why we need to use a real device.
If you’re on Mac, you can use Valet once again to share the server to the internet. This uses ngrok behind the scenes:
valet share
Otherwise, you can just use ngrok directory. For this, you need to download and set up the executable on your computer:
cd ~/directory_where_ngrok_is
./ngrok http-host-header=rniapserver.test 80
Once that’s done, update the src/config.js file in the React Native project with your HTTPS ngrok URL:
const config={ APP_TITLE:"RNIAP Sample", BASE_URL:"https://your.ngrok.io",//update this //..
};
Save that and run the app on your device:
npx react-native run-android
npx react-native run-ios
At this point, you should now see a similar output to what I’ve shown you in the App Overview earlier.
Conclusion and next steps
In this tutorial, we learned how to implement in-app purchases in your React Native app. We also looked at how we can handle subscriptions in the server. But the app we’ve created isn’t really production-ready yet. There are still a few things we haven’t covered:
- Restoring subscriptions – Sometimes users switch devices. This means that you need to provide a way to restore their existing subscription on a new device. Expo in-app purchases provide the
getPurchaseHistoryAsync()method for this purpose - App store server notifications – We’re currently able to subscribe in iOS. But we’re not actually handling things like cancellations or pausing subscriptions. For this, Apple provides App store server notifications
- Testing – To make sure that our implementation works in the real world, we need to test if the user subscriptions are actually renewed after the duration we specified has passed. Here are a couple of docs to help you out:
You can find the project source code in this GitHub repo.
The post Implementing in-app purchases in React Native appeared first on LogRocket Blog.