Introduction
In this article we will be looking at server-side pagination and how we can implement it with Angular’s ngx-pagination.
Before we start, let’s look at what we are going to cover and what you should know before going further.
Prerequisites
- Basic knowledge of Fetch API
- Basic knowledge of Angular
- Visual Studio Code
- Node.js installed
What we will learn
This article will cover the following:
- What is server-side pagination?
- What is ngx-pagination?
- Installing an ngx-pagination package
What is server-side pagination?
Server-side pagination is a way of controlling a subset of data requests that were fetched from a client-side server, and are useful if we don’t want to display all of the data at once. Server-side pagination requires the client to pass in a parameter in order to fetch the relevant information.
To implement server-side pagination in Angular, we have to make use of an Angular pagination package manager called ngx-pagination.
What is ngx-pagination?
Ngx-pagination is an Angular package manger (or tool) that has been made available for server-side pagination. It allows Angular developers to view data by pages, which is useful for receiving data in more manageable pieces.
Ngx-pagination accepts a single argument as an object to confirm the pagination instance interface.
Installing the ngx-pagination package manager
In this tutorial, we will be experimenting with server-side pagination using a faux airline passenger database.
Let’s begin by running the following command:
npm install ngx-pagination --save
Once the installation is done successfully, open the project app.module.ts and import the ngx-pagination module:
import {NgxPaginationModule} from 'ngx-pagination'; @NgModule({
declarations: [
AppComponent
],
imports: [
NgxPaginationModule,
],
export class AppModule { }
Next, pass the ngx-pagination module into the imports section:
import { HttpClient } from "@angular/common/http"
constructor( private http: HttpClient) {}
In the app.component.ts, we first imported the Angular httpsClients module which allows us to interact with an external API. After that, we moved further and passed it as a private http which we will use when calling our API.
Now let’s call a request to the server.
The API endpoint to which we are going to subscribe is the free Instant Webtool Fake API that allows us access to our faux airline’s passenger booking details and more. We are making use of the Instant Webtool Fake API because it supports pagination and it has over a thousand raw datasets.
Before we start, let create our getAllPassengerData() function that will handle the API request:
ngOnInit() {
this.getAllPassengerData();
} getAllPassengerData() {
this.http.get("https://api.instantwebtools.net/v1/passenger").subscribe((data: any) => {
console.log(data);
})
};
In the above function we passed in the getAllPassengerData() function inside ngOnInit lifecycle hooks. What ngOnInit does is load any code that was assigned to it every time the component is loaded, or each time that component is on viewpoint.
Now, inside the function we subscribe to the Instant Webtool Fake API and make use of the passenger endpoint, then log the response. However, there are a lot of other endpoints, like “airline”, for example.
For now we can’t access the data or response we got from the API. So we have to pass the response to a variable in order to use the variable inside the app.component.html.
After the constructor write the below code:
passenger: any; getAllData() {
this.http.get("https://api.instantwebtools.net/v1/passenger")
.subscribe((data: any) => { console.log(data); this.passenger = data.data; })
};
We declared a variable called passenger, then assigned the response we got from the API to the passenger variable.
Now we can make use of the response we got from the request inside the app.component.html with the below code:
<div> <p *ngFor=" let item of passenger " > {{ item.airline.name }} </p>
</div>
If we check the browser console we are going to see a large array of objects. In order for us to access the data we want from that larger array, we have to loop through the data using ngFor. If you take a look at the p tag, above, you’ll see this in action.
When we serve our web app with the command below, we’ll see a long list of passenger names on our web page:
ng serve
This list is really long, and scrolling down the whole page is not going to be fun. So we are going to implement server-side pagination to subset our data into pages. This is where angular ngx-pagination comes in.
In the app.component.ts write the below code:
page: number = 1;
The above code is variable we declared and assigned as “1”, which will display the current page we are in:
getAllData() { this.http.get("https://api.instantwebtools.net/v1/passenger").subscribe((data: any) => { console.log(data.data); this.passenger = data.data; this.page = 0 }) };
So we just pass the page count in after we have subscribed to the API.
What the page number is doing is taking the given number count and passing it to the ngx-pagination click event.
In the app.component.html write the below code:
<pagination-controls class="pagi" (pageChange)="page = $event"
></pagination-controls>
If we look at the ngx-pagination we will notice some attributes that have been bound to it. From the ngx-pagination documentation, ngx-pagination has some attributes that we have to pass to it in order to use it.
These attributes include ItemsPerPage, in which we input the number of items to be displayed on each page. The number will not be assigned to the ngx-pagination component, and this attribute only take a number (not a string or boolean).
Another required attribute is CurrrentPage, which tells the ngx-pagination component what page it is currently on. This attribute also only takes a number.
There many more ngx-pagination attributes but we are only going to make use of these two in this example.
Let’s make proper use of these two attributes so we can achieve ngx-pagination and receive the list of passenger names in a more reasonable format.
Open app.component.ts and write the below code:
page = 1; passenger: any; itemsPerPage = 6; totalItems : any; getAllData() { this.http.get(`https://api.instantwebtools.net/v1/passenger?page=${1}&size=${this.itemsPerPage}`).subscribe((data: any) => { this.passenger = data.data; this.totalItems = data.totalPassengers; }) }
First we started by declaring more variables, like itemsPerPage:, which holds the numbers of items to be displayed per page request. We also declared totalItems:, which holds the total number of passengers on our Instant Webtool Fake API server.
Now we pass those arguments into the API to receive and loop through the data.
On the app.component.html we can make use of the pagination attributes just like the code below:
<div> <p *ngFor=" let item of passenger | paginate : { itemsPerPage: itemsPerPage, currentPage: page, totalItems: totalItems } " > {{ item.name }} <span>{{ item.airline.country }}</span> <br /> <img src="{{ item.airline.logo }}" alt="" /> <br /> <span>{{ item.airline.slogan }}</span> <br /> </p>
</div>
<pagination-controls class="pagi" (pageChange)="gty((page = $event))"
></pagination-controls>
If we look closely at the p tag we will see the pagination attributes and the variables we created.
Then in the pagination component, we pass in the second function that we created, then pass the page attribute to the function just like the code below:
gty(page: any){ this.http.get(`https://api.instantwebtools.net/v1/passenger?page=${page}&size=${this.itemsPerPage}`).subscribe((data: any) => { this.passenger = data.data; this.totalItems = data.totalPassengers; }) }
If we load our server now we should have something that looks like this:
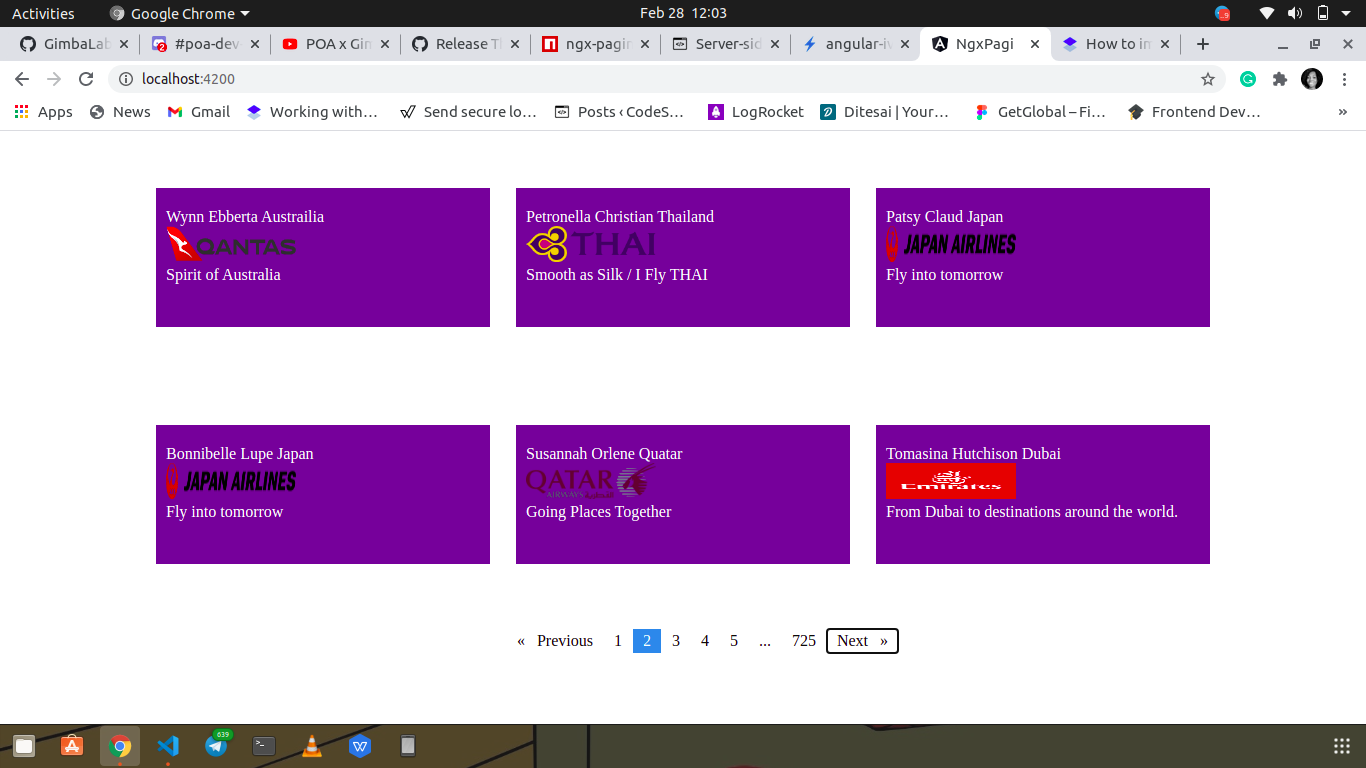
And we’re finished!
Conclusion
I hope in this article you were able to understand the importance of serve-side pagination and how we can achieve it using ngx-pagination in an Angular project.
The post Server-side pagination in Angular with ngx-pagination appeared first on LogRocket Blog.