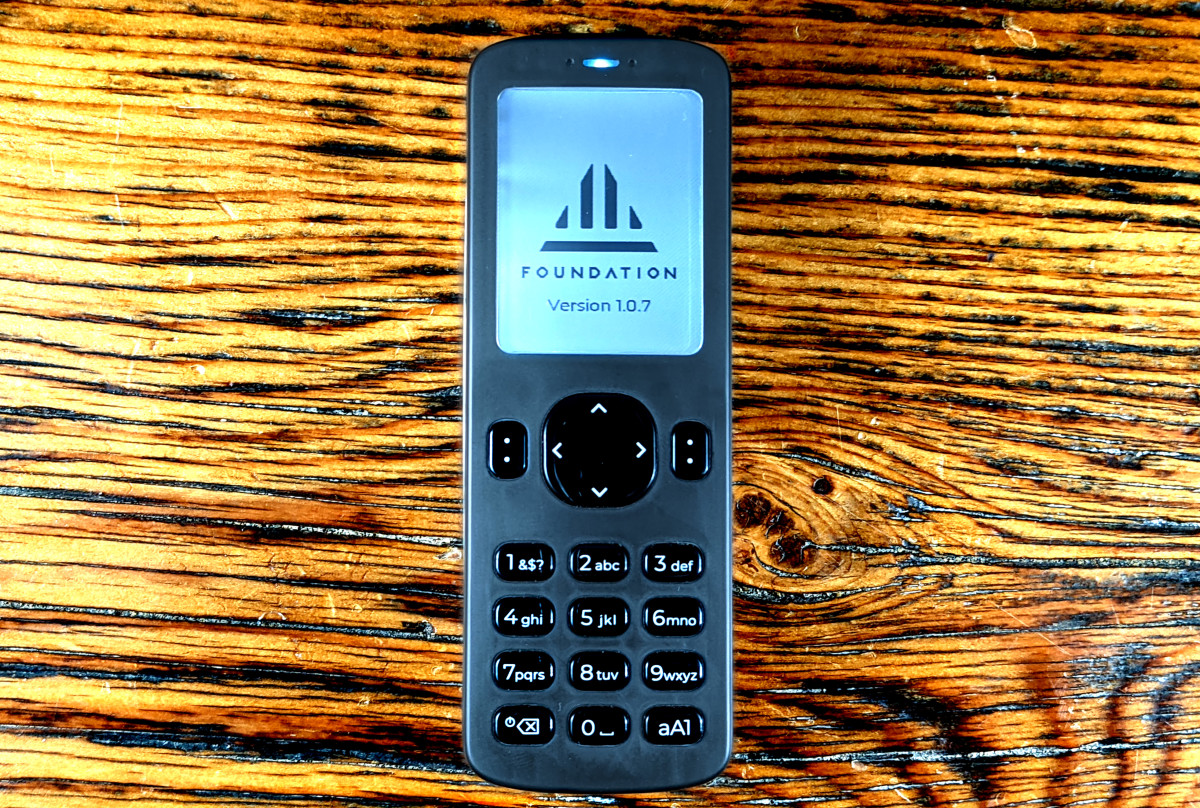
Ce guide explique comment démarrer avec un Passeport portefeuille de stockage à froid. Le passeport est un portefeuille matériel Bitcoin qui est assemblé aux États-Unis, entièrement open source et conçu pour être utilisé uniquement de manière sécurisée et isolée.
Prendre la garde de votre bitcoin signifie que vous êtes responsable de votre propre richesse, il n’y a pas de coffre-fort bancaire pour vous protéger ou une ligne d’assistance 1-800 pour annuler une transaction. Être capable d’effectuer des transactions sans autorisation est puissant, et un grand pouvoir s’accompagne d’une grande responsabilité. Alors, commençons votre voyage vers la garde autonome du bon pied.
Ce guide couvre :
Contenu
DéballageValidation de la chaîne d’approvisionnementConfiguration du code PINMise à jour du micrologicielCréation d’une phrase de départCréation d’une phrase de passeTest des sauvegardesConnecter Passport à Sparrow WalletMultiSigFonctionnalités supplémentaires
Déballage
De manière générale, il est recommandé d’utiliser un bon de commande Case lors de la commande de produits ou de matériaux liés au Bitcoin. Cela permet d’éviter votre exposition aux risques associés aux violations de données. Si vous soupçonnez que votre appareil a été altéré pendant le transport, contactez [email protected].
Le passeport est expédié dans une boîte en carton blanc avec un sceau de sécurité bleu inviolable. Il n’y a rien à l’extérieur de la boîte qui indique qu’elle a quelque chose à voir avec Bitcoin. Le numéro imprimé sur le sceau de sécurité n’est pas enregistré par Foundation Devices, mais le lot initial de passeports a tous été expédiés avec des numéros d’étiquette commençant par B722, B732 ou B733. Si la bande inviolable est dérangée, elle révélera le mot”VOID”.
À l’intérieur de la boîte en carton, vous trouverez une boîte à bulles contenant le Passeport. Cette boîte intérieure est également munie d’un sceau inviolable. Vous trouverez également des autocollants et une carte de correspondance contenant des explications de base sur votre nouveau passeport. L’édition des fondateurs comprend une copie miniature du livre blanc Bitcoin imprimé sous la forme d’un passeport.
Après avoir retiré le papier bulle et coupé le sceau d’inviolabilité, à l’intérieur de la boîte intérieure, vous trouverez votre nouveau passeport. Sous le passeport, vous trouverez deux piles AAA et deux cartes microSD de huit Go.
Tous ensemble, tout le nécessaire pour commencer est inclus. Le passeport mesure 108 mm de long sur 38 mm de large.

Pour commencer, retirez simplement le couvercle magnétique à l’arrière de l’appareil et insérez les piles AAA incluses. Le dos de la carte d’information incluse comporte un code QR que vous pouvez scanner avec votre téléphone pour visiter Foundation Devices page de configuration.

Ensuite, vous verrez comment allumer le Passport et vérifier la chaîne d’approvisionnement pour vous assurer que l’appareil est authentique.
Validation de la chaîne d’approvisionnement
Cette section montre comment allumer le passeport et exécuter la validation de la chaîne d’approvisionnement. Il existe une clé privée stockée sur l’élément sécurisé utilisé pour cette validation. En scannant un code QR de clé publique statique avec le passeport, il générera quatre mots qui seront utilisés comme somme de contrôle que seule une clé privée de passeport valide peut produire.
Maintenez enfoncé le bouton dans le coin inférieur gauche du passeport pendant environ une demi-seconde jusqu’à ce que l’appareil s’allume. Après le démarrage initial, vous serez accueilli par un message de bienvenue. Vous pouvez faire défiler ce message jusqu’en bas en maintenant la « flèche vers le bas », puis appuyer sur le bouton « Continuer ».
Ensuite, vous verrez un code QR que vous pouvez scanner avec votre téléphone pour visiter les guide de configuration si vous ne l’avez pas déjà fait. Ensuite, vous devrez accepter les conditions d’utilisation en appuyant sur le bouton”continuer”.
Enfin, confirmez avoir lu les termes en appuyant sur le bouton”continuer”.

Pour cette prochaine étape, assurez-vous vos batteries sont bien chargées, alors vous voudrez avoir le code QR de validation de la chaîne d’approvisionnement ouvert sur votre ordinateur ou votre téléphone. Lisez et faites défiler jusqu’à la fin du message de validation, puis appuyez sur le bouton”continuer”. Cela lancera l’appareil photo et vous pourrez ensuite scanner le code QR de validation sur l’écran de votre appareil.
Le passeport affichera alors quatre mots à l’écran. Entrez ces mots dans l’interface sous le code QR de validation. Vous devriez recevoir un message de validation confirmant que votre appareil est un appareil légitime de la Fondation.

Appuyez ensuite sur le bouton”VALIDE”et vous êtes prêt à configurer votre code PIN. À ce stade, c’est une bonne idée de préparer un bloc-notes et un stylo ou un crayon pour noter certaines informations dont vous aurez besoin pour sécuriser.
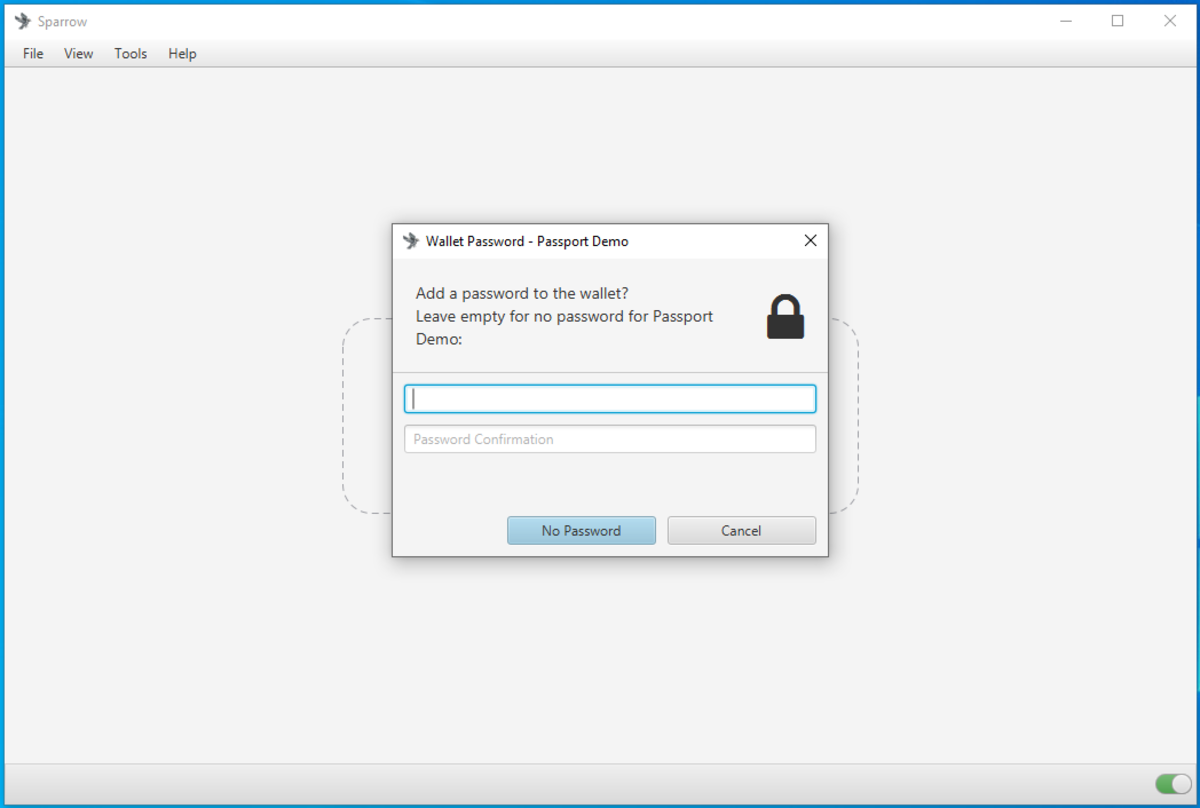
Configuration du code PIN
Cette section montre comment pour configurer le code PIN pour accéder à votre passeport. Préparez un cahier et un stylo ou un crayon. Pour commencer, il y a quelques considérations à comprendre, puis les étapes pour terminer ce processus sont décrites.
Le code PIN est utilisé pour sécuriser l’accès à votre passeport. Sans le code PIN, votre passeport sera inaccessible. Il n’y a aucun moyen de récupérer un code PIN perdu ou oublié, alors assurez-vous de sécuriser votre code PIN de manière à ne pas en perdre l’accès. La meilleure pratique consiste à écrire physiquement ces informations dans un cahier que vous gardez privé et sécurisé. Tout au long de ce guide, il y aura quelques informations qui seront sensibles en ce qui concerne l’accès au passeport et aux clés de signature qu’il contiendra. En écrivant ces informations sur papier, vous pouvez atténuer les risques introduits par l’utilisation des médias numériques.
Par exemple, dans un fichier numérique, ces informations peuvent être consultées à distance sur un ordinateur connecté au réseau si l’ordinateur est compromis. De plus, d’autres formes de médias numériques tels que des images ou des vidéos peuvent non seulement être accessibles à distance sur un appareil compromis, mais elles peuvent également être copiées et transférées rapidement et facilement par toute personne ayant un accès physique à l’ordinateur ou à un autre appareil. Bien qu’il soit vrai que toute personne ayant un accès physique aux informations manuscrites pourrait facilement en prendre une photo, au moins le bloc-notes pourrait être facilement caché dans un endroit discret ou sécurisé dans un coffre-fort, tandis que mettre un ordinateur dans un coffre-fort peut ne pas être pratique ou pratique.
L’utilisation d’un code PIN facile à deviner peut entraîner une perte de bitcoins si un adversaire s’empare de votre passeport. L’utilisation d’un code PIN difficile à deviner présente des avantages. Le code PIN doit comporter au moins six chiffres. Vous entrerez les quatre premiers chiffres, puis deux mots anti-hameçonnage vous seront présentés. Notez ces mots anti-hameçonnage, ce sont des mots uniques qui sont générés en utilisant une certaine entropie du passeport en combinaison avec les quatre premiers chiffres de votre code PIN.
Après avoir établi votre nouveau code PIN, lors de la rentrée dans le Passeport, ces deux mêmes mots anti-hameçonnage vous seront présentés. Si jamais vous êtes confronté à différents mots anti-hameçonnage, c’est que vous avez entré les quatre premiers chiffres de votre code PIN de manière incorrecte ou que votre appareil a été falsifié. Si cela vous arrive, ne continuez pas à accéder à votre appareil jusqu’à ce que vous sachiez dans quelle situation vous vous trouvez à ce moment-là.
Par mesure de sécurité, le Passeport se briquera s’il y a 21 tentatives de code PIN infructueuses. Une fois qu’un code PIN valide est saisi, le compteur se remet à zéro.
Après la validation de la chaîne d’approvisionnement de la dernière section, vous devriez voir un message sur votre passeport qui explique certains détails sur le code PIN. Faites défiler vers le bas de ce message avec la”flèche vers le bas”. Après avoir lu l’intégralité du message, appuyez sur le bouton”continuer”.

Ensuite, on vous présentera avec une boîte de dialogue de saisie de code PIN vide. Utilisez les touches numérotées du passeport pour saisir les quatre premiers chiffres de votre nouveau code PIN. Immédiatement après la saisie du quatrième chiffre, les deux mots anti-hameçonnage vous seront présentés. Notez les quatre premiers chiffres de votre code PIN ainsi que ces deux mots anti-hameçonnage.
Le fait de prononcer ces informations à haute voix peut introduire un risque potentiel d’exposer les détails à tout appareil susceptible de vous écouter. Appuyez ensuite sur le bouton”Suivant”et entrez la partie restante de votre code PIN et notez-le également. Cette partie restante doit comporter au moins deux chiffres et peut comporter jusqu’à huit chiffres. Votre code PIN dans son intégralité peut comporter jusqu’à 12 chiffres. Dans cet exemple, le code PIN”12345678″est utilisé. N’utilisez pas”12345678″pour votre code PIN.

Lorsque vous avez terminé, appuyez sur”Entrée”. Il vous sera ensuite demandé de confirmer votre code PIN en saisissant d’abord les quatre premiers chiffres, en confirmant les deux mots anti-hameçonnage et en saisissant à nouveau la partie restante du code PIN.

Encore une fois, appuyez sur”Entrée”lorsque vous avez terminé et le passeport enregistrera ces informations. Désormais, le code PIN sera requis pour accéder à votre passeport. Un NIP perdu ou oublié ne peut pas être récupéré du Passeport. Personne ne peut vous aider à récupérer un NIP perdu ou oublié. Le passeport se briquera après 21 entrées de code PIN échouées. Assurez-vous d’écrire et de sécuriser votre code PIN complet et les deux mots anti-hameçonnage. Une fois que le passeport a terminé d’enregistrer les détails du code PIN, vous serez au menu principal.
Avant de configurer votre nouveau portefeuille de stockage à froid, il est conseillé de vous assurer que le micrologiciel est à jour.
Pour cette section, vous aurez besoin d’un adaptateur USB pour votre carte microSD incluse, sauf si votre ordinateur dispose d’un port de carte microSD. Il est important de maintenir à jour le micrologiciel du passeport, car c’est ainsi que de nouvelles fonctionnalités sont introduites, que des améliorations de la qualité de vie sont apportées, que les problèmes de sécurité sont résolus et que les bogues sont corrigés. Foundation publie régulièrement des mises à jour du micrologiciel, alors assurez-vous de rester à jour avec celles-ci au fur et à mesure qu’elles se produisent. Accédez à la page officielle du micrologiciel Foundation pour voir plus de détails.
Dans cette section, la mise à jour du firmware sera démontrée de deux manières. La première méthode implique moins d’étapes mais renonce à une vérification indépendante, la seconde méthode démontre l’utilisation des clés publiques et des signatures PGP du développeur pour vérifier de manière cryptographique l’intégrité du fichier du micrologiciel.
Le passeport n’autorisera l’installation du micrologiciel que s’il a été signé par au moins deux des quatre clés PGP possibles du développeur de la Fondation. Cela donne aux utilisateurs débutants ou intermédiaires la possibilité de mettre à jour leur micrologiciel avec un degré de confiance raisonnable, tout en donnant aux utilisateurs avancés la possibilité de vérifier eux-mêmes l’intégrité du micrologiciel.
Avant de commencer avec l’une ou l’autre des approches décrites ci-dessous, vérifiez d’abord votre passeport pour comparer la version du micrologiciel actuellement installée avec la version du micrologiciel actuellement disponible.
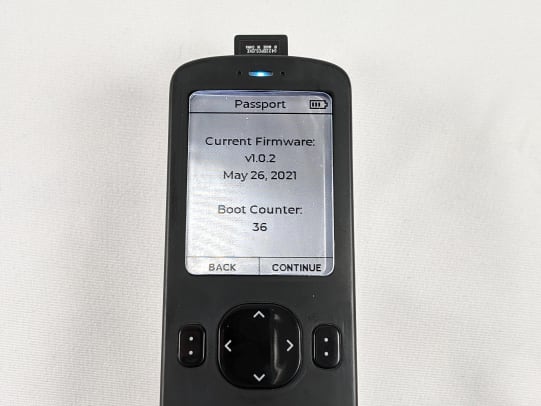
Connectez-vous à votre Passport en l’allumant, en saisissant les quatre premiers chiffres de votre code PIN, en confirmant vos deux mots anti-hameçonnage et en saisissant le reste de votre code PIN. Dans le menu principal, accédez à”Paramètres”,”Firmware”,”Version actuelle”.
Vous y verrez la version du firmware actuellement installée, la date de sa sortie et un compteur de démarrage. Le compteur de démarrage vous indique combien de fois le Passport a été allumé. Comparez la version du micrologiciel actuellement installée à la version actuellement disponible affichée sur la page de téléchargement du micrologiciel. Si la version installée est inférieure à la version disponible, vous souhaiterez la mettre à jour. Si vous avez installé le dernier micrologiciel, vous pouvez passer à la section suivante. Appuyez sur le bouton « retour »: pour revenir au sous-menu précédent.
Mise à jour simple du micrologiciel
Naviguez vers la Fondation page de configuration et cliquez sur le lien pour ouvrir la téléchargement du micrologiciel.

Cliquer sur ce lien lancera automatiquement le téléchargement du fichier « .bin » du micrologiciel Foundation sur votre ordinateur. Si votre ordinateur est équipé d’un slot microSD, vous pouvez simplement insérer la carte microSD. Si votre ordinateur ne dispose pas d’un emplacement microSD, vous devrez peut-être utiliser votre propre adaptateur USB vers microSD, insérez votre carte microSD incluse dans l’adaptateur USB, puis insérez cet adaptateur dans un port USB de votre ordinateur. Une fois que l’ordinateur reconnaît votre adaptateur USB, il vous suffit alors d’ouvrir un explorateur de fichiers et de copier/coller le fichier «.bin » du firmware sur la carte microSD. Éjectez ensuite la carte microSD en toute sécurité.

La carte microSD s’insère dans le port situé sur le dessus du Passport. La carte microSD ne s’insère pas complètement dans l’appareil, elle dépassera à mi-chemin. Assurez-vous que les broches de la carte microSD sont orientées vers le haut, dans la même direction que la face de l’appareil.

Dans le même sous-menu où vous avez vérifié la version du firmware, sélectionnez cette fois”Mettre à jour le firmware”. Suivez ensuite l’invite et appuyez sur”continuer”. Sur l’écran suivant, faites défiler jusqu’au bas du message en appuyant sur la”flèche vers le bas”.
Confirmez que vous souhaitez continuer en appuyant sur”OUI”.
Sur l’écran suivant, vous verrez un message vous avertissant de ne pas éteindre le Passport pendant la mise à jour du micrologiciel. Il est recommandé d’installer des piles neuves. Appuyez sur”OK”pour continuer. Ensuite, le Passport préparera d’abord la mise à jour, puis exécutera la mise à jour. Après un moment, le Passport affichera la nouvelle version du micrologiciel actuellement installée.

Une fois la mise à jour du micrologiciel terminée, vous pouvez retirer la carte microSD et continuer à configurer votre phrase de départ. Ou, si vous voulez voir comment vérifier cryptographiquement l’intégrité du fichier du micrologiciel avant de l’installer sur votre Passport, continuez avec les détails de la mise à jour avancée ci-dessous.
Mise à jour avancée du micrologiciel
Apprendre à vérifier un logiciel est une étape importante mais souvent négligée qui peut vous éviter un certain nombre de menaces. Le risque est que des logiciels malveillants puissent être téléchargés sur des serveurs compromis que vous téléchargez ensuite en pensant qu’ils sont légitimes. Ou des sites Web malveillants qui visent à imiter le site Web légitime pourraient vous faire croire que vous obtenez le logiciel directement de la véritable entreprise.
L’idée de base derrière la vérification des logiciels est que vous pouvez utiliser des signatures cryptographiques et des valeurs de hachage pour prouver que le logiciel que vous avez téléchargé correspond en fait exactement à ce que les développeurs avaient l’intention de vous faire recevoir. Ceci est différent d’un audit de sécurité, dans lequel des experts analysent le code ligne par ligne pour vérifier qu’il ne fait rien de malveillant. La partie vérification garantit uniquement que le logiciel téléchargé est ce qu’il prétend être, que les développeurs qui ont créé ce logiciel soient ou non à la hauteur de stratagèmes néfastes est un autre problème, mais qui est atténué par un logiciel open source que n’importe qui peut examiner et mettre beaucoup d’yeux.
Il y a quelques éléments dont vous aurez besoin pour vérifier votre micrologiciel Passport :
Les étapes décrites ci-dessous seront démontrées avec l’outil de gestion de clés Windows Gpg4win. Si vous utilisez Linux, les instructions peuvent être trouvées sur la page officielle de la Fondation ici.
Vous aurez besoin d’avoir votre propre configuration de paire de clés PGP dans Kleopatra (l’outil de gestion de clés de Gpg4win) afin de certifier la clé publique de la Fondation. Vous pouvez en savoir plus sur la configuration de Kleopatra dans une variété de didacticiels vidéo comme celui-ci. Les étapes suivantes supposent que vous avez déjà configuré votre propre paire de clés PGP.
En outre, pour les utilisateurs de Windows, il existe un éditeur hexadécimal gratuit appelé HxD qui facilite le calcul des valeurs de hachage.
Une fois que vous avez installé Gpg4win, votre propre clé PGP configurée et HxD installé, accédez à le référentiel Foundation GitHub et téléchargez le dernier fichier de micrologiciel, le fichier de signature et notez la valeur de hachage du fichier de micrologiciel. Enregistrez les deux fichiers dans un dossier pratique et gardez un onglet ouvert pour vous référer facilement à la valeur de hachage en quelques étapes.

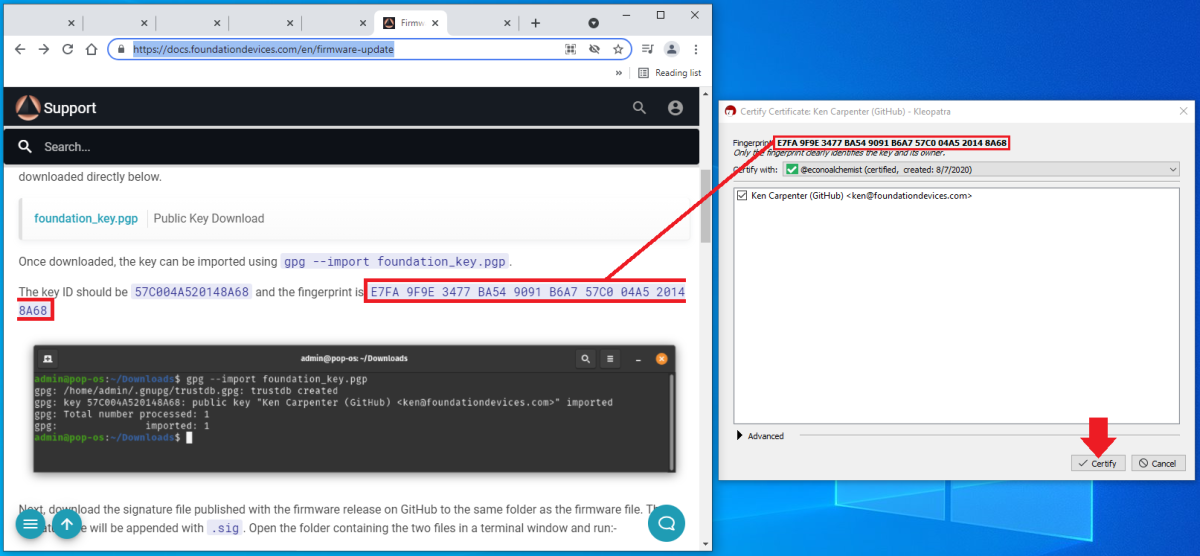
Ensuite, accédez à la page de support de mise à jour du micrologiciel Foundation et téléchargez la clé publique. Vous pouvez l’enregistrer dans le même dossier que les autres fichiers si vous le souhaitez.

Ensuite, vous souhaitez importer la clé publique de la Fondation dans votre gestionnaire de trousseaux Kleopatra. Cliquez sur l’icône”Importer…”dans le menu supérieur.

Accédez ensuite au dossier dans lequel vous avez enregistré la clé publique de la Fondation, sélectionnez ce fichier et cliquez sur”Ouvrir”.

Puis cliquez sur”Oui”pour certifier.
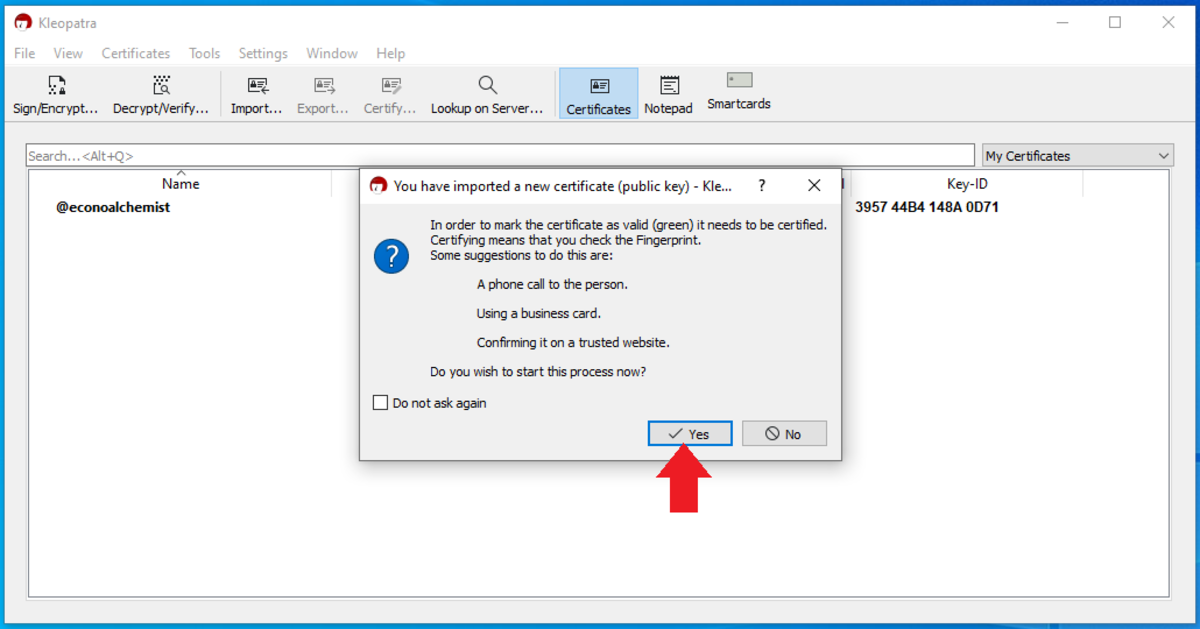
Comparez maintenant l’empreinte digitale affichée dans la boîte de dialogue Kleopatra à une empreinte digitale affichée publiquement pour le développeur de la Fondation. Dans ce cas, depuis le site Web de la Fondation. S’ils correspondent, cliquez sur « Certifier » pour saisir votre mot de passe et terminer l’importation/la certification.
Maintenant, lorsque vous essayez de valider un fichier de signature signé par la clé Foundation, il vous donnera la boîte de dialogue verte, au lieu de la boîte de dialogue de couleur blanche, ce qui signifie que la signature est valide mais non certifié. Il est important de pouvoir faire la distinction entre une signature certifiée et valide (vert), une signature valide mais non certifiée (blanc) et une signature invalide (rouge).

Naviguez jusqu’au dossier où vous avez enregistré le fichier”.bin”du firmware et la signature”.sig”du développeur déposer. Faites un clic droit sur le fichier”.bin”puis sélectionnez”Plus d’options GpgEX”et”Vérifier”. Ensuite, vous devriez obtenir la boîte de dialogue verte certifiée et vérifiée.

Cela signifie que jusqu’à présent, vous avez confirmé que le fichier du micrologiciel”.bin”que vous avez téléchargé est vérifié avec la signature du développeur Foundation.
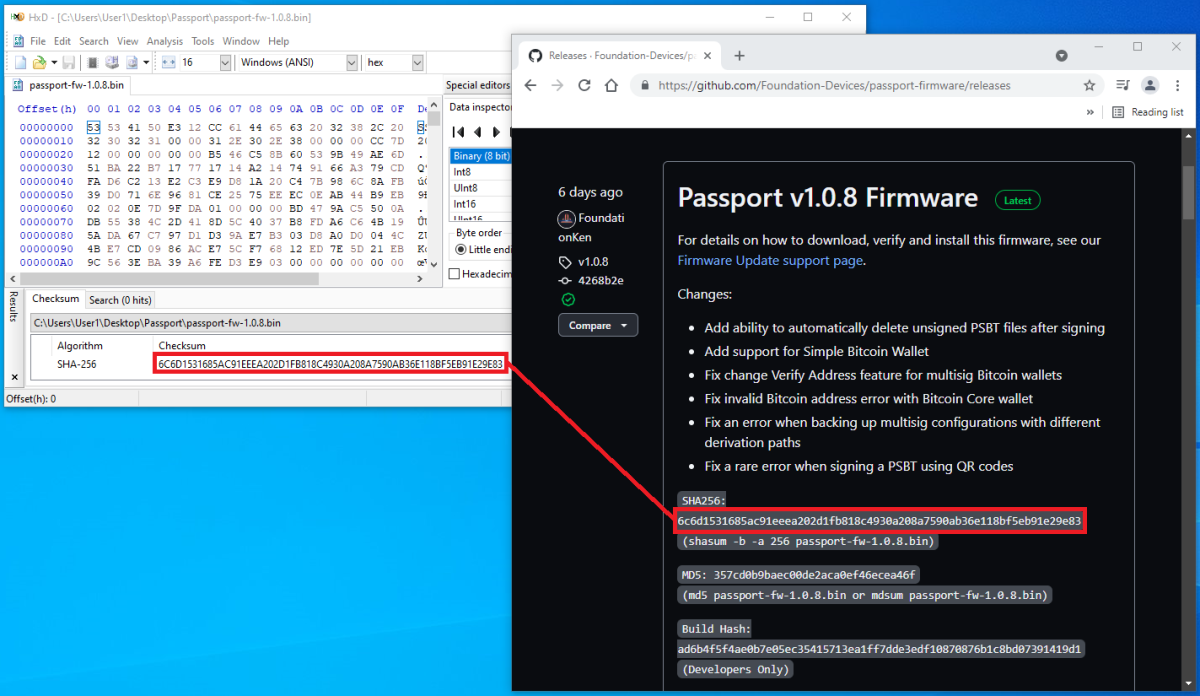
Ensuite, ouvrez le fichier du micrologiciel”.bin”avec HxD, puis accédez à”Analyse”et”Checksums”et choisissez”SHA256″. HxD calculera ensuite la valeur de hachage SHA-256 et vous pourrez la comparer à celle affichée sur le Site GitHub de la Fondation.
Vous êtes maintenant prêt à charger le fichier du firmware vérifié sur votre carte microSD et à l’importer dans votre Passport. À l’aide de votre propre adaptateur USB vers microSD, insérez votre carte microSD incluse dans l’adaptateur USB, puis insérez cet adaptateur dans un port USB de votre ordinateur. Ou si votre ordinateur dispose d’un port de carte microSD, vous pouvez simplement l’utiliser. Une fois que l’ordinateur reconnaît votre adaptateur USB ou la carte microSD, ouvrez simplement un explorateur de fichiers et copiez/collez le fichier”.bin”du firmware sur la carte microSD. Éjectez ensuite la carte microSD en toute sécurité.
La carte microSD s’insère dans le port situé sur le dessus du Passport. La carte microSD ne s’insère pas complètement dans l’appareil, elle dépassera à mi-chemin. Assurez-vous que les broches de la carte microSD sont orientées vers le haut, dans la même direction que la face de l’appareil.
Dans le même sous-menu où vous avez vérifié la version du firmware, sélectionnez cette fois”Mettre à jour le firmware”. Suivez ensuite l’invite et appuyez sur”continuer”. Sur l’écran suivant, faites défiler jusqu’au bas du message en appuyant sur la”flèche vers le bas”. Confirmez que vous souhaitez continuer en appuyant sur”oui”.

Sur l’écran suivant, vous verrez un message vous avertissant de ne pas éteindre le Passport pendant la mise à jour du micrologiciel. Il est recommandé d’installer des piles neuves. Appuyez sur”OK”pour continuer. Ensuite, le passeport préparera d’abord la mise à jour, puis exécutera la mise à jour. Après un moment, le passeport affichera la nouvelle version du micrologiciel actuellement installée.

Une fois la mise à jour du micrologiciel terminée, vous pouvez retirer la carte microSD et continuer à configurer votre phrase de départ.
Création d’une phrase de départ
Cette section couvre comment créer une phrase de départ sur le passeport. Le passeport va générer 24 mots anglais, ces mots constituent la phrase de départ. Une phrase de départ est simplement une représentation lisible par l’homme de la clé de signature de votre bitcoin. La graine est sensible et doit être considérée de la même manière que l’argent, l’or ou les bijoux. Si quelqu’un accède à votre phrase de départ, il accède à votre bitcoin.
Par défaut, le Passport génère la phrase de départ de 24 mots, la chiffre et l’enregistre sur la carte microSD. La phrase de départ peut ensuite être déchiffrée avec un mot de passe que le passeport générera. Ce mot de passe est composé de six mots anglais. Vous pouvez noter le mot de passe dans un carnet sécurisé, l’enregistrer dans un gestionnaire de mots de passe local ou enregistrer le fichier de mot de passe dans une solution de stockage cloud sécurisée. Si quelqu’un accède à votre mot de passe, cela ne met pas vos fonds directement en danger car ils auraient également besoin d’un accès physique à la carte microSD avec le fichier de sauvegarde crypté. De même, si quelqu’un accède à la carte microSD, il aura besoin du mot de passe de six mots pour déchiffrer la phrase de départ.
Le Passport est livré avec deux cartes microSD et la phrase de départ cryptée peut être enregistrée sur les deux pour la redondance.
Pour commencer, insérez la carte microSD dans le Passport, alimentez-le et connectez-vous.
Dans le menu principal, sélectionnez”Créer une nouvelle graine”, puis faites défiler jusqu’au bas du message affiché expliquant les deux sauvegardes et sélectionnez”continuer”.

Ensuite, le passeport affichera un message expliquant le mot de passe de six mots que vous sont sur le point d’être donnés. Faites défiler jusqu’au bas de ce message, puis sélectionnez”continuer”.

Le passeport affichera maintenant votre mot de passe de six mots. Gardez ces mots dans l’ordre, de un à six. Assurez-vous de l’enregistrer de manière à ce qu’il vous soit accessible à l’avenir et sécurisé entre-temps. Si vous avez besoin de restaurer votre passeport à partir d’une sauvegarde, le fichier crypté de la carte microSD et le mot de passe de six mots seront nécessaires.

Une fois que vous avez enregistré votre mot de passe, le Passport vous testera dessus. Sélectionnez simplement la réponse correspondante pour chacun des six mots. Après avoir réussi le test, le Passport chiffrera et enregistrera votre phrase de départ sur la carte microSD. Ensuite, le passeport vous indiquera l’emplacement du fichier, puis vous demandera si vous souhaitez effectuer une sauvegarde secondaire. Si vous souhaitez effectuer une sauvegarde secondaire, retirez simplement la carte microSD et remplacez-la par l’autre carte microSD, puis sélectionnez”OUI”.
Il existe également d’autres options pour enregistrer la phrase de départ. Beaucoup de gens aiment écrire physiquement les 24 mots dans un cahier qu’ils peuvent garder en sécurité. L’avantage de cette méthode est qu’un accès physique est requis et qu’il n’y a absolument aucun risque d’accès à distance depuis un appareil compromis, comme ce qui peut être introduit lors de l’utilisation d’un support numérique. Certains inconvénients d’écrire la phrase de départ sur papier sont qu’elle ne peut pas résister à des environnements extrêmes comme un incendie ou une inondation.
En raison de ce risque environnemental, de nombreuses personnes choisissent d’enregistrer leurs informations de sauvegarde dans un support en acier tel que des rondelles ou assiettes. Pour un exemple, consultez ce guide sur le sujet.
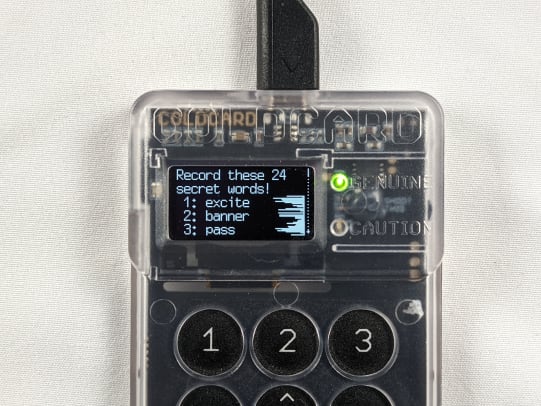
Si vous souhaitez enregistrer votre phrase de départ sous une autre forme, elle peut être récupérée à partir du Passeport. Accédez au menu principal et vous remarquerez que les options du menu ont changé depuis la création de la phrase de départ. Faites défiler jusqu’à”Paramètres”, puis”Avancé”, puis”Afficher les mots clés”.
Ensuite, un message s’affichera expliquant le risque d’exposer ces mots clés à qui que ce soit. Faites défiler vers le bas du message et sélectionnez”OUI”pour afficher ces informations sensibles.
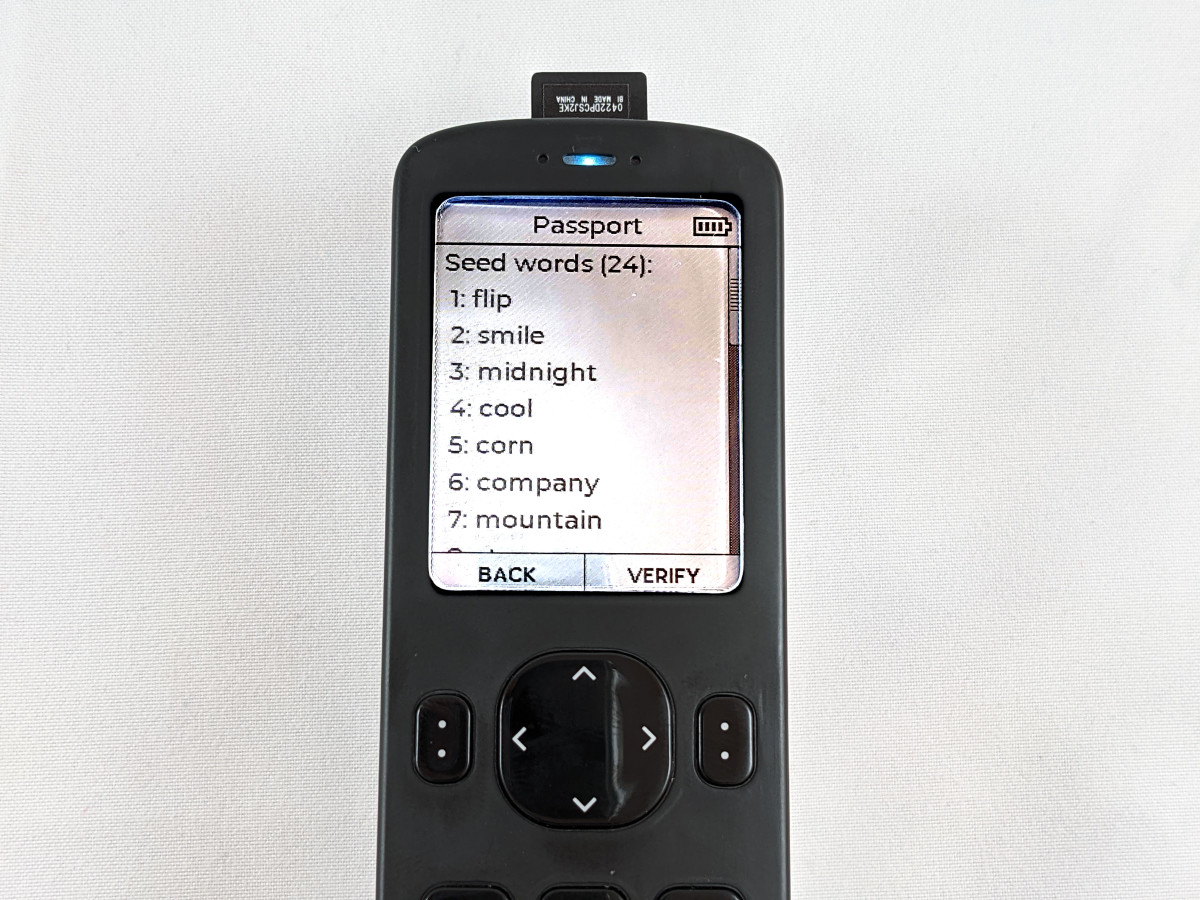
Ici vous pouvez voir vos 24 mots. Assurez-vous de les garder dans l’ordre lorsque vous les notez. Vérifiez que vous travaillez. Ne partagez ces mots avec personne. Gardez-les en sécurité, quelle que soit la façon dont vous choisissez de les sauvegarder. Toute personne ayant accès à ces mots peut accéder à votre bitcoin.
Tester vos sauvegardes sous n’importe quelle forme est une bonne idée et sera couvert après la section Passphrase. Cela garantira que vos sauvegardes fonctionnent comme elles le devraient avant de déposer des fonds.
Création d’une phrase secrète
Une phrase secrète ajoute une couche de sécurité supplémentaire à votre portefeuille Bitcoin. La phrase de passe est une information supplémentaire requise pour accéder à votre clé privée et signer des transactions. La phrase de passe peut être considérée comme un”25e mot”ajouté à la fin de votre phrase de départ de 24 mots. Without the passphrase, the bitcoin will not be accessible.
There are some important considerations to make with passphrases:
With the added security comes added complication. Keep in mind that it may not be you attempting to recover your bitcoin, it may be your loved ones who may not understand how Bitcoin wallets work. The Passport (or any BIP39 wallet) has no way of knowing whether or not you entered the correct passphrase. Any passphrase entered will cause the wallet to display a fully-functioning and valid bitcoin wallet. But only when you enter your passphrase correctly will the right wallet be opened. A”fingerprint”is used to uniquely identify the wallet so you know it is the right one.You will now need to secure an extra piece of information for a complete backup. This can be a disadvantage if you want to minimize the information required to access your bitcoin or this could be advantageous if you leverage it as a duress feature.
If you want to add a passphrase to your Passport, this section will show you how to do it. Make sure you write this information down in a notebook and secure it. The passphrase is not stored in your Passport encrypted backup file.
After you add a passphrase, in order to have a complete backup, you will need:
The microSD card with the encrypted backup file (or the 24 words in writing)The six-word password to decrypt the backup fileThe passphrase and fingerprint
Log in to the Passport and then from the main menu select “Settings,” then “Advanced,” then “Passphrase,” then “Set Passphrase.”

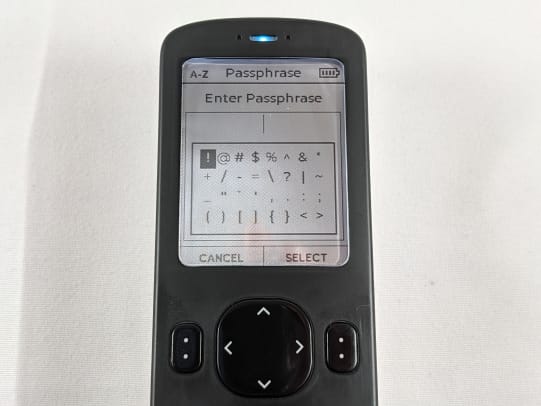
This brings you to the screen where you can enter your passphrase. Passphrases are not limited to words like the seed phrase. Passphrases can contain any combination of special characters, lower case letters, upper case letters or numbers.
You can make your passphrase an easy-to-remember phrase or even a random, high-entropy string of characters.

Once you decide what you want your passphrase to be, make sure you write it down exactly as you have it entered in the Passport. Remember, any deviation from this passphrase going forward will result in a completely different wallet being generated and you will lose your bitcoin if you do not save this information correctly and test it prior to making deposits. The Passport has no way of knowing if you entered the correct passphrase or not and there is nothing that can be done to help you recover a lost or forgotten passphrase.
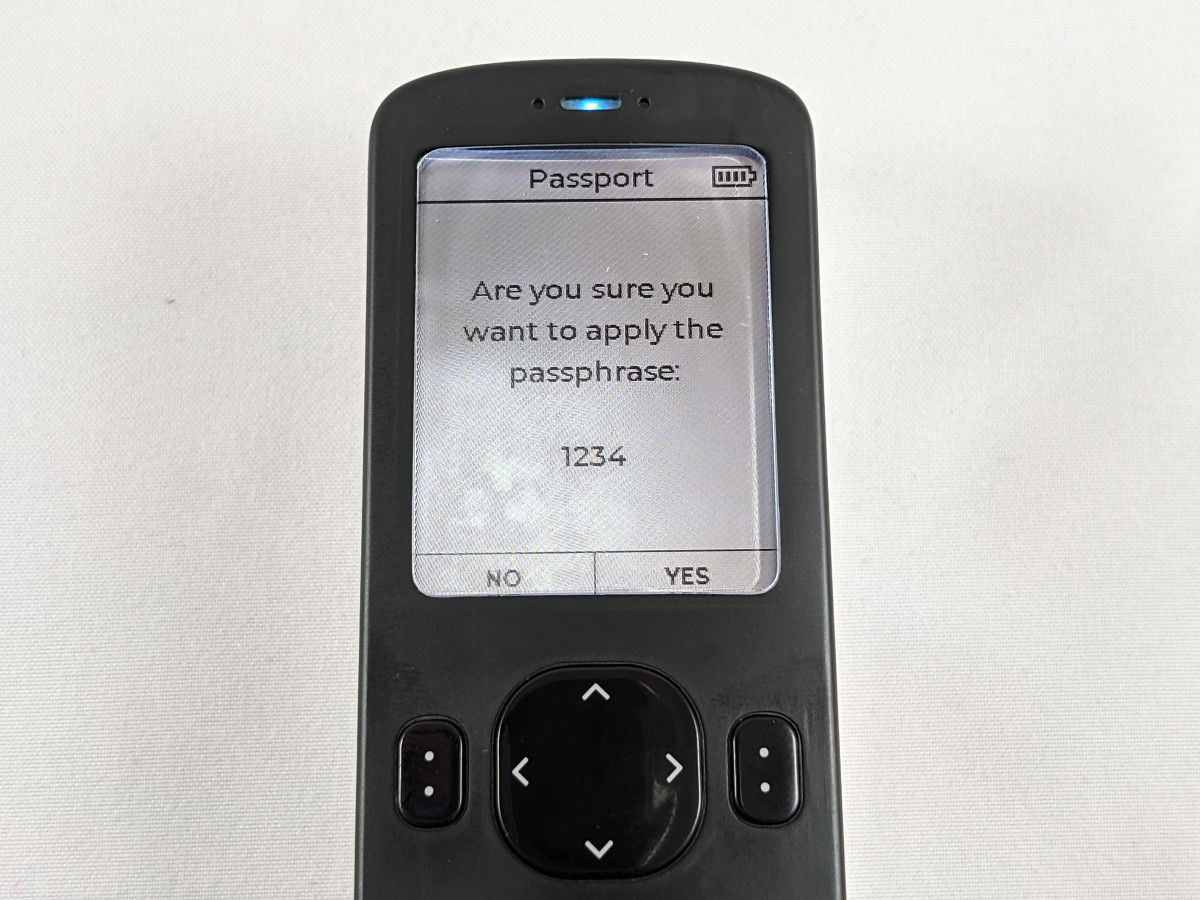
The Passport will display the passphrase you are about to apply, if everything looks correct, click on “YES” to apply the passphrase.
Once a passphrase is applied, you will notice the”P”shield in the upper left-hand corner signifying that a passphrase has been applied and that you are operating in a different wallet than the one you initially logged into. Also, if you want to be prompted for your passphrase upon logging into your Passport in the future, then you can enable this setting by navigating to and selecting “Enter at Startup,” then “Enabled.”

Next, you want to ensure that you write down the fingerprint as well along with your passphrase. The fingerprint is a unique string of characters that helps you identify that you have entered your passphrase correctly and that you are operating in the correct wallet when using the Passport in the future.
You can find your wallet’s fingerprint by navigating back to the “Settings” menu and then “About.” Note the “Master Fingerprint.”

Now that you have a seed phrase and passphrase created and your backup information secured, it is important to verify that your backup information is sufficient for recreating this exact wallet.
Testing Backups
This section will cover how to test your backups and ensure that you have all of the information necessary to recover your wallet in the event that you no longer have access to your Passport. Verifying the viability of your backup is an important step to take prior to depositing any bitcoin to your wallet. This may seem counterintuitive after taking all that time to set up your new Passport, but in this section you will see how to delete your private keys from your Passport. Then you will use your backup information to recreate your wallet.
This exercise not only ensures that your backup works but it also helps you understand the steps necessary to recover your wallet. You don’t want to wait until you absolutely need to recover your funds to learn how this works. Doing some practice and understanding the steps now, before making bitcoin deposits, will help you remain calm and know all the steps when it really counts.
This section demonstrates restoring from both the microSD card and the written 24-word seed phrase, starting with the microSD card method.
From MicroSD Card
First, ensure you have your encrypted file password written down. This is the six-word password that your Passport generated for you when you set up the device. Log in to the Passport and enter your passphrase, if you enabled the setting to prompt you for it at login. Then navigate to “Settings,” then “Backup,” then “View Password.” This will display your six words and you can confirm you have this information notated correctly.

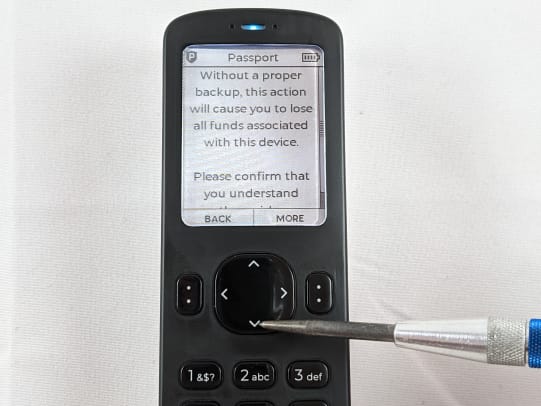
Second, navigate back to “Settings,” then go to “Advanced” and “Erase Passport.” Then select “YES” to confirm that you wish to erase your Passport.

Then, read the message that explains that by confirming, you understand all funds will be lost without a proper backup. Scroll to the bottom of that message and then press “confirm” to acknowledge you understand the risks. This will initiate the Passport to erase your seed phrase.
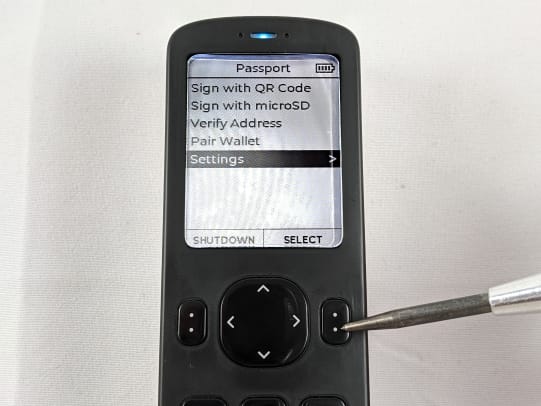
Once the Passport reboots itself, insert your microSD card with the encrypted backup file. Log back in and then, from the main menu, select “Restore Backup,” then press “CONTINUE” to select the encrypted backup file from the microSD card. You probably only have one file to choose from, so select that file.

Next, you will be asked for your encrypted file password. Using the alphanumeric keypad, press the keys that spell the word you want. For example, to enter the word “ruin,” press “7,” “8,” “4” for “r,” “u,” “i,” respectively, and then select “ruin” from the short list of possible words.

Repeat that process for all six words in order, making up your password. Then, The Passport will alert you that the restoration was successful and that the device will now reboot. You can remove the microSD card at this time.

Next, you want to apply your passphrase and ensure that you get the same fingerprint returned that you have notated. Navigate to “Advanced,” then “Passphrase,” then “Set Passphrase,” then enter and apply your passphrase.

With the passphrase applied, you can then navigate to “Settings,” then “About” and view the master fingerprint there. This should match your records, if it does not match your records then you either entered the passphrase incorrectly or you have the wrong passphrase written down.
Now you know that your encrypted backup file on your microSD card works to restore your wallet and that your passphrase works too.
From Written Seed Words
This part demonstrates how to ensure the written seed phrase and passphrase can be used to restore your wallet. If you are only using the encrypted backup file on the microSD card then this step is not necessary for you. This is meant for people who want to write down their seed phrase or stamp it into metal.
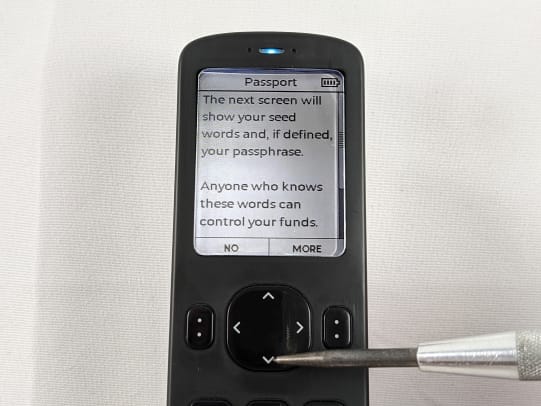
First, ensure you have written down your seed phrase words correctly and in the right order. To verify this, log in to your Passport, then from the main menu select “Settings,” then “Advanced,” then “View Seed Words.”
You will be presented with a message explaining that anyone with access to these words has access to your bitcoin. Press the down arrow to scroll to the bottom of the message then press “YES.”
Then you can scroll through the list of words on your Passport and compare it to the list of words you have written down. Checking to be sure that the words are written down correctly and that they are in the right order.
Once you have verified that your seed words are notated correctly, ensure that the passphrase you have notated works as well. You want to compare the fingerprint you have written down to the one displayed on your Passport after applying the passphrase.
Navigate to “Settings,” then “Advanced,” then “Passphrase,” then “Set Passphrase.”
Enter your passphrase, then the Passport will display the passphrase you are about to apply, if everything looks correct, press “YES” to apply the passphrase.
Then view your wallet’s fingerprint by navigating back to the “Settings” menu and then “About.” Note the “Master Fingerprint.”
If everything looks good then you have verified that you have your seed words written down correctly and that your passphrase is correct and reproduces the same fingerprint. Now you can erase your Passport and restore from backup. Navigate back to “Setting,” then go to “Advanced” and “Erase Passport.” Then select “YES” to confirm that you wish to erase your Passport.
Then read the message that explains that by confirming, you understand all funds will be lost without a proper backup. Scroll to the bottom of that message and then press “confirm” to acknowledge you understand the risks. This will initiate the Passport to erase your seed phrase.
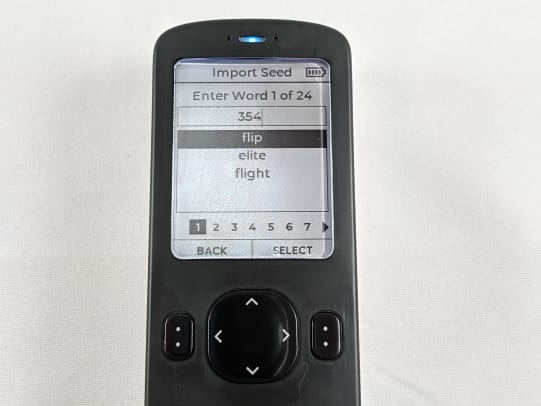
Once the Passport reboots itself, log back in, then from the main menu select “Restore Seed,” then “24-Word Seed,” then scroll to the bottom of the message explaining how the predictive text works and press “CONTINUE.”

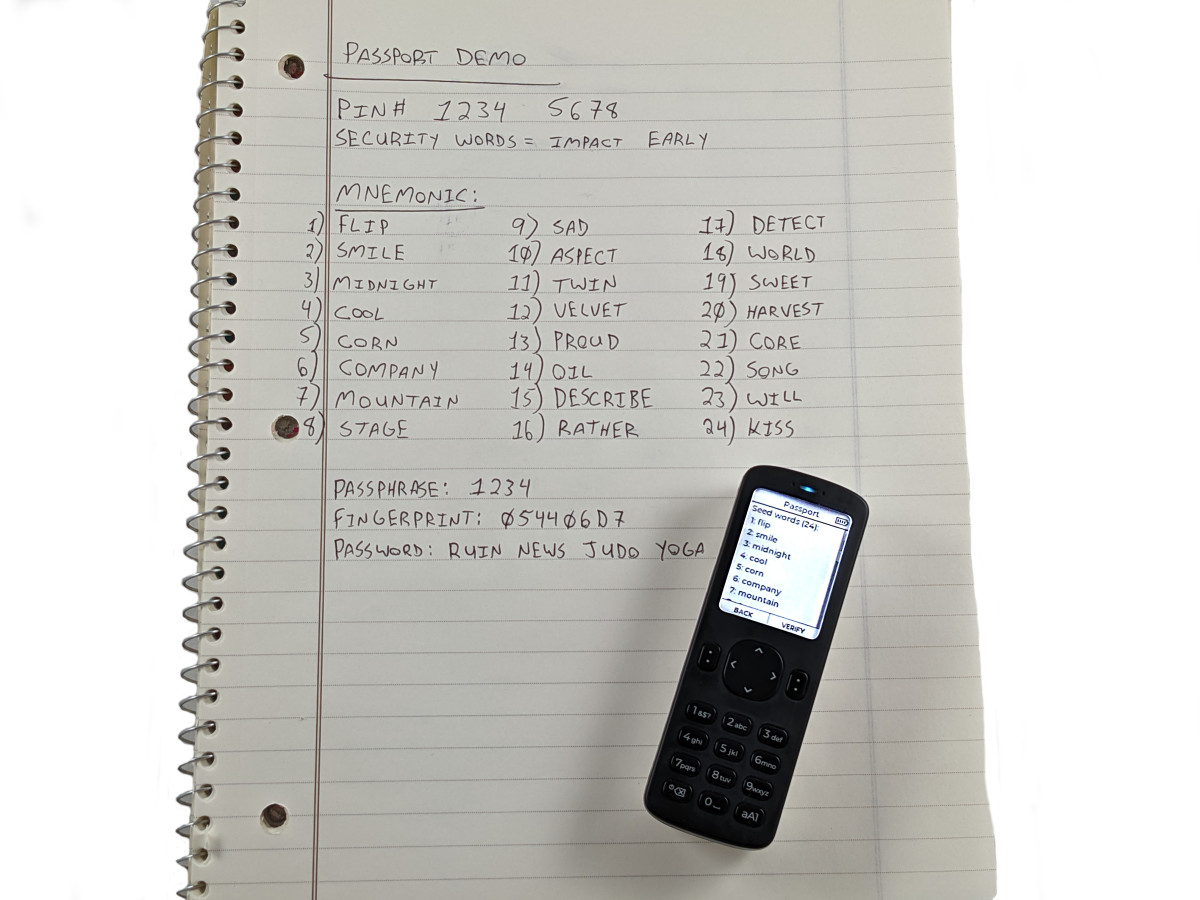
Using the alphanumeric key pad, press the keys that spell the word you want. For example, to enter the word”flip,”press”3,””5,””4,”for”f,””l,””i,”respectively, and then select”flip”from the short list of possible words. Continue this process for all of your seed words.
After you enter the 24th word, the Passport should automatically import the seed phrase and bring you back to the main menu. Now you want to apply your passphrase and then double check the resulting fingerprint to ensure that you were able to restore your wallet precisely. Follow the steps above for entering your passphrase and then checking the fingerprint.
Now that you have verified that either your encrypted backup file or your written seed words or both are valid and work accordingly, you can start making deposits to your Passport knowing that in a worst-case scenario, you indeed have the necessary backup information to recover your wallet.
Connecting Passport With Sparrow Wallet
In this section, you will see how to import information to Sparrow Wallet that allows you to monitor your Passport bitcoin balance, generate receive addresses and create transactions all while keeping the Passport air gapped. Sparrow Wallet is a desktop Bitcoin wallet designed to be connected with your own node. This is a user-friendly wallet with an intuitive interface and many capabilities and advanced features. To learn more about Sparrow Wallet and for installation instructions, visit the Sparrow Wallet website.
This section demonstrates how to connect Passport with Sparrow Wallet using your own Bitcoin Core node. If you don’t have your own Bitcoin node, you can use reputable public Electrum servers. However, there are privacy tradeoffs that come with using the convenience of a public Electrum server. Luckily, there are a number of resources available to help you spin up your own Bitcoin node, to learn more check out:
Once you have your Bitcoin Core node ready, there are a couple steps needed to configure it to work with Sparrow Wallet.
If you have Bitcoin Core running on the same computer as Sparrow Wallet, then all you need to do is open the “bitcoin.conf” configuration file and add “server=1” near the top and save it. Then relaunch Bitcoin Core. You may have a blank configuration file if this was a new Bitcoin Core install and that is fine.
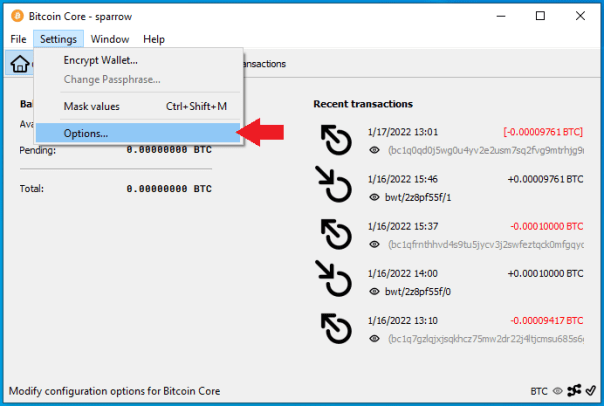
If you are not sure where your “bitcoin.conf” file is located, you can always open it from within the Bitcoin Core application by navigating to “Settings,” then “Options” and then clicking on the “Open Configuration File” button in the pop-up window. Just be sure to close the application and restart it for those changes to take effect.
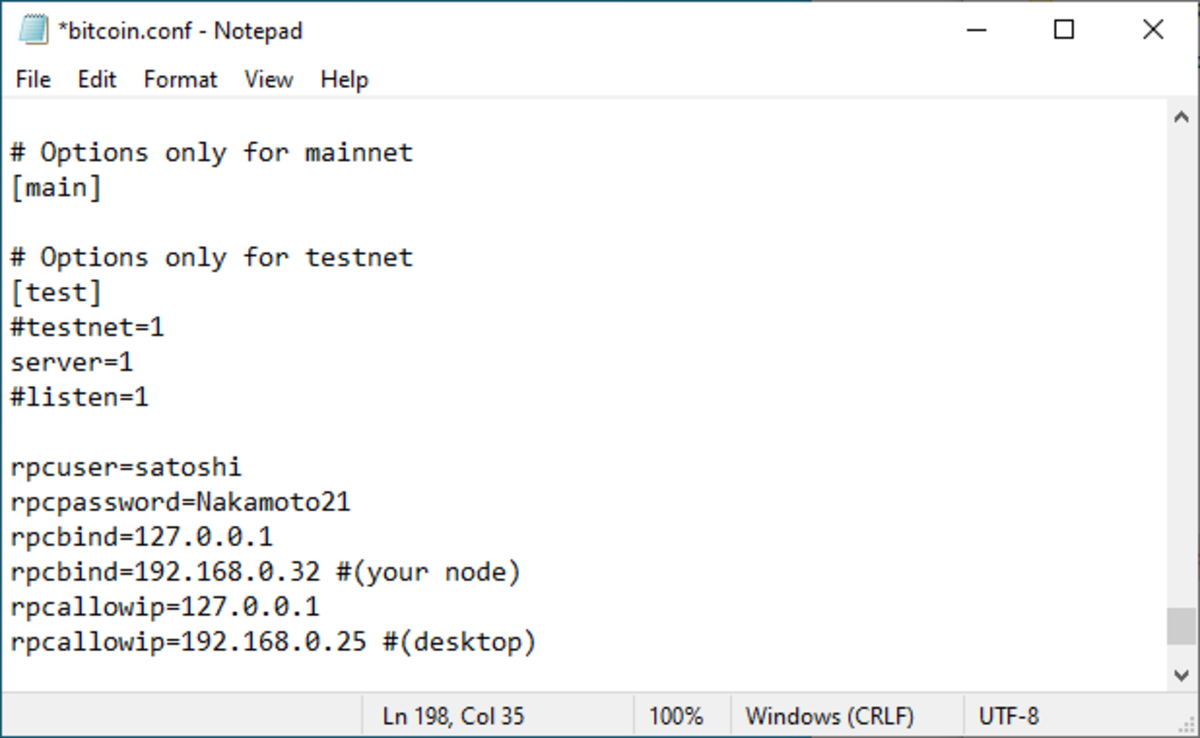
Alternatively, if you are running Bitcoin Core on a remote computer, you need to add a username and password and the Remote Procedure Calls (RPC), binding local IP addresses in the configuration file. To do this, navigate to the “bitcoin.conf” configuration file and open it in your preferred text editor. Then add the local IP address for your node and the local IP address for your desktop. For example:
rpcuser=pi
rpcpassword=Nakamoto21
rpcbind=127.0.0.1
rpcbind=192.168.0.11 #(your node)
rpcallowip=127.0.0.1
rpcallowip=192.168.0.12 #(desktop)
Save those changes and then you should be able to connect to your Bitcoin Core node from your computer on the same local network. Make sure you restart Bitcoin Core after saving those changes.
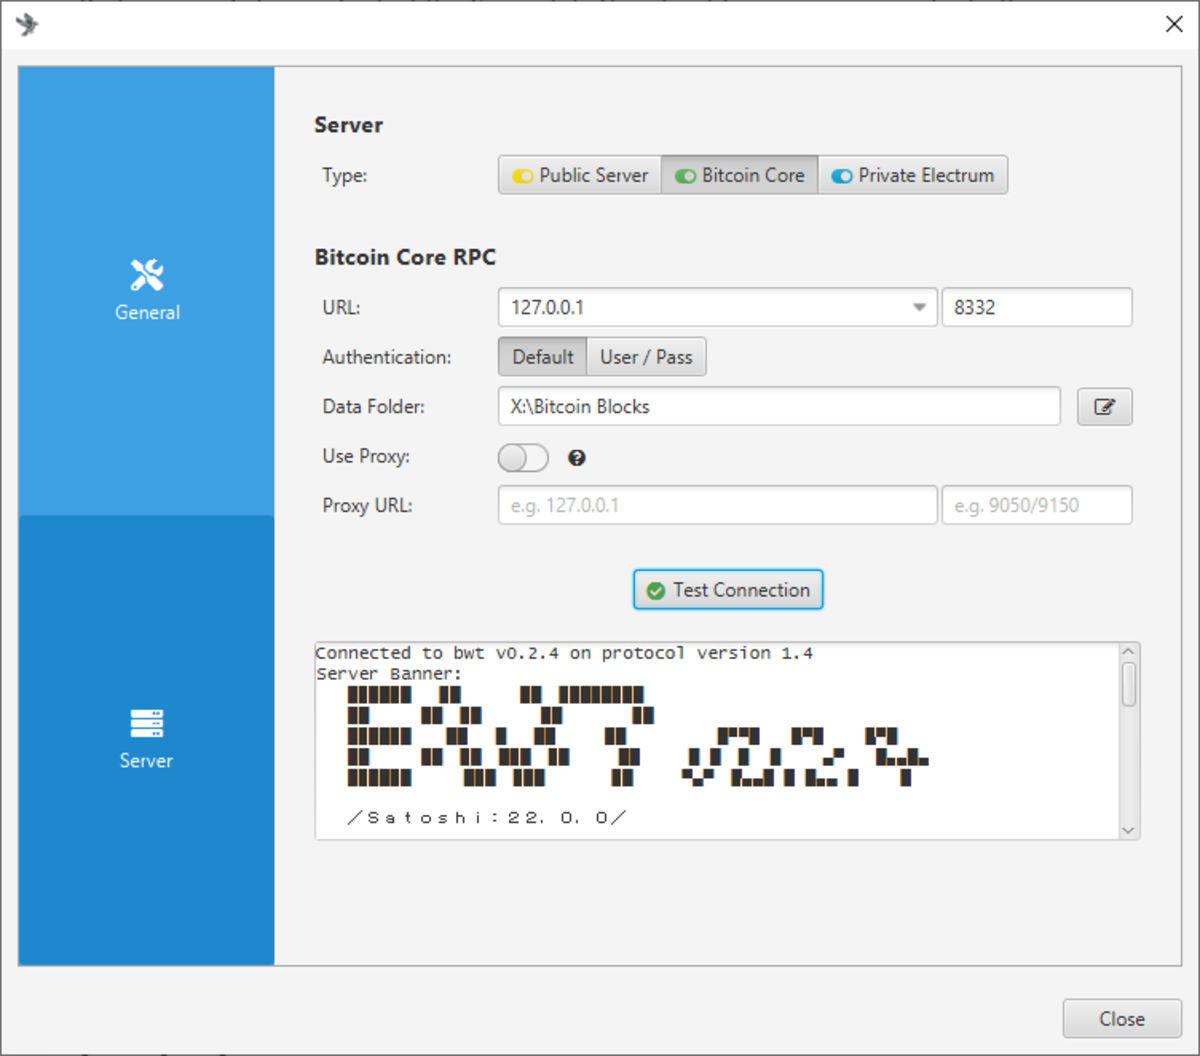
Now you are ready to configure Sparrow Wallet to talk to your Bitcoin Core node. Once you have Sparrow Wallet installed and launched, you will be presented with an empty user interface. Navigate to “File,” then “Preferences”:

Then click on the “Server” tab on the left-hand side. Click on the “Bitcoin Core” tab for the “Server Type.” If running Bitcoin Core on the same computer, use the “127.0.0.1” rpcbind IP address with “8332” as the port and the default authentication option. Or, if running Bitcoin Core on a different computer, use the same username and password that you entered in the “bitcoin.conf” file.
Either way, set the data folder directory to the same folder that the “bitcoin.conf” file is being written in (you should have been prompted to specify this folder when you launched Bitcoin Core for the first time prior to initial block download). This should be the same directory that Bitcoin Core writes the “.cookie” file that Sparrow Wallet needs to read.
Test the network connection from Sparrow Wallet. If it’s good, you should see the green check mark next to “Test Connection” and some information populated in the dialog box below that. If the connection is not good, try shutting down Sparrow Wallet, then ensure that Bitcoin Core is up and running and connected to some peers, then restart Sparrow Wallet and try again. Then you can close that window.
Unfortunately, Bitcoin Core stores your public keys and balances unencrypted on the computer it is running on. Although your bitcoin are not directly at risk of theft, if this computer is regularly connected to the internet, it is at risk to hackers — which has the potential to make you a target if your balance and geographic location are discovered. To learn more about Sparrow Wallet best practices, check out this Sparrow Wallet resource.
Now that Sparrow Wallet is connected with Bitcoin Core, the Passport can be connected via QR code if you have a webcam on your computer or via microSD card if you do not have a webcam.
Since the Passport is strictly an air-gapped hardware wallet, a Partially Signed Bitcoin Transaction (PSBT) is utilized to spend bitcoin from the Passport. The information necessary to generate such transactions is imported to Sparrow with the QR codes from the Passport. Basically, the public information from the Passport called an XPUB will be used to import the necessary information into Sparrow Wallet on your desktop. By doing this, Sparrow Wallet will be able to generate receive addresses and QR codes, monitor the Passport’s balance and initiate PSBTs. All without exposing the signing key on the Passport.
You can also use the microSD card to transfer information between the desktop and the Passport but the QR codes enable a faster user experience. This section will cover both, starting with the QR code method.
Importing Via QR Code
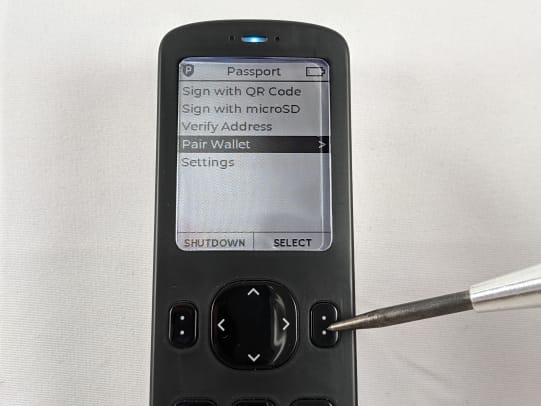
To import a single signature wallet via QR code, first log in to your Passport and enter your passphrase if you are using one. Then from the main menu navigate to “Pair Wallet,” then “Sparrow,” then “Single-sig,” then “QR Code.” Once you press “CONTINUE,” the Passport will start flashing a series of QR codes, so hold off on pressing that for a moment while you prepare Sparrow Wallet on your desktop.
In Sparrow Wallet on your desktop, navigate to “File,” then “Import Wallet.”

From the menu of wallets that pop up, scroll down to “Passport” and select “Scan…”
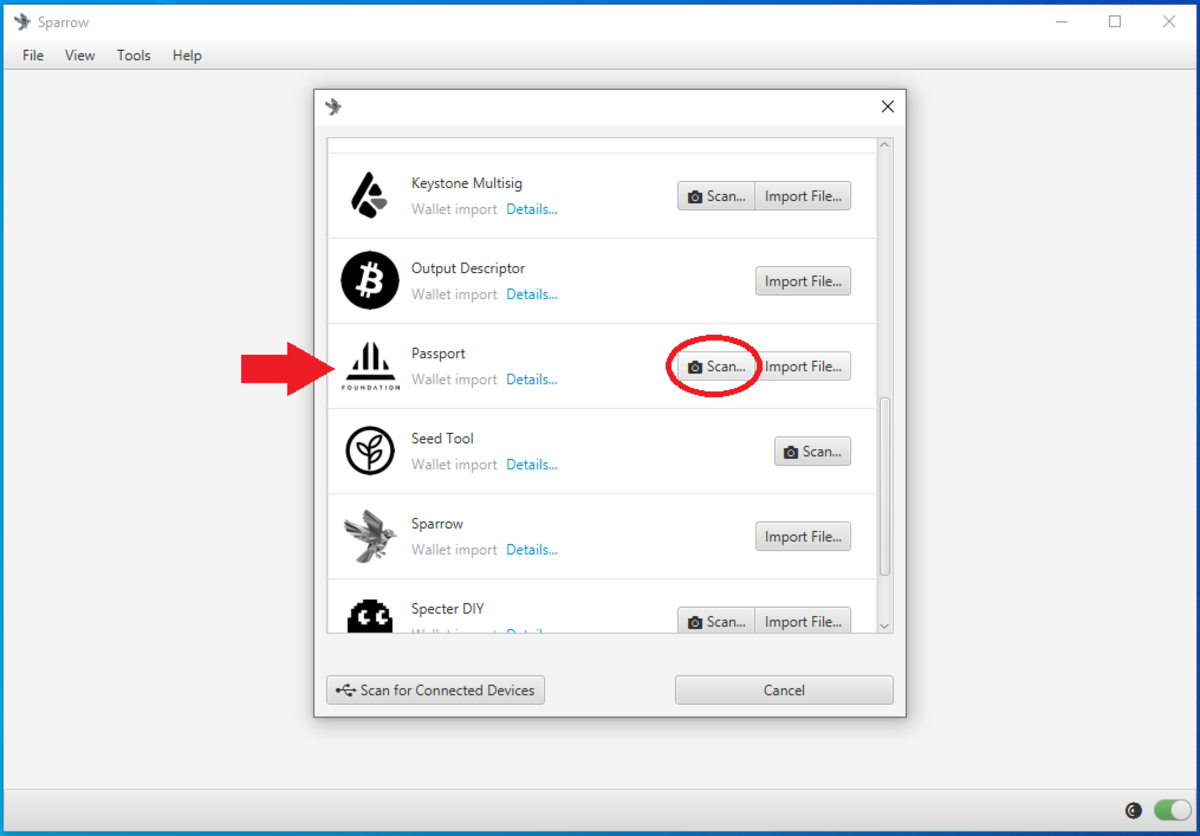
This should launch your webcam. Now you can pick your Passport back up and press “CONTINUE” to initiate the series of QR codes. If you want to resize the QR codes on the passport screen, you can press the “Resize” button to change the QR code resolution to three possible sizes.
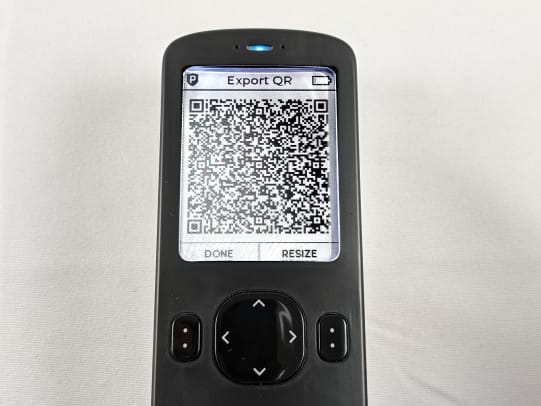
Capturing the whole series of QR codes can take a moment, so try to keep the passport steady and the QR codes within the dotted boundary lines on the Sparrow Wallet screen. You can skip ahead in this guide to the”After Either QR Code Or File Import”section.
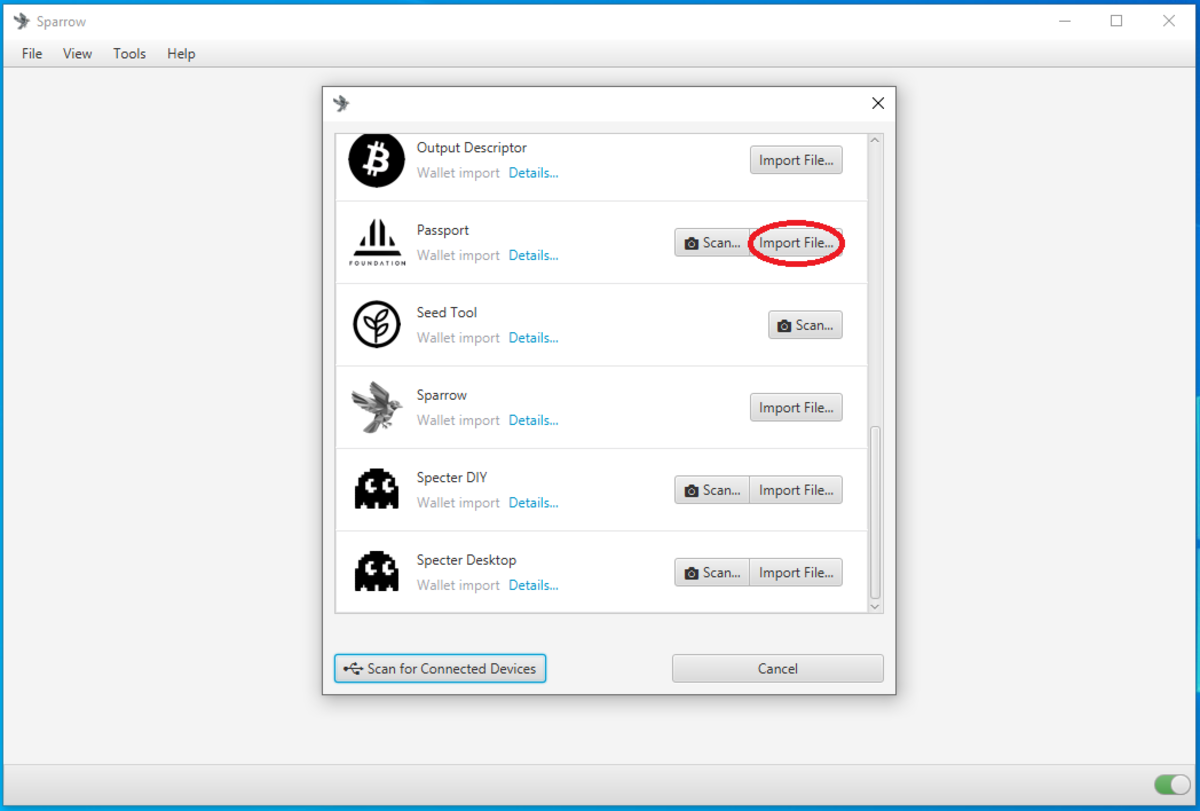
Importing Via File
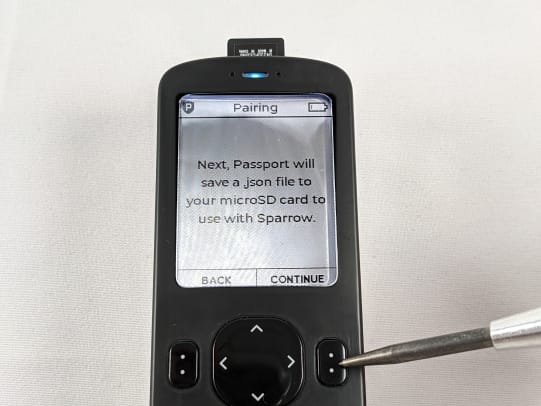
To import a single signature wallet via file, first log in to your Passport and enter your passphrase if you are using one. Then, from the main menu, navigate to “Pair Wallet,” then “Sparrow,” then “Single-sig,” then “microSD.”
Make sure you insert the microSD card. The Passport explains that it is about to save a “.json” file to your microSD card with the XPUB information. This information will not put your funds at risk, however, they may put your privacy at risk as this XPUB information can be used to recreate your balance and transaction history. The Passport will let you know what the filename is going to be.
Next, the Passport will ask you to verify that import was successful by scanning an address generated from Sparrow Wallet and then scanning that address with the Passport camera to ensure it is an address that the Passport created. Set the Passport aside for now and go through the next section to get Sparrow Wallet ready to do this.
Remove the microSD card from the Passport and insert it into a microSD-to-USB adaptor and insert that to your desktop computer running Sparrow Wallet. Or, if your computer has a microSD card port, then you can just use that without the USB adaptor.

In Sparrow Wallet on your desktop, navigate to “File,” then “Import Wallet.”
From the menu of wallets that pop up, scroll down to “Passport” and select “Import File…”
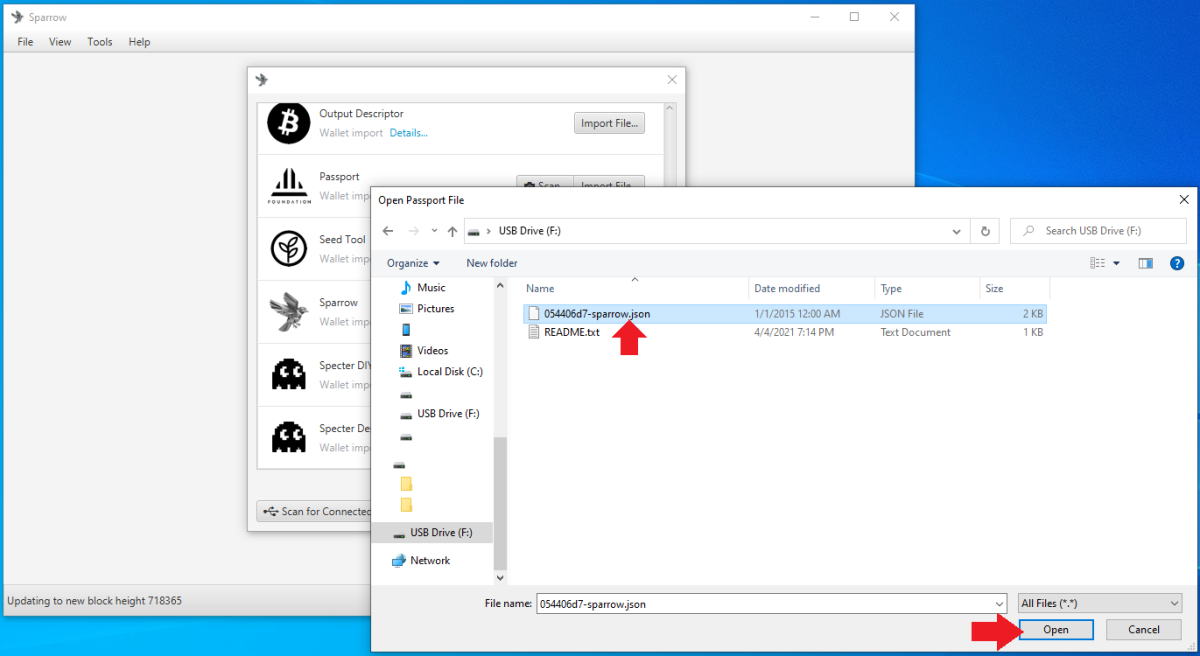
This should launch your file explorer where you can navigate to the file location of the exported “.json” file on the microSD card and select “Open.”
After Either QR Code Or File Import
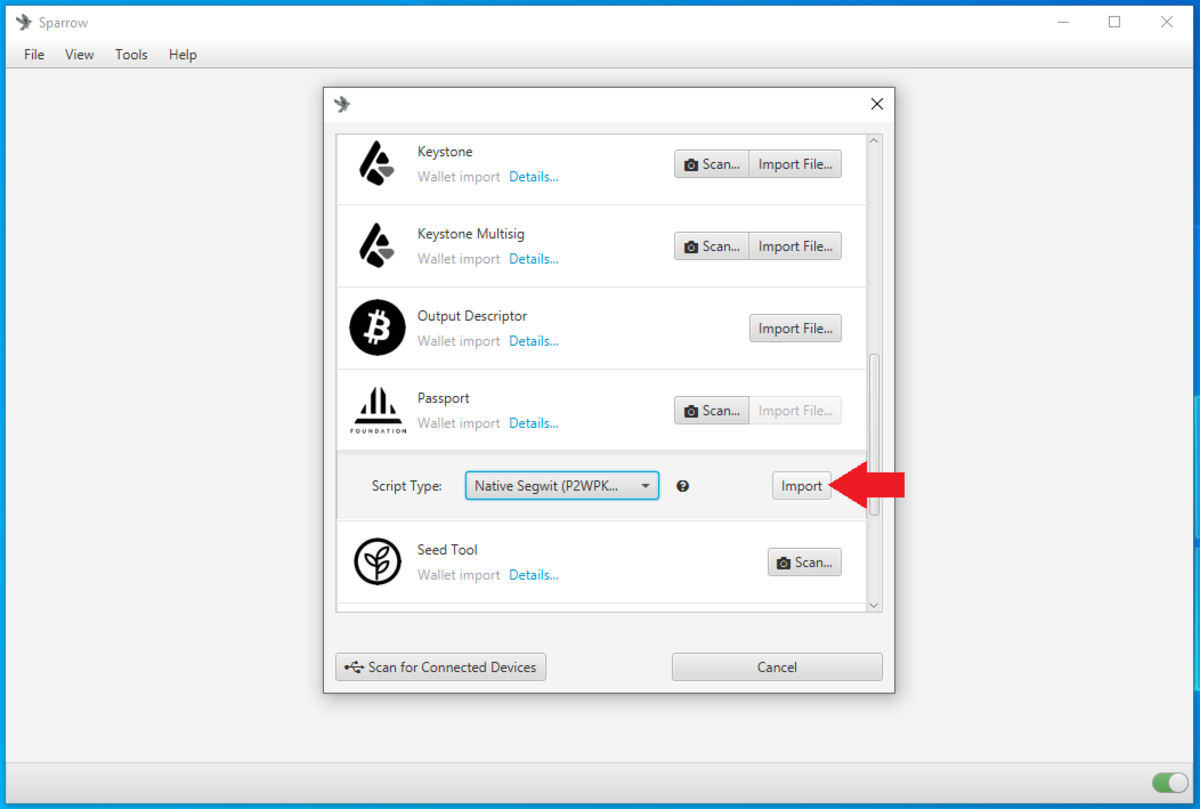
Once the necessary informat ion has been gathered by Sparrow Wallet, either by QR code import or by “.json” file import, you should be taken back to the previous menu screen in Sparrow Wallet. This time though, you should notice that you can choose the “Script Type” from a dropdown menu, this is where you can choose whether you want to use legacy Bitcoin addresses that start with”1,”or nested SegWit addresses that start with”3,”or native SegWit addresses that start with”bc1q,”or Taproot addresses that start with”bc1p.”Although Sparrow Wallet is ready to handle Taproot addresses, this is anticipated to be implemented in the Passport in the first quarter of 2022. In this demo, bative SegWit,”bc1q”addresses are used.
Next, Sparrow Wallet will ask you to name your new wallet. This can be whatever you choose. In this example,”Passport Demo”is used. Then click on “Create Wallet.”

Then Sparrow Wallet will ask you if you want to use a password on this wallet. This password is what encrypts your wallet data file on your desktop and it is optional. If anyone gains access to your desktop, they could potentially open your wallet data file if it is not password protected. In this case, even if someone does open your wallet data file, they would not be able to spend your bitcoin because a signature from the Passport would be required to do that.
After applying the changes, you can now navigate through your watch-only wallet in Sparrow Wallet.

On the left-hand side of the Sparrow Wallet interface there are six tabs. The “Transactions” tab is where you can see information related to the transactions in this watch-only wallet. The “Send” tab is where you can create the PSBTs to then sign with Passport via QR code or microSD card. The “Receive” tab is where you can generate receive address for your Passport without having to retrieve the Passport and log into it. The “Addresses” tab shows several deposit and change addresses as well as any balances. The “UTXOs” tab shows any unspent transaction outputs and a small graph charting the history. Finally, the “Settings” tab is where you can see detailed information about the watch-only wallet such as the master fingerprint, derivation path and XPUB.
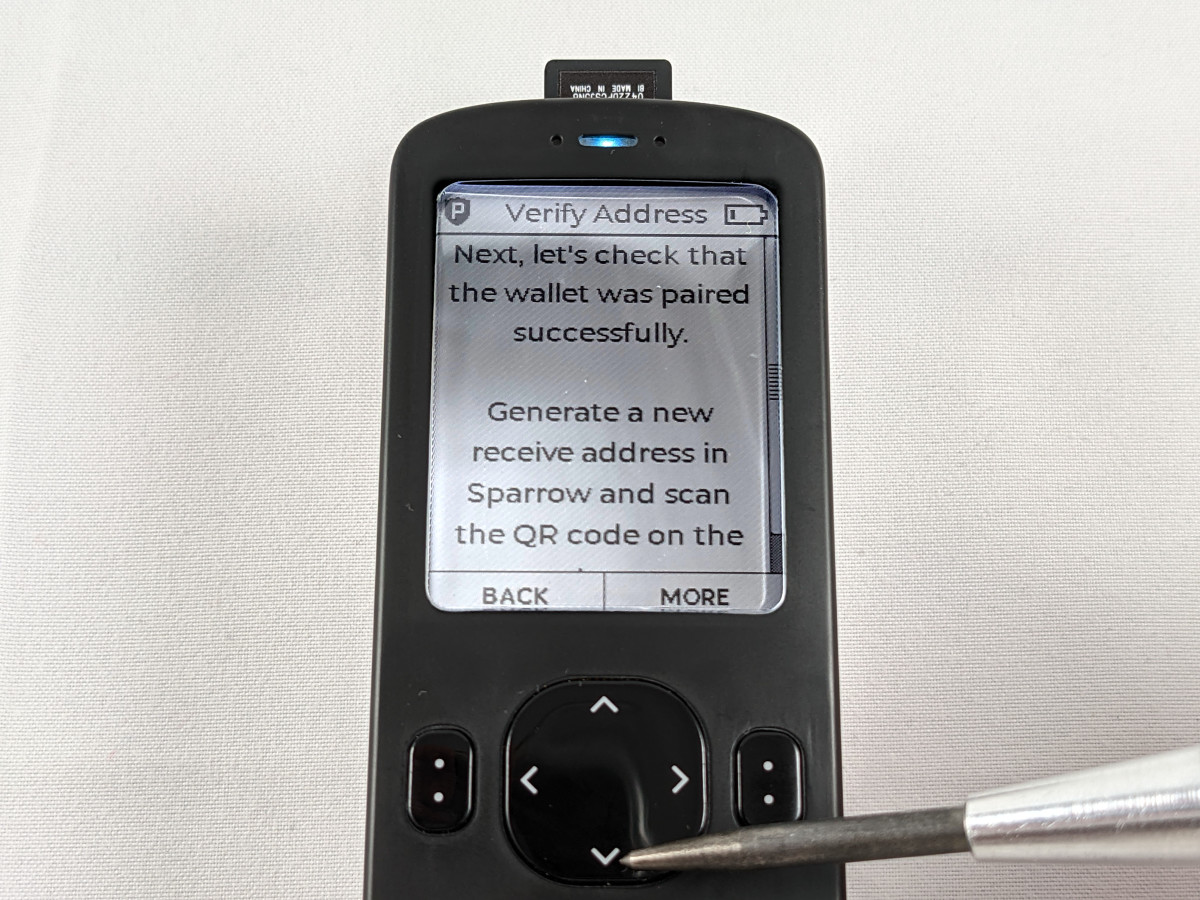
If you imported your Passport wallet from file, you still need to scan an address to verify with your Passport. Navigate to the “Receive” tab in Sparrow Wallet, this will bring up a Bitcoin receive address along with the QR code.
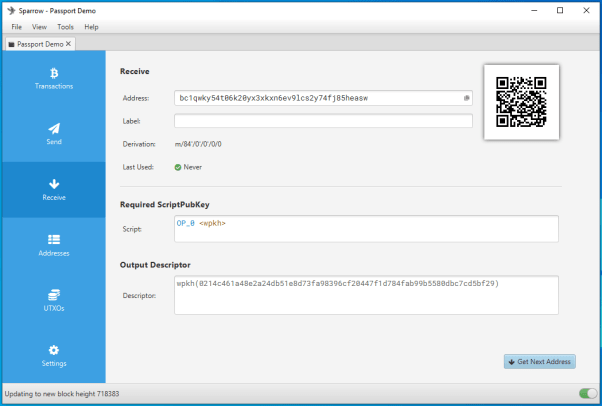
Now you can scan this Sparrow Wallet QR code with your Passport to verify the wallet import was completed successfully. Your Passport should still be waiting for you to verify that the import was successful. Scan this QR code with your Passport and you should see a prompt on the Passport saying”Pairing Complete.”
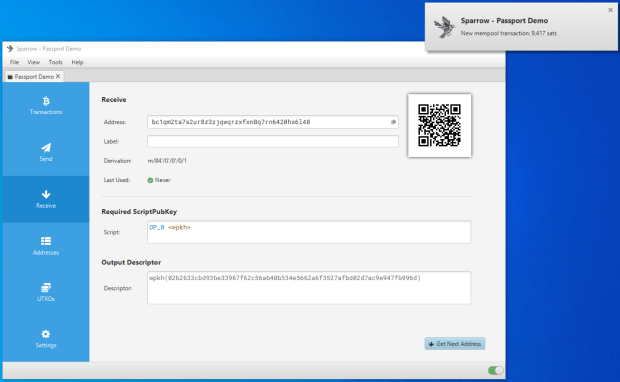
Back in Sparrow Wallet you can click on the “Receive” tab on the left-hand side menu any time you want to generate a new receive address. You can scan this QR code with your mobile Bitcoin wallet, for example, and deposit some bitcoin to your Passport. You should see the transaction show up in Sparrow Wallet after a moment along with a pop-up notification. Also, in Bitcoin Core, the transactions should show up there as well. The transaction will remain in a pending status until it receives some blockchain confirmations. In the meantime, you can click on the “Transactions” tab and review further details about your transaction. You can also copy/paste your transaction ID (TXID) in mempool.space to watch for your first confirmation, or use whatever your preferred block explorer is. Tor Browser is a privacy-focused browser.
Now you can power off and secure your Passport in a safe place until you want to sign a transaction and spend from it, several addresses will be cataloged in Sparrow Wallet so you can continue depositing to your Passport via Sparrow Wallet without having to reconnect it every time. Best practice is to confirm each receiving address on the Passport itself by navigating to “Verify Address” from the Passport main menu and scanning the displayed QR code in Sparrow Wallet with the Passport camera. Additionally, use each address only once.
When you are ready to sign a transaction to spend bitcoin, it is necessary to create a PSBT. You can deposit bitcoin with your Passport stored away but to spend bitcoin, the Passport needs to sign the transaction. Sparrow Wallet is used to build the transaction based on your available UTXOs and the information you enter when constructing the transaction. The PSBT details are passed between Sparrow Wallet and the Passport using the QR code exchange method or the microSD card.
Signing A PSBT Via QR Code
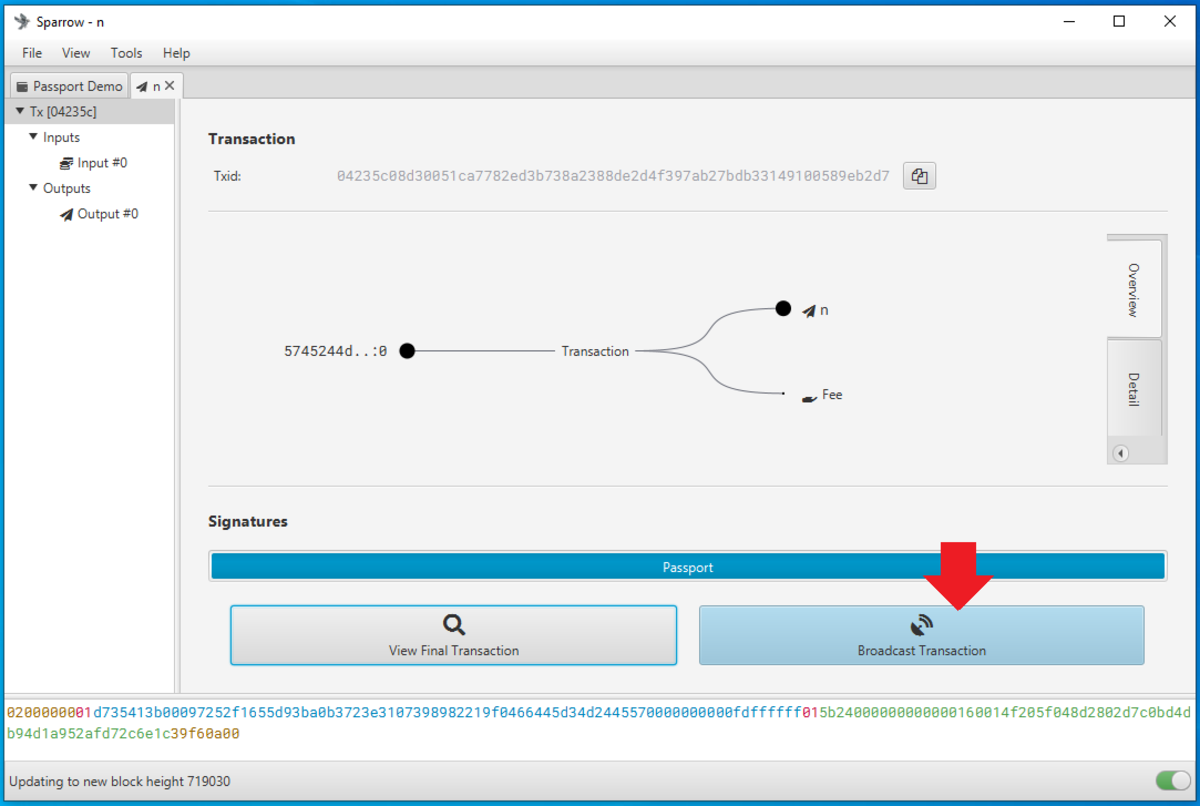
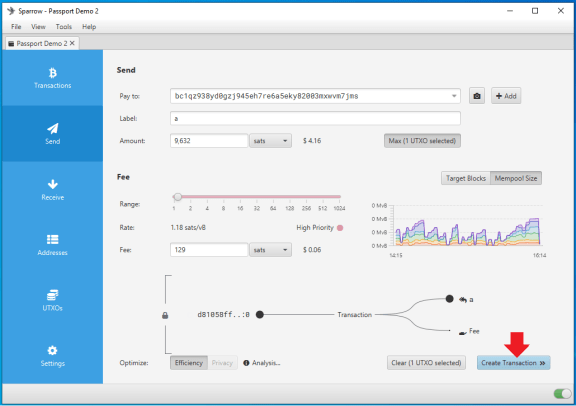
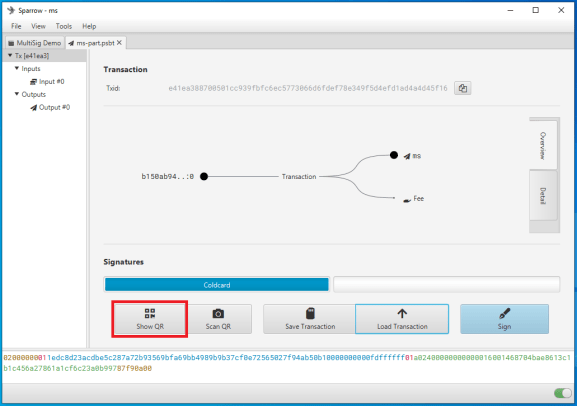
To create a PSBT, navigate to the “Send” tab on the left-hand side in Sparrow Wallet. There, you can paste the address you are sending to, add a label, enter an amount to send and choose a miners fee rate, etc. Once you have everything set, click on “Create Transaction.” On the next screen, double check the details then click on “Finalize Transaction for signing.” Then you will be asked what you want to do with the finalized PSBT. In this case, click on “Show QR” and Sparrow Wallet will launch an animated series of QR codes.

With your Passport, ensure you have the passphrase applied, then from the main menu select “Scan with QR Code.” Then point the camera on the Passport to the flashing series of QR codes in the Sparrow Wallet interface.

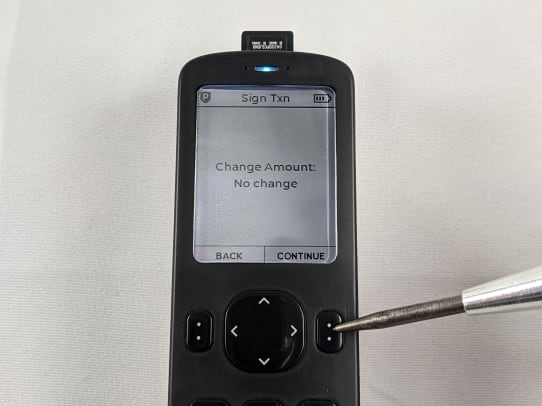
On the Passport screen you will be shown the amount of bitcoin being spent and the address it is being spent to, press “CONTINUE” if the details are correct. The Passport will then tell you what the change amount is, if any, and you can press “CONTINUE.” Lastly, the Passport will display the network fee, if everything is correct then press “SIGN.”

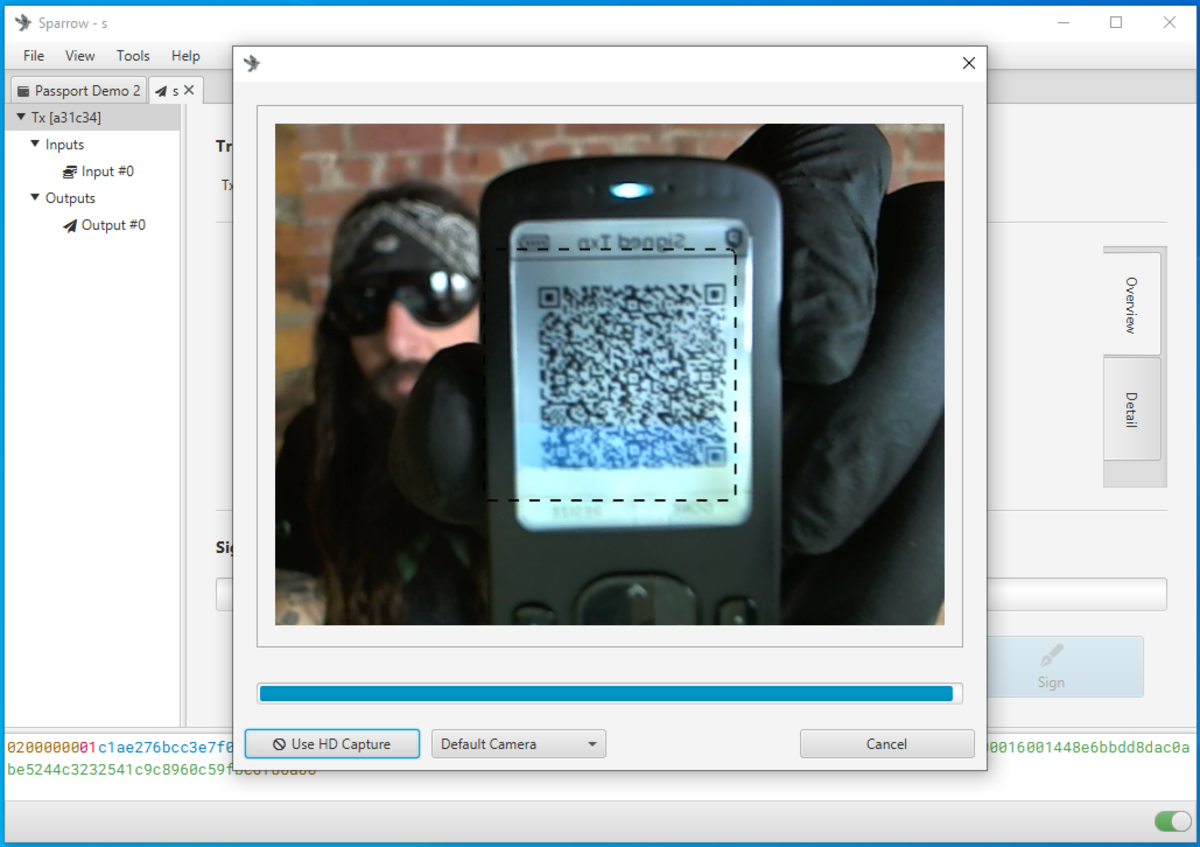
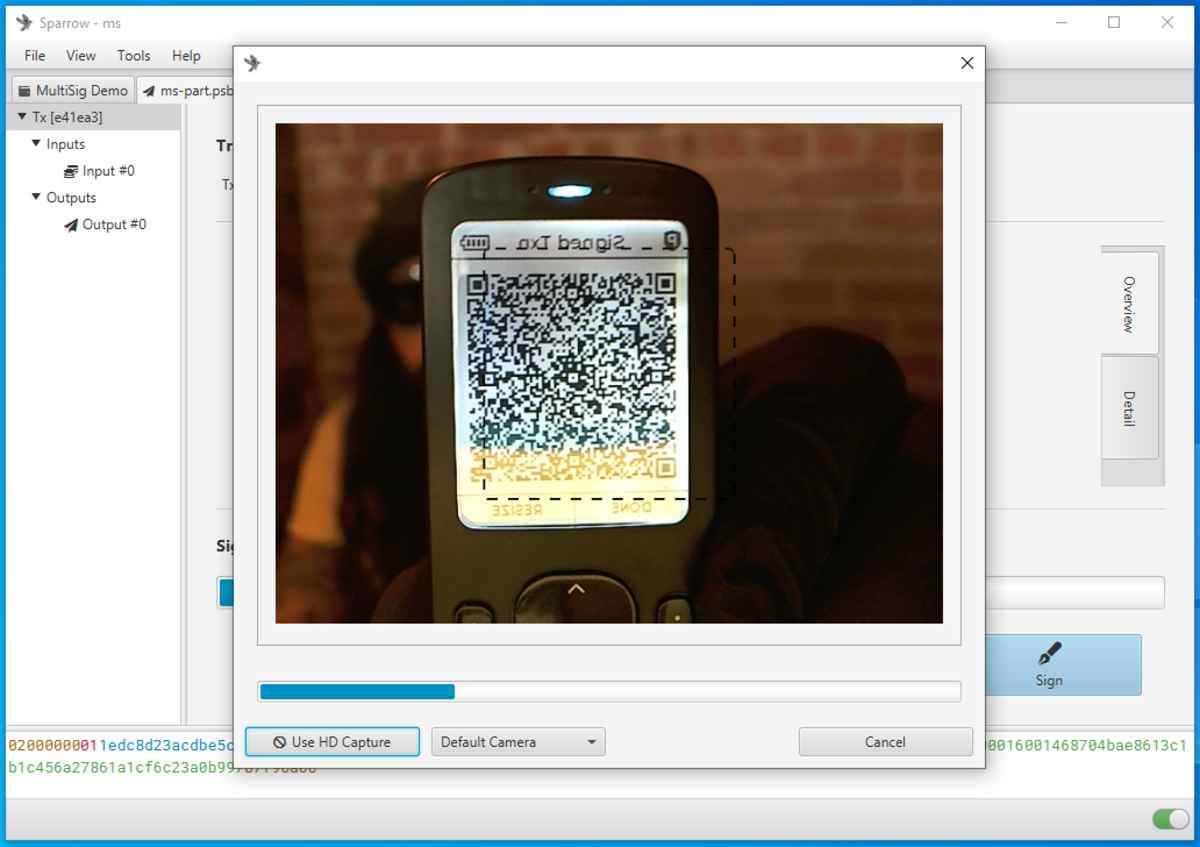
Once the transaction is signed by the Passport, a QR code will be displayed on the Passport screen. Back on your desktop, in Sparrow Wallet, select the “Scan QR” button with the camera icon.

This will launch your desktop webcam and you can hold the Passport in front of your webcam so that Sparrow Wallet can read the details of the signed transaction.
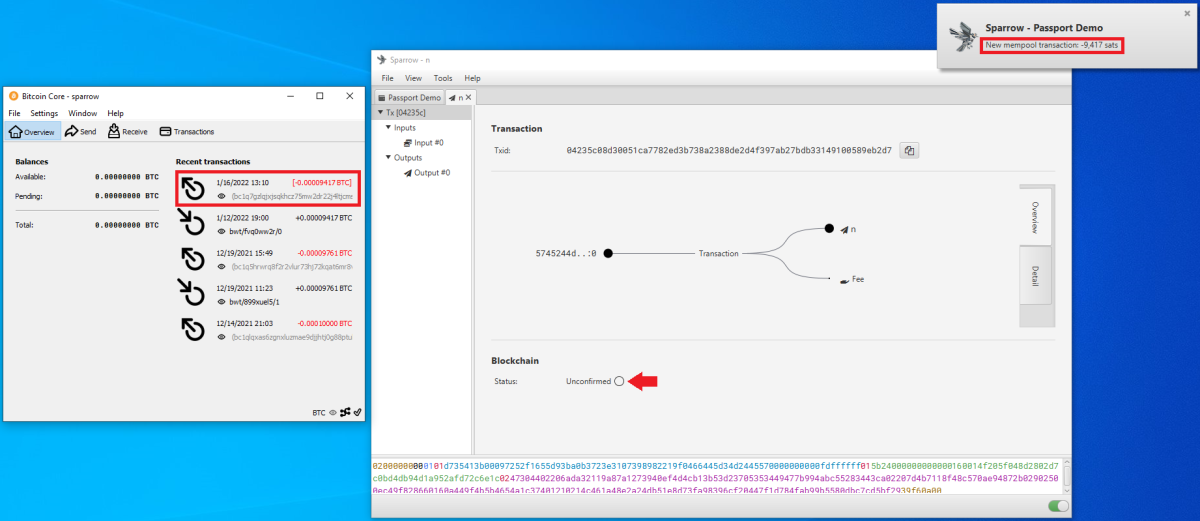
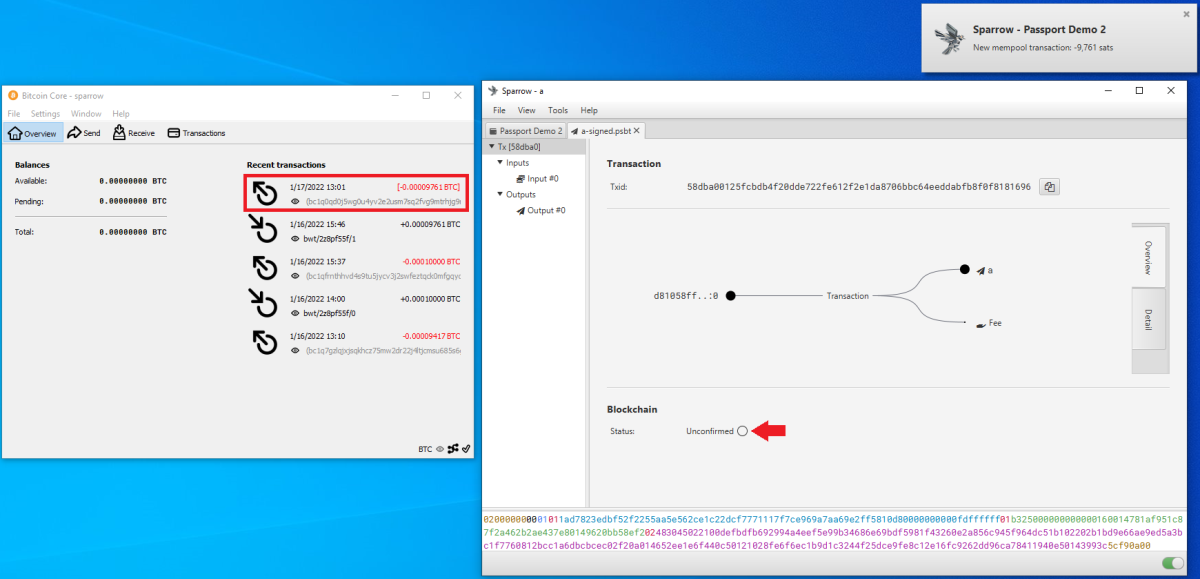
Once Sparrow Wallet picks up the details of the signed transaction, then you can broadcast the transaction to the Bitcoin network by pressing the “Broadcast Transaction” button.
At the time of broadcast you should see the transaction in Bitcoin Core as well as receive a notification in Sparrow Wallet. Again, you can copy the transaction ID and paste in your preferred block explorer to watch for confirmations.
Signing A PSBT Via microSD
To create a PSBT, navigate to the “Send” tab on the left-hand side in Sparrow Wallet. There, you can paste the address you are sending to, add a label, enter an amount to send, and choose a miners fee rate, etc. Once you have everything set, click on “Create Transaction.” On the next screen, double check the details then click on “Finalize Transaction for signing.” Then you will be asked what you want to do with the finalized PSBT. In this case, click on “Save Transaction” and Sparrow Wallet will launch your file explorer. Navigate to your microSD card and save the finalized transaction there.
Take the microSD card and insert it into the Passport. Power on the Passport and log in to it and apply the passphrase if necessary. Navigate to “Sign with microSD” then the Passport will display the amount to be spent and the destination address. Press “CONTINUE.”

The passport will display the change amount, if any, press “CONTINUE.” Next, the network fee will be displayed, if everything looks correct, press “SIGN.” Then the Passport will save the signed “.psbt” to the microSD card. You can remove the microSD card and press “CONTINUE” then shut down your Passport.
Insert the microSD card into your computer or use the USB adaptor and insert that into the computer if necessary. Then back in Sparrow Wallet, click on “Load Transaction” from the same screen you originally saved the “.psbt” file. Navigate to the microSD card and select the signed “.psbt” file.
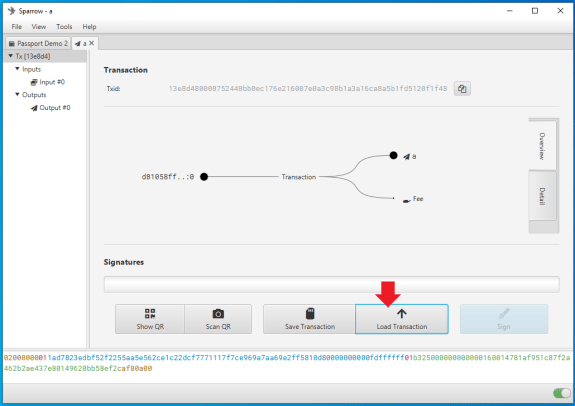
Once the transaction is loaded, click on the “Broadcast Transaction” button in Sparrow Wallet to send the transaction to the Bitcoin network.

At the time of broadcast you should see the transaction in Bitcoin Core as well as receive a notification in Sparrow Wallet. Again, you can copy the transaction ID and paste in your preferred block explorer to watch for confirmations.
The main point here is that your Passport is the required signing device while your Sparrow Wallet is your interface, transaction builder and broadcaster. In this configuration, Sparrow Wallet can do many things like catalog addresses and build transactions but without the signature from your Passport, Sparrow Wallet cannot authorize spending of any bitcoin secured by the Passport.
You should now be able to connect your Passport with Sparrow Wallet and sign transactions via QR code or microSD card in a single signature manner. In the next section, multisig configurations will be explained.
MultiSig
Multisig is shorthand for”multiple signatures,”and this popular configuration is how you can secure your bitcoin in such a way that signatures from multiple wallets are required in order for the bitcoin to be spent. In the case of hardware wallets, this means you need multiple devices to sign the transaction.
One approach to multisig is to use hardware wallets from different manufacturers in order to mitigate unforeseen vulnerabilities or attack vectors that may be present in one manufacturer but not another. Depending on how the multisig quorum is configured, two-of-three signatures may be required to spend the bitcoin, or this number can be extended to even more robust security models like seven of nine.
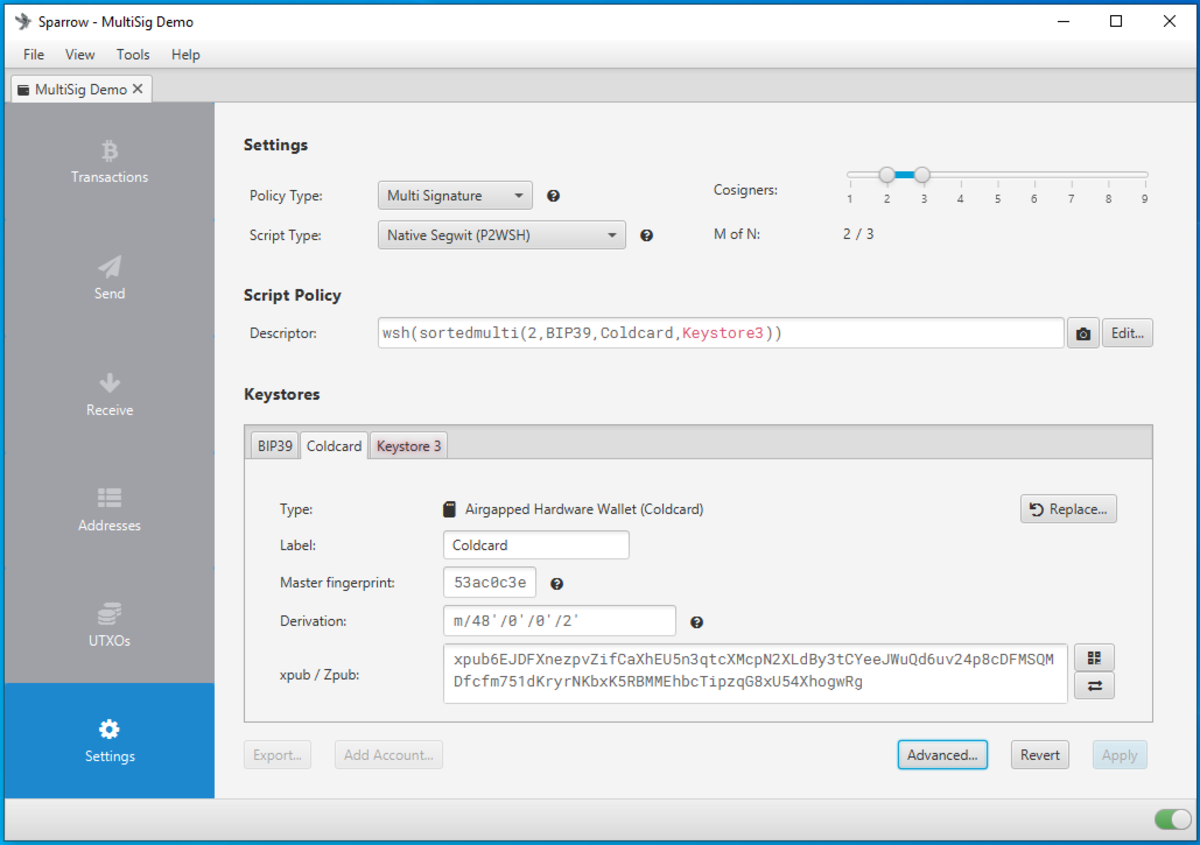
In this demonstration, a two-of-three multisig configuration will be presented using one software wallet in Sparrow Wallet, one Coldcard hardware wallet and one Passport hardware wallet. This means that one-of-three signatures will be from a hot wallet. If you want to ensure your multisig setup has all air-gapped keys, then use a third hardware wallet instead. This guide will at least give you the basic understanding you need to customize your configuration to fit your needs. To learn more about getting started with Coldcard, check out this guide.
Sparrow Wallet
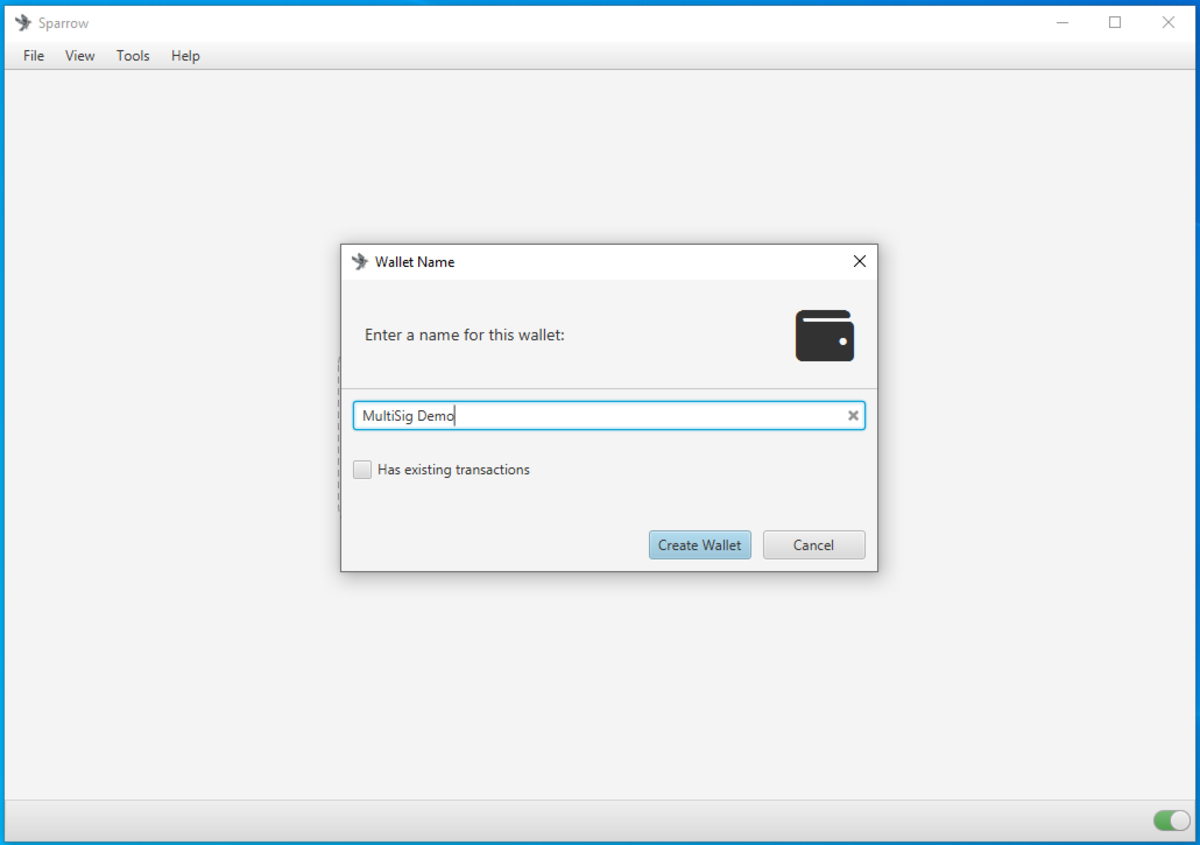
Starting with Sparrow Wallet, navigate to “File,” then “New Wallet.”

Then Sparrow Wallet will ask you to name your new wallet, and this can be anything you want. In this example”MultiSig Demo”was used.
On the next screen select “Multi Signature” from the policy type dropdown menu.
Choose the script type you want; P2SH for legacy addresses that start with”1,”P2SH-P2WSH for nested SegWit addresses that start with”3,”or P2WSH for native-SegWit addresses that start with”bc1q.”In this example, P2WSH native SegWit addresses will be used.
Choose how many cosigners are required, in this example two of three will be used which means that any two signatures from the Passport, the Coldcard or Sparrow Wallet combined will suffice for spending the bitcoin locked up in this quorum.
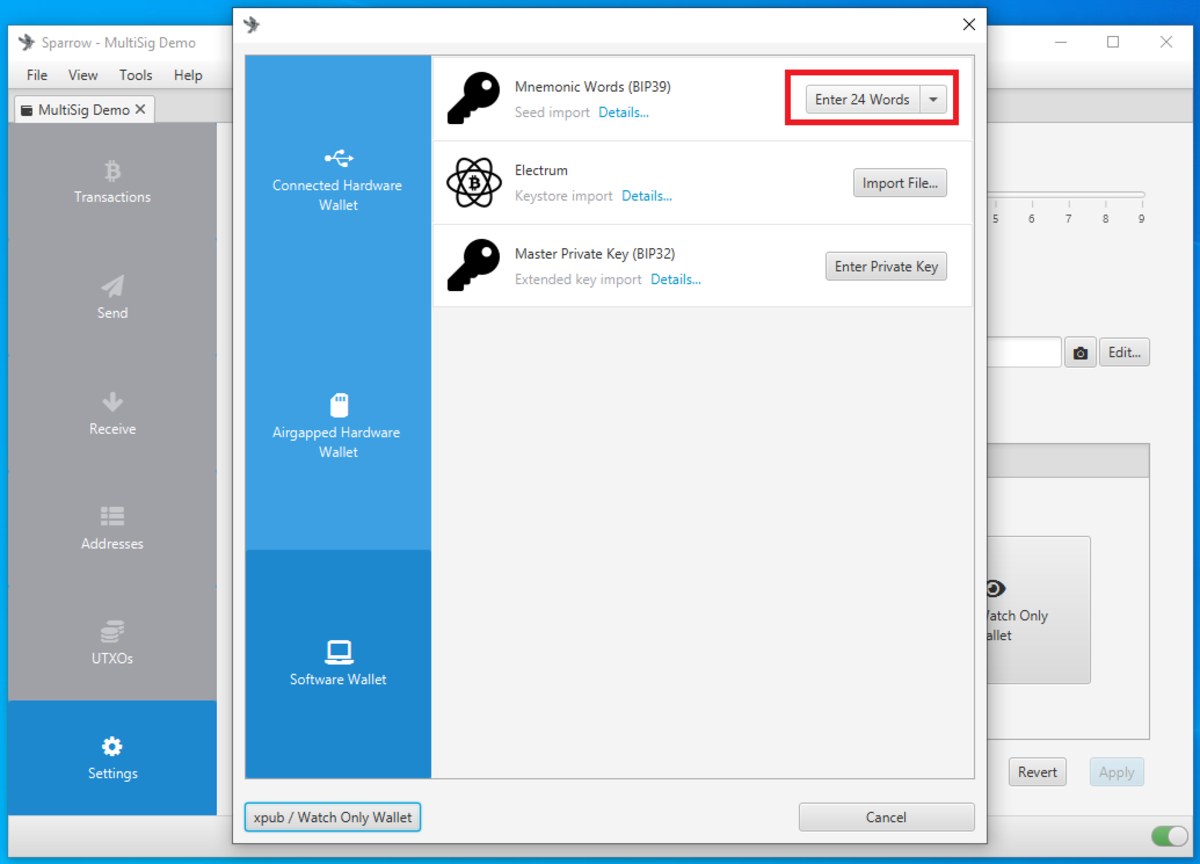
Then under the Keystores section, you will see three tabs (more if your quorum is larger). For the first keystore, “Keystore 1,” select “New or Imported Software Wallet.” This will create a brand new wallet in Sparrow Wallet to be set up as the first cosigning wallet.

A pop-up window will appear, click on the “Enter 24 words” button next to the “Mnemonic Words (BIP39)” option.
On the next screen, click on “Generate New” to have Sparrow Wallet randomly generate 24 seed words.

Sparrow Wallet will generate 24 words making your new seed phrase. Do not share these words with anyone, they will have access to one-of-three signing keys. Do not take a screenshot of these words, do not store them in a digital format, do not take a picture of them with your phone, you will compromise the security of your multisig setup. Write these words down on paper at the very least and consider stamping them into metal for a backup that can withstand extreme environmental hazards.
Also, you have the option here of adding a passphrase if you want. As explained earlier in this guide, a passphrase can be thought of as a”25th word”that only you know.
Once you have written down your words and optional passphrase and double checked your work, click on the “Confirm Backup…” button to verify you have written this information down correctly. Sparrow Wallet will ask you if you have written the words down, click on the “Re-enter Words…” button to continue the test.
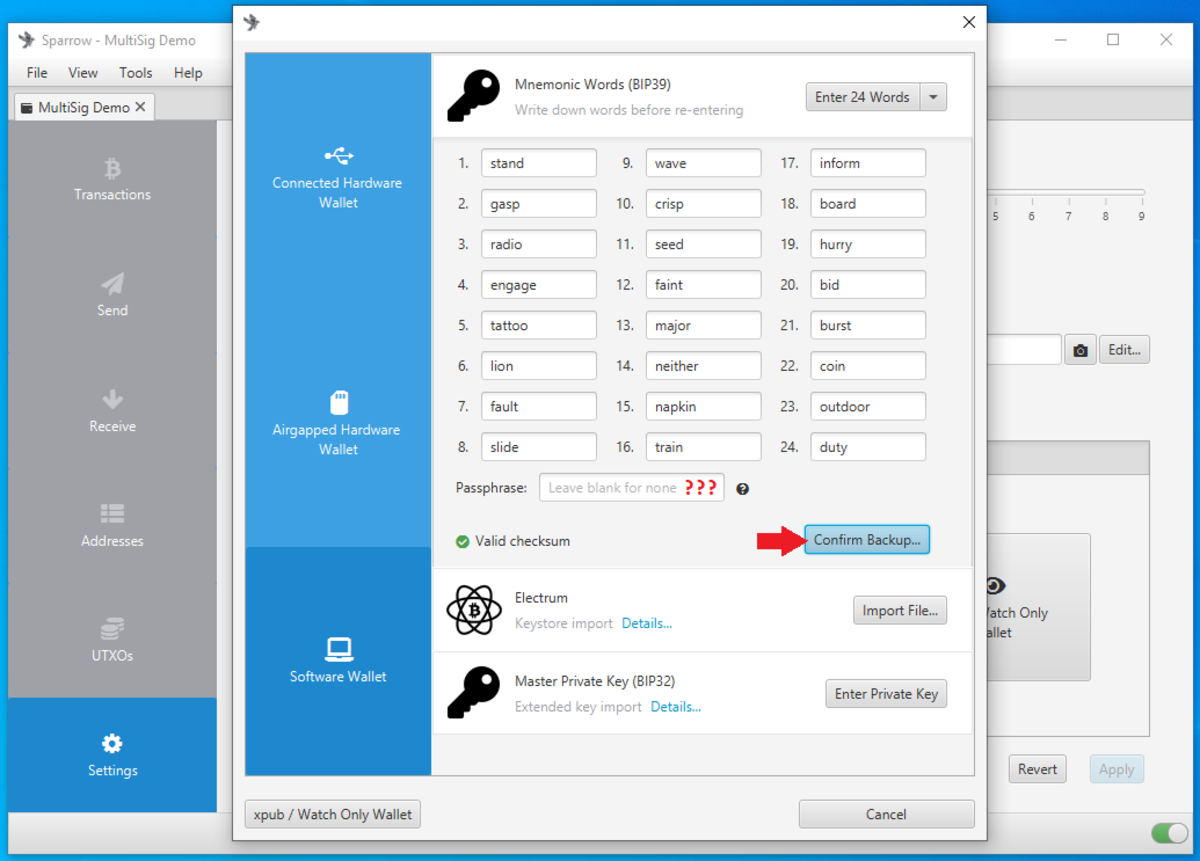
Once you have re-entered all 24 words in order, click on the “Create KeyStore” button.

On the next screen, click on the “Import Keystore” button.

You will be taken back to the settings page for your multisig configuration. The first keystore is finished and you will notice that it has been populated with the details from your newly set up wallet.

Coldcard
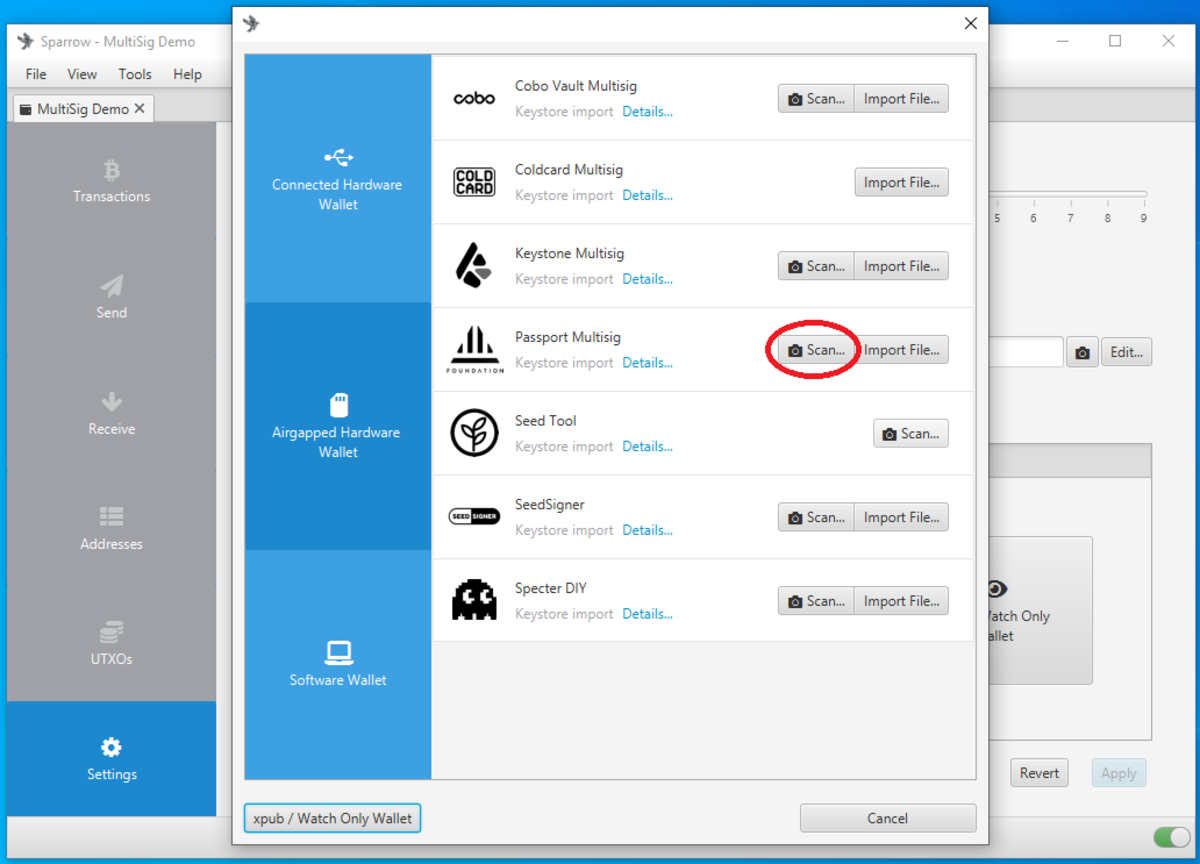
Click on the “Keystore 2” tab, then select “Airgapped Hardware Wallet.”
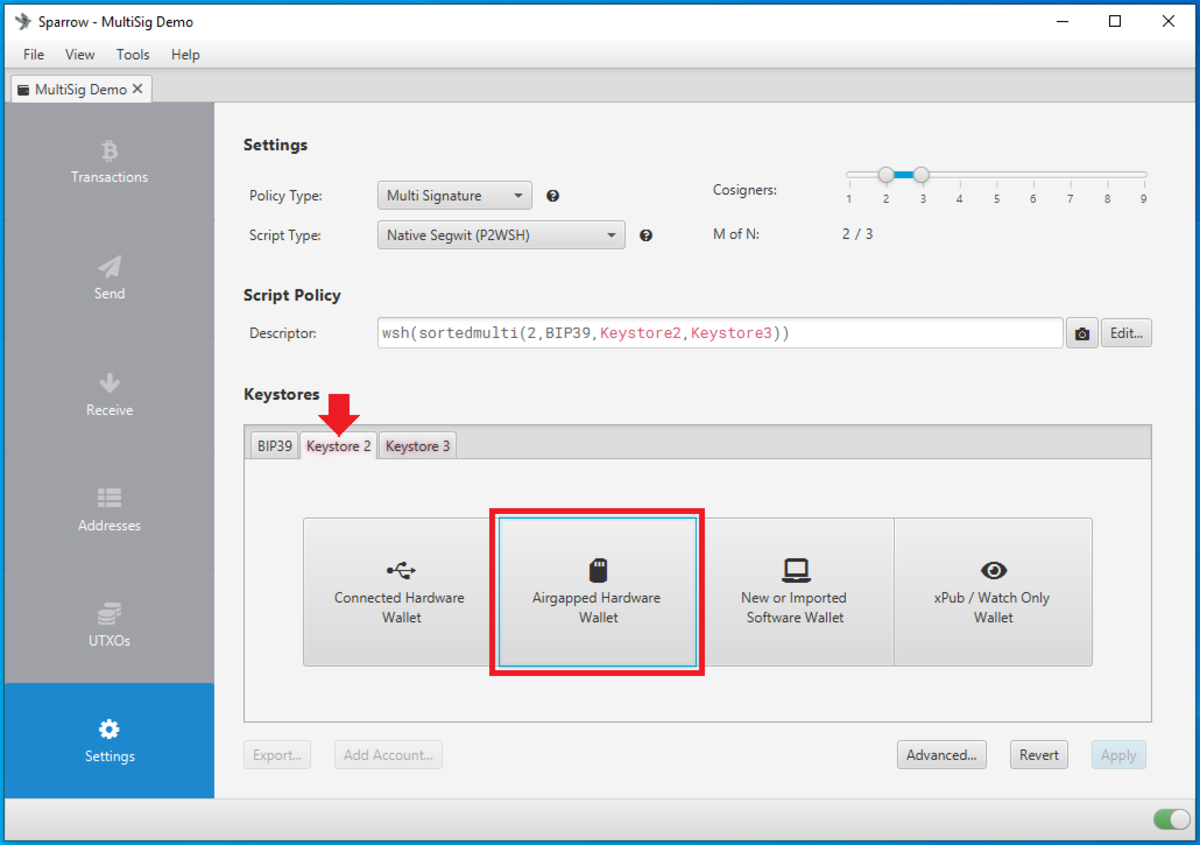
In the next window that pops up, press the “Import File…” button in the “Coldcard Multisig” row. This will open the file explorer where you can navigate to the file written by your Coldcard.
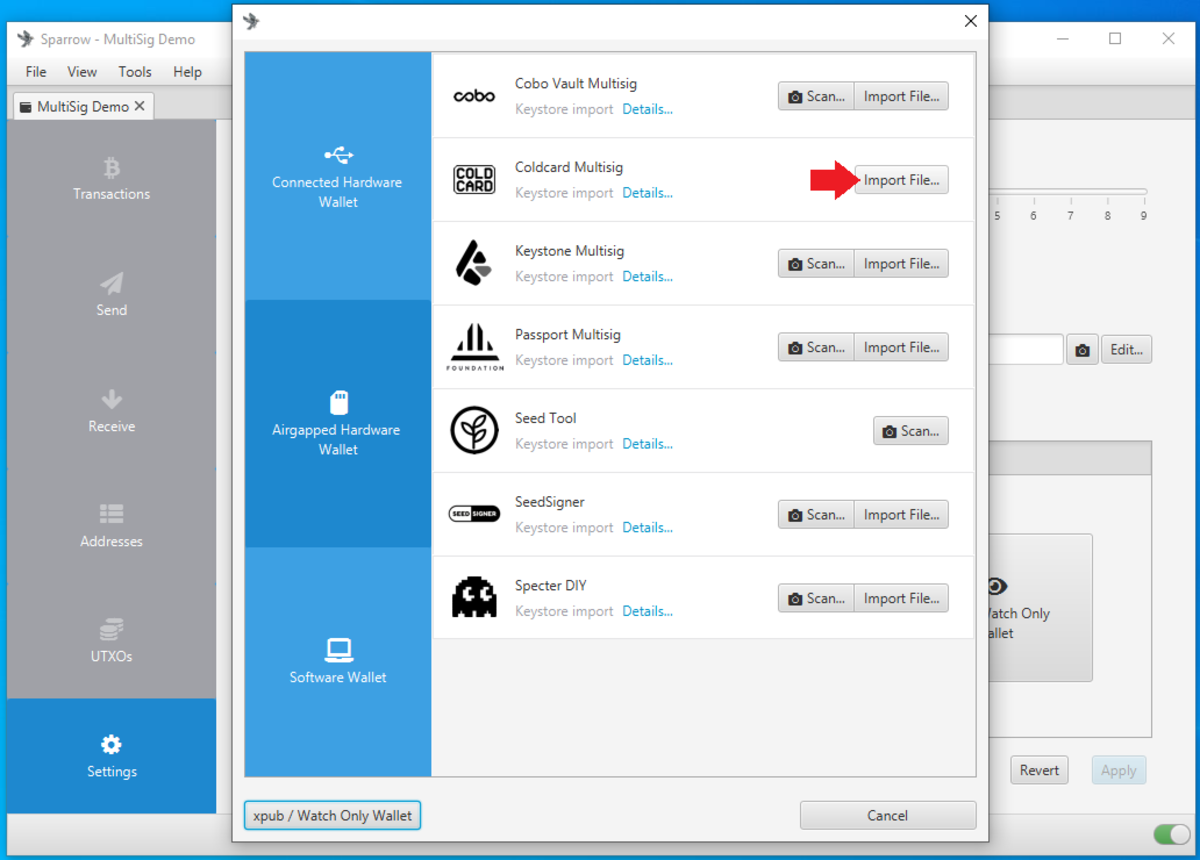
If you have not done so already, you need to export the “.json” file with the XPUB information from the Coldcard. These next steps will only show a very high-level explainer on how to export this information but for a full detailed guide read this article.
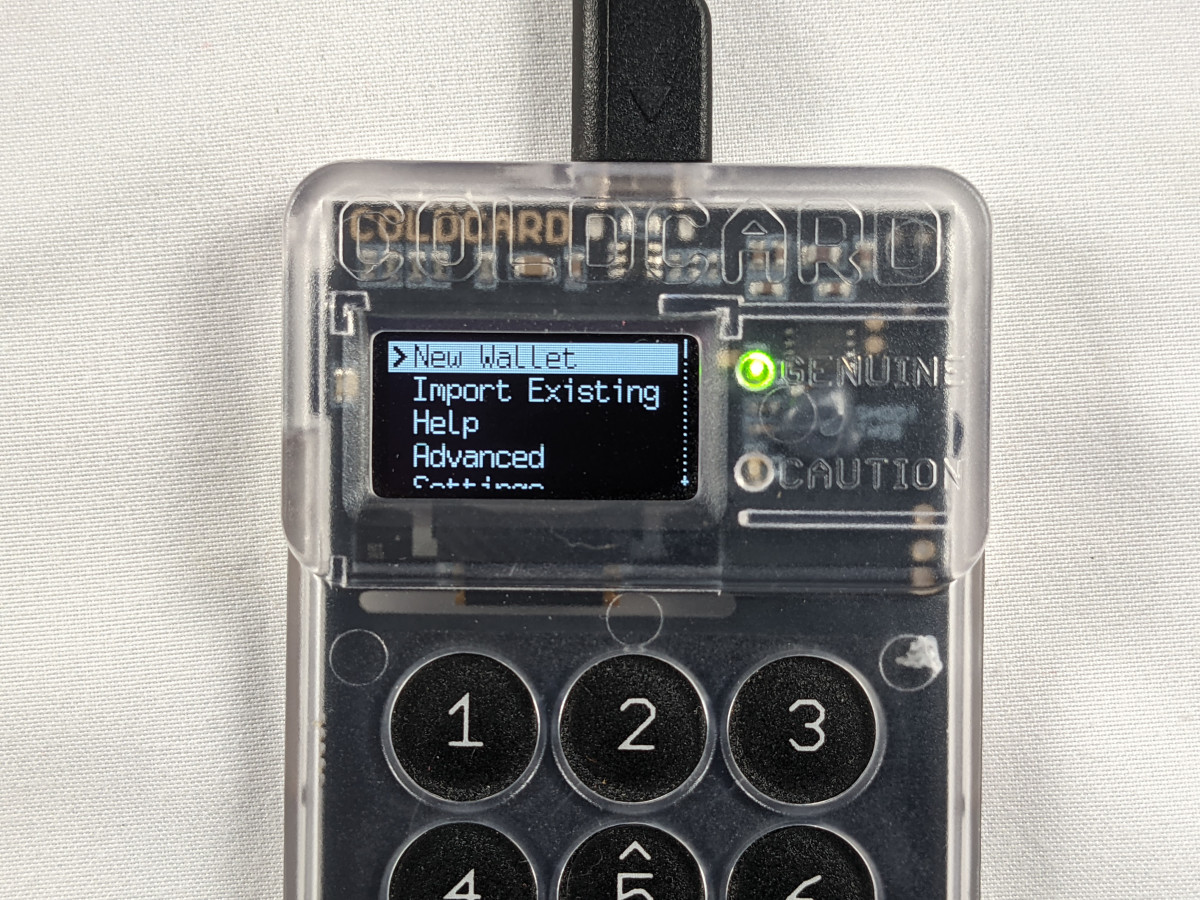
After setting up your Coldcard for the first time and securing your PIN and anti-phishing words, as well as upgrading the firmware; one of the first things you will do is generate a new wallet by navigating to “New Wallet” from the main menu, if you have not set up a wallet on this Coldcard already.
Then the Coldcard will randomly generate and display 24 seed words, again do not share these words with anyone, they will have access to one-of-three signing keys. Do not take a screenshot of these words, do not store them in a digital format, do not take a picture of them with your phone, you will compromise the security of your multisig setup. Write these words down on paper at the very least and consider stamping them into metal for a backup that can withstand extreme environmental hazards.
The Coldcard will then test you on all the words.
At this point, if you want to enter a passphrase on the Coldcard, you can do so at this time. Refer to this article for details on the passphrase. To summarize, the Coldcard has no way of knowing if your passphrase is correct, so ensure that you double check your work by testing your backup information so you know you have everything you need to restore your wallet.
Once you have decided whether you want a passphrase or not, then navigate to “Settings” from the main menu and then “Multisig Wallets” then “Export XPUB.” At this point, you can insert a microSD card into the Coldcard.

The Coldcard will then display a message explaining the contents of the “.json” file. After pressing “OK” on the Coldcard at the end of that message, the Coldcard will ask you for an account number, you can just leave it blank for the default “0.” Then the Coldard will let you know when the file is finished being written to the microSD card and what the name of the file is.
Remove the microSD card from the Coldcard and insert the microSD card into your computer or use an USB adaptor and then insert that into your desktop computer running Sparrow Wallet. Back in Sparrow Wallet, navigate to the microSD card and select the “coldcard-export.json” file.

Sparrow Wallet will use the “.json” file to populate the necessary information in “Keystore 2.” Now you can navigate to the “Keystore 3” tab.
Passport
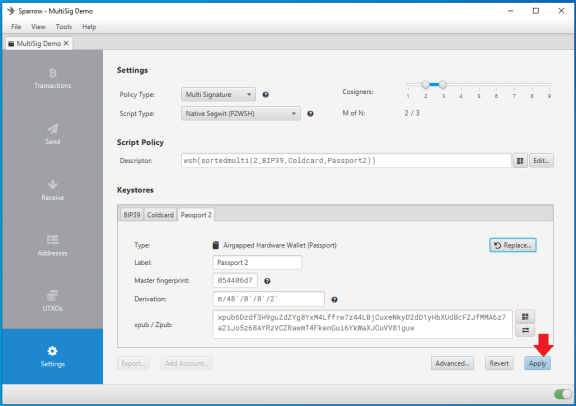
From the “Keystore 3” tab, select “Airgapped Hardware Wallet.”

From the pop up window, press the “Scan…” button on the “Passport Multisig” row.
Then Sparrow will launch the webcam and wait for you to hold up the Passport with the animated QR codes. Log in to the Passport and apply the passphrase if necessary. Then from the main menu scroll down to “Pair Wallet,” then “Sparrow,” then “Multisig,” then “QR Code.”

The Passport will display a message saying to scan the following QR codes into Sparrow. Now hold the Passport up to your webcam and let Sparrow scan in the details from the animated QR codes.

Sparrow will use the QR code information to automatically populate the necessary information for “Keystore 3.” Then you can click on “Apply.” Then Sparrow will ask you if you would like to add a password, this is an optional password that encrypts the wallet data file on your computer to prevent anyone from gaining access to this information by gaining access to your computer.
Transacting
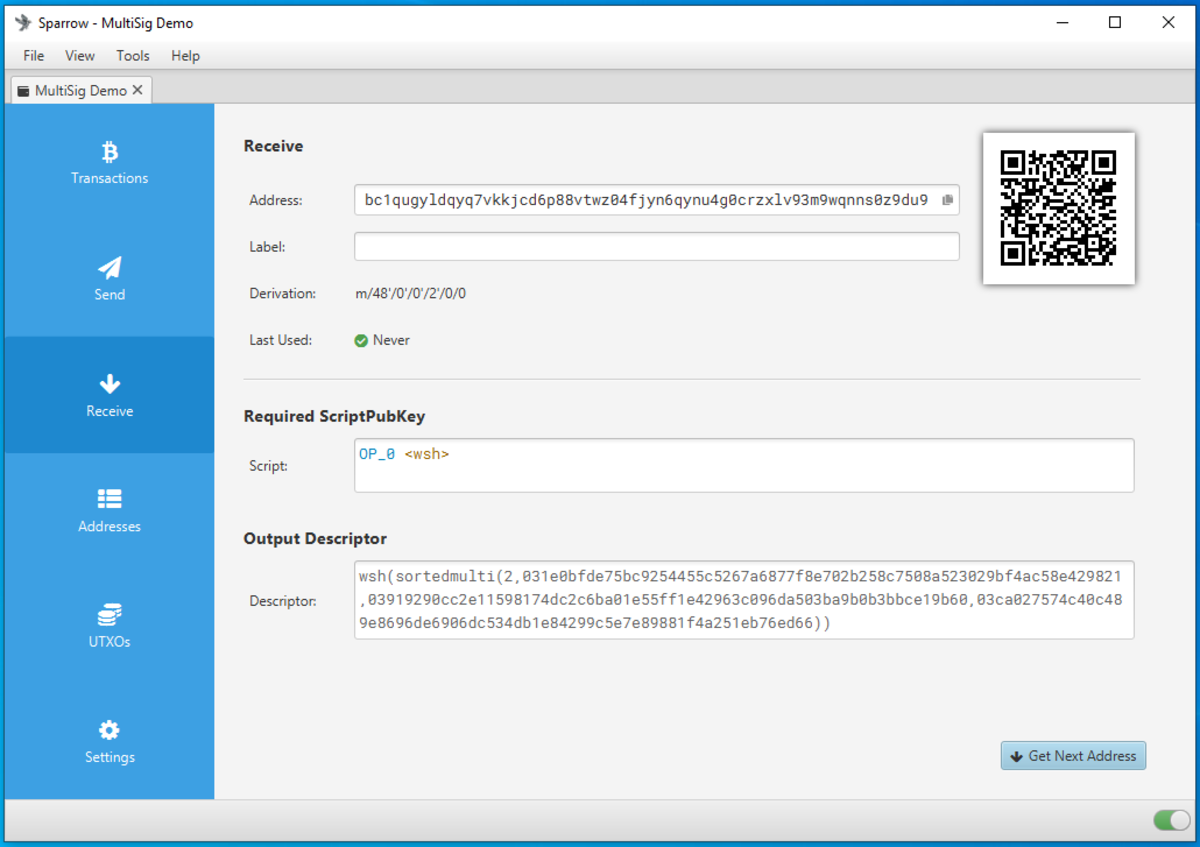
Now you can navigate through your new multisig wallet, for example, from the “Receive” tab you can display a deposit address that you can scan with your mobile Bitcoin wallet or copy/paste the address as necessary to deposit some bitcoin to your new multisig wallet.
Once you send some bitcoin, the transaction will appear in Bitcoin Core and Sparrow Wallet, you can copy/paste the TXID into your favorite block explorer and watch the mempool progress. Once your bitcoin is deposited in your multisig wallet, you will need to provide at least two-of-three signatures from the three wallets to spend this bitcoin.

Once you are ready to spend from your multisig wallet, set up the transaction the same way you do for a single signature transaction by navigating to the “Send” tab on the left-hand side of the Sparrow Wallet interface. There, you can input the Bitcoin address to spend to, add a label, enter the amount, set the miners fee and then click on “Create Transaction.”

Then, on the next screen click on “Finalize Transaction for Signing.”

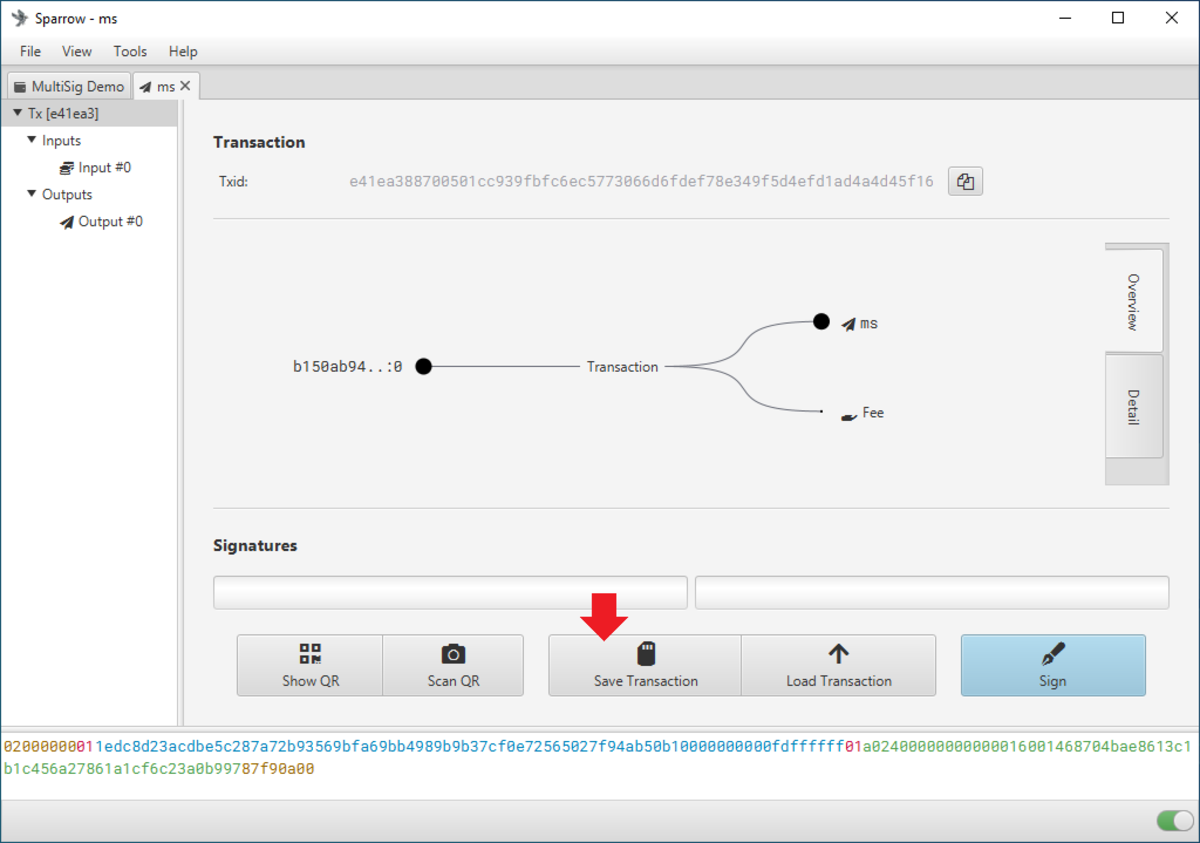
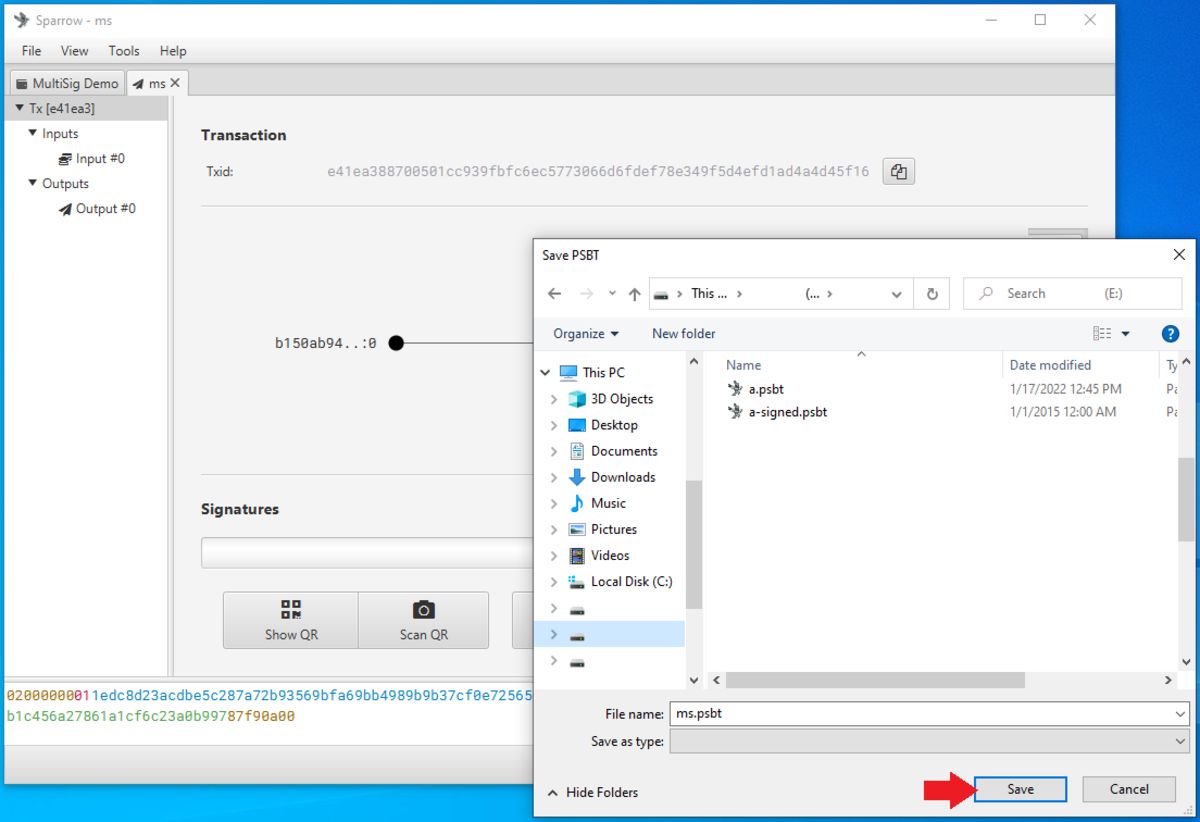
At this point, you have a couple of options, this transaction needs two-of-three signatures in order to be valid. One of the signatures can be provided by Sparrow Wallet since it is one of the cosigners. To sign with Sparrow Wallet, simply click on the “Sign” button in the lower left-hand corner and then one signature will be added. However, it would be beneficial for the purposes of this guide to demonstrate both hardware wallets signing. Starting with the Coldcard, click on the “Save Transaction” button.
This will launch the file explorer, navigate to the microSD card and save the transaction there.
Take that microSD card and insert into the Coldcard, then power it on and log in and apply a passphrase, if necessary. From the main menu, select “Ready To Sign” then the Coldcard will read the multisig transaction from the microSD card and ask if you want to create a new multisig wallet, press “OK.” The Coldcard will then display the amount to be spent, the address being sent to, and the network fee. If everything looks good then press “OK.” Last, the Coldcard will let you know when the transaction has been signed and what the name of the new file is.

You can now power down the Coldcard and eject the microSD card. Insert the microSD card into your USB adaptor and insert that into the computer running Sparrow Wallet. Then, back in Sparrow Wallet, from the transaction screen click on “Load Transaction.” Then a file explorer will open, navigate to the microSD card and select the partially-signed transaction.

You’ll see one of the two required signatures populate in Sparrow Wallet. Now you can sign with the Passport by pressing the “Show QR” button in Sparrow Wallet. An animated series of QR codes will be displayed in a pop up window.
At this point, power on the Passport, log in and apply the passphrase if necessary. From the main menu, select “Sign with QR Code.” Then, the Passport will ask you if you want to create a new multisig wallet, scroll to the bottom of that message and select to continue. The amount to be spent and the destination address will be displayed, if there will be any change then that will also be displayed, and the network fee will be displayed. If all the details look correct, press “SIGN.”

Then the Passport will let you know it is going to start flashing a series of QR codes in the next step, press “CONTINUE” then go back to Sparrow Wallet and click on “Scan QR.” The webcam will launch and then you can hold the Passport up to the camera so that Sparrow Wallet can scan the animated QR codes.
That makes two-of-three signatures and the transaction is now ready to be broadcast to the Bitcoin network. Simply click on the “Broadcast Transaction” button.

Once the transaction is broadcast, you will see it in Bitcoin Core and you will get the Sparrow Wallet notification. Then you can copy/paste the TXID into your favorite block explorer and wait for your first confirmation.

Now that you see how multisig works, it is important to backup the appropriate information and test those backups before depositing any bitcoin to your new multisig wallet. Be sure to have the seed words written down in order, then think about stamping them in metal. Have your passphrase written down and consider stamping that in metal. Have your XPUBs written down as well and consider stamping those in metal.
There are a number of creative solutions you can employ to conceal backup information in different geographic locations. For example, say you have a two-of-three multisig, each wallet has a 24-word seed phrase, we’ll call it”S”in this example. Each wallet also has a passphrase, we’ll call it”P.” And each wallet has an XPUB, we’ll call that”X.”You could in theory then store your backup information like:
That way if anyone else finds any of the backup packs, they will not have enough information to spend any bitcoin. But if you are able to recover any two of the three backup packs, then you will have enough information to restore your multisig wallet and sign a transaction.
Additional Features
This section covers a few additional features at a high level. This is meant more to be reference material than step-by-step instructions. This is not an exhaustive list, just some useful highlights.
Change The Screen Brightness
Purpose: Helps save on battery life, easier to view the screen in low light environments.
Process: Navigate to “Settings,” then “Screen Brightne ss,” then choose “25%,” “50%,” “75%” or “100%.”
Auto Shutdown
Purpose: Helps save on battery life, adds security if you step away from the device for too long.
Process: Navigate to “Settings,” then “Auto Shutdown,” then choose “1 minute,” “2 minutes,” “5 minutes,” “15 minutes,” “30 minutes,” “60 minutes” or “Never.”
Change PIN
Purpose: Allows users to modify the existing PIN number in case it was compromised for any other reason.
Process: Navigate to “Settings,” then “Advanced,” then “Change PIN,” then enter your current PIN, then add and confirm your new PIN. This action will generate two new anti-phishing words, so be sure to note that in your backup information.
Units
Purpose: Change the way bitcoin amounts are displayed on the device.
Process: Navigate to “Settings,” then “Advanced,” then “Units,” then choose “BTC” or “sats.” For example, 1.2575 BTC would be displayed as 125,750,000 sats.
Sign A Text File
Purpose: Prove ownership of an address.
Process: Navigate to “Settings,” then “Advanced,” then “Sign Text File,” then load your message in a “.txt” file and save it to the microSD card. Insert the microSD card, select the file and sign. The Passport will automatically select the address used to sign and save a new file appended with “-signed.txt.”
You can see the implications of being able to sign a message with an address in full force here.
Import Public Key
Purpose: This allows advanced users to import their own public key to the Passport so that when they compile their own firmware, the Passport will use their own key to verify it along with the Foundation developer keys.
Process: Navigate to “Settings,” then “Advanced,” then “Developer PubKey,” then “Install PubKey,” then insert a microSD card with your public key and import.
This is a guest post by Econoalchemist. Opinions expressed are entirely their own and do not necessarily reflect those of BTC Inc or Bitcoin Magazine.