0x80080005 est un code d’erreur signalé par de nombreux utilisateurs lorsqu’ils tentent d’exécuter Windows Update. Cela empêche votre système d’exploitation de télécharger et d’appliquer les dernières mises à jour, ce qui pourrait entraîner de graves problèmes à long terme.
Par exemple, vous pourriez avoir problème de mise à jour des applications du Microsoft Store sans les dernières mises à jour du système. L’erreur peut être déclenchée par une erreur logicielle ou matérielle. Cela a généralement à voir avec votre ordinateur ou les paramètres de connexion réseau, ce qui signifie que vous devriez être en mesure de les résoudre facilement en utilisant les solutions ci-dessous.

Comment réparer l’erreur de mise à jour Windows 10 0x80080005
Avant de démarrer le processus de dépannage, assurez-vous de créez un point de restauration système sur votre PC. Si vous rencontrez des problèmes supplémentaires en cours de route, vous pouvez les annuler en rétablissant Windows 10 au point de restauration.
De plus, vous devriez essayer d’exécuter Windows Update pour confirmer l’erreur:
- Cliquez avec le bouton droit sur le bouton Démarrer et accédez à Paramètres
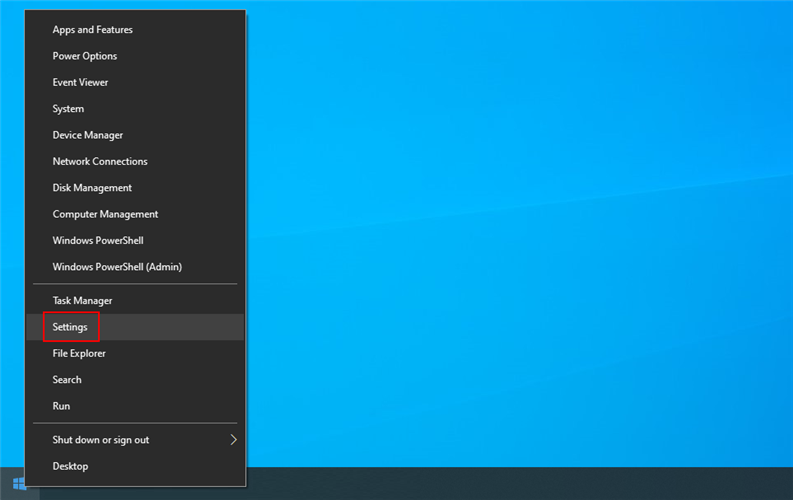
- Sélectionnez Mise à jour et sécurité
- Cliquez sur Windows Update sur le côté gauche
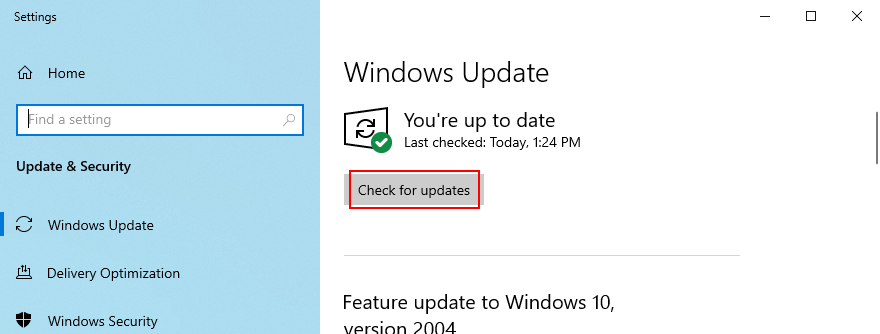
- Cliquez sur Rechercher les mises à jour
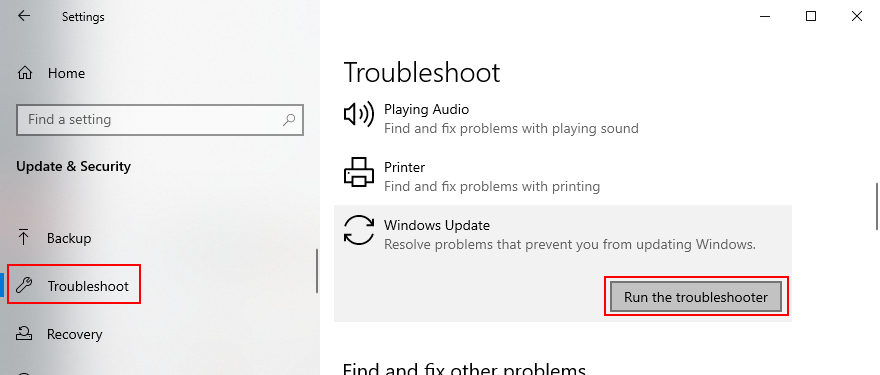
1. Exécutez l’utilitaire de résolution des problèmes de Windows Update
Vous pouvez commencer avec une solution simple: utilisez le Outil de dépannage Windows Update . Il est conçu pour identifier et réparer les problèmes courants qui empêchent la mise à jour de votre système d’exploitation. Voici comment l’utiliser:
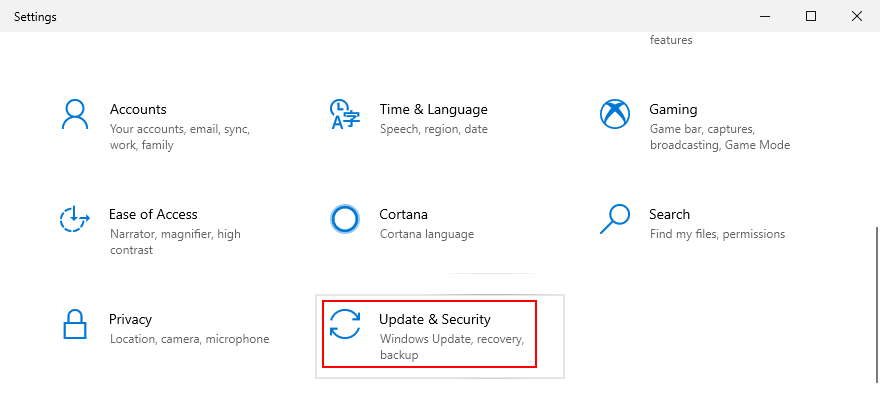
- Cliquez sur le bouton Démarrer , recherchez Paramètres et ouvrez cette application
- Accédez à Mise à jour et sécurité
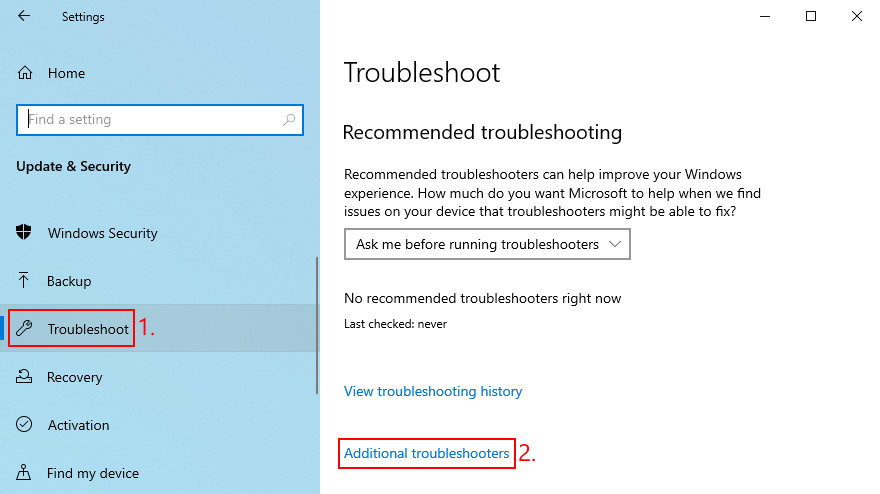
- Aller à Dépanner sur le côté gauche
- Cliquez sur Outils de dépannage supplémentaires
- Sélectionnez Windows Update et cliquez sur Exécuter l’utilitaire de résolution des problèmes
- Suivez les étapes de l’assistant et appliquez les éventuels correctifs
- Redémarrez votre PC et essayez d’exécuter Windows Update maintenant
2. Utiliser le diagnostic de mise à jour Windows
Si l’utilitaire de résolution des problèmes intégré n’a pas fait l’affaire, vous pouvez vous tourner vers Windows Update Diagnostic. C’est un outil conçu par Microsoft pour diagnostiquer et réparer les problèmes de Windows Update, qui doit être installé séparément. Voici comment l’utiliser:
- Assurez-vous de vous connecter à Windows 10 avec un compte administrateur
- Téléchargez Windows Update Diagnostic à partir du site Web officiel
- Lancez l’application
- Dans l’assistant, sélectionnez Windows Update et cliquez sur Suivant
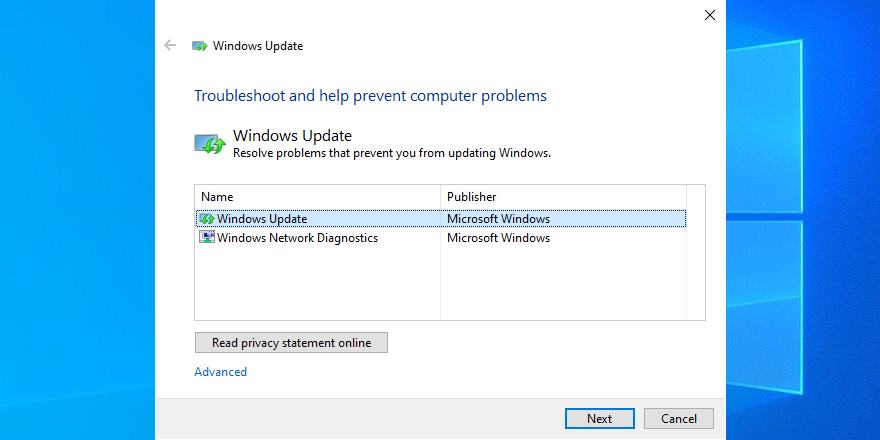
- Suivez les instructions étape par étape
- Une fois l’opération terminée, relancez Windows Update Diagnostic
- Sélectionnez Diagnostics du réseau Windows et cliquez sur Suivant
- Une fois que l’assistant a appliqué les correctifs, redémarrez votre PC
- Essayez d’exécuter Windows Update maintenant
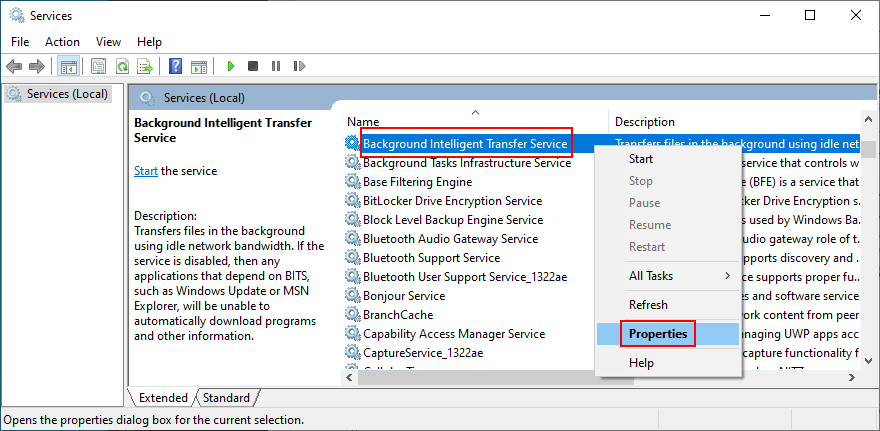
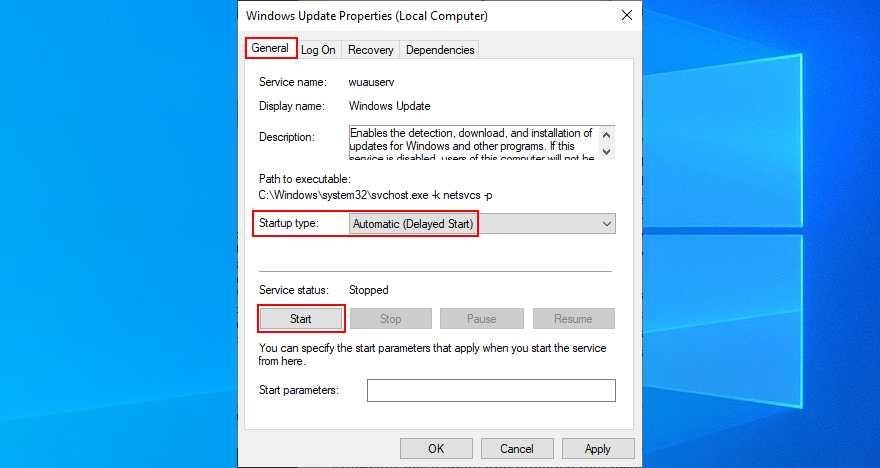
3. Redémarrez le service Windows Update
Windows Update est contrôlé par un service qui doit démarrer automatiquement au démarrage du système et s’exécuter à tout moment. Si, pour une raison quelconque, cela ne se produit pas, vous pouvez vous attendre à des codes d’erreur tels que 0x80080005. Heureusement, vous pouvez facilement résoudre ce problème:
- Cliquez sur le bouton Démarrer , recherchez Services et lancez cette application
- Recherchez et double-cliquez sur Windows Update pour afficher ses propriétés
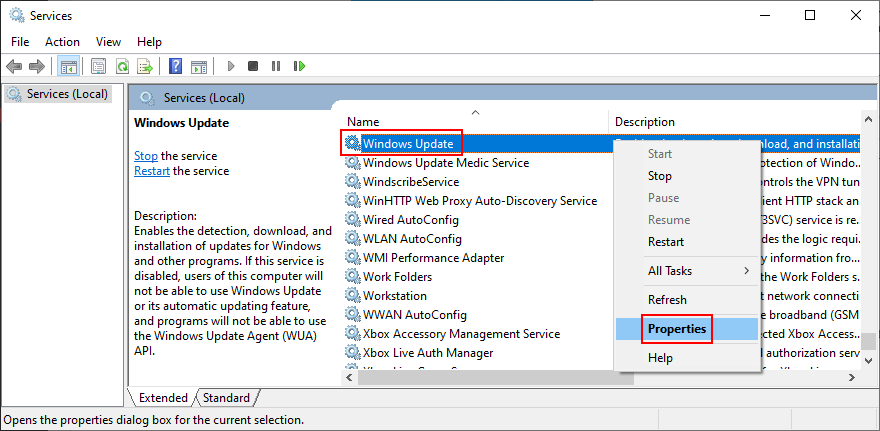
- Restez dans l’onglet Général
- Définissez Type de démarrage sur Automatique (démarrage différé)
- Si le service est arrêté, cliquez sur le bouton Démarrer
- Cliquez sur Appliquer pour valider les modifications et quitter la fenêtre principale des services

- Recherchez Background Intelligent Transfer Service et App Readiness pour effectuer les mêmes actions
- Essayez d’exécuter Windows Update
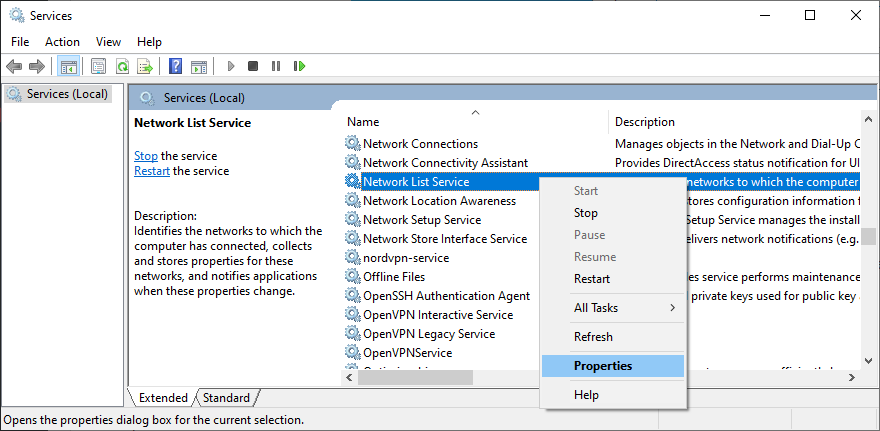
4. Désactiver le service de liste de réseaux
Le service de liste de réseaux est requis, mais certains utilisateurs signalent qu’il provoque des problèmes de mise à jour Windows qui conduisent à l’erreur 0x80080005. Voici comment le désactiver:
- Appuyez sur la touche Win + R , saisissez services.msc , puis appuyez sur Entrée

- Recherchez et double-cliquez sur Service de liste de réseaux
- Définissez Type de démarrage sur Désactivé
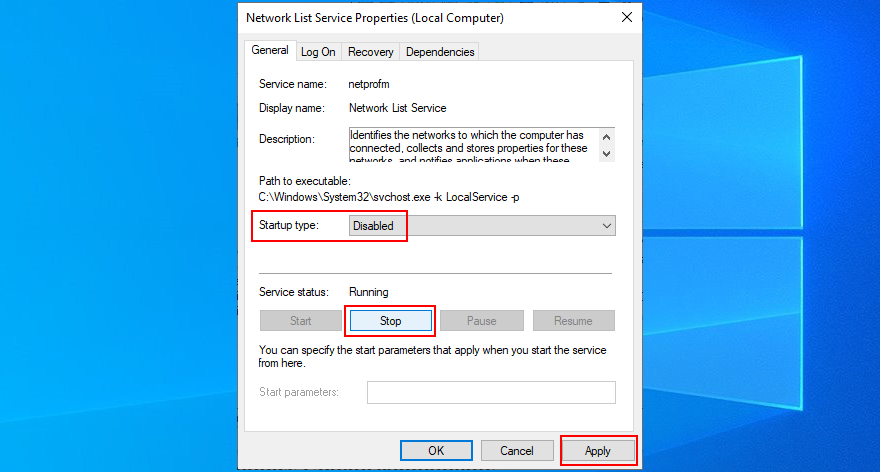
- Si le service est en cours d’exécution, cliquez sur Arrêter
- Cliquez sur Appliquer et quittez
- Essayez d’exécuter Windows Update maintenant
5. Vérifiez les paramètres de stratégie de groupe
Il est possible que le code d’erreur Windows Update 0x80080005 ait été déclenché par des paramètres incorrects dans la stratégie de groupe. Voici comment vérifier et résoudre ce problème:
- Appuyez sur la touche Win + R , saisissez gpedit.msc et appuyez sur Entrée pour ouvrir Éditeur de stratégie de groupe local

- Accédez à Configuration ordinateur > Modèles d’administration > Composants Windows > Windows Update
- Recherchez et double-cliquez sur Configurer les mises à jour automatiques pour afficher ses propriétés
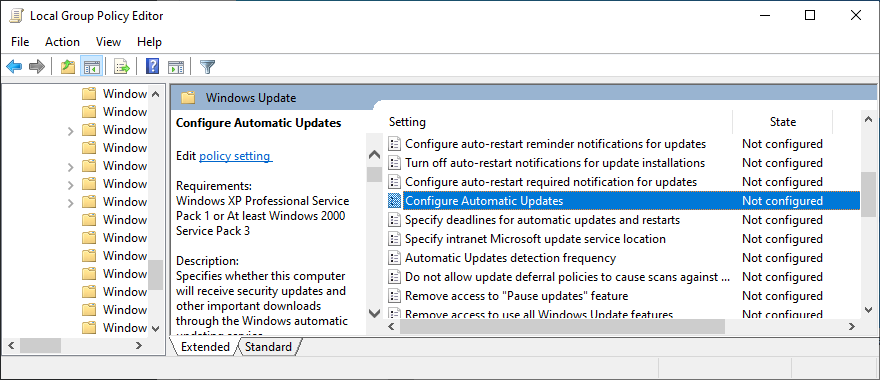
- Sélectionnez Activé et cliquez sur Appliquer
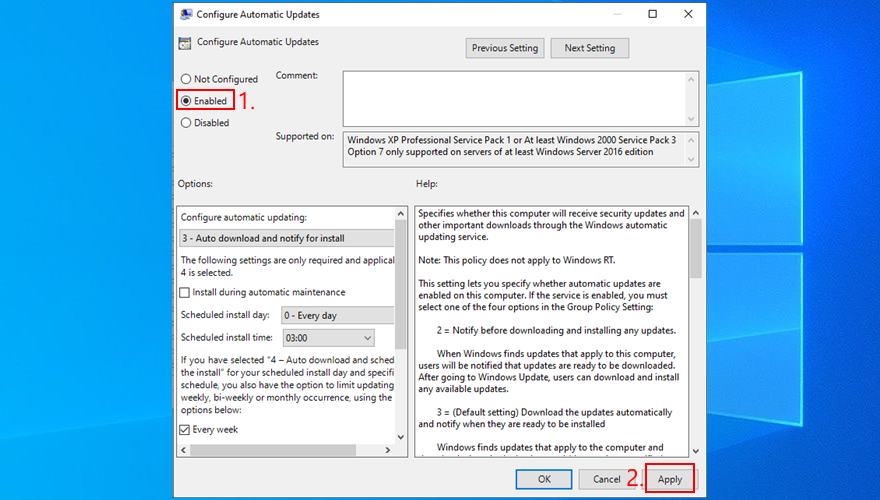
- Redémarrez votre PC
- Essayez d’exécuter Windows Update
6. Réinitialiser Windows Update
Vous pouvez rapidement réinitialiser les composants de Windows Update pour vider le cache et résoudre les problèmes courants pouvant entraîner l’erreur 0x80080005. Pour ce faire, il vous suffit d’utiliser l’invite de commande. Voici ce que vous devez faire:
- Assurez-vous de vous connecter à Windows 10 avec des droits d’élévation
- Cliquez sur le bouton Démarrer , recherchez Invite de commandes et appuyez sur Entrée
- Copiez et collez les commandes suivantes (appuyez sur Entrée après chaque ligne de texte):
- Quittez l’invite de commande et redémarrez votre PC
- Essayez d’exécuter Windows Update
7. Débranchez tous les périphériques
Tout périphérique externe que vous avez récemment branché sur votre ordinateur peut avoir causé le code d’erreur 0x80080005 en raison de problèmes de compatibilité ou de pilote. Pensez à tout nouveau matériel que vous avez acheté ou reçu en cadeau, comme les clés USB, les adaptateurs Wi-Fi ou les webcams avec des fonctionnalités plug-and-play.
Pour résoudre ce problème, arrêtez votre ordinateur et débranchez tous les périphériques, à l’exception de votre clavier et de votre souris. Ensuite, démarrez le système d’exploitation et exécutez Windows Update pour confirmer que vous n’obtenez plus l’erreur.
Vous avez deux options à ce stade: rebranchez tous les appareils et détachez-les chaque fois que vous avez besoin d’exécuter Windows Update, ou identifiez l’équipement coupable pour le réparer ou cesser de l’utiliser.
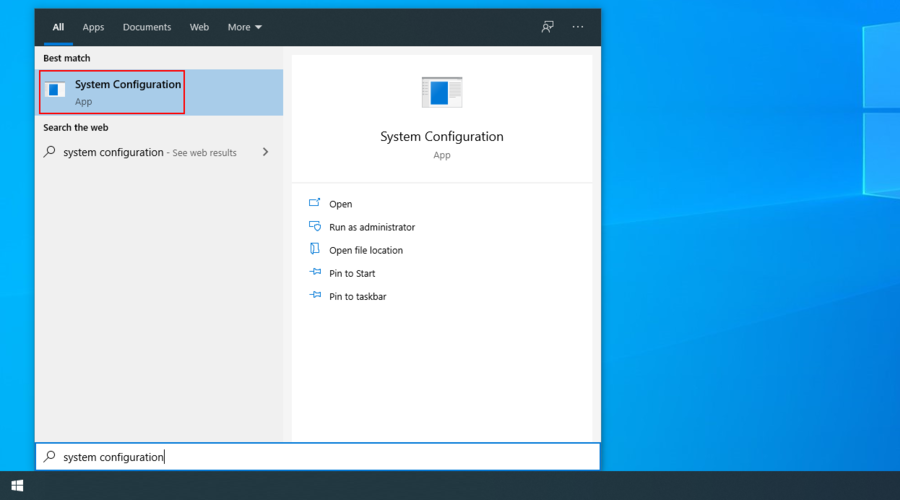
8. Lancer un démarrage propre
Un démarrage propre de Windows 10 signifie désactiver tous les composants inutiles susceptibles de provoquer des problèmes logiciels, tels que les pilotes, les services et les processus. Cela peut vous aider à éliminer les problèmes qui entraînent l’erreur Windows Update 0x80080005. Voici ce que vous devez faire:
- Appuyez sur la touche Windows , recherchez Configuration système et appuyez sur Entrée
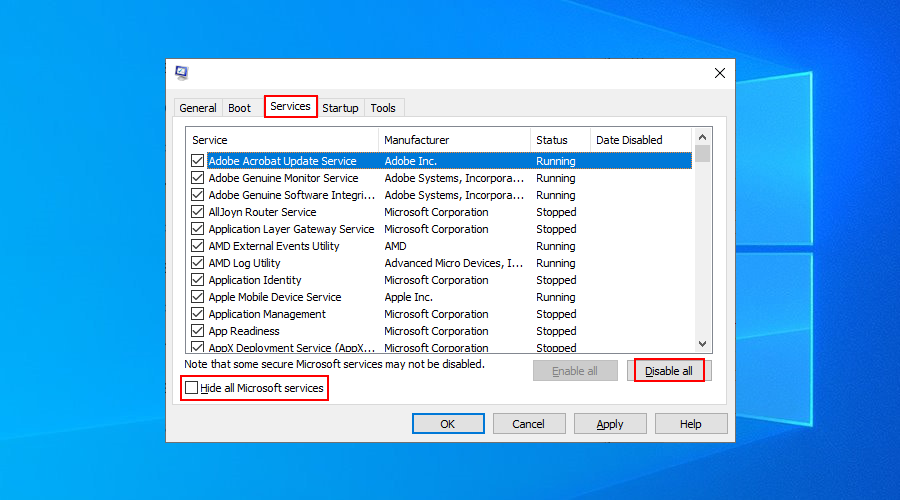
- Passer à l’onglet Services
- Décochez Masquer tous les services Microsoft et cliquez sur Tout désactiver

- Quitter Configuration du système
- Cliquez avec le bouton droit de la souris sur la barre des tâches et sélectionnez Gestionnaire de tâches

- Passer à l’onglet Démarrage
- Cliquez sur la colonne État pour trier toutes les applications par état ( Activé en premier)
- Sélectionnez la première application et cliquez sur Désactiver
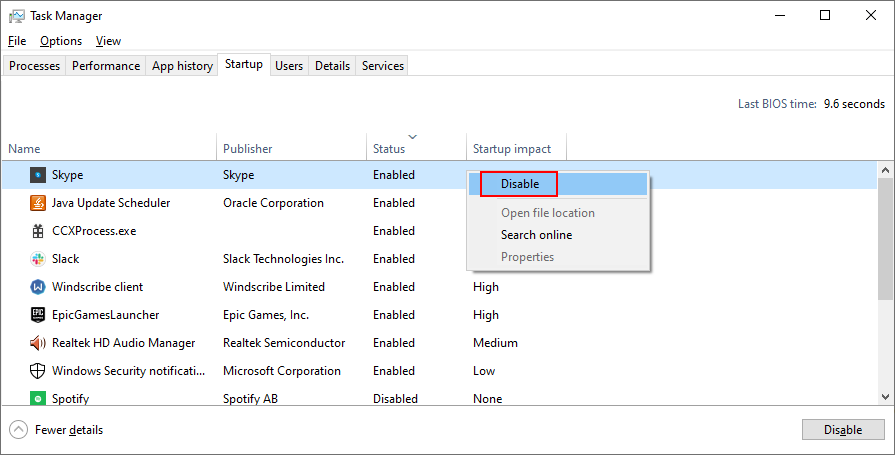
- Effectuez cette opération pour toutes les applications dont l’état est Activé
- Redémarrez votre PC
- Essayez d’exécuter Windows Update maintenant
9. Désactivez votre pare-feu
C’est peu probable, mais Windows Update pourrait être bloqué par votre pare-feu. Cela se produit généralement lorsque vous modifiez les paramètres par défaut du pare-feu ou que vous installez une application de pare-feu tierce qui rend cela possible.
Pour rester prudent, vous pouvez désactiver temporairement le pare-feu pour laisser à Windows suffisamment de temps pour installer les mises à jour. Assurez-vous simplement de le redémarrer par la suite. Sinon, vous laisserez votre ordinateur exposé aux logiciels malveillants.
Comment désactiver et réactiver le pare-feu Windows:
- Connectez-vous à Windows 10 avec des droits d’administration
- Cliquez sur le bouton Démarrer , recherchez Panneau de configuration et ouvrez cette application
- Recherchez et cliquez sur Pare-feu Windows Defender
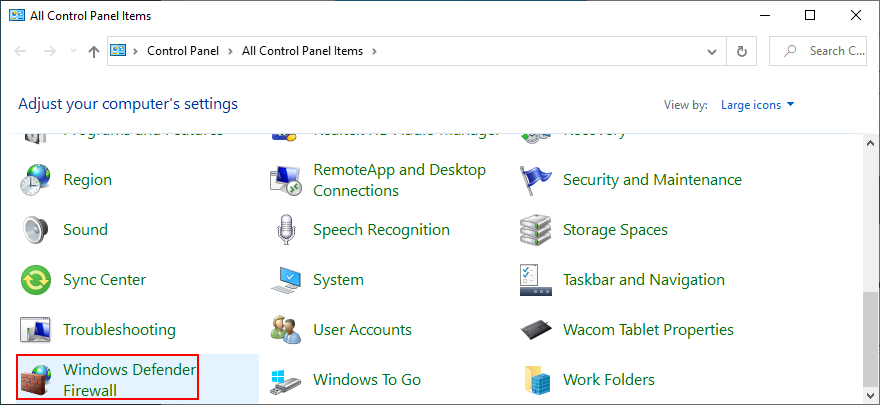
- Cliquez sur Activer ou désactiver Windows Defender dans le panneau de gauche
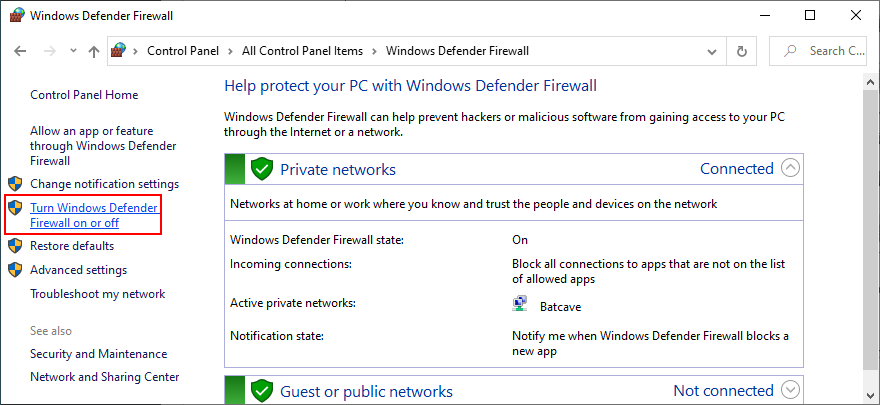
- Sélectionnez Désactiver le pare-feu Windows Defender (non recommandé) dans Paramètres du réseau privé et Paramètres du réseau public

- Cliquez sur OK pour confirmer
- Essayez d’exécuter Windows Update
- Une fois la mise à jour terminée, revenez au Panneau de configuration > Pare-feu Windows Defender
- Sélectionnez Restaurer les paramètres par défaut sur le côté gauche
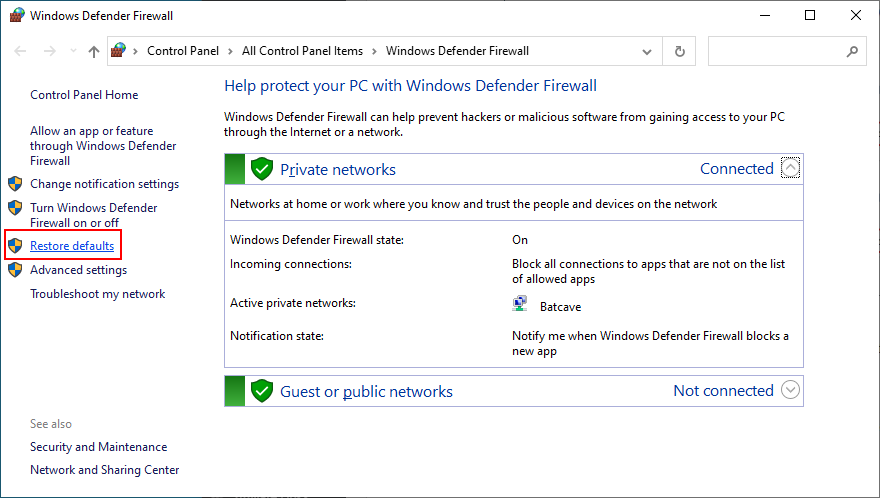
- Cliquez sur Restaurer les paramètres par défaut et Oui pour confirmer
Si vous disposez d’un pare-feu tiers qui prend en charge le pare-feu Windows, adaptez les étapes ci-dessus pour le désactiver temporairement.
10. Désinstaller les logiciels tiers
Dans la solution précédente, nous avons mentionné qu’un pare-feu tiers avec des paramètres incorrects pouvait bloquer Windows Update et, par la suite, déclencher des codes d’erreur tels que 0x80080005. Cependant, il est également possible que l’application de pare-feu soit mal conçue ou ne prenne pas totalement en charge votre édition Windows.
Cela s’applique non seulement aux applications de pare-feu, mais également à tous les programmes ayant accès à Internet. Cela inclut les solutions de sécurité Internet, les services VPN , les navigateurs Web ou les clients torrent.
Si vous avez commencé à rencontrer des erreurs Windows Update juste après avoir ajouté un nouveau logiciel à votre PC, cela pourrait être le coupable. Mais vous devriez pouvoir résoudre ce problème en le désinstallant.
How to uninstall recent software:
- Right-click the Start button and select Apps and Features
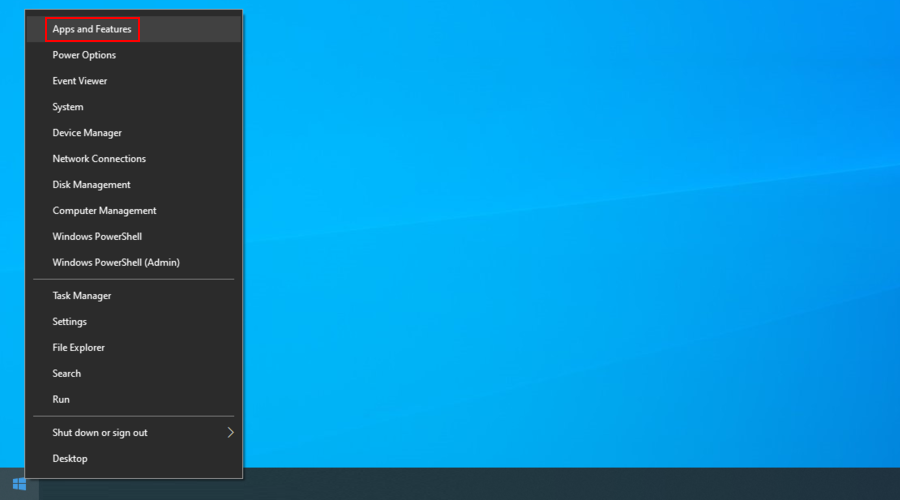
- In the Apps & features section, set Sort by to Install date (newest first)
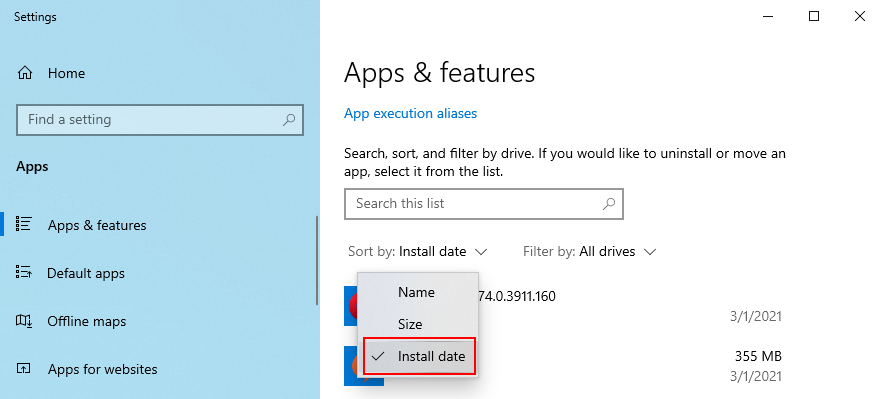
- Pick the first program in the list and click Uninstall
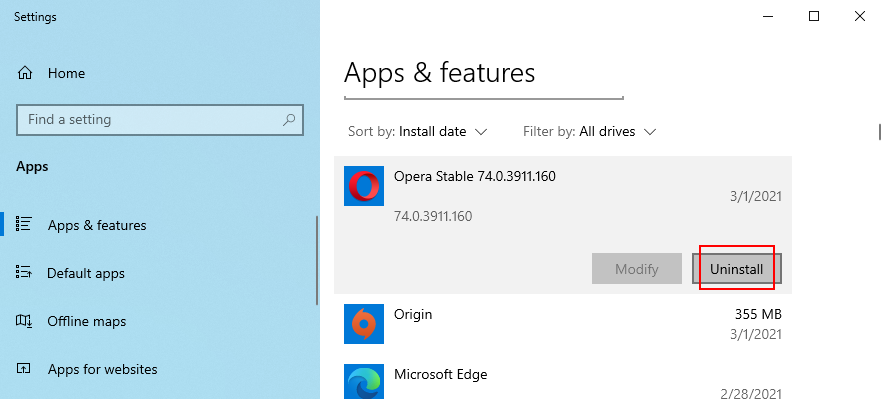
- Click Uninstall again to confirm and proceed with the wizard steps
- If you recently installed multiple fishy programs, make sure to remove all of them
- Reboot your PC and try running Windows Update
The Windows 10 built-in uninstaller is not that effective. If you prefer a more thorough solution that removes not only programs but also any leftover files and registry entries, use a third-party app uninstaller.
11. Uninstall system updates
Not only software applications can cause Windows Update issues but also a faulty system update. It’s not uncommon for Microsoft to push unreliable updates that affect the computers of millions of users. In some cases, this could even lead to error code 0x80080005.
But you can fix it by uninstalling the most recent Windows updates. Voici comment:
- Press Win key + R, type appwiz.cpl, and press Enter

- Click View installed updates

- Click the Installed On column to sort the updates by time (newest first)
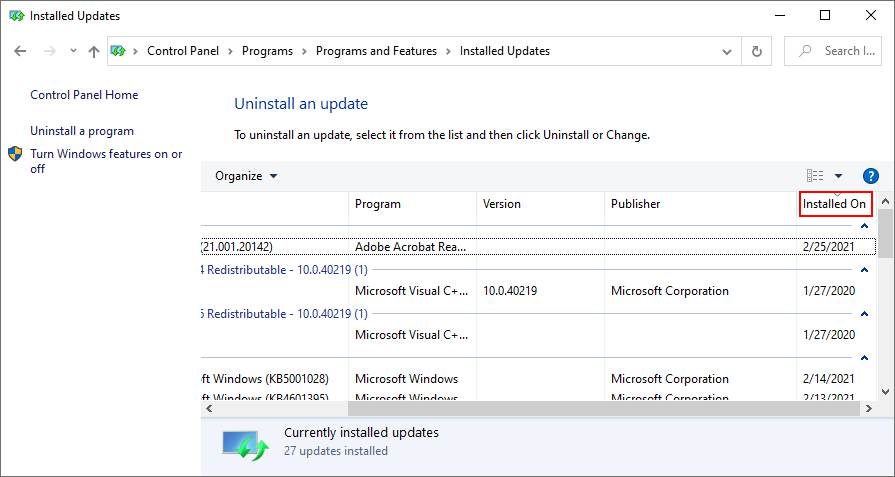
- Double-click the first entry in the Microsoft Windows category
- Click Yes to confirm and proceed with the removal
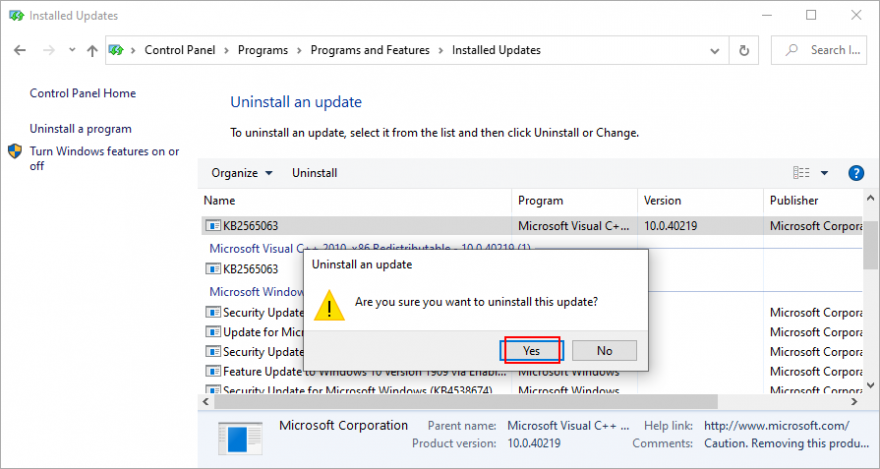
- Restart your PC and try to run Windows Update now
- If Windows Update works now, make sure to avoid installing the same update that was giving you trouble
12. Check the disk space
If there isn’t enough free disk space on your computer, Windows Update might not be able to carry out its activities, like downloading files or running background processes. You can tell if you get the insufficient disk space message in the notifications center.
To fix this problem, you can increase the disk space on the C: drive (or wherever you have Windows installed) by turning to a partition manager. However, if you don’t want to install any third-party tools, Disk Management should do the trick.
How to use Disk Management:
- Right-click the Start button and select Disk Management
- Select a large drive that doesn’t contain Windows (like D:)
- Right-click D: and select Shrink Volume
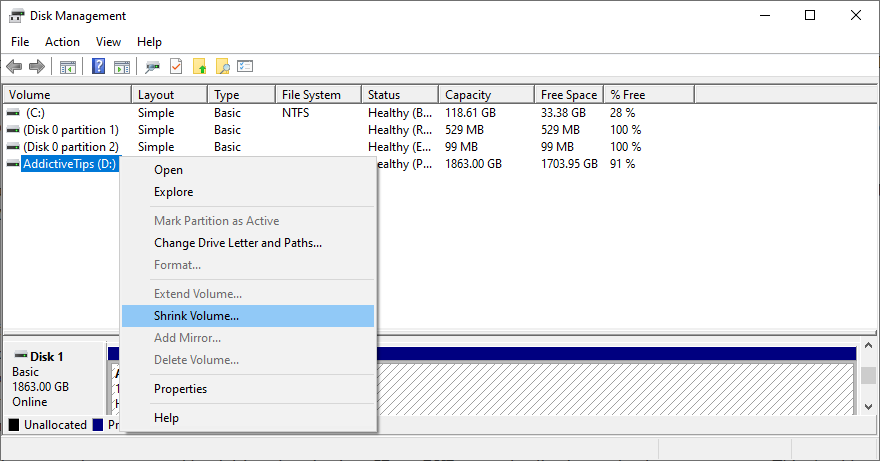
- Write the new volume size and click Shrink
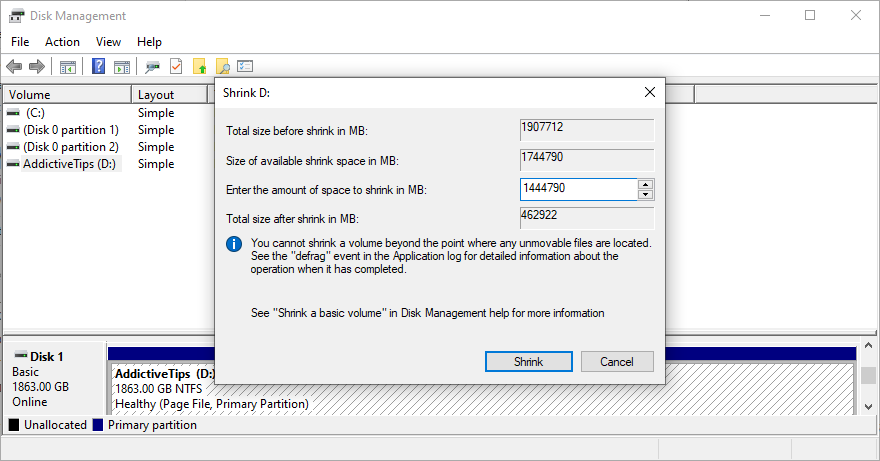
- Return to the main window
- Right-click the C: drive (or where you have Windows installed) and choose Extend Volume
- Set the new volume size and click Extend
- Try to run Windows Update now
If your hard disk is not big enough to allocate disk space from one partition to another, a workaround is to remove files from your PC to make room for Windows Update. Move personal photos and videos to an external hard disk, burn them to DVDs, or upload them to cloud storage accounts.
You can also uninstall large games and applications, as well as get rid of junk files with the help of a system cleaner. Or, if you don’t want to install anything extra, check out the Windows Disk Cleanup utility.
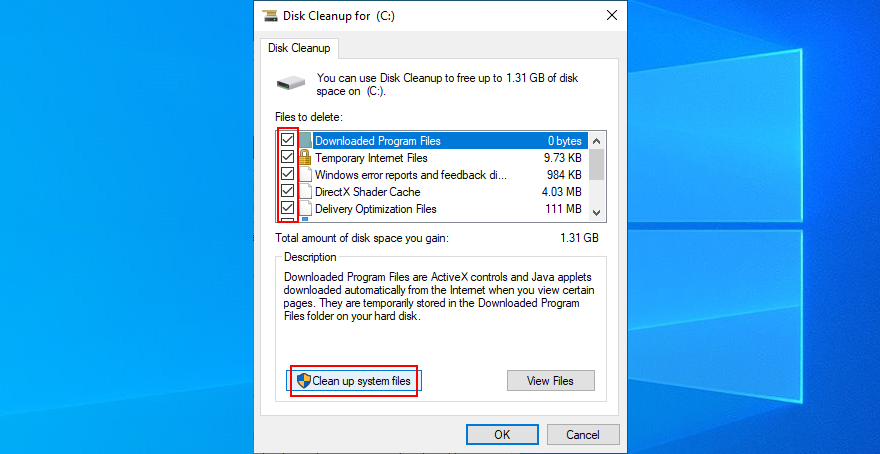
How to use Disk Cleanup:
- Sign in to Windows 10 with admin rights
- Go to Downloads and Recycle Bin to back up or restore any files you would like to keep since these folders will be emptied
- Press Win key + E to open File Explorer
- Select the C: drive or where you have your OS installed
- Right-click the drive and go to Properties
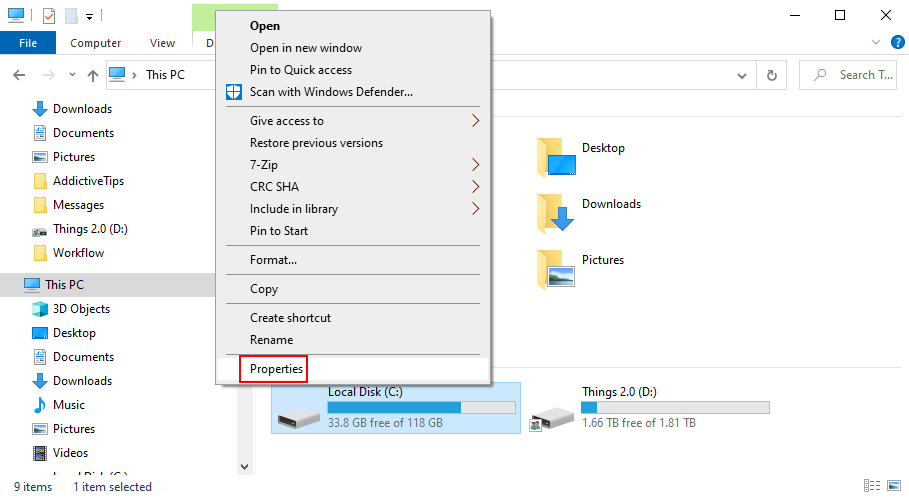
- In the General tab, click Disk Cleanup
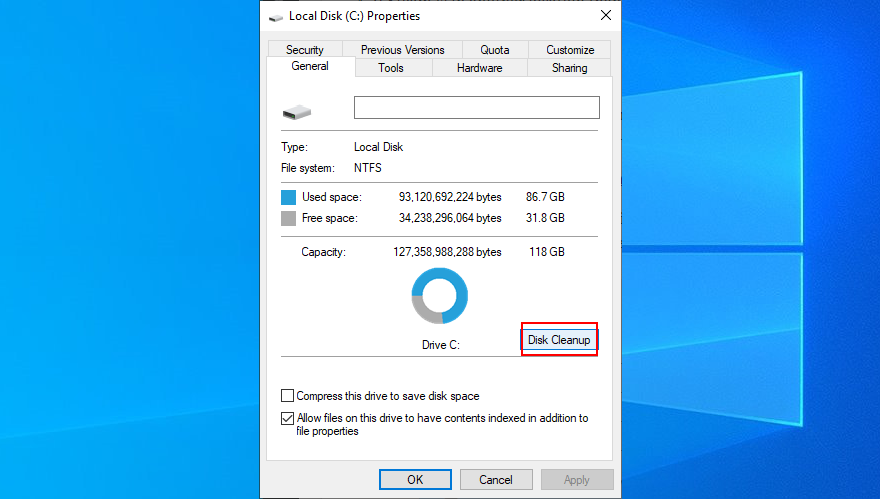
- At Files to delete, select everything and click Clean up system files
- Once the file search is over, choose all items again and press OK
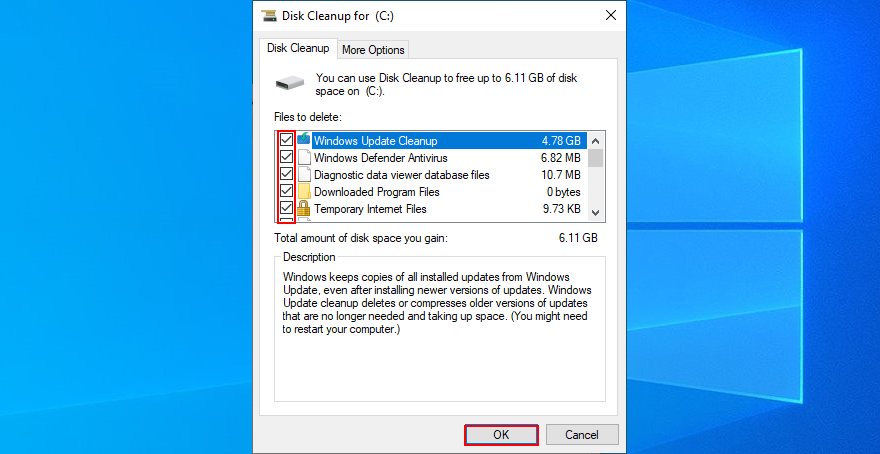
- Restart your PC when the cleanup is over
- Try to run Windows Update now
13. Check the network drivers
It’s common for driver issues to interfere with all applications and system utilities that require Internet access, including Windows Update. For instance, if your network device is not working properly, it could be the reason why you keep getting error code 0x80080005. It’s also possible that your network driver is obsolete or incompatible with your operating system. Here’s what you need to do:
How to quickly reinstall the network device:
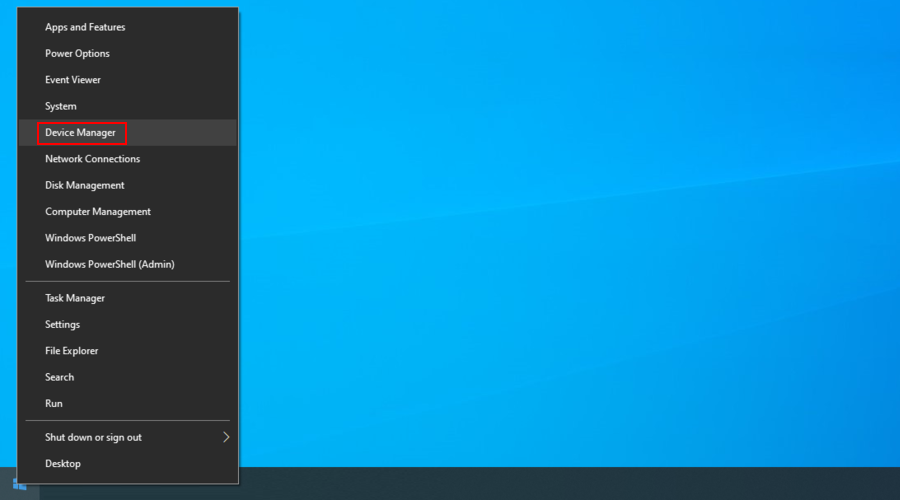
- Cliquez avec le bouton droit sur le bouton Démarrer et accédez au Gestionnaire de périphériques
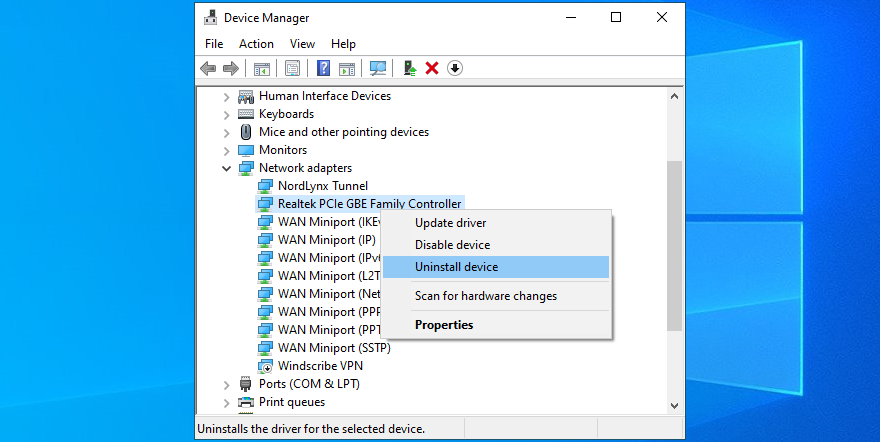
- Open the Network adapters category
- Select and right-click your main network device, then click Uninstall device
- Open the Action menu and click Scan for hardware changes
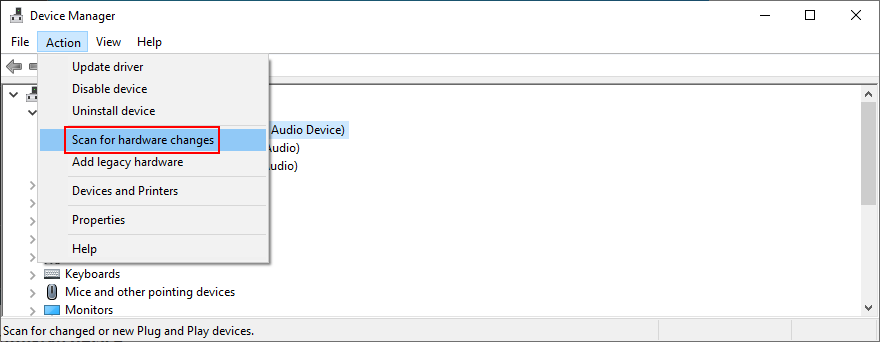
- Restart your computer. Windows will auto-reinstall the missing network device
- Check for Windows Update errors

How to update your network driver:
- Return to Device Manager
- Right-click your network device and select Update driver

- When prompted with two options, click Search automatically for updated driver software
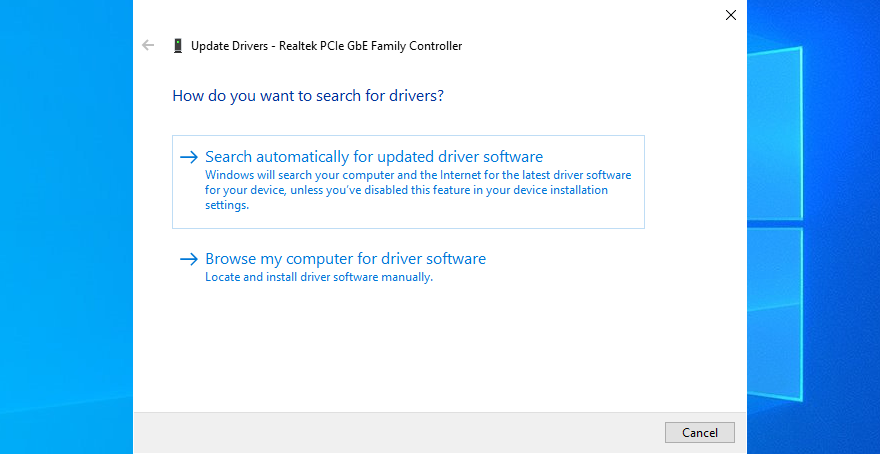
- Wait a bit until Windows checks for updates. If it doesn’t find anything, exit
If Windows fails to find a network driver, we suggest turning to a driver update tool. It identifies all outdated drivers on your PC and finds newer versions on the web that are compatible with your operating system. Furthermore, it can automatically download and install all drivers.
How to roll back an incompatible network driver:
- Go back to Device Manager
- Right-click your network adapter and go to Properties
- Switch to the Driver section
- Click Roll Back Driver and follow the on-screen steps
- If the button is greyed out, it means that no previous network driver exists on your PC, so you can’t complete the rollback
- If the rollback was successful, reboot your machine and try to run Windows Update
14. Repair hard disk and system errors
Data corruption in the hard disk or operating system can be devastating to all system utilities, including Windows Update. If you have a missing or damaged file that’s critical for the updater component, it’s no wonder that you get error codes like 0x80080005.
To fix HDD errors, you can use CHKDSK (Check Disk). When it comes to damaged system files, use SFC (System File Checker). Lastly, for more serious problems with the component store of the Windows image, turn to DISM (Deployment Image Servicing and Management).
How to use CHKDSK:
- Click the Start button, search for Command Prompt, and click Run as administrator
- Type
chkdsk c:/fif your operating system is installed on the C: drive. If it’s not, replacec:with the correct partition letter. Press Enter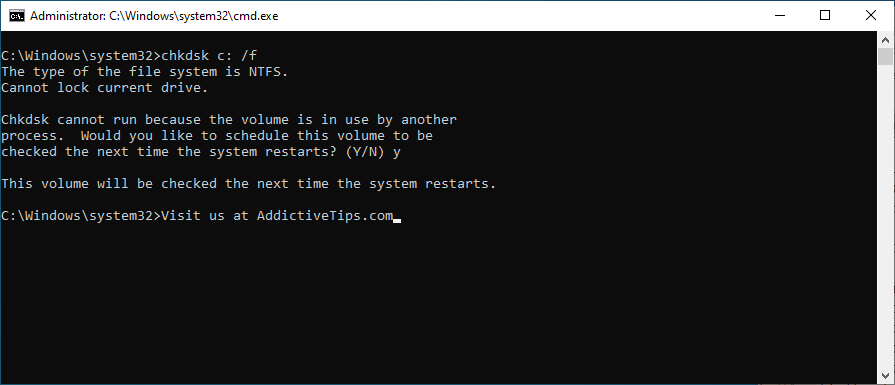
- When asked to confirm the CHKDSK scheduling at the next system boot, type y and hit Enter
- Reboot your PC
- During restart, CHKDSK will scan your hard disk and fix any errors
- After boot, try running Windows Update
How to use SFC:
- Press Win key + R, type cmd, and press Ctrl + Shift + Enter to run CMD as admin. Click Yes if prompted by UAC (User Account Control)

- Type
sfc/scannowand press Enter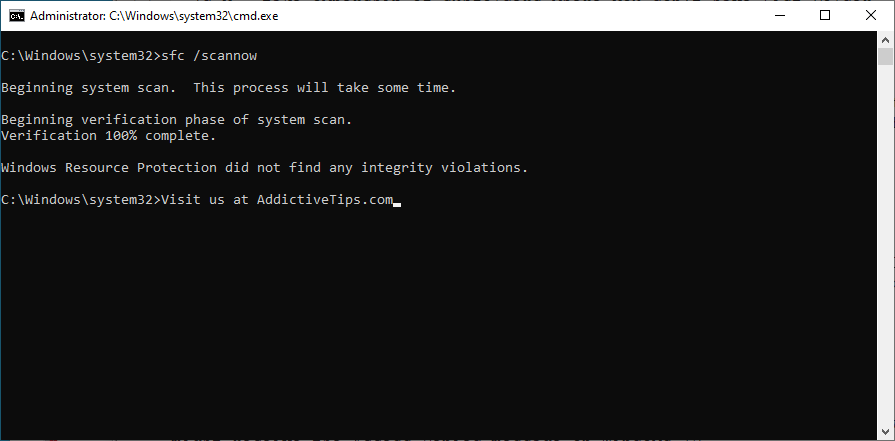
- Patiently wait while SFC performs the system scan and fixes any issues
- Restart your PC
- Run Windows Update and check if you still get error 0x80080005
How to use DISM:
- Launch Command Prompt as admin
- Run
DISM/online/cleanup-image/scanhealthto check the health of your operating system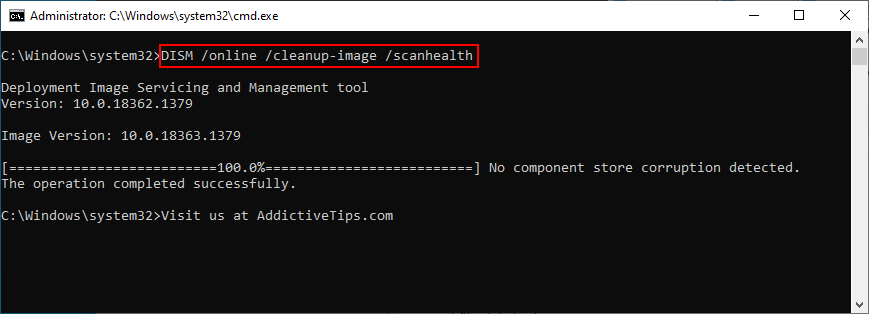
- If DISM finds any issues, type
DISM/online/cleanup-image/restorehealthand press Enter to fix them - Reboot your PC after the process is complete
- Open CMD as admin again
- Run SFC (
sfc/scannow) - Restart your computer one last time
- Try to run Windows Update now
15. Run a malware scan
If your antivirus solution failed to fend off malware attacks, then an infection could have affected the entire operating system and its utilities, including Windows Update. You need to immediately perform a computer scan and remove any viruses from your PC.
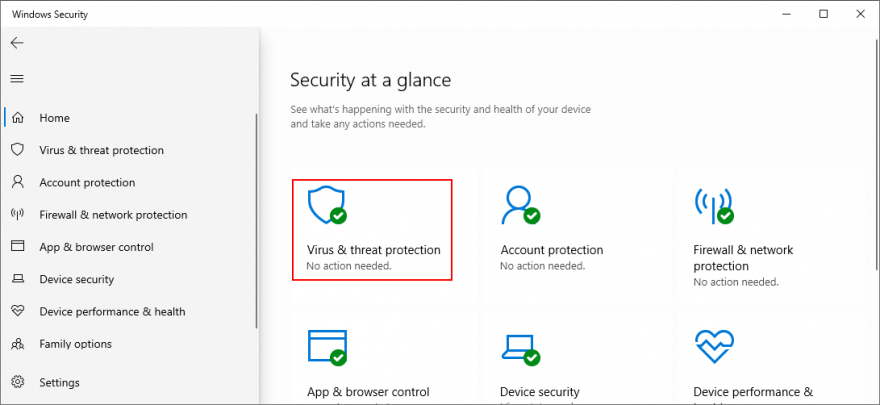
How to run Windows Defender:
- Click the Start button, search for Windows Security, and press Enter

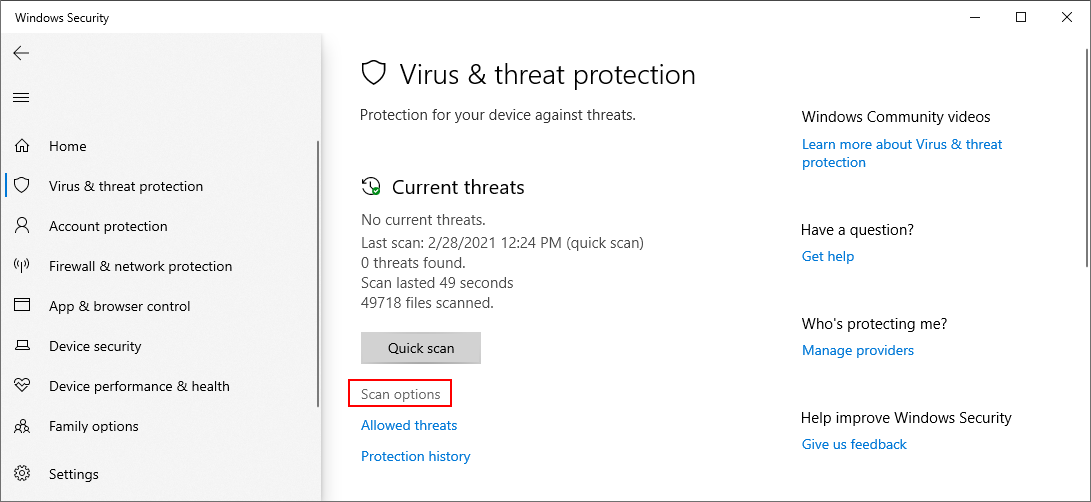
- Jump to Virus & threat protection
- Click Scan options
- Select Quick scan and click Scan now
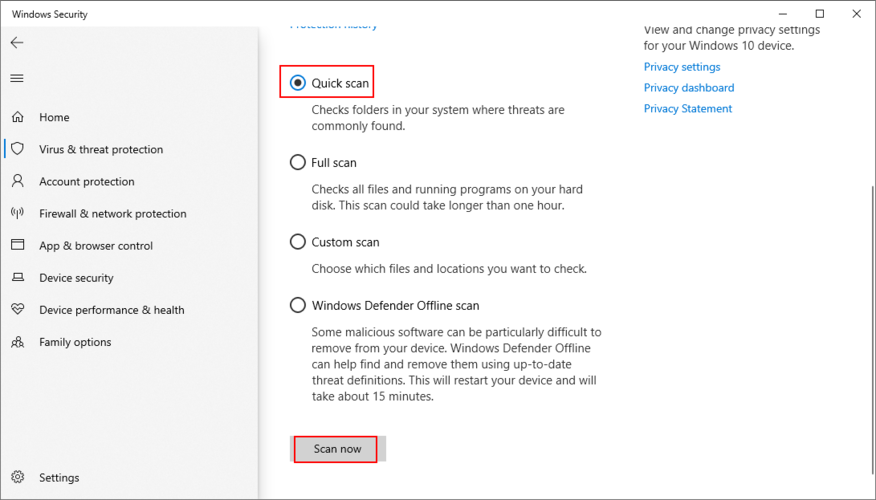
- Wait until Windows runs the scan. If it doesn’t find anything, select Windows Defender Offline scan and click Scan now
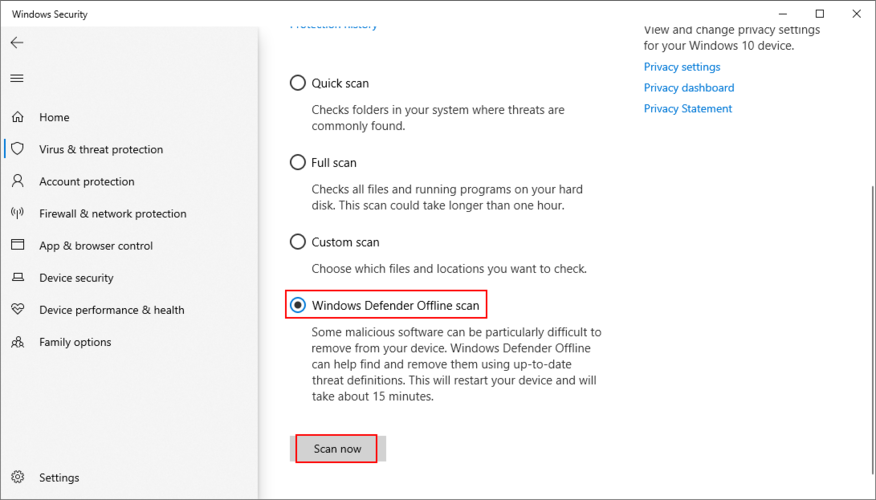
- Once the threats have been eliminated from your PC, restart
- Try to run Windows Update now
16. Turn off IPv6
It’s a bit unusual, but IPv6 connectivity may conflict with Windows Update if your network doesn’t support IPv6. In turn, this can lead to error codes like 0x80080005. Unless you’re absolutely sure that your ISP supports IPv6 (you can contact it and ask), it’s safer to disable IPv6 connections on your PC.
How to disable IPv6 on Windows 10:
- Click the network icon in the system tray and visit Network & Internet settings
- Go to Change adapter options
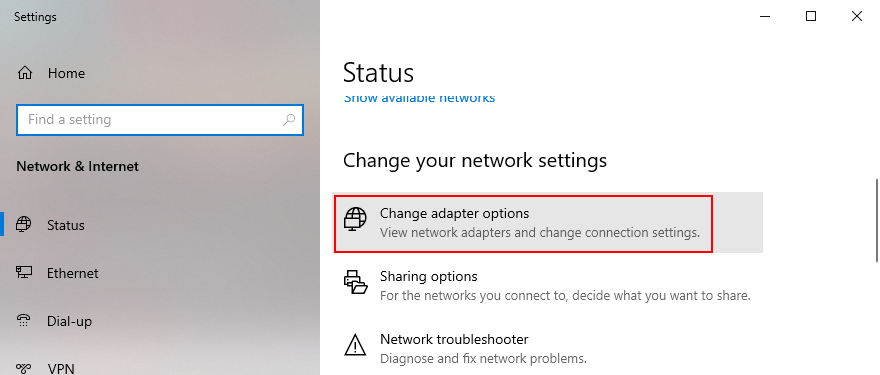
- Select your Internet connection, right-click it, and choose Properties (you need admin rights)
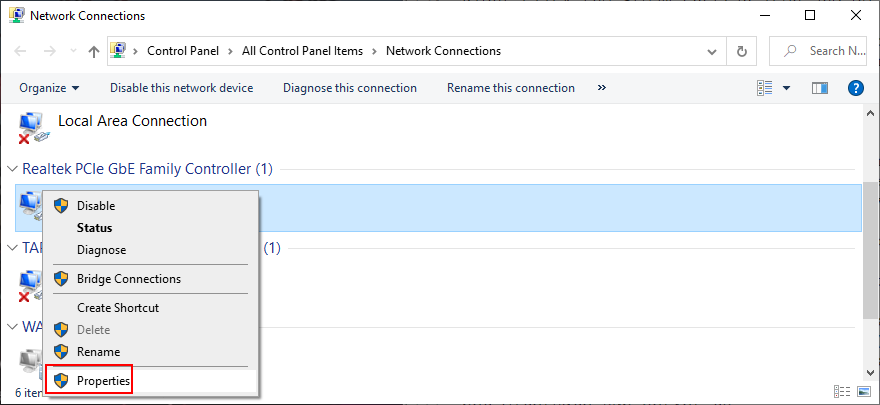
- Remain in the Networking tab
- Find and uncheck Internet Protocol Version 6 (TCP/IPv6)
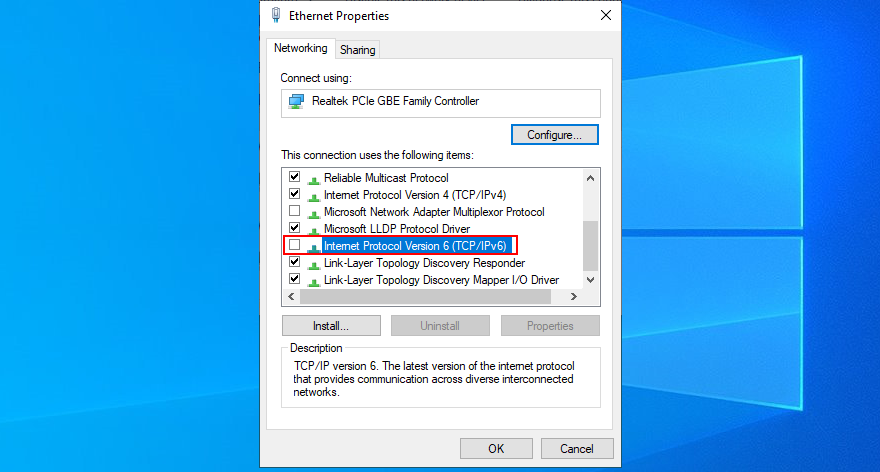
- Cliquez sur OK et quittez
- Try to run Windows Update now
It’s also a good idea to turn disable IPv6 connectivity from your router’s admin panel.
17. Fix registry settings
You can also fix the 0x80080005 Windows Update error code by fixing several system registry settings. Don’t worry since you don’t need any previous experience, as long as you follow the instructions below.
- Click the Start button, search for Registry Editor, and open this app
- If prompted by User Account Control, click Yes
- In Registry Editor, create a backup:

- Open the File menu
- Select Export
- Set a new file name and indicate a destination
- Click Save to save the current registry settings as backup (.reg format)
- Copy and paste the following address to visit this location:
Computer\HKEY_LOCAL_MACHINE\SOFTWARE\Microsoft\Windows\CurrentVersion\WindowsUpdate\Auto Update
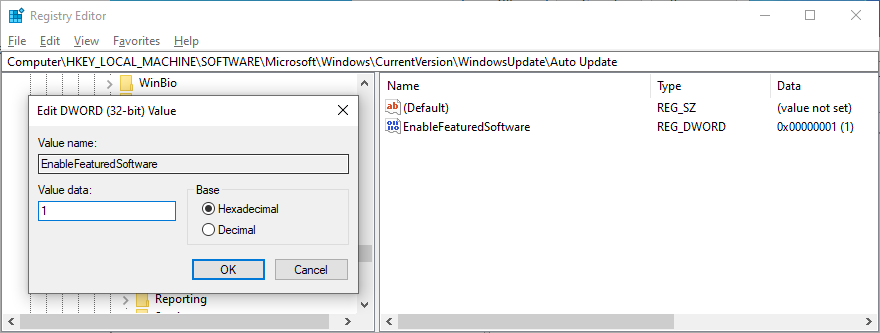
- If you spot the EnableFeaturedSoftware entry, check if Data is 0x00000001 (1). Otherwise:
- Double-click the entry
- Set Value data to 1
- Set Base to Hexadecimal
- Click OK
- If the EnableFeaturedSoftware entry doesn’t exist:
- Open the Edit menu
- Select New > DWORD (32-bit) Value
- Set the name to EnableFeaturedSoftware
- Double-click the entry
- Set Value data to 1
- Set Base to Hexadecimal
- Click OK
- Go to the following location:
HKEY_LOCAL_MACHINE\SOFTWARE\Microsoft\WindowsUpdate\UX
- Find and double-click IsConvergedUpdateStackEnabled

- Set Value data to 0
- Set Base to Hexadecimal
- Click OK
- Now, visit this address:
HKEY_LOCAL_MACHINE\SOFTWARE\Microsoft\WindowsUpdate\UX\Settings
- Locate UxOption
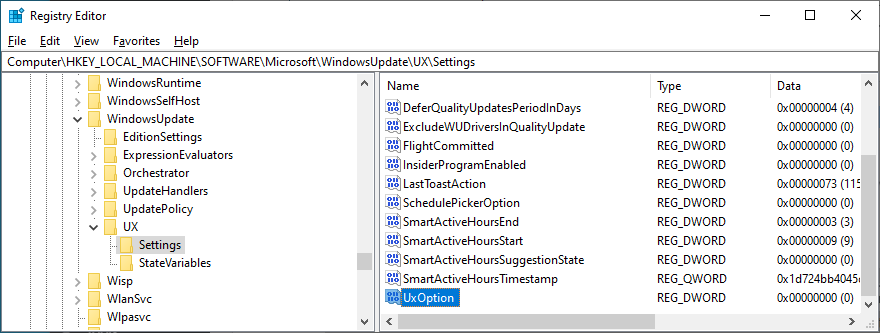
- Double-click the entry
- Set Value data to 0
- Set Base to Hexadecimal
- Click OK
- Finally, visit this location:
HKEY_LOCAL_MACHINE\SOFTWARE\Policies\Microsoft\SystemCertificates
- If you spot the CopyFileBufferedSynchronousIo entry, make sure that its data is set to 0x00000001 (1). If it’s not:

- Double-click the entry
- Set Value data to 1
- Set Base to Hexadecimal
- Click OK
- If CopyFileBufferedSynchronousIo doesn’t exist:Open the Edit menu
- Select New > DWORD (32-bit) Value
- Set the entry name to CopyFileBufferedSynchronousIo
- At Value data, write 1
- Set Base to Hexadecimal
- Click OK
- Exit Registry Editor and restart your computer
- Try to run Windows Update now
If, for any reason, you need to roll back the changes you made in the registry, just double-click the.reg backup file you previously created to restore the original registry configuration.
18. Fix Windows startup problems
The Windows advanced troubleshooting mode gives you the possibility to repair startup issues that might prevent your operating system from working properly. It’s worth a shot when it comes to repairing Windows Update errors. Here’s how to use it:
- Make sure to save any ongoing projects
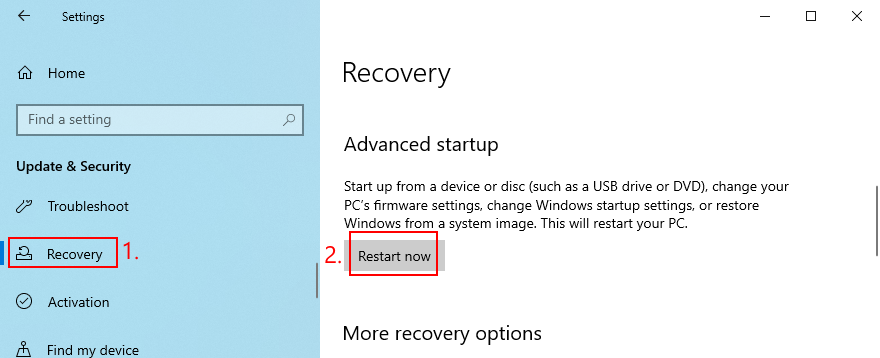
- Right-click the Start button and go to Settings
- Sélectionnez Mise à jour et sécurité
- Jump to Recovery on the left side
- At Advanced startup, click Restart now
- Windows will restart in recovery mode. When the screen turns blue and loads various options, go to Troubleshoot
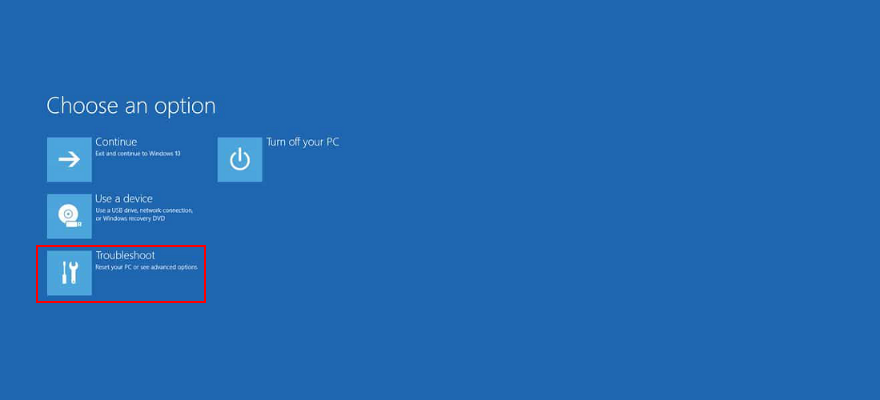
- Select Advanced options > Startup Repair

- Select your admin account and enter your password
- Follow the step-by-step instructions to fix startup problems
- After Windows starts, try running the system updater
19. Roll back Windows 10
For any other unforeseen software events that you can’t identify but may have damaged Windows Update, turn to System Restore. If you have created a restore point before starting to receive error code 0x80080005 on each attempt to update the OS, you can roll back Windows 10 to that state. Voici comment:
- Click the Start button, search for Control Panel, and open this app
- Select the Recovery section

- Pick a restore point from the list or select Show more restore point to go back further
- To view which applications will be removed from your PC, click Scan for affected programs
- Click Next and follow the on-screen instructions
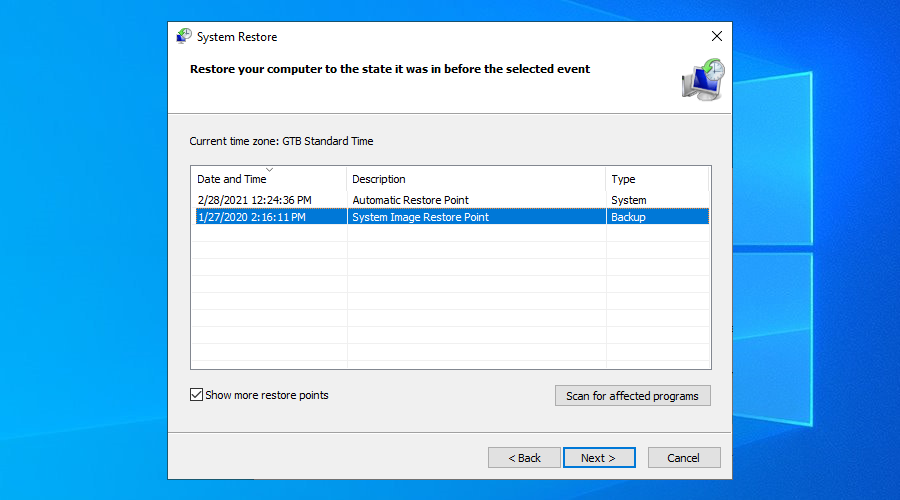
- After your PC restarts, try to run Windows Update
20. Reset Windows 10
Unfortunately, System Restore fails to work on many occasions. After exhausting all the previous solutions and still getting hampered by error code 0x80080005, it’s time to reset Windows 10.
Your files, downloads, and game saves will be left untouched. However, all your applications will disappear from your PC. Here’s what you need to do:
- Right-click the Windows 10 Start button and select Settings
- Visit the Update & Security section
- Jump to Recovery
- At Reset this PC, click Get started
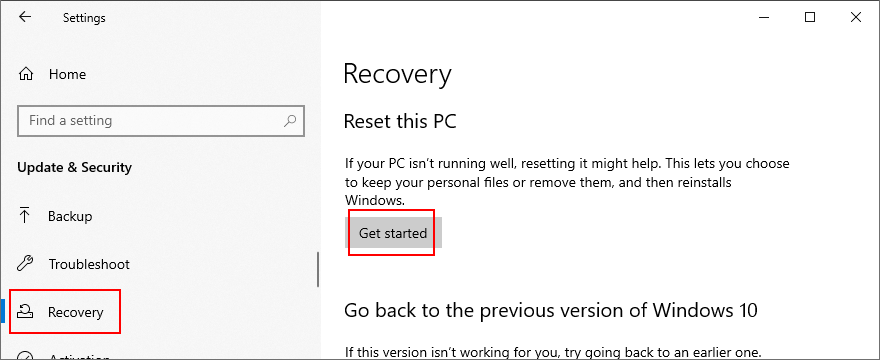
- When prompted with two options, select Keep my files
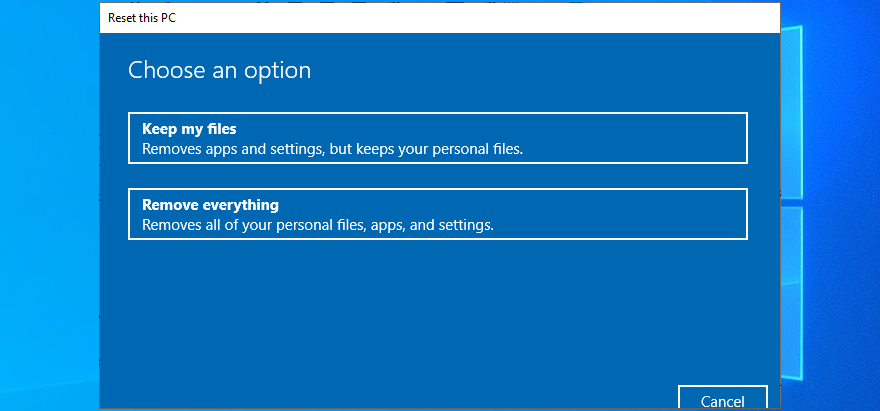
- Follow the on-screen steps to reset Windows 10
- Once the task is complete, run Windows Update to install all required updates
Windows Update error 0x80080005 can be fixed
To sum up, 0x80080005 is an error code that pops up on the screen when trying to run Windows Update. It’s typically caused by a hardware or software problem that can be resolved.
Start by running the Windows Update troubleshooter and using the Windows Update Diagnostic tool. If these fail, restart the Windows Update and dependent services, turn off Network List Service, check Group Policy settings, reset Windows Update components, and unplug all peripheral devices.
You can also run a clean boot, temporarily deactivate your firewall, uninstall recent third-party software and system updates, check the disk space and network drivers, as well as repair any hard disk and operating system errors.
It’s also a good idea to run a computer scan to remove any malware, disable IPv6 connectivity if you don’t use it, fix registry settings and Windows startup problems, and roll back Windows 10 to a previous checkpoint. If everything fails, it’s time to factory reset Windows 10.
How did you manage to get rid of 0x80080005?
Did we miss any important steps? Let us know in the comment area below.