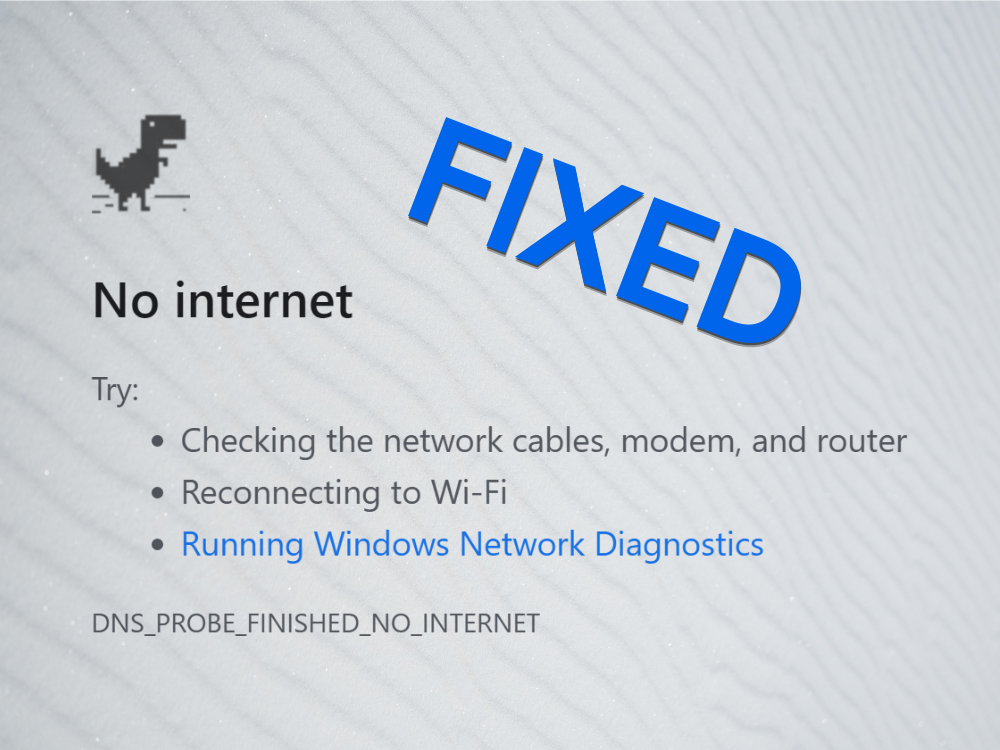
DNS_PROBE_FINISHED_NO_INTERNET est un message d’erreur affiché par Google Chrome lorsque vous essayez d’accéder à des sites Web. Cela indique un problème avec vos serveurs DNS, ce qui vous empêche de naviguer sur Internet et de visualiser votre contenu préféré.
Il existe plusieurs façons de gérer cette erreur sans recourir à l’aide d’un professionnel. Cependant, il est nécessaire de déterminer s’il y a un problème avec votre navigateur Web, les paramètres de votre ordinateur ou votre connexion Internet.
Comment corriger l’erreur DNS_PROBE_FINISHED_NO_INTERNET sur n’importe quelle plate-forme
Découvrez les solutions suivantes et assurez-vous de les parcourir étape par étape. Nous avons pris en compte les plates-formes Windows 10 et macOS.
1. Essayez un autre navigateur
Le moyen le plus simple de savoir si la SONDE DNS FINI SANS INTERNET signale un problème avec votre navigateur Web est d’essayer d’utiliser une autre application pour accéder à Internet.
Si vous parvenez à surfer sur le Web avec un autre navigateur comme Firefox, Edge ou Safari, cela facilite les choses car il vous suffit de dépanner Chrome. Sinon, cela indique un problème plus grave qui affecte non seulement Chrome, mais tout votre ordinateur et éventuellement votre connexion Internet.
2. Redémarrez Chrome
Cela peut sembler trop simple à utiliser, mais le redémarrage de Google Chrome corrige généralement l’erreur DNS_PROBE_FINISHED_NO_INTERNET. Cependant, vous devez vous assurer de fermer correctement tous ses processus avant de redémarrer.
Comment redémarrer correctement Chrome sous Windows 10:
- Cliquez avec le bouton droit sur la barre des tâches et accédez au Gestionnaire des tâches

- Dans l’onglet Processus , recherchez et sélectionnez Google Chrome et l’intégralité de son arborescence de processus
- Cliquez sur Terminer la tâche
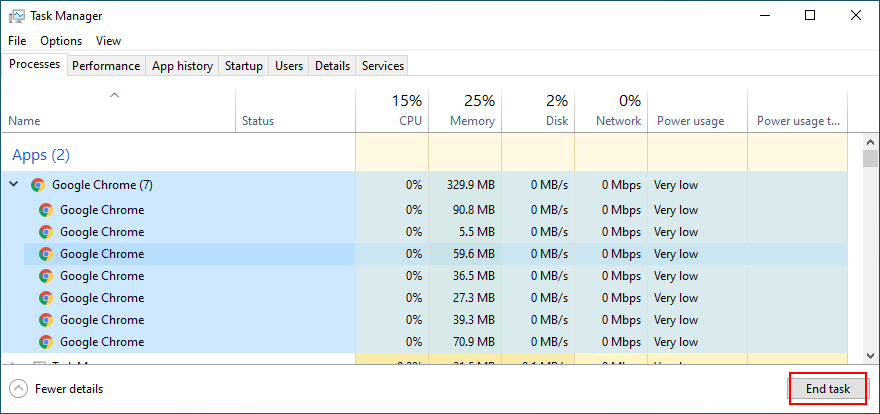
- Lancez Chrome et recherchez les erreurs DNS
Comment redémarrer correctement Chrome sur Mac:
- Sélectionnez la fenêtre Chrome
- Cliquez sur le bouton Apple et sélectionnez Forcer à quitter dans le menu
- Relancez Chrome et inspectez les résultats
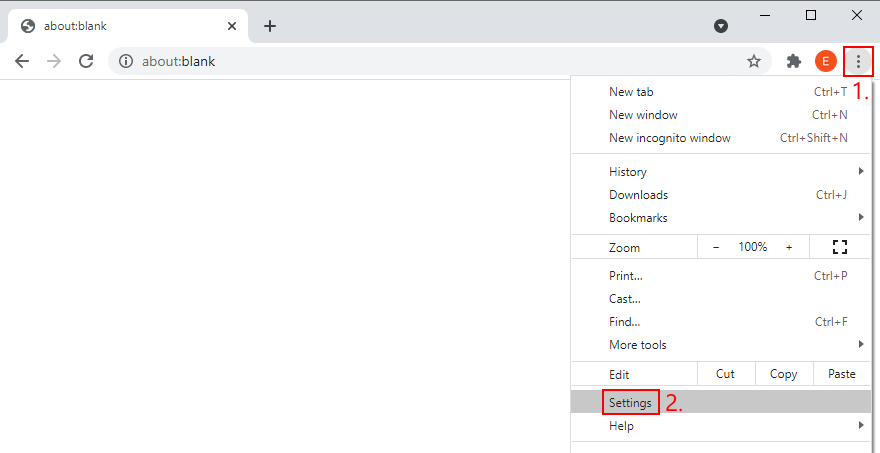
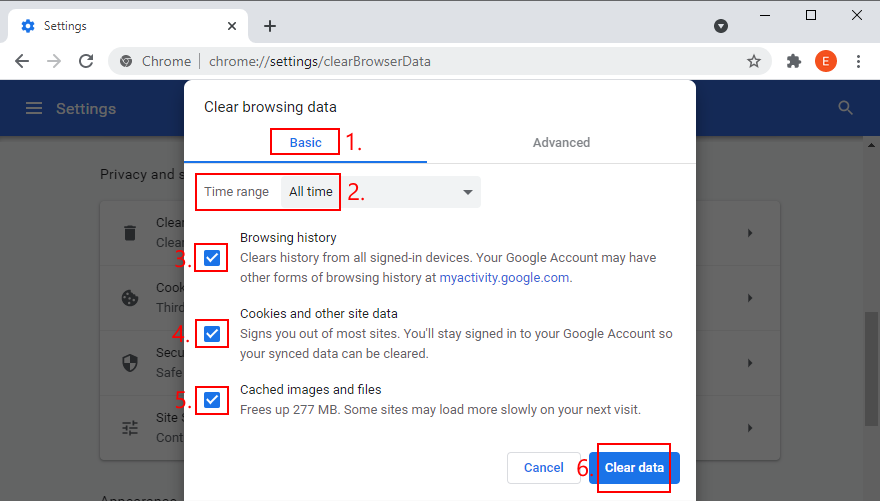
3. Vider le cache du navigateur
Les problèmes de connexion DNS peuvent être causés par le cache du navigateur, comme les cookies enregistrés. C’est donc une bonne idée de vider le cache Chrome avant d’essayer d’accéder à une page Web. Voici ce que vous devez faire.
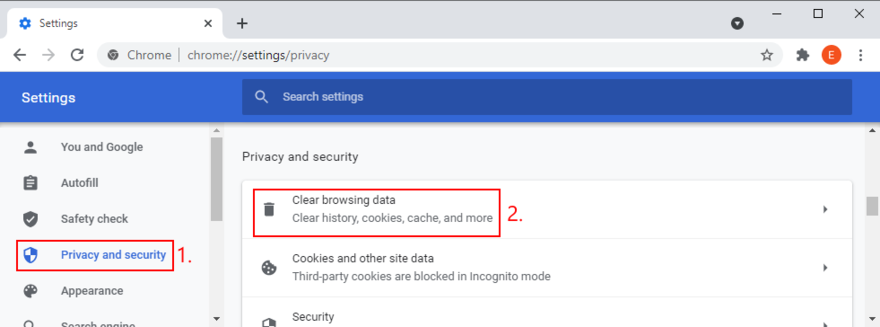
Comment vider le cache Chrome (Windows et Mac):
- Lancez Chrome et cliquez sur le bouton Plus dans le coin supérieur droit
- Sélectionnez Paramètres dans le menu
- Accédez à la section Confidentialité et sécurité (ou accédez à l’adresse
chrome://settings/privacycomme raccourci) - Cliquez sur Effacer les données de navigation

- Restez dans la zone Basique
- Définissez Période sur Toutes les périodes
- Assurez-vous d’activer les options suivantes:
- Historique de navigation
- Cookies et autres données de site
- Images et fichiers mis en cache
- Cliquez sur Effacer les données lorsque vous êtes prêt

- Redémarrez Chrome et recherchez les erreurs DNS
4. Mettre à jour Chrome
Sur la dernière édition de Windows et de macOS, il est essentiel de maintenir Chrome à jour avec la dernière version. De cette façon, vous aurez un accès immédiat non seulement aux toutes nouvelles fonctionnalités, mais également à toutes les améliorations et corrections d’erreurs DNS connues.
Comment mettre à jour Chrome sur Windows et Mac:
- Ouvrez Chrome et cliquez sur le bouton Plus
- Accédez à la section Aide
- Cliquez sur À propos de Google Chrome . Sinon, vous pouvez visiter l’
chrome://settings/help address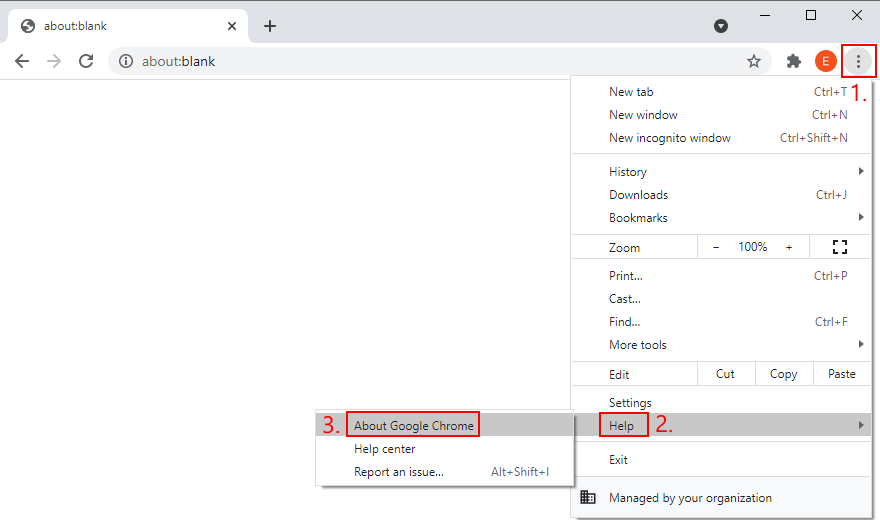
- Attendez que Chrome trouve et effectue les mises à jour
- Redémarrez le navigateur une fois qu’il a terminé et recherchez les problèmes DNS
5. Réinitialiser Chrome aux paramètres par défaut
Si vous ou une extension de navigateur avez configuré trop de paramètres dans Chrome, la configuration DNS a peut-être également été perturbée. Il est difficile de trouver et de réparer les options défectueuses. Une solution plus simple et plus élégante consiste à réinitialiser Chrome par défaut.
Comment restaurer Chrome aux paramètres d’usine sur Windows et Mac:
- Ouvrez le menu Plus et sélectionnez Paramètres (ou accédez à l’adresse
chrome://settings/) - Descendez en bas de la page et cliquez sur Avancé
- Dans la section Réinitialiser et nettoyer , cliquez sur Rétablir les paramètres par défaut d’origine
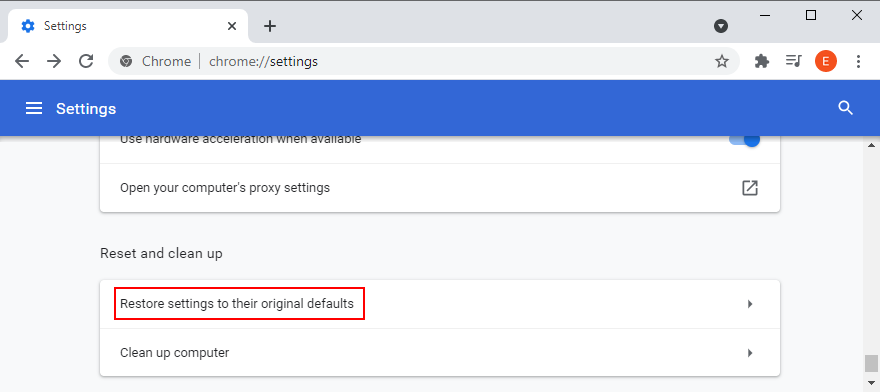
- Lorsque vous êtes invité à confirmer, cliquez sur Réinitialiser les paramètres
- Redémarrez Chrome et recherchez les problèmes DNS
- Dans la section Réinitialiser et nettoyer , cliquez sur Rétablir les paramètres par défaut d’origine
6. Désactiver les extensions Chrome
Certaines extensions de navigateur sont autorisées à modifier la configuration IP et DNS de Chrome, telles que VPN services et outils proxy. Si ce n’est pas fait correctement, cela pourrait couper l’accès Internet à l’ensemble de votre navigateur.
Pour résoudre ce problème, vous devez désinstaller toutes les extensions Chrome suspectes ou inconnues. Voici ce que vous devez faire (Windows et Mac):
- Dans le menu Plus , accédez à Plus d’outils
- Sélectionnez Extensions . Sinon, accédez à l’adresse
chrome://extensions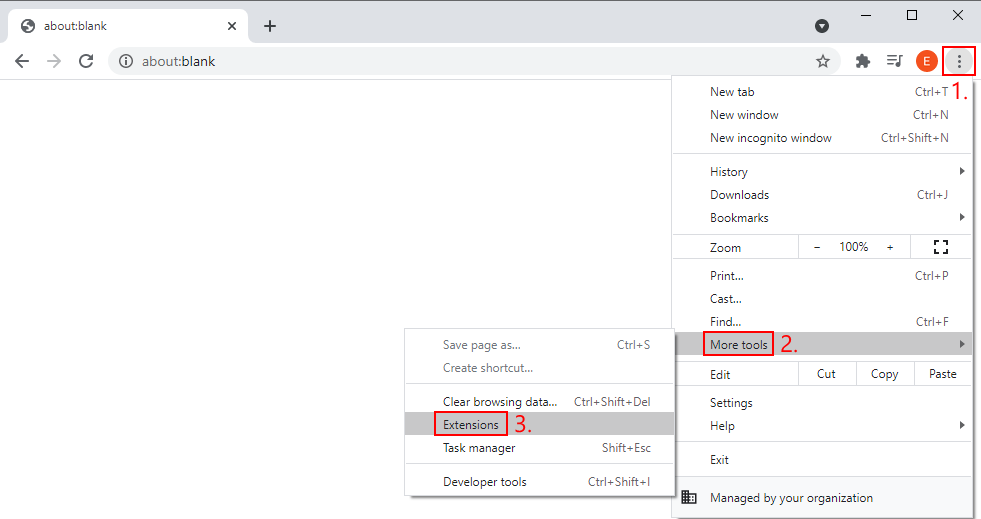
- Supprimez toutes les extensions ayant accès à votre configuration IP et DNS, y compris les outils VPN et proxy
- Relancez Chrome et inspectez les résultats
7. Réinstaller Chrome
Si Chrome génère toujours l’erreur DNS_PROBE_FINISHED_NO_INTERNET après avoir essayé les solutions ci-dessus, il est judicieux de le supprimer de votre ordinateur, puis de le réinstaller.
Comment réinstaller correctement Chrome sur Windows 10:
- Cliquez avec le bouton droit de la souris sur la barre des tâches et sélectionnez Gestionnaire de tâches
- Sélectionnez Google Chrome et cliquez sur Terminer la tâche

- Cliquez avec le bouton droit sur le bouton Démarrer et accédez à Applications et fonctionnalités

- Recherchez et sélectionnez Google Chrome
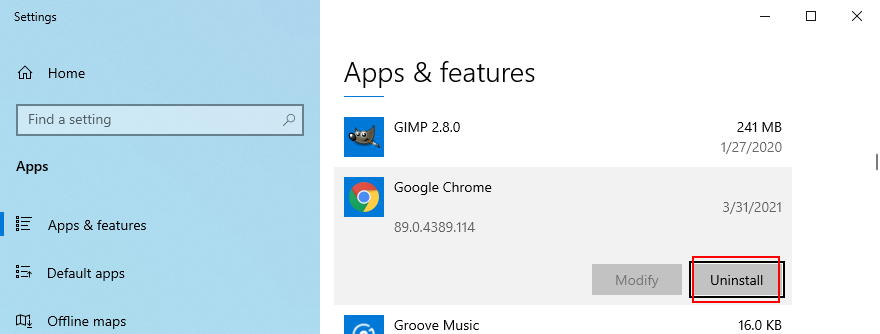
- Cliquez sur Désinstaller , puis à nouveau pour confirmer
- Poursuivre l’opération de suppression
- Téléchargez Chrome à partir du site Web officiel
- Lancez Chrome et recherchez les erreurs DNS
Comment réinstaller correctement Chrome sur Mac:
- Lancez Chrome et ouvrez le menu Pomme
- Cliquez sur Forcer à quitter
- Utilisez l’application Finder pour localiser Chrome
- Faites glisser et déposez Chrome dans la Corbeille
- Si vous y êtes invité, saisissez votre nom d’utilisateur et votre mot de passe d’administrateur pour confirmer la suppression de l’application
- Sélectionnez Vider la corbeille dans le Finder
- Téléchargez Chrome à partir du site Web officiel
- Ouvrez Chrome et essayez de visiter un site Web
8. Utilisez le canal stable de Chrome
Chrome propose plusieurs versions de version disponible en téléchargement: Stable, Beta, Developer et Canary. Les trois dernières versions vous donnent accès à de nouvelles fonctionnalités et améliorations qui doivent être testées avant d’atteindre le canal Stable. Certains d’entre eux ne le font jamais.
Bien qu’il soit passionnant d’être au premier rang et de découvrir de nouvelles fonctionnalités intéressantes de Chrome, il est incroyablement instable et doit être évité si vous ne voulez pas rencontrer des problèmes de connectivité Internet comme l’erreur DNS_PROBE_FINISHED_NO_INTERNET.
Il vous suffit de vous en tenir à la version stable de Chrome et vous serez trouvé. C’est celui que vous pouvez télécharger sur le site Web officiel .
Vous pouvez télécharger séparément les versions bêta, développeur ou Canary, car elles ne remplaceront pas la version stable. Mais ne les utilisez pas lorsque vous avez besoin d’une connexion Internet fiable.
9. Rétrograder Chrome (Windows)
Si vous disposez d’une ancienne version de Windows, il se peut qu’elle ne prenne pas totalement en charge la dernière édition de Google Chrome. Cela peut entraîner toutes sortes de problèmes à mesure que Chrome évolue et que votre système d’exploitation est laissé pour compte.
La solution la plus sûre ici est de migrer vers Windows 10 car vous pouvez profiter des correctifs de sécurité publiés par Microsoft et protéger votre ordinateur contre les logiciels malveillants.
Cependant, si ce n’est pas possible, vous devez rétrograder Chrome vers une version plus ancienne, toujours compatible avec votre système d’exploitation obsolète. N’oubliez pas que tous vos profils utilisateur et données de cache seront supprimés.
Comment désactiver les mises à jour automatiques de Chrome:
- Cliquez sur le bouton Démarrer , recherchez Services et ouvrez cette application
- Localisez Google Update Service (gpupdate) , cliquez dessus avec le bouton droit de la souris et accédez à Propriétés
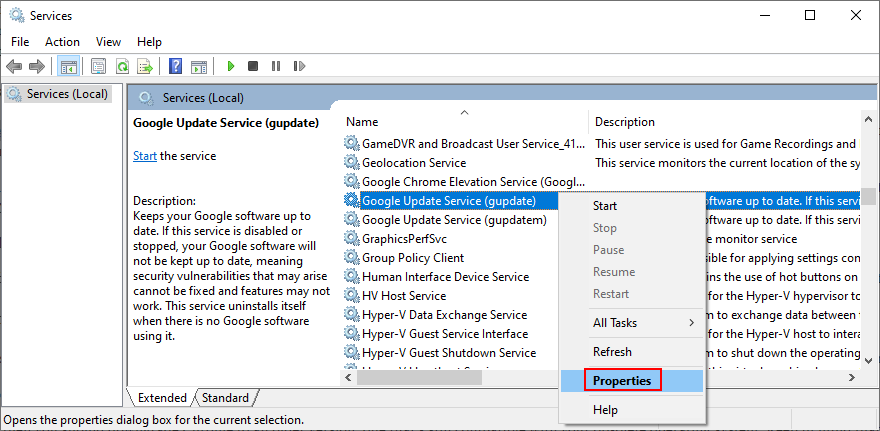
- Définissez Type de démarrage sur Désactivé
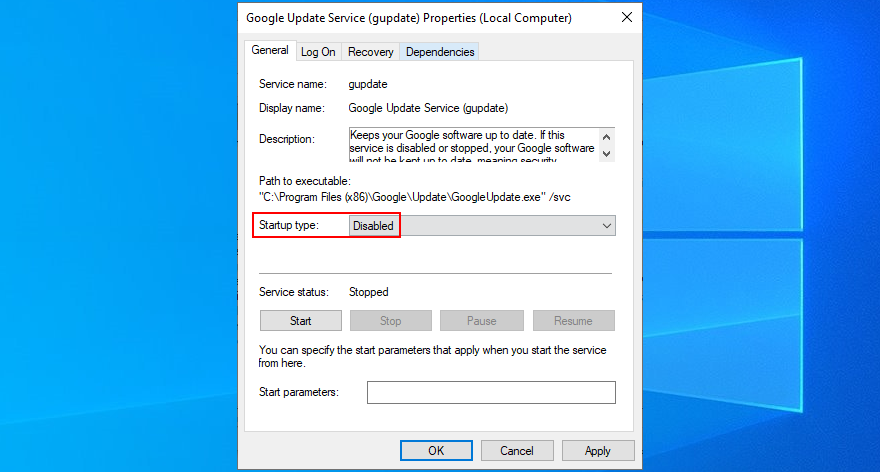
- Cliquez sur Appliquer et quittez
- Double-cliquez sur Google Update Service (gpupdatem) pour afficher ses propriétés
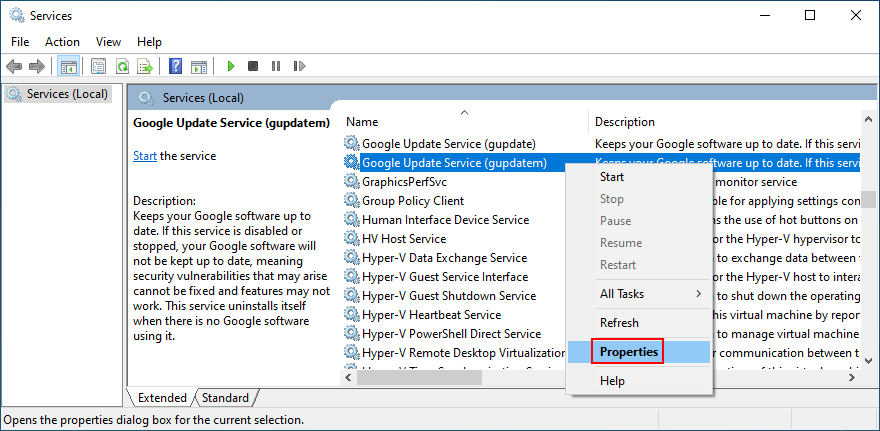
- Définissez Type de démarrage sur Désactivé

- Cliquez sur Appliquer et quittez les services
Comment désinstaller Chrome:
- Cliquez avec le bouton droit sur le bouton Démarrer et sélectionnez Applications et fonctionnalités
- Sélectionnez Google Chrome et cliquez sur Désinstaller
- Poursuivez les étapes de suppression

Comment installer l’ancien Chrome:
Malheureusement, Google n’autorise pas les utilisateurs à télécharger les anciennes versions de Chrome pour des raisons de sécurité. Cependant, vous pouvez toujours trouver d’anciennes versions de Chrome sur des sites Web tiers tels que SlimJet .
N’oubliez pas que vous téléchargerez et installerez ces fichiers à vos propres risques. La prudence est de mise.
10. Redémarrez le service client DNS (Windows)
Les serveurs DNS Windows sont gérés par le service client DNS, qui doit s’exécuter automatiquement à chaque démarrage du système et continuer à fonctionner pendant que vous travaillez sur votre ordinateur.
Cependant, s’il y a un problème avec le service, il n’est pas étonnant que vous obteniez l’erreur DNS PROBE FINISHED NO INTERNET dans Chrome. Cela signifie également que votre connexion Internet est désactivée sur toutes les applications que vous essayez d’utiliser, pas seulement sur Chrome.
Comment redémarrer le service client DNS:
- Appuyez sur la touche Win + R , saisissez services.msc , puis appuyez sur Entrée

- Recherchez et cliquez avec le bouton droit sur Client DNS
- Accédez à Propriétés
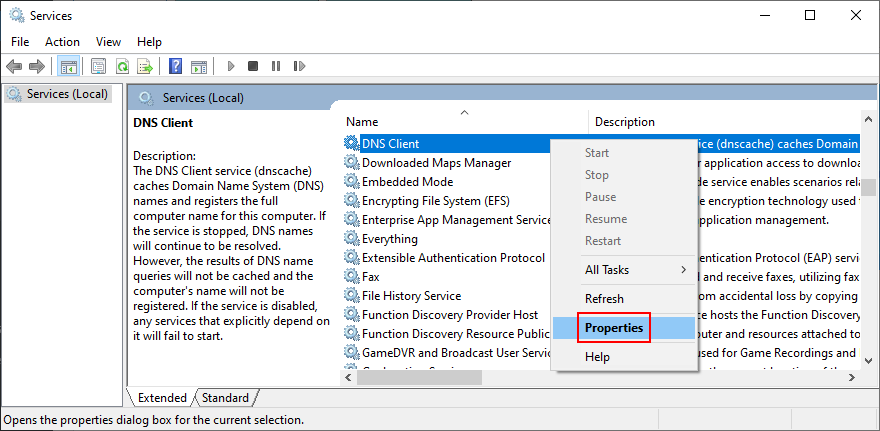
- Définissez Type de démarrage sur Automatique
- Si l’ état du service indique Arrêté , cliquez sur le bouton Démarrer
- Cliquez sur Appliquer et quittez
Si les boutons du service client DNS sont grisés, procédez comme suit:
- Appuyez sur la touche Win + R , saisissez regedit et appuyez sur Entrée

- Cliquez sur Oui si vous y êtes invité par UAC (contrôle de compte d’utilisateur)
- Copiez et collez l’adresse suivante:
Ordinateur \ HKEY_LOCAL_MACHINE \ SYSTEM \ CurrentControlSet \ Services \ Dnscache
- Recherchez et double-cliquez sur l’entrée Démarrer
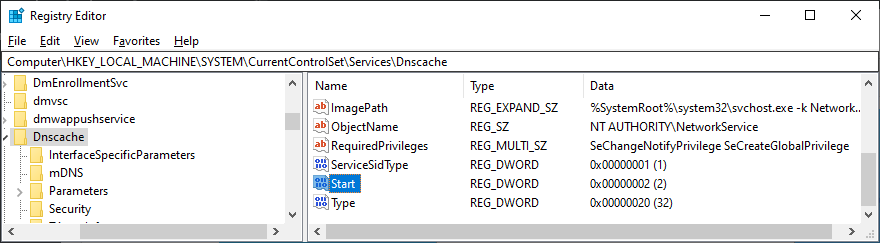
- Définissez Données de la valeur sur 2
- Définissez Base sur Hexadécimal

- Click OK and exit Services
- Redémarrez votre PC
- Launch Chrome and check for DNS errors
- Définissez Base sur Hexadécimal

11. Use Google DNS servers
By default, your computer uses the DNS servers assigned by your ISP. If they are too slow for Chrome, then your web browser might show the DNS_PROBE_FINISHED_NO_INTERNET error as a warning. You can fix this issue by changing your DNS servers to something else.
We suggest using Google Public DNS because it provides free, public, and secure DNS servers optimized for Chrome. However, you can also try others like OpenDNS or Cloudflare.
How to set Google Public DNS servers on Windows 10:
- Make sure to log in to Windows 10 with an admin account
- Click the connections icon in the systray and then Network & Internet settings
- Press Change adapter options

- Choose your Internet connection from the list, right-click it, and go to Properties

- Select the Internet Protocol Version 4 (TCP/IPv4) entry and click Properties
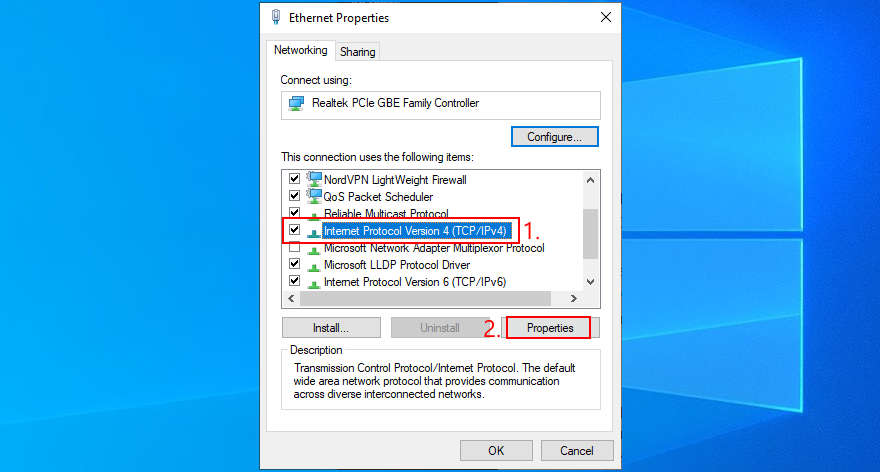
- Remain in the General section
- Sélectionnez Utiliser les adresses de serveur DNS suivantes
- Définissez Serveur DNS préféré sur 8.8.8.8
- Set Alternate DNS server to 8.8.4.4
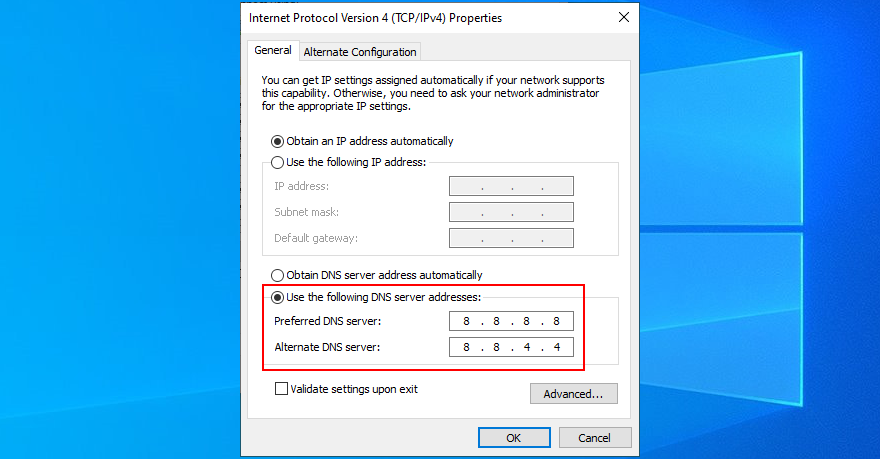
- Check the Validate settings upon exit option
- Cliquez sur OK et quittez
- Try to use Chrome now
- Set Alternate DNS server to 8.8.4.4
How to set Google Public DNS servers on Mac:
- Open the Apple menu on the upper-right part of the screen
- Select System Preferences
- Go to Network > Advanced
- Choose the DNS section
- Click the + symbol and write 8.8.8.8
- Press it again to also add 8.8.4.4
- Cliquez sur OK et quittez
- Launch Chrome and check for DNS errors
12. Clear the DNS cache
Just like your web browser, the system’s DNS cache might get full and cause connectivity errors instead of loading the pages you’re attempting to access. But you can fix this problem by entering a couple of lines of code in Command Prompt on Windows and Terminal on Mac, in order to clear the DNS cache.
How to clear the DNS cache on Windows 10:
- Press the Win key, search for Command Prompt, and open this app
- Paste the following lines of code (press Enter after each one):
-
ipconfig/flushdns
-
ipconfig/registerdns
-
ipconfig/release
-
ipconfig/renew
-
réinitialisation netsh winsock
-
- Quittez l’invite de commande et redémarrez votre PC
- Fire up Chrome and check for DNS errors
How to clear the DNS cache on macOS:
- Open the Terminal app
- Type
sudo killall-HUP mDNSResponderand press Return - When asked, write your admin username and password to confirm
- Restart macOS
- Launch Chrome and inspect results
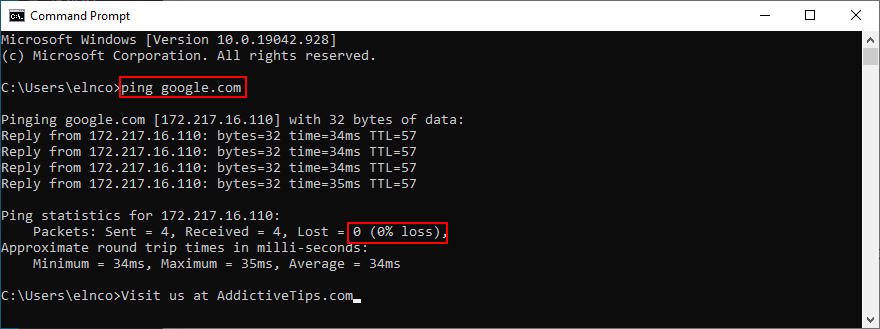
13. Run a ping test
A ping test helps you measure the connectivity signal between your device and Chrome. You can use it as a guide to figure out if the Internet connection is too slow or doesn’t work at all. It’s possible to use ping in Command Prompt on Windows or Terminal on Mac. Alternatively, you can turn to third-party ping applications.
How to run a ping test on Windows 10:
- Click the Start button, search for Command Prompt, and open this application
- Ping Google by typing
ping google.comand pressing Enter - Wait until the ping test is complete
- Check out the % loss noted at Ping statistics
How to run a ping test on Mac:
- Go to Applications > Utilities
- Launch the Terminal app
- Type
ping.google.comand press Return - Patiently wait while the ping test is working
- Note the 0% packet loss written at Server ping statistics
If you have 100% packet loss, it means that your device can’t reach Google at all, indicating an issue with your Internet connection. Any value lower than 100% says that the connection is active but unstable. It’s good news because you can take action to improve it.
14. Visit a website by IP address
You normally visit a website by entering its domain in the Chrome address bar. However, if the DNS resolver isn’t doing its job properly and shows the DNS_PROBE_FINISHED_NO_INTERNET instead, try entering the domain’s IP address.
To discover a domain’s name, you can use the ping command with the help of Command Prompt on Windows or Terminal on macOS. No administrative rights are required. Just send the ping website_name command. For example, if you want to find out the IP address used by Google, type ping google.com.
Right before the logging details, you can spot the IP address next to the domain name. In the example below, the domain name is google.com and its IP is 172.217.20.14.
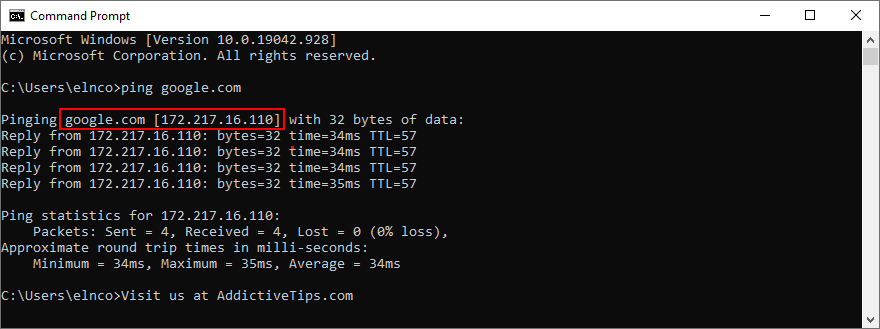
In the next step, launch Chrome, enter the IP address in the address bar, and see what happens. If Google loads after visiting 172.217.20.14, it means that your DNS resolver is at fault and there’s nothing wrong with your device or Internet connection.
15. Disable the VPN or proxy
A lot of privacy-concerned users turn to VPN or proxy tools to hide their IP address and encrypt their data traffic. It has numerous benefits, like accessing websites that aren’t normally available to your country.
However, the IP address change could affect Chrome entirely, especially if you’re using a free VPN or proxy server (they are notoriously unreliable). To stay on the safe side and restore the connectivity of your web browser, you should disable any VPN or proxy services.
For example, if you have a proxy or VPN browser extension installed on Chrome, make sure to turn it off. When it comes to desktop applications designed for Windows or Mac, uninstall them from Apps and Features. Or, if you have system-wide manual connections set up, here’s how to deactivate them.
How to disable VPN and proxy on Windows 10:
- Click the network icon in the notifications area and select Network & Internet settings
- Go to VPN on the left panel
- Select any active VPN connections and click Disconnect
- Shift your attention to the Proxy area on the left side
- Disable Automatically detect settings and Use setup script

- Scroll down and also turn off Use a proxy server
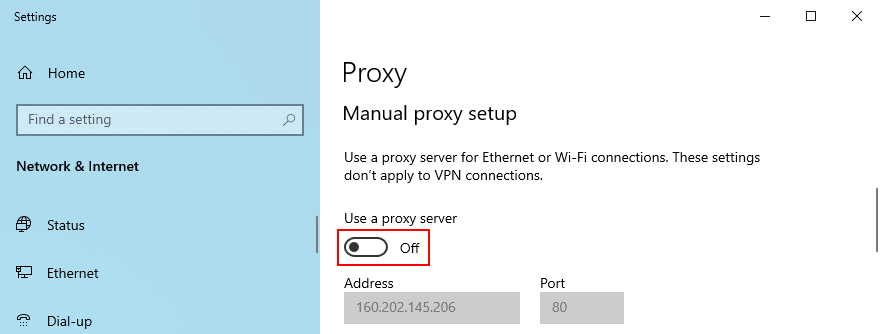
- Redémarrez votre PC
- Fire up Chrome and check for DNS issues
How to disable VPN and proxy on macOS:
- Click the Apple button on the top-left corner
- Select System Preferences
- Head over to Network
- Choose VPN on the left side
- If there’s an ongoing VPN connection, click Disconnect
- Choose your Internet connection from the list and go to Advanced
- Select the Proxies tab and turn off all settings
- Click OK and restart macOS
- Launch Chrome and check for DNS errors
16. Check firewall settings for Chrome
Under normal circumstances, Chrome gets added as an exception to the system firewall at installation. However, your firewall settings might have been changed in the meantime. It’s not unusual but can be fixed without any issues.
How to add Chrome as an exception to the firewall on Windows 10:
- Sign in to Windows 10 with elevation rights
- Press the Win key button, search for firewall, and open Firewall & network protection
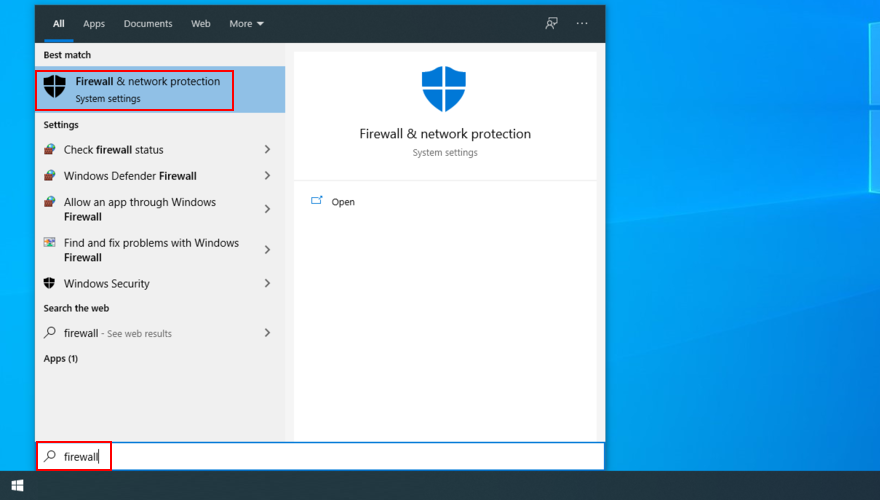
- Click Allow an app through firewall
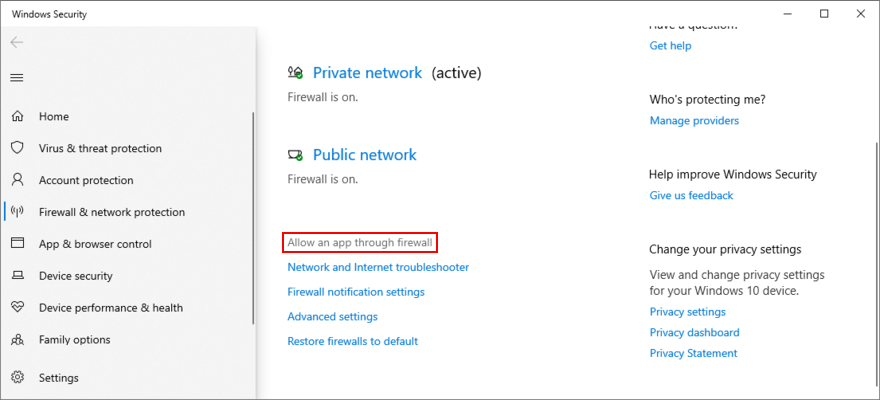
- Then, click Change settings
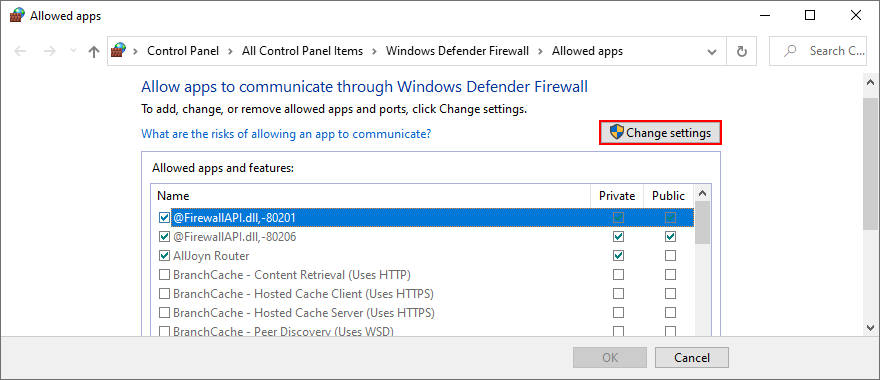
- Try to find Google Chrome on this list. If it’s not there, click Allow another app and then Browse to track down and add the Chrome executable file (on Windows 64-bit, it’s in
C:\Program Files (x86)\Google\Chrome\Application\chrome.exeby default) - Tick the Private and Public boxes next to Google Chrome
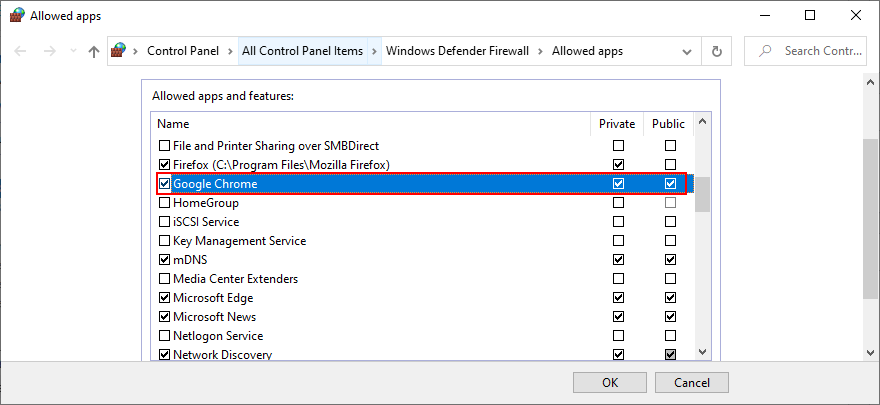
- Click OK
- Fire up the web browser and try to access something
If you have a third-party firewall installed that overrides Windows Firewall, adjust the steps above for that application.
How to add Chrome as an exception to the firewall on macOS:
- Ouvrez le menu Pomme
- Go to System Preferences > Security
- Choose the Firewall section
- Press the lock symbol and specify your admin username and password if required
- Go to Firewall > Firewall Options > Add Application
- Choose Google Chrome and click Add
- Click OK
- Open the Chrome app and check for DNS errors
17. Uninstall antivirus tools
If you have third-party Internet security solutions installed on your computer, you should check their settings since they might be configured to block browser traffic as a security measure. However, when it comes to free antivirus tools, it’s safer to just remove them from your PC.
Just head over to the Apps and Features section of Windows, locate your security solution, and proceed with the uninstallation process. On Mac, you just have to drag the app to the Trash using Finder.
18. Verify parental control settings
Many parents turn to specialized solutions to protect the online privacy of their children and prevent them from accessing websites with inappropriate content: parental control tools. Some of them also give you the possibility to schedule allowed times for Internet navigation.
If you have such a program installed on your computer, check its settings and make sure to temporarily turn it off while you’re using Google Chrome. Otherwise, you might wake up with the DNS_PROBE_FINISHED_NO_INTERNET error due to permission issues.
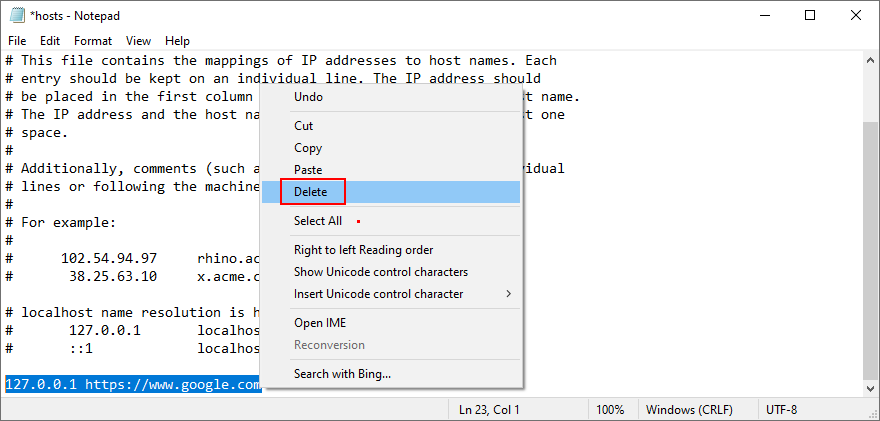
19. Inspects the Hosts file (Windows)
The Windows Hosts file contains information about your TCP/IPv4 configuration. It can also be used to block access to specific websites. If you’re receiving the DNS error when trying to reach a particular page although Chrome seems to load others without any problems, it’s worth inspecting and modifying the Hosts file. Voici comment:
- Press Win key + R to open File Explorer
- Visit the following location:
C:\Windows\System32\drivers\etc
- Locate the Hosts file and copy it to create a backup
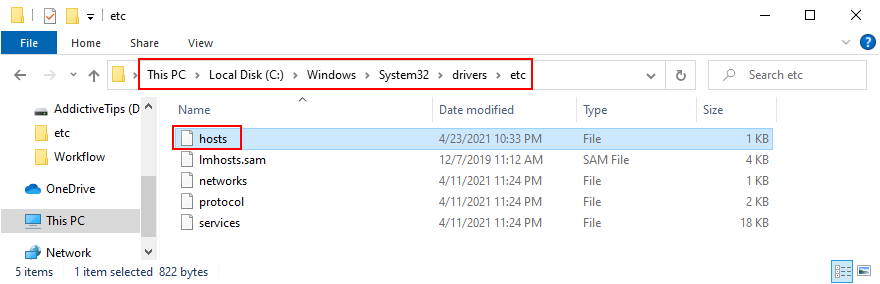
- Open the Hosts file in a text editor like Notepad (you must run the text editor with admin rights)
- Look for any lines that mention the website you’re trying to visit. For example, if you can’t access Google, try to locate
127.0.0.1 https://www.google.comor something similar - Delete those lines and save the new Hosts file
- Launch Chrome and try to access your website now
- If you need to restore the previous Hosts version, you just have to replace the newest file with the backup
20. Update your OS
Your operating system should have automatic access to updates, but that’s not always possible. In case you haven’t updated your OS for a long time, you should take care of that issue right away. It’s an opportunity to resolve a wide range of PC problems, including the DNS PROBE FINISHED NO INTERNET error on Google Chrome.
Comment mettre à jour Windows 10:
- Click the Start button, search for Check for updates, and hit Enter
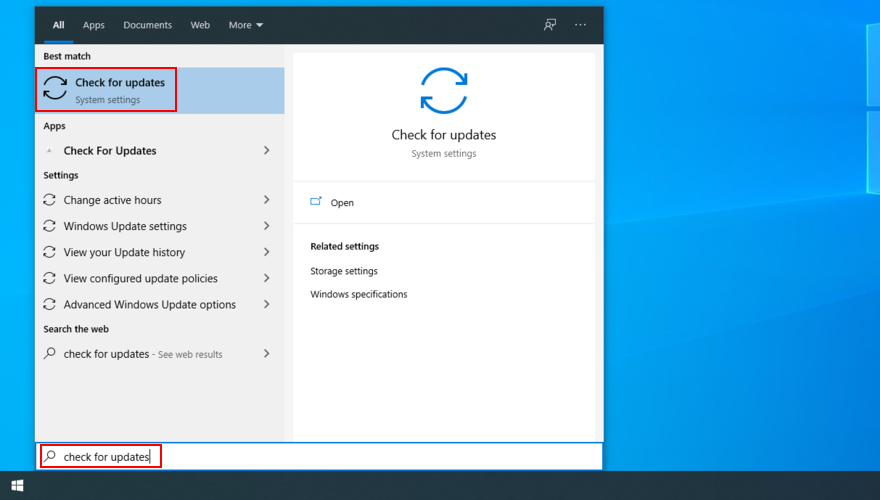
- If the auto-search doesn’t begin automatically, press the Check for updates button
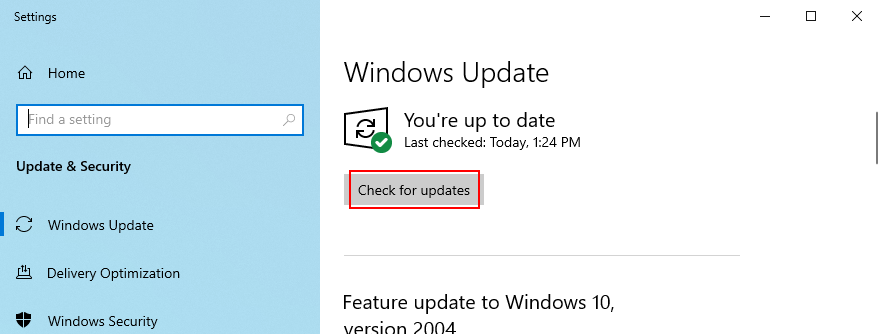
- Wait until Windows locates any available updates. If it finds anything, click Download
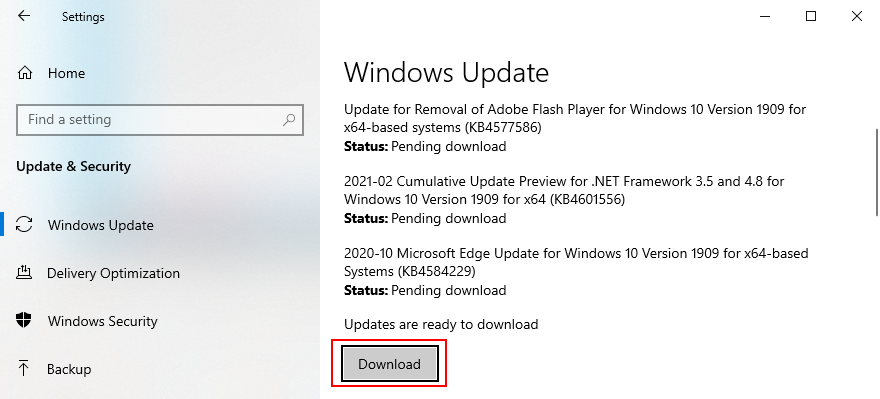
- Your PC might restart one or more times to complete the update
- When it finishes, launch Chrome and check for DNS issues
How to update macOS:
- Click the Apple button on the top-left corner
- Press Software Update
- macOS will start looking for and downloading new updates
- When it finishes, restart the computer
- Launch Chrome and check for DNS errors
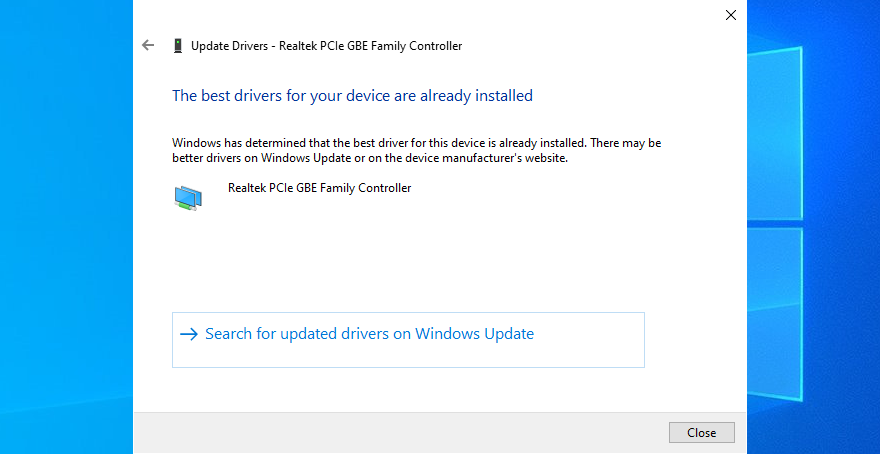
21. Check the network driver
There might be something wrong with your network device, which is causing DNS errors in your web browser. Try reinstalling the network adapter, updating its driver, or downgrading an incompatible driver to a stable version. Here’s everything you need to know.
How to reinstall the network device on Windows 10:
- Press Windows key + R, type devmgmt.msc, and press Enter
- In Device Manager, open the Network adapters category
- Identify your network adapter, right-click it, and select Uninstall device
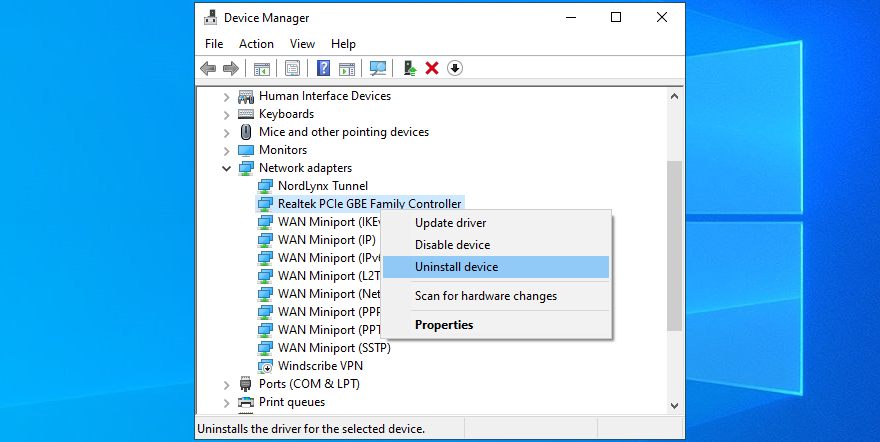
- Proceed with the removal steps
- Open the Action menu and click Scan for hardware changes
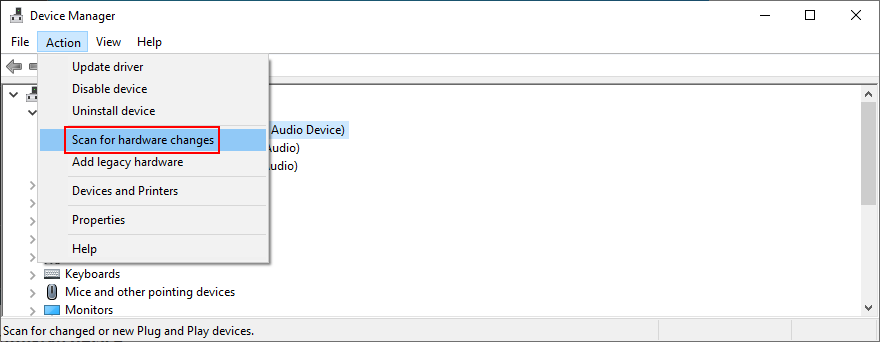
- Redémarrez votre PC. Windows will auto-reinstall the missing network adapter
- Check Chrome for DNS errors
How to update the network driver on Windows 10:
- Go to Device Manager
- Expand the Network adapters group
- Right-click your network adapter and choose Update driver
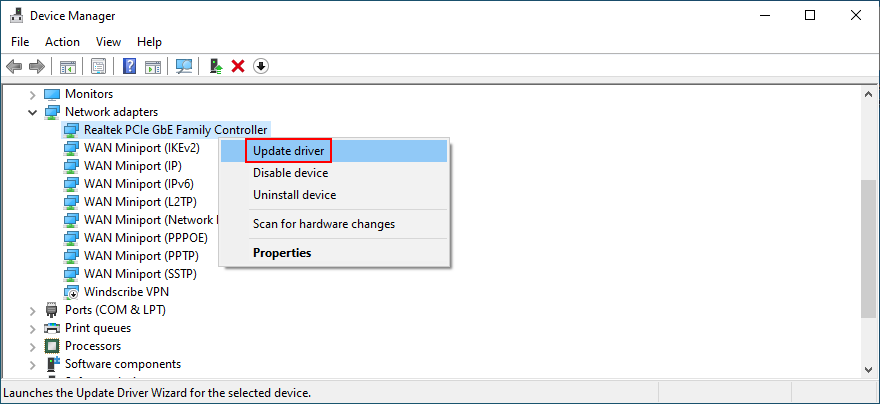
- Click Search automatically for updated driver software
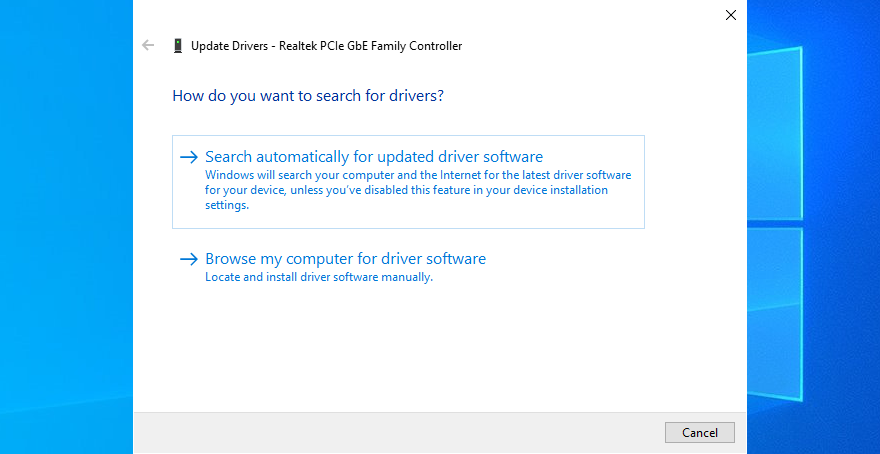
- If the online search doesn’t return any results, click Search for updated drivers on Windows Update. However, if you have already used Windows Update in a previous solution, you can skip this step
- Redémarrez votre PC
- Start Chrome and check for DNS errors
If Windows can’t find a network driver available for download, you should visit the manufacturer’s website and look for a newer version yourself. Alternatively, you can turn to a driver update app to update all your device drivers and avoid getting incompatible versions that could cause system stability issues.
On the other hand, if you have already installed a network driver that doesn’t support Windows 10, you should roll it back to the previous, stable version.
How to roll back the network driver on Windows 10:
- Open Device Manager
- Right-click your network device and go to Properties
- Passer à l’onglet Pilote
- Click Roll Back Driver and follow the step-by-step instructions
- If the button is greyed out, it means that you can’t perform the rollback because a previous version doesn’t exist on your computer
- Restart your computer
- Launch Chrome and check for DNS issues
22. Check IPv4 and IPv6 connectivity
If you don’t have Internet access at all but get the DNS PROBE FINISHED NO INTERNET error when trying to visit a webpage in Chrome, you should check the IPv4 and IPv6 settings of your Internet connection.
For example, if your network doesn’t support IPv6 connections but has it enabled in the properties panel, make sure that your device is still getting assigned with an IPv4 address, regardless of whether IPv6 is enabled or not.
How to verify IPv4 and IPv6 on Windows 10:
- Right-click the Start button and select Network Connections

- Click Change adapter options
- Right-click your Internet connection and go to Properties
- Check the box next to Internet Protocol Version 4 (TCP/IPv4)
- Uncheck the box next to Internet Protocol Version 6 (TCP/IPv6)
- Click OK
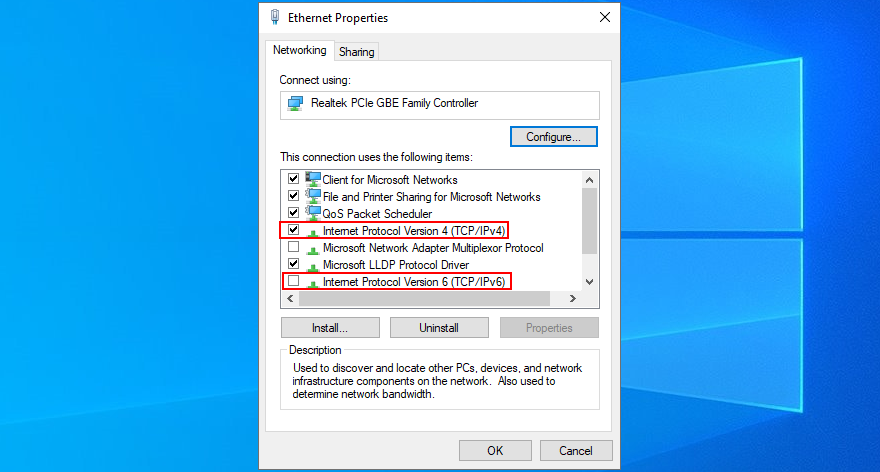
- Launch Chrome and try to use it
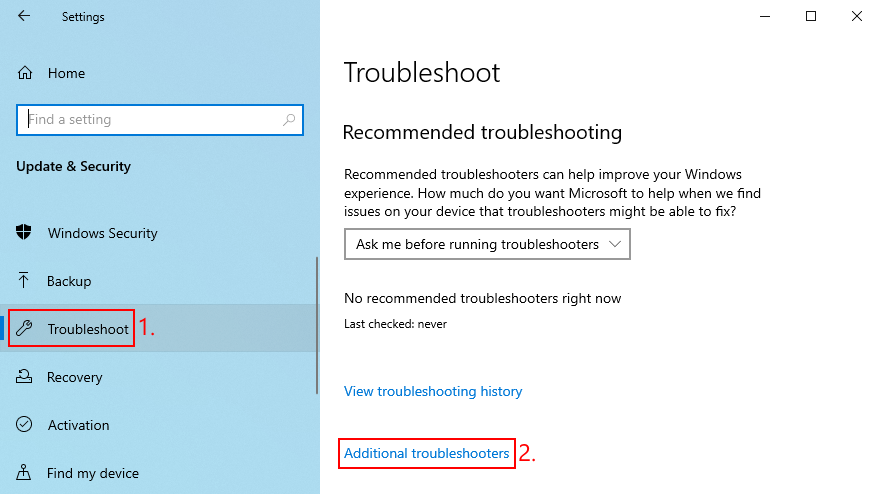
23. Run the Internet Connections troubleshooter (Windows)
You can run the Internet Connections troubleshooter built into Windows 10 to resolve common issues that could have a negative impact on your browsing experience and trigger the DNS_PROBE_FINISHED_NO_INTERNET error in Chrome. Voici comment:
- Press the Windows key, search for Settings, and press Enter

- Go to the Update & Security area

- Select Troubleshoot
- Cliquez sur Outils de dépannage supplémentaires
- Select Internet Connections and click Run the troubleshooter
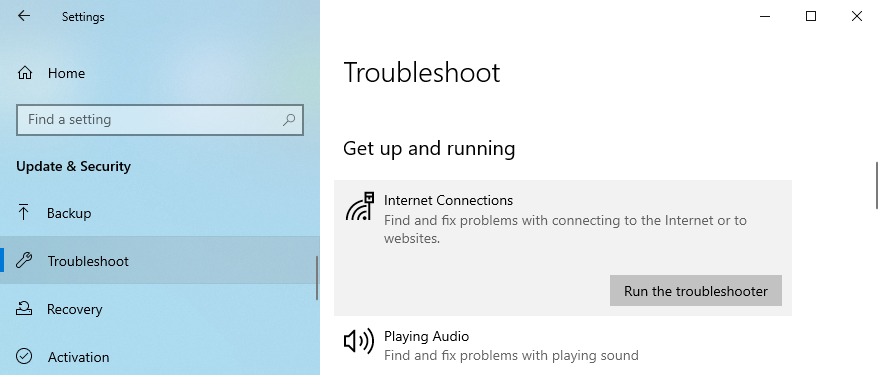
- Proceed with the wizard steps
- Restart your computer and try to use Chrome now
24. Reboot your router and modem
To refresh your Internet connectivity settings, it’s a good idea to shut down your router and modem, wait for a few minutes, and then start them up again. Then, you can shift your attention to your computer, fire up Chrome, and see if you can access any pages.
The DNS_PROBE_FINISHED_NO_INTERNET issue can be solved
To recap, DNS_PROBE_FINISHED_NO_INTERNET is an error message that appears in Chrome and prevents you from going online. It describes a problem with the DNS servers, which can be used by incorrect DNS, computer, or Internet settings. There are multiple ways to repair it.
You should try using a different browser, restart Chrome, clear the browsing cache, update Chrome, reset it to default settings, disable any third-party browser extensions, reinstall the application, and always use the Chrome stable channel.
Furthermore, you should downgrade Chrome if you’re using an older Windows version, restart the DNS client service, use Google DNS servers, clear the DNS cache, run a ping test, visit a website by IP address instead of domain name, and turn off any VPN or proxy apps.
It’s also a good idea to check firewall settings, uninstall antivirus tools, check parental control settings, examine the Hosts file, update your operating system, check the network driver, check IPv4 and IPv6 connectivity, run the Internet Connections troubleshooter, as well as reboot your router and modem.
How did you manage to fix the DNS_PROBE_FINISHED_NO_INTERNET error on your device? Let us know in the comment section below.