Non c’è niente di peggio che prepararsi a giocare a un videogioco con i tuoi amici solo per essere interrotto da un Messaggio Blue Screen of Death (BSOD) che prende il controllo del tuo computer, si spegne tutto e ti impedisce di fare qualsiasi cosa tranne il riavvio.
Gli errori BSOD variano e indicano il problema esatto che causa lo spegnimento automatico del computer e previene il danneggiamento dell’hardware e la grave perdita di dati. Il problema è che i codici di errore possono essere difficili da decifrare senza conoscenze tecniche.

Ad esempio, ERRORE TDR VIDEO è un codice di arresto BSOD che può verificarsi su computer con schede grafiche NVIDIA. L’intero schermo diventa blu e mostra il Il tuo PC ha riscontrato un problema e deve essere riavviato messaggio e indica nvlddmkm.sys come file problematico. nvlddmkm.sys è un driver e il suo nome completo è NVIDIA Windows Kernel Mode Driver .
ERRORE TDR VIDEO su Windows 10 – CORREZIONE
Prima di trovare una soluzione per l’errore VIDEO TDR FAILURE, è una buona idea crea un punto di ripristino del sistema. Se succede qualcosa e devi annullare tutte le modifiche, puoi facilmente ripristinare Windows 10 a un checkpoint e iniziare la risoluzione dei problemi da zero.
1. nvlddmkm.sys non riuscito ? Avvia Windows 10 in modalità provvisoria
Se hai difficoltà a utilizzare il computer perché il sistema si blocca immediatamente, mostra la schermata blu ed entra in un ciclo di riavvio, puoi avvia Windows 10 in modalità provvisoria :
- Accendi e spegni il PC tre volte per attivare la modalità di risoluzione dei problemi di Windows 10
- Vai a Risoluzione dei problemi > Opzioni avanzate > Impostazioni di avvio

- Fai clic su Riavvia e attendi un po’
- Premi F5 per abilitare la Modalità provvisoria con rete

- Dopo l’avvio di Windows, controlla se ricevi ancora l’errore nvlddmkm. Se lo fai ancora, segui i passaggi precedenti per accedere alle opzioni della modalità provvisoria e scegli F4 per abilitare la Modalità provvisoria senza funzionalità di rete

2. Esegui un avvio pulito
Se la modalità provvisoria si è rivelata la chiave per stabilizzare il tuo sistema operativo e impedire che mostri errori BSOD, puoi clean-boot Windows 10 per disabilitare l’avvio e i servizi che potrebbero non funzionare correttamente e causare l’errore VIDEO TDR FAILURE.
- Segui i passaggi della Soluzione 1 per avviare Windows 10 in modalità provvisoria
- Fai clic sul pulsante Avvia, cerca Configurazione del sistema e avvia questa app

- Nella scheda Generale , scegli l’opzione Avvio selettivo
- Disattiva Carica servizi di sistema e Carica elementi di avvio

- Fai clic su Applica e vai alla sezione Avvio
- Fai clic su Apri Task Manager

- Scegli un’applicazione con lo stato Abilitato e fai clic su Disabilita. Fai in modo che ciò accada per tutte le app con lo stato Abilitato

- Riavvia il PC e controlla i risultati

3. Controlla gli aggiornamenti di sistema
Se non utilizzi Windows Update da molto tempo, potresti aver perso gli aggiornamenti critici progettati per correggere gli errori di sistema. Poiché è un componente del sistema operativo così importante, Windows Update dovrebbe essere eseguito in background e avvisarti ogni volta che è presente un aggiornamento in sospeso. Ma, se gli aggiornamenti di sistema automatici sono stati disabilitati sul tuo dispositivo, dovrebbero essere avviati manualmente.
- Premi il tasto Win, digita Verifica aggiornamenti e premi Invio

- Fai clic su Verifica aggiornamenti e attendi

- Se Windows trova qualcosa, fai clic su Scarica

- Attendi pazientemente che i nuovi aggiornamenti di sistema vengano scaricati e installati
- Riavvia il computer
4. Disabilita il software di overclock
Le persone usano strumenti di overclock della memoria per migliorare la loro esperienza di gioco. Tuttavia, se il computer non è dotato di un dispositivo di raffreddamento abbastanza potente da sostenere il calore extra, Windows alla fine si spegnerà e mostrerà un messaggio con schermata blu come VIDEO TDR FAILURE per prevenire il danneggiamento dell’HDD e la perdita di dati.
A meno che tu non sappia esattamente cosa stai facendo, dovresti disabilitare qualsiasi strumento software di overclock, come MSI Afterburner, CPU-Z o GPU-Z e ripristina le impostazioni predefinite dell’orologio del computer. Se hai configurato l’overclock nel BIOS, controlla la prossima soluzione in questo elenco.
5. Ripristina il BIOS ai valori predefiniti
Il BIOS del computer contiene un’ampia gamma di impostazioni di personalizzazione progettate per migliorare le prestazioni del sistema. Sfortunatamente, questo piano potrebbe facilmente ritorcersi contro se tu o qualcun altro con accesso al tuo computer avete modificato senza scopo le impostazioni del BIOS, come l’overclocking e la memorizzazione nella cache.
Potrebbe anche portare a errori con schermata blu come nvlddmkm.sys. Il modo più semplice per risolvere questo problema è ripristinare le impostazioni predefinite del BIOS .
- Accendi il PC
- Prima dell’avvio di Windows, premi rapidamente il tasto mostrato sullo schermo per accedi alla configurazione del BIOS
- Accedi alla sezione BIOS avanzata
- Trova e abilita l’opzione che ripristina i dati di configurazione del BIOS ai valori predefiniti

- Salva le impostazioni correnti ed esci
6. Aggiorna BIOS
Se non hai aggiornato il BIOS per molto tempo o non l’hai mai fatto, dovresti iniziare subito. Hai solo bisogno di una chiavetta USB e di una connessione Internet.
- Collega un’unità flash USB al tuo PC
- Avviare il sistema e premere il tasto mostrato sullo schermo per accedere alla configurazione del BIOS
- Nella sezione BIOS principale, puoi scoprire il produttore, la versione e la data di installazione del BIOS
- Utilizzando queste informazioni, avvia Windows sul PC malfunzionante o utilizza un altro computer con accesso a Internet, apri un browser web e visita il sito web del produttore del BIOS
- Trova e scarica l’ultima versione del BIOS compatibile con il tuo sistema operativo
- Decomprimi il file scaricato sull’unità flash USB
- Torna al menu del BIOS, crea un backup della versione attuale del BIOS per sicurezza e salva il backup sull’unità flash USB
- Esegui l’aggiornamento del firmware di sistema e assicurati di non spegnere o riavviare il PC durante questo periodo

7. Ripristina il file nvlddmkm.sys
NVIDIA ha un backup del file nvlddmkm.sys da qualche parte sul tuo computer, quindi tutto ciò che devi fare è trovarlo, copiarlo e sovrascrivere il file nvlddmkm.sys corrotto.
- Apri Esplora risorse premendo il tasto Win + E
- Nella barra degli indirizzi, digita
%SystemRoot%\System32\Drivers - Trova il file nvlddmkm.sys e rinominalo in nvlddmkm.sys.old
- Nel riquadro di navigazione di Esplora risorse di Windows, fai clic su Questo PC
- Fai clic all’interno del campo Cerca in questo PC e cerca nvlddmkm.sy_
- Copia il file nvlddmkm.sy_
- Premi il tasto Win + R, digita cmd e premi Invio per aprire il Prompt dei comandi
- Esegui
chdir desktop - Quindi, esegui
expand-r nvlddmkm.sy_ nvlddmkm.sys - Esci dal prompt dei comandi
- Vai sul desktop e copia il file nvlddmkm.sys
- Torna a
%SystemRoot%\System32\Driverse incolla il file - Riavvia il computer e verifica la presenza di errori BSOD
8. Cancella i cookie di sistema e i file temporanei
Windows salva cookie e file temporanei, che dovrebbero essere eliminati regolarmente per svuotare la cache di sistema e fare spazio a nuovi dati. Se ciò non accade, ciò potrebbe portare a problemi di stabilità del sistema e errori Blue Screen of Death come VIDEO TDR FAILURE.
Per risolvere questo problema, devi solo cancellare i cookie di sistema e i file temporanei utilizzando strumenti specializzati come CCleaner. Oppure, se non desideri installare alcuna applicazione di terze parti, puoi utilizzare l’utilità di pulizia del disco integrata.
Come usare Pulitura disco:
- Fai clic sul pulsante Avvia, cerca Pulizia disco e apri questa app
- Scegli l’unità in cui è installato Windows (di solito C:) e fai clic su OK
- Seleziona i seguenti file da eliminare:
- File di programma scaricati
- File temporanei Internet
- File temporanei
- Fai clic su OK e Elimina file per confermare
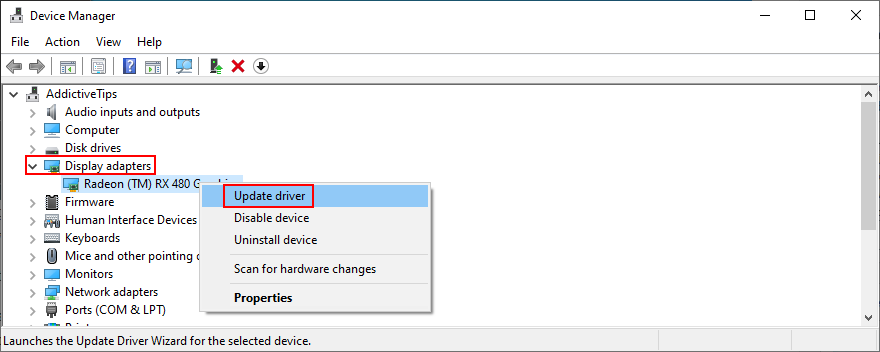
9. Reinstallare l’adattatore grafico
Il tuo display grafico potrebbe non essere stato installato correttamente sul tuo computer. Tuttavia, puoi risolvere facilmente questo problema da Gestione dispositivi.
- Fai clic con il pulsante destro del mouse sul pulsante Avvia e seleziona Gestione dispositivi
- Espandi la categoria Adattatori video
- Fai clic con il pulsante destro del mouse sulla scheda video e seleziona Disinstalla dispositivo

- Riavvia il PC. Windows installerà automaticamente gli adattatori mancanti
10. Aggiorna i driver della GPU
I driver di grafica obsoleti potrebbero causare problemi con la scheda video, problemi di gioco e persino errori con schermata blu come nvlddmkm.sys. Ma puoi aggiornare il driver GPU obsoleto con il minimo sforzo.
- Apri Gestione dispositivi, fai clic con il pulsante destro del mouse sulla scheda video e seleziona Aggiorna driver
- Fai clic su Cerca automaticamente i driver
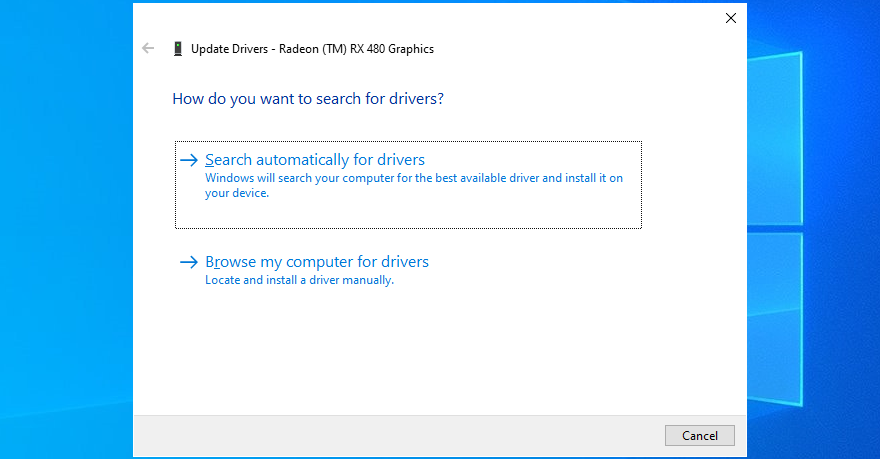
- Se viene visualizzato il messaggio I migliori driver per il dispositivo sono già installati , fai clic su Cerca driver aggiornati su Windows Update . Tuttavia, se hai già controllato il tuo sistema per gli aggiornamenti, non è necessario farlo di nuovo

- Riavvia il computer se il driver è stato aggiornato con successo
Sfortunatamente, Windows spesso non riesce a trovare i driver più recenti nel suo database o utilizzando il componente Windows Update. In tal caso, puoi fare doppio clic sull’adattatore GPU in Gestione dispositivi, passare alla scheda Driver e scoprire il produttore, la versione e la data di installazione del driver. Utilizzando queste informazioni, visitare il produttore del sito Web per scaricare e installare il driver più recente.
Tuttavia, se trovi questo processo difficile o non vuoi rischiare di scaricare un driver non supportato, puoi rivolgerti a un driver updater che rileva automaticamente tutti i driver obsoleti sul tuo PC e ti offre l’installazione immediata delle versioni più recenti. E non rischierai nemmeno di ottenere driver incompatibili.
11. Ripristina i driver GPU non supportati
h
A proposito di driver GPU incompatibili, molti utenti di PC li scaricano da fonti sconosciute senza sapere effettivamente se funzionano o meno sui propri computer.
Se sei uno di questi utenti, dovresti immediatamente ripristinare il driver dello schermo non supportato per ripristinare la stabilità del tuo computer, eliminare gli arresti anomali ricorrenti del sistema e procedere con un corretto aggiornamento del driver.
- Vai a Gestione dispositivi e fai doppio clic sull’adattatore GPU
- Passa alla sezione Driver
- Fai clic su Ripristina driver e segui le istruzioni sullo schermo. Se il pulsante è disattivato, significa che nessuna versione precedente del driver è stata salvata sul tuo PC, quindi puoi saltare l’intera soluzione
12. Esegui lo strumento di risoluzione dei problemi di hardware e dispositivi
Windows 10 dispone di strumenti di risoluzione dei problemi interni per la risoluzione dei problemi comuni che si verificano su vari componenti del PC, inclusi hardware e dispositivi. Normalmente, dovresti essere in grado di individuarlo in Impostazioni di risoluzione dei problemi . Tuttavia, se manca lo strumento per la risoluzione dei problemi relativi a hardware e dispositivi in quella sezione, ecco come puoi eseguirlo subito:
- Premi il tasto Win + R ed esegui
msdt.exe-id DeviceDiagnostic - Fai clic su Avanti e attendi che lo strumento di risoluzione dei problemi esegua la scansione del tuo PC

- Se trova soluzioni alternative, fai clic su Applica questa correzione
- Riavvia il PC al termine e verifica la presenza di errori BSOD
13. Disabilita l’accelerazione hardware
Numerose applicazioni software utilizzano accelerazione hardware per migliorare la tua esperienza, che si tratti di giochi, navigazione web, streaming o altro. Se hai notato che il tuo computer mostra l’errore BSOD dopo aver avviato una particolare applicazione, controlla le impostazioni del programma e cerca un’opzione di accelerazione hardware per disattivarla. Ecco alcuni suggerimenti.
Come disabilitare l’accelerazione hardware in Google Chrome:
- In Chrome, apri il menu Altro e vai a Impostazioni

- Seleziona Avanzate > Sistema (o vai a
chrome://settings/system) - Disattiva Utilizza l’accelerazione hardware quando disponibile

- Riavvia Chrome

Come disabilitare l’accelerazione hardware in Mozilla Firefox:
- In Firefox, apri il menu ≡ e vai su Opzioni (o visita
about:preferences)
- In General, locate the Performance section
- Disable Use recommended performance settings
- Also disable Use hardware acceleration when available

- Restart Firefox
How to disable hardware acceleration in Microsoft Edge:
- In Edge, open the More menu and select Settings

- Go to System (or visit
edge://settings/system) - Disable Use hardware acceleration when available

- Restart Edge
14. Analyze the crash dumps
If you’re the type of user who doesn’t shy away from the computer’s technical aspects, you can analyze the crash dumps left behind by the VIDEO TDR FAILURE error, in order to find out the exact driver that’s giving you trouble. Event Viewer is a great assistant for this role.
How to use Event Viewer:
- Restart your PC after a system crash
- Immediately press the Win key, search for Event Viewer, and open this app

- In the navigation pane on the left side, go to Windows Logs > System
- Select the first entry that says Error
- Inspect the information from the General and Details tab

You can use this data to perform a Google search or get in touch with the Microsoft support team. However, if you find Event Viewer to be intimidating, we suggest using BlueScreenView instead. It has the same role but it’s wrapped in a simpler interface and has more intuitive options for analyzing minidump files.
15. Use Display Driver Uninstaller
Display Driver Uninstaller (DDU) is an awesome application that can reset your GPU software and drivers. If display driver nvlddmkm stopped responding on your Windows 10 PC, you can use DDU to safely troubleshoot the BSOD error.
- Make sure to create a system restore point if you haven’t so far
- Download Display Driver Uninstaller from the official website
- Unzip the downloaded archive and open the DDU file
- Start Windows 10 in Safe Mode with Networking (see Solution 1 from this list)
- Open Display Driver Uninstaller.exe
- When prompted with the configuration window, leave everything as is and click OK to continue
- Select GPU and NVIDIA from the two menus on the right side
- Then, click Clean and restart

16. Remove and reseat the GPU card
It’s possible that your graphics card needs to be reattached to your computer unit. If it’s not properly connected, this could trigger Blue Screen of Death errors like the VIDEO TDR FAILURE stop code.
Shut down your desktop, unplug all cables, remove the computer chassis, and carefully detach the GPU card. Then, put it back in the same slot firmly but without using force. Turn on your computer and see if anything changed.
17. Try the GPU card on another computer
If your graphics card is malfunctioning and needs to be replaced, then all your efforts at attempting to resolve the blue screen problem at the software level will have been in vain.
A simple way to test this is by removing the GPU card from your computer and inserting it into another PC, preferably with a clean Windows installation. If the system starts glitching, it should be pretty clear that you need to replace your hardware. Check out the best GPU cards for gaming.
18. Check system memory
System memory issues can affect the entire computer, leading to blue screen errors like nvlddmkm.sys. You can easily run a check-up by turning to Windows Memory Diagnostic, a tool that comes bundled with Windows 10.
How to use Windows Memory Diagnostic:
- Save your current work and close all programs
- Press Win key + R, type
mdsched.exe, and hit the Enter key - Click Restart now and check for problems

Your operating system will reboot and start running memory tests. It runs a standard test by default. However, if you have a bit of time on your hands, we suggest switching to the Extended test in order to obtain more accurate information about any potential RAM issues.
Press F1 to open the options section, select Extended, and press F10 to apply this setting. The entire memory test can take a long time, so you can leave your PC unattended since your intervention will not be required. Once the test is complete, Windows 10 boots as usual and shows the test results in the notifications center.
19. Use Startup Repair
If Windows 10 is experiencing boot problems, this can lead to all sorts of computer issues, including BSOD errors with the VIDEO TDR FAILURE stop code. But you can fix startup issues by running the Startup Repair tool from the Advanced Startup menu. Before doing so, you need an empty USB flash drive and Internet access to set up a system installation disk.
How to create a Windows 10 installation media disk:
- Plug a USB flash drive into the PC and make sure to save any important files saved there since the drive will be formatted
- Download Media Creation Tool from the official website
- Open Media Creation Tool and follow the steps to create a Windows 10 installation media disk on the USB flash drive
How to run Startup Repair:
- Make sure the USB flash drive with the Windows 10 installation media is plugged into the PC
- Click the Start button and open the menu with the power options
- While holding down the Shift key, click Restart to boot Windows 10 to the troubleshoot menu
- Go to Troubleshoot > Advanced options > Startup Repair
- Select your administrator account and enter your password to continue
- Follow the given instructions to complete the startup repair sequence
20. Fix HDD issues
Your hard drive may have corrupt files or bad sectors which prevent Windows from operating normally, But you can fix HDD issues without having to use a third-party software application, thanks to CHKDSK (Check Disk).
- Press Win key + R, type CMD, and press Ctrl + Shift + Enter to open Command Prompt with administrator rights

- If your OS is installed on the C: drive, run
chkdsk c:/f/r. Else, replacec:with the correct partition letter- If you don’t know Windows’ whereabouts, choose a drive letter when entering the run command (e.g.
run d:) and view its containing folders (run dir). Keep listing folders for multiple drive letters until you see the Windows directory
- If you don’t know Windows’ whereabouts, choose a drive letter when entering the run command (e.g.
- When asked to confirm scheduling CHKDSK during the next system reboot, type y and press Enter
- Restart your computer and wait for CHKDSK to do its job
21. Repair corrupt system files
Not only hard disk problems but also damaged, modified, or missing OS files can cause blue screen errors on your computer. To restore system files on Windows 10, you can run DISM (Deployment Image Servicing and Management) and SFC (System File Checker).
- Start Windows 10 in Safe Mode with Networking (see Solution 1)
- Click the Start button, type cmd, and open Command Prompt
- Run
DISM.exe/Online/Cleanup-image/RestoreHealth. However, if the Windows Update component is broken, this command won’t work. Instead, you can create a Windows 10 installation media disk (see Solution 19) and set it as the repair source:DISM.exe/Online/Cleanup-Image/RestoreHealth/Source:C:\RepairSource\Windows(replaceC:\RepairSource\Windowswith the full path to your Windows 10 installation media disk) - After DISM does its job, run SFC (
sfc/scannow). If SFC is successful, it shows the Windows Resource Protection did not find any integrity violations message
22. Disable Fast Startup
Fast Startup is a Windows component that boots your operating system faster by pre-loading drivers. Unfortunately, it’s known to cause serious PC problems. If drivers are not properly shut down and restarted, it could trigger blue screen errors like nvlddmkm.sys.
To solve this problem, you can disable Fast Startup:
- Press the Win key, search for Control Panel, and open this app
- Double-click Power Options

- Click Choose what the power buttons do
- Click Change settings that are currently unavailable (admin rights are required)
- Disable Turn on fast startup and click Save changes

- Restart your computer
23. Disable the PCI Express power option
Many users reported that turning off the PCI Express power option helped fix the VIDEO TDR FAILURE error on their computer. Here’s what you need to do:
- Click the Start button, type edit power plan, and press Enter
- Click Change advanced power settings
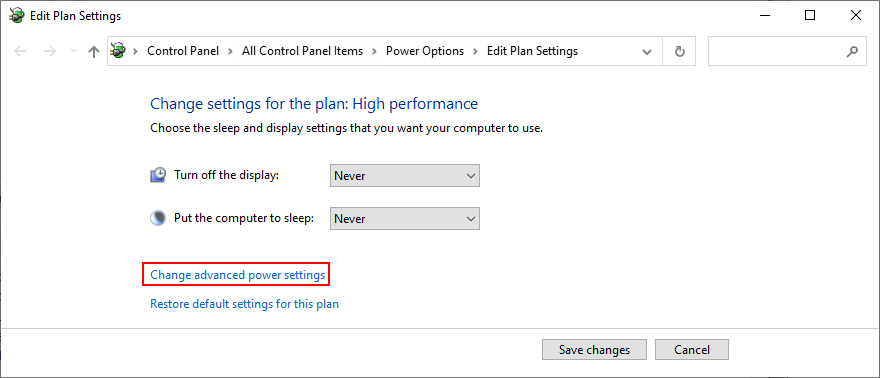
- Expand the PCI Express group
- Set Link State Power Management to Off
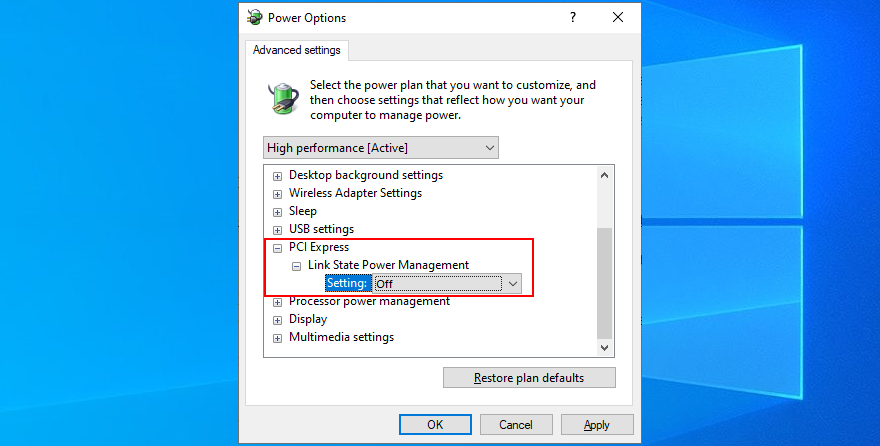
- Click Apply
- Restart your computer
24. Run a malware scan
Malware infections can be severe enough to corrupt critical system files and prevent you from running system tools like Task Manager or Command Prompt. If you suspect that your computer was recently infected with a virus, you should run a scan to eliminate any threats and regain the control of your PC.
How to run a malware scan with Windows Defender:
- Press the Windows key, type Windows Security, and launch this tool
- Select Virus & threat protection

- Click Scan options

- Choose Quick scan and press Scan now

- If the computer search reveals nothing, select Windows Defender Offline scan and click Scan now

- Allow Windows Defender to remove or quarantine any threats. If you think it has wrongfully detected safe files as malware, make sure to add them to the whitelist in order to exclude the items from future scans
25. Fix the system registry
Missing, modified, corrupt, or incorrect registry settings can be devastating for your operating system and can even trigger blue screen errors like nvlddmkm.sys. But you can restore the original registry configuration from Command Prompt before system boot.
- Click the Start button and open the power menu
- Hold down the Shift key and click Restart to reboot Windows in Advanced Startup mode
- Select Troubleshoot > Advanced options > Command Prompt
- Pick your admin account and enter your password
- Run these commands (press Enter after each line):
-
cd %SystemRoot%System32\config
-
ren %SystemRoot%System32\config\DEFAULT DEFAULT.old
-
ren %SystemRoot%System32\config\SAM SAM.old
-
ren %SystemRoot%System32\config\SECURITY SECURITY.old
-
ren %SystemRoot%System32\config\SOFTWARE SOFTWARE.old
-
ren %SystemRoot%System32\config\SYSTEM SYSTEM.old
-
copy %SystemRoot%System32\config\RegBack\DEFAULT %SystemRoot%System32\config\
-
copy %SystemRoot%System32\config\RegBack\DEFAULT %SystemRoot%System32\config\
-
copy %SystemRoot%System32\config\RegBack\SAM %SystemRoot%System32\config\
-
copy %SystemRoot%System32\config\RegBack\SECURITY %SystemRoot%System32\config\
-
copy %SystemRoot%System32\config\RegBack\SYSTEM %SystemRoot%System32\config\
-
copy %SystemRoot%System32\config\RegBack\SOFTWARE %SystemRoot%System32\config\
-
- Start Windows as usual
26. Unplug external devices
If you have recently attached new hardware components into your desktop or laptop, such as a webcam, a USB flash drive, a microphone, headphones, or a wireless network adapter, it’s possible that the device is experiencing compatibility issues with your Windows 10 PC, triggering the VIDEO TDR FAILURE stop code as a result.
You can easily test this by unplugging all external devices from your PC, except for your keyboard and mouse, in order to inspect results. If the keyboard and mouse are also brand new, try replacing them if you have others.
27. Use System Restore
System Restore allows you to revert Windows 10 to a checkpoint that was recorded before you started experiencing blue screen errors. However, it means that System Restore must be enabled on your computer and at least one restore point must have been created prior to the BSOD event.
Even if you didn’t manually set up a restore point, it’s possible that some of your applications did, such as driver updaters, so it doesn’t hurt to at least check.
How to use System Restore:
- Sign in to Windows 10 using an administrator account
- Press the Win key, type Control Panel, and launch this app
- Go to Recovery

- Click Open System Restore

- Select a restore point or click Show more restore points to evaluate more options. You can also click Scan for affected programs to find out which applications you will have to reinstall after restore

- Click Next and follow the instructions. Your PC will reboot
28. Reset Windows 10
If everything failed up until this point, you should prepare Windows 10 for factory reset in order to uninstall all programs and restore system settings to default. The good news is that your personal files will be left untouched.
But make sure to write down all applications you will have to install, save program preferences, and get hold of serial keys required for reactivation. Then, proceed to the following steps:
- Right-click the Start button and go to Settings
- Select Update & Security

- Choose Recovery and click Get started
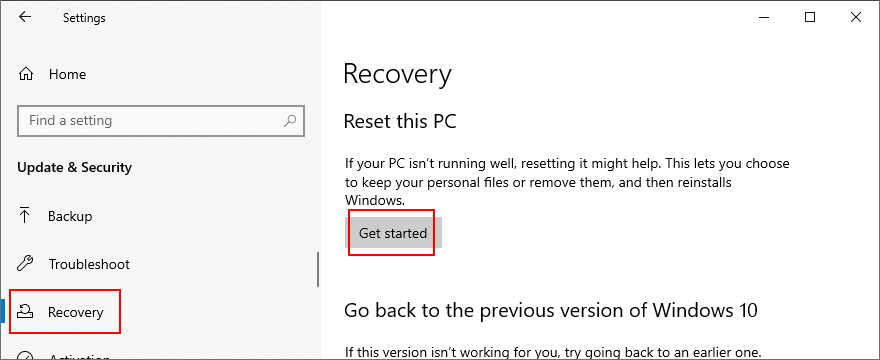
- Click Keep my files and follow the remaining instructions

Stop code VIDEO TDR FAILURE (nvlddmkm.sys) can be fixed on Windows 10
To recap, VIDEO TDR FAILURE is a BSOD error that indicates a problem with your video settings. If it’s accompanied by the nvlddmkm.sys file, it means that you can troubleshoot the file errors to get rid of system crashes.
To fix this problem, you can start Windows 10 in Safe Mode, run a clean system boot, check for system updates, disable overclocking software, reset and update BIOS, restore the nvlddmkm.sys file, clear system cookies and temp files, reinstall the graphics adapter, as well as update or roll back GPU drivers.
It’s also a good idea to run the Hardware and Devices troubleshooter, disable hardware acceleration, analyze crash dumps, use Display Driver Uninstaller, remove and reseat the GPU card, try the GPU card on another computer, check system memory, use Startup Repair, or fix HDD issues and corrupt system files.
In addition, you can disable Fast Startup and the PCI Express power option, run a computer malware scan, fix the system registry, unplug external devices, and use System Restore to roll back Windows 10 to a previous checkpoint. If all these solutions fail, you can go to the last resort, which means resetting Windows 10 to factory settings.
How did you manage to fix the nvlddmkm.sys file and VIDEO TDR FAILURE stop code? Tell us all about it in the comments section below.