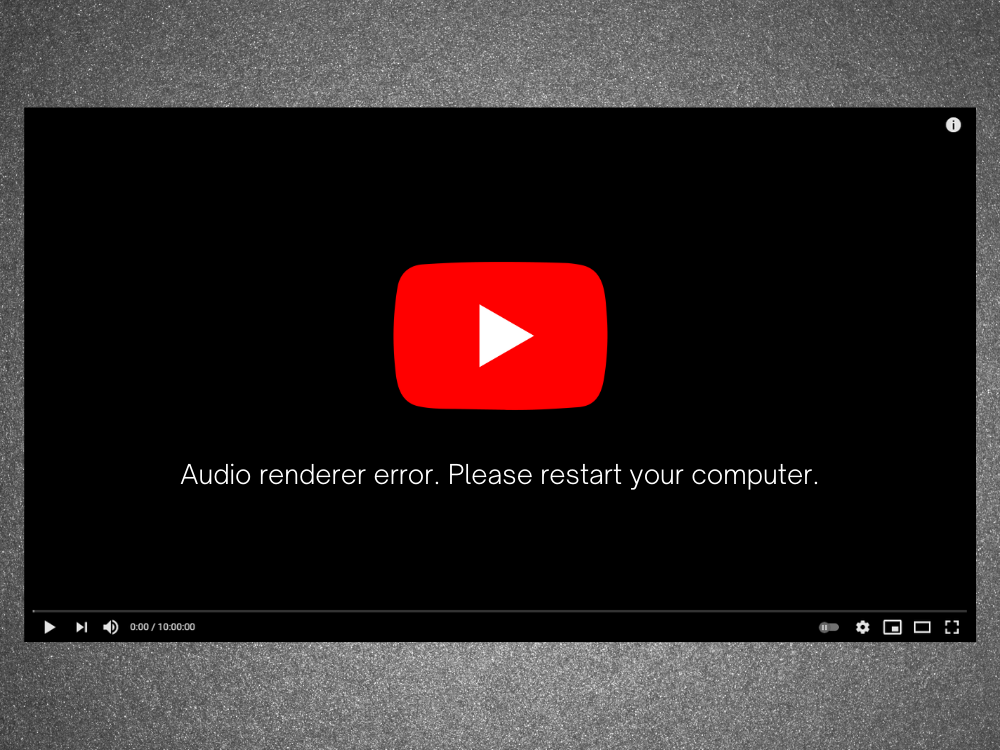
I problemi del computer sono destinati a verificarsi di tanto in tanto, quindi devi essere pronto ad agire in qualsiasi scenario. Ad esempio, se è presente nessun suono proveniente dal tuo PC Windows 10 , potrebbe essere causato da vari problemi, come l’errore del renderer audio. Ma non c’è bisogno di farsi prendere dal panico poiché puoi risolvere questo problema seguendo le istruzioni riportate di seguito.
Errore di rendering audio: riavvia il computer!
Errore del renderer audio, riavvia il computer è un messaggio di errore che appare sullo schermo quando il computer non riesce a riprodurre le tracce audio. Può verificarsi ovunque, sia che tu stia cercando di guardare un video su YouTube o un film nel tuo lettore multimediale.
Il comportamento è strano. A volte, l’audio viene riprodotto senza problemi fino a quando l’errore non si verifica improvvisamente e disabilita tutti i suoni provenienti dal computer. Ti chiede gentilmente di riavviare il computer, il che sembra risolvere il problema.
Tuttavia, il riavvio del PC è solo una soluzione temporanea poiché l’errore si ripresenta alla fine. A quel punto, sei costretto a inserire un ciclo di riavvio del computer solo per mantenere il suono. È facile capire perché è così frustrante per gli utenti, soprattutto quando la radice del problema non è chiara.
Abbiamo testato questo problema, chattato con vari utenti e raccolto un elenco di possibili soluzioni che risolvono l’errore del renderer audio sulla maggior parte dei PC con Windows 10.
Come correggere l’errore del renderer audio su Windows 10
L’errore di rendering audio può essere causato da un problema con il browser web o le impostazioni del computer. È importante armarsi di pazienza perché potrebbe volerci un po’prima di esaurire tutte le opzioni.
Prima di iniziare a risolvere questo fastidioso problema, è consigliabile imposta un punto di ripristino del sistema . Ti consente di ripristinare Windows 10 a uno stato stabile nel caso in cui dovessi riscontrare altri problemi lungo il percorso.
1. Cancella cache di navigazione
Molti utenti segnalano di aver ricevuto l’errore di rendering audio su YouTube. Potrebbe essere causato da un problema del browser, come la cache e i cookie salvati. Un modo semplice per risolverlo è aggiornando a fondo il browser web . A tal fine, seleziona la scheda YouTube e premi Ctrl + Maiusc + R . Quindi, controlla se ricevi ancora l’errore.
Tuttavia, è solo una soluzione temporanea, poiché devi ancora svuotare la cache del browser nel modo tradizionale.
Come svuotare la cache di Chrome:
- Avvia Chrome e apri il menu Altro nell’angolo in alto a destra
- Vai a Impostazioni
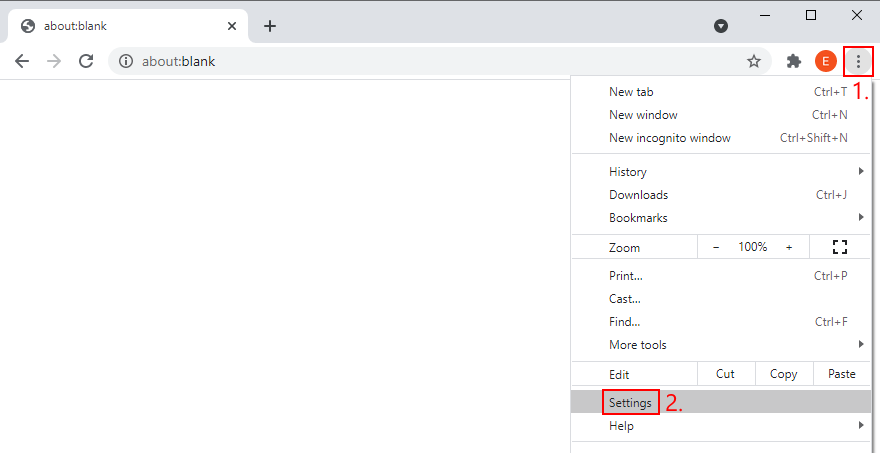
- Passa a Privacy e sicurezza sul lato sinistro
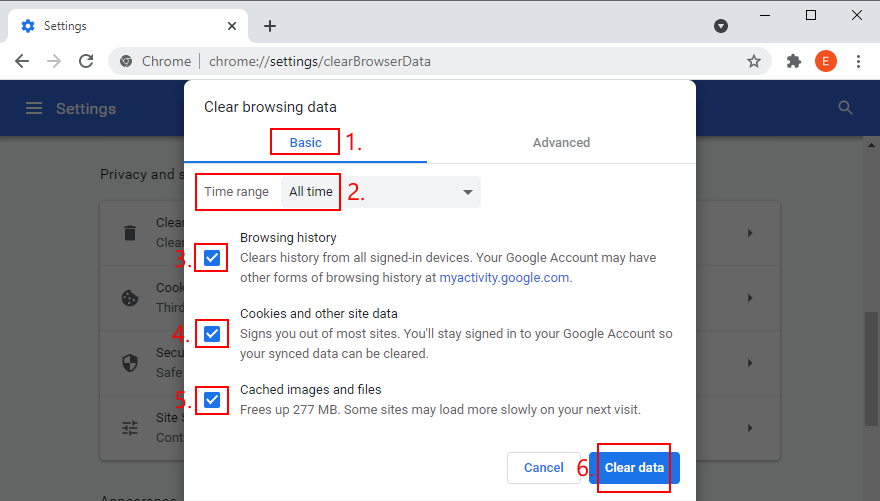
- Fai clic su Cancella dati di navigazione . In alternativa, puoi inserire l’indirizzo
chrome://settings/clearBrowserData
- Rimani nella sezione Di base
- Imposta Intervallo di tempo su Dall’inizio
- Assicurati che le seguenti opzioni siano abilitate:
- Cronologia di navigazione
- Cookie e altri dati dei siti
- Immagini e file memorizzati nella cache
- Fai clic su Cancella dati
- Riavvia Chrome e prova a guardare YouTube adesso
Come svuotare la cache di Firefox:
- Apri Firefox e fai clic sul pulsante dell’hamburger ≡
- Seleziona Opzioni
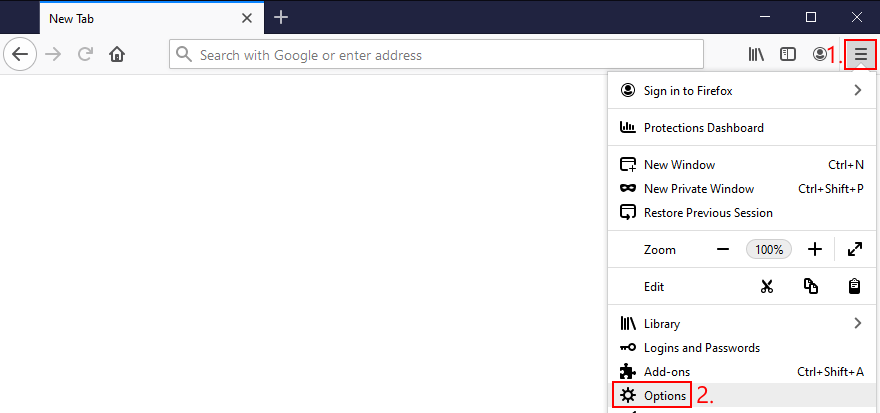
- Passa a Privacy e sicurezza e fai clic su Cancella dati

- Verifica che siano selezionate le impostazioni successive:
- Cookie e dati dei siti
- Contenuti web memorizzati nella cache
- Fai clic su Cancella
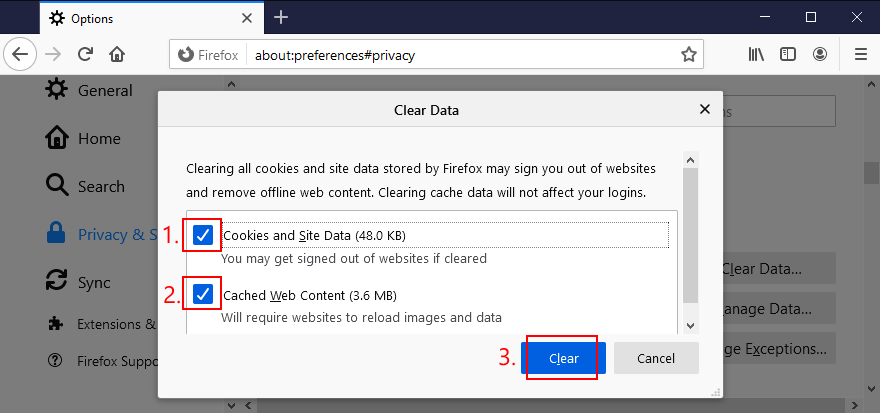
- Riavvia Firefox e verifica la presenza di errori audio
Come svuotare la cache di Microsoft Edge:
- Avvia Microsoft Edge
- Fai clic sul pulsante Altro nell’angolo in alto a destra
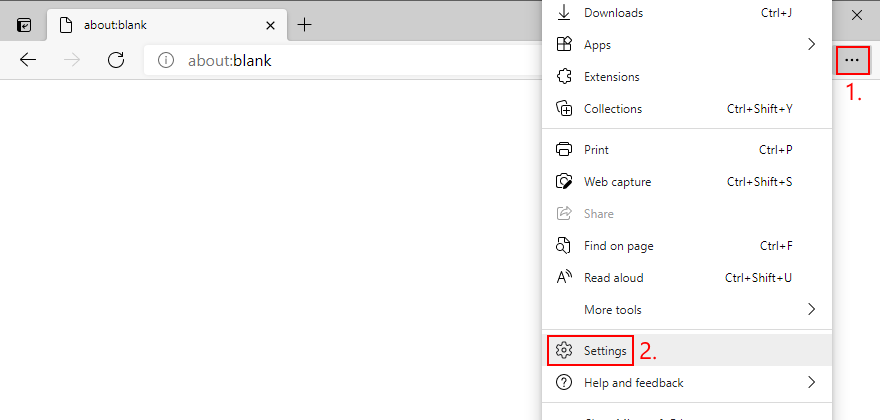
- Seleziona Impostazioni
- Passa a Privacy, ricerca e servizi . Altrimenti, puoi utilizzare l’indirizzo
edge://settings/privacy- In Cancella dati di navigazione adesso , fai clic su Scegli cosa cancellare
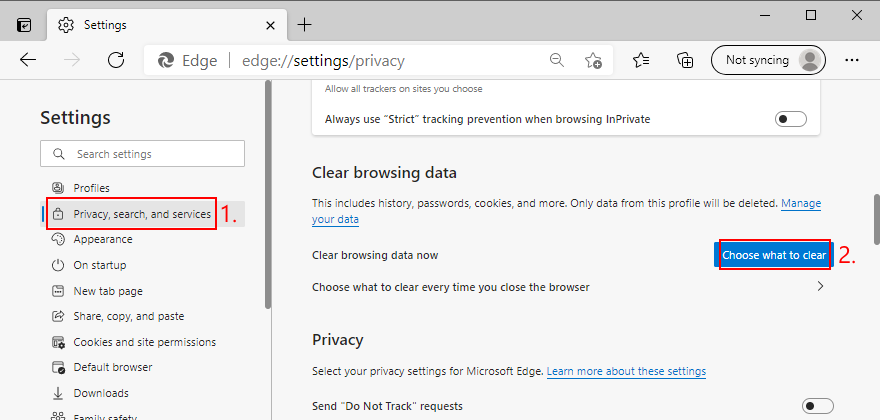
- Imposta Intervallo di tempo su Dall’inizio
- Seleziona le caselle delle seguenti opzioni:
- Cronologia di navigazione
- Cronologia download
- Cookie e altri dati dei siti
- Immagini e file memorizzati nella cache
- Fai clic su Cancella adesso
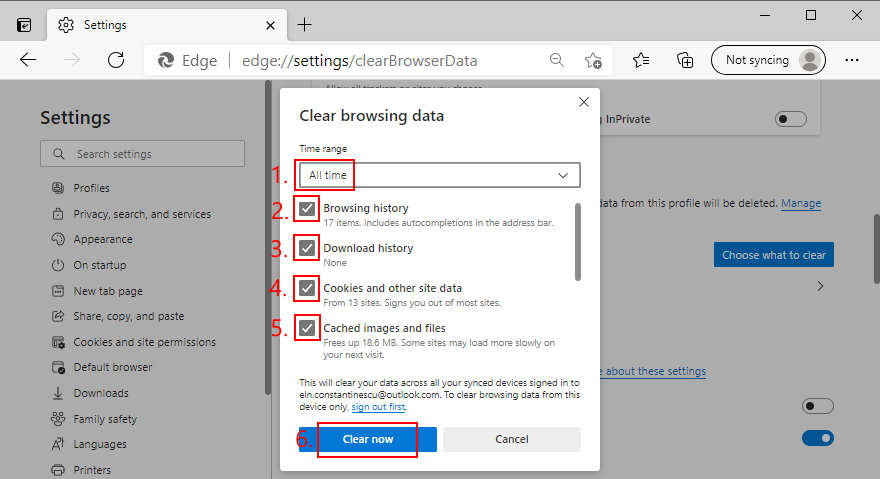
- Riavvia Edge e prova a goderti YouTube senza problemi di audio
- Passa a Privacy, ricerca e servizi . Altrimenti, puoi utilizzare l’indirizzo
2. Esegui lo strumento di risoluzione dei problemi audio
Windows 10 è dotato di uno strumento di risoluzione dei problemi integrato che risolve i problemi audio comuni. Vale la pena provare se ti sei stancato di gestire l’errore del renderer audio.
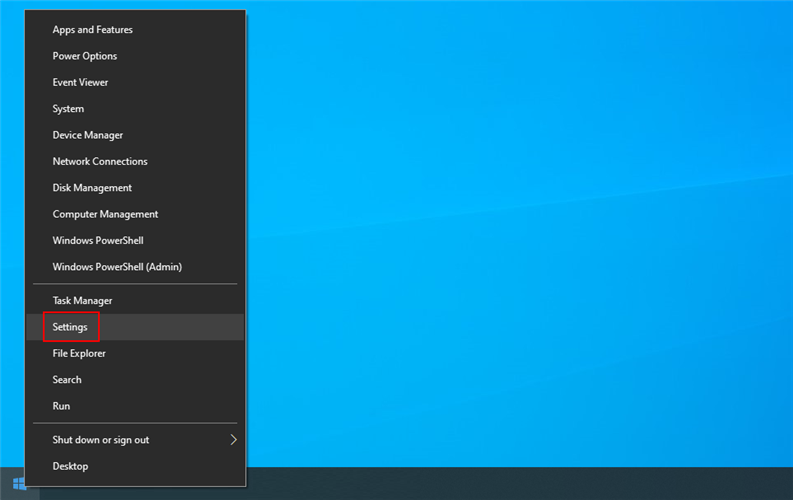
- Fai clic con il pulsante destro del mouse sul pulsante Start di Windows 10 e vai a Impostazioni
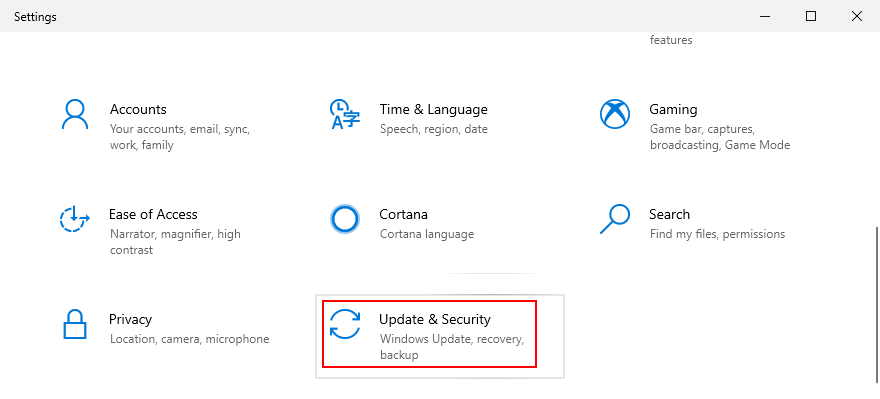
- Seleziona Aggiornamento e sicurezza
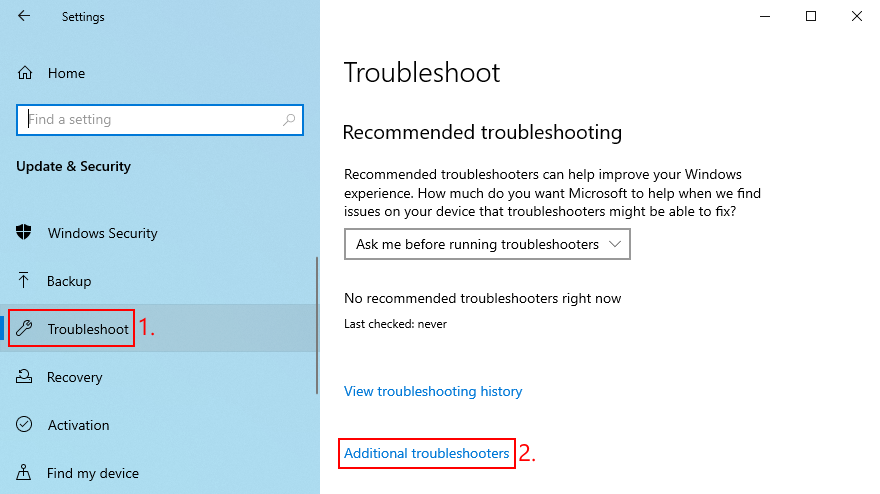
- Vai a Risoluzione dei problemi sul lato sinistro
- Fai clic su Ulteriori strumenti per la risoluzione dei problemi
- Seleziona Riproduzione audio e fai clic su Esegui lo strumento di risoluzione dei problemi

- Segui le istruzioni sullo schermo
- Verifica la presenza di errori audio
3. Abilita il dispositivo audio
Se hai collegato più dispositivi audio al tuo computer, potresti aver inconsapevolmente confuso le impostazioni del dispositivo audio e disabilitato l’adattatore audio principale. Ecco come riattivarlo:
- Fai clic sul pulsante Start , digita Pannello di controllo e apri questa applicazione
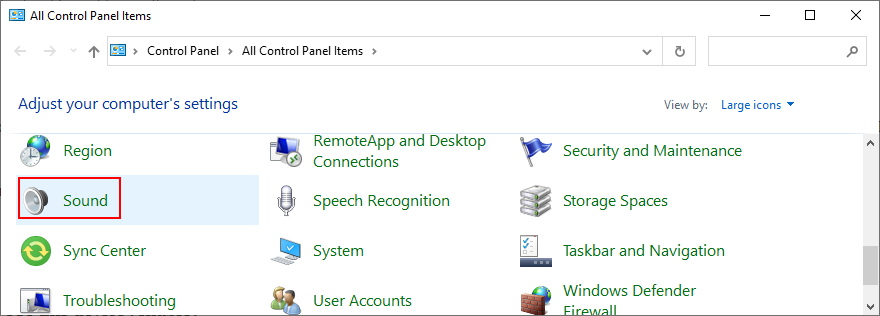
- Vai alla sezione Audio
- Passa alla scheda Riproduzione
- Seleziona il tuo dispositivo audio dall’elenco
- Fai clic su Proprietà
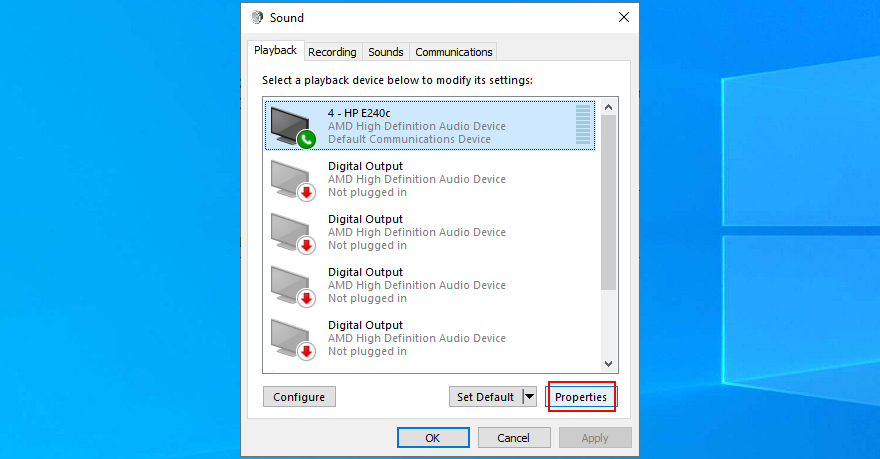
- Nella scheda Generale , imposta Utilizzo del dispositivo su Usa questo dispositivo (abilita)
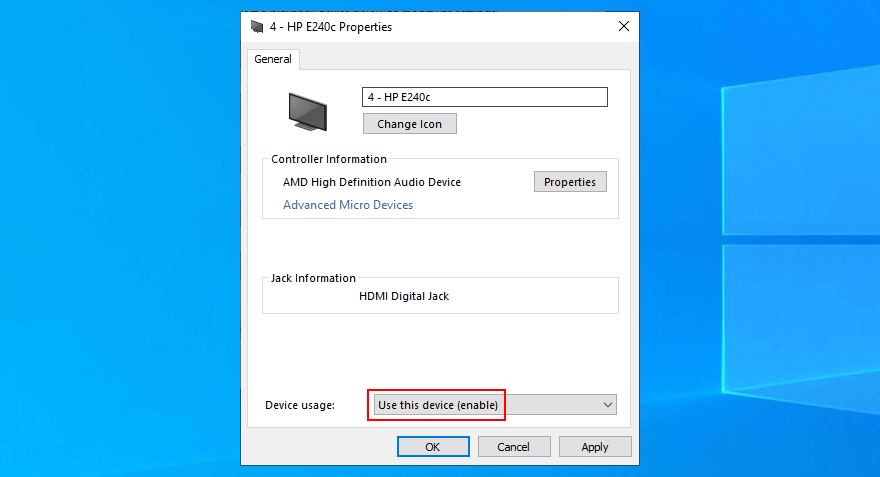
- Fai clic su Applica ed esci
- Verifica subito la presenza di problemi audio
4. Riavvia il servizio Windows Audio
Tutti i suoni che escono dal tuo computer sono gestiti da un servizio in background. Se il servizio non è attualmente in esecuzione, viene interrotto spesso o non si avvia automaticamente all’avvio di Windows, dovresti aspettarti problemi come l’errore del renderer audio.
Ma puoi risolvere questo problema riavviando il servizio Windows Audio. Ecco come:
- Premi il tasto Windows , digita Servizi e apri questa applicazione
- Trova e fai clic con il pulsante destro del mouse su Windows Audio
- Vai a Proprietà
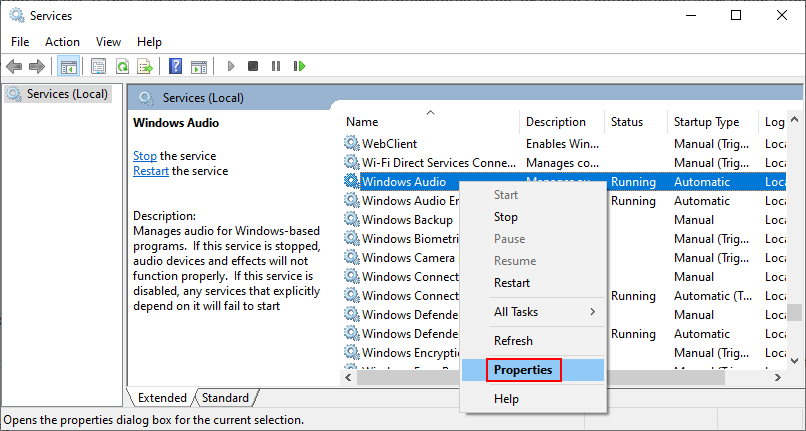
- Rimani nella scheda Generale
- Imposta Tipo di avvio su Automatico
- Se Stato del servizio indica Interrotto , fai clic sul pulsante Avvia
- Fai clic su Applica ed esci da
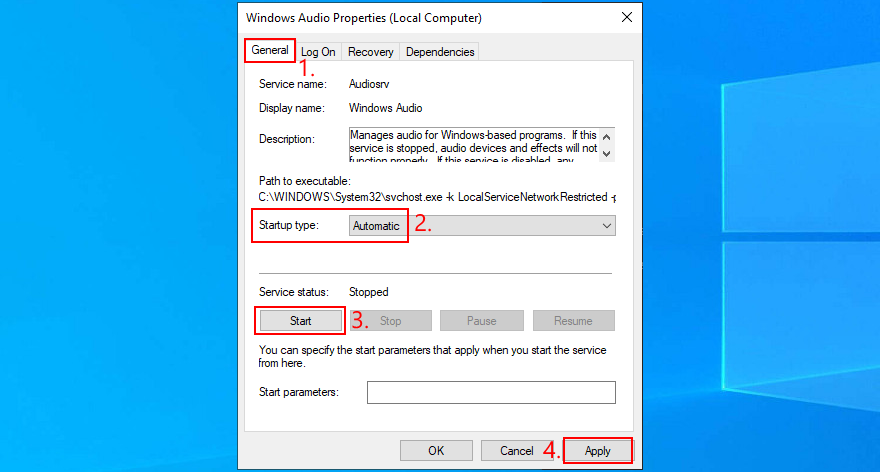
- Verifica la presenza di problemi audio
5. Sincronizza la frequenza audio (driver ASIO)
Gli utenti con driver ASIO4ALL hanno segnalato conflitti con le impostazioni audio del sistema. Più specificamente, se la frequenza di campionamento non è impostata sullo stesso valore in entrambe le parti, il computer inizia a riscontrare problemi di suono. Ecco come risolvere facilmente questo problema:
- Fai clic sul pulsante Start , digita Pannello di controllo e premi Invio
- Seleziona l’area Audio

- Nella scheda Riproduzione , seleziona il tuo dispositivo audio e fai clic su Proprietà

- Passa alla scheda Avanzate
- Annota la frequenza di campionamento specificata in Formato predefinito
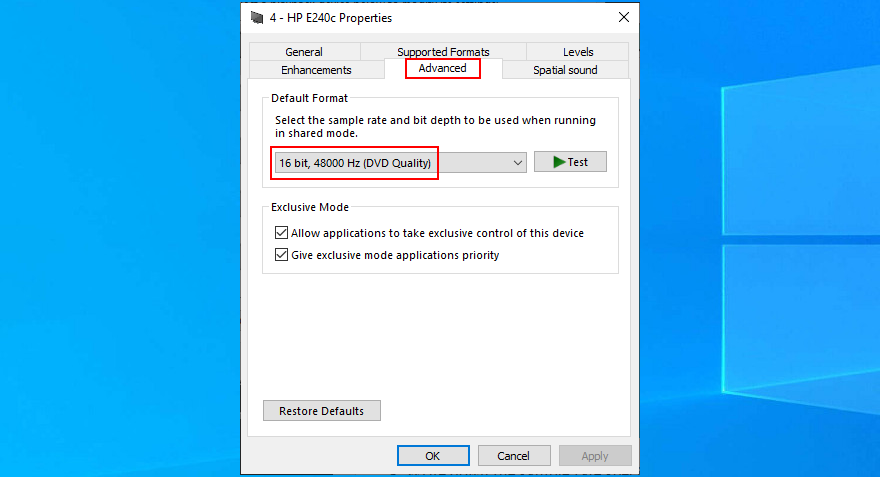
- Esci da quest’area
- Apri l’utility ASIO
- Passa alla scheda Audio
- Imposta la Frequenza di campionamento sullo stesso valore di Windows
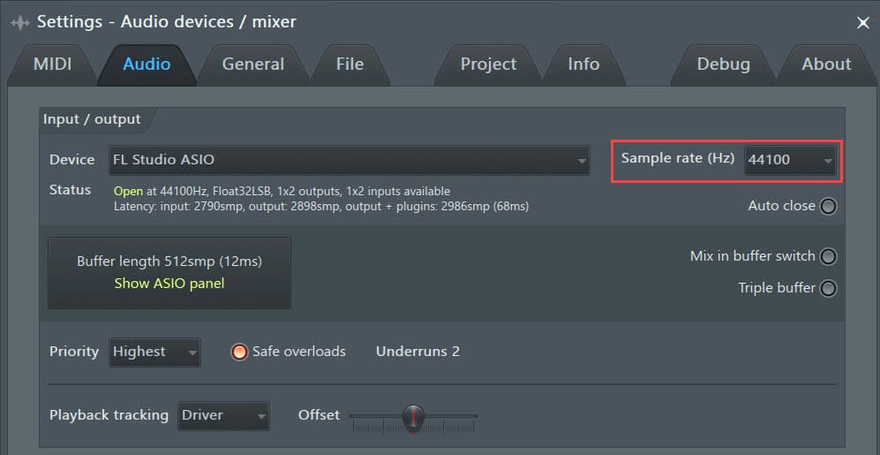
- Riavvia il PC e controlla i risultati
- Seleziona l’area Audio
6. Esegui test audio (laptop HP)
Gli utenti HP possono utilizzare uno strumento di diagnostica audio chiamato HP PC Hardware Diagnostics (UEFI). Ecco come usarlo:
- Riavvia il tuo laptop HP
- Durante il riavvio, premere rapidamente il tasto che consente di accedere a HP PC Hardware Diagnostics (UEFI)
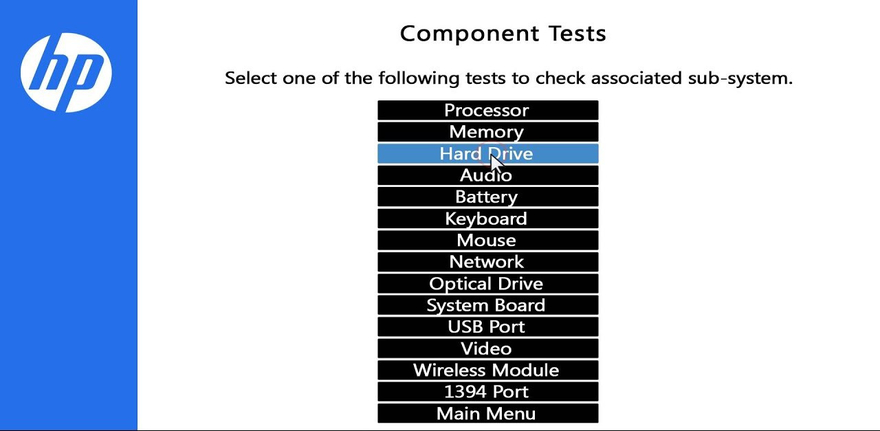
- Vai alla sezione Audio
- Fai clic su Esegui una volta per iniziare a valutare i tuoi dispositivi audio
- Seleziona Altoparlante e segui le istruzioni sullo schermo
- Completa il test e avvia Windows
- Verifica la presenza di problemi audio
Puoi anche scaricare HP Audio Check dal sito web ufficiale e usalo per eseguire test aggiuntivi.
7. Imposta il dispositivo audio predefinito
Windows a volte ha problemi a identificare il dispositivo audio predefinito. E questo è anche il motivo per cui potrebbe mostrare l’errore del renderer audio, sia che lo trovi su YouTube o altrove. Per risolvere questo fastidioso problema, devi solo impostare nuovamente il tuo dispositivo audio preferito come predefinito. Ecco come:
- Premi il tasto Win , digita Pannello di controllo e apri questa applicazione
- Fai clic su Audio

- Scegli il tuo dispositivo audio dalla scheda Riproduzione
- Fai clic su Imposta
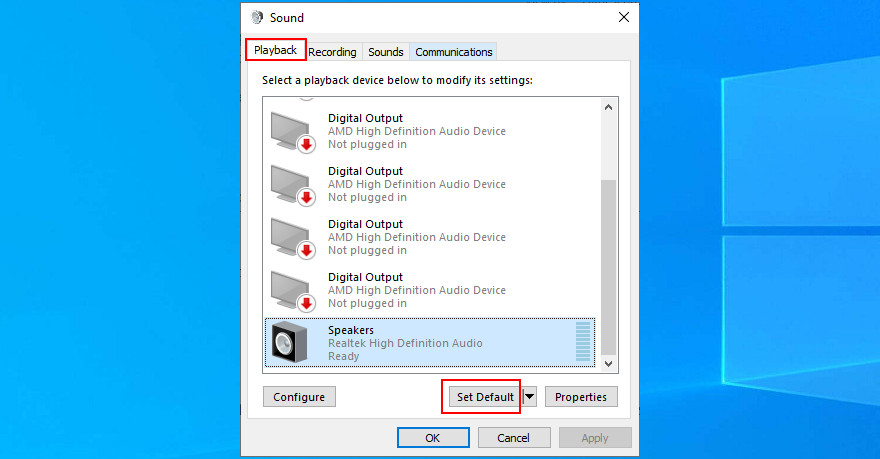
- Se il pulsante Imposta predefinito è disattivato, seleziona qualsiasi altro dispositivo per impostarlo come predefinito, quindi torna alla prima opzione
- Fai clic su Applica ed esci da quest’area
- Verifica la presenza di problemi audio
8. Reinstallare l’adattatore audio
L’adattatore audio potrebbe non essere collegato correttamente al computer. Tuttavia, puoi reinstallarlo senza sforzo senza danneggiare il tuo PC nel processo. Ecco cosa devi fare:
- Fai clic con il pulsante destro del mouse sul pulsante Start e seleziona Gestione dispositivi
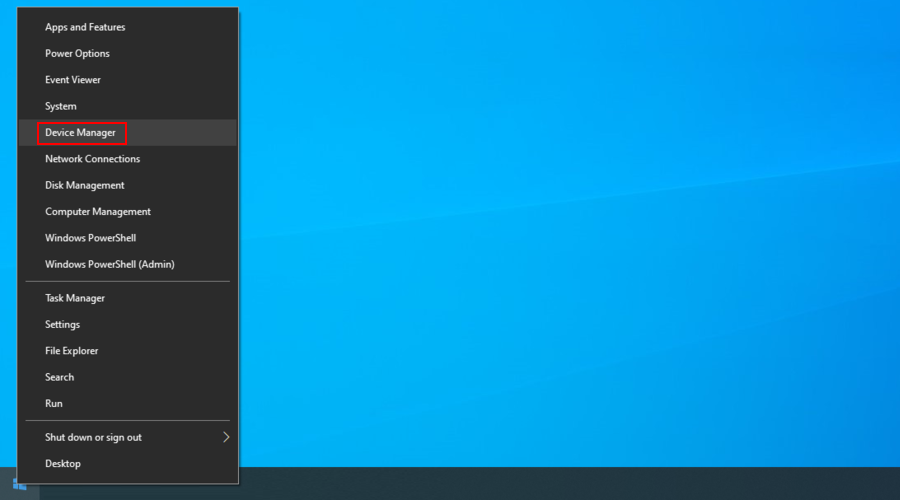
- Estendi il gruppo Ingressi e uscite audio
- Identifica il tuo dispositivo audio principale, fai clic con il pulsante destro del mouse e seleziona Disinstalla dispositivo

- Seleziona una voce dall’elenco
- Apri il menu Azione e fai clic su Rileva modifiche hardware
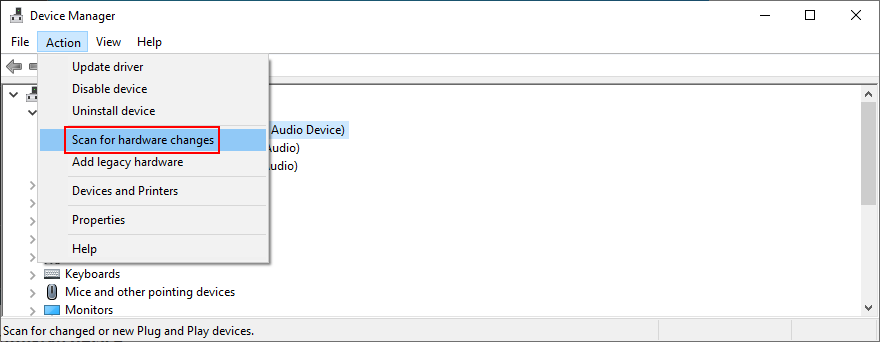
- Riavvia il computer. Windows will auto-reinstall the missing audio driver
- Check for sound problems
9. Update the audio driver
Even if your sound adapter is correctly installed, perhaps it’s equipped with an obsolete driver that’s no longer supported by Windows 10. It would certainly explain the audio renderer error. However, you can easily update the audio driver:
- Click the Start button, type Device Manager, and press Enter
- Expand the Audio inputs and outputs category
- Right-click your primary audio adapter and select Update driver
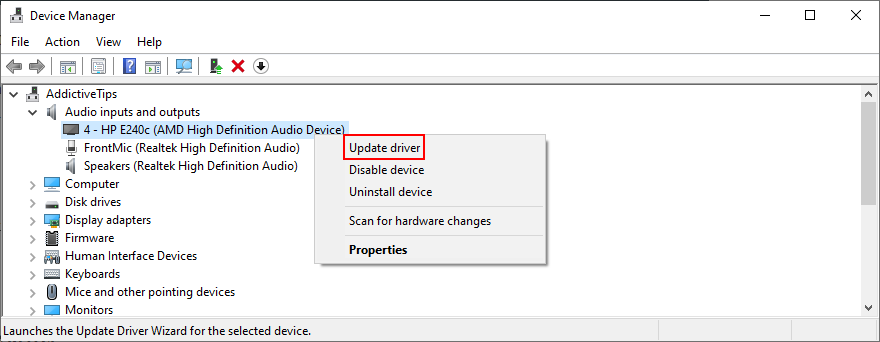
- Click Search automatically for updated driver software
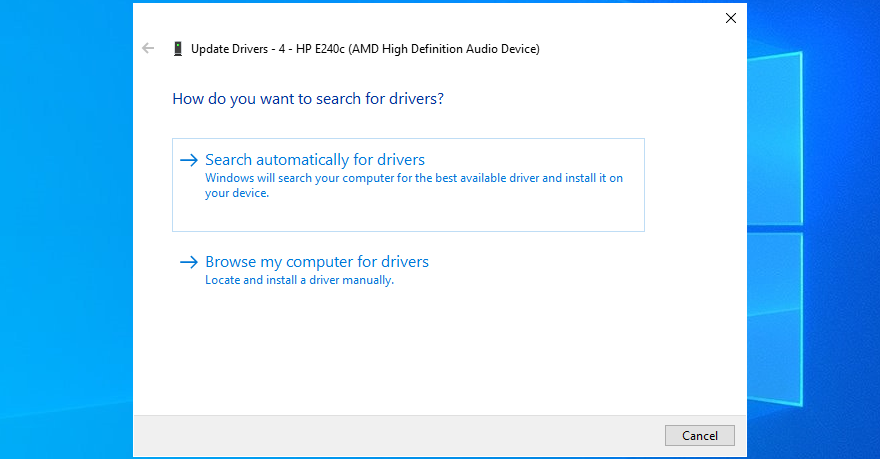
- If you see the The best drivers for your device are already installed message, click Search for updated drivers on Windows Update
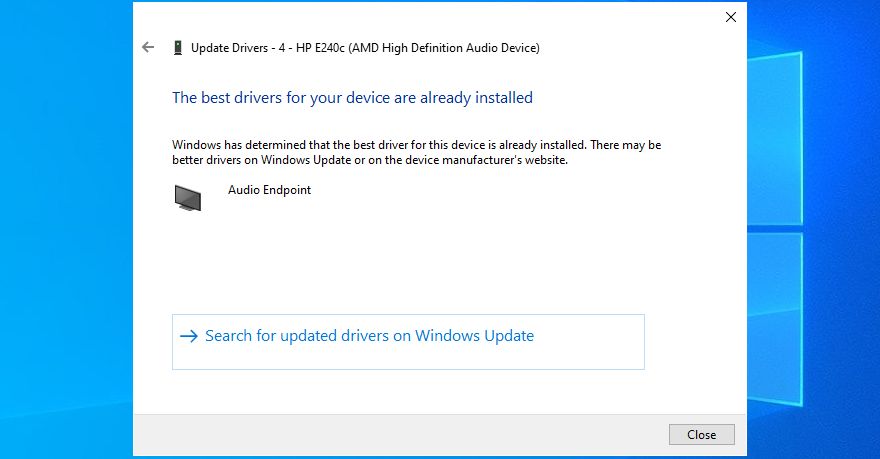
- Reboot your PC and check for additional audio issues
It’s possible that Microsoft fails to find a newer audio driver using Windows Update. In that case, you should head over to the manufacturer website of your sound adapter, then find, download, and install a newer driver that’s compatible with your OS configuration.
However, if you don’t want to go through that trouble as well as risk installing an incompatible driver that could cause more problems, we suggest opting for a driver updating software solution. You can use it to keep all your device drivers in check.
10. Roll back the audio driver
If you have recently updated your sound driver, perhaps you installed an incompatible version that’s throwing you the audio renderer error. To fix it, you should roll back to the previous driver version. Ecco come:
- Head over to Device Manager
- Right-click your audio device and go to Properties
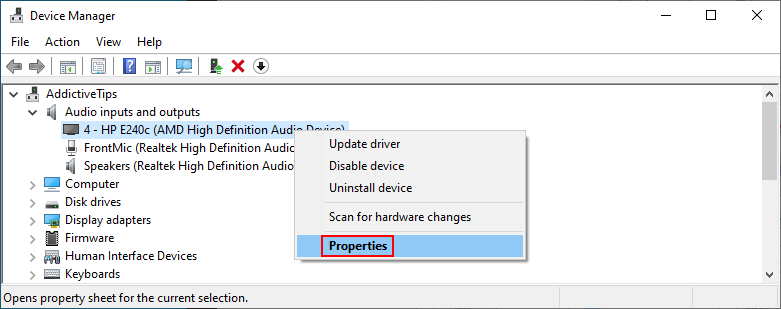
- Select the Driver tab
- Click Roll Back Driver and follow the given instructions
- If the button is greyed out, it means that your operating system doesn’t have the previous driver version, so you can skip this solution
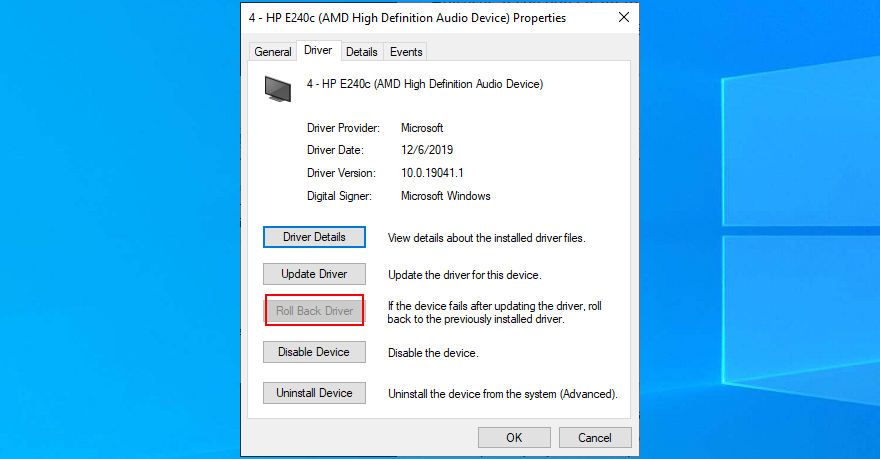
- Restart your computer and inspect results
11. Check the audio cable
It’s a good idea to check your audio cable to see if there’s anything wrong with it since hardware problems can cause audio renderer errors, too. If you have multiple audio inputs on your computer, try sticking the audio jack somewhere else in case you have malfunctioning jacks.
In fact, if you have several external playback devices plugged into your machine, it’s a good idea to remove the ones you’re not currently using. Furthermore, make sure that you didn’t accidentally swap the audio and microphone jacks in the process.
12. Disable audio mixing software
Certain audio mixing tools are not fully compatible with the Windows 10 sound drivers, resulting in conflicts and the audio renderer error message. As soon as you start an audio mixing tool and configure sound drivers, the application overrides the system settings, causing various problems.
To fix this problem, you just need to disable your audio mixing tools when trying to watch a movie offline or a clip on YouTube.
13. Update your web browser
If you’re getting the audio renderer error message on YouTube when trying to enjoy a video, it’s a good idea to update your web browser to the latest version.
How to update Google Chrome:
- Open the More menu on the top-right corner
- Visit the Help submenu and click About Google Chrome. Alternatively, you can visit the
chrome://settings/helpaddress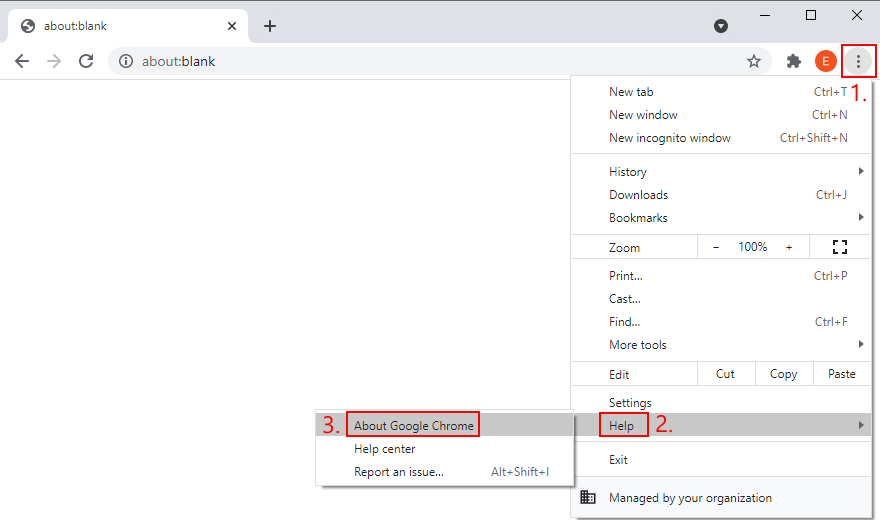
- Wait until Chrome downloads and installs any available updates
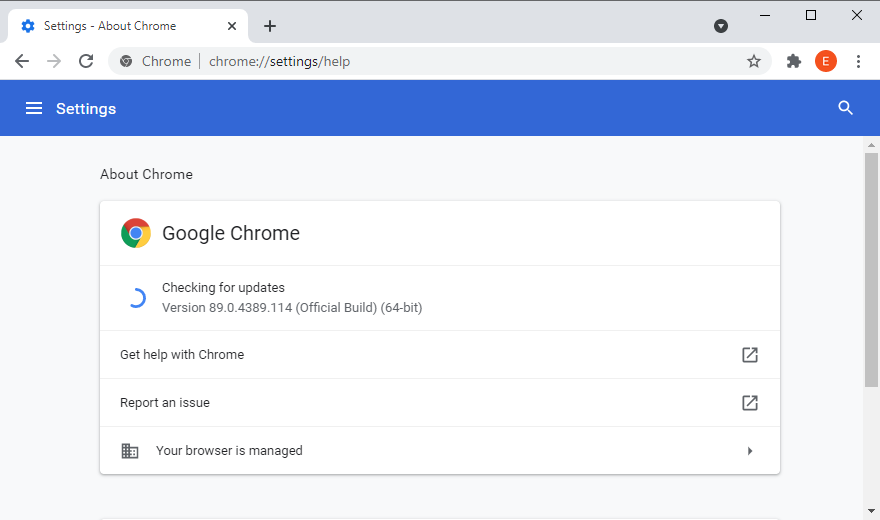
- Click Relaunch and try to watch YouTube
How to update Mozilla Firefox:
- Open the ≡ hamburger menu on the upper-right corner
- Select the Help section and click About Firefox
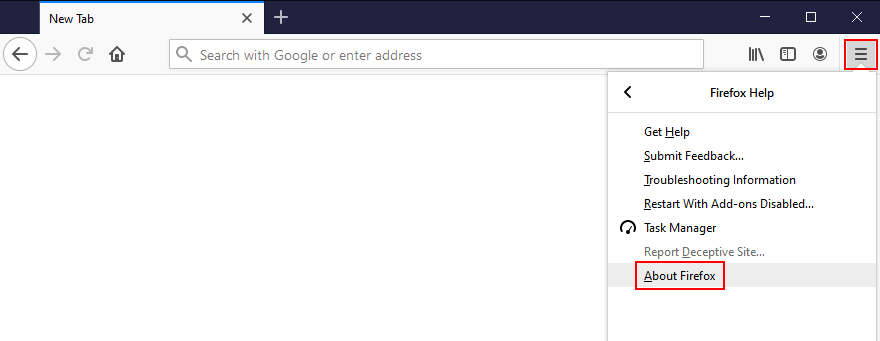
- If Firefox finds any updates, give it time to install them
- When it’s over, restart the web browser and check for audio issues
How to update Microsoft Edge:
- Click the More button on the top-right corner
- Go to the Help & feedback menu and click About Microsoft Edge
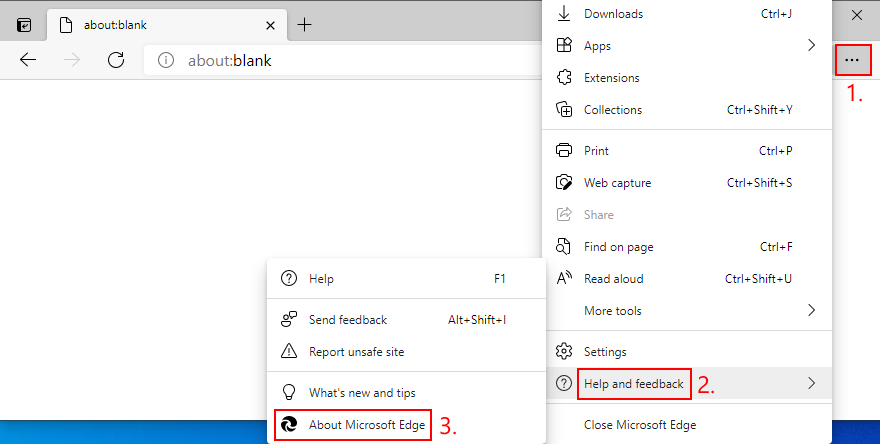
- Else, you can go to the
edge://settings/helpaddress - Wait until Edge finds and installs any updates
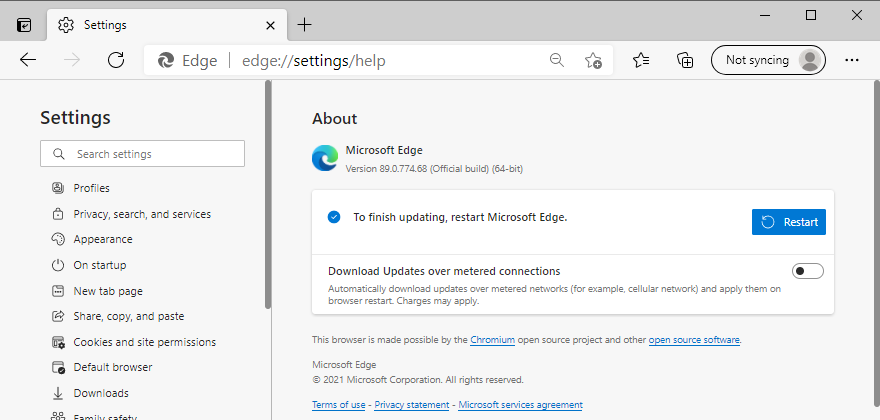
- Restart the browser and inspect results
14. Disable hardware acceleration
Modern web browsers take advantage of your computer’s hardware acceleration to improve the page loading speed and enhance your overall browsing experience. However, users report that it has interfered with the audio driver, causing rendering errors. To fix this issue, you have to turn off hardware acceleration for each browser.
How to disable hardware acceleration in Google Chrome:
- Open the More button and go to Settings

- Scroll down to the bottom of the page and click Advanced
- At System, turn off Use hardware acceleration when available

- Relaunch Chrome and check for audio errors
How to disable hardware acceleration in Mozilla Firefox:
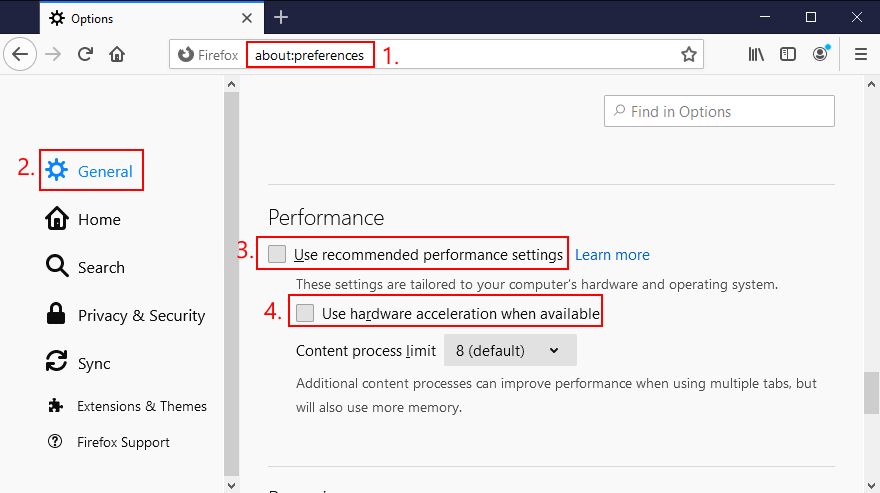
- Click the ≡ hamburger button and go to Options (or visit the
about:preferencesaddress)
- In the General tab, scroll down to Performance
- Uncheck Use recommended performance settings
- Also uncheck Use hardware acceleration when available
- Restart Firefox and check for audio errors
How to disable hardware acceleration in Microsoft Edge:
- Open the More menu and head over to Settings

- Jump to the System section on the left side (or visit
edge://settings/system) - Turn off Use hardware acceleration when available
- Click the Restart button

- Watch YouTube and check for audio errors
15. Disable your ad blocker
Many YouTube users who have encountered the audio renderer error said that they managed to fix this problem by deactivating the ad blocker built into the web browser. Otherwise, you should whitelist YouTube to make sure that video ads are permitted.
For example, if you’re using Adblock Plus, here’s how you can whitelist YouTube:
- Go to the Adblock Plus settings panel
- Jump to the Whitelisted websites area
- Type
youtube.comand click Add website
- Go to YouTube and check for audio rendering issues
16. Try using a different web browser
An unforeseen number of browser settings can interfere with multimedia features, so it’s a good idea to change your web browser. Switch to an application that has default settings. You can import your bookmarks and other website data, but make sure to leave the browser configuration untouched.
Then, head over to YouTube or the platform that throws the audio renderer error to test it out. If it works, you can stick to the new browser for audio and use your preferred application for everything else.
17. Update Windows 10
It’s essential to keep Windows 10 updated to the latest edition so that you can take advantage of the newest features, hotfixes, and security patches. If there’s a known problem with the audio, it will likely get fixed in the upcoming system update.
How to run Windows Update:
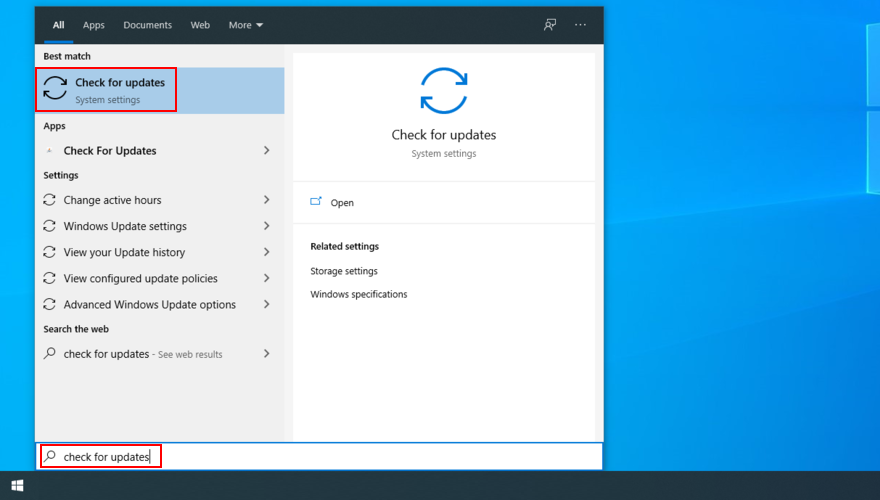
- Press the Win key, type Check for updates, and press Enter
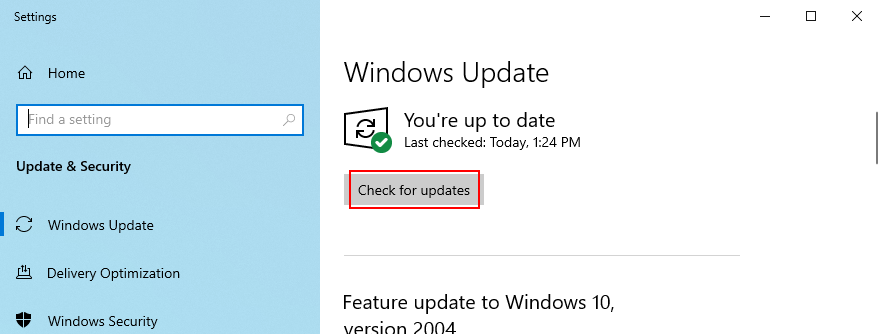
- Click Check for updates and wait
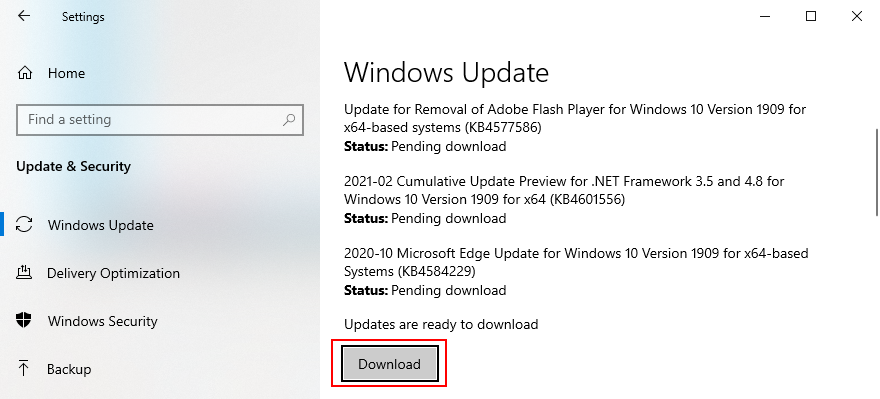
- If it finds any updates, click Download
- Leave your PC unattended while it’s busy with updates. It might restart several times
- Check for audio rendering issues
18. Uninstall system updates
On the other hand, a recent Windows update may have compromised your entire operating system, causing various problems like the audio renderer error. When this happens, you have to uninstall the malfunctioning update. Ecco come:
- Press the Win key, type control panel, and hit Enter
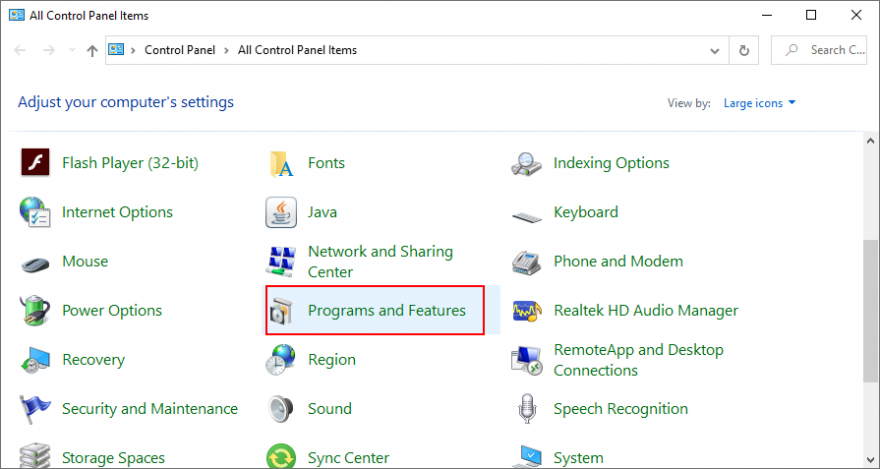
- Go to Programs and Features
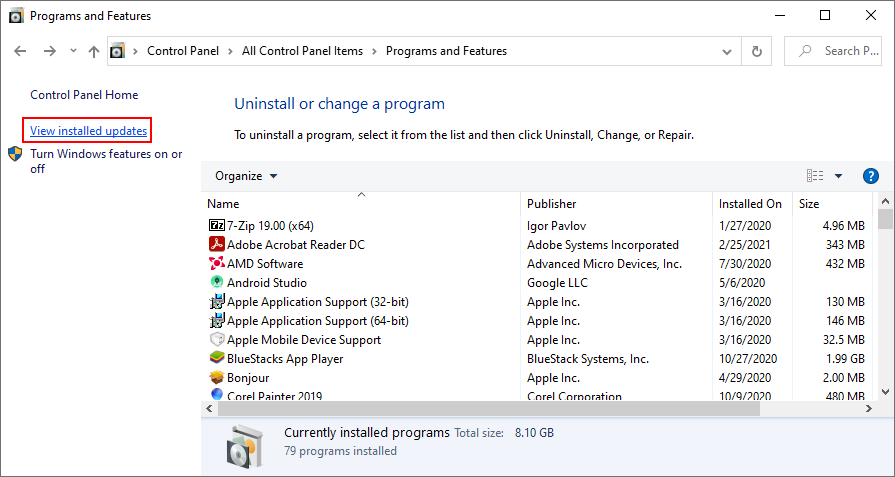
- Click View installed updates on the left side
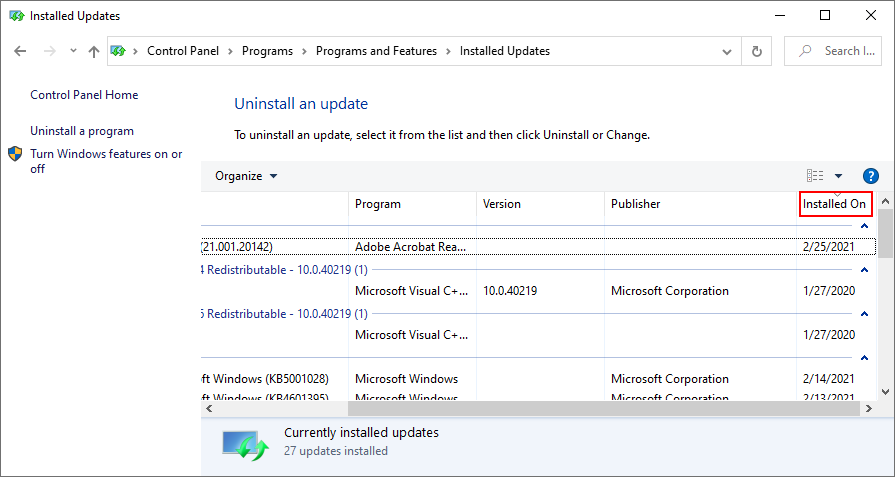
- Click the Installed On column to sort the updates (newest first)
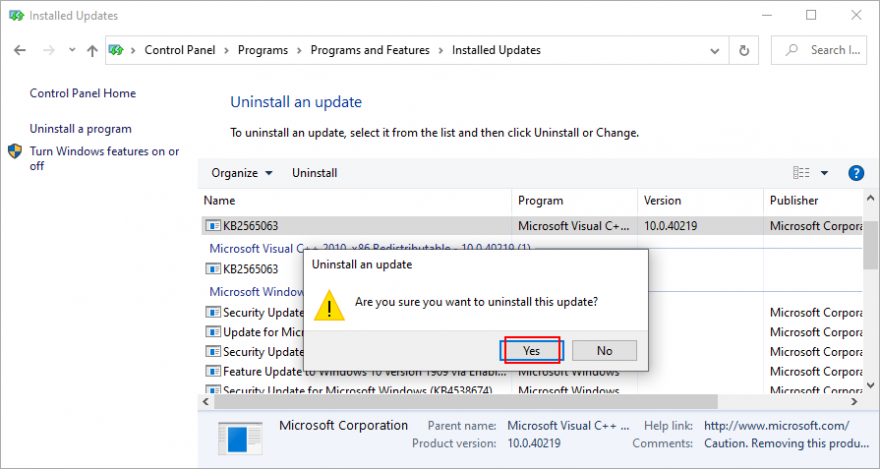
- Right-click the first update in the list and select Uninstall
- Click Yes to confirm
- Restart your PC and check for audio errors
19. Sign in with a different PC account
Windows 10 sometimes experiences issues due a lack of permissions caused by your account. To solve this problem, you can try signing in with a different profile. For example, if you’re currently logged in with the Microsoft account, switch to a local user account (or the other way around).
How to sign in with a Microsoft account:
- Right-click the Start button and select Settings
- Go to Accounts
- Click Login to your Microsoft account
- Enter your email address and password
- Click Verify to confirm your identity
- Log out of Windows 10
- Log back in using the Microsoft account
- Check for audio renderer errors
How to create a local user account:
- Right-click the Start button and go to Settings

- Select Accounts
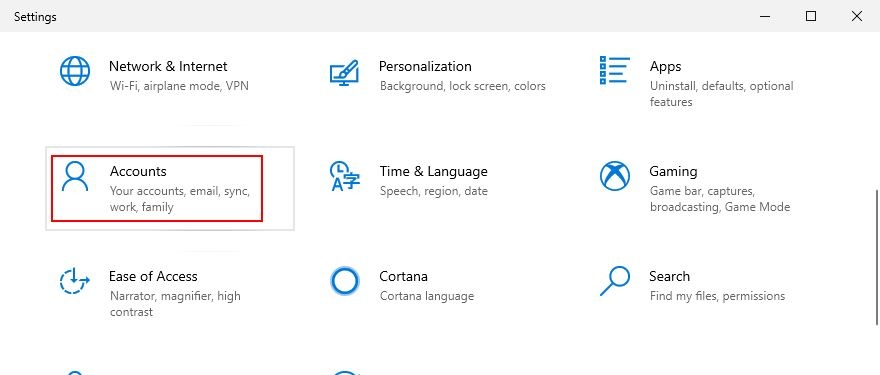
- Click Sign in with a local account instead
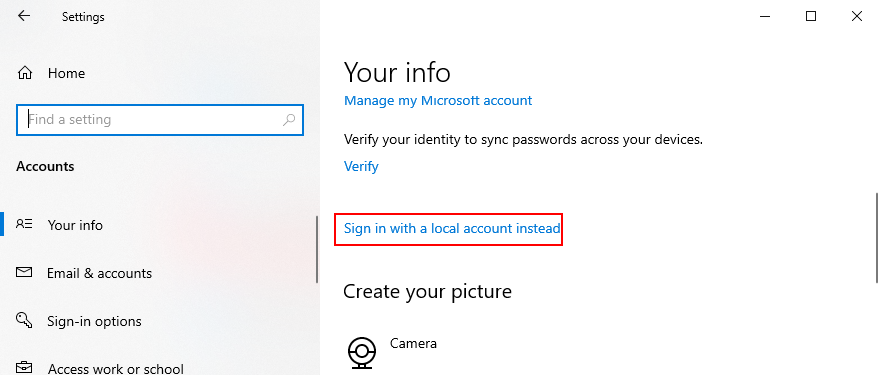
- Specify your computer password or PIN
- At Enter your local account info, set a new username and password
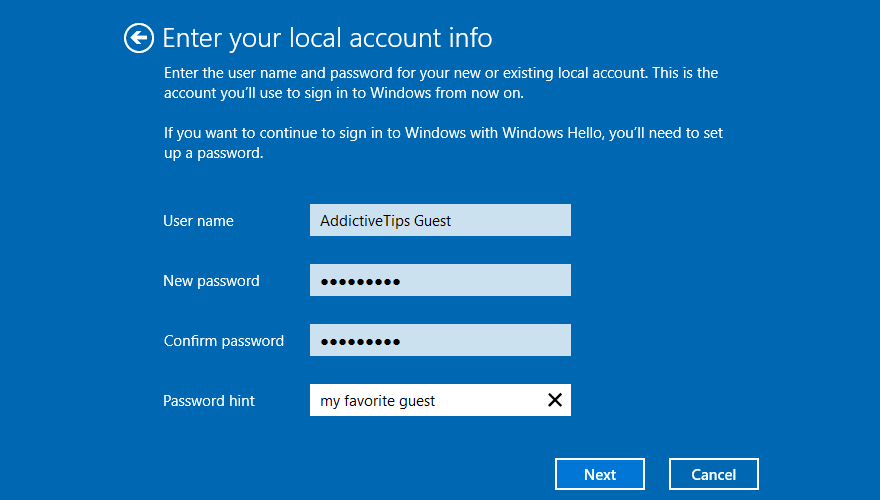
- Click Next and then Sign out and finish
- Log back in to Windows 10 using the new local account
- Check for audio issues
20. Reset BIOS
DELL users have reported that they were experiencing the audio renderer error due to incorrect BIOS settings. And they were able to solve it by restoring BIOS to default settings. Here’s how you can easily do that:
- Restart your computer
- During reboot, rapidly press the key displayed on the screen to access BIOS
- Locate and access the advanced BIOS options
- Enable the setting that resets BIOS configuration data
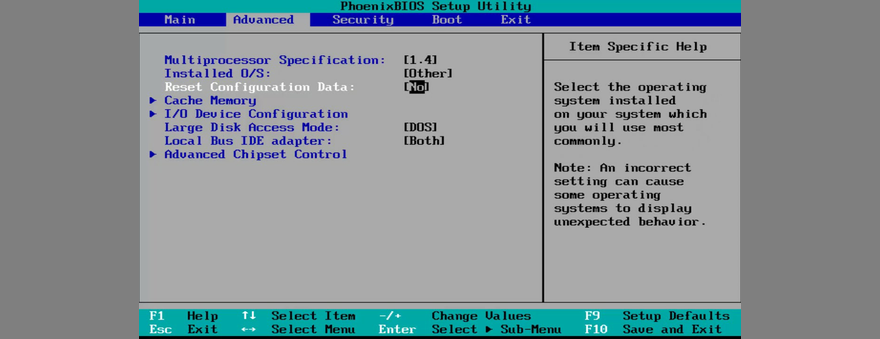
- Save the current BIOS settings and exit
- Wait until Windows boots, then check for audio issues
21. Update BIOS
Another way to deal with BIOS issues on DELL systems is by updating it to the latest version since an obsolete BIOS is known to cause system stability and even audio problems. Ecco come:
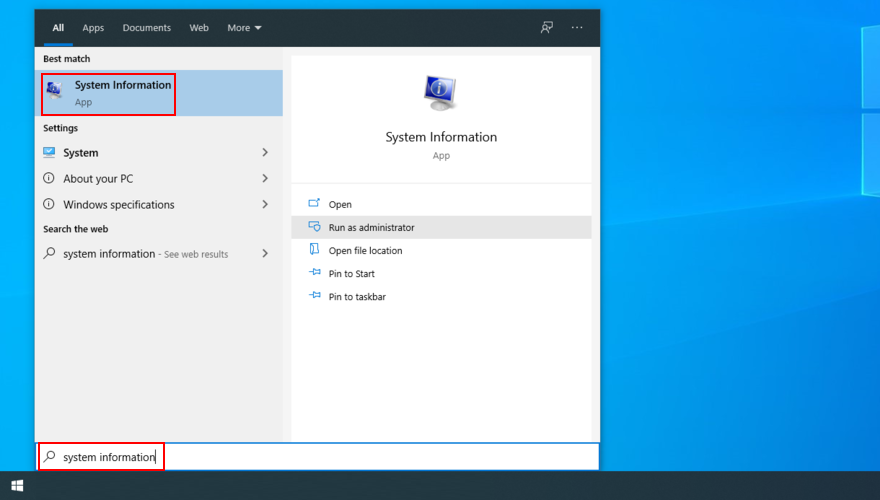
- Press the Win key, type System Information, and open this app
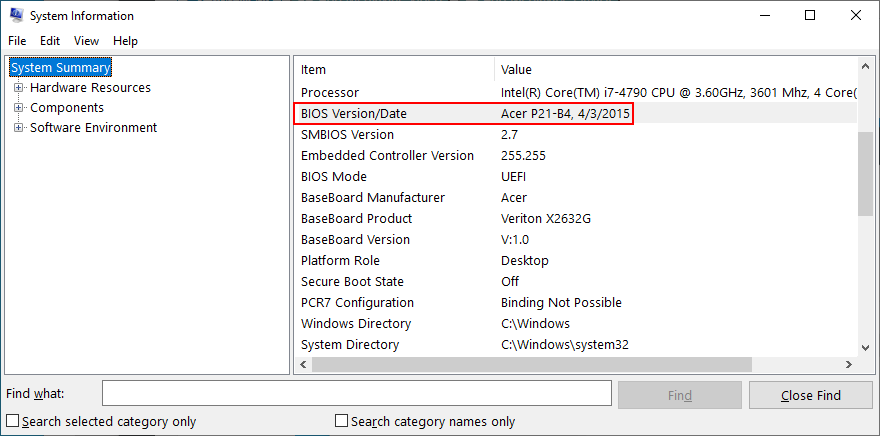
- Go to the System Summary section
- Write down the info displayed at BIOS Version/Date
- Go to the website of your BIOS manufacturer
- Find and download a newer BIOS version that’s compatible with your PC
- Unzip the BIOS setup file to a USB flash drive
- Restart your computer and access BIOS
- Back up the current BIOS version to the pen drive
- Start BIOS setup
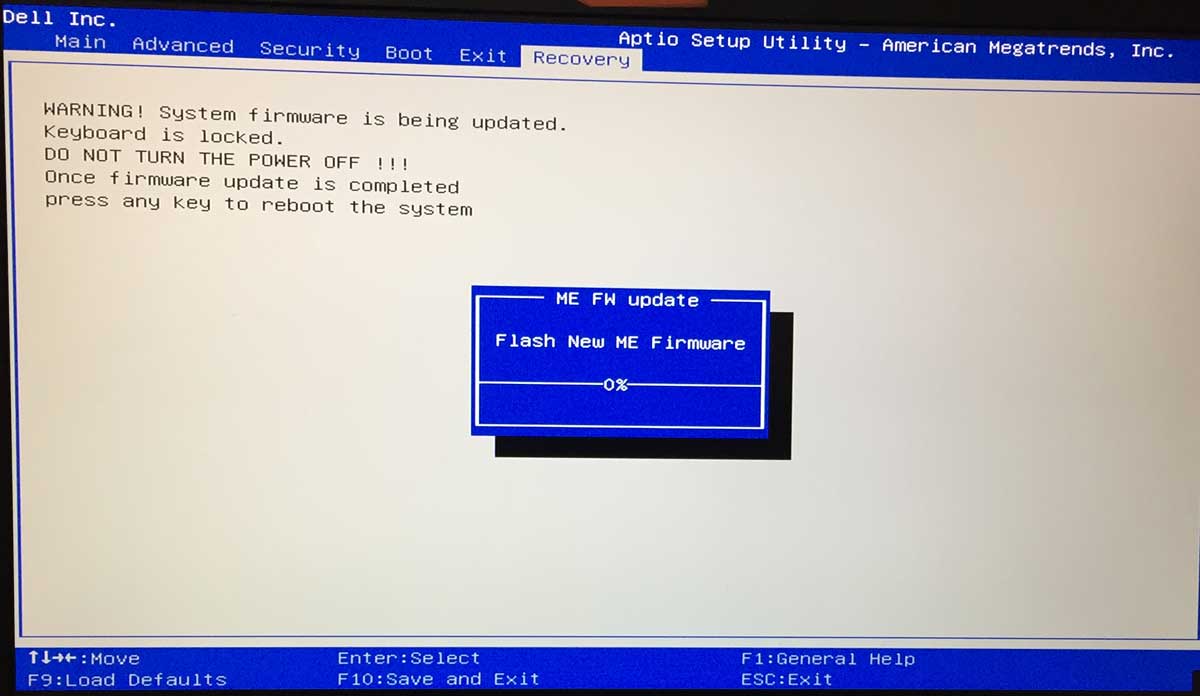
- Don’t turn off or restart your PC during setup
- Boot Windows as normal and check for audio issues
22. Use System Restore
If the audio renderer error was caused by a software event that you can’t pinpoint, you can fix it by rolling back Windows 10 to a previous restore point. Here’s how to do its easily:
- Make sure you’re logged in to Windows 10 with admin rights
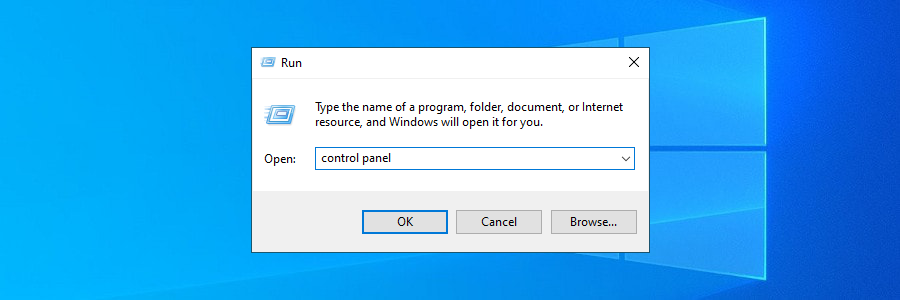
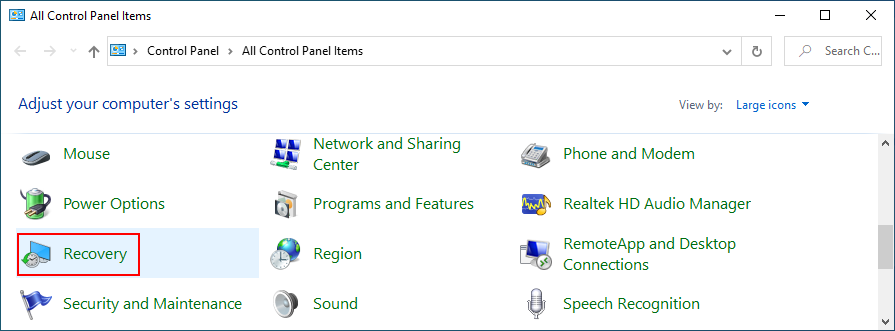
- Press Win key + R, type control panel, and press Enter
- Go to the Recovery area
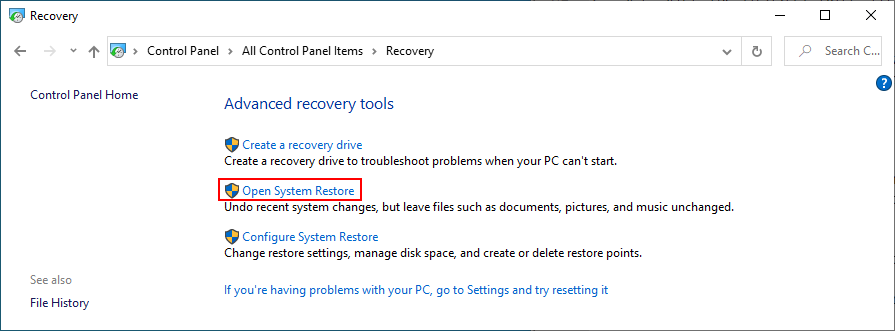
- Click Open System Restore
- Select a system restore point from the list
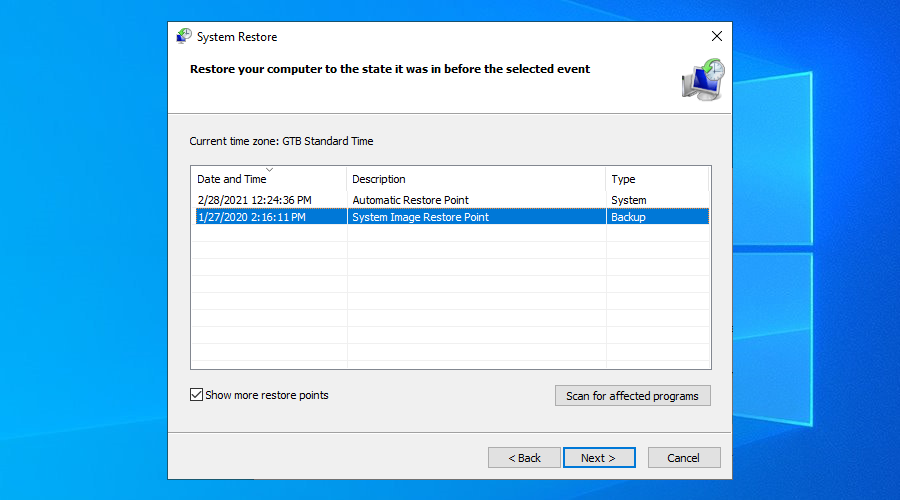
- Click Next and follow the on-screen instructions
- Restart your PC and check for audio issues
The Audio renderer error can be fixed
To review, you can stumble upon the audio renderer error when trying to watch a video on YouTube, in your media player, or anywhere else. It’s caused by a hardware or software issue which you should be able to fix.
For instance, you can clear browser cache, run the audio troubleshooter, make sure the sound device is enabled and set as default, restart the Windows Audio service, synchronize the sample rate for ASIO drivers, as well as run audio tests on HP laptops.
It’s also a good idea to reinstall the audio adapter, update the audio driver or roll back to a compatible version, check the cables and remove extra peripheral devices, disable any audio mixing software, update your web browser, as well as disable hardware acceleration.
Furthermore, you can turn off your ad blocker, try using a different browser, update Windows 10 or uninstall unstable system updates, sign in to Windows 10 using a different account, reset BIOS and update it to the latest version, as well as roll back Windows 10 using System Restore mode.
How did you manage to finally get rid of the audio renderer error? Did we miss any essential steps? Let us know in the comment area below.
