Quando si tratta di lavorare da casa, ci sono poche cose peggiori che essere in ritardo per una riunione a causa di un errore della webcam. Anche altri tipi di utenti sono interessati da fotocamere malfunzionanti , come i giocatori.
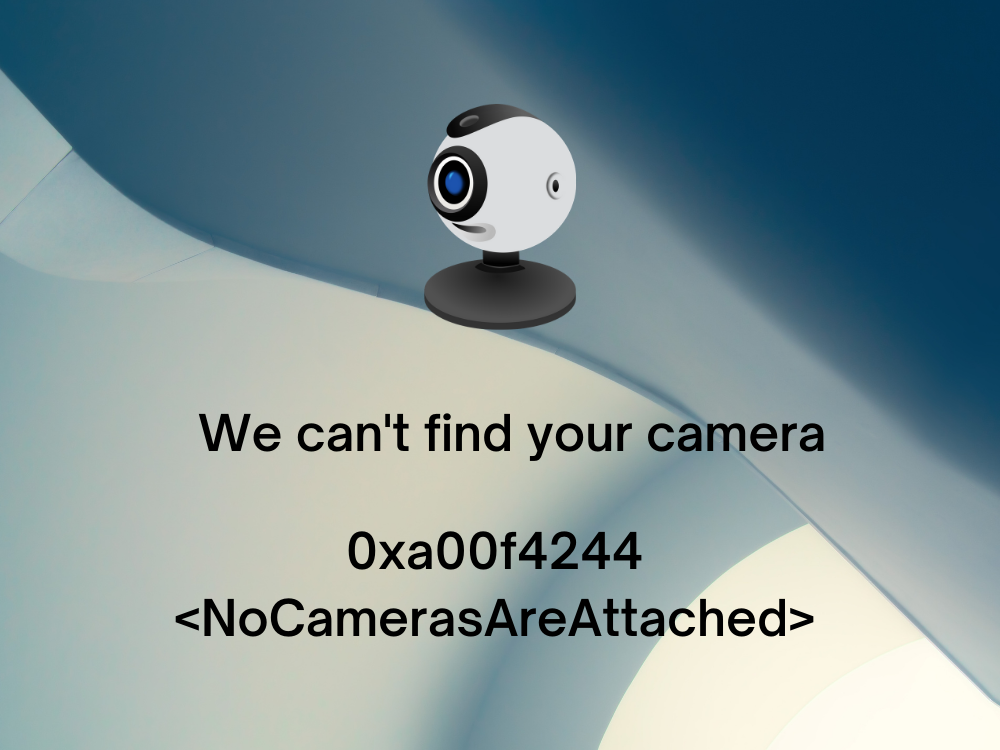
0xa00f4244 NoCamerasAreAttached è un messaggio di errore comune mostrato sullo schermo degli utenti di Windows 10 quando tentano di avviare l’app Fotocamera. La schermata della webcam diventa nera e mostra testo bianco, come nell’immagine sotto.
Non riusciamo a trovare la tua fotocamera
Di solito accade a laptop o monitor con webcam integrate. Ma l’errore può verificarsi anche su adattatori webcam esterni. Non preoccuparti, però, poiché dovresti essere in grado di gestire la questione senza rivolgerti a un professionista. In genere è una soluzione semplice che non ti è mai passata per la mente, come premere una combinazione di tasti che abilita la webcam.
FIX: 0xa00f4244 NoCamerasAreAttached
Prima di tentare di riparare il codice di errore 0xa00f4244 NoCamerasAreAttached sul tuo computer, è una buona idea crea un punto di ripristino del sistema . Le ultime soluzioni in questo elenco sono avanzate e apportano modifiche significative al tuo computer. Nel caso in cui qualcosa vada storto, puoi sempre ripristinare Windows 10 a un punto di ripristino stabile e riprovare.
Sebbene le seguenti correzioni siano personalizzate per l’app Fotocamera, possono essere applicate anche ad altre app (ad esempio, se la webcam non funziona su Skype ).
1. Esegui Windows Update
Poiché l’errore 0xa00f4244 NoCamerasAreAttached viene attivato dall’app Fotocamera e poiché l’app Fotocamera è intrecciata con Windows, è necessario verificare la presenza di aggiornamenti di sistema e scaricare eventuali aggiornamenti disponibili. Ecco come realizzarlo facilmente:
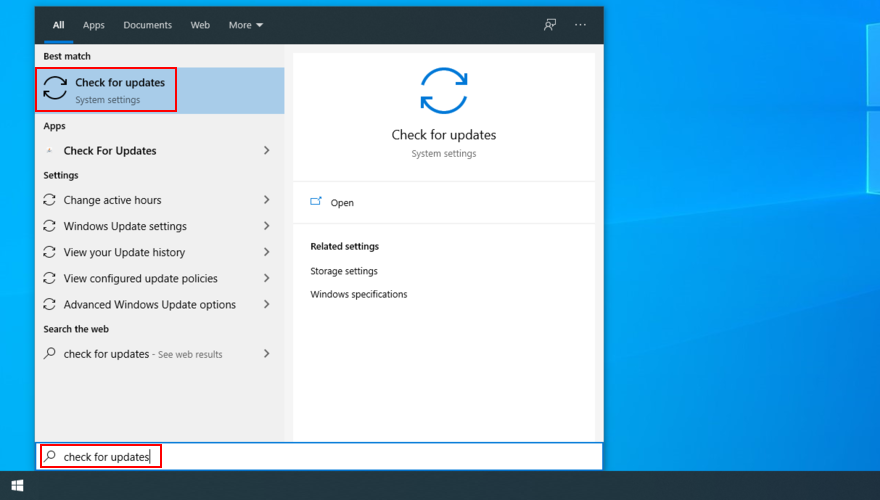
- Premi il tasto Win , digita Verifica aggiornamenti e premi Invio
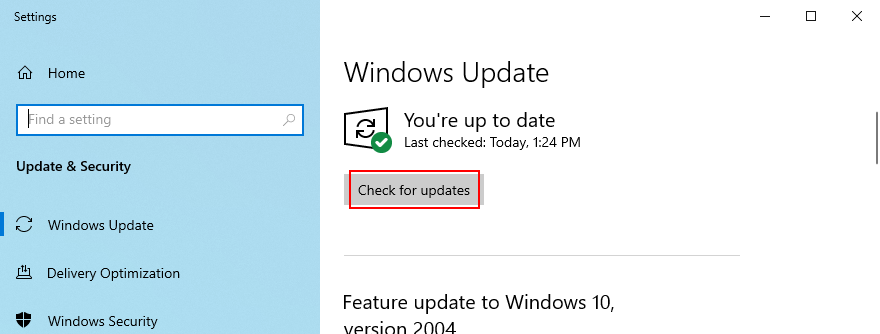
- Fai clic su Verifica aggiornamenti e attendi fino al completamento della ricerca online
- Se è disponibile qualcosa, fai clic su Scarica
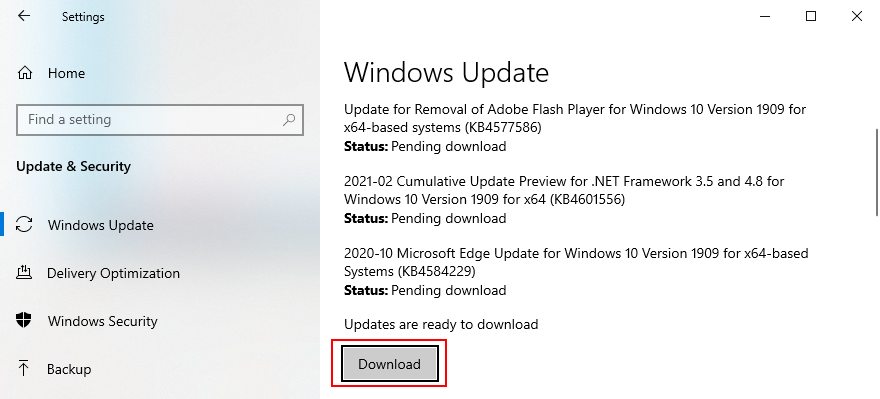
- Non spegnere o riavviare il PC durante l’aggiornamento
- Al termine, avvia l’app Fotocamera e verifica la presenza di errori
2. Controlla il coperchio, il cavo e l’interruttore della webcam
Alcuni laptop e monitor con webcam integrate hanno cover o pulsanti che devi spingere o tirare fisicamente per attivare la webcam. È una misura di sicurezza contro i dirottatori di webcam. Ad esempio, i laptop MSI richiedono di premere FN + F6 per attivare la webcam. Nel frattempo, i sistemi ASUS funzionano con F10.
Poiché il messaggio di errore 0xa00f4244 NoCamerasAreAttached indica chiaramente che Windows ha problemi a identificare la tua webcam, assicurati di premere il pulsante o capovolgere l’interruttore responsabile della riaccensione della webcam.
In alcuni casi, è necessario collegare il monitor all’unità computer utilizzando un cavo speciale per la webcam, anche se il dispositivo è integrato nel display. Cerca un cavo nella custodia della webcam e collegalo.
Se il cavo era già installato, prova a scollegarlo e ricollegarlo. Puoi anche provare a utilizzare una porta USB diversa nel caso in cui la porta originale non funzioni correttamente.
3. Verifica le autorizzazioni della webcam
Il dispositivo e le app richiedono l’accesso alla webcam. Ad esempio, Microsoft Teams non può funzionare con una webcam senza il tuo permesso. Altrimenti, continuerai a vedere 0xa00f4244 NoCamerasAreAttached sullo schermo. Si applica in particolare agli utenti che hanno recentemente eseguito un importante aggiornamento di Windows o che hanno aggiornato il sistema operativo.
- Accedi a Windows 10 con diritti di amministratore
- Fai clic con il pulsante destro del mouse sul pulsante Start e vai a Impostazioni
- Seleziona Privacy
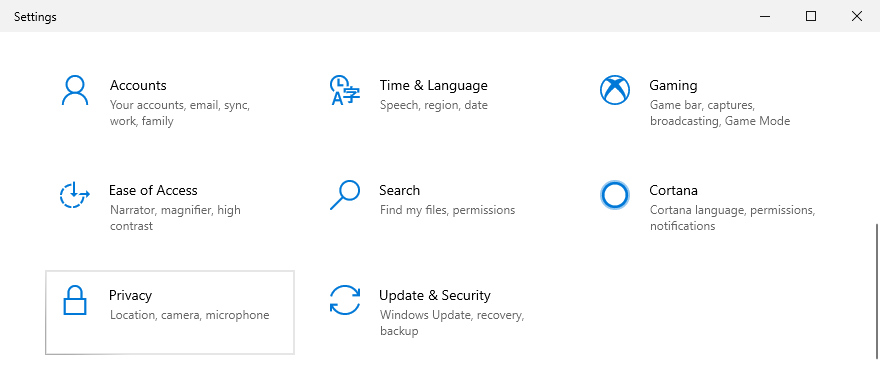
- Nelle autorizzazioni dell’app sul lato sinistro, seleziona Fotocamera
- Fai clic su Cambia e assicurati che Accesso alla fotocamera per questo dispositivo sia abilitato. Puoi anche consentire alla fotocamera di accedere ad altre app, come Skype
- Abilita Consenti alle app di accedere alla tua fotocamera
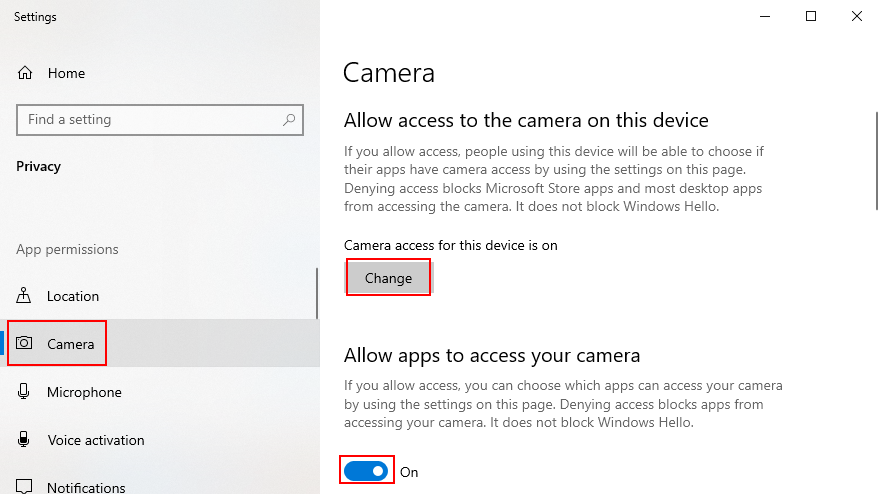
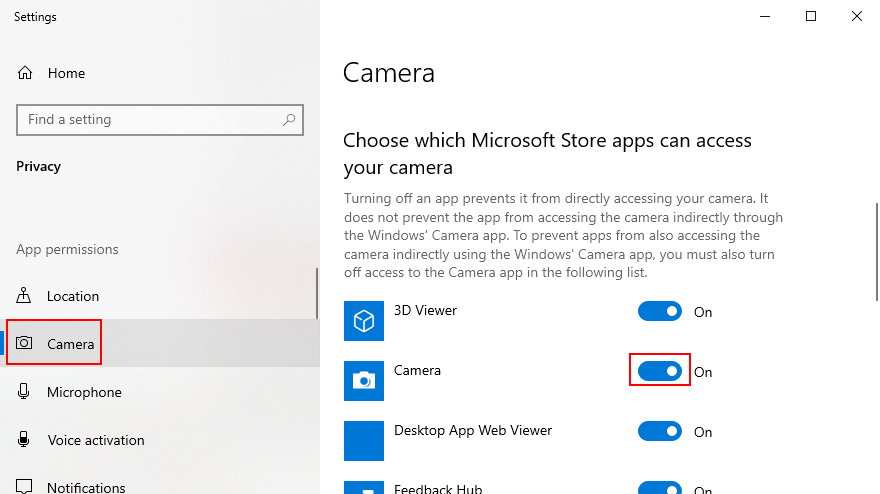
- In Scegli quali app di Microsoft Store possono accedere alla tua fotocamera , imposta Fotocamera su On
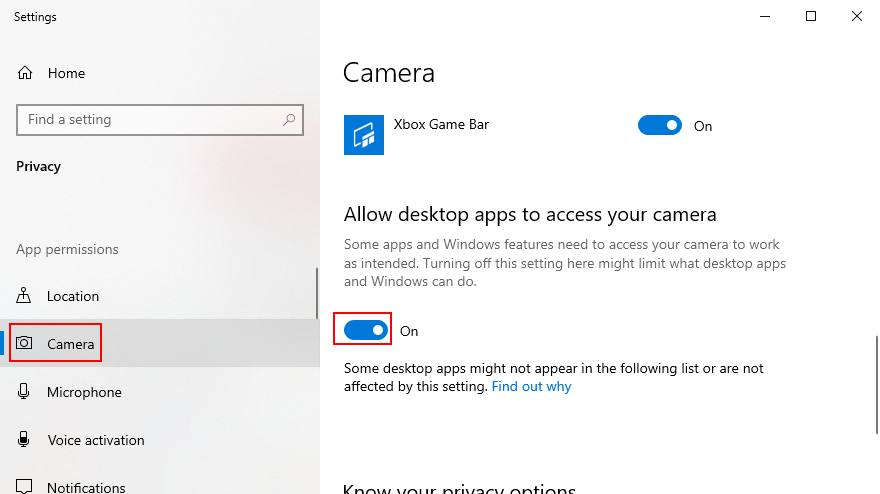
- Scorri verso il basso fino a Consenti alle app desktop di accedere alla fotocamera e impostala su On
- Seleziona Privacy
4. Verifica la compatibilità della webcam
Se hai acquistato o ricevuto la tua webcam molto tempo fa, è possibile che l’hardware non sia supportato da Windows 10. In tal caso, non devi fare altro che acquistare una nuova webcam. C’è un semplice trucco per scoprirlo rapidamente: trovare un file chiamato stream.sys. Ecco cosa dovresti fare:
- Fai clic con il pulsante destro del mouse sul pulsante Start e seleziona Gestione dispositivi
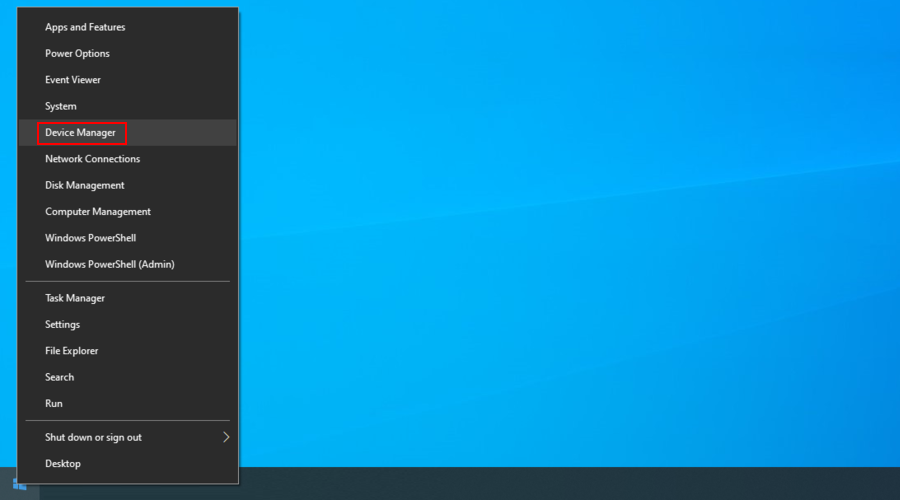
- Espandi la categoria Fotocamere per cercare la tua webcam
- Fai clic con il pulsante destro del mouse sul dispositivo della webcam e seleziona Proprietà
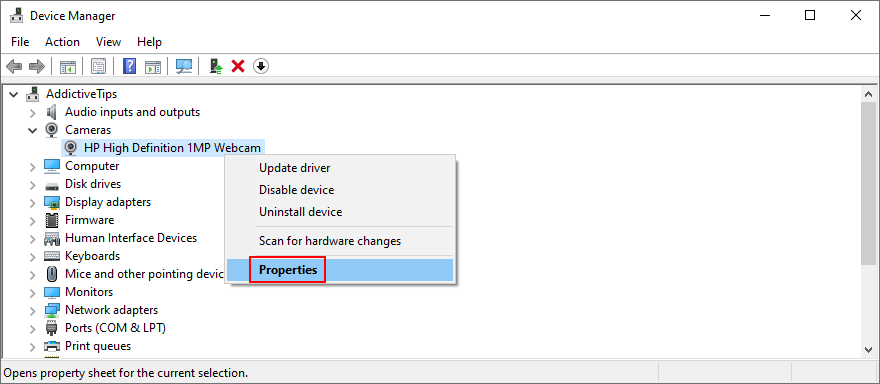
- Passa alla scheda Driver e fai clic su Dettagli driver

- Nell’elenco dei file, cerca stream.sys . Se lo trovi, significa che la webcam non è supportata da Windows 7 e versioni più recenti, quindi devi sostituirla con una nuova. Altrimenti, puoi andare a
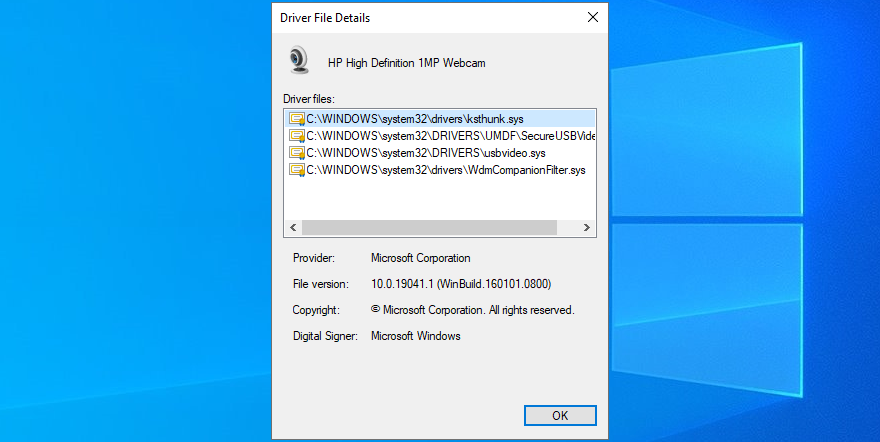
Se non riesci a trovare la tua webcam in Gestione dispositivi , scopri come risolvere questo problema.
5. Controlla i driver della webcam
Lo dice nel messaggio di errore: dovresti ispezionare i driver della tua webcam per assicurarti che tutto funzioni correttamente. Ci sono tre approcci a questo: reinstallare il dispositivo, aggiornare il driver o ripristinare il driver.
Come reinstallare il dispositivo webcam:
- Fai clic con il pulsante destro del mouse sul pulsante Start e vai a Gestione dispositivi

- Cerca la tua webcam nel gruppo Fotocamere
- Fai clic con il pulsante destro del mouse sulla voce della webcam e seleziona Disinstalla dispositivo
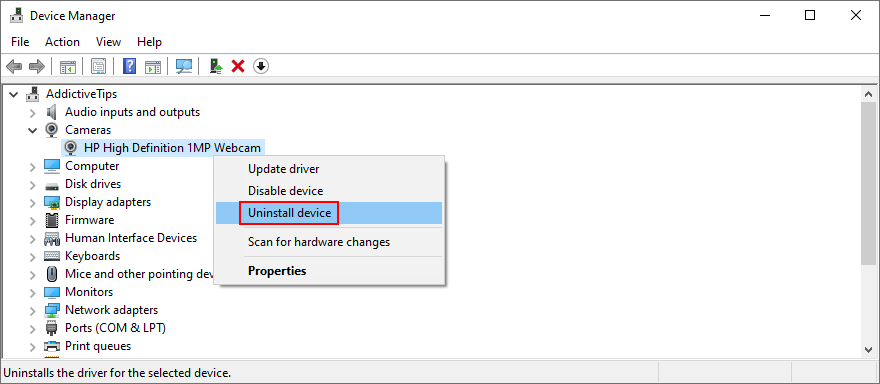
- Procedi con la rimozione del dispositivo
- Fai clic con il pulsante destro del mouse su una voce e seleziona Rileva modifiche hardware
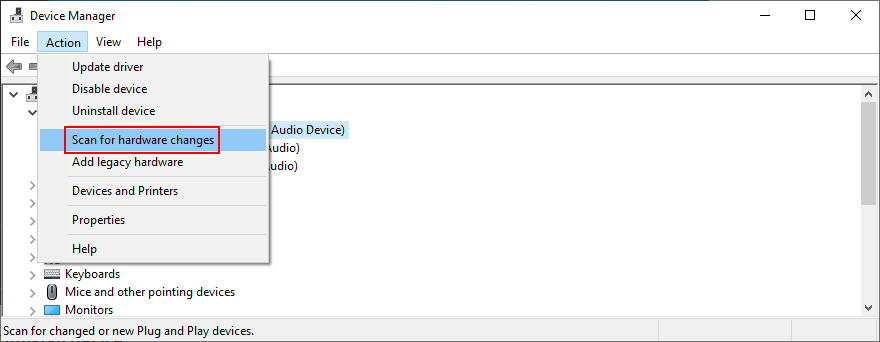
- Riavvia il computer. Windows reinstallerà automaticamente gli adattatori della webcam
- Apri l’app Fotocamera e verifica la presenza di errori
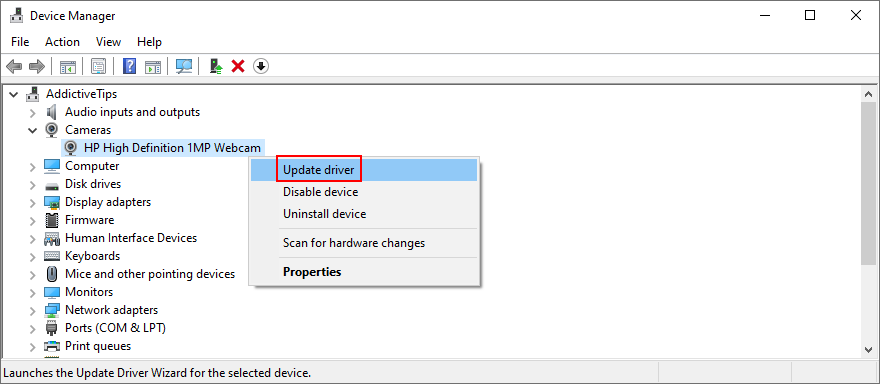
Come aggiornare il driver della fotocamera:
- In Gestione dispositivi , fai clic con il pulsante destro del mouse sulla webcam e seleziona Aggiorna driver
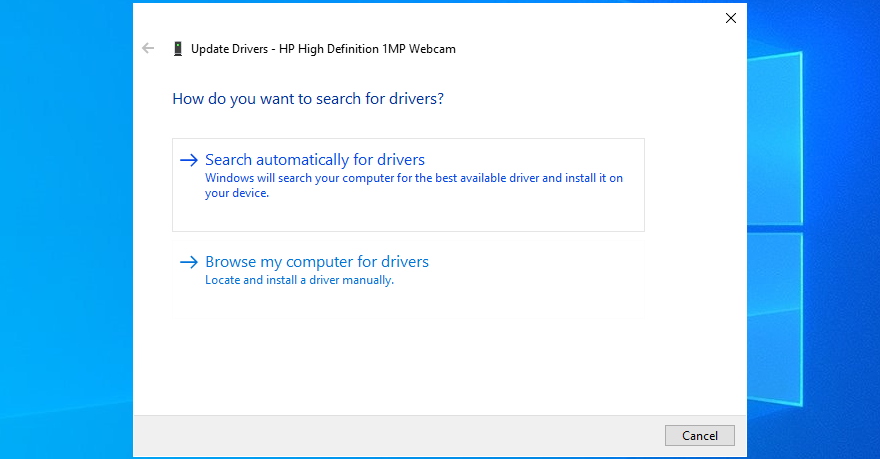
- Fai clic su Cerca automaticamente i driver e attendi
- Se la ricerca online non restituisce nulla, fai clic su Cerca driver aggiornati su Windows Update
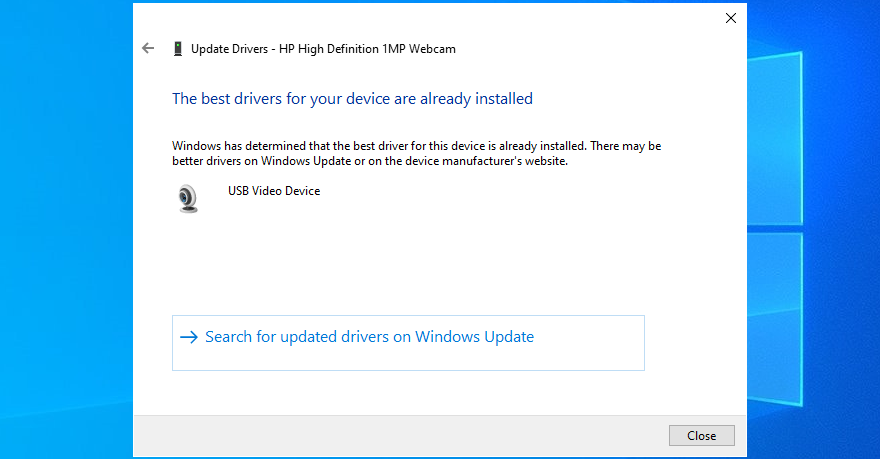
Se Windows non riesce a trovare un driver più recente per la tua webcam, visita il sito web ufficiale per trovare e scaricare una versione più recente. Quindi, ripercorri i passaggi precedenti e utilizza Cerca il software del driver nel mio computer per aggiornare manualmente il driver della webcam.
D’altra parte, se hai installato accidentalmente un driver incompatibile, devi eseguire un rollback.
Come ripristinare il driver della webcam:
- Vai a Gestione dispositivi

- Fai clic con il pulsante destro del mouse sulla webcam e seleziona Proprietà

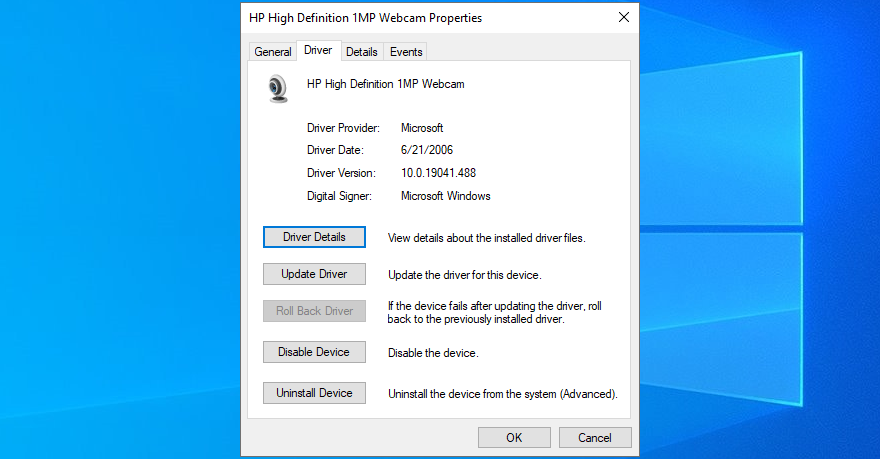
- Passa alla scheda Driver
- Fai clic su Ripristina driver e segui le istruzioni
- Se il pulsante Ripristina driver è disattivato, non puoi eseguire un ripristino, quindi puoi saltare l’intero passaggio
- Riavvia il PC e apri l’app Fotocamera per esaminare i risultati
6. Scansiona il tuo computer alla ricerca di malware
Il tuo computer potrebbe essere stato recentemente infettato da malware senza nemmeno rendersene conto. Di conseguenza, l’agente dannoso potrebbe aver disabilitato i processi di sistema critici e i servizi correlati all’app Fotocamera ed è per questo che continui a visualizzare il messaggio di errore 0xa00f4244 NoCamerasAreAttached.
Ma puoi eseguire una scansione antimalware e rimuovere eventuali infezioni per ripristinare le impostazioni del computer. Se non hai installato uno strumento antivirus di terze parti, puoi utilizzare Windows Defender.
Come eseguire una scansione antimalware con Windows Defender:
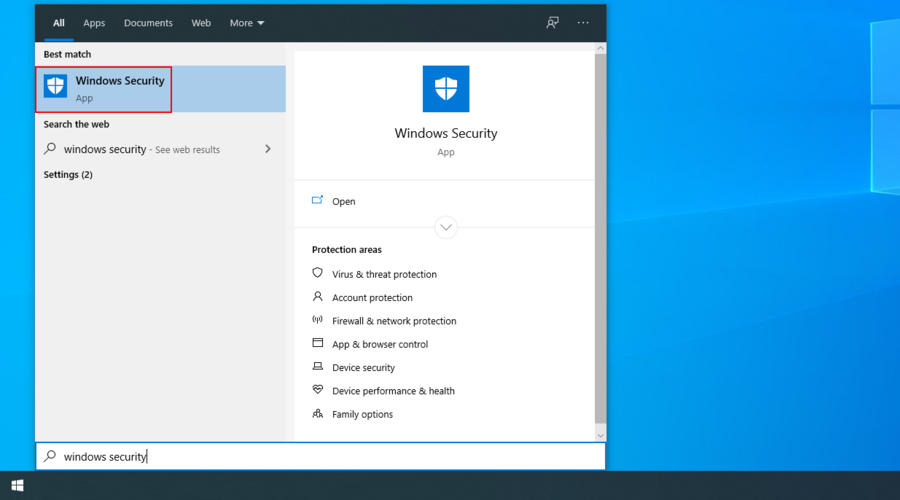
- Fai clic sul pulsante Start , digita Protezione di Windows e premi Invio
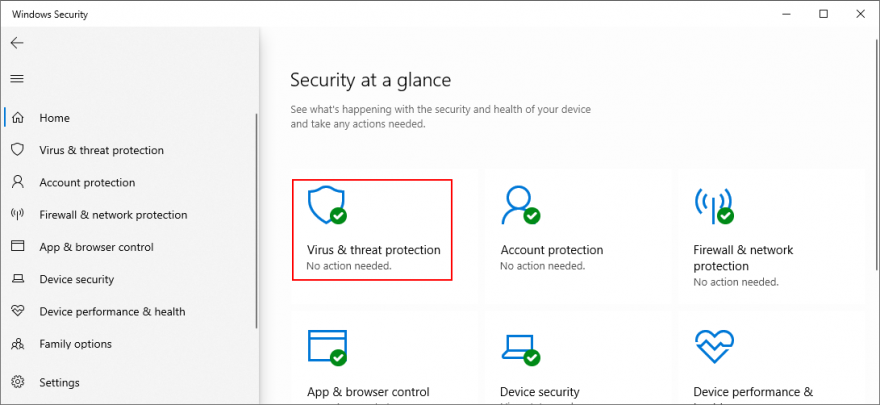
- Seleziona Protezione da virus e minacce
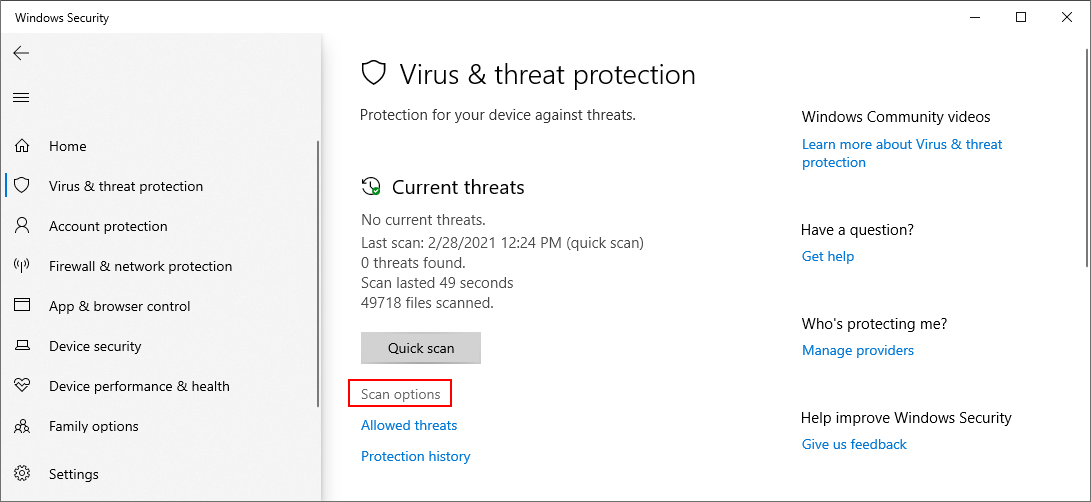
- Fai clic su Opzioni di scansione
- Seleziona Scansione rapida e fai clic su Scansiona ora
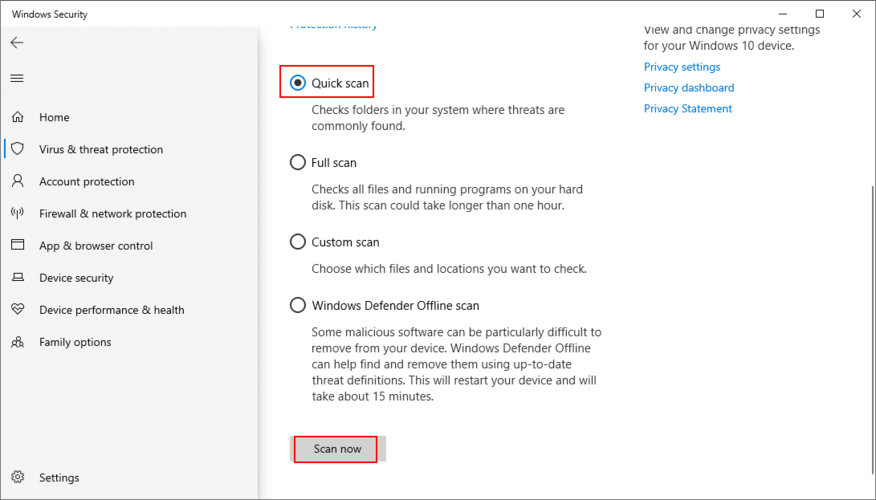
- Se i risultati della scansione non rivelano nulla di sospetto, esegui un’altra scansione utilizzando la modalità Scansione offline di Windows Defender
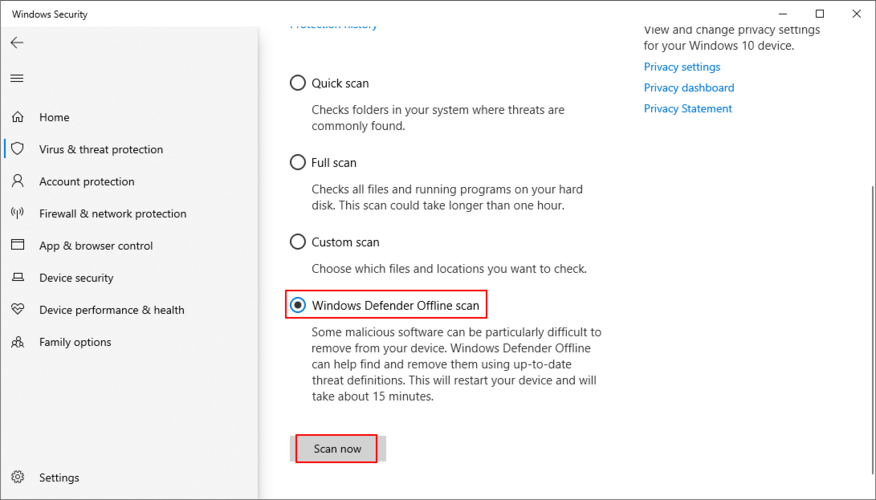
- Riavvia il computer
- Avvia l’app Fotocamera e verifica la presenza di errori
7. Controlla la tua applicazione di sicurezza Internet
Se hai una soluzione di sicurezza informatica installata sul tuo computer, potrebbe avere una funzione speciale dedicata al blocco dell’accesso alla webcam, nel tentativo di impedire alle spie di guardare ogni tua mossa.
Since the application overrides your computer settings, it could be the reason why you keep getting the 0xa00f4244 NoCamerasAreAttached error code.
To fix this problem, just locate the webcam feature in your Internet security program and shut it down to allow webcam access to all your installed applications.
8. Review Camera app permissions
In a previous solution, we said how important it is to verify webcam permissions in the privacy settings of your operating system. However, it’s equally important to check the permissions of the Camera app to make sure that everything is in working order. Here’s how to make it happen:
- Press the Win key, type Camera, and go to App settings
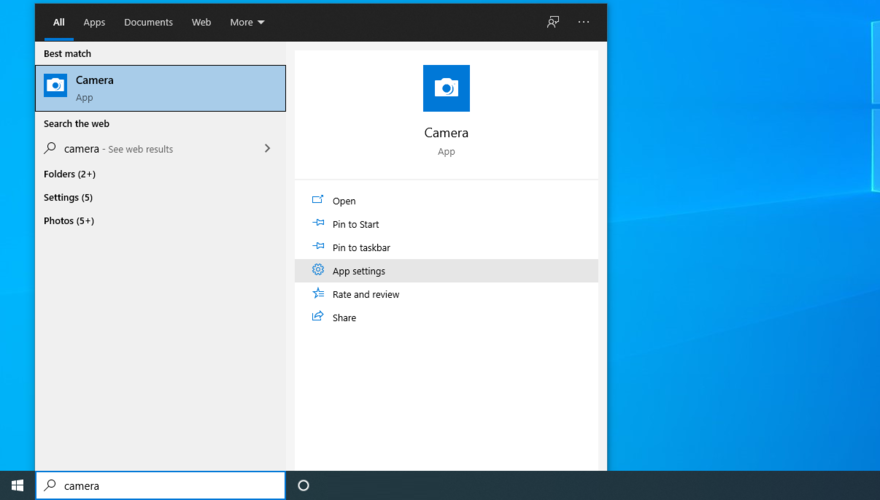
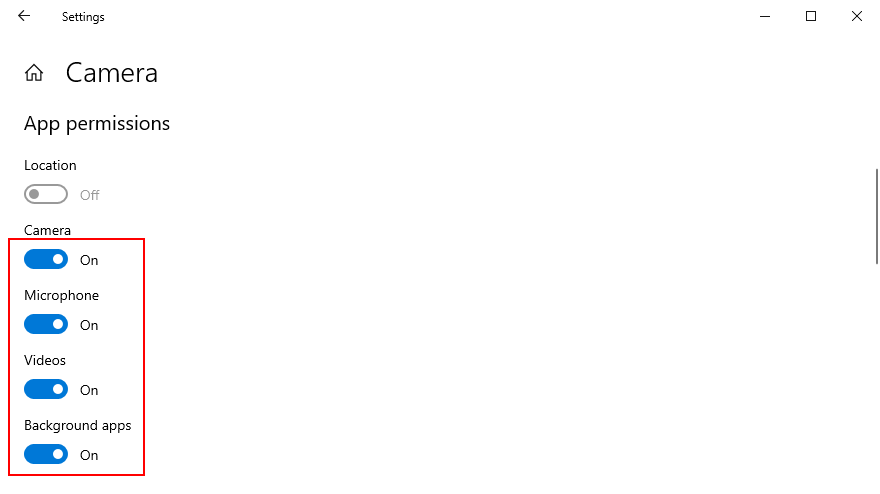
- At App permissions, enable Camera, Microphone, Videos, and Background apps
- Open the Camera app and check for errors
9. End any processes currently using your webcam
Windows Camera is just one app that requires webcam access, but there might be others currently running on your computer, such as Skype, Zoom, or Microsoft Teams. To avoid software conflicts, it’s a good idea to terminate all other processes besides the Camera app. Here’s how to do it easily:
- Right-click the taskbar and select Task Manager

- Locate all apps with camera access beside Camera
- Select each app and click Disable
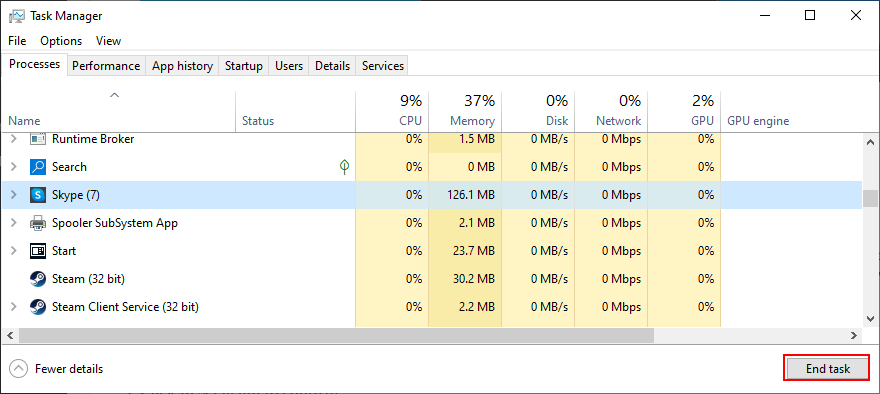
- Also, disable the Camera app
- Relaunch Windows Camera and check for errors
10. Reset the Camera app
If there’s something wrong with the Camera app that could trigger the 0xa00f4244 NoCamerasAreAttached error code, you can easily reset its settings from Microsoft Store. However, keep in mind that all app data will be deleted. Here’s what you have to do:
- Click the Start button, type Camera, and click App settings

- Scroll down and click the Reset button
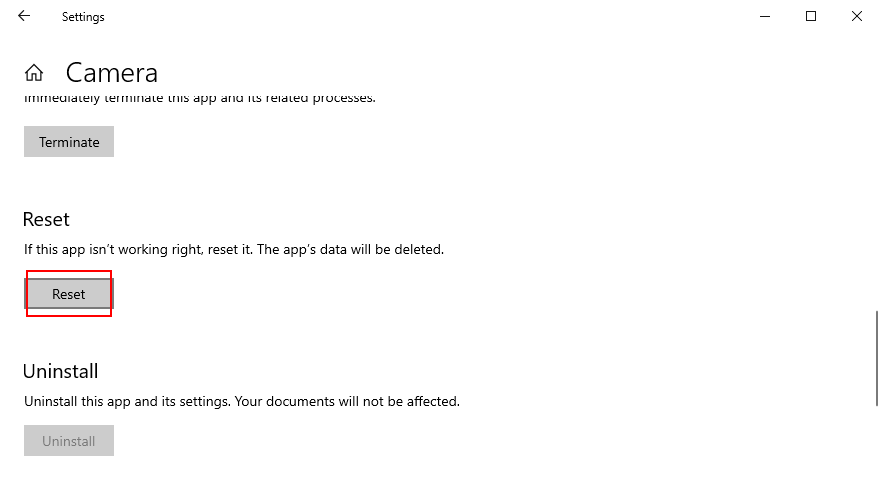
- Click Reset again to confirm
- Open the Camera app and check for errors
11. Reinstall the Camera app
The reset option sometimes fails to fix the 0xa00f4244 NoCamerasAreAttached error. A better but more complicated solution is to uninstall the Camera app and set it up again. To do this, you must first make sure that all its processes are properly closed.
How to terminate all Camera app processes:
- Press the Windows button, type Camera, and select App settings

- Scroll down and click Terminate
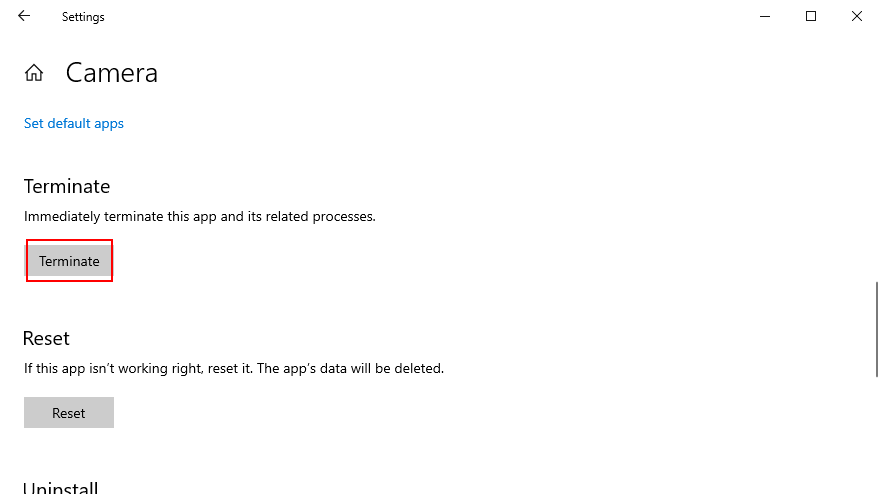
- Right-click the taskbar and go to Task Manager

- Look for the Camera process. If you can still find it here, select it and click End task
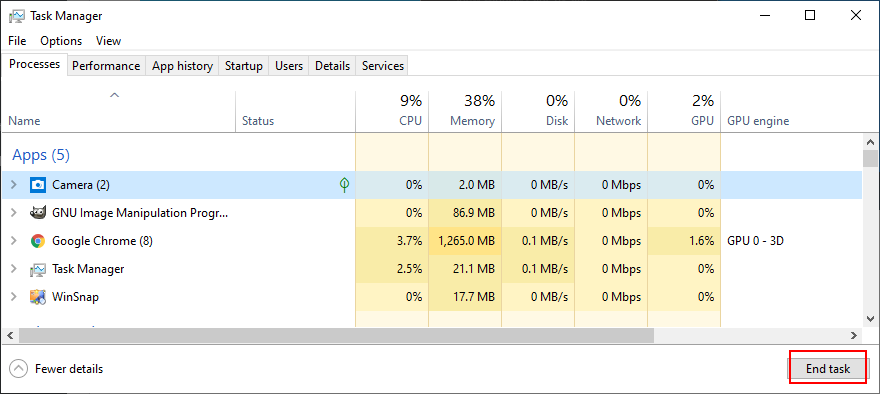
How to reinstall the Camera app using Apps and Features:
- Right-click the Start button and go to Apps and Features
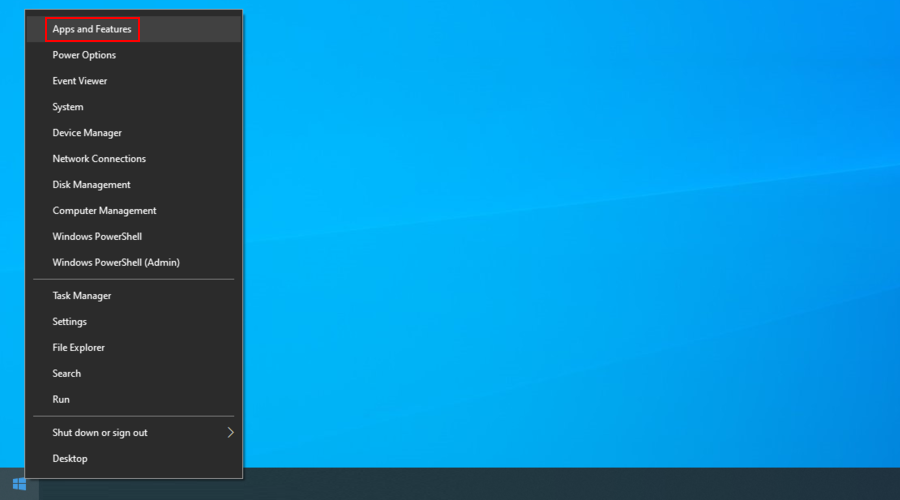
- Find and select Camera (by Microsoft Corporation)
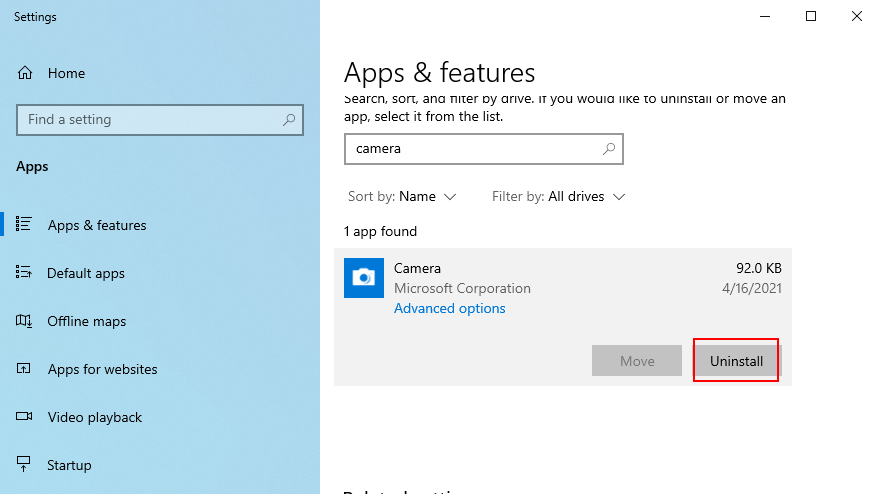
- Click Uninstall and proceed with the app removal
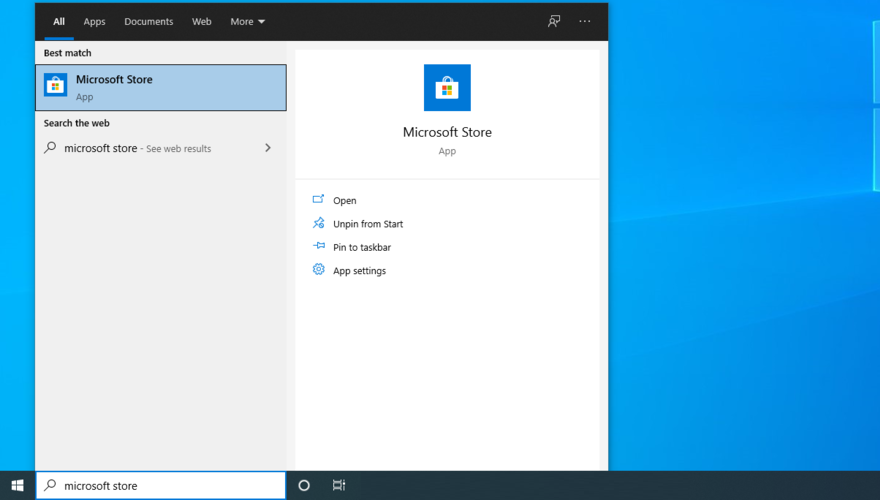
- Press the Win key, type Microsoft Store, and hit Enter
- Click the Search button on top, type Windows Camera, and select this app
- Click Get and then Install
If you can’t remove the Camera app from Apps and Features because the Uninstall button is greyed out, you can force the app’s uninstall with the help of PowerShell.
How to reinstall the Camera app using PowerShell:
- Click the Start button, type Windows PowerShell, and select Run as administrator
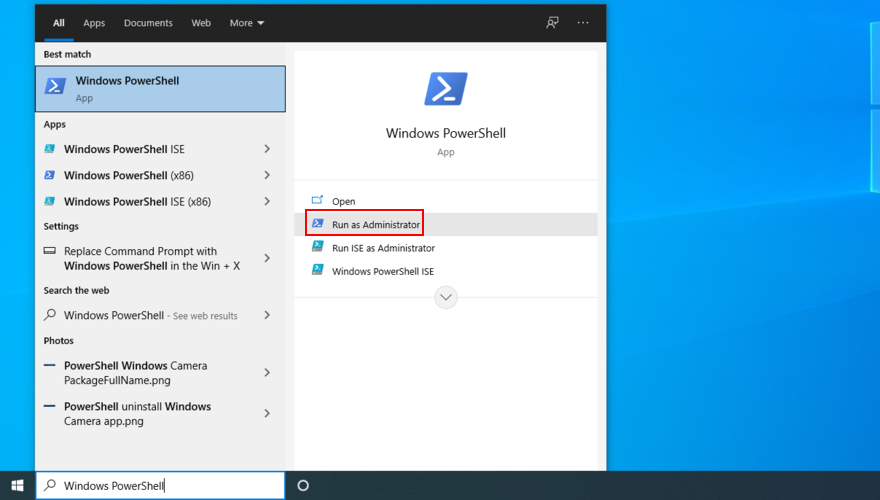
- Type
Get-AppxPackage-allusers | Select Name, PackageFullNameand press Enter
- Locate the Name entry that says
Microsoft.WindowsCamera - Copy the
PackageFullNameassociated with that entry (e.g.Microsoft.WindowsCamera_2018.826.98.0_x64__8wekyb3d8bbwe)
- Type
Remove-AppxPackage PackageFullNameand replacePackageFullNamewith what you copied (e.g.Remove-AppxPackage Microsoft.WindowsCamera_2018.826.98.0_x64__8wekyb3d8bbwe). Press Enter
- Type
Add-AppxPackage-register “C:\Program Files\WindowsApps\PackageFullName\appxmanifest.xml”-DisableDevelopmentMode. ReplacePackageFullNamewith what you copied (e.g.Remove-AppxPackage Microsoft.WindowsCamera_2018.826.98.0_x64__8wekyb3d8bbwe). Press Enter
Launch the Camera app and check if you still get the 0xa00f4244 NoCamerasAreAttached error.
12. Run the Hardware and Devices troubleshooter
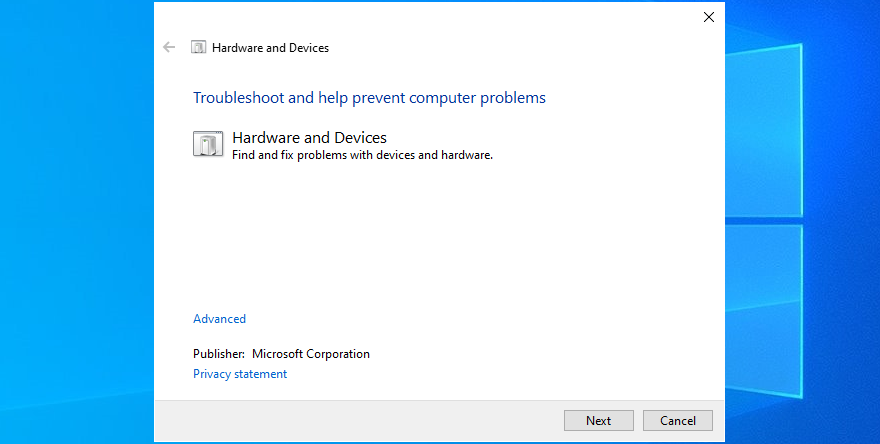
Windows has a built-in troubleshooter prepared to repair common issues with hardware devices. It’s worth a shot to repair webcam problems and works with multiple apps (for instance, if Zoom won’t work with your camera).
- Press the Win key + R, type
msdt.exe-id DeviceDiagnostic, and press Enter
- Click Next and follow the wizard instructions
- If the troubleshooter finds a solution, click Apply this fix
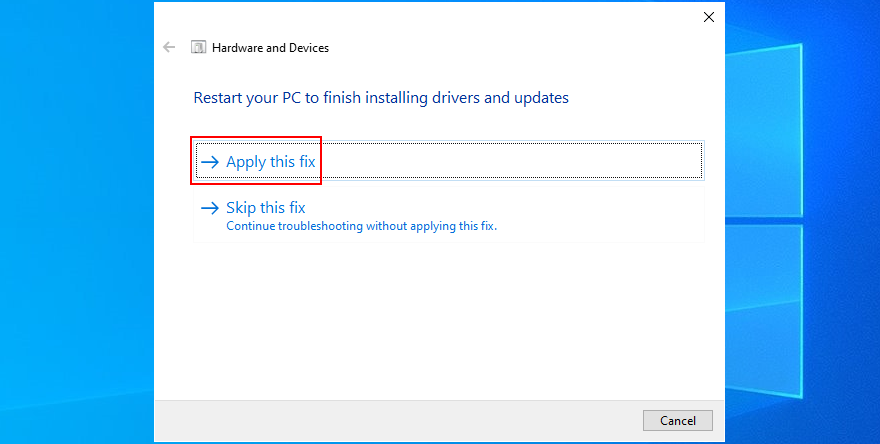
- Restart your computer
- Launch the Camera app and check for additional errors
13. Run the Microsoft Store troubleshooter
Since Windows Camera is a Microsoft Store, you should also troubleshoot this application, especially if you have trouble running other Store apps, too.
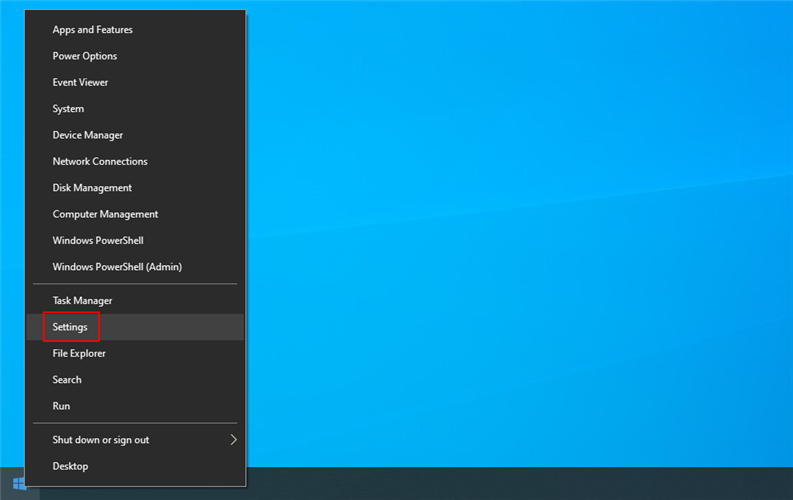
- Right-click the Start button and select Settings
- Click Update & Security
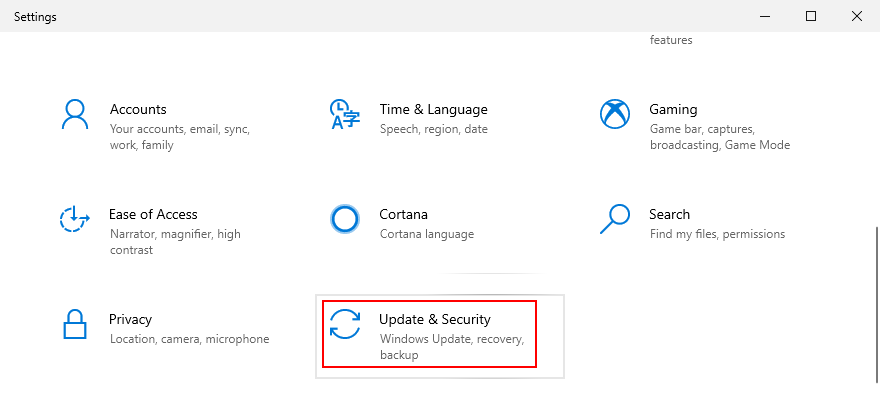
- Select Troubleshoot on the left side
- Fai clic su Ulteriori strumenti per la risoluzione dei problemi
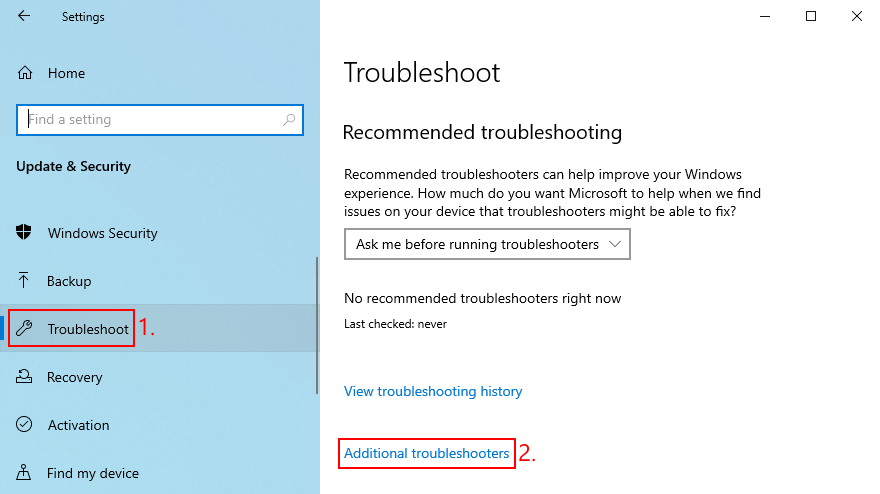
- Scroll down to the bottom of the window
- Select Windows Store Apps and click Run the troubleshooter
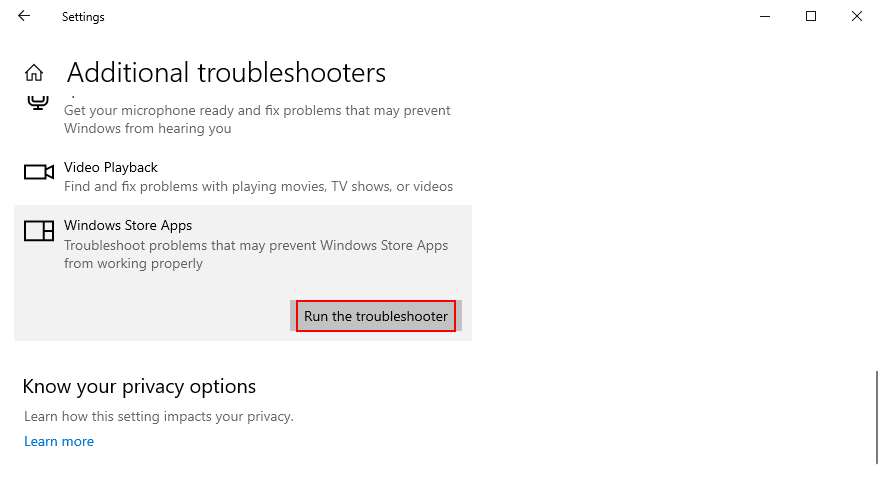
- Follow the on-screen instructions
- If the troubleshooter finds any solutions, apply them
- Restart your PC
- Open the Camera app and check for errors
14. Uninstall recent third-party software
If you have recently installed third-party software applications, they might not be fully supported by Windows 10, resulting in various functionality issues. In some cases, they can even cause error 0xa00f4244 NoCamerasAreAttached in your Camera app. But you can fix this problem by removing the problematic apps.
How to remove recent apps:
- Right-click the Start button and select Apps and Features

- Set Sort by to Install date
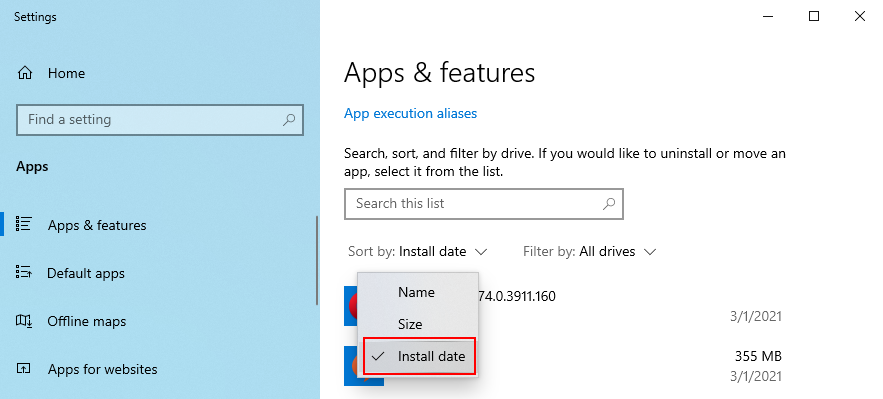
- Select the first entry in the list and click Uninstall
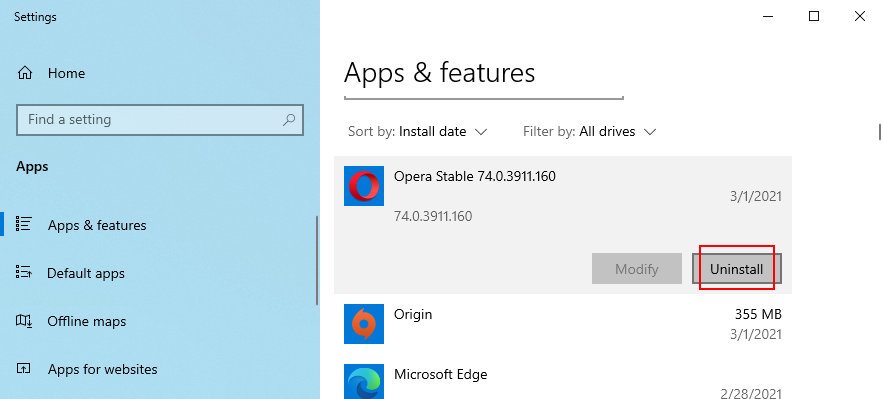
- Click Uninstall again to confirm and proceed with its removal
- Reboot your computer and try to use the Camera app
15. Uninstall recent system updates
A system update that rolled out lately might not be fully compliant with Windows 10, resulting in problems with Microsoft Store apps. It can be tricky to tell, but it makes sense if you started receiving the 0xa00f4244 NoCamerasAreAttached error code right after finishing a system update.
To test this, you can uninstall the most recent Windows update. Don’t worry since you can reinstall it later anyway.
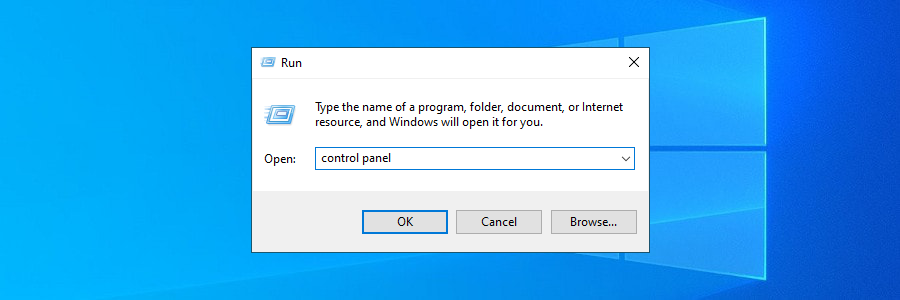
- Press Win key + R, type control panel, and press Enter
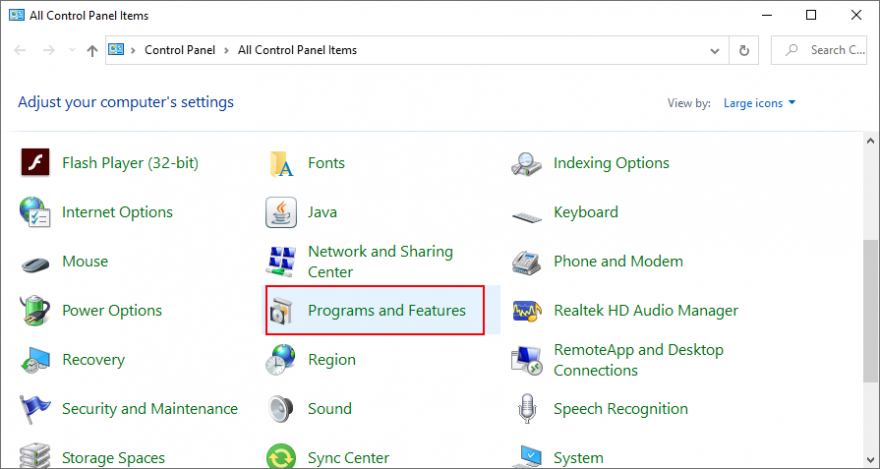
- Click Programs and Features
- Select View installed updates on the left side
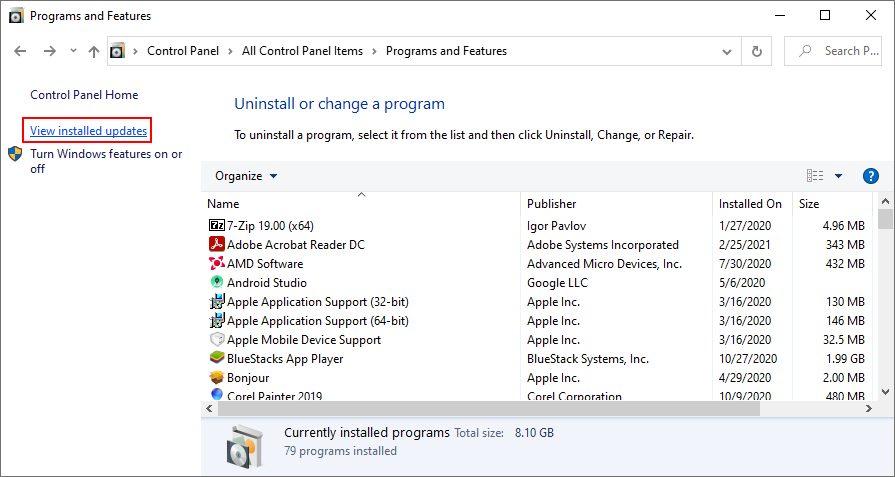
- Click the Installed On column to sort the updates (newest first)
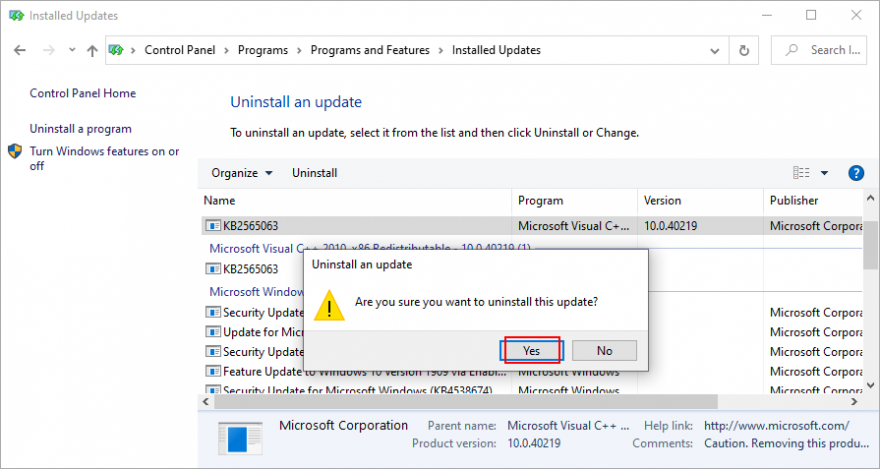
- Double-click the first update on the list
- Click Yes to confirm its removal
- Reboot your PC and open the Camera app
16. Fix corrupt system files
Your operating system might have damaged or missing files that are directly related to the Windows Camera app. However, you can fix this problem without having to use third-party software solutions, thanks to SFC (System File Checker) and DISM (Deployment Image Servicing and Management).
Get started by running SFC:
- Press the Windows key + R, type cmd, and press Ctrl + Shift + Enter to open Command Prompt with admin rights

- Type sfc/scannow and press Enter
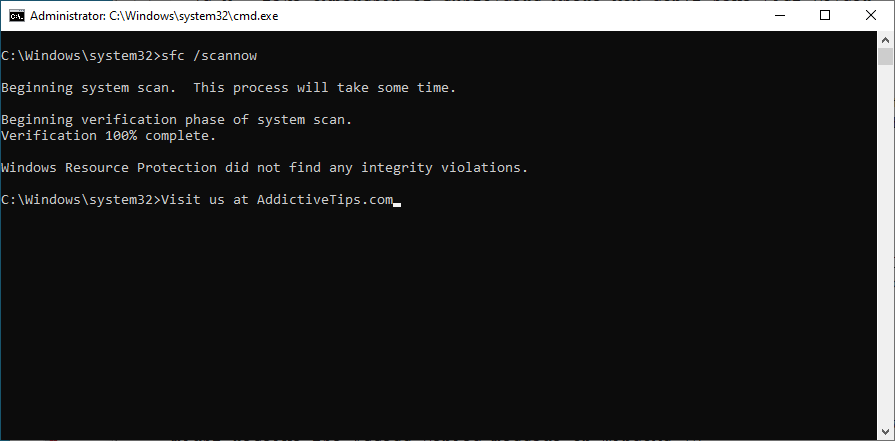
- Wait until SFC finds and fixes any issues
- Exit CMD and restart your PC
- Open the Camera app and check for errors
If SFC doesn’t do the trick, then you can turn to DISM to verify the component store of the Windows image.
How to use DISM:
- Open Command Prompt with elevation rights
- Run
DISM/online/cleanup-image/scanhealth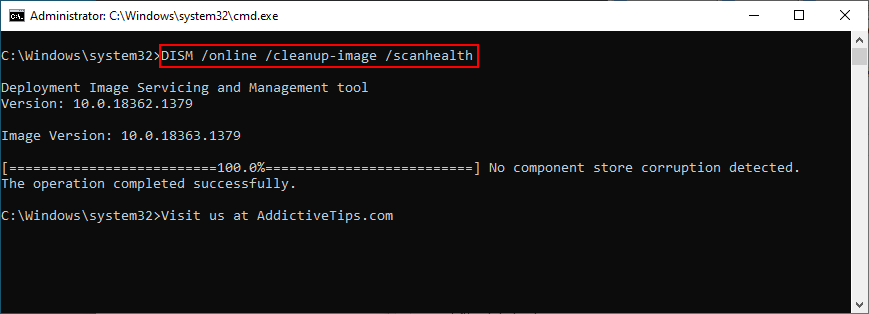
- If DISM reports any issues, run
DISM/online/cleanup-image/restorehealth - Reboot your PC and restart CMD as admin
- Run the SFC command
- Restart your computer, open the Camera app, and check for errors
17. Reset BIOS settings to default
Several users reported that they got rid of the 0xa00f4244 NoCamerasAreAttached error message by resetting BIOS settings to default. It’s an easy task that requires just a couple of clicks. Ecco cosa devi fare:
- Reboot your PC and quickly press the key shown on the screen to enter BIOS mode
- Go to the advanced BIOS settings
- Find the option that resets configuration data and enable it
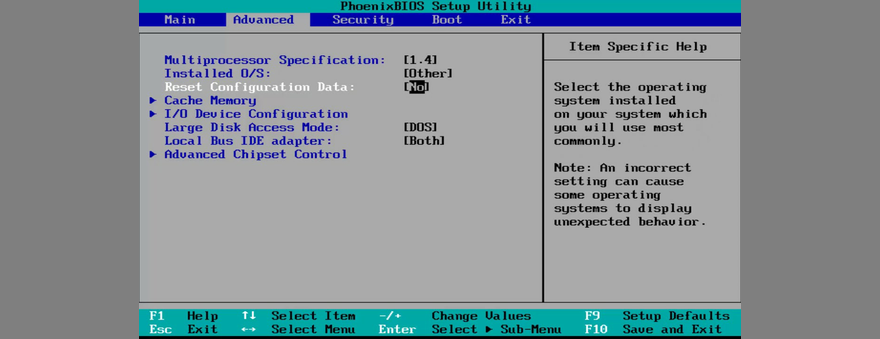
- Save the current BIOS configuration and exit to Windows
- Open the Camera app to check for improvements
18. Check a registry setting
Microsoft Store apps like Camera or Skype need a specific registry in order to function normally. If it doesn’t exist, then you can wake up with error messages like 0xa00f4244 NoCamerasAreAttached.
But you can check this issue by taking a look in Registry Editor and by adding the entry if it’s missing. Don’t worry since there’s no risk of damaging your PC because you will create a registry backup first.
- Click the Start button, type Registry Editor, and select Run as administrator
- Click Yes if prompted by UAC (User Account Control)
- Open the File menu and select Export
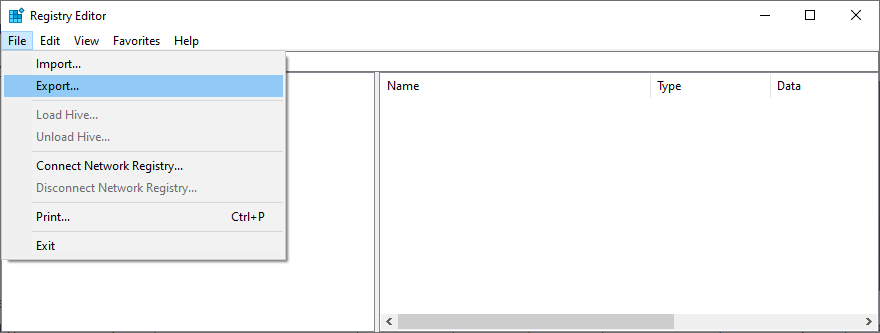
- Write a file name and indicate a folder where you want to save the registry backup. Then, click Save
- If you’re running 32-bit Windows, visit the following location
Computer\HKEY_LOCAL_MACHINE\SOFTWARE\Microsoft\Windows Media Foundation\Platform
- For 64-bit Windows, go to this address instead
Computer\HKEY_LOCAL_MACHINE\SOFTWARE\WOW6432Node\Microsoft\Windows Media Foundation\Platform
- Check if you have an entry called EnableFrameServerMode

- Otherwise, open the Edit menu, click New, and select DWORD (32-bit) Value
- Rename the entry to EnableFrameServerMode
- Double-click EnableFrameServerMode and set its Value Data to 0
- Set Base to Hexadecimal and click OK
- Exit Registry Editor and restart your PC
- Open the Camera app to see if it works now
If you have started experiencing other issues on your computer after making this registry change, you can roll back settings by double-clicking the.reg backup file you previously created. Or, if you didn’t create a backup, simply revisit that registry location and delete the EnableFrameServerMode entry.
19. Create a new user profile
It’s pretty rare, but the Camera app might not be working properly due to data corruption in your user profile. As a result, you get the 0xa00f4244 NoCamerasAreAttached error on your screen. But you can fix this problem by setting up a new local user profile. Here’s how to do it:
- Right-click the Start button and go to Settings

- Select Accounts
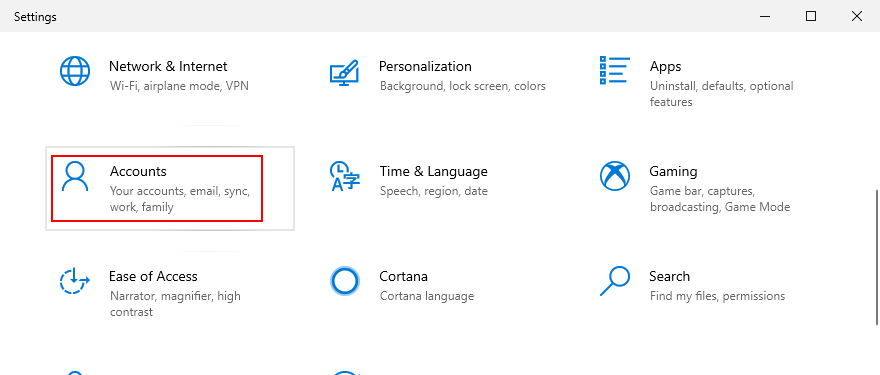
- If you’re logged in with your Microsoft account, click Sign in with a local account instead. Otherwise, click Add someone else to this PC
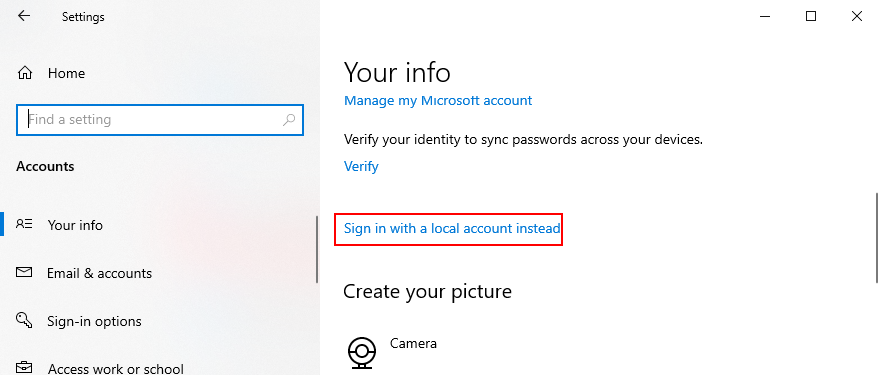
- Set up the username and password of the new account
- Click Change account type and select Administrator
- Log out of your current account and log back in with the new one
- Try to use the Camera app now
20. Use System Restore
Finally, if you can’t pinpoint the software event that caused the 0xa00f4244 NoCamerasAreAttached error code, you can roll back Windows 10 if there are any restore points created before the Camera app started acting up. However, keep in mind that it will affect your programs, so you will lose apps installed after the restore point was made.
- Make sure you’re signed in to Windows 10 with the admin role
- Press Win key + R, type control panel, and hit Enter

- Select Recovery
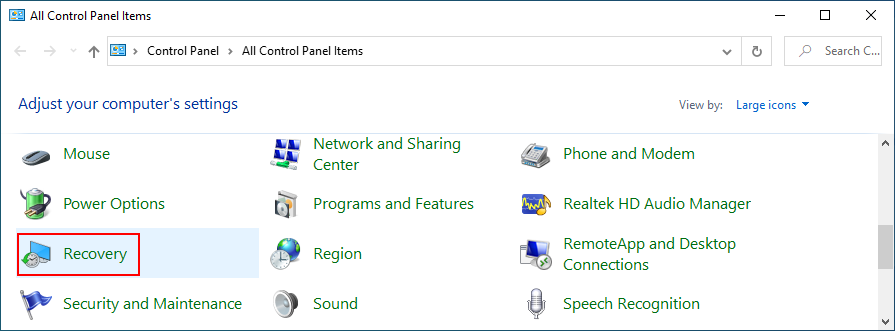
- Click Open System Restore
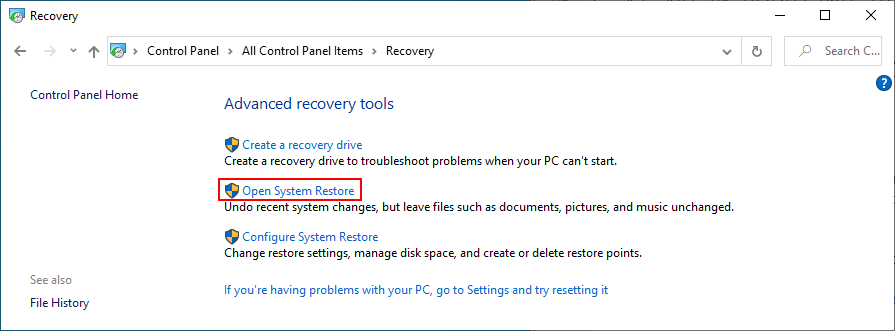
- Select a restore point from the list
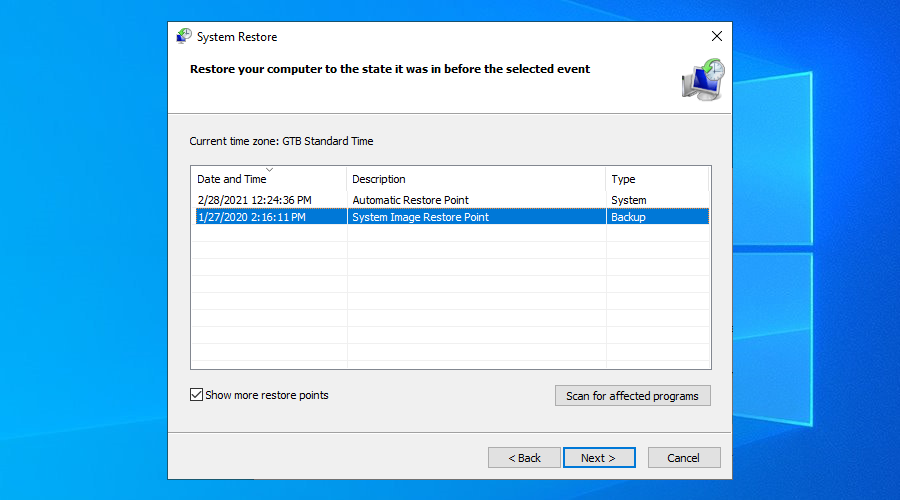
- Click Scan for affected programs if you want to learn more about the changes
- Click Next and proceed with the instructions
- System Restore might take a while. Once it finishes, restart your PC
- Launch the Camera app and try to use it now
The 0xa00f4244 NoCamerasAreAttached error can be fixed
To recap, 0xa00f4244 NoCamerasAreAttached is an error code that appears in the Windows Camera app, preventing you from using your camera. To fix this problem, you can run Windows Update, check the webcam cover, cable and switch, review webcam permissions, verify webcam compatibility, and inspect the webcam drivers.
It’s also a good idea to scan your PC for malware, check the settings of your Internet security solution, verify Camera app permissions, end all processes currently using your webcam, reset or reinstall the Camera app, as well as to run the Hardware and Devices troubleshooter.
Moreover, you can run the Microsoft Store troubleshooter, uninstall recent third-party software and system updates, fix corrupt system files, reset BIOS settings to default, add a registry entry if it’s missing, create a new user profile, and use System Restore.
How did you manage to get rid of error 0xa00f4244 NoCamerasAreAttached on your Windows 10 PC? Tell us about your experience in the comment section below.

