0x80080005 è un codice di errore segnalato da molti utenti durante il tentativo di eseguire Windows Update. Impedisce al tuo sistema operativo di scaricare e applicare gli ultimi aggiornamenti, il che potrebbe causare seri problemi a lungo termine.
Ad esempio, potresti avere problema durante l’aggiornamento delle app di Microsoft Store senza gli ultimi aggiornamenti di sistema. L’errore può essere innescato da un errore software o hardware. Di solito ha a che fare con le impostazioni del computer o della connessione di rete, il che significa che dovresti essere in grado di risolverle facilmente utilizzando le soluzioni seguenti.
Come correggere l’errore di aggiornamento di Windows 10 0x80080005
Prima di iniziare il processo di risoluzione dei problemi, assicurati di crea un punto di ripristino del sistema sul tuo PC. Se incontri ulteriori problemi lungo il percorso, puoi annullarli ripristinando Windows 10 al punto di ripristino.
Inoltre, dovresti provare a eseguire Windows Update per confermare l’errore:
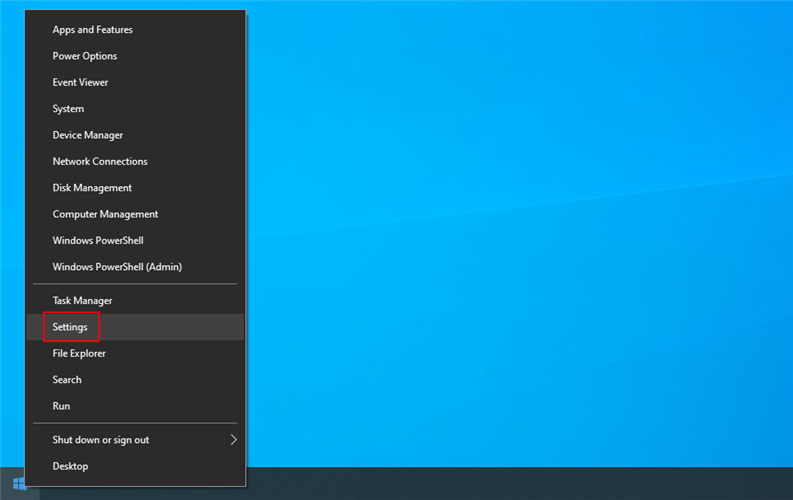
- Fai clic con il pulsante destro del mouse sul pulsante Start e vai a Impostazioni
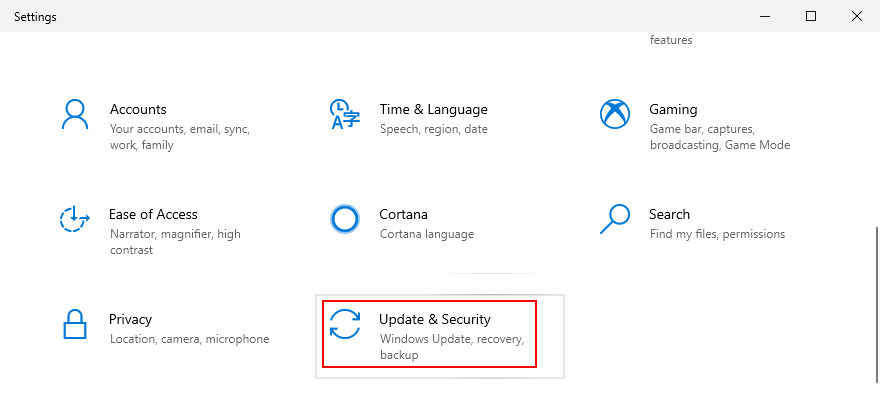
- Seleziona Aggiornamento e sicurezza
- Fai clic su Windows Update sul lato sinistro
- Fai clic su Verifica la disponibilità di aggiornamenti

1. Esegui lo strumento di risoluzione dei problemi di Windows Update
Puoi iniziare con una soluzione semplice: utilizza Risoluzione dei problemi di Windows Update . È progettato per identificare e riparare i problemi comuni che impediscono l’aggiornamento del sistema operativo. Ecco come usarlo:
- Fai clic sul pulsante Start , cerca Impostazioni e apri questa app

- Vai a Aggiornamento e sicurezza

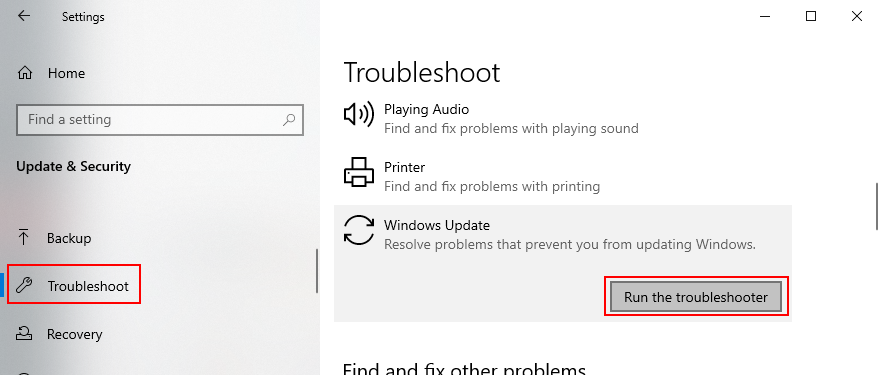
- Passa a Risoluzione dei problemi sul lato sinistro
- Fai clic su Ulteriori strumenti per la risoluzione dei problemi

- Seleziona Windows Update e fai clic su Esegui lo strumento di risoluzione dei problemi
- Segui i passaggi della procedura guidata e applica le eventuali correzioni
- Riavvia il PC e prova a eseguire Windows Update ora
2. Utilizza la diagnostica di Windows Update
Se lo strumento di risoluzione dei problemi integrato non ha funzionato, puoi passare alla diagnostica di Windows Update. È uno strumento creato da Microsoft per diagnosticare e riparare i problemi di Windows Update, che deve essere installato separatamente. Ecco come usarlo:
- Assicurati di accedere a Windows 10 con un account amministratore
- Scarica Windows Update Diagnostic dalla sito web ufficiale
- Avvia l’app
- Nella procedura guidata, seleziona Windows Update e fai clic su Avanti
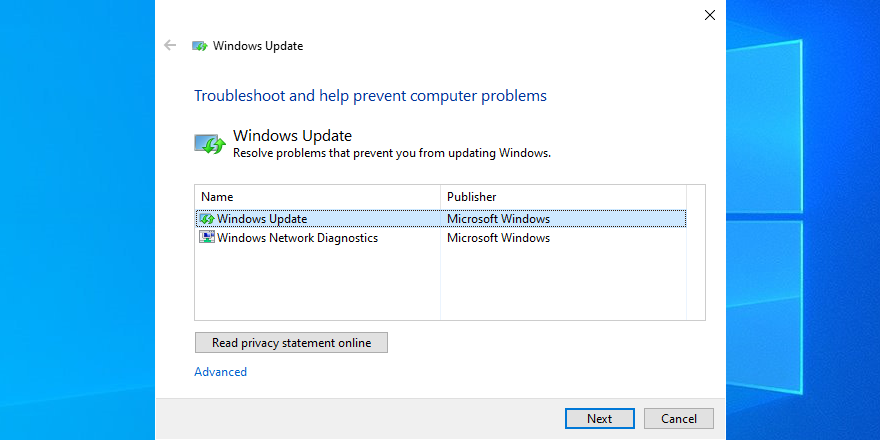
- Segui le istruzioni passo passo
- Al termine, riavvia Windows Update Diagnostic
- Seleziona Diagnostica di rete Windows e fai clic su Avanti
- Dopo che la procedura guidata ha applicato le correzioni, riavvia il PC
- Prova a eseguire Windows Update adesso
3. Riavvia il servizio Windows Update
Windows Update è controllato da un servizio che dovrebbe avviarsi automaticamente all’avvio del sistema ed essere sempre eseguito. Se, per qualche motivo, ciò non accade, puoi aspettarti codici di errore come 0x80080005. Per fortuna, puoi risolvere facilmente questo problema:
- Fai clic sul pulsante Start , cerca Servizi e avvia questa applicazione
- Trova e fai doppio clic su Windows Update per visualizzarne le proprietà
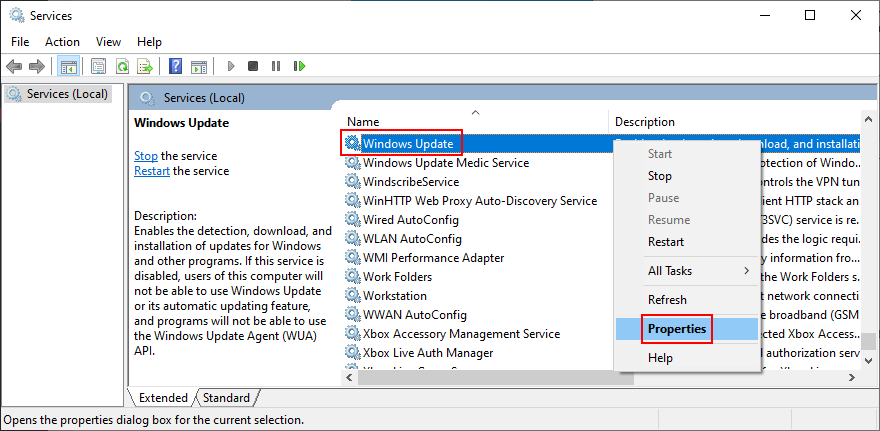
- Rimani nella scheda Generale
- Imposta Tipo di avvio su Automatico (avvio ritardato)
- Se il servizio viene arrestato, fai clic sul pulsante Avvia
- Fare clic su Applica per confermare le modifiche e uscire alla finestra principale dei servizi

- Trova Servizio trasferimento intelligente in background e Disponibilità app per eseguire le stesse azioni
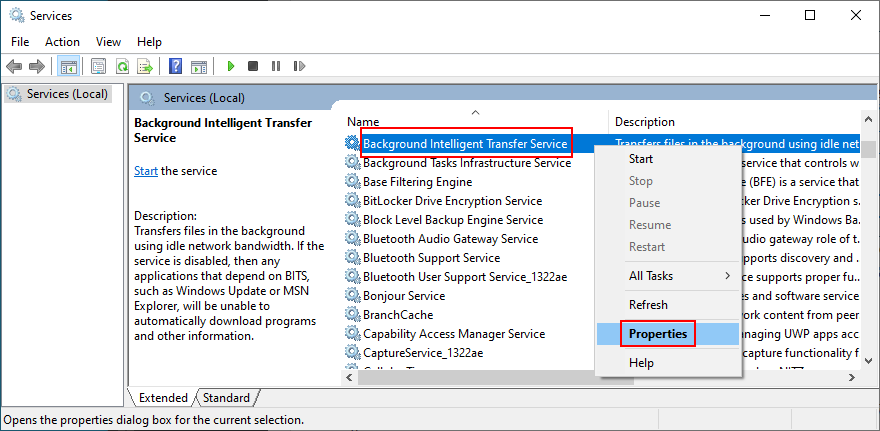
- Prova a eseguire Windows Update
4. Disabilita il servizio elenco reti
È richiesto il servizio Elenco reti, ma alcuni utenti segnalano che causa problemi di Windows Update che portano all’errore 0x80080005. Ecco come disattivarlo:
- Premi il tasto Win + R , digita services.msc e premi Invio

- Individua e fai doppio clic su Network List Service
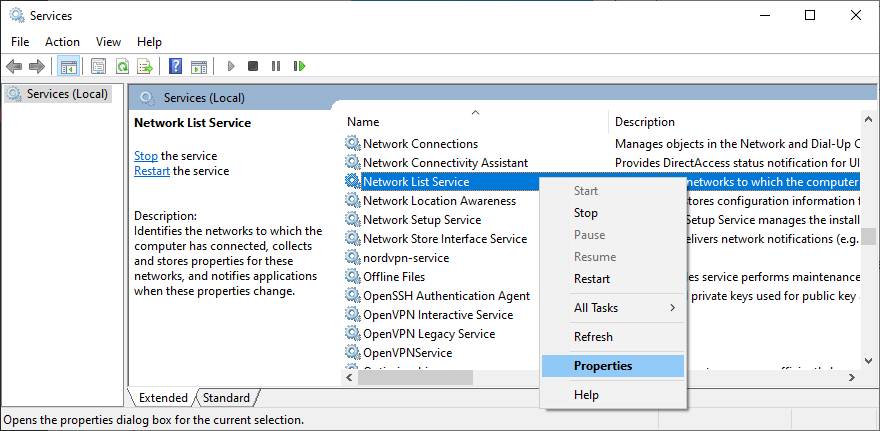
- Imposta Tipo di avvio su Disabilitato
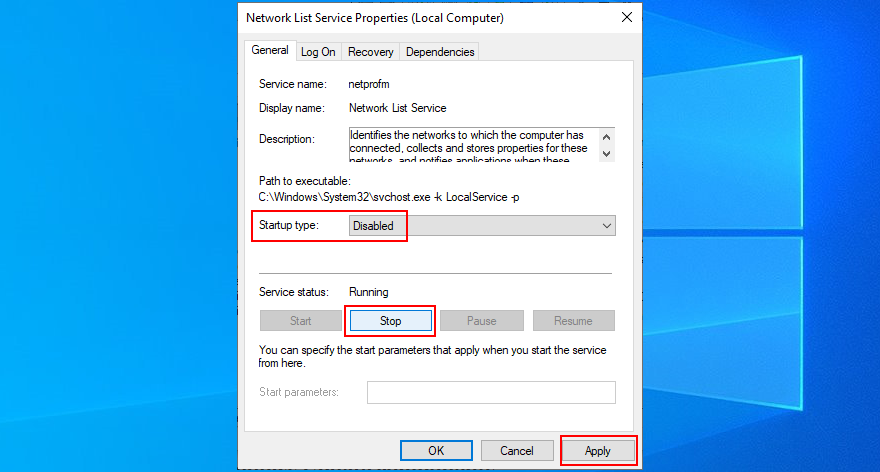
- Se il servizio è in esecuzione, fai clic su Ferma
- Fai clic su Applica ed esci
- Prova a eseguire Windows Update adesso
5. Controlla le impostazioni di Criteri di gruppo
È possibile che il codice di errore di Windows Update 0x80080005 sia stato attivato da impostazioni errate in Criteri di gruppo. Ecco come verificare e risolvere questo problema:
- Premi il tasto Win + R , digita gpedit.msc e premi Invio per aprire Editor Criteri di gruppo locali

- Vai a Configurazione computer > Modelli amministrativi > Componenti di Windows > Windows Update
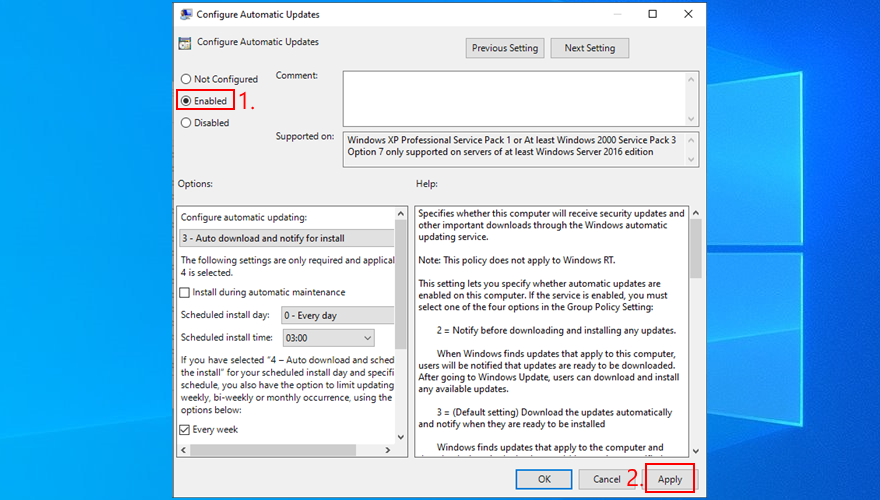
- Individua e fai doppio clic su Configura aggiornamenti automatici per visualizzarne le proprietà

- Seleziona Abilitato e fai clic su Applica
- Riavvia il PC
- Prova a eseguire Windows Update
6. Ripristina Windows Update
Puoi ripristinare rapidamente i componenti di Windows Update per svuotare la cache e risolvere problemi comuni che potrebbero portare all’errore 0x80080005. Per far sì che ciò accada, devi solo usare il prompt dei comandi. Ecco cosa dovresti fare:
- Assicurati di accedere a Windows 10 con diritti di elevazione
- Fai clic sul pulsante Start , cerca Prompt dei comandi e premi Invio
- Copia e incolla i comandi successivi (premi Invio dopo ogni riga di testo):
- Esci dal prompt dei comandi e riavvia il PC
- Prova a eseguire Windows Update
7. Scollega tutte le periferiche
Qualsiasi dispositivo esterno che hai recentemente collegato al computer potrebbe aver causato il codice di errore 0x80080005 a causa di problemi di compatibilità o driver. Pensa a qualsiasi nuovo componente hardware che hai acquistato o ricevuto in regalo, come chiavette USB, adattatori Wi-Fi o webcam con funzionalità plug-and-play.
Per gestire questa questione, spegni il computer e scollega tutte le periferiche, ad eccezione della tastiera e del mouse. Quindi, avvia il sistema operativo ed esegui Windows Update per confermare che non ricevi più l’errore.
A questo punto hai due opzioni: ricollega tutti i dispositivi e scollegali ogni volta che devi eseguire Windows Update oppure individua l’attrezzatura colpevole per ripararla o smettere di usarla.
8. Esegui un avvio pulito
Un avvio pulito di Windows 10 significa disattivare tutti i componenti non necessari che possono causare problemi al software, come driver, servizi e processi. Può aiutarti a escludere problemi che portano all’errore di Windows Update 0x80080005. Ecco cosa devi fare:
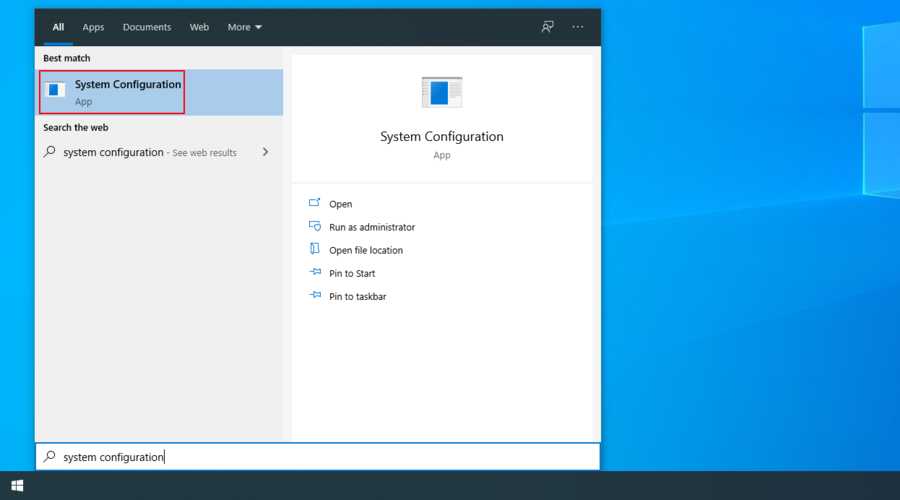
- Premi il tasto Windows , cerca Configurazione di sistema e premi Invio
- Passa alla scheda Servizi
- Deseleziona Nascondi tutti i servizi Microsoft e fai clic su Disabilita tutto

- Esci dalla Configurazione di sistema
- Fai clic con il pulsante destro del mouse sulla barra delle applicazioni e seleziona Task Manager

- Passa alla scheda Avvio
- Fare clic sulla colonna Stato per ordinare tutte le app in base allo stato (prima Abilitate )
- Seleziona la prima app e fai clic su Disabilita
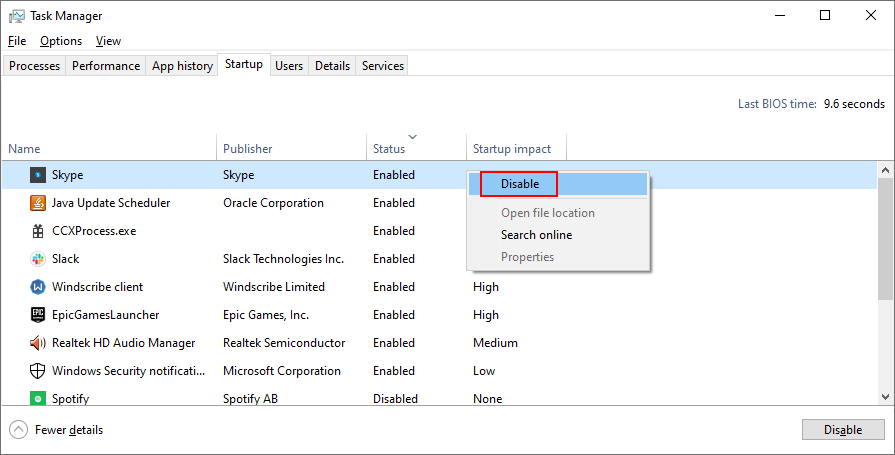
- Esegui questa operazione per tutte le app con lo stato Abilitato
- Riavvia il PC
- Prova a eseguire Windows Update adesso
9. Disattiva il firewall
È improbabile, ma Windows Update potrebbe essere bloccato dal firewall. Di solito accade quando si modificano le impostazioni del firewall predefinite o si installa un’applicazione firewall di terze parti che lo rende possibile.
Per stare al sicuro, puoi disattivare temporaneamente il firewall per dare a Windows abbastanza tempo per installare gli aggiornamenti. Assicurati solo di riavviarlo in seguito. In caso contrario, lascerai il tuo computer esposto a malware.
Come disattivare e riattivare Windows Firewall:
- Accedi a Windows 10 con diritti di amministratore
- Fai clic sul pulsante Start , cerca Pannello di controllo e apri questa applicazione
- Trova e fai clic su Windows Defender Firewall
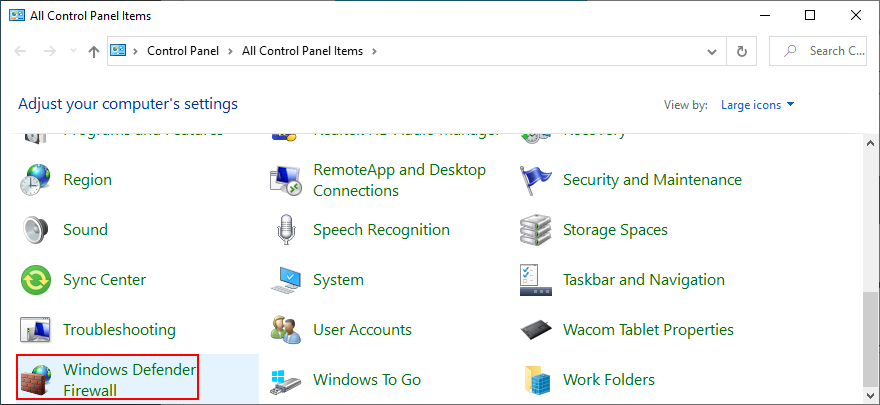
- Fai clic su Attiva o disattiva Windows Defender nel pannello di sinistra

- Seleziona Disattiva Windows Defender Firewall (non consigliato) in Impostazioni di rete privata e Impostazioni di rete pubblica
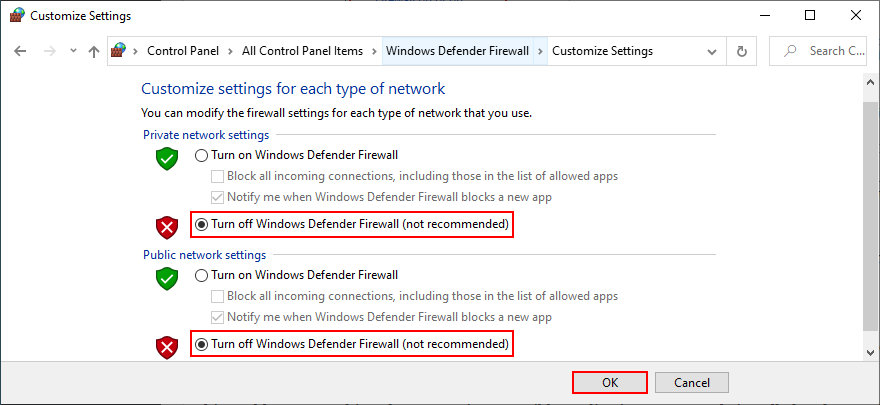
- Fai clic su OK per confermare
- Prova a eseguire Windows Update
- Al termine dell’aggiornamento, torna a Pannello di controllo > Windows Defender Firewall
- Seleziona Ripristina impostazioni predefinite sul lato sinistro
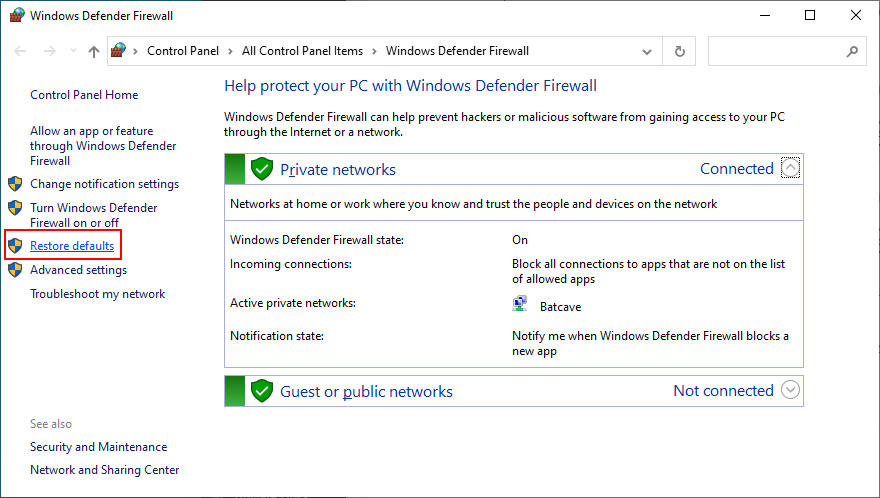
- Fai clic su Ripristina impostazioni predefinite e Sì per confermare
If you have a third-party firewall that takes over Windows Firewall, adapt the steps above to temporarily turn it off.
10. Uninstall third-party software
In the previous solution, we mentioned that a third-party firewall with incorrect settings could block Windows Update and, subsequently, trigger error codes like 0x80080005. However, it’s also possible that the firewall application is built poorly or doesn’t fully support your Windows edition.
It applies not only to firewall apps but also any programs with Internet access. This includes Internet security solutions, VPN services, web browsers, or torrenting clients.
If you started experiencing Windows Update errors right after adding a new piece of software to your PC, that could be the guilty party. But you should be able to fix this problem by uninstalling it.
How to uninstall recent software:
- Right-click the Start button and select Apps and Features
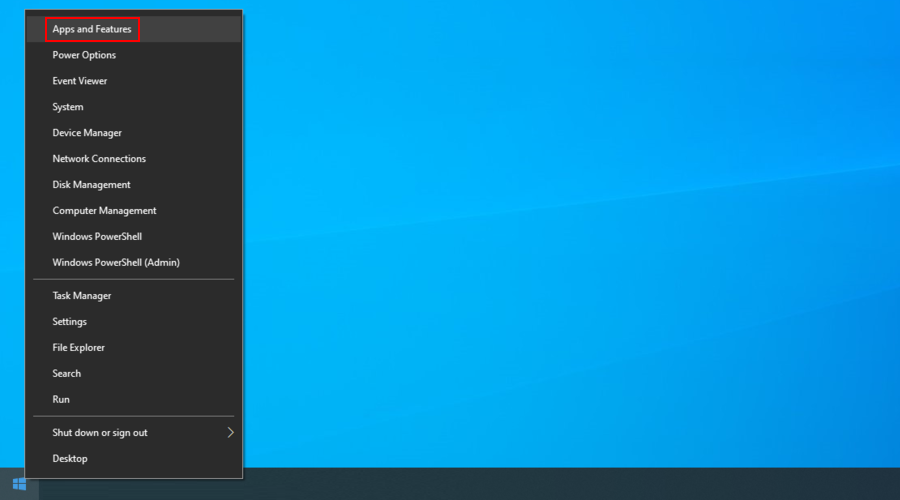
- In the Apps & features section, set Sort by to Install date (newest first)
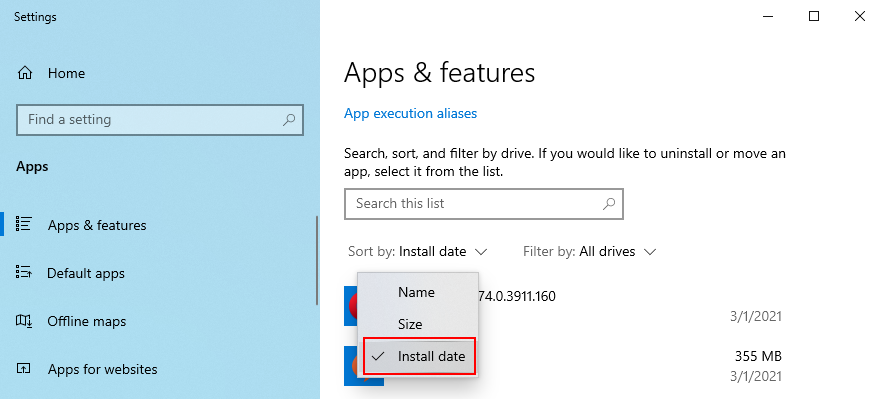
- Pick the first program in the list and click Uninstall
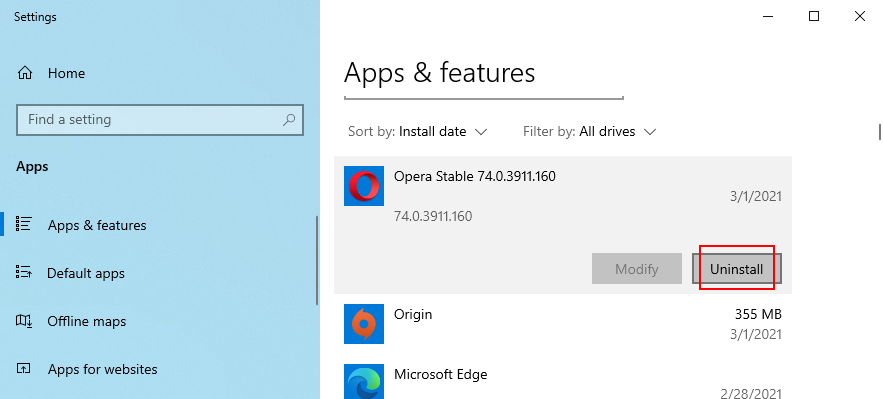
- Click Uninstall again to confirm and proceed with the wizard steps
- If you recently installed multiple fishy programs, make sure to remove all of them
- Reboot your PC and try running Windows Update
The Windows 10 built-in uninstaller is not that effective. If you prefer a more thorough solution that removes not only programs but also any leftover files and registry entries, use a third-party app uninstaller.
11. Uninstall system updates
Not only software applications can cause Windows Update issues but also a faulty system update. It’s not uncommon for Microsoft to push unreliable updates that affect the computers of millions of users. In some cases, this could even lead to error code 0x80080005.
But you can fix it by uninstalling the most recent Windows updates. Here’s how:
- Press Win key + R, type appwiz.cpl, and press Enter

- Click View installed updates
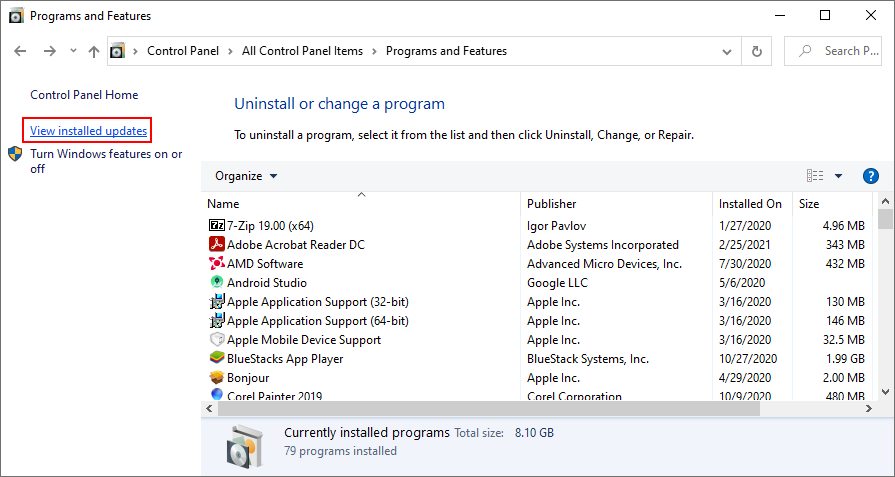
- Click the Installed On column to sort the updates by time (newest first)

- Double-click the first entry in the Microsoft Windows category
- Click Yes to confirm and proceed with the removal
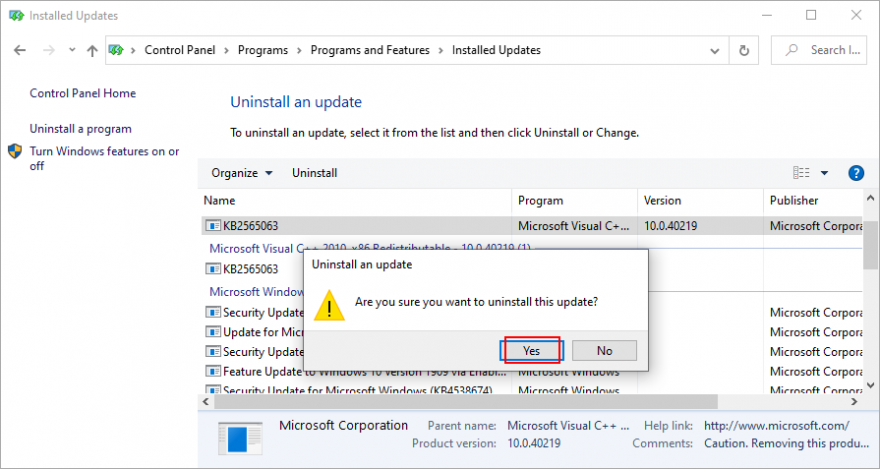
- Restart your PC and try to run Windows Update now
- If Windows Update works now, make sure to avoid installing the same update that was giving you trouble
12. Check the disk space
If there isn’t enough free disk space on your computer, Windows Update might not be able to carry out its activities, like downloading files or running background processes. You can tell if you get the insufficient disk space message in the notifications center.
To fix this problem, you can increase the disk space on the C: drive (or wherever you have Windows installed) by turning to a partition manager. However, if you don’t want to install any third-party tools, Disk Management should do the trick.
How to use Disk Management:
- Right-click the Start button and select Disk Management
- Select a large drive that doesn’t contain Windows (like D:)
- Right-click D: and select Shrink Volume
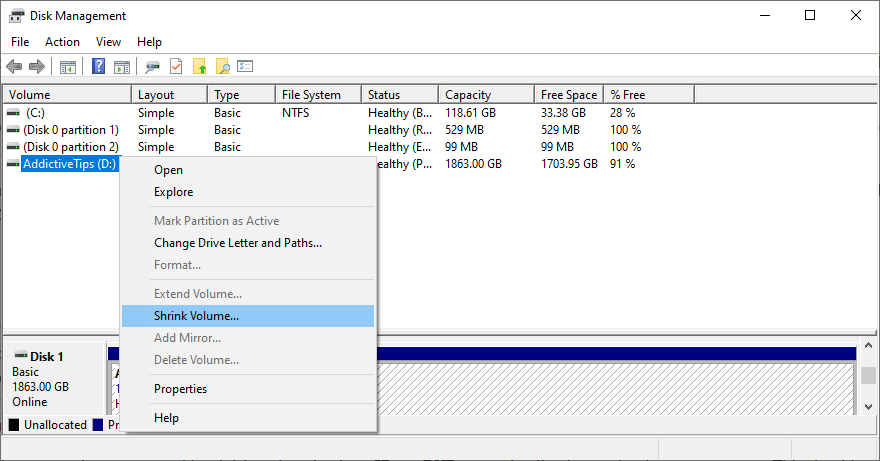
- Write the new volume size and click Shrink
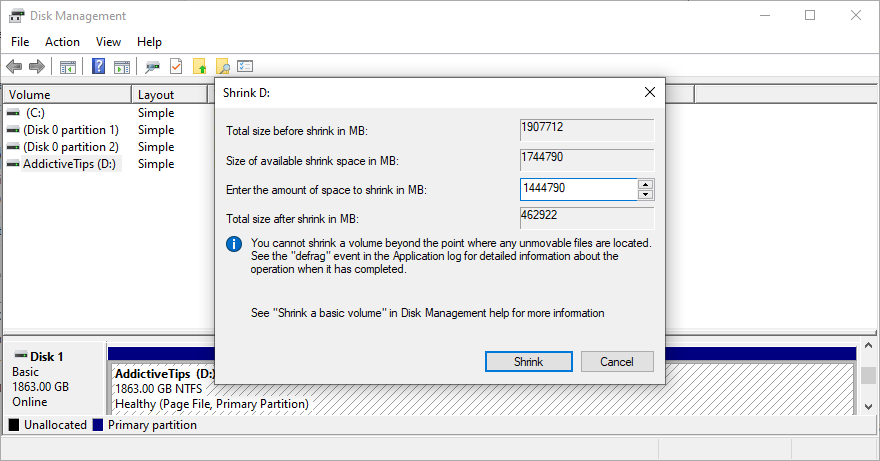
- Return to the main window
- Right-click the C: drive (or where you have Windows installed) and choose Extend Volume
- Set the new volume size and click Extend
- Try to run Windows Update now
If your hard disk is not big enough to allocate disk space from one partition to another, a workaround is to remove files from your PC to make room for Windows Update. Move personal photos and videos to an external hard disk, burn them to DVDs, or upload them to cloud storage accounts.
You can also uninstall large games and applications, as well as get rid of junk files with the help of a system cleaner. Or, if you don’t want to install anything extra, check out the Windows Disk Cleanup utility.
How to use Disk Cleanup:
- Sign in to Windows 10 with admin rights
- Go to Downloads and Recycle Bin to back up or restore any files you would like to keep since these folders will be emptied
- Press Win key + E to open File Explorer
- Select the C: drive or where you have your OS installed
- Right-click the drive and go to Properties

- In the General tab, click Disk Cleanup
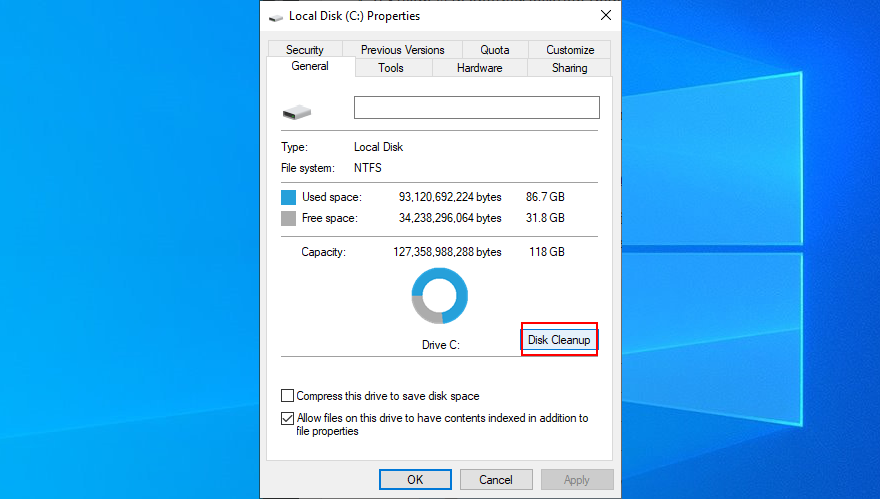
- At Files to delete, select everything and click Clean up system files
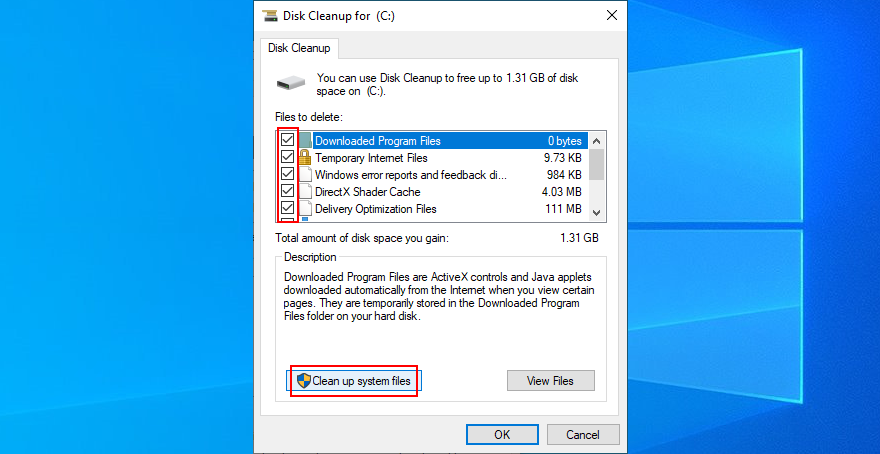
- Once the file search is over, choose all items again and press OK

- Restart your PC when the cleanup is over
- Try to run Windows Update now
13. Check the network drivers
It’s common for driver issues to interfere with all applications and system utilities that require Internet access, including Windows Update. For instance, if your network device is not working properly, it could be the reason why you keep getting error code 0x80080005. It’s also possible that your network driver is obsolete or incompatible with your operating system. Here’s what you need to do:
How to quickly reinstall the network device:
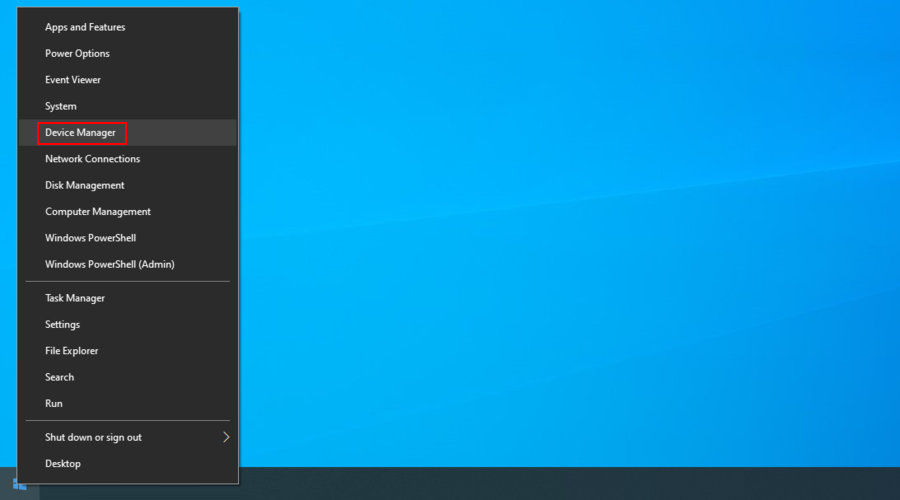
- Fai clic con il pulsante destro del mouse sul pulsante Start e vai a Gestione dispositivi
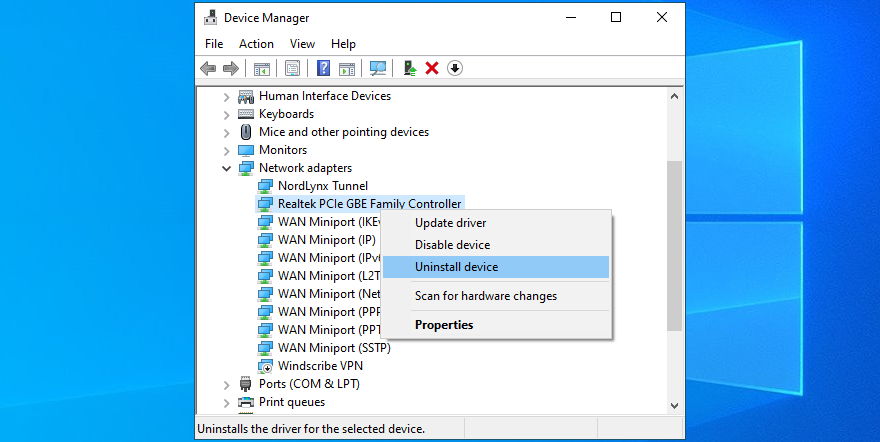
- Open the Network adapters category
- Select and right-click your main network device, then click Uninstall device
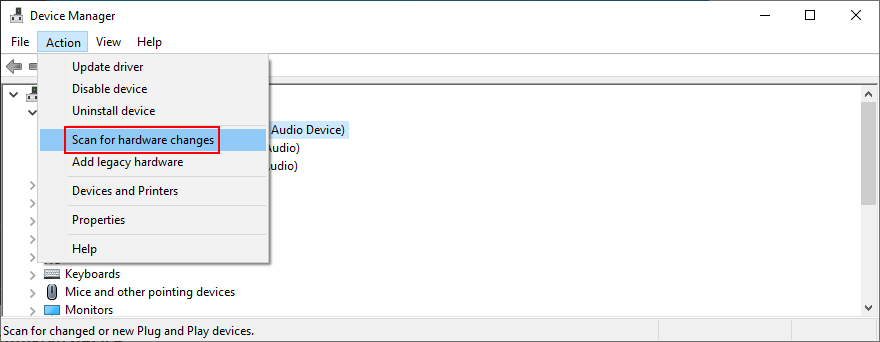
- Open the Action menu and click Scan for hardware changes
- Riavvia il computer. Windows will auto-reinstall the missing network device
- Check for Windows Update errors
How to update your network driver:
- Torna a Gestione dispositivi
- Right-click your network device and select Update driver

- When prompted with two options, click Search automatically for updated driver software
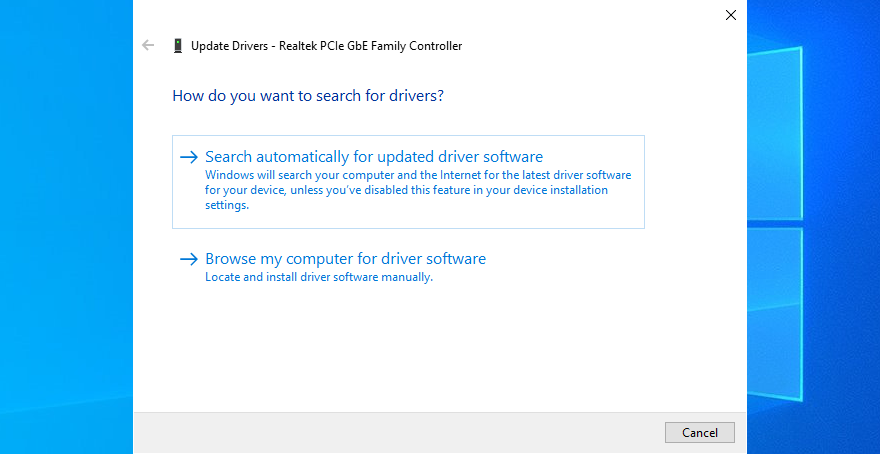
- Wait a bit until Windows checks for updates. If it doesn’t find anything, exit
If Windows fails to find a network driver, we suggest turning to a driver update tool. It identifies all outdated drivers on your PC and finds newer versions on the web that are compatible with your operating system. Furthermore, it can automatically download and install all drivers.
How to roll back an incompatible network driver:
- Go back to Device Manager
- Right-click your network adapter and go to Properties
- Switch to the Driver section
- Click Roll Back Driver and follow the on-screen steps
- If the button is greyed out, it means that no previous network driver exists on your PC, so you can’t complete the rollback
- If the rollback was successful, reboot your machine and try to run Windows Update
14. Repair hard disk and system errors
Data corruption in the hard disk or operating system can be devastating to all system utilities, including Windows Update. If you have a missing or damaged file that’s critical for the updater component, it’s no wonder that you get error codes like 0x80080005.
To fix HDD errors, you can use CHKDSK (Check Disk). When it comes to damaged system files, use SFC (System File Checker). Lastly, for more serious problems with the component store of the Windows image, turn to DISM (Deployment Image Servicing and Management).
How to use CHKDSK:
- Click the Start button, search for Command Prompt, and click Run as administrator
- Type
chkdsk c:/fif your operating system is installed on the C: drive. If it’s not, replacec:with the correct partition letter. Press Enter
- When asked to confirm the CHKDSK scheduling at the next system boot, type y and hit Enter
- Reboot your PC
- During restart, CHKDSK will scan your hard disk and fix any errors
- After boot, try running Windows Update
How to use SFC:
- Press Win key + R, type cmd, and press Ctrl + Shift + Enter to run CMD as admin. Click Yes if prompted by UAC (User Account Control)

- Type
sfc/scannowand press Enter
- Patiently wait while SFC performs the system scan and fixes any issues
- Restart your PC
- Run Windows Update and check if you still get error 0x80080005
How to use DISM:
- Launch Command Prompt as admin
- Run
DISM/online/cleanup-image/scanhealthto check the health of your operating system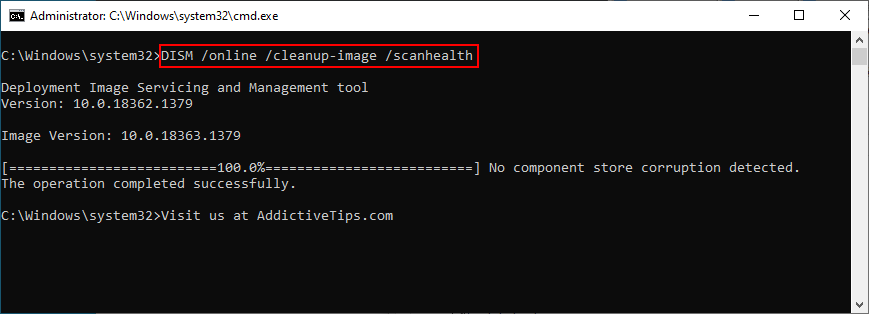
- If DISM finds any issues, type
DISM/online/cleanup-image/restorehealthand press Enter to fix them - Reboot your PC after the process is complete
- Open CMD as admin again
- Run SFC (
sfc/scannow)
- Restart your computer one last time
- Try to run Windows Update now
15. Run a malware scan
If your antivirus solution failed to fend off malware attacks, then an infection could have affected the entire operating system and its utilities, including Windows Update. You need to immediately perform a computer scan and remove any viruses from your PC.
How to run Windows Defender:
- Click the Start button, search for Windows Security, and press Enter
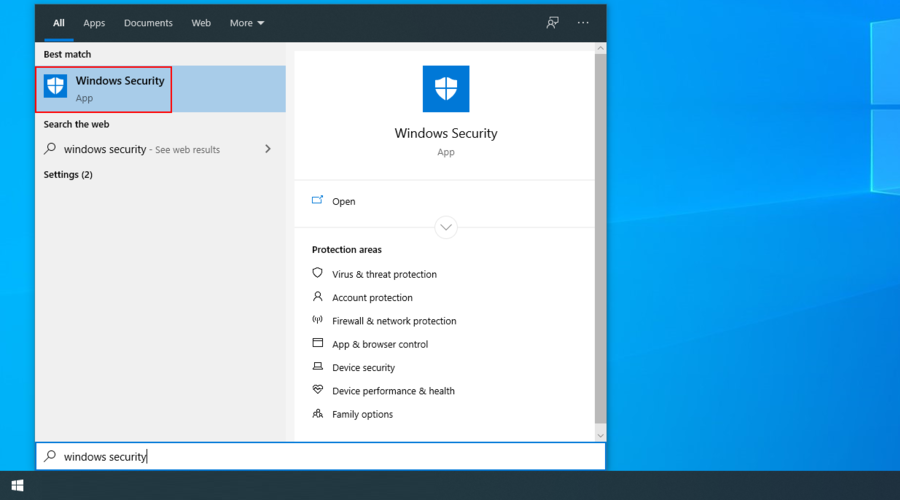
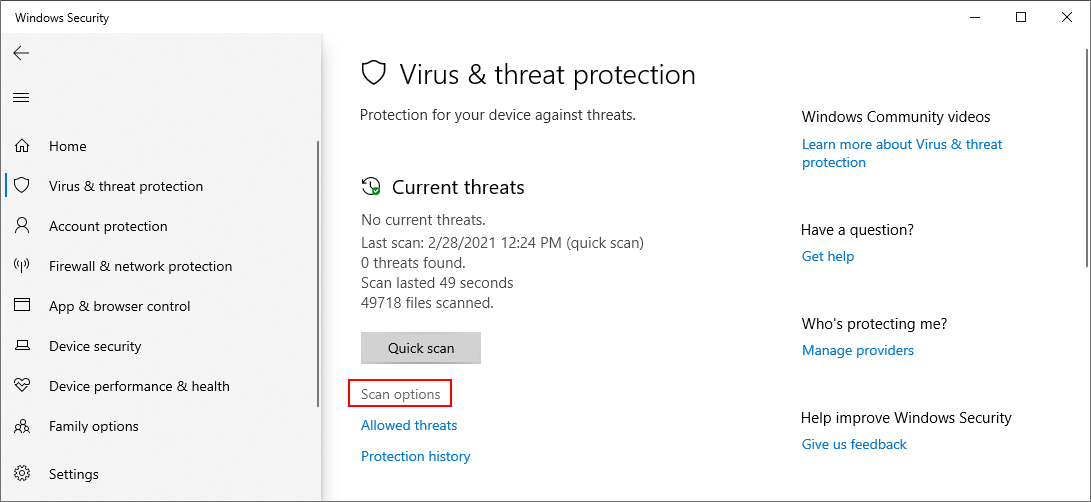
- Jump to Virus & threat protection

- Fai clic su Opzioni di scansione
- Select Quick scan and click Scan now
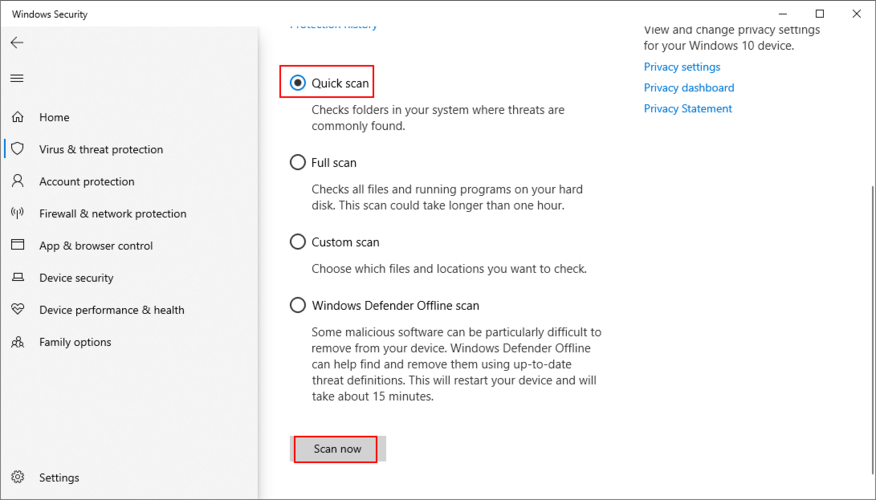
- Wait until Windows runs the scan. If it doesn’t find anything, select Windows Defender Offline scan and click Scan now
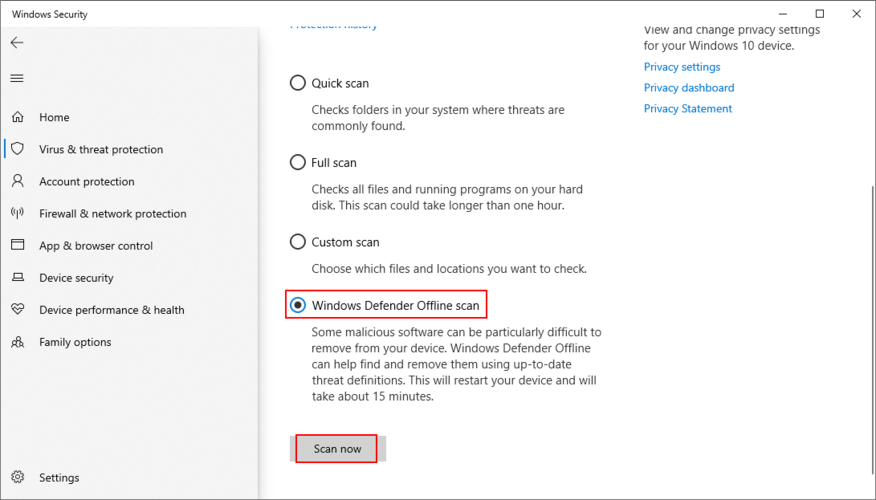
- Once the threats have been eliminated from your PC, restart
- Try to run Windows Update now
16. Turn off IPv6
It’s a bit unusual, but IPv6 connectivity may conflict with Windows Update if your network doesn’t support IPv6. In turn, this can lead to error codes like 0x80080005. Unless you’re absolutely sure that your ISP supports IPv6 (you can contact it and ask), it’s safer to disable IPv6 connections on your PC.
How to disable IPv6 on Windows 10:
- Click the network icon in the system tray and visit Network & Internet settings
- Go to Change adapter options
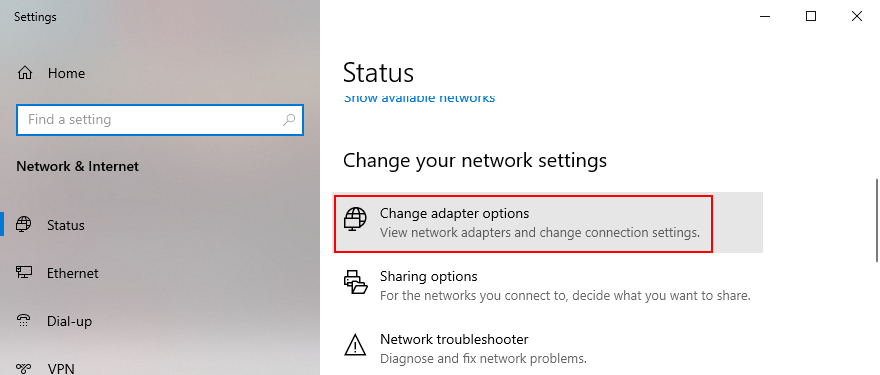
- Select your Internet connection, right-click it, and choose Properties (you need admin rights)
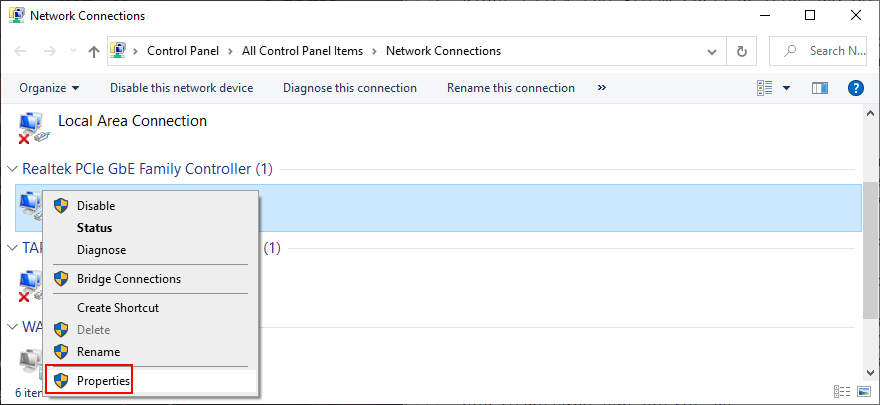
- Remain in the Networking tab
- Find and uncheck Internet Protocol Version 6 (TCP/IPv6)
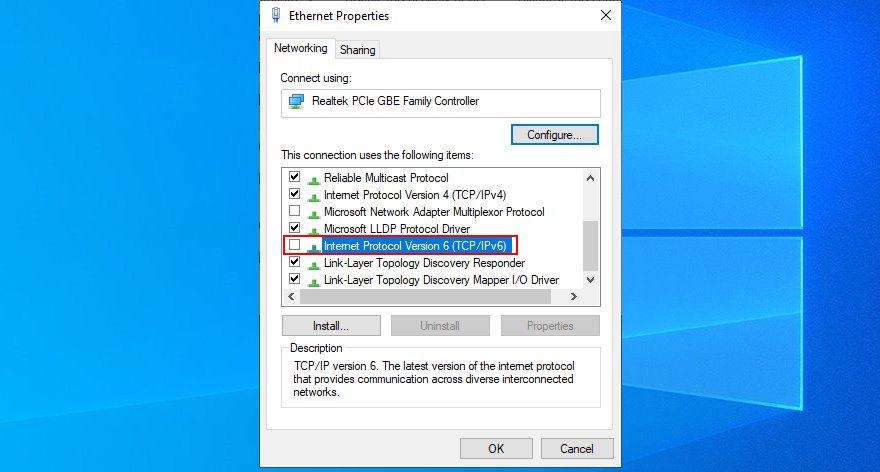
- Click OK and exit
- Try to run Windows Update now
It’s also a good idea to turn disable IPv6 connectivity from your router’s admin panel.
17. Fix registry settings
You can also fix the 0x80080005 Windows Update error code by fixing several system registry settings. Don’t worry since you don’t need any previous experience, as long as you follow the instructions below.
- Click the Start button, search for Registry Editor, and open this app
- If prompted by User Account Control, click Yes
- In Registry Editor, create a backup:
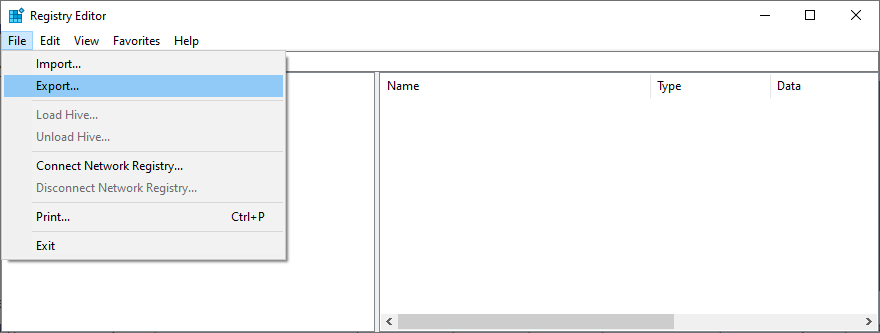
- Open the File menu
- Select Export
- Set a new file name and indicate a destination
- Click Save to save the current registry settings as backup (.reg format)
- Copy and paste the following address to visit this location:
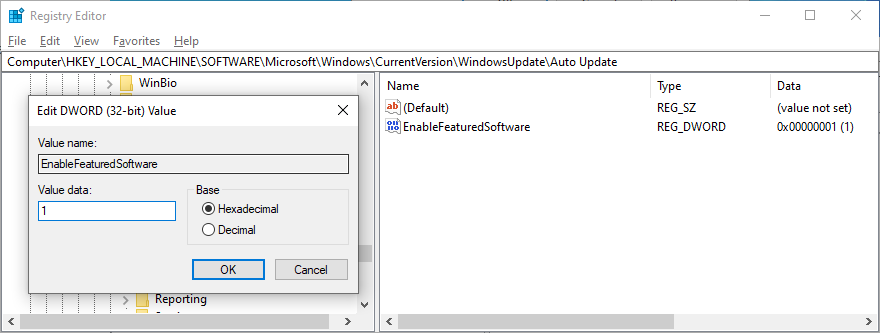
Computer\HKEY_LOCAL_MACHINE\SOFTWARE\Microsoft\Windows\CurrentVersion\WindowsUpdate\Auto Update
- If you spot the EnableFeaturedSoftware entry, check if Data is 0x00000001 (1). Otherwise:
- Double-click the entry
- Set Value data to 1
- Set Base to Hexadecimal
- Click OK
- If the EnableFeaturedSoftware entry doesn’t exist:
- Open the Edit menu
- Select New > DWORD (32-bit) Value
- Set the name to EnableFeaturedSoftware
- Double-click the entry
- Set Value data to 1
- Set Base to Hexadecimal
- Click OK
- Go to the following location:
HKEY_LOCAL_MACHINE\SOFTWARE\Microsoft\WindowsUpdate\UX
- Find and double-click IsConvergedUpdateStackEnabled
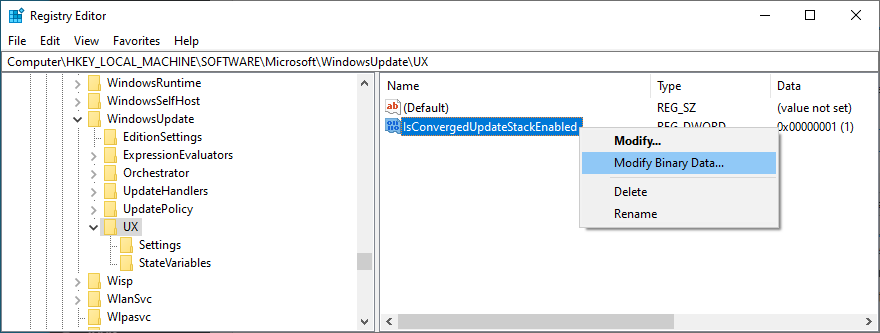
- Set Value data to 0
- Set Base to Hexadecimal
- Click OK
- Now, visit this address:
HKEY_LOCAL_MACHINE\SOFTWARE\Microsoft\WindowsUpdate\UX\Settings
- Locate UxOption
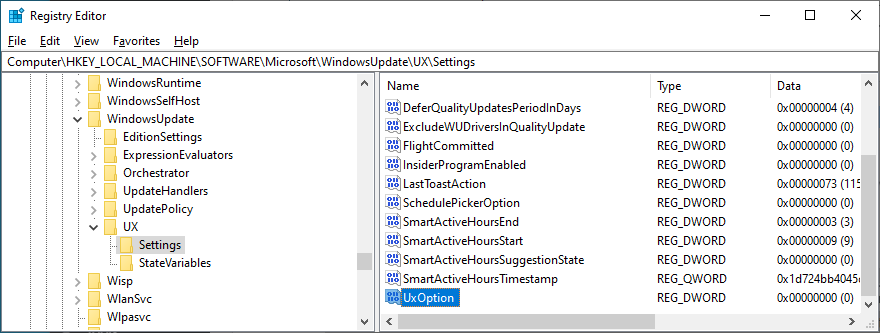
- Double-click the entry
- Set Value data to 0
- Set Base to Hexadecimal
- Click OK
- Finally, visit this location:
HKEY_LOCAL_MACHINE\SOFTWARE\Policies\Microsoft\SystemCertificates
- If you spot the CopyFileBufferedSynchronousIo entry, make sure that its data is set to 0x00000001 (1). If it’s not:
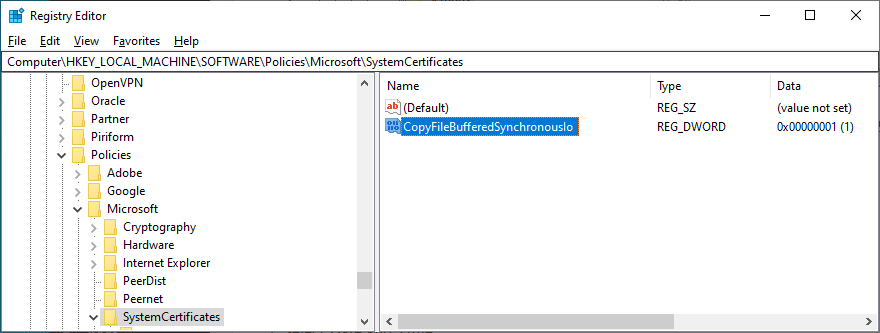
- Double-click the entry
- Set Value data to 1
- Set Base to Hexadecimal
- Click OK
- If CopyFileBufferedSynchronousIo doesn’t exist:Open the Edit menu
- Select New > DWORD (32-bit) Value
- Set the entry name to CopyFileBufferedSynchronousIo
- At Value data, write 1
- Set Base to Hexadecimal
- Click OK
- Exit Registry Editor and restart your computer
- Try to run Windows Update now
If, for any reason, you need to roll back the changes you made in the registry, just double-click the.reg backup file you previously created to restore the original registry configuration.
18. Fix Windows startup problems
The Windows advanced troubleshooting mode gives you the possibility to repair startup issues that might prevent your operating system from working properly. It’s worth a shot when it comes to repairing Windows Update errors. Here’s how to use it:
- Make sure to save any ongoing projects
- Right-click the Start button and go to Settings

- Select Update & Security

- Jump to Recovery on the left side
- At Advanced startup, click Restart now
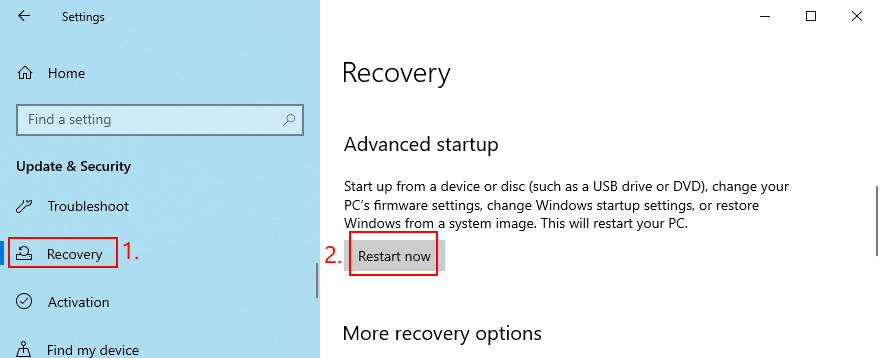
- Windows will restart in recovery mode. When the screen turns blue and loads various options, go to Troubleshoot
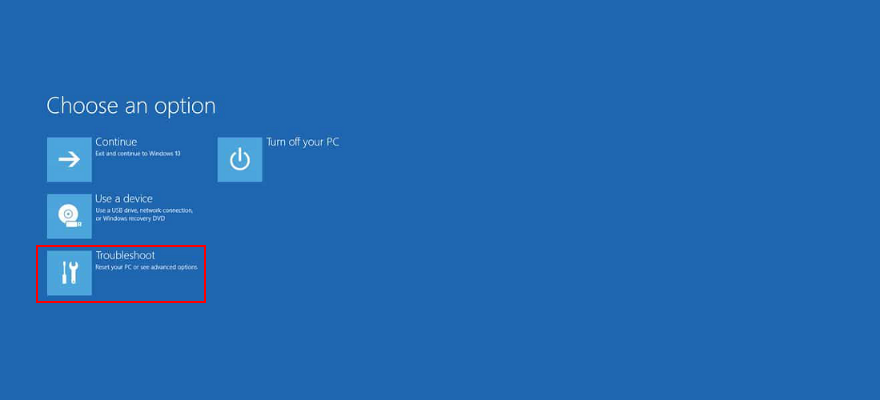
- Select Advanced options > Startup Repair

- Select your admin account and enter your password
- Follow the step-by-step instructions to fix startup problems
- After Windows starts, try running the system updater
19. Roll back Windows 10
For any other unforeseen software events that you can’t identify but may have damaged Windows Update, turn to System Restore. If you have created a restore point before starting to receive error code 0x80080005 on each attempt to update the OS, you can roll back Windows 10 to that state. Here’s how:
- Click the Start button, search for Control Panel, and open this app
- Select the Recovery section
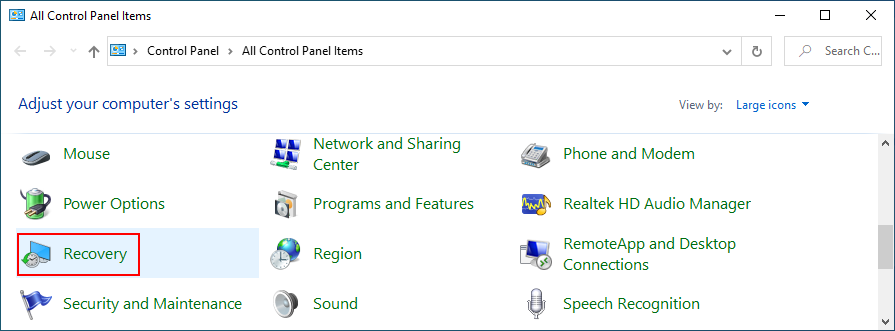
- Pick a restore point from the list or select Show more restore point to go back further
- To view which applications will be removed from your PC, click Scan for affected programs
- Click Next and follow the on-screen instructions
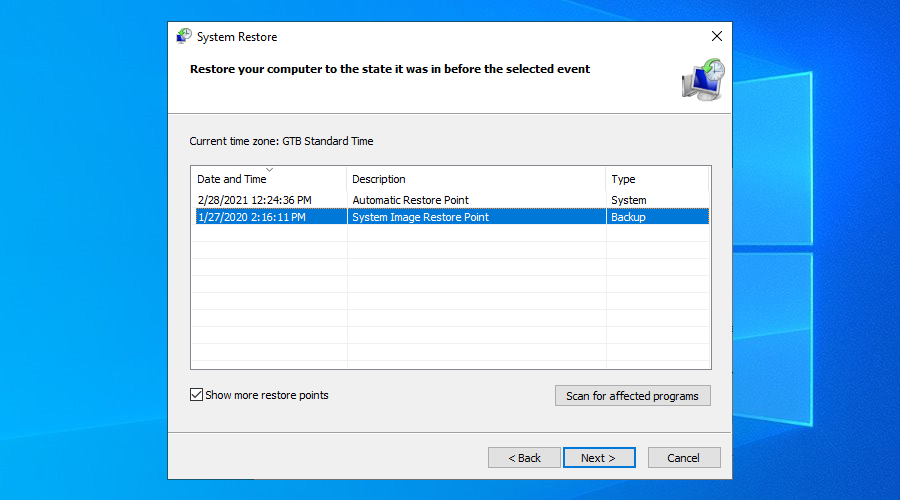
- After your PC restarts, try to run Windows Update
20. Reset Windows 10
Unfortunately, System Restore fails to work on many occasions. After exhausting all the previous solutions and still getting hampered by error code 0x80080005, it’s time to reset Windows 10.
Your files, downloads, and game saves will be left untouched. However, all your applications will disappear from your PC. Here’s what you need to do:
- Right-click the Windows 10 Start button and select Settings

- Visit the Update & Security section

- Jump to Recovery
- At Reset this PC, click Get started
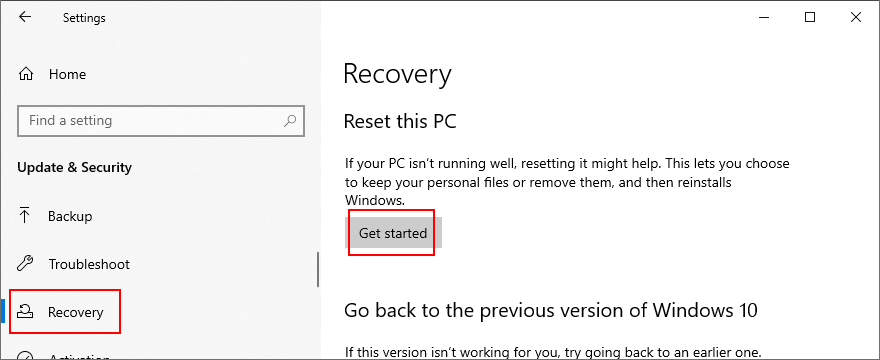
- When prompted with two options, select Keep my files

- Follow the on-screen steps to reset Windows 10
- Once the task is complete, run Windows Update to install all required updates
Windows Update error 0x80080005 can be fixed
To sum up, 0x80080005 is an error code that pops up on the screen when trying to run Windows Update. It’s typically caused by a hardware or software problem that can be resolved.
Start by running the Windows Update troubleshooter and using the Windows Update Diagnostic tool. If these fail, restart the Windows Update and dependent services, turn off Network List Service, check Group Policy settings, reset Windows Update components, and unplug all peripheral devices.
You can also run a clean boot, temporarily deactivate your firewall, uninstall recent third-party software and system updates, check the disk space and network drivers, as well as repair any hard disk and operating system errors.
It’s also a good idea to run a computer scan to remove any malware, disable IPv6 connectivity if you don’t use it, fix registry settings and Windows startup problems, and roll back Windows 10 to a previous checkpoint. If everything fails, it’s time to factory reset Windows 10.
How did you manage to get rid of 0x80080005?
Did we miss any important steps? Let us know in the comment area below.
