Gli errori della schermata blu della morte sono inevitabili sui computer Windows e possono verificarsi a causa di vari problemi con il software o l’hardware. L’aspetto più importante è che errori BSOD possono essere risolto senza dover contattare il supporto tecnico Microsoft.
Che cos’è l’ERRORE INTERNO DEL PROGRAMMA VIDEO?
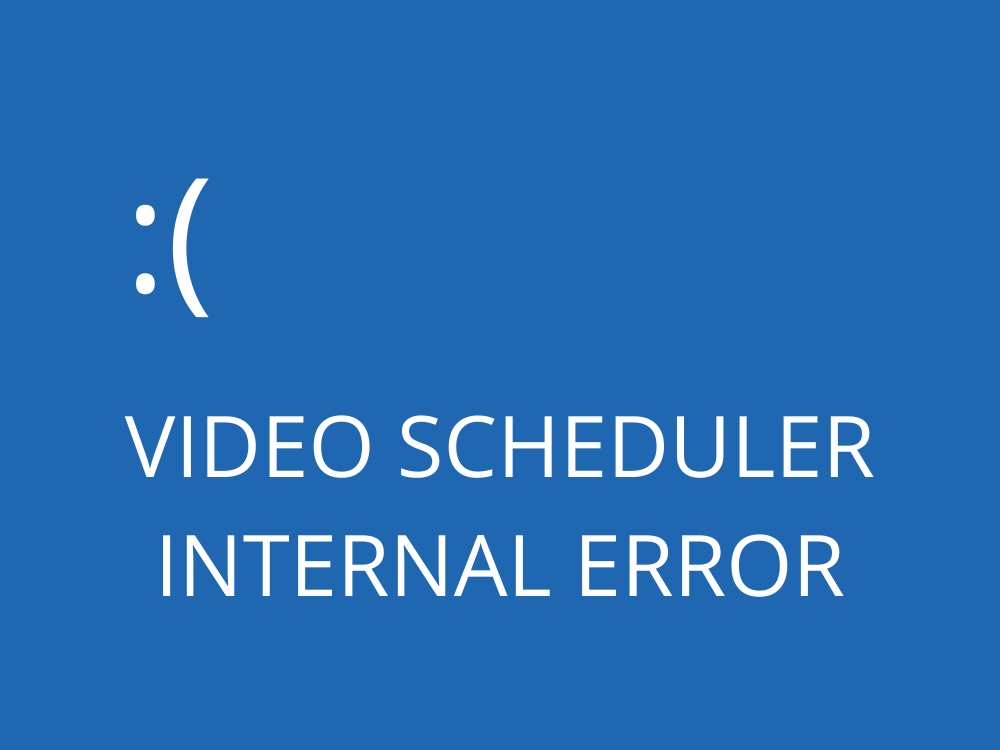
VIDEO SCHEDULER INTERNAL ERROR è un messaggio di errore che compare sullo schermo dopo essere diventato blu. Quello che succede è che Windows 10 ti blocca per evitare ulteriori danni al tuo computer.
È causato da un problema con l’adattatore grafico e di solito si verifica con le GPU NVIDIA. Forse la tua scheda grafica non viene rilevata correttamente dal tuo PC. Tuttavia, puoi correggere questo errore senza chiedere aiuto a un professionista.
Ecco alcuni possibili problemi:
- BIOS o sistema operativo obsoleto
- Infezioni da malware o danneggiamento del registro
- Overclock
- Software di sicurezza, aggiornamenti di sistema o periferiche incompatibili
- Impostazioni firewall errate
- Driver GPU obsoleto o incompatibile
Come correggere ERRORE INTERNO DEL PROGRAMMA VIDEO su Windows 10
Per eliminare il codice di arresto ERRORE INTERNO DEL PROGRAMMA VIDEO, devi risolvere il problema sottostante con il tuo display. Prima di iniziare l’operazione di risoluzione dei problemi, tuttavia, è una buona idea crea un punto di ripristino del sistema . Sarai in grado di ripristinare Windows 10 a un punto di controllo precedente nel caso in cui devi ricominciare da capo.
1. Verifica la disponibilità di aggiornamenti di sistema
Inizia aggiornando Windows 10 alla versione più recente. Normalmente, questo dovrebbe accadere automaticamente sul tuo computer. Tuttavia, se l’aggiornamento automatico è disabilitato, è necessario attivarlo manualmente. È abbastanza facile:
- Fai clic sul pulsante Start , digita verifica aggiornamenti e premi Invio
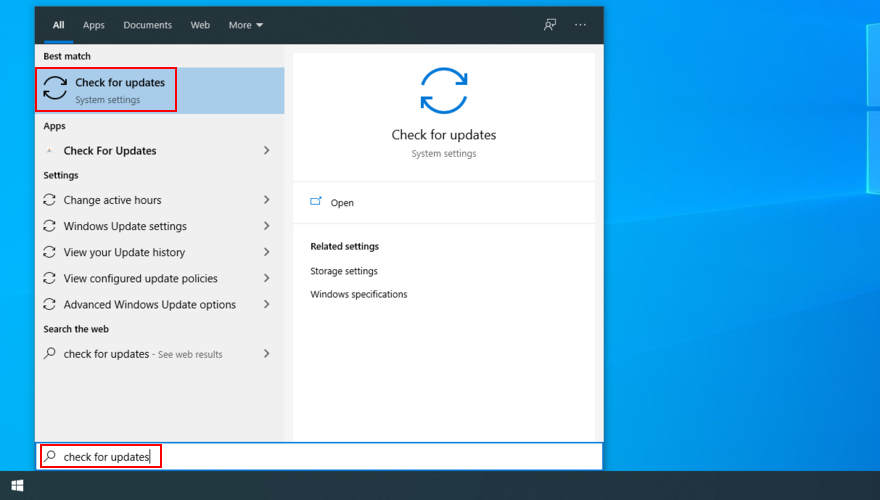
- Il tuo sistema operativo dovrebbe iniziare a cercare immediatamente gli aggiornamenti. In caso contrario, fai clic su Controlla aggiornamenti
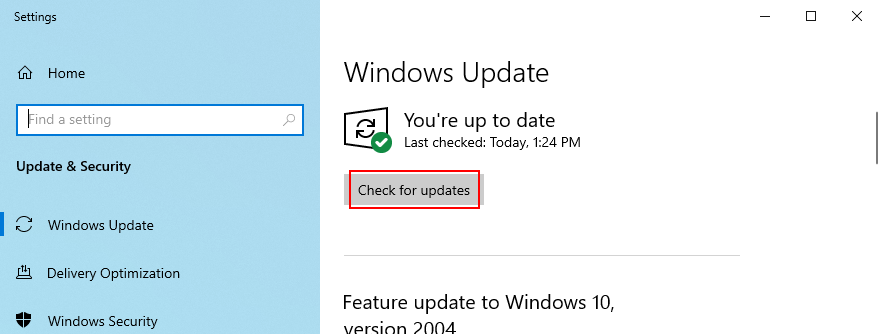
- Fai clic su Scarica per ottenere eventuali aggiornamenti in sospeso
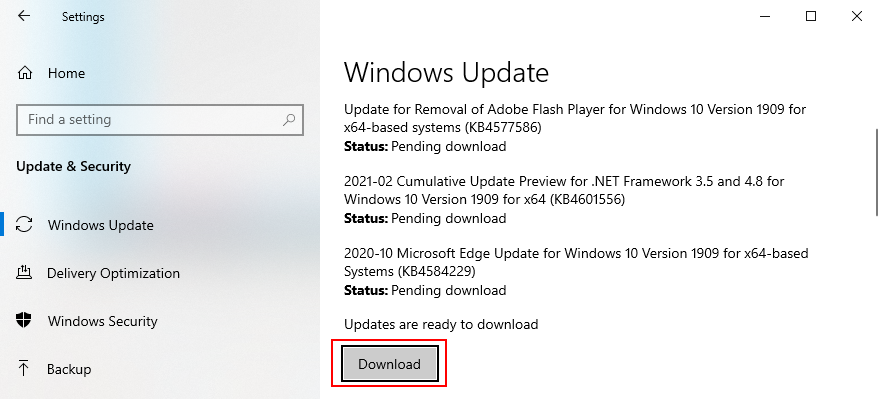
- Il tuo PC potrebbe riavviarsi più volte. Al termine, verifica la presenza di errori BSOD
Se Windows 10 non viene completato aggiornamenti , prova a riavviare Windows Update e i servizi dipendenti.
2. Esegui uno stress test della GPU
Il modo migliore per determinare i problemi della scheda grafica è eseguire uno stress test della GPU per vedere che tipo di artefatti ricevi. Sebbene richieda più tempo, il test dovrebbe durare almeno un’ora per essere completo. Alla fine, è una buona idea registrare le temperature massime.
Può essere difficile trovare lo strumento giusto per eseguire uno stress test sulla tua scheda grafica. Se sei indeciso, ti suggeriamo di optare per FurMark , MSI Afterburner o GPU-Z .
3. Esegui una scansione antimalware
L’ERRORE INTERNO DEL PROGRAMMA VIDEO DI Windows 10 può anche essere causato da un’infezione da virus. Quindi è una buona idea eseguire una scansione antimalware sul tuo computer per trovare ed eliminare eventuali minacce, sia che tu stia utilizzando Windows Defender o un’applicazione anti-malware di terze parti.
Come utilizzare Windows Defender:
- Premi il tasto Win , digita Protezione di Windows e premi Invio per avviare questa applicazione
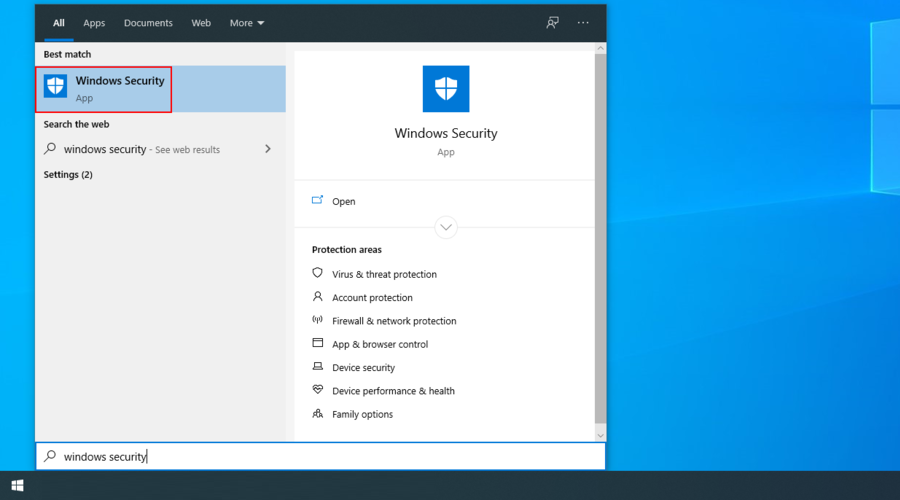
- Seleziona Protezione da virus e minacce
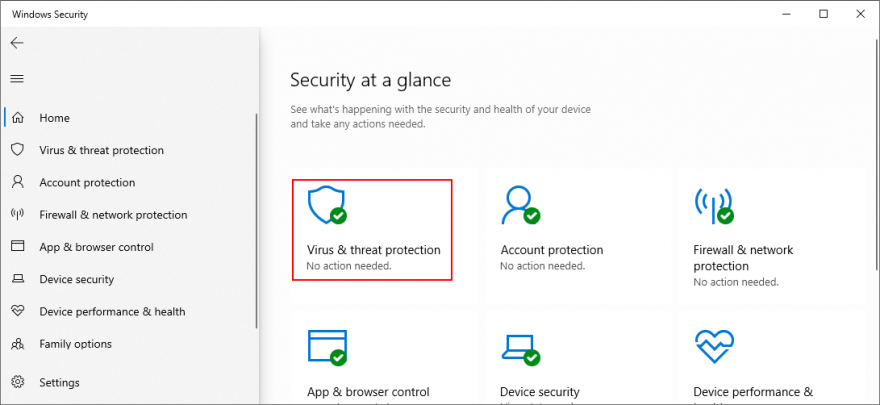
- Fai clic su Opzioni di scansione
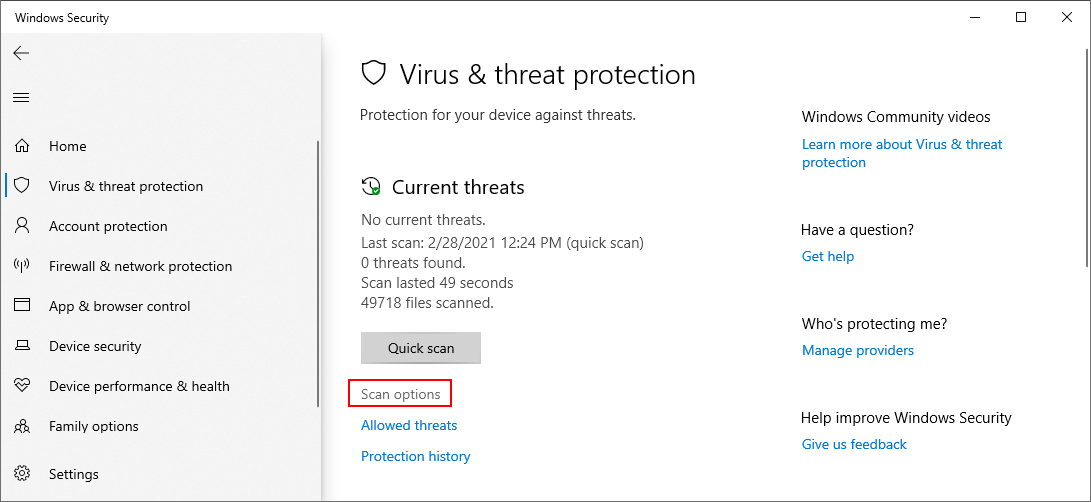
- Scegli Scansione rapida dall’elenco delle modalità di scansione
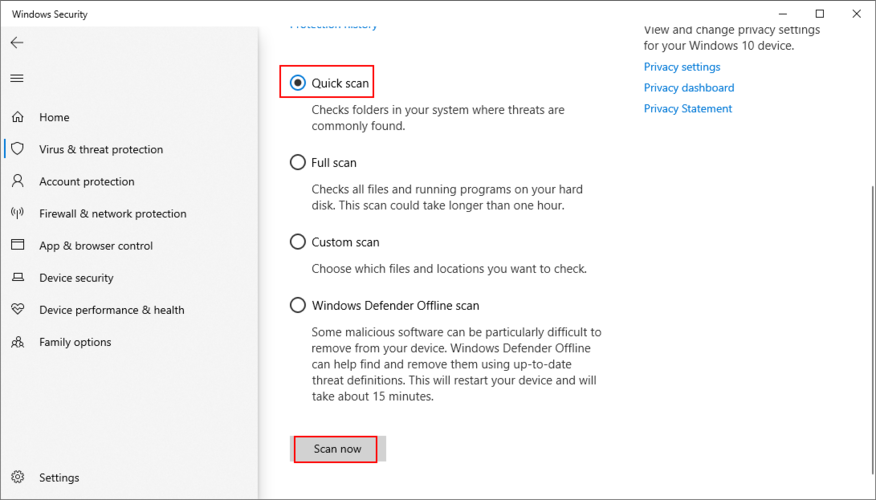
- Fai clic su Scansiona ora
- Attendi pazientemente che Defender esegua una scansione e consenti alla rimozione di eventuali infezioni. Se non trova nulla di sospetto, esegui un altro controllo utilizzando la modalità Scansione offline di Windows Defender
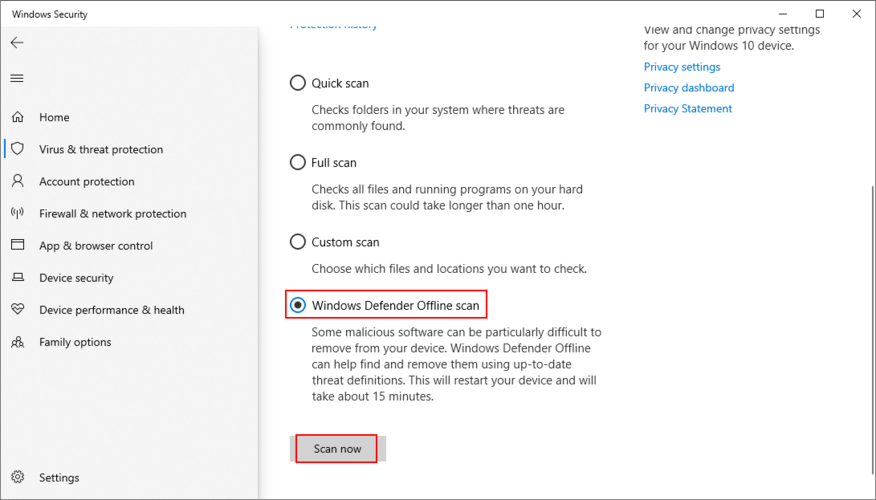
- Una volta che Defender ha fatto il suo lavoro, riavvia il PC
- Verifica la presenza di errori di schermata blu
4. Correggi il registro di sistema
Se il registro di Windows ha subito troppe modifiche a causa di troppe installazioni software, potrebbe essersi danneggiato, attivando come risultato codici di arresto BSOD come VIDEO_SCHEDULER_INTERNAL_ERROR. Tuttavia, puoi risolverlo senza dover reimpostare il PC o utilizzare Ripristino configurazione di sistema.
- Crea un backup del registro:
- Fai clic sul pulsante Start , cerca Editor del registro e apri questa applicazione
- Apri il menu File e seleziona Esporta
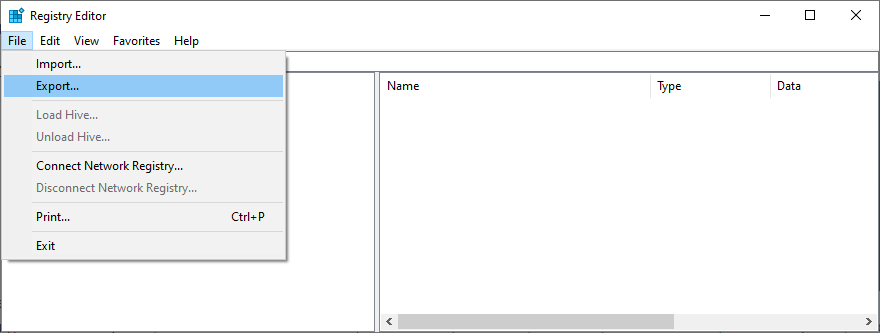
- Specifica un nome file e una cartella di salvataggio per il file.reg
- Fai clic su Salva
- Esci dall’ Editor del registro di sistema
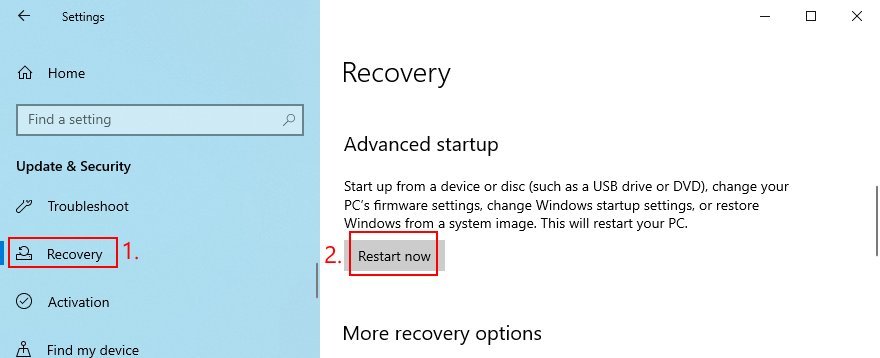
- Fai clic con il pulsante destro del mouse sul pulsante Start e vai a Impostazioni
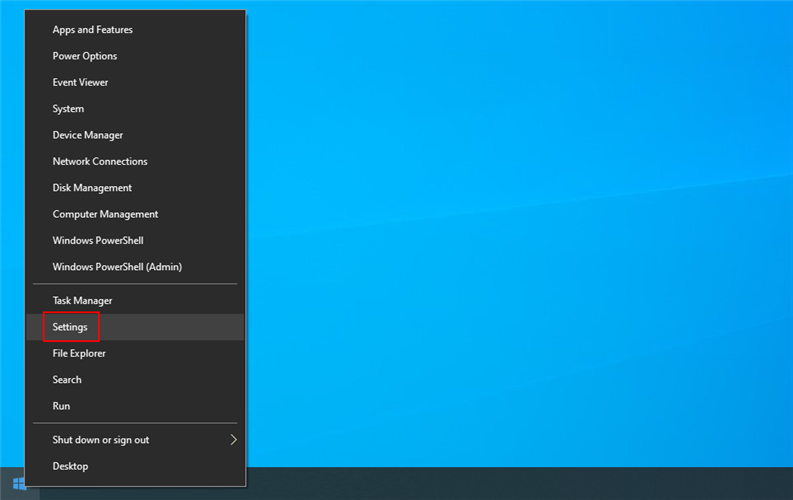
- Fai clic su Aggiorna e sicurezza
- Passa a Ripristino sul lato sinistro
- In Avvio avanzato , fai clic su Riavvia ora

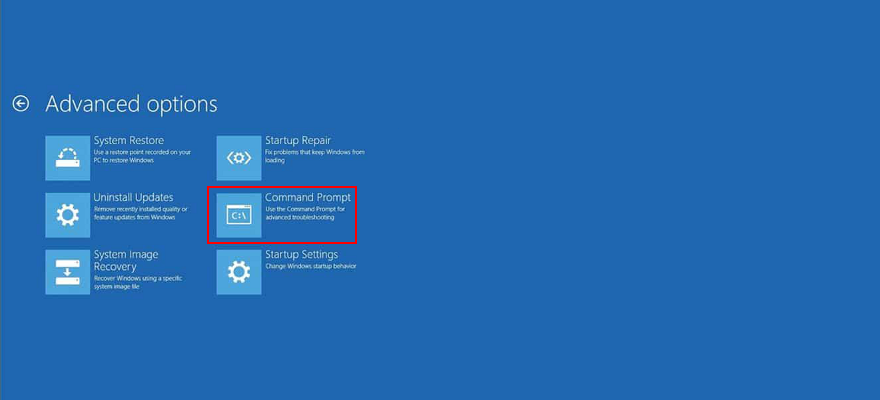
- Windows 10 si riavvierà in modalità Avvio avanzato . Seleziona Risoluzione dei problemi > Opzioni avanzate
- Fai clic su Prompt dei comandi
- Incolla i seguenti comandi (premi Invio dopo ogni comando):
-
cd c: \ Windows \ System32 \ config
-
ren c: \ Windows \ System32 \ config \ DEFAULT DEFAULT.old
-
ren c: \ Windows \ System32 \ config \ SAM SAM.old
-
ren c: \ Windows \ System32 \ config \ SECURITY SECURITY.old
-
ren c: \ Windows \ System32 \ config \ SOFTWARE SOFTWARE.old
-
ren c: \ Windows \ System32 \ config \ SYSTEM SYSTEM.old
-
copia c: \ Windows \ System32 \ config \ RegBack \ DEFAULT c: \ Windows \ System32 \ config \
-
copia c: \ Windows \ System32 \ config \ RegBack \ DEFAULT c: \ Windows \ System32 \ config \
-
copia c: \ Windows \ System32 \ config \ RegBack \ SAM c: \ Windows \ System32 \ config \
-
copia c: \ Windows \ System32 \ config \ RegBack \ SECURITY c: \ Windows \ System32 \ config \
-
copia c: \ Windows \ System32 \ config \ RegBack \ SYSTEM c: \ Windows \ System32 \ config \
-
copia c: \ Windows \ System32 \ config \ RegBack \ SOFTWARE c: \ Windows \ System32 \ config \
-
- Riavvia il PC
- Controlla se ricevi ancora il codice di interruzione ERRORE INTERNO DI VIDEO SCHEDULER
5. Disabilita l’overclock
Alcuni giocatori overcloccano il proprio computer per sfruttare al massimo la GPU, la CPU o la RAM, nel tentativo di migliorare i requisiti di sistema per i giochi più impegnativi. Tuttavia, se non viene eseguito correttamente o se il dispositivo di raffreddamento non è abbastanza potente da sostenere il calore extra, lo schermo potrebbe diventare blu per proteggere l’hardware dal surriscaldamento.
Una soluzione migliore è disattivare il software di overclock. Quindi, riproduci la situazione che ha portato all’ERRORE INTERNO DEL PROGRAMMA VIDEO in primo luogo, come l’avvio di un gioco particolare.
6. Ripristina BIOS
Il BIOS ha un sacco di fantastiche opzioni che puoi configurare, inclusi overclock, caching e shading. Tuttavia, proprio come nella soluzione precedente, se non fai quello che stai facendo, potresti finire per danneggiare il tuo PC a causa di impostazioni del BIOS errate. Per risolvere questo problema, devi solo ripristinare le opzioni del BIOS ai valori di fabbrica.
- Riavvia il computer
- Prima dell’avvio di Windows, premere il tasto visualizzato sullo schermo per accedere alla modalità BIOS
- Accedi alle impostazioni avanzate
- Trova e abilita l’opzione che ripristina la configurazione del BIOS predefinita
- Salva le impostazioni correnti del BIOS ed esci
- Dopo l’avvio del sistema operativo, verifica la presenza di ulteriori errori BSOD
7. Aggiorna BIOS
Dato che stiamo discutendo del BIOS, è una buona idea controllare se è obsoleto. Proprio come il sistema operativo, le applicazioni e il firmware del router, anche il BIOS dovrebbe essere aggiornato alla versione più recente per sfruttare le funzionalità più recenti.
- Collega un’unità flash USB vuota al PC
- Premi il tasto Windows , cerca Informazioni di sistema e apri questa app

- Vai all’area Riepilogo del sistema
- Prendi nota delle informazioni visualizzate in BIOS Version/Date e BaseBoard Manufacturer

- Tenendo conto del produttore di BaseBoard , visita il sito web ufficiale del produttore del tuo BIOS
- Controlla i dettagli rivelati in Versione/Data BIOS e utilizzali per trovare una versione più recente del BIOS compatibile con il tuo sistema operativo
- Scarica l’archivio del BIOS e decomprimilo su una pen drive
- Riavvia il PC e accedi alla modalità BIOS premendo rapidamente il tasto mostrato sullo schermo
- Crea un backup della versione corrente del BIOS e salvalo sull’unità flash USB
- Avvia l’aggiornamento del BIOS e segui i passaggi sullo schermo
- Attendi con pazienza durante l’aggiornamento e assicurati di non riavviare o spegnere il PC
- Avvia Windows 10 normalmente
- Verifica la presenza di ERRORE INTERNO DEL PROGRAMMA VIDEO
8. Disinstalla strumenti di sicurezza di terze parti
Non tutte le soluzioni software di terze parti supportano completamente Windows 10. In effetti, alcune di esse possono causare problemi di visualizzazione e attivare messaggi di errore BSOD come VIDEO SCHEDULER INTERNAL ERROR. Per risolvere questo problema, dovresti sbarazzarti di tutte le applicazioni di sicurezza di terze parti installate di recente.
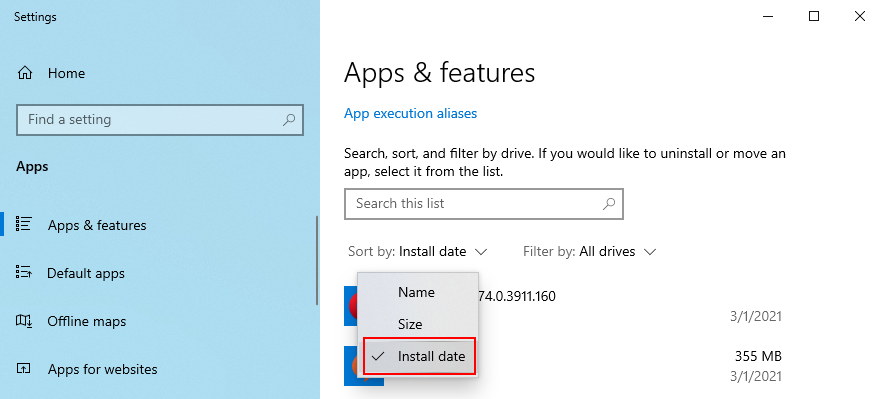
- Fai clic con il pulsante destro del mouse sul pulsante Start e seleziona App e funzionalità
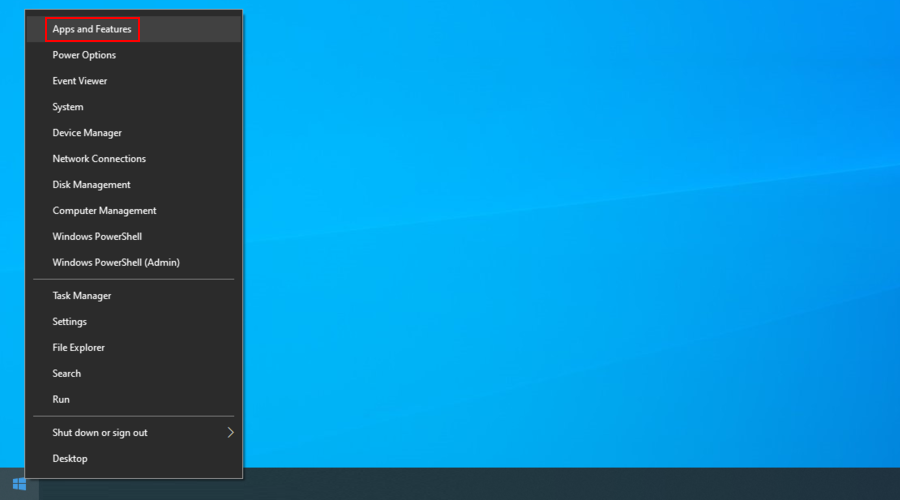
- Imposta Ordina per su Data installazione (prima la più recente)
- Seleziona un programma di sicurezza e fai clic su Disinstalla
- Fai di nuovo clic su Disinstalla per confermare
- Procedi con l’operazione di rimozione
- Riavvia il PC e verifica la presenza di errori BSOD
Il programma di disinstallazione integrato di Windows 10 può rimuovere solo programmi dal computer. Se stai cercando un modo per eliminare i file rimanenti e ripristinare le impostazioni del registro, ti suggeriamo di ricorrere a rimozione di applicazioni specializzato che fa il suo lavoro a fondo.
9. Disinstalla gli aggiornamenti di sistema
Se hai iniziato a ricevere il codice di interruzione VIDEO_SCHEDULER_INTERNAL_ERROR dopo un recente aggiornamento di sistema, forse è qui che dovresti spostare la tua attenzione. Alcuni aggiornamenti di Windows possono causare problemi di stabilità perché non supportano completamente la configurazione del sistema, quindi è meglio sbarazzarsene e attendere fino a quando Microsoft non distribuisce un aggiornamento affidabile.
Come disinstallare gli aggiornamenti recenti di Windows:
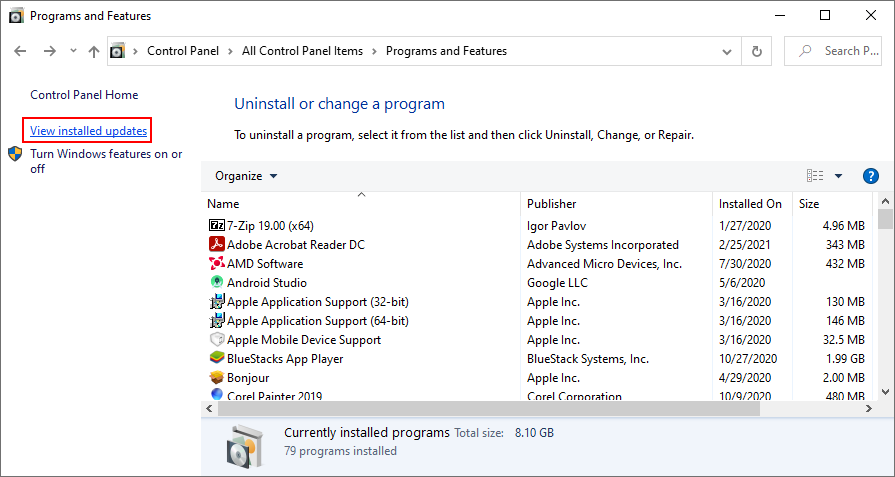
- Premi il tasto Windows + R , digita pannello di controllo e premi Invio

- Vai a Programmi e funzionalità

- Fai clic su Visualizza aggiornamenti installati
- Fare clic sulla colonna Installato il per ordinare gli aggiornamenti in base alla data (prima i più recenti)
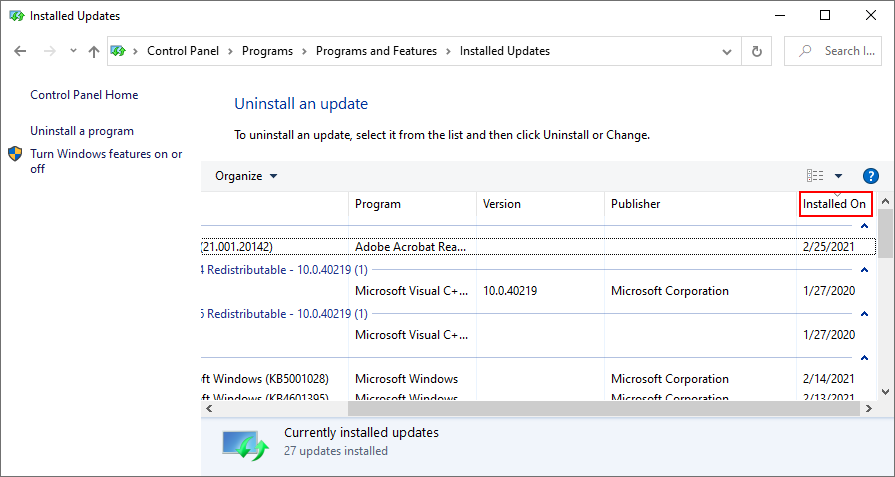
- Fai clic con il pulsante destro del mouse sul primo aggiornamento nell’elenco e seleziona Disinstalla
- Quando ti viene chiesto se sei sicuro, fai clic su Sì
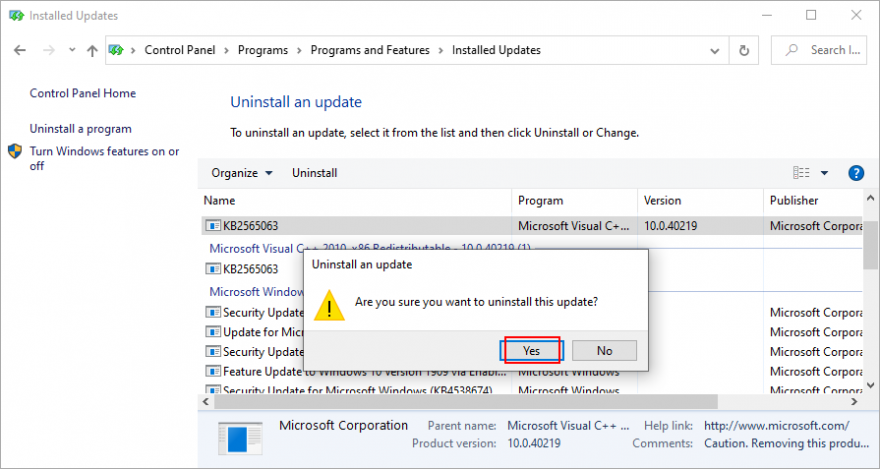
- Reboot your PC and check for BSOD errors
- Quando ti viene chiesto se sei sicuro, fai clic su Sì

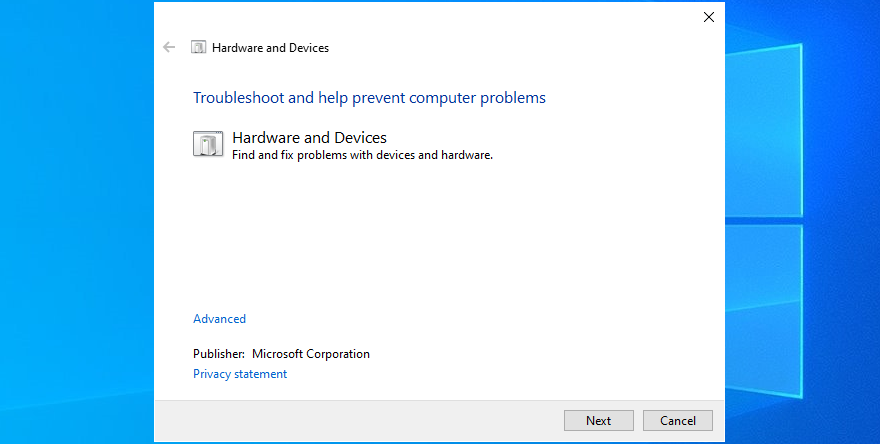
10. Run the Hardware and Devices troubleshooter
Windows has a troubleshooter designed to fix common errors with your hardware and devices. It’s a good idea to use it for getting rid of the the VIDEO SCHEDULER INTERNAL ERROR.
- Press the Win key + R, type msdt.exe-id DeviceDiagnostic, and hit the Enter key

- Click Next and follow the given instructions
- If it finds a way to repair your hardware and devices, click Apply this fix
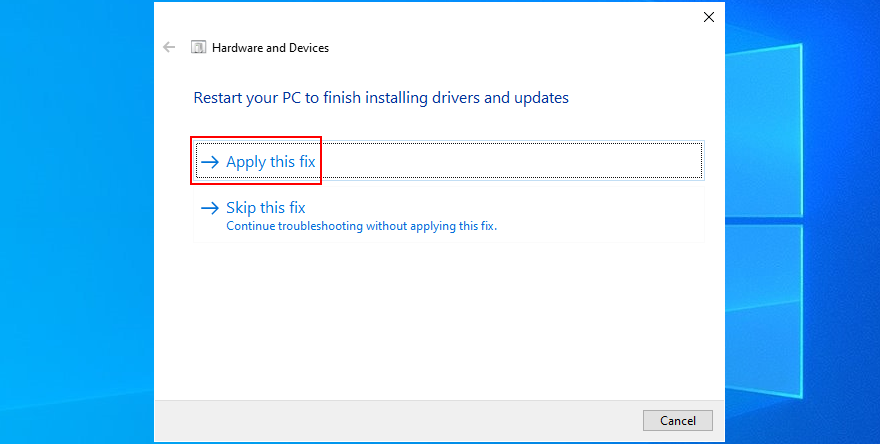
- Restart Windows 10
- See if you are still getting blue screen messages
11. Remove recent peripheral devices
The hardware components you recently attached to your desktop or laptop might not be functioning correctly. Or, they could be incompatible with your operating system. So it’s a good idea to detach them, then start your PC and check for blue screen errors.
If you can’t tell which device is at fault, just shut down your computer and unplug everything, except for your mouse and keyboard. Then, boot Windows and confirm that your PC is no longer crashing.
Replug one device at a time and see what happens with your computer. When you get the VIDEO SCHEDULER INTERNAL ERROR again, you will know for sure which component is malfunctioning. In that case, you should send it back to the manufacturer to fix it.
12. Disable your antivirus software
Your antivirus software solution might be blocking critical system processes that your computer needs to function correctly. Otherwise, you could end up with blue screen messages such as VIDEO SCHEDULER INTERNAL ERROR.
It typically happens when you have a third-party anti-malware application installed, which isn’t compatible with your operating system. Or, if you have two or more security tools with real-time protection, those components might clash, leading to PC crashes.
To resolve this problem, make sure to turn off any third-party software solutions. And, if you have multiple such programs installed, remove them to restore the stability of your computer.
13. Turn off the firewall
Other security issues might be caused by your firewall, which blocks Internet access to critical components that Windows requires, such as Windows Update. If you or someone else with access to your PC has messed up the firewall settings, then you should restore them to default.
Furthermore, some third-party firewall applications might have a default configuration that’s wrong for your PC, so you should remove them. If you’re not in this situation, here’s how to temporarily turn off Windows Firewall:
- Make sure you’re signed in as the PC administrator
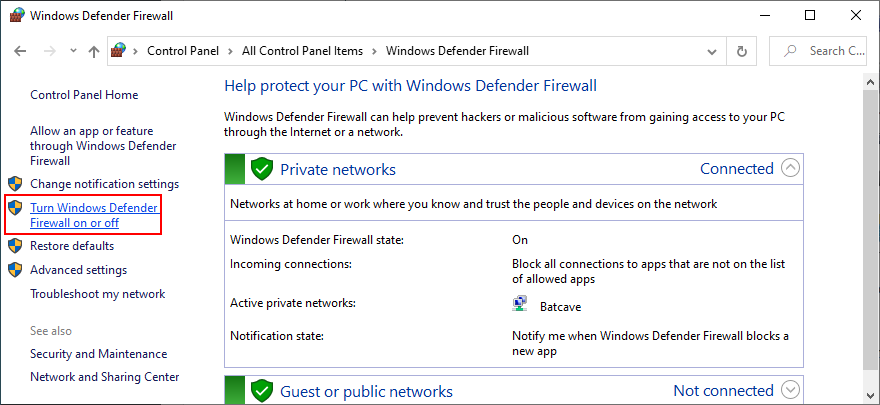
- Click the Start button, search for Control Panel, and open this app
- Go to Windows Defender Firewall
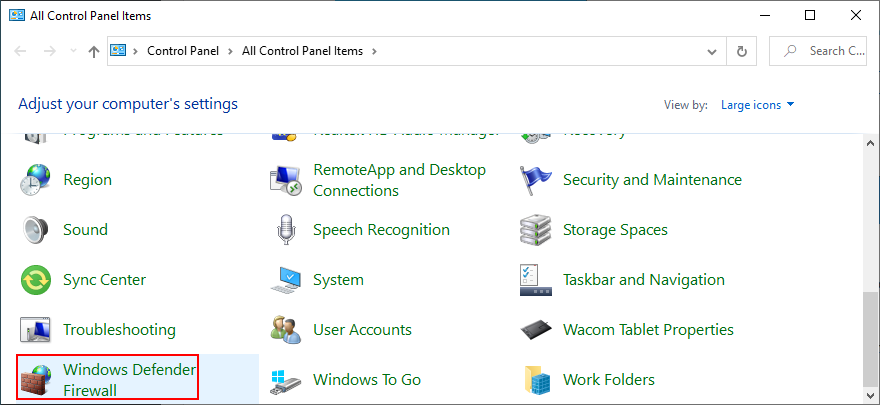
- Click Turn Windows Defender on or off on the left side
- Select Turn off Windows Defender Firewall (not recommended) at both Private network settings and Public network settings
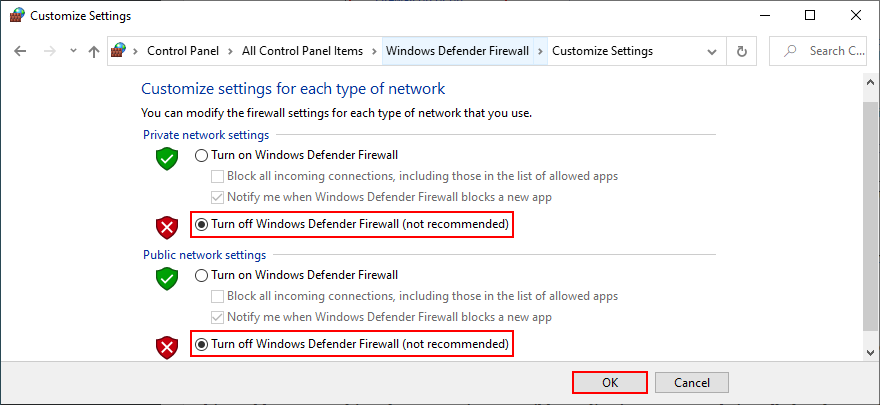
- Click OK and restart your PC
- Check for BSOD errors
It’s not a good idea to leave your firewall turned off because it means exposing your machine to Internet dangers. Make sure to turn it back on as soon as possible by retracing the steps above.
14. Update your GPU driver
If your graphics adapter is outdated, it’s no wonder that VIDEO SCHEDULER INTERNAL ERROR pops up on your screen. To resolve this problem, you just have to update your GPU driver to the newest version.
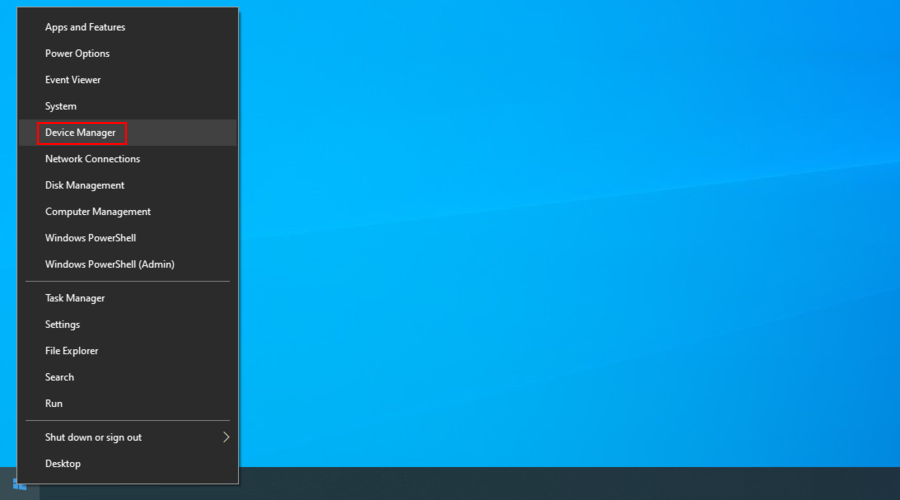
- Right-click the Windows 10 Start button and select Device Manager
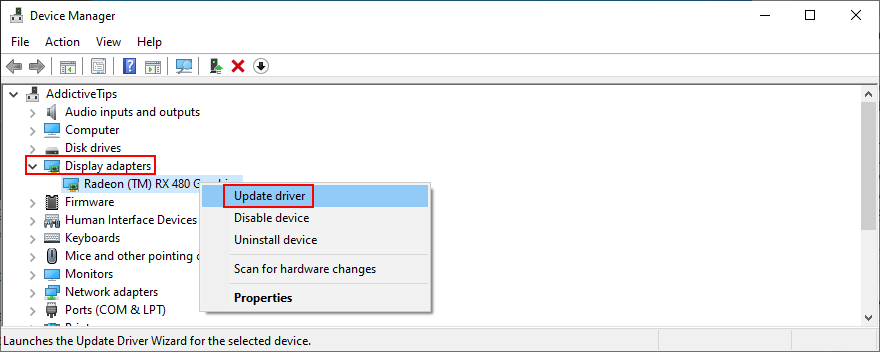
- Expand the Display adapters category
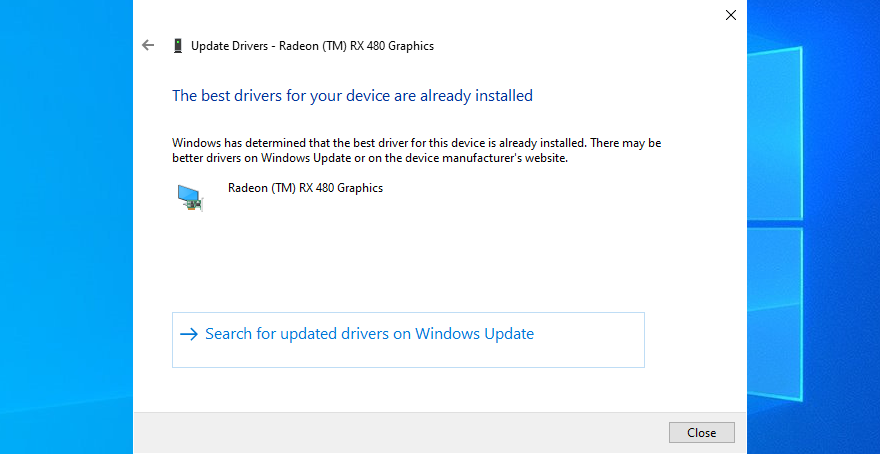
- Right-click your graphics device and choose Update driver
- When prompted with two options, select Search automatically for drivers
- If you see the The best drivers for your device are already installed message, click Search for updated drivers on Windows Update. However, if you have already updated Windows 10, you can skip this step
Windows is not that great at tracking down newer drivers on the Internet, although they are available for download. A better solution is to visit the website of your manufacturer to find and download the latest driver.
However, if you don’t want to go through that trouble or risk getting an incompatible driver, you can use a driver update software solution to keep all your drivers in check.
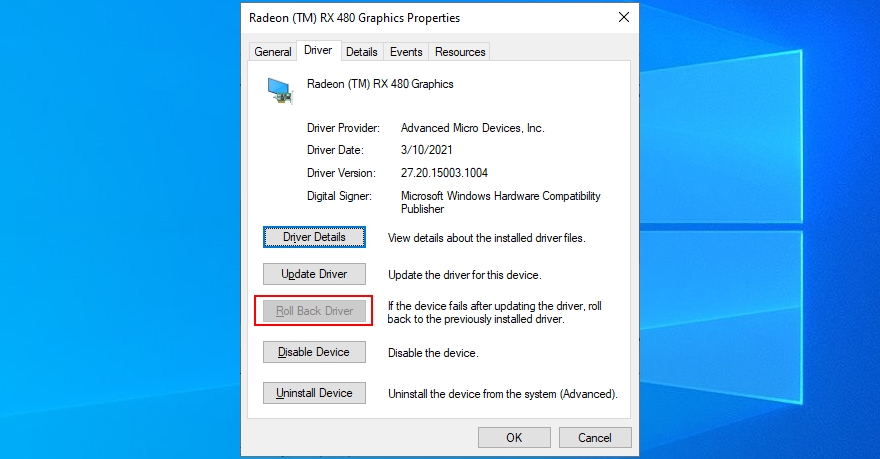
15. Roll back the graphics driver
On the other hand, if you have already installed a driver that’s damaged or incompatible with your graphics card, you should immediately roll back to the previous version, assuming that it still exists on your hard disk.
- Go back to Device Manager
- Right-click your graphics device and select Properties
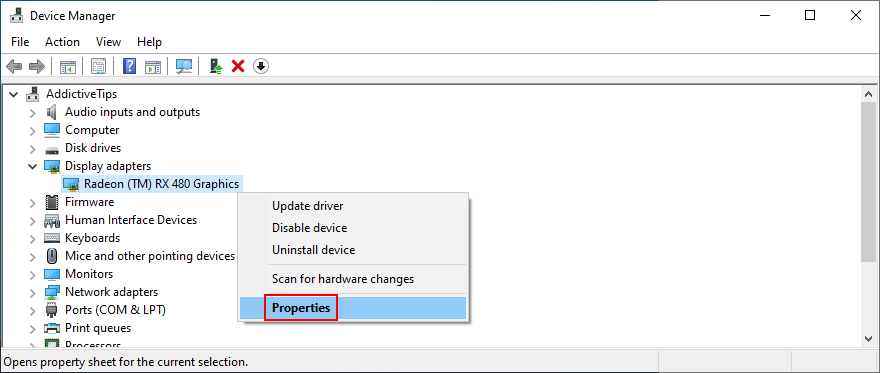
- Select the Driver area
- Click Roll Back Driver and follow the steps
- If the button is greyed out and can’t be clicked, it means that you can’t make the rollback because a previous driver doesn’t exist on your PC
16. Disable hardware acceleration
Some games, web browsers, and other programs have a built-in option for improving performance by accelerating your hardware. However, it should be a feature reserved for high-end computers only.
Otherwise, you risk getting system crashes and blue screen messages because your hardware is overworked. If you have a low-end computer with a GPU card on a budget, make sure to disable hardware acceleration in all our apps.
How to disable hardware acceleration in Google Chrome:
- Launch Google Chrome
- Click the More button on the top-right corner
- Select Settings (or visit
chrome://settings/)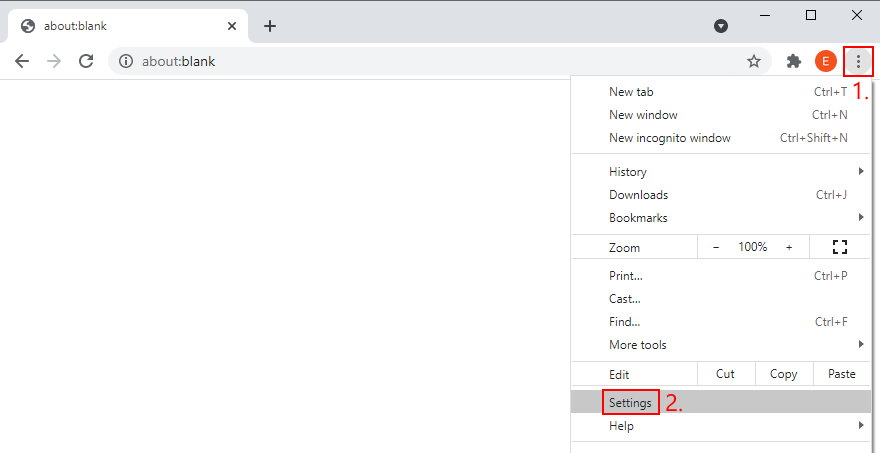
- Jump to the Advanced section
- At System, turn off Use hardware acceleration when available
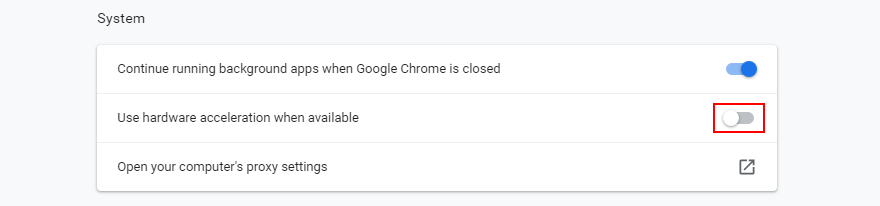
- Relaunch your web browser
How to disable hardware acceleration in Mozilla Firefox:
- Open Mozilla Firefox
- Click the ≡ button on the upper-right part
- Go to Options (or visit
about:preferences)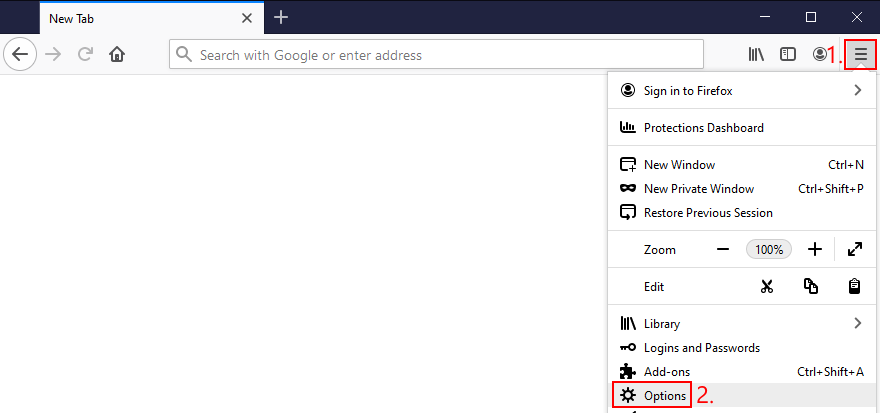
- In General, locate the Performance section
- Disable Use recommended performance settings
- When shown, also disable Use hardware acceleration when available
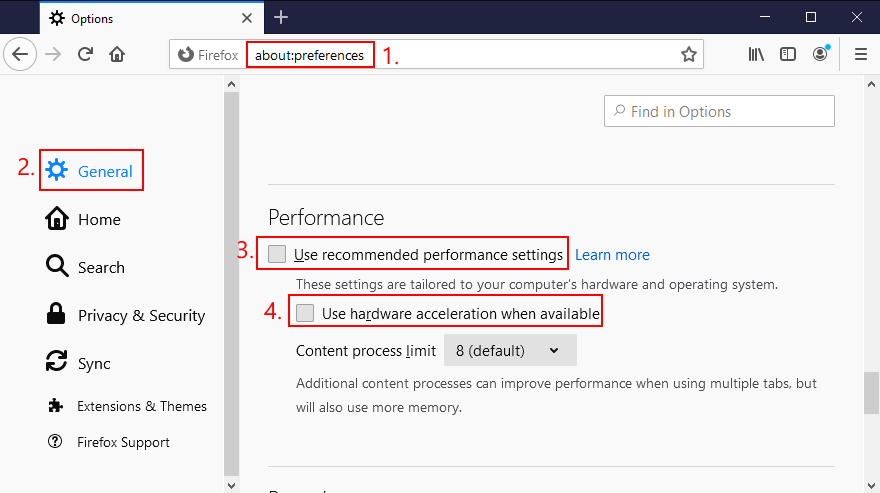
- Restart Firefox
How to disable hardware acceleration in Microsoft Edge:
- Open Microsoft Edge
- Click the More button on the upper-right corner
- Go to Settings
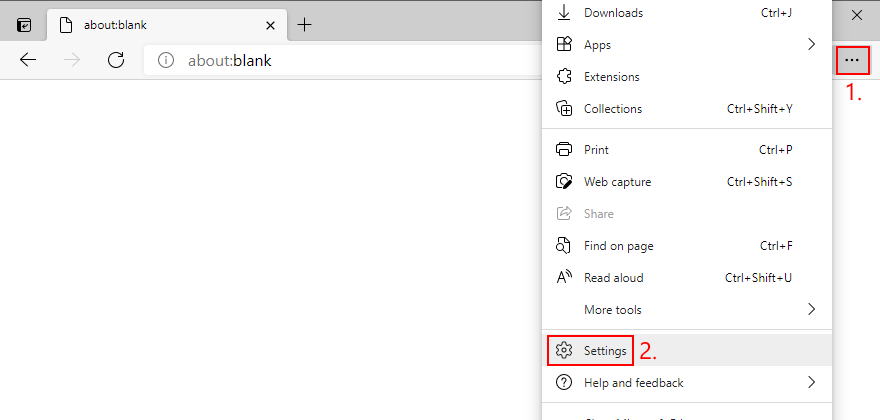
- Jump to the System area (or visit
edge://settings/system) - Switch off Use hardware acceleration when available
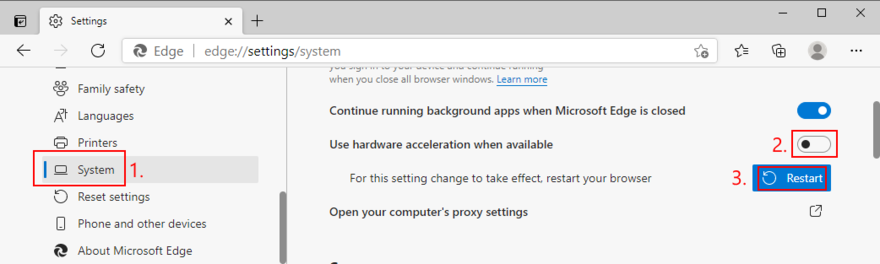
- Click Restart
17. Remove and reseat your hardware
Circling back to your computer’s hardware, the last resort is to remove and reseat all components. It means shutting down your computer and unpluging all components and cards, including your monitor, motherboard, graphics card, and memory.
Make sure to carefully clean off dust, switch ports if you have two or more ports of the same kind, as well as check and change cables if you have any to spare. When it comes to your monitor, try switching from Displayport to HDMI (or vice versa).
Take your time and arm yourself with a bit of patience while doing this. Once you’re ready, insert all cards into the right slots firmly but without applying force. Then, boot your PC and inspect results to see if you’re still getting VIDEO SCHEDULER INTERNAL ERROR.
18. Fix hard drive errors
Hard drive corruption and bad sectors could be the reason why your computer is acting up and preventing you from using it. But you can fix HDD errors without having to install a third-party application, thanks to CHKDSK (Check Disk).
How to use CHKDSK:
- Press Win key + R, type cmd, and press Ctrl + Shift + Enter to open Command Prompt as admin

- Click Yes if prompted by UAC (User Account Control)
- If Windows is installed on the C: drive, run
chkdsk c:/f. Otherwise, replacec:with the right partition letter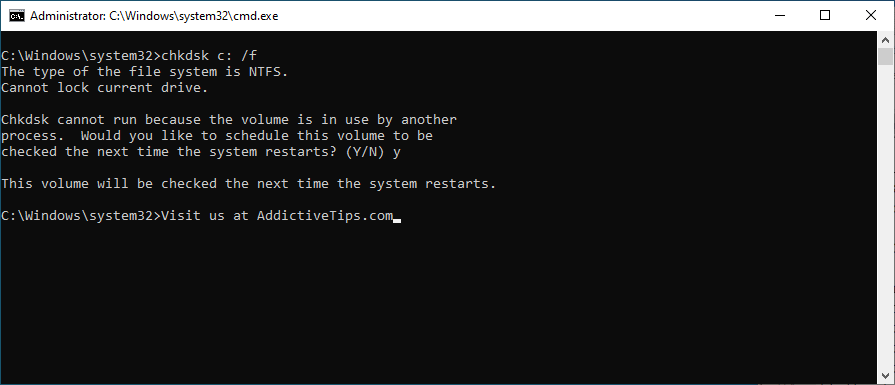
- When asked to schedule CHKDSK at the next system boot, type y and press Enter
- Exit Command Prompt and restart your PC
- CHKDSK will scan and repair disk errors during boot. Once it finishes, check if you still get BSOD error messages
19. Repair corrupt system files
If your operating system has any corrupt or missing files, it could be why your computer keeps crashing and shows VIDEO SCHEDULER INTERNAL ERROR on your screen. But you should be able to resolve this problem without having to reinstall Windows, thanks to SFC (System File Checker).
How to use SFC:
- Click the Start button, type Command Prompt, and select Run as administrator
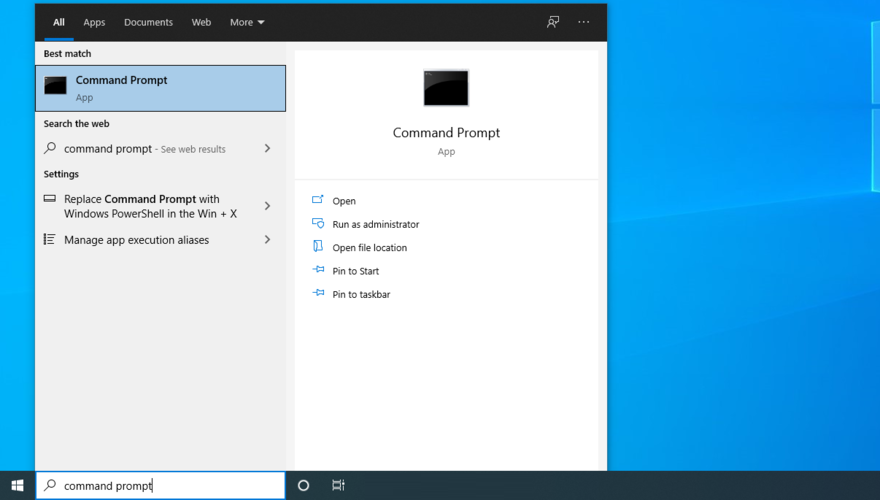
- Type
sfc/scannowand press Enter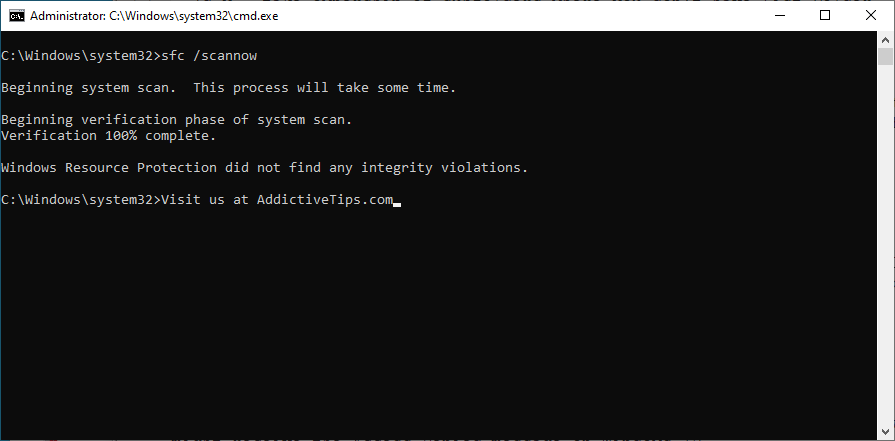
- Wait until SFC finishes its job. Once it’s done, restart your PC
- Check if you still get blue screen messages
More serious problems about damaged system files can be handled by DISM (Deployment Image Servicing and Management). It’s an internal tool that verifies and repairs the component store of the Windows image.
How to use DISM:
- Launch Command Prompt with elevated rights
- Type
DISM/online/cleanup-image/scanhealthand press Enter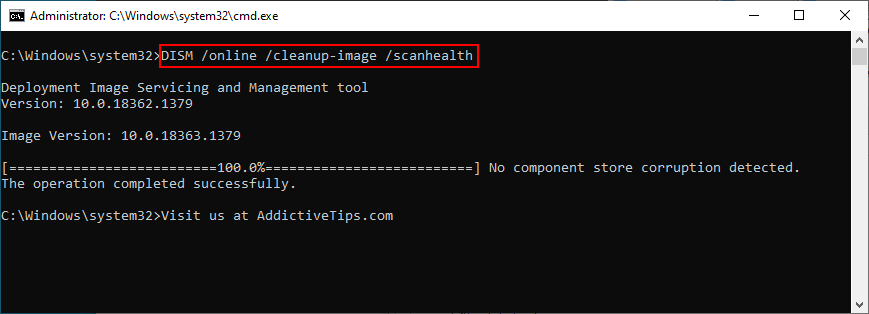
- If DISM finds any errors, type
DISM/online/cleanup-image/restorehealthand press Enter to fix them - Patiently wait while it’s doing its job. Then, restart your PC
- Open Command Prompt as admin again
- Run SFC (
sfc/scannow) - Restart your PC one last time and check for BSOD errors
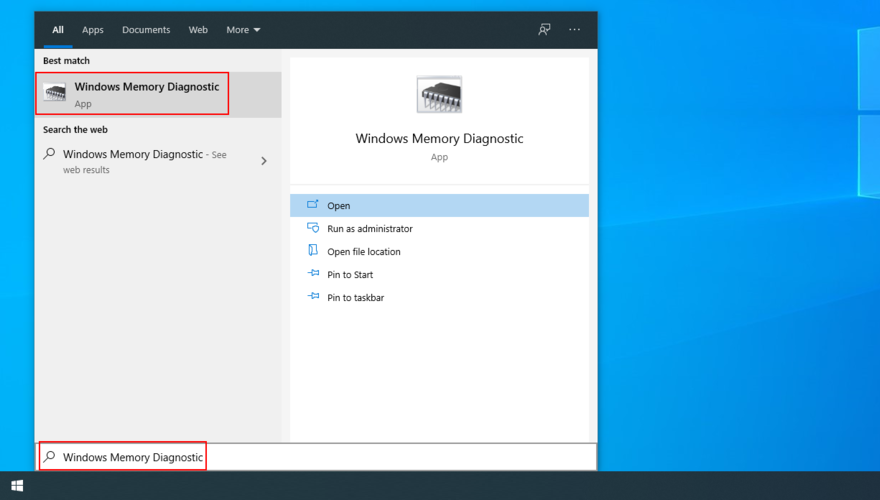
20. Check your RAM
It’s a good idea to inspect your RAM card at the software level to find and resolve any problems which might be causing VIDEO SCHEDULER INTERNAL ERROR. You can easily do this by turning to a built-in system tool called Windows Memory Diagnostic.
How to use Windows Memory Diagnostic:
- Save all projects you’re currently working on and quit all applications
- Press the Windows key, search for Windows Memory Diagnostic, and open this app
- Click Restart now and check for problems (recommended)
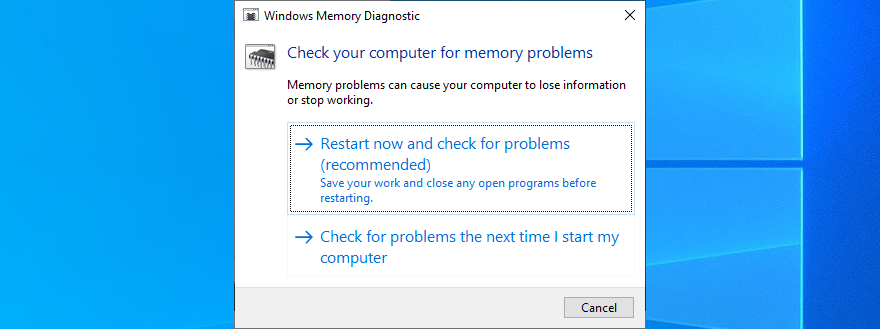
- After Windows restarts, it will find and fix any RAM issues
- Once it’s complete, check if you still get BSOD messages
For additional information about your memory card, check out MemTest86.
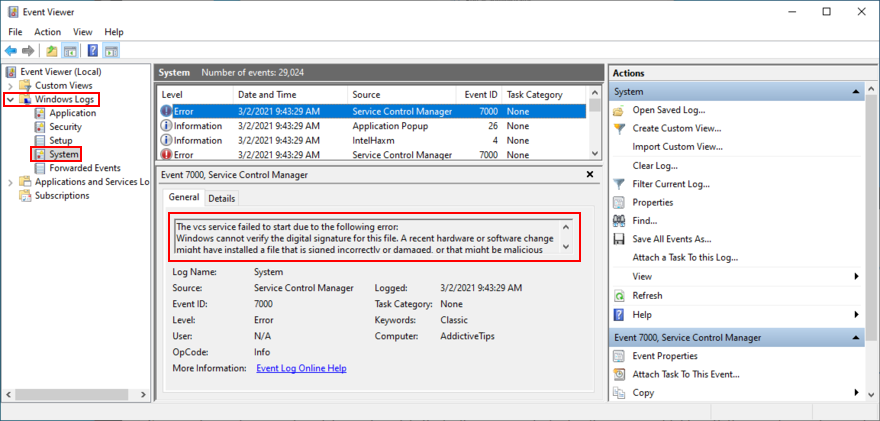
21. Use Event Viewer
It can be difficult to solve VIDEO SCHEDULER INTERNAL ERROR if you don’t know which drivers are involved in the system crash. But you can get in-depth information by turning to Windows Event Viewer.
- When Windows reboots after a system crash, immediately click the Start button, type Event Viewer, and press Enter to open this app
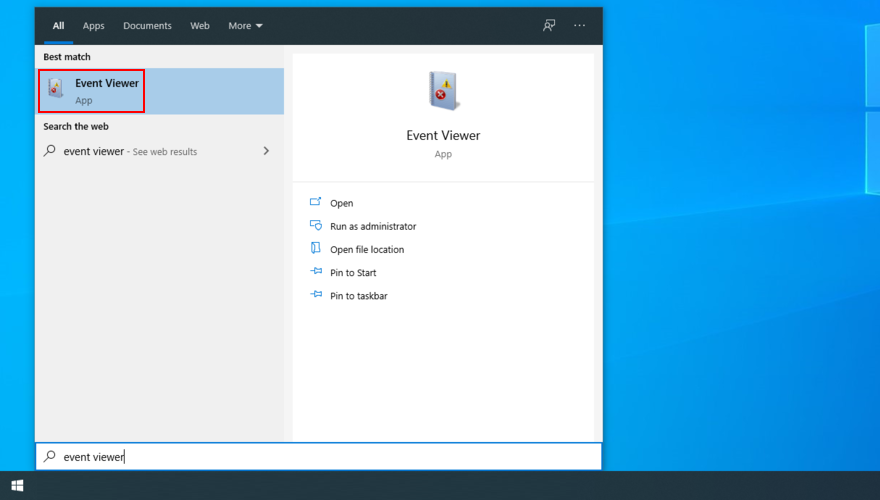
- Select Windows Logs on the left side and go to System
- Choose the first entry in the list to discover more details about VIDEO SCHEDULER INTERNAL ERROR. You can analyze the information shown in the General and Details tabs
If you prefer a simpler approach toward investigating blue screen errors, we suggest checking out BlueScreenView. It’s a third-party app that gives you the possibility to analyze minidumps (.dmp files) left behind by BSOD events, showing all relevant information in a user-friendly interface.
22. Use System Restore
If you’re the type of user who frequently creates system restore points, then you should be able to roll back Windows 10 to a previous state. The only condition is that the checkpoint must have been created before you started getting VIDEO SCHEDULER INTERNAL ERROR.
It’s a simple way to erase any unpredictable software events that could have sent your computer into a spiral. Just keep in mind that any applications installed after the checkpoint will disappear, so you have to reinstall them.
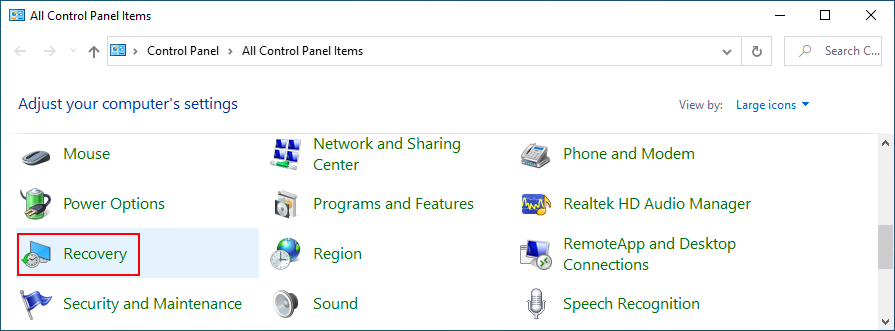
How to use System Restore:
- Click the Start button, search for Control Panel, and open this app
- Select Recovery
- Click Open System Restore (you need administrator rights)
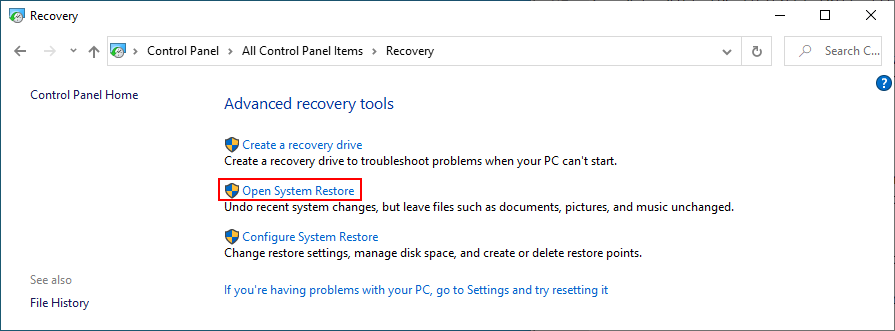
- If this option is visible, click Show more restore points to get a better view of all available restore points
- Choose a restore point created before you started experiencing system crashes. You can click Scan for affected programs to find out which applications you will have to reinstall later
- Once you select a restore point, click Next and follow the on-screen instructions

- It will take a while, and your computer will reboot later
- Check if your system still crashes now
23. Start Windows 10 in Safe Mode
Booting Windows 10 in Safe Mode means turning off all non-essential drivers, processes, and services to create a secure environment. It’s a great way to get your PC working again, without any BSOD errors.
- Interrupt the Windows startup sequence three times to trigger Advanced startup mode
- Go to the Troubleshoot section

- Select Advanced options > Startup Settings
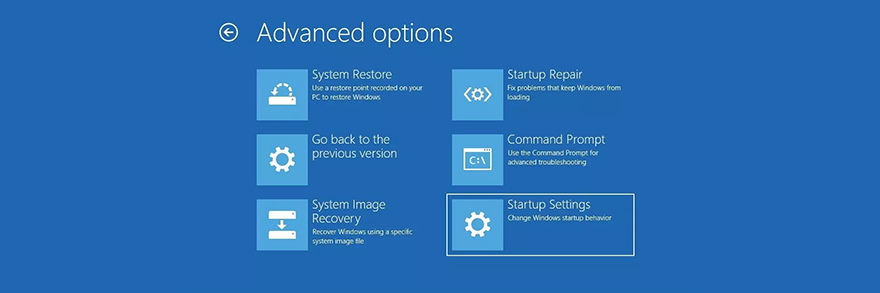
- Click Restart

- Press F4 to boot Windows in Safe Mode
- After Windows boots, check for BSOD errors
24. Use Display Driver Uninstaller
You can use Display Driver Uninstaller (DDU) to reset your NVIDIA software and drivers with minimum effort. Here’s how to use it.
- Download Display Driver Uninstaller from the official website
- Unzip the downloaded files
- Start Windows 10 in Safe Mode
- Launch the DDU executable file
- At Select device type, choose GPU-Z
- At Select device, pick NVIDIA
- Click Clean and restart
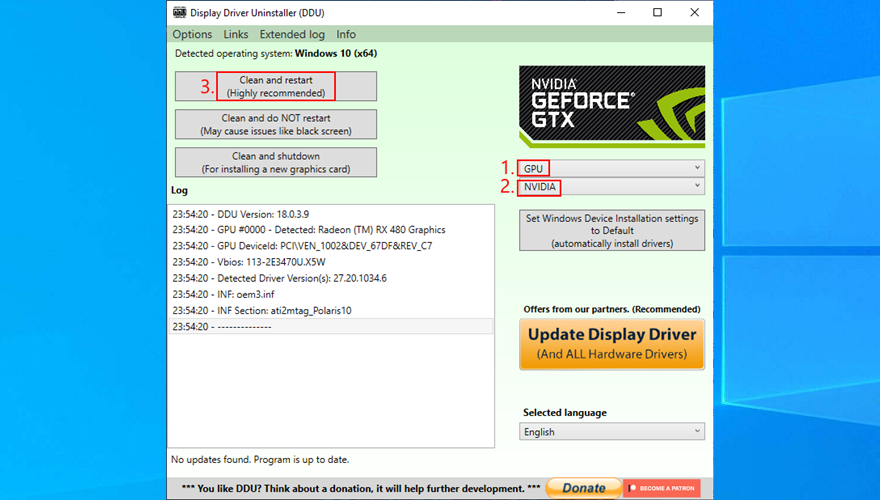
- Check for BSOD errors
25. Lower your monitor refresh rate
Many users overclock their monitors on Windows 10. However, it has been reported that it sometimes causes blue screen errors such as VIDEO SCHEDULER INTERNAL ERROR. To fix this problem, you should lower the refresh rate. For instance, if you pumped it up to 75 GHz, try setting it to 60 Hz.
- Right-click the Windows 10 desktop and access Display settings

- Scroll down and select Advanced display settings
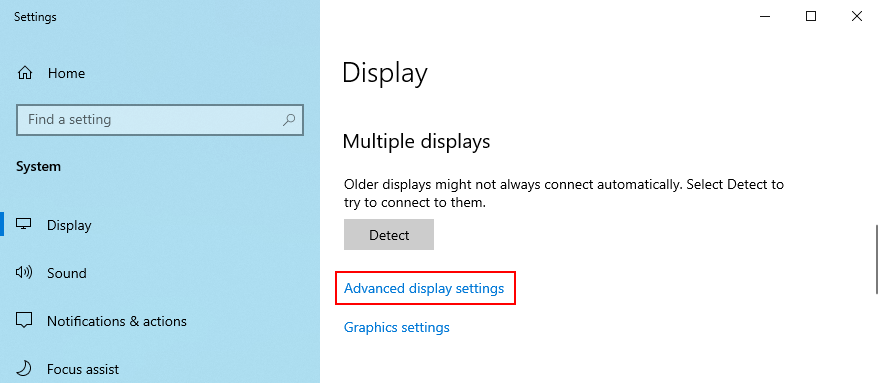
- If you have multiple monitors, choose your primary display from the list
- Set Refresh rate to one step lower
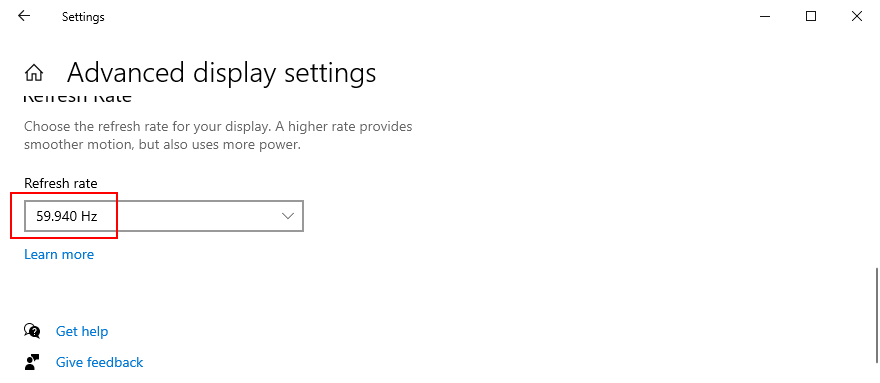
- Check the new settings. If you’re pleased with the new monitor configuration, click Keep changes. Otherwise, select Revert and try a different refresh rate (lower, not higher)
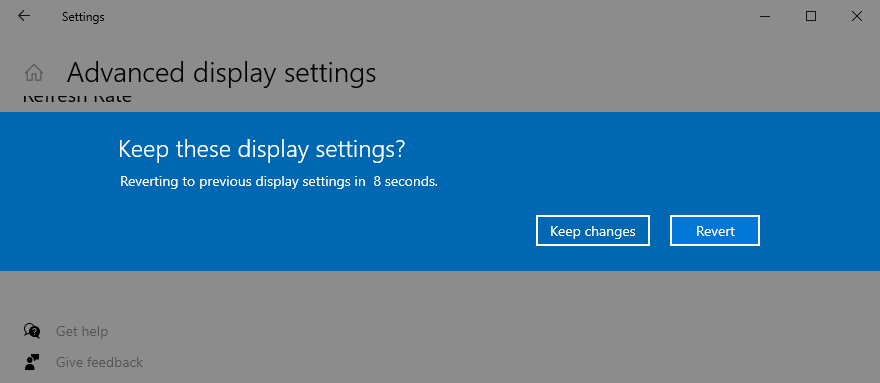
- Once you are comfortable with the monitor refresh rate, check for BSOD errors
Worth mentioning is that, if you have multiple monitors installed on your PC, you should lower the refresh rate of each display to fix VIDEO_SCHEDULER_INTERNAL_ERROR.
26. Check your disk space
If you don’t have enough disk space on your computer, Windows will not be able to properly conduct its processes, resulting in system stability issues and BSOD stop codes like VIDEO_SCHEDULER_INTERNAL_ERROR.
To resolve this problem, you just have to increase the disk space. For example, you can use a partition manager like Windows Disk Management to allocate more disk space from a large partition (e.g. D:) to the Windows drive (e.g. C:).
How to use Disk Management:
- Press Windows key + R, type diskmgmt.msc, and press Enter to open Disk Management
- Select a large partition on the list that doesn’t have Windows installed (e.g. D:)
- Right-click the large partition and select Shrink Volume

- Set the new volume size by taking out a considerable chunk, then click Shrink
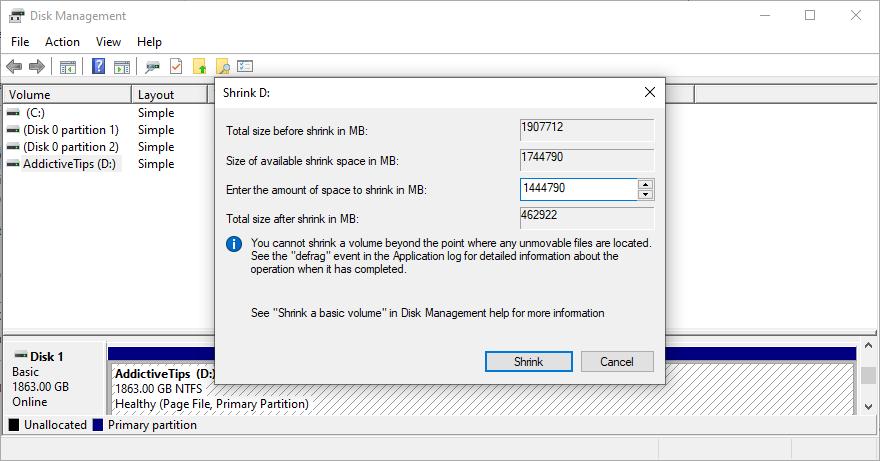
- Choose the Windows drive (e.g. C:), right-click it, and pick Extend Volume
- Specify the new drive size by adding the chunk you just acquired
- Finalize extending the volume and restart your PC. The Windows drive should now have more disk space
- Check if you still get blue screen errors
An alternative solution is to delete large files you don’t need anymore, like uninstalling applications and games. Plus, you can transfer important data to external hard disks, upload it to a cloud storage account, or burn it to DVD discs. For junk files, you can turn to a system cleaner or Windows Disk Cleanup.
How to use Disk Cleanup:
- Visit Downloads and Recycle Bin to save or restore important files since these folders will be cleared
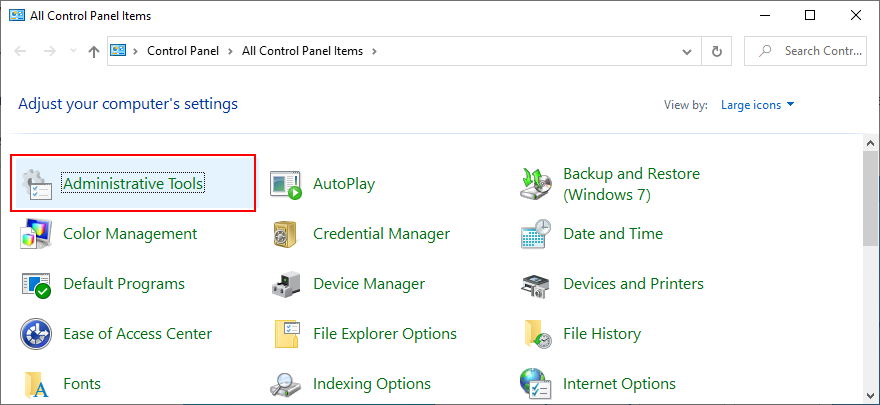
- Click the Start button, search for Control Panel, and open this app
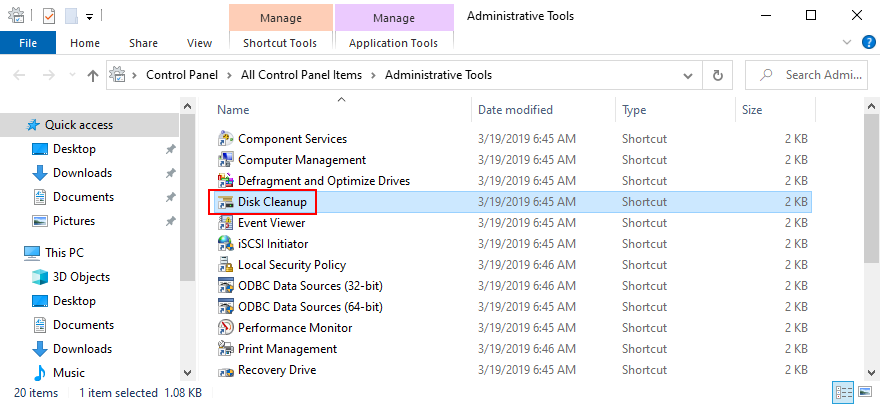
- Go to Administrative Tools
- Open Disk Cleanup
- Choose the Windows drive (e.g. C:) and click OK
- Select all files from the list and click Clean up system files (you need admin rights)
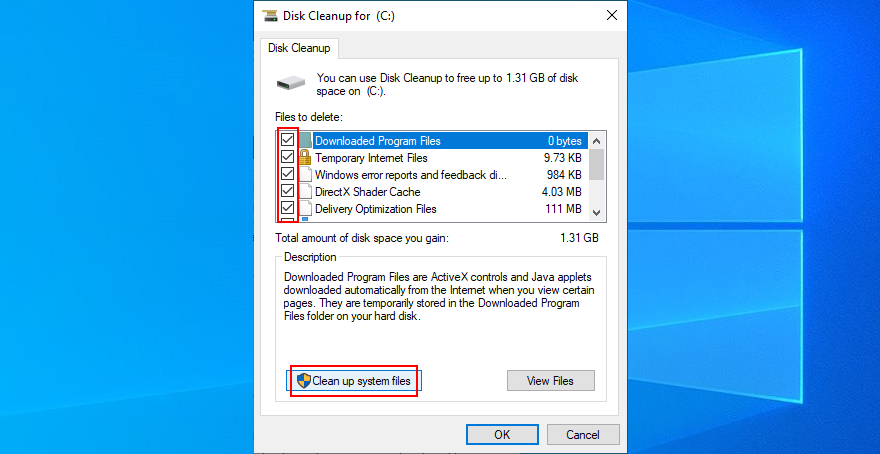
- After the file search, select all items again and click OK
- Patiently wait while Windows performs the cleanup and don’t use your computer during this time
- After it’s done, reboot your PC and check for BSOD issues
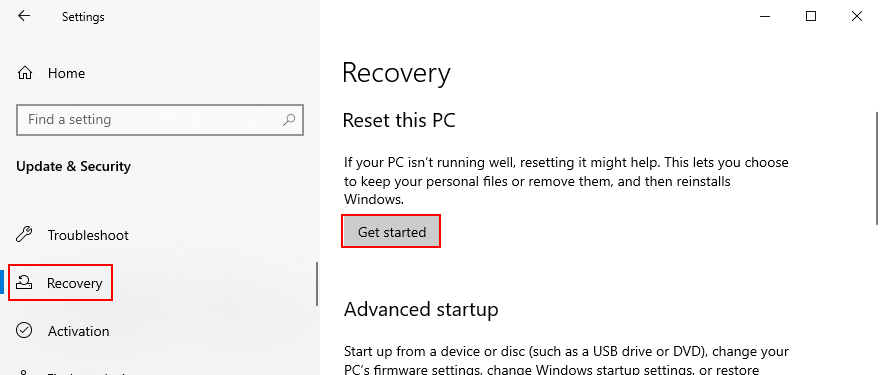
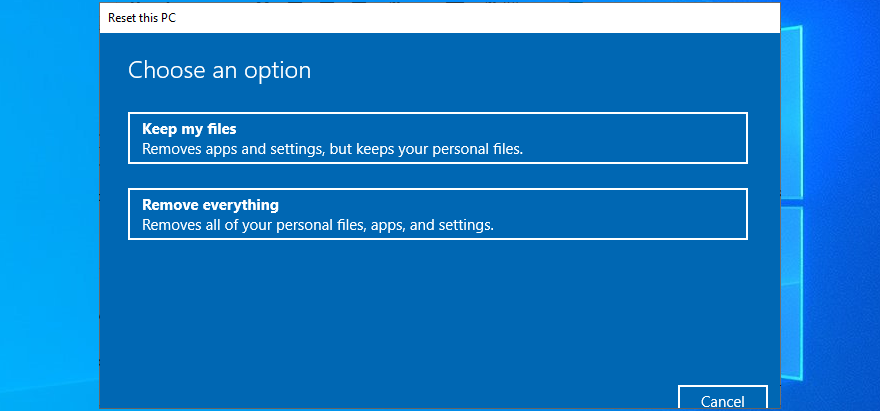
27. Reset Windows 10
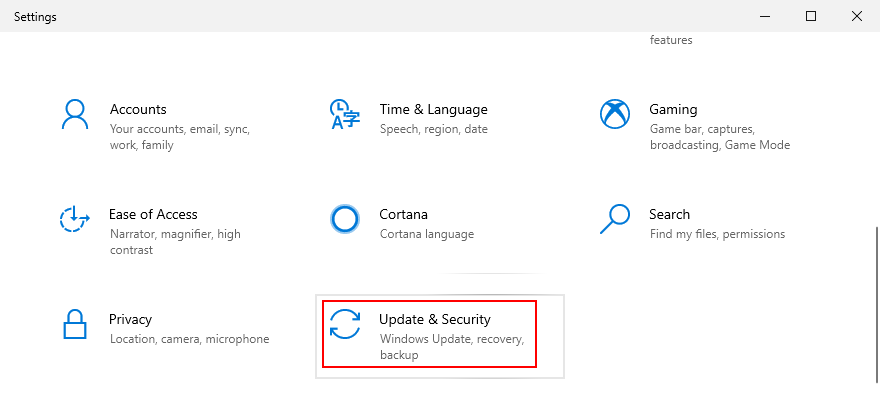
When all other solutions are unsuccessful in their attempts to fix VIDEO SCHEDULER INTERNAL ERROR, it’s time to factory reset Windows 10. Don’t worry since your personal files will be left untouched. But all your software applications will be removed.
- Right-click the Start button and go to Settings
- Select Update & Security
- Switch to the Recovery section
- At Reset this PC, click Get started
- Select Keep my files and follow the step-by-step instructions
VIDEO SCHEDULER INTERNAL ERROR can be resolved
To review, VIDEO SCHEDULER INTERNAL ERROR is a nasty blue screen message that indicates a problem with your graphics card (usually NVIDIA). However, it can be also tied to other computer components, like your CPU, motherboard, or even software changes.
To fix this issue, start by running Windows Update and performing a GPU stress test. You should also check your PC for malware, repair corrupt registry settings, turn off your overclocking tools, reset and update BIOS, uninstall third-party security tools and broken system updates, as well as run the internal Hardware and Devices troubleshooter.
Furthermore, it’s a good idea to unplug your external devices, temporarily turn off your antivirus software and firewall, update your GPU driver or roll it back to a stable version, deactivate hardware acceleration, remove and reseat your hardware components, fix hard drive and operating system errors, or check your memory card for issues.
If that doesn’t work either, you should use Event Viewer to find out more details about the crash, roll back Windows 10 to a previous restore point, start the operating system in Safe Mode, use Display Driver Uninstaller to reset your NVIDIA software and drivers, lower your monitor refresh rate, check for insufficient disk space, as well as reset Windows 10.
In the worst case scenario, you might have to ditch your graphics card and upgrade to a superior model. For example, it’s well known that gamers need powerful GPU cards to handle resource-demanding processes.
What solution solved VIDEO SCHEDULER INTERNAL ERROR on your Windows 10 computer? Tell us all about it in the comment section below.