Wszyscy użytkownicy systemu Windows ostatecznie radzą sobie z problemami z komputerem, w zależności od tego, jak używają komputera i jak ostrożni są podczas przeglądania Internetu. Niebieski ekran powoduje uszkodzenie urządzenia i uniemożliwia korzystanie z niego. Jednak bez względu na to, jak poważny jest problem, Błędy BSOD można naprawić .
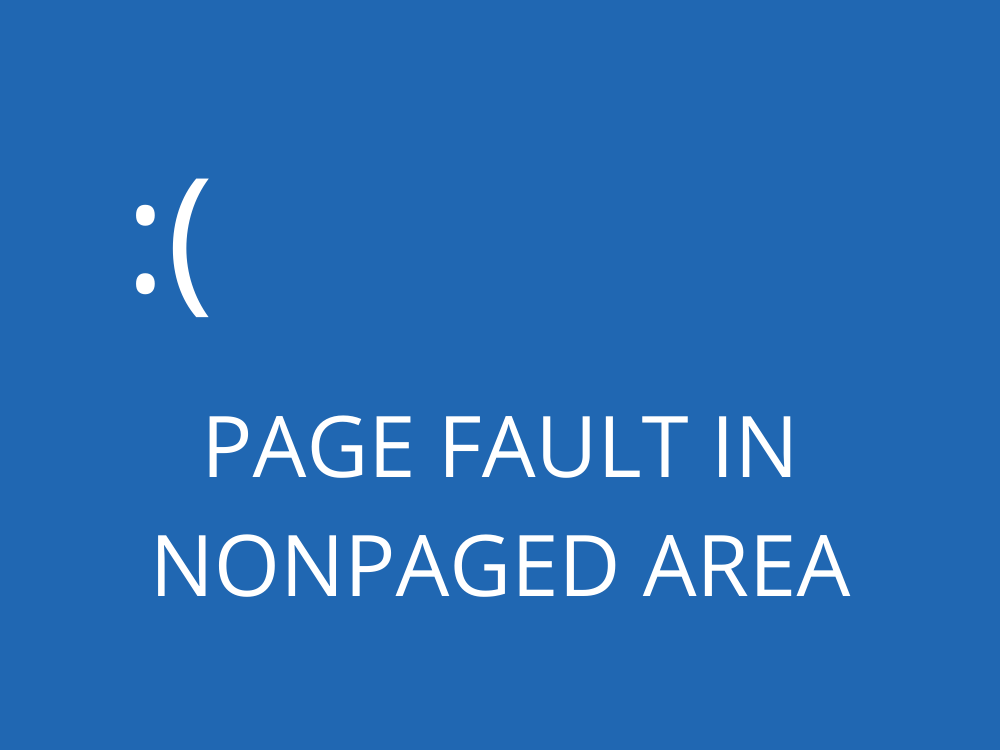
Co to jest BŁĄD STRONY W OBSZARZE NIEPAGOWANYM?
BŁĄD STRONY W OBSZARZE NIEPAGOWANYM to błąd BSOD. Zwykle towarzyszy mu kod 0x00000050 i może wystąpić w dowolnej iteracji systemu Windows, w tym w systemach Windows 10, 8, 7, Vista i XP.
Kod zatrzymania wskazuje, że system operacyjny nie może zidentyfikować podstawowego pliku systemowego w pamięci, niezależnie od tego, czy mówimy o pamięci głównej, procesorze czy pamięci karty graficznej. W rezultacie system Windows wyłącza się i wyświetla niebieski ekran, aby zapobiec utracie danych i uszkodzeniu plików.
Jak naprawić USTERKĘ STRONY W OBSZARZE NIEPAGOWANYM w systemie Windows 10
Rozwiązywanie problemów z kodem zatrzymania PAGE FAULT IN NIEPAGED AREA może zająć dużo czasu. Jednak ważne jest, aby uzbroić się w cierpliwość. Dobrym pomysłem jest też posiadanie innego urządzenia z dostępem do internetu w trybie gotowości, aby w razie pojawienia się nowych problemów wyszukiwać w sieci więcej informacji.
Ponadto, chyba że BŁĄD STRONY W OBSZARZE NIEPAGOWANYM spowoduje pętlę rozruchową w systemie Windows 10, należy jako środek bezpieczeństwa utwórz punkt przywracania systemu , a nawet pełną kopię zapasową plików osobistych i aplikacji. Po wykonaniu tej czynności sprawdź następujące rozwiązania.
1. Wykonaj twardy restart komputera
Zacznij od prostego obejścia, które może pozbyć się kodu zatrzymania PAGE FAULT IN NIEPAGED AREA, jeśli jest to jednorazowy problem: twarde ponowne uruchomienie komputera. Oznacza to usunięcie całej tymczasowej pamięci podręcznej przechowywanej na komputerze w celu wykonania czystego ponownego uruchomienia.
Jak mocno zrestartować komputer:
- Wyłącz system Windows (naciśnij Alt + F4 i wybierz Zamknij )
- Odłącz przewód zasilający od komputera. Jeśli masz laptopa, wyjmij jego baterię
- Naciśnij i przytrzymaj przycisk zasilania przez 20–30 sekund. Na tabletach naciśnij i przytrzymaj jednocześnie przycisk zasilania i zmniejszanie głośności przez ten czas
- Ponownie podłącz przewód zasilający do komputera stacjonarnego lub ponownie podłącz baterię do laptopa
Włącz komputer i uruchom system Windows
2. Uruchom Windows Update
Jeśli nigdy nie aktualizowałeś systemu Windows 10 lub minęło zbyt dużo czasu od ostatniej aktualizacji, nie zwlekaj dłużej z tym wydarzeniem. Sprawdź, czy nie ma żadnych oznak, że komputer jest gotowy do wykonania aktualizacji, takich jak mała czerwona kropka na powiadomieniach lub przycisku zasilania, które sygnalizują oczekującą aktualizację.
Jeśli jednak wyłączyłeś automatyczne aktualizacje systemu Windows 10 , możesz ręcznie przeprowadzić kontrolę i pozwolić systemowi operacyjnemu na pobranie najnowszych funkcji, ulepszeń, poprawek i poprawek zabezpieczeń.
Jak ręcznie sprawdzić dostępność aktualizacji systemu:
- Kliknij prawym przyciskiem myszy przycisk Start i wybierz Ustawienia
- Przejdź do Update & Security
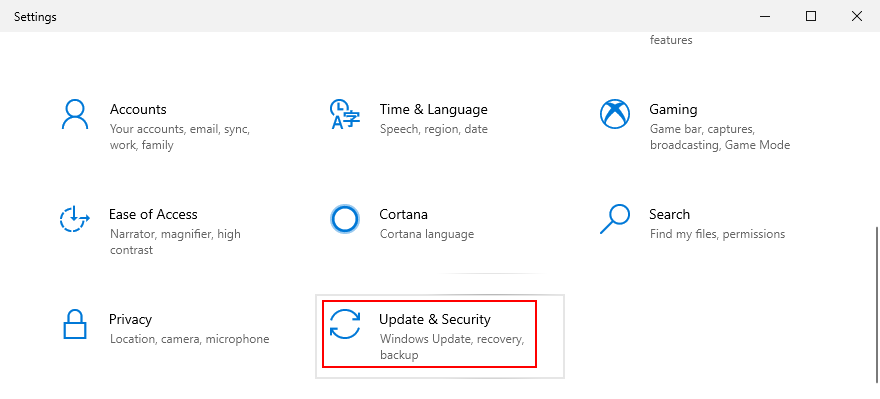
- Przejdź do Windows Update po lewej stronie
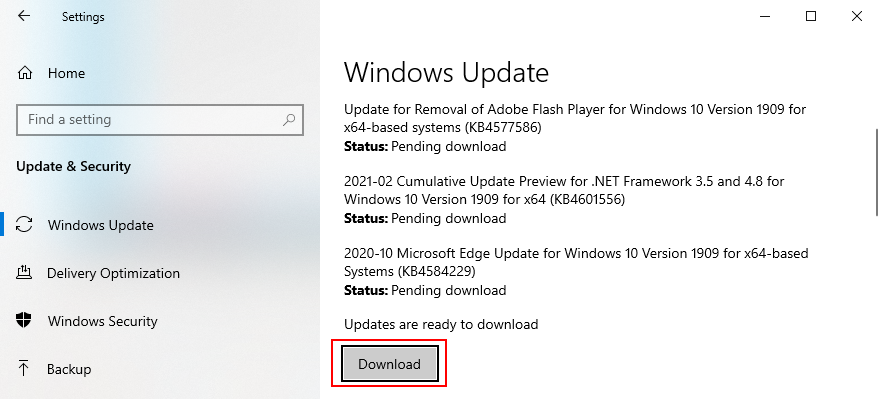
- Jeśli są jakieś oczekujące aktualizacje, kliknij Zainstaluj teraz lub Uruchom ponownie teraz . W przeciwnym razie kliknij Sprawdź aktualizacje , a następnie Pobierz
- Cierpliwie czekaj, aż system operacyjny zostanie zaktualizowany. Może kilka razy ponownie uruchomić komputer
3. Napraw błędy dysku twardego
Uszkodzenie dysku twardego i uszkodzone sektory mogą powodować błędy niebieskiego ekranu, takie jak BŁĄD STRONY W OBSZARZE NIEPAGOWANYM. Może się to zdarzyć, gdy operacja formatowania partycji zostanie nagle przerwana, na przykład przez awarię zasilania.
W takim przypadku możesz skorzystać z wewnętrznego narzędzia wiersza poleceń o nazwie CHKDSK (Check Disk), aby przeskanować dysk twardy i naprawić wszelkie błędy.
Jak używać CHKDSK:
- Kliknij przycisk Start , wyszukaj hasło Wiersz polecenia i kliknij opcję Uruchom jako administrator . Jeśli pojawi się monit UAC (Kontrola konta użytkownika), kliknij Tak
- Wpisz
chkdsk c:/f/r, jeśli Twój system operacyjny jest zainstalowany na domyślnym dysku C:. W przeciwnym razie zamieńc:na prawidłową literę partycji. Naciśnij klawisz Enter
- Zostaniesz poproszony o zaplanowanie CHKDSK na następne ponowne uruchomienie systemu. Wpisz y i naciśnij Enter , aby potwierdzić
- Wyjdź z wiersza polecenia i uruchom ponownie komputer
- Skanowanie i naprawa dysku zostanie wykonana przed uruchomieniem systemu Windows
- Wpisz
4. Napraw uszkodzone pliki systemowe
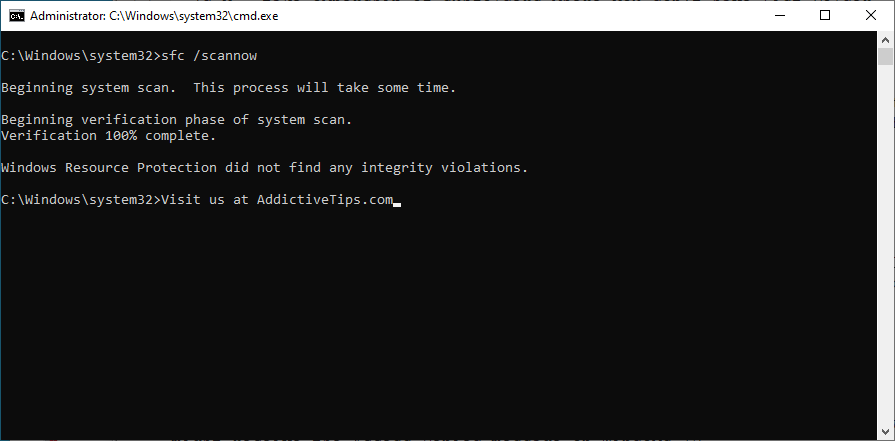
Nie tylko awaria dysku twardego może spowodować BŁĄD STRONY W OBSZARZE NIEPAGOWANYM, ale także wszelkie uszkodzone, zmodyfikowane lub brakujące pliki systemowe, których system Windows potrzebuje do uruchamiania swoich procesów. W takim przypadku możesz użyć SFC (Kontroler plików systemowych) , kolejne wbudowane narzędzie wiersza poleceń.
Jak korzystać z SFC:
- Naciśnij klawisz Win + R , wpisz cmd i naciśnij Ctrl + Shift + Enter , aby uruchomić Wiersz polecenia z uprawnieniami do podniesienia uprawnień
- Uruchom
sfc/scannowi pozwól systemowi Windows znaleźć i naprawić wszelkie naruszenia integralności
- Zamknij wiersz polecenia
- Uruchom ponownie komputer
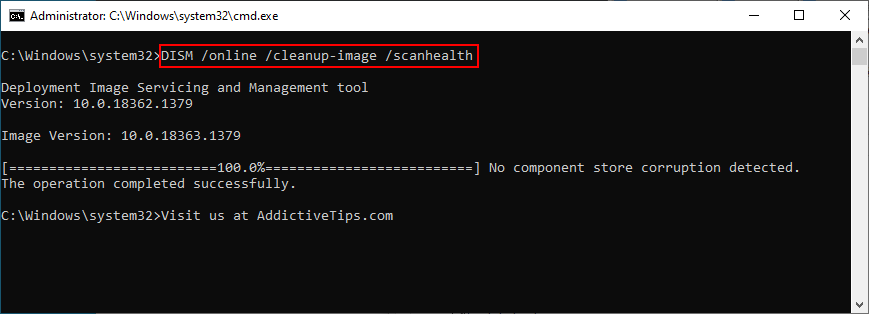
Jeśli SFC nie znajdzie żadnych problemów lub jeśli nie wystarczy naprawić kod zatrzymania PAGE FAULT IN NONPAGED AREA, możesz skorzystać z DISM (Deployment Image Servicing and Management) w celu naprawienia składowej składowej obrazu systemu operacyjnego.
Jak korzystać z DISM:
- Naciśnij klawisz Win , wpisz Wiersz polecenia , wybierz tę aplikację i kliknij Uruchom jako administrator
- Uruchom polecenie
DISM/online/cleanup-image/scanhealth
- Jeśli DISM nie znajdzie nic złego w Twoim komputerze, możesz zakończyć. W przeciwnym razie uruchom
DISM/online/cleanup-image/restorehealth, aby naprawić problemy - Gdy DISM zakończy swoje zadanie, zamknij wiersz polecenia i uruchom ponownie komputer
- Ponownie uruchom CMD z prawami podniesienia uprawnień
- Uruchom SFC (
sfc/scannow), aby sprawdzić system - Wyjdź z wiersza polecenia i uruchom ponownie komputer po raz ostatni
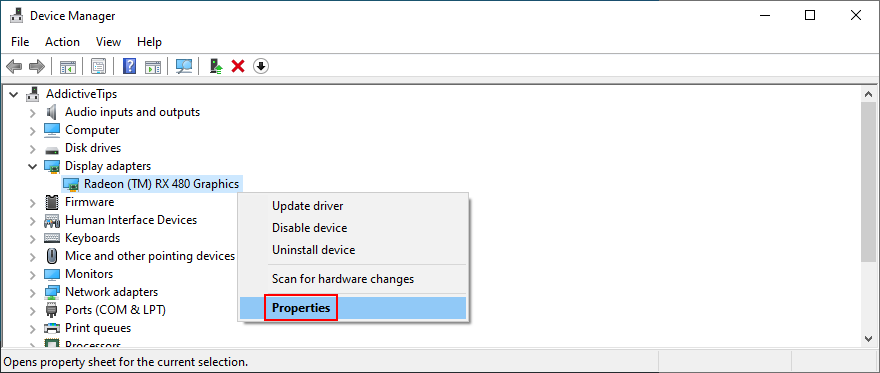
5. Sprawdź sterowniki urządzeń
Urządzenia, które nie zostały poprawnie zainstalowane na komputerze lub sterowniki, które są przestarzałe lub niekompatybilne z systemem operacyjnym, mogą być kolejnym powodem, dla którego na niebieskim ekranie pojawia się błąd PAGE FAULT IN NIEPAGED AREA. Na przykład wielu użytkowników zgłasza problemy ze sterownikami wyświetlacza AMD. Oto, co musisz zrobić.
Zainstaluj ponownie swoje urządzenia:
- Kliknij przycisk Start , wyszukaj Menedżer urządzeń i otwórz tę aplikację
- Rozszerz wszystkie menu urządzenia
- Poszukaj dowolnego urządzenia z żółtym wykrzyknikiem
- Kliknij go prawym przyciskiem myszy i wybierz opcję Odinstaluj urządzenie
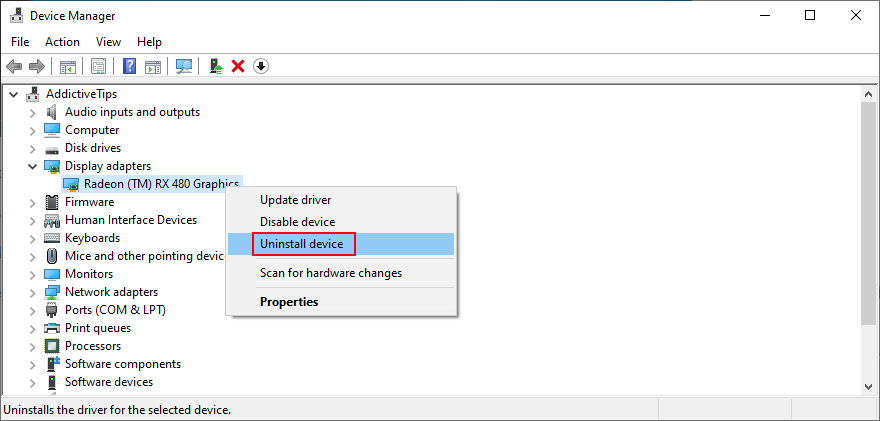
- Kliknij Odinstaluj , aby potwierdzić
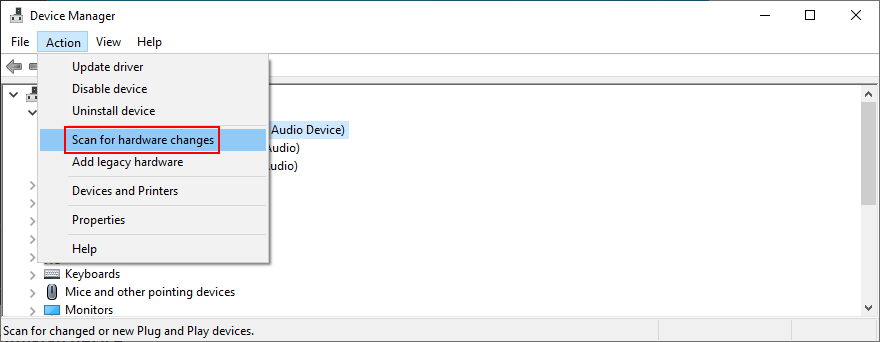
- Otwórz menu Akcja i wybierz Skanuj w poszukiwaniu zmian sprzętu
- Jeśli urządzenie nie zostanie ponownie zainstalowane automatycznie, uruchom ponownie komputer
Zaktualizuj stare sterowniki:
- Kliknij prawym przyciskiem myszy przycisk Start i przejdź do Menedżera urządzeń
- Wybierz urządzenie, kliknij je prawym przyciskiem myszy i wybierz opcję Aktualizuj sterownik . Jeśli nie masz pewności, które urządzenia wybrać, sugerujemy rozpoczęcie od karty graficznej

- Gdy pojawi się pytanie, co zrobić, kliknij opcję Wyszukaj automatycznie sterowniki
- Jeśli pojawi się komunikat Najlepsze sterowniki dla tego urządzenia są już zainstalowane , kliknij opcję Wyszukaj zaktualizowane sterowniki w witrynie Windows Update . Ale jeśli sprawdziłeś już dostępność aktualizacji systemu, pomiń ten krok
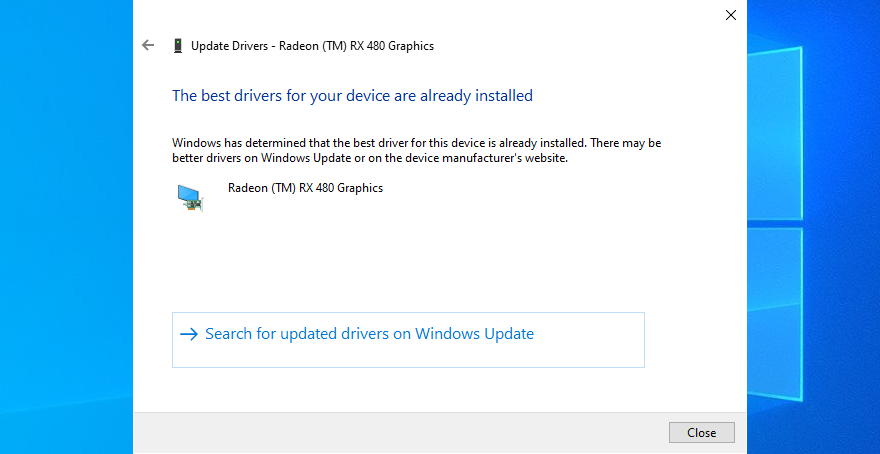
- Postępuj zgodnie z instrukcjami wyświetlanymi na ekranie, aby zakończyć aktualizację sterownika
- Uruchom ponownie komputer

Ustalenie, które sterowniki należy zaktualizować na komputerze, może być trudne. Jeśli nie chcesz spędzać dużo czasu na rozwiązywaniu tego problemu, po prostu użyj aplikacja do aktualizacji sterowników . Automatycznie wykrywa wszystkie przestarzałe sterowniki na twoim komputerze i proponuje zainstalowanie ich wszystkich. Poza tym nie ryzykujesz, że Twój system operacyjny nie będzie obsługiwał sterownika.
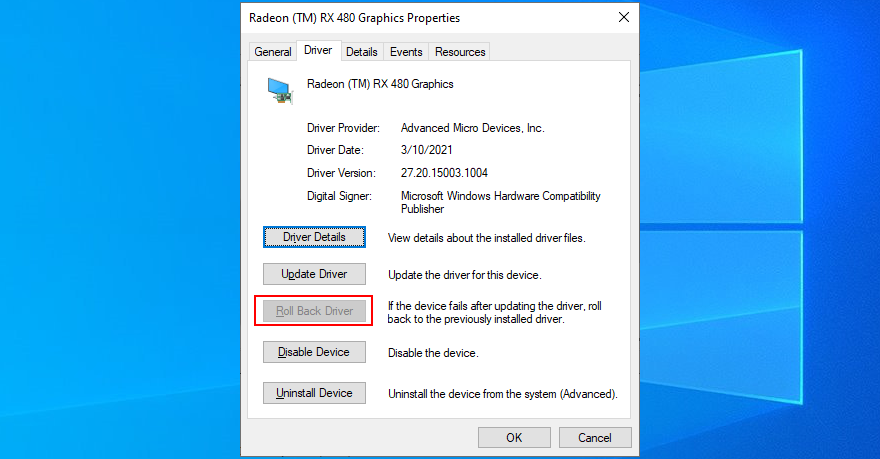
Jeśli przypadkowo zainstalowałeś niezgodny sterownik dla dowolnego urządzenia, przywróć go do poprzedniej, stabilnej wersji. Następnie możesz pozostawić komputer bez zmian i sprawdzić, czy nadal otrzymujesz kod zatrzymania PAGE FAULT IN NONPAGED AREA, lub poprawnie zaktualizować sterowniki, wykonując opisane wcześniej kroki.
Przywróć nieobsługiwane sterowniki:
- Naciśnij klawisz Win + R , wpisz devmgmt.msc i naciśnij Enter , aby otworzyć Menedżer urządzeń
- Wybierz wadliwe urządzenie i otwórz menu prawym przyciskiem myszy
- Przejdź do Właściwości
- Przejdź do sekcji Sterownik
- Kliknij opcję Przywróć sterownik i postępuj zgodnie z podanymi instrukcjami. Jeśli nie możesz kliknąć tego przycisku, ponieważ jest wyszarzony, nie możesz wykonać przywracania, ponieważ na komputerze nie ma poprzedniej wersji sterownika. Po prostu pomiń tę część rozwiązań
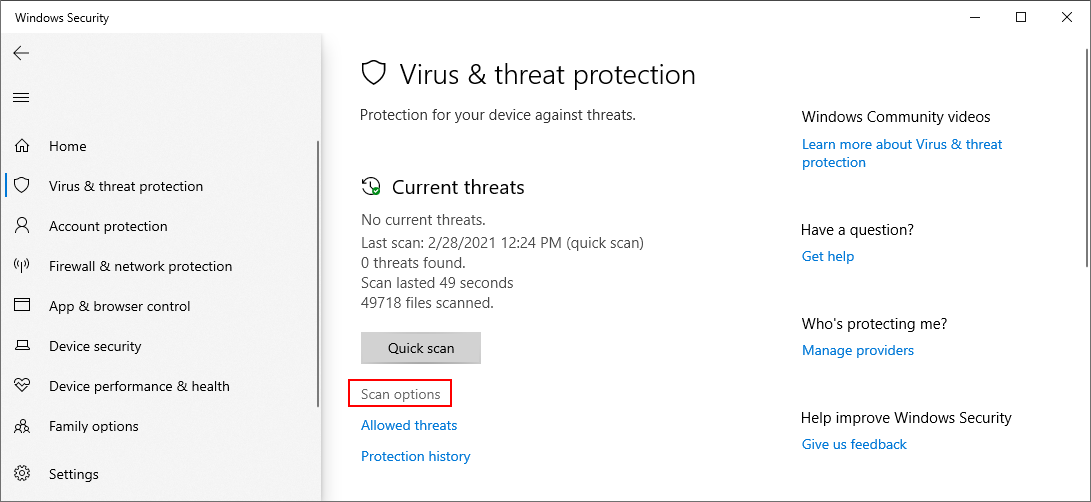
6. Uruchom skanowanie w poszukiwaniu złośliwego oprogramowania
Infekcja wirusowa może być wystarczająco silna, aby uszkodzić krytyczne pliki systemowe, których system Windows potrzebuje do normalnego działania. Zwykle zdarza się to użytkownikom, którzy nie mają zainstalowanego rozwiązania antywirusowego, mają je cały czas wyłączone lub nie stosują wskazówek dotyczących bezpieczeństwa podczas korzystania z internetu.
Aby przetestować tę teorię, wystarczy uruchomić aplikację chroniącą przed złośliwym oprogramowaniem i przeprowadzić skanowanie, aby zobaczyć, jakie wyniki pokażą. Jeśli nie masz zainstalowanego rozwiązania zabezpieczającego innej firmy, przenieś swoją uwagę na program Windows Defender.
Jak korzystać z programu Windows Defender:
- Kliknij przycisk Start , wyszukaj hasło Windows Defender i otwórz tę aplikację
- Przejdź do Ochrona przed wirusami i zagrożeniami

- Kliknij Opcje skanowania
- Na liście opcji skanowania wybierz Szybkie skanowanie i kliknij Skanuj teraz
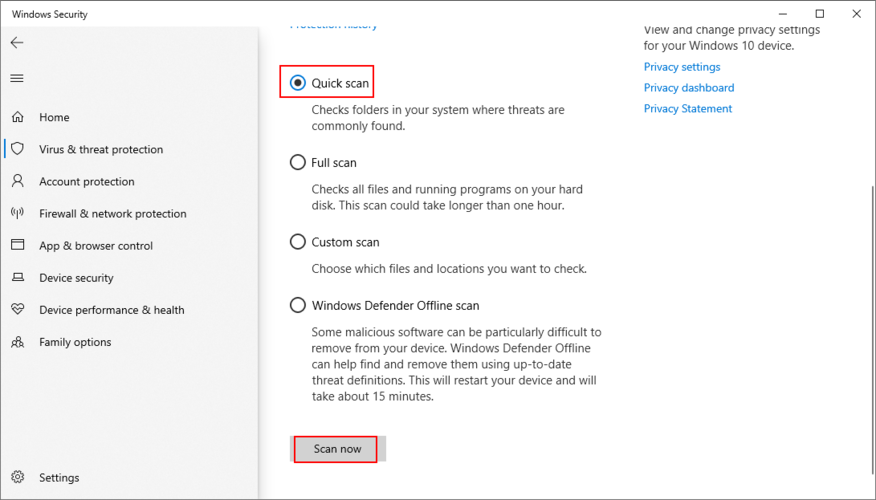
- Defender rozpocznie skanowanie. W tym czasie nie wyłączaj ani nie uruchamiaj ponownie komputera
- Jeśli wyniki skanowania pojawią się z pustymi rękami, wykonaj kolejne skanowanie, korzystając z opcji Skanowanie offline w usłudze Windows Defender
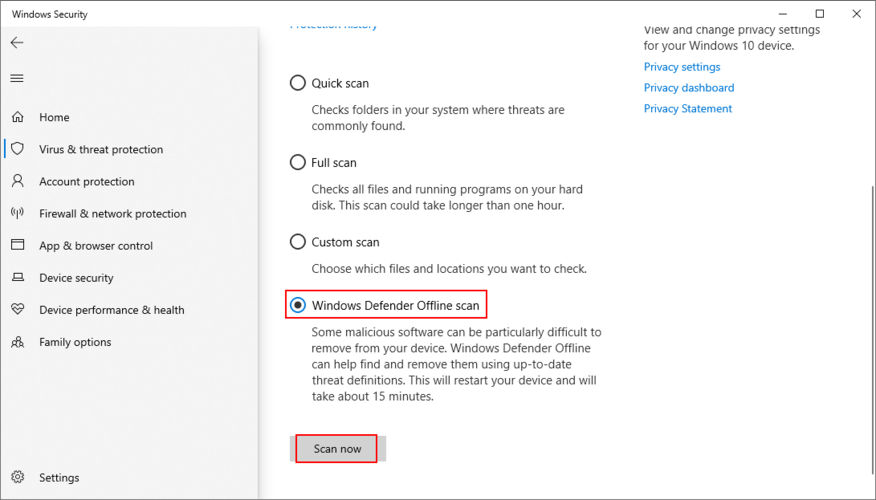
- Jeśli znajdzie jakieś złośliwe zagrożenia, pozwól usłudze Defender usunąć lub poddać kwarantannie zainfekowane pliki
- Uruchom ponownie komputer i zobacz, czy to rozwiązało problemy z awariami

7. Uruchom czysty rozruch
Czysty rozruch systemu Windows 10 oznacza uruchamianie systemu operacyjnego przez wyłączenie wszystkich programów, które uruchamiają się automatycznie zaraz po włączeniu komputera. Niektórzy agenci złośliwego oprogramowania są na tyle podstępni, że przenikają do programów startowych, więc czysty rozruch pomoże rozwiązać ten problem.
Jak wyczyścić rozruch systemu Windows 10:
- Naciśnij klawisz Win + R , wpisz msconfig i naciśnij Enter , aby uruchomić Konfiguracja systemu
- Pozostań na karcie Ogólne
- W Wybór uruchomienia
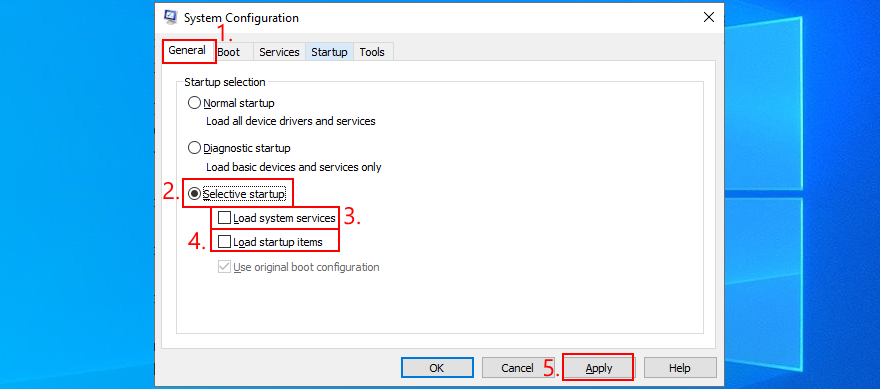
- Wybierz Uruchamianie selektywne
- Odznacz opcję Załaduj usługi systemowe
- Usuń zaznaczenie opcji Wczytaj elementy startowe
- Kliknij Zastosuj i zamknij
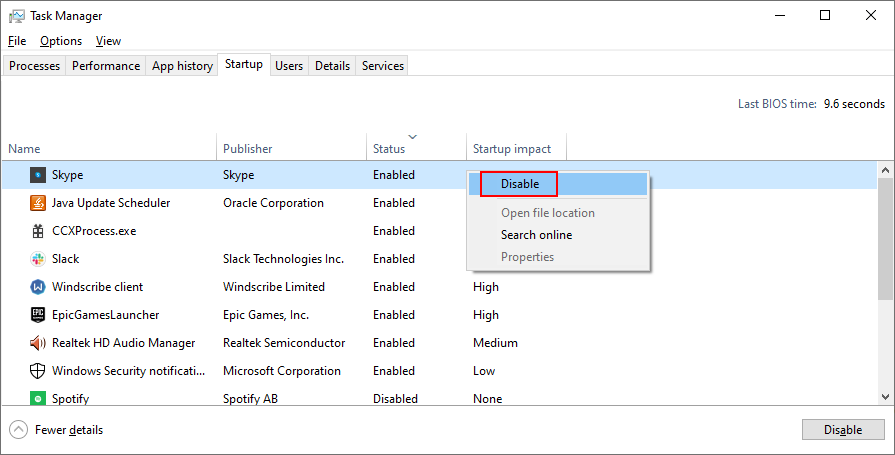
- Naciśnij Ctrl + Shift + Esc , aby otworzyć Menedżera zadań
- Przejdź na kartę Uruchamianie
- Dla każdej aplikacji ze stanem Włączona wybierz ją i kliknij Wyłącz
- Wyjdź na pulpit i uruchom ponownie komputer
- Sprawdź, czy Twój system nadal się zawiesza
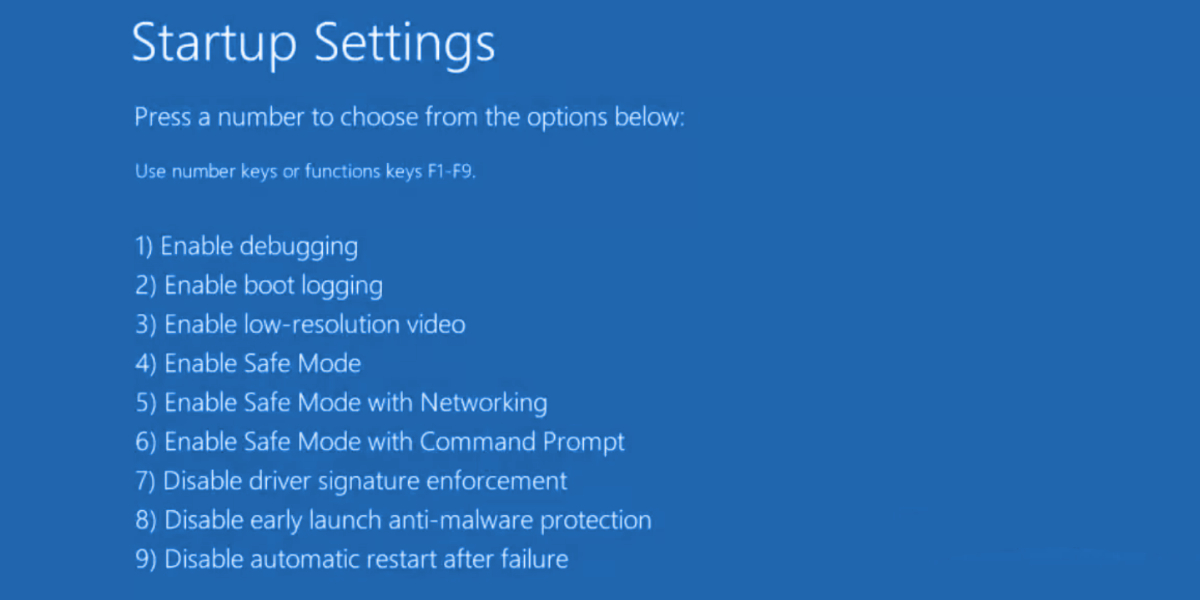
8. Uruchom system Windows 10 w trybie awaryjnym
Aby stworzyć bezpieczne środowisko do rozwiązywania problemów z błędami BSOD, zaleca się uruchom system Windows 10 w trybie awaryjnym . Twój system operacyjny uruchomi się tylko z niezbędnymi sterownikami, procesami i usługami. Jest to więc prosty sposób na zawężenie wyszukiwania poprzez wyłączenie wszelkich składników oprogramowania, które mogą powodować kod zatrzymania USTERKA STRONY W OBSZARZE NIEPOWAGANYM.
- Kliknij przycisk Start na pulpicie i otwórz menu zasilania
- Przytrzymaj klawisz Shift i kliknij Uruchom ponownie , aby uruchom system Windows w trybie rozwiązywania problemów
- Jeśli nie możesz uzyskać dostępu do pulpitu, ponieważ błąd niebieskiego ekranu powoduje uruchomienie komputera w pętli rozruchowej, trzykrotnie przerwij sekwencję rozruchową systemu Windows, aby przejść do trybu Zaawansowane uruchamianie .
- Przejdź do Rozwiązywanie problemów > Opcje zaawansowane > Ustawienia uruchamiania
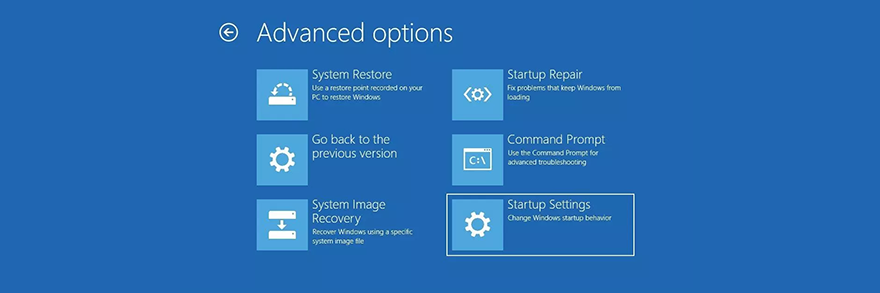
- Kliknij Uruchom ponownie
- Naciśnij klawisz F4 , aby uruchomić system Windows w trybie awaryjnym
- Sprawdź, czy po uruchomieniu systemu Windows nadal pojawiają się błędy niebieskiego ekranu
9. Użyj narzędzia do odinstalowywania sterownika ekranu
Warto dokładnie sprawdzić sterowniki karty graficznej, ponieważ każdy problem w tym dziale może wpłynąć na wrażenia z gry i przesyłania strumieniowego. Co gorsza, może nawet powodować błędy niebieskiego ekranu, takie jak USTERKA STRONY W OBSZARZE NIEPAGOWANYM w systemie Windows 10 lub starszych wersjach.
Zalecamy skorzystanie z narzędzia Display Driver Uninstaller (DDU) w celu bezproblemowego resetowania oprogramowania urządzenia i sterowników. Działa z NVIDIA, AMD i Intel. Może nawet ponownie uruchomić system Windows w trybie awaryjnym, aby bezpiecznie wykonać te operacje.
Jak używać narzędzia do odinstalowywania sterownika ekranu:
- Utwórz punkt przywracania systemu lub pełną kopię zapasową, jeśli jeszcze tego nie zrobiłeś
- Pobierz narzędzie do odinstalowywania sterownika ekranu z oficjalnego witryna internetowa
- Rozpakuj pobrany plik gdzieś na swoim komputerze
- Otwórz plik wykonywalny DDU
- Jeśli pojawi się aplikacja, którą próbujesz zainstalować, nie jest aplikacją zweryfikowaną przez firmę Microsoft , kliknij Mimo to zainstaluj
- Wypakuj pliki programu do dowolnego folderu
- Jeśli masz oczekujące aktualizacje systemu Windows, zainstaluj je
- Uruchom system Windows 10 w trybie awaryjnym, postępując zgodnie z instrukcjami z Rozwiązania 6 na tej liście. Jednak gdy dojdziesz do ekranu Ustawienia uruchamiania , wybierz F5 , aby włączyć tryb awaryjny z obsługą sieci
- Uruchom Display Driver Uninstaller.exe
- Pozostaw konfigurację domyślną i kliknij OK , aby przejść do głównego okna DDU
- Wybierz typ urządzenia i urządzenie z dwóch menu po prawej stronie
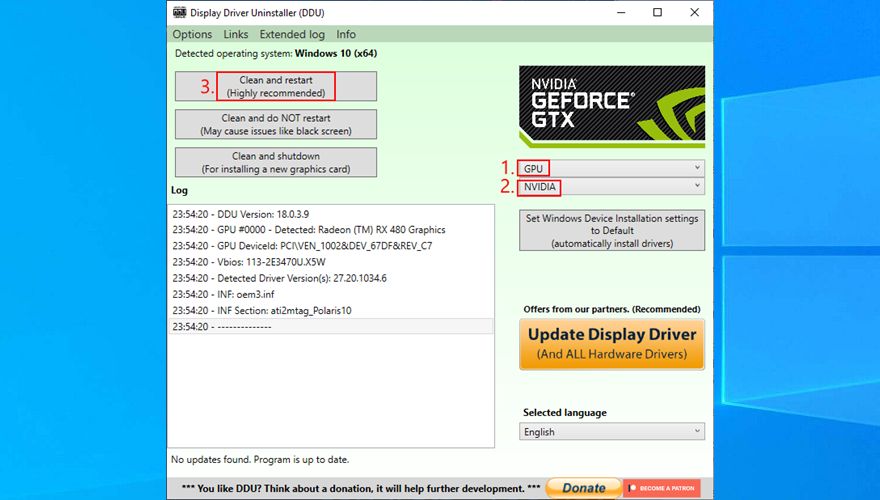
- Kliknij Wyczyść i uruchom ponownie
10. Napraw i ponownie zainstaluj.NET Framework
Microsoft.NET Framework jest wymaganą zależnością dla systemu operacyjnego i wielu aplikacji tworzonych przez system Windows. Tak więc, jeśli coś jest nie tak z pakietem komponentów, może to spowodować konflikty oprogramowania, błędy systemowe, a nawet komunikaty niebieskiego ekranu, takie jak USTERKA STRONY W OBSZARZE NIEPAGOWANYM.
However, you can fix a broken.NET Framework by installing a straightforward and practical tool released by Microsoft for this very purpose.
How to use Microsoft.NET Framework Repair Tool:
- Download Microsoft.NET Framework Repair Tool from the official website
- Launch the setup file
- Agree to the license terms and click Next to check your PC for issues
- If it finds any problems, like reregistering or restarting the Windows Installer service, click Next to apply all fixes
After completing the wizard steps and exiting to the desktop, check if you still get the PAGE FAULT IN NONPAGED AREA stop code on your PC. If you do, it’s a good idea to reinstall.NET Framework. Don’t worry since it’s pretty basic.
How to reinstall Microsoft.NET Framework:
- Right-click the Start menu and go to Apps and Features
- Find and select any entry that includes .NET Framework
- Click Uninstall and then again to confirm removal
- Do this for all .NET Framework entries
- Open a web browser
- Go to the .NET Framework official download page
- In the Supported versions category, click the recommended entry
- Download the runtime version (for non-developers)
- Open the downloaded file and install.NET Framework
11. Run Windows Memory Diagnostic
The PAGE FAULT IN NONPAGED AREA blue screen error could be caused by issues with your system memory. A simple way to test this is by running Windows Memory Diagnostic, a tool that comes integrated with Windows 10.
- Save all ongoing projects and terminate all applications
- Press Win key + R, type mdsched.exe, and press Enter
- Click Restart now and check for problems
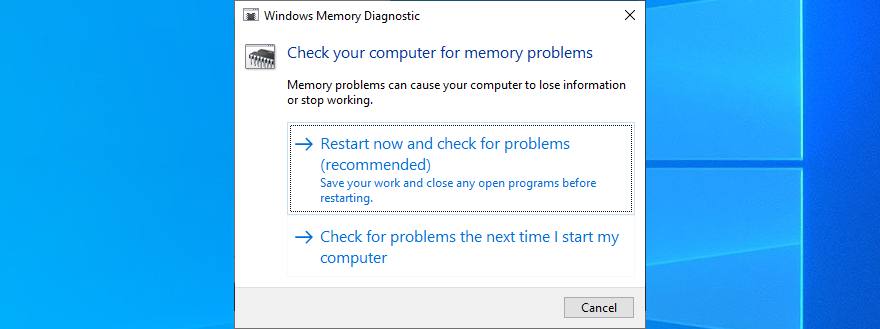
Before Windows boots, it engages in memory testing. There are three tests available: Basic, Standard, and Extended. By default, it runs the Standard test. However, it’s a good idea to switch to the Extended version. Although it takes more time, it’s more thorough.
To to this, press F1 to access Options. Then, select Extended and press F10 to apply. After the memory diagnosis is done, Windows will start as normal and show you the results in the notifications center. It might take a few seconds or minutes, just be patient until you get notified.
If you’re looking for a more advanced solution, we suggest checking out MemTest86.
12. Remove and reseat the memory slots
If Windows Memory Diagnostic doesn’t indicate any errors and you still can’t shake off the PAGE FAULT IN NONPAGED AREA error, you should remove and reseat your memory slots. But you need to be a bit handy with your computer.
It means removing all cables, taking apart your desktop, unpluging the memory sticks from their slots, then attaching them back. You could also try different memory slots if you have multiple options available.
However, you might have to consider replacing your RAM card if it’s damaged beyond repair.
13. Temporarily disable your antivirus
Security alerts could mean that your anti-malware tool is blocking access to critical system files that Windows needs to function at optimal parameters. You can quickly check this by temporarily turning off your antivirus solution.
Some applications don’t allow you to disable them due to security problems, however. In that case, you’re better off removing the program from your computer.
Furthermore, if you have two or more anti-malware programs installed, each with its own real-time engine, it’s absolutely necessary to uninstall all except one. That’s because multiple real-time safeguards can clash with each other, leading to severe computer problems, even blue screen errors like PAGE FAULT IN NONPAGED AREA.
14. Temporarily turn off your firewall
Just like your antivirus application, your antivirus could be blocking Internet access to system files that really need it. For example, Windows Update needs web access or it can’t bring your system up to speed, and Microsoft Store won’t work either.
In some rare cases, incorrect firewall settings can lead to BSOD errors such as PAGE FAULT IN NONPAGED AREA. Here’s what you need to.
How to disable your firewall:
- Log in to Windows using an administrator account
- Press Windows key + R, type control panel, and hit Enter
- In Control Panel, select Windows Defender Firewall
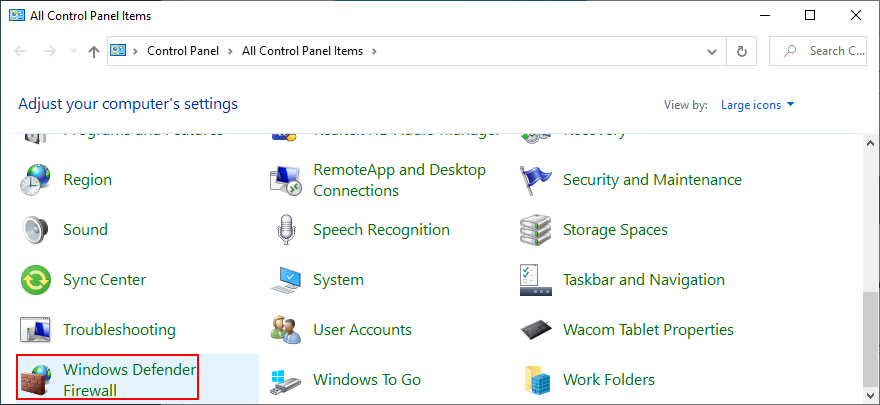
- Click Turn Windows Defender on or off to open this section
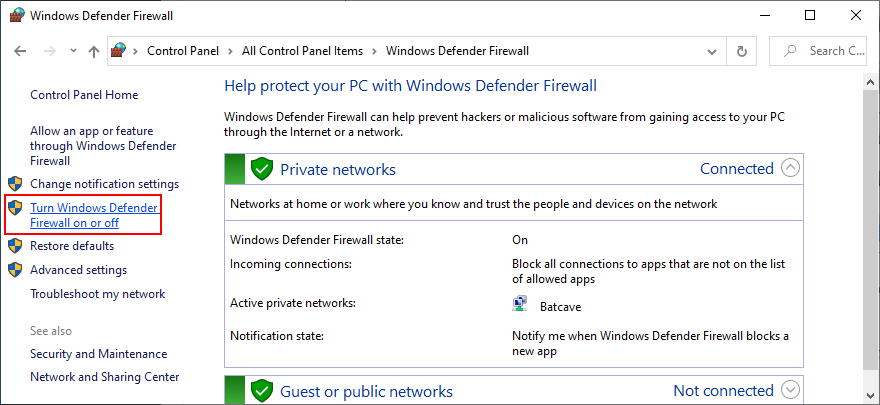
- Set Turn off Windows Defender Firewall at Private network settings and Public network settings
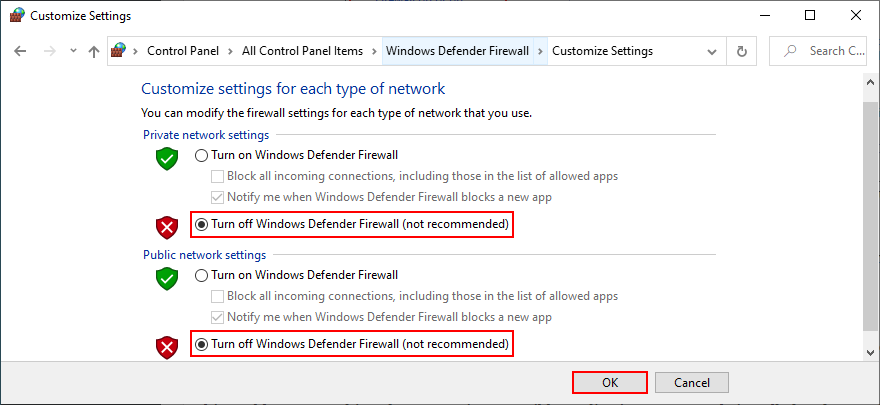
- Click OK to confirm
- Reboot your PC and check if you still get BSOD errors
Even if this solution solved the computer crash, you shouldn’t leave the firewall turned off since it means leaving your system vulnerable to malware attacks. Instead, you should restore firewall settings to their factory values.
How to restore firewall settings to default:
- Click the Start button, type firewall, and open Firewall & network protection
- Click Restore firewalls to default to open a new area
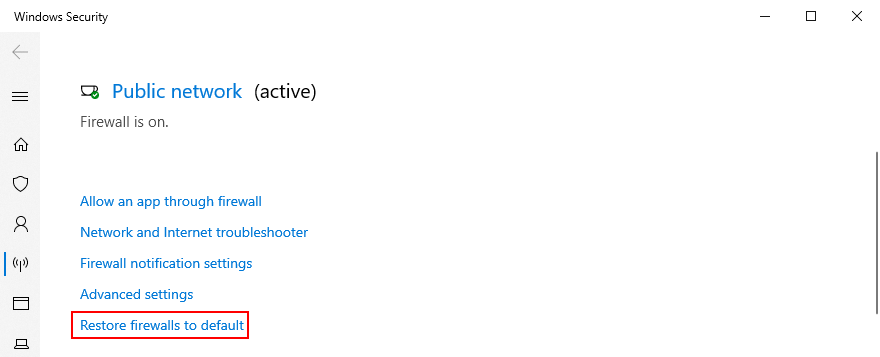
- Then, click Restore defaults and Yes to confirm
- Exit all windows
15. Check the storage space
If you don’t have enough storage space available on your computer, Windows won’t be able to start its processes and download the files it needs to work properly. In turn, this can lead to blue screen errors like PAGE FAULT IN NONPAGED AREA. But you can fix this issue by adding more storage space.
For instance, you can use a partition manager like Disk Management to increase the capacity of your Windows drive.
How to use Disk Management:
- Click the Start button, search for Disk Management, and open this tool
- By taking into account the values shown in the Capacity, Free Space and % Free columns, choose a partition besides the one that contains Windows
- Right-click the drive and select Shrink Volume
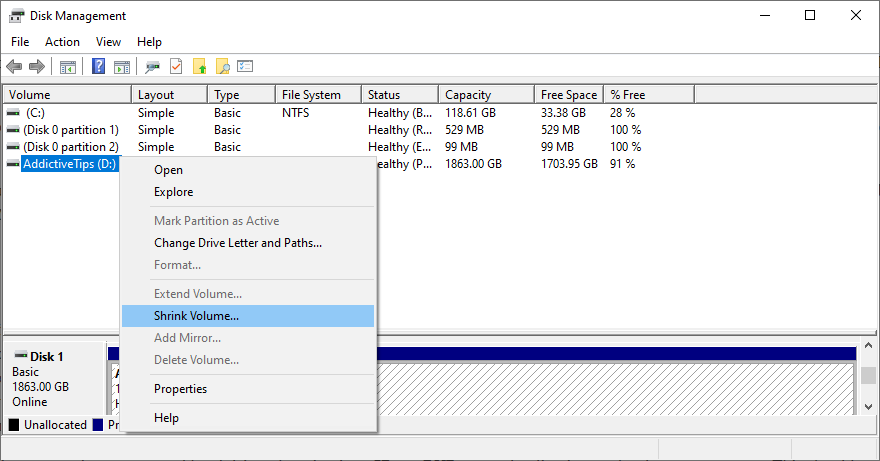
- Specify the new drive size and click Shrink

- Then, shift your attention to the partition with Windows. Right-click it and select Extend Volume
- Set its new size by adding all the available disk space. Click Extend
- Restart your computer and check if you still have blue screen issues
Another way to increase the storage space is by removing files. Make sure to uninstall large games and applications you don’t use anymore, as well as to move large photos, videos, documents, and other personal files somewhere else.
For example, you can back up your data to a removable storage unit, burn it to DVDs, or upload it to a cloud storage account. Remaining junk files on your computer can be eliminated with the help of a specialized cleaning solution such as CCleaner. Or, if you don’t want to install anything, use the Windows Disk Cleanup program.
How to use Disk Cleanup:
- Make sure you’re logged in to Windows 10 with an administrator account
- Open File Explorer by pressing Win key + E
- Go to the Downloads and Recycle Bin locations. Review containing files and copy or restore the ones you’d like to keep since these folders will be cleared by Disk Cleanup
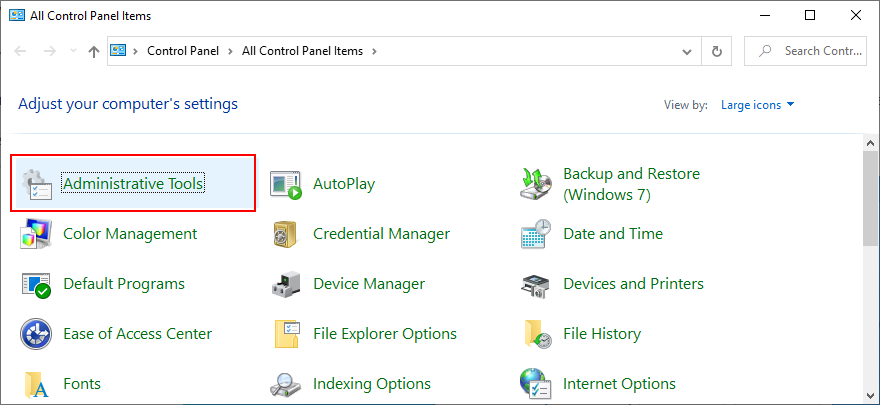
- Press the Windows key, search for Control Panel, and open this app
- Select Administrative Tools
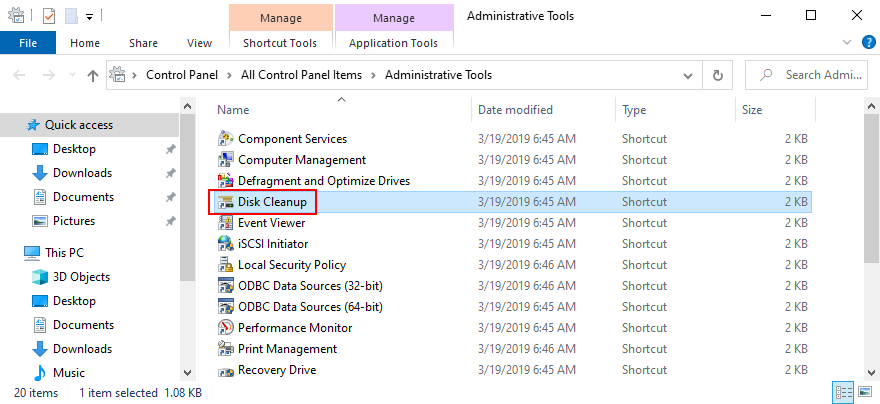
- Double-click Disk Cleanup to launch this utility
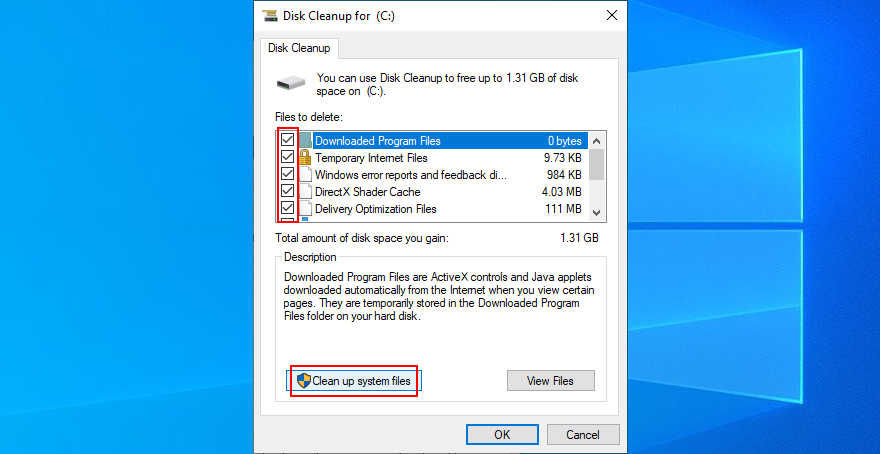
- Select the drive that contains Windows and click OK
- At Files to delete, select all items. Then, click Clean up system files
- It will begin a file search. Once it’s over, make the same selection and click OK
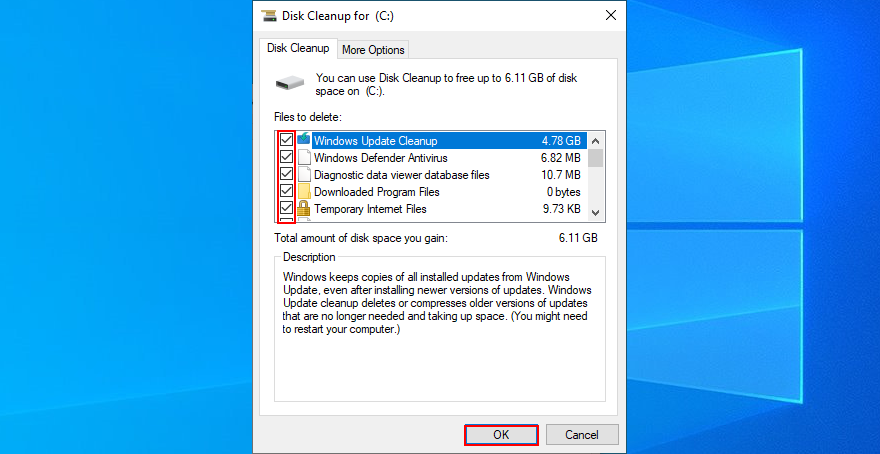
- The cleanup task might take a while. Don’t turn off or restart your PC during this time
- Once it finishes, restart your computer
- Check if your system still crashes
16. Run Hardware and Devices troubleshooter
As we mentioned in the beginning of this article, the PAGE FAULT IN NONPAGED AREA stop code can be caused by a malfunctioning device. An easy way to find and fix device problems is by using the dedicated troubleshooter that’s built into Windows 10.
Normally, you can track down this tool in Settings > Troubleshoot. But if Hardware and Devices troubleshooter is missing, you can run it with a simple command.
How to use Hardware and Devices troubleshooter:
- Click the Start menu, type Run, and open this app
- Type
msdt.exe-id DeviceDiagnosticand press Enter to launch the troubleshooter - Click Next to proceed to the next wizard step
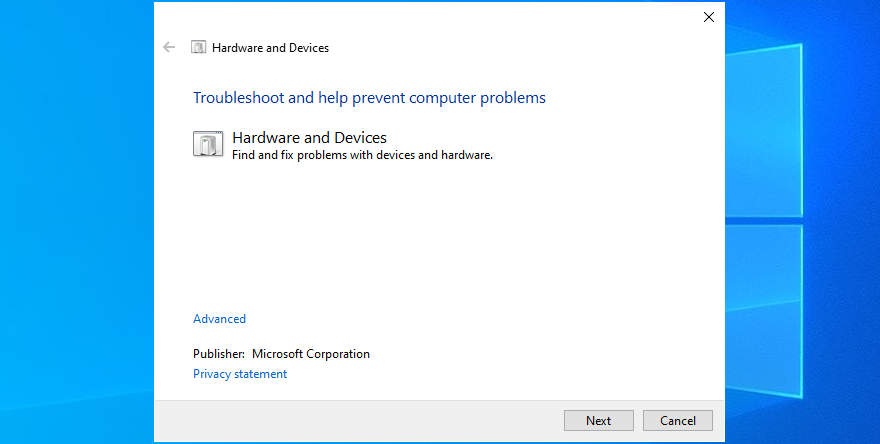
- Windows will start checking for hardware issues right away. If it finds any solutions, click Apply this fix
- Complete the wizard steps and restart your machine
- Check if you still have blue screen problems
17. Disable hardware acceleration
Hardware acceleration is a technique used by certain applications to improve your graphics experience by demanding more power from your hardware. However, if your computer is not powerful enough to handle hardware acceleration properly or if it’s overworked, you shouldn’t be surprised when you get BSOD errors like PAGE FAULT IN NONPAGED AREA.
To fix this problem, make sure to disable hardware acceleration in all your applications, especially when it comes to gaming launchers or emulators. Here’s how to make it happen in your web browser.
How to turn off hardware acceleration in Google Chrome:
- In Chrome, open the More menu on the top-right corner
- Go to Settings. Alternatively, enter the
chrome://settings/address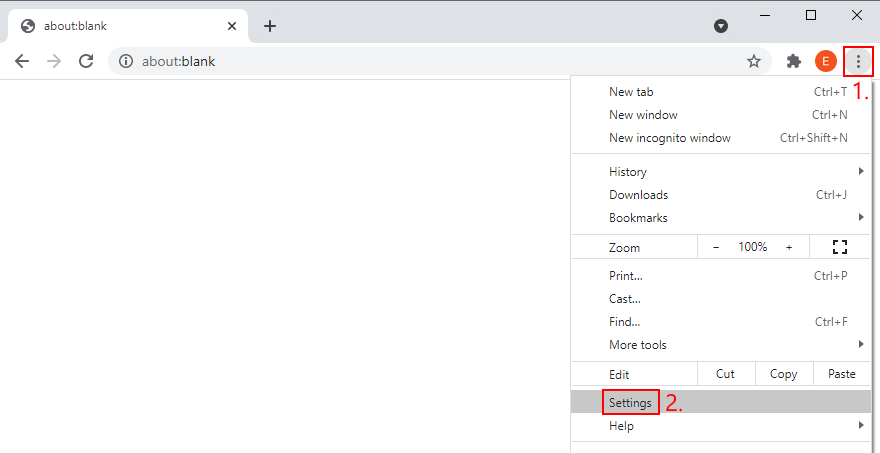
- Scroll down to the bottom of the screen and click Advanced to extend this section
- Switch off Use hardware acceleration when available
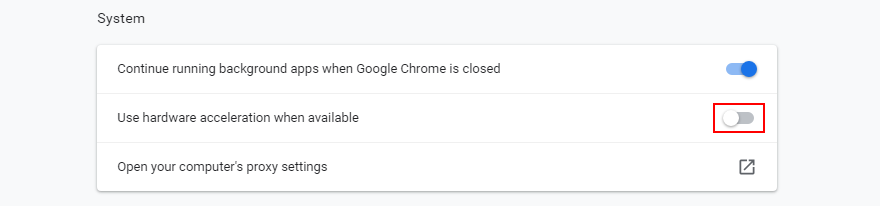
- Restart Chrome
How to deactivate hardware acceleration in Mozilla Firefox:
- In Firefox, open the ≡ menu from the upper-right corner
- Select Options. Or, you can visit the
about:preferencesaddress instead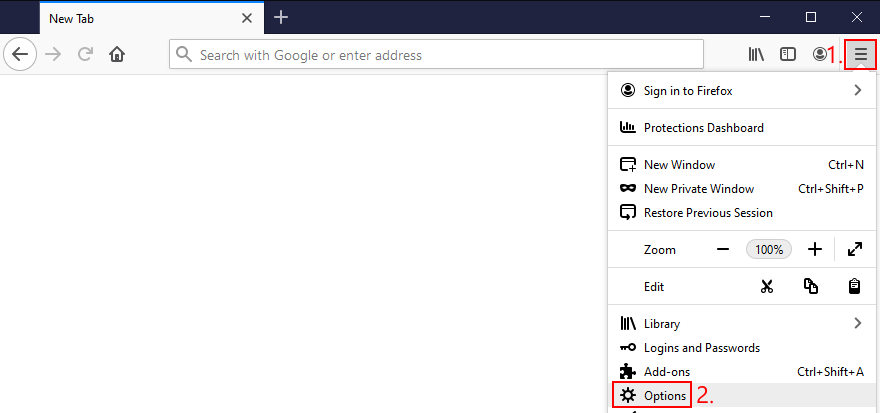
- In the General area, locate Performance
- Disable Use recommended performance settings and then Use hardware acceleration when available
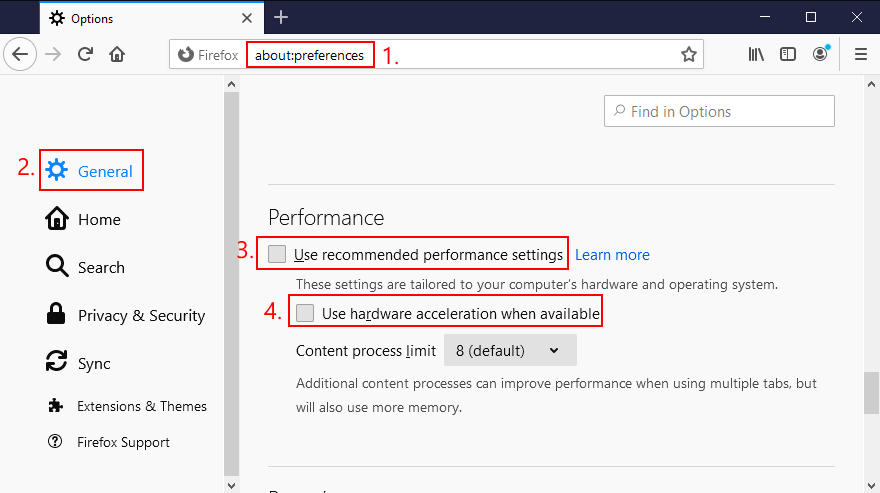
- Relaunch Firefox
How to disable hardware acceleration in Microsoft Edge:
- In Edge, open the More menu next to the address bar
- Select Settings
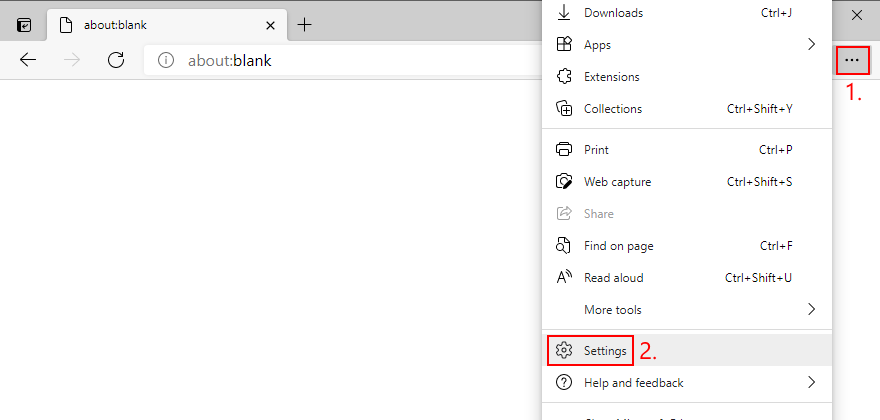
- Go to System (or, visit the
edge://settings/systemaddress) - Turn off Use hardware acceleration when available
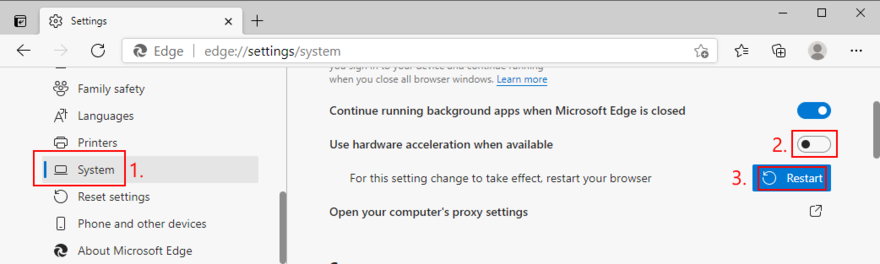
- Restart Edge
18. Roll back Windows
At this point, it might be a simpler idea to roll back Windows 10 to a restore point. However, this solution works only if System Restore is enabled on your computer and if you, your system or your applications have created a restore point before your PC started experiencing stability issues.
Before proceeding with System Restore, though, keep in mind that you will lose all applications installed beyond the restore point, so you will have to reinstall them afterward.
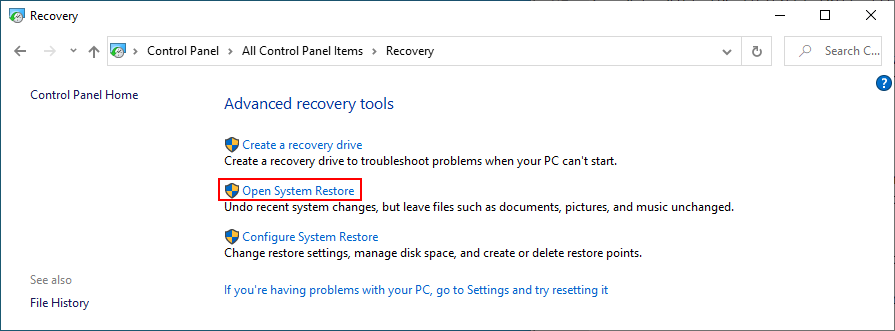
How to use System Restore:
- Sign in to Windows 10 using elevated rights
- Click the Start button, type Control Panel, and launch this tool
- Go to the Recovery section
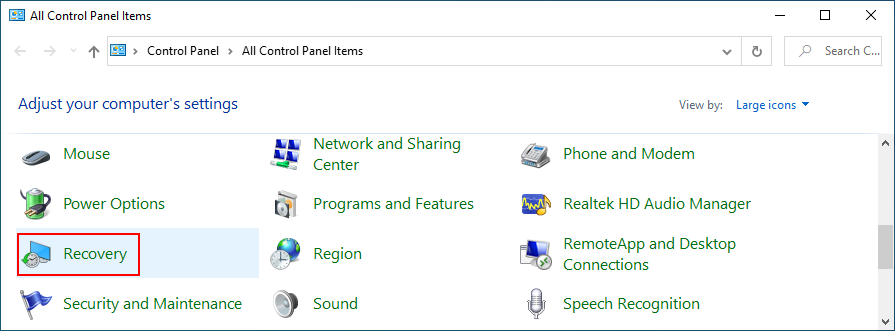
- Click Open System Restore to open this area
- If necessary, select Show more restore points. You can also click Scan for affected programs to find out which applications you will have to reinstall
- Select a restore point and click Next
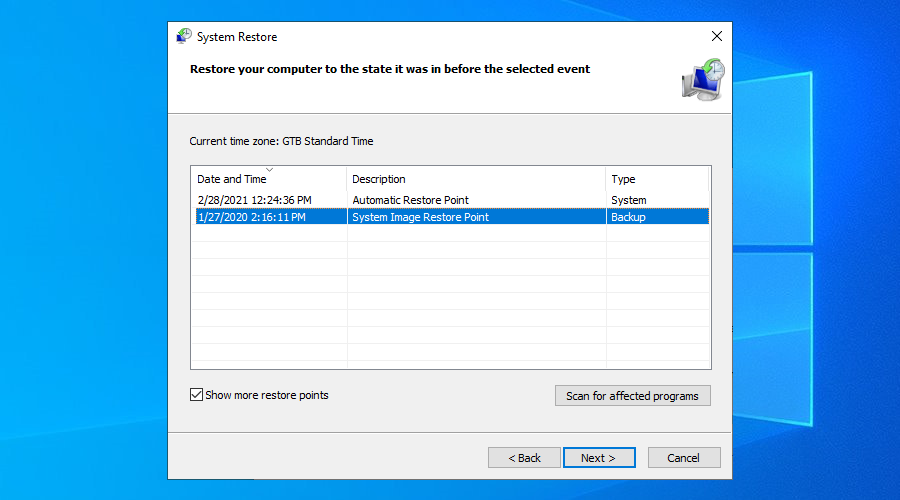
- Follow the wizard steps and complete system recovery. Windows will reboot
- Check if your system is still crashing and showing a blue screen
19. Find out more about the BSOD error
If you prefer getting in touch with tech support and asking for help in troubleshooting PAGE FAULT IN NONPAGED AREA, it’s a good idea to gather and share as many details as possible about the error. A handy tool for this job is Event Viewer, an internal Windows 10 tool.
How to use Event Viewer:
- Press Win key + R, type eventvwr.msc, and press Enter to open Event Viewer
- Go to Windows Logs > System on the left side
- Click the first entry in the list. You can find out more details about the BSOD error in the General and Details tab
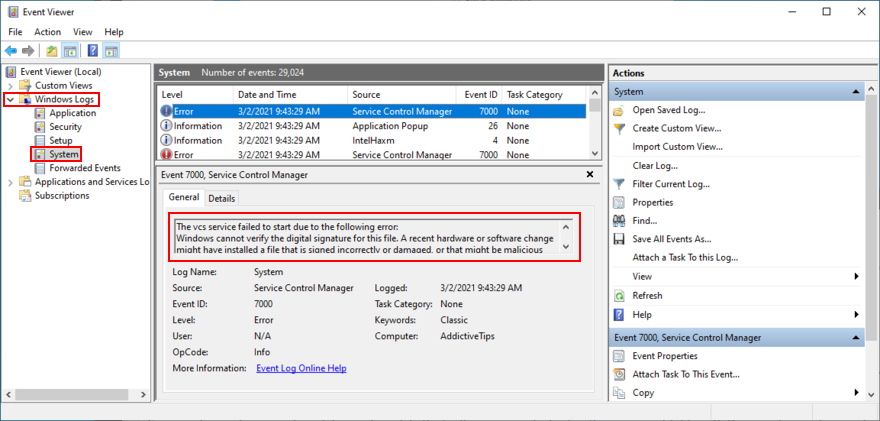
- Make sure to copy this text and paste it somewhere safe. You can also use it to look more information on the Internet
Casual users looking for a simpler way to access the event details created by this BSOD error can use BlueScreenView. It’s a third-party tool that you don’t need to install: just download and run. It’s lightweight, easy to use, and offers an intuitive interface for analyzing minidump (.dmp) files created by blue screen events.
20. Remove newly installed software
Some software applications don’t fully support Windows 10 or have settings that clash with the system configuration. So it’s a good idea to uninstall these incompatible programs and restore the stability of your PC.
For example, many users have reported that uninstalling uTorrent or Tencent Gaming Buddy fixed the PAGE FAULT IN NONPAGED AREA error. Pay special attention to any new and suspicious apps you installed, like free driver updaters, VPN services, proxy servers, torrenting clients, or gaming emulators.
How to uninstall recent software:
- Right-click the Start button and head over to Apps and Features
- Set Sort by to Install date (newest first)
- Select the first (newest) suspicious app in the list and click Uninstall
- Click Uninstall again to confirm. Proceed with the removal instructions
- Restart your computer and check if this fixed the system crash
- If not, remove the next suspicious programs in the list of newly installed software
If you prefer a better solution, we recommend checking out dedicated application removers. These are tools specialized in thoroughly uninstalling programs by getting rid of any leftover files and registry entries.
21. Unplug external devices
If you have recently attached an old or new device to your computer unit, like a USB flash drive, an external hard disk, a wireless adapter or a webcam, perhaps it’s causing stability issues with your computer.
Just unplug the device and see what happens when you boot Windows again. If you’re unsure, detach everything, aside from your mouse and keyboard. Then, start your operating system to confirm that you’re not getting blue screen errors anymore.
It’s also a good idea to change USB ports since any one of them could be malfunctioning. Moreover, you should check the cables and replace any damaged ones.
22. Napraw rejestr systemowy
The Windows registry contains essential information about your operating system and how its software components interact with each other. If it has corrupt, missing or modified data, it’s no wonder that you keep seeing stop code PAGE FAULT IN NONPAGED AREA.
This usually happens after installing and uninstalling software programs from unknown sources, which are too invasive when it comes to the system registry. You can try using a registry cleaner to solve this issue but, if you don’t want to install third-party apps, here’s what you need to do.
How to repair the registry:
- Press Win key + R, type regedit, and press Enter to open Registry Editor
- Open the File menu and click Export
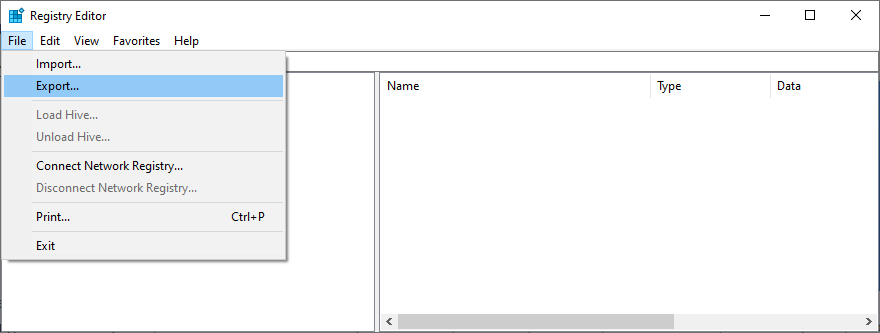
- Set a name and destination to save the registry backup file. Click Save
- Zamknij Edytor rejestru
- Press the Win key and open the power menu
- Hold down Shift and click Restart to reboot Windows in Advanced Startup mode
- Go to Troubleshoot > Advanced options > Command Prompt
- Type the following commands and make sure to press Enter after each one:
-
cd c:\Windows\System32\config
-
ren c:\Windows\System32\config\DEFAULT DEFAULT.old
-
ren c:\Windows\System32\config\SAM SAM.old
-
ren c:\Windows\System32\config\SECURITY SECURITY.old
-
ren c:\Windows\System32\config\SOFTWARE SOFTWARE.old
-
ren c:\Windows\System32\config\SYSTEM SYSTEM.old
-
copy c:\Windows\System32\config\RegBack\DEFAULT c:\Windows\System32\config\
-
copy c:\Windows\System32\config\RegBack\DEFAULT c:\Windows\System32\config\
-
copy c:\Windows\System32\config\RegBack\SAM c:\Windows\System32\config\
-
copy c:\Windows\System32\config\RegBack\SECURITY c:\Windows\System32\config\
-
copy c:\Windows\System32\config\RegBack\SYSTEM c:\Windows\System32\config\
-
copy c:\Windows\System32\config\RegBack\SOFTWARE c:\Windows\System32\config\
-
- Exit Command Prompt and boot to Windows
- Check for BSOD errors
23. Check the Windows page file
The Windows page file (also known as the swap file) is in charge of your system’s virtual memory size. It’s useful when your OS moves data from RAM to the virtual memory size when the memory is full, in order to prevent data loss and corruption.
Normally, the swap file doesn’t pose a problem for modern computers with plenty of RAM. However, even if you have enough memory, the page file shouldn’t be left disabled or to a low value.
Otherwise, your computer might crash when it gets too busy trying to run multiple applications at the same time. As a result, it shows a blue screen and the PAGE FAULT IN NONPAGED AREA stop code due to incorrect page file settings.
In this case, you should change the virtual memory size on Windows 10:
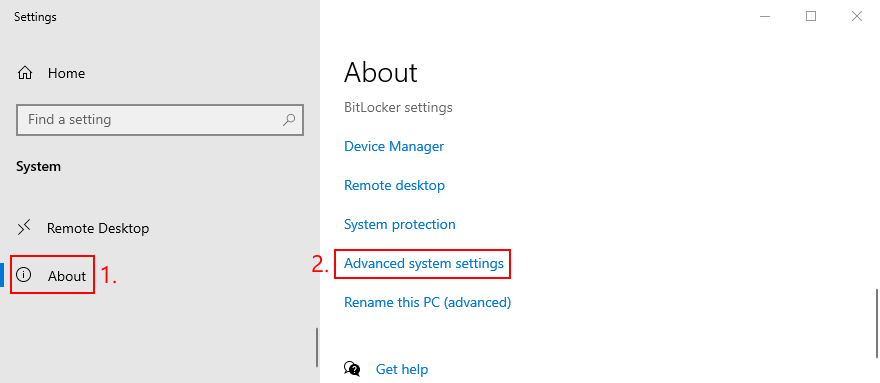
- Right-click the Start button and go to System
- Jump to the About section
- Click Advanced system settings
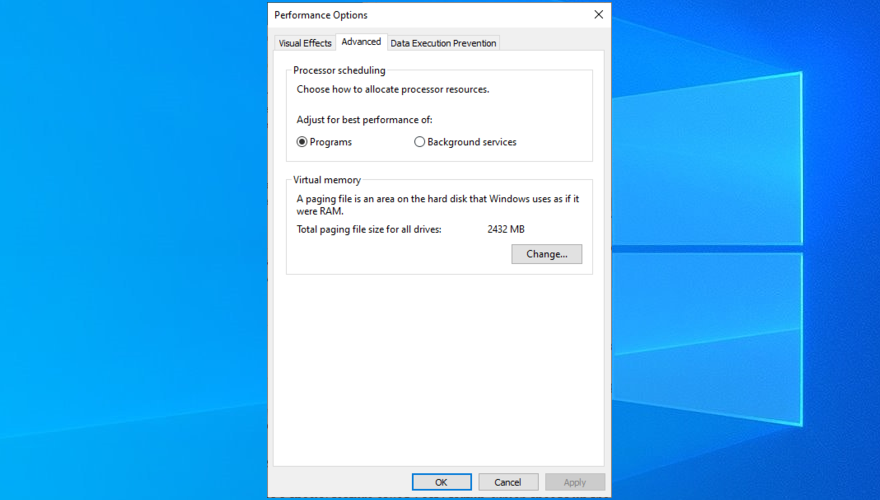
- At Performance, click Settings

- Switch to the Advanced tab
- At Virtual memory, check if Total paging file size for all drives is larger than 0 MB. If it is, you can skip this entire solution. Otherwise, click Change
- Disable Automatically manage paging file size for all drives
- Select the partition that contains Windows
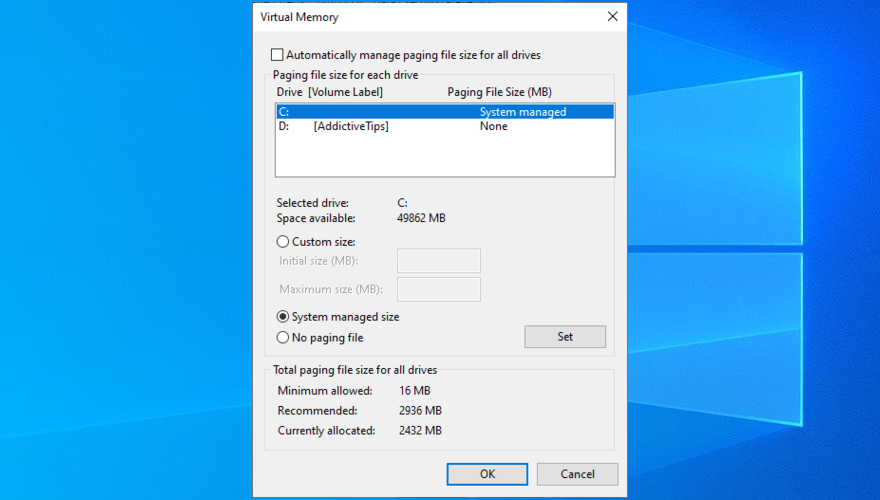
- You have two options here
- Select System managed size to allow Windows to dynamically set the page file size by adapting to the system settings (recommended for most users, especially on Windows 10)
- Or, select Custom size in order to fill it out on your own (for experts)
- Click OK and exit
- Restart your computer and check for errors
24. Disable Fast Startup
Windows 10 has a special feature called Fast Startup, which speeds up the boot process by not terminating all processes and services at shutdown. Although it has its obvious benefits, Fast Startup is sometimes guilty for blue screen errors like FAULT IN NONPAGED AREA.
But you can disable Fast Startup on Windows 10:
- Log in to your operating system using an admin account
- Click the Start button, search for Control Panel, and launch this app
- Go to Power Options

- Click Choose what the power buttons do
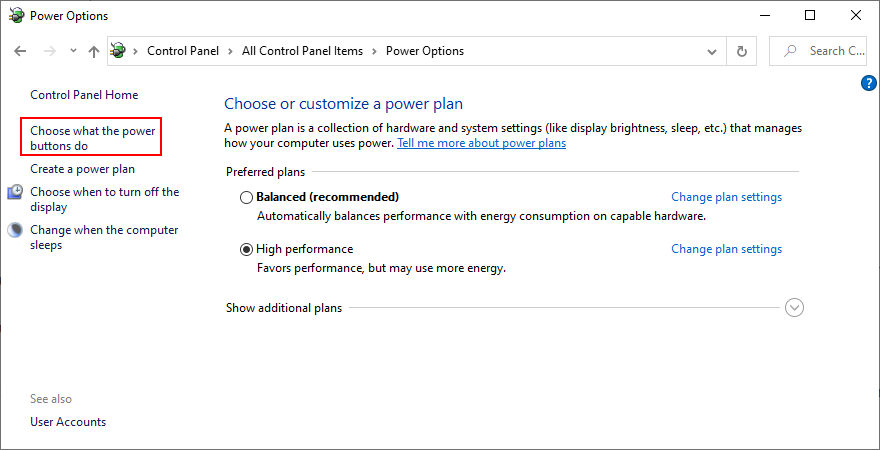
- Click Change settings that are currently unavailable
- Uncheck Turn on fast startup and click Save changes
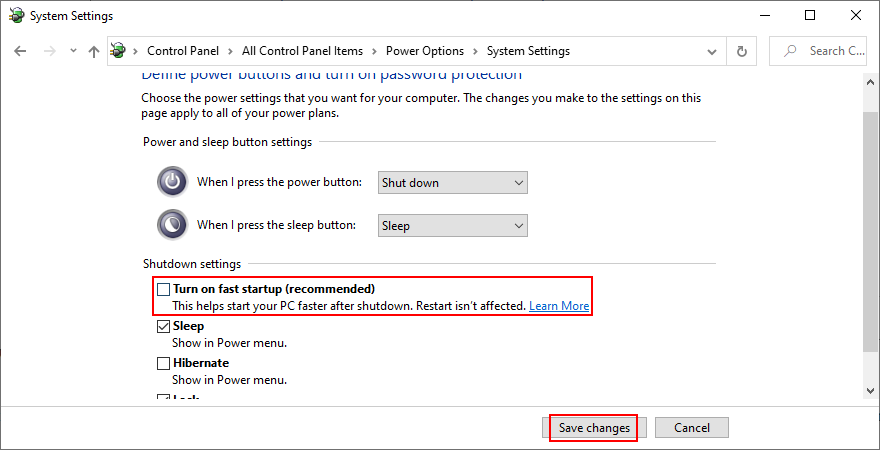
- Exit and restart your PC
- Check if your computer still crashes
25. Change your monitor refresh rate
You might be underclocking or overclocking your monitor without even realizing it. As unconformable as it may be for the eyesight, incorrect refresh rate settings could send your computer into a spiral due to fatal graphics errors.
To fix it, just modify the monitor’s refresh rate on Windows 10:
- Right-click an empty spot on the desktop to open the context menu
- Go to Display settings

- Scroll down to the end of the page and click Advanced display settings

- If you have two or more displays, select the primary one
- Open the Refresh rate menu and pick another value. It’s usually recommended to go lower, but you can test more possibilities
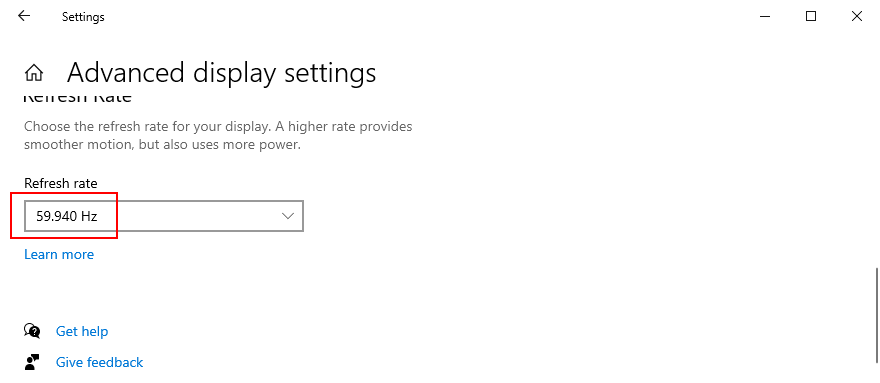
- Check if you are comfortable with the new settings. If so, click Keep changes. Otherwise, select Revert and then pick another refresh rate
- Once you find the right setting, restart your PC and check for additional system crashes
26. Disable overclocking
Gamers prefer overclocking software solutions to amp up their computer settings and enhance their gaming experience, particularly when the PC doesn’t meet the game’s minimum system requirements. But it’s not usually a good idea for your PC’s health.
If you’re using a dedicated tool for overclocking your RAM and speeding up your PC, disable that setting since it could be the reason why your computer freezes and shows the PAGE FAULT IN NONPAGED AREA (it’s directly tied to the RAM).
You might have to take one step further and uninstall the overclocking tool from your PC. However, if the overclocking setting was configured in BIOS, skip this step and check out the next solution.
27. Reset BIOS
If you configured BIOS settings, such as overclocking or caching, maybe you made a wrong move that triggered system crashes. It’s not necessary to identify and repair the exact BIOS settings since you can reset the entire BIOS configuration to default. Here’s how:
- Restart Windows
- Before system boot, press the key shown for accessing BIOS setup mode
- Go to the advanced section
- Locate and enable the setting that restores BIOS to default
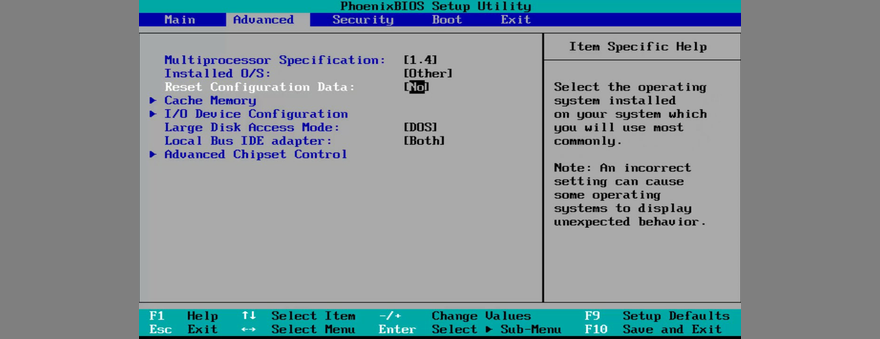
- Quit to Windows
- Check system crashes
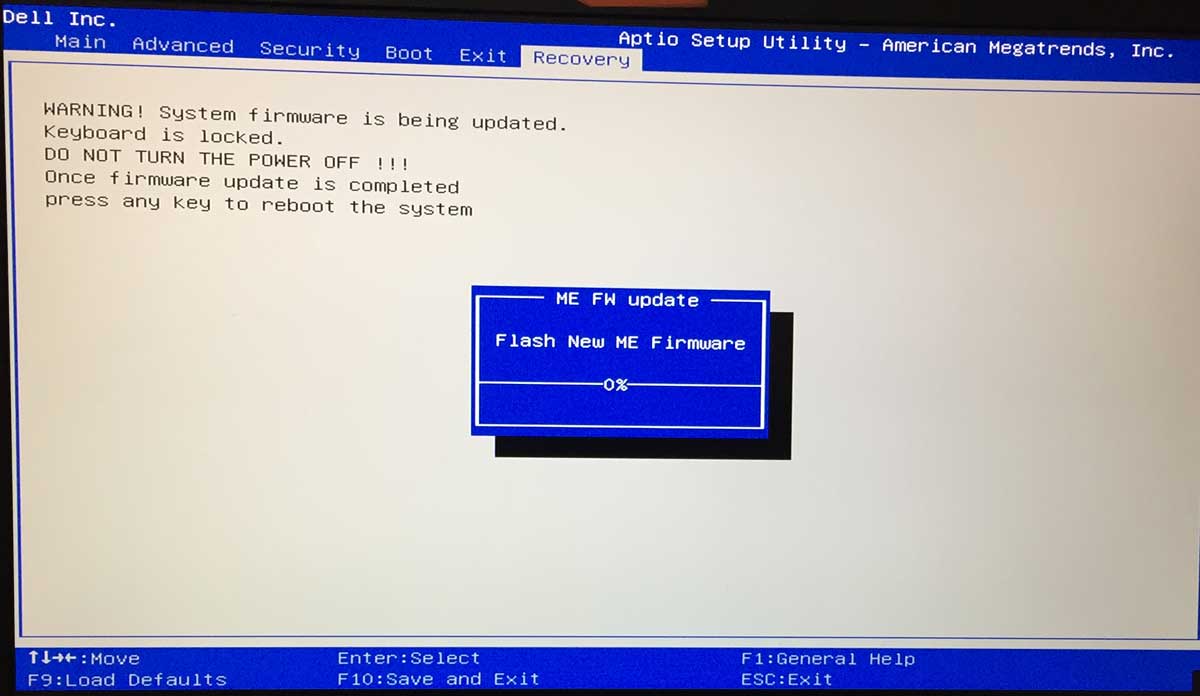
28. Update BIOS
If the PAGE FAULT IN NONPAGED AREA stop code wasn’t resolved in the previous solution, you should update BIOS to the latest version if you have never done this. In addition to improving the BIOS, you might also get access to new options.
How to update BIOS:
- Find an empty pen drive and plug it into your PC
- On the Windows desktop, click the Start button, type System Information, and launch this app
- Select the System Summary section
- Check out the information shown at BIOS Version/Date and BaseBoard Manufacturer
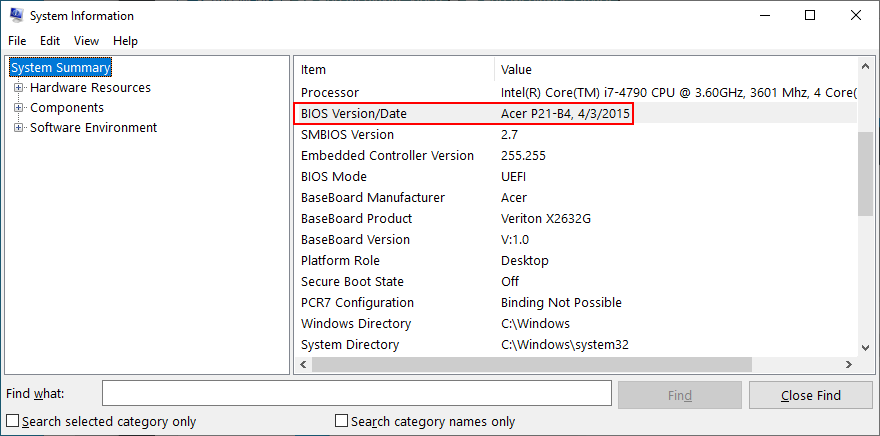
- Visit the official website of your BIOS manufacturer to find and download a newer BIOS version
- Unzip the downloaded file the USB flash drive
- Restart your computer and enter BIOS mode
- Create a backup of the current BIOS version and save it to the pen drive
- Begin the BIOS update. It may take a while
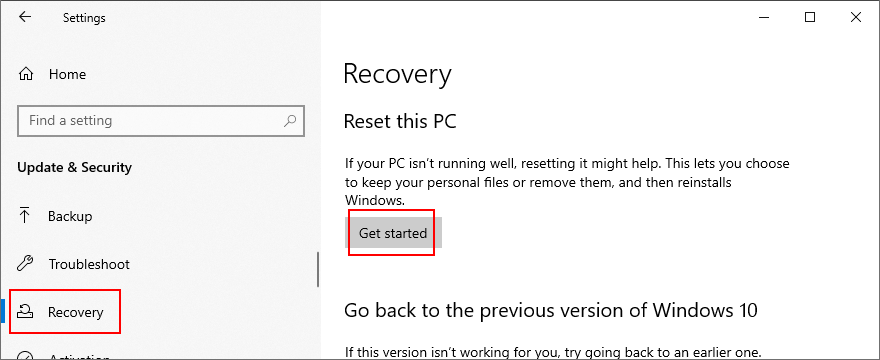
29. Reset Windows 10
The last resort is resetting Windows 10 to factory mode. You don’t have to back up your personal files since they will be left untouched. But your entire set of games and applications installed on the Windows drive will be gone, so you will have to reinstall everything from scratch.
How to reset Windows 10:
- Press the Win key, type Reset this PC, and hit Enter
- Click Get started
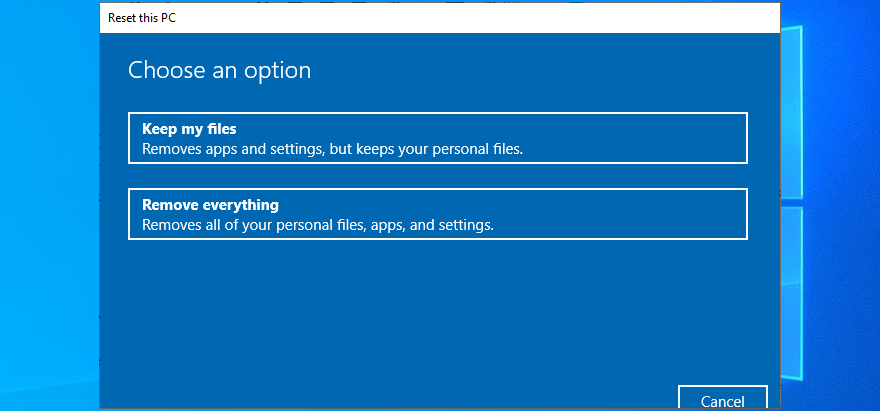
- Select Keep my files
- Follow the instructions
- After PC restart, configure the initial Windows settings
CONCLUSION: Stop code PAGE FAULT IN NONPAGED AREA can be fixed
To review, PAGE FAULT IN NONPAGED AREA is a blue screen error that tells you about a critical system file which can’t be found by Windows in the system memory. Your computer shuts down in an effort to prevent major data loss.
There are multiple approaches toward fixing this issue, but you should start with something as simple as hard-rebooting your PC and running Windows Update. Next, you can repair hard disk errors and corrupt system files, check your device drivers, run a malware scan, and clean boot Windows 10 or start it in Safe Mode.
It’s also a good idea to reinstall your drivers using Display Driver Uninstaller. Plus, you can repair and reinstall.NET Framework, check your memory using Windows Memory Diagnostic, remove and reseat the memory slots, temporarily disable your antivirus and firewall, check the storage space, and run Hardware and Devices troubleshooter.
Furthermore, you can disable hardware acceleration, roll back Windows, use Event Viewer, uninstall recent software, unplug external devices, fix the system registry, check the Windows page file, disable Fast Startup, change your monitor refresh rate, turn off overclocking, reset and update BIOS, or reset Windows 10.
How did you manage to get rid of the PAGE FAULT IN NONPAGED AREA stop code on your computer? Let us know in the comments below.