System nie może znaleźć określonego pliku to komunikat o błędzie, który może wystąpić w systemie Windows 10 podczas próby otwarcia lub usunięcia pliku, uruchom aplikacji, zaktualizuj system operacyjny, wykonaj kopię zapasową danych lub wykonaj inne operacje na plikach.
W trudniejszych scenariuszach błąd pojawia się podczas próby uruchomienia systemu operacyjnego, pokazując pomarańczowy ekran . Jest jednak kilka sposobów naprawienia tego problemu, w zależności od tego, gdzie się na niego natkniesz.
Jak naprawić System nie może znaleźć określonego pliku błąd w systemie Windows 10
Sprawdź następujące poprawki. Jeśli to możliwe, upewnij się, że utwórz punkt przywracania systemu , aby móc przywrócić system Windows 10, jeśli chcesz uruchomić rozwiązania od podstaw.
1. Uruchom ponownie komputer
Być może system Windows wyświetla błąd System nie może znaleźć określonego pliku z powodu zawieszającego się procesu lub braku odpowiedzi usługi. Dlatego warto zacząć od czegoś tak podstawowego, jak ponowne uruchomienie komputera. Jeszcze lepszym pomysłem jest twardy restart komputera. Po wyłączeniu odłącz źródło zasilania i przytrzymaj przycisk zasilania przez 20-30 sekund, aby wyczyścić pamięć podręczną komputera. Następnie uruchom system operacyjny i sprawdź, czy problem został rozwiązany.
2. Zaktualizuj system Windows 10
Dodanie najnowszych aktualizacji do systemu operacyjnego ma kluczowe znaczenie dla konserwacji komputera, które jest możliwe dzięki usłudze Windows Update. Ta usługa powinna automatycznie działać w tle, stale sprawdzać dostępność aktualizacji i monitować, gdy wymagane są dalsze działania.
Sprawdź, czy w centrum powiadomień lub menu opcji zasilania nie ma czerwonych kropek wskazujących na oczekiwanie na ponowne uruchomienie, zwłaszcza jeśli komputer nie był wyłączony przez długi czas. W przeciwnym razie możesz ręcznie sprawdzić dostępność aktualizacji:
- Kliknij przycisk Start , wpisz sprawdź aktualizacje i naciśnij Enter

- Kliknij Sprawdź aktualizacje i poczekaj
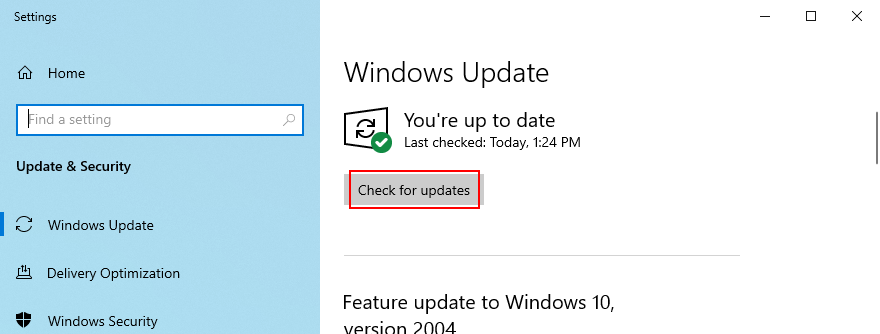
- Jeśli jest coś oczekującego, kliknij Pobierz
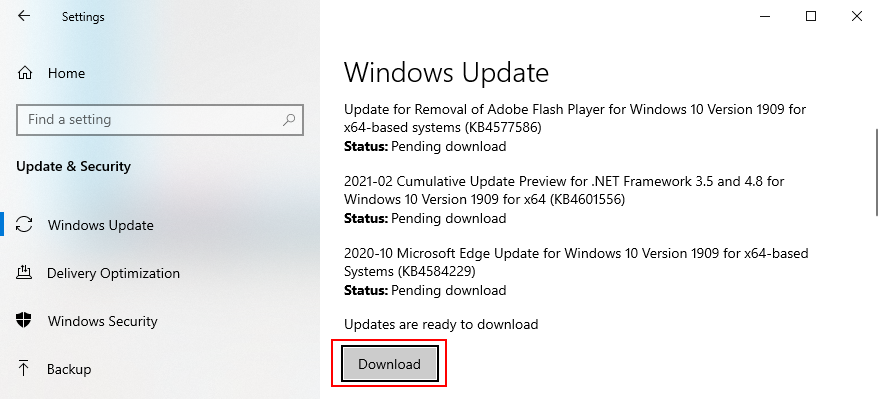
- W tym czasie nie wyłączaj ani nie uruchamiaj ponownie komputera. Po pobraniu i zainstalowaniu aktualizacji przeprowadź ponowne uruchomienie komputera, aby sfinalizować zadanie
3. Uruchom narzędzie do rozwiązywania problemów z usługą Windows Update
Wielu użytkowników nie może uruchomić usługi Windows Update z powodu błędu System nie może znaleźć określonego pliku . W takim przypadku użyj narzędzia do rozwiązywania problemów z Windows Update aby znaleźć i naprawić typowe problemy, które uniemożliwiają uruchomienie tej aplikacji:
- Kliknij przycisk Start , wpisz Ustawienia rozwiązywania problemów i naciśnij Enter
- Kliknij Dodatkowe narzędzia do rozwiązywania problemów
- Wybierz Windows Update i kliknij Uruchom narzędzie do rozwiązywania problemów
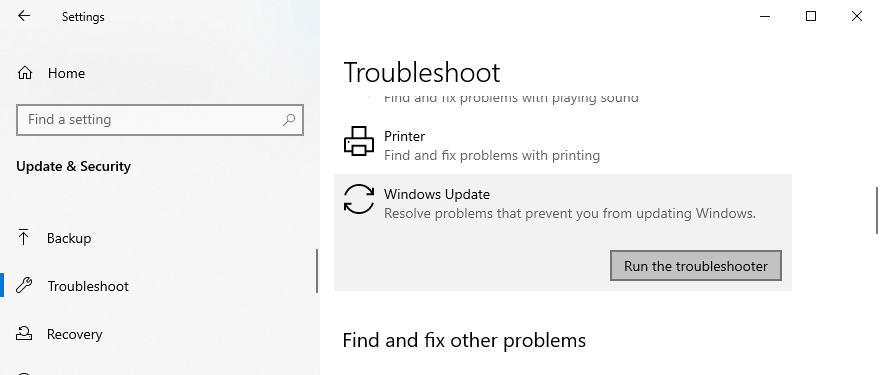
- Zastosuj wszelkie poprawki wskazane przez narzędzie do rozwiązywania problemów
- Uruchom ponownie komputer i spróbuj teraz uruchomić usługę Windows Update
4. Sprawdź usługi Windows Update
Niektórzy użytkownicy wyłącz usługę Windows Update , ponieważ przerywa ona ich działania i trwa wieczność, aby zamknąć, uruchomić lub ponownie uruchomić komputer podczas wykonywania pilnych zadań. Jeśli jednak pozostanie wyłączona, nie będzie w stanie pobrać krytycznych aktualizacji, co spowoduje różne problemy z komputerem.
Jak ponownie uruchomić usługi Windows Update:
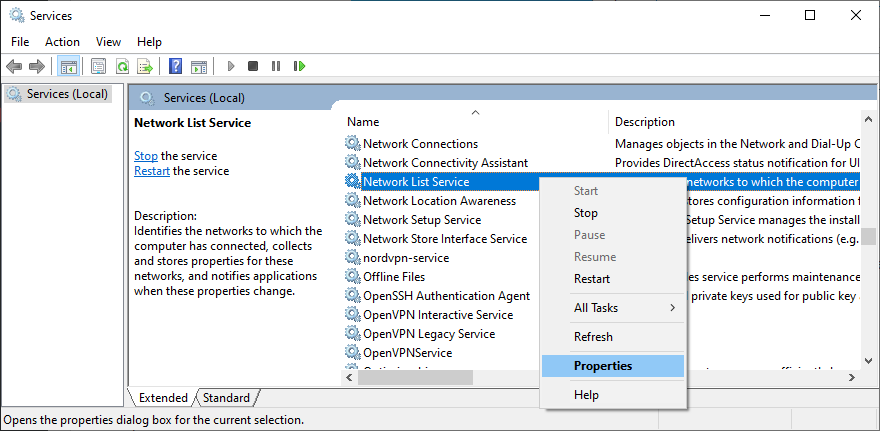
- Naciśnij klawisz Win + R , wpisz services.msc i naciśnij Enter , aby otworzyć
Aplikacja Usługi - Znajdź i kliknij dwukrotnie Windows Update , aby wyświetlić jego właściwości

- Ustaw Typ uruchomienia na Automatyczny (opóźniony start)
- Kliknij przycisk Start , aby od razu uruchomić usługę
- Kliknij Zastosuj i wróć do okna głównego
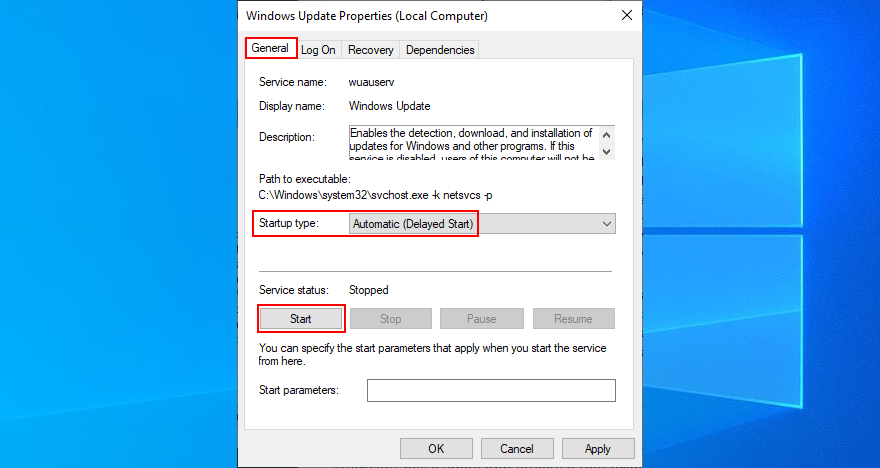
- Znajdź usługi Inteligentny transfer w tle i Gotowość aplikacji , aby zmienić te same ustawienia, znajdują się powyżej

Warto również wyłączyć usługę listy sieci, która czasami powoduje konflikt z usługą Windows Update:
- Znajdź i kliknij dwukrotnie Usługa listy sieci , aby uzyskać dostęp do jej właściwości

- Ustaw Typ uruchomienia na Wyłączony
- Kliknij Zatrzymaj , aby zakończyć usługę
- Kliknij Zastosuj i wyjdź na pulpit
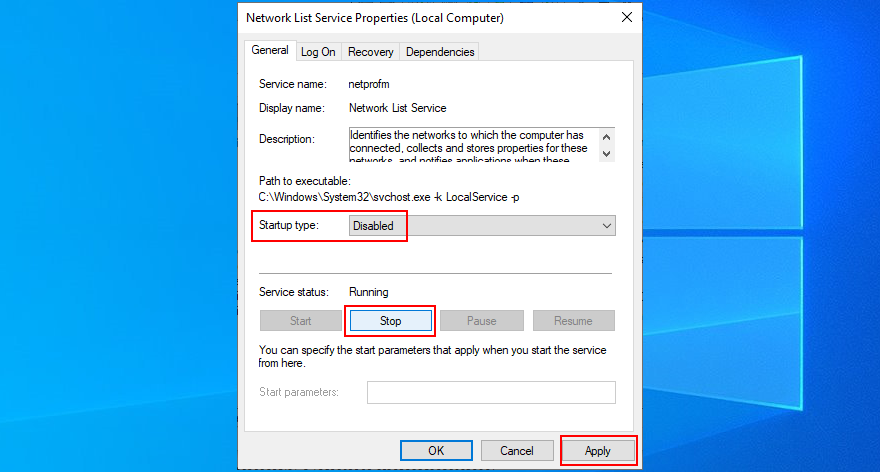
- Spróbuj teraz uruchomić Windows Update
5. Uruchom system Windows 10 w trybie awaryjnym
Jeśli błąd System nie może znaleźć określonego pliku jest wywoływany przez wadliwy sterownik lub usługę innej firmy, możesz uruchom Windows 10 w trybie awaryjnym , aby automatycznie wyłączyć wszystkie sterowniki i usługi, które nie należą do twojego system operacyjny. Oto, co musisz zrobić:
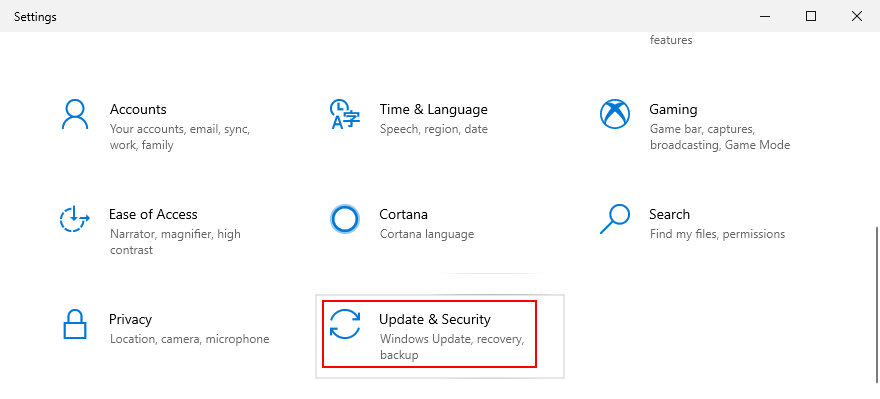
- Kliknij prawym przyciskiem myszy przycisk Start i przejdź do Ustawień
- Wybierz opcję Aktualizacja i zabezpieczenia
- Przejdź do Odzyskiwanie
- Na Start zaawansowany kliknij Uruchom ponownie teraz

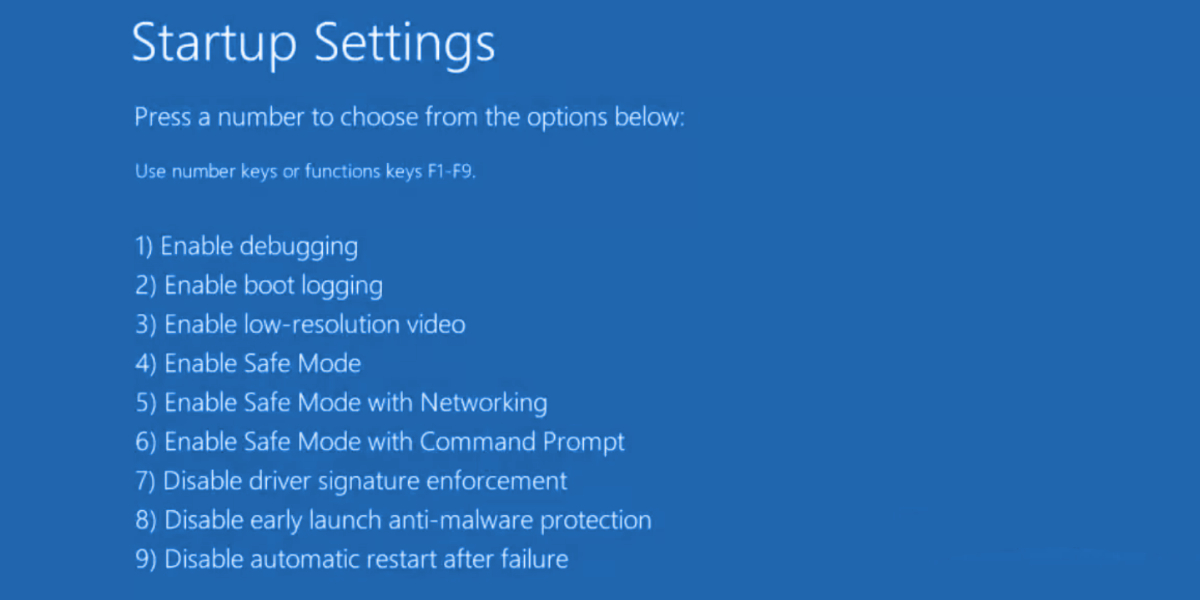
- Przejdź do Rozwiązywanie problemów > Opcje zaawansowane > Ustawienia uruchamiania

- Kliknij Uruchom ponownie
- Jeśli nie potrzebujesz dostępu do internetu, naciśnij klawisz F4 . W przeciwnym razie naciśnij F5 , aby włączyć tryb awaryjny z obsługą sieci

6. Wyłącz aplikacje startowe
Jeśli tryb awaryjny nie pomógł w naprawieniu błędu System nie może znaleźć określonego pliku , spróbuj wyłączanie programów startowych . Na przykład możesz mieć aplikację zabezpieczającą, która jest zaplanowana do automatycznego uruchamiania przy każdym włączeniu komputera, co powoduje konflikt z krytycznymi procesami systemowymi. Identyfikacja winnego może być trudna, dlatego lepiej jest wyłączyć wszystko.
Jak wyłączyć programy startowe:
- Kliknij prawym przyciskiem myszy pasek zadań systemu Windows 10 i wybierz Menedżer zadań
- Przejdź do sekcji Uruchamianie
- Dla każdej aplikacji ze stanem Włączona wybierz jej wpis i kliknij Wyłącz
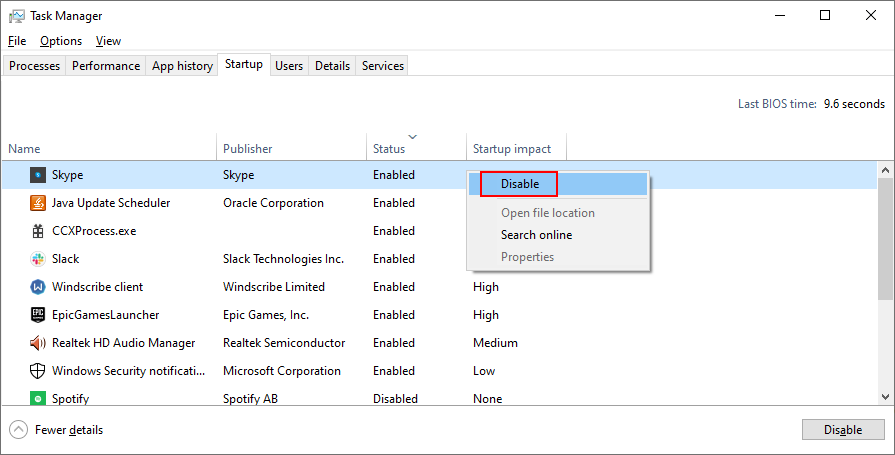
- Uruchom ponownie komputer
7. Czysty rozruch systemu operacyjnego
Wykonywanie czystego rozruchu w systemie Windows 10 jest nieco podobny do trybu awaryjnego. Różnica polega na tym, że czysty rozruch wyłącza nie tylko nieistotne urządzenia i usługi, ale także elementy startowe. Oto jak to skonfigurować:
- Naciśnij klawisz Win + R , wpisz msconfig i naciśnij Enter , aby otworzyć System Konfiguracja aplikacji
- Pozostań na karcie Ogólne
- Wybierz Uruchamianie selektywne
- Usuń zaznaczenie opcji Załaduj usługi systemowe i Załaduj elementy startowe
- Kliknij Zastosuj

- Przejdź na kartę Uruchamianie
- Kliknij opcję Otwórz Menedżera zadań
- Wyłącz wszystkie aplikacje startowe ze stanem Włączone
- Uruchom ponownie komputer

Jeśli później zajdzie potrzeba przywrócenia domyślnych ustawień rozruchu, otwórz aplikację Konfiguracja systemu i wybierz opcję Uruchamianie normalne .
8. Odinstaluj aplikacje innych firm
Pobieranie błędu System nie może znaleźć określonego pliku po uruchomieniu aplikacji może sygnalizować konflikt oprogramowania. Być może twój program koliduje z innym, na przykład dwoma programami antywirusowymi z oddzielnymi silnikami czasu rzeczywistego. Nie pozostaje nic innego, jak usunąć inną aplikację z komputera.
- Kliknij prawym przyciskiem myszy przycisk Start i wybierz Aplikacje i funkcje
- Znajdź i wybierz program z listy
- Kliknij Odinstaluj , a następnie ponownie, aby potwierdzić
- Kontynuuj pracę kreatora
- Uruchom ponownie komputer
Jeśli jednak program zmienił ustawienia rejestru, domyślny program do odinstalowywania systemu Windows nie pomoże ich przywrócić. Zamiast tego użyj dezinstalatora oprogramowania , który usuwa nie tylko program, ale także wszelkie pozostałe pliki i wpisy rejestru.
9. Odłącz urządzenia zewnętrzne
Konflikty mogą być również powodowane przez nieobsługiwane urządzenia peryferyjne niedawno podłączone do komputera. Jeśli niedawno kupiłeś lub otrzymałeś nowy element sprzętu w prezencie, taki jak adapter Wi-Fi, nowe słuchawki, kamera internetowa lub pendrive, natychmiast usuń go z komputera, a następnie uruchom ponownie, aby sprawdzić, czy to rozwiązało problem System nie może znaleźć podanego pliku błąd.
Może to nie wina urządzenia, ale Twojego portu. Spróbuj zmienić porty USB, jeśli masz wiele dostępnych opcji. W przeciwnym razie podłącz wieloportowy koncentrator USB do komputera, a następnie urządzenie do koncentratora zamiast bezpośrednio do komputera. Czasami to działa.
10. Uruchom CHKDSK
CHKDSK (Check Disk) to wewnętrzne narzędzie systemu Windows, które można obsługiwać w środowisku wiersza poleceń. Pomaga w naprawie problemów z uszkodzeniem dysku twardego i uszkodzonych sektorów, które mogą uniemożliwić prawidłowe działanie komputera i w rezultacie spowodować błąd System nie może znaleźć określonego pliku .
Jak używać CHKDSK:
- Kliknij przycisk Start , wpisz Wiersz polecenia , wybierz tę aplikację i kliknij Uruchom jako administrator
- Jeśli system Windows jest zainstalowany na domyślnym dysku C:, wpisz
chkdsk c:/f/r. W przeciwnym razie pamiętaj, aby zastąpićc:literą partycji systemu operacyjnego
- Gdy pojawi się prośba o zaplanowanie CHKDSK przy następnym ponownym uruchomieniu systemu, wpisz y i naciśnij Wprowadź
- Uruchom ponownie komputer i poczekaj, aż CHKDSK wykona swoje zadanie
11. Uruchom SFC
Jeśli nadal pojawia się błąd System nie może znaleźć określonego pliku po uruchomieniu narzędzia CHKDSK, być może należy przenieść swoją uwagę na system, ponieważ może on zawierać uszkodzone lub brakujące pliki. Pomoże Ci w tym SFC (System File Checker) wzgląd.
Jak korzystać z SFC:
- Uruchom system Windows 10 w trybie awaryjnym
- Naciśnij klawisz Win + R i naciśnij Enter, uruchom wiersz polecenia
- Napisz
sfc/scannowi naciśnij Enter
- Po zakończeniu SFC uruchom ponownie komputer
12. Uruchom DISM
DISM (Deployment Image Servicing and Management) jest bardziej zaawansowanym narzędziem niż SFC, ponieważ może sprawdzić integralność magazynu komponentów w pliku obrazu systemu Windows.
Jak korzystać z DISM:
- Uruchom system Windows 10 w trybie awaryjnym
- Otwórz Wiersz polecenia
- Wpisz
DISM/online/cleanup-image/scanhealthi naciśnij Enter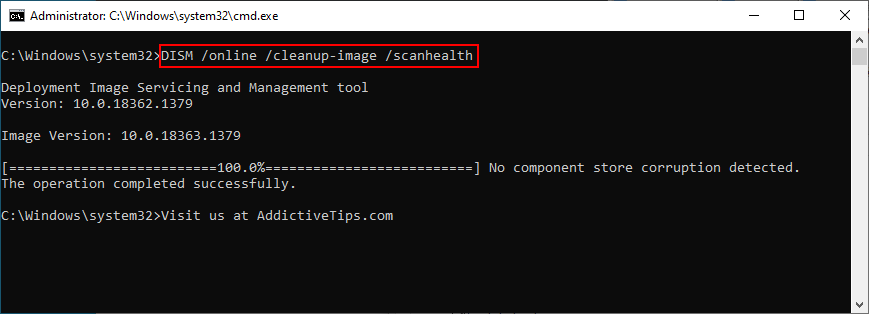
- Jeśli wykryje jakieś błędy, uruchom
DISM/online/cleanup-image/restorehealth, aby się ich pozbyć - Po zakończeniu uruchom ponownie system Windows 10 w trybie awaryjnym
- Otwórz Wiersz polecenia i uruchom SFC (
sfc/scannow) - Uruchom ponownie komputer w normalny sposób
13. Sprawdź dziennik systemowy
Możesz znaleźć dokładny sterownik urządzenia, który powoduje błąd System nie może znaleźć określonego pliku , sprawdzając plik dziennika systemowego. Oto, co musisz zrobić:
- Naciśnij klawisz Win + E , aby otworzyć Eksploratora Windows
- Przejdź pod następujący adres:
% SystemRoot% \ INF
- Znajdź i otwórz plik setupapi.dev lub setupapi.dev.log w Notatniku
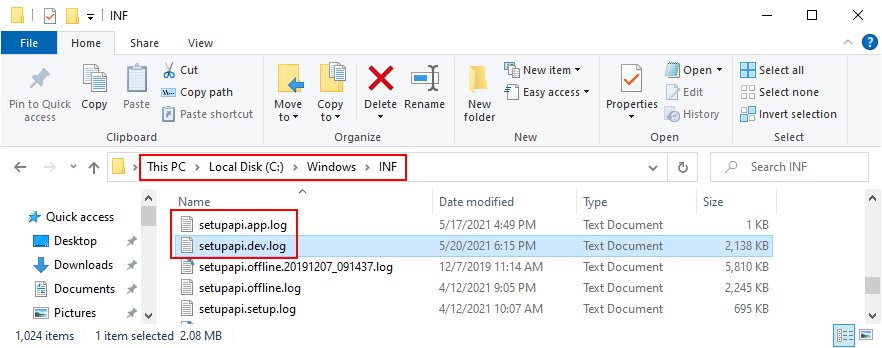
- Naciśnij Ctrl + F , wpisz system nie może znaleźć pliku i naciśnij Enter
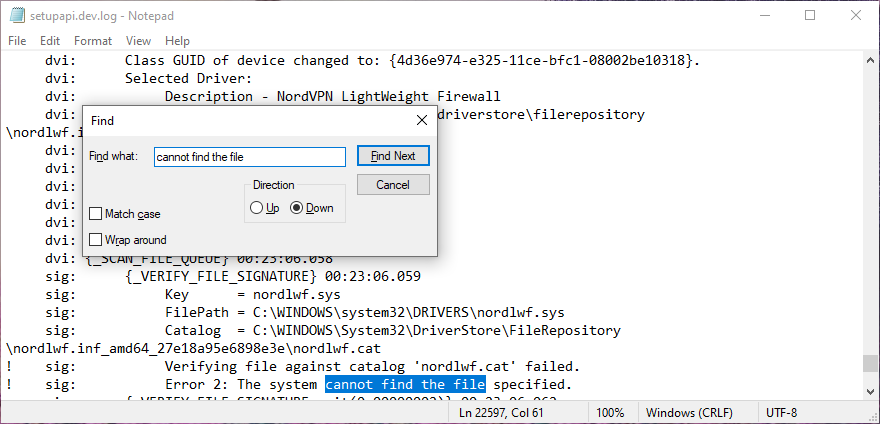
- W FilePath skopiuj nazwę sterownika
- Otwórz przeglądarkę internetową i wprowadź nazwę pliku sterownika, aby dowiedzieć się, do którego urządzenia należy
Po zidentyfikowaniu winnego urządzenia możesz podjąć dalsze działania w Menedżerze urządzeń (wykonaj poniższe rozwiązania).
14. Szybko zainstaluj ponownie urządzenia
Biorąc pod uwagę sterownik i urządzenie znalezione w dzienniku systemowym, należy przejść do Menedżera urządzeń , aby ponownie zainstalować urządzenie. Jeśli nie został poprawnie zainstalowany na komputerze z systemem Windows 10, ta metoda powinna rozwiązać ten problem. Oto, co musisz zrobić:
- Kliknij prawym przyciskiem myszy przycisk Start i wybierz Menedżer urządzeń
- Znajdź urządzenie i kliknij je dwukrotnie
- Przejdź do zakładki Sterownik i kliknij Szczegóły sterownika
- Tutaj możesz dwukrotnie sprawdzić, czy plik sterownika odpowiada informacjom znalezionym w dzienniku systemowym
- Wróć do głównego okna Menedżera urządzeń
- Kliknij urządzenie prawym przyciskiem myszy i wybierz opcję Odinstaluj urządzenie

- Zaznacz opcję Usuń oprogramowanie sterownika dla tego urządzenia i kliknij Odinstaluj , aby potwierdzić
- Otwórz menu Akcja i wybierz Skanuj w poszukiwaniu zmian sprzętu
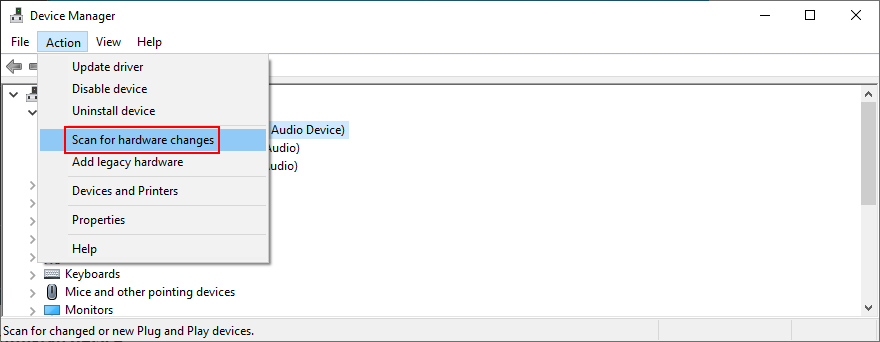
- Jeśli urządzenie nie pojawi się ponownie w Menedżerze urządzeń, uruchom ponownie komputer, ponieważ system Windows automatycznie ponownie zainstaluje brakującą kartę.
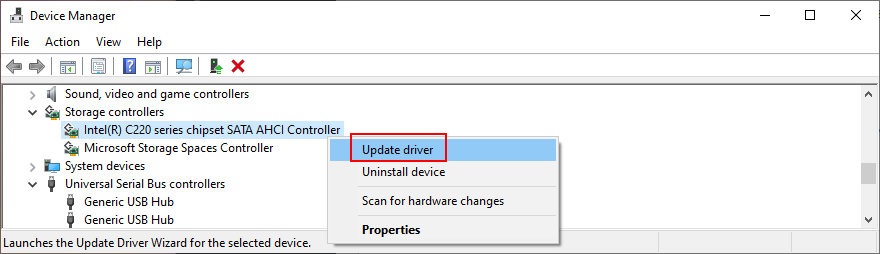
15. Zaktualizuj sterowniki urządzeń
Możliwe, że urządzenie jest poprawnie zainstalowane na komputerze, ale jego sterownik jest nieaktualny. Rozwiązaniem jest tutaj aktualizacja przestarzałych sterowników:
- Naciśnij klawisz Win + R , wpisz devmgmt.msc i naciśnij Enter
- Kliknij urządzenie prawym przyciskiem myszy i wybierz Aktualizuj sterownik
- Click Search automatically for drivers and follow the on-screen instructions
- Kliknij urządzenie prawym przyciskiem myszy i wybierz Aktualizuj sterownik
If the online search doesn’t return any results, click Search for updated drivers on Windows Update. However, if you have already checked for system updates or the dedicated service doesn’t work, then you have to manually download and install drivers.
However, if you don’t want to risk installing an unsupported driver, it’s better to use a driver update tool. Besides, you can use it to update all your obsolete drivers at the same time, without risking compatibility issues.
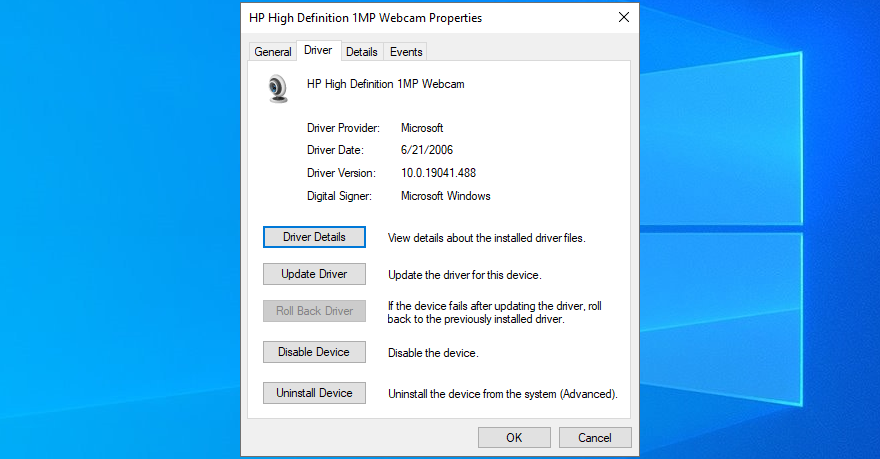
16. Roll back drivers
If you have already downloaded an unsupported driver, you must roll it back to the previous version before performing the update. Here’s what you need to do:
- Click the Start button, search for Device Manager, and press Enter
- Right-click a device and go to Properties
- Select the Driver section
- Click Roll Back Driver and follow the instructions. If the button is greyed out, you can skip this step since you can’t perform the rollback
17. Reinstall programs
Some software applications should be reset, repaired, or reinstalled, depending on the available operations. It certainly applies in the scenario where the The system cannot find the file specified error started appearing on your screen after a recent software change.
You have multiple options when it comes to Microsoft Store apps. Click the Start button, search for a program, and go to App settings. From that section, you can repair or reset the app with one click. And, if those two options fail, you should uninstall the app and reinstall it from Microsoft Store.
It’s simpler with regular software programs since the repair option rarely works. Instead, you can uninstall the application from Apps & Features, then download it again from its official website and proceed with the setup operation.
18. Check registry settings
If you can’t open files or launch applications due to the The system cannot find the file specified error, you should inspect registry settings to make sure that everything is in order. It’s pretty easy. Here’s what you need to do:
- Click the Start button, search for Registry Editor, and hit Enter to open this app
- Open the File menu and click Export
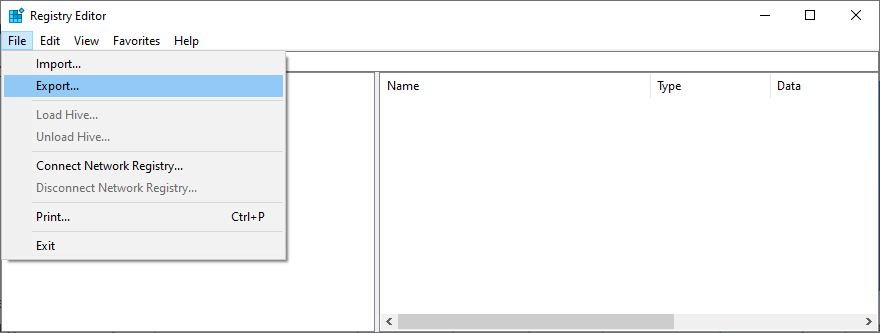
- Create a registry backup by setting a file name, picking a destination, and clicking Save. If you need to restore the initial registry configuration later, just double-click the.reg file
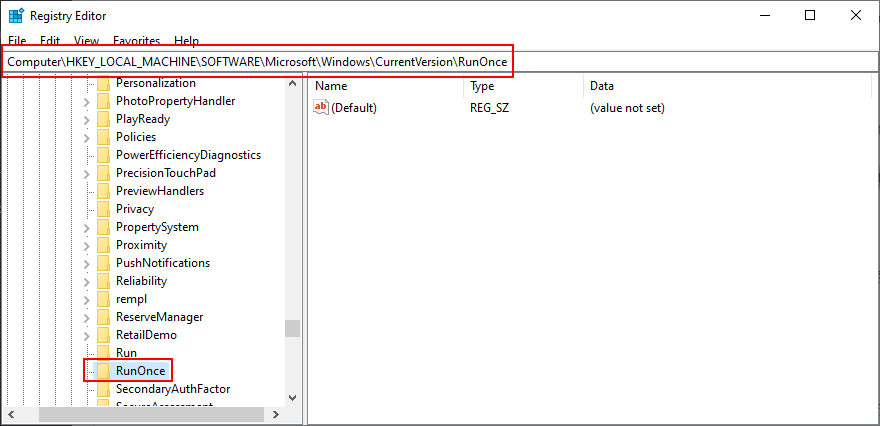
- Visit the following address:
Computer\HKEY_LOCAL_MACHINE\SOFTWARE\Microsoft\Windows\CurrentVersion\
- Look for the RunOnce key (looks like a folder in the tree on the left)
- If the key doesn’t exist, right-click the CurrentVersion key and select New > Key
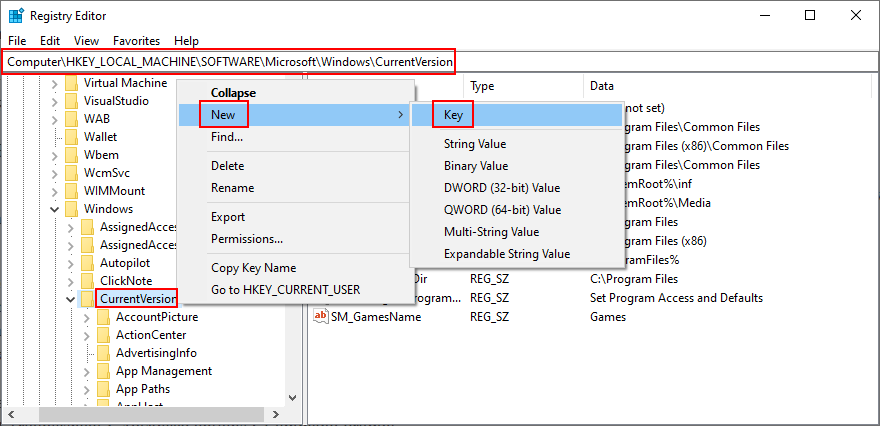
- Set the key name to RunOnce
- Now, go to this location:
Computer\HKEY_CURRENT_USER\SOFTWARE\Microsoft\Windows\CurrentVersion\
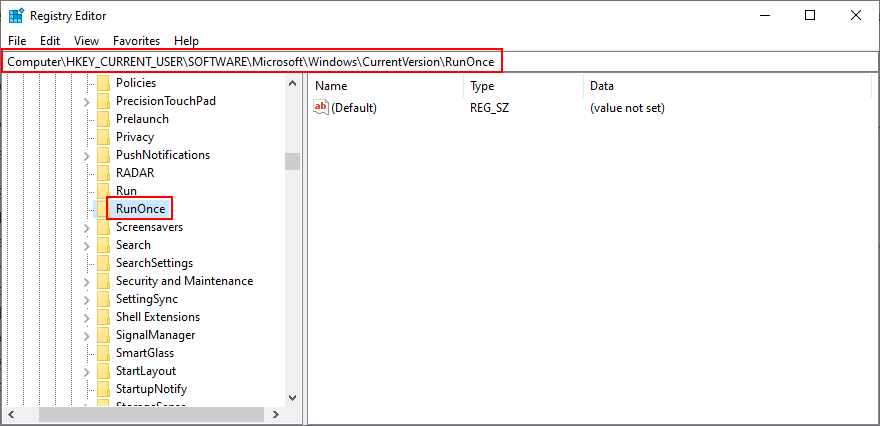
- Take the same steps: if the RunOnce key doesn’t exist, create it
- Zamknij Edytor rejestru
19. Restore the original registry settings
If the system registry suffered more modifications that you can’t identify, it’s easier to restore its configuration to factory values, which is more effective than using a registry cleaner. Here’s how to make it happen.
- Click the Start button, search for Registry Editor, and launch this tool
- Create a registry backup:
- Open the File menu and click Export
- Set a file name and destination
- Click Save to create a backup of the current registry settings
- Press the Windows key and click the power button to view power options
- While holding down the Shift key, click Restart to reboot Windows in troubleshooting mode
- Select Troubleshoot > Advanced options > Command Prompt
- Choose your PC account and enter your password to continue
- Write the following commands and hit Enter after each one:
-
cd %SystemRoot%\System32\config
-
ren %SystemRoot%\System32\config\DEFAULT DEFAULT.old
-
ren %SystemRoot%\System32\config\SAM SAM.old
-
ren %SystemRoot%\System32\config\SECURITY SECURITY.old
-
ren %SystemRoot%\System32\config\SOFTWARE SOFTWARE.old
-
ren %SystemRoot%\System32\config\SYSTEM SYSTEM.old
-
copy %SystemRoot%\System32\config\RegBack\DEFAULT %SystemRoot%\System32\config\
-
copy %SystemRoot%\System32\config\RegBack\DEFAULT %SystemRoot%\System32\config\
-
copy %SystemRoot%\System32\config\RegBack\SAM %SystemRoot%\System32\config\
-
copy %SystemRoot%\System32\config\RegBack\SECURITY %SystemRoot%\System32\config\
-
copy %SystemRoot%\System32\config\RegBack\SYSTEM %SystemRoot%\System32\config\
-
copy %SystemRoot%\System32\config\RegBack\SOFTWARE %SystemRoot%\System32\config\
-
- Uruchom ponownie komputer
20. Uninstall system updates
Some Windows updates end up harming your computer and causing various problems, including the The system cannot find the file specified error. In this case, the best course of action is to remove the most recent system update. Here’s how:
- Press Win key + R, type appwiz.cpl, and hit Enter

- Kliknij Wyświetl zainstalowane aktualizacje

- To sort the updates by time of installed, click the Installed On column
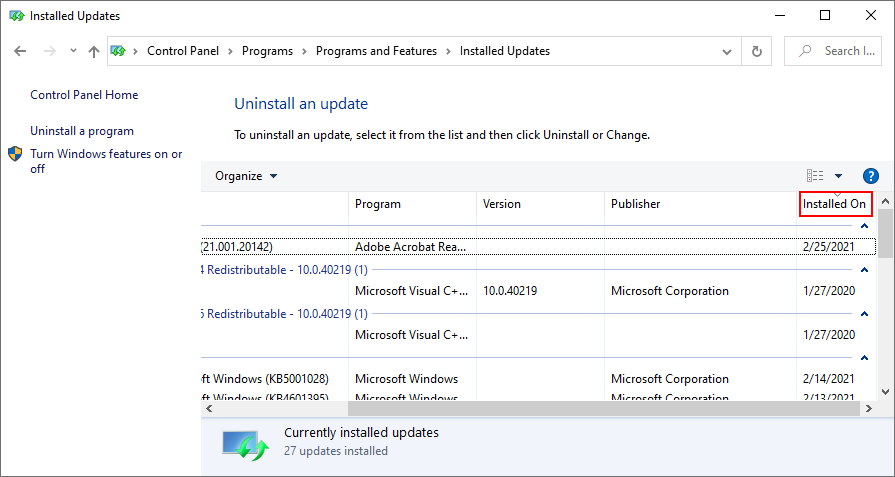
- Search for the Microsoft Windows category
- Double-click the first update in that group
- When asked to confirm its uninstall, click Yes
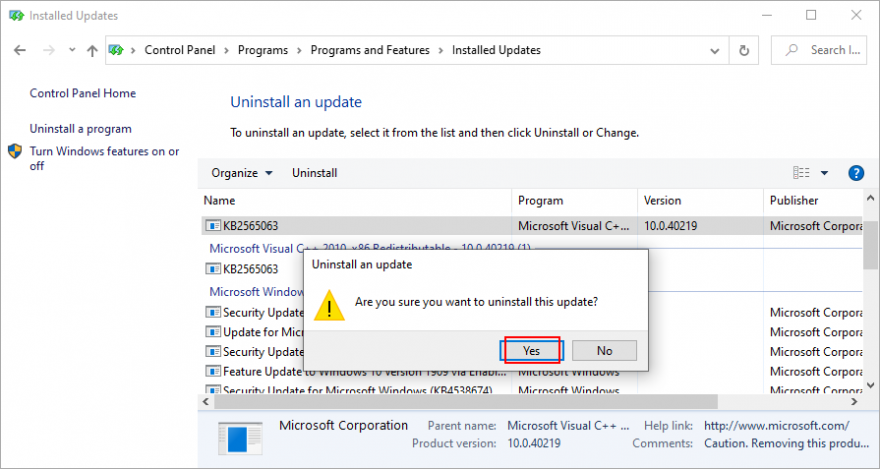
- Uruchom ponownie komputer
If you can’t boot Windows due to the The system cannot find the file specified error, you can interrupt the startup sequence three times in a row to start Windows troubleshooting mode. Then go to Troubleshoot > Advanced Options > Uninstall Updates.
21. Check your computer for malware
A malware agent could have infected system files, thus preventing you from opening any files or launching applications. To fix this issue, you can resort to Windows Defender:
- Press the Win key, search for Windows Security, and open this app
- Select Virus & threat protection

- Kliknij Opcje skanowania
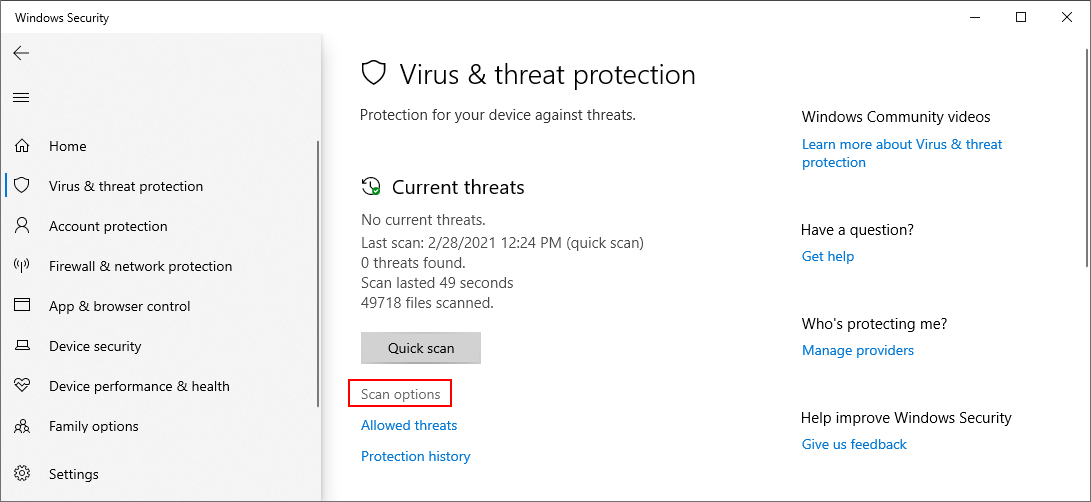
- Pick Quick scan and click Scan now
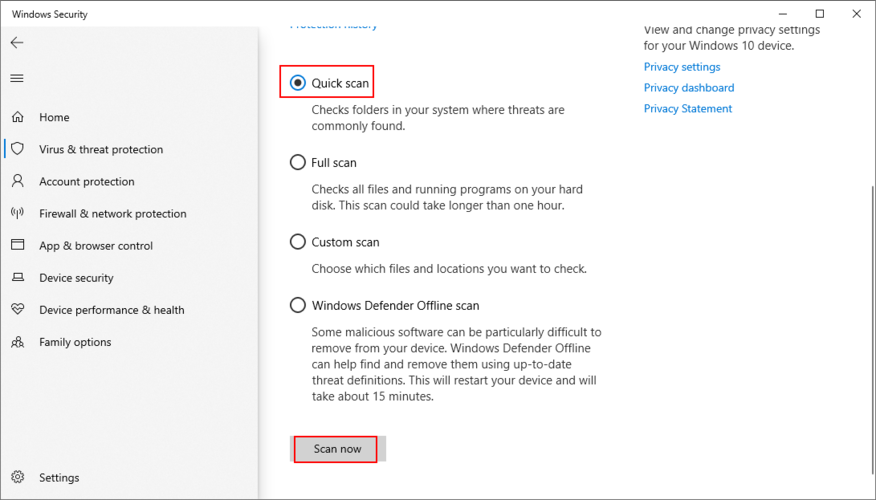
- If it doesn’t find any threats, choose Windows Defender Offline scan and click Scan now

- Allow Windows to quarantine or remove any suspicious files. If you think some of those files are safe, make sure to add them to the whitelist, in order to exclude them from any upcoming scans
If you have a third-party security solution that you rely on, make sure to adjust the steps above.
22. Use a Linux live distro
You might think that your data will be lost forever due to this serious error. And it might be impossible to even perform a disk backup because Windows doesn’t recognize the selected files. If there’s a major problem with your OS that requires system reset, you can save your files with the help of a Linux live distro.
Simply put, you will be creating a USB flash drive that boots a Linux-based operating system (e.g. Ubuntu), in order to gain access to your files and copy them somewhere safe. Since it’s not Windows, you shouldn’t be getting the The system cannot find the file specified error anymore. Then, you can safely proceed with more dangerous scenarios that involve data loss, like disk formatting.
How to create a Linux live distro with Rufus:
- Download a Linux distro. If you can’t decide which, we suggest Ubuntu since it’s intuitive
- Connect a USB flash drive to your PC. Make sure it doesn’t contain any files you might need later since the disk will be formatted
- Download Rufus from the official website
- Install and run Rufus
- Choose the pen drive and set Boot section to Disk or ISO image
- Click SELECT and add the Ubuntu ISO
- Set Partition scheme to MBR
- At File system, select FAT32
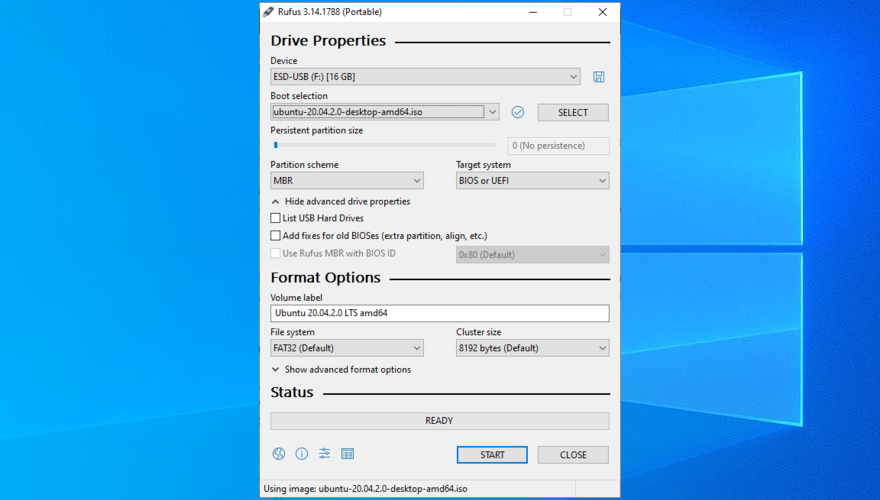
- Click OK and wait for Rufus to create your Linux live distro drive
How to boot Linux from the USB flash drive:
- Keep the flash drive plugged into your PC
- Restart Windows
- Right after your display turns on and before Windows boots, press the key shown on the screen to enter the boot startup menu (e.g. F12)
- Select the USB storage drive and hit Enter
- Once Ubuntu loads, create a backup of your files
23. Change drive letters
You might be experiencing file access errors due to your HDD or SSD. For instance, if it doesn’t have a partition letter assigned, or if it shares the letter with another drive, you should immediately fix this problem. The simplest way to do this is by using Disk Management.
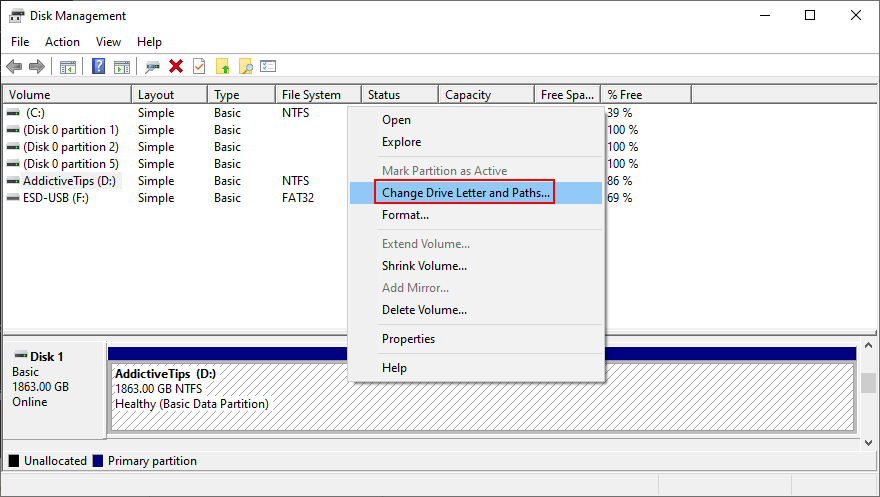
How to assign drive letters with Disk Management:
- Press Win key + R, type diskmgmt.msc, and press Enter
- In Disk Management, select the drive that’s giving you trouble
- Right-click the drive and select Change Drive Letters and Paths
- If the drive already has a letter
- Click Change
- Set a new drive letter
- Click OK
- If the drive doesn’t have a letter
- Click Add
- At Mount in the following empty NTFS folder, click Browse
- Set the new drive path by selecting an empty NTFS folder and click OK
- Then, click OK to confirm
- Quit to the desktop
However, if you can’t access Disk Management or if it doesn’t identify your drive, you can turn to the console environment.
How to assign drive letters with Command Prompt:
- Press Windows key + R, type cmd, then press Ctrl + Shift + Enter to launch Command Prompt with elevated rights
- Type
diskpartand hit Enter to use the partition manager built into Windows - Run
list volumeto view all current drives - Check out the number assigned to your disk or partition. Run
select volume #and use that number (e.g.select volume 4) - Write
assign letter=and add the new drive letter (e.g.assign letter=e). Hit Enter - Quit to the desktop
24. Format the partition
If changing the drive letter didn’t help get rid of the The system cannot find the file specified error, it’s time to format the partition. Keep in mind that it means losing everything saved there.
So, you should perform a backup before proceeding with this solution. If you can’t perform the backup in Windows, check out the previous solution on how to create a backup from a Linux distro.
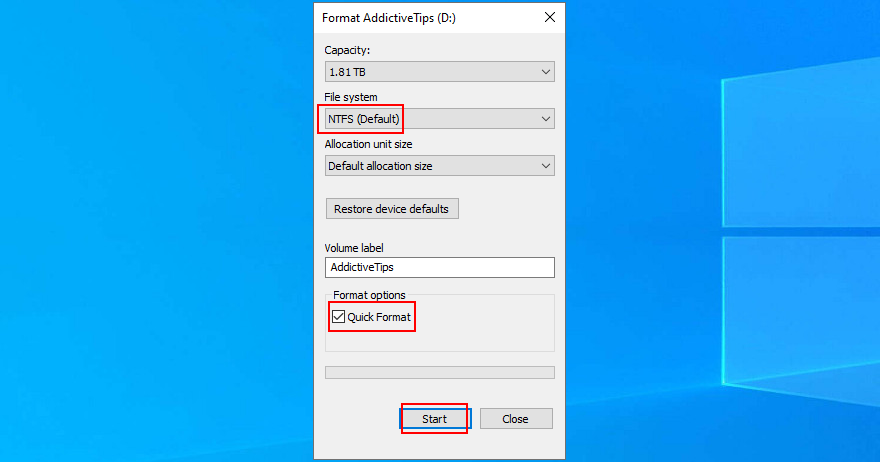
How to format a partition using Windows Explorer:
- Press Win key + E to open File Explorer on Windows 10
- Select the drive, right-click it, and choose Format

- At File system, select NTFS
- Leave Quick Format enabled
- Click Start
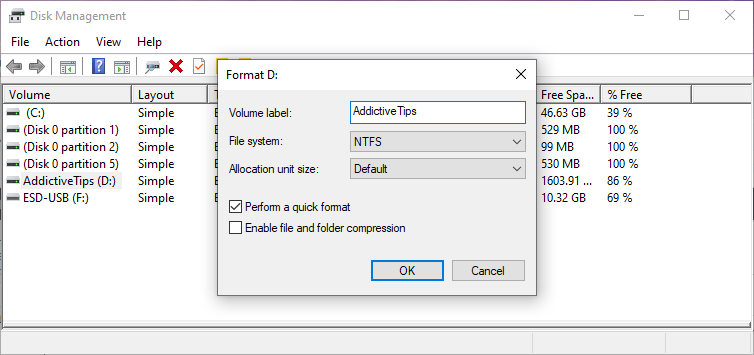
How to format a partition using Disk Management:
- Right-click the Start button and launch Disk Management
- Pick the partition, right-click it, and select Format
- Set File system to NTFS
- Leave Perform a quick format enabled
- Click OK
How to format a partition using Command Prompt:
- Press the Win key, search for Command Prompt, and click Run as administrator. If prompted by User Account Control, click Yes
- Type
diskpartand press Enter - Run
list volumeto view all volumes - Identify the number of your partition and use it when entering
select volume #(e.g.select volume 5) - Run
format fs=ntfsto format the partition as NTFS
25. Roll back the operating system
You can roll back Windows 10 to a restore point that was recorded before you started experiencing the The system cannot find the file specified error, thanks to System Restore. It means undoing all software modifications made to your computer that you can’t detect and which somehow led to file access and application launch issues. However, it automatically means that all programs you installed after the restore point was recorded will no longer exist, so you will have to install them again.
How to use System Restore:
- Sign in to Windows 10 with an administrator account
- Click the Start button, find Control Panel, and open this app
- Select Recovery
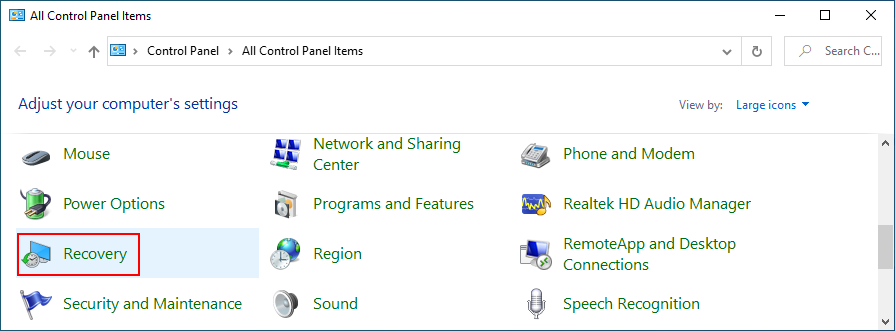
- Click Open System Restore
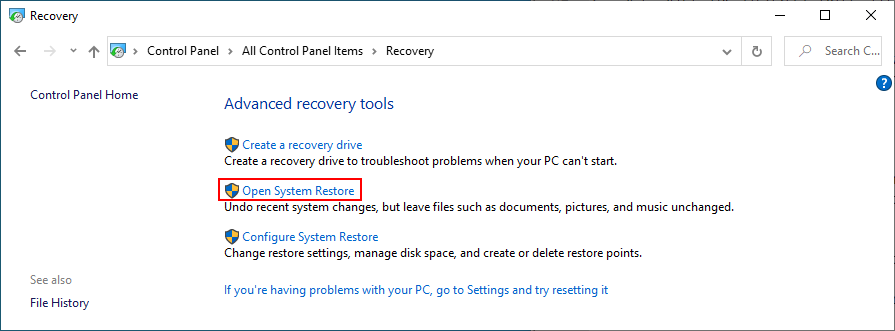
- Choose a restore point or click Show more restore points to get more options. Click Scan for affected programs to discover the exact applications you will have to reinstall

- After making a selection, click Next and follow the remaining steps
If you can’t boot Windows 10, interrupt the startup three times in a row to access system troubleshooting mode. Then, go to Troubleshoot > Advanced Options > System Restore.
26. Reset Windows 10
If you still can’t shake off the The system cannot find the file specified error or if System Restore didn’t work, there’s nothing left to do except restore Windows 10 to factory settings. It means uninstalling all your applications and reverting the system configuration to default. But you can keep your personal files, so it’s not necessary to perform a backup.
How to reset Windows 10:
- Kliknij prawym przyciskiem myszy przycisk Start i wybierz Ustawienia
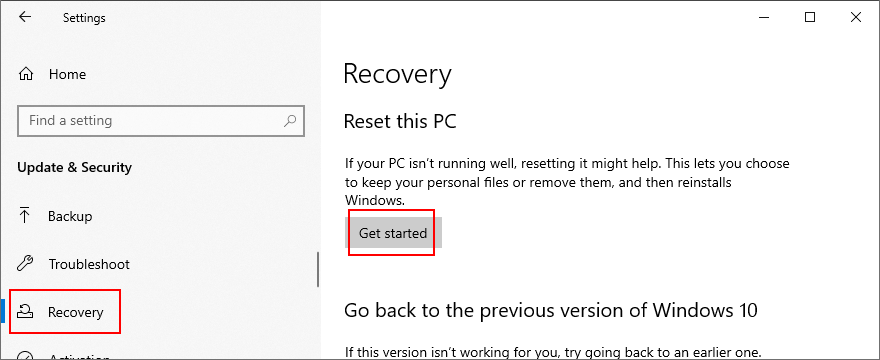
- Click Update & Security and select Recovery
- At Reset this PC, click Get started
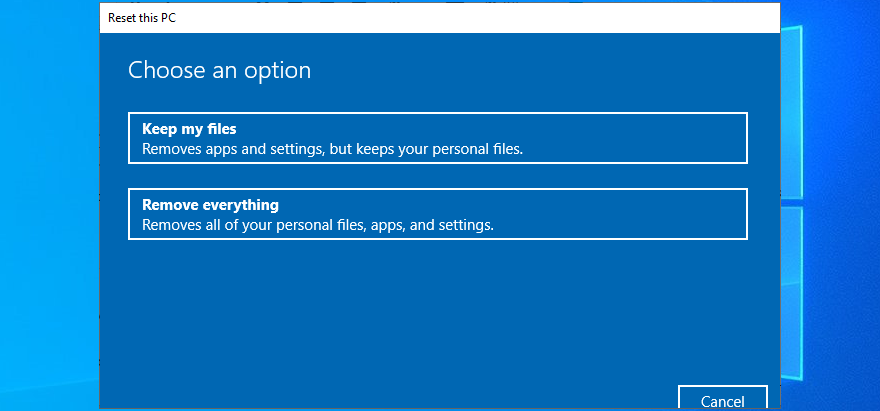
- Pick Keep my files and follow the remaining instructions
You can also turn your PC on and off three times to launch Advanced Startup mode before Windows boot. There, you can go to Troubleshoot > Reset your PC.
If you managed to get hold of your files by using the Linux live distro, we suggest performing a clean reset by selecting the Remove everything option instead of Keep my files.
Error The system cannot find the file specified can be fixed
To review, you can try to fix the The system cannot find the file specified error by restarting your PC, updating Windows 10, running the Windows Update troubleshooter, checking the Windows Update services, starting the OS in Safe Mode, disabling startup apps, running a clean boot, and uninstalling third-party applications.
It’s also a good idea to disconnect external devices, run CHKDSK, SFC and DISM, investigate the system log, reinstall devices, update or roll back drivers, reinstall programs, check registry settings or restore the registry to default, uninstall system updates, run a malware scan, use a Linux live distro, change drive letters, format partitions, use System Restore, and reset Windows 10.
How did you repair this error? Let us know in the comments below.