Windows 8 a complètement repensé Erreurs BSOD et comment les corriger . Par rapport à Windows 7 et aux versions antérieures, il a opté pour une approche plus conviviale afin que les utilisateurs occasionnels puissent rechercher des codes d’arrêt sur la page d’assistance de Microsoft.
Lorsque Windows 10 rencontre une erreur fatale, il fait tout ce qu’il faut pour éviter la perte et la corruption de données majeures, affichant un écran bleu avec un smiley triste et un texte blanc disant Votre PC a rencontré un problème et doit redémarrer , nous recueillons simplement des informations sur les erreurs .
Ce n’est pas un problème lorsque vous tombez sur ce scénario une seule fois, car vous pouvez redémarrer votre ordinateur et reprendre là où vous vous étiez arrêté. Mais cela devient vraiment problématique lorsque le message d’erreur Votre PC a rencontré un problème et doit redémarrer entre dans une boucle. Parfois, il se bloque à 100% et ne parvient pas à démarrer Windows, vous obligeant à le redémarrer.

Qu’est-ce qui cause l’erreur Votre PC a rencontré un problème et doit redémarrer ?
Votre PC peut être affecté par un événement logiciel, une panne matérielle ou les deux. Voici quelques causes possibles:
- Panne matérielle
- Secteurs défectueux sur le disque
- Fichiers système ou magasin de composants corrompus
- Système d’exploitation, pilotes ou BIOS obsolètes
- Paramètres du BIOS ou du registre incorrects
- Espace disque insuffisant
- Applications, mises à jour système ou matériel incompatibles
- Infection par un logiciel malveillant
- Problèmes de mémoire système
- La surchauffe résulte de l’overclocking
Comment réparer Votre PC a rencontré un problème et doit redémarrer sous Windows 10
Il existe plusieurs manières d’aborder le dépannage. Mais vous devriez configurez un point de restauration système avant de passer à la première solution de cette liste. De cette façon, vous pouvez toujours annuler les modifications si vous faites des erreurs.
1. Démarrez Windows en mode sans échec
Si vous ne pouvez pas démarrer votre système d’exploitation pour atteindre le bureau et effectuer des actions parce que vous êtes immédiatement envoyé dans une boucle Votre PC a rencontré un problème et doit redémarrer , alors vous pouvez démarrer Windows en mode sans échec . C’est une mesure de précaution qui crée un environnement sûr pour le diagnostic.
Comment démarrer Windows en mode sans échec sans démarrage:
- Lancez Windows et interrompez la séquence de démarrage
- Effectuez cette opération trois fois pour passer en mode Récupération
- Dans l’écran Choisir une option , sélectionnez Dépanner

- Accédez aux Options avancées
- Sélectionnez Paramètres de démarrage
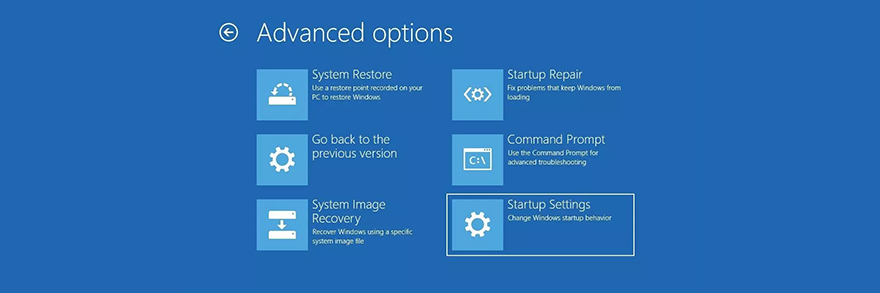
- Cliquez sur Redémarrer
- Appuyez sur F4 pour activer le mode sans échec
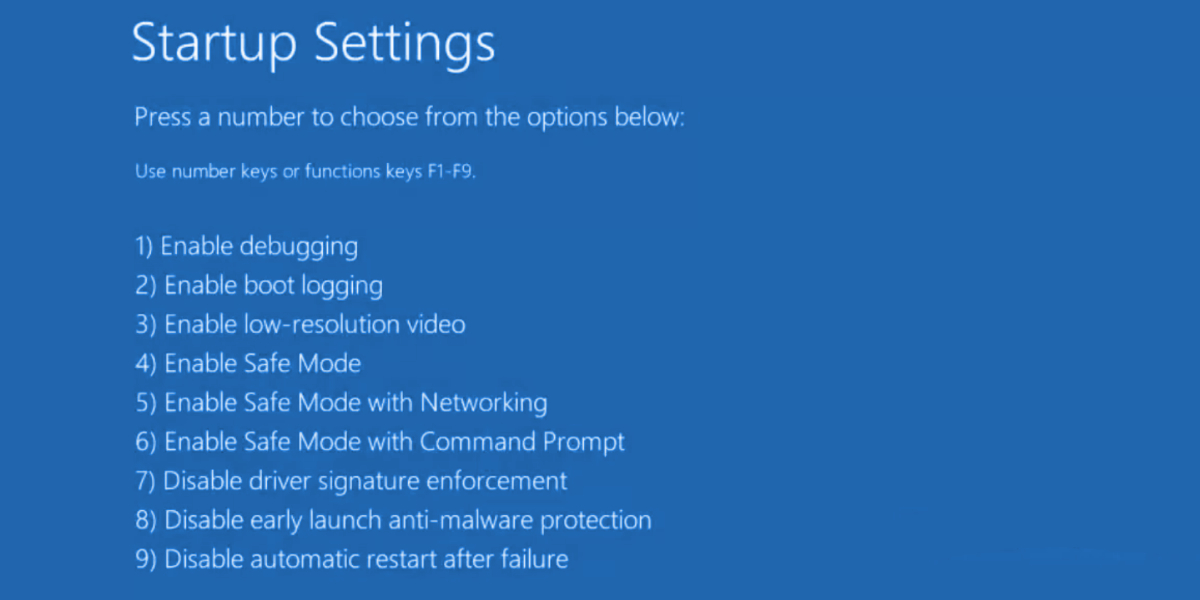
- Appuyez sur F4 pour activer le mode sans échec

2. Lancer un démarrage propre
Si l’erreur Votre PC a rencontré un problème et doit redémarrer ne se déclenche pas en mode sans échec, vous pouvez nettoyer le démarrage de Windows 10 pour désactiver tout processus, pilote ou service non essentiel. cela pourrait causer le problème. Voici comment y parvenir:
- Cliquez sur le bouton Démarrer , saisissez Configuration du système et appuyez sur Entrée
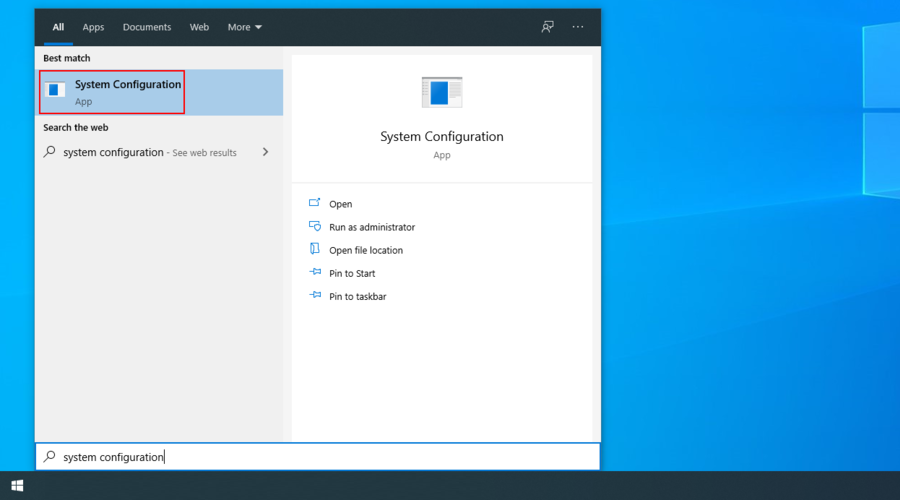
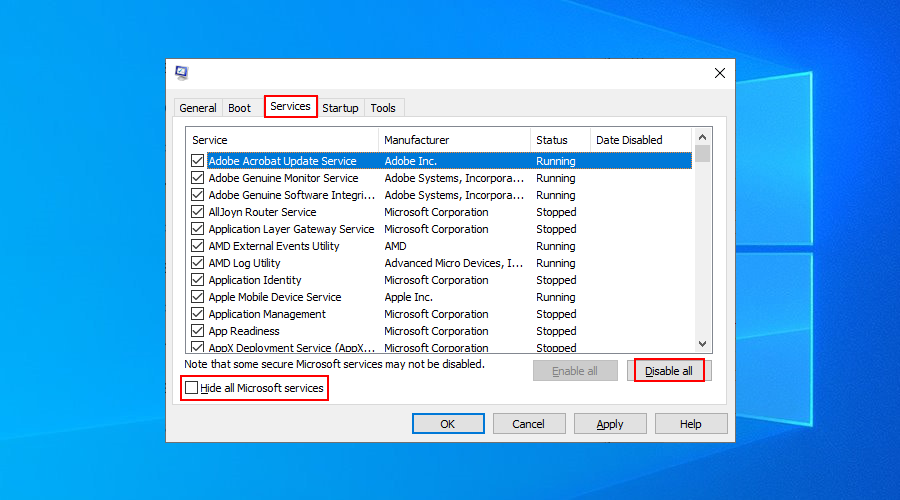
- Accédez à la section Services
- Décochez Masquer tous les services Microsoft et cliquez sur Tout désactiver

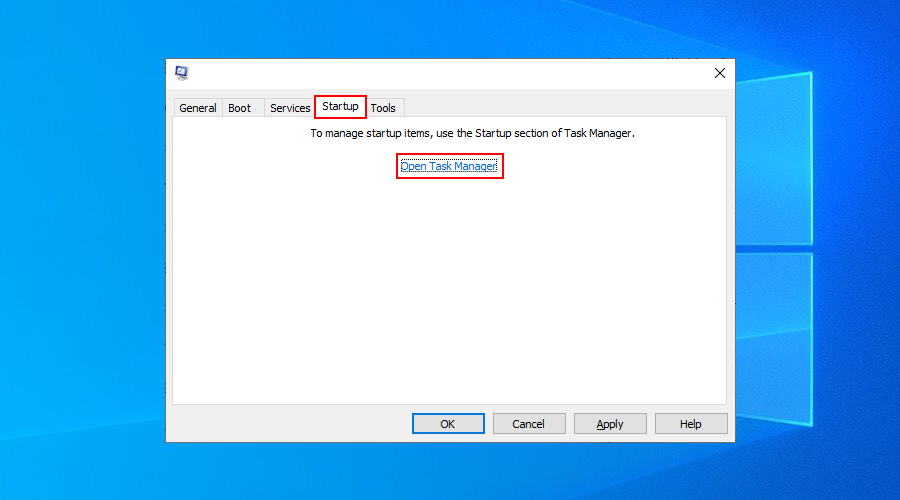
- Passez à l’onglet Démarrage et cliquez sur Ouvrir le gestionnaire de tâches
- Sélectionnez une application avec l’état Activé et cliquez sur Désactiver
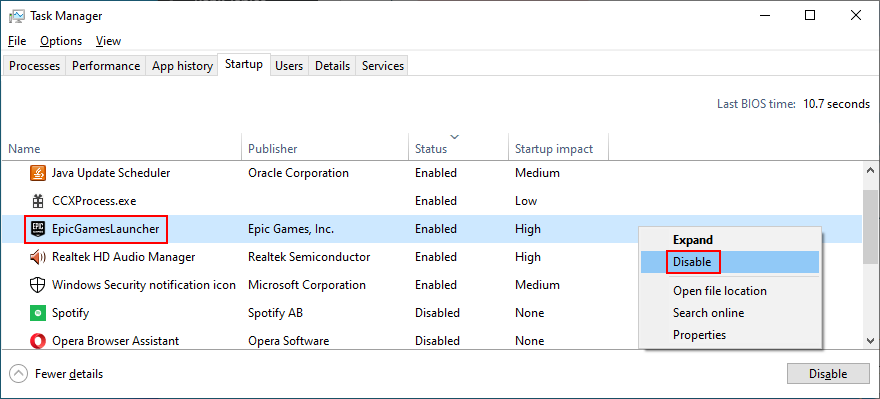
- Effectuez cette opération pour toutes les applications dont l’état est Activé
- Redémarrez votre PC et recherchez les problèmes
3. Exécutez Windows Update
Il est essentiel de maintenir Windows à jour avec les derniers correctifs et correctifs de sécurité, afin d’éviter les problèmes de stabilité du système et le message d’erreur Votre PC a rencontré un problème et doit redémarrer .
- Appuyez sur la touche Win , saisissez Rechercher les mises à jour , puis appuyez sur Entrée
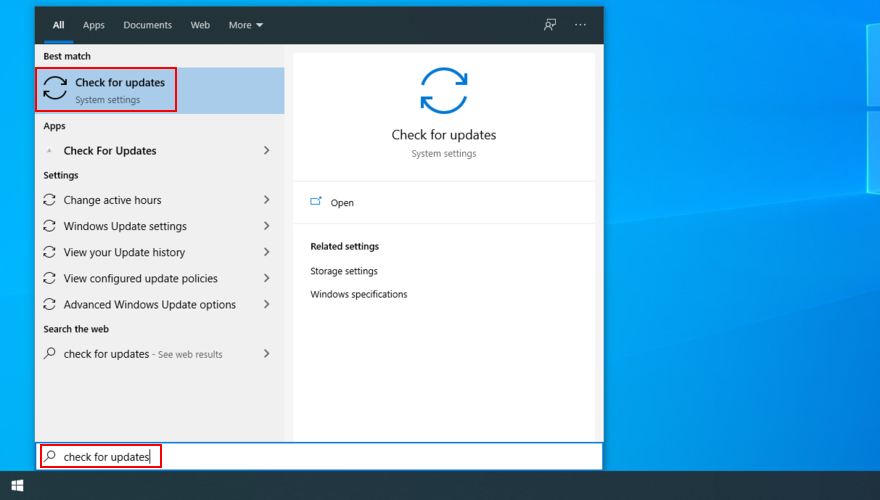
- Cliquez sur Rechercher les mises à jour et attendez

- Si Windows trouve quelque chose, cliquez sur Télécharger
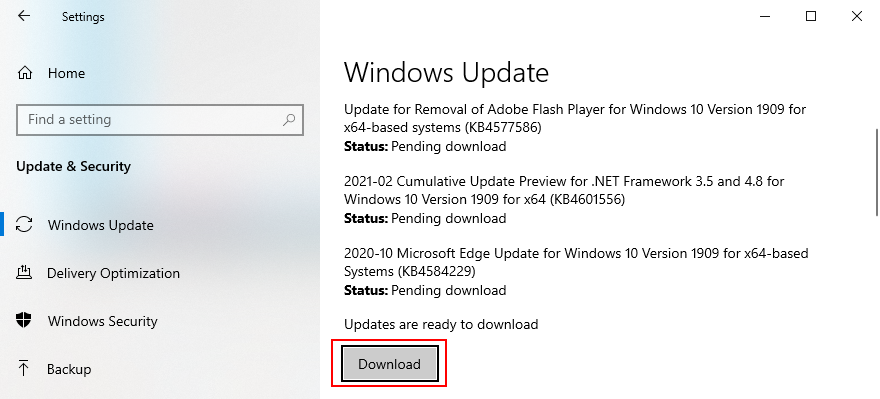
- Redémarrez votre PC une fois la mise à jour terminée et recherchez les erreurs
4. Inspectez le journal système
Windows collecte des journaux sur tous les événements majeurs qui se produisent sur votre ordinateur, y compris les plantages. Pour en savoir plus sur l’erreur Votre PC a rencontré un problème et doit redémarrer , vous pouvez inspecter le journal système à l’aide de l’Observateur d’événements ou de BlueScreenView.
L’observateur d’événements est un outil d’information système intégré au système d’exploitation. Vous pouvez l’utiliser pour analyser les minidumps créés par des pannes du système, afin de découvrir quels pilotes ont causé l’erreur Votre PC a rencontré un problème et doit redémarrer .
Comment utiliser l’Observateur d’événements:
- Redémarrez votre système d’exploitation immédiatement après le plantage
- Cliquez sur le bouton Démarrer , saisissez Observateur d’événements et ouvrez cette application
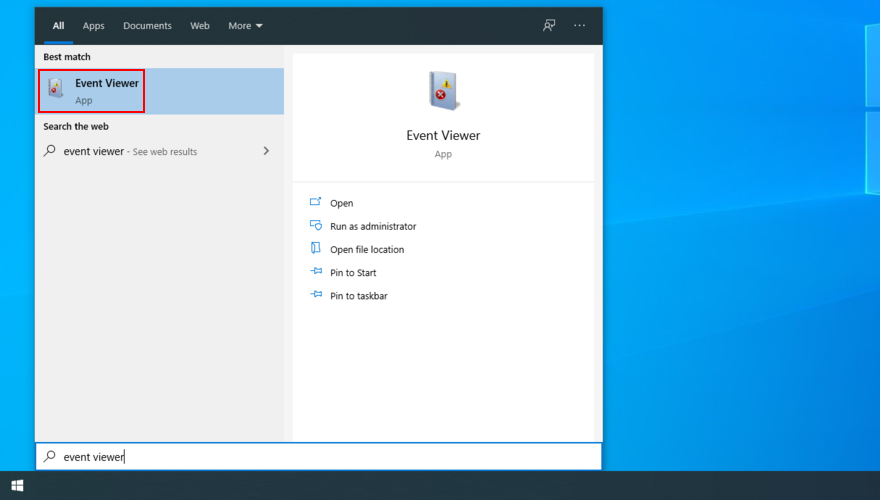
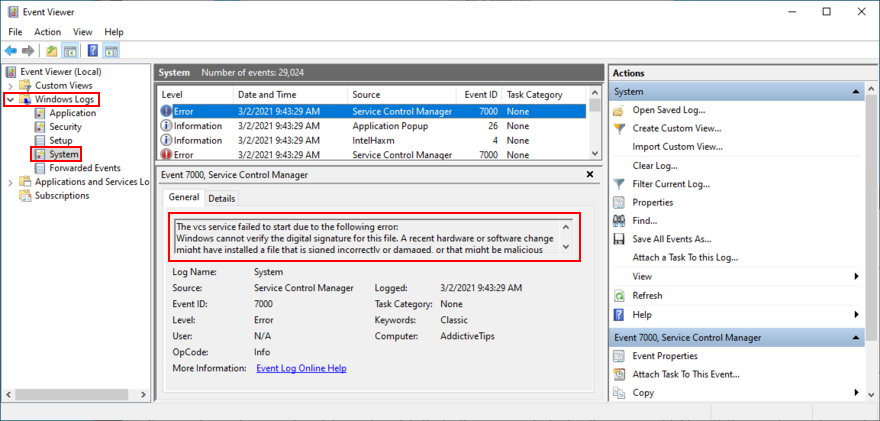
- Accédez à la section Journaux Windows sur le côté gauche
- Ouvrez le dossier Système
- Sélectionnez la première erreur de la liste
- Analysez les informations sur le plantage du système dans les onglets Général et Détails
Si vous préférez une approche plus conviviale pour enquêter sur les fichiers minidump, vous pouvez installer et utiliser BlueScreenView. C’est un outil léger, portable et simple à utiliser.
Comment utiliser BlueScreenView:
- Téléchargez BlueScreenView depuis le site Web officiel
- Lancez l’application et ouvrez le fichier.dmp créé par le plantage du système
- Découvrez les fichiers du pilote à l’origine de l’événement
5. Vérifiez les pilotes de votre appareil
Une fois que vous avez découvert les pilotes défectueux qui ont déclenché le message d’erreur Votre PC a rencontré un problème et doit redémarrer , vous pouvez les résoudre de trois manières: réinstaller les adaptateurs, mettre à jour les pilotes ou lancer ramener les pilotes à la version précédente.
Comment réinstaller les adaptateurs:
- Cliquez avec le bouton droit sur le bouton Démarrer et sélectionnez Gestionnaire de périphériques
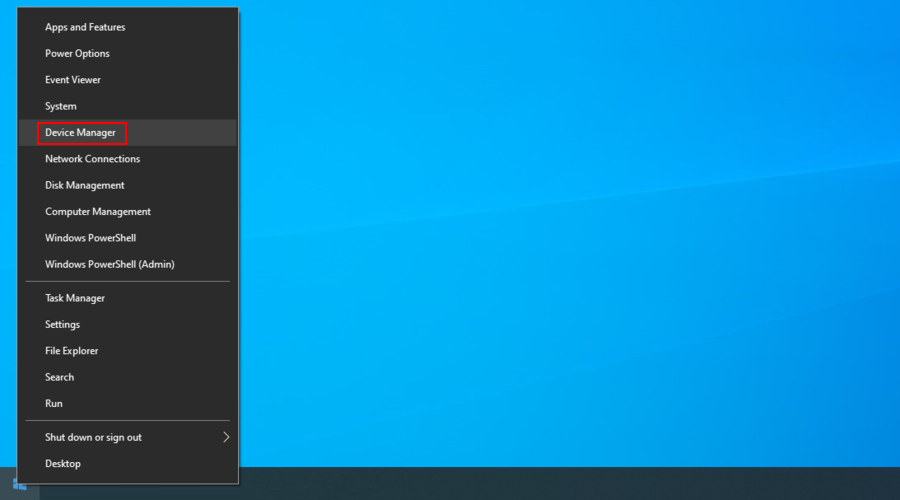
- Sélectionnez le périphérique défectueux dans la liste, cliquez dessus avec le bouton droit de la souris et choisissez Désinstaller le périphérique
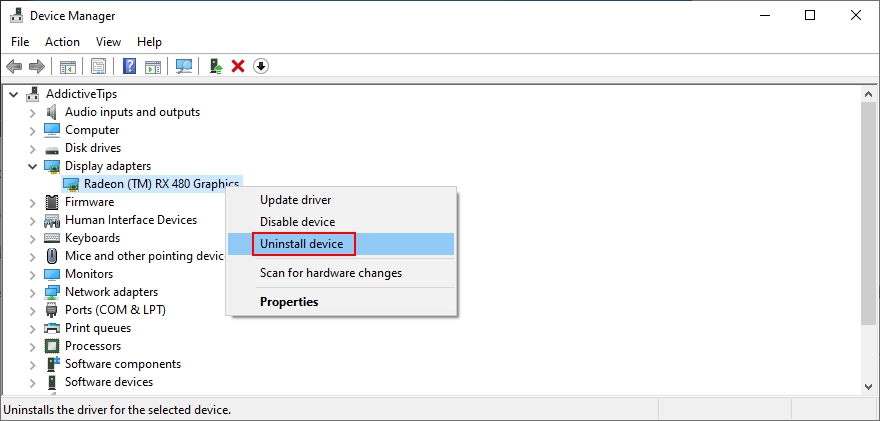
- Suivez les étapes à l’écran
- Sélectionnez un appareil, ouvrez le menu Action et cliquez sur Rechercher les modifications matérielles
- Redémarrez votre PC. L’adaptateur manquant sera automatiquement réinstallé par Windows
- Rechercher d’autres problèmes de stabilité du système
Cette solution devrait éliminer le message d’erreur Votre PC a rencontré un problème et doit redémarrer s’il a été causé par un appareil qui n’est pas correctement connecté au système d’exploitation.
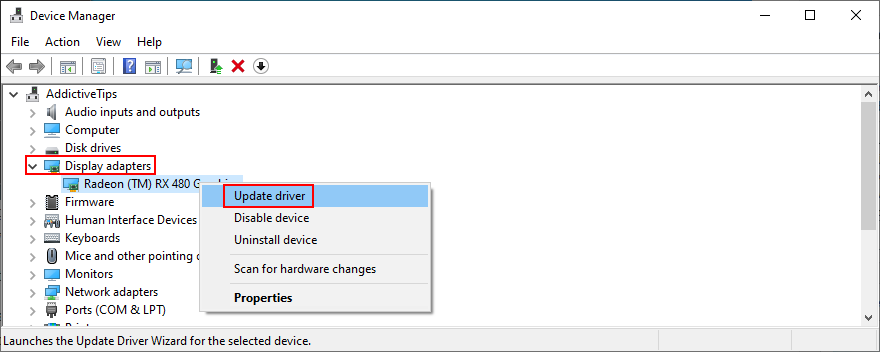
Comment mettre à jour les pilotes:
- Revenez au Gestionnaire de périphériques
- Cliquez avec le bouton droit sur le périphérique obsolète et sélectionnez Mettre à jour le pilote
- Cliquez sur Rechercher automatiquement le pilote logiciel mis à jour
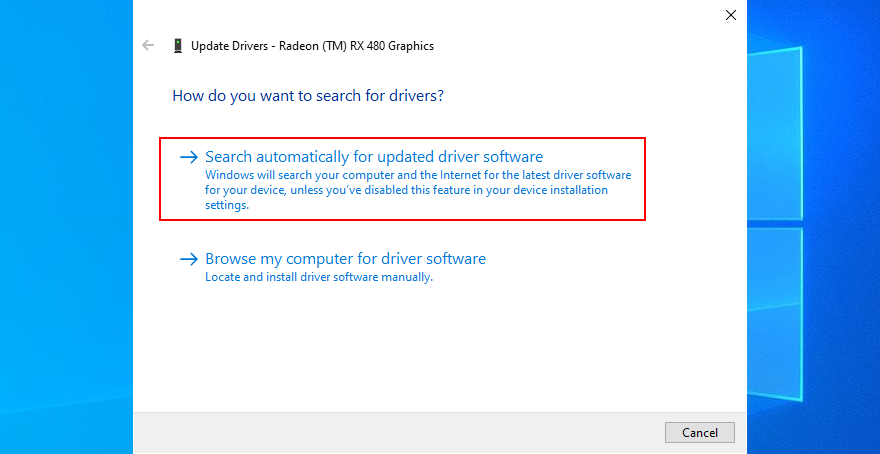
- S’il ne trouve pas de pilote, cliquez sur Rechercher les pilotes mis à jour sur Windows Update
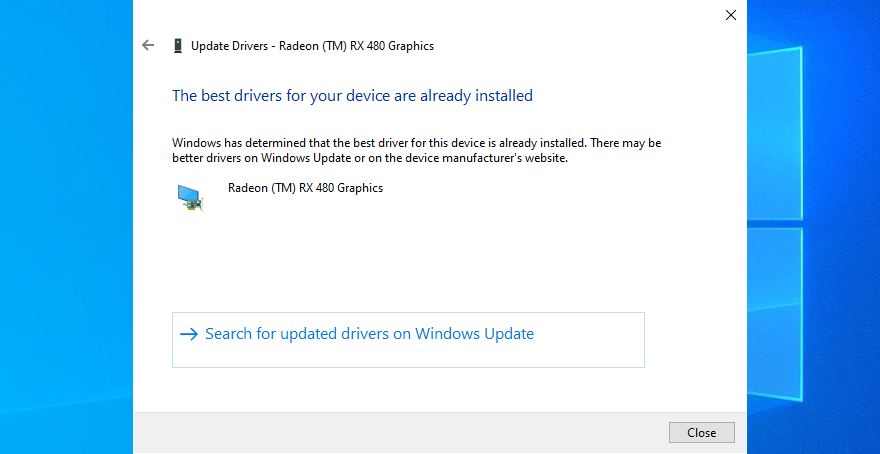
- Redémarrez votre PC et recherchez les erreurs du système d’exploitation

Les pilotes obsolètes peuvent provoquer des pannes de l’ordinateur, donc leur mise à jour devrait faire l’affaire. Cependant, si Windows Update ne parvient pas à trouver un pilote plus récent, c’est à vous de le télécharger et de l’installer à partir du site Web du fabricant.
C’est risqué, cependant, car vous pourriez accidentellement installer un pilote incompatible. Pour éviter ce scénario, il est préférable d’utiliser un pilote mettre à jour l’application qui télécharge et installe automatiquement les pilotes les plus récents.
D’un autre côté, si votre système d’exploitation a commencé à planter après une mise à jour du pilote, cela peut être dû au fait que la dernière version ne prend pas entièrement en charge Windows 10. Lorsque cela se produit, vous devez restaurer le pilote à la version stable précédente..
Comment restaurer les pilotes:
- Revenir au Gestionnaire de périphériques
- Sélectionnez l’appareil, cliquez dessus avec le bouton droit de la souris et accédez à Propriétés
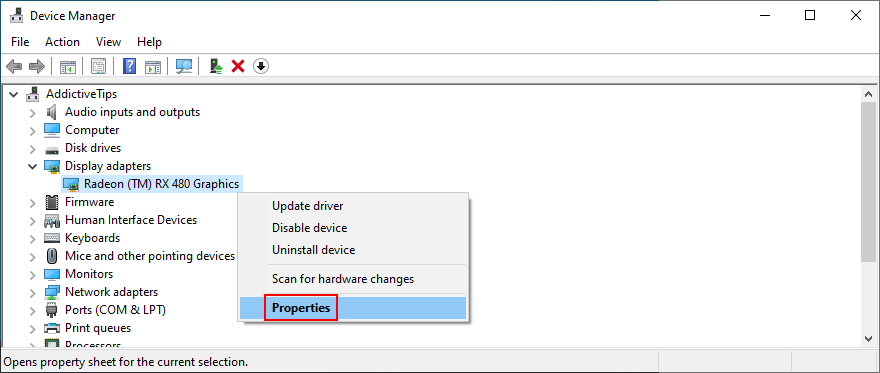
- Sélectionnez la section Pilote
- Cliquez sur Restaurer le pilote et suivez les étapes
- Si vous ne pouvez pas cliquer sur le bouton car il est grisé, cela signifie qu’aucune version de pilote précédente n’est disponible sur votre PC, vous ne pouvez donc pas terminer la restauration
- Redémarrez l’ordinateur et testez-le pour détecter les erreurs
6. Vérifiez votre espace disque
Votre système d’exploitation a constamment besoin d’espace disque libre pour diverses opérations. Sinon, il pourrait planter et vous empêcher d’accéder à votre PC jusqu’à ce que vous résolviez le problème. Il est possible d’allouer plus d’espace disque à la partition de votre système d’exploitation à partir d’un autre lecteur ou de supprimer des fichiers existants pour faire de la place.
Comment augmenter la taille de la partition du système d’exploitation avec la gestion des disques:
- Appuyez sur la touche Win + R , saisissez diskmgmt.msc , puis appuyez sur Entrée
- Choisissez un grand lecteur à côté de celui avec Windows
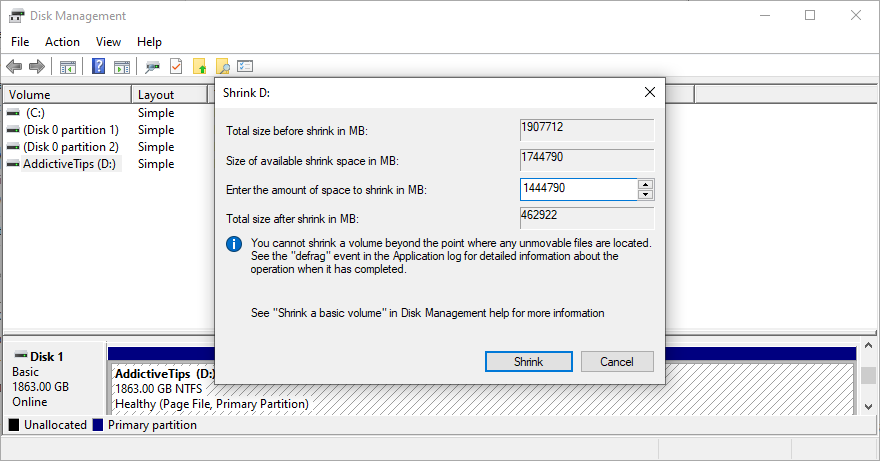
- Cliquez dessus avec le bouton droit et sélectionnez Réduire le volume
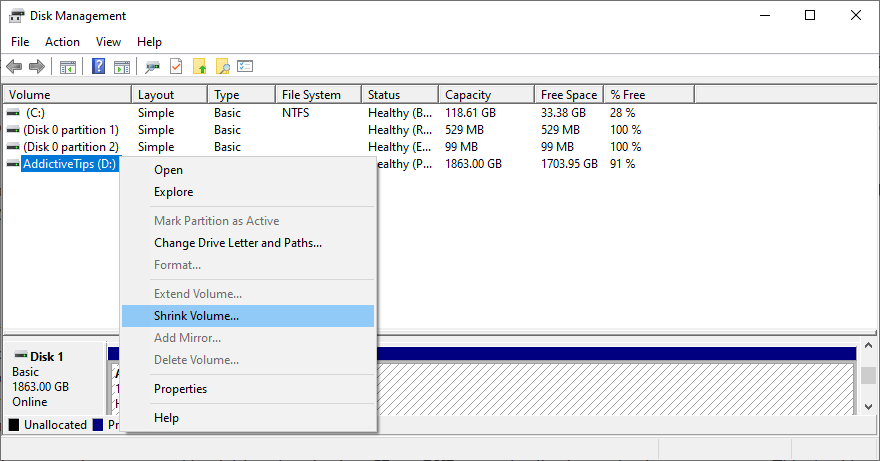
- Définissez la nouvelle taille du pilote et cliquez sur Réduire
- Maintenant, cliquez avec le bouton droit de la souris sur la partition Windows et sélectionnez Étendre le volume
- Spécifiez la nouvelle taille en ajoutant l’espace disque libre que vous avez précédemment acquis
- Finalisez les modifications, redémarrez votre PC et recherchez les plantages
S’il n’est pas possible d’allouer plus d’espace disque à partir d’une autre partition, vous pouvez supprimer les fichiers existants. Par exemple, vous pouvez déplacer votre collection de photos et de films sur un disque externe, la télécharger sur un compte cloud ou la graver sur des DVD. Les grands jeux et applications dont vous n’avez plus besoin doivent être désinstallés.
Et, quand il s’agit de données indésirables, vous pouvez vous en débarrasser en vous tournant vers un nettoyeur de système . Ou, si vous ne souhaitez pas installer d’autres applications, vous pouvez utiliser l’outil de nettoyage de disque de Windows.
Comment utiliser le nettoyage de disque Windows:
- Assurez-vous de vous connecter à Windows 10 avec un compte administrateur
- Accédez à Téléchargements et à la Corbeille pour vérifier si vous souhaitez conserver des fichiers avant la suppression
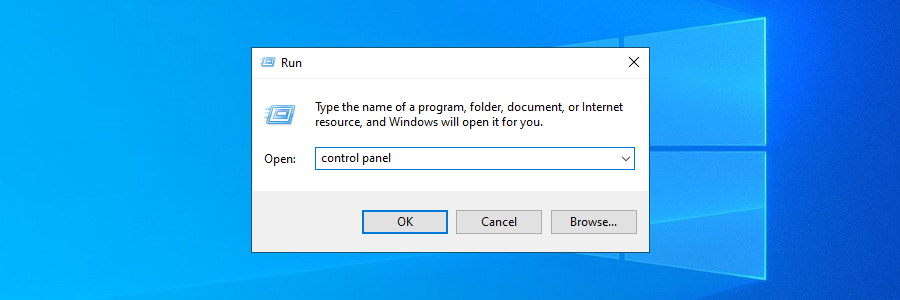
- Cliquez sur le menu Démarrer , saisissez panneau de configuration et appuyez sur Entrée
- Sélectionnez Outils d’administration
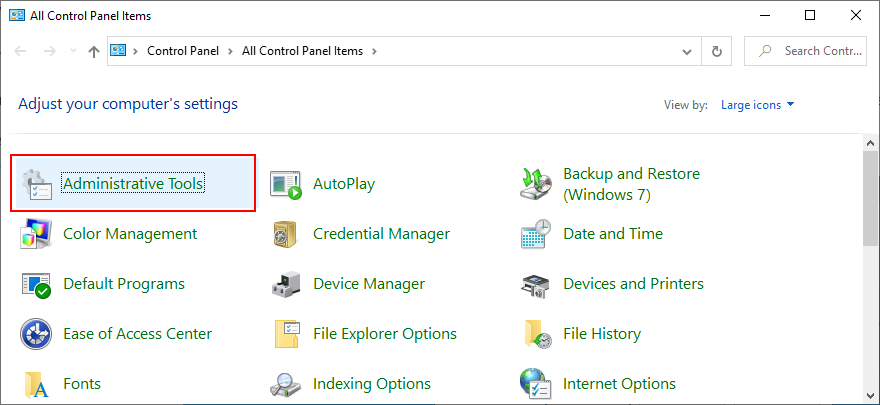
- Double-cliquez sur Nettoyage de disque pour lancer cette application
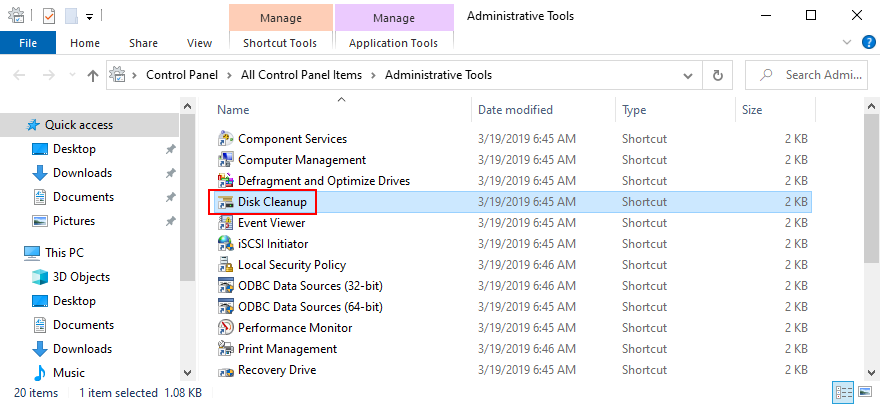
- Choisissez la partition Windows et cliquez sur OK
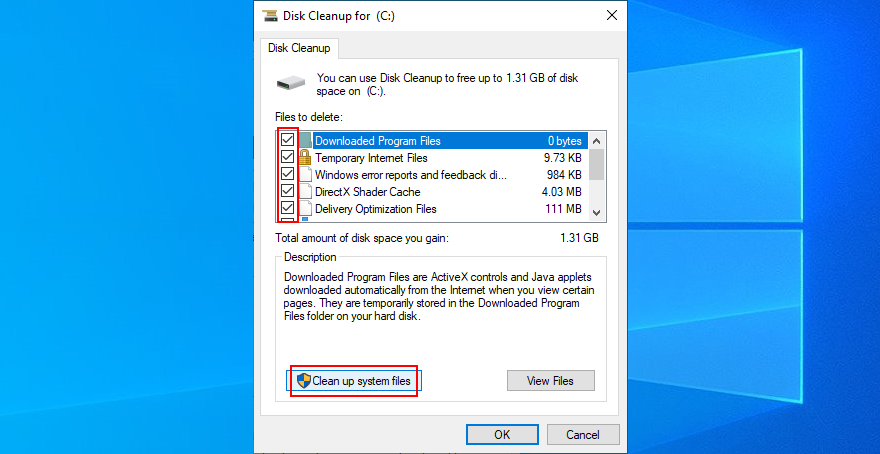
- Dans Fichiers à supprimer , sélectionnez tous les éléments, puis cliquez sur Nettoyer les fichiers système
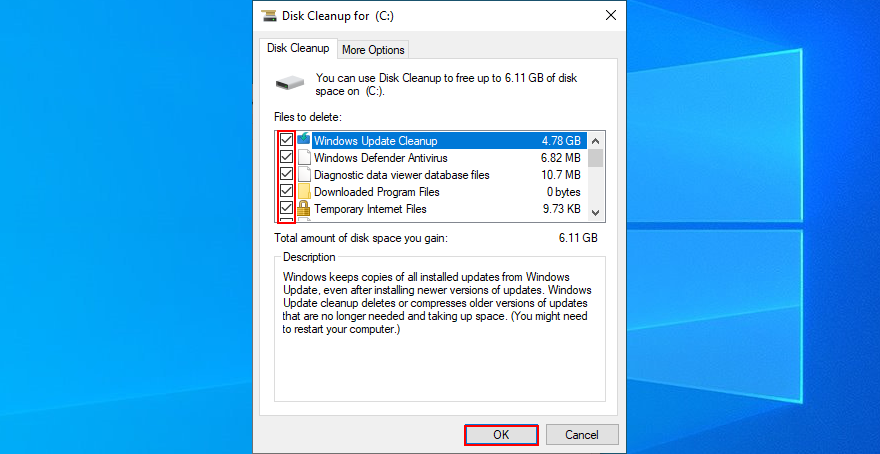
- Une fois l’analyse terminée, choisissez à nouveau tous les fichiers
- Cliquez sur OK et Supprimer les fichiers pour confirmer la suppression
- Don’t shut down or turn off your PC during the cleanup
- Once it’s over, reboot your PC and check for system stability issues
- Sélectionnez Outils d’administration
7. Unplug new hardware devices
The Your PC ran into a problem and needs to restart error can be triggered by peripheral devices that have compatibility issues with your computer and operating system. If you notice that you started having problems with your computer after plugging in a new piece of hardware, you should take it out.
It can be anything, from a webcam to a Wi-Fi adapter. Furthermore, if the peripheral device is connected through a USB cable, then you should switch USB ports in case not all of them are functioning correctly.
8. Scan your PC for malware
If your computer was infected with malware, it’s possible that critical processes and services were disabled in an attempt to take down your defenses. It often translates to system crashes, too, represented by a blue screen with an error message and perhaps a stop code.
How to run Windows Defender:
- Press the Windows key, type Windows Security, and open this app
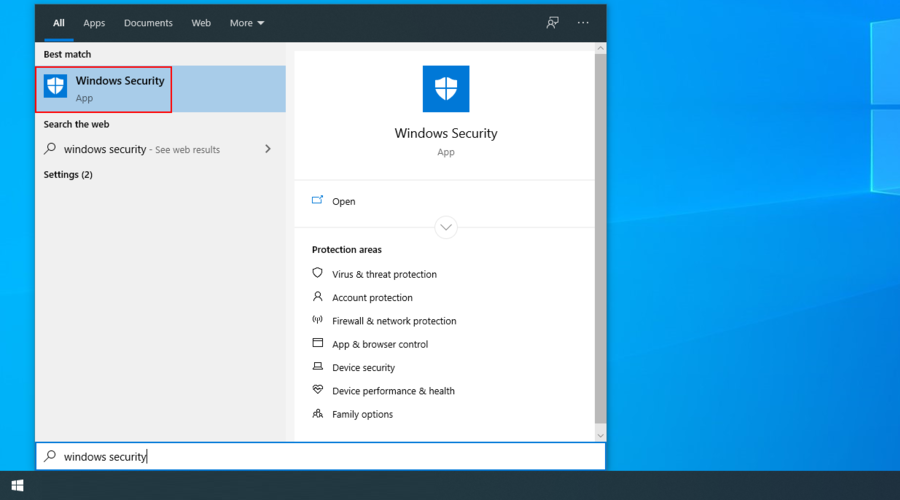
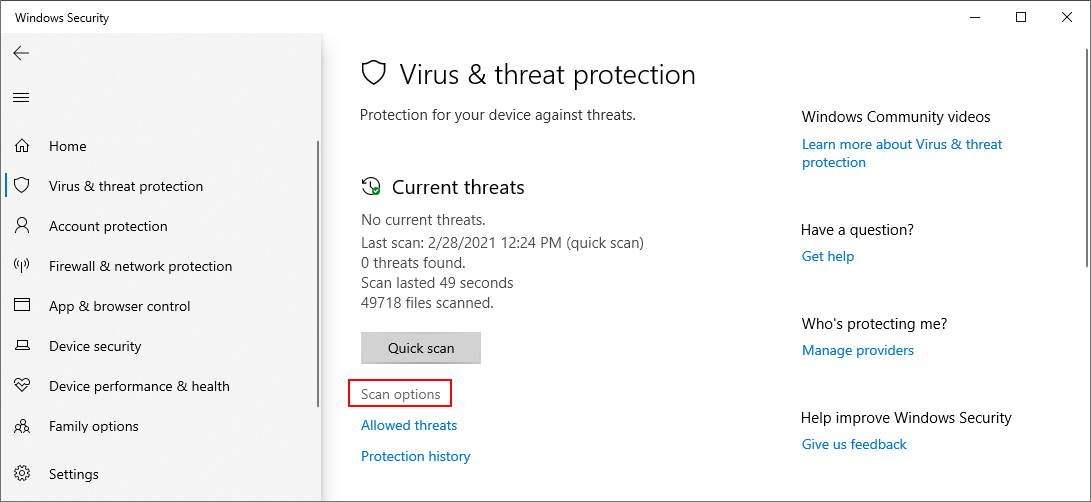
- Select the Virus & threat protection section
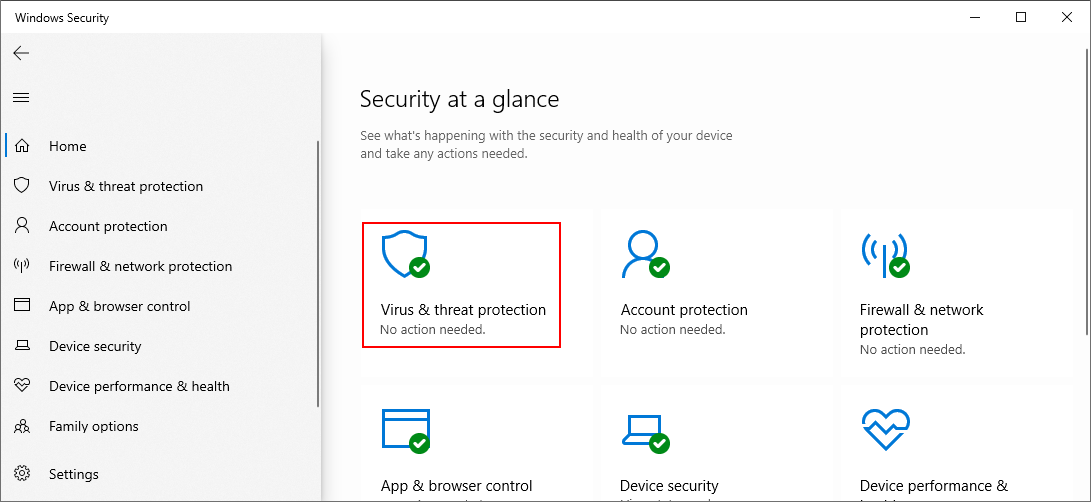
- Click Scan options
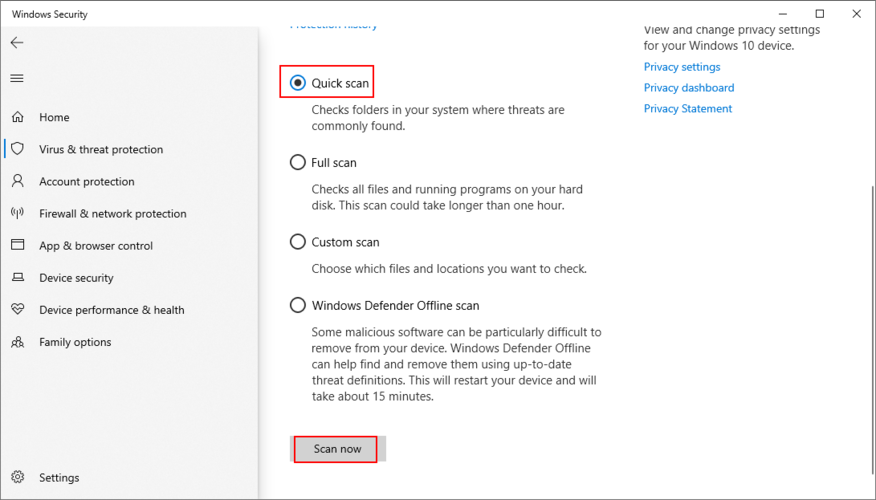
- Pick Quick scan and click Scan now
- If the scan doesn’t reveal anything suspicious, select Windows Defender Offline scan and click Scan now
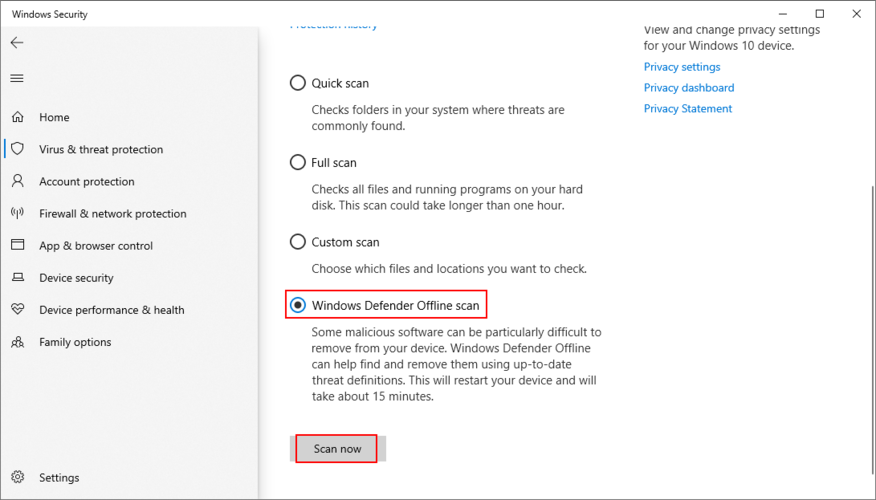
- Once Defender removes the infected files, restart your PC and check for errors
If you have any antivirus solution installed beside Windows Defender, make sure to adapt the steps above.
9. Check the system memory
Any issues with your RAM card can affect the entire computer, leading to system crashes and various stop codes. However, you can quickly verify the system memory with the help of Windows Memory Diagnostic, a built-in tool.
How to use Windows Memory Diagnostic:
- Save your work and close all programs
- Click the Start button, type Windows Memory Diagnostic, and open this app

- Click Restart now and check for problems (recommended)
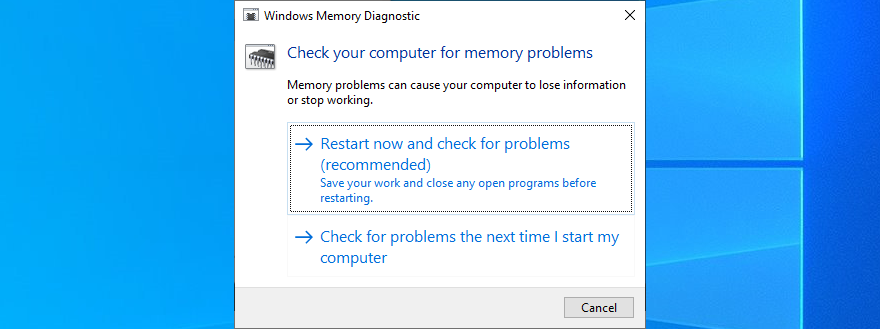
- Your PC will reboot and start checking your RAM
- Once it repairs all memory problems, boot Windows and check for stability issues
Windows Memory Diagnostic is pretty good at what it does. But if you’re looking for something a little more advanced, you should check out MemTest86.
10. Disable overclocking tools
Gamers typically use overclocking tools like MSI Afterburner, AMD Overdrive, CPU-Z or GPU-Z to crank up their systems and enhance their gaming experience. However, it’s not often done properly.
For example, you must have a cooler powerful enough to handle the heat resulted from overclocking. Else, your PC will shut down and show the Your PC ran into a problem and needs to restart error message to prevent overheating and protect itself.
So it’s a good idea to turn off all overclocking software solutions you have on your PC, whether you applied them for your GPU, CPU, or RAM. Then, reset the clock settings to default and check your PC for any additional stability problems.
11. Reset BIOS to default
It’s possible to control many computer settings from the BIOS area, including overclocking and caching. However, if you don’t know what you’re doing, you can end up harming your PC and triggering system crashes with can’t carry out its activities properties due to missing or damaged files. However, you can try to fix these problems by resorting to three command-linethe Your PC ran into a problem and needs to restart error message.
But you can fix it by resetting all BIOS settings to their factory values. Here’s how to make it happen:
- Restart your computer
- During reboot, press the key shown on the screen to access BIOS mode
- Find the advanced options
- Locate the setting that resets configuration data and turn it on
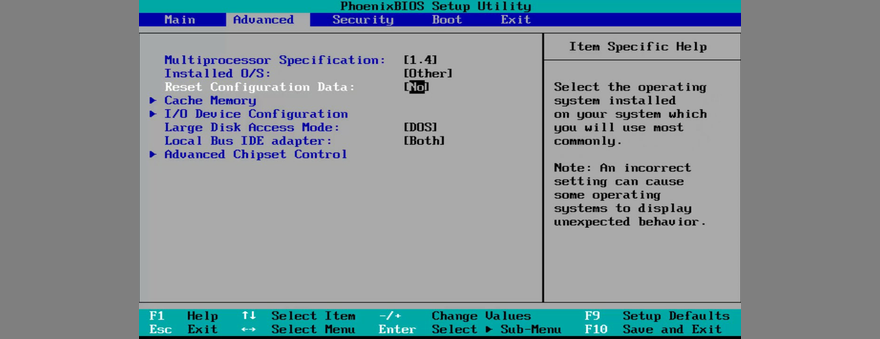
- Save the current BIOS layout and exit
- After Windows starts, check for stability issues
12. Update BIOS
Since you’re already changing BIOS settings, it’s a good idea to update BIOS to the latest version to avoid computer functionality problems and the Your PC ran into a problem and needs to restart loop. Voici comment:
- Click the Start button, type System Information, and open this app
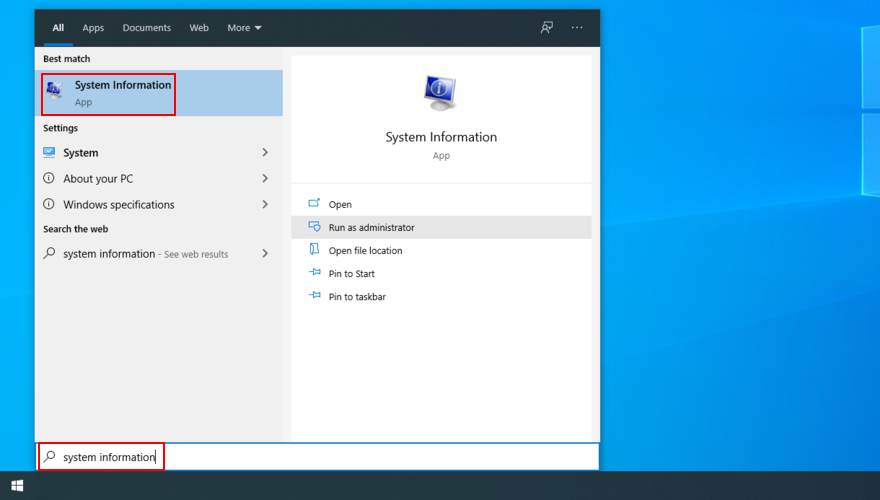
- Select the System Summary area
- Take note of the BIOS Version/Date

- Start a web browsing session and visit the website of your BIOS manufacturer
- Find and download a newer BIOS version that’s compatible with your PC
- Unzip the downloaded archive and copy contents to a USB flash drive
- Restart your PC and press the key that enters BIOS mode
- Back up the current BIOS version and save it to the pen drive
- Begin the BIOS update and proceed with the on-screen instructions
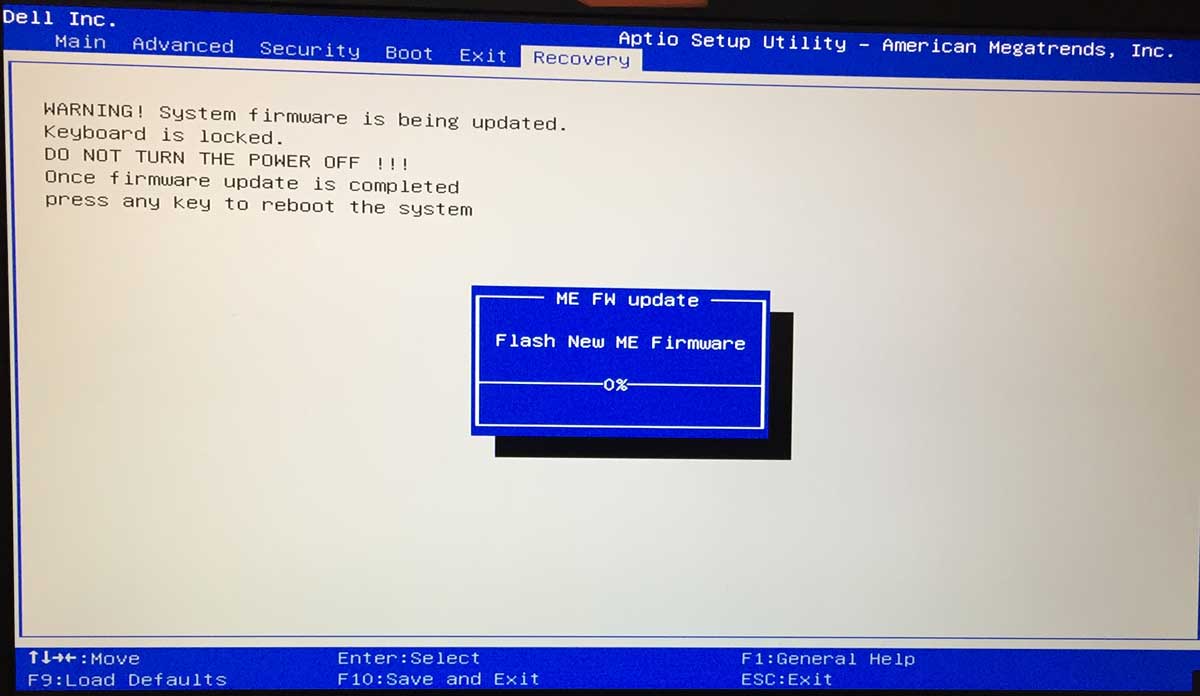
- Don’t shut down or restart your PC during the update
- Start Windows and check for errors
13. Repair disk and system errors
Your hard disk may have bad sectors, or your operating system may have corrupt files. As a result, Windows 10 can’t carry out its activities due to missing or damaged files. However, you can try to fix these problems by resorting to three command-line tools built into the OS: CHKDSK (Check Disk), SFC (System File Checker), and DISM (Deployment Image Servicing and Management).
How to fix bad sectors with CHKDSK:
- Press Win key + R, type cmd, and press Ctrl + Shift + Enter to open Command Prompt with admin rights

- If Windows is installed on the C: drive, run
chkdsk c:/f. Otherwise, replacec:with the right partition letter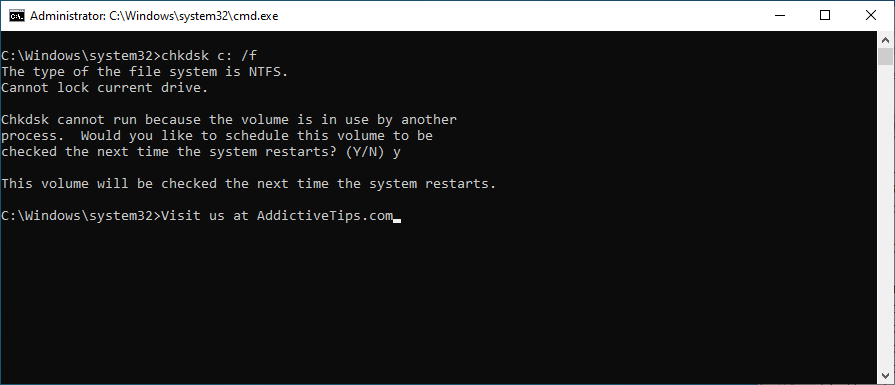
- Type y and press Enter when you’re asked to schedule the task at the next system startup
- Restart your PC and wait for CHKDSK to do its job
- Once it finishes, start Windows as normal and check if it still crashes
How to fix system errors with SFC:
- Run Command Prompt as administrator
- Type
sfc/scannowand press Enter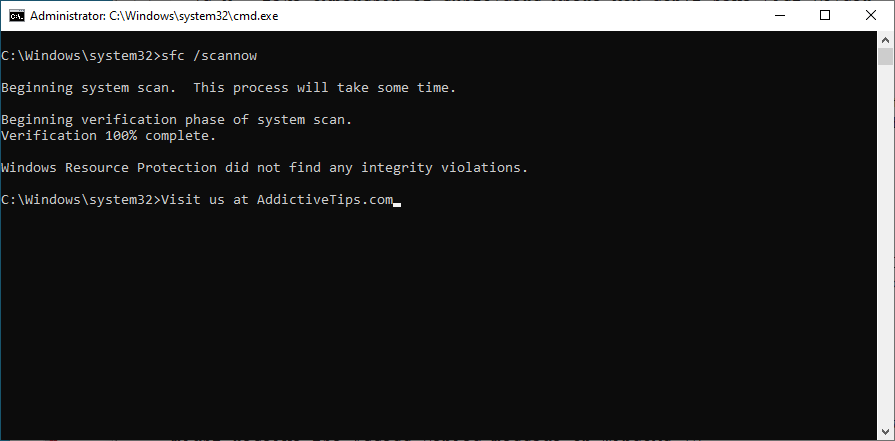
- SFC will begin to scan and repair any problems it detects
- Once it finishes, restart your PC and check for issues
How to fix component store issues with DISM:
- Run CMD with elevation rights
- Type
DISM/online/cleanup-image/scanhealthand press Enter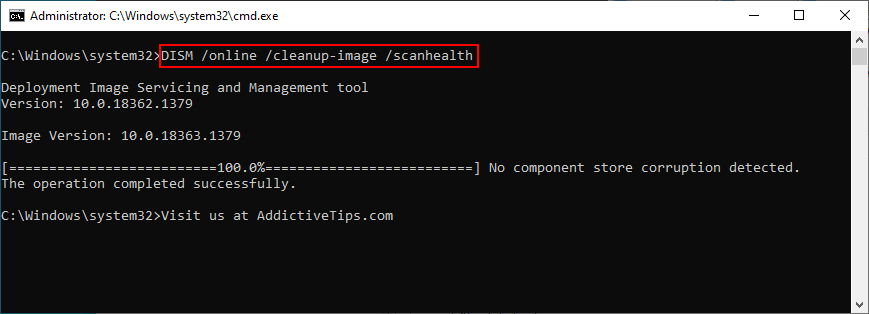
- If it finds any problems, fix them using
DISM/online/cleanup-image/restorehealth - Reboot your PC
- Launch CMD as admin again and run SFC
- Restart your PC one last time to check for stability issues
14. Remove new system updates
Many users report getting the Your PC ran into a problem and needs to restart, we’re just collecting some error info error message right after installing a new Windows update. It’s quite possible that the system update does not fully support Windows 10, resulting in crashes.
To fix this problem, you have to uninstall the most recent system update. Voici comment:
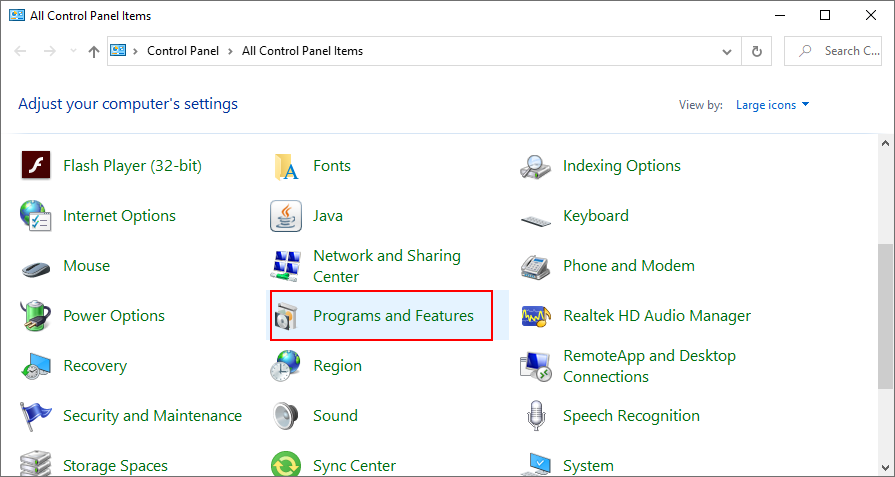
- Press the Windows key + R, type control panel, and press Enter
- Go to Programs and Features
- Click View installed updates on the top-left corner

- Click the Installed On column to sort the update (newest first)
- Right-click the first update in the list and select Uninstall
- Click Yes to confirm
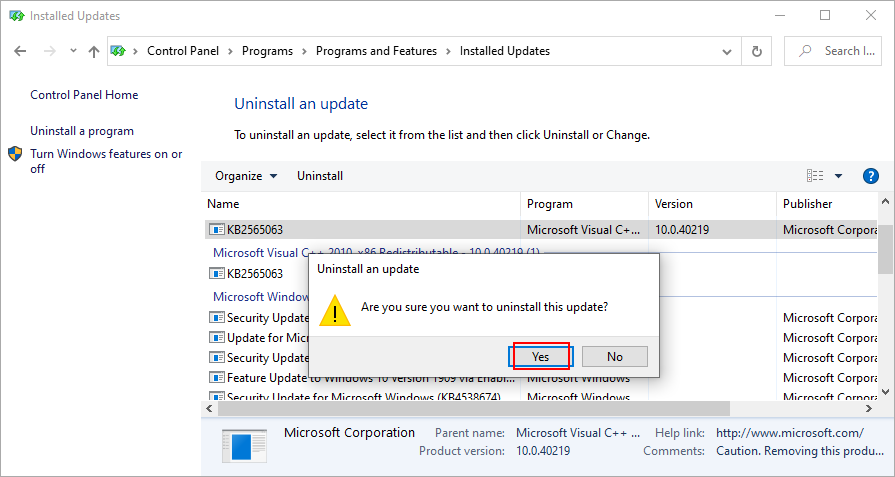
- Restart your PC to inspect results
15. Uninstall third-party applications
Some types of software are known to cause PC functionality problems due to their poor support for Windows 10 as well as the fact that they require access to sensitive parts of the system. It’s the case of several free antivirus and VPN tools, for example. You just have to get rid of them to restore your computer’s performance.
How to uninstall recent programs:
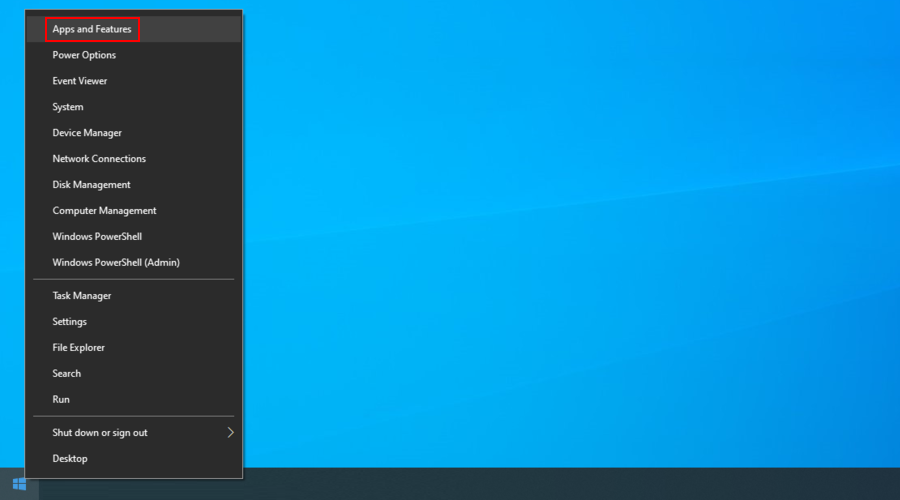
- Right-click the Start button and go to Apps and Features
- Click the menu next to Sort by and select Install date (newest first)
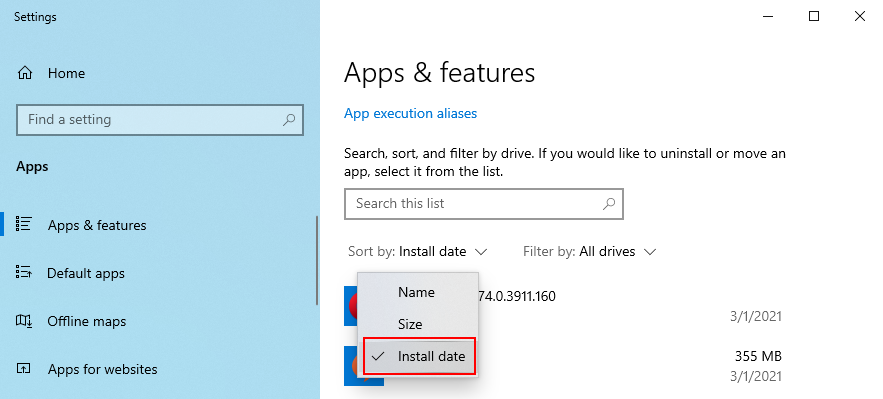
- Choose the first application in the list and click Uninstall
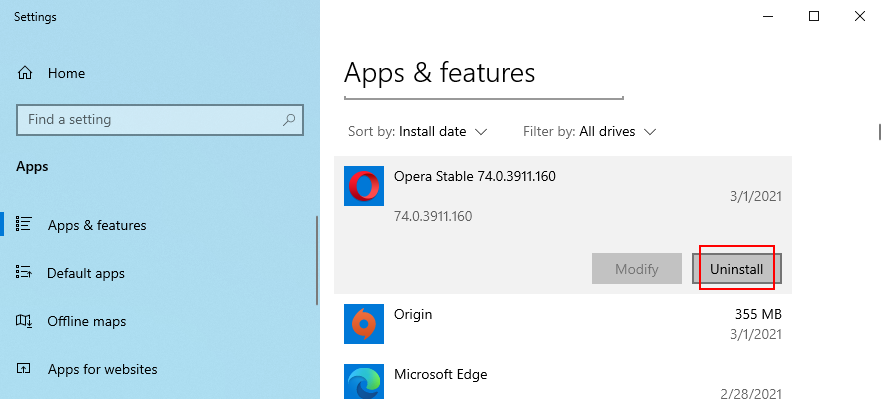
- Click Uninstall again to confirm its removal
- Once the app is removed, restart your PC to check for errors
This method won’t work for applications that have made significant changes to the system registry. However, you can turn to a program uninstaller, which is more thorough than the Windows default uninstaller because it also eliminates leftover files and registry entries.
16. Repair registry settings
If there are incorrect settings in the system registry, like an entry with a wrong value or a missing key, then you should expect system crashes and error messages like Your PC ran into a problem and needs to restart. However, it’s possible to apply some quick fixes from Command Prompt and without having to use an OS emergency disk.
- Press the power button to open a menu
- Hold down Shift and press Restart to trigger Recovery mode
- Or, if you can’t boot Windows at all, interrupt the startup sequence three times to start Recovery mode
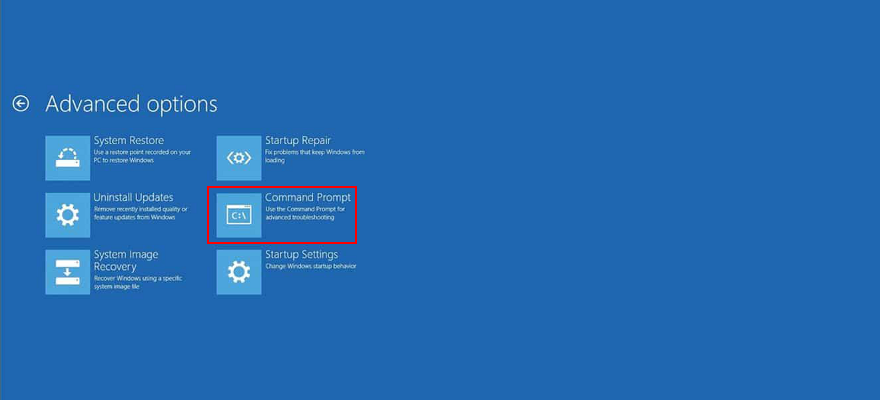
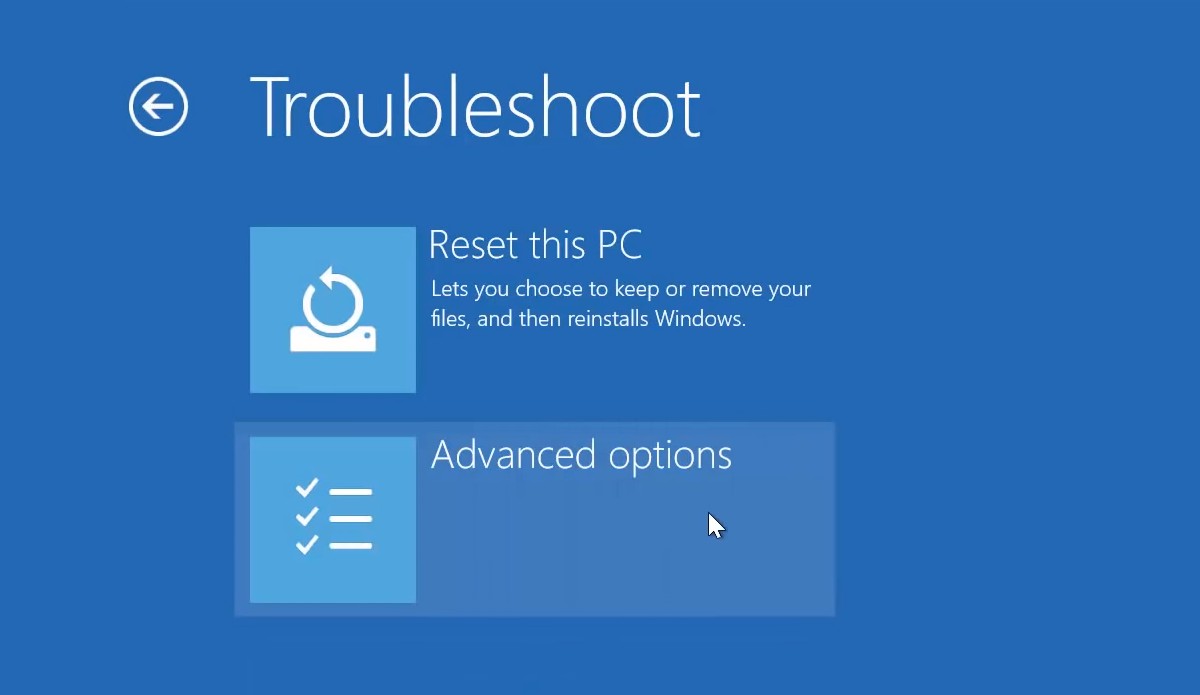
- Select Troubleshoot
- Go to Advanced
- Click Command Prompt
- Copy and paste the following lines (press Enter after each line):
-
cd c:\Windows\System32\config
-
ren c:\Windows\System32\config\DEFAULT DEFAULT.old
-
ren c:\Windows\System32\config\SAM SAM.old
-
ren c:\Windows\System32\config\SECURITY SECURITY.old
-
ren c:\Windows\System32\config\SOFTWARE SOFTWARE.old
-
ren c:\Windows\System32\config\SYSTEM SYSTEM.old
-
copy c:\Windows\System32\config\RegBack\DEFAULT c:\Windows\System32\config\
-
copy c:\Windows\System32\config\RegBack\DEFAULT c:\Windows\System32\config\
-
copy c:\Windows\System32\config\RegBack\SAM c:\Windows\System32\config\
-
copy c:\Windows\System32\config\RegBack\SECURITY c:\Windows\System32\config\
-
copy c:\Windows\System32\config\RegBack\SYSTEM c:\Windows\System32\config\
-
copy c:\Windows\System32\config\RegBack\SOFTWARE c:\Windows\System32\config\
-
- Reboot your PC and inspect results
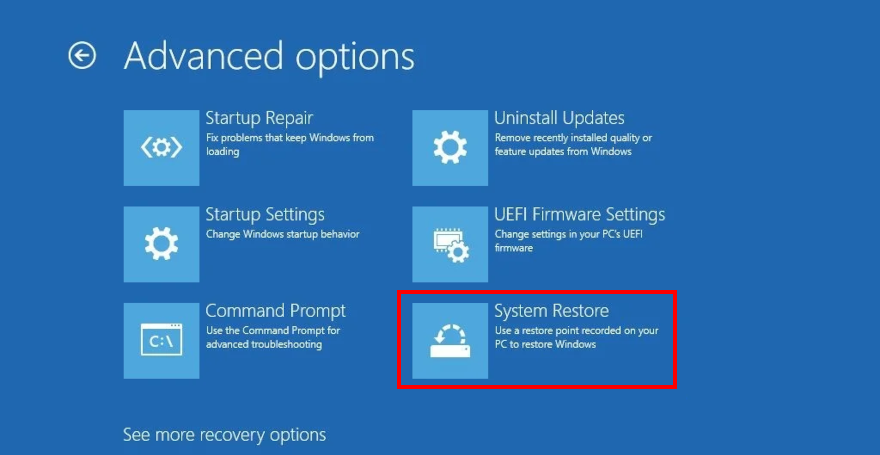
17. Use System Restore
Any software events that you can’t identify can be reversed by rolling back Windows 10 in System Restore more. But that means that you must have created a restore point before you started experiencing system stability problems that lead to the Your PC ran into a problem and needs to restart error message.
How to use System Restore:
- Press Win key + R, type control panel, and press Enter
- Click Recovery
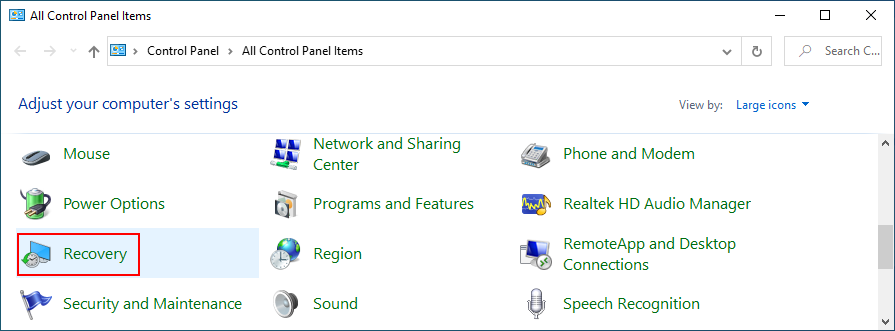
- Click Open System Restore (you need administrator rights)
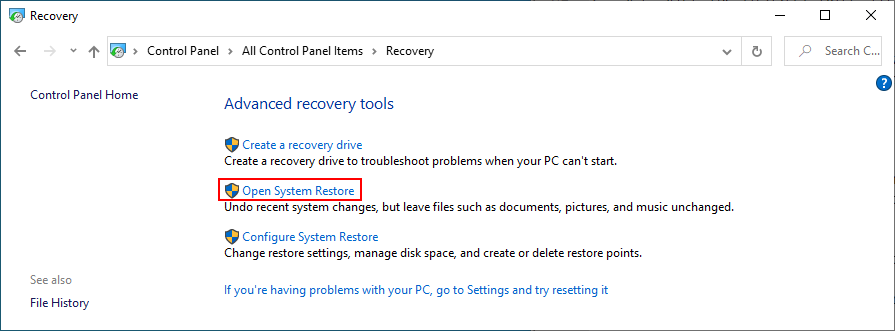
- Choose a restore point. You can click Scan for affected programs to learn more about the changes

- Click Next and follow the steps
- Restart your PC and check for errors
If you can’t boot Windows, interrupt the startup sequence three times to start Recovery mode. Then, go to Troubleshoot > Advanced options to access System Restore.
18. Reset Windows 10
Resetting your OS to factory values is among the last solutions you should try when you can’t get rid of the Your PC ran into a problem and needs to restart error message. You will keep your personal files, but all applications will be removed, so you will have to reinstall everything afterward.
How to reset Windows 10 without boot:
- Interrupt the Windows boot three times to enter Recovery mode
- Click Troubleshoot
- Select Reset this PC
- Click Keep my files
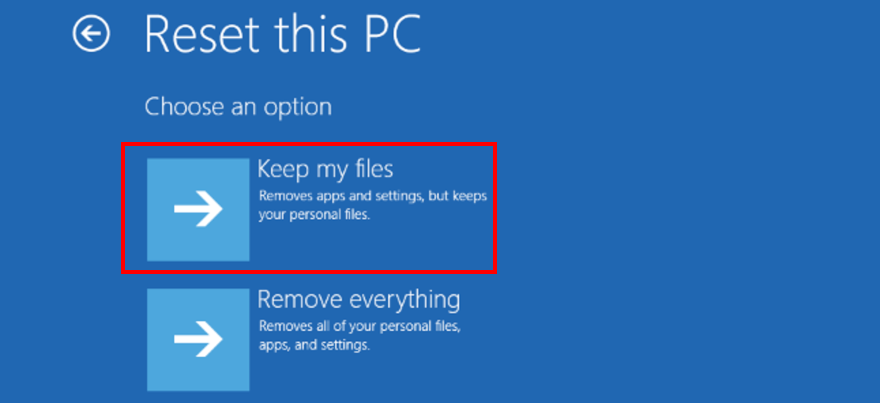
- Follow the on-screen instructions
19. Run System Image Recovery
If all solutions failed until this point, it’s time to create and use OS recovery media with the help of the System Image Recovery tool. Note that it means losing all applications and files, so it’s a good idea to back up everything important to you before proceeding with this solution.
How to create OS recovery media:
- Get an empty USB pen drive with 16 Gb minimum storage capacity
- Plug the pen drive into your PC
- Press the Windows key, type Create a recovery drive and hit Enter
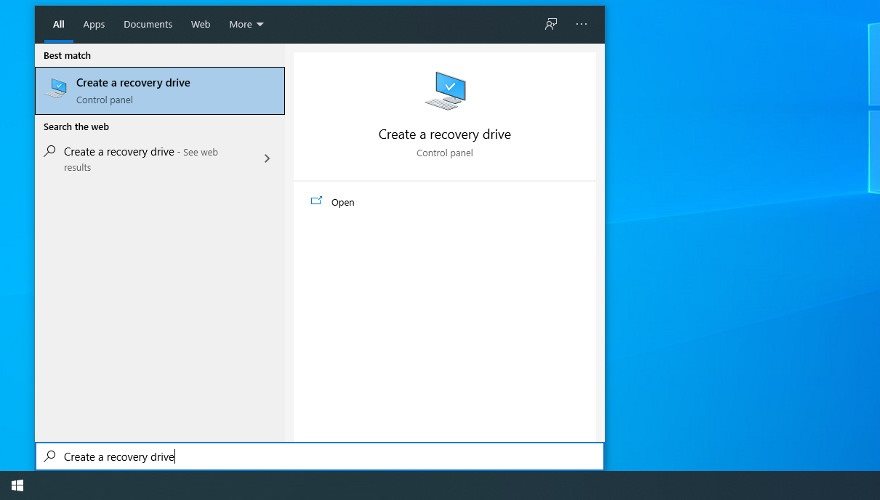
- Specify your admin password if prompted for authorization
- Select Back up system files to the recovery drive and click Next
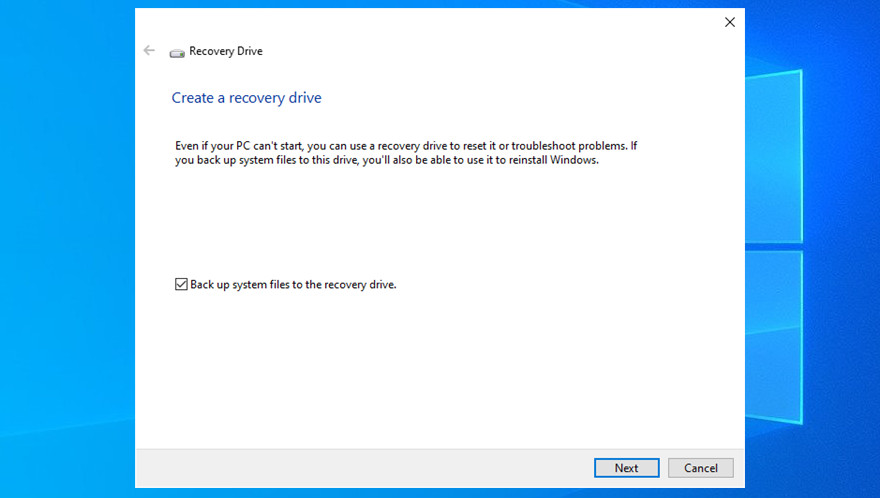
- Select the empty USB drive from the list
- Click Next and then Create
- Patiently wait while Windows creates your recovery media drive
How to use OS recovery media:
- With the USB flash drive still plugged into your computer, restart Windows
- Interrupt the boot sequence three times to trigger Recovery mode
- Go to Troubleshoot and select Advanced Options
- Click System Image Recovery and proceed with the given steps
Conclusion
To review, the Your PC ran into a problem and needs to restart error message is shown on the screen when your display turns blue and your operating system is trying to protect itself from data loss and corruption. It can be caused by various events at the software or hardware level.
However, you can try to repair this error by starting Windows in Safe Mode, running a clean boot, using Windows Update, investigating the system log, checking the device drivers and disk space, or unplugging new gear.
It’s also a good idea to scan your computer for malware infections, check the system memory, disable overclocking tools, reset BIOS to default, update BIOS, repair disk and system errors, and remove new system updates that may not be compatible with your PC.
In addition, you can uninstall third-party applications, repair registry settings, use System Restore, reset Windows 10, and run System Image Recovery.
What solutions did you use to get rid of the Your PC ran into a problem and needs to restart error? Did we miss any important steps? Let us know in the comment area below.